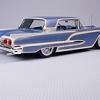
John Goschke Posted June 22, 2013 Posted June 22, 2013 (edited) Recently decided to take a little break from the '36 Ford I'd been working on to see if I could get this raised convertible top to fit this Impala. I picked up the model off ebay a little ovr two years ago and did some work to shortly after the purchase to grind it apart and give an attitude adjustment and new rolling stock. Picked up the top at a swapmeet a few years ago; I think it was originally out of the '61 Ford kit. I've always liked the lines of the '58 Impala with the top up and adding it to this model would save me having to add a lot of detail to the crude interior in this kit. Though now the area behind the rear seat will need to be modified to represent the top well. Edited April 16, 2017 by John Goschke
John Goschke Posted June 22, 2013 Author Posted June 22, 2013 The top needed to be shortened a bit and reshaped at the header and the side window profile needed to be recontoured. Also had to reshape the opening in the tulip panel and add the molding around it. I made L-shaped relief cuts at the seam line between the rear window and rear top bow and from there to the end of the top bow that enabled me to bend the sail panels in so the top would inside the top of the quarter panels. The existing deck lid panel lines needed to be filled with cyano at the corners then a new line was scribed in. A lot of tweaking; adding material, then shaving it down; test fitting, then more tweaking. Fresh plating by Dale Horner at Little Motor Kar Co. on the original bumpers helped jazz me into action on this car!
John Goschke Posted June 22, 2013 Author Posted June 22, 2013 As it arrived. Built, never painted. This baby's at stock ride height all around! Note the taildragger stance! Front bumper fit's a little weird. Too far back. Interior is deeper than most of the other AMT/SMP '58s but the top boot overlaps onto the trunklid! UH oh, sinkmarks on the outside from too much cement inside the body around the interior attachment points! Body shape and detail compares well with the AMT Trophy Series kit.
Maindrian Pace Posted June 22, 2013 Posted June 22, 2013 The up-top looks right from every angle, I'd say you nailed it. -MJS
Ace-Garageguy Posted June 22, 2013 Posted June 22, 2013 Absolutely beautiful what you've done so far. It looks so pristine in bare plastic, especially compared to the 'before' images. Impressive save and rework.
doggie427 Posted June 22, 2013 Posted June 22, 2013 Great finesse in adapting the Galaxie top to the Impala. Any ideas on colours ?
Wonderbread Kustomz Posted June 22, 2013 Posted June 22, 2013 This looks great ! I gotta get my hands on one of these SMPs one day... Can't wait to see it in paint
John Goschke Posted May 30, 2016 Author Posted May 30, 2016 (edited) Rescue from the Shelf of Doom! I'm happy to report to some progress on this mild custom Impala that I've been attempting to concentrate on since finishing a '59 Ford convertible late last year. These shots show a complete mockup as it stands now. I'll do some subsequent posts that'll show some details of what was done and descriptions of how the work was done. Basically here's a list of the changes since the last post nearly three years ago!... 1. Replace belt line molding with styrene strip. Finish scribing missing panel lines (Rear fuel filler door and matching lines below trunk opening). 2. To smooth the body and simplify the design; removal of door handles and locks, trunk and hood emblems, front fender ornaments and "hash marks," Impala emblem and script from body sides, dogleg molding between side molding and fin molding, and windshield wipers. 3. Remove quarter panel "pitchfork" molding and fill remaining indentations with cyano, file and block sand quarter panel smooth. 4. Create secure attachment points for the interior. 5. Add "floor" to the convertible top well. 6. Add top boot cover snap detail to belt line and rear window molding. 7. Modify original kit chassis to close in wheel wells to block view inside the body. 8. Removal front bumper attachment tabs to lower the front of the car and resolve fit issues. Create new attachment points for the bumper. 9. Make dual tailpipe extensions. 10. Make custom '59 Pontiac Catalina taillights. Edited May 30, 2016 by John Goschke
John Goschke Posted May 30, 2016 Author Posted May 30, 2016 Interior attachment points The process of disassembling this old model when it arrived required grinding off the interior attachment posts and tabs inside the body where cement was used unsparingly by the original builder. This left the interior with no firm mounting points, a problem compounded by my desire to build a top-up convertible requiring the removal of the package shelf behind the rear seat and replacing it with some sort of representation of a floor for the top well. Before making the top well floor I wanted to make sure I could install, remove, and reinstall the interior in the same place consistently, and to have top edge of the interior and the top edge of the body line up every time. To do this I shaped two tabs of Plastruct ABS plastic to fit and cemented them inside the body, lined up with the door opening. I then cut a slot in a piece sheet of styrene to fit on the tab. The slotted piece was cemented to the side of the interior tub after the location was marked with a sharp pencil while the interior was held in place. Note that the side of the tub needed to be built out a bit because there was a step near the top edge. This is the first time I've used this technique and it worked great, and will come in handy in future rebuild projects.
72 Charger Posted May 30, 2016 Posted May 30, 2016 Really nice work John . How do you scribe the panel lines so strait and clean? Every time I try to do scribing I end up going wonky or just plain old Fing it all up
MrObsessive Posted May 30, 2016 Posted May 30, 2016 John, nice to see this one back on your work table! That's a really neat idea about the interior tub------I have to give that a try sometime. Somehow, the body on your annual looks a little bit better than the full detail kit that AMT did a few years later. Especially in the windshield area it looks more accurate. The shape of it says "1958" better than the '63 release. Of course this is a convertible, and I don't remember if SMP did a coupe annual along with this back then. Just goes to show that long before computers and CAD systems, they were able to get it right.
John Goschke Posted May 30, 2016 Author Posted May 30, 2016 Really nice work John . How do you scribe the panel lines so strait and clean? Every time I try to do scribing I end up going wonky or just plain old Fing it all upThanks, Dave. Often I will lay down a strip of tape and scribe several repeated light strokes against it to get started, then remove it for final scribing. Sometimes I'll use a pair of dividers with adjustable points when scribing a line parallel to an edge, like the molding that goes along the fin, by adjusting one out further then using it as a guide along the edge while the shorter point does the scribing.
72 Charger Posted May 30, 2016 Posted May 30, 2016 Thanks John ive been modelling for a long time now but scribing still scares the stuffing out of me
John Goschke Posted May 30, 2016 Author Posted May 30, 2016 Top Well Non-detail Making a floor for this area was actually more about blocking viewers' sight lines to the inside of the body than achieving prototypical accuracy in this area. So I simply added a back to the rear seat then built out a flat floor that goes around the sides of the tub and back under the edge of the decklid. The main thing I want to achieve when building a convertible like this is a correct-looking top profile and to have the top fit inside the body, if that is prototypically correct, rather than having the top fit loosely on top of the body. In the case of this build it will likely mean that the top will stay on permanently. In the one shot you can see the replaced beltline molding along the top of the door and quarter panel and the panel line that was cut in the interior bucket to represent the door opening. Also visible is the line that needed to be scribed for separation between the front fender and the cowl.
John Goschke Posted May 30, 2016 Author Posted May 30, 2016 John, nice to see this one back on your work table! That's a really neat idea about the interior tub------I have to give that a try sometime. Somehow, the body on your annual looks a little bit better than the full detail kit that AMT did a few years later. Especially in the windshield area it looks more accurate. The shape of it says "1958" better than the '63 release. Of course this is a convertible, and I don't remember if SMP did a coupe annual along with this back then. Just goes to show that long before computers and CAD systems, they were able to get it right. Thanks, Bill! Well, you know what they say, "Nothing says '58 like a kit from '58!" Although I've always thought AMT's Trophy series Impala looked pretty good and I was glad to see that the SMP '58 annuals compare so favorably with that classic kit. Particularly in comparison with the '59, '60, and '61 annuals, which leave a lot to be desired in the accuracy department! My favorite "detail" is on the '61 Impala kit, where the panel line for the doors are scribed on the body but not through the side molding. How would one open the door?! SMP did do a hardtop in '58 and just recently I've acquired enough rough built-ups to restore one. And I won't have to worry about poor-fitting opening doors or chrome moldings that fit in huge channels in the body!
MrObsessive Posted May 30, 2016 Posted May 30, 2016 SMP did do a hardtop in '58 and just recently I've acquired enough rough built-ups to restore one. And I won't have to worry about poor-fitting opening doors or chrome moldings that fit in huge channels in the body! Yeah, one of these days, I'll do another Impala......more than likely the '58 hardtop. Which one I'm not sure. The Revell one while nice, has that "chrome inside the channel" construction which I'm sure more than likely I'll have to tighten up like I had to do on the '59. My better sense tells me to stick to the old tooling AMT kit. And yes, those doors can be a challenge, but I'll be re-engineering the kit from bumper to bumper anyway! My favorite "detail" is on the '61 Impala kit, where the panel line for the doors are scribed on the body but not through the side molding. How would one open the door?!
Don Sikora II Posted May 30, 2016 Posted May 30, 2016 Man, you have it sitting nice! Great work! Very clever idea for locating the interior too, and the boot well area modifications should look great when you're done. The SMP '58 Chevies are among my favorite classic kits, will be sure to follow your progress.
ImpalaBoy Posted May 31, 2016 Posted May 31, 2016 This looks fantastic! I greatly look forward to seeing it completed. If I may put in my own 2 cents, my only suggestion would be to scavenge a set of headlights from the Revell kit if you can get your hands on one cheap.
John Goschke Posted May 31, 2016 Author Posted May 31, 2016 Man, you have it sitting nice! Great work! Very clever idea for locating the interior too, and the boot well area modifications should look great when you're done. The SMP '58 Chevies are among my favorite classic kits, will be sure to follow your progress.Thanks, Don!
misterNNL Posted May 31, 2016 Posted May 31, 2016 Thanks for posting your progress on this build.These kit were the dawn of my model building.I was a sophomore in high school when the real cars were in the local dealers showrooms and I fell in love with 'em instantaneously.They were so radically different from the tri fives that proceeded them and had a low powerful look to them.Great memories all around.
John Goschke Posted May 31, 2016 Author Posted May 31, 2016 Top Boot Snaps These little buggers had me scratching my head for awhile and were part of the reason I decided to finish the '59 Ford before coming back to this model. As often happens, the solution wasn't nearly as difficult as I imagined. Knowing I'd need to use a fine drill and my shaky hand to make a series of even spaced holes through the center of that narrow molding had me pretty nervous. But the only way to get it done was to do it! Online pictures seemed to show that there were 15 snaps for the boot. To get the spacing I measured the distance around the top well molding using a thin strip of tape laid on top of the molding from the location of the first snap on the left to the last snap on the right. Then I peeled the tape off the model and laid it out straight on a piece of paper and measure it (as I recall it was something like 4.375"). Going to my computer and using Adobe Illustrator, I drew a horizontal line of the appropriate length, then placed a vertical tick mark at each end of the line with 13 similar marks dragged and copied along the line. Selecting all the tick marks, I then had Illustrator space them evenly along the line and printed the result. I cut another strip of masking tape the same width as the molding and laid it on my printout so the snap locations could be marked on the tape. The tape with the snap locations marked was then laid on the model. I transferred the locations by very careful poking through the tape with a fresh #11 blade, then peeled the tape off. The knife-pricked locations were highlighted with a little pencil lead rubbed in. The snaps themselves were made with lengths of .03" Plastruct styrene rod cemented into the holes drilled through the molding and the car body. Drilling all the way through enabled me to do all the cementing inside the body. After the cement was dry the lengths of rod were cut with nail clippers close to the right height on the outside, then very carefully sanded flat to the final height, where they stand just a bit higher than the molding. Finally thee rods were cut flush on the inside of the body.
peekay Posted May 31, 2016 Posted May 31, 2016 Beautiful work as always John!I'm always impressed with your photography too, so sharp and perfectly lit. Would you mind writing a couple of lines about your set-up?
Recommended Posts
Create an account or sign in to comment
You need to be a member in order to leave a comment
Create an account
Sign up for a new account in our community. It's easy!
Register a new accountSign in
Already have an account? Sign in here.
Sign In Now