lordgodbob Posted January 11, 2021 Author Posted January 11, 2021 So, it's been cleared, but I have a stance issue. If I get the body to sit low enough, the valve covers will hit the hood. Now I get to disassemble it some, build drop spindles, and I may do a couple other tricks to get the hood to clear. Next is wet sand and polish, fabricate side windows, and final assembly. Overall I'm sorta happy with it, although the clearcoat magnified a couple of flaws in the paint which I could live without....
TransAmMike Posted January 11, 2021 Posted January 11, 2021 You have put a lot of work into that Tim and it looks great. Too bad you have to do reworking tho.
am73grand Posted January 13, 2021 Posted January 13, 2021 This is looking fantastic! One question, how did you do the lettering on the tires? All the tire decals I see have perfect edges. Yours look way more realistic.
lordgodbob Posted January 13, 2021 Author Posted January 13, 2021 1 hour ago, am73grand said: This is looking fantastic! One question, how did you do the lettering on the tires? All the tire decals I see have perfect edges. Yours look way more realistic. Right? SO much more realistic. I just need to play with the color, maybe add a little brown to it to make them look dirty, like the real thing. It's a stencil, I can't remember the manufacturer. I'll take a picture of it tonight and post it tomorrow. And, thank you so much for the compliment, I appreciate it!
lordgodbob Posted January 21, 2021 Author Posted January 21, 2021 On 1/13/2021 at 7:14 AM, lordgodbob said: Right? SO much more realistic. I just need to play with the color, maybe add a little brown to it to make them look dirty, like the real thing. It's a stencil, I can't remember the manufacturer. I'll take a picture of it tonight and post it tomorrow. And, thank you so much for the compliment, I appreciate it!
Tortuga Kustomz Posted January 22, 2021 Posted January 22, 2021 Like this project a lot, looking forward for more updates
lordgodbob Posted February 3, 2021 Author Posted February 3, 2021 So....major setback that I’ll try and make the best of. The clear was NOT happy with the Duplicolor silver, and when I was wet sanding it peeled off. So I guess I’ll sand it all down, order more decals, and try again. While I’m at it I’m going to fix a couple issues that showed up when the clear was applied, hopefully this just makes for a better build in the end.
lordgodbob Posted February 18, 2021 Author Posted February 18, 2021 Aaaaand...I’m back to this point. Stripped, sanded, repainted. Black accents and decals and I’ll try it all again!
TransAmMike Posted February 18, 2021 Posted February 18, 2021 I had to do my first reworking of a build and it sucks doesn't it!!!!! And all because I screwed up hood and roof stripes.
lordgodbob Posted February 18, 2021 Author Posted February 18, 2021 2 minutes ago, TransAmMike said: I had to do my first reworking of a build and it sucks doesn't it!!!!! And all because I screwed up hood and roof stripes. Yeah, I’m not thrilled, but I used the opportunity to fix a couple things I was less than happy with, and I’m trying to make the best of it!
TransAmMike Posted February 18, 2021 Posted February 18, 2021 17 minutes ago, lordgodbob said: Yeah, I’m not thrilled, but I used the opportunity to fix a couple things I was less than happy with, and I’m trying to make the best of it! Good point Tim, I sure can improve on my re-do.
NYLIBUD Posted February 18, 2021 Posted February 18, 2021 Ah man that just sucks.Been there,done that.But you seem to be getting a handle on it.Looking good.
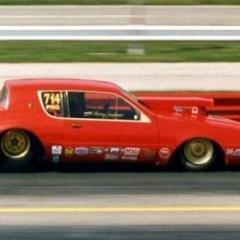
TheBandit Posted February 18, 2021 Posted February 18, 2021 Sorry to hear about the clear coat. Though every strike down is another reason to build back stronger, I believe the project will come out better. Also the perfectionist in me saw the Oldsmobile rocket decal by the door line was upside down. Here is a pic of WJ's car in the shop as a reference. Look forward to seeing the finished product!
lordgodbob Posted February 18, 2021 Author Posted February 18, 2021 1 hour ago, TheBandit said: Sorry to hear about the clear coat. Though every strike down is another reason to build back stronger, I believe the project will come out better. Also the perfectionist in me saw the Oldsmobile rocket decal by the door line was upside down. Here is a pic of WJ's car in the shop as a reference. Look forward to seeing the finished product! Yeah, I was hoping to go through this without anyone noticing that! I’m embarrassed that I did that, it’s on the list of things I’m glad I get to fix...great pic, by the way, wish I’d had that when I was first starting the project, didn’t know it had Willie’s trademark gold tin...
TheBandit Posted February 19, 2021 Posted February 19, 2021 21 hours ago, lordgodbob said: Yeah, I was hoping to go through this without anyone noticing that! I’m embarrassed that I did that, it’s on the list of things I’m glad I get to fix...great pic, by the way, wish I’d had that when I was first starting the project, didn’t know it had Willie’s trademark gold tin... Here are a few other pics I have. The first 3 were from Willie's Facebook page and were taken before the 84 Winternationals. The final pic was from I believe an IHRA event at Rockingham.
lordgodbob Posted February 19, 2021 Author Posted February 19, 2021 1 hour ago, TheBandit said: Here are a few other pics I have. The first 3 were from Willie's Facebook page and were taken before the 84 Winternationals. The final pic was from I believe an IHRA event at Rockingham. Thank you!
iBorg Posted February 19, 2021 Posted February 19, 2021 Very nice detail pics. Very helpful for an accurate build.
Steve H Posted February 20, 2021 Posted February 20, 2021 Hi Tim, shame about the paint issue. Looking forward to seeing it complete, this is a great subject. Cheers, Steve
lordgodbob Posted March 7, 2021 Author Posted March 7, 2021 Like I said before, I’m taking this opportunity to make some upgrades to things I wasn’t happy with the first time around. No idea why I made no effort to make engine compartment tin the first time around, but I’m doing it now. I cut up an old Camaro body to rob the side panels, and I’m fabricating the rest. It’ll look much more finished and complete. I also realized that I need to extend the hood, so I’m doing that too. stance is finalized, and seems perfect now In the end this will be a much better build because the paint fell off...
Recommended Posts
Create an account or sign in to comment
You need to be a member in order to leave a comment
Create an account
Sign up for a new account in our community. It's easy!
Register a new accountSign in
Already have an account? Sign in here.
Sign In Now