cobramike
-
Posts
408 -
Joined
-
Last visited
Content Type
Profiles
Forums
Events
Gallery
Everything posted by cobramike
-
Thanks for the great idea, well I dug out a old delivery van I had that I had done many years ago that was in pretty sad shape, got the body off and tossed it in some brake fluid for 4 days, washed it clean and now back to putting this together. I think it's going to be a good one!
-
Mine is a small round one as well, I think I got it from Ron Popeil back in the days when he was hawking them on late nite TV. I have never had this happen before, but I know what I did wrong, I placed the body on the base tray just above the heating coil, then like a idiot I started to walk away (this was in my work shed) but had a paper towel so I just slung it without realizing that it had landed on top of the dehydrator there by holding in too much heat. When I went back out to get the body about an hour later and I saw the paper on the top covering the vents I knew I was in trouble!
-
Thanks for the question, yes, it drys the paint as if it was 1:1 like they do in a real auto body paint booth. With Enamel it can take considerable time to dry even here in dry Colorado, with the dehydrator it cuts the drying time dramatically. You can wet sand etc normally in one day, tops 2. without it your looking at a week for the paint to completely degas. I have been using a dehydrator for about 5 years now and this is the first time that it has done this.
-
These pics are "what not to do" when using a dehydrator to dry the paint on your model. My dehydrator has 5 trays, I used the lowest tray for the body...WRONG PLACE TO PUT IT! This almost made me cry! At first I thought that this might have been a godsend thinking that I could go ahead and put this body on the frame...WRONG! Anyone need some extra polystyrene?
-
WOW!!! I am loving this build! The skulls you did are fantastic ideas! But the one you cast into the hood...OMG! That is just way too cool. Keep up the great work, and I'll be following along as your building it so be sure to add all of your story here.
-
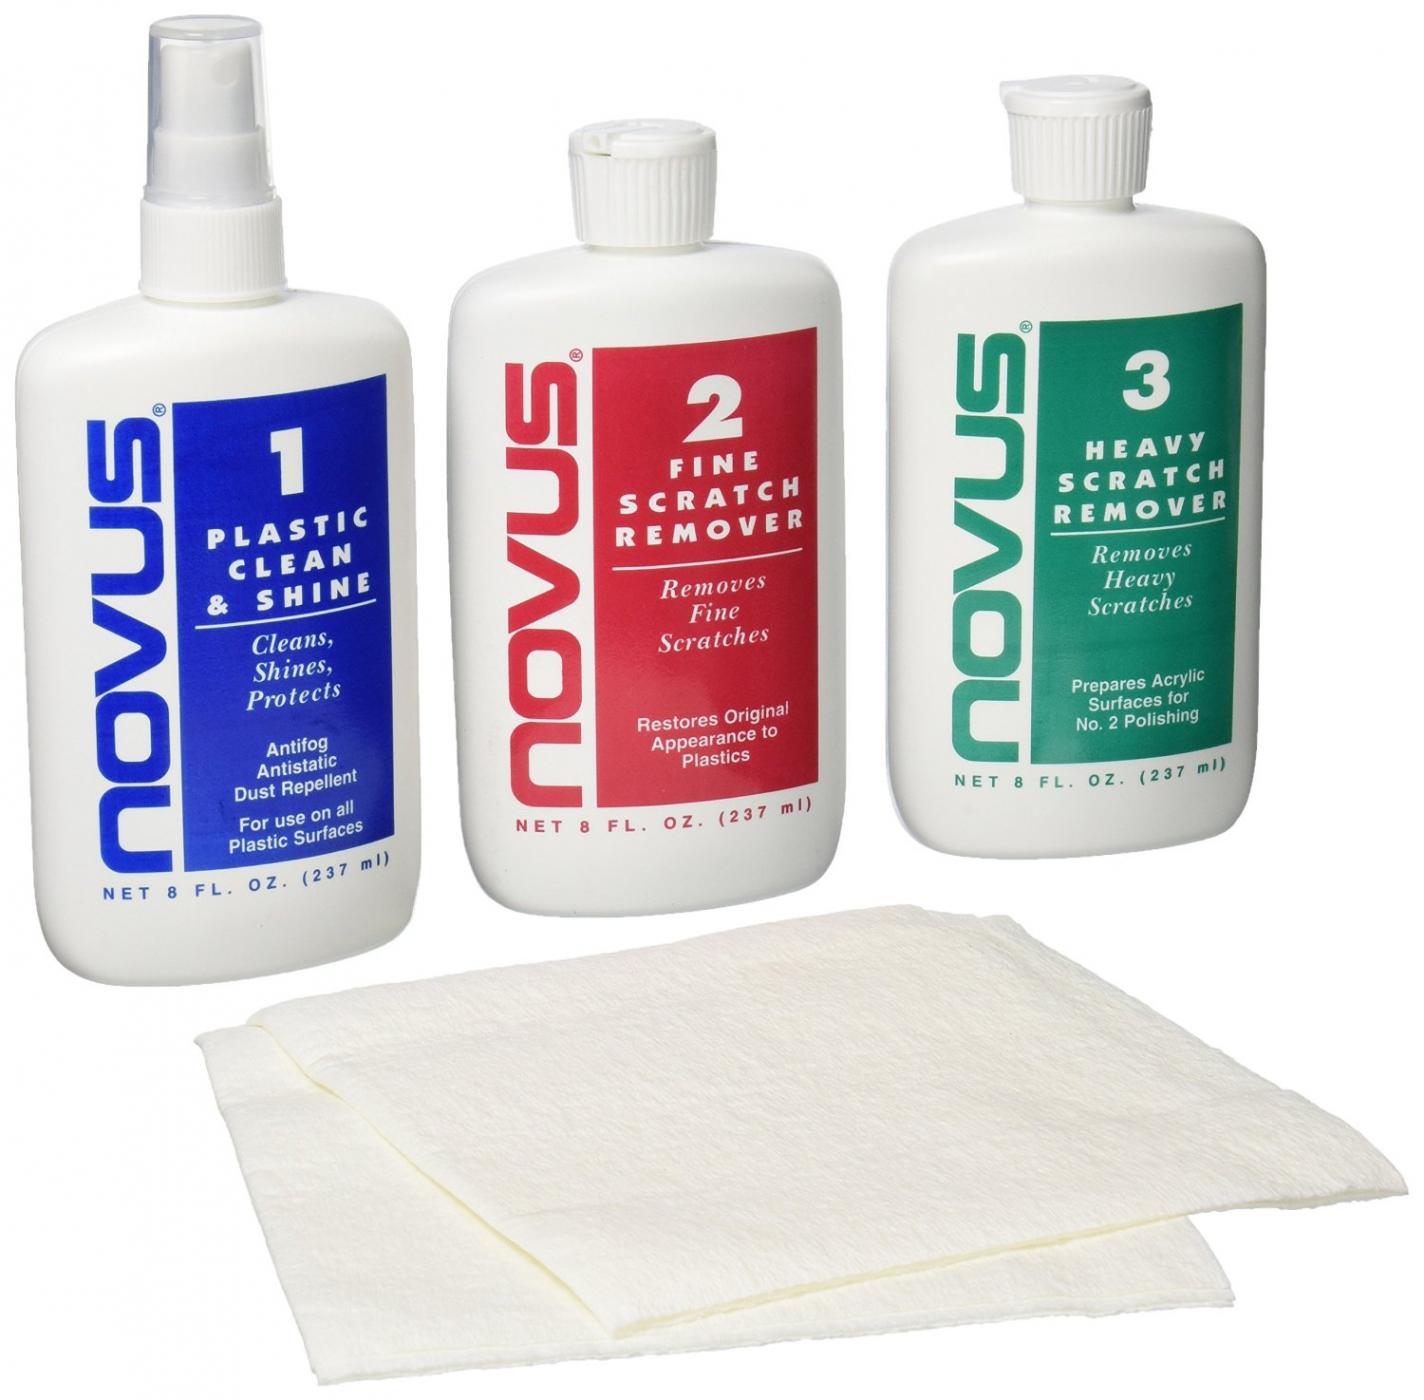
I use this allot for the face shields on our motorcycle helments and more recently on plastic windshields like yours.

-
Hey Dr. I was looking on line at Amazon for your book Ratz, Rods, and rust...found nothing there. Where to look now?
-
New Build Somewhat Restomoded 67 Shelby 3/10/16 Finished !
cobramike replied to Metalmad's topic in WIP: Model Cars
fine work! Can't wait to see the finished project! -
That is sweet! Love the candy apple paint! Is the roof off of a 67 Mustang 2+2?;
-
very nice! Great work!
-
The taillights aren't for a 2010, that was the first year that they were changed to the smooth back panel.
-
WOW! Loving the paint allot! Nice job!
-
I've done this kit and let me tell you I hope you have better luck at getting the body to sit correctly on the undercarriage! I ruined one kit, ended up building another, Still had problems, so I had to do some serious slicing and dicing to get it to sit correctly! Thing still looks like it is a 4x4!
-
I built one of these a couple of years ago...man, I had fits getting the interior to fit right with the body! Finally ended up slicing and dicing to MAKE it fit! Yepper, too bad that no one has ever done the 03-04 cobra's! I even wrote to Revell and asked them to manufacture a kit. Got back an answer that they couldn't get the rights for it from the blue oval people! At least I got an answer even if it isn't what I wanted to hear!
-
You can always go with Tamiya TS-13.It's back on the market.Just be aware that you have to apply it within 30 minutes of applying a color coat or wait AT LEAST 30 days if you don't catch the 30 minute window.If you fail to follow the guidelines the color coat will crack under the clear due to different solvent evaporation rates of the color and the clear coat. The next suggestion would be to use Testor One Coat(non one coat) clear.It sprays out thicker from the can than TS-13 but there are no cracking issues and can be applied over decals without the worry of destroying them(unlike TS-13). I just did a 66 Fairlane with Testor's one coat clear, came out very nicely if I say so myself. Did it over Testors 1833 White Lightening. She shines nicely!
-
Help me decide what to finish 1st (67 Shelby, J car or Cobra
cobramike replied to vamach1's topic in WIP: Model Cars
YES! what he said! -
Love the color! That is sweet looking! The seats are looking very nice as well!
-
What have I got myself into... Mustang Triple.
cobramike replied to Shelby 427 1965's topic in WIP: Model Cars
-
What have I got myself into... Mustang Triple.
cobramike replied to Shelby 427 1965's topic in WIP: Model Cars
Nice, I like a man that knows his Stang's! You know, a Mustang guy can never have enough! I have 7 currently, looking to add to them with a 2015 GT soon! -
-
Yes, not correct.
-
I just finished painting my 66 Fairlane with Testors one coat Lacquer #1833 with 4 coats, then I clear coated that with 2 coats of Testors Lacquer 1834m I did lightly sand between coats with 12000 cloth.
-
There is a 95 Cobra by AMT kit # 8231. I am surprised that no company has made one for the Terminator. What a shame! That will have to be a huge hole in my Mustang collection!
-
Has there ever been a plastic kit made be any of the makers of kits for a 03-04 Mustang Cobra? I have hunted everywhere till I am blue in the face and going blind looking. Please tell me thet someone out there knows of a kit to be had!
-
nice! Love the paint scheme! I built one of these but it sure didn't turn pout as nice as your did! Congratulations in order!