
Kennyboy
-
Posts
2,209 -
Joined
-
Last visited
Content Type
Profiles
Forums
Events
Gallery
Everything posted by Kennyboy
-
Thank you Peter. Thanks Stephen!
-
Thank you Phil........I like to look for the more limited stuff and sometimes you have to put up with a kit just because of the subject!
-
Thank you so much guys! REALLY appreciate the support and nice comments! .......JC ummmm no I think I'll keep it now.
-
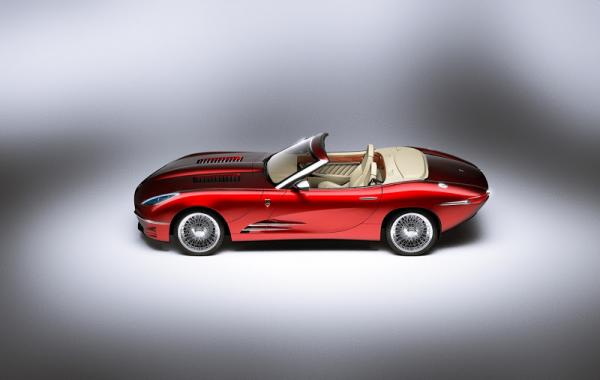
Sorry I did not post up progress on this as frequently as I usually do but, at least I finished it! The kit has several issues with fitment ESPECIALLY when fitting the body together..... .......over a dozen clamps it took to get the darn thing to come together AFTER clearancing several areas that were contacting too early. WHAT a HEADACHE! Thank goodness it is over! I originally planned on having a racing theme on this but alas, I could not find any JAGUAR decals that would be appropriate for the build. Photos were taken in ambient sunlight to show color depth (as much as possible.) Hope you enjoy!
-
Bravo Jonathan! Looks awesome!!
-
 If I can find the decals, I would like to do it as a Super Touring style. Looking for the decals with the outline Jaguar head for the sides and white Jaguar scripts with a small amount of sponsors.
 -
Thanks Gene. The paint is two colors of Kandy over black so it is pretty darn deep......The camera does not do it justice no matter what angle I have tried.
-
Thank you Dave. I just couldn't see it with those tiny things from the kit.
-
Resto-Mods & Modern Hot Rods
Kennyboy replied to afx's topic in General Automotive Talk (Trucks and Cars)
You know the guy above was telling his friend's "Yo check it out.....I got 18 x 10's to FIT on my ride!" If I were one of them I would be like......"Um, no you didn't...." -
Well guys, I am finally going to post up some pics of where I am on this........ALMOST DONE!! The wheels were not easy (at all) to get into the wheelwells due to the size of the original kit wheels, but finally got them to fit. The engine detailing is almost non-existent on the kit, so I spent a LOT of time in there trying to make a reasonable representation of the proper engine room. Replaced the kit seats with a pair from a Skyline GTR (not pictured yet) to fit the proper race theme of the build. The kit taillights are molded completely in transparent red (which is very incorrect) this had me painting the amber and silver sections on the front of the lens which is quite difficult! They turned quite nice though, and will be easy to see when I get the final pics in after assembly/decal work is done. Threw in a couple shots of it in the sun to show the contrast between ambient light and artificial........enjoy! Got the windows to glue in and put the two halves together.....then to find some Jaguar race decals for tasteful installation. BTW......in this photo \/ the gauges were done with colored pencil.....there are no decals for this in the kit.
-
Well done on the depth and color!! LOVE it!
-
On the ferrules, can't you just drill the proper sized hole into the intake manifold and slide the ferrule in as far as needed? I wouldn't mess with trying to cut and/or sand the tubing......instead, work the plastic to accept the metal pieces.
-
Beautiful job on this Delfin! I have this same kit in the Fujimi drawer of the stash......cant wait to build it!
-
2003 Infiniti G35 Coupe 7/7/17 Replaced photos fron Fotki
Kennyboy replied to Foxer's topic in WIP: Model Cars
Kerry beat me to it.......the Kleenex/toilet paper and CA glue has been a trick of mine since back in the day when I would repair speakers that had a hole in the cone. Works great and doesn't everybody have A_ _ WIPE around? -
It's a Ferrari so I will be watching as well!!
-
Thank you Carl! I myself was really surprised at the quality of the molding and detail for such an old kit........just throw away the wheels and tires from the kit, they are completely useless. Thanks Richard!
-
Hey Bob, I shot this with my Iwata HP-BCS with just the standard tip that comes in it at 18 psi.......and I could probably bring the templates and airbrush to mess around with on something.
-
Datsun 240zg. In no way shape or form is this stumps build?
Kennyboy replied to lanesteele240's topic in WIP: Model Cars
I agree with Robin Gary, GREAT looking parts to start with........EBAY huh, Man, I would love to get a hold of some of those parts! -
That intake manifold is off of a naturally aspirated Mitsubishi 3000gt. Wish I would have kept mine...... I used to have the same intake manifold for a twisted project I was planning on a 1990 Dodge Daytona......(they both had the 3.0 liter Mitsubishi engine.)
-
Thank you Steve! Been airbrushing now for around 21 years.
-
Thank you Bob! BIG thanks for the great service on the Kandy's!! "Bob's Paint" rocks!! I am definitely interested in playing with new paint colors!! Working on the engine/suspension for this beast guys! Also, working on fitting the MASSIVE gold BBS wheels........Pics when I get further.
-
Oh no Dave, I only plan on having a few small sponsor decals here and there.......I wouldn't dream of putting a lot of stuff over this......
-
Thank you Walid and Tom! Tom, I can't wait to do the racing livery myself. Going to try to section-in a racing interior/cage from a Tamiya 911 GT3 car.
-
Thank you so much guys for the kind words and encouragement! I used the Artool True Fire Nano series templates for this technique........they are very small, but effective.
-
Thank you Eric.........your explanation is very true (no pun intended) not too hard to learn, just takes a while to "get it"....not saying that I "get it" by no means. Thank you Martin! I do plan on finishing it soon........it will be a race car rolling on gold BBS's and slicks. Now to find some sponsor decals.....