Russell C
-
Posts
1,933 -
Joined
-
Last visited
Content Type
Profiles
Forums
Events
Gallery
Everything posted by Russell C
-
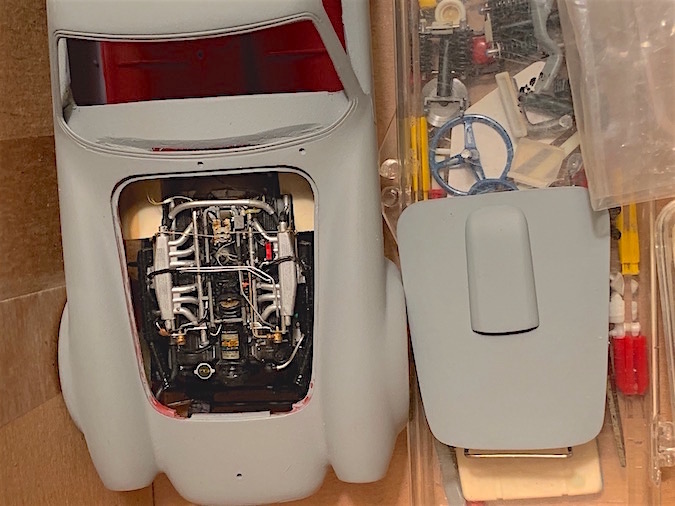
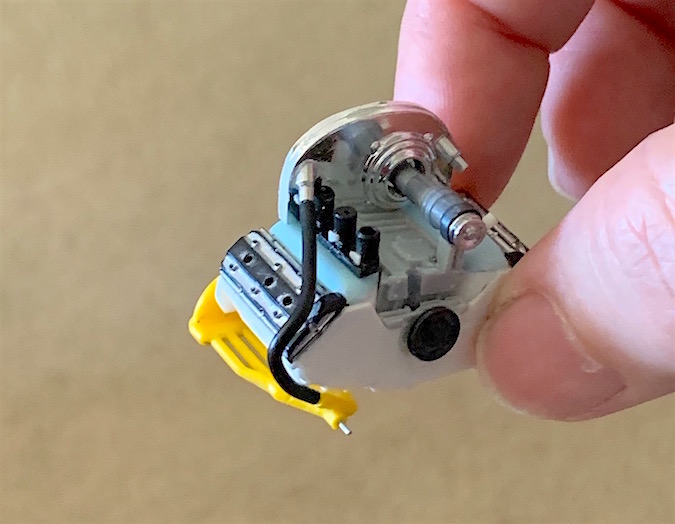
Nice alternative roofline there. Me, had the body & details, engine, interior all together, but hit the wall when it came to the suspension geometry, which was going to be a way better improvement over the Monogram kit. Gotta get my act together on figuring out how to make deadly sure the wheels are centered within the fender arches, with the right slight rake and all four wheels touching the ground. The key to engineering something is the success of making it so that it can be dry-fitted, evaluated for proper appearance, disassembled, tweaked, and reassembled in a way where assembly / disassembly / reassembly goes right every time. Couldn't figure that out with the suspension back then. Meanwhile, calling this engine done today. But now that I look at the pics, I'll need to run an Xacto blade over the top edge of the fan belt (oh, wait - there is no fan) to make it more of a dead flat black color. Made from heat-streatched black plastic sprue. When I went to install the battery wire to the generator, the heat-stretched red sprue just looked like it was plunging down a gopher hole, so to give it a more realistic look, I made one of my tiny wire rings for that junction. This particular one is really small. Slide the ring onto the wire, jamb the wire into the hole, slide into place, and make it all permanent with a tiny drop of super glue. Regarding the way I made the distributor, spark plug wires & color matched wire boots, I think I'll cover that in a separate future Building Tips thread, since another of my projects requires a custom made distributor, and I think I know of a way to make an even better one than I made here. What car does this go into? The hint was in my prior post above -- stay tuned to the photo coverage at the GSL contest two weekends from now, assuming no completion disaster intervenes.

-
Or a Jag V-12. Been using the same techniques since the 1990s, as seen in my still-uncompleted 427 Cobra Berlinetta. Tragic how some projects get sidelined. Onward with this one, though (jealous that you got your GSL Common Kit Tamiya VW Beetle entry done with weeks to spare before the deadline). Wasn't sure if this would work out well or not, to have the smaller wires (heat-stretched sprue, actually) come out of the coil, but they actually cooperated better than I expected when I test fitted the whole shroud assembly to the engine. Green & red 'wires' get jammed behind the distributor, while the black one will be going into the firewall when the engine is installed. Finally cut into a Fujimi Porsche 911 decal sheet for the coil decal that I had since 1990.
-
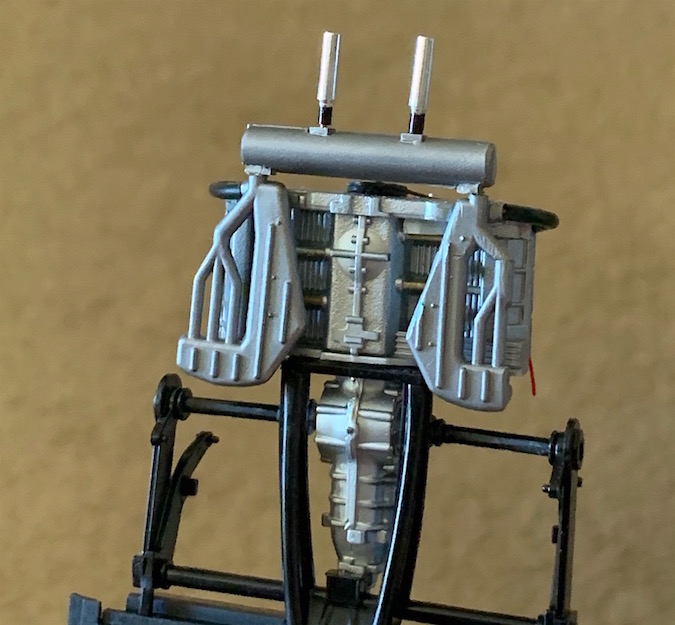
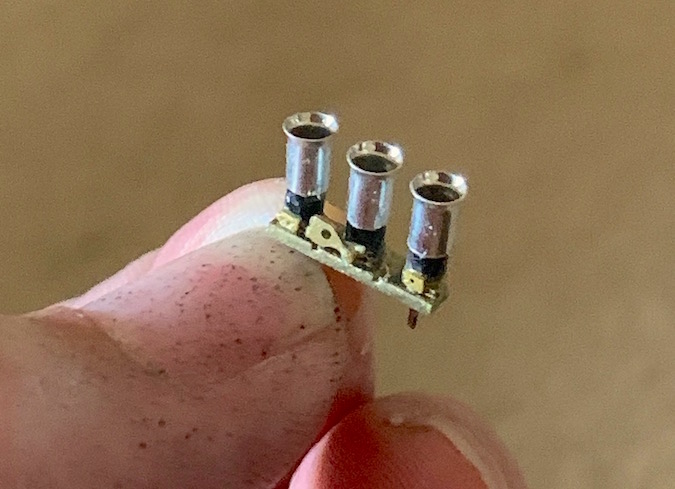
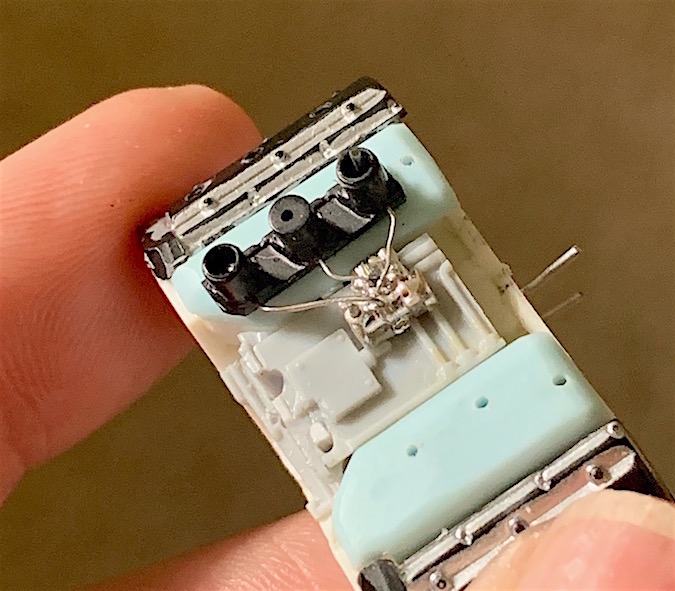
Partial work on the intake areas, and a test fit of the velocity stacks. Flat black paint speckles on my fingers is from painting the air cool covers, seen in the third photo in this latest post. Creating a little more visual interest for the velocity stacks. For accuracy and ease of cutting, I did use my miniature lathe to cut the pipes (from eBay seller "intermeccanica") to the height I needed. But for the thingys inside, I used my regular motor tool. A bit of black plastic sprue is 'lathe-turned' down to the proper diameter with an X-acto blade, then a center hole is drilled to accept a short length of heat-stretched gray sprue. Then I used my smallest drill bit, #80, to make a deep dimple int that tiny center thingy, and finally this is all cut off the black sprue. Engine looks better when it is not just unpainted plastic. Ignore the wire sticking up from the fuel injection pump, it's just there to locate the assembly straight. A fuel line will replace it later. I can get away with the front of the engine block being featureless since it will be almost all hidden from view in the car.
-
Let's See Some Glue Bombs!
Russell C replied to Snake45's topic in General Automotive Talk (Trucks and Cars)
Yep, and I have a roof from the T-bird, favoring that basic look. Drop the 289 roof onto int and it becomes more of the Hawk Bobcat version. We'll see, but I might also just put a widening strip into the Apache roof, too. -
Let's See Some Glue Bombs!
Russell C replied to Snake45's topic in General Automotive Talk (Trucks and Cars)
1/32 scale Hawk Apache Sports Roadster, got it cheap off eBay, single bid. Missing the front valance and one wheel/tire, and the crank for the rubber band is cut in half and solidly glued into place in such a way that I guess it was intended to look like an exhaust pipe. My speculation turned out to be true, the body width and basic midsection height is about the same as a 25th scale Shelby Cobra. Open up the hole for the interior, and a 25th scale one could drop right in ….. so you see where I might be going in a WIP sometime in the future for a fun. relatively easy curbside project. Widening the roof might involve a bit of artful design work, though.
-
Ferrari sacrilege. Following, of course.
-
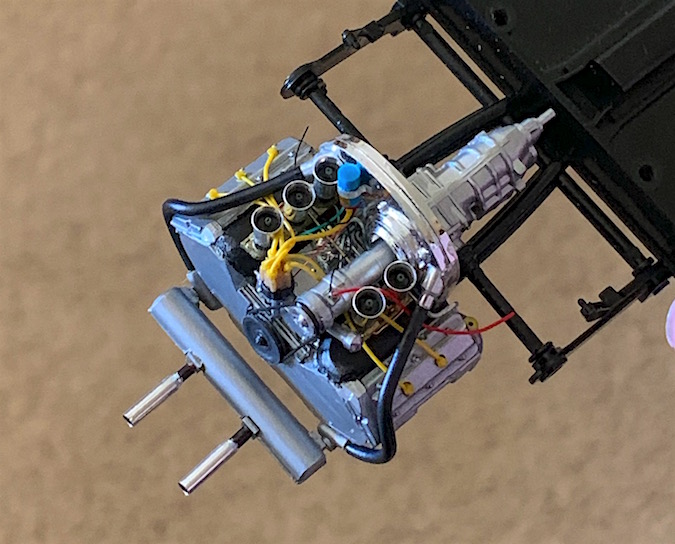
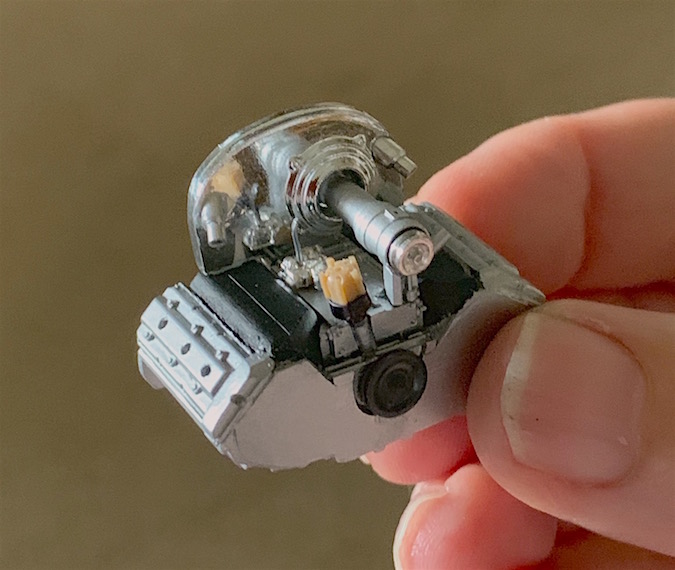
Heater hose is some discarded electrical wire with black insulation. Perfect diameter and texture for my purposes Had to rob the exhaust / heat exchangers manifolds from my late 1970s buildup of the Revell Carrara. Will be the first model I've ever built with velocity stacks. The bases of that are from the Tamiya DTM Mercedes. Some kind of fuel injection system here. Who knows how it works? If it's mechanical, then maybe that box on the plate ahead of it provides some kind of drive to it via the crank near the lower pulley. That's the mystery sometimes with these mix 'n match engines. Air cool area covers made from a thick part number tab on the parts tree sprue from the AMT '58 Impala, which was molded in that robins egg blue color.
-
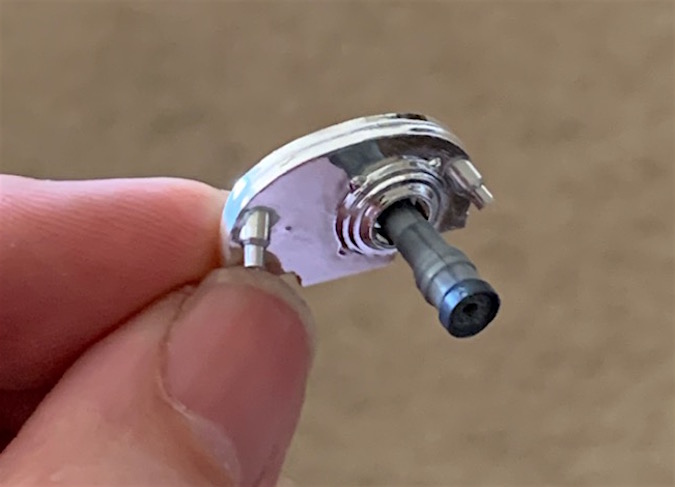
Brown plastic sprue distributor, 'lathe-turned' on my motor tool. Cut it down to the size I needed, drilled the plug wire holes really close to the edge, then for the perimeter bumps, I heat-stretched the same color sprue that was filed into a half round length, and glued those sections on. In heat-stretching, plastic generally keeps the same shape. When a distributor doesn't exist for the model you are building, you have to make one from nothing. Different style section between the cylinder banks, made from some unknown kit's engine compartment wall detail. Redone generator support column with plastruc oil filler tube and 'lathe-turned' white metal oil filler cap. Needs a bit of cleanup, will be painted later. Unpainted engine block / valve covers / air cool covers. The "between the cylinder banks" assembly above goes in the middle of this, and the fan shroud toward the back. Valve covers are from a Tamiya DTM Mercedes (previously silver painted by another builder, the paint is rubbing off), drilled for plug whires. The reason for all the new stuff on the top of the engine is because it was no more than the bottom end from the curbside Fujimi Koenig 911 Porsche. That's a kit I bought in the 1990s for just its tires and wheels.
-
Similar to my Ford Y-block build thread, the engine in this thread will end up somewhat buried in the vehicle, so I thought I'd snag some pics of the assemblies, and what it looks like prior to installation. Here's a few to start. The "hybrid" part of this will appear in subsequent photos in a day or so. Chrome fan shroud out of the AMT Superbug, but it lacked heater hose outlets, so I made those out of aluminum tube. Unpainted generator / elongated shaft 'lathe-turned' on my motor tool. That's a term I'll use for many of the parts here. Unpainted muffler, made from a really thick length of parts tree sprue, lathe-turned aluminum exhaust pipes temporarily pinned in place. Same technique for the upper & lower pulleys, top one is white metal, bottom one is black plastic. Same technique again for a '60s vintage Bosch coil, made from turquoise blue sprue with a bit of red sprue glued onto the end and 'lathe-turned' to shape. I haven't yet cut off the top. Heat-stretched yellow sprue will serve as plug wires. I'll explain later how I can make plug boot ends.
-
What did you see on the road today?
Russell C replied to Harry P.'s topic in General Automotive Talk (Trucks and Cars)
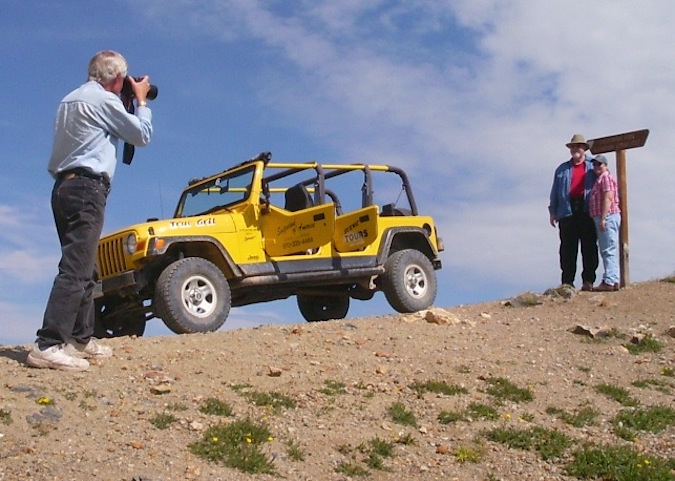
Some do serve a legit purpose. My pic below of our tour driver taking a pic of my fellow offroad tourists back in 2005 at the top of Hurricane Pass. I vacation every summer right near Ouray Colorado, lost track of the number of times I've ridden in this one with my SOA Jeep Tours friends.
-
Haven't stayed there for a couple of turns now, but it looks like it's in the bit over $50 per night. Check availability, of course: https://www.motel6.com/en/motels.ut.salt-lake-city.15.html
-
Car Model History part deux
Russell C replied to Mark's topic in General Automotive Talk (Trucks and Cars)
November '65 cover here, from this person's site collection of the '62 - '68 covers. No Coronet shown or mentioned on that cover. -
What did you see on the road today?
Russell C replied to Harry P.'s topic in General Automotive Talk (Trucks and Cars)
Chugging along at probably not much over 50mph, a bit of a different kind of Willys wagon.
-
All entirely a matter of money vs inconvenience. I stayed at the Motel 6 a couple of times that's a block or so south of the Sheraton, but it was such a drag to walk back & forth, and more of a hassle to arrange for a taxi to & from the airport, so I just take a bigger hit in the wallet in exchange for staying at the Sheraton itself. McDonalds breakfast/lunch & dinner, to save money, except for the awards brunch meal.
-
Speaking of smart cars
Russell C replied to oldnslow's topic in General Automotive Talk (Trucks and Cars)
Somebody's so-so photo alteration found in Google Images. I'm wondering if this would end up being the length of a regular car. -
What did you see on the road today?
Russell C replied to Harry P.'s topic in General Automotive Talk (Trucks and Cars)
Heard this one before I saw it, but too stuck behind the guy ahead of me to get a better shot.
-
International Model Car Builder's Museum?
Russell C replied to Snake45's topic in General Automotive Talk (Trucks and Cars)
Gustavson, and "is," present tense. You have just under 4 weeks if you want to see him in person at this year's GSL: http://www.gslchampionship.org/ -
Could be part of the inspiration for this is the early '60s Auto World / Dave Shucklis photo article on how to build his "Hot Canary" '36 Ford. The builder might have decided to go with another front/rear end version. International Model Car Museum's complete scan of the article in this really old web page (partial image of the end below): https://www.themodelcarmuseum.org/What_s__New/hot_canary/hot_canary.html
-
Rik Hoving has a Fotki site collection of Juha's models https://public.fotki.com/Rikster/model_cars/model_cars_from_others/models_by_juha_airio-1/ Saw several of his at one of the prior GSL contests, too. Hugely jealous of his skills, they must be seen in person to truly appreciate 'em.
-
90-96 Bronco in scale?
Russell C replied to Rusty92's topic in General Automotive Talk (Trucks and Cars)
Plopping just the word "bronco" into the Rocket Fin site's search window turned up this 'unknown manufacturer' result: http://www.rocketfin.com/resin_product.cfm?id=3404 -
Room, flight booked. Evil intentions with the GSL Common Kit Tamiya Bug category. Will have 4 wheels and will be gray. Running a bit behind schedule, as usual. Engine will have a top on it in a few days ....
-
Eek. I had never thought of that either, up 'til today. I just always thought they were nicer looking roofs. Never even gave much thought to landau bars, they just said "pointless decoration" to me without ever implying what they were supposed to be in real life. But the more one thinks about it, the more fake stuff there is on cars. E.g. vinyl woodgrain, wire spoke wheel covers with spinners, functionless taillight extensions, etc, etc.
-
International Model Car Builder's Museum?
Russell C replied to Snake45's topic in General Automotive Talk (Trucks and Cars)
During the GSL contests, I've visited the Museum pretty much every time since it opened. The thing to keep in mind is that the operation of it is a 100% volunteer effort, with more of it going toward receiving & maintaining its content, and unfortunately a lot less toward the website. The stripmall location happens to be a least cost alternative to a much more expensive one, and due to the shortage of available volunteers overall in the immediate area, it's open on a reservation-only, call-way-in-advance basis. Trust me on this, though, if anybody who loves the history of model vehicles has a chance to visit the place, they won't be disappointed. What our hobby needs is a mega-bucks lottery winner who could cover the expense of a much more centrally located larger building and the salaries of museum guides who are absolute model vehicle enthusiasts. Poor as I am, I can't donate money, so I donate services such as helping the Nordberg collection get transferred to the Museum. -
Call me an idiot, but from the '70s on up to somewhere in the late '80s, it never dawned on me that vinyl roofs with the little circles around the back lower edges were fake convertible tops.
-
This Saturday for Phoenix area modelers
Russell C replied to Greg Myers's topic in Contests and Shows
Cool. I might could use a part or three.