DiscoRover007
-
Posts
449 -
Joined
-
Last visited
Content Type
Profiles
Forums
Events
Gallery
Everything posted by DiscoRover007
-
Hard to say honestly. Perhaps you didn't put enough flocking material? For the record I use spray adhesive from auto zone and it works great. Any touchup areas after that I use the white glue method.
-
Tamiya Toyota Supra: UPDATE 6/15/17
DiscoRover007 replied to DiscoRover007's topic in WIP: Model Cars
Thanks guys. It's close to being finished but I just want to make sure it all looks clean. The painting the window glass is going to be hardest part from here on out. All of the available window masks online are very poor. It's one thing I haven't mastered yet. I may ask someone on here to paint it for me haha. -
Tamiya Toyota Supra: UPDATE 6/15/17
DiscoRover007 replied to DiscoRover007's topic in WIP: Model Cars
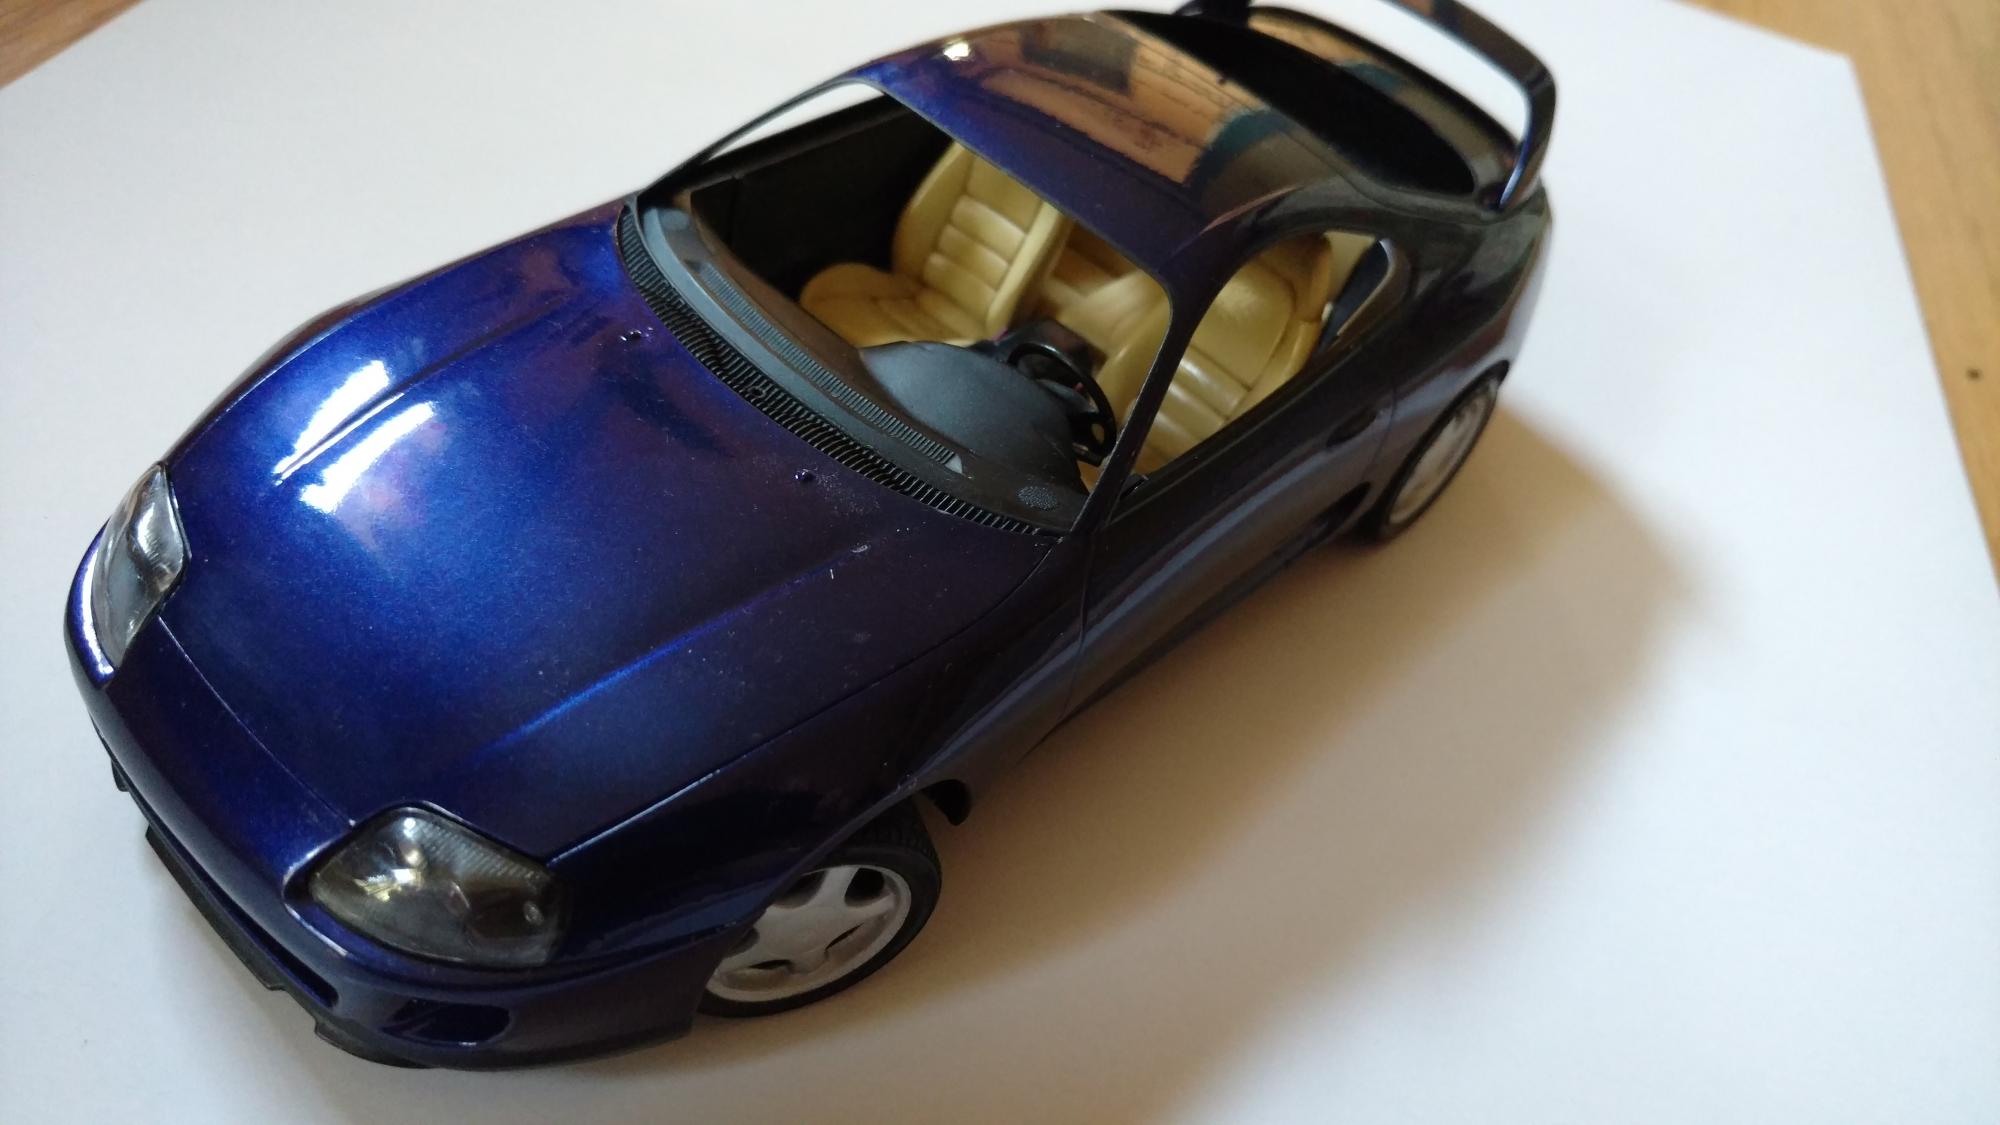
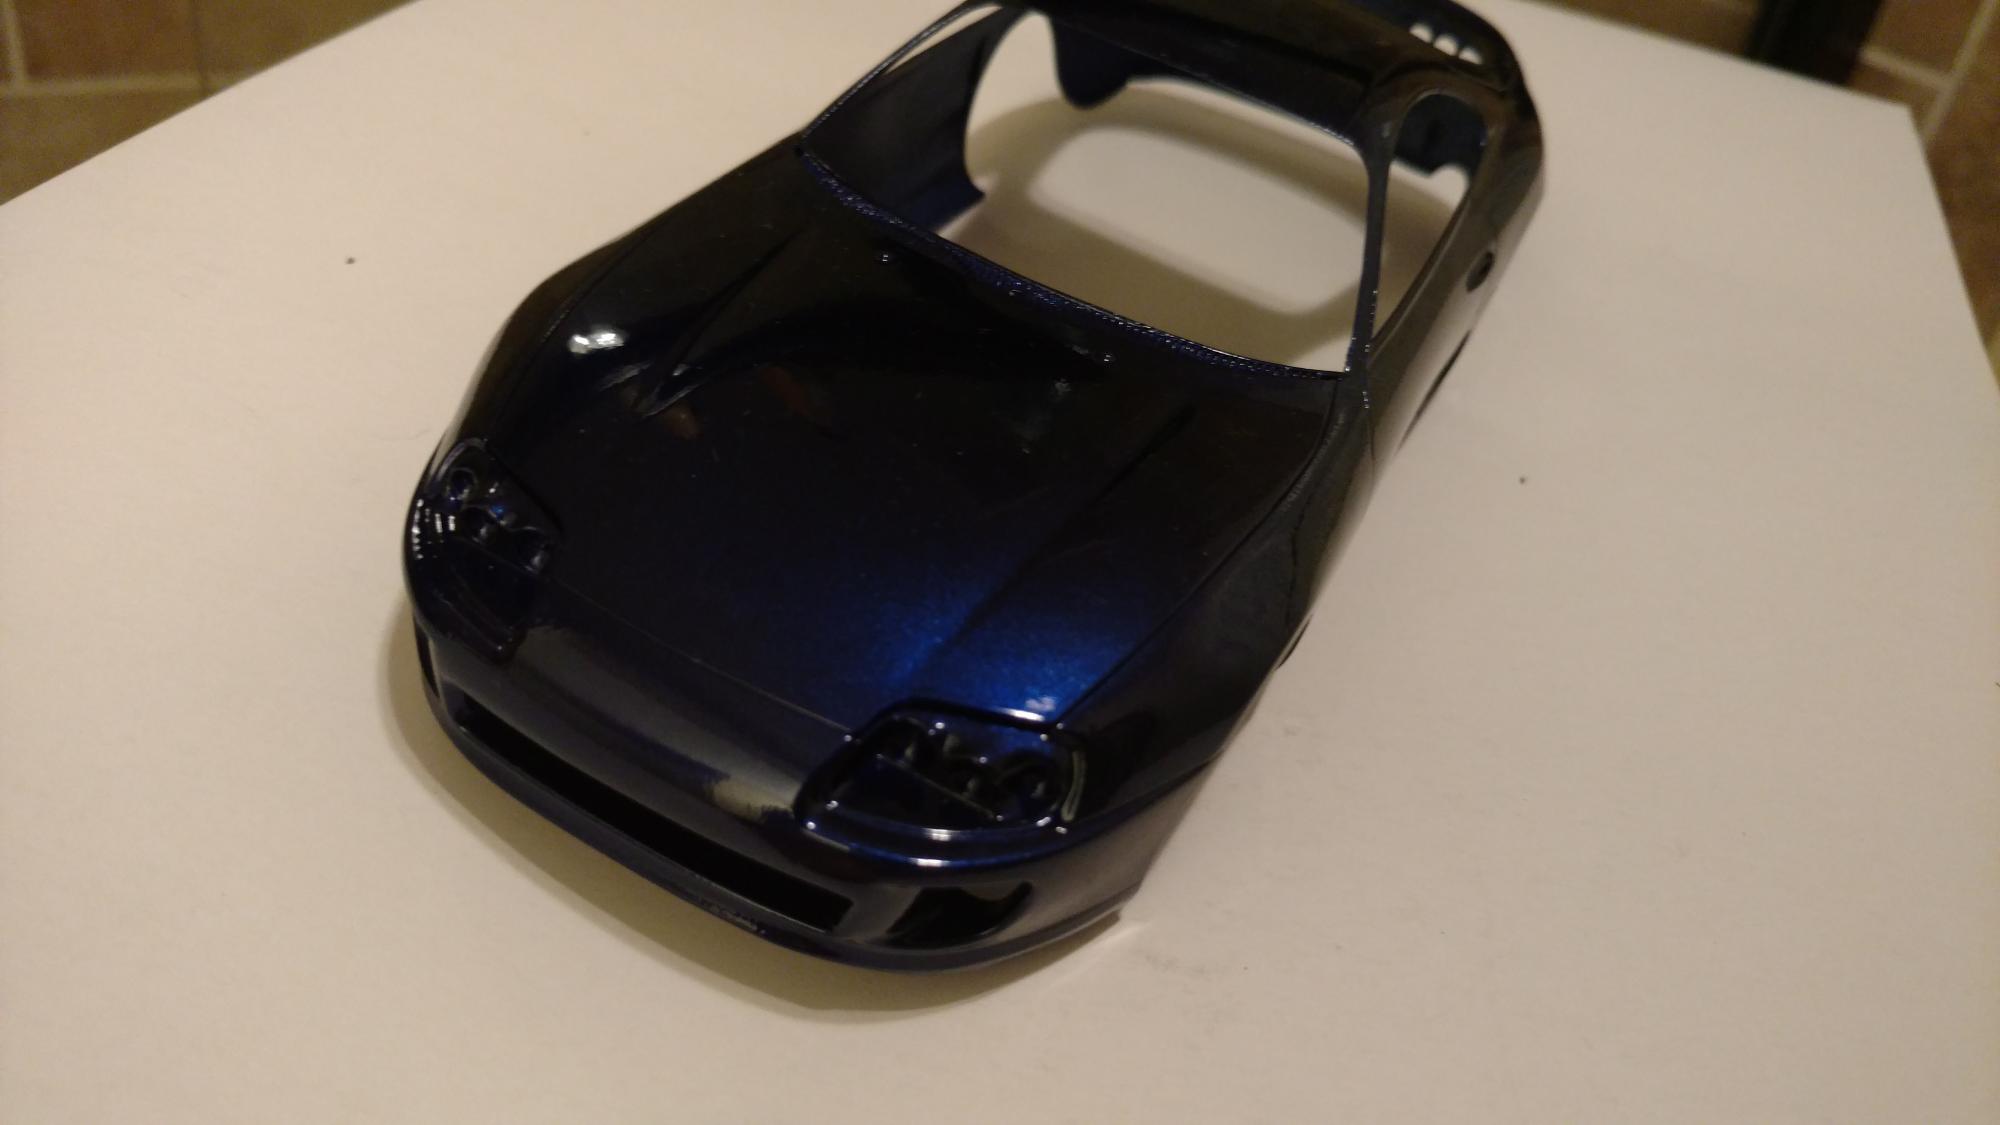
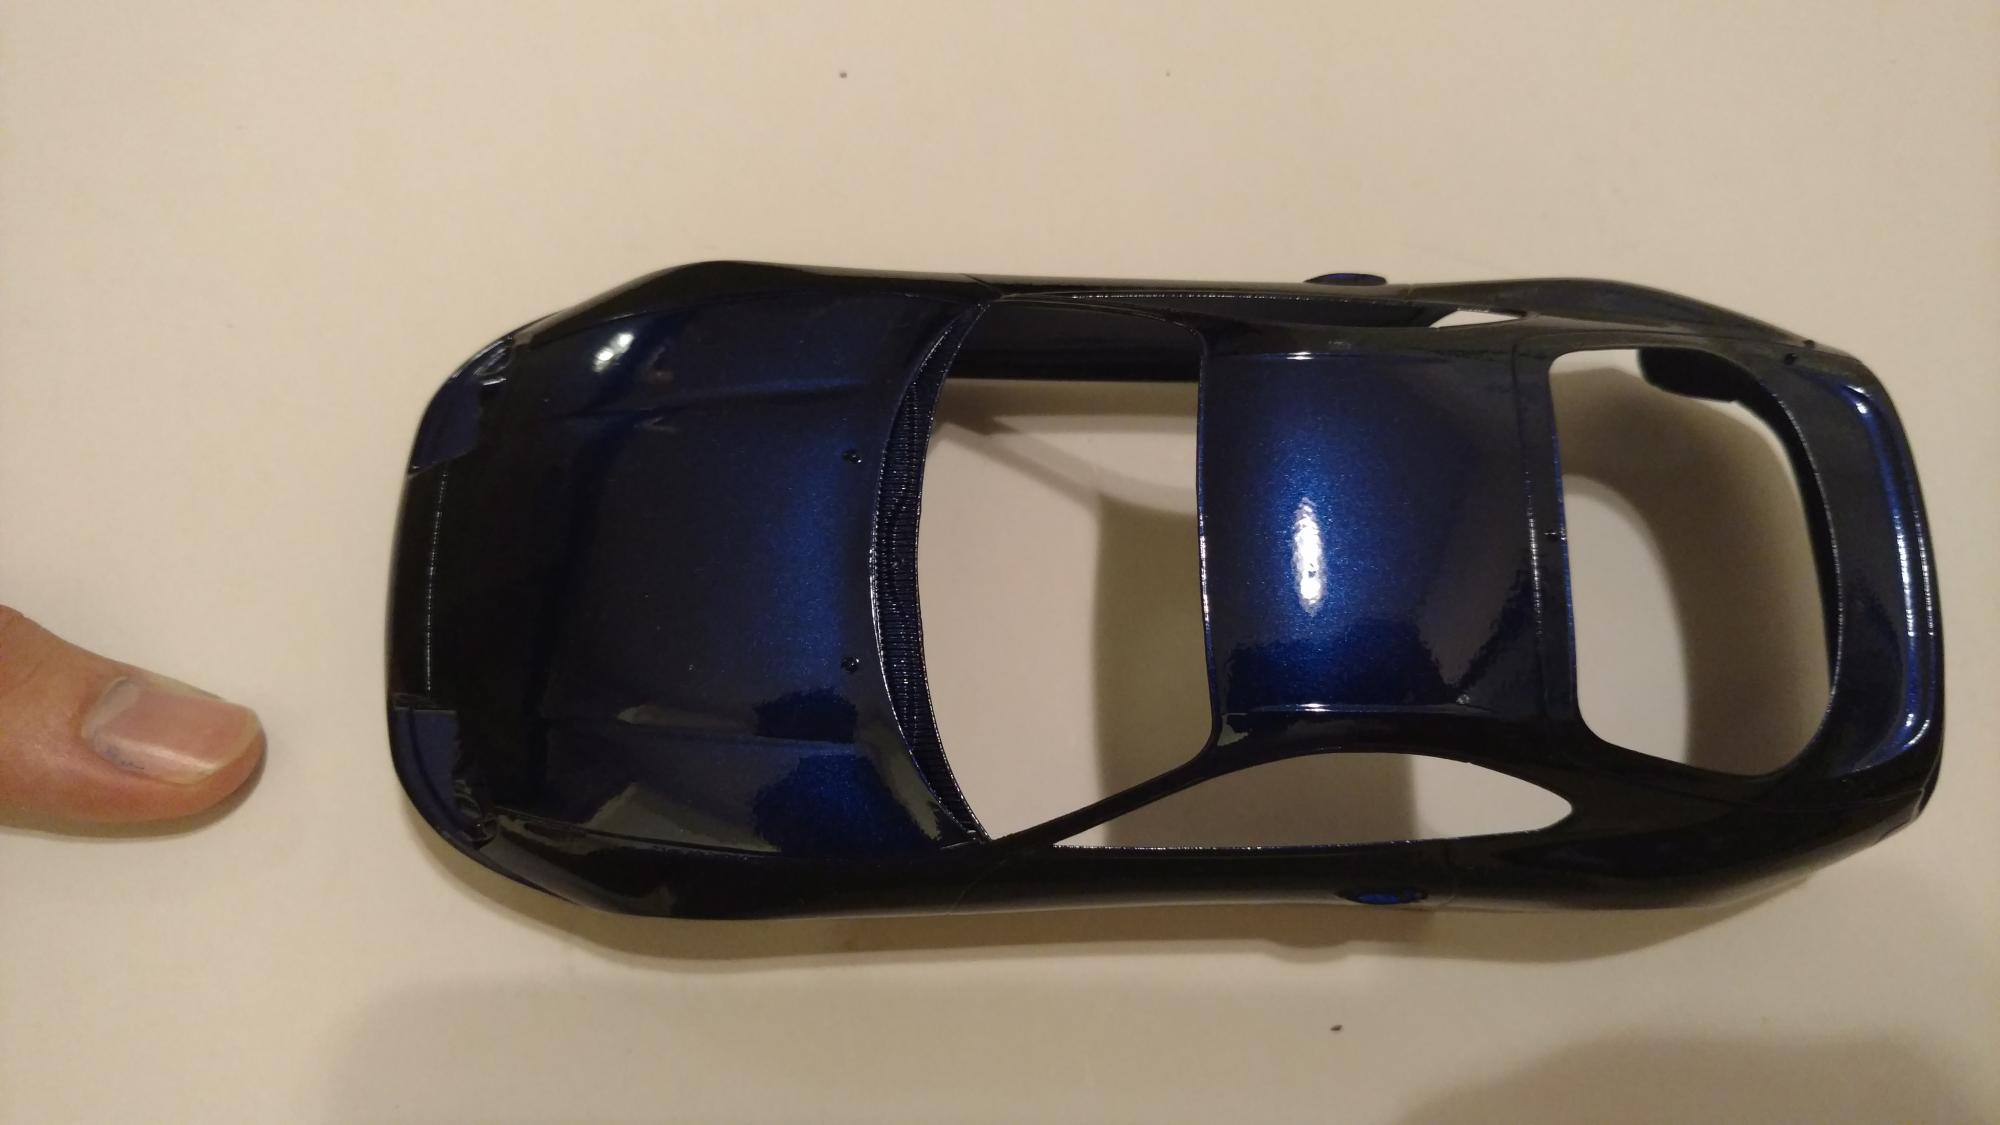
Today was a beautiful day and wanted to get some better daylight mock up shots for you guys. Finished the window rubbers. Next will be badging
-
Looking nice. Are you painting this silver?
-
Tamiya Toyota Supra: UPDATE 6/15/17
DiscoRover007 replied to DiscoRover007's topic in WIP: Model Cars
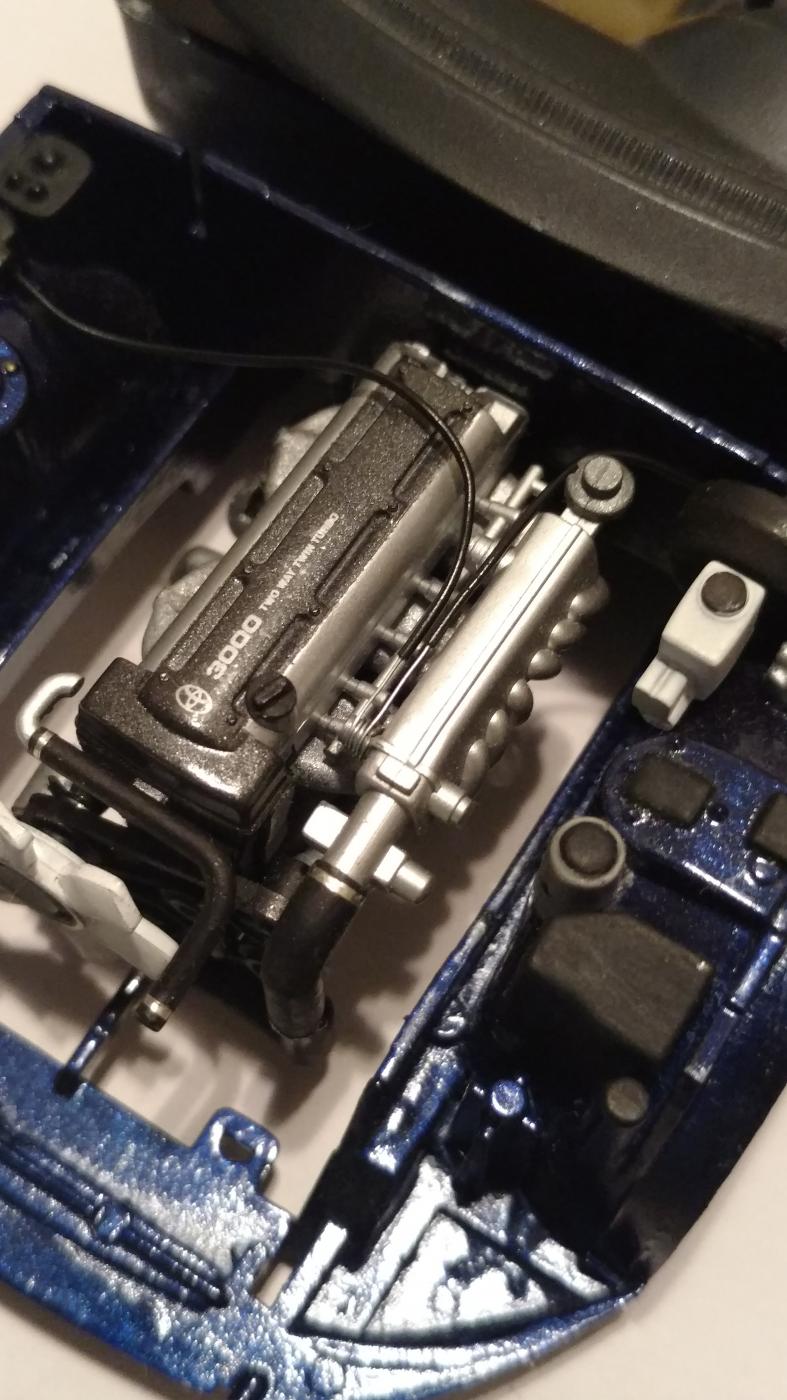
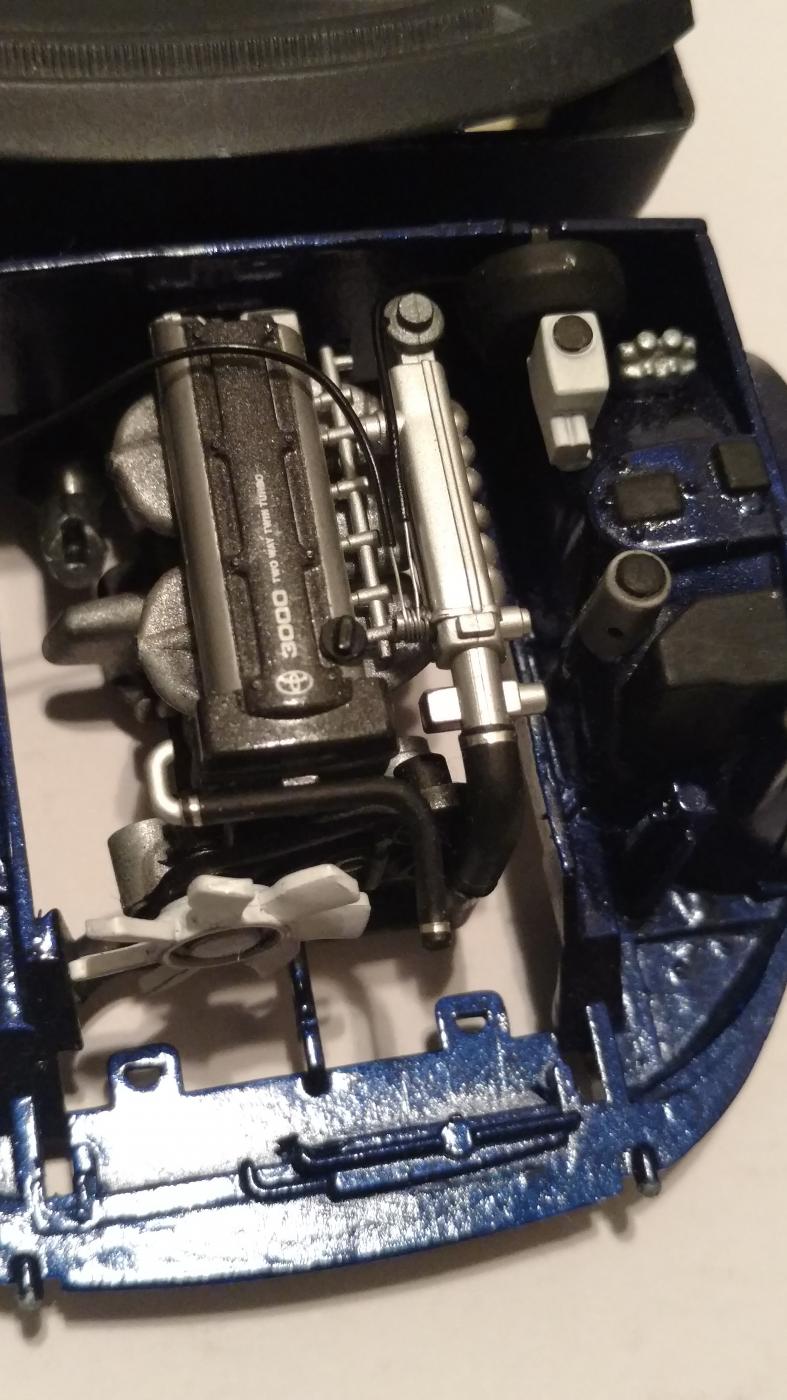
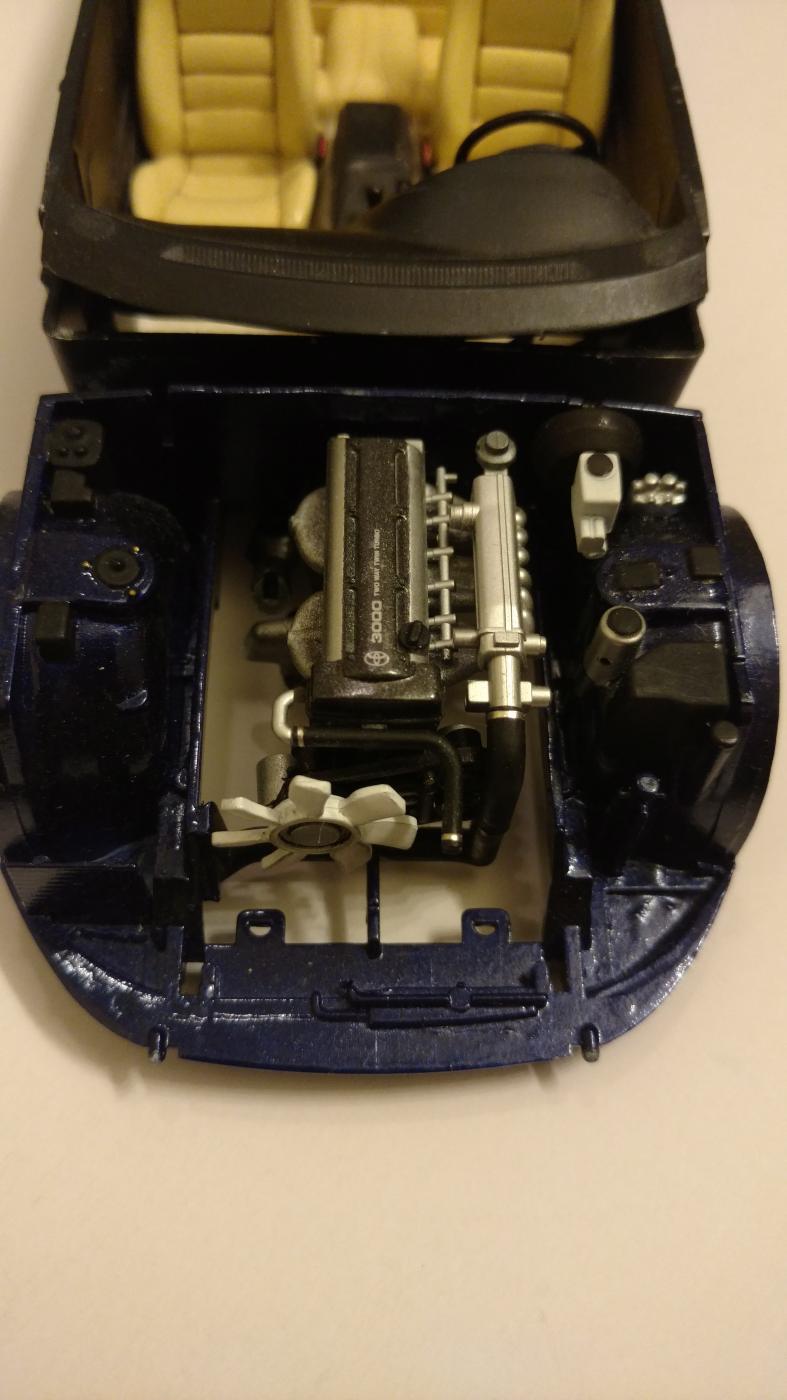
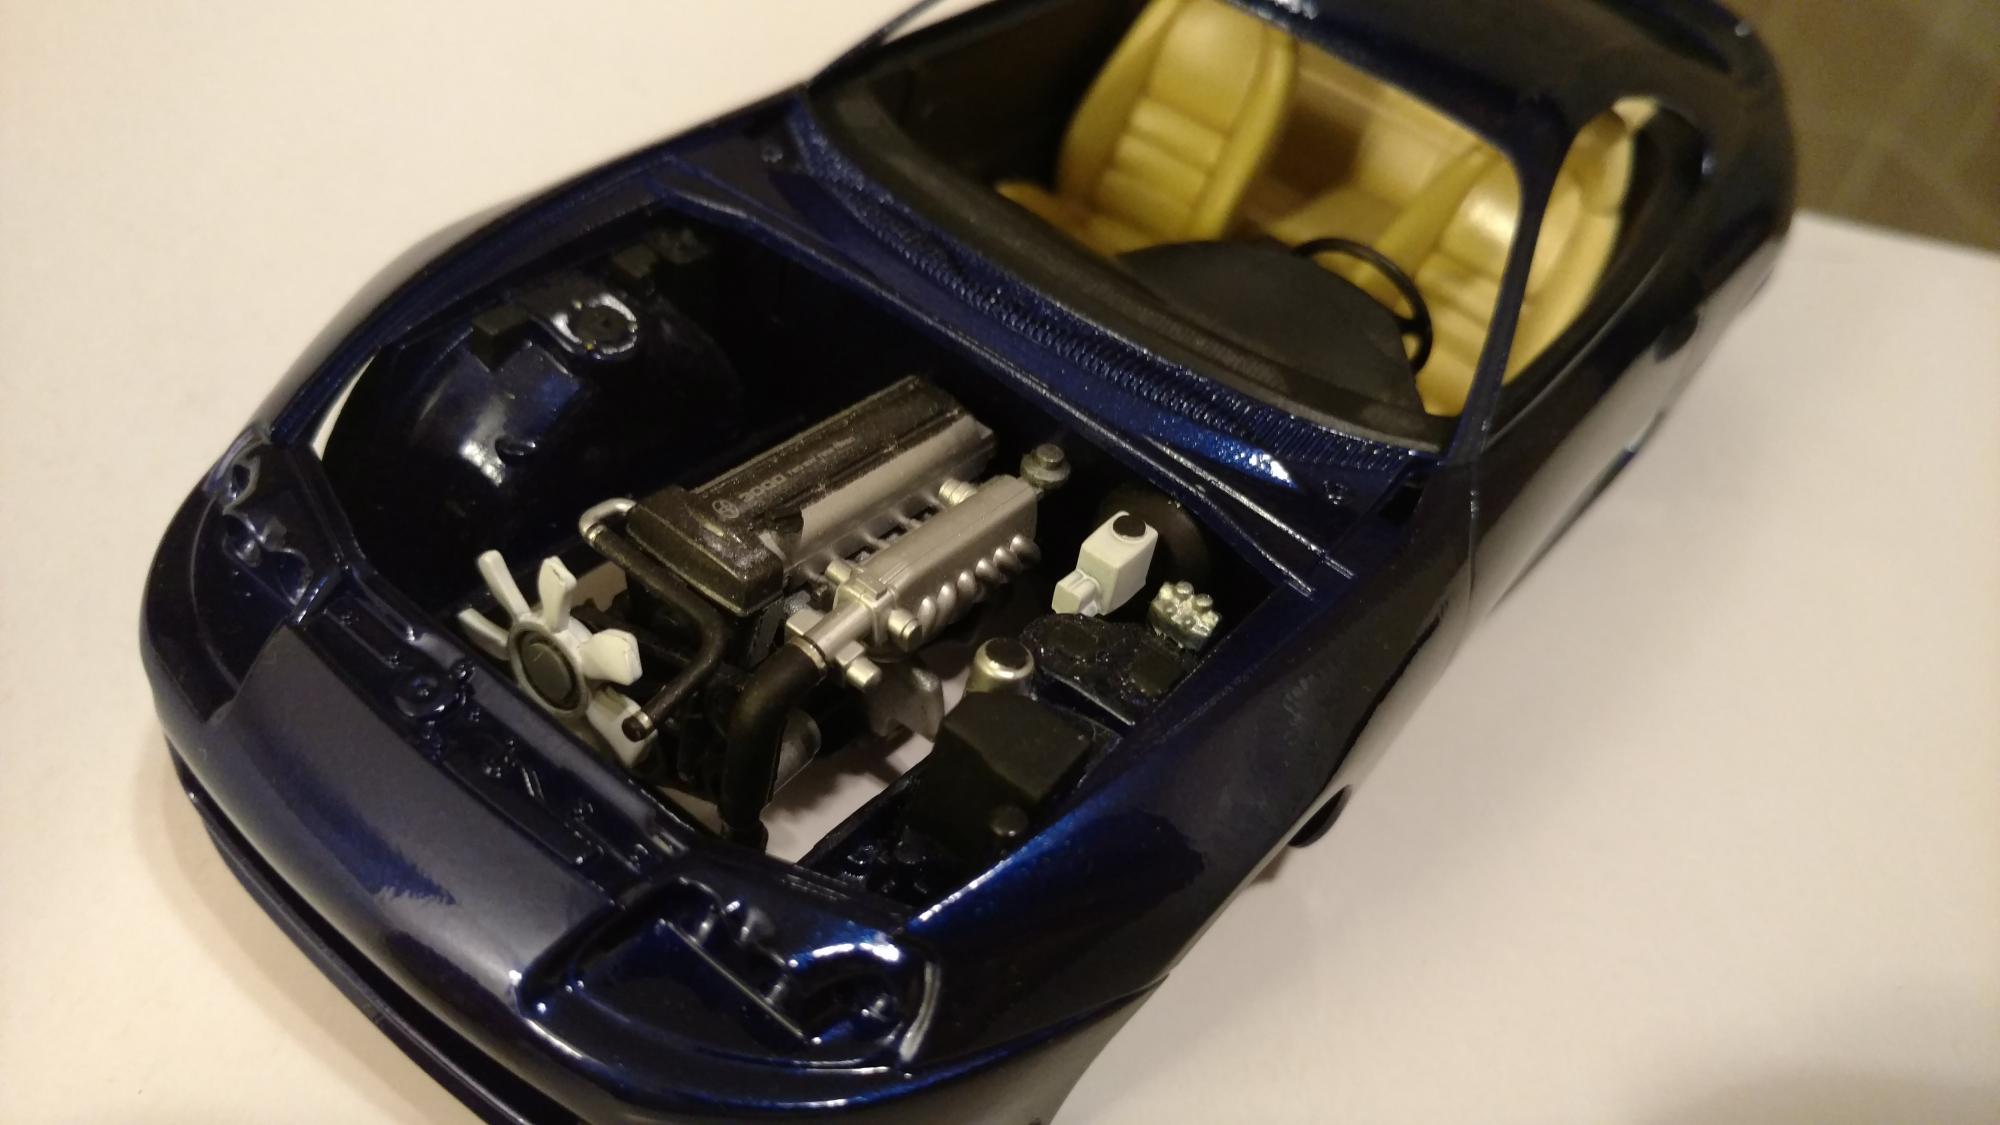
Still need to get the spoiler painted and finish the body trim and window glass. But she is coming together. The engine compartment is almost done but properly detail painting the turbos is frustrating at the moment. trying my best to do a clean job.
-
Tamiya Toyota Supra: UPDATE 6/15/17
DiscoRover007 replied to DiscoRover007's topic in WIP: Model Cars
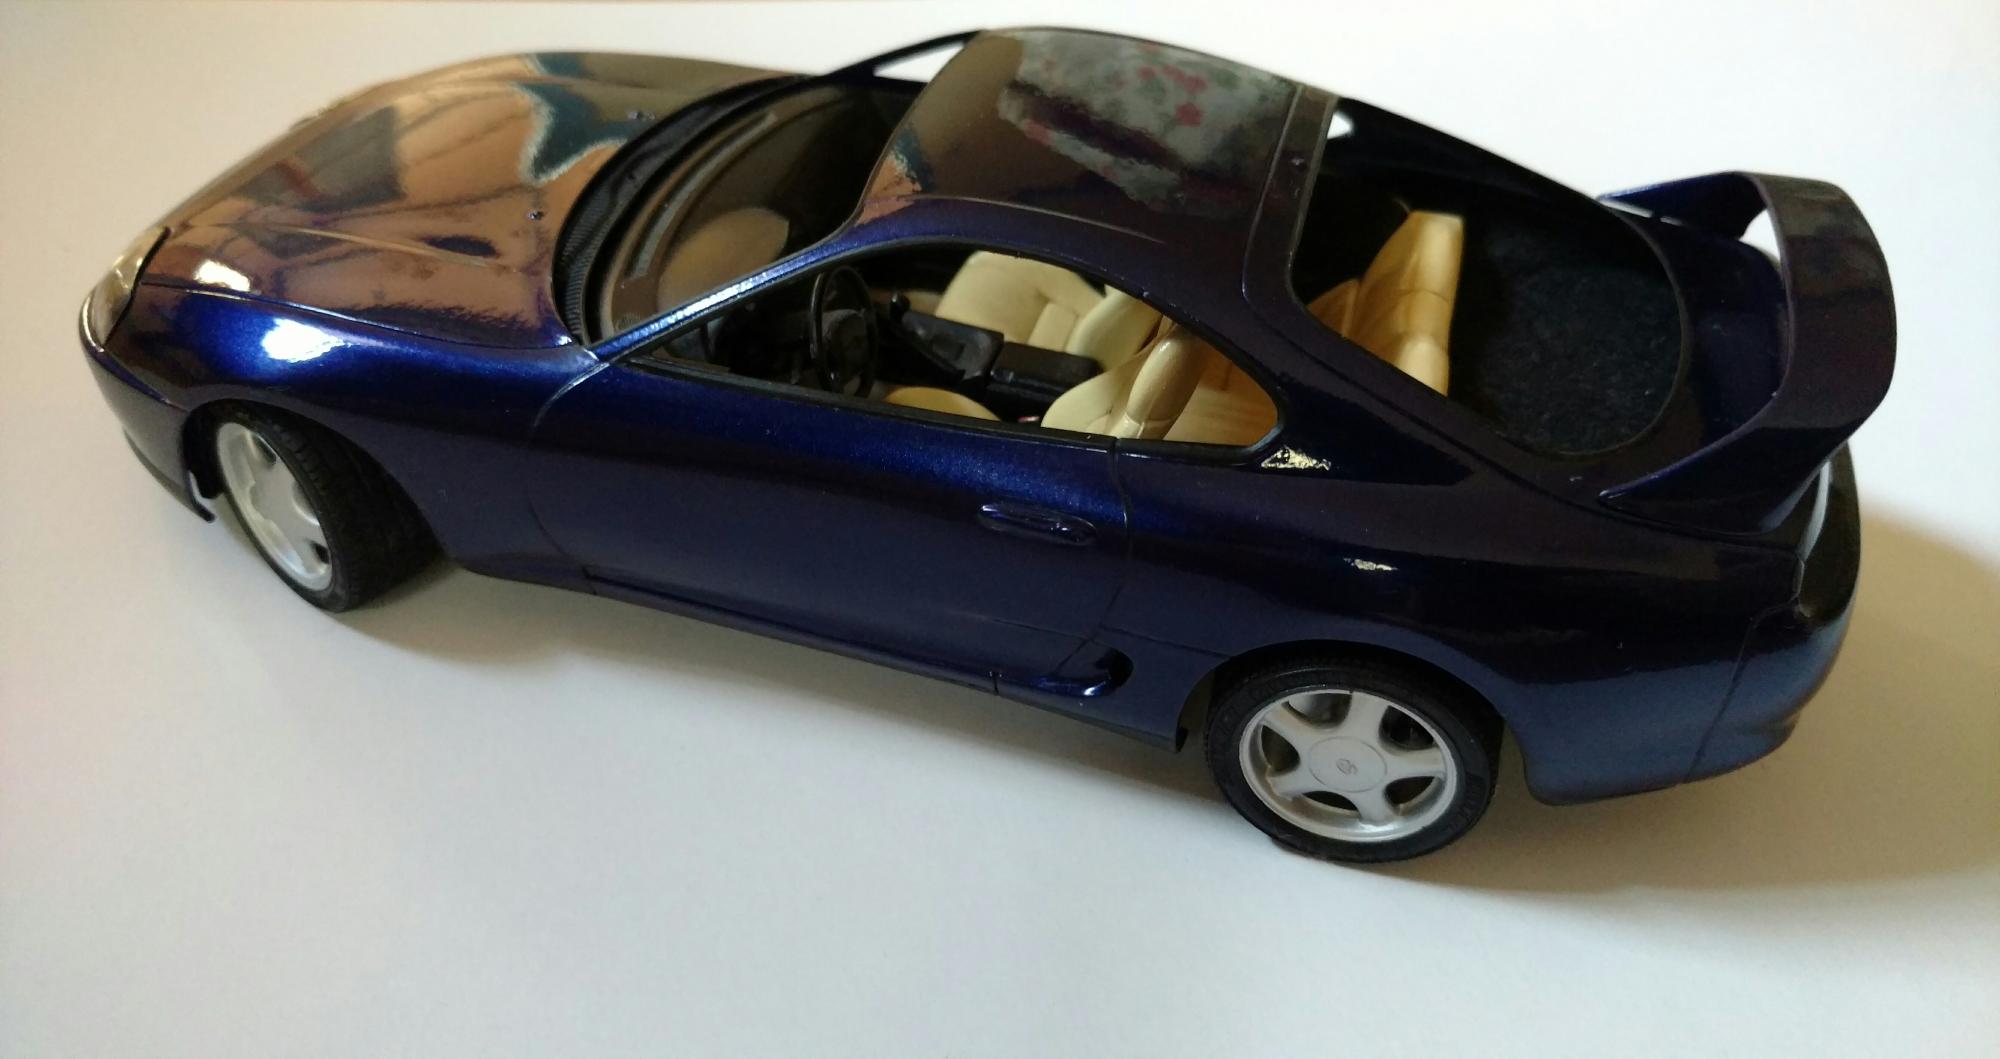
Without further ado I finally have a rolling chassis. I decided to keep this car looking very clean and stock. I stripped the chrome off the wheels and sprayed them model master aluminum. Then I sanded the tread off of the tires with 320 grit and then I actually used real wetlook automotive tire shine on the walls. I debated sending off the wheels to chrome tech but I ultimately thought the aluminum look would give a better in scale effect. I have another set of wheels I may try for that down the road.
-
Tamiya Toyota Supra: UPDATE 6/15/17
DiscoRover007 replied to DiscoRover007's topic in WIP: Model Cars
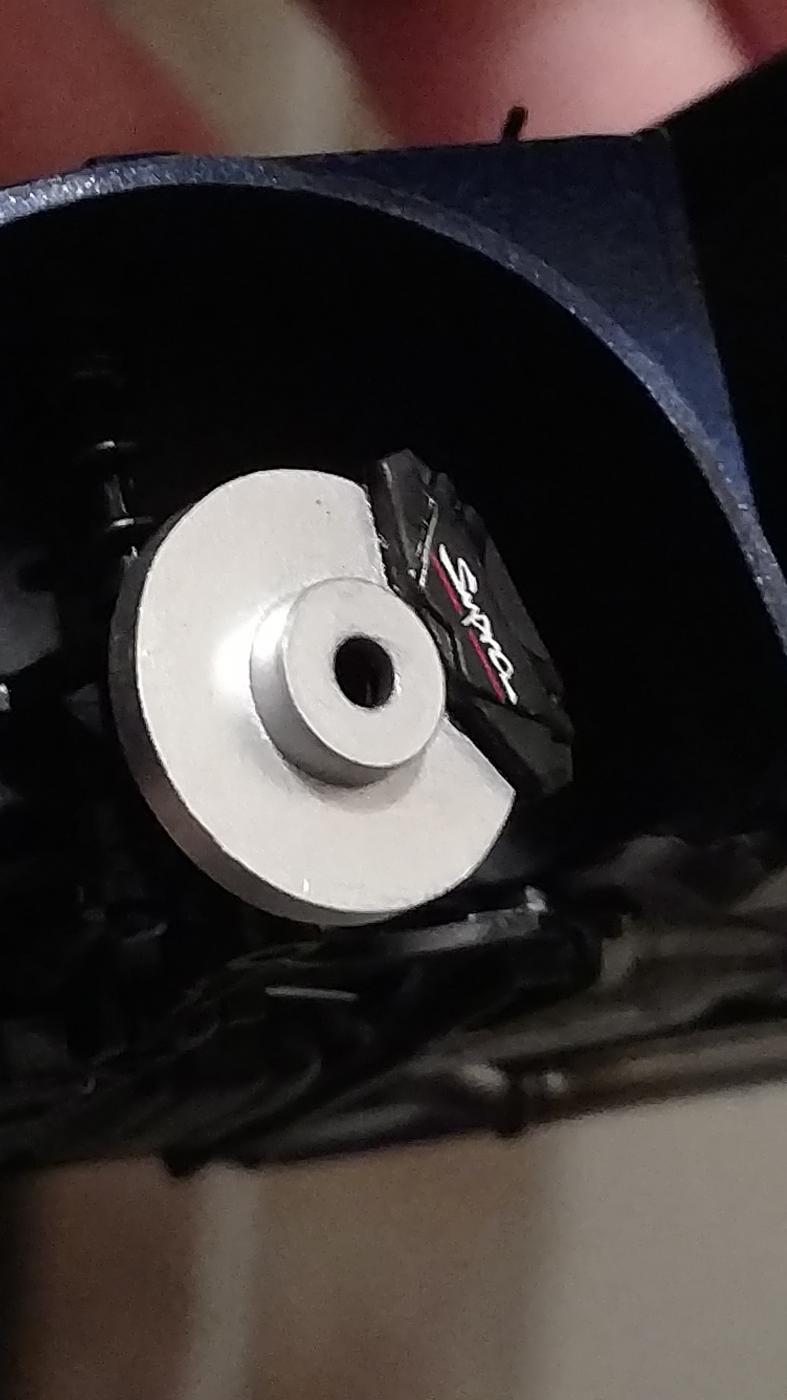
Getting closer to a rolling chassis. Brakes painted model master aluminum plate, buffed, and I did not seal them to keep them as shiny as possible. The calipers are painted Vallejo black. Decals needed a lot of Microsol to conform.
-
I'd super glue, sand and putty over the break. It would be an eye sore to me but it should hold up after that.
-
Tamiya Toyota Supra: UPDATE 6/15/17
DiscoRover007 replied to DiscoRover007's topic in WIP: Model Cars
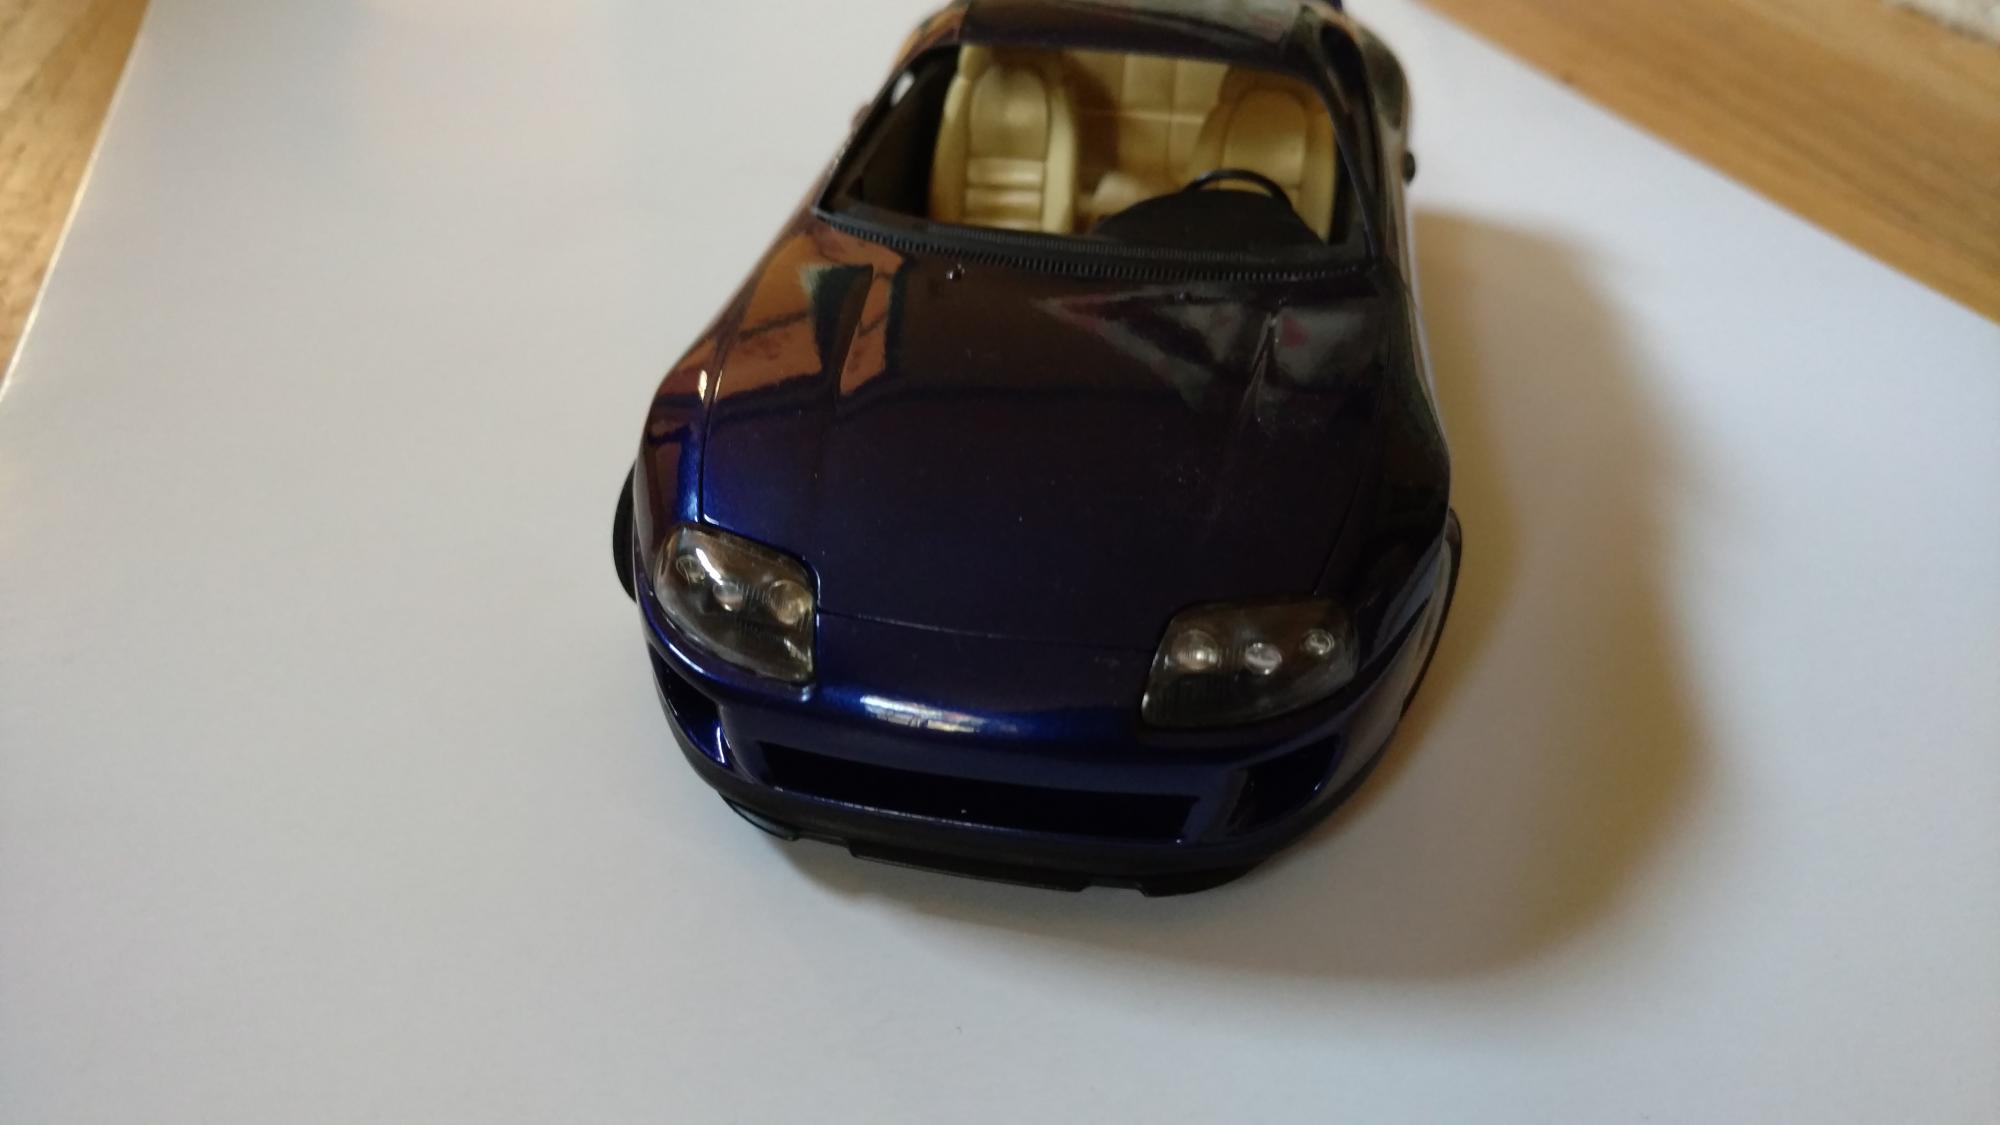
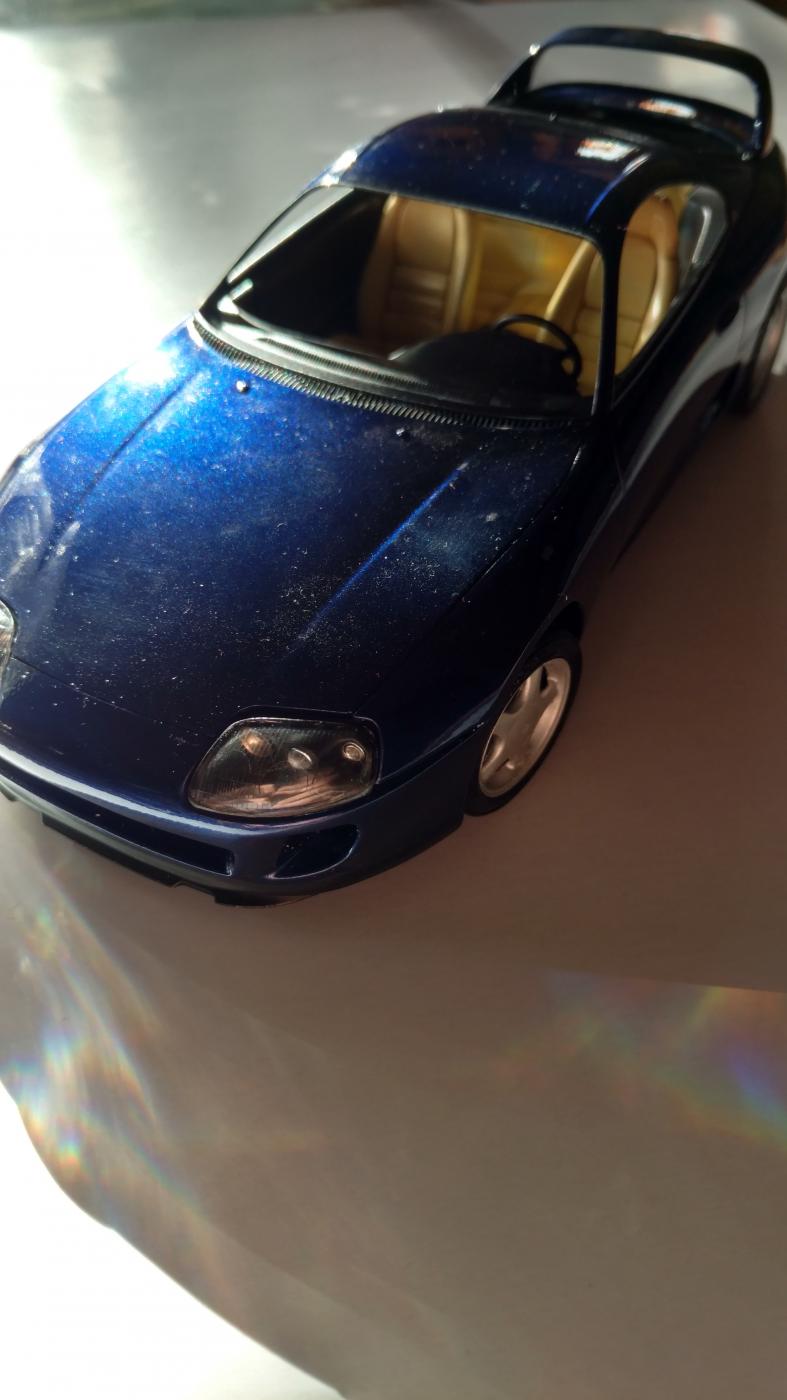
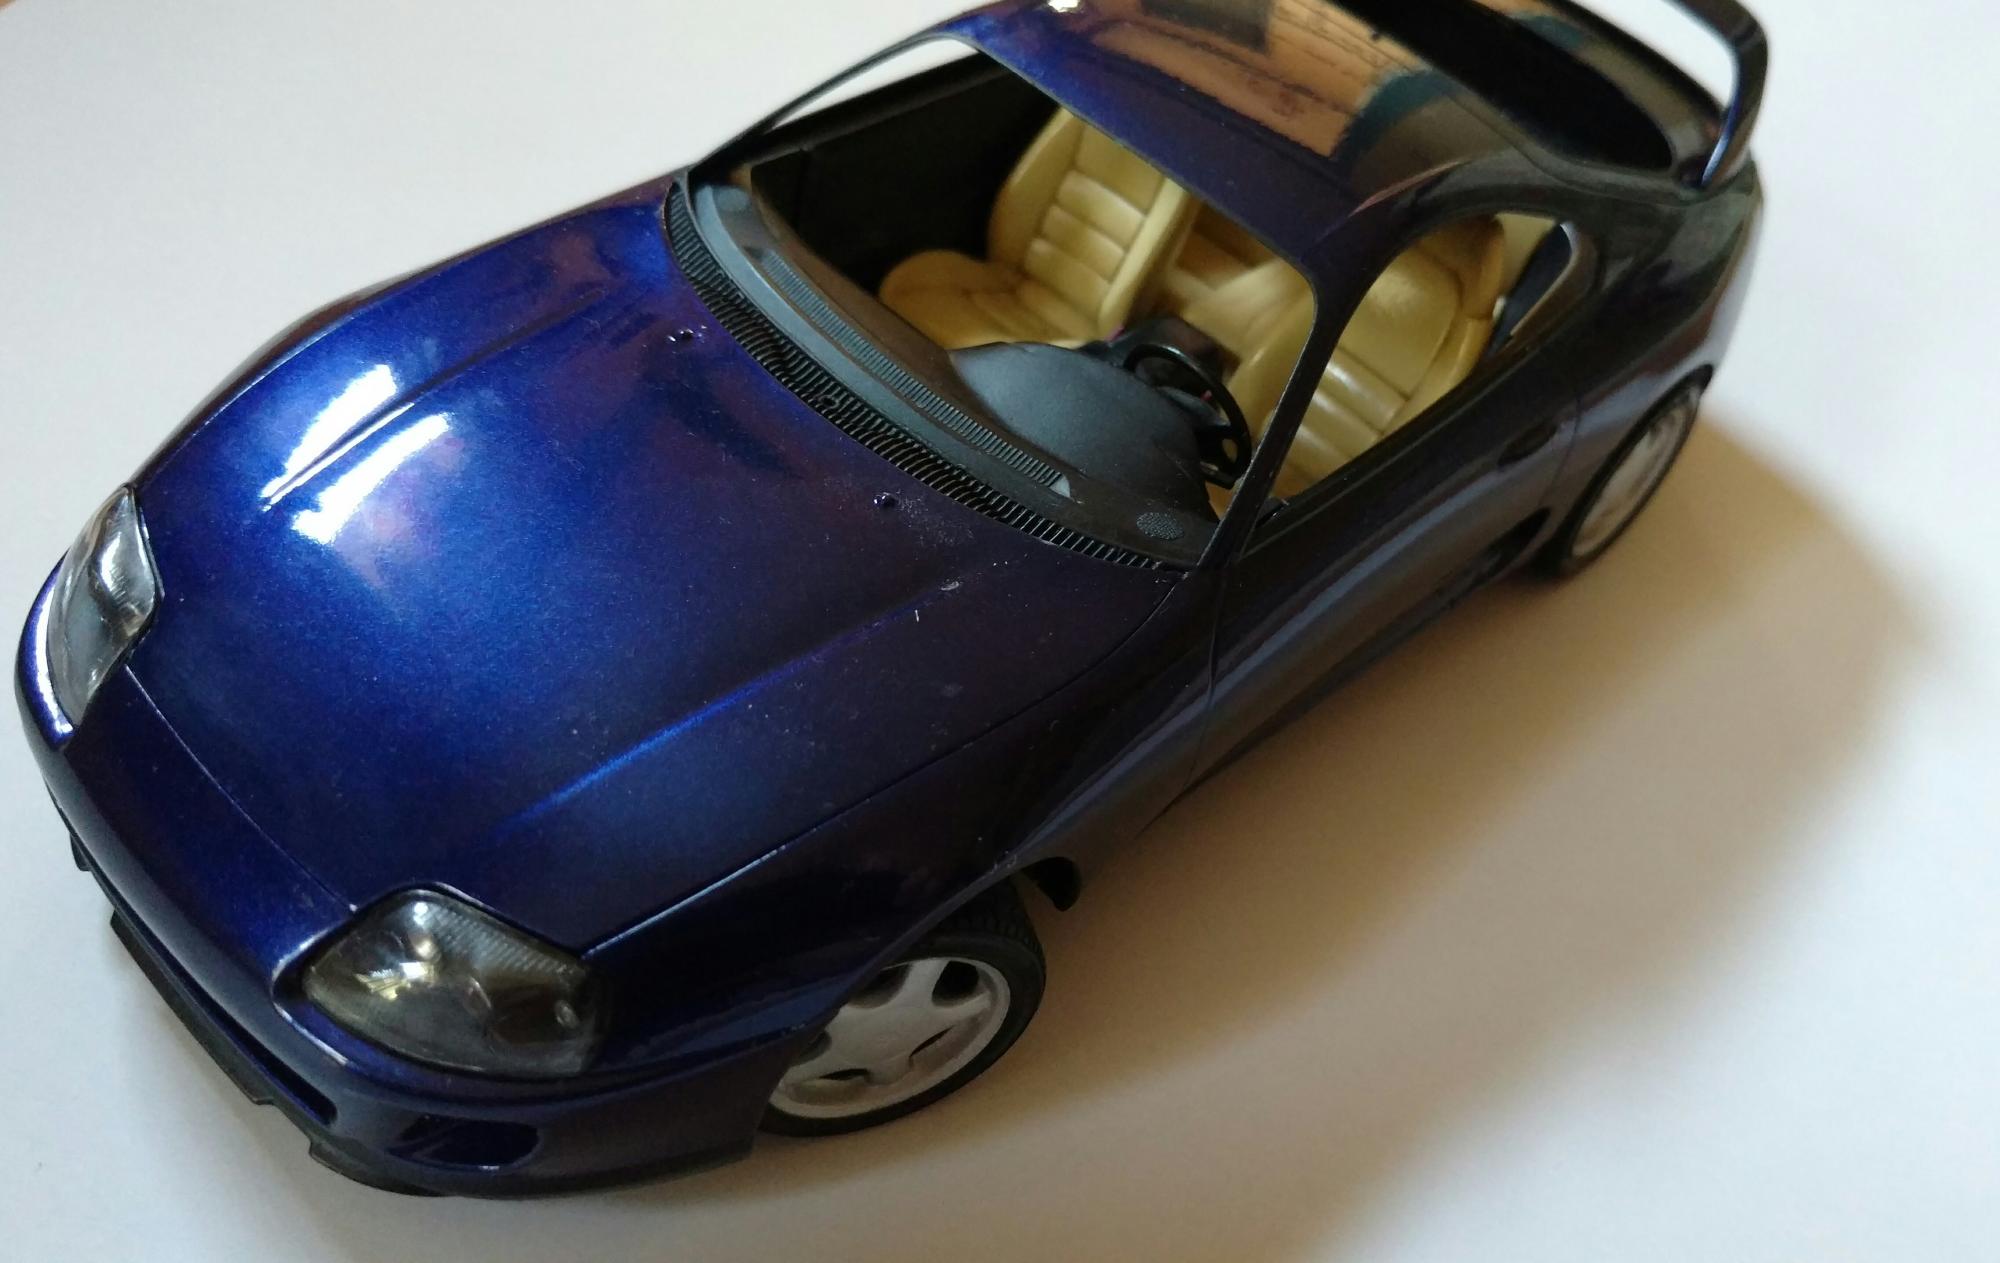
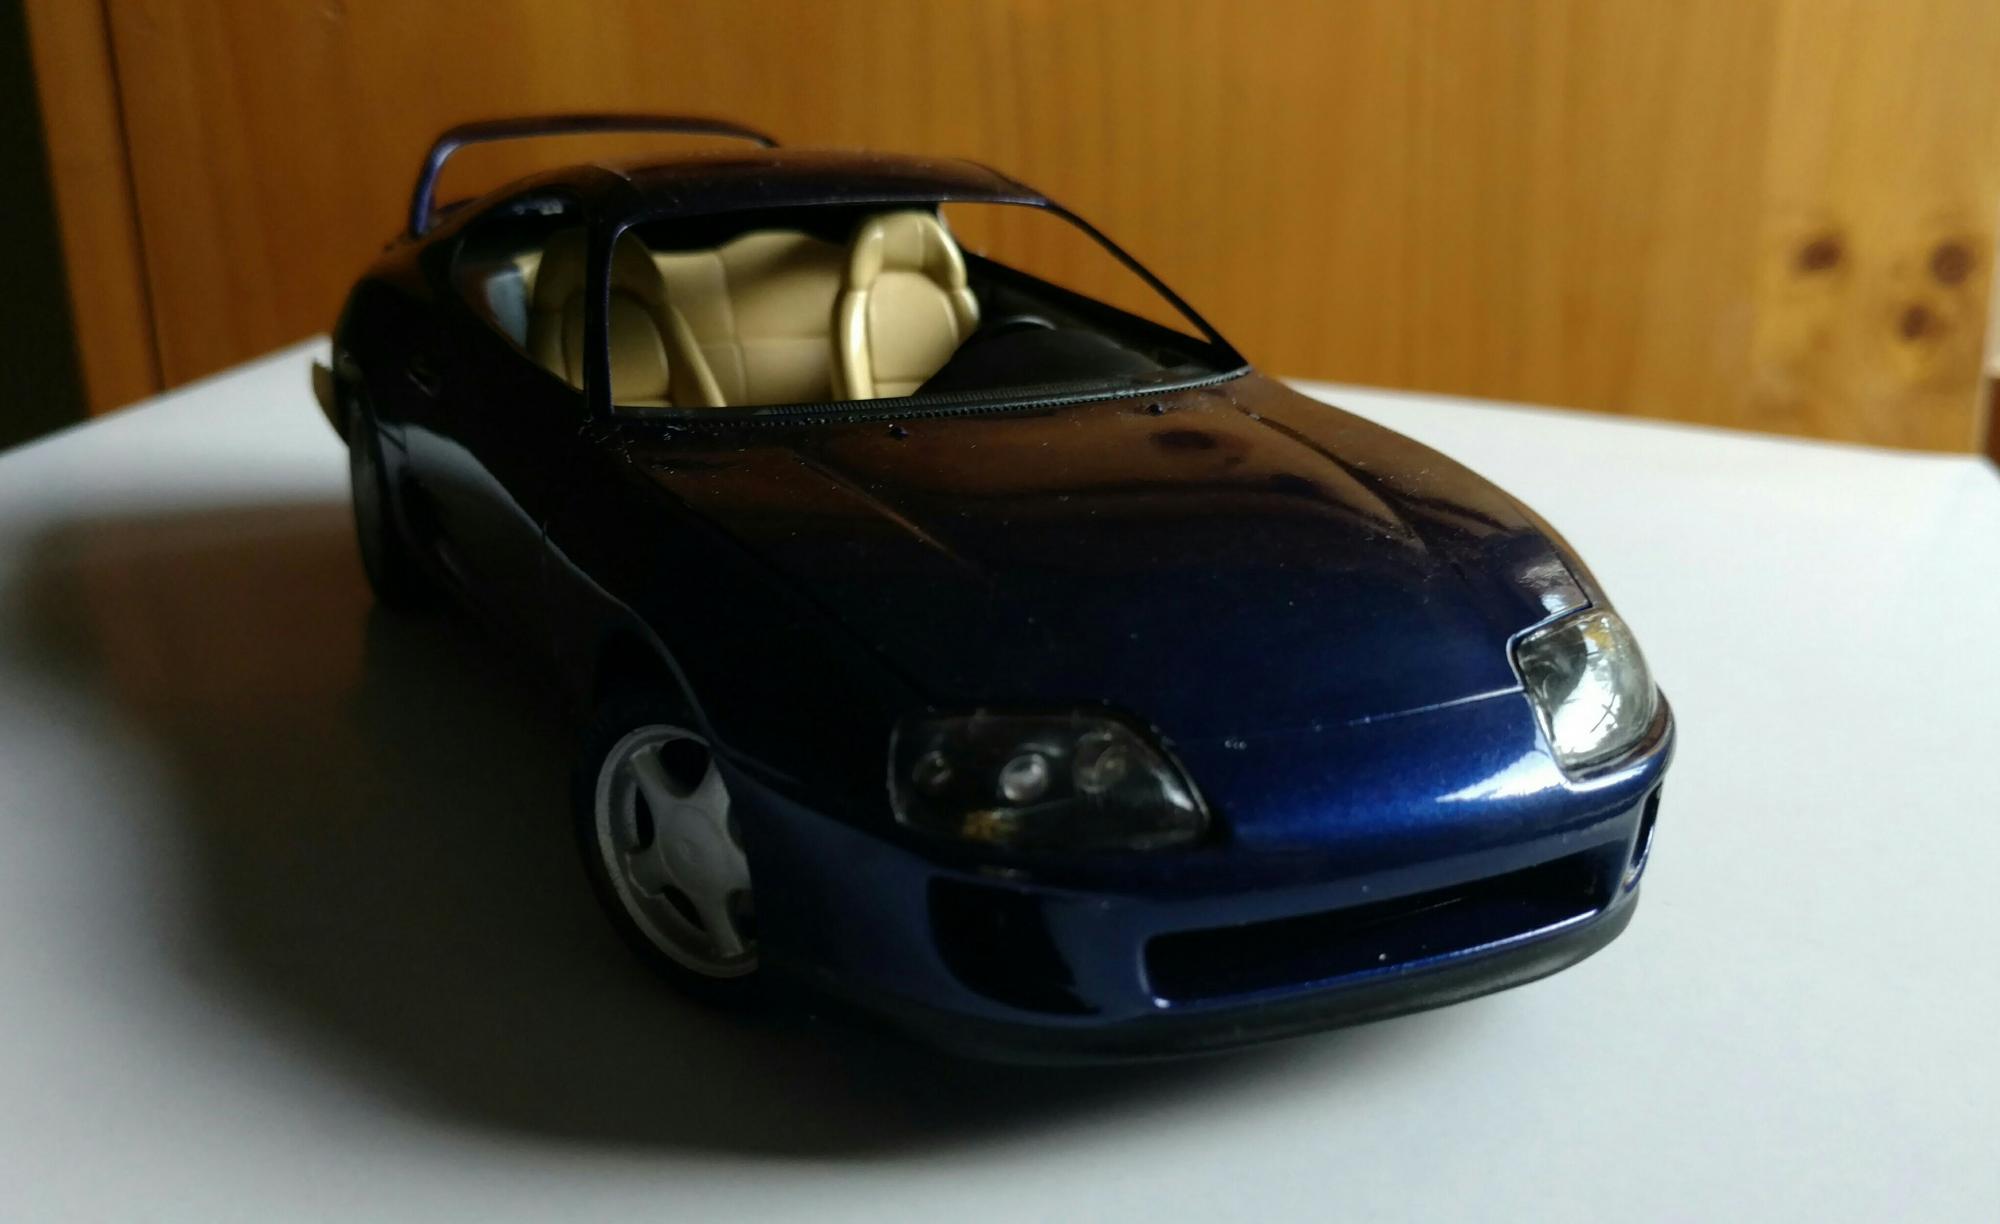
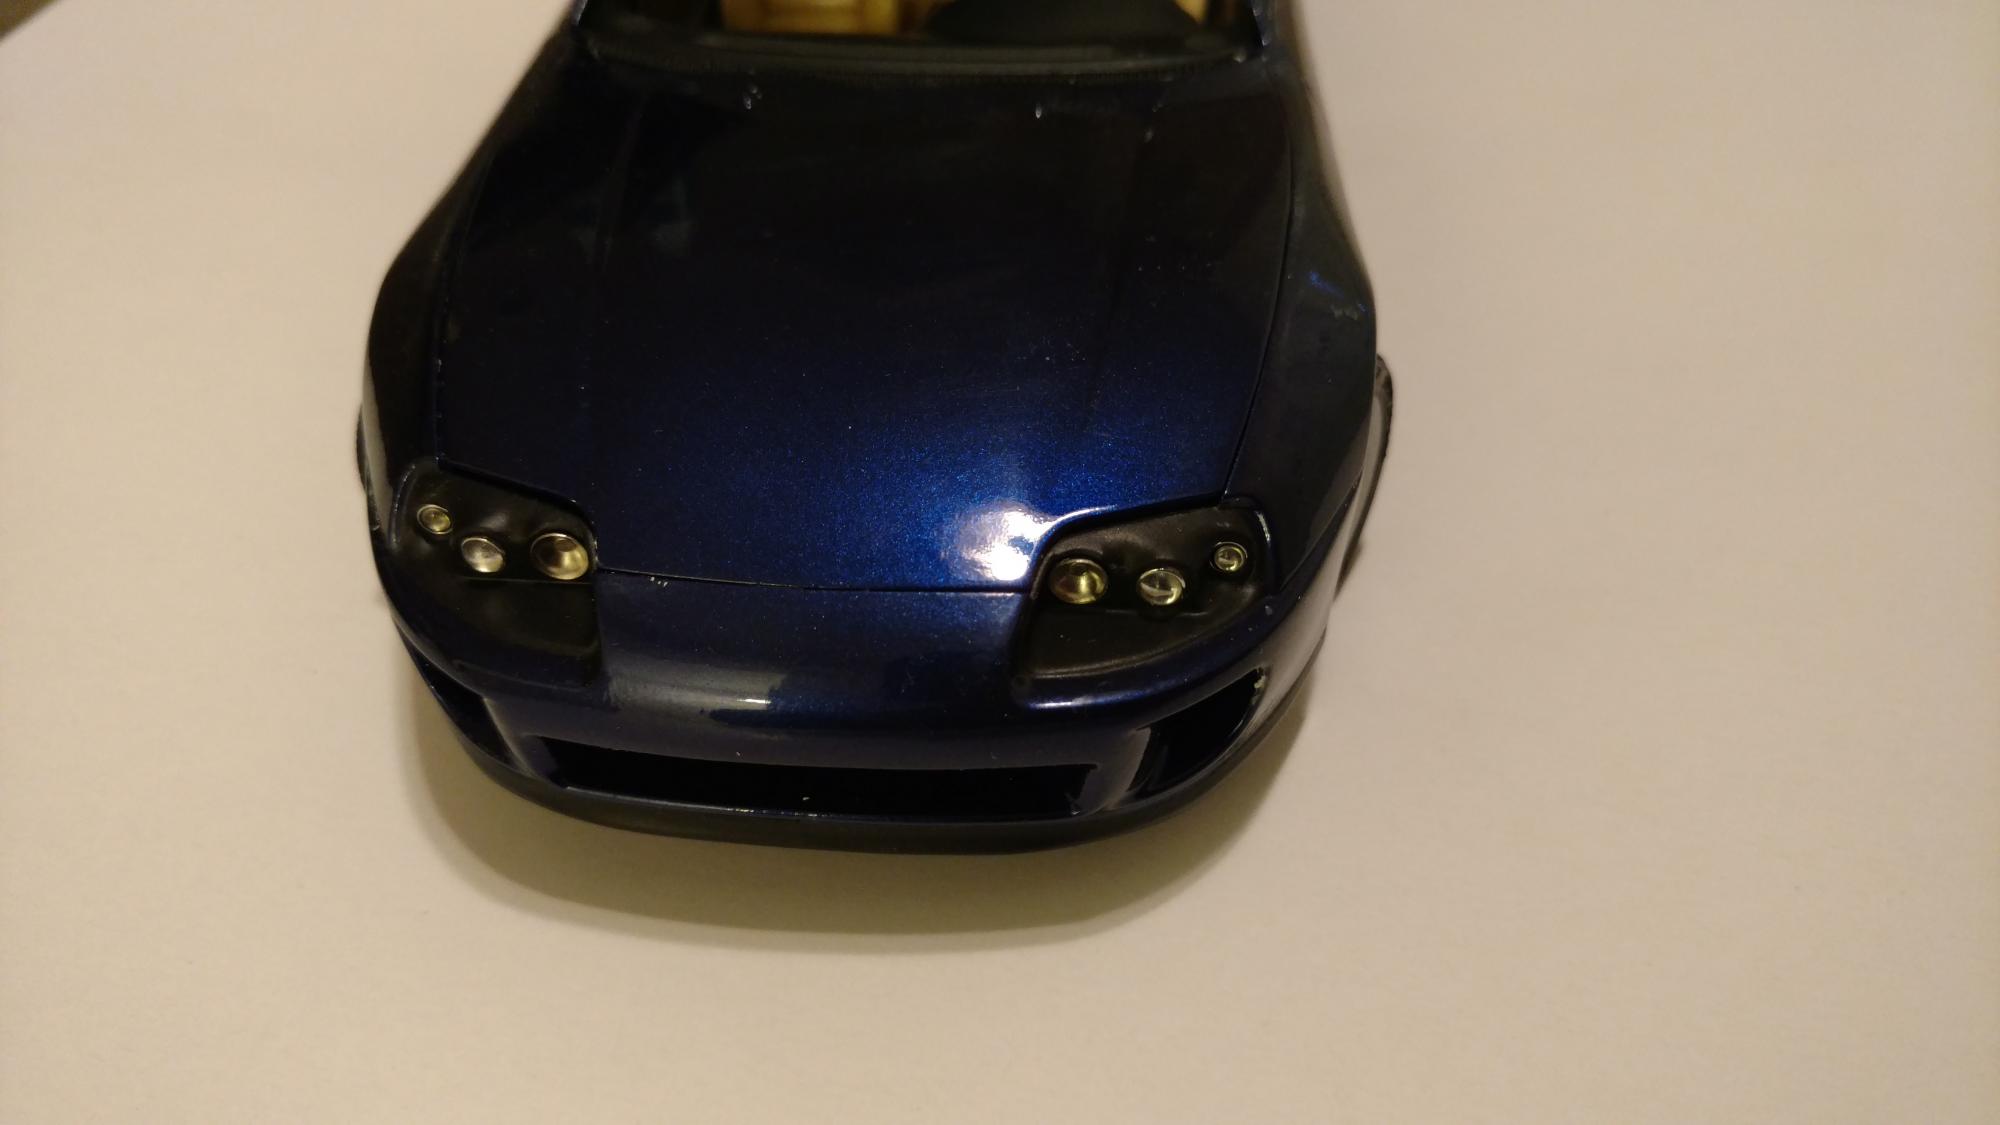
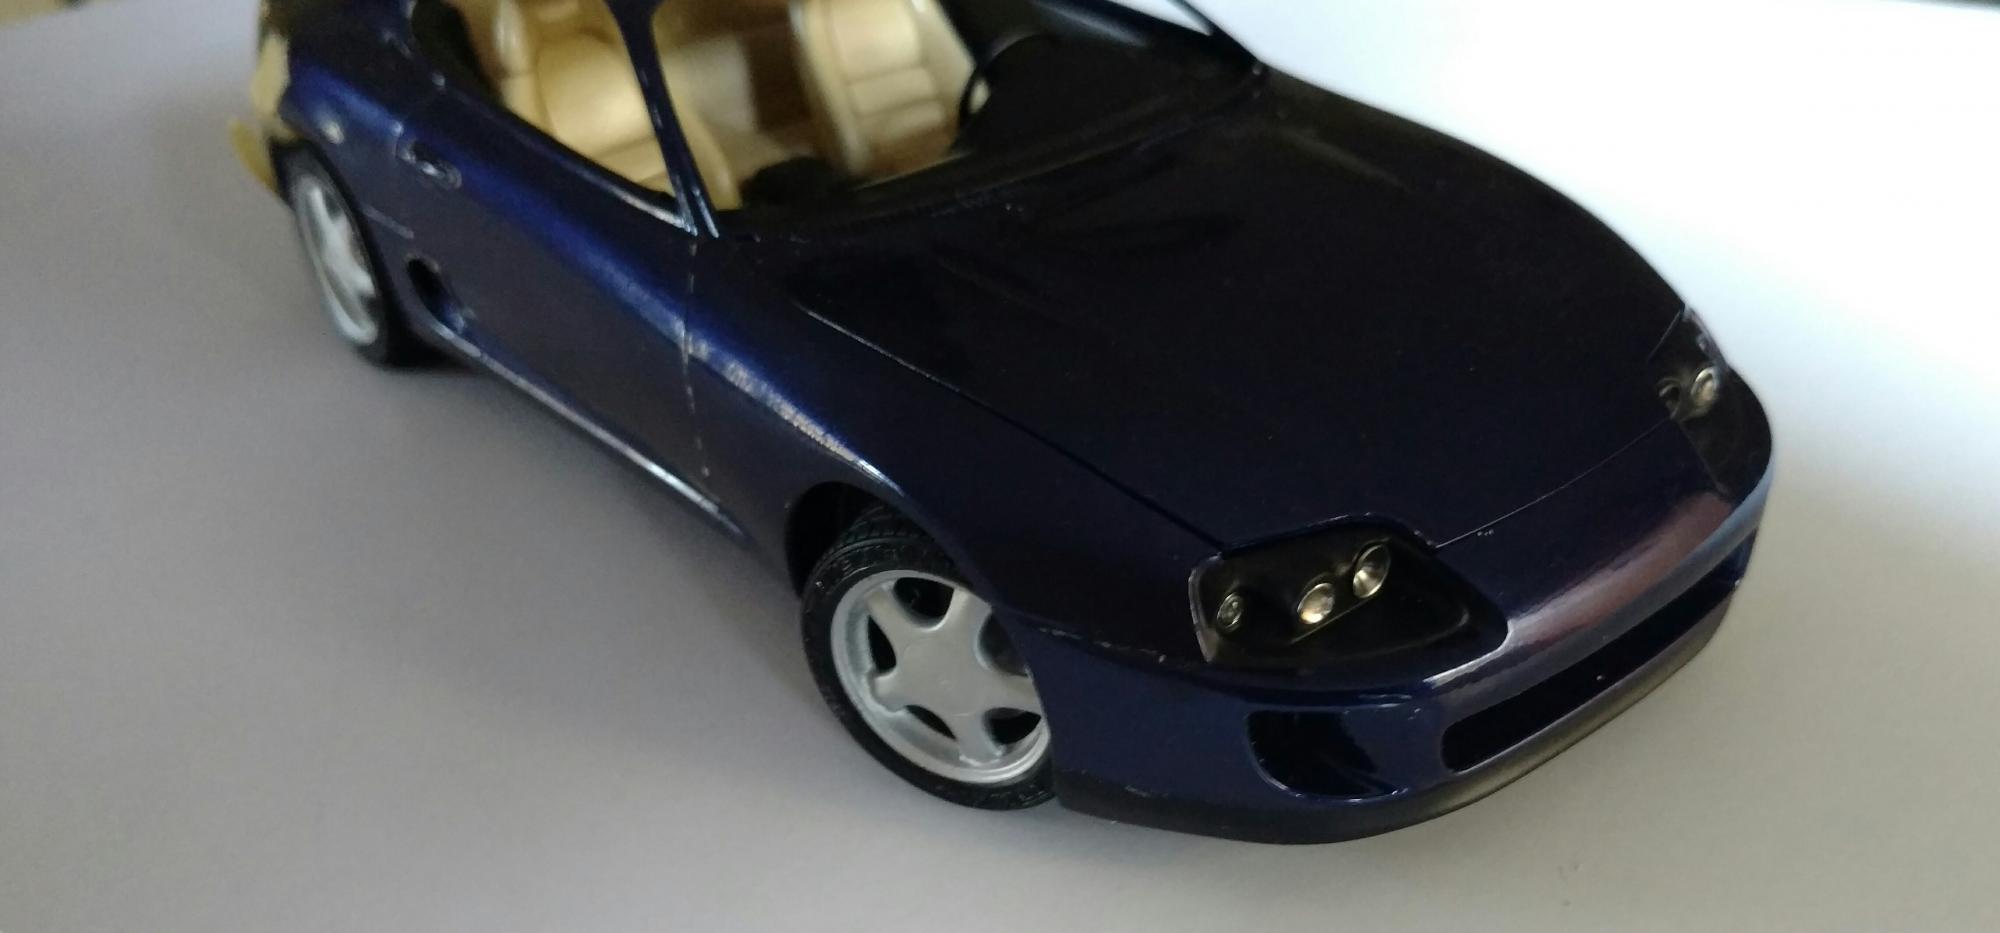
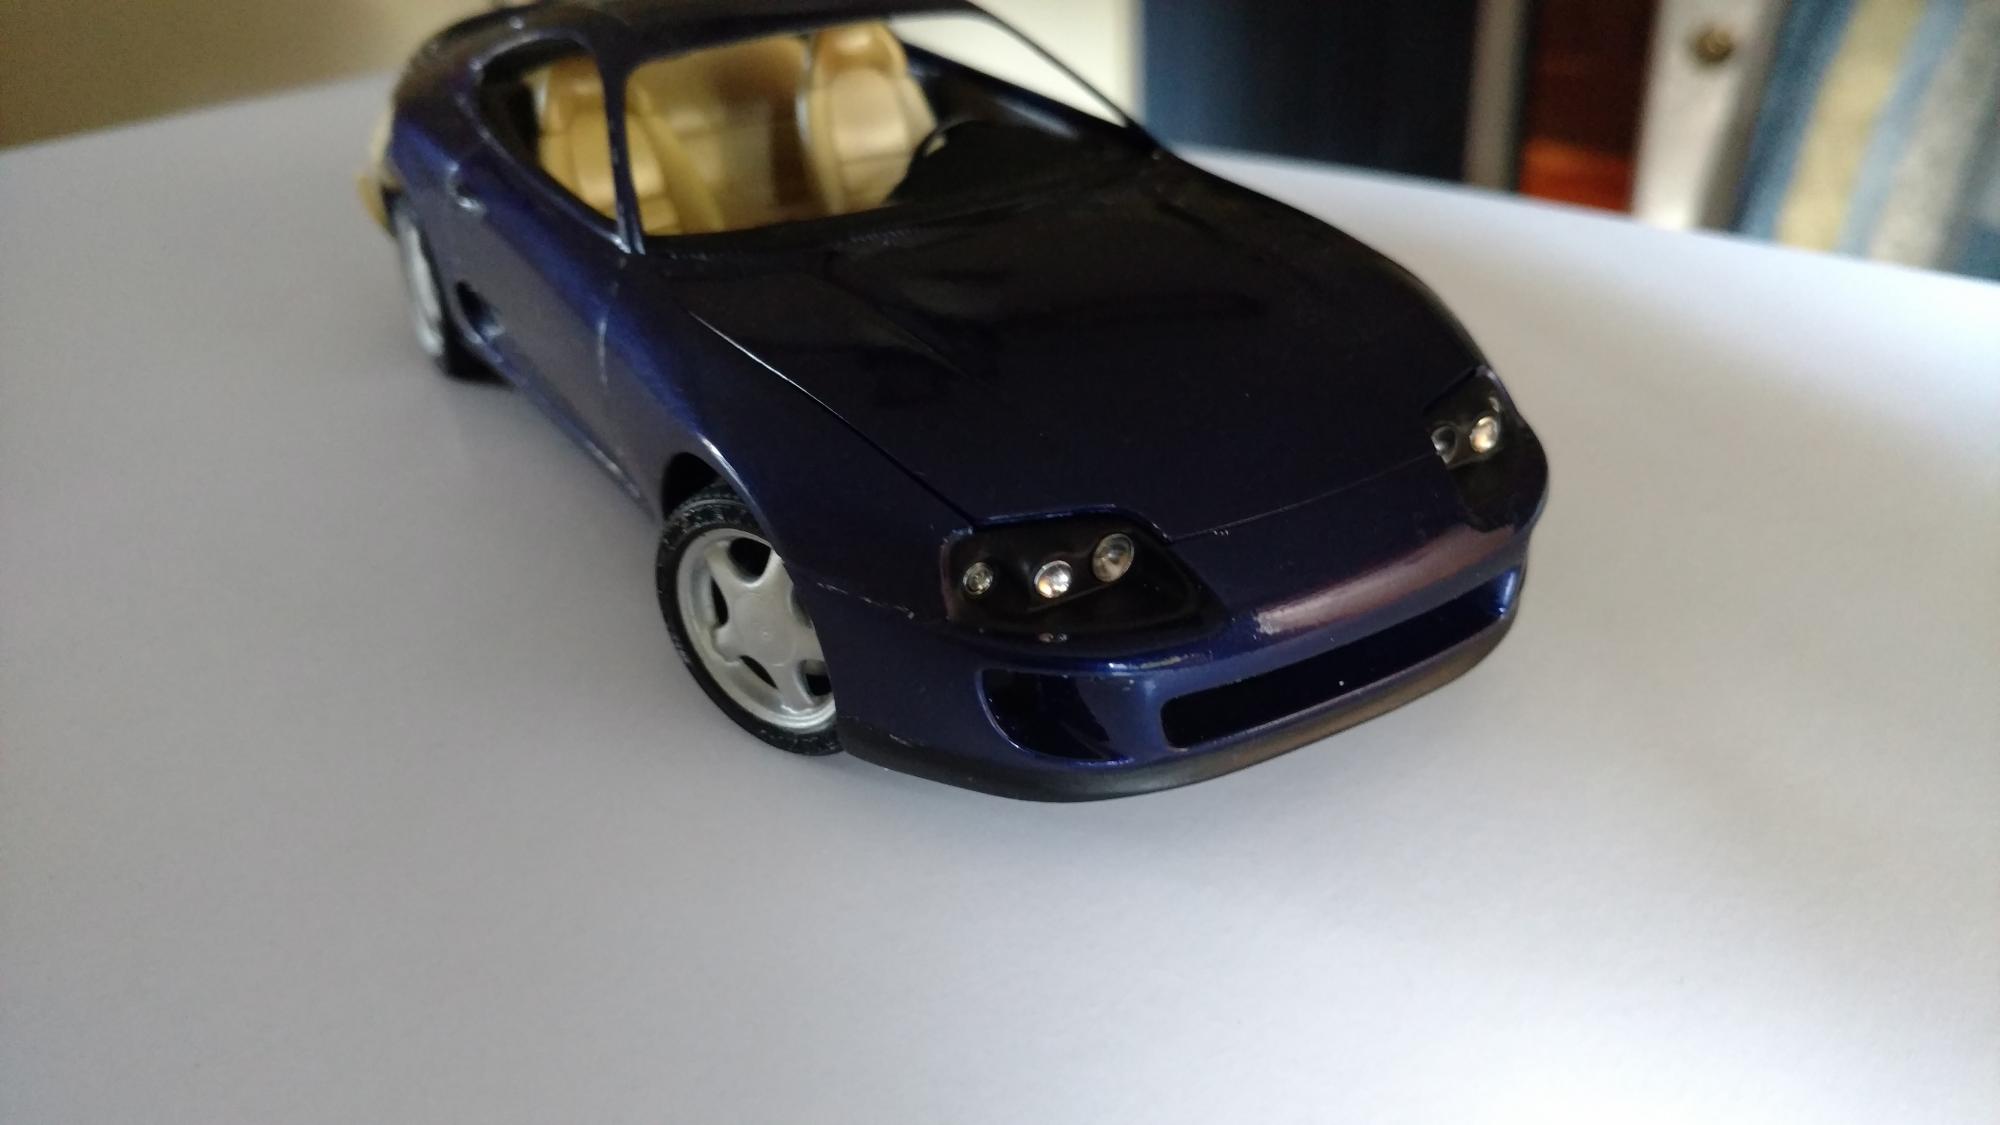
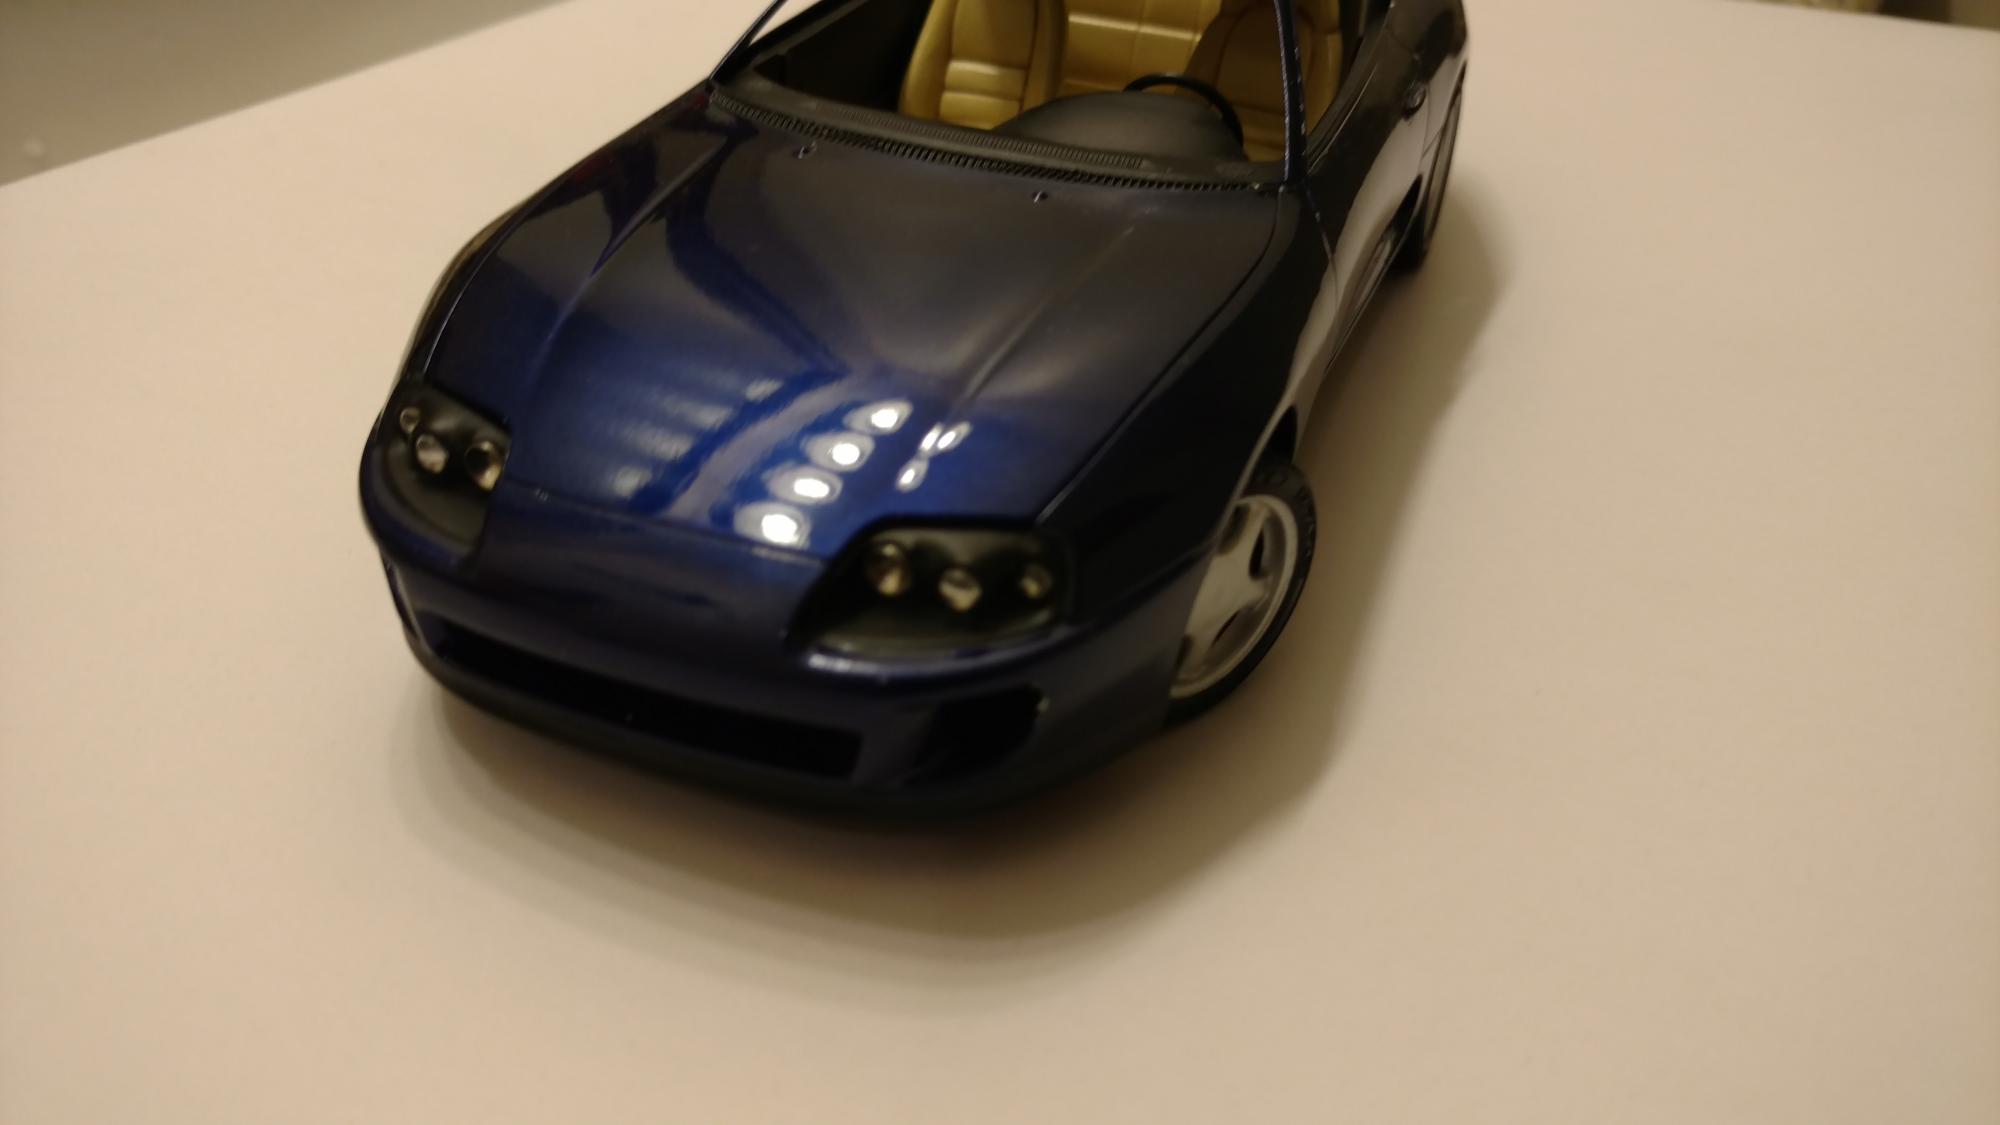
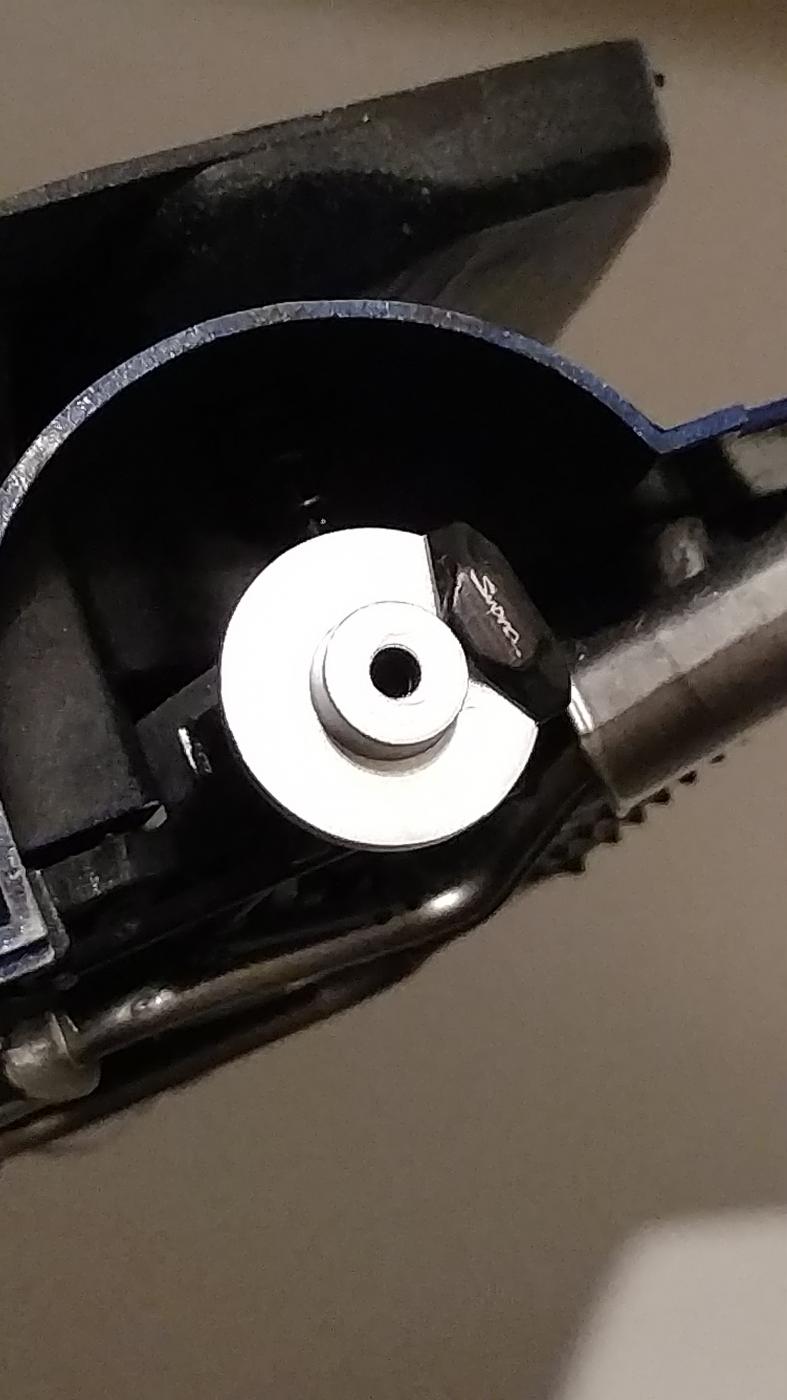
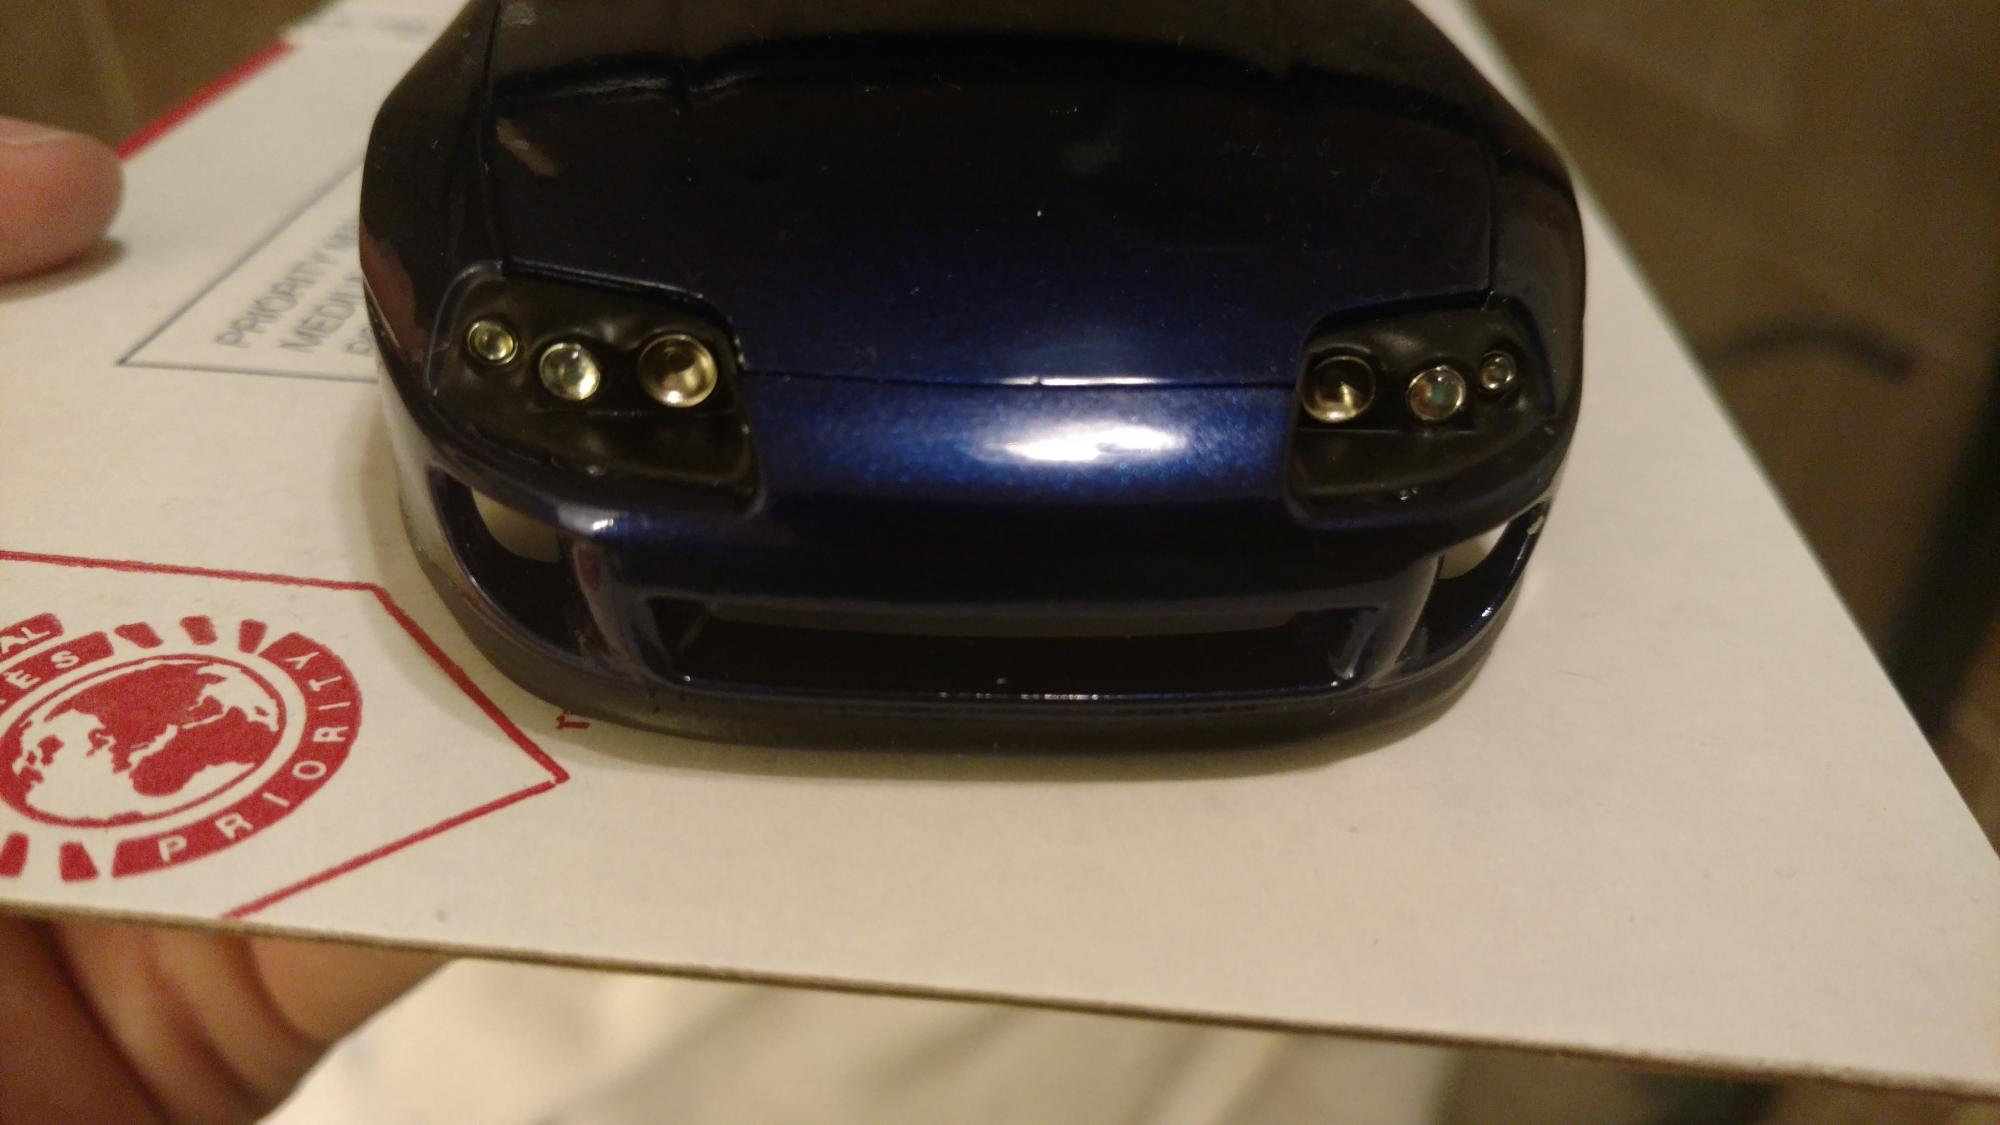
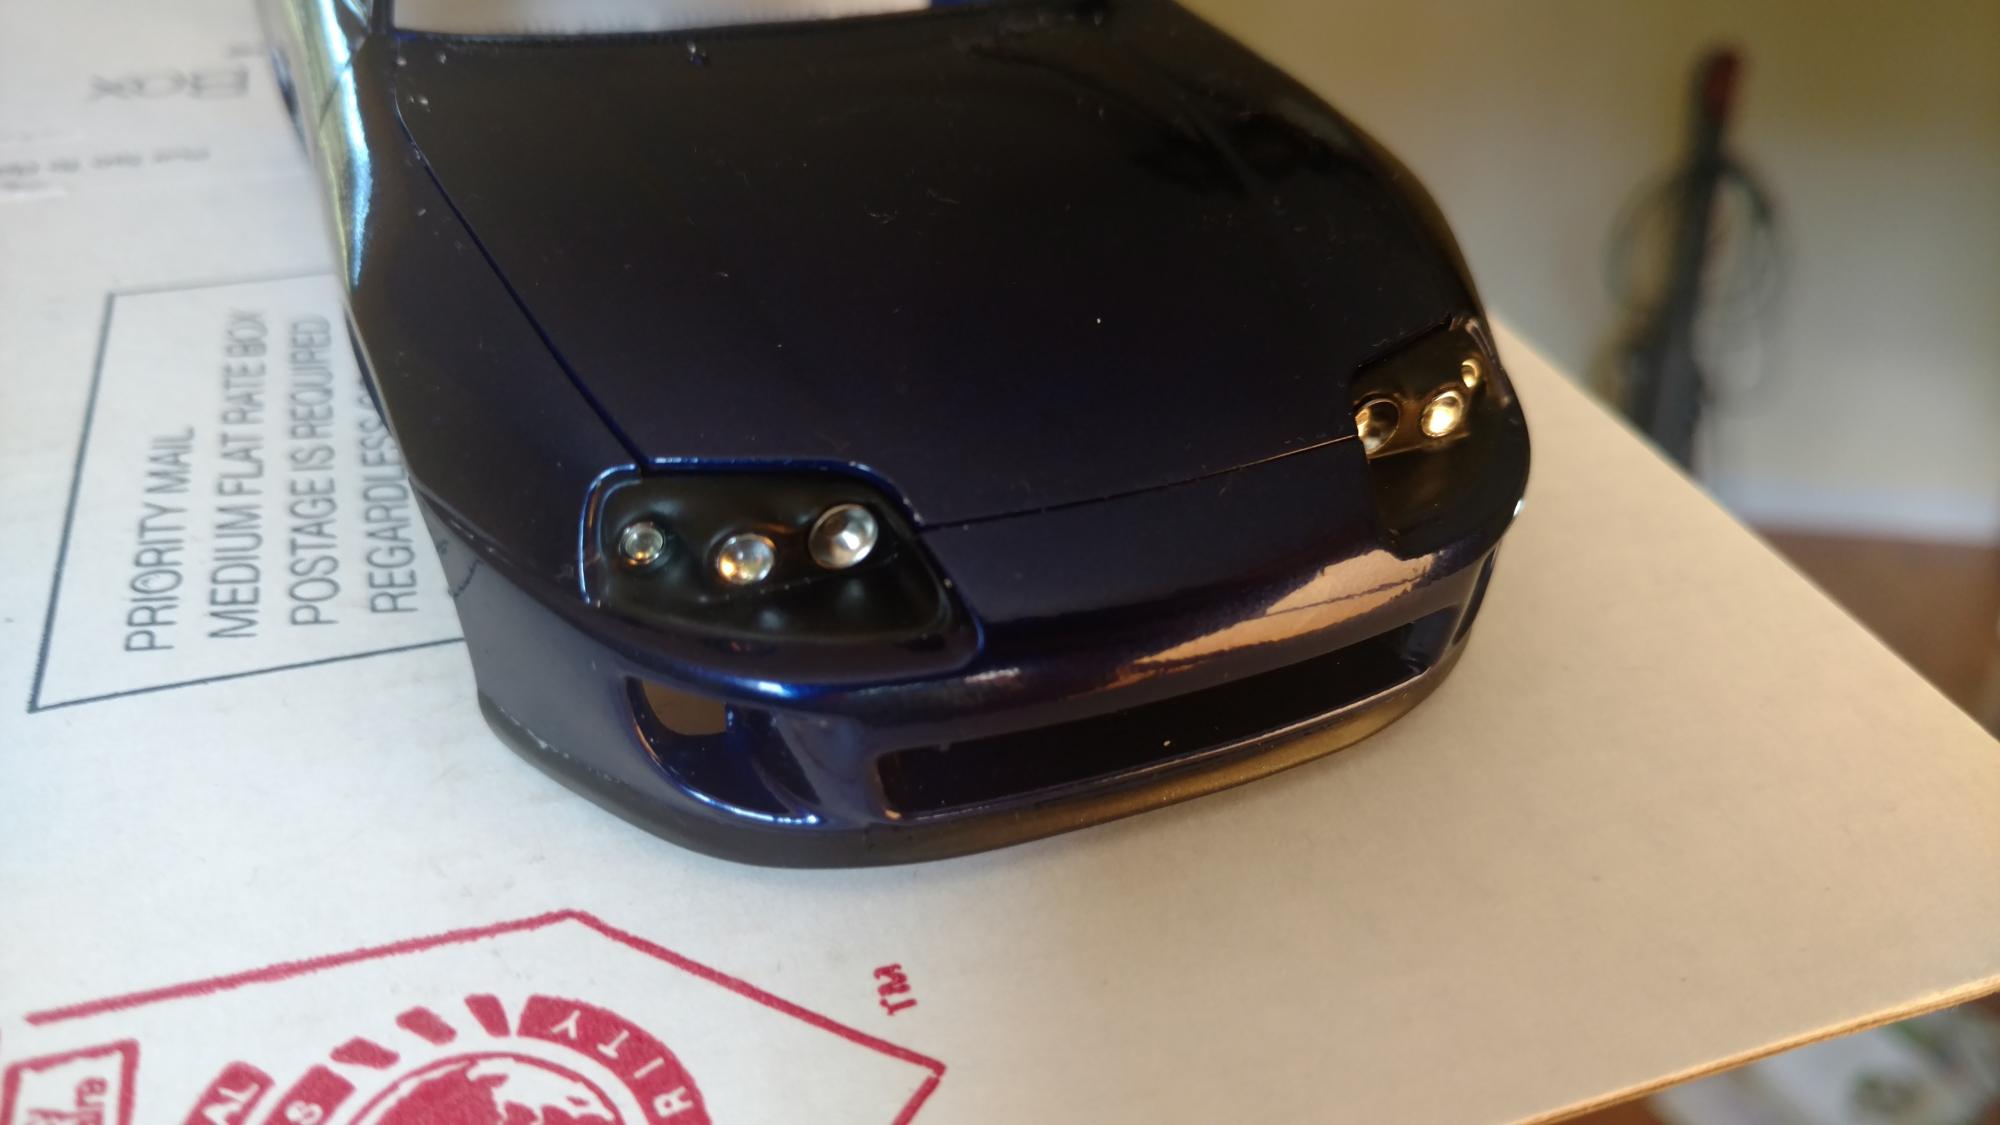
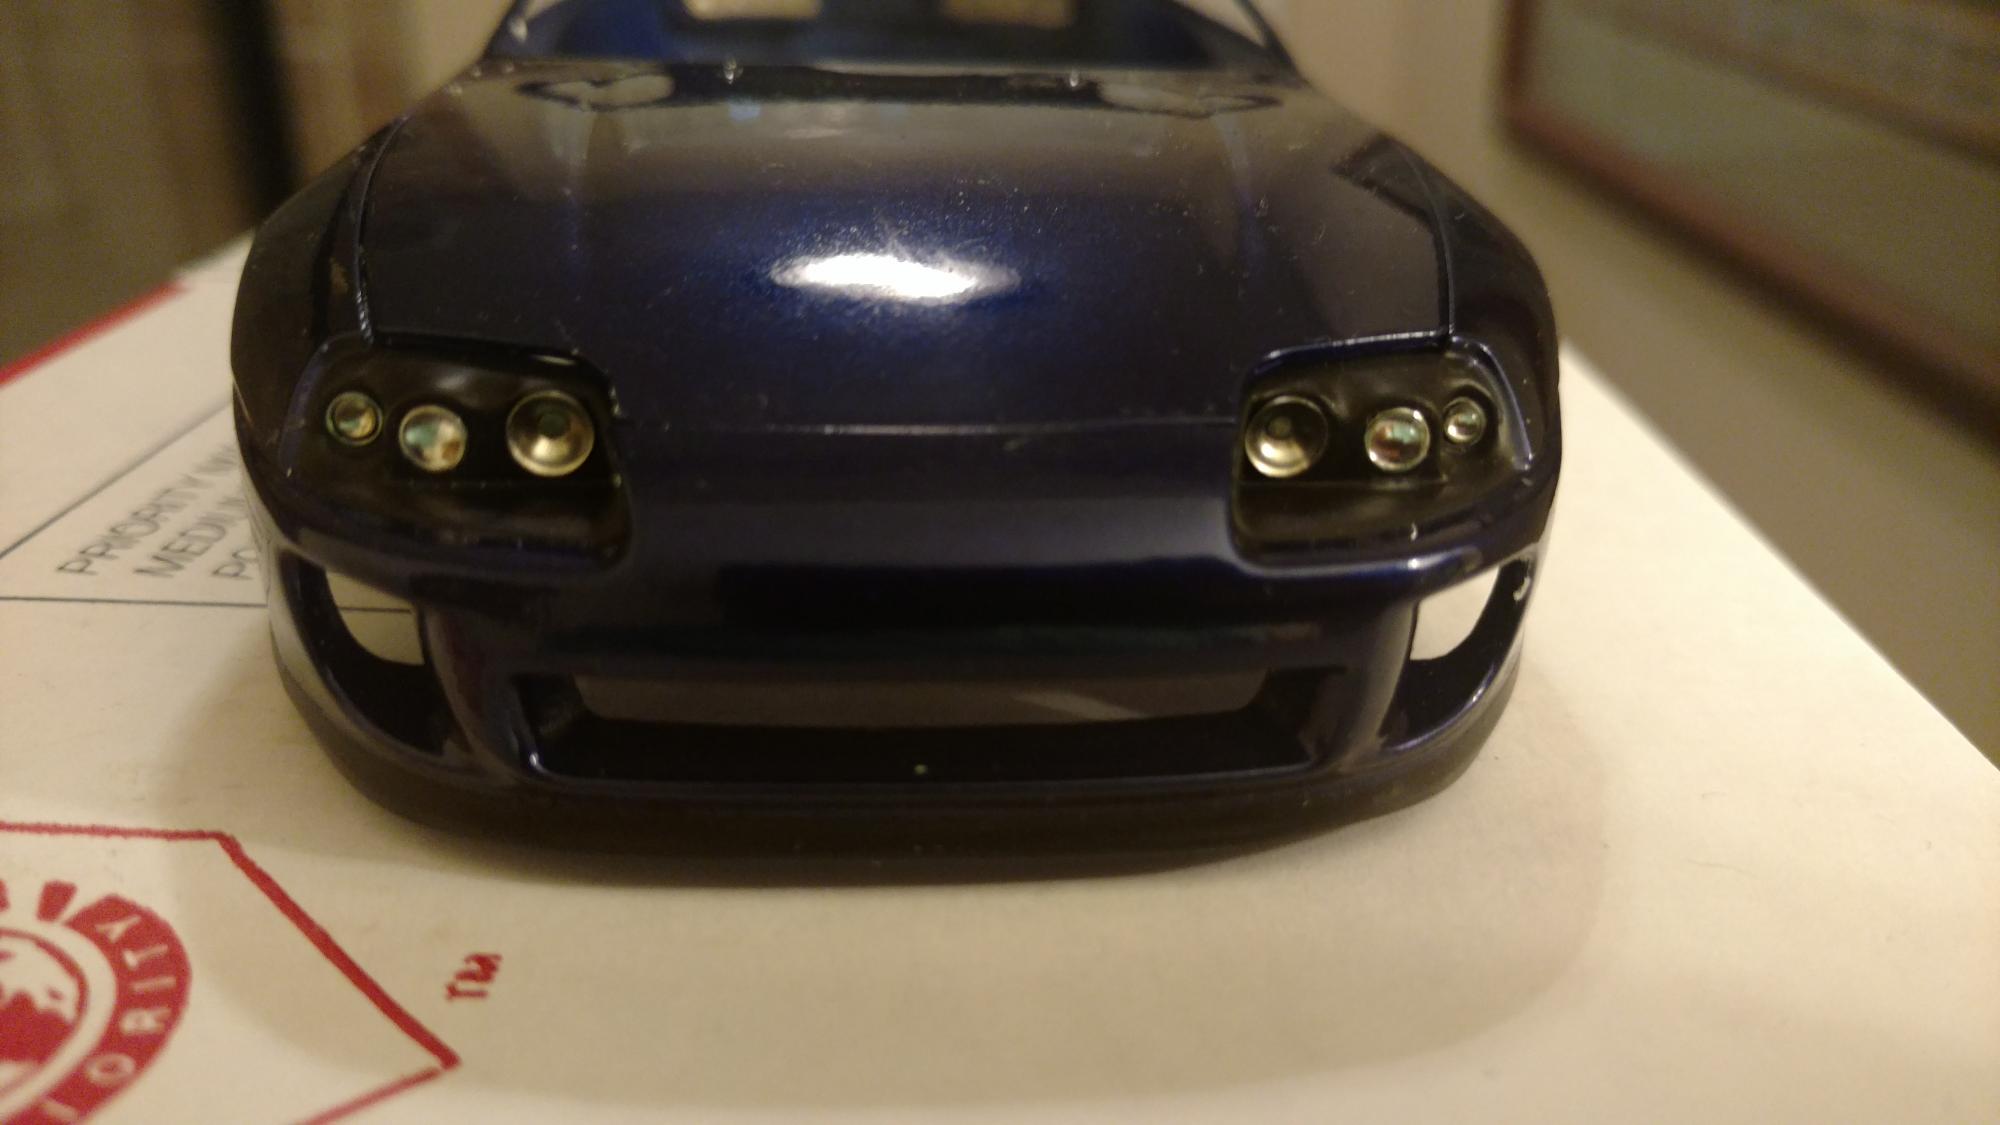
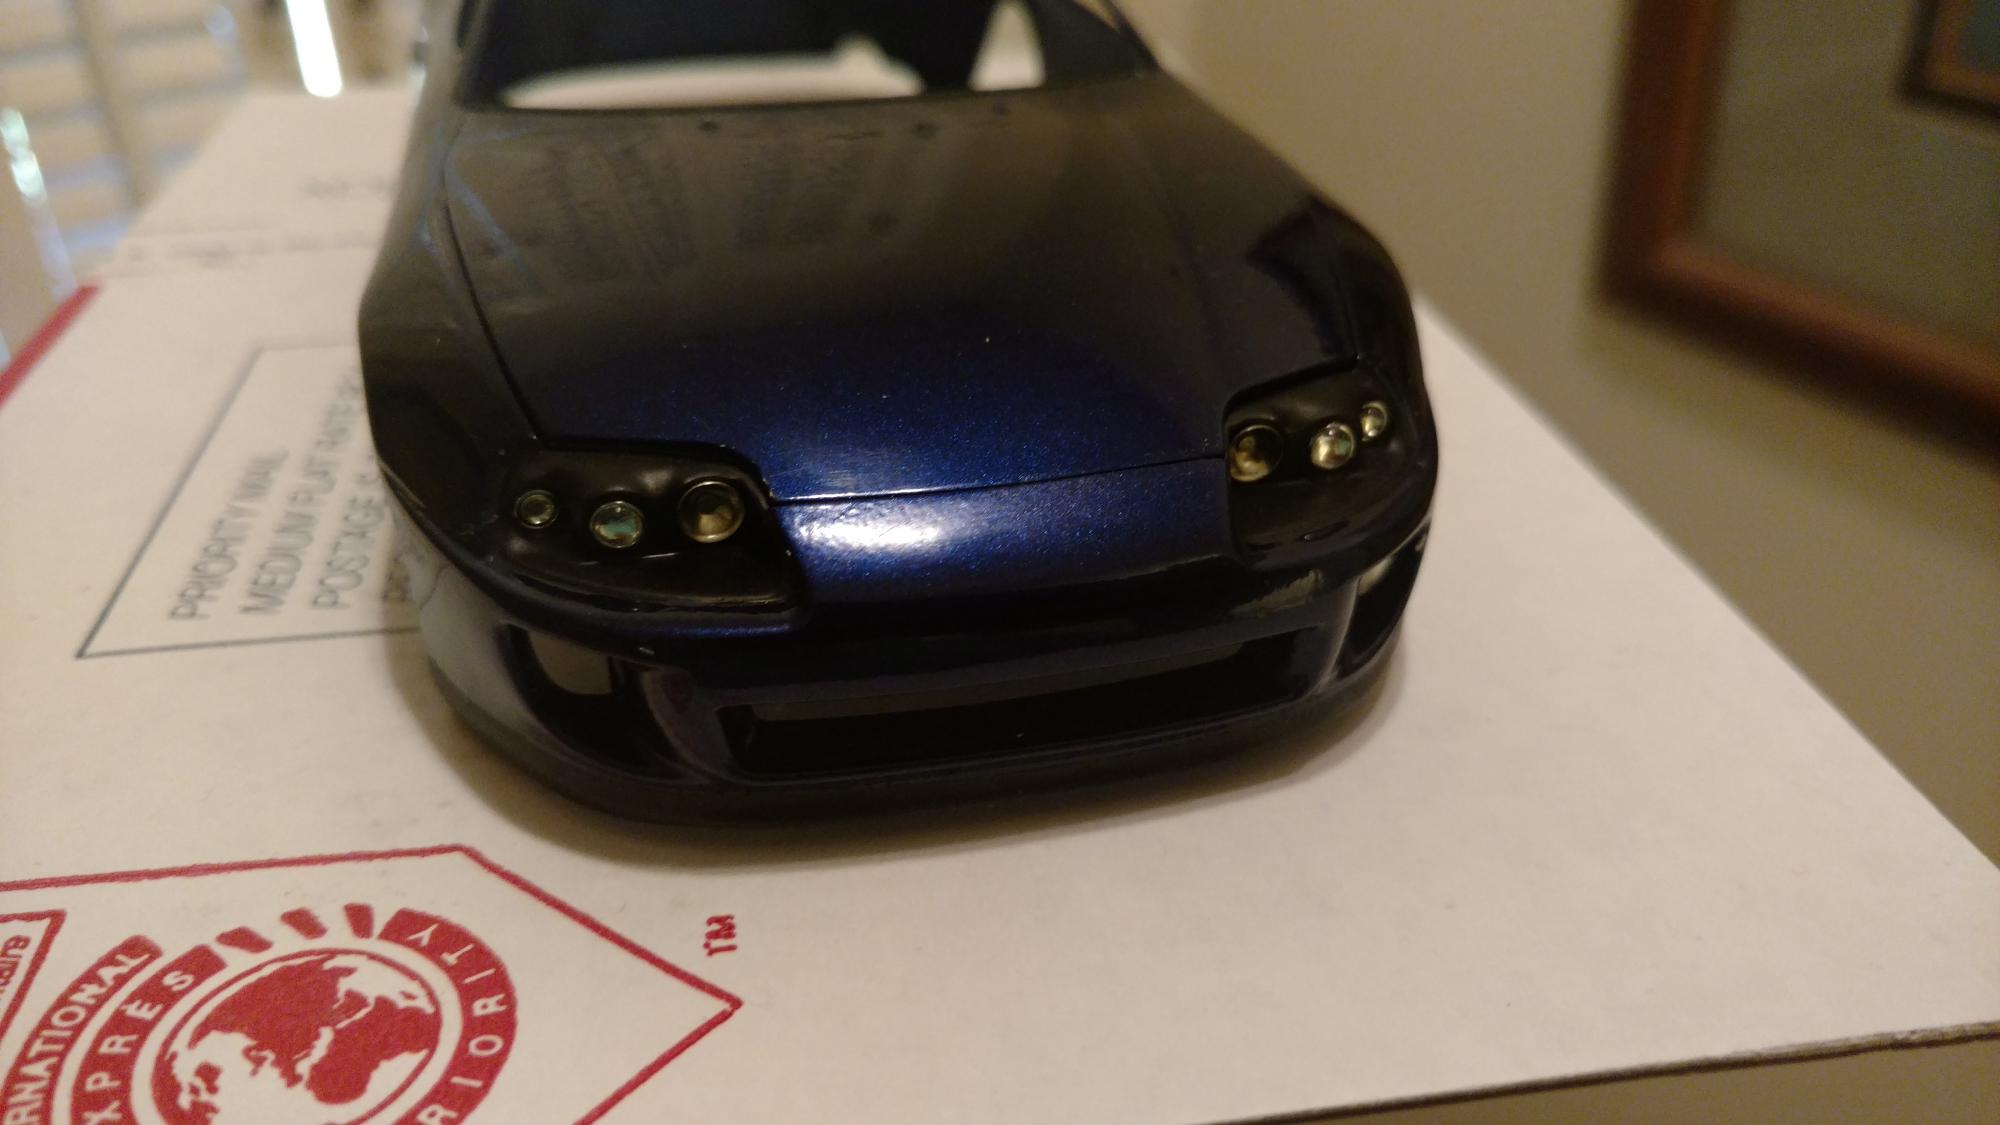
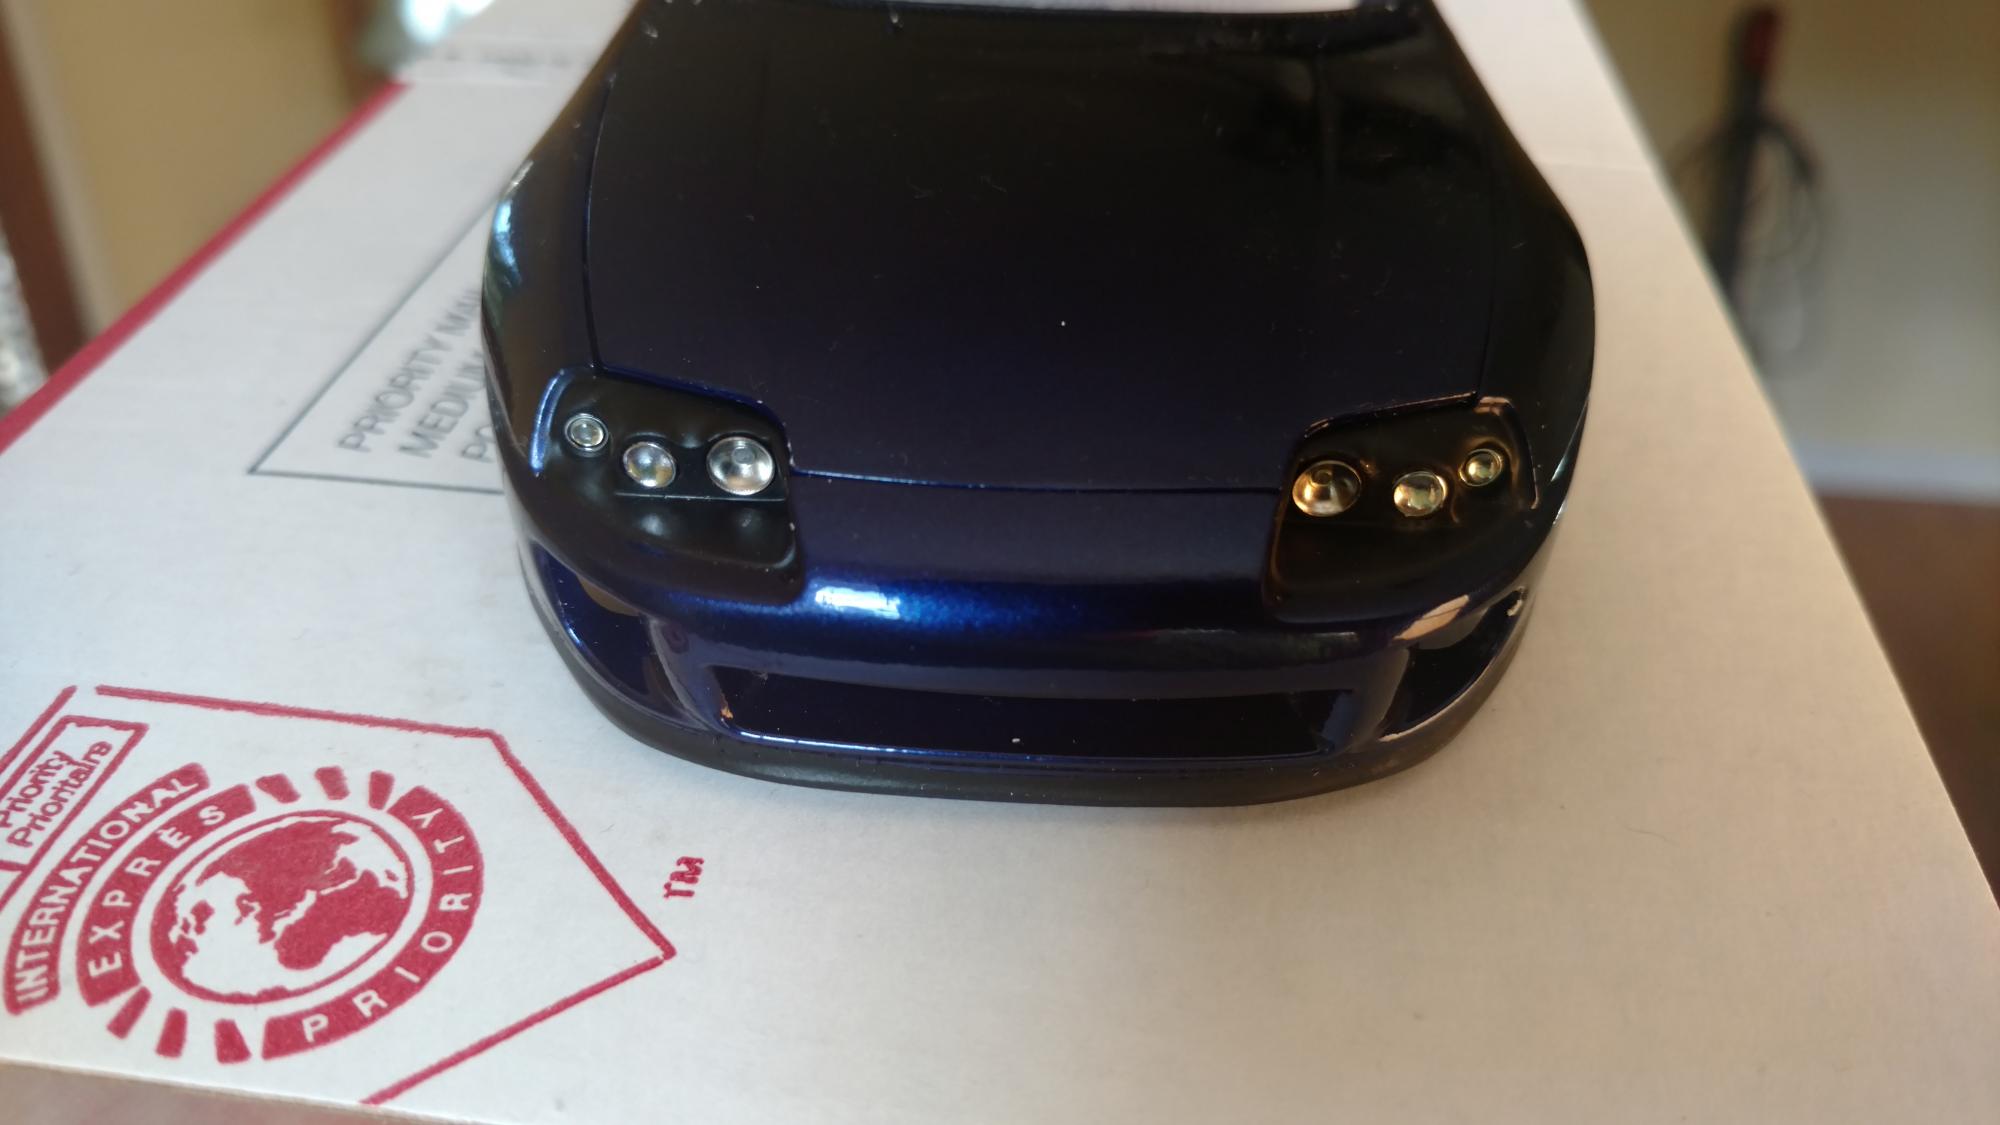
Another small update for today. Started making progress on the headlights. Painted Vallejo air black. Then I installed the zoom on model headlight upgrade. They include 3 sets if parts and 2 metal transfer rings to replicate the supra headlights more accurately. Of the few faults this model has, the headlights are the most glaring one. Probably due to the technology of kit making at the time. But ZoomOn did a great job with these.
-
Tamiya Mitsubishi 3000GT VR4 (UPDATE:UNDER GLASS 11-4-16)
DiscoRover007 replied to lghtngyello03's topic in WIP: Model Cars
Looking pretty -
Tamiya Toyota Supra: UPDATE 6/15/17
DiscoRover007 replied to DiscoRover007's topic in WIP: Model Cars
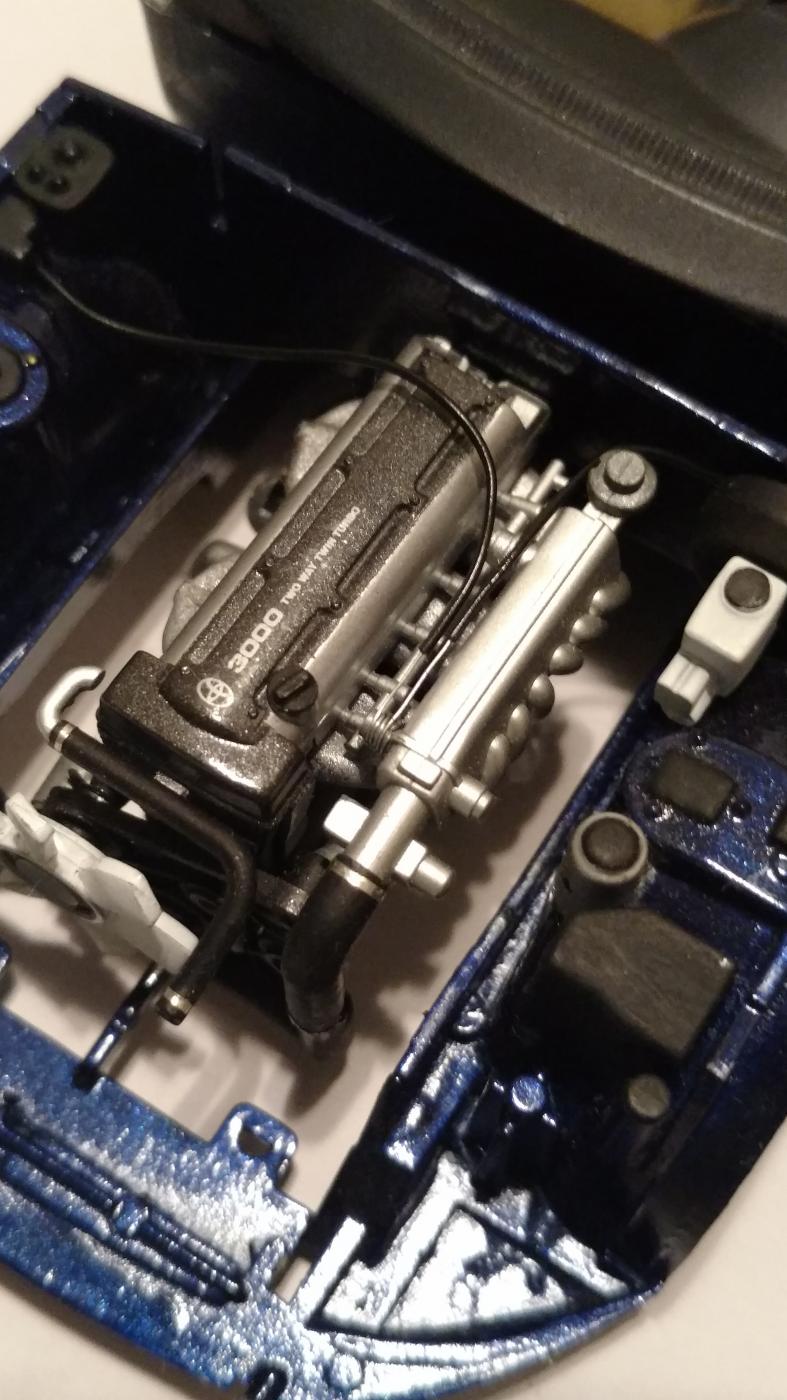
Yep sure did. Not completely though. Just enough to securely place the metal wire inside. The cable on the left was glued but the one right isnt so it can be slightly adjusted. Made it easier to install. I actua made another one since this post. The new cable looks a little more straight. -
Tamiya Toyota Supra: UPDATE 6/15/17
DiscoRover007 replied to DiscoRover007's topic in WIP: Model Cars
Reference
-
Tamiya Toyota Supra: UPDATE 6/15/17
DiscoRover007 replied to DiscoRover007's topic in WIP: Model Cars
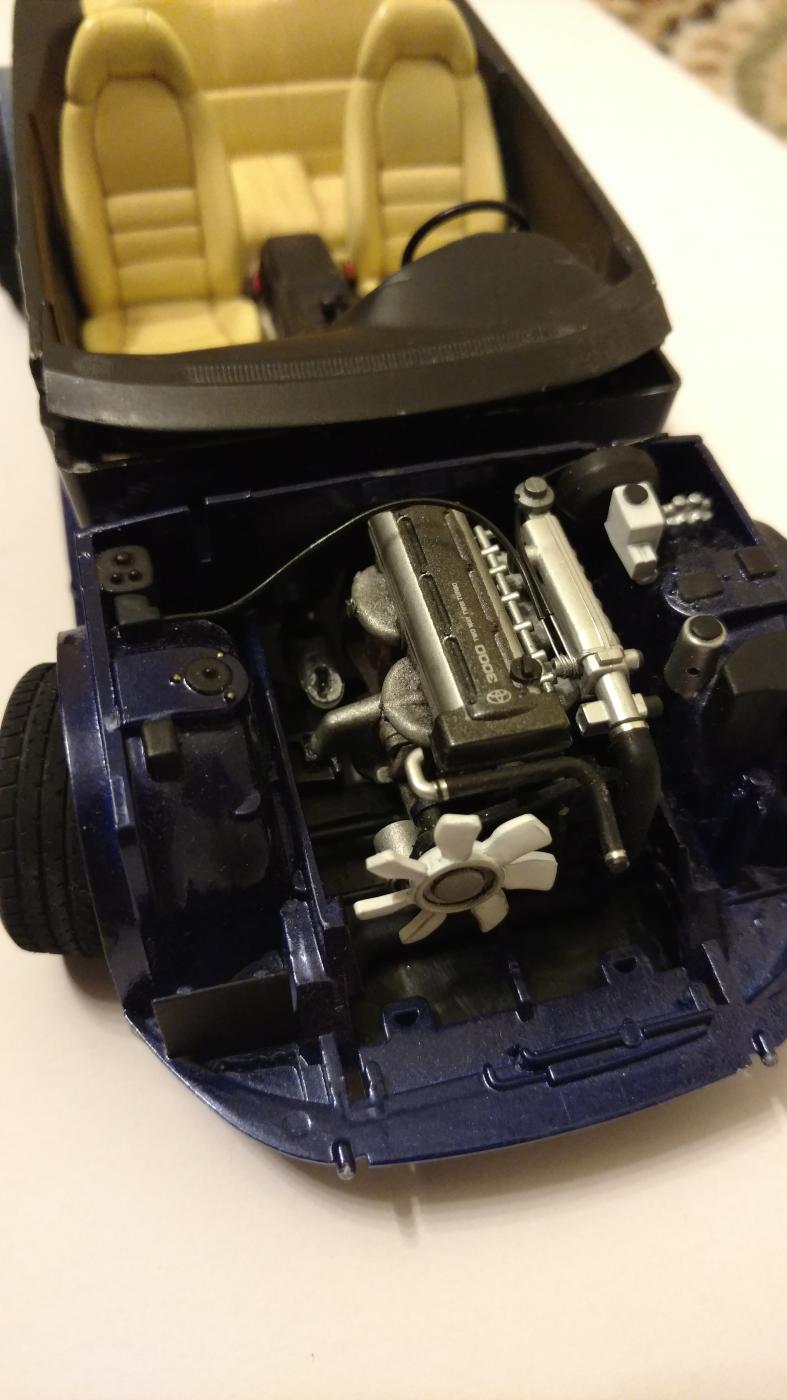
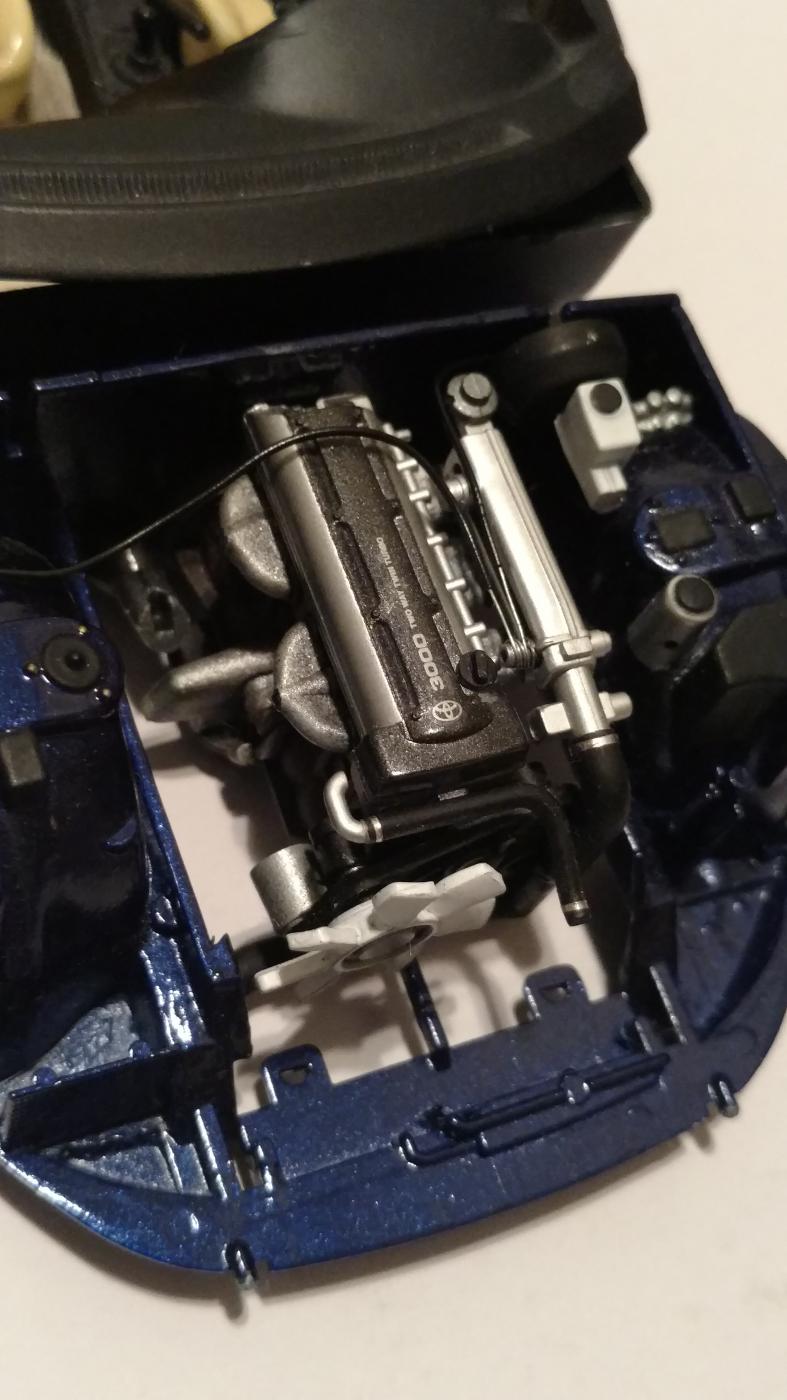
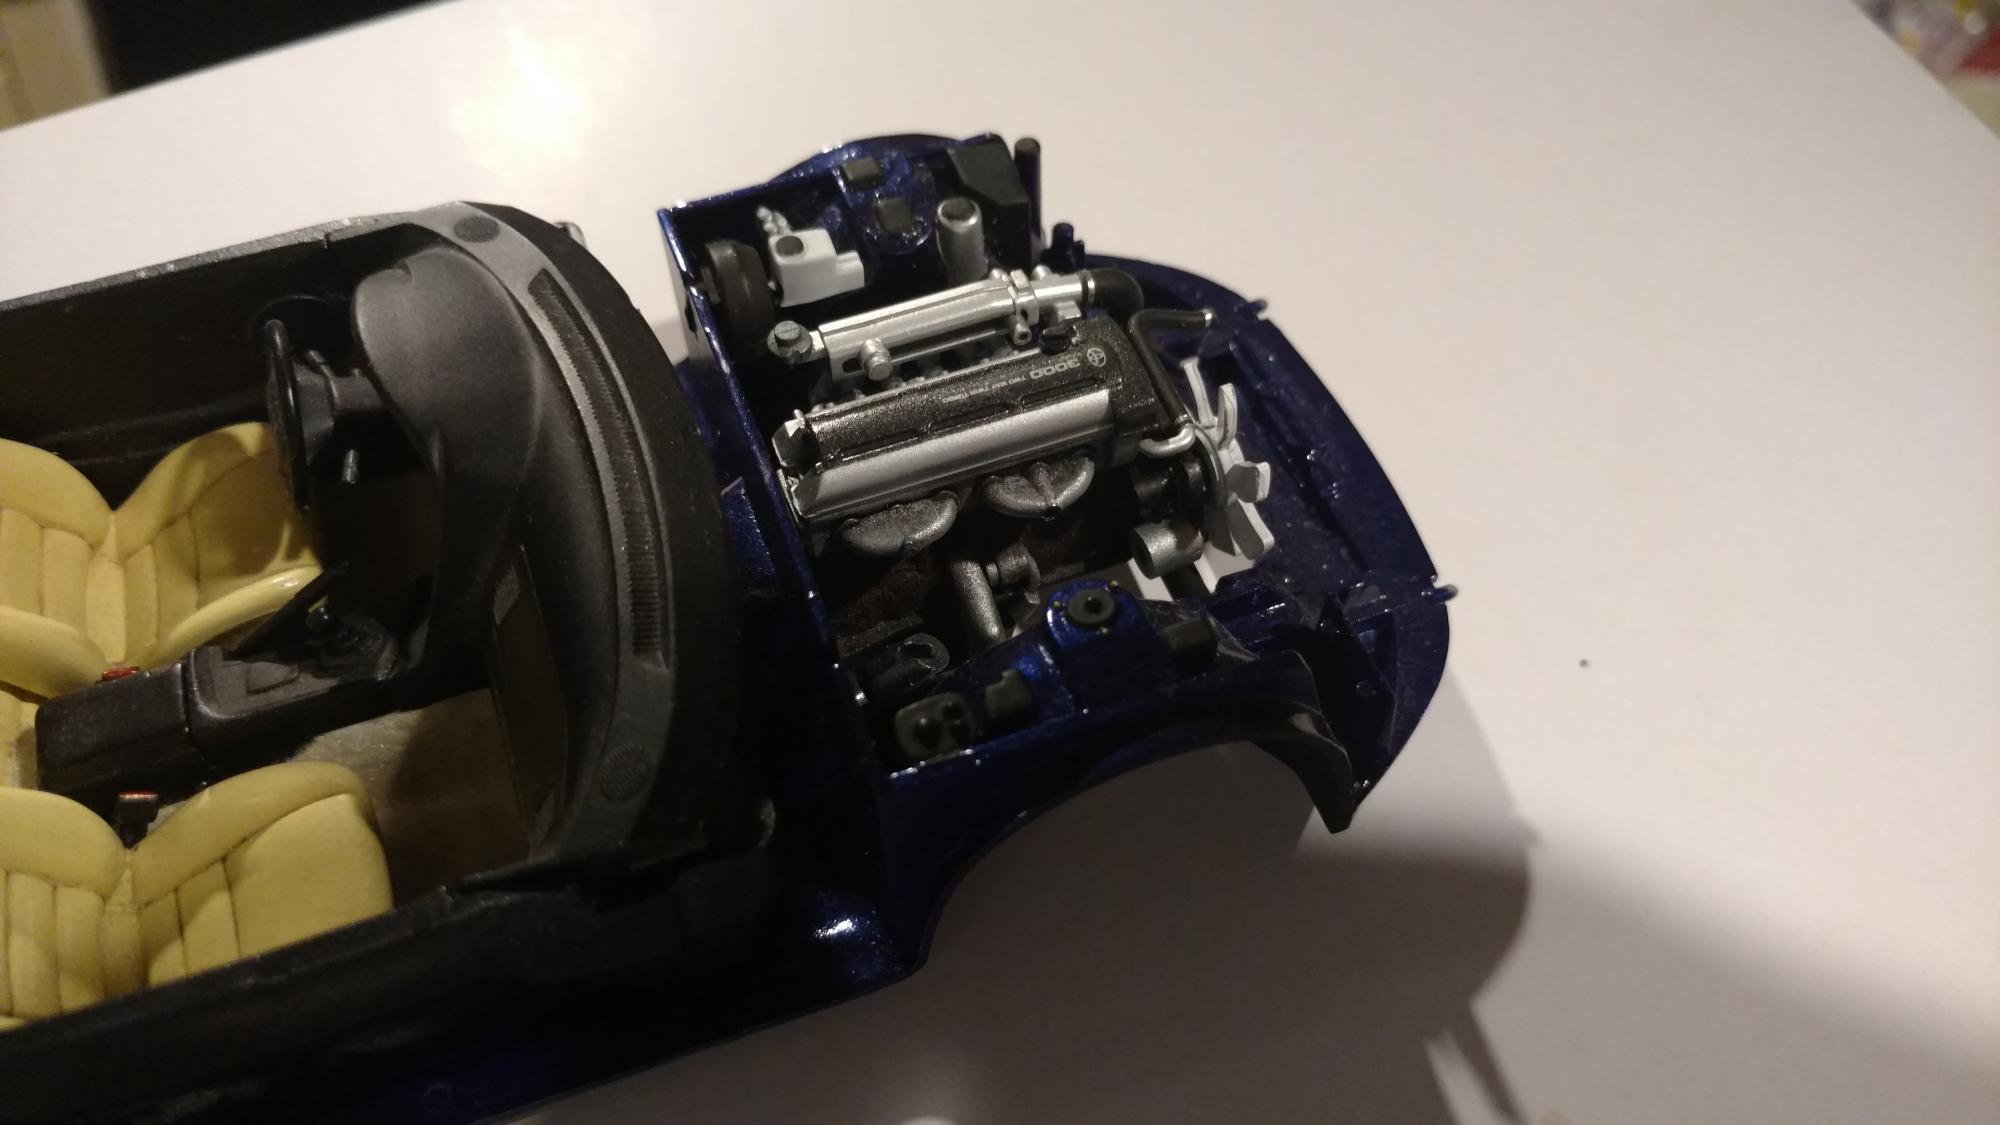
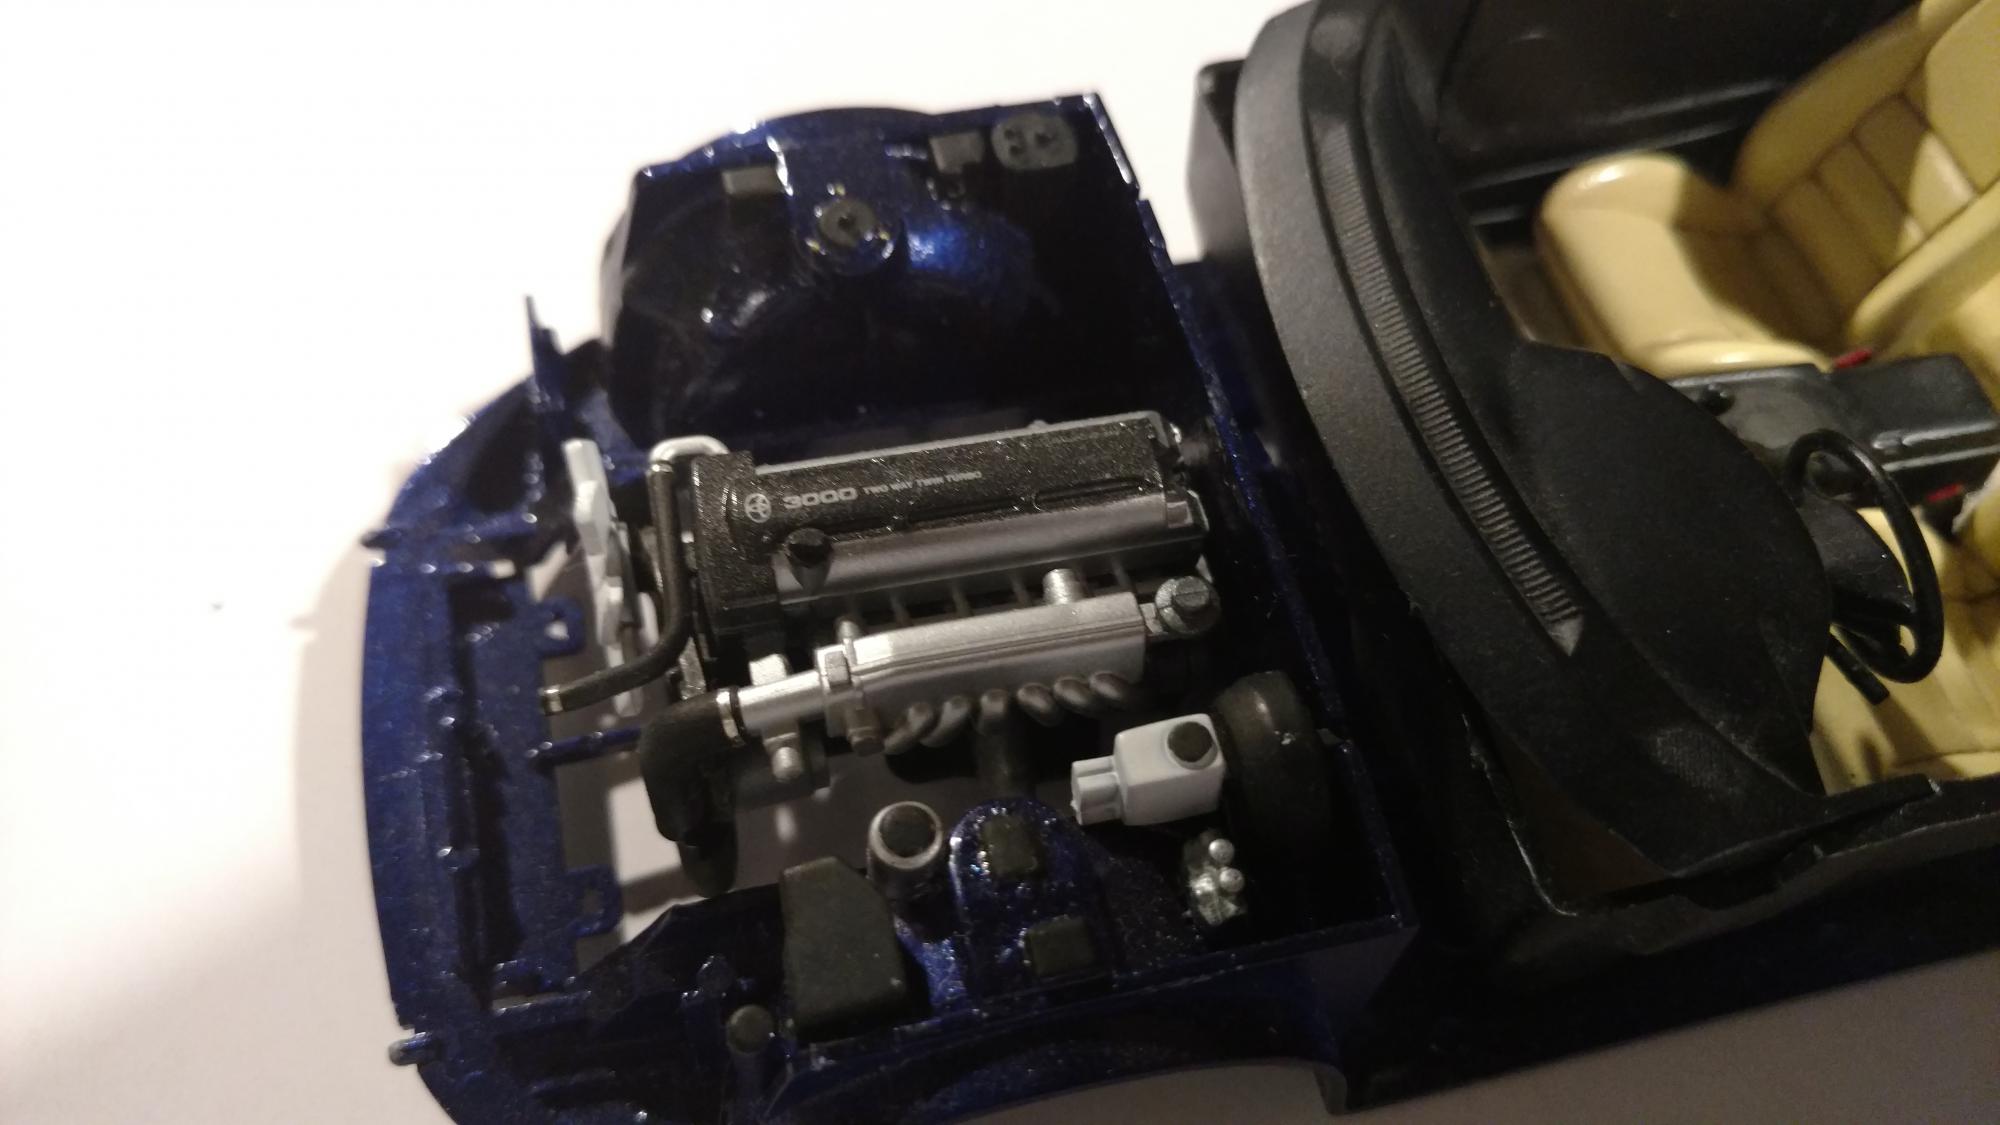
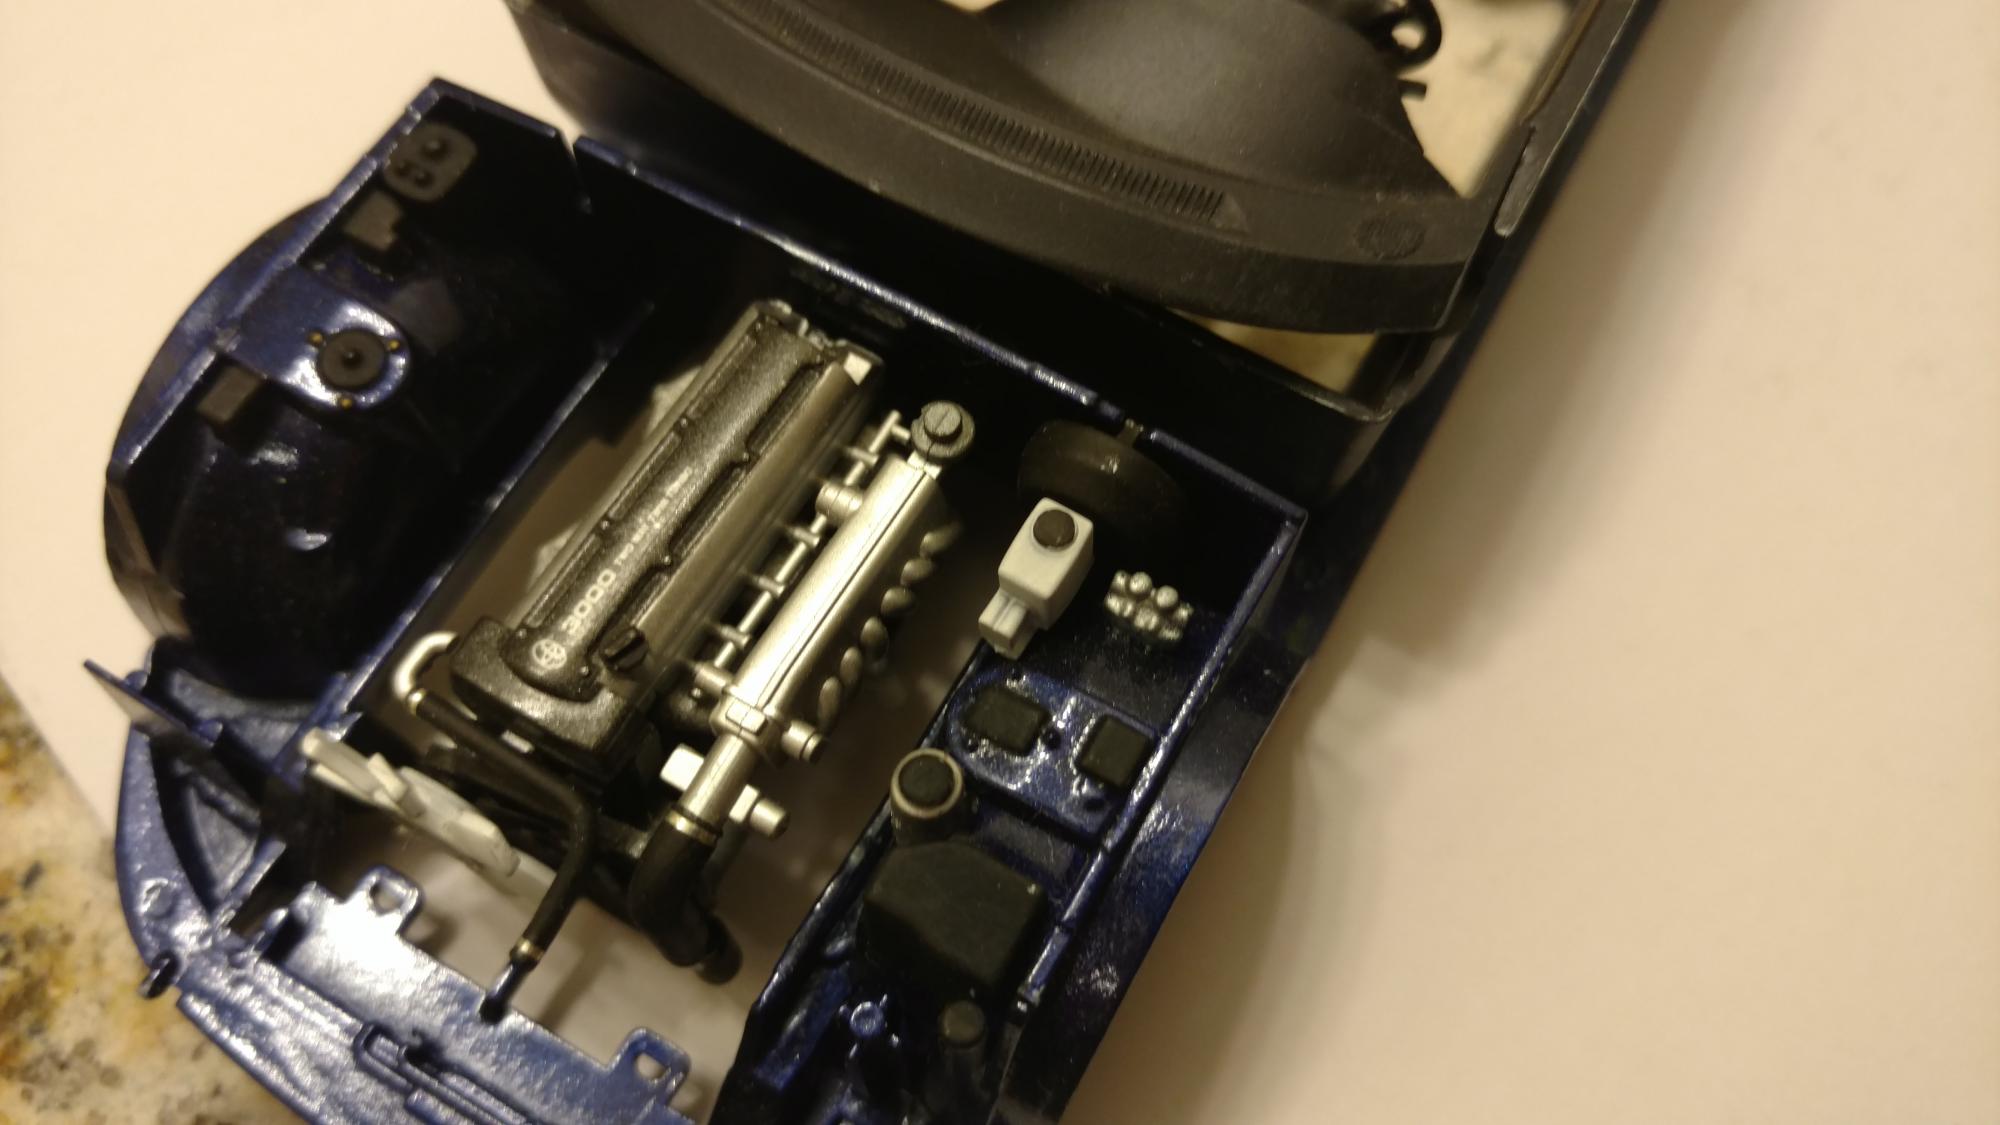
So here's a small update for today. I made two throttle cables and attached them based on reference photos. I used detail master and metal wire from hobby lobby to make the cables. I coiled the wiring over some K&S metal tubing and cut them to fit. It's simple but I think it does enhance the engine quite a bit. Unfortunately there isn't much out there in terms of modern throttle body parts in photo etch. So I stuck with tubing and coiled wire.
-
Tamiya Toyota Supra: UPDATE 6/15/17
DiscoRover007 replied to DiscoRover007's topic in WIP: Model Cars
Hey man I remember checking your build frequently. Looks great. You did some tasteful mods there. -
Tamiya Toyota Supra: UPDATE 6/15/17
DiscoRover007 replied to DiscoRover007's topic in WIP: Model Cars
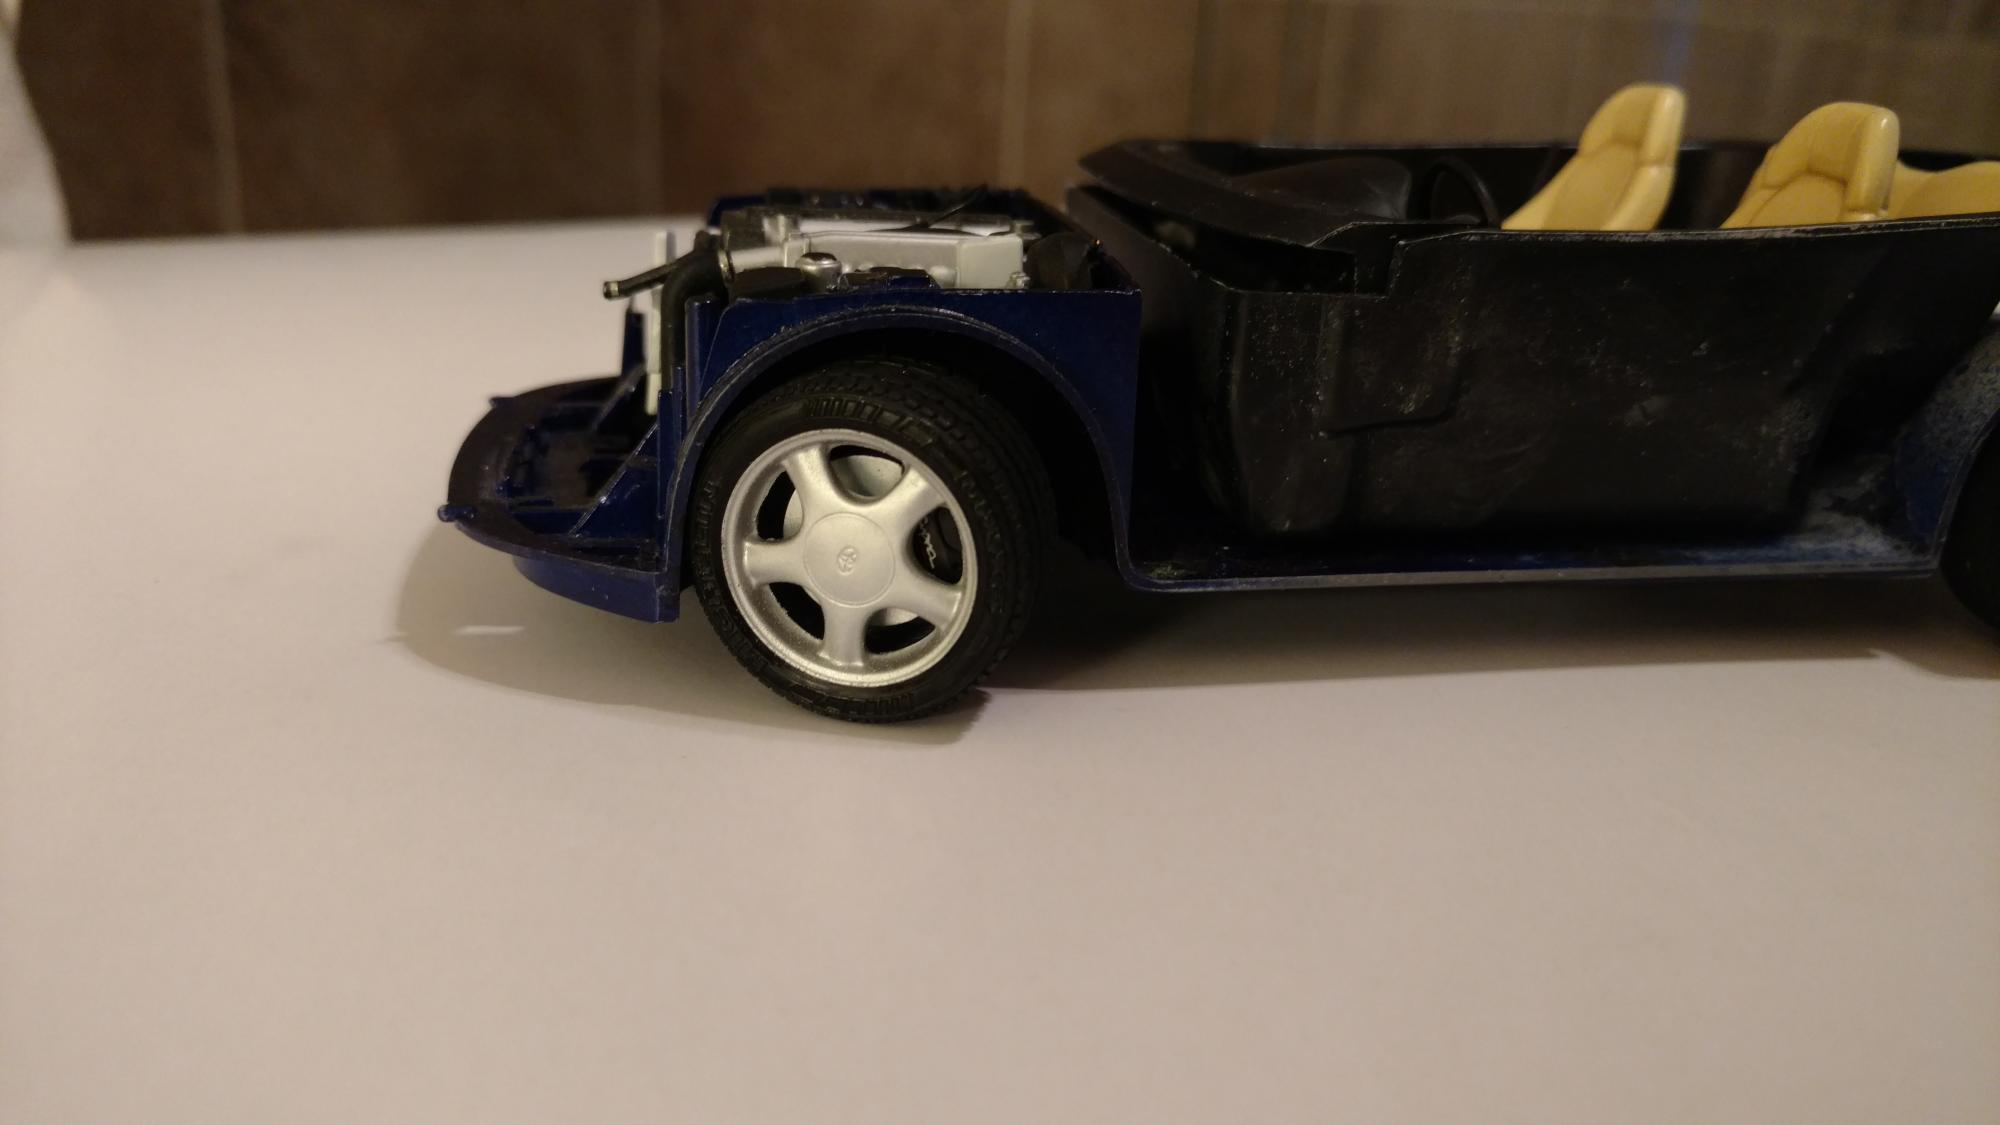
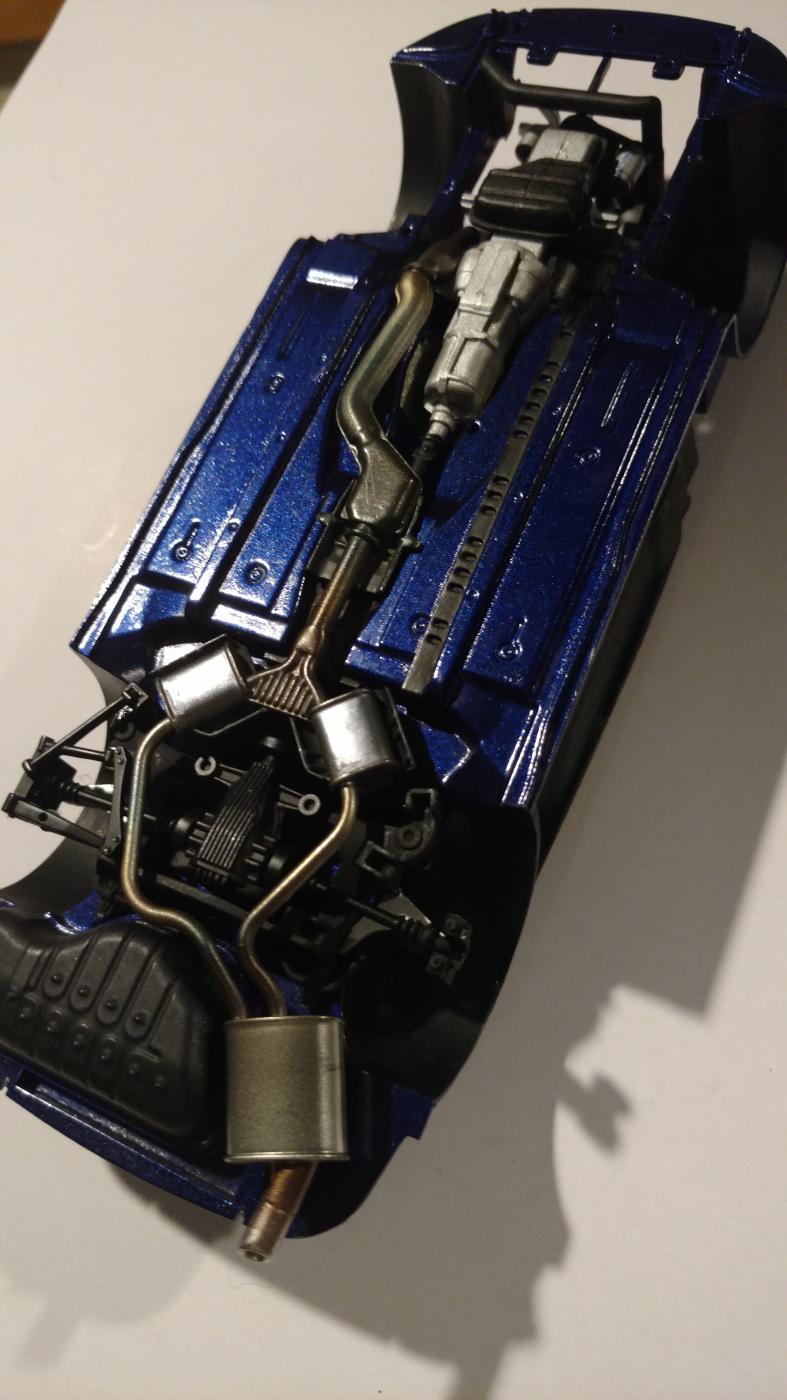
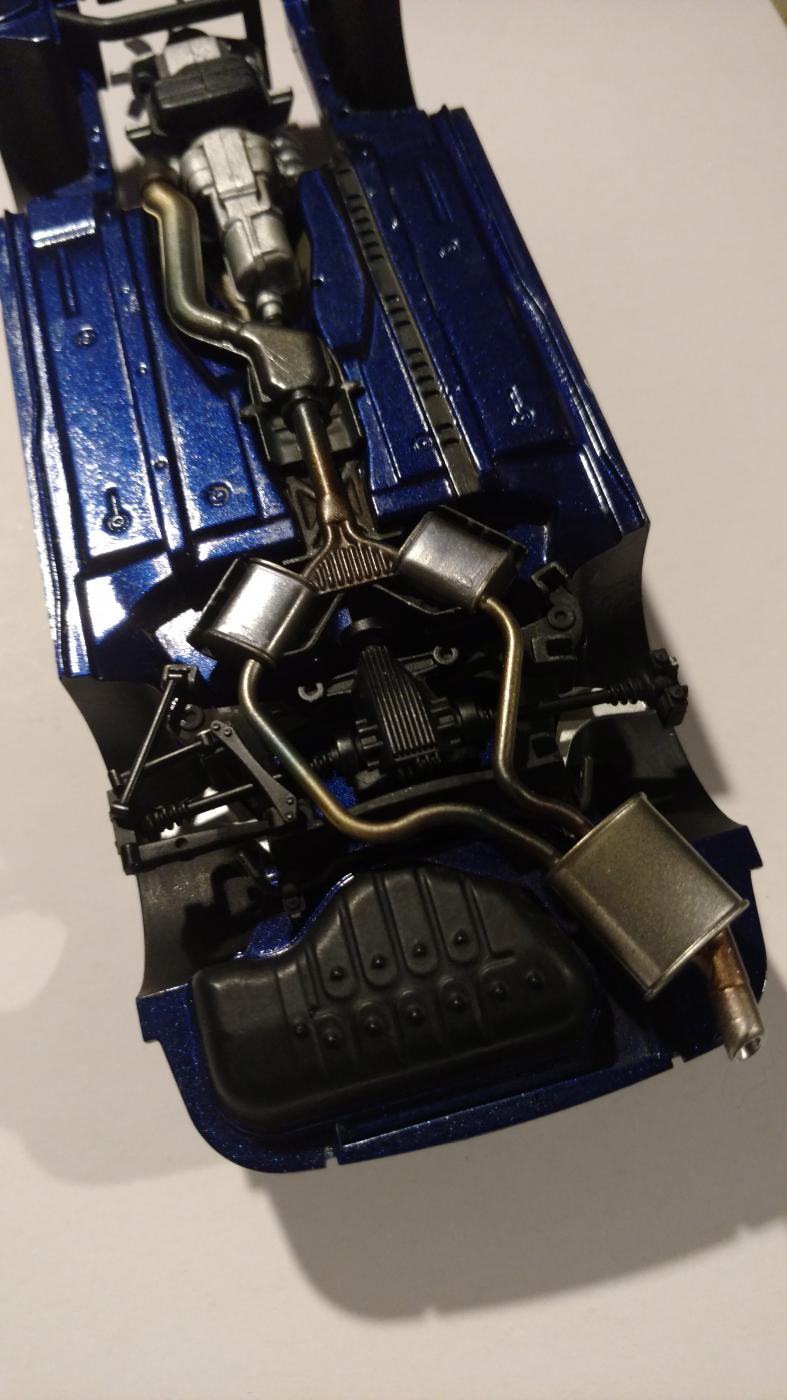
So here are some photos underneath the car. Sprayed in ts-51 and lightly clear coated. The black hand brushed with Vallejo flat black. The exhaust was painted with alclad chrome, base coated with testors enamel gloss black thinned with lacquer thinner. Heat staining was done with Tamiya acrylic clears, yellow, blue, orange. As well as Tamiya acrylic bronze and metallic blue and heat staining powders. If you look carefully I applied cigarette foil as heat shielding for the transmission
-
What don't you like about the color? Looks great
-
Tamiya Toyota Supra: UPDATE 6/15/17
DiscoRover007 replied to DiscoRover007's topic in WIP: Model Cars
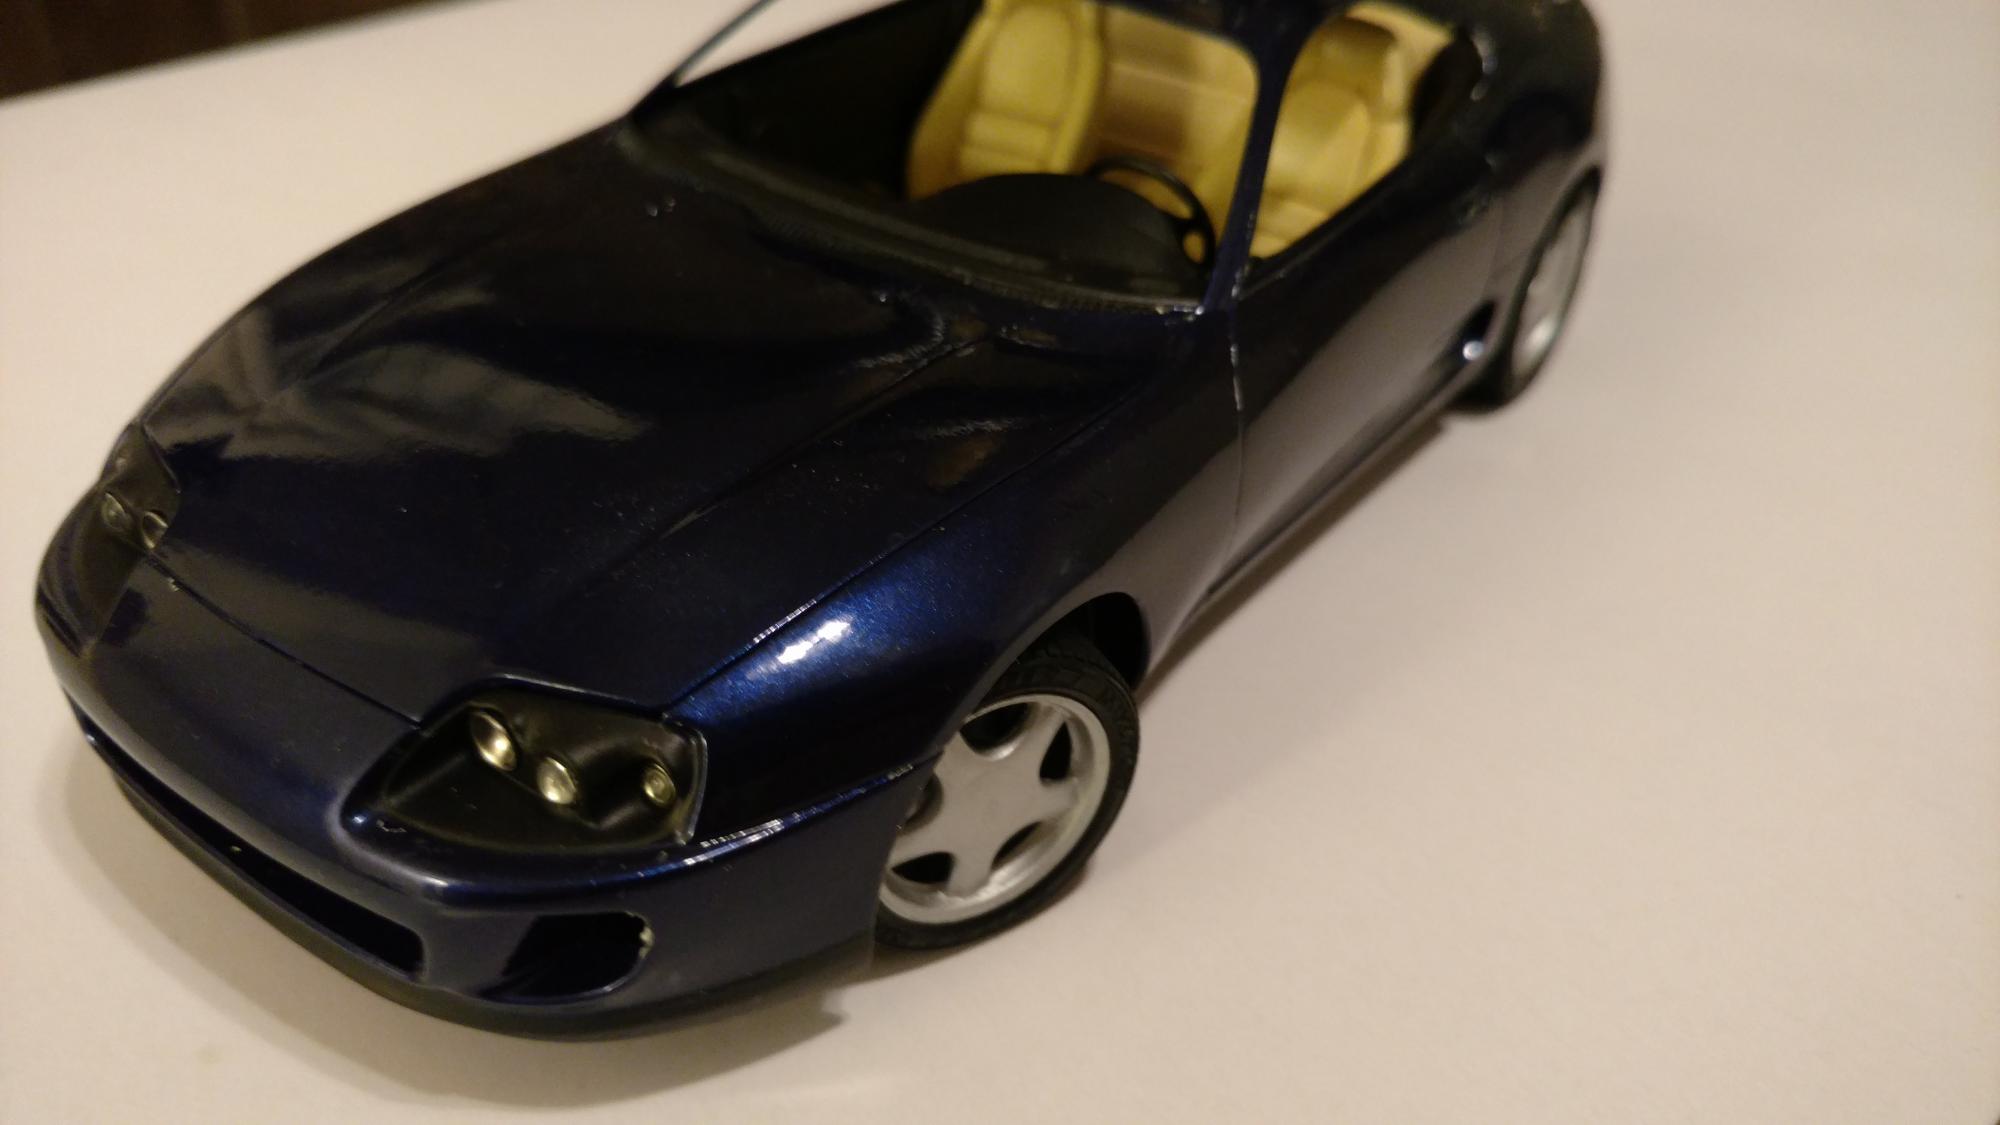
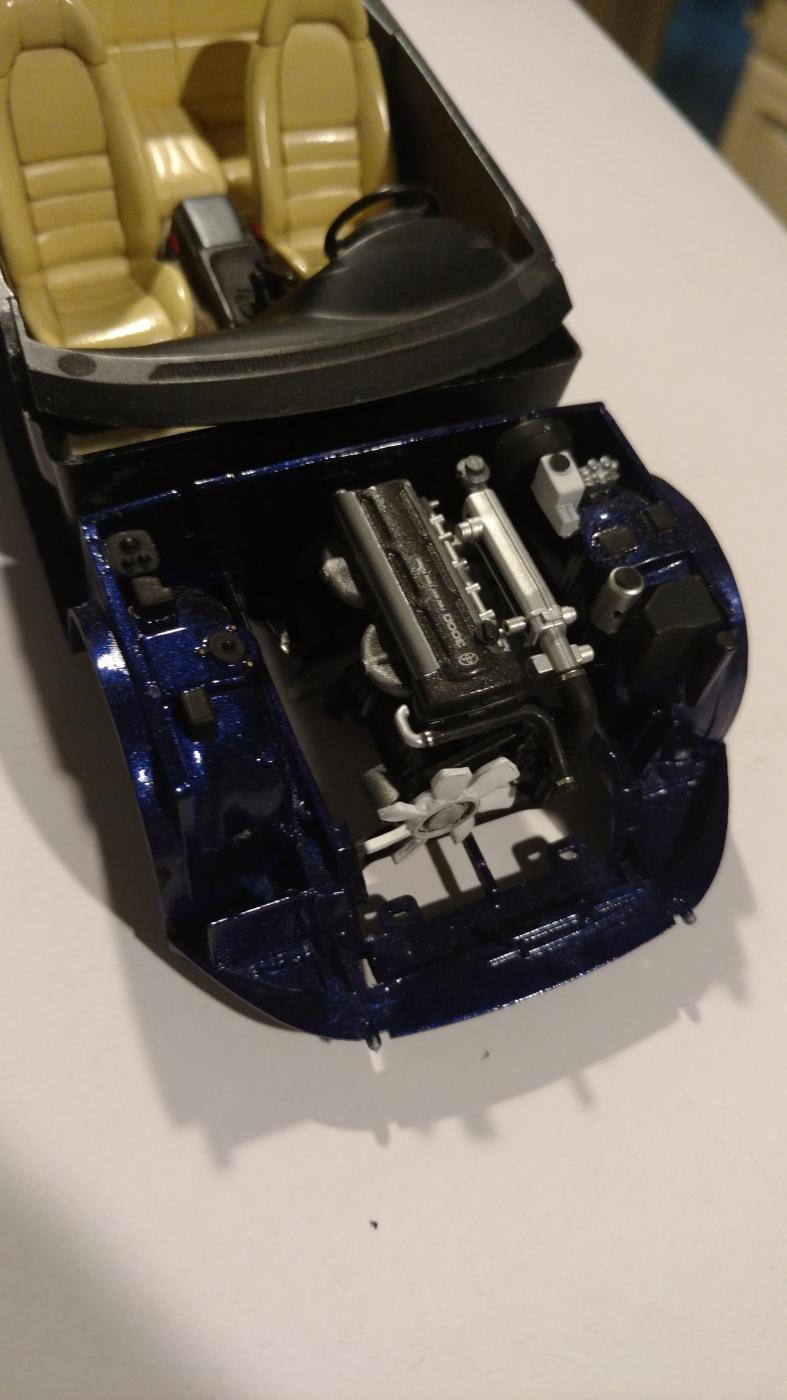
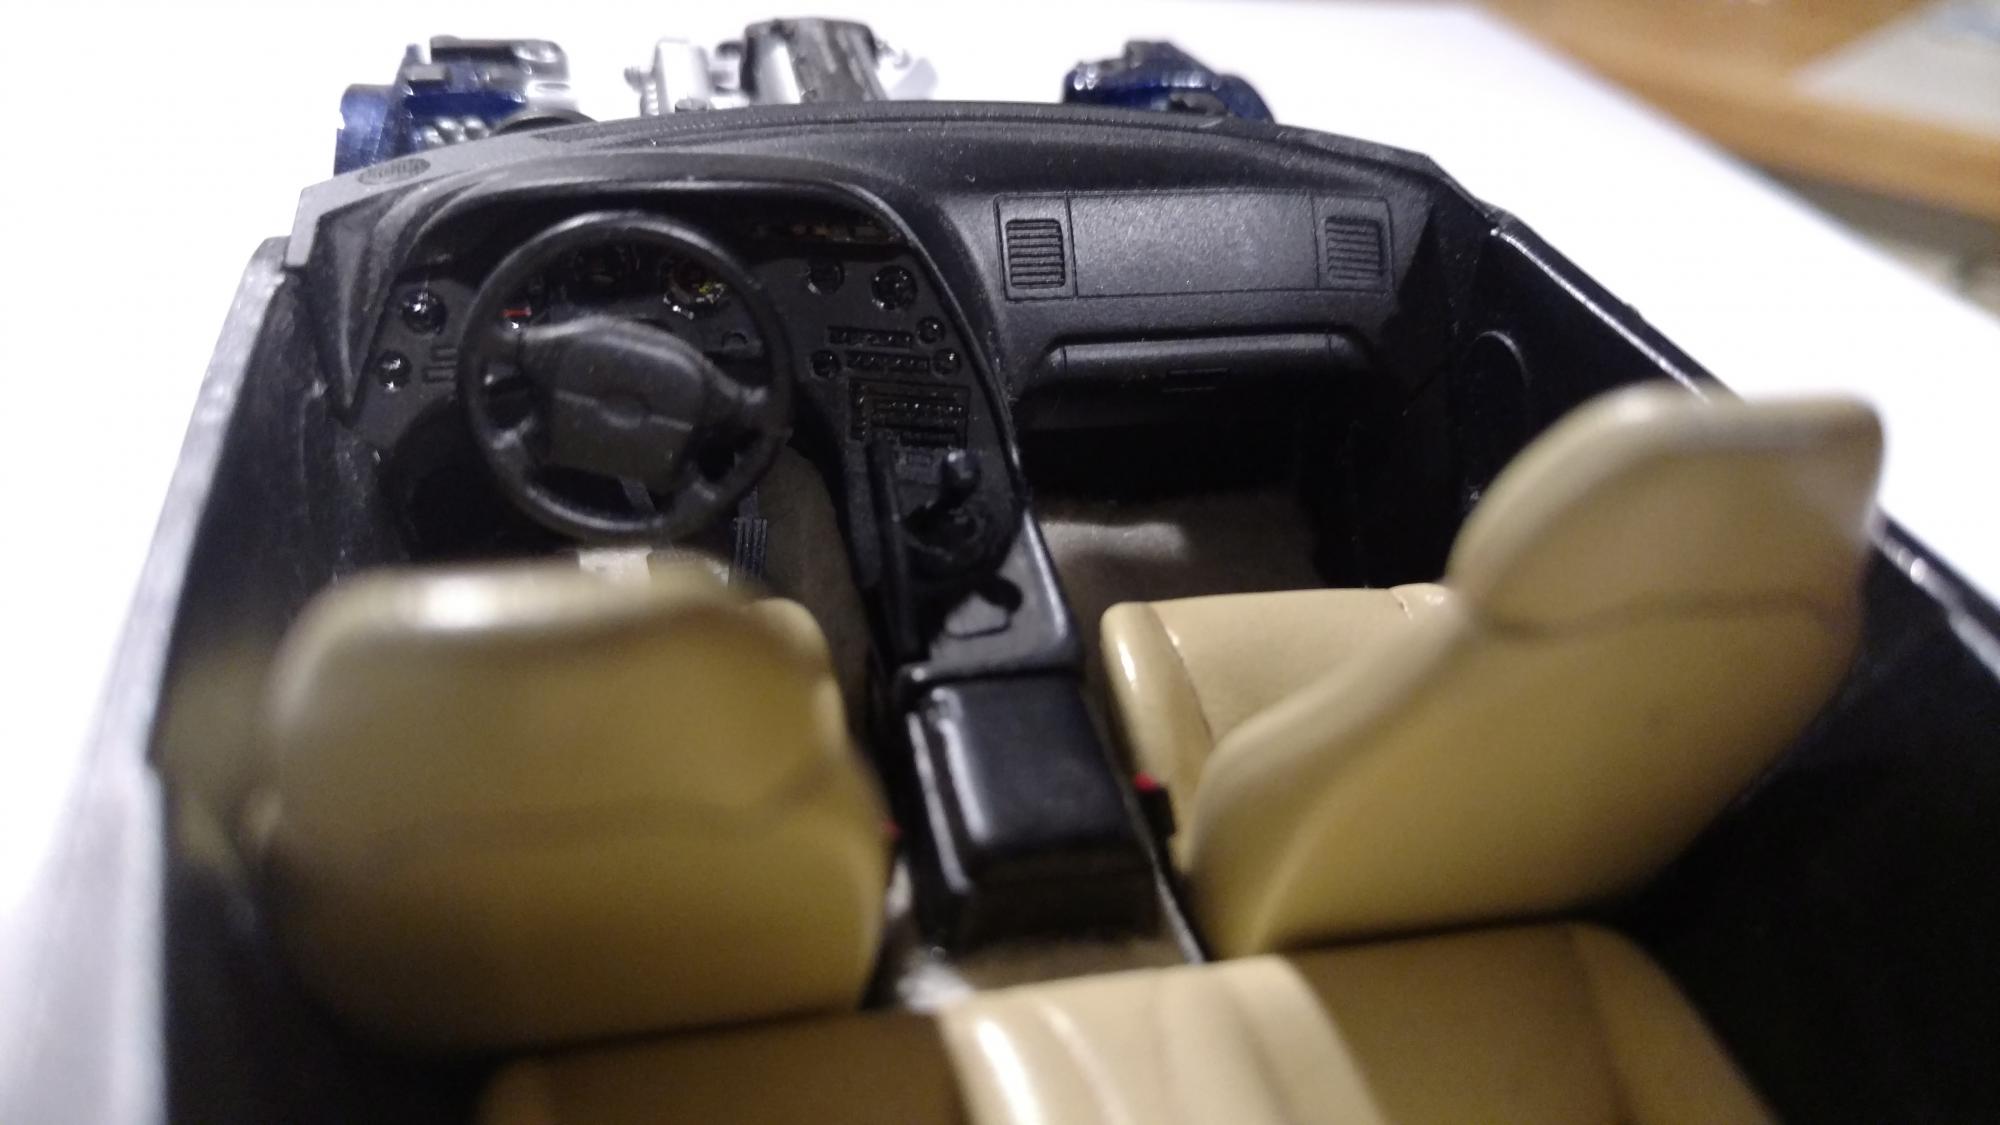
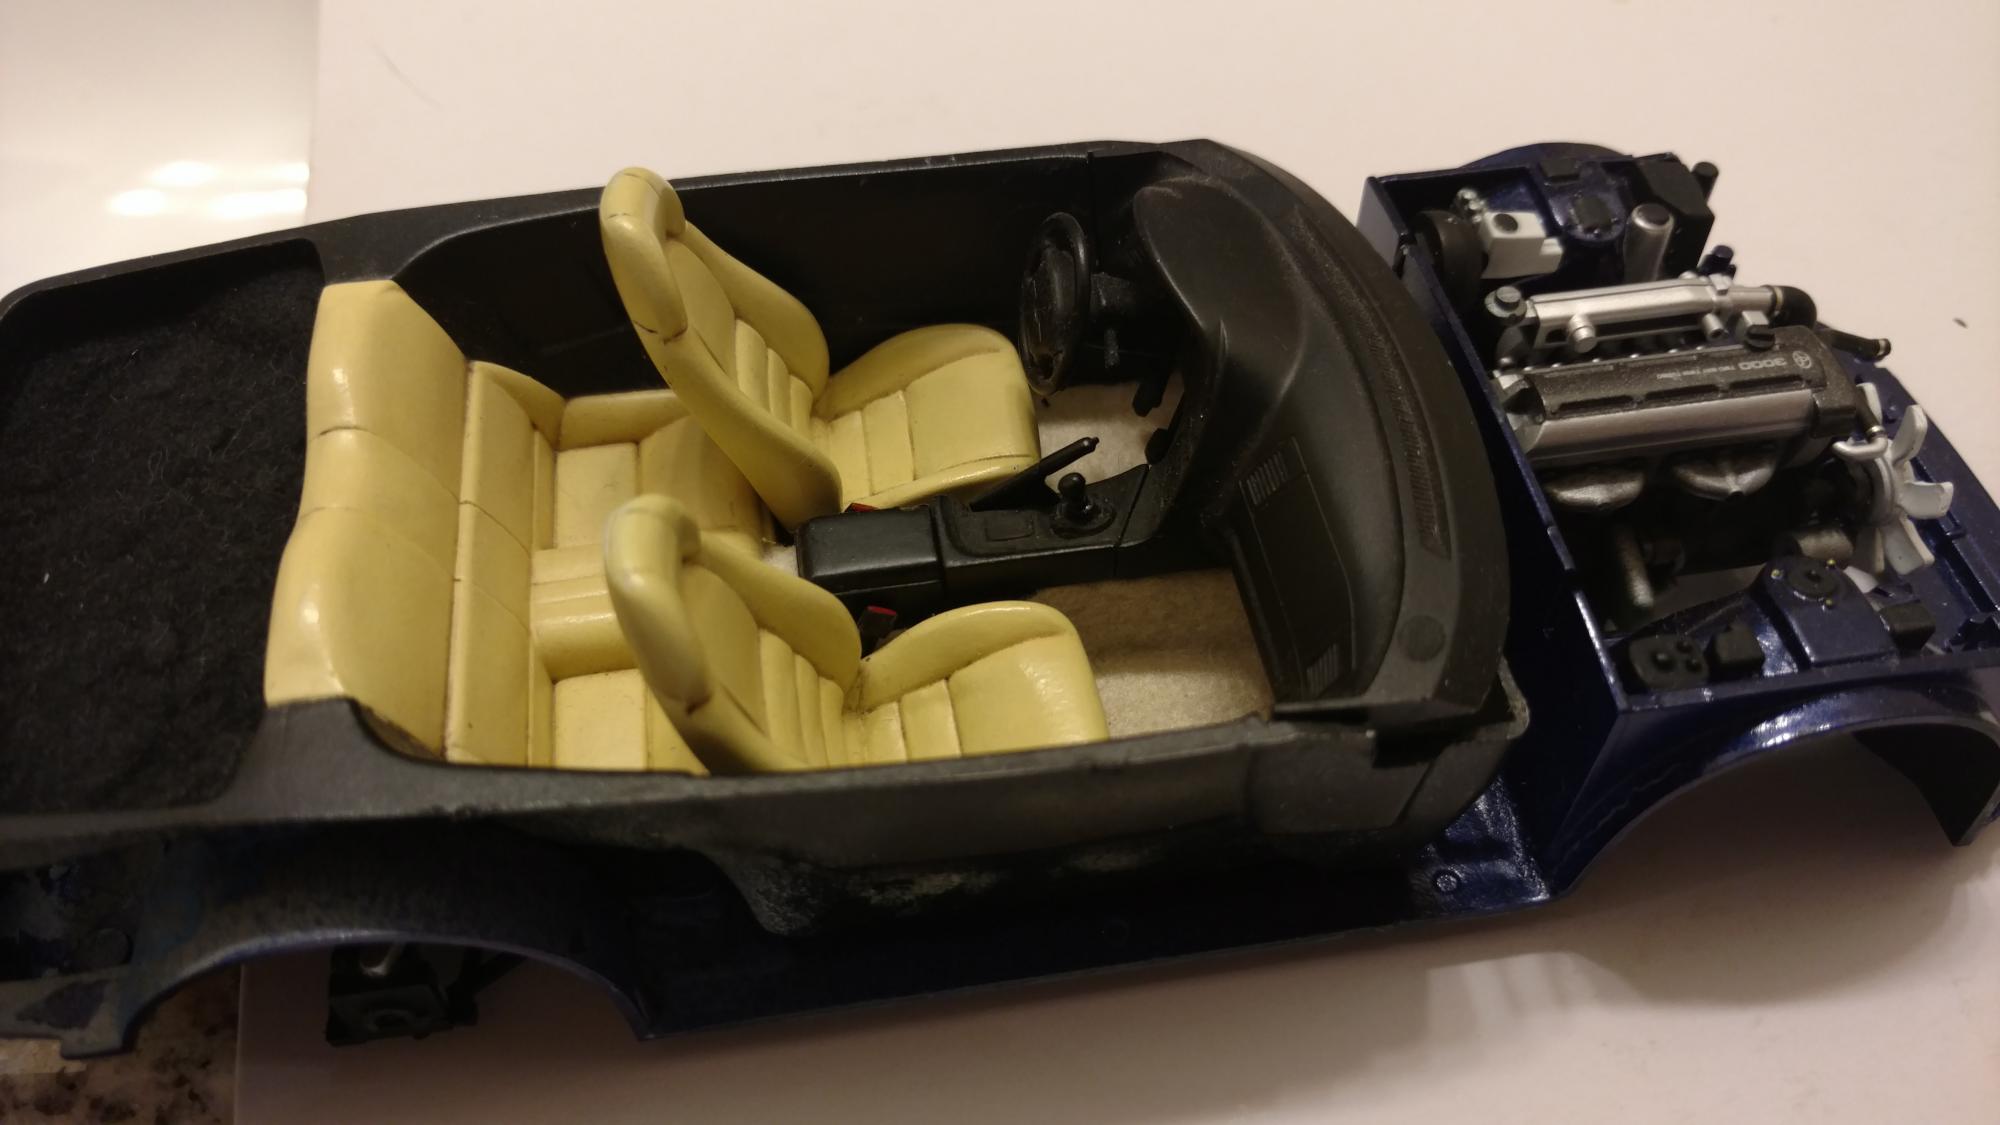
Some better shots for you. I forgot to add that I detailed the dashboard primarily with a mix of future clear and semi gloss Vallejo clear. I find that depending on the dashboard sometimes simpler details look better and cleaner than trying to pick out everything. The gauges were decaled and sealed with future too. I should also add that I did use a wash on the seats. A mix of black and brown oil paints I believe.
-
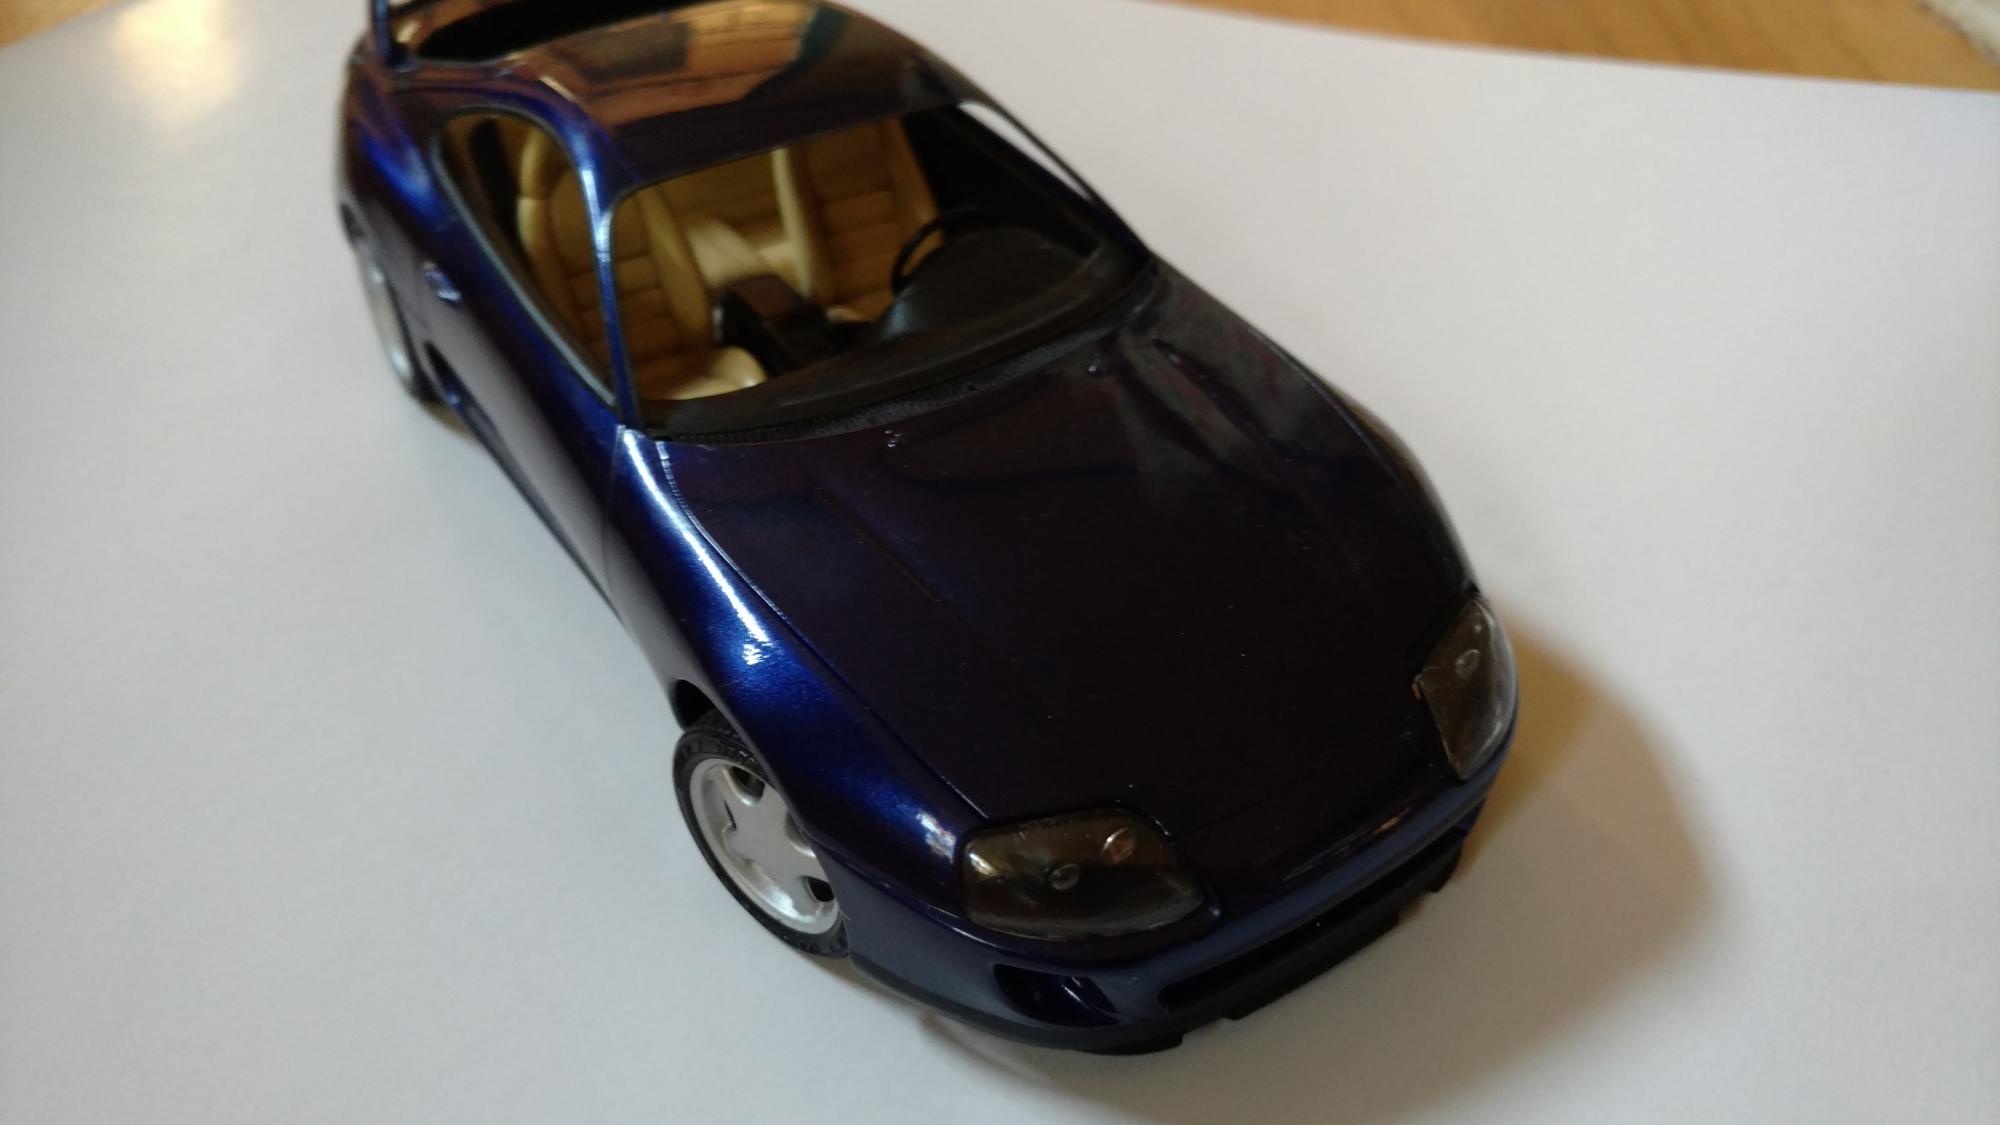
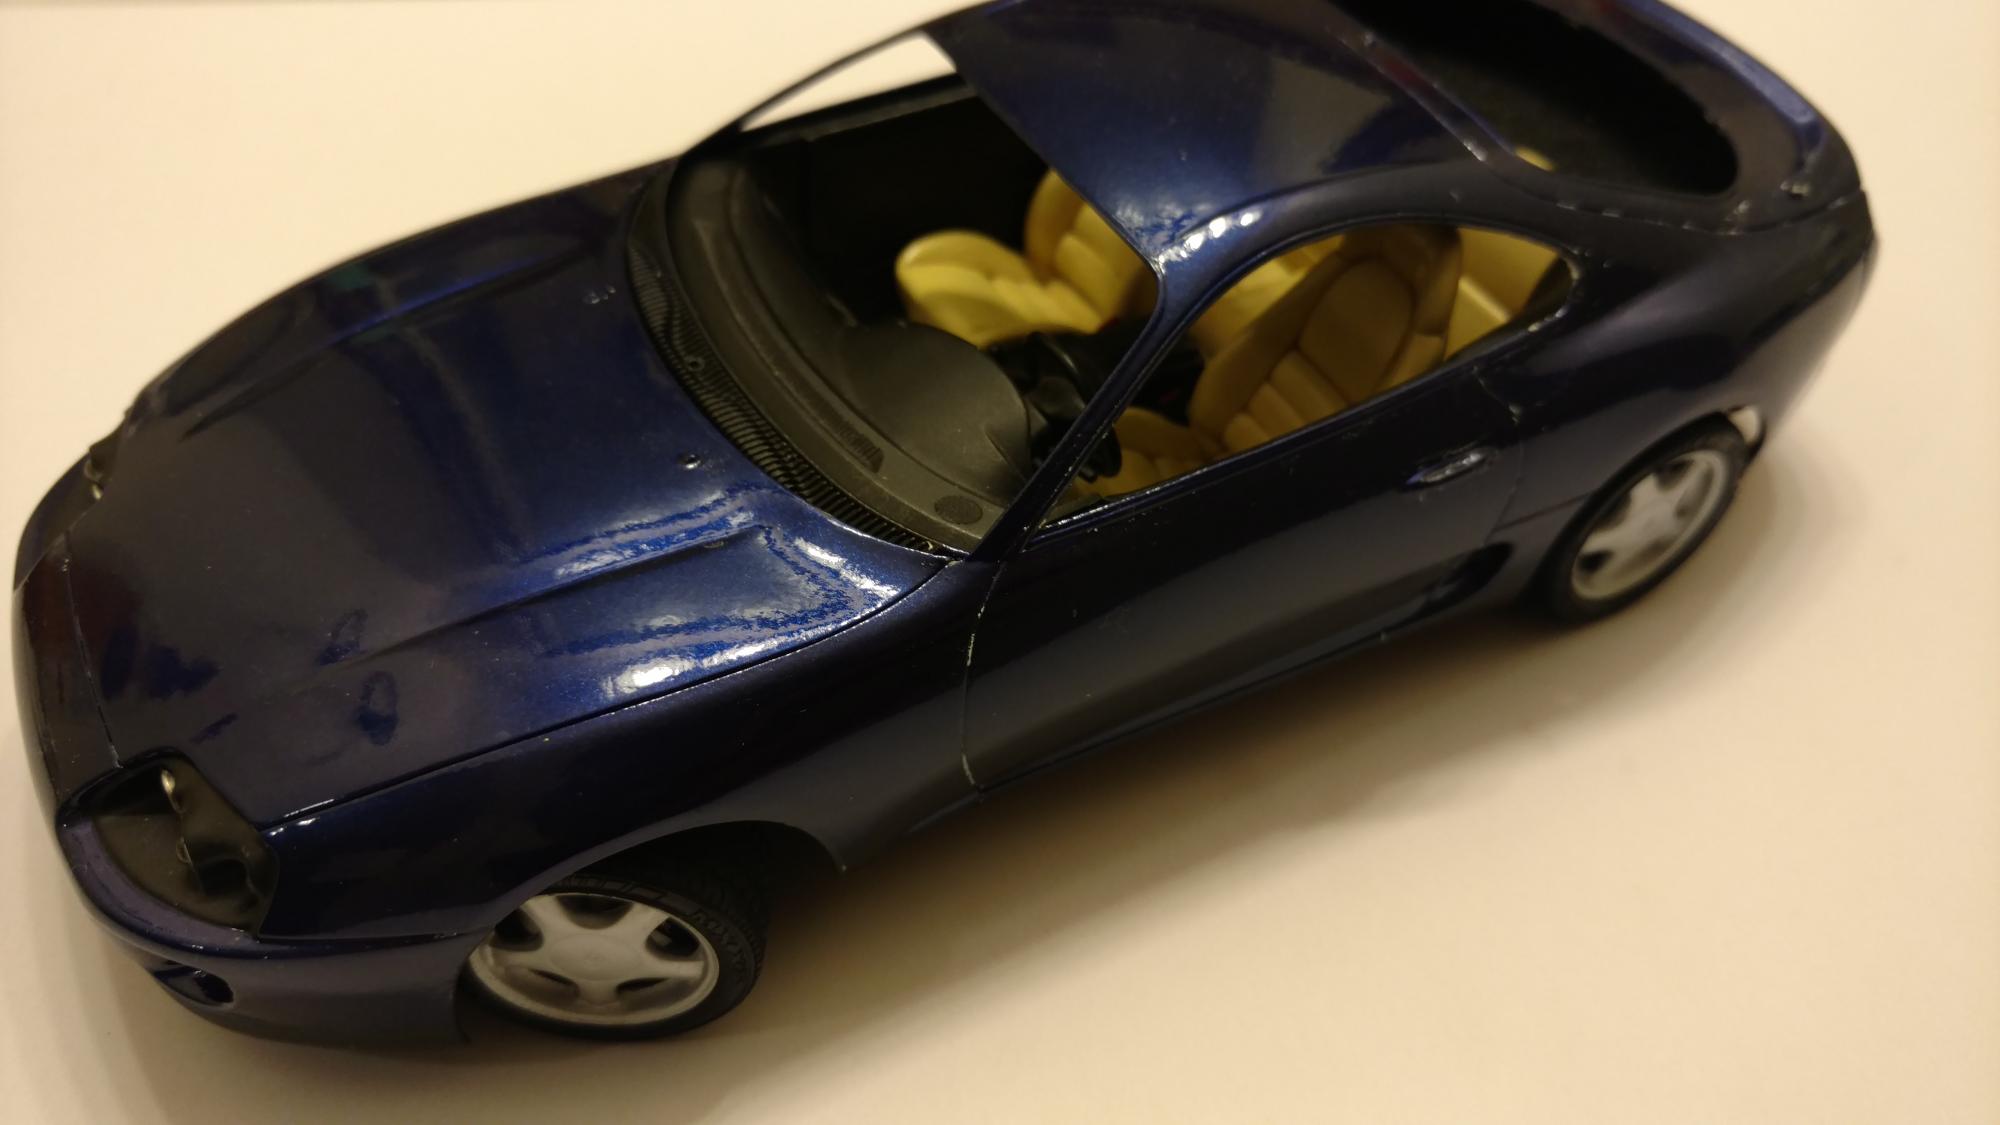
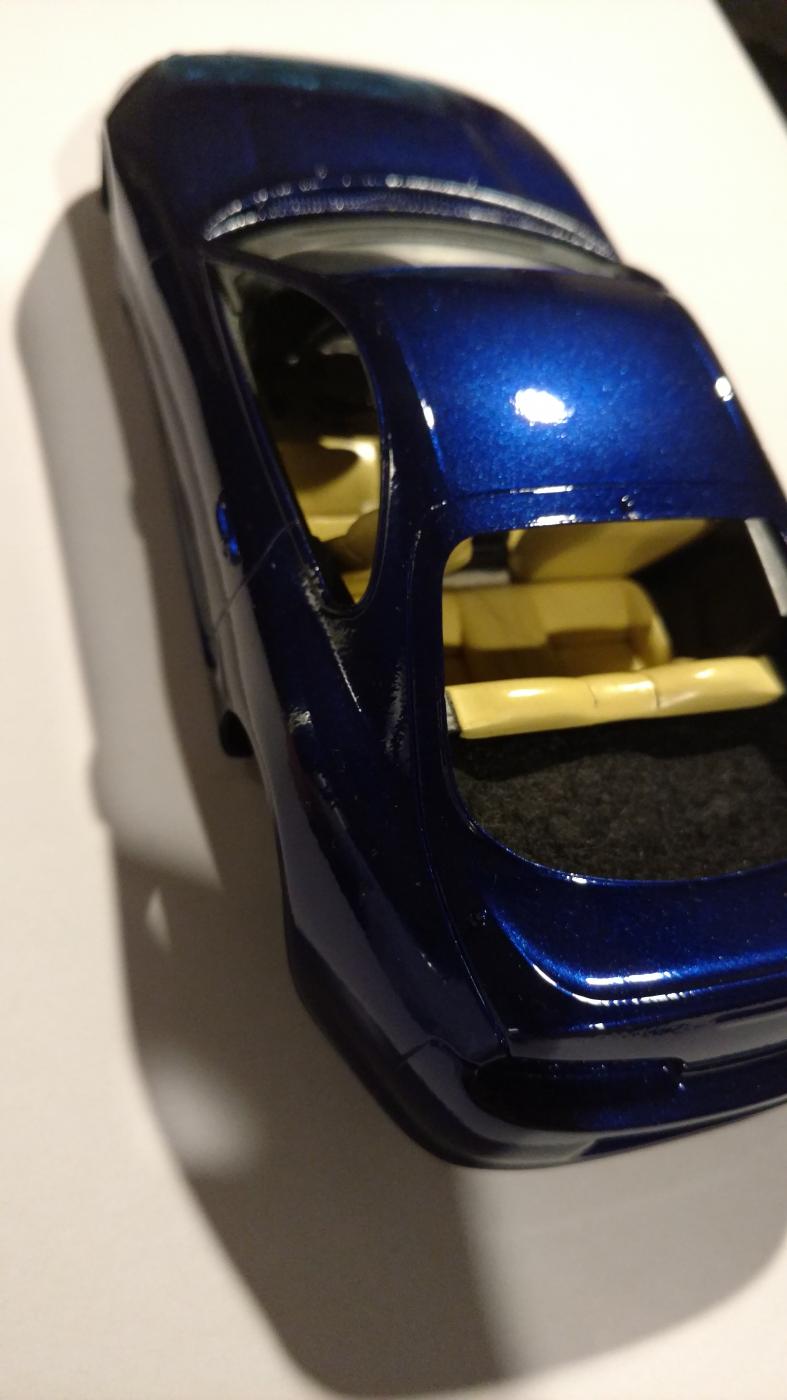
Hey guys so here's one I've been working on for a while. In recently repainted the body because of some errors I was unhappy with on the roof. But everything else was painted about a year and a half ago. The supra is one of my favorite cars ever. My realistic dream car so to speak. I am wanting to make a trio of Blue, Red, and Silver. This one here is painted with TS-53 Racing Blue and TS-13 clear. The interior is painted with Vallejo air Tan and Black. Flocked with model master sand and black as well. I use the spray adhesive method and then use the white glue method to patch up any mistakes. The seat belt catches were scratch built from clear plastic. The gauge panel was handpainted flat black for contrast like the real car. The engine block was painted with XF-16 flat aluminum and then I hand painted the flat block on the block but that is not visible. The upper intake and accessories were painted with model master aluminum metalizer non buffing. The gunmetal detail took quite some time to mask and get right. That was done with MM gunmetal metalizer as well. The details were picked out with strictly Vallejo paints. I am currently trying to devise a way to create ignition wiring and a few other details for this one. I do have the model mieser turbo kit but I may save that for the red supra I have planned. I may keep this one stock. Quick mock up shot. More to come and I'll try to get some better pictures soon!
-
Iwata CR is a tremendous airbrush. Durable, inexpensive, can spray all types of paint and easy to clean. Plus it's gravity feed which is a lot easier all around than a.
-
The Secret to Building a Better Model
DiscoRover007 replied to afx's topic in Tips, Tricks, and Tutorials
Just from my experience gravity feed is much easier and fastet clean up than siphon feed. And you waste less paint. Well worth it in my opinion. -
Protect clear coat from dust
DiscoRover007 replied to CarLover's topic in Model Building Questions and Answers
I paint in my garage. To eliminate dust I have a metal spray booth But I dont use the fan. It's just a box for me. But first and foremost take a windex bottle, fill with water or 50/50 mix or what have you. Completely spray your work area. Spray the air, the ground, and inside your box. Anywhere you could see yourself kicking up dust. Even your sleeves. The point is to trap any dust that could fall on the car body. Secondly if you have an air compressor. Wash your car body before painting and set your airbrush to a high psi to blow the water off. Make sure the water is all gone. Then paint immediately. When you finish painting let it cure enough to at least get some initial orange peel. If you move the body right after spraying you aren't helping yourseIf. Ive done this for about 2 years now and I've eliminated most dust issues. I still get a hair occasionally but this works 95% of the time. -
Nice work. Really wish Tamiya would take on more American muscle cars. A 1/24 96 Viper or 1/24 Corvette. Would love to see a 69 Mustang from them too. They'd blow revells old molds out of the water.
-
Tamiya MK IV Supra Single Turbo - UNDER GLASS 8-27-16
DiscoRover007 replied to lghtngyello03's topic in WIP: Model Cars
Great start I made a how to thread on AF a few years ago describing how to correctly paint the headlight buckets on this kit if you want the modern look. Give it a whirl. http://www.automotiveforums.com/vbulletin/showthread.php?t=1110998&highlight=Painting+tamiya+supra+headlight -
The Secret to Building a Better Model
DiscoRover007 replied to afx's topic in Tips, Tricks, and Tutorials
The biggest thing I can recommend to a beginner to make the leap into higher quality model building is too simply hold yourself to higher standard of building. Do not allow yourself to accept mistakes and flaws. If you mess up, strip it down and paint it again until you get it right. And with that I do believe comes buying quality paints and airbrushes. If you are trying to get serious about the hobby you need a workhorse gravity feed air brush. I know a lot of people will say you don't but if you want to get really good you need to give yourself the ability to do that. I would agree with the OP that studying your subject is a must. One thing that I do. The one standard/minimum goal that I have to accomplish with a model is that it must look like the real deal from the outside. That means a quality paint finish, removing and or filling panel lines that do or do not exist on the real car. Quality products are a must. That doesn't mean you have to get real expensive you just need to know what to buy. For beginners reading this thread. For interiors and engines, stick to acrylics. Vallejo has the best acrylic brush paints you can buy. Their model air line has premium opaque colors perfect for interiors too. Tamiya acrylics also allow for a variety of metal finishes. Tamiya TS line and Duplicolor are awesome for body colors. I like the testors lacquer line too but most of their metallics are out of scale. Personally I still use spray cans for bodys(mostly) and use my airbrushes for interiors and engines. And there is no substitute for Tamiya masking tape. Lastly you have to treat the model as a work of art, every piece of it. We are artists, we just paint on models. The whole hobby is a lot like golf in my opinion. You need a lot of patience, practice, and decent clubs(supplies). You are competing against yourself and no one else. Take as much time as you need to make the model the way you want it to. Rushing will only lead to disapointment. -
Vallejo woes yet again!
DiscoRover007 replied to aurfalien's topic in Model Building Questions and Answers
With the white and yellow paints you need to undercoat them with a more opaque color first. Or you simply need to slowly build the paint up with watered down coats first. I stand by Vallejo paints. They are the best brushing paints in the business.