DiscoRover007
-
Posts
449 -
Joined
-
Last visited
Content Type
Profiles
Forums
Events
Gallery
Everything posted by DiscoRover007
-
2003 Infiniti G35 Coupe 7/7/17 Replaced photos fron Fotki
DiscoRover007 replied to Foxer's topic in WIP: Model Cars
Here's a tip to eliminate most dust from getting out of your paint. Spray your work area with water in a spray bottle. Spray the floor, air, and inside the box or whatever you are storing the body to dry in. Wash the body itself and if you have an airbrush use compressed air at high psi to blow it off. This has eliminated about 95% of dust from my paint jobs. I still get occasional hairs or little tiny dust specs. But nothing that can't be lightly sanded out. -
Tamiya Toyota Supra: UPDATE 6/15/17
DiscoRover007 replied to DiscoRover007's topic in WIP: Model Cars
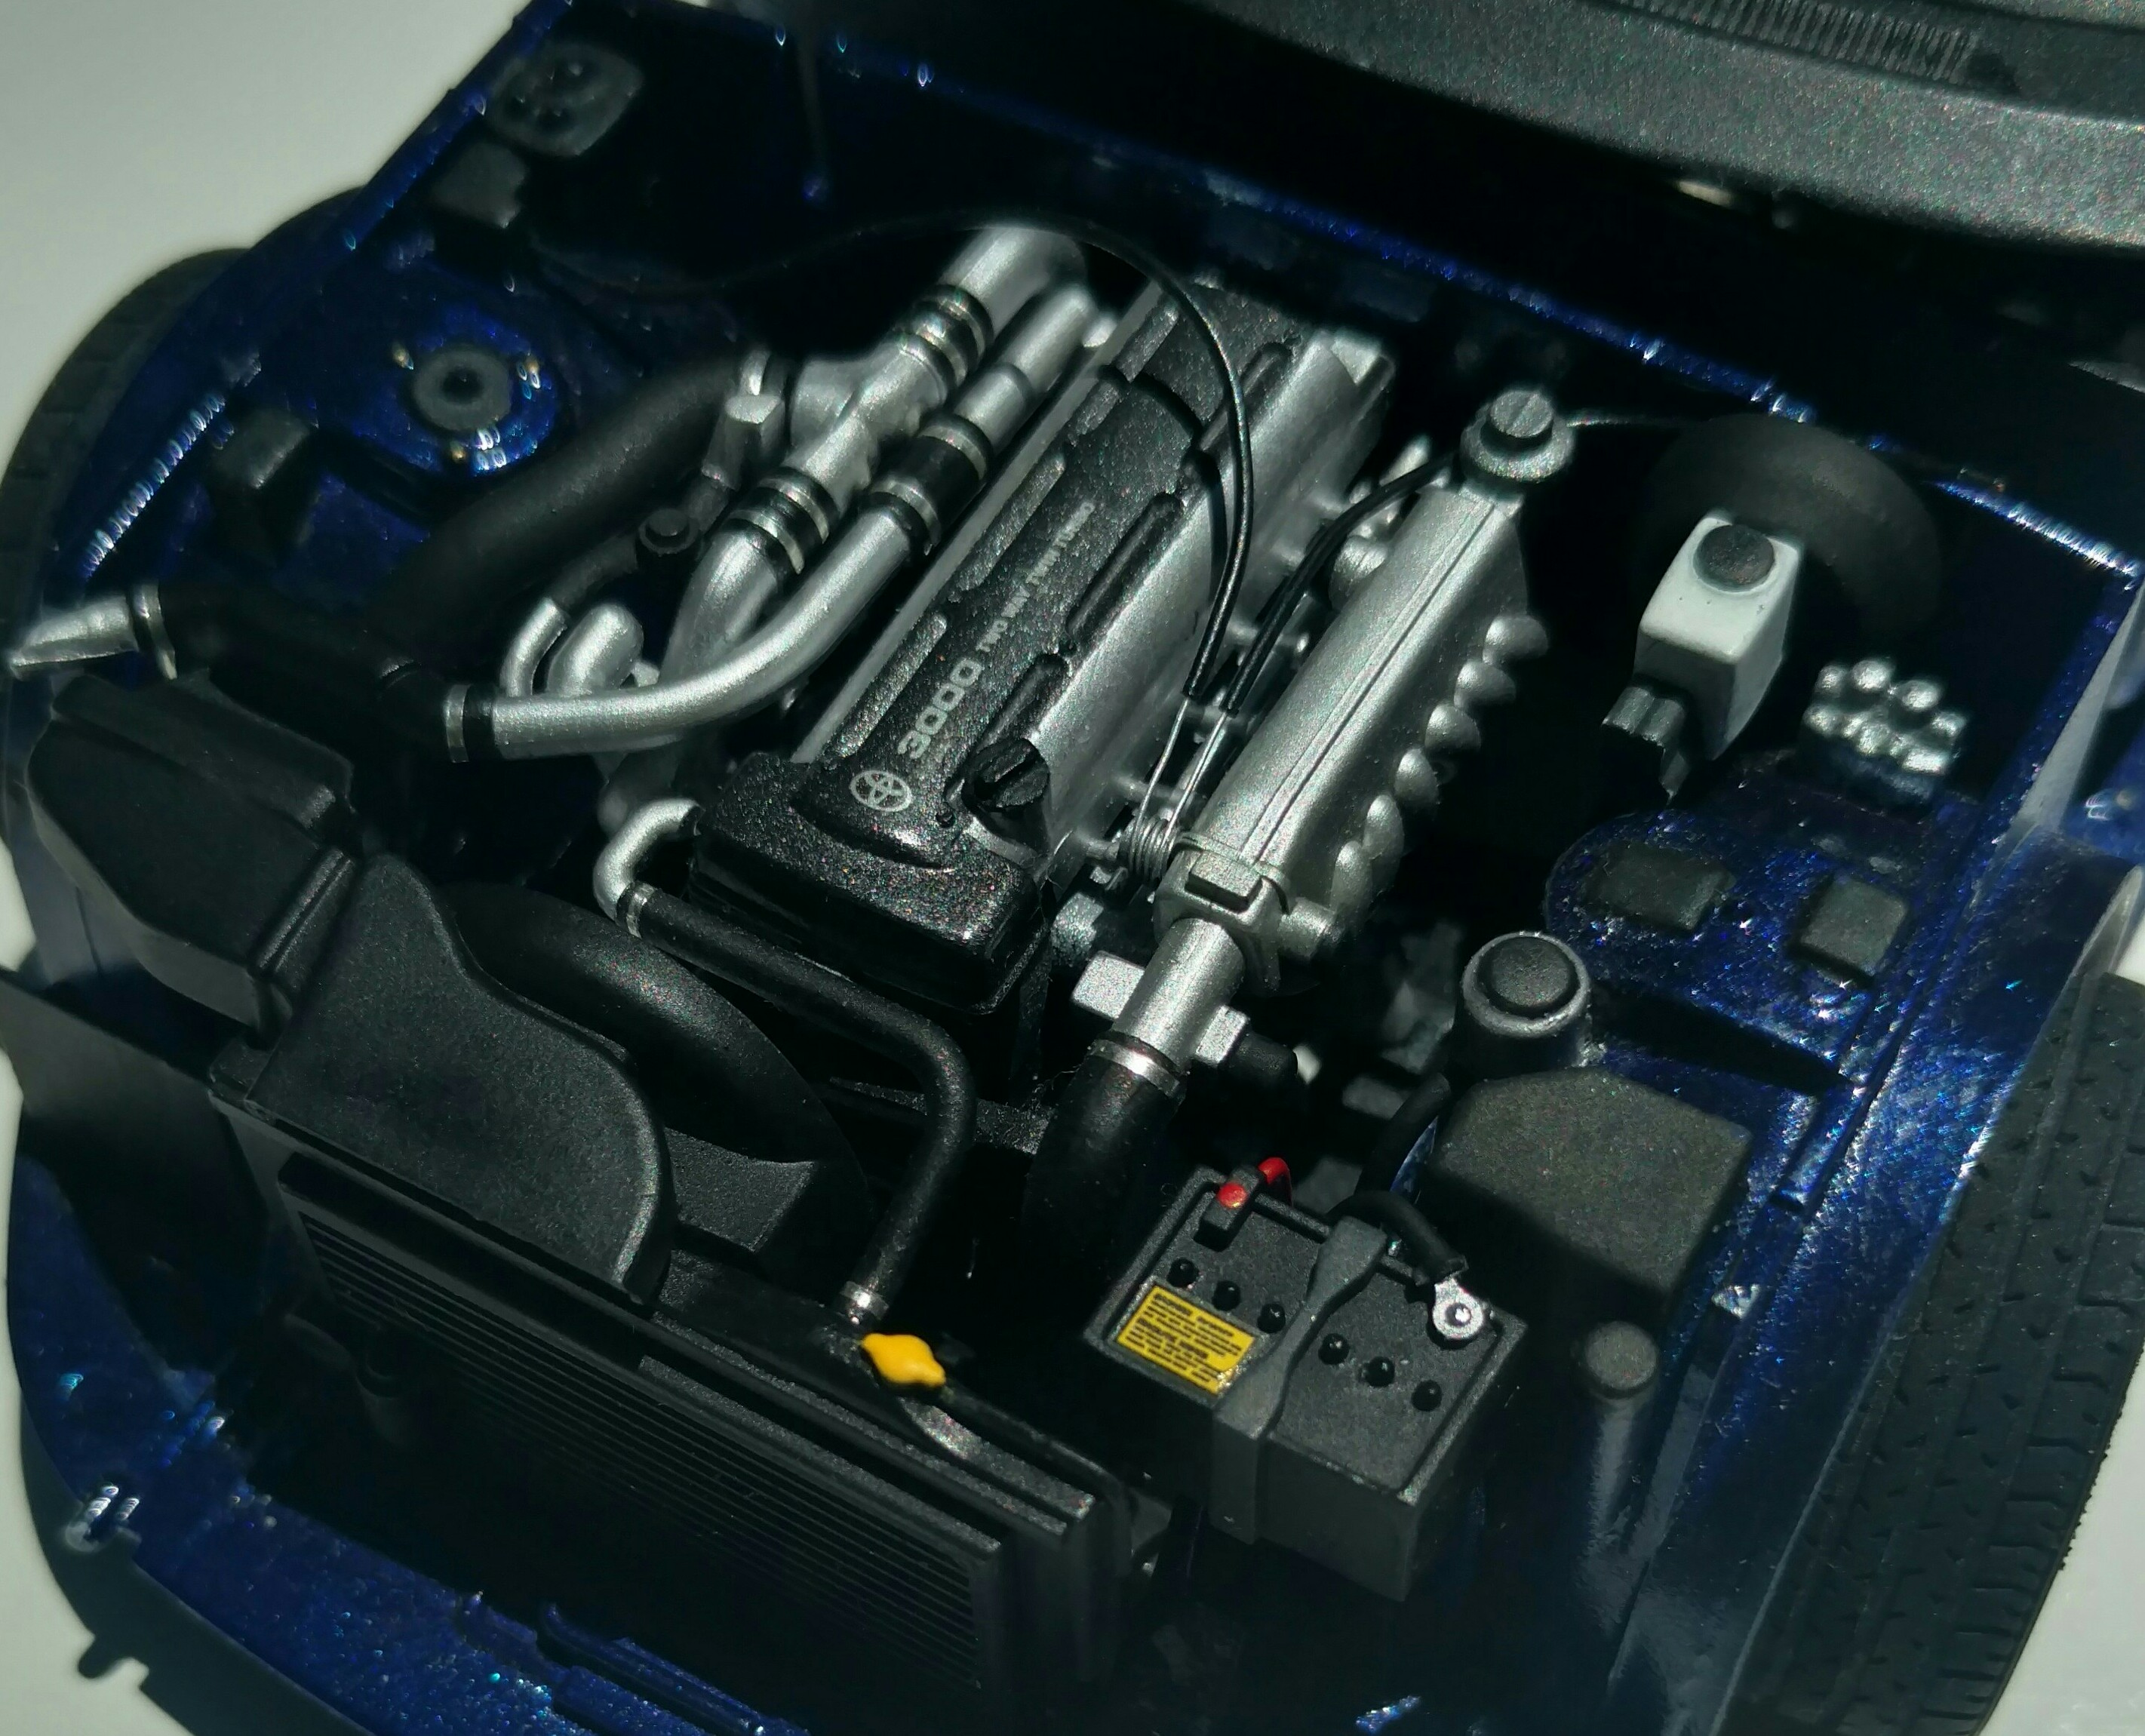
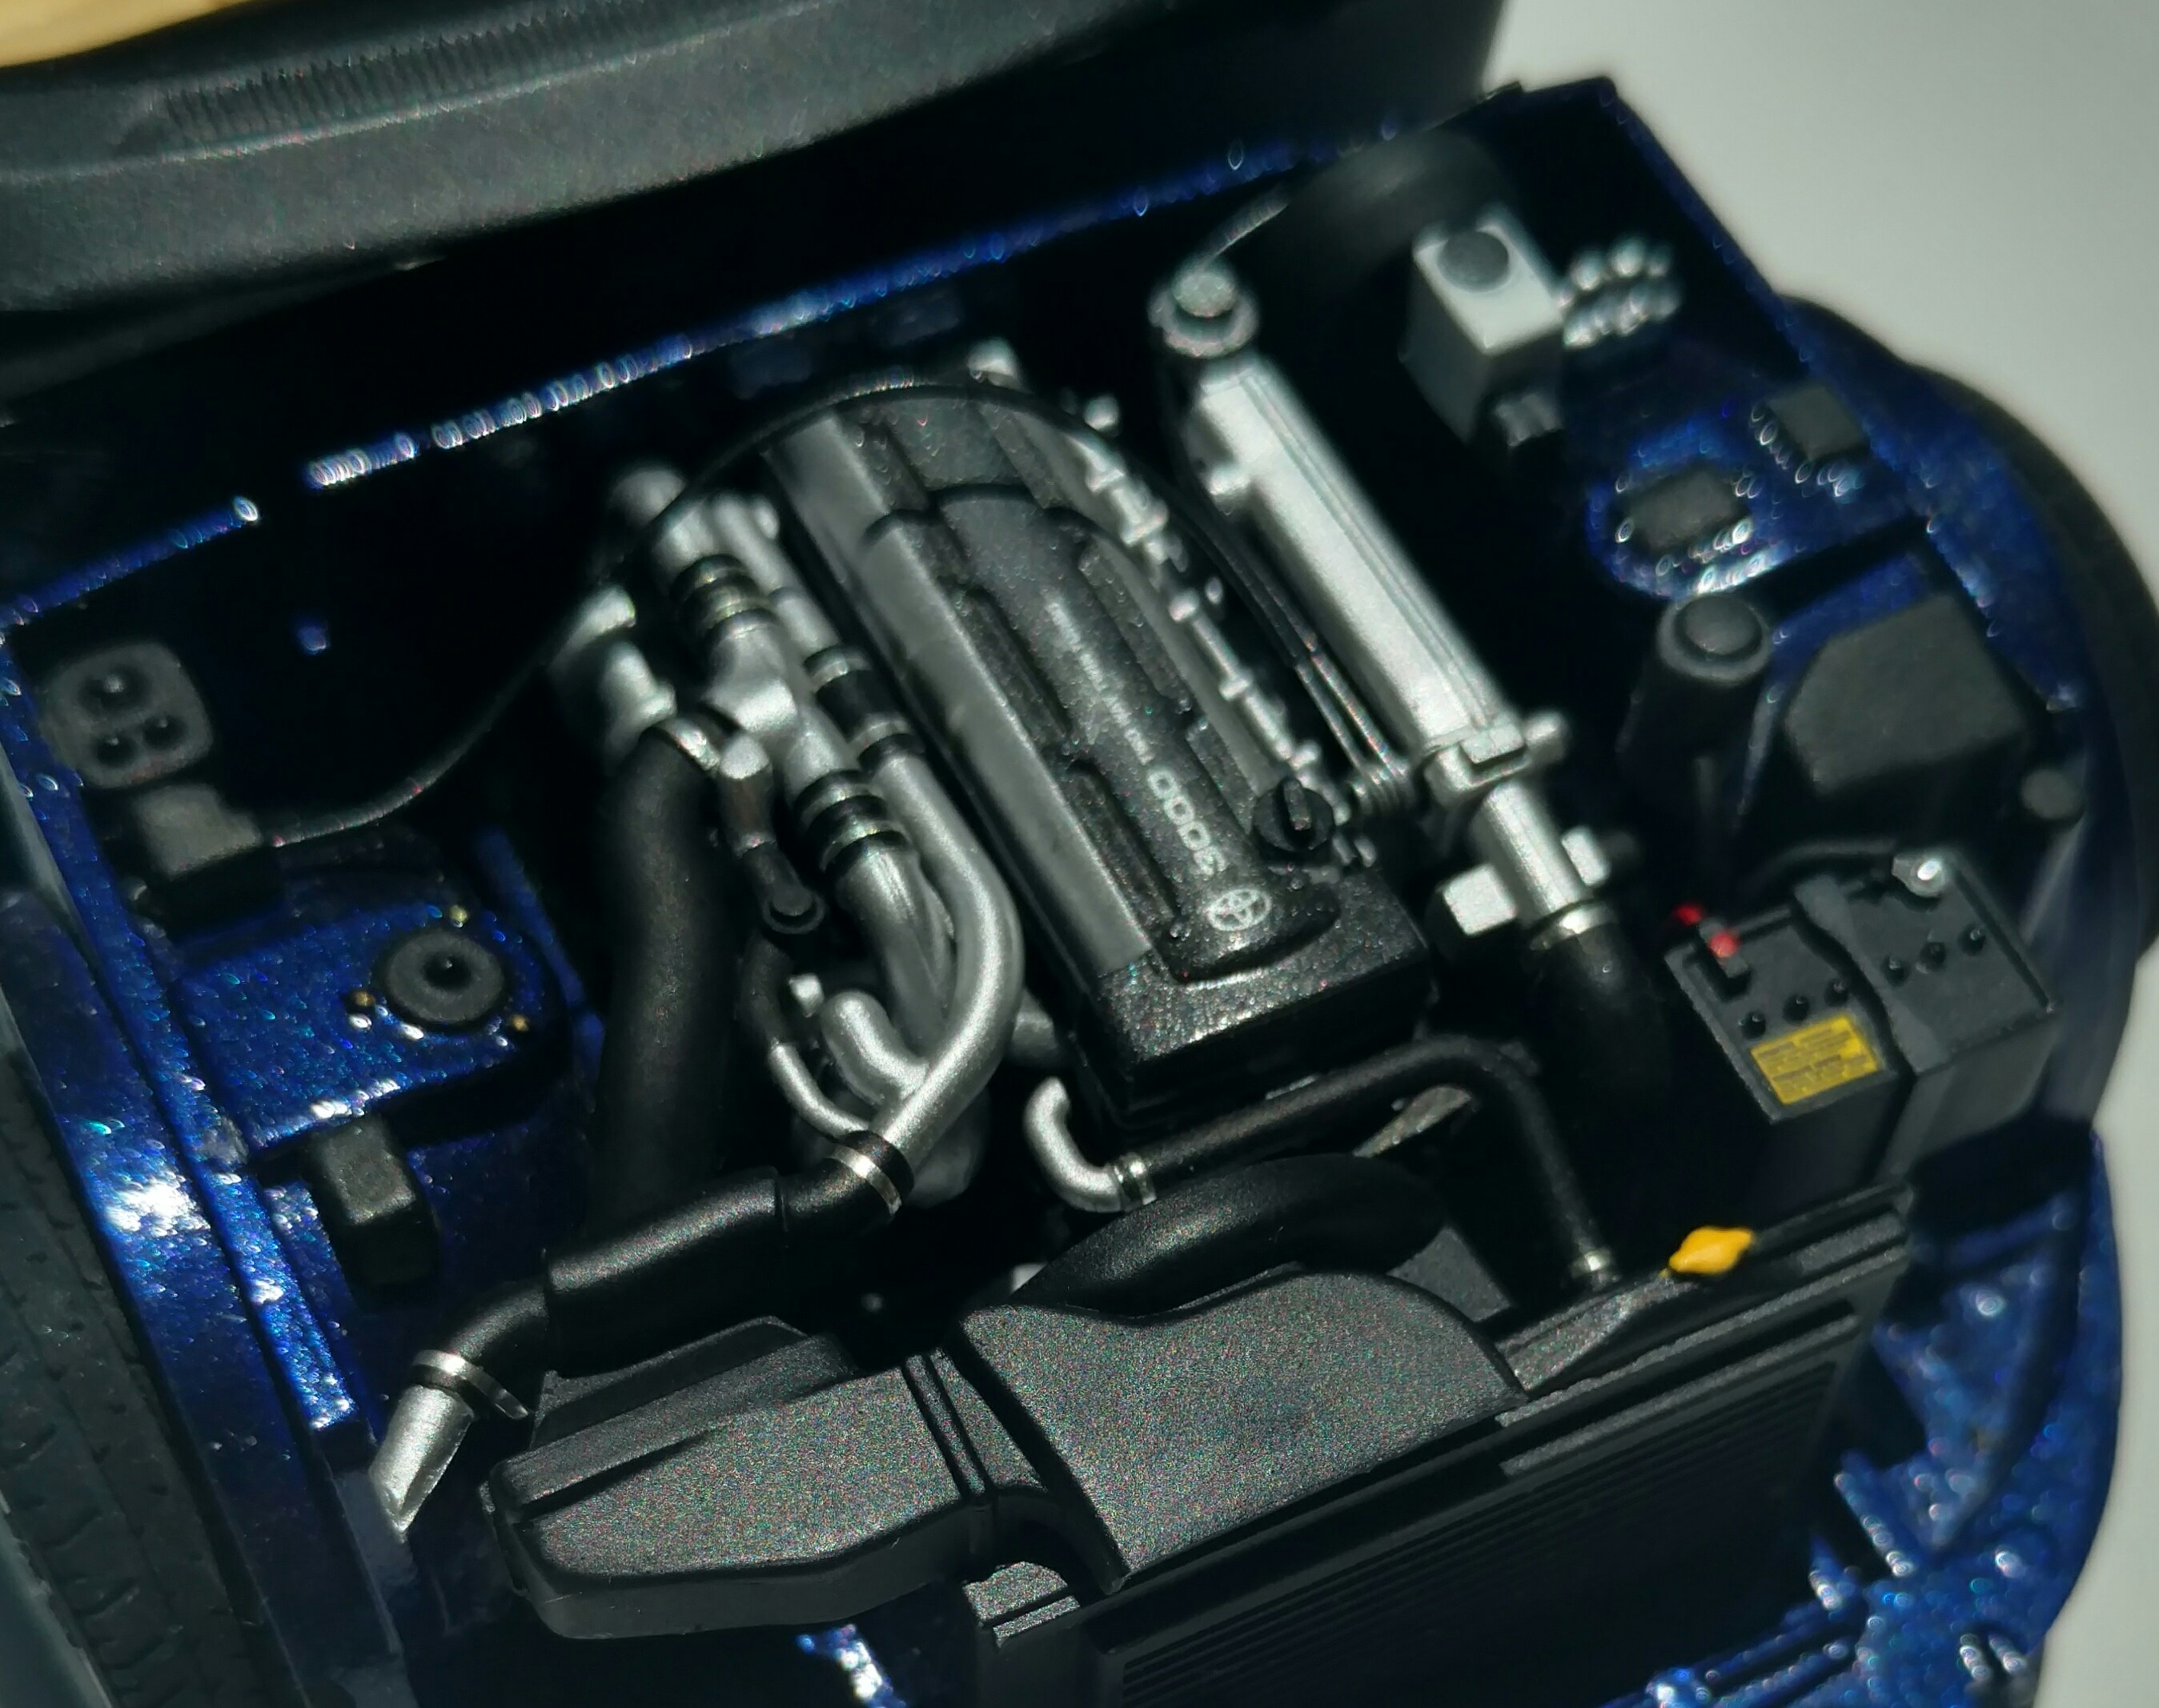
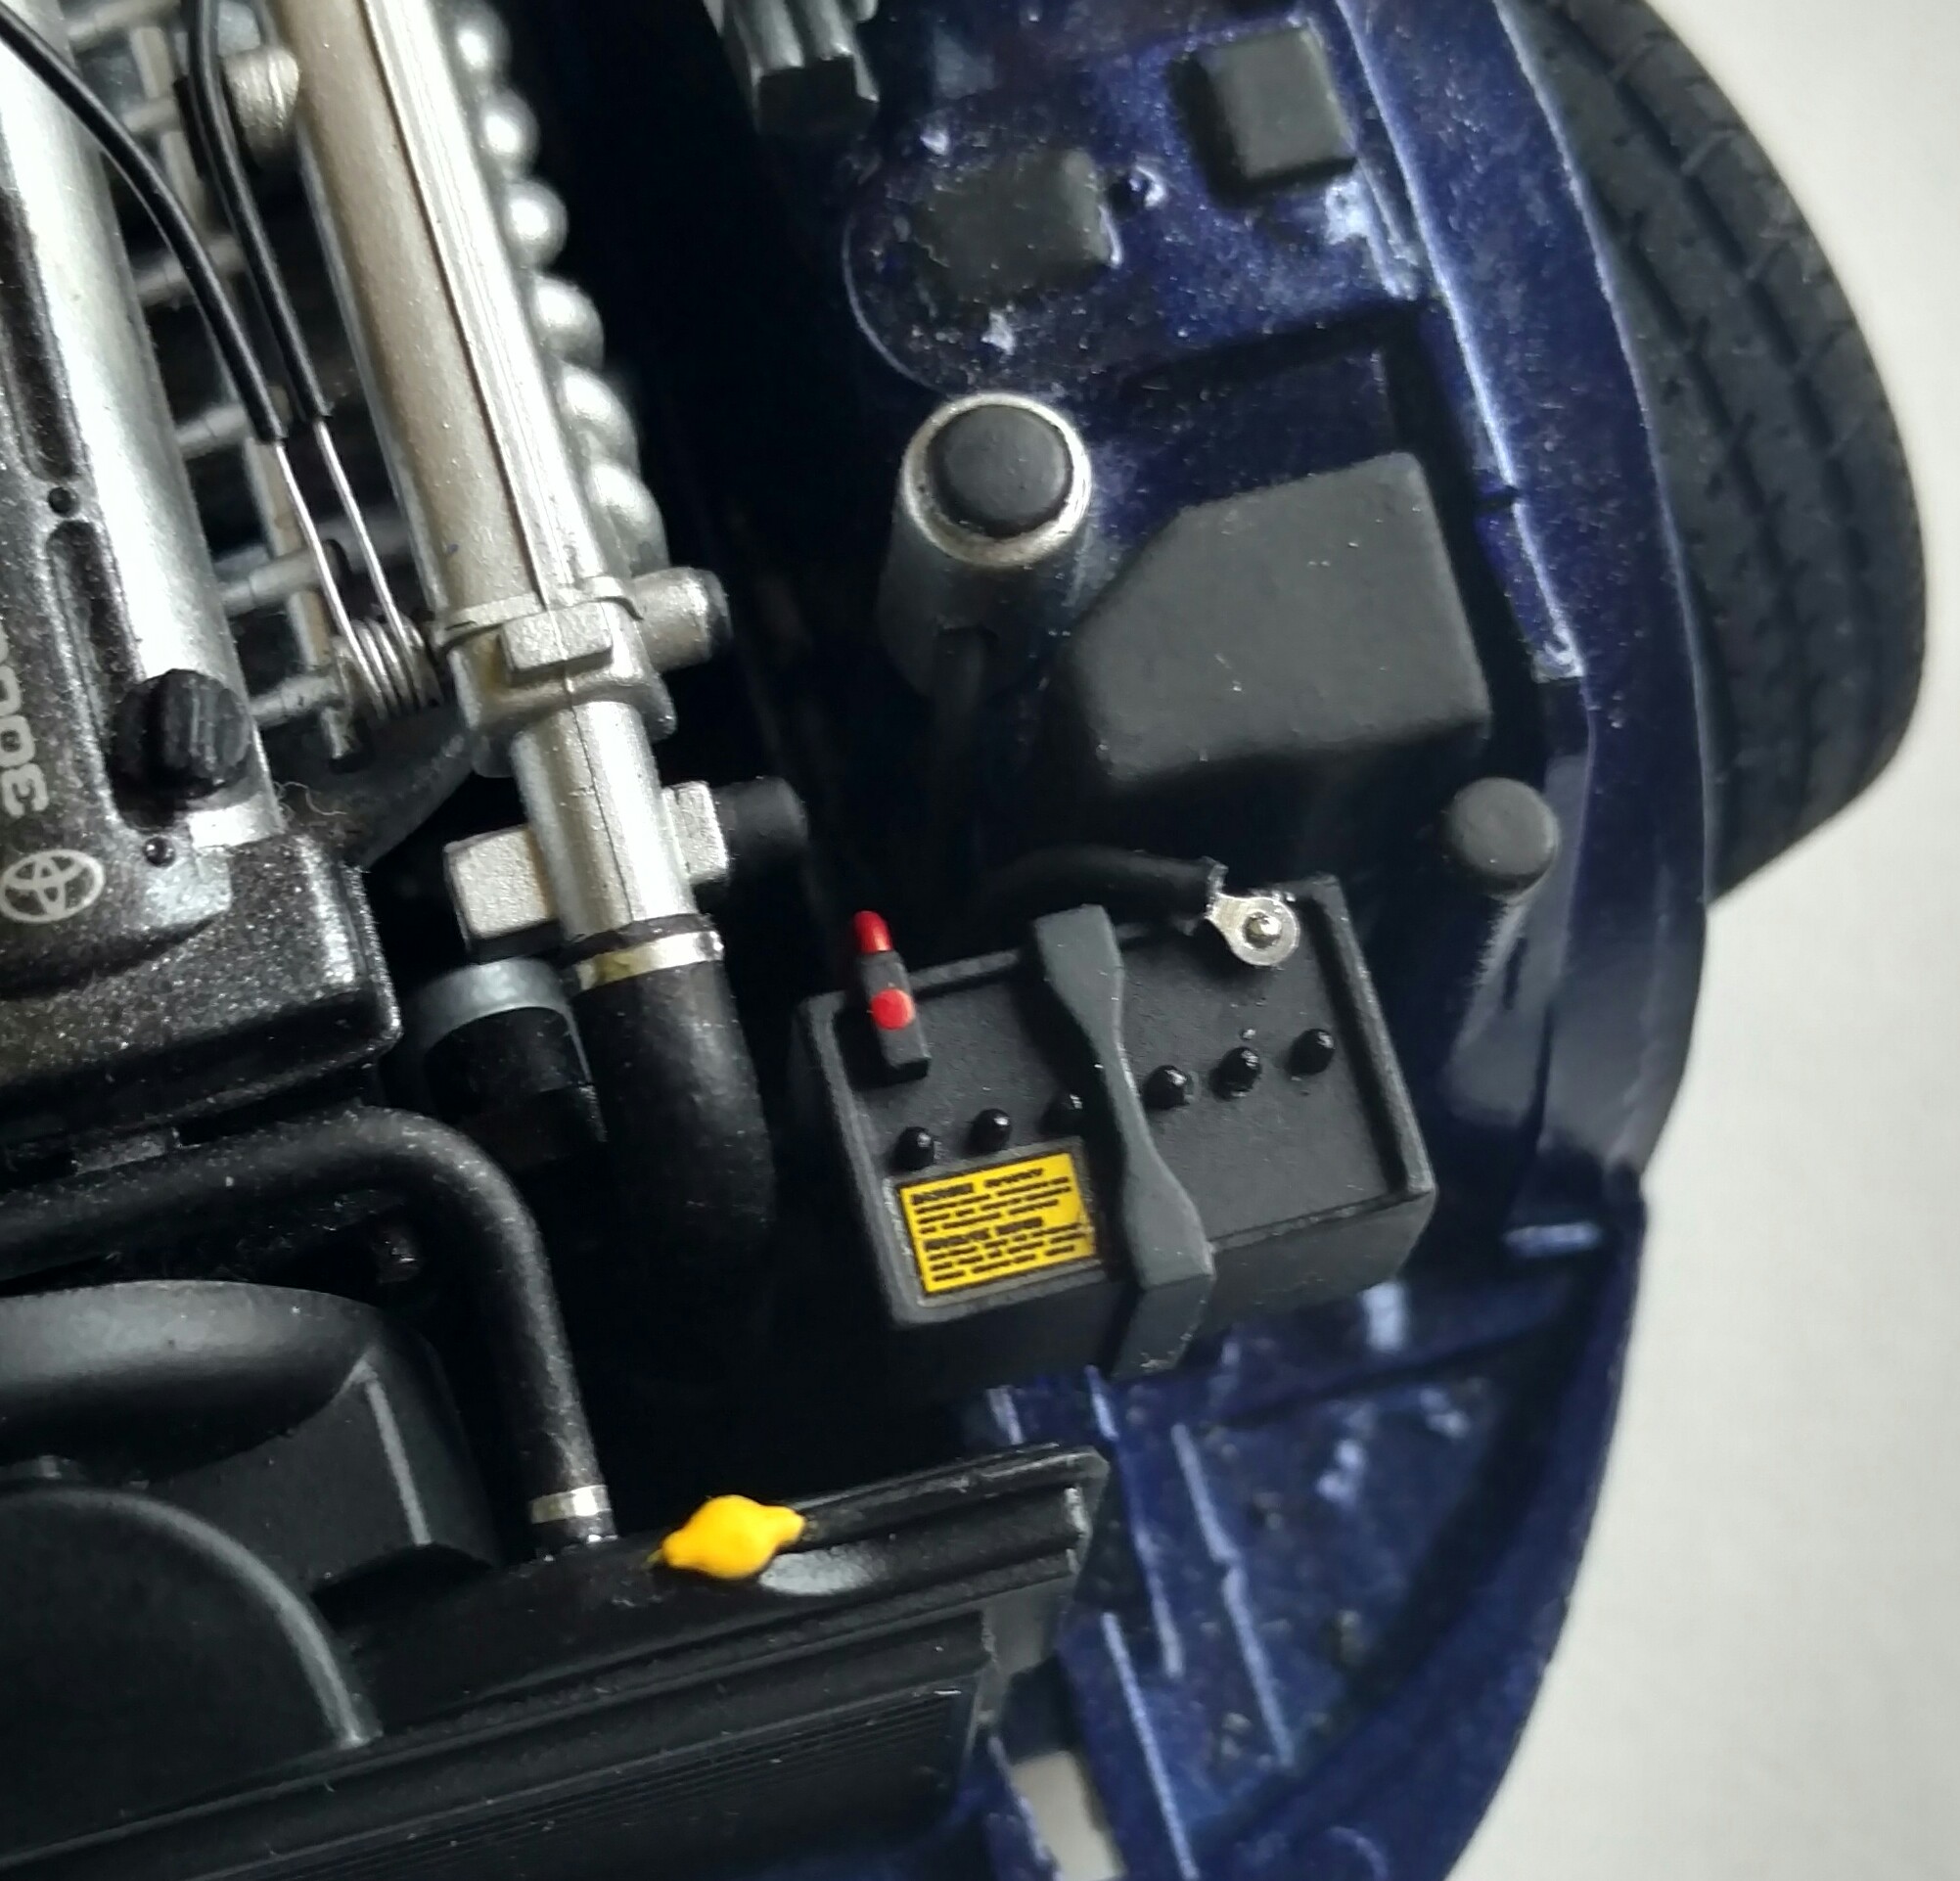
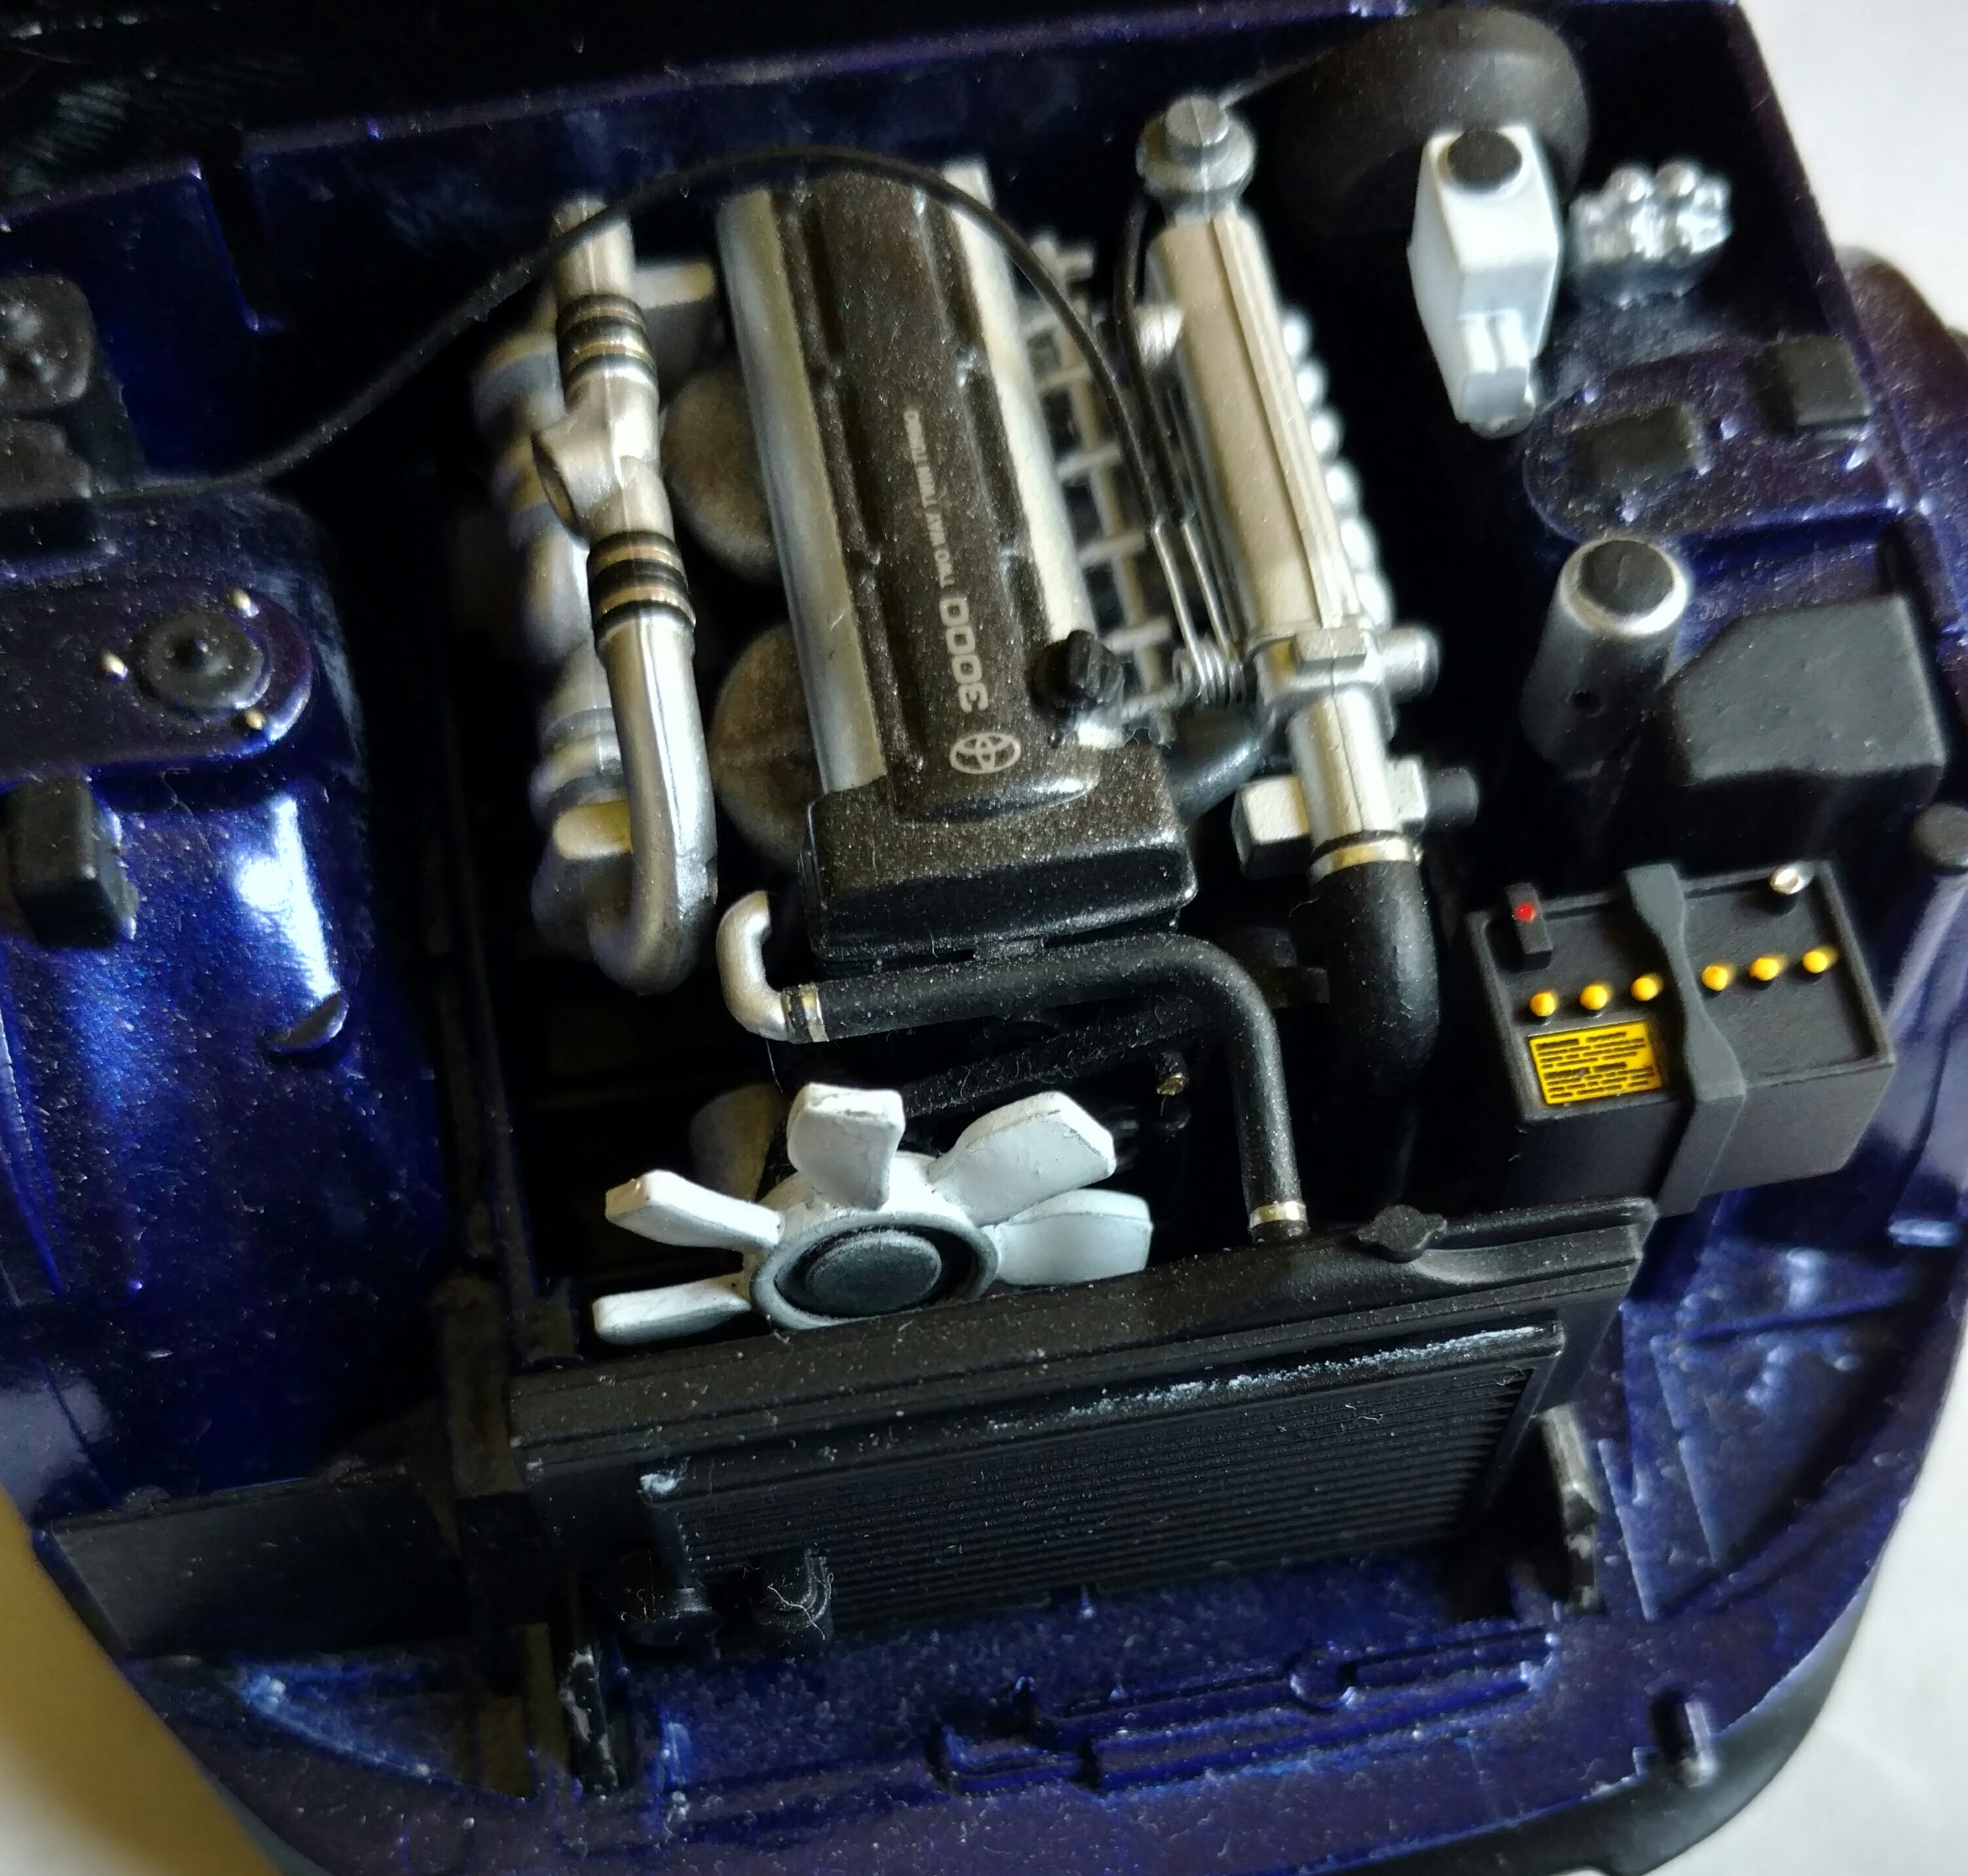
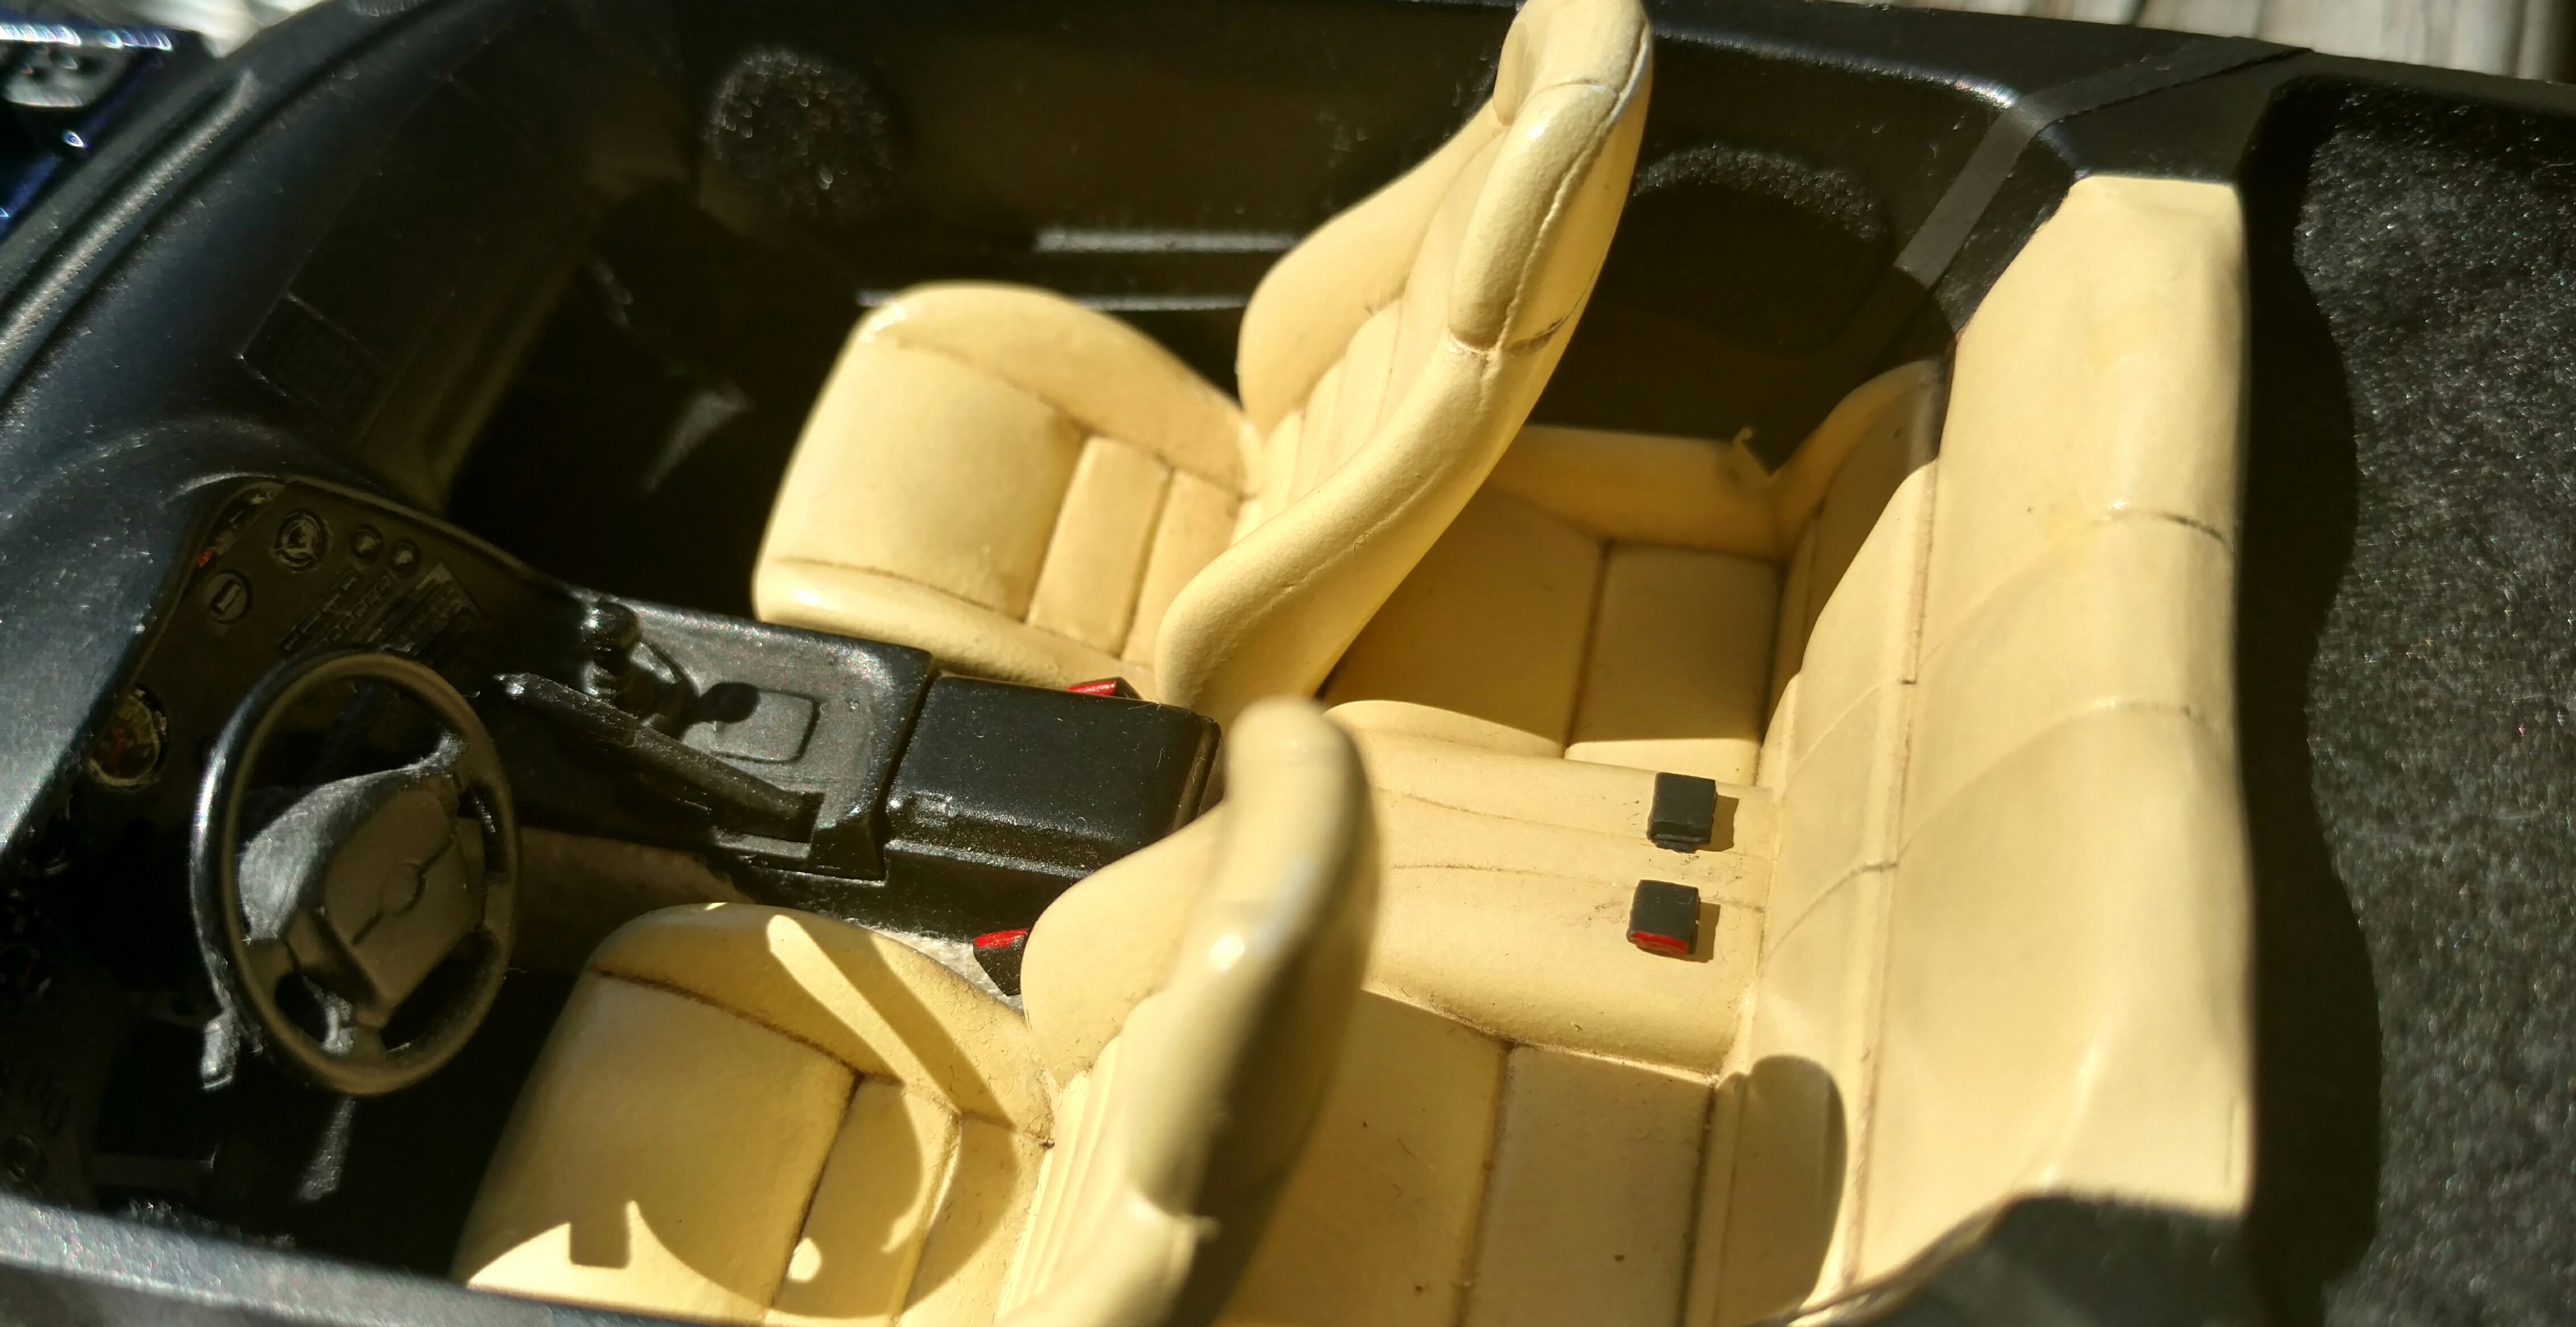
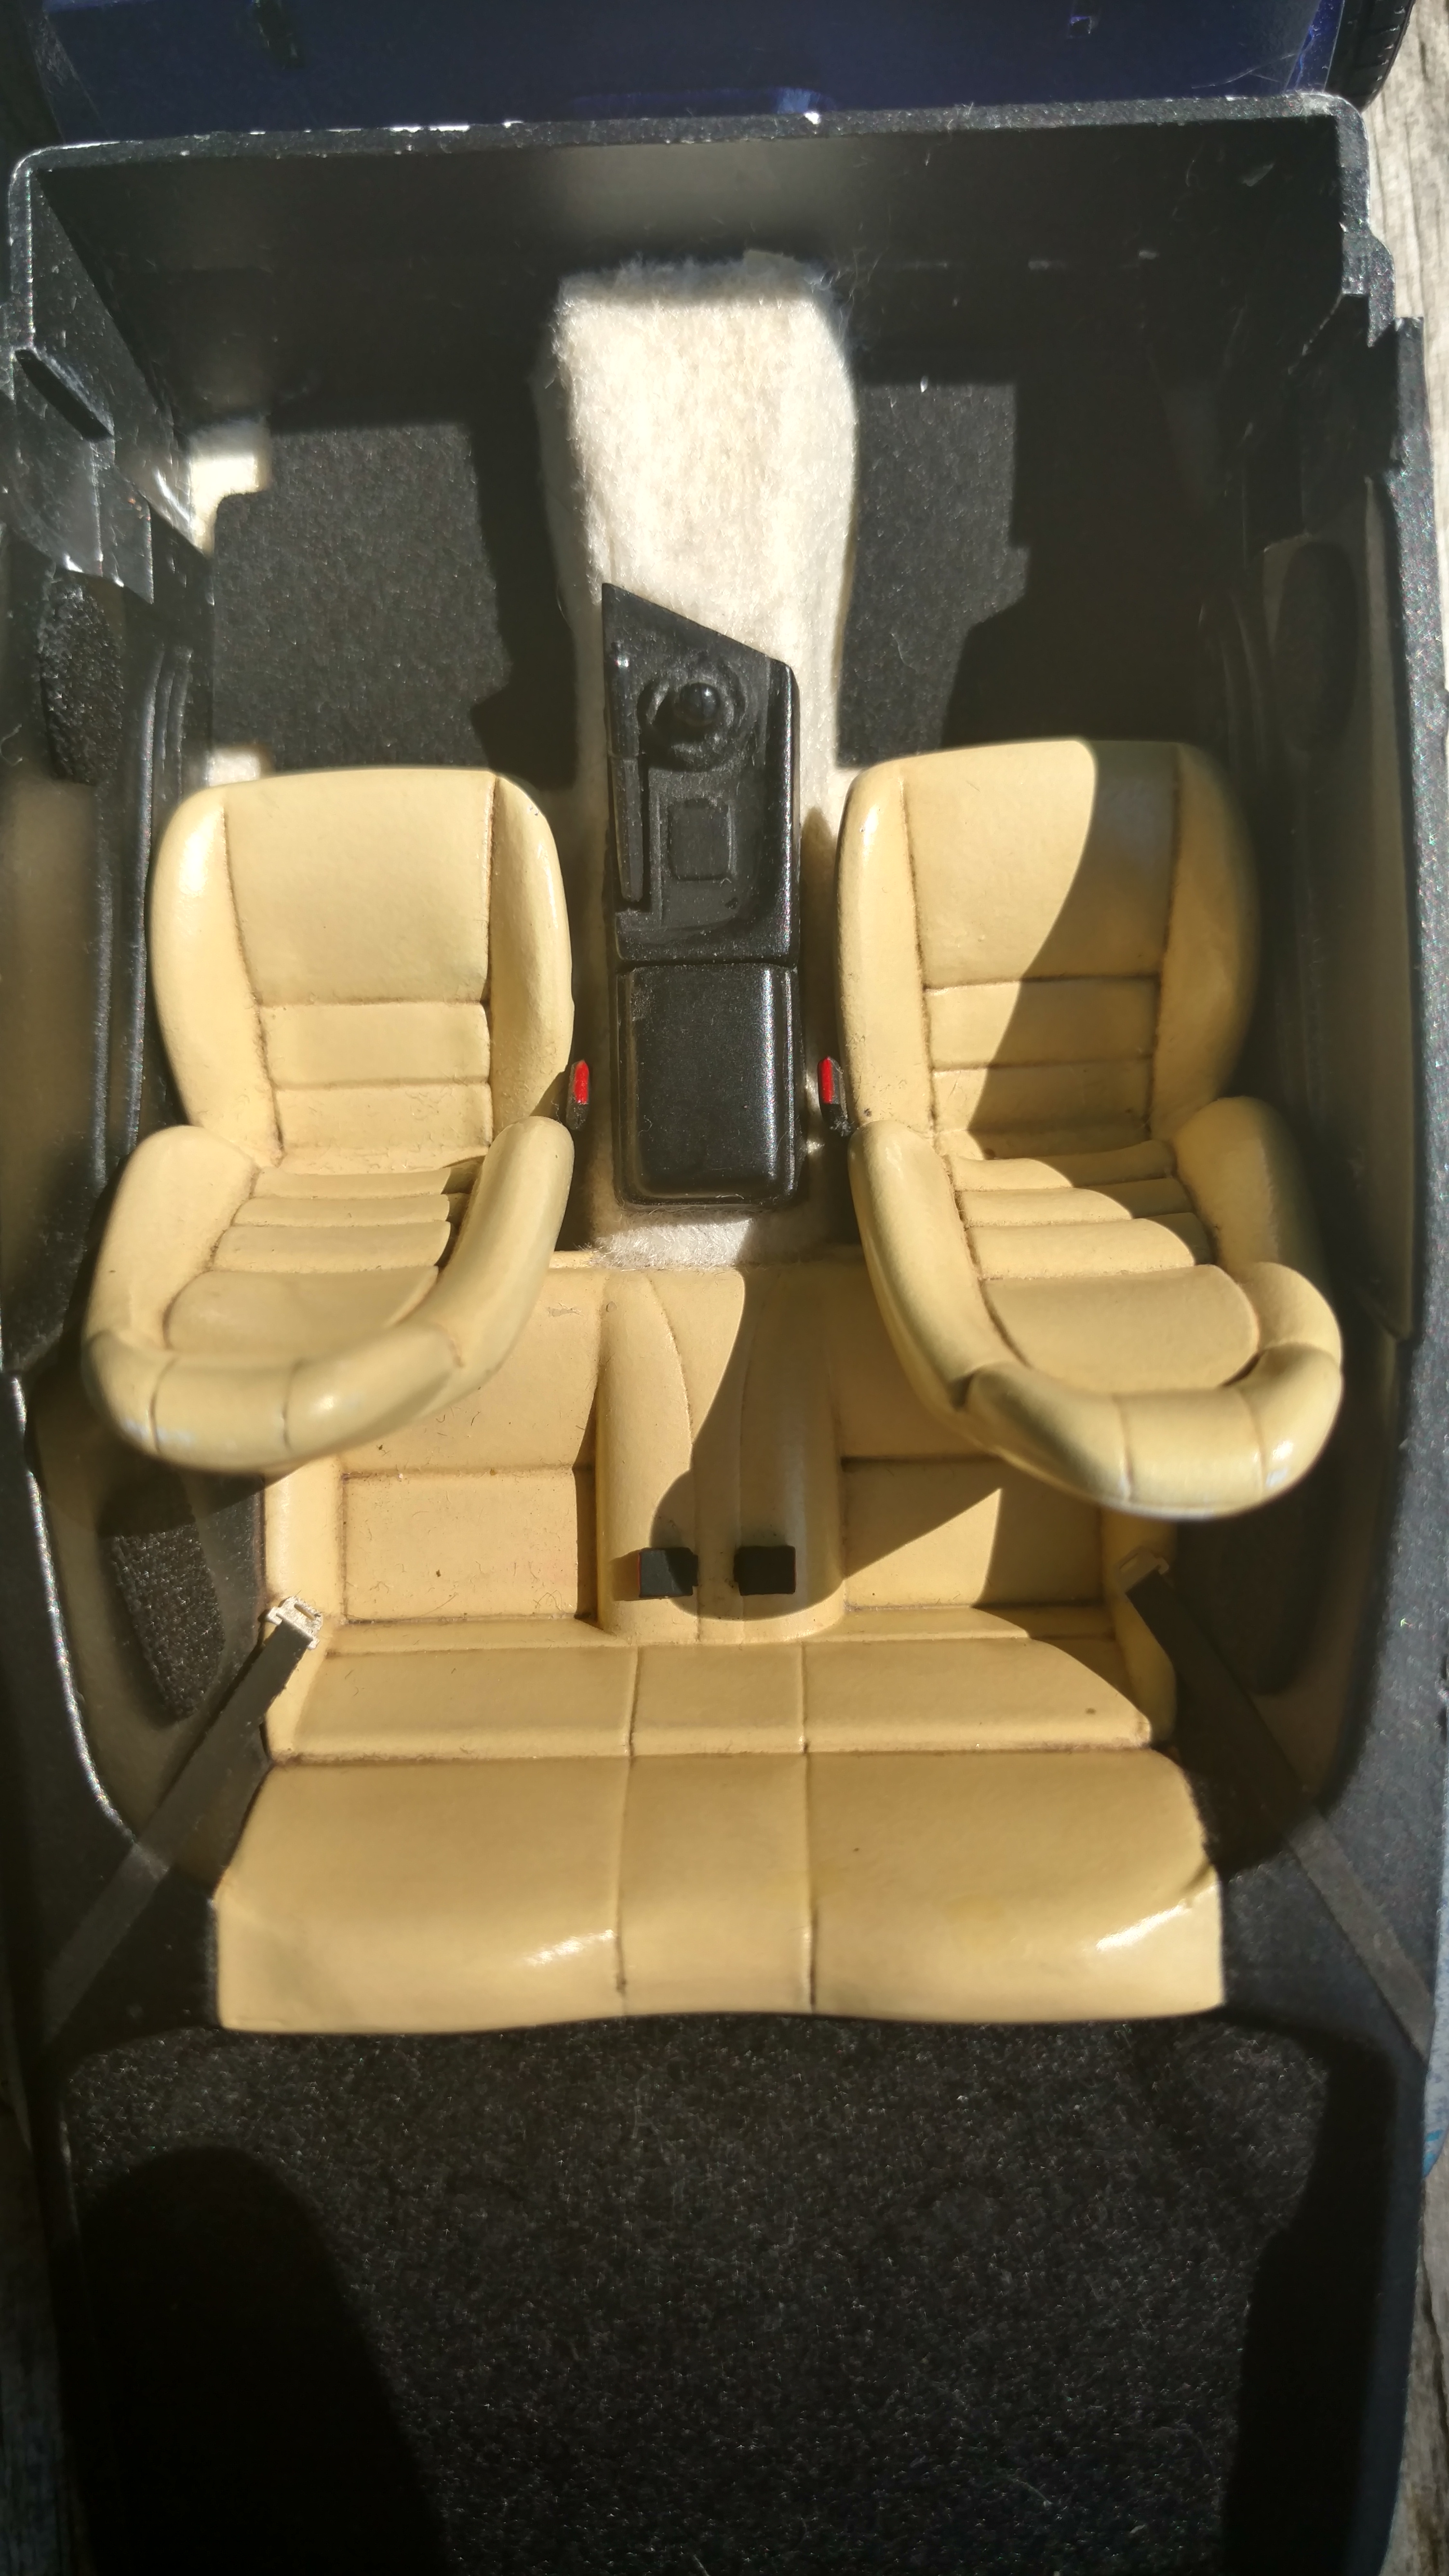
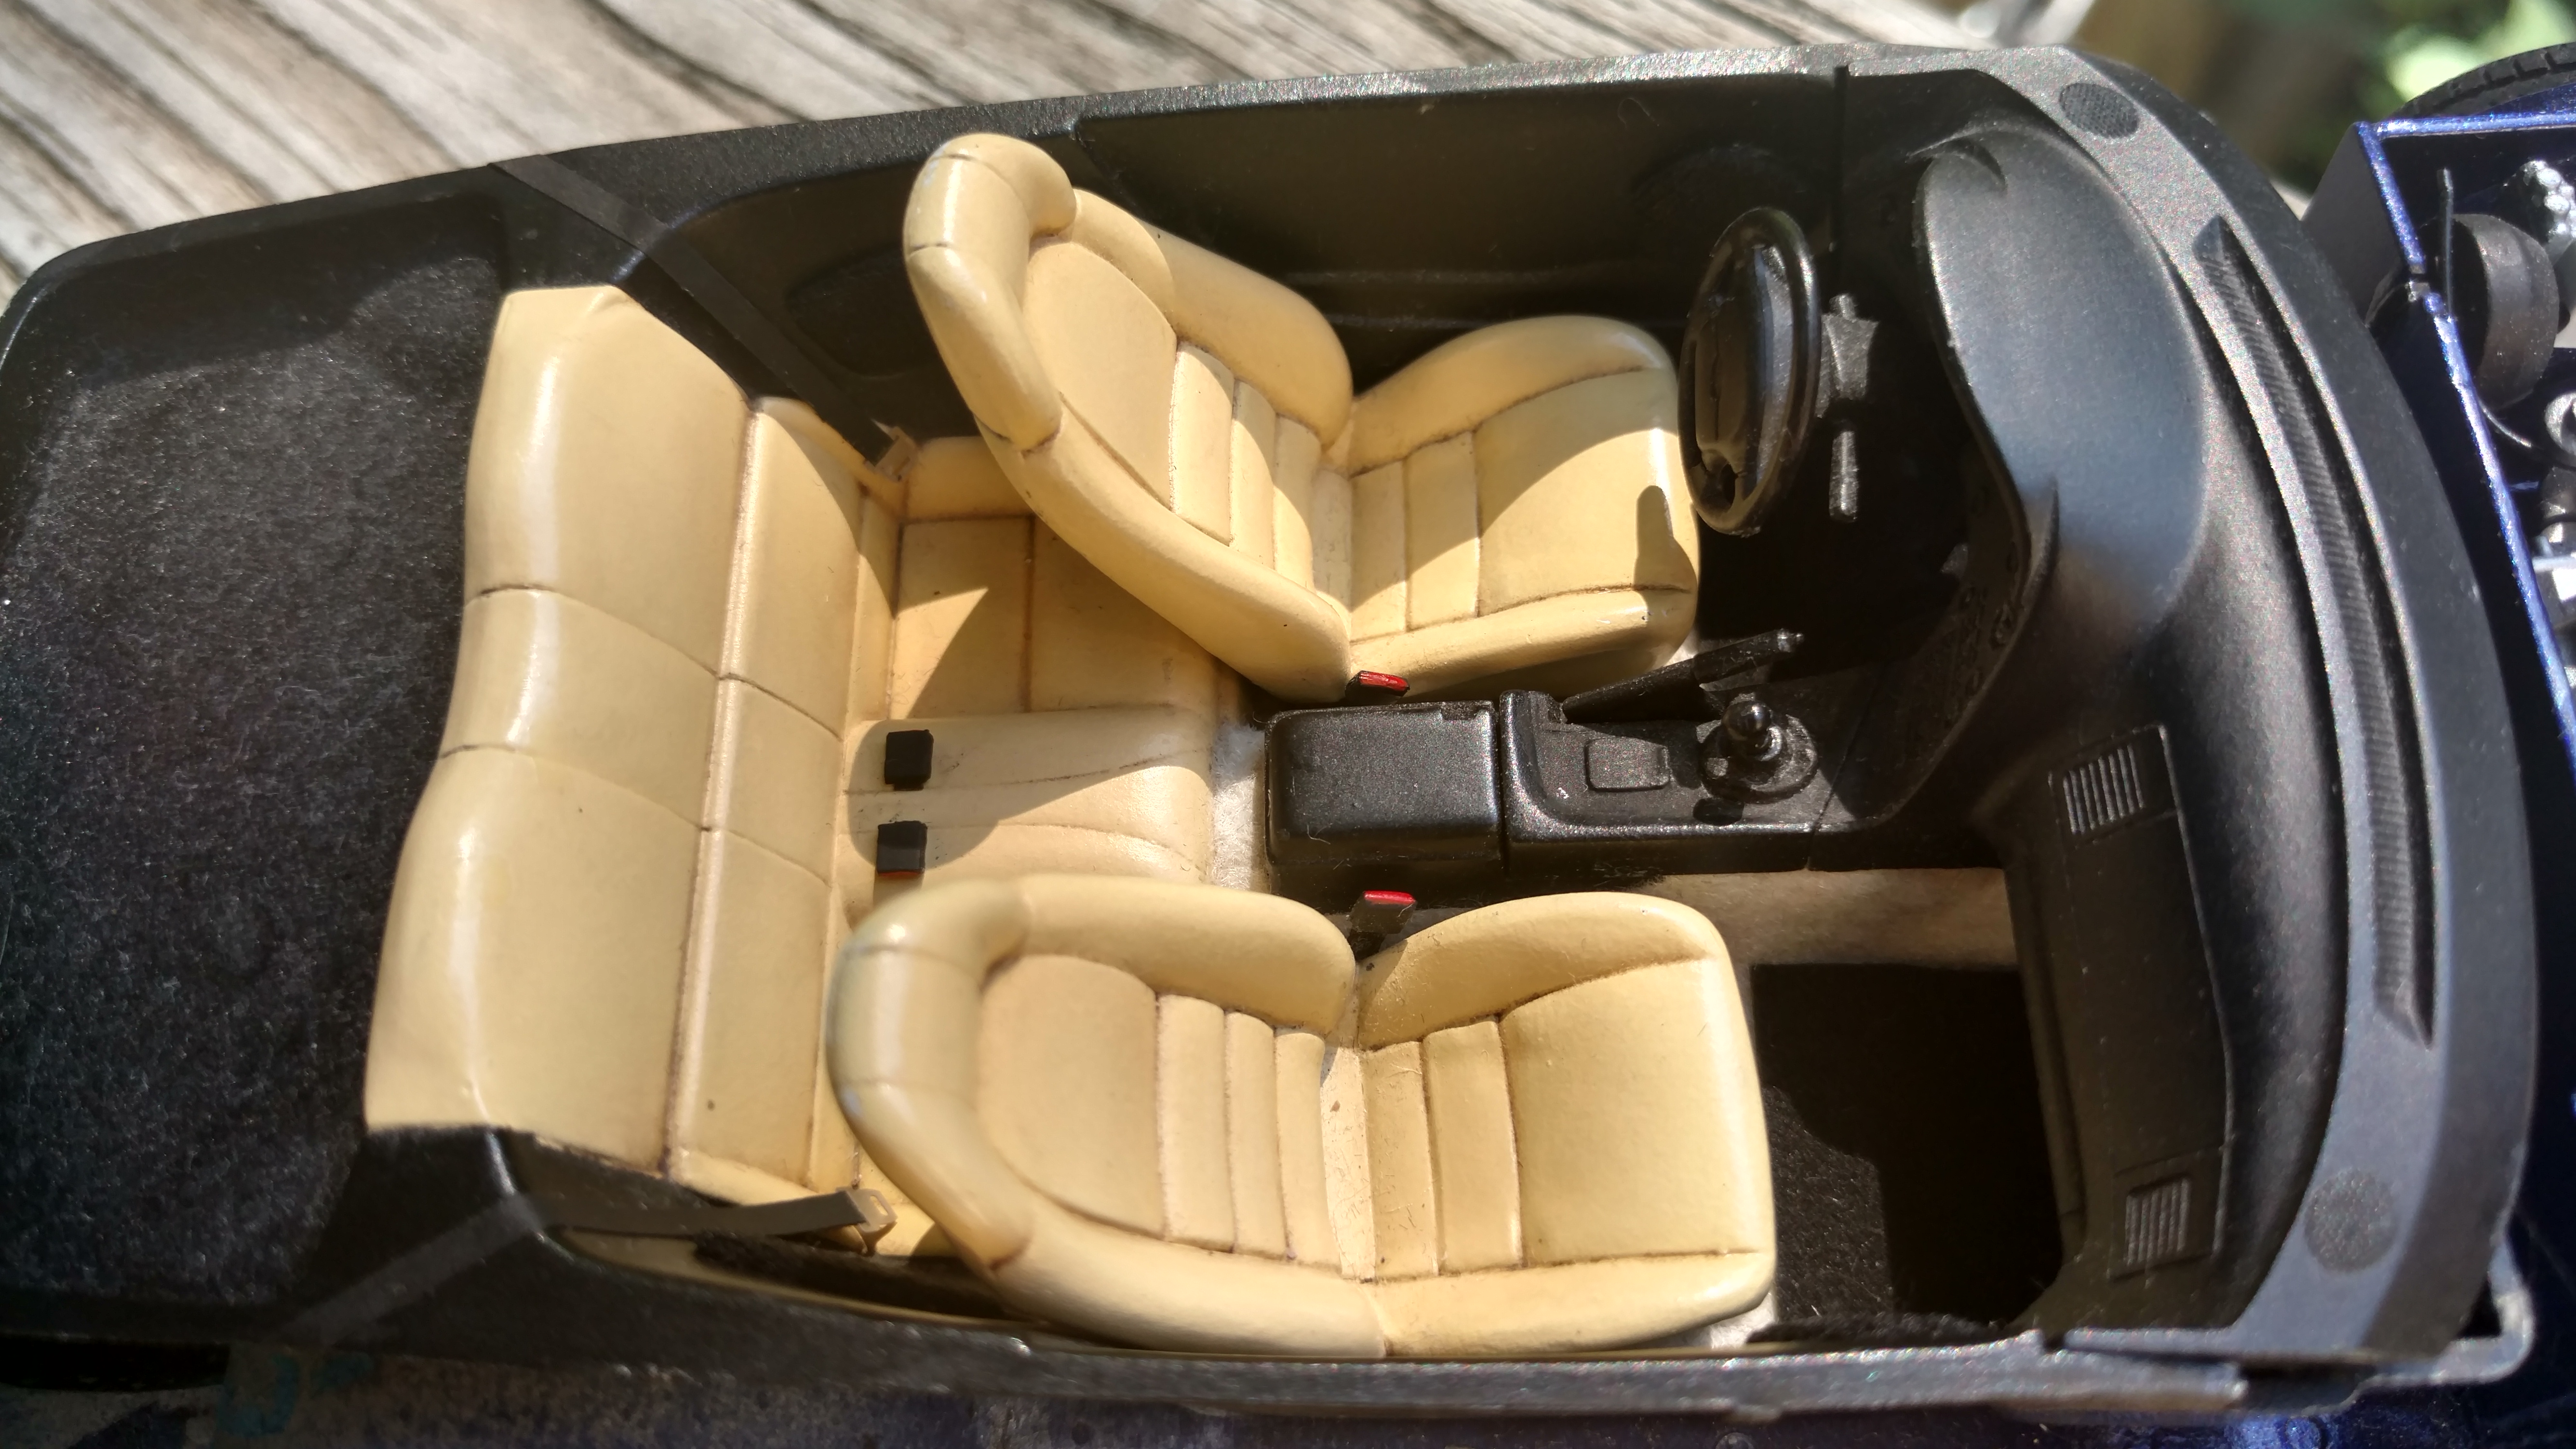
Alright guys just inching closer. I painted the fan shroud and added hose clamps via bmf. That sucker is a pain to mask and detail. I also added battery cables. This was done by drilling a hole in the back of the positive side and simply running thin plastic tubing into it. For the other side I had to modify the terminal by tapping into it and adding a thinner plastic tubing. This way I could snug a PE cable piece securely. I also repainted the battery and I'm very happy with how it turned out. The engine bay is 99% complete. I'm just going to add some vaccum lines to top it off. I have also completed the interior. I added seatbelts belts and and PE brackets for the front seats. I had to cut two notches into the tub to make sure they flush with the body. I also changed out the rear buckles for a modern era design. I then did some touch ups and glued the seats in place. I couldn't find a method to adding the Supra logo to the floor mats so I went with out. It's hard to notice anyway. Getting close to the finish line.
-
Currently Tamiya Toyota Supra 90% done Revell Porsche 918 Tamiya Ferrari F50 Fujimi Ferrari 550 Marinello Aoshima Lamborghini Diablo GT
-
Tamiya 1/24 Laferrari Shadow box Version (Picture Heavy)
DiscoRover007 replied to Samuel S's topic in WIP: Model Cars
Try and see if you can polish off that residue. I'd think a compound could take that off. -
If you want real accuracy the Tamiya 1/24 Supra kit is by far superior in proportion and detail. It represents the stock version of the car but they're are companies that sell the f&f body kits for the model. That would require modelling skills though. No way should that amt model be $100. That is a waste. Just my two cents.
-
Tamiya Toyota Supra: UPDATE 6/15/17
DiscoRover007 replied to DiscoRover007's topic in WIP: Model Cars
Thank you sir! Trying to keep it clean and tasteful! -
Looks terrific
-
Tamiya Toyota Supra: UPDATE 6/15/17
DiscoRover007 replied to DiscoRover007's topic in WIP: Model Cars
Battery painted and detailed. Turbos installed. Painted model master aluminum metalizer, then masked and painted hoses with Vallejo air black. Hose clamps on bmf.
-
1963 Porsche 356 Carrera------Update! 5/22/17
DiscoRover007 replied to MrObsessive's topic in WIP: Model Cars
Looking good -
Tamiya Toyota Supra: UPDATE 6/15/17
DiscoRover007 replied to DiscoRover007's topic in WIP: Model Cars
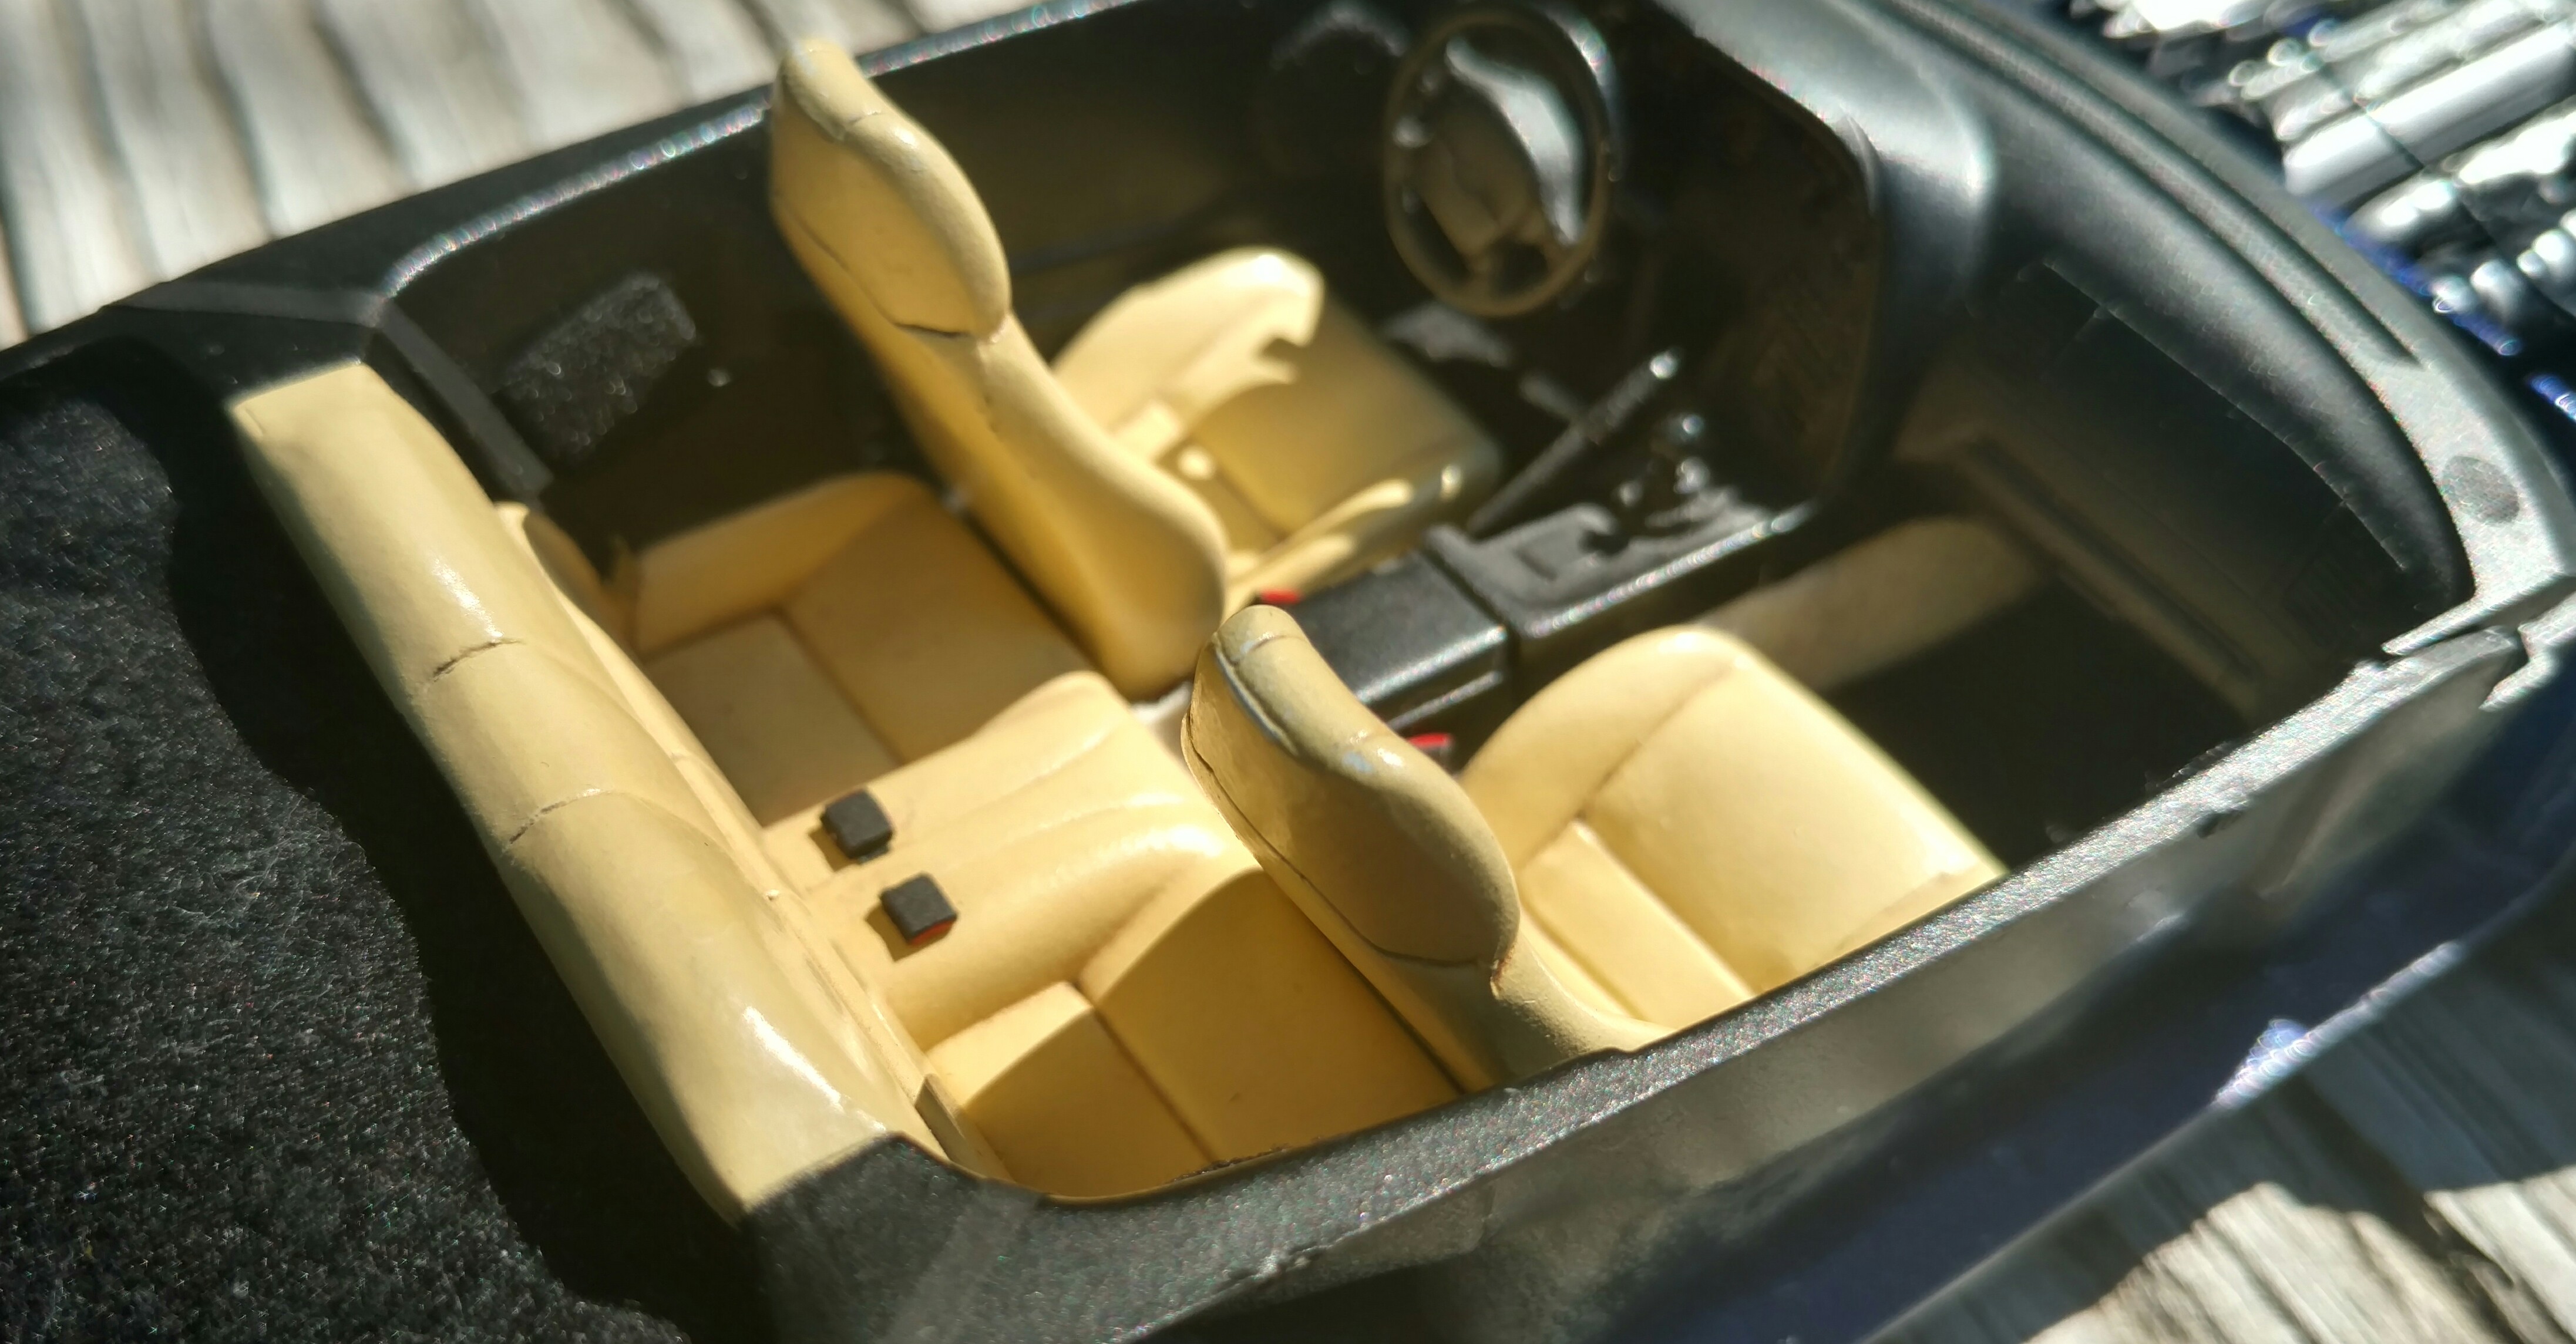
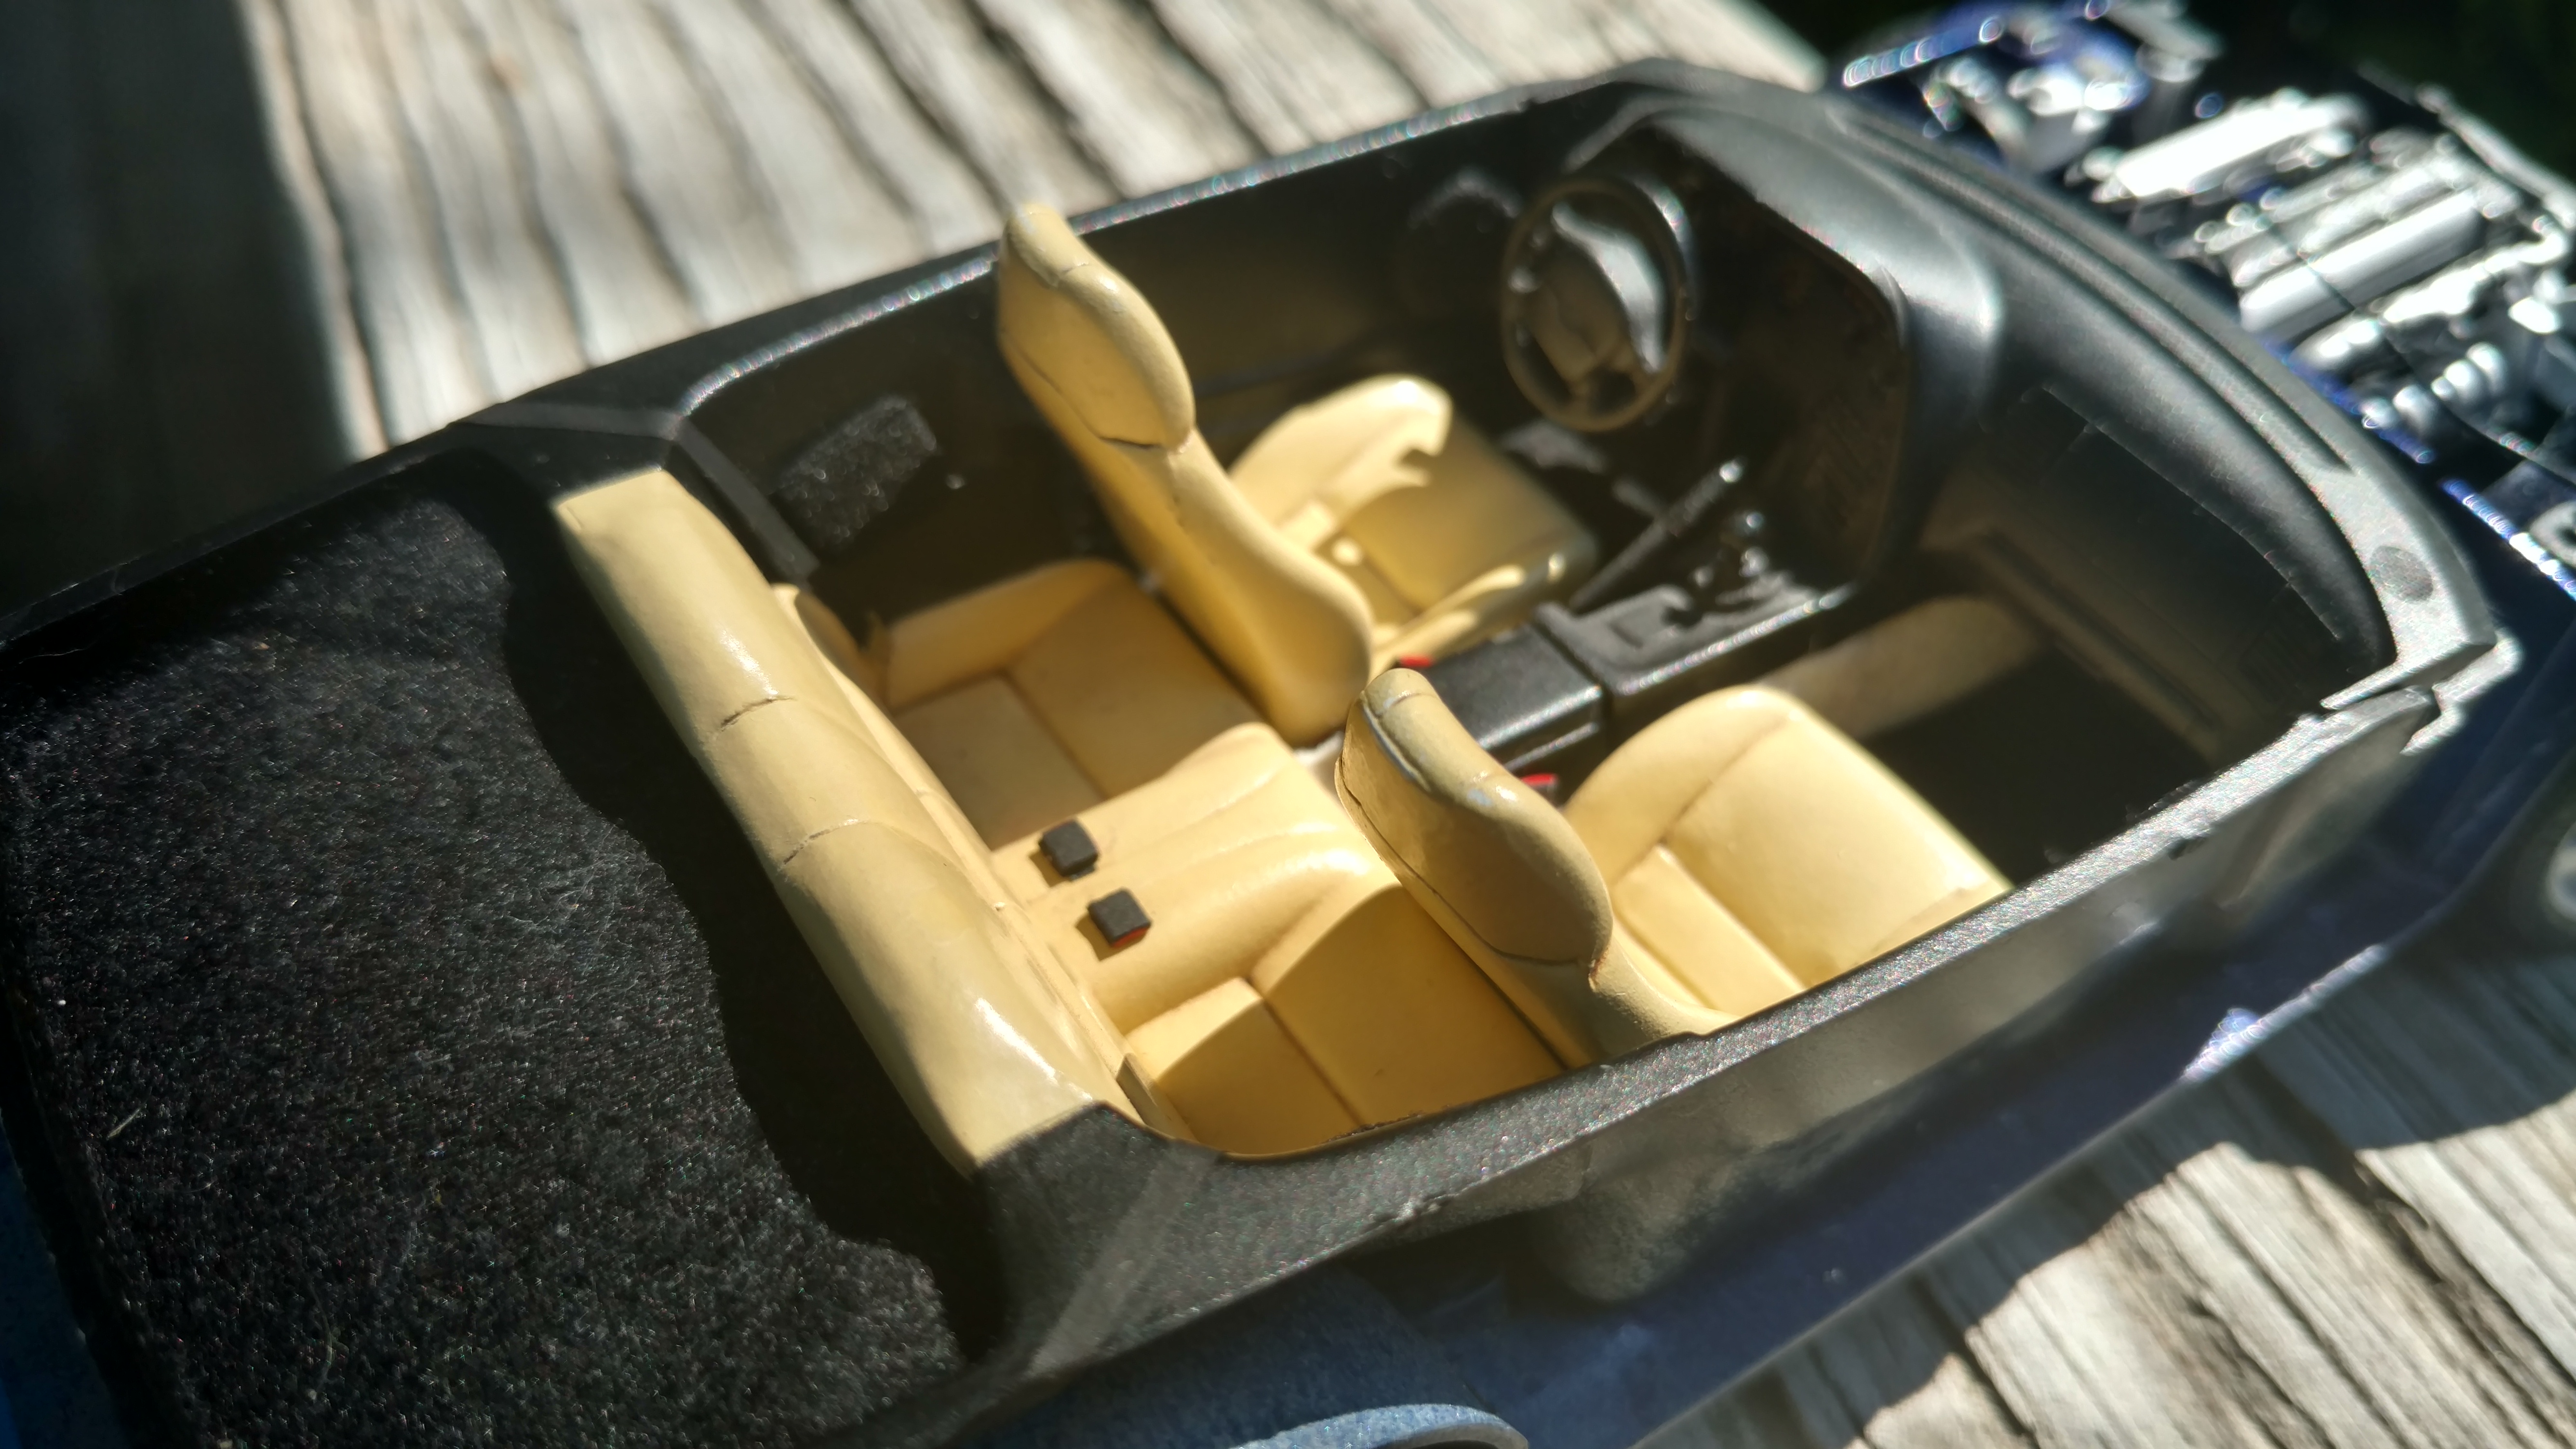
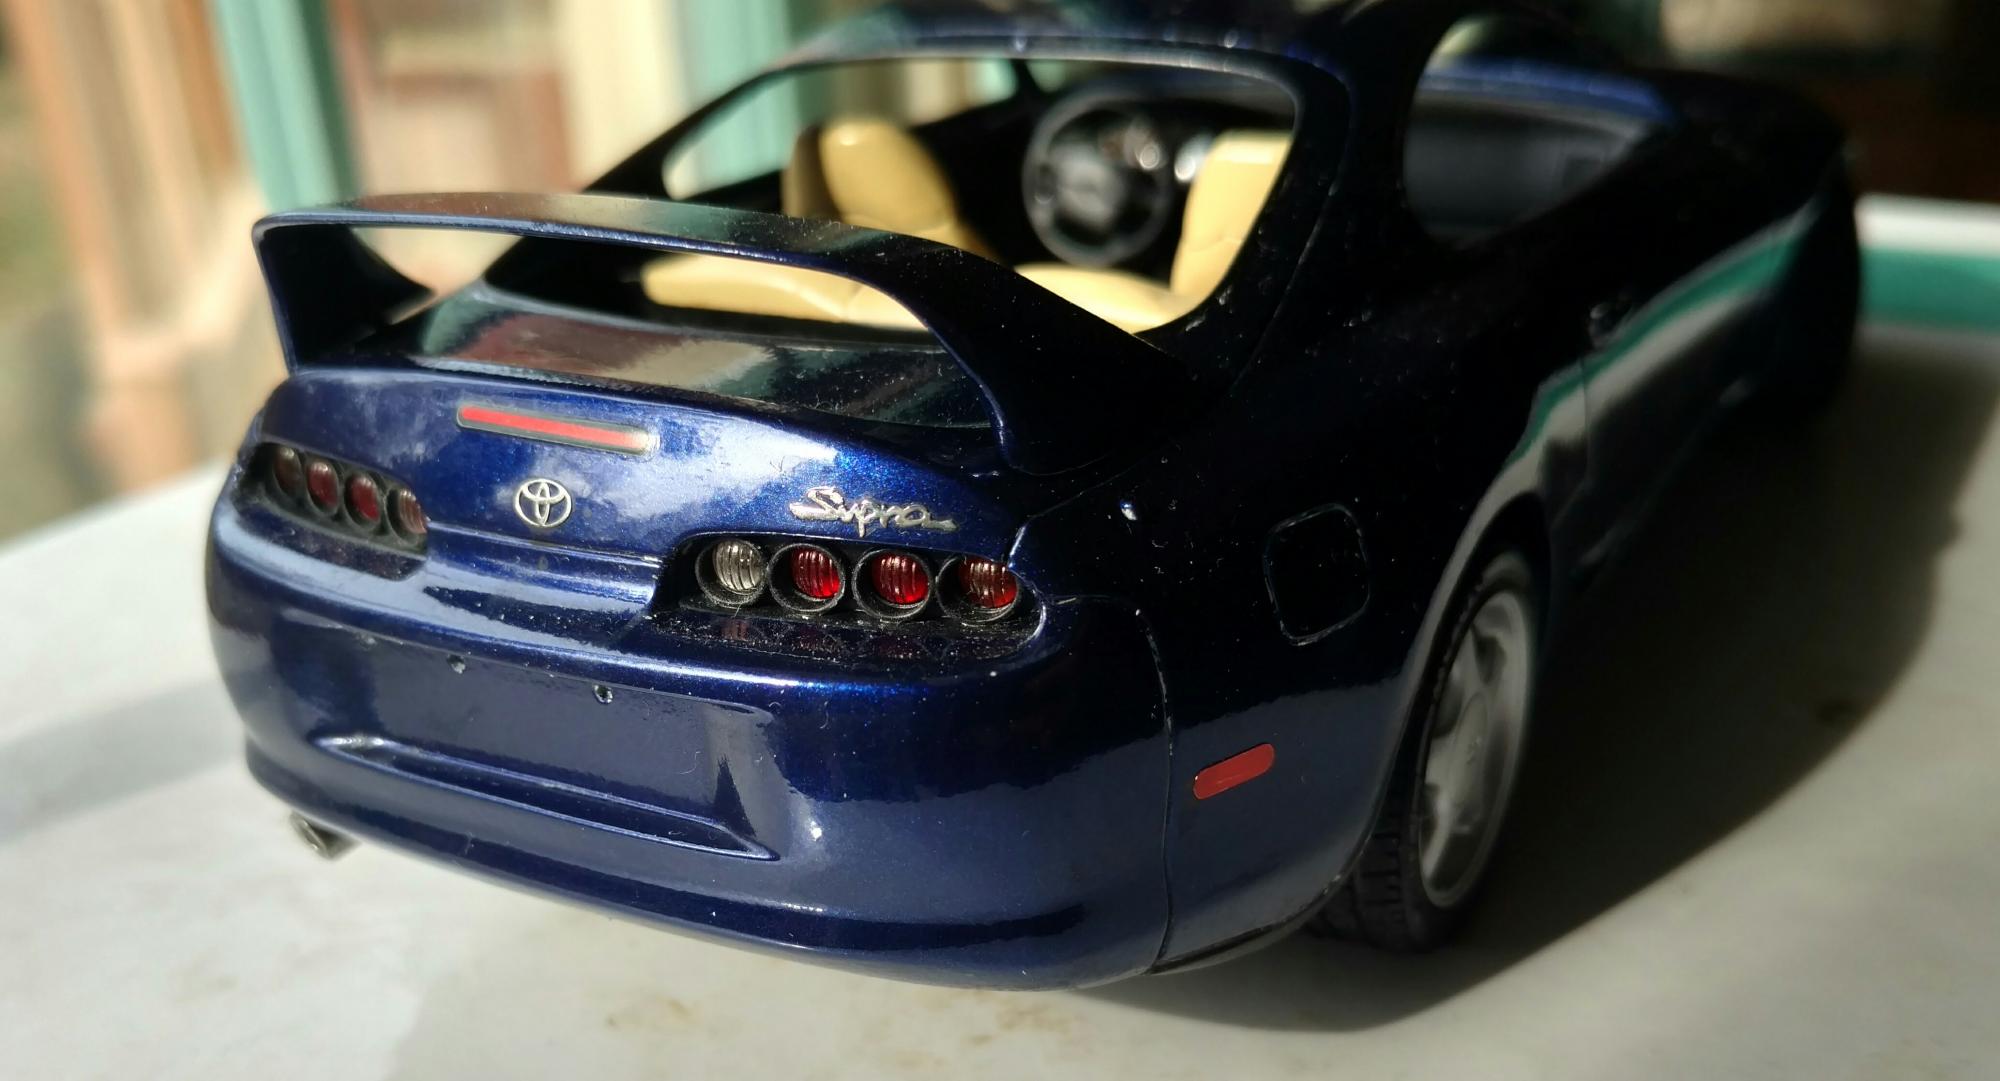
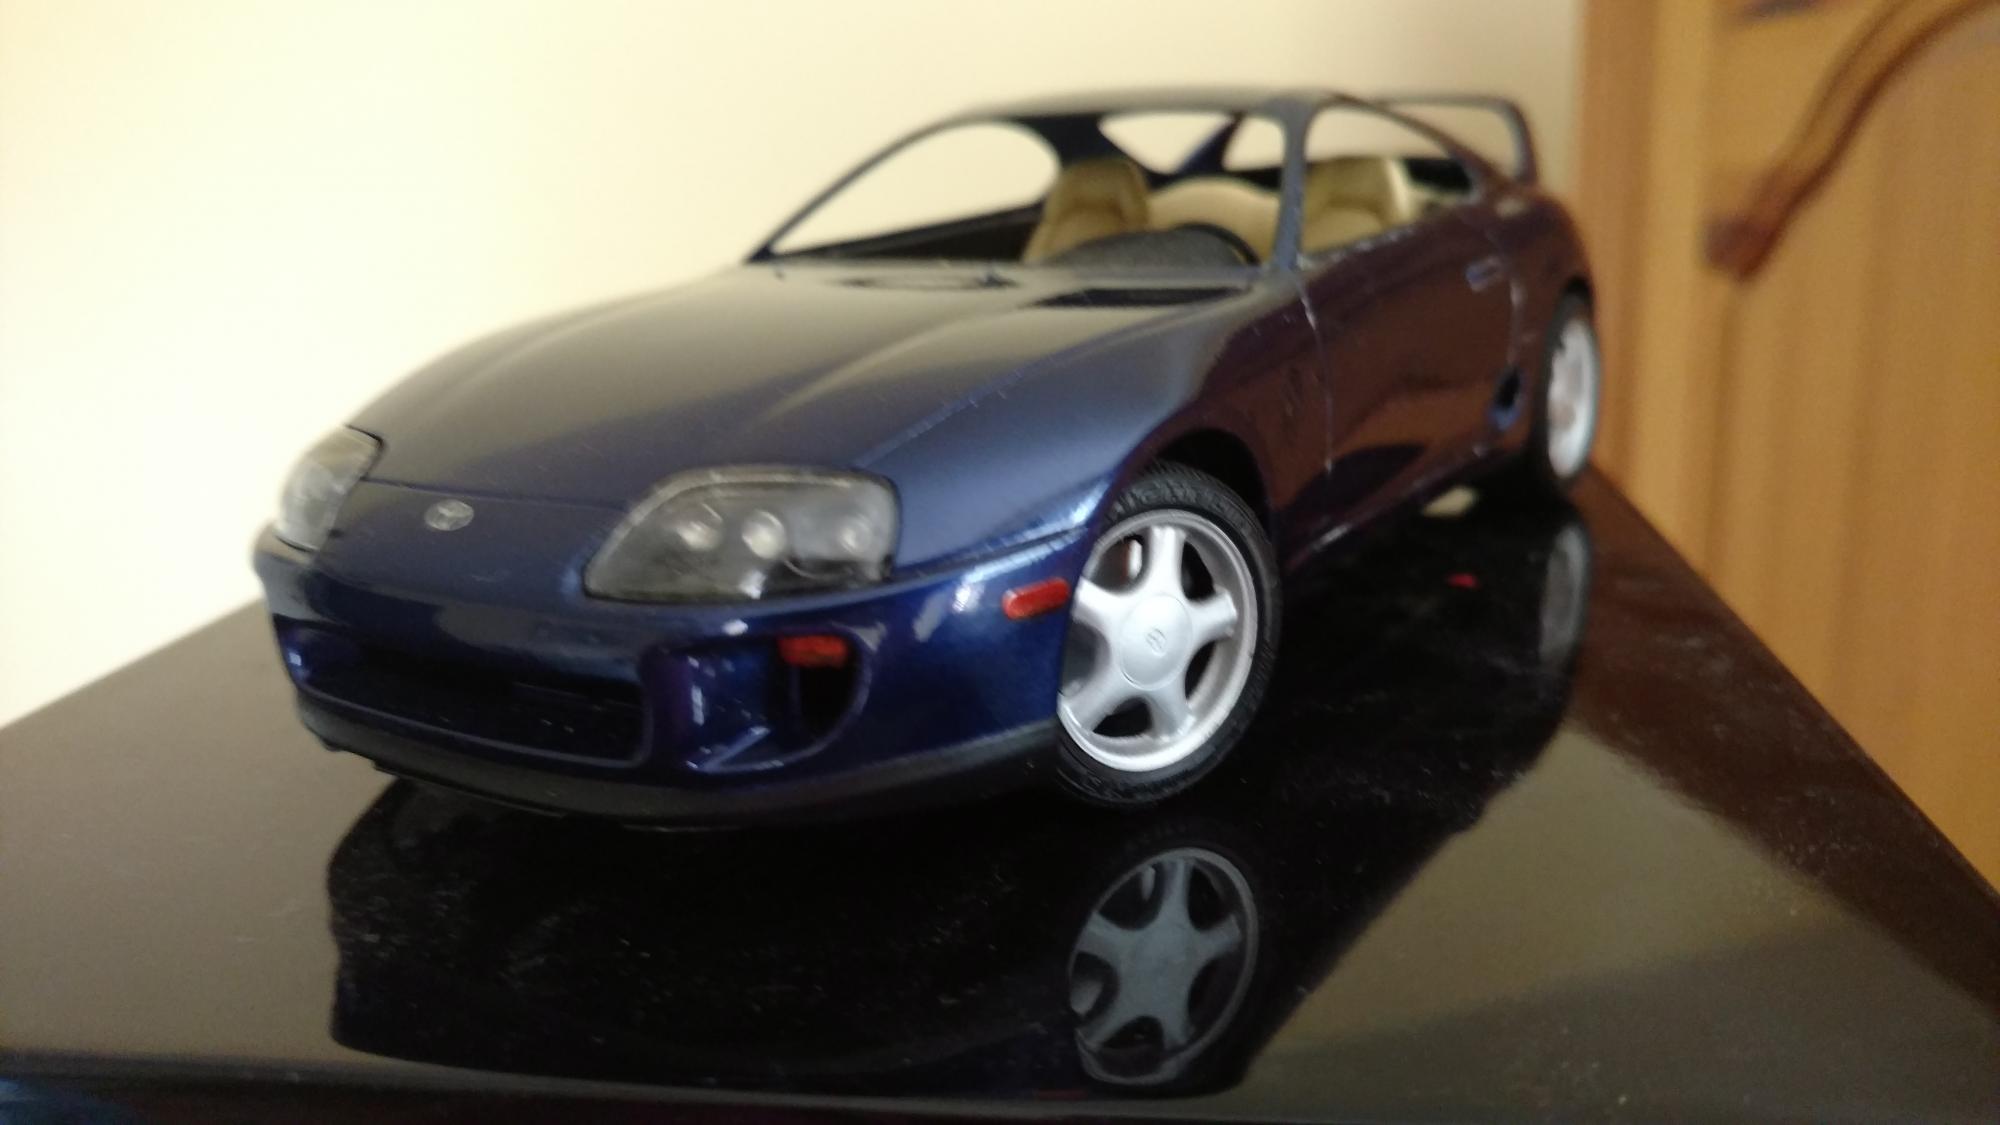
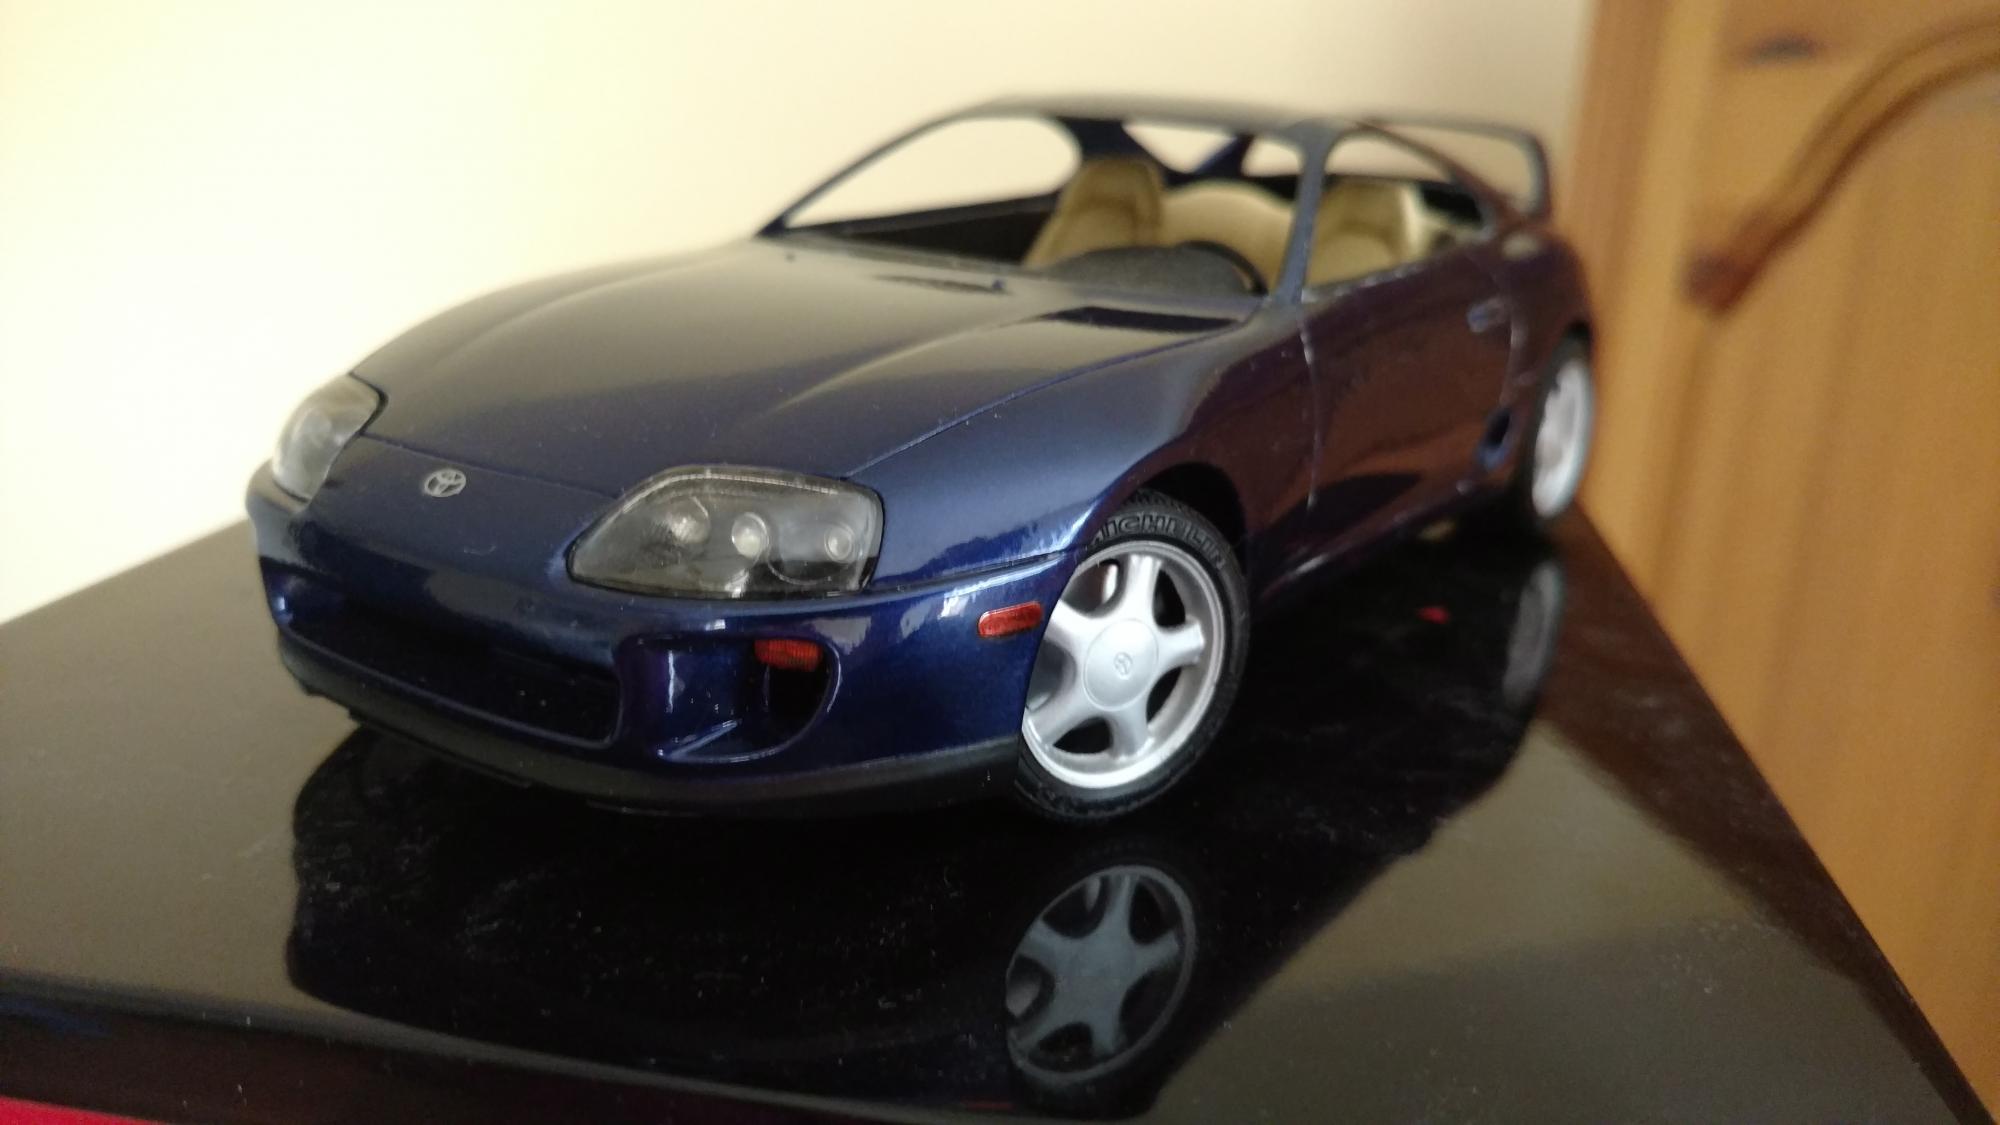
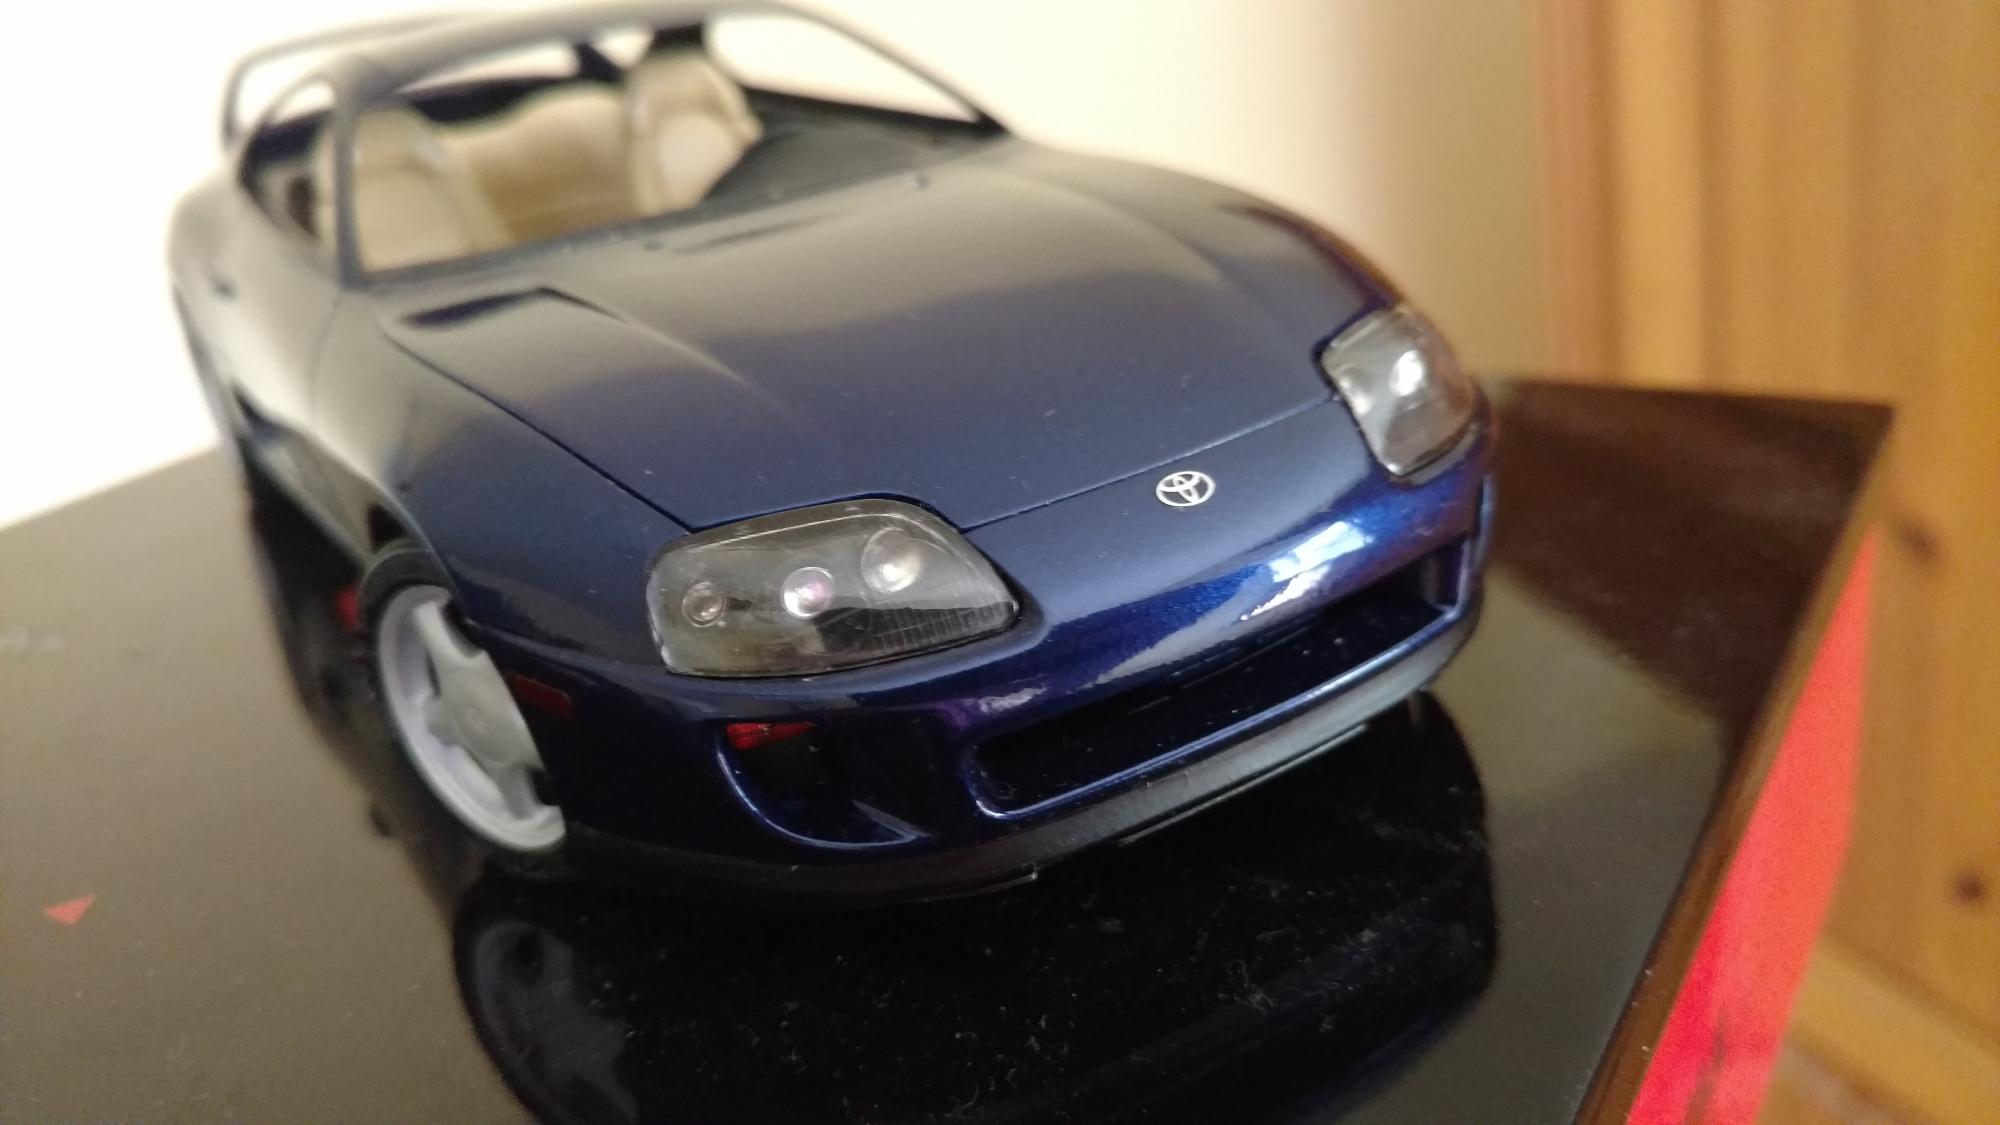
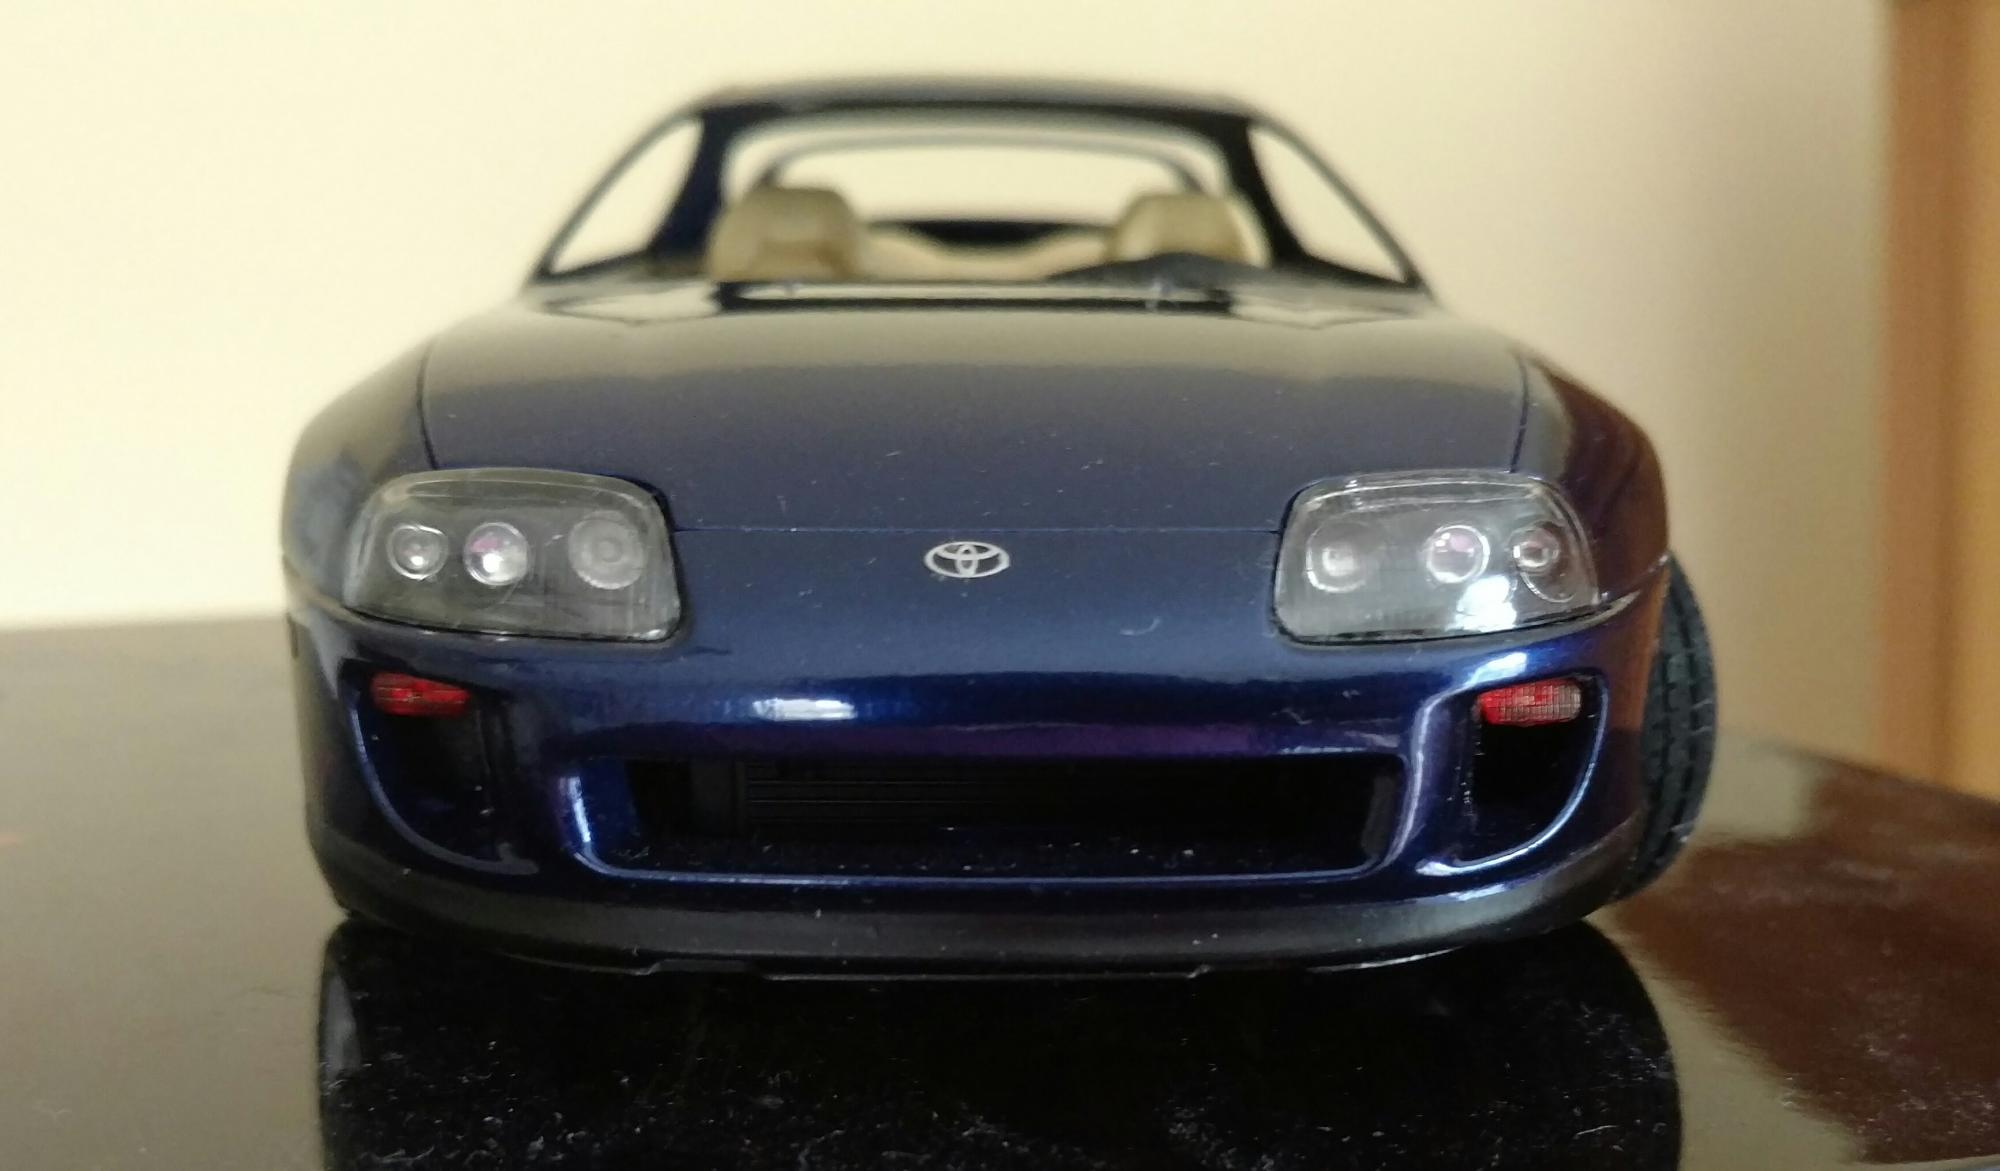
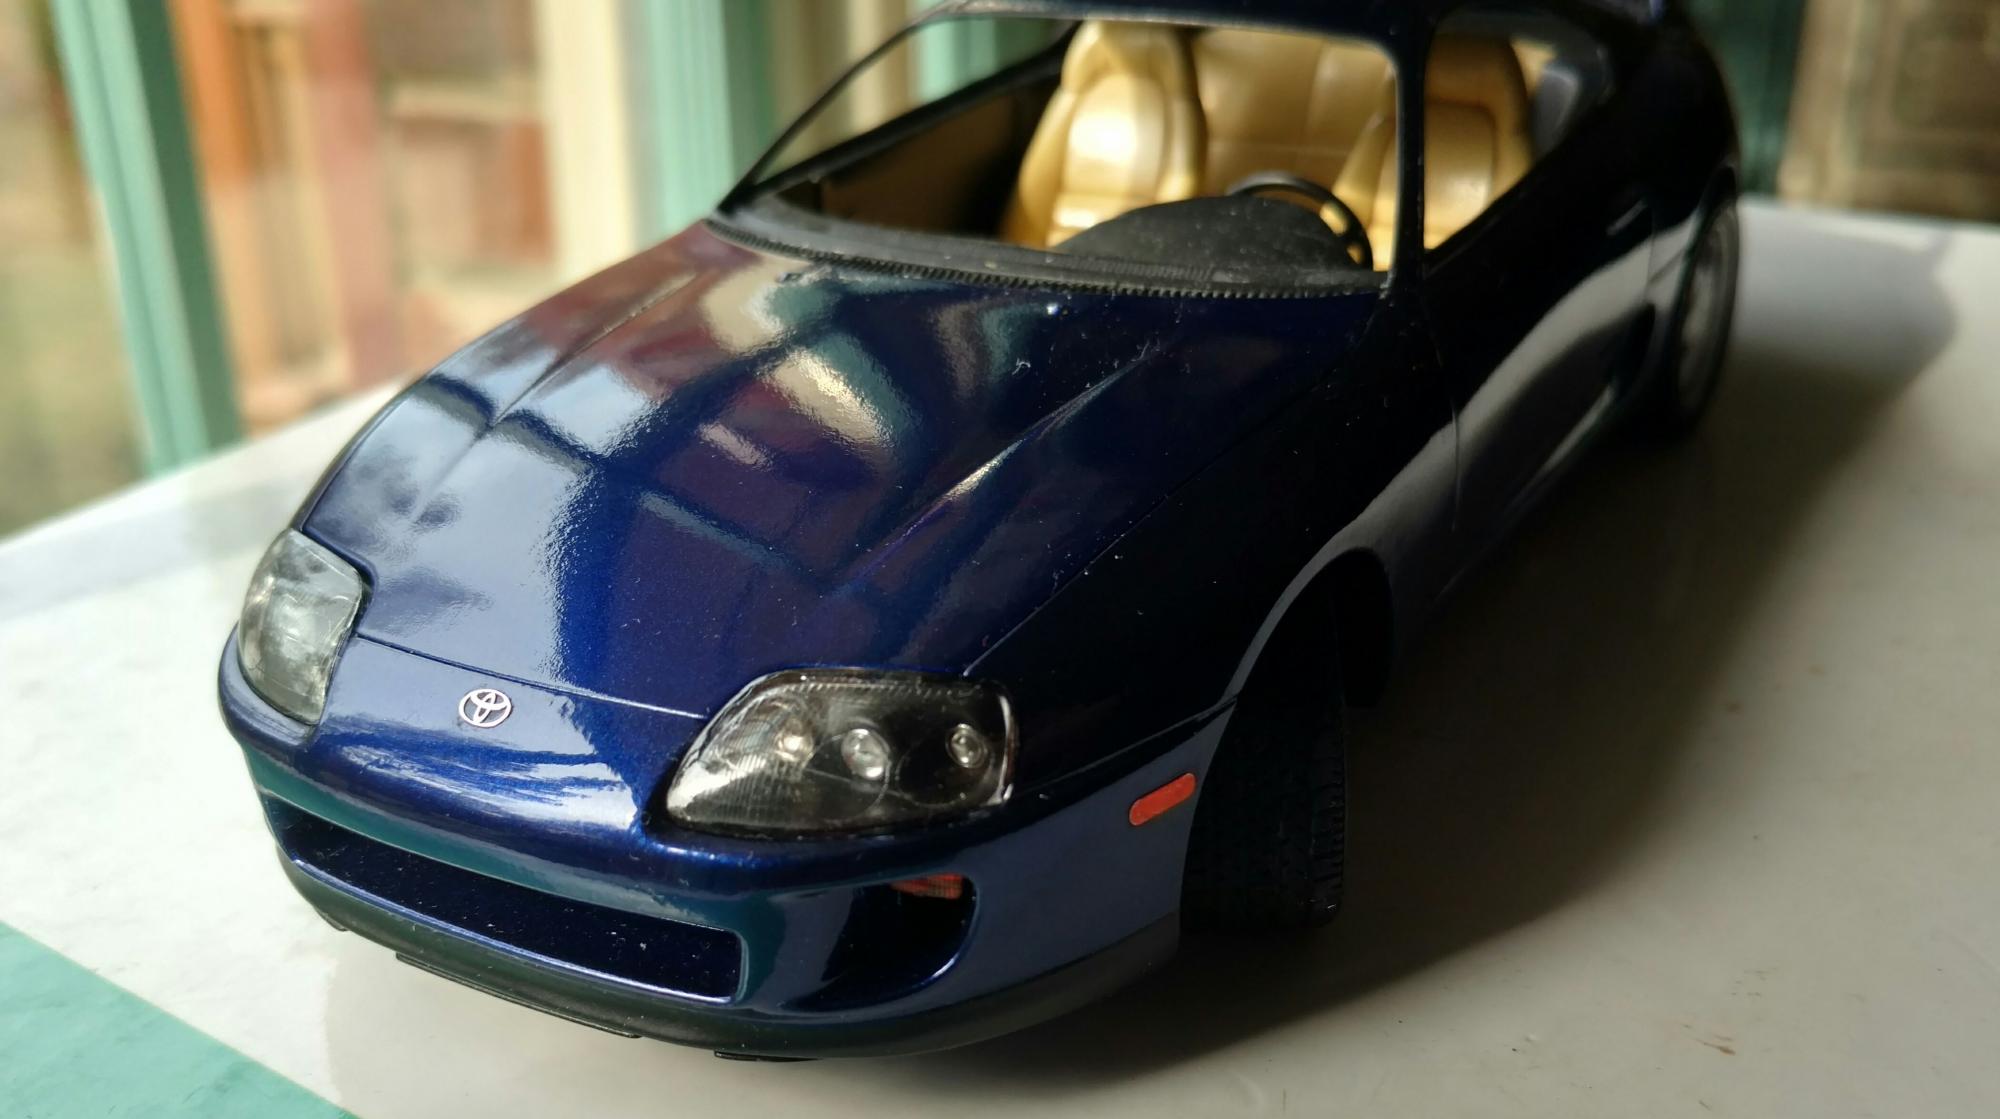
Update. Wow so it has been a while but I have been making small progress here and there on the kit. I finally have the glass painted to my standards after very tedious masking and brush painting. The front windshield needs another coat of future and I think she'll be good. Today's update will be about the interior. Over the weekend I added seatbelts to the rear seats. The belts were cut from Tamiya masking tape with photo etch. The catches were carefully cut and sanded to shape from clear plastic glued together. I did not cut holes into the seats to fit these so instead I cut tiny pieces of Tamiya tape to give the appearance of them tucking into the seat. It is a small detail but noticeable and. Necessary to me. I prefer making the catches myself opposed to photo etch. Two other details you'll notice is that I added speaker grills to the omitted kit parts. This was done by making a template with Tamiya tape then cut out on clear plastic. I then cut a small amount of material from a black nylon women's sock and then used spray adhesive to attach them together. Judging from reference photos I preferred this method over using any of the photo etch speaker grills available. I think it's a nice touch and looks relatively to scale. I also made floor mats cut to shape from reference pics. They are flocked. I am still trying to think of a way to adding the Supra logo to both of them. After that I just need to add seatbelts to the front seat and do some touch up painting and she should be done. Some of the photos seem repeatative but it was hard to get good natural and capture the details of a contrasting black interior. Thanks for looking. Here are the pictures.
-
Nice job. I am currently working on this one
-
Excited to watch your build. I'm probably going to hold off buying one until a PE set is released.
-
Its All About the Paint
DiscoRover007 replied to afx's topic in General Automotive Talk (Trucks and Cars)
Agree to disagree. I think weathering is rather easy. Weathering also gives you an easy out when you have blemishes in the paint. Also if you mess up you can polish your flat paints off and respray. Getting a perfect paint job is not easy. Weathering things like exhausts definitely takes skill and is rather easy to mess up and over kill. I think it just depends on what you're going for. -
Its All About the Paint
DiscoRover007 replied to afx's topic in General Automotive Talk (Trucks and Cars)
All due respect to the contest I would have taken your model as #1. That is smooth and finely laid paint. With no dust I might add. That is a hell of a lot harder than weathering a car to look rusted. -
Its All About the Paint
DiscoRover007 replied to afx's topic in General Automotive Talk (Trucks and Cars)
I think you make a good point there. The paint is priority #1 for the body and interior. Then comes details. But don't try anything you can't reasonably replication within your skill level. Itll look better clean and simple than a mess. -
Hey guys I was just wondering if there was a way to paint carbon twill weave pattern? I know you can use screen mesh for the standard carbon fiber pattern. But I was looking to see if it's possible to paint twill patterns? The only thing I could think of would be to cut thin strips of tape but I feel that would be so maticulous that you might as well use decals at that point. Any ideas?
-
Thank you for your well thought response. You did a nice job on that Ferrari. I know you mentioned the Diablo GT doesn't have modern GM coi packs. But heres a photo from a 2010 Camaro SS. If I could shave these off and attach ignition wires it might be quite convincing.
-
Thats a great thought. I just googled revell Camaro and it seems their 2002 and 2010 models use coil packs like that. That could be the ticket. Maybe there are some other models I should check too.
-
I was surprised as well. Even the aftermarket photoetch set doesn't provide a solution. This will take some creativity.
-
Hey guys I recently picked up the Aoshima Diablo GT kit. And I wanted to ask how to simulate the spark plugs? They are not traditional spark plugs. It appears to me that they have some kind of multi plug set up on each cylinder. The kit does not address these details at all. My first thought would be to maybe cut 12 pieces of half circle sterene piping if I can find it. Then drill small holes into them and insert metal wire. Then wrap that wire with a very thin dia wire. Paint black. Then use rubber hose for plug boots then insert a slightly smaller one for the ignition wire. Any other ideas? Does any company make these kinds of spark plugs so I don't have to scratch build one.
-
Corvette C7R (Daytona winner)
DiscoRover007 replied to ismaelg's topic in WIP: Other Racing: Road Racing, Land Speed Racers
The good news is at least you are painting a solid color. Youd have to stripe all of the paint off if you were going with metallic. -
Mazda MX-5 RF
DiscoRover007 replied to Matt Bacon's topic in General Automotive Talk (Trucks and Cars)
It's a great car. There's a company that puts Corvette motors in the new Miatas for 50k. Might make an interesting project with the new Tamiya model and a revell corvette motor. -
Tamiya Toyota Supra: UPDATE 6/15/17
DiscoRover007 replied to DiscoRover007's topic in WIP: Model Cars
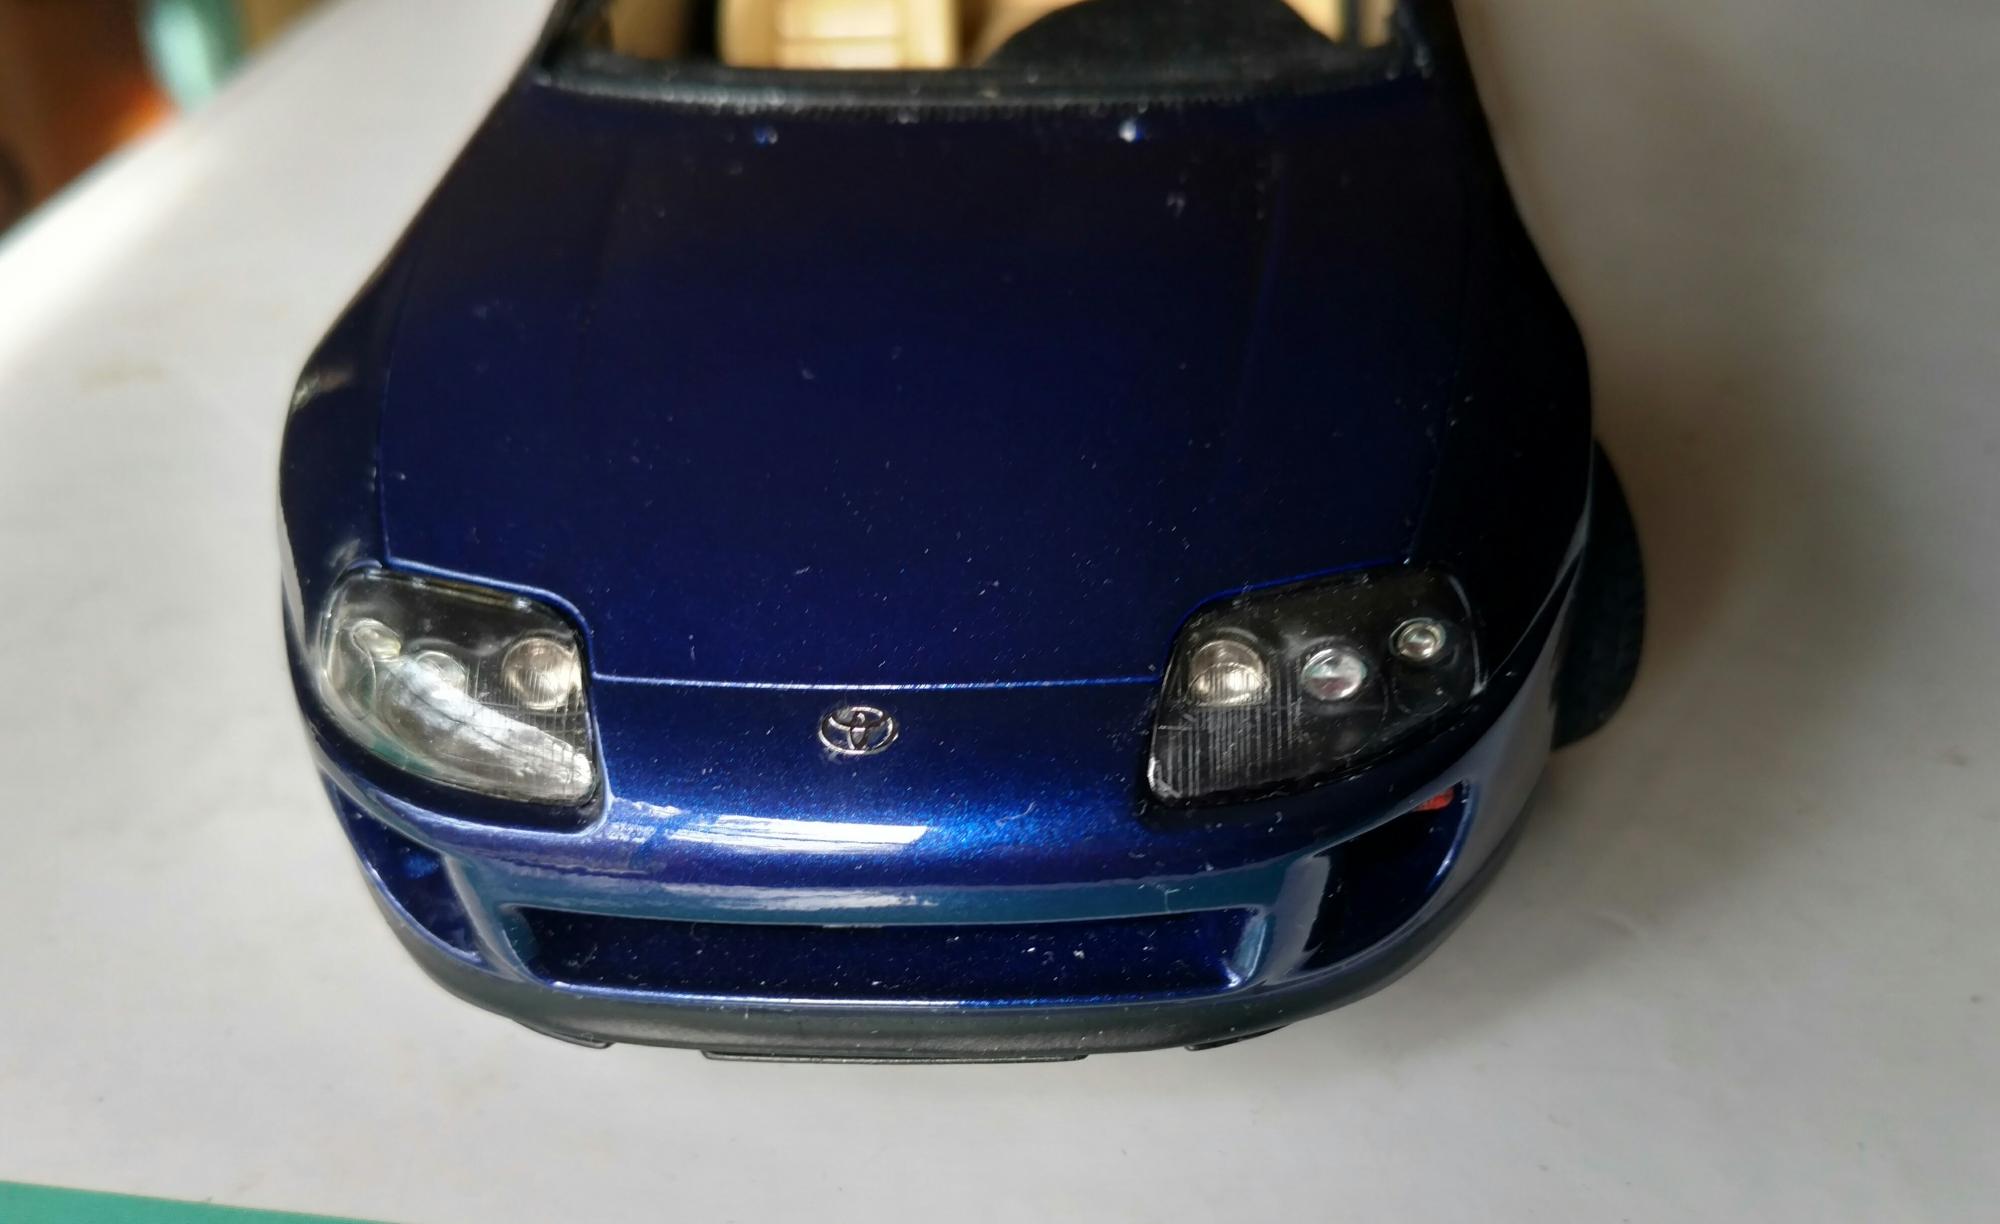
Alright guys not a whole lot of progress since my last post but I did get a few things done. Side markers and turn signals have been attached. ZoomOn provides metal transfers for these which can be colored with a marker. Still debating on whether to keep them over the decals or not. I am still painting the window glass. It's almost finished but certain parts are jagged and need to be retouched. I accidentally stepped on the hood and had to repaint it with a spare I had from a doner kit. Here are some mock up pics. Side mirrors are painted but need to touching up before installation. I also started adding metal transfer decals.
-
Nice. What color is that?
-
Tamiya Toyota Supra: UPDATE 6/15/17
DiscoRover007 replied to DiscoRover007's topic in WIP: Model Cars
Question for you guys. Have any of you clear coated clear plastic with lacquer clear? I know that's probably taboo but will it craze the plastic? I'm trying to keep the headlights crystal clear. I used future but it's easy to fog it up again with handling.