
Chas SCR
-
Posts
718 -
Joined
-
Last visited
Content Type
Profiles
Forums
Events
Gallery
Everything posted by Chas SCR
-
ok, see i thought he was still taking about the rocker panel. Never realy cought that and thanks for pointing that out. I may have understood him better if he didn't use a pic of the body with nothing done to it at that point.
-
Ok, I did'nt know that you needed that big of a chunk to work with is why I was asking if it may helped. The aftermarket G+ ones are thicker then normal is all.
-
What chrome strip do you see? There is a lip that is on the door and all they way down the side from the front fender to the rear fender line. The door line was move up just a little was having trouble scribing it in to the putty. There is no chrome on the side of the car.
-
Steps to building a show model
Chas SCR replied to hooterville75's topic in Model Building Questions and Answers
Also do not be scared to take chances and try new things, even if they been done or try'ed before some people find a better way of doing it and takes it to the next level. Always ask people on how to do stuff better to help you grow and learn. Make sure you pick the right car to build so you enjoy it then get in the middle of building it and learn to hate it. Always walk away from a part that is bothering you so you do not mess it up or mess some thing else up and never rush. -
What about using the gold brass pick up shoes from slot cars? or even the older ones that has not been gold plated?
-
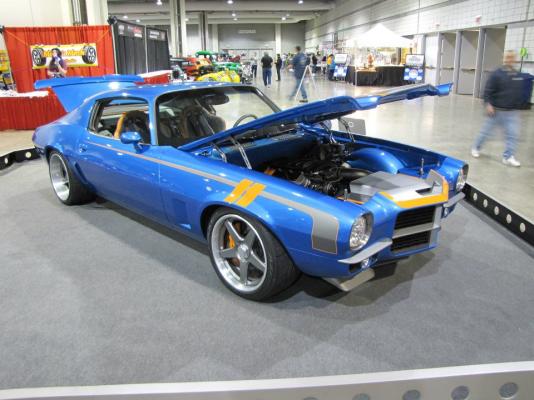
Now that I have the air intake tube put in also you can see the two sliver strips on it and because of the scale only could get one of the others on. Also the red,white and black wire are coming from a plug in to the air senser in located in the tube. Then the last is the hood hinges are now bolted in place.
-
also that is the pic of the body before I did any thing to it. I did not do the resin cast of this body as it's an very old one. Nothing from Model Car World on parts ie grill, head lights or bumpers on either trempter or rat packer kit lines up with this body.
-
Roger, yes the rocker had to be moved flush from the top of the lip down and filled in smooth level with the same thickness as the rear part of the lower quarter panel. In the resin body the rocker was really moved in more then ..020. Also they flow the rocker panel down about another 1/8th inch to be level with the bottom of the frame rail that is even with. If you look the door line is in the middle of the rocker panel that I had to fill in and I had trouble with it chipping the putty when I did it. This is one issue I have had trouble before and have not really figur it out yet. This is why I was ask Mark on that issue as he has help me in the past with the paint work and I know he is one of the best at it.
-
@Mark, Ok I try'ed and did not feel positive about doing this and I know where I need to get better at that part. How about I buy dinner at the hotel thur or friday and you walk me through on how to scribe lines in putty after it drys?
-
I'm not very good at scribing in the new door lines. Not sure if I fill it in and move the door line up a little and get it off the top of the rocker that it will not bleed through.
-
The winch connecter on the bumper as I was doing little detail left. The new air intake tube that still needs to be wired and texture and the last little one is part of the fuel injecting.
-
Looks great Jim, can't wait to see it at the GSL!
-
If the weather is good I will head down for this!
-
working on this and seeing to get the start of the look for the vavle covers.
-
Filling in the sides and seam fitting them together. I use 5min epoxy on this so it will fill in nice and smooth and flows even. The last two pics showing some thing special as I did get the rear bumper connected and put on tonight.
-
If it goes to the Goodguy Nationals it will see a road and do the 1 mil trip into the park under the rules! Fooses all of his cars has done it so far and I do not see why this can not do it.
-
Was able to put the front tires and brakes on it today and run the lines to the firewall. About another 20 other things need to be done before it's done and ready to go.
-
-
Research work is alot of time on the computer and talking to the people who build the real cars in such. I would have to say about the same amount of time between the two but it does take a lot of time for each.
-
Ok cool!
-
Ok so let me try to under stand this. You do all this up in one drawing and then send it out and they make it to look like your drawing or do you have to put the parts together as they are done?
-
Very nice work, Now I know what you are talking about on the Atom as it's a car not a printer machine lol You learn some thing knew every day and sitting here reading every page I see what more you are talking about. Thank you for sharing this stuff with us.
-
Chroming 3D printed plastic
Chas SCR replied to NormL's topic in Model Building Questions and Answers
I talk to the tech support from where I just order my machine regrading all of this and plus your trouble's with smoothness, They told me that either one or two things are going on for the smoothness of the part as your machine or there is not calibrated for either the size of what you are trying to do or the specs of there ca;obration could be more. For chroming they garentee that the electic chrome plating like what we have know'n from Chrome Tech can be done and will not burn or warp the part as it's being chrome plated as if it's ABS plastic this is a very hard plastic once heated and cooled off. If I was you I would take the time and call the people and talk to them and not play email games or nothing like this as they can under stand you better on the phone and know what you are trying to do with it. -
Here you can see the clutch and brake resevior, Then we start to see up the frame in the front. With every thing in the front tied down just put the front wheels on to see how the stance is before doing the rear end.
-