
Chas SCR
-
Posts
718 -
Joined
-
Last visited
Content Type
Profiles
Forums
Events
Gallery
Everything posted by Chas SCR
-
Whats the best masking tape?
Chas SCR replied to flynstyrn's topic in Model Building Questions and Answers
3M super thin. Pricey but very good. -
Wich are your AB settings?
Chas SCR replied to Aeroteto's topic in Model Building Questions and Answers
I shoot normal Du Pont paint and BASF Paint at 7psi at the tip. I have two regulator's as one with a water trap is set up at the compressure and the other is between the line and brush. I have the first one set up to shoot at 12psi and it fills the line as the other chooks it at the brush. For clear I shoot the urethane clear (non thin) at 7psi at the tip for the first coat and for the last coat 5psi as it is easy'er to make it just sage a little bit at the higher psi. -
Brute just showig off the ride high with the rim rings and stole "Runt"s front tires, Also the rear roll pan is being made first with sheet stock and then will be changed over to brass. You can also see the braces in place.
-
-
No rest for the wicked on New Years eve, Today we spend the day making 1 of two new wheel wells and they are flush to the frame and mounted on top of the frame rail to give room for the wide rear tires. Also reworked the driver side vents and clean them up and have the old firewall in place for location reasons
-
Hood vents are now in and here is the top veiw, Rear tail panel for the tail lights and the gas cap and neck is now put in place. Door handles are remove so i can scratch build them also, Last is the start of the firewall is not in place. Had to remove the molded in part so I can replace the vents later.
-
The rear lower floor pans are now remove and ready to be put back in level with the top of the frame rail, This will give room for the 4 link brackets. The rear tail panel also has been remove after the full molded in rear bumper is now in place and ready to be put into putty for seem fit.
-
Thought you had every thing in molds from the last ones you did? Still can't wait to see this as it's being made by hand wise then kit.
-
Christmas eve and we are still working on stuff for "Runt" little detail stuff as we head into the count down to 16 weeks till GSL 24. Rear qaurter windows being made, They are out of .003 clear with a film over them so I can lay them out and cut to the right size.
-
Just want to wish every one a safe and great family time as we head into the new year!
-
Found the trans I need. MAD has them in resin already or the new Revell Camaro!
-
2010 - Shelby GT500 - Eleanor-ish
Chas SCR replied to The Styrene Chemist's topic in WIP: Model Cars
By any chance did the trans on the motor look like this one? -
did some more resin work today and got the motor block, 4spd housing as I do not think I can find a Tremec T56 Magnum trans. But I was able to get the bell housing sanded down so every thing will bolt together. The 4spd was picked as it did not have molded in parts so I can scratch build them. The motor block may also change over to the LS7 block from the corvette kit once I get farther into this.
-
Chassis building Question
Chas SCR replied to raildogg's topic in Model Building Questions and Answers
Yes Rail, AMT has a few kits out that has the chassis, But If you are doing like a real car or just to do a model there is still a few things that need to be changed on the chassis in the rear rails as they are not lined up correct way. Other then that if you never knew this it would not be a no big deal. What kit are you looking for to build into a pro street and then you go from this. The dodge is a little longer on the rear end parts and diffrent angle to the frame. The nova is a little shorter but a tade wider in the rear pans. Also the frame rails are on a diffrent angle. It will take some work on your end and to make it look right and do. You can also use the front sectoin on both kits to make a tube and light weight front end like the real ones. Best thing to do is learn to do some resin work and mold making (Just a little things) and when you start put them into a mold and then work off the resin parts that you made as if you mess up you do not need to go find another kit. -
Chassis building Question
Chas SCR replied to raildogg's topic in Model Building Questions and Answers
Are you wanting to do a full tub or min tub? Full Tub you would have to box the frame in or just get the AMT 67 Nova kit and use the rear of that or the AMT Dodge Cornet RT I think it is. If you are wanting to do a min tub that is just moving the fender wells up and over to be flush with the stock frame that gives you about another 1/8 or .080 thickness to play with in your tires. -
Also the LS3,5 and 7 can be found in the new camaro kits with the corvettes. There is a little changes to the 5 to the 7 on how and where the AC,Alt and brackets are all put in place on the motor. Other then that it's the same motor.
-
here are the rim rings, The top two are 1/3 narrower then the bottom two. The tires are also will be put into resin to fit the rings and the center parts are going to be made in resin and to fit the outer ones. This is so every thing will fit under the fenders the right way and the front fenders are the normal part where the tires and rims on pro touring cars have a problem of getting the chassis parts to fit. This opens up a full new area and can make it look right. here are the rim rings, The top two are 1/3 narrower then the bottom two. The tires are also will be put into resin to fit the rings and the center parts are going to be made in resin and to fit the outer ones. This is so every thing will fit under the fenders the right way and the front fenders are the normal part where the tires and rims on pro touring cars have a problem of getting the chassis parts to fit. This opens up a full new area and can make it look right.
-
GTX, The changes to the car is the decal sheet from MCW, Also from them get the early 1960s cheater slick. When you do the rims and tires you will have to sand the edge of the inner part of the tire just a little. When putting them in just lay them in and make sure the back does not push in to the point of touching the rim it self. The rim will be to replicate the true 11" rim and how the tire stay'ed flush from tread down to the rim. (Hayden cut the rim and widen the stock rim by 2inch) Also for the headers, The kit comes with Jardane headers (Dyno Don's sponser) Hayden ran Sanderson from Ronnie Sanderson headers and they was a fenderwall header. When doing the drivers side the first to pipes piston 1 and 3 go over the steering shaft and the back to go under and up between the steering and frame. Exhaust pipe is not connected to the headers as this was not needed to be in NHRA but the pipe with a muffler had to be in some what of a stock location and back to the front of the rear axle. He ran a straight pipe with a muffler at the end of it for looks. Also for the interior the dash was reworked and only had three gagues in it plus the tach move from the steering colum to the upper dash so he could see it. ( For extra little details you can also add the cloth pins to the fuel line just before the carbs)
-
You did a very beautiful job of what was given to you in a kit that was made for more for the Dyno Don car release then Hayden's car. If you are ever wanting to do another one but more correct on some stuff let me know and I will personaly help you as I have a lot of stuff for this car from Hayden and Brad Proffitt on the detail stuff that not a lot of people knew about.
-
shapping the front vent even more. Now I have the nose short'n up on it and thin down so the brackets can be put in for the oil coolers and then fill the area back up around the grill that was a little larger then the stock one is. Rear panel now smooth out so I can take the tail light section out of change the full panel out. Lower valance has been cut out so I can get the running lights in place and also the new narrower bumper to be made.
-
-
Tim, The first issue is a split bumper but it doe not have the extra section on the nose is all.
-
MCW has the correct decals for this kit. AMT kit did the decals in all white Nick and it had white with yellow lettering done on the cars.
-
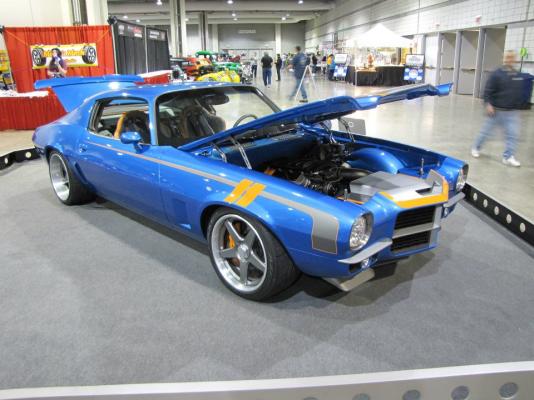
Mark, Every thing I have came from Bob him self! The info as when he started building this car he bought 2 RS, 1 ended up being red that he ran on the GG tour in 2011 that was a strip down rally autocross only car. This one he started at the same time but he did all the body work in his shop, sent it out for the frame work at DSE and then over to Area51 paint and up to RPM to have the interior done. He was hoping to keep this one like a cross between a custom show car and a autocross car. After this last season on the tour it has been taken apart and put back together intime for the World Of Wheels in Pttsburgh PA as a show car like "Runt" was built for. I got the 1st issue AMT kit on a trade as I did not know there was a diffrent in the three kits (RS,Baldwin and 1st issue) I like the interior of the non one better as it's smooth out already and would not have to putty up the interior plus it would be easyer to do the front inner fendwells and firewall. But the chassis sucks in that kit as it's a 1 part only unlike the other being a two part.
-
Thanks James2, for the kind words. @ Plowboy , Was talking about the vents from left to right side as the nose was not even close to being done at this time. @ Mark, I know what you are saying and yes I did my research to the point that I did not pick this car as Mr Bob Bertelsen was the one who contacted me on this as I was working on Runt for Curtis. I have not seen any pics from the internet on this car or even in the magazines other then what was posted by RPM Hotrods when they took the car out west and also sent me pics of the interior parts. Bob sent me a 3 disk set of every part of the car from when it was bought to when it was done. The only out side help from him was more from DSE when they did the frame and chassis work and what parts they use. I do have the non RS/Z28 AMT 1st issue kit and would like to use that one but there seems to be more work in getting the body to the point of even a good start compare to the new issue or even the Baldwin release body issue.