Straightliner59
-
Posts
5,808 -
Joined
-
Last visited
Content Type
Profiles
Forums
Events
Gallery
Everything posted by Straightliner59
-

Goodyear Tire Decals
Straightliner59 replied to Straightliner59's topic in Model Building Questions and Answers
Thak you, Rex! I'll give a look! -
Does anyone know of a source for 1/24-25 scale decals for Goodyear slicks? I need them to be the correct vintage and size to fit the Monogram slicks from their showrods, Badman, etc. The AMT parts packs Blue Streaks are the right tires, but, they are a tad too small. Any ideas?
-
Modeling for fun.....again!
Straightliner59 replied to GaryR's topic in General Automotive Talk (Trucks and Cars)
That's why I do a lot of the stuff I do--just to see if I can. -
Modeling for fun.....again!
Straightliner59 replied to GaryR's topic in General Automotive Talk (Trucks and Cars)
Could not have saidit better, myself! -
Chevy Nova Race Car
Straightliner59 replied to zakdoggi's topic in WIP: Other Racing: Road Racing, Land Speed Racers
Man, that is looking beautiful! You ought, to be pleased! -
Modeling for fun.....again!
Straightliner59 replied to GaryR's topic in General Automotive Talk (Trucks and Cars)
>> I realize that there are a lot of model car builders who enjoy the freedom of building customs and straight track subjects, but I personally really enjoy the rigidity of building factory stock. However, building a replica of either, is no different than building factory stock, other than the pieces that comprise the car. There is more freedom when building a model that is inspired by an actual racer, but, modelers are still bound by what equipment was available at a given time, or, by using the correct speed equipment decals, or font types, when designing graphics for a "non-replica". I can only speak for myself, here, of course, but, those are important things, to me. I do have trouble grasping the concept that creating small details or scratchbuilding something isn't fun. Then again, that's me, too. That's where I find my zen. Boy, I'm really a weirdo! ? -
Thanks, Gary and Chris! Gary, I see someone posted a link to a speed control at HF. I've still got my old Dremel speed control that I've had for about 35 years, or so.
-
Here's the Chevy II I did. I used the Dremel, until I got close, then finished with sandpaper, sanding boards, etc.

-
Modeling for fun.....again!
Straightliner59 replied to GaryR's topic in General Automotive Talk (Trucks and Cars)
That's why I put silly, little details on my models--I like 'em! Scratchbuilding, research--that's what is fun, for me! There's no point to building your models, to suit someone else's taste. -
Sure thing, Jim. I got some more soldering done. I swear, it looks like I have never done this, before. Lots of clean up, to do. I have made a helluva mess! I broke one of my uprights, so, will be replacing it...
-
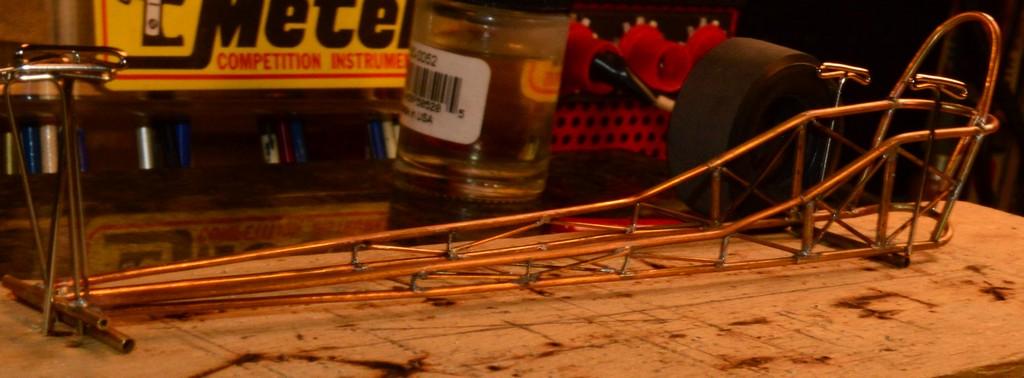
This is the '66 chassis.
-
Thank you, Tim. If this is anywhere near as successful as your altered, I will be ecstatic! Over the past three years, or so, this whole hobby has become much more zen-like, for me. I wish I'd figured out that part, you know, 45 years ago!grin
-
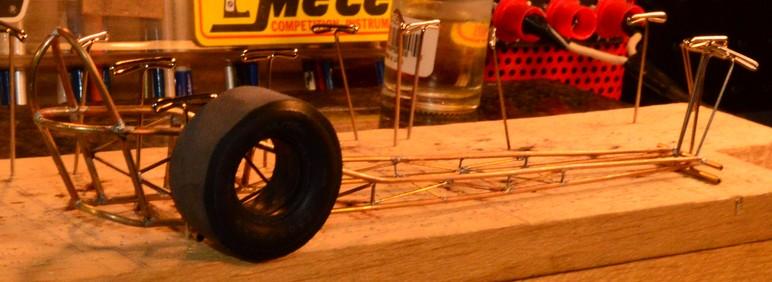
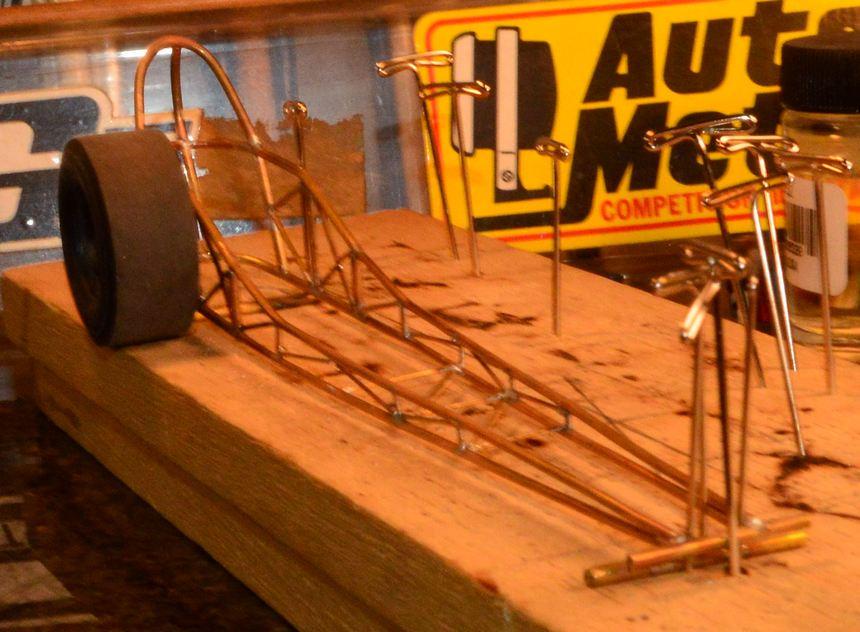
Having finished installing the uprights/diagonals on the second side of the chassis, I did a little cleanup, then installed the torsion bar. I shortened the upper chassis loop, then soldered it and the lower piece in place, before installing the rear upright. A little more cleanup, then I will make the torsion arms, begin work on the front axle, and redo the motor plate. Thanks for looking!
-
I got the uprights and diagonals installed on the other side of the chassis. Thanks to Roger's guidance, it went much more smoothly than the first one. My soldering is a little rough, but, it'll clean up! I'll be making a new wing, because I m not happy with the veneer I used--it has a paper backing, that messes with the finishing of it. I'll also be reworking the motor plate, to correct its profile. Thanks for looking! Qs and Cs always welcome!
-
Thank you, JC. I had a terrible bout of frustration, installing the uprights and diagonals on the left side of the chassis, so, I took a couple of days break from it. I installed the diagonals for the right side of the cockpit area, this morning. I'll get the rest of the right side done, over the weekend. Then I can move on to putting the chassis together. As you can see in the comparison photo, I need to shorten the upper rear chassis loop. Otherwise, I think it compares quite favorably to the real car. I've included a couple of shots of an engine I started fourteen or so years ago, that I may use. If not, I'll do up the unpainted one in these photos, and use it. I am considering installing studs for at least one of the heads, so I can open one side of the engine. Should I do that, I will likely make pistons for that side, and fit them into aluminum sleeves, for the cylinders. Thanks for looking! Questions and comments always welcome!
-
Bantam Fuel Altered - New pics 1-7
Straightliner59 replied to Codi's topic in WIP: Drag Racing Models
I'm about out of words, Tim. FAN-FREAKIN'-TASTIC! -
I bought this thing two years ago, and have yet to even hook it up and try it. I am curious, as to how small of items it can cut out. I am thinking of using it to cut white decal film, for backgrounds to apply under decals printed on clear film. I've had pretty decent luck printing decals with my inkjet printer, but, it would be so much more versatile, if I can use the Cricut to cut white backgrounds to the same shape as the clear film. I think that's a clear description of what i want to do. Thanks!
-
Thanks, Steve. Okay, I finally have this right, and got the "Riceman Stamp of Approval". Next step is to install the frame uprights and diagonals, then I can move on to straightening out the rear chassis loops, and installing them, and the torsion bar and bottom cross tubes and diagonals. Questions and comments are always welcome!
-
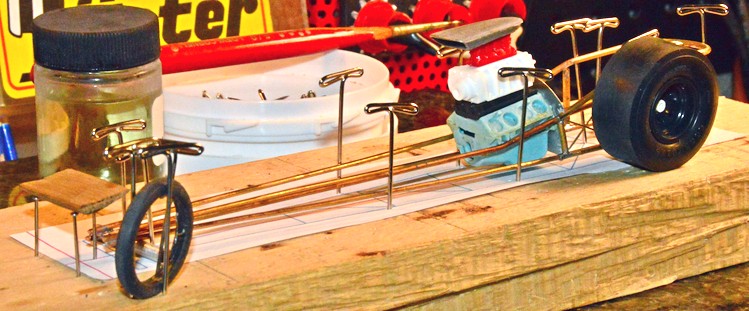
Now, a couple with the chassis and axle at their proper elevations.
-
Thanks, Kurt. Glad you're along for the ride. I dug out some parts to stand in for the blower and manifold, and did a quick mock up. I think I'm on the right track (no pun intended).
-
Scratchbuilding Slapper Bars
Straightliner59 replied to Straightliner59's topic in Tips, Tricks, and Tutorials
Thank you, Greg! -
No doubt about the latter two! As for the first, I reckon we'll find out! I've "known" Roger for quite a while, now (almost 20 years), and he never ceases to amaze me, with is knowledge. An example: When I submitted my plan made from the composited images to him, the first time, I had gone pretty much Stuckey back-half (roll cage included), RCS front-half. Roger said "Make the roll cage 3" taller. When I did, the roll cage height matched exactly, the height of the Popular Hot Rodding drawing! All I could do was shake my head!
-
Thanks, Lee. I had a small setback, but, it's fixed, so I can move forward after work, in the morning. Thanks for the video link!
-
Thank you, Chris! I hope to have at least the back-half of the other side done, before I go to bed, in a few hours. Thanks for looking!
-
Thanks, Bill. Here's hoping I can pull this one off!