Straightliner59
-
Posts
5,809 -
Joined
-
Last visited
Content Type
Profiles
Forums
Events
Gallery
Everything posted by Straightliner59
-
 Yay!
Yay! -
Clearly, he installed an engine from a Revell Corvette!
-
Thanks, JC. It was quite a wrestling match!
-
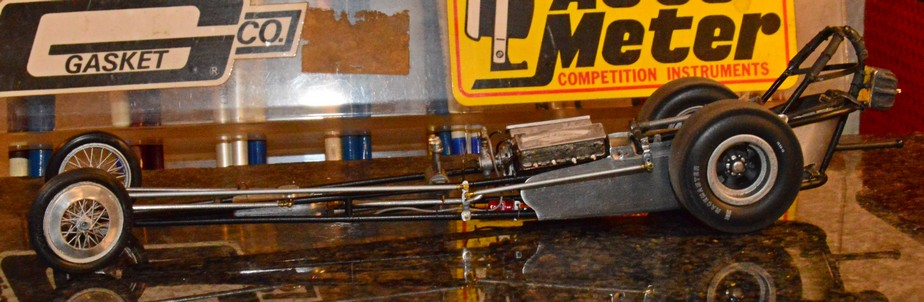
The manifold assembly is nearly complete! I need to add a couple of square plugs, the linkage arm for the throttle cable to attach, a bracket to anchor the shielded part of the throttle cable, and some touch up. Here are some shots, form several angles. I'll finish this up, then move to finish the headers. They are brass, so I can test out my new soldering gadgets. I still need to replace one zip tie, and build and install another return line, and zip tie it to the chassis. I have a little bit of smoothing/polishing of the cowl, to do, and install the windscreen, and some PE dzus fasteners, and that will be done. It's almost punch-list time! I have the decal art done. I need to run a test print of that, and make any adjustments...

-
Porsche 904 GTS Carrera “Ecurie Lutéce”
Straightliner59 replied to Bernard Kron's topic in Model Cars
Excellent work, Bernard! Your building style and your tastes, much reflect my own. Dig it! -
Geoff, I think you pretty much nailed that! Another cool project, from your bench. Inspiring, too! Now, I'm going to have to pick up one of those crappy old AMT NASCAR kits, because you've given me ideas!
-
"Bring Out Your Dead" Completion Build--ROUND 2 Is On!
Straightliner59 replied to Snake45's topic in WIP: Model Cars
Finally got all the injector/hose assemblies installed, after much cursing, and crawling around on the floor, searching for the "dearly departed"! I have found rods for the butterflies, in some fine stainless spring steel wire. I have the barrel valve painted, and its fittings installed. Will get the linkage arm installed on that, next, then, it will be added to the manifold assembly. There's a possibility I can achieve my goal of having the manifold installed on the engine, overnight, tonight! I also have the header pipes cut and bent, and the flanges drilled. I need to cut/file/sand those to shape, then I can solder the pipes to the flanges. If this thing doesn't fight me so hard, and I have a very productive night, maybe both of those assemblies can be installed, by morning! Here's hoping!
-
Thank you, Ray! I appreciate it. That is old MSC 1/25 plug wire material. I've never measured it, but, I'd guess it's about .020", in diameter. I'm running low on it, and wish I had more. I have tons of it, in vibrant colors, of course. Yes, regarding the hoses. I wish I'd opted for the crossover, instead of this way--I mean I have photos of them both ways, but, crossing them would definitely have been easier. I had an injector break, so, I have to replace it, now, before I can move on to the linkage. I am hoping to have it (the linkage) finished before I go to work, Monday night. Once the stacks are on, this assembly will have around 80 pieces!
-
It's been a frustrating week, working on these injector/hose assemblies. I finally got them all on the manifold. Still need to "pose" them, so they look natural, and do some touch up on the assembly. The Frankenstein mag fits (it's just sitting up there, right now). I want to make 90 degree boots for the plug ends of the ignition wires, but, I'm not dead-set against straight ones. I have eight nights off, between now and the end of the month, to finish this thing! If I get everything done, but the decals (they are pretty much ready to print), I'll call it done, for the "BOYD" deal. I need to build linkages, finish plumbing the fuel system, and build a set of headers. After that, it'll be just down to any little things I missed. I think I have this!
-
Thank you, Jeffrey!
-
Hahaha, on the double espresso! Amazon had four, and only one critical review, and it was by Gregg! Thanks for the heads-up, Gary. I'll look for Rex Hays stuff, as well.
-
Chevy Nova Race Car
Straightliner59 replied to zakdoggi's topic in WIP: Other Racing: Road Racing, Land Speed Racers
Excellent work! Thanks for sharing this project. I love it! -
That's very cool! I'm going to find one, for myself. I don't care what else is in there, it's worth having just for those illustrations. That was one of my favorite things about Motor Racing Replica News.
-
"Bring Out Your Dead" Completion Build--ROUND 2 Is On!
Straightliner59 replied to Snake45's topic in WIP: Model Cars
I have half of the injectors/lines installed...
-
Thanks, George! Glad to help.
-
I stacked discs of plastic, to make these. I used strips of electrical tape for the belts. It's over 20 years old, so, it's held up, just fine.
-
"Bring Out Your Dead" Completion Build--ROUND 2 Is On!
Straightliner59 replied to Snake45's topic in WIP: Model Cars
I got the manifold in paint, this morning. I need to reopen the holes for the port nozzles. Injectors and fuel lines are all but ready to install. I am using model railroad bolts I modified, for the injectors (port nozzles). I may be able to get those installed, tomorrow morning, after work. I got a pleasant surprise, when I painted the manifold, in that, it looked better than I thought it would! After the induction, and its inherent plumbing, I will build the headers. I need to drill the holes for the windscreen rivets, and install those, as well. I've made "hella" progress in the past two or three weeks! -
Brad, I think you might be right! I can certainly live with this one (so far! ), Feels good to be closing in... Thanks so much, Chris! I appreciate your kind words. I have the article I used, in which Tom Hanna explains (with a few photos) how to build one of those bodies for a 1:1 car. If you ever want to build one, I can get it to you--I mean it is digitized, and all.Thanks again, sir!
-
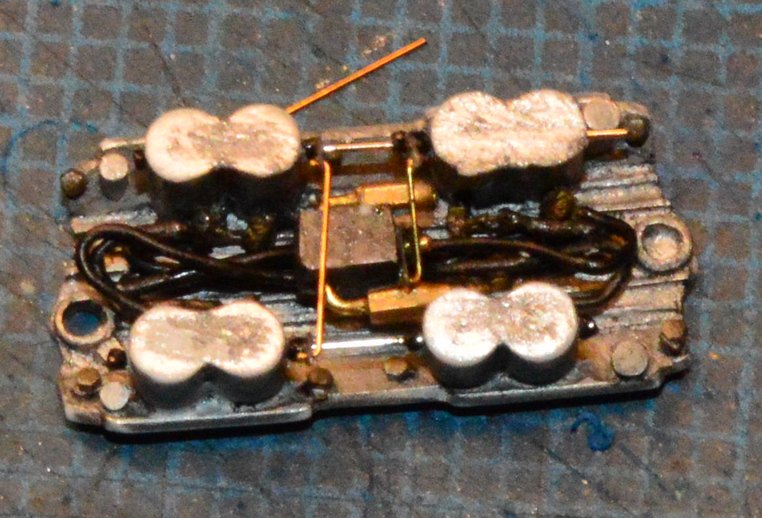
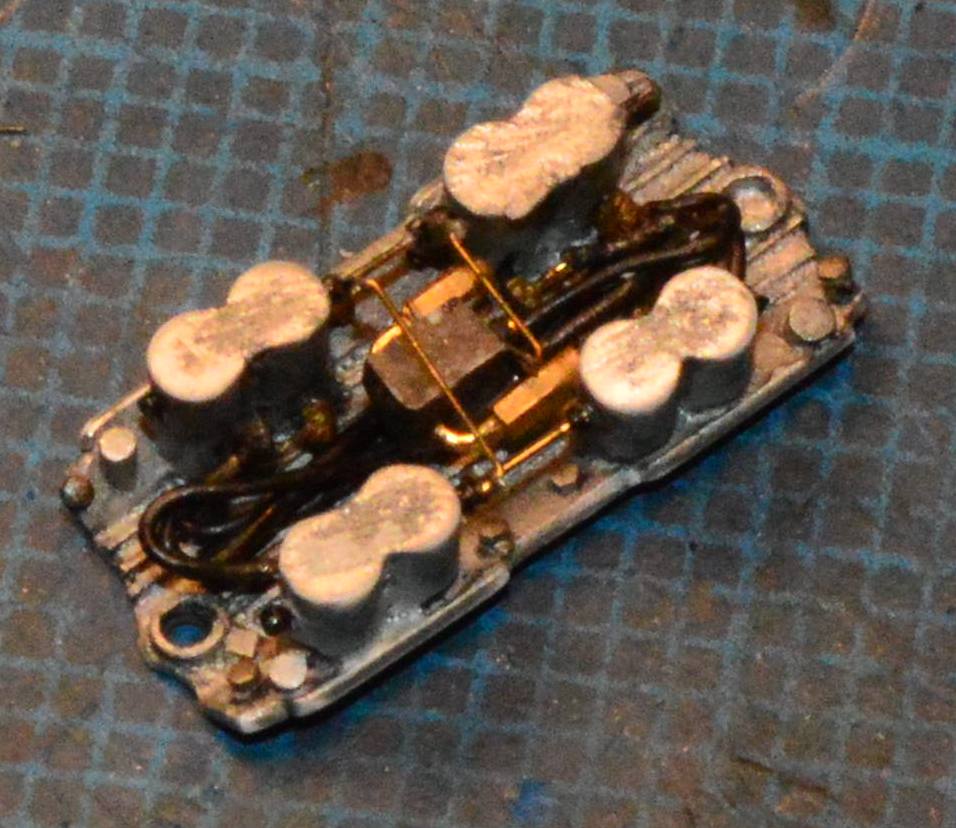
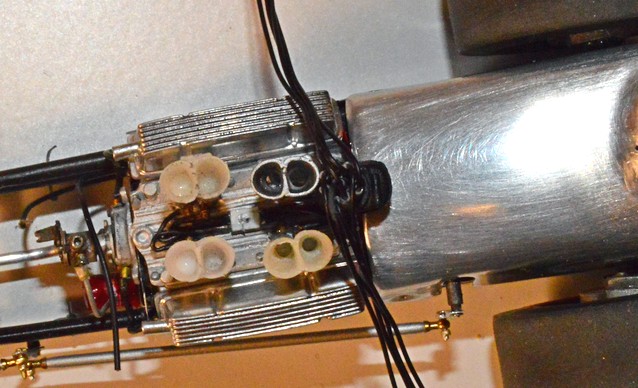
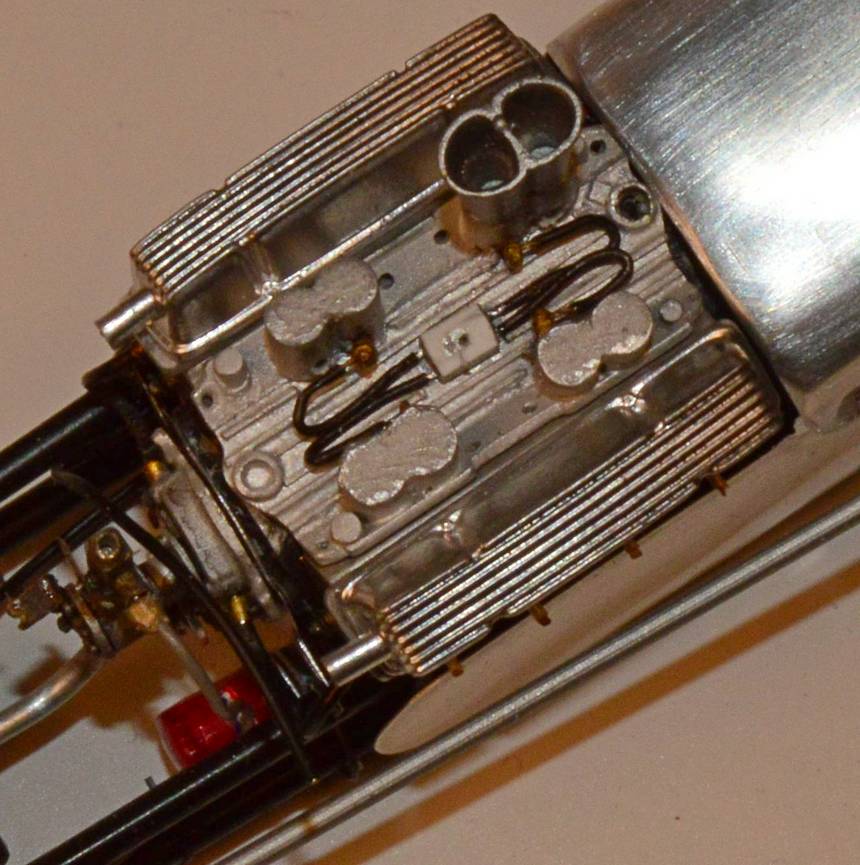
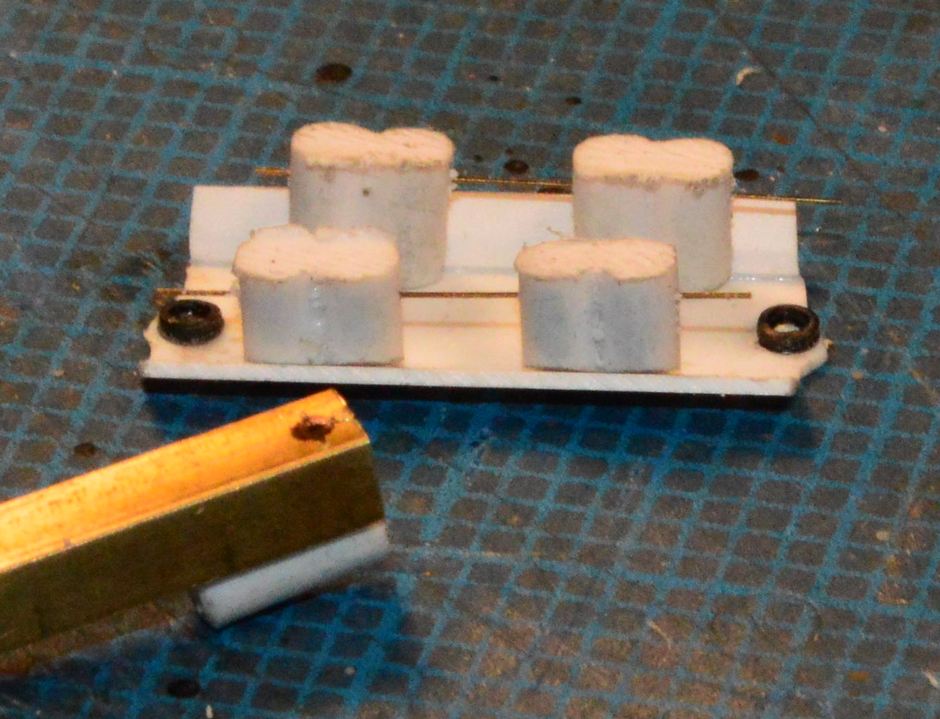
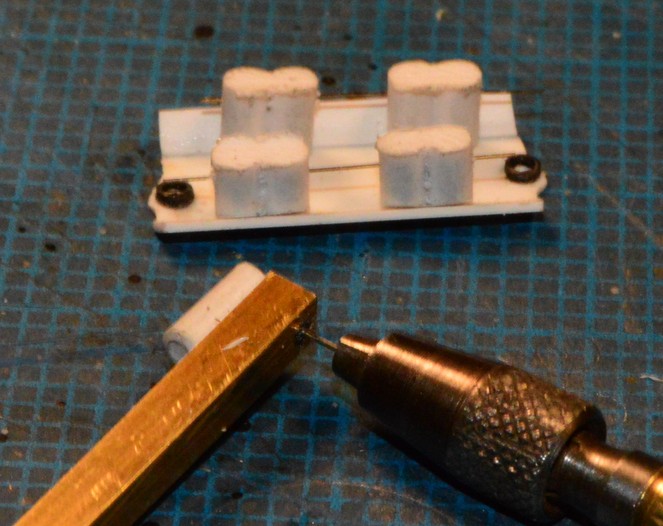
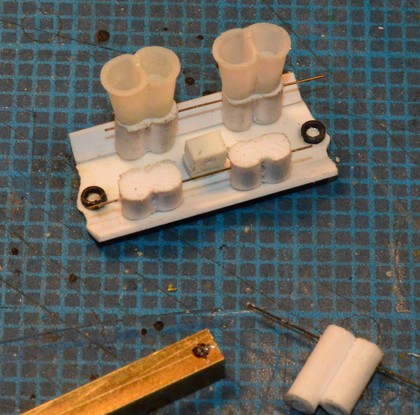
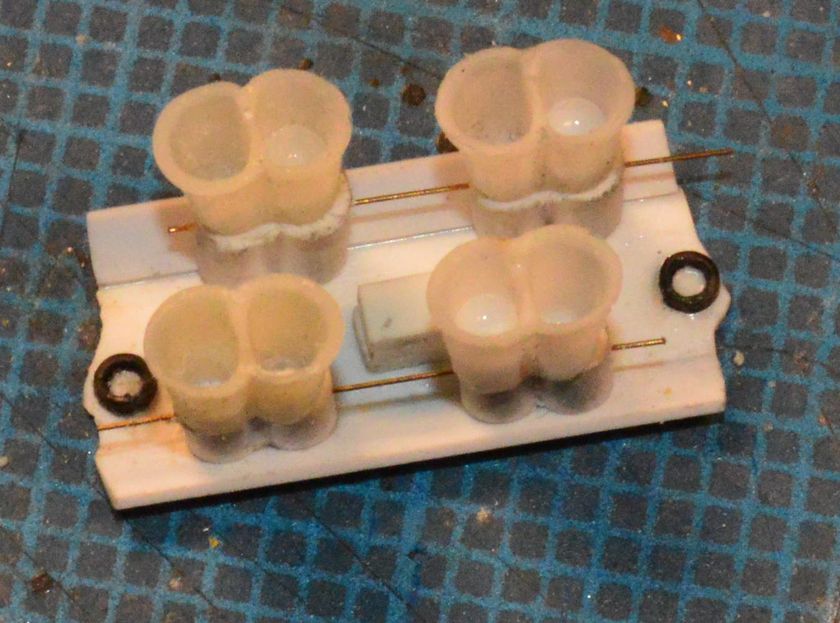
Well, it's happening; I have begun construction of the last major assembly for this project: the Enderle injection setup. I've somewhat explained the history of the stacks, themselves. The manifold has its own story, as well. This is the fourth manifold I've started building, since I decided this thing needed Enderle injection, instead of the Hilborn unit I first installed. They've floundered for various reasons, mainly stemming from a lack of planning, on my part. In order to atone for my sins of the past, I planned a bit this time. That dictated that the throttle bodies needed to be cross-drilled before they were to be installed (In these photos, nothing is cemented, beyond the manifold flanges and the bosses for the mag, and the water outlet. In order to assure that the throttle rod bores were properly aligned, I devised this simple tool from a short length of 1/8" square K&S brass channel. The throttle bodies are .100" styrene rod. In its manufactured state, the channel is too narrow, inside, to fit the plastic rod. As luck would have it, my Nicholson 6"mill bastard just happens to be .100" thick. After a bit of work, the throttle body rod fit snugly, in the channel. Next, I measured about .040" from one end of the channel, and marked it. I then marked a line longitudinally down the center of the "spine" of the channel. At the intersection of these lines, I drilled a hole with a #80 bit. By laying the cut sections of the throttle bodies/intake runners in the channel, and aligning them, I could, by drilling from one side, and then the other, achieve a bore that went straight through the T.B. assemblies, and I didn't have to worry about if they were actually going to align! In these photos, you can see how the rod assembly fits into the drilling jig, along with the T.B.s sitting on the manifold, bisected by the throttle rods. Other photos show the beginnings of "the brain" of the system, as well as the manifold adorned with the injector stacks. I need to install a few ribs, down in the valley. I'm not sure how to, or even if, I will address the "ENDERLE" lettering, on the manifold. I'm considering a tiny decal, of a 3-D vectored graphic, on which I would create the appearance of raised lettering via light and shadow. Anyway...
-
Very nice work, Bill! I always find your models well designed and constructed, and, even better--interesting. Keep up the great work, man!
-
Here are a couple. I was messing around with the camera, one day...
-
Fantastic, Bernard! I HAVE to know how you're doing that steel. I'd swear I'm looking at the real thing, both here and with your hot rod. I expect to see them begin to rust!
-
"Bring Out Your Dead" Completion Build--ROUND 2 Is On!
Straightliner59 replied to Snake45's topic in WIP: Model Cars
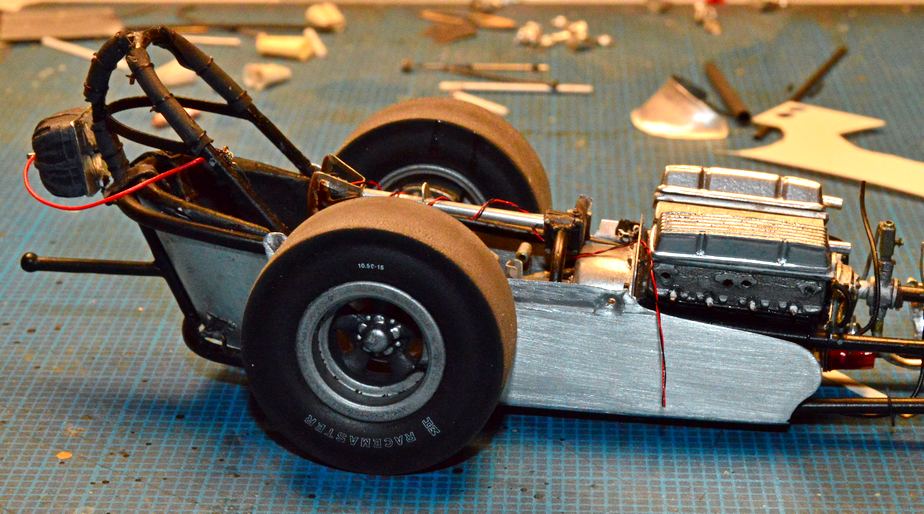
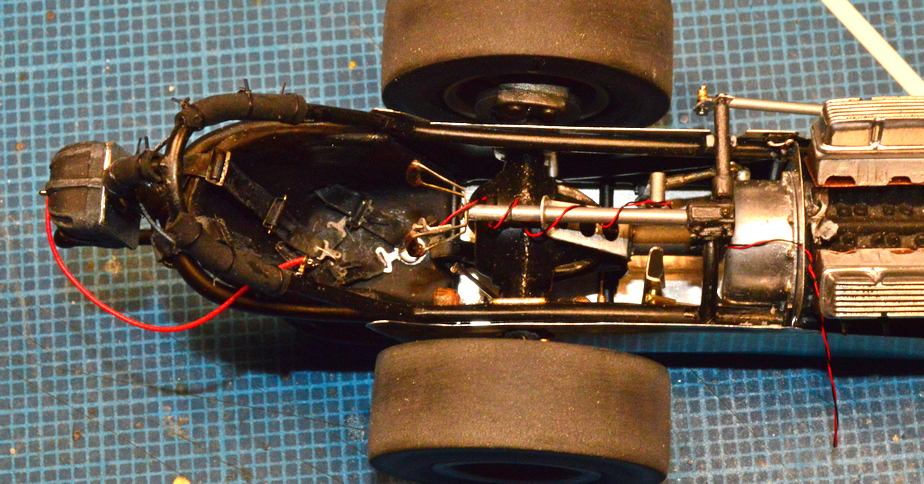
Since the last update, I have added the "rollout" plate, fashioned some tabs for the body, (although the one on the right side of the car has disappeared inside the cockpit, somewhere), added the mag kill switch and wiring and got the steering set up.I also installed the valve covers,which really look tall, with the spacer plates under them. Apparently these SBC cars used tall cams, so, the valve covers had to match, and this was a few years before Moroso's stamped aluminum covers came along. She's rolling! Getting very close to doing the induction setup. I have already begun working on the manifold. She's gettin' done, Snake!
-
I hear that! This is my only case. It may be time to think about putting some of the stuff that's in there, away. I have three or four diecast dragsters that don't need to be out. You have some serious display space!
-
That is awesome! I have an old glass display case, from a jewelry store, as I recall. It's the best way to display models, and memorabilia that goes with them. AND, they never need dusting! Here it is, in a less than friendly environment--an uninsulated, detached garage, in Minnesota.