StevenGuthmiller
-
Posts
15,071 -
Joined
-
Last visited
Content Type
Profiles
Forums
Events
Gallery
Everything posted by StevenGuthmiller
-
 Hi folks. I’ve been contemplating how I’m going to recreate the seams on a convertible top, and I’m a little bit at a loss. I’m converting a hard top into a convertible top, and while I think I’ve got a pretty good handle on how I’m going to create the top bows, it will require that the seams be added afterwards. Doing it with plastic strip and filler will be an issue as I would be gluing plastic over existing fill, and I’m pretty certain that would create a mess. My solution is to lay a piece of thin, wide tape down the center of the top to create the seams, but I need a tape with no texture because I don’t plan on covering the entire top with it, and it needs to be something that can be painted over and will withstand the test of time. My first thought is to use a duct tape, or some sort of packing tape, but I’m not sure. It has to accept paint, and it needs to be sticky and stable enough so that it will hold up for many years No, I don’t want to use masking tape because, for one reason, I don’t want the texture, and I don’t particularly trust that it won’t lift down the road, so please, don’t suggest it. Thanks! Steve
 -
Call me weird, but I love working with it. ? But then again, I’ve had probably 40 years of experience with it. Steve
-
1964 Pontiac Lemans Convertible.
StevenGuthmiller replied to StevenGuthmiller's topic in WIP: Model Cars
Thank you Jeremy. I agree. How you got there is much more important and informative than just the fact that you got there. But, it’s understandable that some might just want to share what they’ve done on a project, rather than what processes they’re using to get there. Personally, I find the latter to be much more educational, and I’m always interested in learning something new. Steve -
1964 Pontiac Lemans Convertible.
StevenGuthmiller replied to StevenGuthmiller's topic in WIP: Model Cars
Thanks guys! Well, I appreciate that guys! I figure that if I'm going to do a build thread, it should be as comprehensive as possible. Plus, it ends up being a useful reference for myself, as I don't always remember what technique I used for a particular circumstance, so it serves as a sort of catalog that I can return to if my memory escapes me. As far as photos go, most of us have a smart phone these days, and mine is always with me, so when I'm in the shop for a while, and I've finished a process, or if I'm just ready to take a break, I'll pull out my phone and snap a few quick pics. Then I just send them to myself in an e-mail where I can deal with them later on my desk top. I organize all of my photos into separate folders, one for the progression of the project, with sub folders for different aspects of the build, (ie, body, engine, interior, chassis, etc.) and another folder for photos of the completed builds. I'm not particularly organized in many other parts of my life, but I've found that my photos can become an absolute quagmire to wade through if I don't have some sort of organization. In any case, I'm happy that you are all following along. Thank you! Steve -
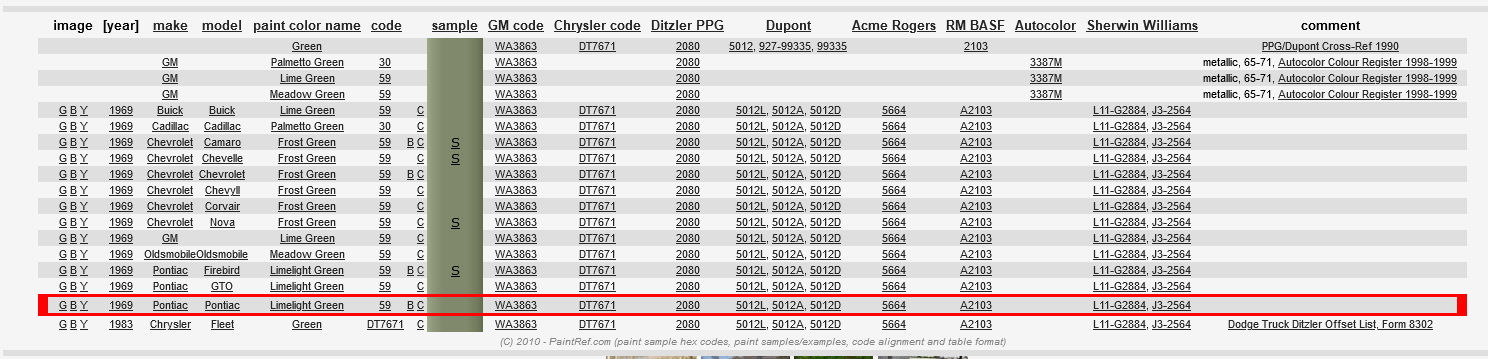
MCW does carry it, but sometimes with their products, you have to do some cross referencing, because they use different names. (Paintref.com is a fantastic resource for cross referencing colors) Most times, they advertise their colors in the Chevrolet names, so while they might not list them in every make's name, there's a good chance that they have it. In your case Don, the color you're looking for is listed as #6914 Frost Green Metallic, which is the same code and color as 1969 Pontiac "Limelight Green". (Code 59) Go to MCW's paint page, the GM section of course, and go to page 2. It's the first color on the page. It's even on sale at the moment! ($7.50) A screen shot from Paintref.com showing the color cross reference chart. MCW #6914 Frost Green Metallic Steve

-
I seem to be bad luck for hobby shops. When I lived in Rochester MN, there was a large, and exceptionally nice hobby shop called "Moon's Hobby". It was there when we moved to Rochester in the late 80s, but folded up probably 10 years before we moved in 2016. When we moved to west central MN, there was a small, but adequate hobby shop 20 miles away in Fargo ND. It too closed about a year ago. Nothing left around here to my knowledge except a Hobby Lobby. The days of the brick and mortar hobby shop are numbered my friends. Steve
-
1964 Pontiac Lemans Convertible.
StevenGuthmiller replied to StevenGuthmiller's topic in WIP: Model Cars
"Bucky", (Keith Buckner) was so kind as to donate a hard top from the AMT '65 GTO kit for me to try to convert into a convertible up top for this project. Mega thanks Keith!! So, I began work on it today. First order of business was to sand the ridge along the corners of the top to ease, or round the corners, and to remove all of the trim. Then I did a little filing and sanding around the top and side of the rear window opening to try to reshape it a bit. Next came the "fillers". The top will be moved back slightly, so a filler panel was added to the front of the top. Then some fillers were added to the top corners of the rear window opening and the side window openings to round them to more closely resemble a convertible top. Once all of this work is completed, I will begin adding the top bows, followed by the top seams, and finally the welting around the perimeter and rear window opening. A lot of work I suppose, but this is the kind of stuff that I really love doing! Steve -
Paint Question on AMT 63 Vette
StevenGuthmiller replied to Len Woodruff's topic in Model Building Questions and Answers
I've had almost exactly the same thing happen in the past when I tried sanding out some boogers from the paint and then clear coated over it. Depending on the clear, the sanded area can "ghost" and although it may look fine prior to clear coating, it becomes greatly amplified and very obvious once the clear is applied. This is part of the reason why I never sand the final color coat prior to clear coat. If sanding is required to eliminate junk, I'll shoot it with another coat of color before clear coating. Granted, I'm using nothing but automotive lacquers for everything, so the hot nature of the paint and clear is of course a factor. That said, whether or not his is the issue with your model, I have no idea, but it sure looks like it. Steve -
I know the gentleman who's '55 made the cover of the Fine Scale Modelers contest edition. I consider Rod a good friend, although we only see each other once a year at the NNL North show in Bloomington MN. Great guy, and a great model!! Saw it up close and personal at the NNL show last May. Fabulous! Steve
- 39,202 replies
-
- 1
-

-
- johan
- glue bombs
- (and 1 more)
-
For factory stock builders
StevenGuthmiller replied to Classicgas's topic in General Automotive Talk (Trucks and Cars)
Another nice feature of the Paintref site is the ability to quickly cross reference colors. If you’re looking at a particular Chevrolet color from say, 1969, you can click on the color and see if that code was available on other makes, models or years, and what the name of the color was for that particular make or model. This is particularly useful when ordering paint from a provider such as MCW, who don’t always provide codes or correct color names for every make. For instance, MCW may have 1966 Chevrolet “Marina Blue” listed on their website, but in order to find out if that exact color was available on a Pontiac for instance, the Paintref cross reference feature will tell you very quickly. According to Paintref.com, F-Code 1966 Chevrolet “Marina Blue” was only available on Chevrolets, and the identical color available on Buick’s as “Blue Mist”, and only in 1966. Lots of very good information there. Steve -
For factory stock builders
StevenGuthmiller replied to Classicgas's topic in General Automotive Talk (Trucks and Cars)
Yup, I've got this site in my bookmarks. Use it constantly! Not just your typical color reference site, but links to actual chip sheets, and cars painted in the actual colors. Extremely useful site, especially when used in conjunction with one of the after market paint providers that offer correct factory colors. Steve -
In all honesty, I have to say that in my case, there is no such thing as a kit that I "can't get enough of". Once I've built one, I've pretty much had enough of it. Repetitiveness is my enemy. I've never been one to build the same kit over and over again. It's hard enough for me to remain focused on building when I'm doing something different every time. Steve
-
Correct. I have many builds that were finished in white and cleared with lacquer. No yellowing issues whatsoever. Steve
-
Those that were only made once
StevenGuthmiller replied to T-Ray's topic in General Automotive Talk (Trucks and Cars)
That’s true. Actually, the USA Oldies ‘62 Chrysler interior was not a ‘62 “non-letter car” interior, but rather a tub taken from the ‘65 Chrysler 300 promo. Steve -
This. Steve
-
'51 Fleetline windshield issue
StevenGuthmiller replied to customline's topic in Model Building Questions and Answers
I believe the Belair was the first one. Steve -
'51 Fleetline windshield issue
StevenGuthmiller replied to customline's topic in Model Building Questions and Answers
Keep me posted. I’ll be interested to see how it fleshes out. This should allow you to play around a little with the window opening shape as well if there are any minor changes that you want to make. Have fun, and good luck! Steve -
'51 Fleetline windshield issue
StevenGuthmiller replied to customline's topic in Model Building Questions and Answers
Thanks to you Jim, I couldn't get this idea out of my head until I went into the shop and doodled around with it. Actually I discovered that with the method that I described, thinning the body would actually be detrimental. That thickness will give you more surface to mount the glass. I just sanded off the external trim, glued a piece of styrene strip to the very edge of the opening, and now it looks as if the space between the opening and the new trim will be exactly what the doctor ordered for mounting new glass. Of course, this was just a test and you'll want to spend more time on it, and completing the radiuses will require some finesse, but I see no reason why this shouldn't work, and honestly, it wasn't difficult at all. Steve -
'51 Fleetline windshield issue
StevenGuthmiller replied to customline's topic in Model Building Questions and Answers
I am happy to help. It won't be something that you can accomplish in a couple of hours, and will be one of those improvements that most people won't be able to quite put their finger on, but as you know, when something bugs you, you're not getting it out of your head until you address it. Good luck! Steve -
'51 Fleetline windshield issue
StevenGuthmiller replied to customline's topic in Model Building Questions and Answers
Personally, I would remove the trim around the window and the center divider, correct the corner radius’s with some plastic fillers. While finishing this correction, I would make the opening about 1 mm larger on the top and sides Once the opening is where you want, use some thin styrene strips or half round for your trim, and position it so that it over hangs the opening slightly, just enough so that you’ll have enough of the trim exposed on the inside of the body to fasten the glass to. Use the same trim material to make the divider. Once you’re ready for the glass, cut the glass from thin clear plastic sheet and carefully glue it to the inside of the trim, not the body. The glass could be taped in place, and some clear glue of some sort could be flowed into the seam between the glass and body for extra strength. If this is all too involved for you, and you can live with the corner radius, you could just carefully thin the body around the inside of the opening and the divider with a Dremel and reamer bit and sand paper, and then scrap the kit glass and use thin cleat sheet plastic. Personally, I almost never use kit glass anymore if avoidable Steve -
Please help
StevenGuthmiller replied to Crapy Builder's topic in Model Building Questions and Answers
That's the route that I would go. Never liked the one dimensional look of decals anyway. Depending on the body color, they virtually disappear. Steve -
Well, in any case, There's no possibility that I'm going to be able to ignore gaps of that size. My suspicion is that if the fender wells are supposed to be mounted outside of the frame rails, they're pretty close, as in the photo that Keith provided, not a scale 2 inches away as they appear to me on this kit. In any event, I believe with some massaging, they're getting closer to acceptable in my view. Steve
-
Thanks Keith, but I think I'm getting closer to the fit that I'm looking for, at least a presentable fit before I have to try to mate it to the new body. Some twisting to bring the "toes" in, bending at the radiator bulkhead, and some other twisting and contorting, and I think at least the gaps are addressed. I'm waiting on another donor kit to arrive before I can begin fitting the firewall, but at the moment, it looks better. Steve
-
Those that were only made once
StevenGuthmiller replied to T-Ray's topic in General Automotive Talk (Trucks and Cars)
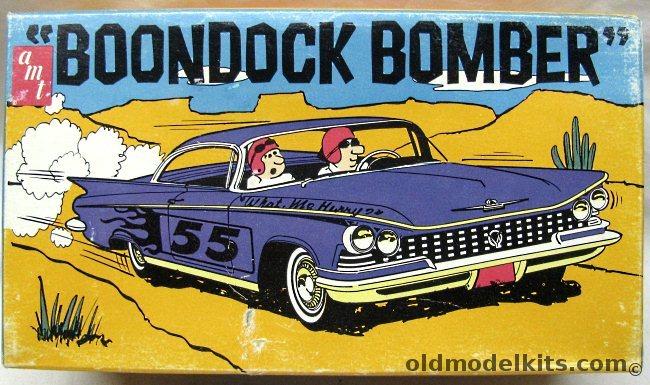
All of the USA Oldies kits were re-issues. I don't believe that Revell ever re-issued their '62 Fury though. But if the Buick convertible in Craig's photo is a '59, the hard top version was re-issued as the "Boondock Bomber". I'm thinking 1962-ish? Steve
-
I could understand a small “vertical” gap, but not a horizontal one. You shouldn’t be able to look down into the engine bay and see the ground between the fender well and frame rail. Steve