StevenGuthmiller
-
Posts
15,071 -
Joined
-
Last visited
Content Type
Profiles
Forums
Events
Gallery
Everything posted by StevenGuthmiller
-

Show us your completed JOHAN kits!
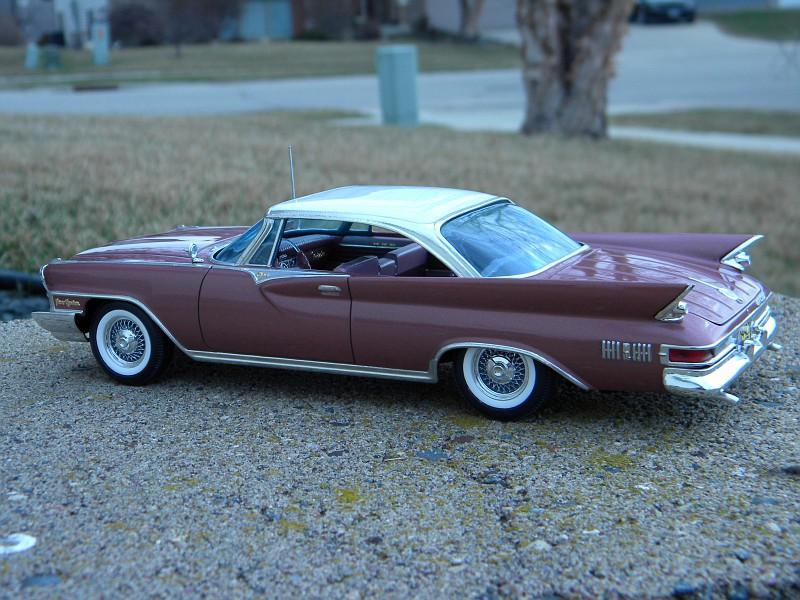
StevenGuthmiller replied to Claude Thibodeau's topic in Model Cars
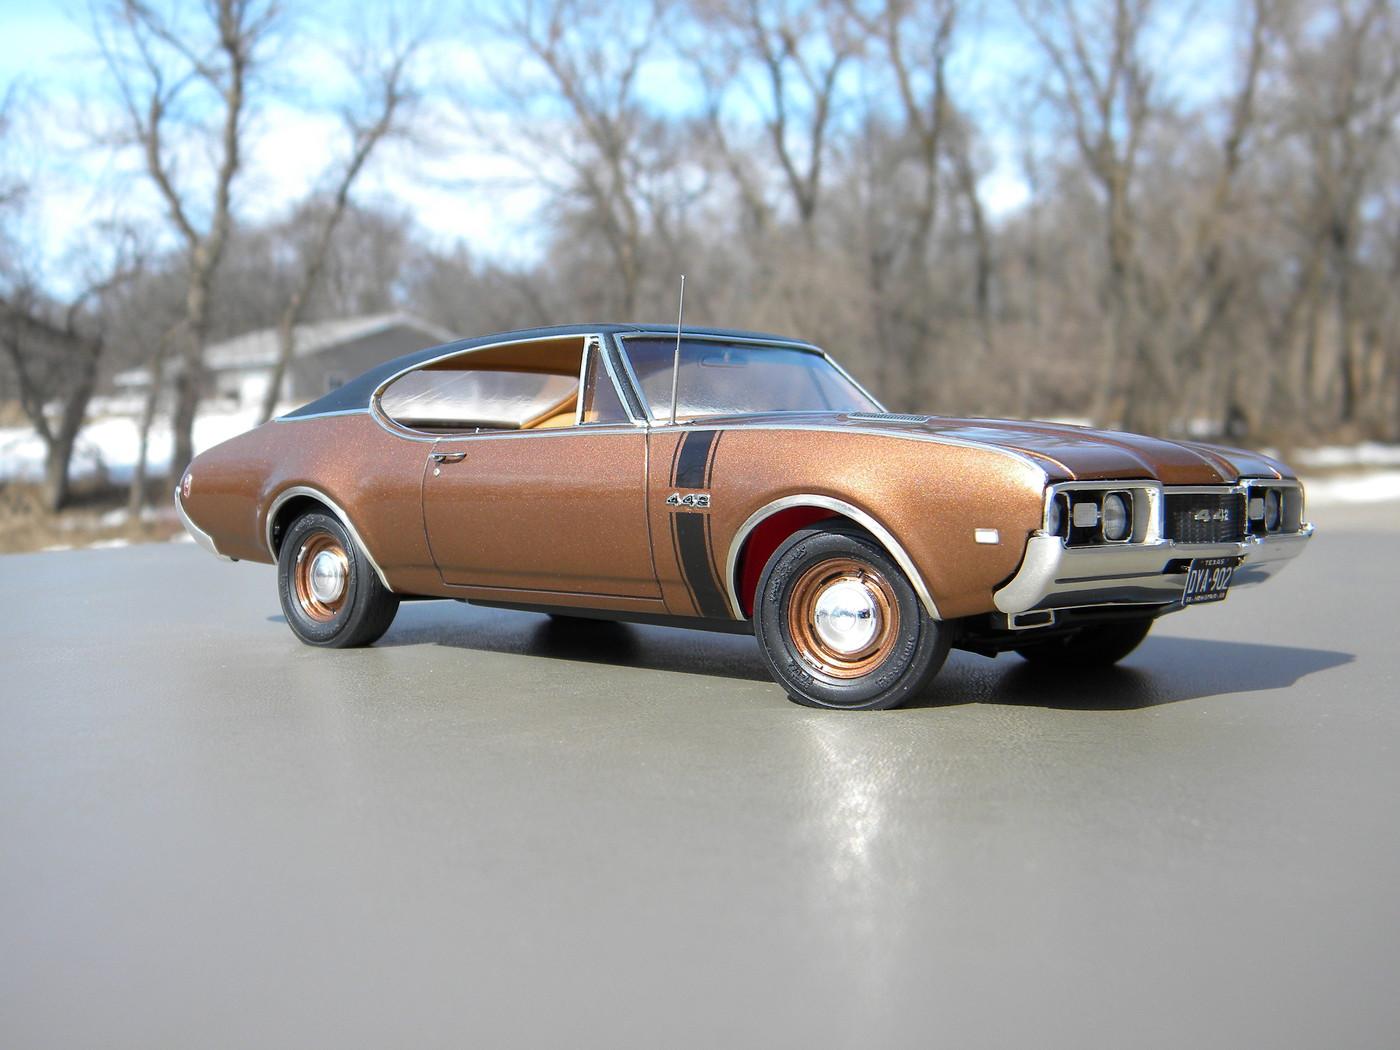
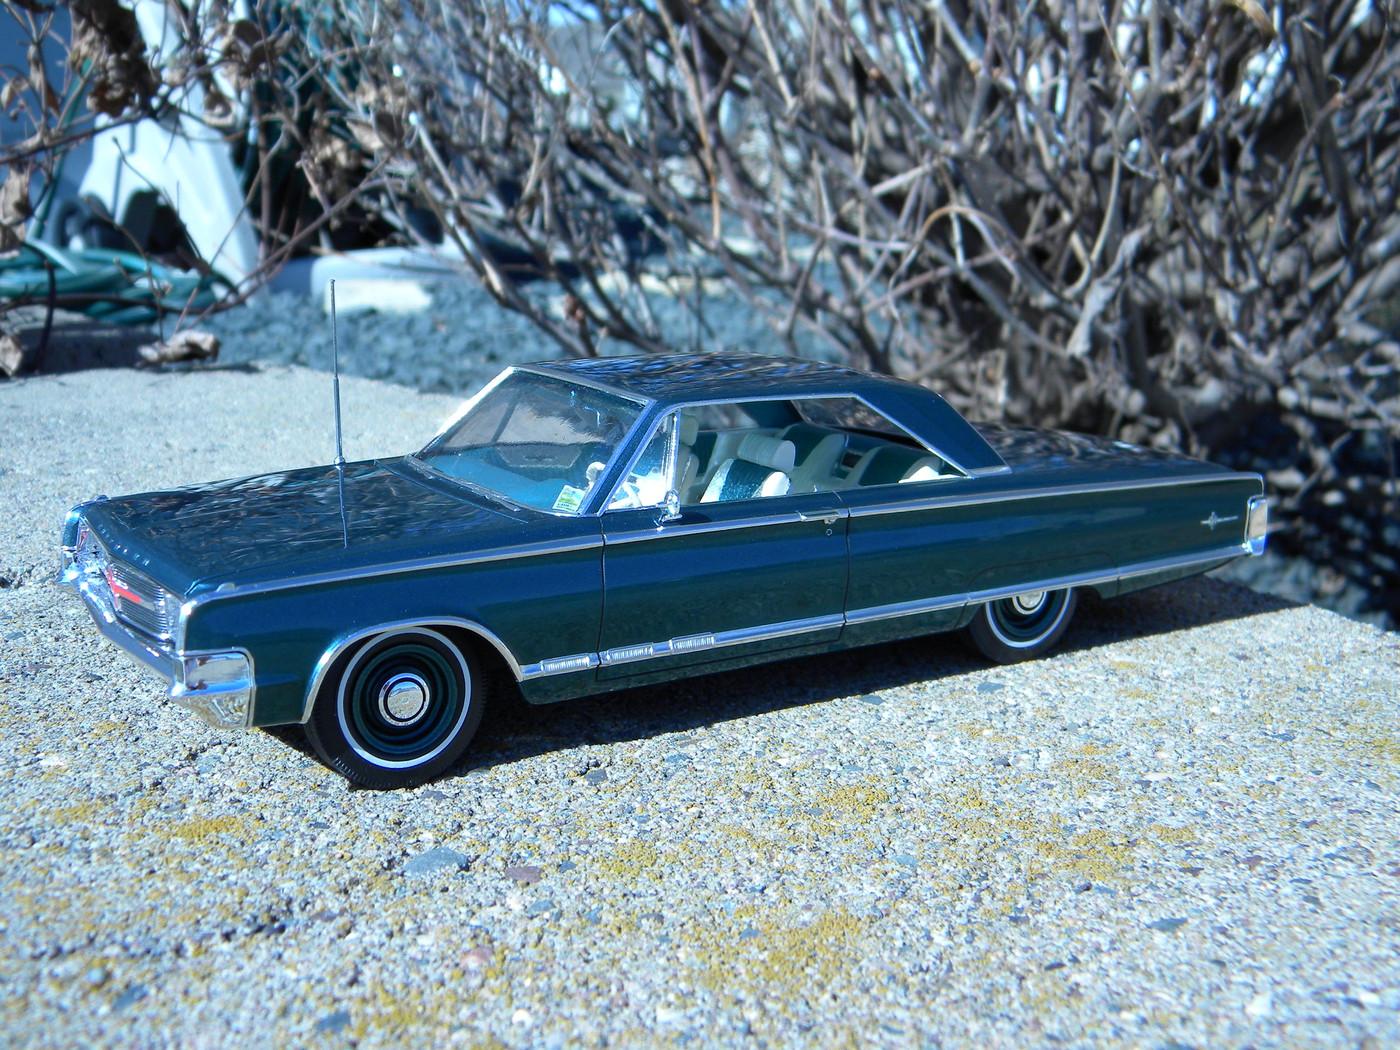
And finally..... Steve
-
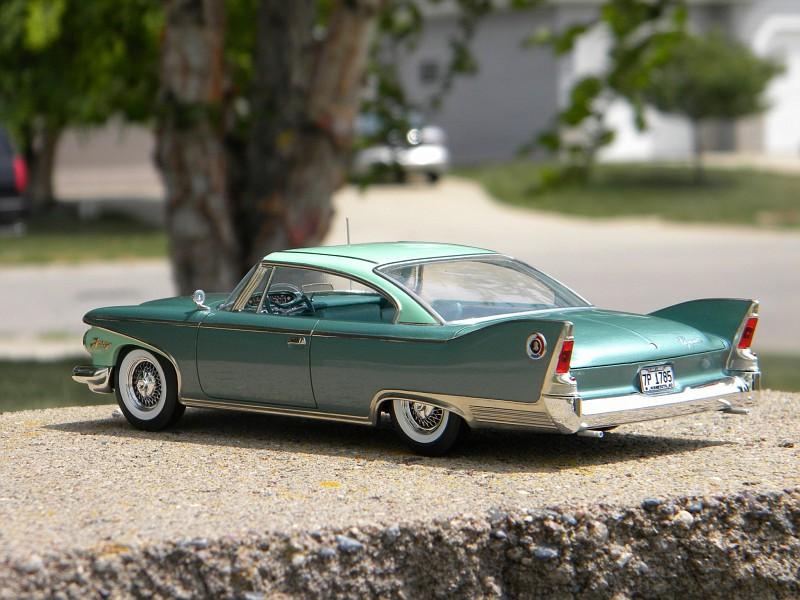
Show us your completed JOHAN kits!
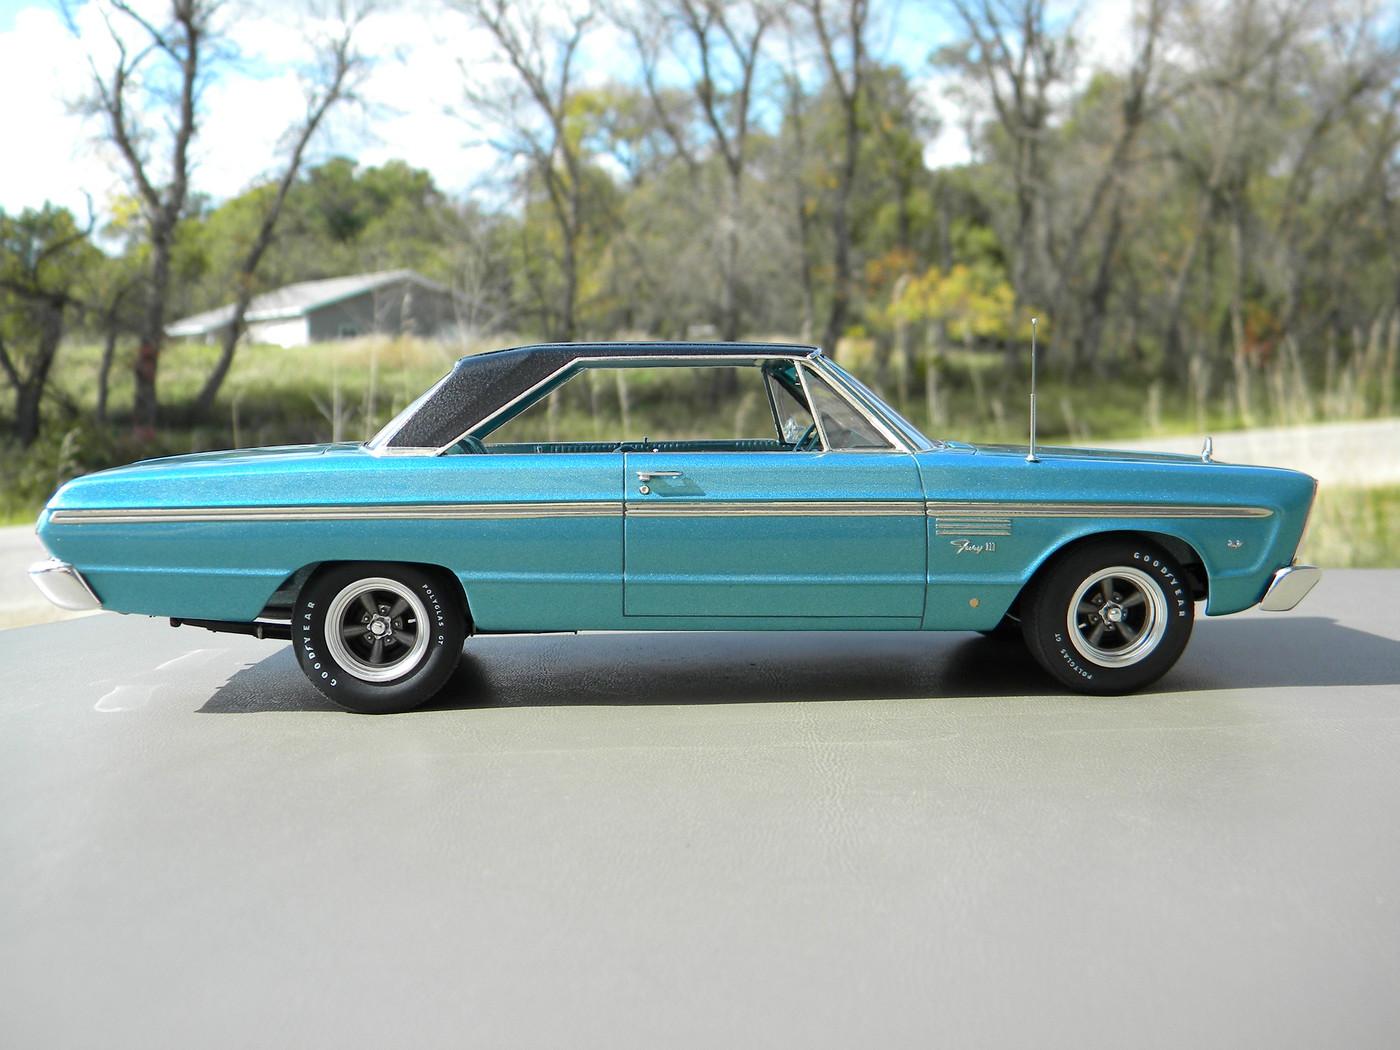
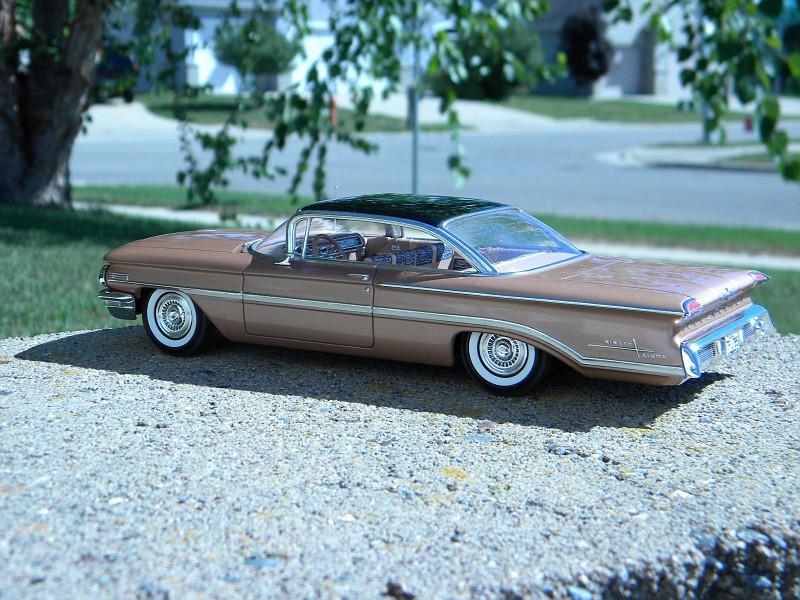
StevenGuthmiller replied to Claude Thibodeau's topic in Model Cars
And, another batch. Steve
-
Show us your completed JOHAN kits!
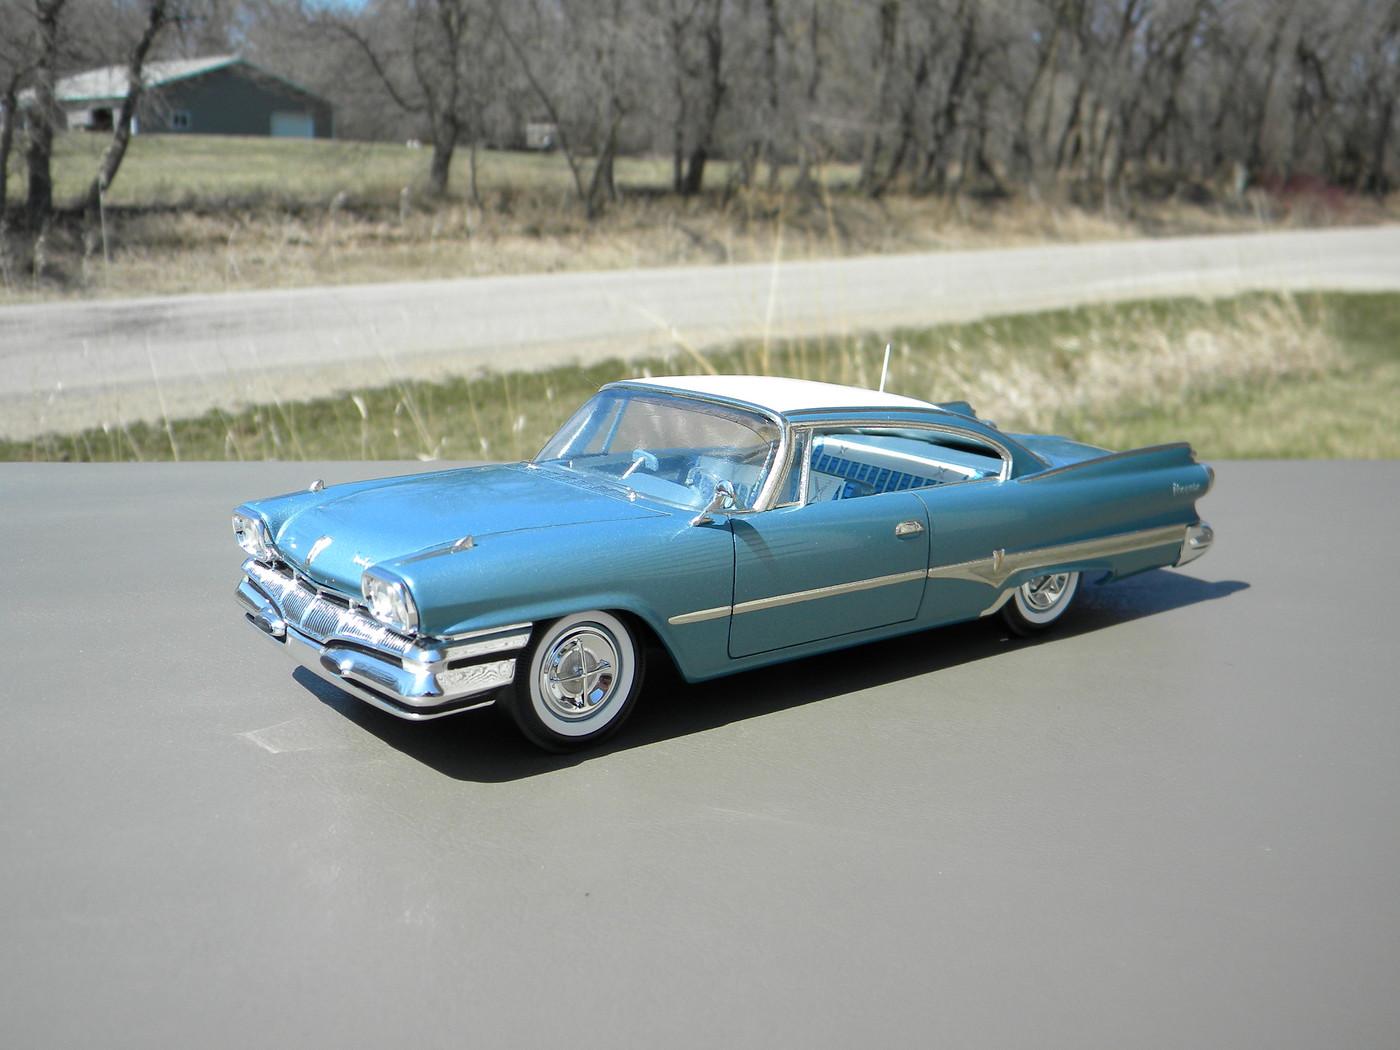
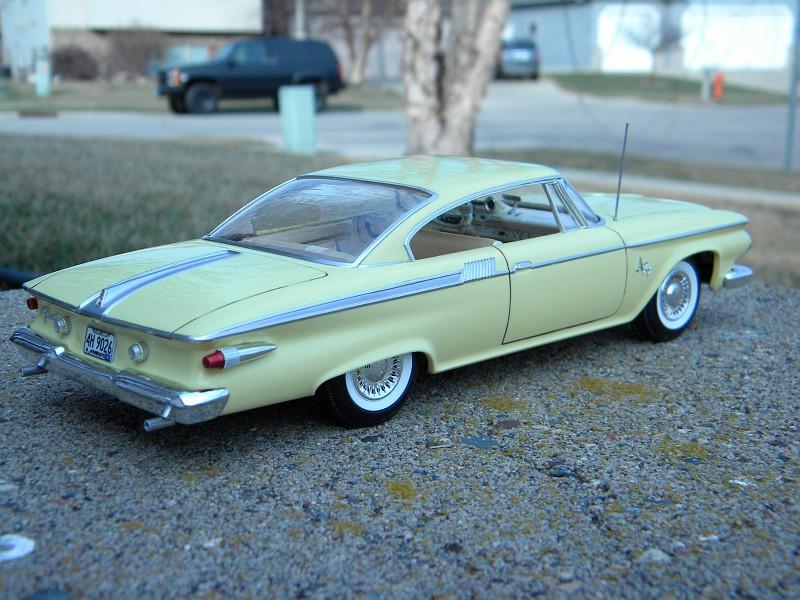
StevenGuthmiller replied to Claude Thibodeau's topic in Model Cars
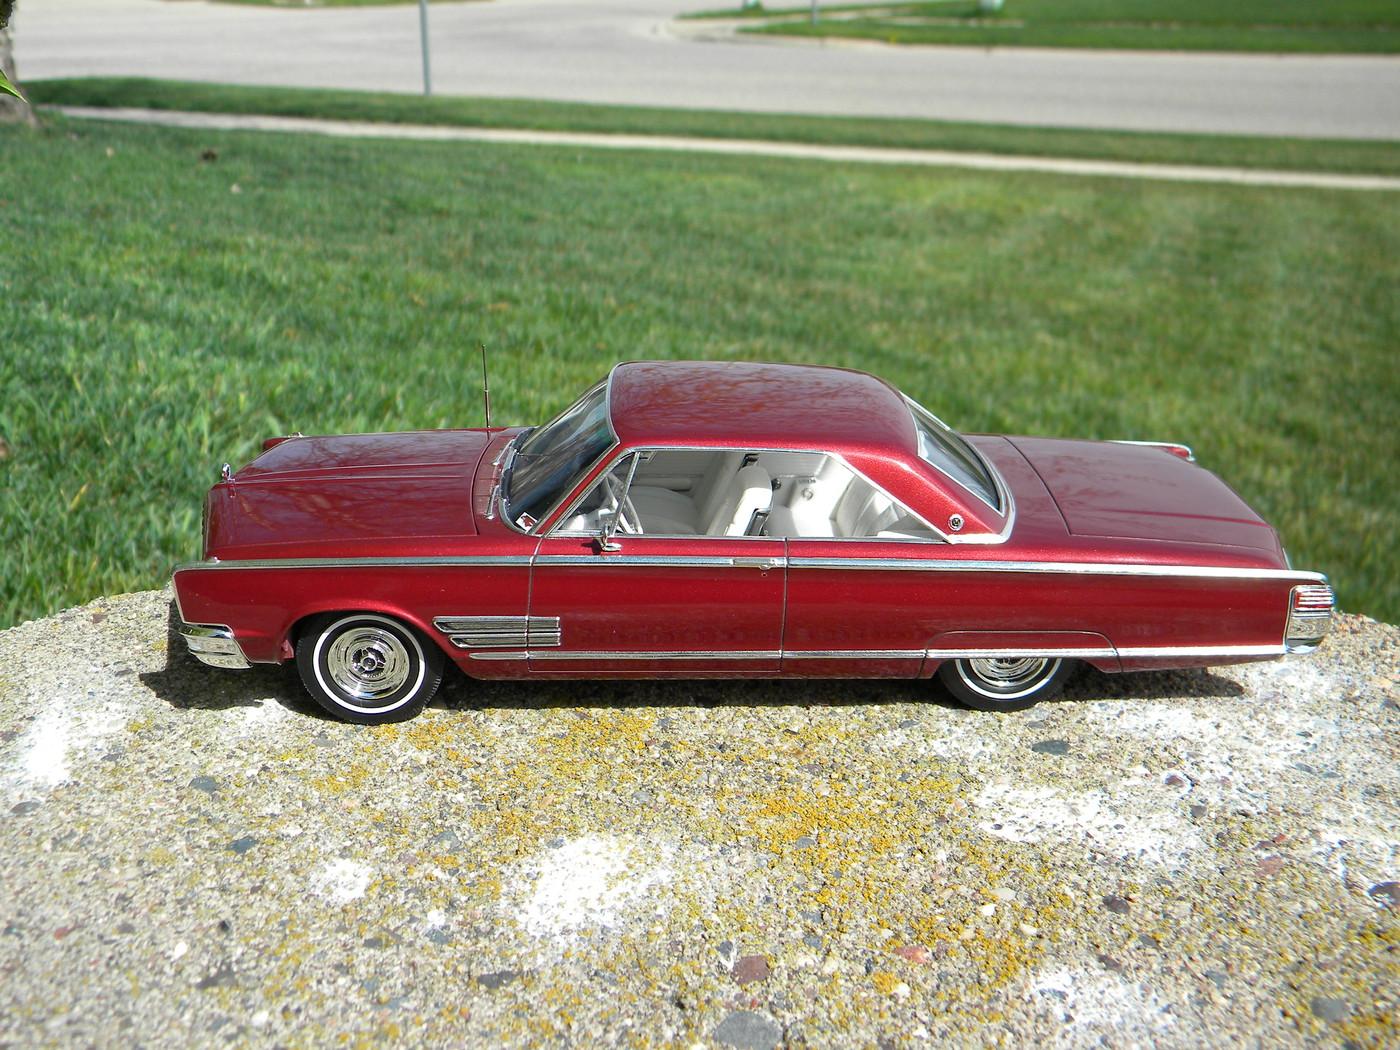
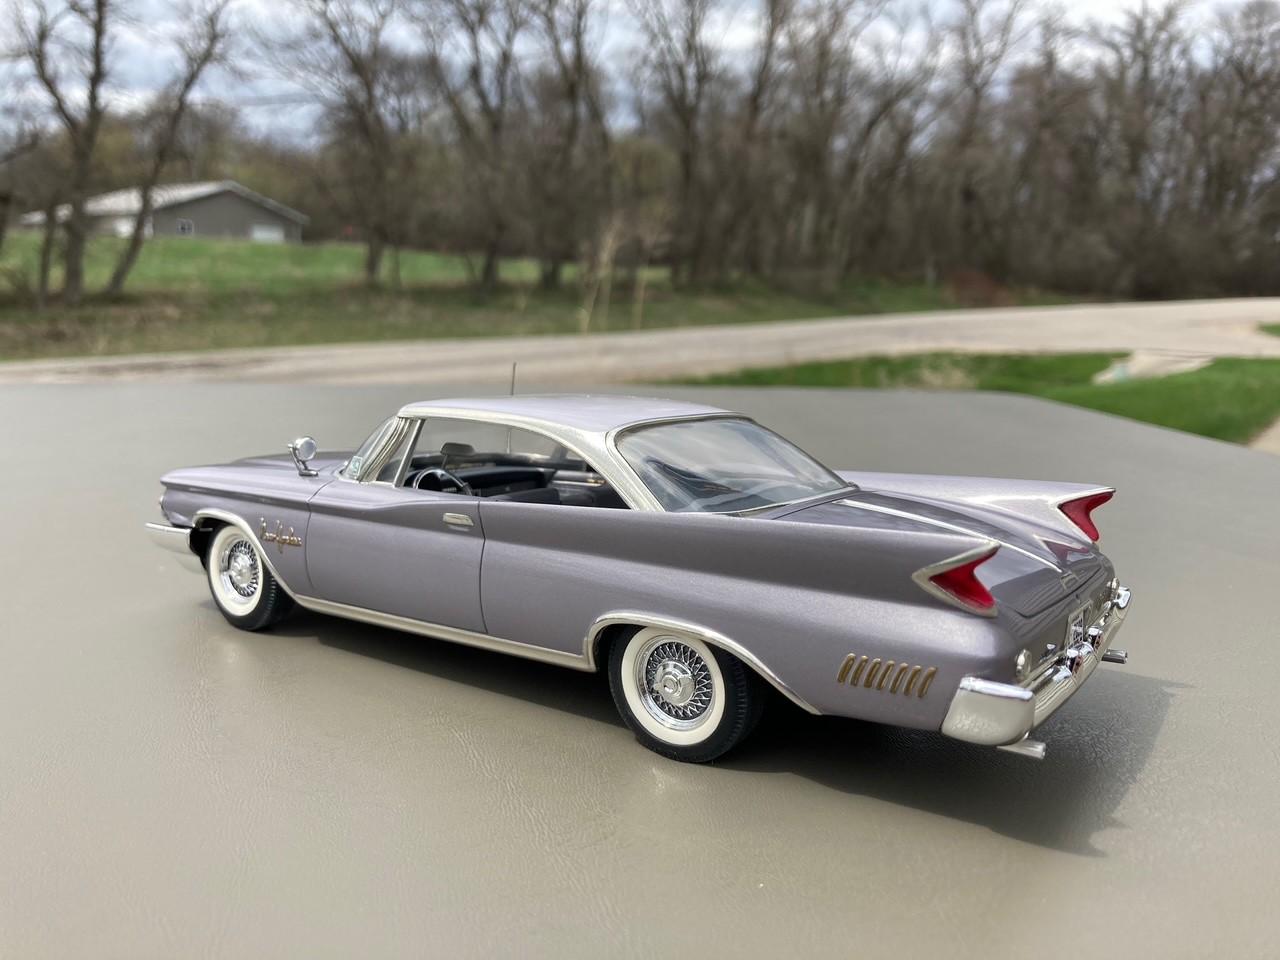
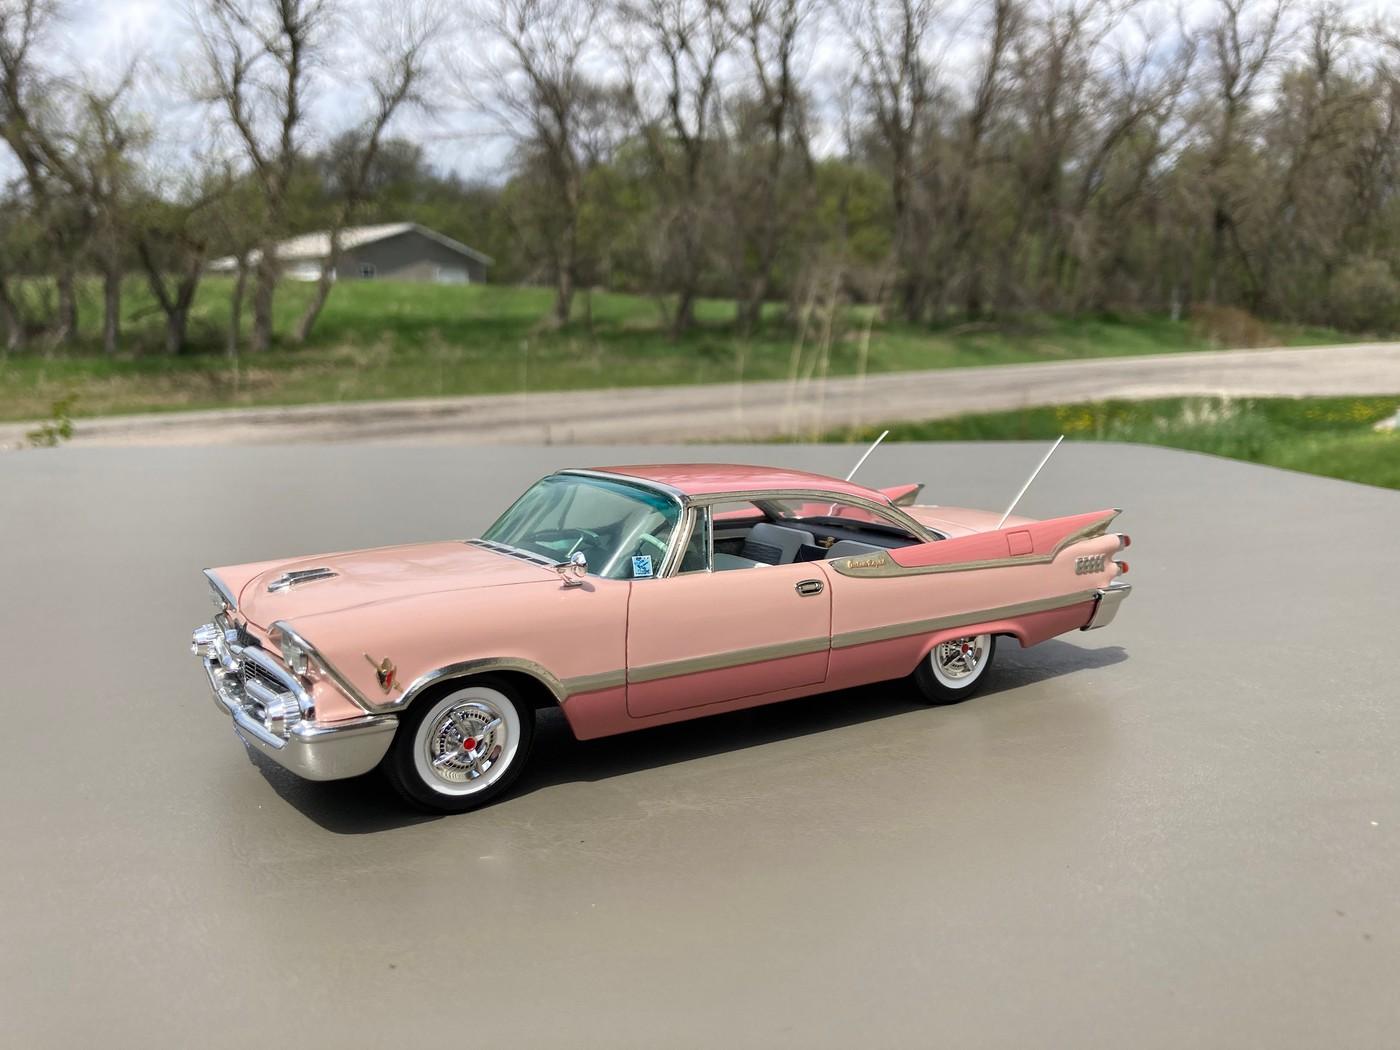
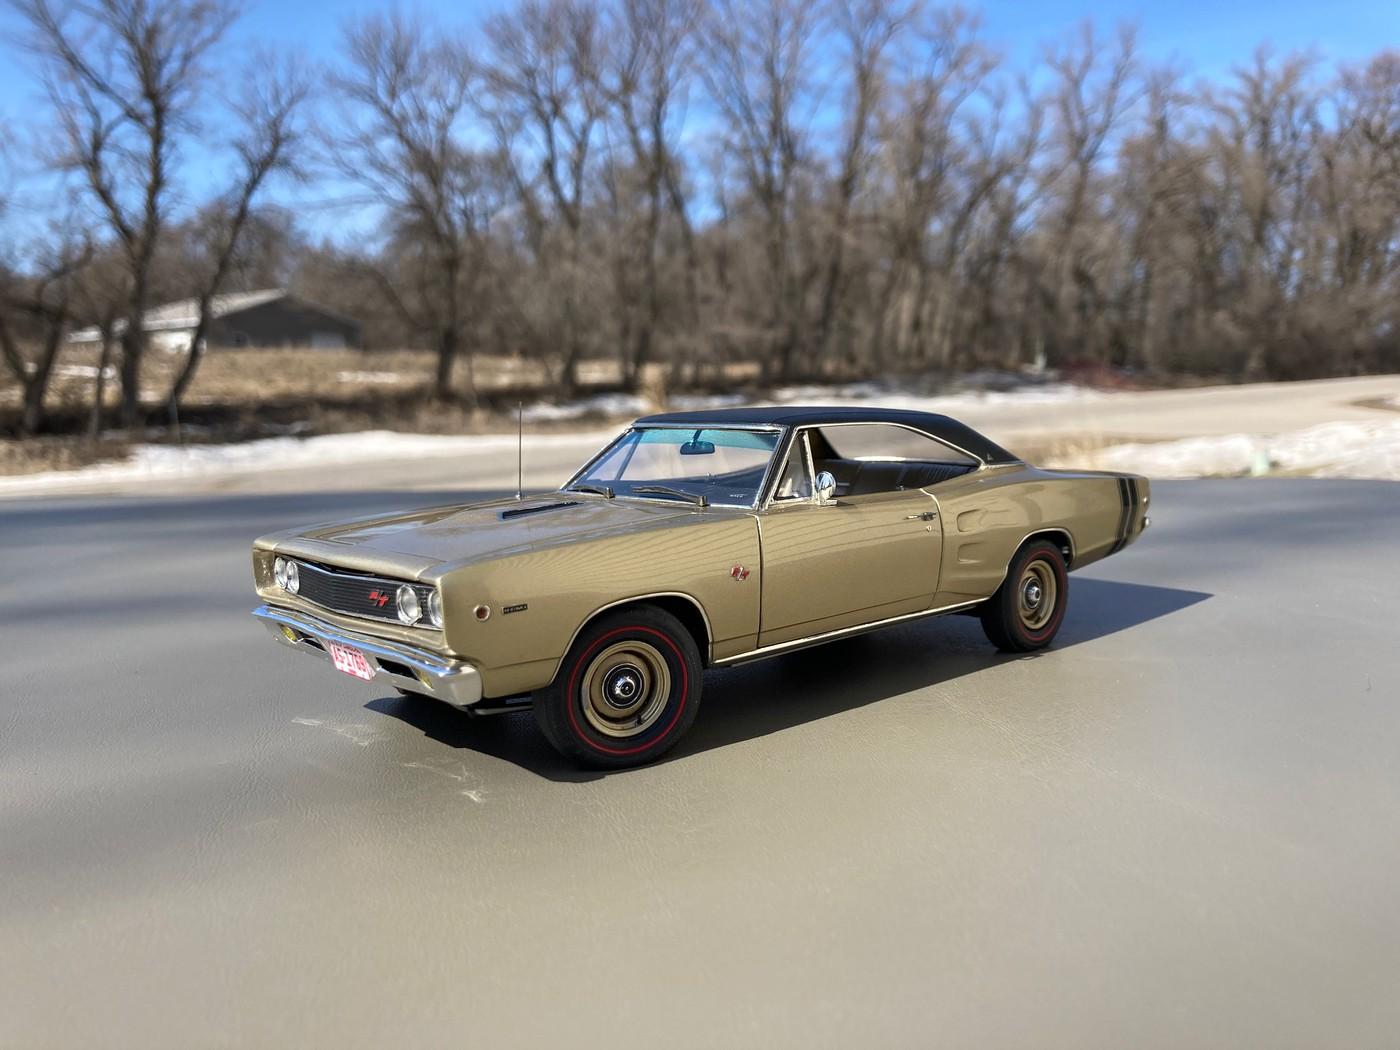
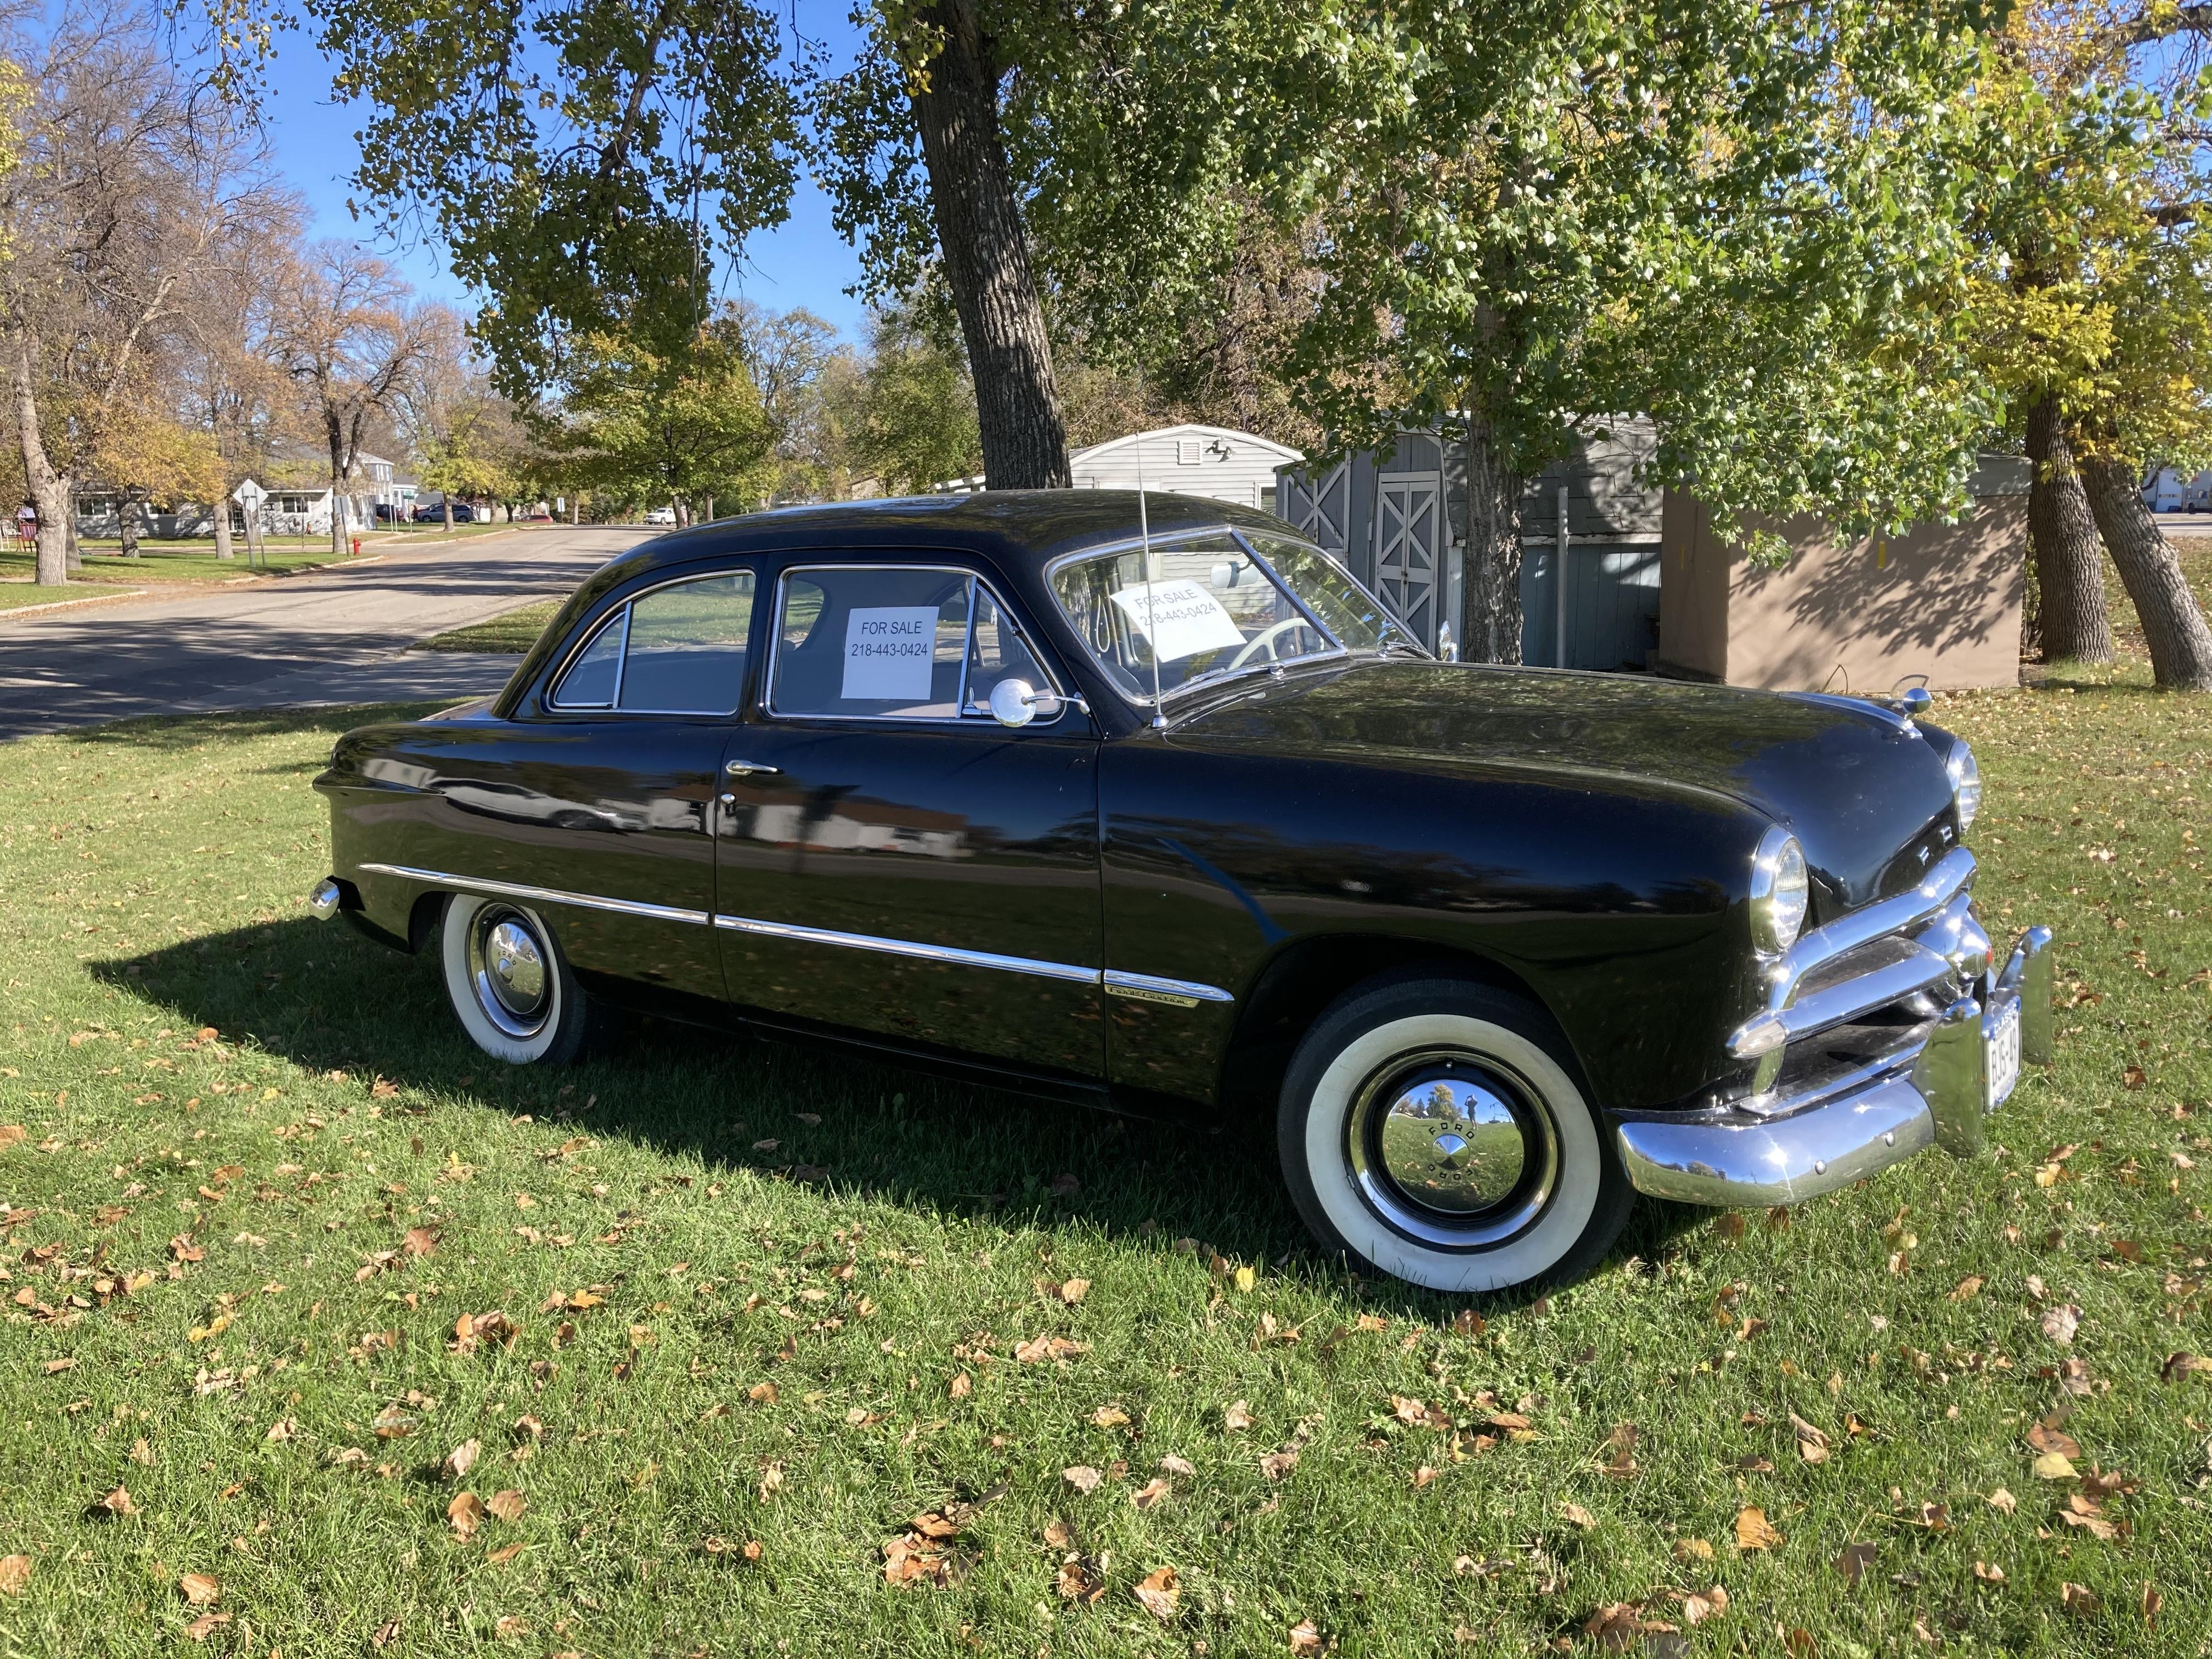
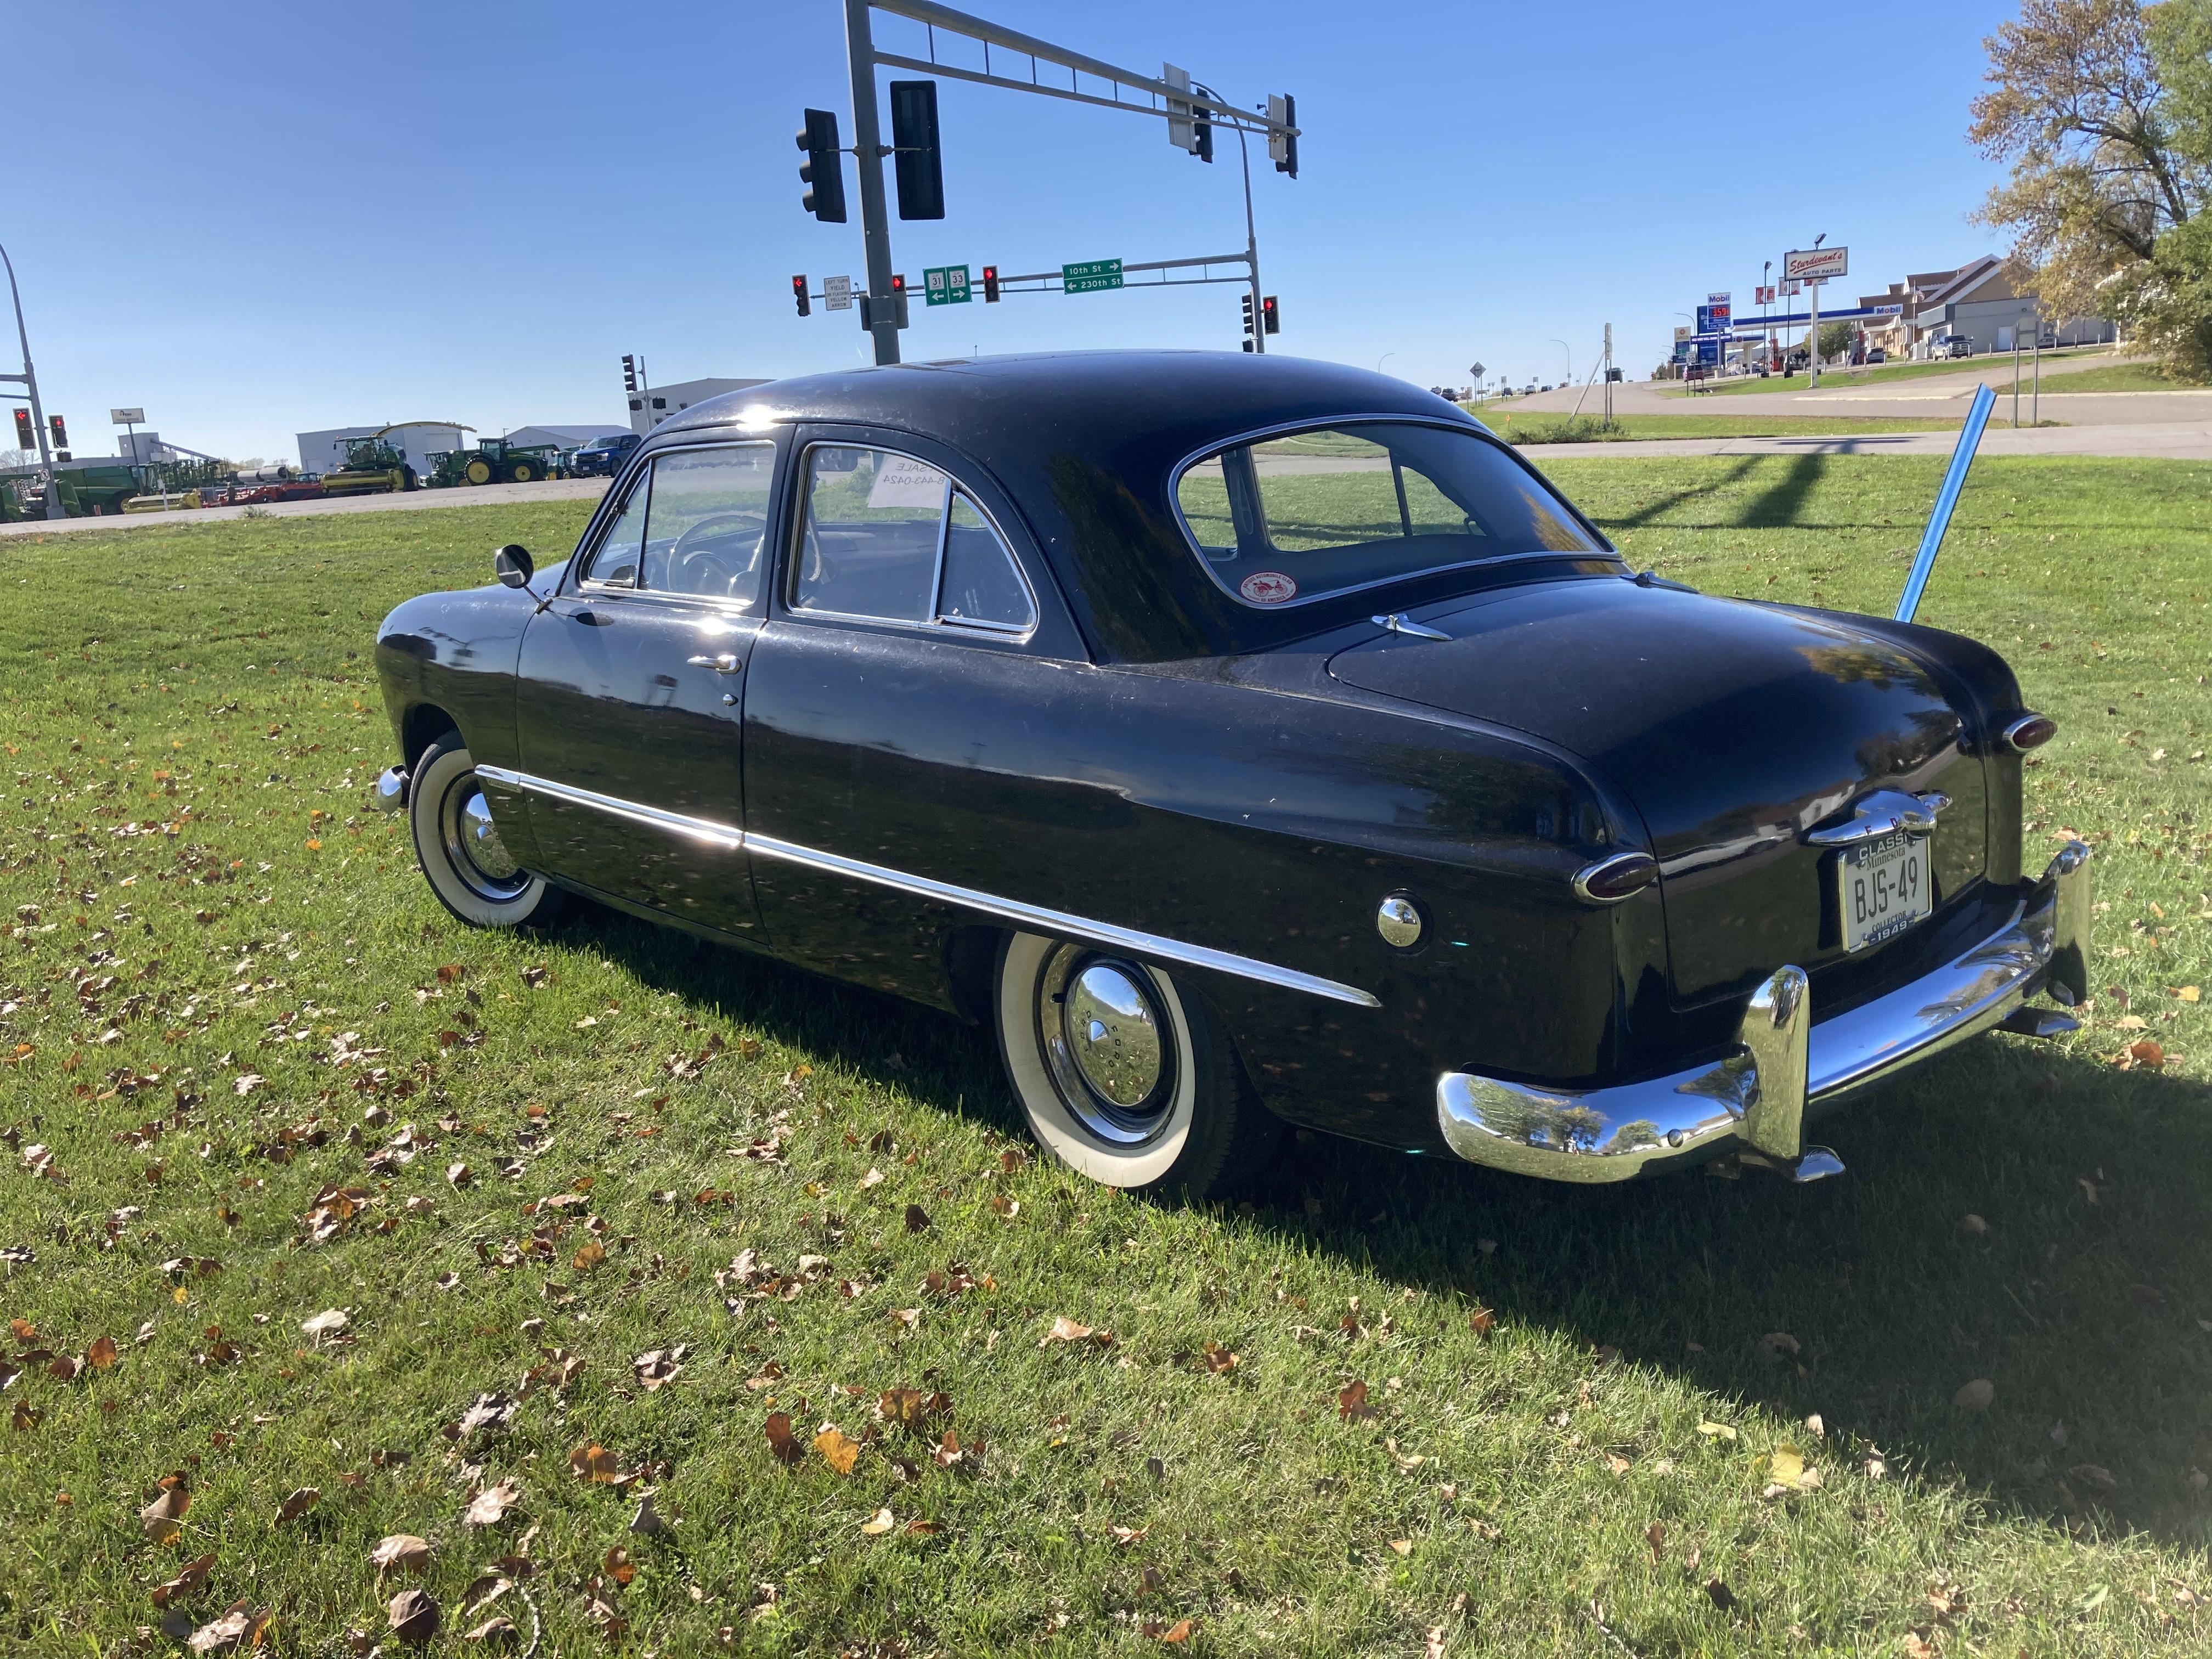
Where do I start?! ? Here’s just a few. Steve
-
I just stumbled upon it, knowing how badly Testors clear enamel yellows. I thought it must be useful for something. ? Steve
-
Help with parts I.D. please
StevenGuthmiller replied to Keef's topic in General Automotive Talk (Trucks and Cars)
I understand, but the OP is asking where the hoods came from. You stated that the MPC Challenger didn’t come with a shaker hood, but I wanted him to be aware that the AMT kit did. That’s all. I don’t think it necessarily matters to him who the manufacturer was. Steve -
Help with parts I.D. please
StevenGuthmiller replied to Keef's topic in General Automotive Talk (Trucks and Cars)
The AMT ‘70 Challenger had a shaker hood. Steve -
Yup! That's the direction that I would go! But then again, you probably already know how I feel about custom wheels, outside of a few like Cragar S/S, Keystone Classics or Torque Thrusts. Classic car, classic wheels is my motto. Save the giant chromies for your Escalade! Moving the rear suspension forward a little was a pretty straight forward operation. I just trimmed the mounting bracket off of the front of the leaf springs, and then added new ones further back. In my instance, I also added new mounting shackles to the rear of the springs to raise up the suspension, and filled the holes in the chassis with a "mounting plate". Keep in mind that the drive shaft will likely need shortening as well, depending on the engine you use. Should you decide to go with a Hemi, don't forget the torque boxes. Actually, they were pretty easy to replicate too. Steve
-
Nice work Bill! The Testors clear for aging those transparent steering wheels works pretty slick, doesn't it? Steve
-
I’m intrigued by the fact that the Charger chassis fit the Coronet body perfectly. Oddly enough, some mods were required with the fit with the ‘68 Coronet. I wound up having to move the rear suspension forward a hair and widening the track of the rear wheels slightly to get it to look right. I also raised the rear end a little, not so much because it was incorrect, but because I wanted it to have a more aggressive look, and with the large, resin Fireball Modelworks A-12, 15 inch tires I was using, a little extra clearance was desirable. I got a little scrutiny for the stance and wheel size on my ‘68, but that was the look that I was shooting for. To me, it gave that “ready to stomp in heads” appearance! ? As I’ve already gone through a similar project with all of it’s trials, if there is anything that I can help with, feel free to ask. I would be more than happy to contribute anything that I can on your project. Steve
-
Removing rusty screws.
StevenGuthmiller replied to John M.'s topic in Model Building Questions and Answers
Soak them in WD-40, let them sit for a day, and then try again. If it doesn’t work, I would personally just cut the chassis around the screws and then remove the screw posts. That’s usually one of my first operations anyway as I normally replace the chassis with something more detailed, and nothing kills a nicely detailed engine faster than those ugly screw posts on the radiator bulkhead. Steve -
Can I ask why you're stripping them? Steve
-
I get it Kevin. Of all of the “ chrome paint” options, I just have the least faith in Molotow. It was never designed for this purpose, nor was it designed to be anything permanent. I just have a tough time using anything on my models that has no track record of any substance. Carry on. Steve
-
I know it’s not really fashionable anymore Kevin, but you might want to give Alclad chrome some consideration rather than Molotow. Yes, you do need to use a base under it, but it can be virtually any glossy finish at all. Doesn’t need to be black, or lacquer, or whatever. I use black primer with a coat of Testors clear enamel and it works just fine. The only reason that I suggest it is because Alclad is cheaper, can be shot directly from the bottle, and most importantly, as it is an actual lacquer paint, and not a graffiti ink, it’s been my experience that given a little time to cure, Alclad is much more durable than Molotow. I don’t think that I’ve kept any secrets about my thoughts about Molotow, but in the end, I want to help you. By all means, try them both and then make your decision, but don’t make it based on the flavor of the month. Steve
-
Yes, as Sledsel stated, be aware that it is indeed a ‘61 Ford. But that may be to your advantage in the parts search department. Parts could be obtained from the AMT re-pop of the ‘61 Victoria club coupe some years ago that should be still pretty easily available. Steve
-
What did you see on the road today?
StevenGuthmiller replied to Harry P.'s topic in General Automotive Talk (Trucks and Cars)
Steve
-
Great reference! I'll have to try to save that for my next attempt. Steve
-
I've done several interior mirrors in various ways, but by far the most difficult for me was trying on several occasions to replicate late 50s/early 60s Mopar exterior mirrors. They're available almost nowhere, (about the only acceptable version that I'm aware of is in the AMT '57 Chrysler 300 kit) and they're a pretty funky design that's kind of a bear to duplicate. I can't really recount exactly how I did any of these as they were done some time ago, and attempted in various manners, but at least a couple of them came out okay, although over sized in a couple of instances. I don't think I'll shy away from another attempt on my current '59 Desoto project when the time comes. 1962 Chrysler 300-H 1960 Chrysler New Yorker 1964 Chrysler 300. Steve
-
I guess my thought is that a heavily metallic paint job like this is by definition a “custom” paint job. There are no norms or standards for the size of the metallics to be used, so everything is fair game. In other words, there really is nothing that would be “correct” for 1/25th scale. It’s all up to individual interpretation. Steve
-
Okay, so then you are talking about the “bass boat” look. That’s very easy to replicate. A metallic silver touch up paint from Duplicolor will act in exactly the same capacity, as will any number of metallic silvers from a variety of other manufacturers. Metallic silver paints with large metallic particles are by no means difficult to find. Steve
-
Exactly why I use ample clear coats. As many as 5 coats in lacquer. This ensures that there will be little possibility of "burn through". Steve
-
I suppose it all boils down to what you're looking for. If it's an "as close to scale as possible" affect that you're after, it's really hard to beat MCW paints. Hobbyists have been in pursuit of in scale looking metallic paints for many many years, and they're still not always easy to find. If you're looking for a heavily metallicized paint, much like what is depicted by the OP above, it's really not that hard. If you want something as close as possible to a truly in scale metallic paint, it's much more difficult. As with a 1:1 vehicle, unless it's some sort of custom with what is often referred to as "bass boat" metallic paint, you should not be able to pick out individual metallic particles in the paint even fairly close up. If you walk out to your garage, and view your 1:1 vehicle, see how close you have to get before you can make out the particles in the metallic paint. I estimated that depending on the paint, you don't begin to see these particles individually until you're at least as close as possibly 2 feet from the surface. That translates into your eyeball being less than an inch away from the models surface at 1/25th scale before the particles become apparent. I know, that makes correctly sized metallics a near impossibility in scale, but some of the paint producers do as well as can be expected. One of these is MCW. Not every color is spot on. Some appear to have more, and heavier metallic than others, but I like to use this example of how a 1/25th scale metallic paint "should" look whenever this subject comes up. Believe it or not, this 1958 Chevy Impala is painted in #932 "Cay Coral Poly" by MCW. It is a metallic paint, but it's nearly impossible to pick out the individual particles, no matter how close. But it still has that nice metallic sheen that would be evident when viewing a vehicle painted with metallic paint in 1/25th scale, if the paint were truly "in scale". Steve
-
That's fabulous!! Steve
-
Mystery motorcycle kit, help identify
StevenGuthmiller replied to bisc63's topic in Model Building Questions and Answers
There’s a started but complete Pyro “Ghost Rider” kit up for auction right now on eBay. Starting bid is a paltry $499.99. But the shipping is free! ? Steve -
That's pretty much exactly the same approach that I employ, although the compounds I use are different, but that should hold little bearing on your problem. My suggestion would be to start with a finer grit if possible, and above all, wait until the paint is completely cured. Soft paint will be much more prone to fine scratches than a fully hardened paint. Also, the more paint and clear the better when it comes to polishing. Nothing worse than spending countless hours painting, clear coating and polishing only to burn through the paint with 10 minutes of work left to go! Steve
-
Need Primer Help
StevenGuthmiller replied to Horrorshow's topic in Model Building Questions and Answers
Well, I don’t know about all that, but my interpretation is that this can all be chalked up as just being a matter of differing philosophies. One philosophy is to work to obtain a perfect, or nearly flawless paint job through a very particular use of specific materials and, quite honestly, a high degree of skill. Absolutely nothing wrong with that philosophy whatsoever. But, as we all know, that skill can be years in the making. Nobody picks up a spray can or an air brush as a novice and instantly starts spraying flawless paint jobs, no matter how high the quality of the materials. The materials are secondary to know-how when it comes to success with painting models. Spraying a perfect paint job was a skill that I was personally never able to perfect with any consistency over my 50+ years of building, so I became a student of philosophy #2. Philosophy #2 states that you don’t need to possess some form of enhanced skill set or follow a rigid materials list. All you need is the desire and the willingness to put forth the effort of some extra elbow grease at the end of the paint process. I don’t worry too much about the brand of primer or what it’s particular properties are other than it’s ability to seal against the particular paint that I use. A few coats of primer, of whatever type is appropriate for your paint, with no sanding unless it becomes necessary due to debris or orange peel, basically the same approach for the color, and then however many coats of the clear that you prefer to be certain to protect the color from what I’m long windedly eluding to..... The polishing process. My point being that you don’t have to be a painting wizard with years of experience and a catalog of high end materials to get fabulous finishes. All that you need is the willingness to put in some time at the end to polish the paint to the degree of fabulousness that you desire. As is often the case, at least as I see it, when people begin describing their processes to someone who’s either new, or just not sure of the path that they want to follow, with a multitude of different products and instructions, ie, use this primer, thinned by so much with this thinner, sand between each coat, use this paint, sprayed at this pressure, mixed to this viscosity, etc, etc, etc, it just fuels nothing but confusion, especially to someone who’s not especially up on all of this stuff. Personally, when I read a painting description that starts to get into the weeds, my eyes just glaze over and I tune out, as certainly any hobbyist who’s a little green will also. In the end, the advice that I give anyone who’s struggling with paint is that there’s more than one way to skin a cat. You don’t “need” to concentrate on all of the latest products and techniques. It is absolutely possible to achieve a show quality paint job with nothing more than mediocre priming and painting results, with finish cutting and polishing at the end. Go to any group or forum and ask the question of what primer, paint or clear you should use, and invariably you will get 150 different enthusiastic answers. You can either try to weed through all of that information and pray that you might find a set of materials and techniques that lead you to the goal of a superior finish, or you can “take the easy way out” and resign yourself to the fact that some cutting and polishing at the end will lead you to the same, or even superior results without having to concern yourself with all of the minutiae of a thousand different suggestions. This is by no means a condemnation of you personally Bob, or your suggestions which are obviously designed to help, as are everyone else’s, but I just felt that in lieu of the OP’s question of whether or not the primer he asked about was compatible with plastic, it was my responsibility to answer the question directly. We can all bombard him with a thousand different suggestions, which in the end are nothing more than our personal opinions, or we can try to help him along the path he has chosen with information that will help guide him down that particular path. Believe me, I understand the reaction of the desire to “get people in the right mindset”. Problem is, “that mindset” might be the right one for some, but who are we to decide what’s “right” for everyone else. There’s a thousand different paths that can all diverge on a single ending point, and while some of them might seem as if they’re going the long way around, or in completely the wrong direction for some, for others, they might be the most direct route. Steve