StevenGuthmiller
-
Posts
14,877 -
Joined
-
Last visited
Content Type
Profiles
Forums
Events
Gallery
Everything posted by StevenGuthmiller
-

Proper Scale for Details
StevenGuthmiller replied to mcs1056's topic in Model Building Questions and Answers
Sure, there are variables, but in general, 32 AWG is going to be about as close of an answer as you’re going to get. Of course, having the material in hand is optimal, but when ordering something on line, all you have to go by is what’s offered as a description. Steve -
Proper Scale for Details
StevenGuthmiller replied to mcs1056's topic in Model Building Questions and Answers
I might have missed it, but did you ask for a size of a particular item? If it's plug wires you're questioning, 32 AWG is what you need. Steve -
1961 Dodge Dart Phoenix D-500
StevenGuthmiller replied to StevenGuthmiller's topic in WIP: Model Cars
Thanks everyone!! Just sat down for a little while this afternoon to try to begin cracking the inner fender well nut. I had some extra Moebius '61 Pontiac parts, including a chassis pan, so I hacked off the front fender liners and began figuring out how to get them to fit the Dodge. So far, so good. Of course, this is just the beginning. Still plenty of work to do. Steve -
Proper Scale for Details
StevenGuthmiller replied to mcs1056's topic in Model Building Questions and Answers
I don't get all the hoopla. Just google photos of the part or assembly that you're trying to recreate and build it as it looks in the photos as it relates to the other parts. I mean seriously, who cares if the part you're making is a tenth of a millimeter off? Is anybody going to get out a caliper and check it? Like I said, if it looks in scale, it's close enough. Sometimes you might get something a little too big or a little too small. So what? I will say though, that if someone has issues with something as simple as finding an ignition wire that looks correct, they might already be a lost cause. I see wires on models that are so obviously too big, so often, that it truly baffles me. I sincerely believe however that it's not so much that people have such bad perception that they can't see it. It's more likely that they're so cheap that they won't spend a dollar on a correct sized wire, but would rather just rip the telephone wire out of their house and strip wire from their electronic equipment because it's free. In the end, if you're unsure of the correct size for something like a plug wire, just ask. Somebody is going to be able to give you that information. And you can probably save yourself a lot of aggravation if you take that advice from someone who's going to give you an actual size, and not someone who's going to tell you to rip it out of the wiring harness of your desk top. Steve -
1961 Dodge Dart Phoenix D-500
StevenGuthmiller replied to StevenGuthmiller's topic in WIP: Model Cars
I hadn’t yet investigated the transmission options, but yes, I had either the AMT ‘57 Chrysler, or ‘58 Plymouth transmission on my radar. As far as the LeMans goes, I think it’s just the fact that the ‘64 Tempest/LeMans/GTO styling is not particularly exciting to me. It’s hard for me to get motivated if the subject bores me. However, I’ve completed enough of the initial work on that project that I’m pretty certain that I will revisit it in the not too distant future. Maybe I’ll get really crazy and try to work two projects at once!! 😮 Not likely. 😉 Steve -
Proper Scale for Details
StevenGuthmiller replied to mcs1056's topic in Model Building Questions and Answers
Maybe it’s just me, but I don’t measure much of anything. I use the “estimation” approach. If it looks right, it’s right. Do I get everything exactly in scale? Absolutely not. But I do my fair share of scratch building parts, and I seem to do alright. Steve -
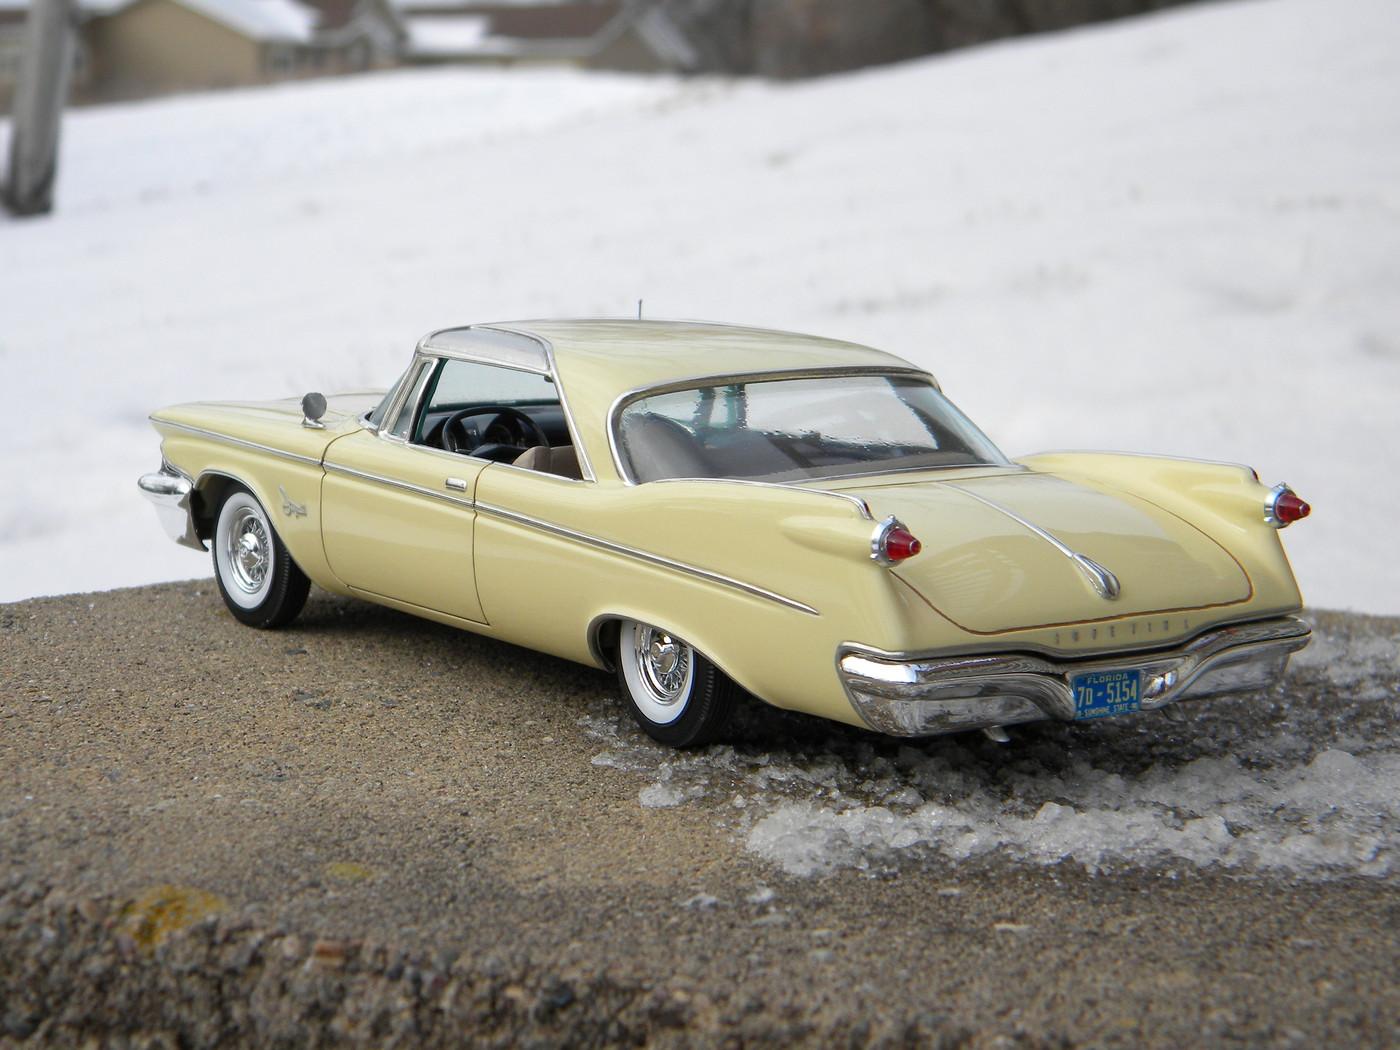
I've been having real problems getting re-motivated since finishing my '64 Bonneville convertible over a year ago. I started looking at converting a '59 Desoto 4 door into a convertible, but abandoned that. Then I thought I would continue with my '64 Pontiac line up by beginning a '64 Lemans convertible restoration, but have been having a hard time keeping interest in that as well. What's been simmering in the back of my mind for quite some time is doing a full detail version of an old X-EL re-pop of the Johan 1961 Dodge Dart. I've been wanting to do a D-500 version of this unusual body style for quite some time, and I thought this might get the juices flowing again with it's odd styling and the monstrous long ram induction system. Sometimes it takes something particularly peculiar to get my juices flowing, and if this doesn't punch the ticket, I'm not sure what will. Anyway, I've begun the process of rummaging through what I have on hand to find the needed components to build this model. It's going to be challenging project as it will require extensive parts swapping, and a ton of scratch building, but I'm hoping it's going to get the motor running again. So far, I've began the process of opening the hood, and starting to thin the thick body in some areas, as well as beginning the scribing process. Being as the '61 was of uni-body construction, I should be able to make one of the more recent Mopar kit chassis work, and as I have several Lindberg '64 Dodge/Plymouth kits on hand, I believe I'll try using one of those. Chassis fit looks pretty good, but fender wells of some sort will need to be found or fabricated, and the firewall will require modification. Once I get all of that figured out, The engine should be relatively easy using a modern Mopar big block and a set of Johan long ram tubes that I have on hand. Then the real work can begin! The interior is going to require a nearly complete scratch build, except for the dash and steering wheel, but in all honesty, I've come to enjoy complete interior rebuilds. Anyway, wish me luck! Something tells me it's going to be a long slog, but I think it'll be worth the effort in the end. Steve
- 35 replies
-
- 15
-

-
And I just grumble under my breath and walk away. Hmm, maybe we need more wives on the board. 😁 Steve
-
The pale yellow could be a problem just because it hasn’t really been a predominant color for cars for many years. I bought a can of pale yellow Duplicolor probably 35 years ago when they were still selling them in the taller, skinnier cans, and used it on a couple of projects, but I don’t think I’ve seen it since. Steve

-
Well, maybe you’re right. But let’s put it this way. How many of us here ever contemplated just a few short years ago that some one would be able to sit down at a computer and print out a complicated and detailed 3 dimensional object in their own home. If we’ve ever learned anything it’s that nobody can predict what technological advancements could be just around the corner. I for one will not pretend that I have any idea what will come, even a year from now. Steve
-
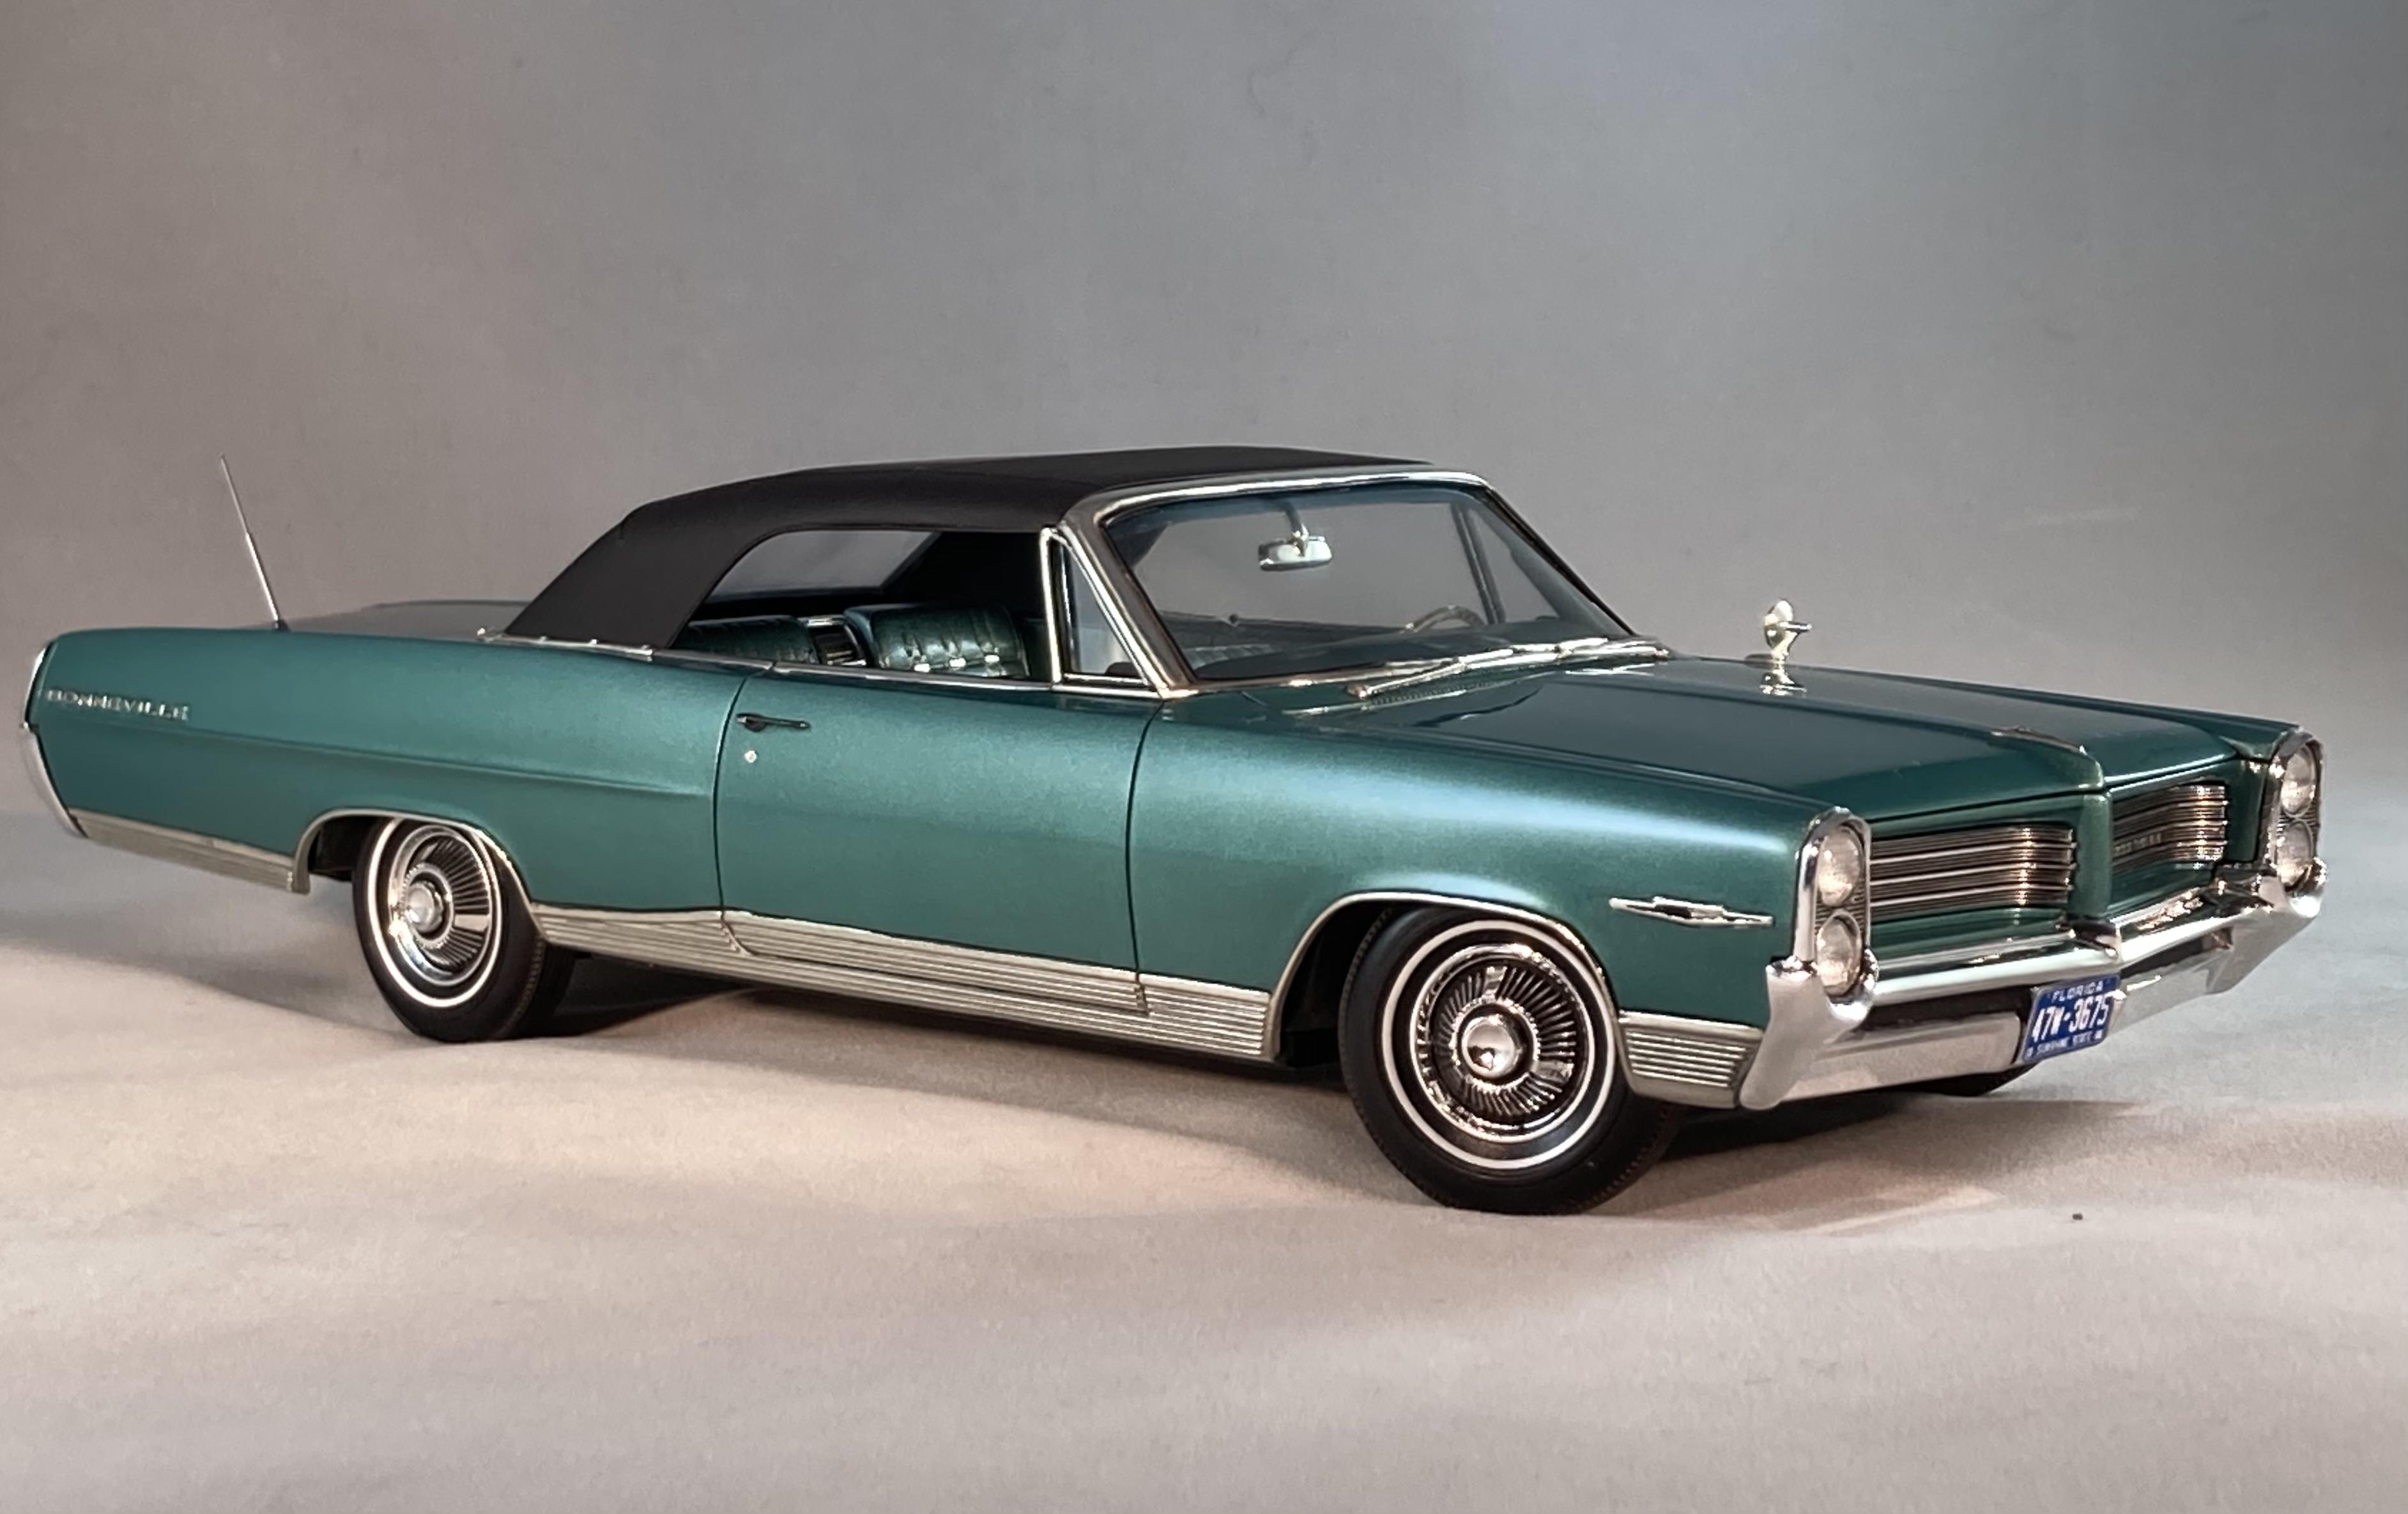
I haven't scraped a painted or chromed glue joint since I was a kid. Call me lazy I guess, but I've never really found much of an advantage to it. I suppose if your models are going to get a lot of really rough handling, or get knocked around a lot, I suppose I could see it. But even with plenty of bouncing around and routine handling, I haven't had much problem with parts coming off. Have I had the occasional mirror or antenna flicked off?.....sure I have, but that's going to be pretty hard to avoid in any circumstance. I've been using 2-part epoxy now for pretty much everything for more than 10 years. I don't scrape a single glue joint anywhere, and my models get more than their share of abuse and frequent handling, and I don't think I can remember the last part I lost. Just for an example, the last model I built, (1964 Pontiac Bonneville) contains a TON of tiny parts. It's made at least four trips to shows this past year of around 500 miles each trip, bouncing around in the trunk of a stiff riding Honda S-2000, unpacked and repacked 16 times during the course of those shows, not to mention the handling it receives at home for whatever reason on occasion. So it's no shelf queen by any stretch, but as fragile as some of the intricate assemblies on this model are, I have not had to re-glue a single part throughout all of the abuse. The same can be said for virtually every model in my collection. Just out of curiosity, I decided to dig out a box of old stuff that has been sitting for about the past decade. These models were packed up when we moved about 9 years ago, were thrown into the back of a U-Haul and driven 300 miles, stored in a hot storage shed for over a month, and then tossed into a pickup truck and hauled to our current home, where they were unloaded and placed in the room that is now my shop. I think this is the first time I've looked at them since they were packed up. The only lost parts that I see on any of them is a knocked off mirror on a '61 Impala, and a front wheel from the '53 Ford. (the wheel is not a failed glue joint, but a broken axle instead) In any case, I imagine that you're catching my drift. A lot of my models have not had easy, pampered lives, and yet I don't scrape joints, and I don't loose parts. Steve
-
Uses Of CA Glue
StevenGuthmiller replied to midlineqb's topic in Model Building Questions and Answers
For probably a decade, (15 years ago) I used pretty much nothing but "Plasti-Zap" medium CA, and to be perfectly honest with you, I don't know why I stuck with it for as long as I did! It seemed to cause nothing but frustration after frustration, until I finally relegated it to the back of my materials shelf. I've used other CA glues since then, and I really don't like any of them that I've used any more than than I did the ZAP. Today, if I use CA on one or two parts during the course of a project, I consider that liberal use. Since then, I've discovered that I really have no need to keep 15 different adhesive products in my shop, including a half dozen different CA glues, kickers, etc, etc. I have Plastruct, "Plastic Weld" for bare plastic, Elmer's white glue for carpets, and JB Weld "Clear Weld" for all of my assembly purposes. That's pretty much it. Seemed like a great idea to me to simplify my life and streamline my modeling processes, and it absolutely was! Nothing I hate more than spending money on, and having a bunch of stuff laying around my shop that I rarely, if ever, have any use for, and then when I think I might have found a use for it 6 months later, it's all dried up and ready for the trash anyway. Steve -
Even most CA glues need to be used carefully. They can be prone to fogging glass, chrome, or even painted surfaces if used too liberally. Steve
-
Wonder what happened next?
StevenGuthmiller replied to Earl Marischal's topic in General Automotive Talk (Trucks and Cars)
She has a look on her face like, “maybe now I can get that Cadillac I wanted”. Steve -
How do YOU clear coat?
StevenGuthmiller replied to dreadpyrat's topic in Model Building Questions and Answers
It is an original kit from Johan produced only in 1962. The hardtop version was available for many years in the "USA Oldies" series, but the interior in that kit is incorrect for a '62 300-H. I believe that they used a promo interior tub from a 1965 Chrysler 300. Unfortunately, as has been discussed on this forum many times, the vast majority of Johan kits will almost certainly never return for a number of reasons, so in order to build one of these kits, you will likely have to rely on finding a vintage kit or re-builder. In order for this kit to ever return, someone would have to produce an all new tooling, which is highly unlikely. The only other options are if the original tooling would happen to still exist, which is probably not the case, or if someone were to offer it as a 3-D print. I was lucky enough to acquire this kit in a trade with one of our very own forum members some years ago, (Thanks again to Al Rich, (thatz4u) as a complete re-builder in fairly good condition, and felt that it was a good candidate for a resurrection. I have had a number of the USA Oldies hardtops over the years, but felt that this convertible with the correct interior was worthy of being restored. This is how it started out before restoration. Steve -
All that I can tell you is that the wheels and tires are from the Monogram ‘58 T-Bird kit. Otherwise, it’s not my genre. Steve
-
Oh, I didn’t realize you were looking for the GTO wheel covers. The Revell ‘66 Goat has a similar wheel without the spinner. 6 slots instead of 8. Just so you’re aware, the Monogram kit is 1/24th scale instead of 1/25th. Steve
-
How do YOU clear coat?
StevenGuthmiller replied to dreadpyrat's topic in Model Building Questions and Answers
No. I’m suggesting lacquer throughout. Steve -
The only “wheel covers” that I’m aware of for ‘64 Pontiacs are the ones in the AMT ‘64 Bonneville, and the AMT 1964 Lemans. Otherwise, all of the full sized Pontiacs in ‘64 were available with 8 lug wheels, which are quite easy to find. Here are the stock full sized ‘64 wheel covers from the Bonneville kit. Probably not particularly easy to find. Steve
-
Yup. Both the wife and I have gotten them. No toll roads in Minnesota either. 🙄 Steve
-
How do YOU clear coat?
StevenGuthmiller replied to dreadpyrat's topic in Model Building Questions and Answers
Lacquer. Steve -
I’m assuming he just used the backside of the tape to imprint the texture. Using the tape itself to cover the dash would be WAY out of scale, much as it is for vinyl tops. Steve
-
How to make door arm rests
StevenGuthmiller replied to slusher's topic in Model Building Questions and Answers
Well, that's a very difficult question to answer as there are a lot of different types and designs of arm rests. But my general answer would be to look at photos of the arm rests you want, and then try to look at them broken down into basic shapes, then build them using those basic shapes as reference. The arm rests that I made for my '65 Fury were done by basically just starting with a chunk of larger sprue that I first filed into a wedge shape, and then just sanded, filed and cut to the shape that I wanted. Then, using a piece of thin plastic strip, I shaped a pad. Doing them in two pieces meant that I could chrome the base and paint the pad separately, making them much easier to detail. These took a little more work than others I have done. A little bit simpler examples were done for my '64 Bonneville. These were made simply with layers of plastic sheet. A couple of shaped pieces for the base, and another for the pad. Again, made separately for painting purposes. Yet another design is for my '68 Olds 442. These again started as a larger piece of sprue sanded and filed to the base shape. A thin piece of stretched sprue added for the ridge in the center of the base, and a pad and the "background" trim made from thin styrene sheet. Steve -
Sure, when you look at it through the lens of the technology that we have today, but nothing ever stays the same. Time marches on, and technologies advance, sometimes at the speed of light! Who's to say that in the future, the designing portion may already be done for you through a huge catalog of finished designs, so that all that one will have to do is punch a computer key and have it ready for print. Then, through advancement of the machinery needed, a manufacturer could possibly have large enough machines to print 30 or 40 kits in a pop within a few minutes, or even seconds. Then of course there's the possibility that virtually every home will have a 3-D printer capable of the same speeds, and along with a vast catalog of subjects available to download for a few dollars, there would be no need for injection molded kits at all, if you could produce whatever kit you wanted for a few bucks in a matter of minutes. I'm sure at one point the concept of being able to buy a ready made frozen meal and being able to pop it into a metal box for a minute to be ready to eat was a pie in the sky concept as well. Now we don't even think about it. Steve
-
Just wait. 3-D printing is basically still in it’s infancy. It won’t surprise me in the least if in the not too distant future, multiple examples of a print will be able to be produced at one time, in a large machine within a matter of minutes, making injection kit molding obsolete. Then, with a few key strokes on a keyboard, the whole operation might be able to be switched over to an entirely different print within a few seconds, and the next batch of 30 kits begins printing. Someday we’ll probably look back and laugh about all of the programming and long print times that are required today, kind of like we laugh at 8-track tapes and VHS recorders today. But, in the meantime, I’m completely content with my skeezy old plastic kits. I’m probably not going to be around for the “revolution”, or at least to old to give a rat’s behind about it when it comes. Steve