StevenGuthmiller
-
Posts
15,071 -
Joined
-
Last visited
Content Type
Profiles
Forums
Events
Gallery
Everything posted by StevenGuthmiller
-

1964 Pontiac Bonneville Convertible.
StevenGuthmiller replied to StevenGuthmiller's topic in WIP: Model Cars
Managed to get into the shop for a few minutes today to pretty much finish up the bottom of the chassis. Steve -
Rust-oleum paint
StevenGuthmiller replied to TracerB's topic in Model Building Questions and Answers
I've never tried Stynylrez primer before, but after a quick look on eBay, and the prices there, I believe I'll stick with my Duplicolor. I'm not cheap when it comes to paint, but at around 7 or 8 bucks for 2 oz. that's a little too rich for me for primer. I could pretty easily burn through a 2 oz. bottle, if not more, on one project. I'd be spending all of my spare time on line ordering primer! Steve -
Rust-oleum paint
StevenGuthmiller replied to TracerB's topic in Model Building Questions and Answers
I have to agree. In the time that I spend on Facebook in various modeling groups, it's pretty much an hourly event to see posts of people trying to figure out why their paint jobs went south. Invariably, it's almost a certainty that the paint culprit was one of these "bargain brand" paints. I can't tell you that I've ever seen someone having paint issues when using good paint. Steve -
Rust-oleum paint
StevenGuthmiller replied to TracerB's topic in Model Building Questions and Answers
Perfect! In a nutshell, as has been stated often, Rustoleum paint is designed to be used on your lawn furniture, not a 1/25th scale model car body, so it only makes sense that it's going to be an inferior product for that purpose. That said, with some mitigation, (ie, decanting and airbrushing, or my preferred method, buying the small cans of brushable paint and thinning to your taste) Rustoleum paint is nothing more than enamel paint, pretty much exactly as what comes in the small Testors bottles. It's the formulation of the paint for a spray can, and the delivery system of these "home improvement" paints that is the problem. Still, it's enamel, and I personally would never use it for bodies when there are so many better options. Steve -
If you really want a 'good" automotive lacquer paint, there's really no such thing as "cheap". The best ones are going to come from some of the fore mentioned providers such as MCW, Splash, and one that I don''t think I've seen mentioned yet, Scale Finishes. MCW is my go-to, and although it's probably one of the least economical, in my opinion, it's one of the best for various reasons. My philosophy is that price is unimportant when it comes to paint for bodies. It's results that count. I will usually order at least a half dozen or more bottles at a time to mitigate the shipping costs. Steve
-
Rustoleum paints are terrible.
StevenGuthmiller replied to James Maynard's topic in General Automotive Talk (Trucks and Cars)
It makes sense because paint providers such as MCW, (or Scale Finishes. I don't remember which) has recently recommended no longer using Tamiya primer under their paints. Steve -
Rust-oleum paint
StevenGuthmiller replied to TracerB's topic in Model Building Questions and Answers
My biggest issue with Rustoleum paint is just the inconsistency and the awful spray cans. I’ve found that it’s usually too thick to spray nicely, and the spray cans are nothing but trouble. They would almost inevitably plug up on me after one use, which probably has something to do with the thick paint as well. I don’t really care much what people use, but it’s undeniable that there are WAY better paints available to us than Rustoleum. Especially if you graduate away from rattle cans to an airbrush. Opens up a whole new world. Steve -
Rust-oleum paint
StevenGuthmiller replied to TracerB's topic in Model Building Questions and Answers
I agree. I will confess that I do use Rustoleum paint for other aspects of my projects, but there are so many much better paints available for bodies that I wouldn’t consider using hardware store paints for that. I mostly use the Rustoleum paint that you can buy in the small cans and thin it for airbrush for basic chassis work because I’m used to enamels, and the stuff in the cans is pretty much identical to what you get in the small Testors bottles at a much more economical price. Besides, when you’re doing stuff like this to your chassis, there’s really no need for high end paint. ? Steve
-
Rust-oleum paint
StevenGuthmiller replied to TracerB's topic in Model Building Questions and Answers
Exactly. Go cheap on other parts of the build. I use MCW and Scale Finishes lacquers for bodies, and you couldn’t pay me to go back to using some of these “bargain” paints. Steve -
1964 Pontiac Bonneville Convertible.
StevenGuthmiller replied to StevenGuthmiller's topic in WIP: Model Cars
Thanks guys! I came up with this solution because I wanted to make it a simple operation to just slip it into place at the time of final assembly. I didn't want to have to start routing wires once everything was all painted and detailed. Stay tuned. I think you'll be pleased with the finished result. Steve -
1964 Pontiac Bonneville Convertible.
StevenGuthmiller replied to StevenGuthmiller's topic in WIP: Model Cars
A mock-up of the chassis, exhaust, and rear suspension parts finished so far. Steve -
1964 Pontiac Bonneville Convertible.
StevenGuthmiller replied to StevenGuthmiller's topic in WIP: Model Cars
And, the chassis plate and frame with some dirt. Steve -
1964 Pontiac Bonneville Convertible.
StevenGuthmiller replied to StevenGuthmiller's topic in WIP: Model Cars
It's just Alclad steel, followed by a misting of red oxide primer shot from about 2 feet away. Designed to make them look rusty. They look a little strange at the moment, but the effect will change entirely once the exhaust and other chassis parts are weathered. Steve -
1964 Pontiac Bonneville Convertible.
StevenGuthmiller replied to StevenGuthmiller's topic in WIP: Model Cars
Got most of the painting and detail painting finished up on my '64 Bonneville's chassis, and a few other parts. Ready for some weathering. Steve -
Plug Wires Revisited
StevenGuthmiller replied to bluestringer's topic in Tips, Tricks, and Tutorials
I always thought that 30 AWG was too large for plug wires as well, but it's what's readily available to most modelers. I use 30 for things like vacuum hoses and battery cables. 32 or 34 appears to be about right for plug wires, but of course it's a little harder to find. I found this 36 AWG wire on ebay a while back. It came from China, so shipping took a while, but it works very nicely for fine wiring detail, although it's size makes it a bit of a trick to handle. Comes in a lot of different colors. The first photo shows it next to a piece of 30 AWG, the second, a little bit of firewall wiring. Steve -
This subject has been batted around a lot, and I believe that for Mopars, the consensus is what Bill Geary suggested. Gray primer with a little body color around the edges. Another aspect to consider is the chassis components. By this I mean the frame rails, cross members, etc. These are the areas where you usually see the most "mistakes". I'm no expert on this subject, but from what I've been able to learn, apparently these cars, being of uni-body construction, had the entire frame in place at the time of body painting, minus the suspension components of course. A common mistake, (I've made it myself) is to paint the rear or front frame rails black. My understanding is that they would all be primed and over sprayed just as the rest of the floor pan was. The only parts that would have been painted other colors would have been the suspension components added later, such as the front K-frame, torsion bars, exhaust, fuel tank, rear springs and axle, etc. Another detail that I became aware of while researching my '68 Dodge Coronet project, (which I used the Revell '68 Charger chassis for) is that at least some of these cars had limited undercoating applied to certain areas of the chassis pan. Mainly a smattering inside of the front and rear fender wells. Of course you can avoid all of this by just painting the entire chassis with a thick, lumpy satin black to simulate the undercoating installed by a lot of dealers. ( Not certain if the factory offered full undercoating or not. I never researched that). Anyway, I think I got pretty close to the correct look for my Coronet, although my understanding is that there may have been variations based on where the car was built. This is the exact chassis that you'll be dealing with, with a few added "Hemi" mods, including front and rear torque boxes, and front K-frame "skid plate". And of course, it's been lightly weathered. Oh, and by the way, Mopars of this era always had all of the sheet metal engine compartment components painted in body color as well. Steve
-
Sanding help
StevenGuthmiller replied to Sidney Schwartz's topic in Model Building Questions and Answers
By the way Bill, I came across this photo on the forum today from a recent show, and it's a classic example of what I mean by the "hard candy look". Steve -
That's never a good sign. Steve
-
I've learned to absolutely HATE this shade of green. I always thought it was kind of cool on a '70 Challenger or 'Cuda, but once it started showing up on everything from a '55 Chevy to your model-T example, it was over for me. Old cars have a uniqueness in style that doesn't require a "look at me" paint job. Whenever I come across pictures of an antique or classic car model in a variation of this color, I instantly pass it by, no matter how well it's done. It's an unmitigated offense to my eyes! ? Steve
-
I like this one too. All too often, I believe that people over think their custom color combinations and often wind up with some heinous combination that looks like it belongs in a jar of jaw breakers rather than their car. I guess I’m just old fashioned, but bright and gaudy has never been much of a fashion statement to me. ? Steve
-
I love it! So much more tasteful than the nauseating day-glo green that everybody uses on everything these days. ? Steve
-
MCW Finishes
StevenGuthmiller replied to bluestringer's topic in Model Building Questions and Answers
Who knows. But in the end, I’m confident that Jame’s paint will arrive in relatively short order. There are a handful of aftermarket providers that I get my materials from that I always have absolute confidence in. Among them, Fireball Modelworks, M.A.D. and MCW. Steve -
MCW Finishes
StevenGuthmiller replied to bluestringer's topic in Model Building Questions and Answers
Hmmm, I don’t remember ever getting anything from them through FedEx, and I’m almost certain never through UPS. Pretty sure my orders always came regular USPS. Steve -
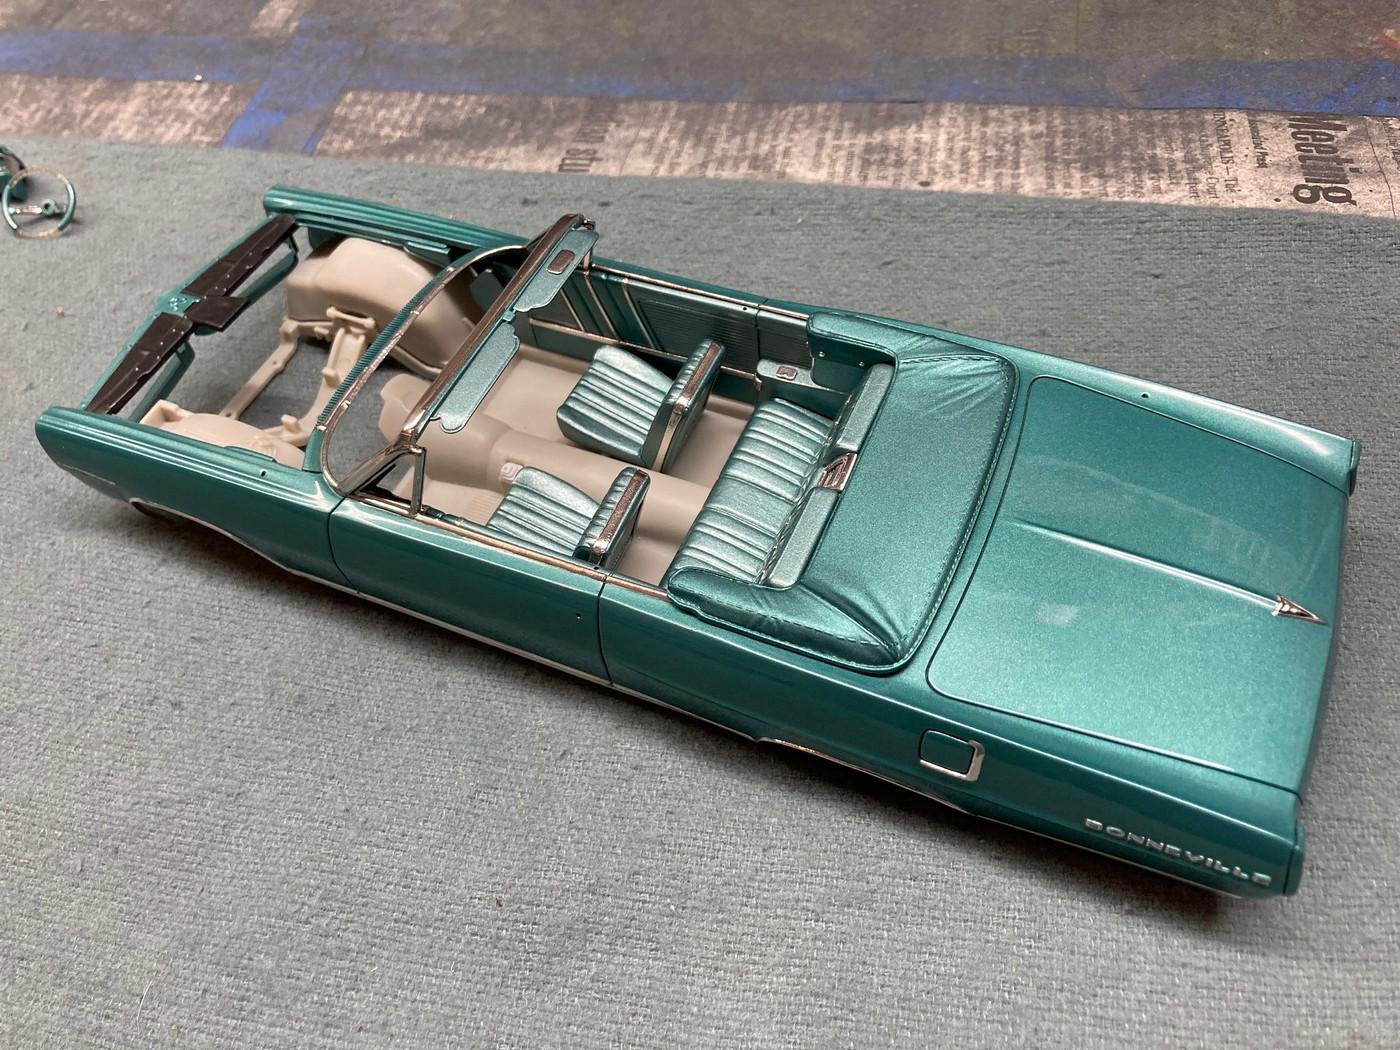
AMT 67 Impala convertible
StevenGuthmiller replied to chris chabre's topic in Model Building Questions and Answers
I can’t imagine that it would be too difficult to find a good substitute from a modern kit. Most top boots are pretty universal, so maybe check out the boot from the Revell ‘65/‘66 Impala kit for starters. I used a boot from the Revellogram ‘59 Impala for my ‘64 Bonneville, and after a little adjustment I think it fits, and looks better than the original. Steve