

mr68gts
-
Posts
1,464 -
Joined
-
Last visited
Content Type
Profiles
Forums
Events
Gallery
Everything posted by mr68gts
-
They are not.They were produced by Chuck who sadly no longer is with us. Best bet is if you happen to find them on the bay or something is to snap them up. I have a set myself and they are not available.
-
Don't give him any ideas! Tim, what do you use to soldier your parts together? The steering box looks fantastic! Will it operate too? Paul
-
69 pro mod chevelle, chassis started mock ups
mr68gts replied to mr68gts's topic in WIP: Drag Racing Models
Tim, technically yes. I could do it now if I had the machine and tooling. Because you can take the file and open it up in Mastercam which will help convert it to the necessary file for nc (maybe .stl also, im not sure) and program the machine to mill it. It would takes days however to machine. Limitaions to something in scale would be available tooling however. Easier maybe to use as a wax master and cast in metal maybe. -
69 pro mod chevelle, chassis started mock ups
mr68gts replied to mr68gts's topic in WIP: Drag Racing Models
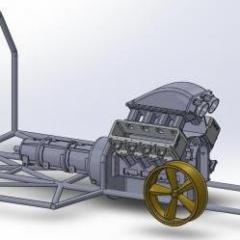
And finally the last piece of the 481x long block is finished up! (the block!) Thanks to those that have helped and also pushed me to get this thing finished! The rest of the front of the block is finished up and at Shapeways also. I think I am going to add a crank snout starter to it though but that should be easy. I hope... Now I will need to finish up the supercharger manifold and do the superchargers for it. It's not cheap to print at 28 dollars but it will be supported pretty good. I may go back in and clear out some material in the middle to cut down on some of the material costs. That's where most of the expense is. It passed all of Shapeways inspections so it's ready for me to order up....as soon as I save up some money! lol. -
Excellent work so far! Keep it up. Paul
-
Wish List for Aftermarket Parts in '17
mr68gts replied to Dodge Driver's topic in Car Aftermarket / Resin / 3D Printed
I was going a bit larger for myself but 1/16 is an option also as there was altered that was a Bakersfield back in the 90's I'd like to recreate that used a Hilborn injected 340 and would like in 1/16. -
Wish List for Aftermarket Parts in '17
mr68gts replied to Dodge Driver's topic in Car Aftermarket / Resin / 3D Printed
Hakan, This was started because I require one in a larger scale. To my eye the AMT one is on the small side. I'd have to break out the AMT Duster kit to check/measure but I've been around my 340's since the 80's so I'm pretty familiar with them. Part of it for me was the lacking detail. They're close and certainly "good enough" for most modelers, but I'm not most modelers lol. By drawing it up 1:1 scale I can scale it down to any size I want as long as it's printable and it will actual scale. It's a lot of work but if I am going to do it I might as well do it right. Probably the closest accurate 340 was the Gibson resin engine. However with the multi piece block it was a pain to put together. (I bought one a long time ago but nla) -
Should be the same JC. And it's possible it's as good as the ones in the AMT 66 Fairlanes. (in fact most if not all 1:1 FE blocks say 352 on them IIRC) Excellent work so far! Paul
-
69 pro mod chevelle, chassis started mock ups
mr68gts replied to mr68gts's topic in WIP: Drag Racing Models
Thank you guys! I placed the order for the 4 link parts and added to the file the front brakes, some of the crank drive parts for the 481x, the updated front struts, and some suspension tab pieces just in case the ones on there already break on me during the reconstruction and an MSD 44 promag. Like a kid excited for Christmas, I can hardly wait lol. Hurry up 18th of Jan! Paul -
Wish List for Aftermarket Parts in '17
mr68gts replied to Dodge Driver's topic in Car Aftermarket / Resin / 3D Printed
Measuring up my real 340 to have 3d printed. Just time,.... and more time.... lol -
69 pro mod chevelle, chassis started mock ups
mr68gts replied to mr68gts's topic in WIP: Drag Racing Models
Thanks Dave! I so far have just used superglue. works pretty good thus far. So, with a WHOLE LOT of help, the engineering part of the 4 link is finished up. Now mind you on a real car it is critical on where the bars sit as it moves the intersect points essentially changing how the car will leave the line. On a model it's obviously not critical but if I can't engineer it correctly in scale then the end result is it will all fit together properly and now everything will clear so the model will look right since it is true to scale! All this work has led to this... With everything where it's supposed to be the driveshaft is now in the correct position. And the bars will be correctly located also. From this I can build the fixture for the bars so now there is no guess work with them. 4 links can be a pain in real life, no need to make it any harder in scale lol. Paul -
69 pro mod chevelle, chassis started mock ups
mr68gts replied to mr68gts's topic in WIP: Drag Racing Models
Thanks Tim. Most of what has been printed has come out really good so far. I myself am curious though. The technology is amazing for sure but there are some limitations to it which is the draw back besides the clean up on certain materials. Thank You. I can't wait till it's on wheels! Plan is to have it as a roller with a basic engine on display at GSL this year. Managed to finish up the other part of the 4 link bracket. These actually adjust with in the other part depending on where you require them. (On a real car it's critical, on the model not so much but hey, if I can make it so..... I will! lol) -
Beautiful work on that steering box! I wonder if Hobby Design is just using hypodermic tubing in the appropriate sizes to make it telescoping. Amazon sells Hypo tubing btw. Different grades and wall thicknesses to suit what ever . Comes in 1 foot or 6 foot lengths and the prices are pretty good. Waiting for whats next.....
-
69 pro mod chevelle, chassis started mock ups
mr68gts replied to mr68gts's topic in WIP: Drag Racing Models
So, with the brackets finished up I've uploaded a single part to Shapeways to see about print ability. We will see what they say. I really cannot continue on with the chassis until these are done and in so I will be in hiatus mode finishing up the commission work until these show up. (few things I need to get finished up over the next week) -
69 pro mod chevelle, chassis started mock ups
mr68gts replied to mr68gts's topic in WIP: Drag Racing Models
Got a few minutes before bed. Managed to get some of the reliefs in the brackets. I'd like to finish these up and get it uploaded along with a few other things so I can get them ordered. -
Wish List for Aftermarket Parts in '17
mr68gts replied to Dodge Driver's topic in Car Aftermarket / Resin / 3D Printed
the small block mopar is in the works actually....as a 340 though -
69 pro mod chevelle, chassis started mock ups
mr68gts replied to mr68gts's topic in WIP: Drag Racing Models
Just want to wish everyone a Merry Christmas. Looks like we are getting a white chrsitmas this year....hopefully. Be back on this in the coming year. Paul -
69 pro mod chevelle, chassis started mock ups
mr68gts replied to mr68gts's topic in WIP: Drag Racing Models
Dave, I was going to do a Chevrolet pattern, (whats in the modeled mock up) however because I added the 4 studs it will now be a dual pattern 8 5/8 deep. I have a print for the Chrysler pattern also so it should be easy to add. I think I did the diameter at 14 but I'd have to check when I get home tomorrow night. Paul -
Im not home to measure for a few days but how wide are the cheater slicks in the Johan SS cars? I know for a while someone was reproducing them in rubber. Maybe replicas and miniatures? P
-
How small is that end mill that did the reliefs? Holy cow! Great work!
-
69 pro mod chevelle, chassis started mock ups
mr68gts replied to mr68gts's topic in WIP: Drag Racing Models
Tim, if you do decide to get into it Ill help you any way I can. Dave, thank you but it is your work that has made me push my own limits. For this I thank you and it is I that should be jealous! So I managed to do the stud placement on the mid plate. I still need to add the coresponding holes for the bell housing bolts and there are 2 vent holes allowed in the mid plate for cooling. Before I print it out on paper I will draw lines through the center of each hole and use it as a template to drill the .02 thick aluminum sheet. Then install the studs or quandrant bolts. -
69 pro mod chevelle, chassis started mock ups
mr68gts replied to mr68gts's topic in WIP: Drag Racing Models
Thank you Bill. I figure if I am going this far I might as well make it right. It really only takes a little bit more time to build an "accurate" model. Little bit of an update. I've got the engine placement and wheel base done. I need to change the bell housing up though. The depth is correct but the diameter is off and there are no mid plate studs in the model which correspond to holes in the bell housing obviously. Neat thing about all this cad work is I can even figure out the length of the 4 link bars and build a fixture accordingly! (the real reason I am doing all this cad work! No guessing, just accuracy as long as I follow the map lol)These 4 link brackets are a bit different in that they are more modular but they are the correct height and should alleviate a ton of problems with clearance issues with the driveshaft etc. -
69 pro mod chevelle, chassis started mock ups
mr68gts replied to mr68gts's topic in WIP: Drag Racing Models
And, I may wind up using my own rear end instead of the TDR one. I will have to machine the spindles for it though to give it some strength. One of the inherent issues with 3d printed parts is there is not a lot of strength in the parts depending on material. What hold the wheels where they need to be is one place I do not want to skimp on material. I'm not to worried about how much the model weighs. -
69 pro mod chevelle, chassis started mock ups
mr68gts replied to mr68gts's topic in WIP: Drag Racing Models
OK, what you are looking at is a "quadrant bolt". What these pesky little suckers do is make it near impossible to get the clutch can on or off when you are in a hurry. There is one is each corner and required on all fuel cars, I believe all alcohol cars (not the kind you drink!) and most if not all pro mods. They are actually in real life 3/4 or larger studs that are pressed into the mid plate and help retain the can in the event of a blow back. Keeps the can where it's supposed to be basically. I've had my fair share of experience with these buggers so what do I do, make em for the model! Ha ha. One down, 3 more to go. I searched the SFI spec for this for a bit to come up with the dimensions and yes it is to print in scale! -
69 pro mod chevelle, chassis started mock ups
mr68gts replied to mr68gts's topic in WIP: Drag Racing Models
Thanks guys. Boy I'll tell ya what, reading the NHRA rule book is like reading the bible! There's a lot of deciphering going on! Having to flop between the NHRA and the SFI book has given me a head ache lol. Paul