

mr68gts
-
Posts
1,464 -
Joined
-
Last visited
Content Type
Profiles
Forums
Events
Gallery
Everything posted by mr68gts
-
Ah! Finally a top pulley! Looks great! Your a jeweler by profession right?
-
69 pro mod chevelle, chassis started mock ups
mr68gts replied to mr68gts's topic in WIP: Drag Racing Models
Thanks Chris! It's a bit more time consuming this way however it will be correct and square since it's all engineered on the computer! Paul -
69 pro mod chevelle, chassis started mock ups
mr68gts replied to mr68gts's topic in WIP: Drag Racing Models
Back to the drawing board! I had a couple minutes this morning so I redid the print for the chassis floor and main rails. The new hoop is glued into the main chassis and I am waiting on some dimensions to show up, (thanks again!) to set the cross bar in the hoop. I've started machining the insert to properly space the 4 link brackets out the proper distance according to the rear end. Before I know it it's going to be a complete chassis again even though much of the old one I can't use on this version. I can salvage some of the tube though. I need to look at the wheelbase on the body again so I can find the mid plate location according to the 481x I've drawn up. (10% setback from number 1 plug) I'd like to draw up the mid plate to use as a template to cut out in sheet plastic although I may use aluminum sheet instead. -
Don't know how true but supposedly the these "Petty" headers came on this car and they are the original factory header to the car. Not arguing or anything just know what they are saying. Restorations are hard to read because there's no telling what someone deems original to the vehicle. I believe he's got the documentation to prove it though. http://www.garlandmotorsports.com/65-super-stock.html
-
'41 Willys Pickup Gasser circa late '60s - Finished
mr68gts replied to gasser59's topic in WIP: Drag Racing Models
The elf on the shelf need to pay a visit? -
I can supply some of those dimensions. I have a tunnel ram for a B block. (383-400) The port spacing and everything is identical with exception to a bit wider for a RB block to make up the difference in deck height.
-
1/16 Scale Army Vega Funny Car - Finished 10/14/2018
mr68gts replied to Mooneyzs's topic in WIP: Drag Racing Models
Thanks Brad! I couldn't remember and I was on my phone. They're usually the first place I look outside of the U.S. I've ordered a few things from them including paint and never had a problem! -
1/16 Scale Army Vega Funny Car - Finished 10/14/2018
mr68gts replied to Mooneyzs's topic in WIP: Drag Racing Models
Chris, try Top Studio. They make some detail parts like this but I think they're aluminum. Hiro-boy.com has a bunch of their stuff. Paul -
1/16 Scale Army Vega Funny Car - Finished 10/14/2018
mr68gts replied to Mooneyzs's topic in WIP: Drag Racing Models
I think if you use CA glue it needs to be the non fogging kind. Honestly if it was me I would use the same clear that is on the panels. This way if too much gets on there the sheen will be close to whats on there now. Possibly you could use epoxy but it will show if too much is applied! -
69 pro mod chevelle, chassis started mock ups
mr68gts replied to mr68gts's topic in WIP: Drag Racing Models
Henry, Thank you! I can't wait till they're actually done. Dave, I'll be marketing them. You probably won't need the whole engine so when the time comes I'll get with you and make a file for you since you'll want to machine parts I'm sure. Chris, Thanks bud! What Chris isn't telling you guys is that he has helped me immensely with this thing. I have bugged him here and there for advice or help and quite frankly none of this would be possible with out him! So, what to do when your just not happy with something? You break it down and start over of course! -
69 pro mod chevelle, chassis started mock ups
mr68gts replied to mr68gts's topic in WIP: Drag Racing Models
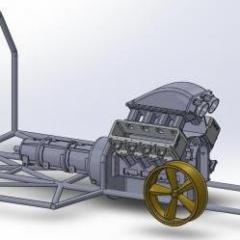
Thank you for the comments guys. I do appreciate them! If you have any questions or comments please don't hesitate to ask. Even if you see something wrong and feel it needs correcting. So, Dave was wanting some pics of the 481x. I have some of the printed parts on the camera I'll upload and show tomorrow that are better than the ones I took with my cell phone. (probably part of the light problem) There are some other parts in here. The front of the engine has taken the most time to model. There is a never ending barrage of parts that make up the front drive pieces. Just when I think I am getting close to done I find more I need to add to complete it. I have had very limited information on the 481x. AJPE, (oh yes I emailed them!) helped some but only with the cylinder head height and the location of the mounting holes in the front. Much of the exterior dimensions otherwise were pulled from Chevrolet prints of a BBC which much of the dimensions are identical to with exception to the raised cam, front timing area and Chrysler oil pump. By the way, the original 481x's were identical in to a BBC with exception to the side profile of the block itself. Even the oil pan and timing cover used to be standard BBC. When Alan Johnson bought out Rodeck he changed it up to what it is today. Johnson and Rodeck were the original creators of the 481x. I haven't touched this thing in months (like 6 lol) and I really need to get a start on it again. Hopefully soon though! Assembled turbo 481x Assembled supercharged 481x If I have the dimensions for the parts and all it's internal pieces it is in there. Case in point? The idler pulley cut away! The bearings, and all it's spacers are there. I have done the spacers in machined aluminum already so I know the idea will work. I'll see if I can locate pics of the parts as they are on my phone somewhere! Assembled idler pulley cut away. I may change the rims to this.V series insert. I still need to model the front rim but the rears are designed to interchange with the rim rings other than the Delta wheel because it's a one piece rim. 481x pulley arrangement side view. Here you can see all or much of the parts making up the drive system. Lots of work to be sure. Wheelie bar wheels! I hunted a long time for dimensions on these. Managed to finally locate the information so it is done other than the bearings and the spacers. Now mind you, the bearings are not machined like a true bearing but are made to look like a complete bearing. Basically it's just an insert and you can see that in the idler cut away. -
69 pro mod chevelle, chassis started mock ups
mr68gts replied to mr68gts's topic in WIP: Drag Racing Models
So, not a true update but more of a theory update. I am at a point where I must decide one of two things! And there's a reason for it. When this project was started it was a commissioned job and so I was told to use certain parts. Case in point is the brass 4 link brackets for the chassis. There's an issue with these though. It's something I've noticed for a long time now. When building a pro mod and using these brackets you have to do one of two things to get the car low enough to sit right. First one is point the pinion at the dirt. Reason being is the brackets are not tall enough so when the car is sitting at ground level the drive shaft will not clear the main hoop cross member! This is unacceptable and quite frankly looks like BLAH_BLAH_BLAH_BLAH IMO. No car runs with that much pinion angle, especially a 4 link car! So the other fix is to raise the back of the car up and skirt the sides to keep the proper height off the ground. This was discussed when this issue was found and was decided on leaving the brass brackets in place. Now, the model is mine now. (trading other work in exchange for it) So I've drawn and had printed new 4 link brackets to fix this issue. The other pic is actually a chassis for a 68 Camaro pro mod that I borrowed a body for a bit to build a chassis. This chassis was to be a development piece for parts to be printed and showcase the parts. If I can ever afford a body for it it will get finished though. With the new brackets in place there are no more driveshaft clearance issues and no more pinion pointing to China issues. On the Chevelle chassis I may have to to redo the main hoop anyway and the front door posts also because when I started this chassis I made it pretty tight to the sides of the body and now there is not a whole lot of clearance for door structure to fit in. (this was corrected on the Camaro chassis also) I may be easier to start over with it, using the correct 4 link parts but I may just skirt the sides and continue on provided I can remedy the issue with door clearance. Added bonus to this is I would be able to use the strut fixtures so the J bars are even and the strut mounts in the correct spot. These were done by hand previously by measurement and while close enough no one would notice they are indeed off just a hair and I know. -
I would have to dig through my photographs I took of this car at Bakersfield but I do not recall the restored car having any candy paint on it.
-
WINGED FIAT ALTERED - Buckling In - 1/10/2017
mr68gts replied to Nytrozilla's topic in WIP: Drag Racing Models
Bat er up? Lol -
69 pro mod chevelle, chassis started mock ups
mr68gts replied to mr68gts's topic in WIP: Drag Racing Models
Thanks Dave! It is fun for me trying to see how accurate I can make something. The Lenco and 481x can be available in 1/8th. I need to do the oil pump boss still. I did manage to find a dimension finally for the block skirt. There were measurements for an oil pan width so I used that! The mill is going to depend on overtime next year but I plan to finally make it happen. Then stroker parts for my real 340 gts....but mill first lol. Paul -
69 pro mod chevelle, chassis started mock ups
mr68gts replied to mr68gts's topic in WIP: Drag Racing Models
Thanks Tim. I'm very limited to light in this house unfortunately but I can see what I can do! So, many haven't seen the parts that are going into this, with exception of a couple of people. This project has been under wraps for a long time. There are many hours sitting in front of this box designing, engineering, and just flat trying to figure out how to do something on it in this thing. What you are looking at here is the front cover parts for the 481x. Yes I tend to get a little crazy at times and go all out in detailed accuracy. Some of which has to be looked past or worked around due to limitations in the 3d printing process. The way the front cover parts are designed I could actually spin the engine if I wanted to and the lower pulley would articulate correctly. The master cylinder consists of 5 pieces and could be made to operate if I so choose. This part has been printed, painted and done already but still requires it's mount brackets. This is the basic wheel assembly with its brake hat in place and the strut. The lower half of the strut has been printed but I have revised it some so that it now accepts an aluminum "spindle" post for the rim. I didn't take into account the lack of strength in some of these parts and this is one part I do not want breaking on me once the model is finished. I still need to print the brake hat itself. the rotor will be machined and painted with Zero paints. They have a carbon brake paint color that looks really good! One of the inherent issues with scratch building is the inability to get things square. In order to combat this I have designed this fixture for the front end. I may do more fixtures but I had to start somewhere. This will make sure the top strut mount is in the right spot for the strut axis and the printed arrows on the base correspond with the center line of the spindle. This also foxes another issue, where the J bars are located. That is dependent on the strut height. So taking into account a known strut height I can now properly locate the struts upper mount and then locate the J bars where they really need to be with out guessing. Same way a real pro mod would be made. I may add to this some sort of fixture for the lower arm pivots or they may need to be a separate fixture from this one as the bodies all vary somewhat and the track width may need to change accordingly. -
69 pro mod chevelle, chassis started mock ups
mr68gts replied to mr68gts's topic in WIP: Drag Racing Models
Shapeways printed the body but it is a TDR product, not mine. (I haven't advanced that far yet in 3d modeling) Thanks for looking Paul -
WINGED FIAT ALTERED - Buckling In - 1/10/2017
mr68gts replied to Nytrozilla's topic in WIP: Drag Racing Models
Its bat tastic! -
Been building this a while now. 69 chevelle pro mod in 1/16. As time and money permit I do some here and ther. No kit parts in this one. Its all scratch built, machined, 3d printed, or after market. The tires are futurattraction. The bell housing, rear end, and body are tdr. The rest of the 3d parts are mine that I had printed at Shapeways. Ive been developing the 481x forever now but I am out of school as of this week so I'll have a little time to finish up a customer project and get back on this and the camaro. Paul
-
WINGED FIAT ALTERED - Buckling In - 1/10/2017
mr68gts replied to Nytrozilla's topic in WIP: Drag Racing Models
I like Knitro Knight! -
impatiently taps finger waiting on top pulley....., or an update lol! I have got to get me a mill! Maybe next year. ( I keep saying that but there is a 1/12 project that has been held up because of no milling machine and I'm tired of looking at it in pieces lol)
-
Hmm, might have to locate my penny books and see if I have a 55 plain. I'm betting I do. I go back before the steel pennies. I even have one of those! (although there were 2 years I believe of steel pennies.) Back on subject. LOL. There's not much more than can be said of the work that is being done here that hasn't already been said. I'm really enjoying this build and altereds have a special spot in my heart. (probably because I crewed on one lol) Paul
-
Alright! One I've been wanting to do for a long time now and I will finally get my chance! Will definitely have to add it to the show rod collection. Now, to actually build them....or something....
-
the Lenco is based on the CS3 Lenco which is the peanut trans. Light and compact used for under about 2000 hp. There is a CS1 Lenco available also, just not at TDR's site. The Cs1 Lenco is the original trans design. The cs3 that tdr sells I am sure is accurate considering I am pretty sure I know where the dimensions came from.
-
Tim, As far as I know it was a Gibson engine. A good friend that passed away this year pulled a mold off of. I have access to the mold but would need to get some resin in first. Id be happy to pour one up for ya provided I can locate the mold. (I'll find out Thanksgiving as we are going over to their house.) I have been sitting on this engine for a looong time so finding one otherwise may prove difficult. Joe, thanks for chiming in! Yeah, Im about up to enough with the Photobucket issues lately. It will be nice to sit at the desk again! I've got 3 more weeks of one class and then 5 more of another class then I am done till mid January for classes. I know what I plan on doing but the Honey do list may interject somehow lol. Plan on going to GSL I hope? We are. Need to finish Tim's last model and take it up there for one last hurah. Going to be a sobering moment for sure! Paul