

mr68gts
-
Posts
1,464 -
Joined
-
Last visited
Content Type
Profiles
Forums
Events
Gallery
Everything posted by mr68gts
-
69 pro mod chevelle, chassis started mock ups
mr68gts replied to mr68gts's topic in WIP: Drag Racing Models
Thanks Chris. I did pick up some more. They didn't have the .080 but I think I have enough of that to get by. I was scraping up bits of .100 though lol. I ordered the fab rear end Thursday so it should be on it's way in a few days. Then I can start getting the 4 link together! I'm just going to use mock up bars for shocks temporarily. Wait till you see the shocks.... It was fun hangin out. Next time we need more time though lol. Gsl...well...Ive just about got both models done for gsl so I may just actually make it and not have to build on the way up like I have in the past. No more of that lol. If it is not done then it is not going! I do hope this Chevelle is done for 2019 though. Paul -
1/16 Scale Army Vega Funny Car - Finished 10/14/2018
mr68gts replied to Mooneyzs's topic in WIP: Drag Racing Models
Chris, I've had good luck so far with Fotki but it is a subscription site. The first month or so is free then after that is pay per month or annually. Just a heads up. And I have yet to be able to post from the app. Hope you get the issues figured out! Paul -
69 pro mod chevelle, chassis started mock ups
mr68gts replied to mr68gts's topic in WIP: Drag Racing Models
Got some more chassis work done. Need to go buy some .080 rod to finish the cabin part of the chassiz -
Ron, how much of the new tool 71 can you use for your 73? I was contemplating going this route with my 74 annual.
-
3-d printers ... $180-$200???
mr68gts replied to tedd60's topic in General Automotive Talk (Trucks and Cars)
this I whole heartedly agree. It is not easy to learn the 3d program if you want to get some serious parts from the printer. -
Here's the original annual kit. Unfortunately I am missing the destructions and the mag front rims but the rest of the kit is there.
-
Yep...Tom is A-OK
-
Just signed up myself! This should be good! Good luck on this endeavor Randy! Paul
-
I Really Like Like This Hobby,,,,, But
mr68gts replied to Fortheloveofgassers's topic in WIP: Drag Racing Models
Probably sprayed too heavy of a first coat. I've found with the Urethane clears that if you thin it some instead of relying only on the hardener to do it that it tends to flow out better, not look like it is dipped in the stuff, and you don't need as much to start out avoiding the orange peal. This allows you to use less helping to avoid the problem. I've been going that route for quite a few years without any problems. Also drying time of the decals and how well they are adhered to the body affect that. Too soon after applying the decals and they tend to lift or wrinkle. I also use solvaset quite often to help with the decal adhesion. Seems to work for me with pretty good success rate, especially with older decals. Paul -
Got the main decals on. Had an issue with the Judge stripe on one side so they are staying off. Let them dry for a few days and then I can final clear it. I may do the emblems in bare metal before the clear. Just so they are protected from handling since they are small and thin. Have fun with that Jesse. I know on mine nothing had fit the way it should or should I say the way we like! I think the trans was pointing to one of the rear tires when I mocked it up before engine assembly lol. The chassis wasn't too bad but the cleanup required was a lot of work. It went together pretty square though. I used the floorboard as a jig and weighted it down while the glue set up to get the chassis square and straight. Worked out pretty good. Not bad for doing much of it at work anyway! Paul
-
Thank you! I got it in not only the intercoat clear with the gold pearl but also the 2 part Urethane! So far so good! Paint looks good but the lights I feel will do it no justice and need to see it in the daylight so I will hold judgement till then. At least I managed a pic of it though!
-
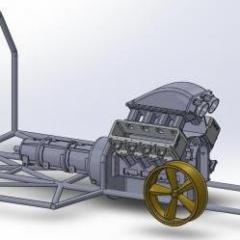
The engine is a pretty good representation of one but the 4 spd behind it shouldnt be there. Lots of cleanup work and squaring of the engine block was required.
-
I am building that particular model. But since it is not totally accurate as far as Arnies car goes I am doing the paint this way. Ya know, kinda flashy, out of the box. I believe the "correct" color is the Carousel Red you mentioned though. I am even fighting off correcting the headers in the kit because I want a 100% box stock build. (The headers are horrible and not correct for the Poncho) Paul
-
To the O.P. I would maybe look into a rubber band about the correct size and width if there is one available. Or electrical tape can work also as a belt. Unless you are going for a 100% box stock build (like you were going to go to contest with it) I have one of these started but never got to the engine stage as I never cared for the engines in the kit. It is still a nice kit however and with a little bit of work can be made to look great! Yours is coming out fantastic thus far. Keep up the great work! Paul
-
Manzo,...The KING of T/A!
-
Thanks guys. Here's the chassis as it sits currently. I still have some work to do but it's not to bad. As I said, most of the clean up work for the chrome is finished. Just need to get off my butt and get to it. I am just happy to finally get the body painted! Hope to clear it tonight with the gold pearl added to it. It should make the color pop! Paul
-
lol. No...no scratchbuilding. Just box stock. I still remember how to do that.....I think....lol
-
Sorry, I was thinking common kit. I forgot about the group 17 thing.
-
So, I've been working on this thing for a while. Just a box stock build that I finally have no paint problems. I've had a bunch of problems getting it in paint. It's been fighting me the whole way! Finally managed to get the base coats on it today without any hiccups. The color is Candy Orange over Greeks Gold base. Still need to clear it then add the main decals, then more clear. Lastly the sponsor decals. The chassis and Poncho engine are pretty much completed. I still have some Spaztix chrome work to do but most of the clean up is done. Nice to have a box stock build to go to while I am going crazy with the Pro Mod.
-
Always admired Russel's 3 wheeled creations! Nice to see someone else carry on the tradition! The group model this year is the corvette I believe? I couldn't imagine that as a 3 wheeled thing, but then again.... Paul Scratch that! It's the 67 Camaro
-
69 pro mod chevelle, chassis started mock ups
mr68gts replied to mr68gts's topic in WIP: Drag Racing Models
Dave, Thank you! I am having a blast with this thing. Managed to stop by Chris's over the weekend for a bit and got to see the Army car first hand. The pics he shows of it while awesome still do not show the detail of the parts themselves. Was nice to hang out for a few hours and just bs and catch up. Too bad I can't make it to DSC but work comes first and I am trying to save my vacation time lol. Bad enough I'm using up 100 hours of it for GSL! (I get 210 hours!) Anyhow, I started playing with the struts last night and unfortunately broke one. I have spares but it just goes to prove my point that the struts just are not going to be strong enough to hold this model up I think. SO, I started machining them out of brass! I've got the main body of both sides done. I need to change over to the mill and machine the spindle hole,(at the required angle) to accept the machined boss/spindle that will go in the hole. I'll start out with a center drill and finish up with a regular drill bit. Once that is done I can machine the spindle half of it out of brass and then soldier it together. The hole will help stabilize the spindle and give it some strength. I hope.... onto the pics... I haven't decided if I am going to clean off the parting nub and machine a receiver hole into the top of the body to accept the adjustable part of the strut yet or not. The nub makes a good register also but I was trying to see if I can make the struts and Penske shocks for the rear operational so I may require it to be gone although I won't require much travel. -
1/16 Scale Army Vega Funny Car - Finished 10/14/2018
mr68gts replied to Mooneyzs's topic in WIP: Drag Racing Models
you ought to see this thing in person! I got to see it first hand over the weekend...neener neener! lol -
Adventures in soldering:The GT40 project New pics 2/13/17
mr68gts replied to Randy D's topic in WIP: Model Cars
Randy..... I got nothing....time to call it quits! Lol Wow that is seriously some amazing work! Cant wait to see this again at GSL! I have always wanted to make working butterflies, musta read my mind. Better dawn my trusty ol tin foil hat again...lol -
Is there a tutoial on your glassing process? Id be interested in it for a 1/12 Porsche 910 I did a brass frame for eons ago! (I've wanted to do a true glass body using molds to get the proper texture and such.)
-
Tim, Glad to help. It was easy since I already had the solid model, just the wong scale lol. Looks like it printed fairly well. Btw, the hole in the side of the reverser is or should be.04 for the crossshaft bung with the crossshaft being .02 across the flats. (Hex shaft) Looks like it mated up to your bellhousing well too! Awsome work! Paul