Goodwrench3
-
Posts
804 -
Joined
-
Last visited
Content Type
Profiles
Forums
Events
Gallery
Everything posted by Goodwrench3
-

Humbrol acrylic spray paints
Goodwrench3 replied to Tesla's topic in Model Building Questions and Answers
I didn't see any replies to this. I'm interested in this too. I was wondering if you need to use their primer first with these ? Or can you just spray the color on bare plastic ? -
Yes, yes -- I know. Ditch the rattle cans ! LOL. I'll get there this summer. ?
-
Yes I have used the cheap-O Walmart flat black and then sprayed the Model Master semi-gloss black lacquer over it. You can be pretty "generous" with the Wal-Mart flat black -- you can blast it in to corners, tight spots, etc. and not really have to worry about it running or sagging. BUT I found that you have be very careful when spraying the Model Master lacquer over it because the Wal-Mart stuff is enamel -- and if you get too generous with the Model Master lacquer over it, it can "bubble" the paint. So that's why I was wondering if there might be a good "one step" replacement for what I had done.
-
Thanks for the explanation. I've been making the mistake assuming that "Acrylic" means water-based. Clearly not the case.
-
Thanks ! I've got a NAPA nearby and apparently O'Reilly Auto carries it too -- I have one just down the street.
-
BRBO 2020 IH 4300 Transtar
Goodwrench3 replied to Goodwrench3's topic in WIP: Model Trucks: Big Rigs and Heavy Equipment
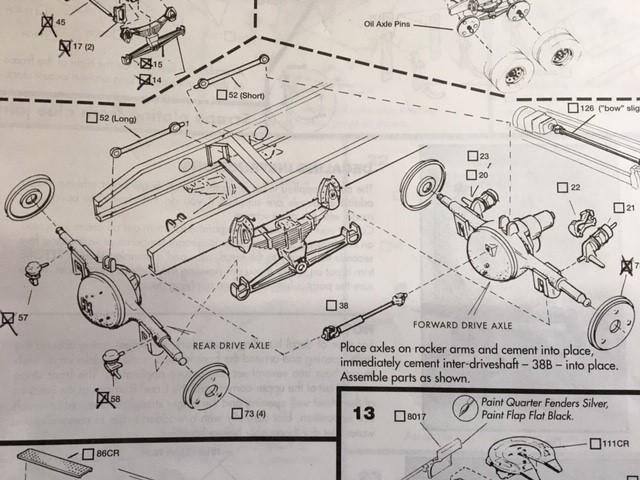
OK - both rear axles are on now and my measurements show that they are exactly level and at the same height. Hoping to get some primer on the engine this weekend -- we're supposed to be at 60 deg. and since I have to paint in the garage I'm guessing I don't dare even try to spray primer below 60 deg. ? Next up is repositioning the front axle, since it is too far back out of the box.
-
Thanks -- does it work well on bare plastic ? Or does it need primer under it ?
-
Thanks ! Looks like some really positive comments on the Citadel paint. But it looks like it's kind of hard to find ?
-
Cool -- I see they have an "Acrylic Satin Varnish" spray. Are those "varnish" sprays then used to take the flat black to a "semi-gloss" (satin) or "gloss" black ? I've never understood these "Acrylic" sprays and "Varnishes". Thanks
-
Thanks -- Unfortunately, I'm not at the airbrush stage yet (hopefully this summer). Is this the Vallejo spray paint you are referring to ? I didn't see semi-gloss black in the color choices.
-
So many parts on kits are either flat black or semi-gloss black. What is everyone's "go to" rattle can spray for semi-gloss black ? I.e. ideally: Easy to apply -- doesn't run or sag easily (in case you have to blast a little extra in to tight areas). Not thick Dries quickly Lays down nice and smooth every time Even coverage -- doesn't need primer, doesn't appear "blotchy" Looking forward to hearing ! Thanks!
-
Thanks for the info. Do you brush paint the Tamiya acrylic to bare plastic ? Or do you always use primer first ?
-
Nicely done !! I struggle with the Tamiya and Model Master acrylic paints when brushing them. They seem to want to dry too fast. Do you have a special trick ? I've also had issues with using the Model Master acrylic paint on bare plastic -- it doesn't seem to "bite" well and I've had adhesion problems unless I use primer first. Thanks!
-
I really wish they'd do an elliptical tank trailer kit.
-
HUH... that's very interesting !
-
Thanks for the replies guys. I do appreciate it. Thanks, Jeff
-
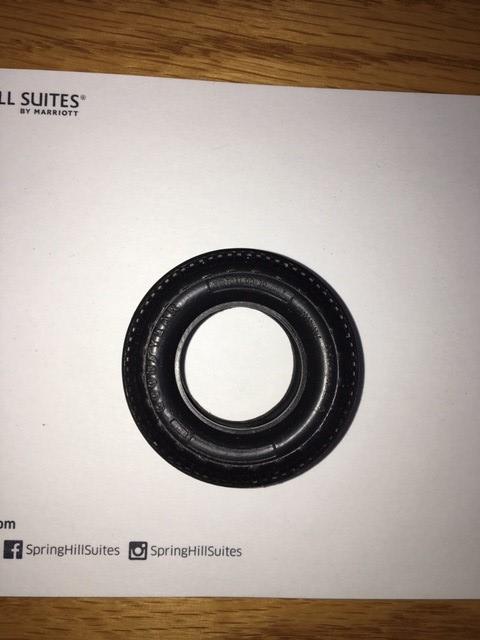
Wow -- it looks super !!!! I love the tread design. It's certainly "period correct" for the 1970's. I'd just need a pair of steer tires to go with those drives. Keep me posted !! I'd love to order a set !
-
Hey -- thanks for the reply. I came up with a simple check. I just layed frame level on some Lego bricks and then layed the axles in place, checking them with the torque rods. The forward axle is good. The rear axle is level, but isn't at the same height as the forward one due to my doubt about the kit molding where the rear axle sits in the suspension. The "ears" were too tall (I thought) and so the center part of the axle wouldn't sit all the way down in the pocket. Well, turns out that was intended to make the axle sit at the same ride height as the forward one. Oh well. No biggie. I'm just going to glue some strip styrene shims on the axle blocks and set it to the correct ride height that way. I should have remembered the old saying "measure twice, cut once" ! Thanks again.
-
Hey Danny -- I LOVE that you are now making the Goodyear Hi-Miler tires for the big rigs !! By chance -- are you planning on doing this tire for the AMT 1/25 kits that have the 11.00-20 Hi-Miler tires ?? We talked about these in the past at one of the club meetings -- they really are too "fat" I think. The inside diameter would be 0.865" and the outer diameter is 1.67". Are you doing any big rig tires with these dimensions ? Thanks ! Hope to see you again soon at a club meeting when this COVID thing is over. Jeff
-
Hi all: Hoping for some help with this. I'm working on a AMT 4300 kit and I'm struggling to find a way to check that all the wheels are going to sit on the ground before cementing the axles in place. If there needs to be any shimming to level the axles, obviously I want to do that before cementing the axles in place. The problem I'm having is coming up with a way to temporarily hold the axles in place without gluing them to check the fit. Unfortunately, this kit is such that I can't just rest the frame and suspension on top of the axles -- see pics. I've tried some clamps, etc. -- but haven't come up with a good way with the several parts that have to be in place at once (axles, torque rods). Thanks for any help!
-
BRBO 2020 IH 4300 Transtar
Goodwrench3 replied to Goodwrench3's topic in WIP: Model Trucks: Big Rigs and Heavy Equipment
I found a YouTube video that showed the wheel pieces assembled -- it looks like the cone shaped middle piece is installed with the smaller end towards the outer wheel. What's the best way to check the installation of the axles to make sure all the wheels are going to sit on the ground with the frame level before cementing the axles in place ? I been trying different ways of trying to clamp the axles temporarily and measuring and nothing is really working -- too many pieces at once. If I need to do any shimming anywhere, it would be good to know before the axles are permanently glued in place. Thanks for your help !
-
BRBO 2020 IH 4300 Transtar
Goodwrench3 replied to Goodwrench3's topic in WIP: Model Trucks: Big Rigs and Heavy Equipment
Hi all: Another couple questions that I need some help on to "keep 'er movin'" ... The assembly of the rear drive wheels -- there is a middle ring that goes between the inner and outer wheels (part #74). The ring itself is "beveled" -- but the instructions really aren't clear as to which side should go toward the inner or outer wheel ? It's hard to see in the pic below, but it slopes down from right to left in the pic. The outer wheel also has a "cone" shape to it. And, what color are you normally painting the inner wheel ? You won't hardly see the middle ring so that's not too important. Thanks!
-
BRBO 2020 IH 4300 Transtar
Goodwrench3 replied to Goodwrench3's topic in WIP: Model Trucks: Big Rigs and Heavy Equipment
Hey thanks for the reply. You are correct. I really didn't look at the cross member - I just assumed it was the same as in the 4270. In fact, there are locating holes on both sides of the cross member for the pins on the torque rods. Thanks for the advice on the axle posts -- I guess the wheels don't really need to turn - it's not like it's going to be going anywhere ?
-
BRBO 2020 IH 4300 Transtar
Goodwrench3 replied to Goodwrench3's topic in WIP: Model Trucks: Big Rigs and Heavy Equipment
Hi all: Further to the question above, does anyone have any info (or 1:1 pics) of the rear axles and the torque rods on the 4300 ? The instructions for the 4270 and the 4300 are opposite of each other as far as how the rods are oriented (i.e. which direction the side with the pin is on goes). In the 4270 instructions it shows the pin toward the axle housing. In the 4300 instructions, it shows the pins toward the frame cross member ? Thanks!