Goodwrench3
-
Posts
804 -
Joined
-
Last visited
Content Type
Profiles
Forums
Events
Gallery
Everything posted by Goodwrench3
-
 Thanks ! So - did you brush paint it or airbrush it ?
 -
2020 BRBO Chevrolet Bison
Goodwrench3 replied to kurth's topic in WIP: Model Trucks: Big Rigs and Heavy Equipment
Yeah - it's the Model Master semi-gloss black lacquer that i think is causing the bubbles and -- I think it might be because I was a bit too "generous" in those areas with the lacquer spray. Most of it was fine. It was just on a couple of areas where I may have been a bit "generous" with the Model Master lacquer that it "bubbled". -
1/25 AMT 1976 GMC General Tractor -- Coca-Cola
Goodwrench3 replied to Casey's topic in Truck Kit News & Reviews
Not yet. I checked with my local hobby shop on Monday -- they don't have it yet. But I picked up the AMT Freightliner FLC and the Revell KW W-900 ? -
BRBO 2020 IH 4300 Transtar
Goodwrench3 replied to Goodwrench3's topic in WIP: Model Trucks: Big Rigs and Heavy Equipment
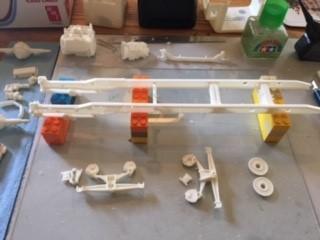
Just finishing assembling the rear axles now. Here's where my nervousness sets in. I'm not sure exactly how to make sure that all 8 tires are going to be on the ground at the same time after the axles are glued to the suspension ?? I seem to need to do some sanding on the area where the axles set in the suspension arms so that they rest fully "seated" -- and that is why I'm concerned that when I'm done all the paws are on the ground. It's always a "nail biting" part of the assembly for me. LOL. This kit doesn't have the metal axle through the axles that you can just slide the hubs on and off -- it has the "snap-on" inner wheels and I don't want to snap them on before I paint the frame assembly. Suggestions welcome !
-
BRBO 2020 IH 4300 Transtar
Goodwrench3 replied to Goodwrench3's topic in WIP: Model Trucks: Big Rigs and Heavy Equipment
Got a bit further... rear suspension is on, attached a couple of the frame brackets. "Keep 'er movin' !"
-
I talked to several guys at the ATHS national show in Des Moines a couple years back because I saw a LOT of KW's with the Pete air leaf suspension on them. I asked "why ?" -- similar answer -- the KW 8-bag was very expensive and didn't ride as well. Here's a pic of Paul Sagehorn's "Movin' On" KW with the Pete suspension on it.
-
Congrats !! I see the brackets for the air cylinders are still there -- I think I snapped them off on mine at about week 2 LOL.
-
BRBO 2020 IH 4300 Transtar
Goodwrench3 replied to Goodwrench3's topic in WIP: Model Trucks: Big Rigs and Heavy Equipment
-
BRBO 2020 IH 4300 Transtar
Goodwrench3 replied to Goodwrench3's topic in WIP: Model Trucks: Big Rigs and Heavy Equipment
Thanks ! I've been reminding myself that it doesn't need to be "perfect" -- I think sometimes I spend too much time on every little imperfection and then I don't get stuff finished. Plus... when it gets to the painting I can guarantee it ain't gonna be anywhere near "perfect"! For this project, I've been telling myself something a good friend of mine used to say... "make it done !". Or ... as Charlie says... "Keep 'er movin' !" ? -
This is a late post -- so it should not be considered "in the running" for the contest prize (or anything else). I just am interested in FINISHING a project -- and hopefully a little encouragement will help me along (plus the fact that the COVID thing has me trapped at home and I can't travel for work for the foreseeable future!). Stay safe!
-
BRBO 2020
Goodwrench3 replied to gotnitro?'s topic in WIP: Model Trucks: Big Rigs and Heavy Equipment
Oh I'll keep building ! It's just that I'm out of the running for the prize -- and that's OK with me. My prize will be the satisfaction of FINISHING something! Stay safe. -
BRBO 2020
Goodwrench3 replied to gotnitro?'s topic in WIP: Model Trucks: Big Rigs and Heavy Equipment
Hi All: Unfortunately, work and business travel got the better of me at that start of this -- so as I haven't posted any updates to date, I've basically disqualified myself. After being in 3 countries over the past two months on business (France, Canada, Mexico), the COVID thing has killed all business travel (thankfully) and as a result I've got time on my hands again to work on my project. So I'll post my progress on a non-BRBO post and hopefully get into the contest next time. Here's where it is so far. Thanks all ! Stay safe.
-
2020 BRBO Chevrolet Bison
Goodwrench3 replied to kurth's topic in WIP: Model Trucks: Big Rigs and Heavy Equipment
I'm not sure which is bubbling up. After spraying the Model Master semi-gloss black lacquer over the cheap-O Wal-Mart flat black enamel spray paint, I saw a couple areas that "bubbled". I had to sand them out and re-spray the Model Master semi-gloss black lacquer. It's possible in those couple areas the Model Master semi-gloss black lacquer was a bit heavy ? -
Very nice !! What paint did you use for the "Cummins beige" ?
-
2020 BRBO Chevrolet Bison
Goodwrench3 replied to kurth's topic in WIP: Model Trucks: Big Rigs and Heavy Equipment
TBill: I had been using Tamiya [Lacquer] gray primer on the frame/suspension assembly, then spraying it with some cheap-O Wal-Mart flat black enamel (you could blast this stuff and it won't run/sag), followed by some Model Master semi-gloss black lacquer. What I found is that in a couple of spots the paint "bubbled". What "automotive primer" spray paint are you using ? Thanks ! -
What semi would you like in a kit?
Goodwrench3 replied to Bobcat205's topic in General Automotive Talk (Trucks and Cars)
Simple. Bring back the Ertl IH Transtar II Eagle COE kit !!!!!!! -
Revell snap tires
Goodwrench3 replied to delta99's topic in General Automotive Talk (Trucks and Cars)
I swapped them out (wheels too) with the Mobius "Big Rig" wheel and tire set. Much nicer ! -
LOL.. thanks... as long as it works !! I only ask because on my last kit, I used the cheapie Wal-Mart flat black enamel spray paint as the base on the frame and then sprayed Model Master semi-gloss black lacquer over it -- in a couple areas it "bubbled" and I'm not sure why.
-
Who makes that "Quick Color" spray paint ? Thanks
-
Hi all: Has anyone done the fix for moving the front axle on the AMT IH 4300 kit so that the front wheels are centered in the front fenders? Unfortunately, the front springs are molded with the frame rails. Just looking to see how others have done this. Thanks for your help.
-
1/25 AMT 1976 GMC General Tractor -- Coca-Cola
Goodwrench3 replied to Casey's topic in Truck Kit News & Reviews
I'm thankful for the General kit, but honestly -- why does EVERYTHING have to be Coke ???!!?? -
AMT freightliner FLC rebox italeri kit .
Goodwrench3 replied to Mr mopar's topic in Truck Kit News & Reviews
Awesome !!! I'll take 3 !! -
International transtar 4300 eagle
Goodwrench3 replied to PierreR89's topic in Model Trucks: Big Rigs and Heavy Equipment
Thanks ! I'm wondering if anyone here has done that modification -- if so, how ? -
I had heard that the 4300 kit needs to have the front axle moved a bit so that the front wheels are centered in the fender openings. Did you need to do anything for this ? Thanks!
-
I had heard that the 4300 kit built out of the box needs to have the front axle moved a bit so the front wheels are centered in the fenders. Is this true ? Thanks