Spex84
-
Posts
1,744 -
Joined
-
Last visited


(1).thumb.jpg.e371d4579f83ee021ff22f9ad4b79bbc.jpg)
(2017_04_1812_00_26UTC).thumb.JPG.380881573af0b9f4de16623c476fa36e.JPG)
Spex84's Achievements
MCM Ohana (6/6)
-
Side note: I often use the sprue clippers to fracture the supports at the base (the flat platforms at the bottom) and then perform the wiggle-the-supports technique on small sections of supports at a time. Less chance of cracking the body that way. It's worth being patient and methodical about it.
-
That's what all 3D printed parts made with SLA resin printing technology look like before the supports are removed. The supports can help prevent warping and support the body during handling and shipping. That body looks totally fine. The warm water (not painfully hot, we don't want to boil the model or our fingers) will help the supports break free without leaving little pucker marks. The other way is to clip as many supports as you can reach and gently wiggle/twist the parts until they break free. Get yourself some sprue clippers (photo attached) and get clippin'!

-
Incredible levels of detail here!
-
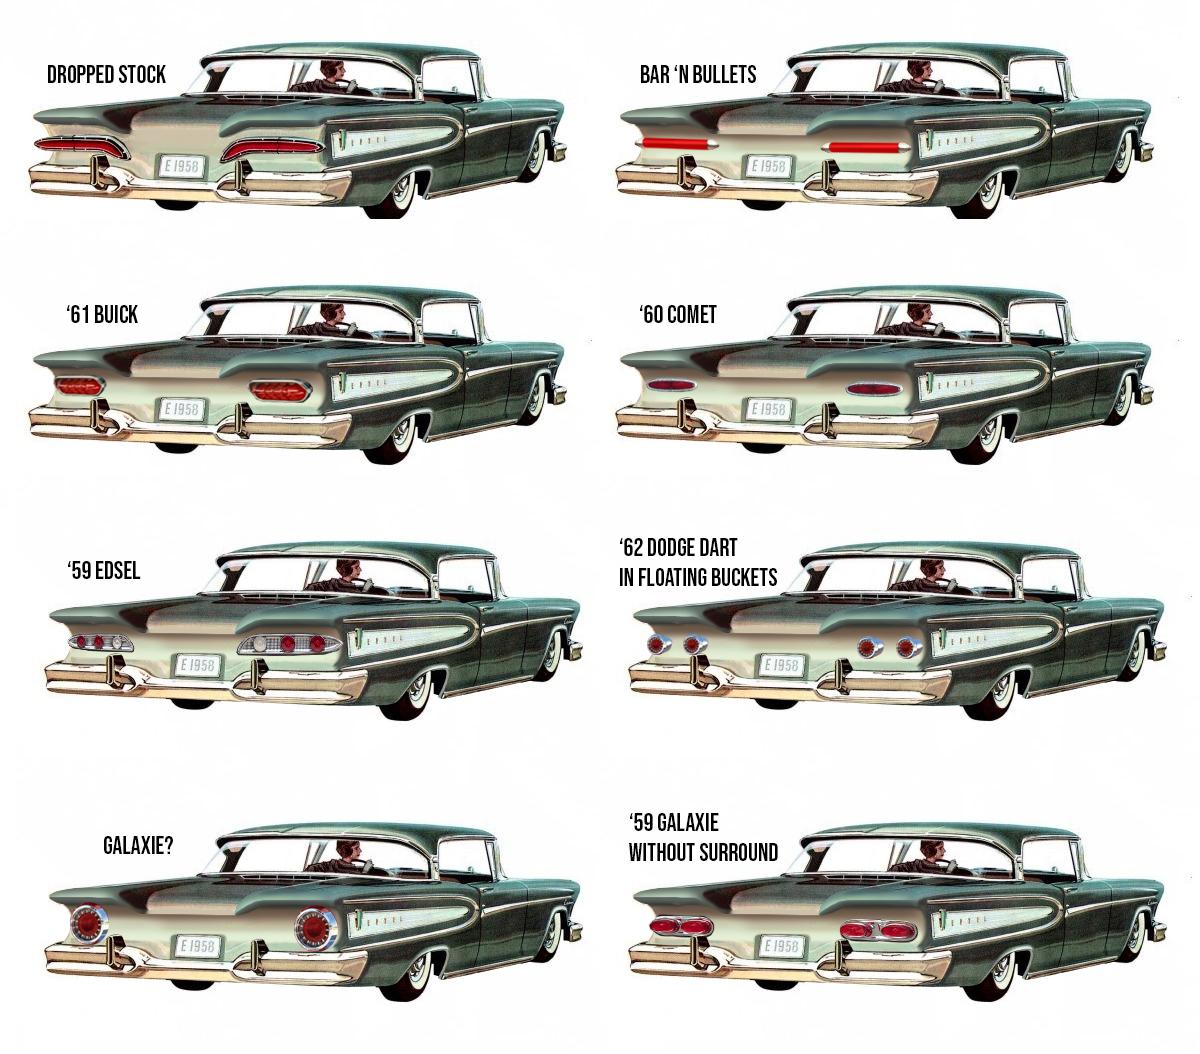
I like the Buick lights too, but I don't know what kit they'd even appear in. I know I've seen '61 Buick tail lights in scale, but I don't know if they came in a kit (like an annual, maybe? A google search doesn't turn up much more than the AMT '62 Buick) or if they were a custom accessory in a different kit. If they were custom accessories, they probably lacked the cool chrome hooded surround that mimics the Edsel's back window shape.
-
Cool idea! The overall vibe is kinda like the Chrysler Norseman concept car...but with A pillars.
-
I tried messing around with some ideas for taillights, and laughed when I arrived at the '59 Edsel design independently: "yeah, fill those taillights, install a waffle-pattern chrome panel below the stock taillight location with floating double or triple round lights like a T-bird, that's the ticket..." So I tried a few others on for size instead, just for fun. I can't kick the idea of floating taillights in a chrome bucket, sort of like the late '50s Imperial's headlights. Also wondering if '58 Mercury Turnpike taillights would work.
-
Loving the way that engine looks, spectacular detailing work. Also, those brake discs are nuts!
-
Very cool.. This build turned out great! Nice detailing on the belts, stacks, decals etc, and a very effective color combination.
-

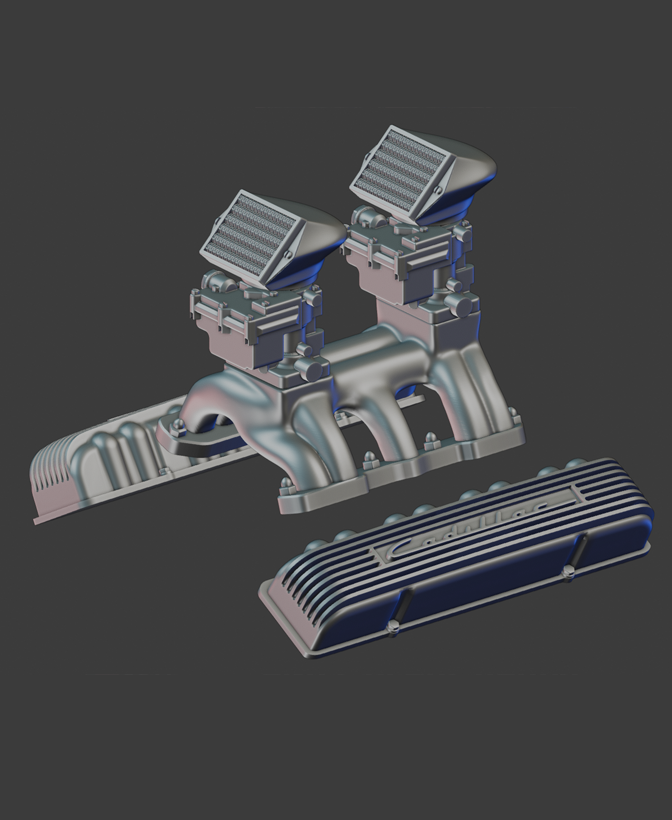
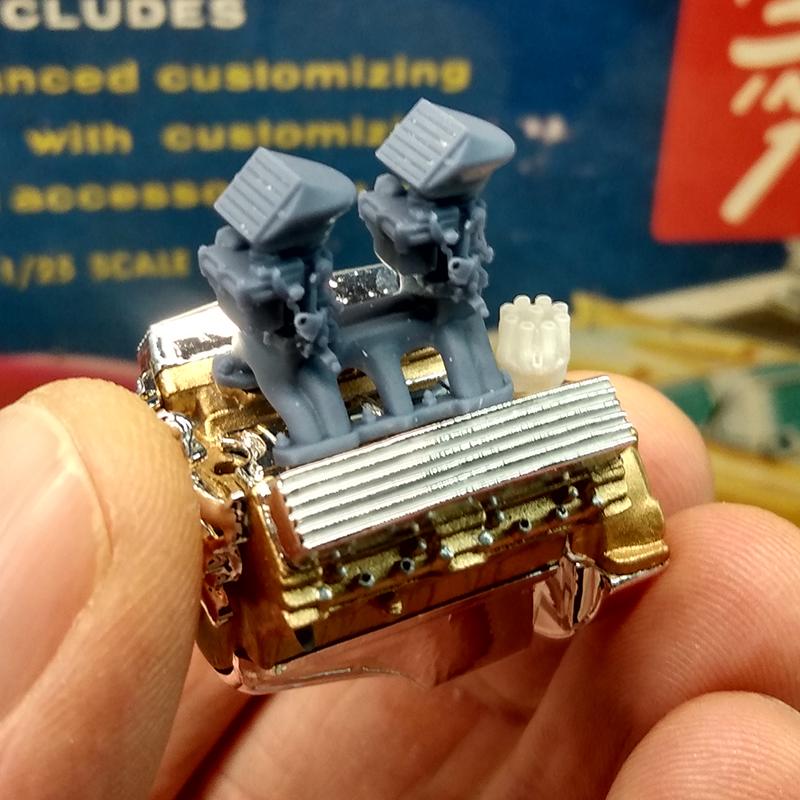
Where I can foud this intake manifold?
Spex84 replied to Drago's topic in Model Building Questions and Answers
This is a bit of a self-promotion, but I just uploaded a 2x2 version recently; it can be printed via Shapeways. A bit of styrene and/or Milliput, and boom--it's a 3-carb manifold! Note--the prototype at right has carb linkages, but no carb linkages are present on the Thangs version; they're too fragile for Shapeways to print. (That's a Revell Cadillac parts pack engine, by the way). https://thangs.com/designer/MapleLeaf Modelworks/3d-model/Cadillac intake Hop-Up Pack 1-1462220 If you want a kit source, I'd suggest the flathead intake from the Revell '32 Tudor sedan...trim off the Flathead-specific intake runners, and add your own carved from styrene to mate with the Cadillac.
-
Nice work! I typically build hot rods but the '34 is such a classy stock design and your build certainly does it justice. Cool backdrop too! It's very convincing.
-
This is awesome!! Nice swoopy forms there, and I like the detailed fuel/electrical setup. Killer engine too--are there air intakes in the deck somewhere?
-
This is an astounding feat of focus and execution. Congrats on finishing it! It's darn near perfect. My parents owned a shorty Winnebago for a while. It was a musty, nausea-inducing ride for little kid me. I don't exactly have fond memories of it, but I LOVE this model
-
Revell 29 Ford closed cab pickup
Spex84 replied to Bullybeef's topic in Model Trucks: Pickups, Vans, SUVs, Light Commercial
This truck hit me like a slap to the face! I need it on MY shelf! The want is palpable, haha. The paint color in combination with the bang-on wheel-package, combined with the just-right stance, gives this build an immediate presence that straight OOB builds lack. -
Looking good! Loving the bright orange on the surf board, it's going to really pop against the blue 😁
-
Heck yeah, that looks good!