Kmb0319
-
Posts
468 -
Joined
-
Last visited
Content Type
Profiles
Forums
Events
Gallery
Everything posted by Kmb0319
-
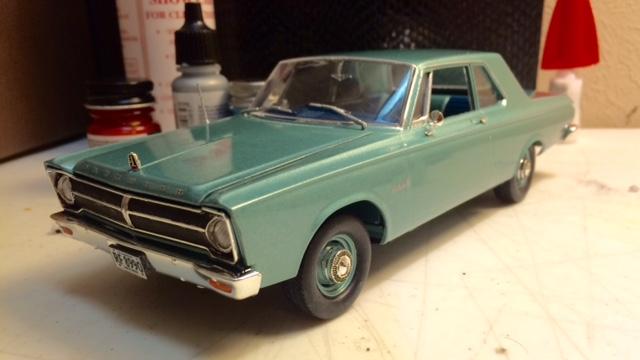
So, building my stash of kits this summer, I wanted to try a Moebius kit, as I've heard many good things about them. I tend to build muscle cars in the 1968-1972 range mostly, but when this 65 Belvedere was released, I had to try it out. I went completely box stock with this build for a couple reasons: 1. I was down to only one wired distributor kit, and my GTO I'm building for a friend gets that... budget is a little low for model stuff at the moment. And 2. This kit has a different distributor set-up, with the base molded into the engine block. The real reason was #1, but #2 made it easier to make the decision. I used Model Master turquoise metallic and Mr. Hobby clear. I actually only used one coat of clear, as my finish was smooth, and with the basecoat being enamel, I didn't want to mess with it too much. For the interior I used the body color plus a dark turquoise Duplicolor paint. I wanted to make this car look as grandma-ish as possible. I left the glass out on the driver's window and cut the door lock off, putting a dot of silver in its place.... if you're cruising, you'll have the window down, and your elbow will push that lock pin down. These are nice kits... everything fits beautifully, although i had some trouble with the front and rear windshields. I haven't seen any of these Under Glass yet, so I thought I'd throw it up here. Hope you like. A couple of the interior first: Engine: Had to take one complete pic without the hubcaps: Complete: I would've taken some outside shots, but a storm moved in.

-
WOW!!!!! That's one amazing GTO!!! I'd love to see some more pics of this baby.
-
I'm posting on this because I feel compelled to, and yet I have no words. This left me speechless. Someone posted WOW above, and that's pretty accurate. I'll just say phenomenal. If there was an emoji of a standing ovation, I'd use it.
-
Bogger, I can't call myself an expert, as I haven't seen a whole lot of these built, but to my eyes, this is by far the best build of a 69 Cutlass I've seen. Beautiful job!!
-
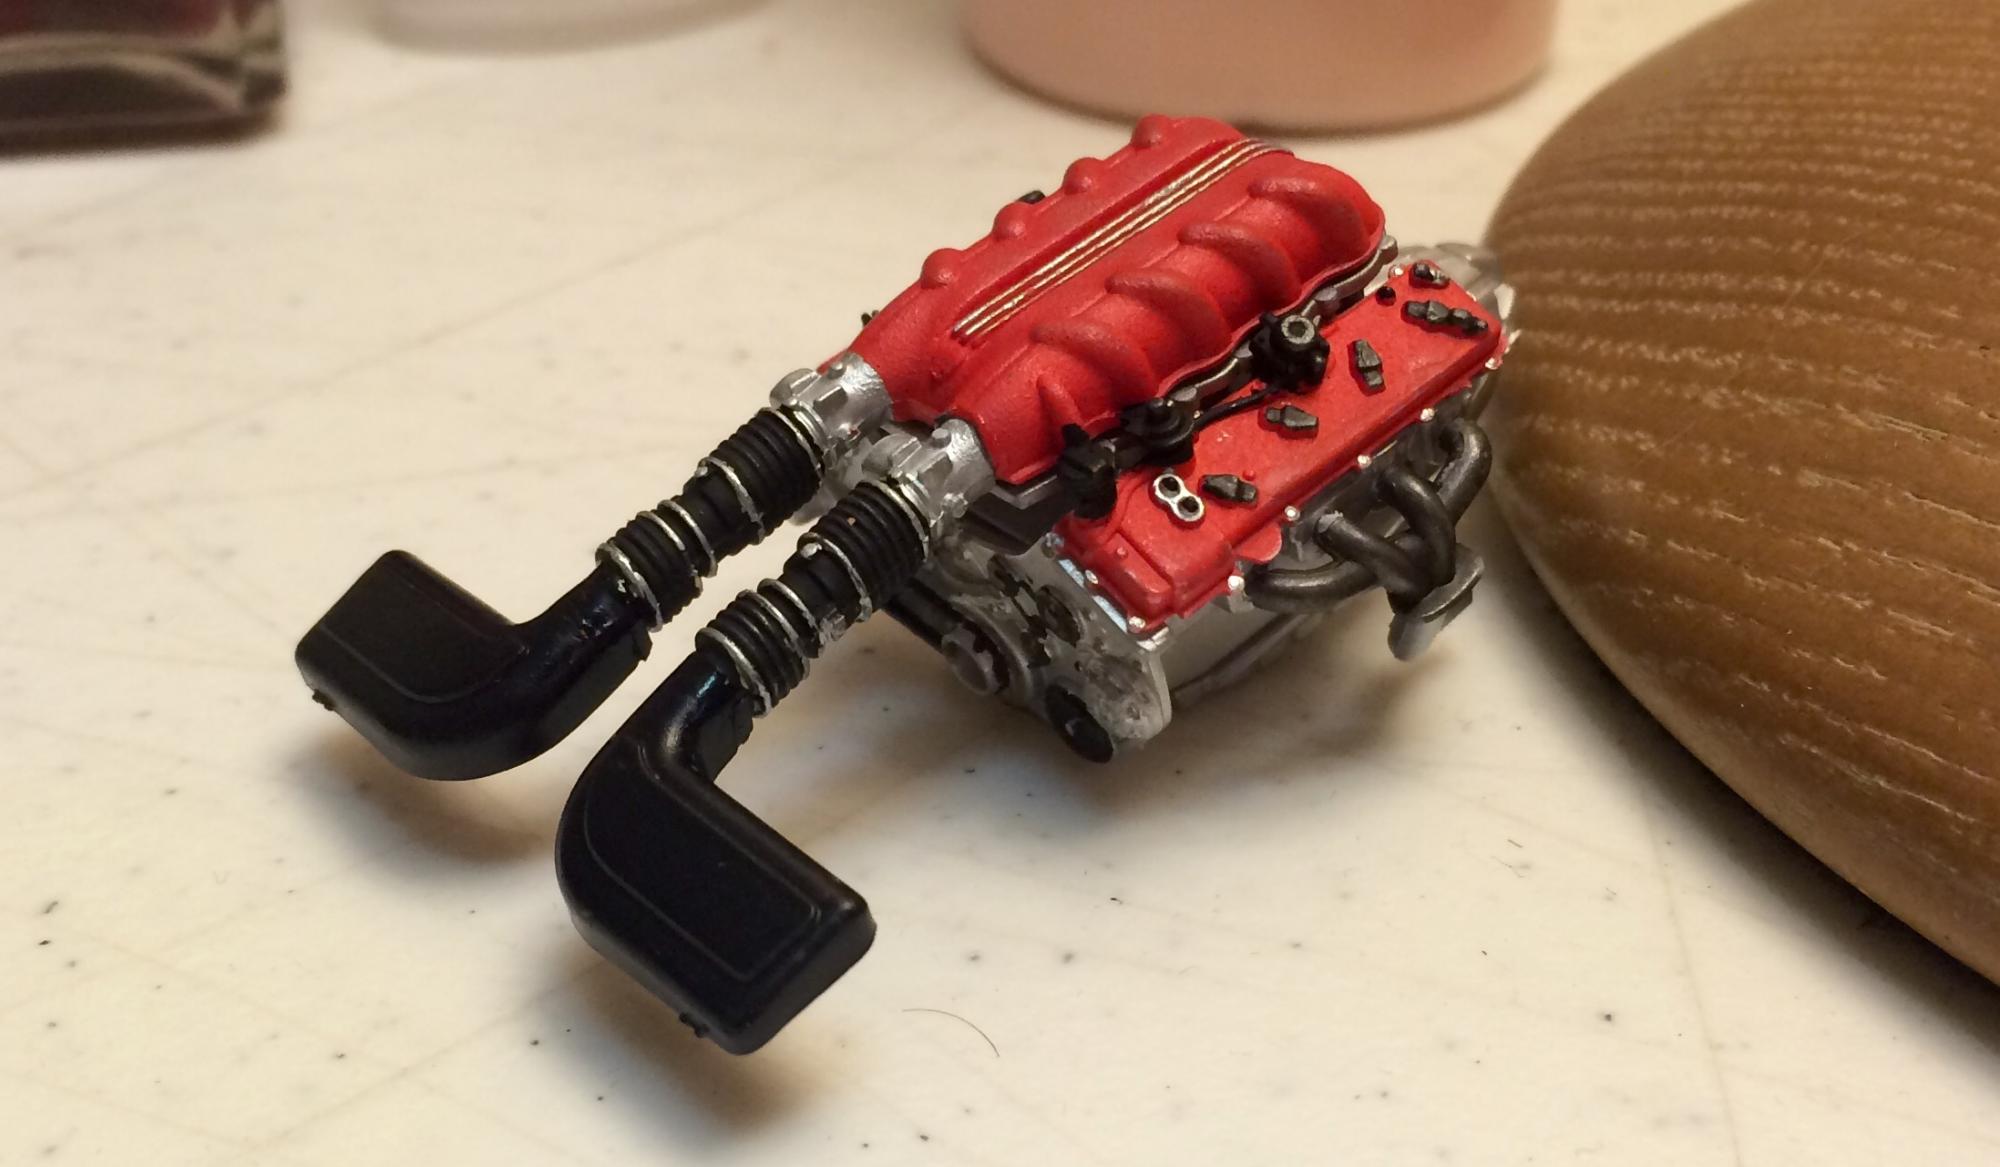
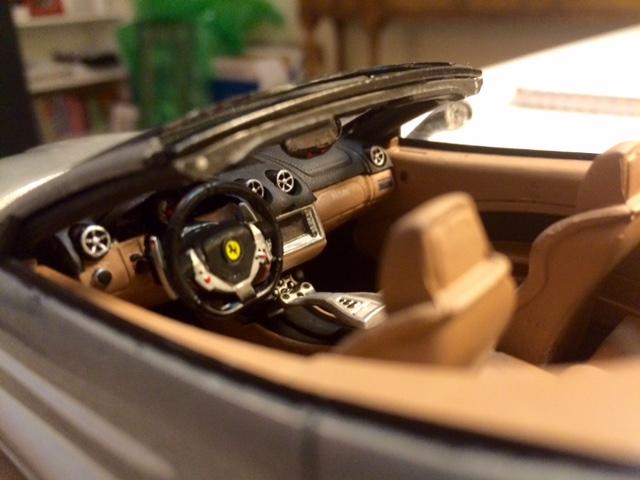
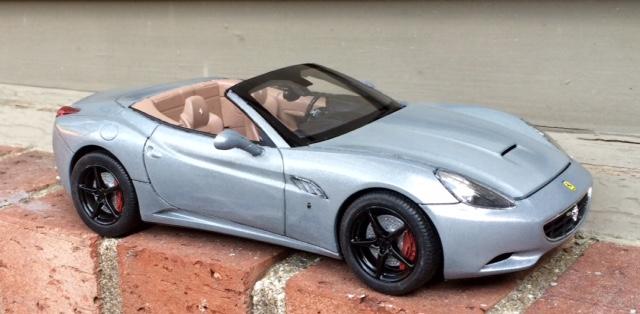
As we were going through our relocation, I built a little stash of 10 kits to build once we were settled. Eight of them were "holy grail" kits I'd either always wanted to build or thought were amazing, one of them was a huge project (the MPC 72 GTO) that I'll try to make something into for a friend, and this one. It wasn't on my list... I had some interest, as I've seen some really nice builds of it and heard it was well engineered, but I'm lukewarm on the looks of the Ferrari California. But, as I picked up some paints and supplies for my stash, my favorite hobby shop must've gotten an over-shipment, because they had a whole rack of the open-top kit by the register for $8.95. Well, why not?? I've thus far only built muscle cars and NASCAR kits... so what to do with this one? I do have 3 modern Ferraris in my to do list, so I decided to tie them together (more on that later). I built it box stock, other than the fact that I thought the "star" wheels were ugly. I had purchased the Fujimi BBS wheels to use, but ended up liking the kit wheels from the Ferrari 458 Italia better. I used Duplicolor Light Slate on the body with automotive clear, and painted the wheels black to try and make this car look a little meaner. This is the first modern vehicle I've ever built, so comments and criticism are welcome. I hope you like it. Engine: Interior Done:
-
Beautiful!!! Love it without the stripes.
-

Something different for me: Ferrari California
Kmb0319 replied to Kmb0319's topic in WIP: Model Cars
Got more done over the holiday weekend. In fact, she's almost finished... But for small details and adjustments. Got my interior and dash together: My chassis is complete: And did a test-fit of my chassis on the body without my interior: However, this brings up a question for those of you who have built this kit... I need to bring my front end down a little. Has anyone else had this problem? Since these kits fit together pretty tightly, I'm not sure what I can do that is the simplest fix and won't keep my from having the poseable front wheels, as I like that feature. I suppose I can cut the mounting pins off and glue them higher on the wheel mount, but I'm open to suggestions. Thanks! -
This is gonna be COOL.... Edge of my seat.
-
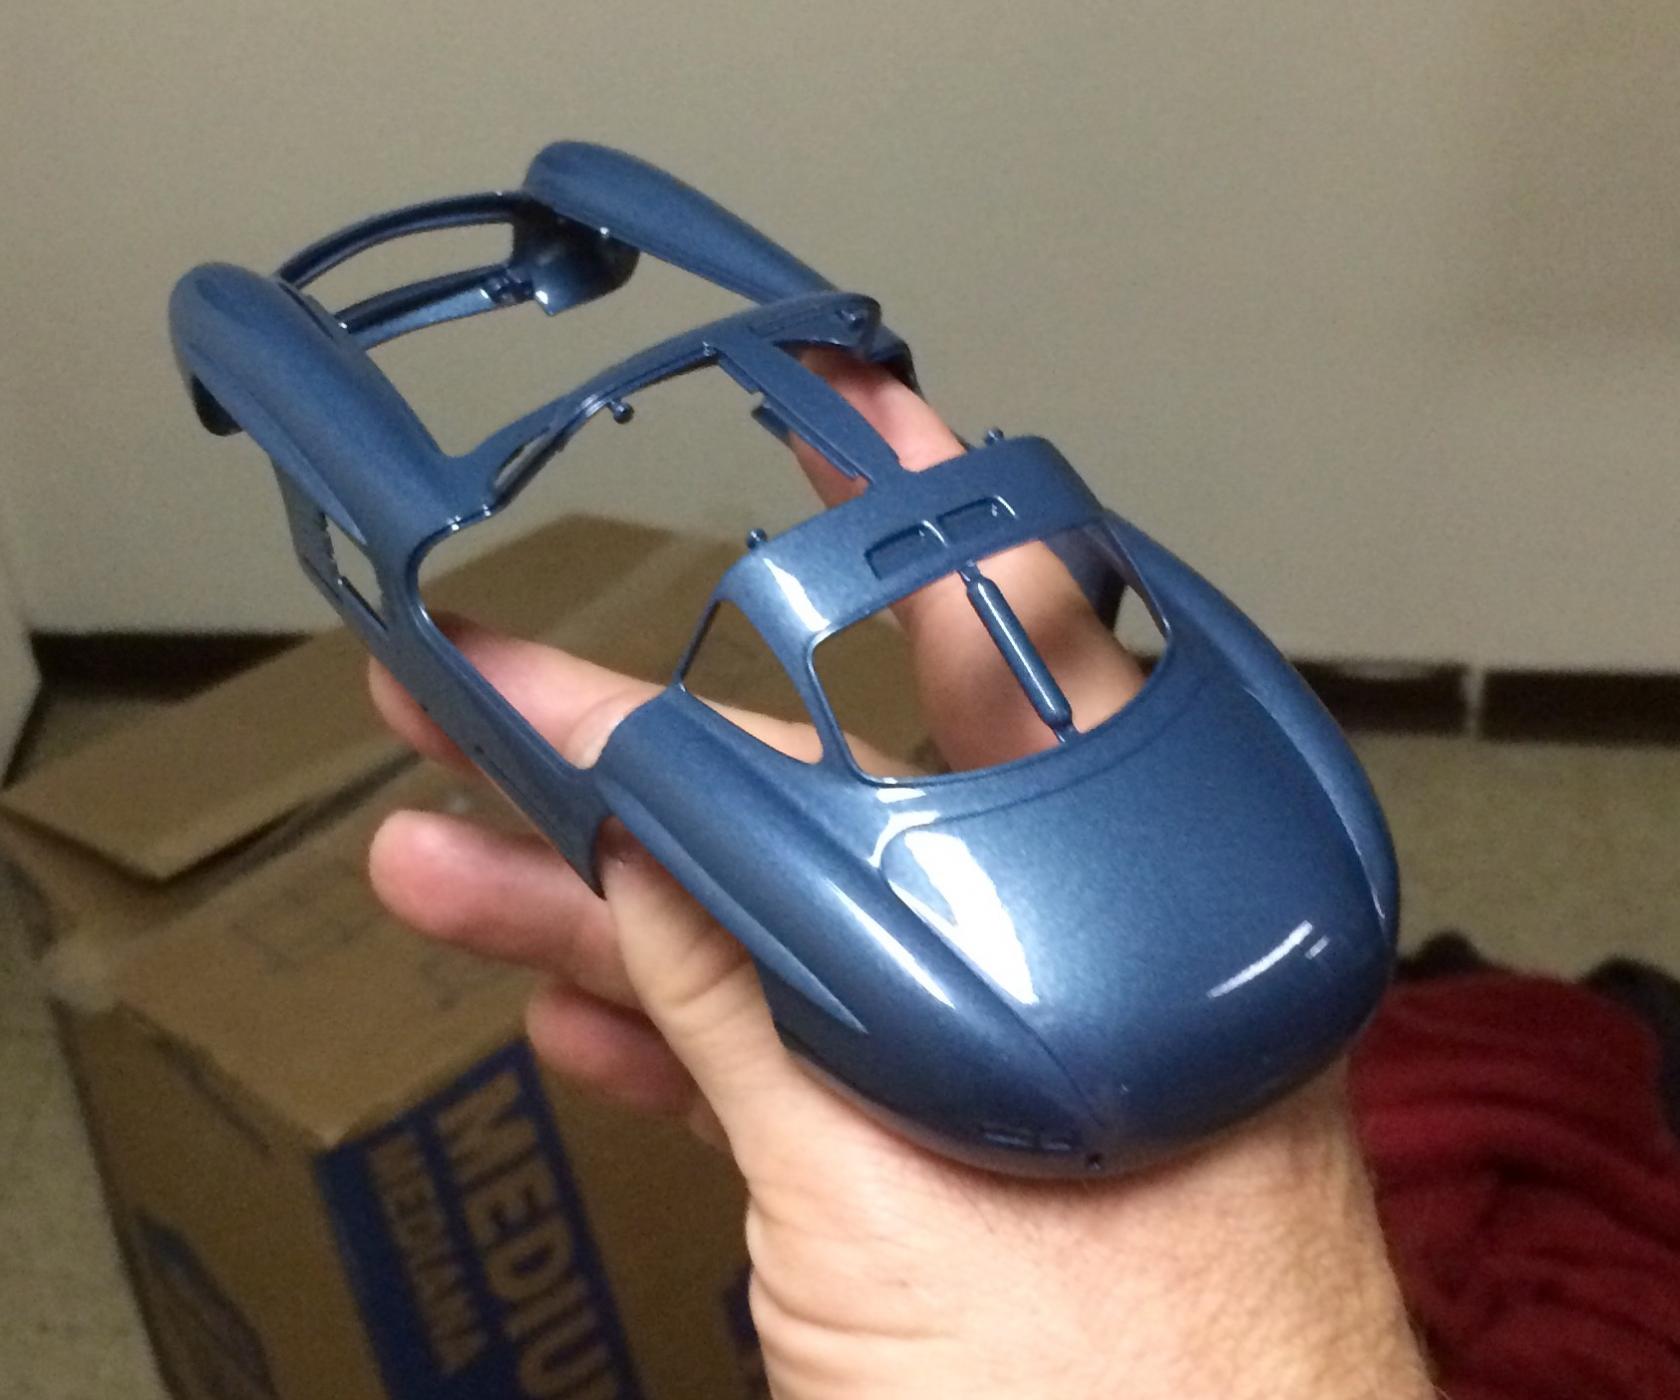
When I built a stash of 10 "holy grail" kits to build after settling into the new house, this was not a planned member of the list. I wanted to expand out of just muscle car builds, and finally felt comfortable enough since getting back into the hobby to get a few kits I've always wanted. So, I got the Fujimi Ferrari 250 GTO, the Tamiya 300 SL, the Fujimi F12, the Revell 458 Italia, etc... Another modern kit I purchased was the Revell Audi R8. Well, when I bought that kit, my local hobby shop must've received too many of these open-top California kits, as they had a big stack of them up at the register for $8.95. I'm not a giant fan of the California, but hey, it's a nice kit for $8.95! This really is a great kit. I'm tying my 3 modern Ferrari builds together (more on that later), but what to do with this unplanned one? So far, I've built the engine, and painted most of the pieces. I went with a GM Duplicolor paint called light slate... Kinda looks like a dark, smoky silver. I like it. I am using the Fujimi 20" mesh BBS wheels, painted black. Tan interior with some black trim. This will be box stock other than the wheels. I'm really enjoying this build so far. Progress:
-
What he said! Any muscle car is instantly cooler with them, imo. Beautiful builds, Ron!!
-
OK... Posted one way earlier, but my latest build prompted another entry. Verdoro green
-
thanks so much! Funny, I was going with Root Beer metallic until looking at reference pics and saw a metallic green one that struck me... Good luck with yours!
-
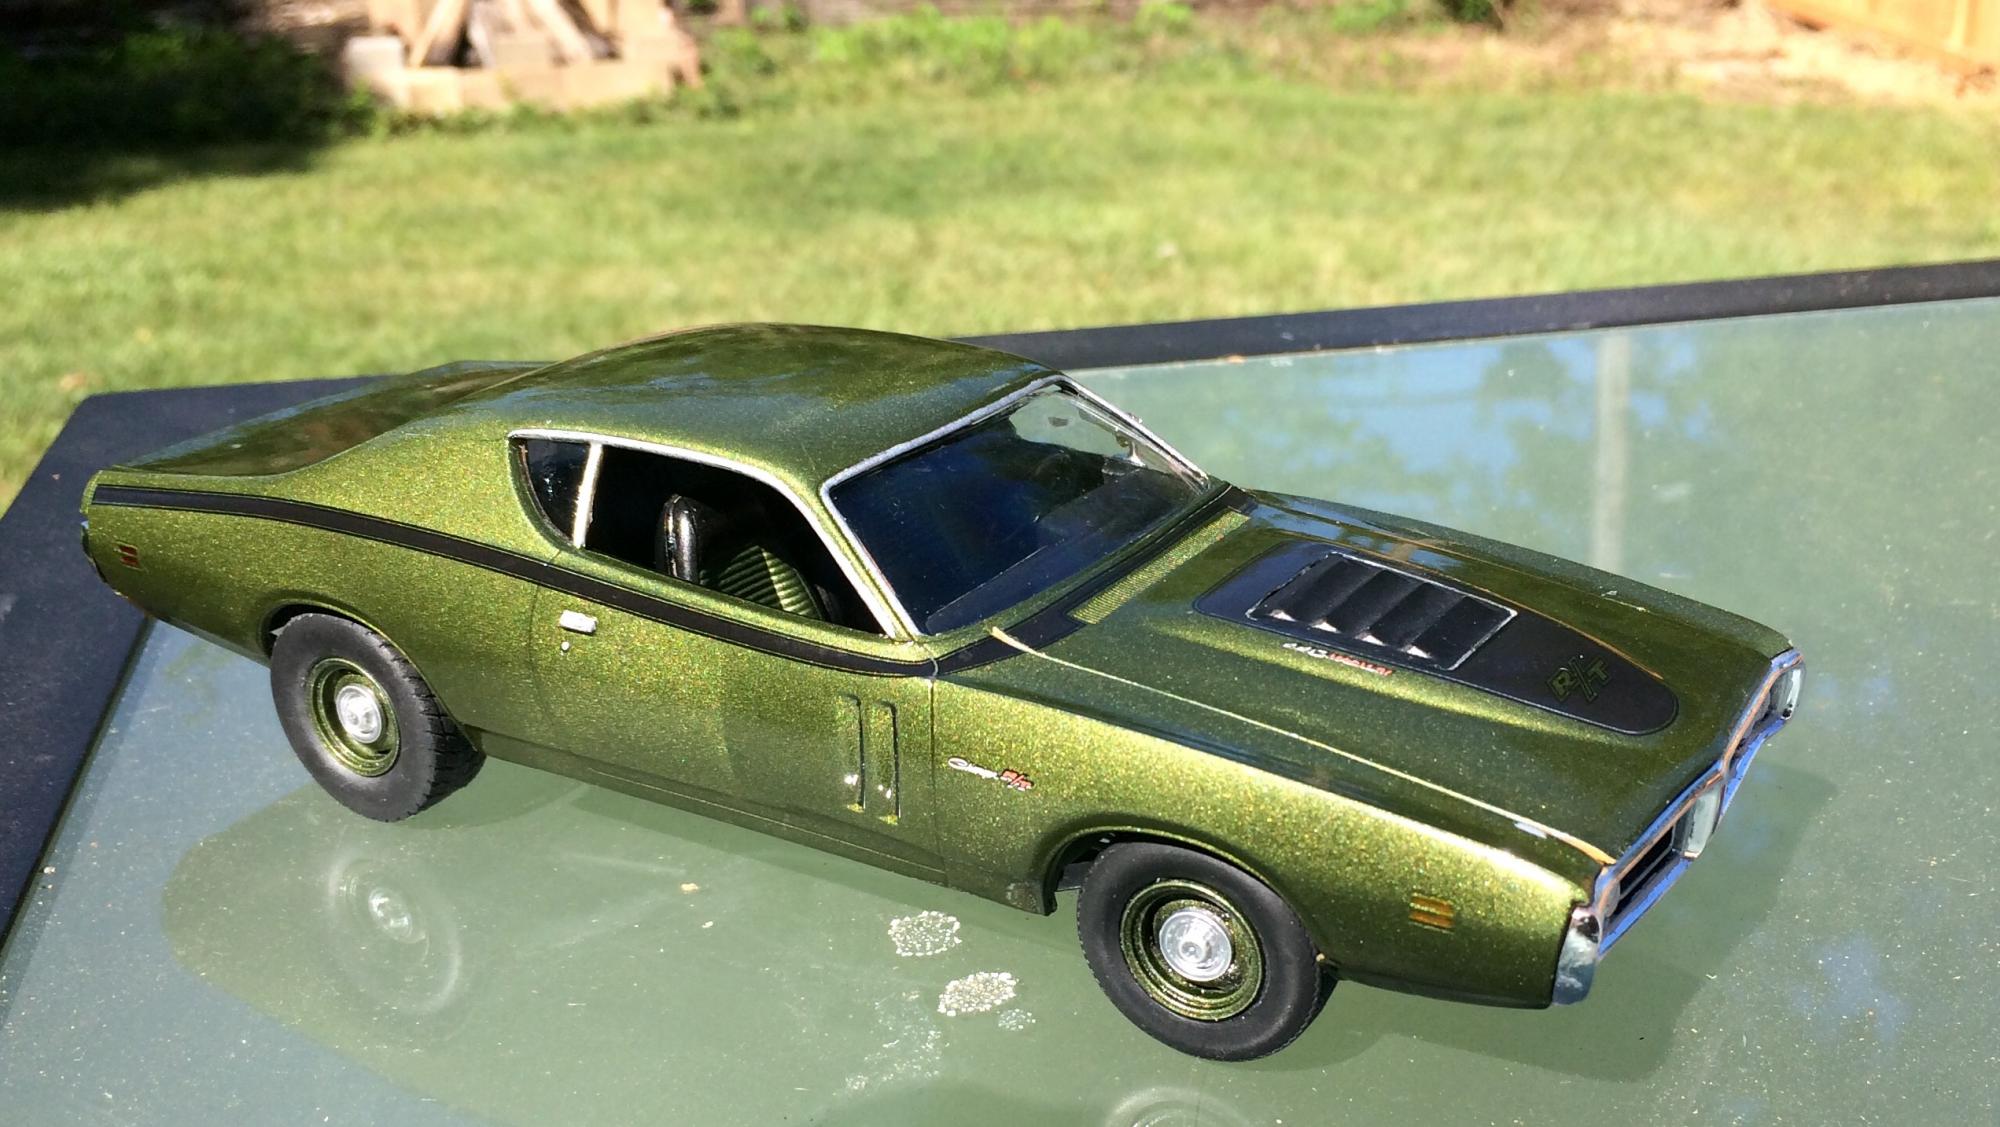
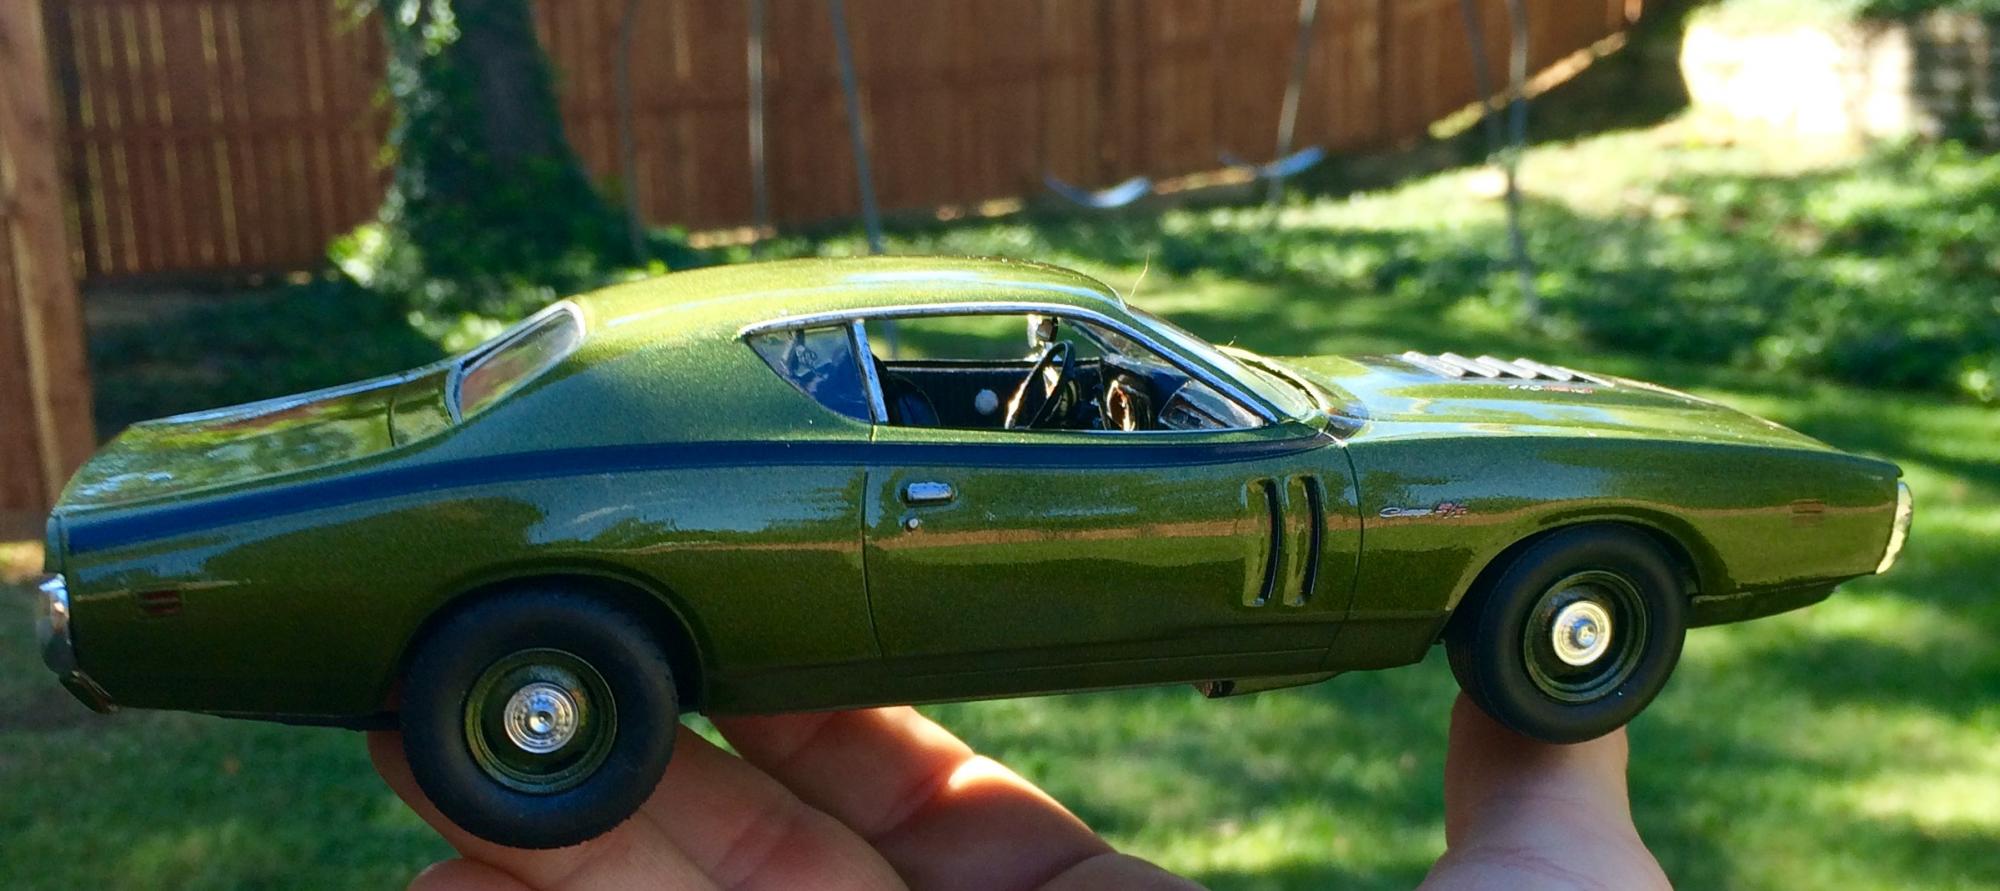
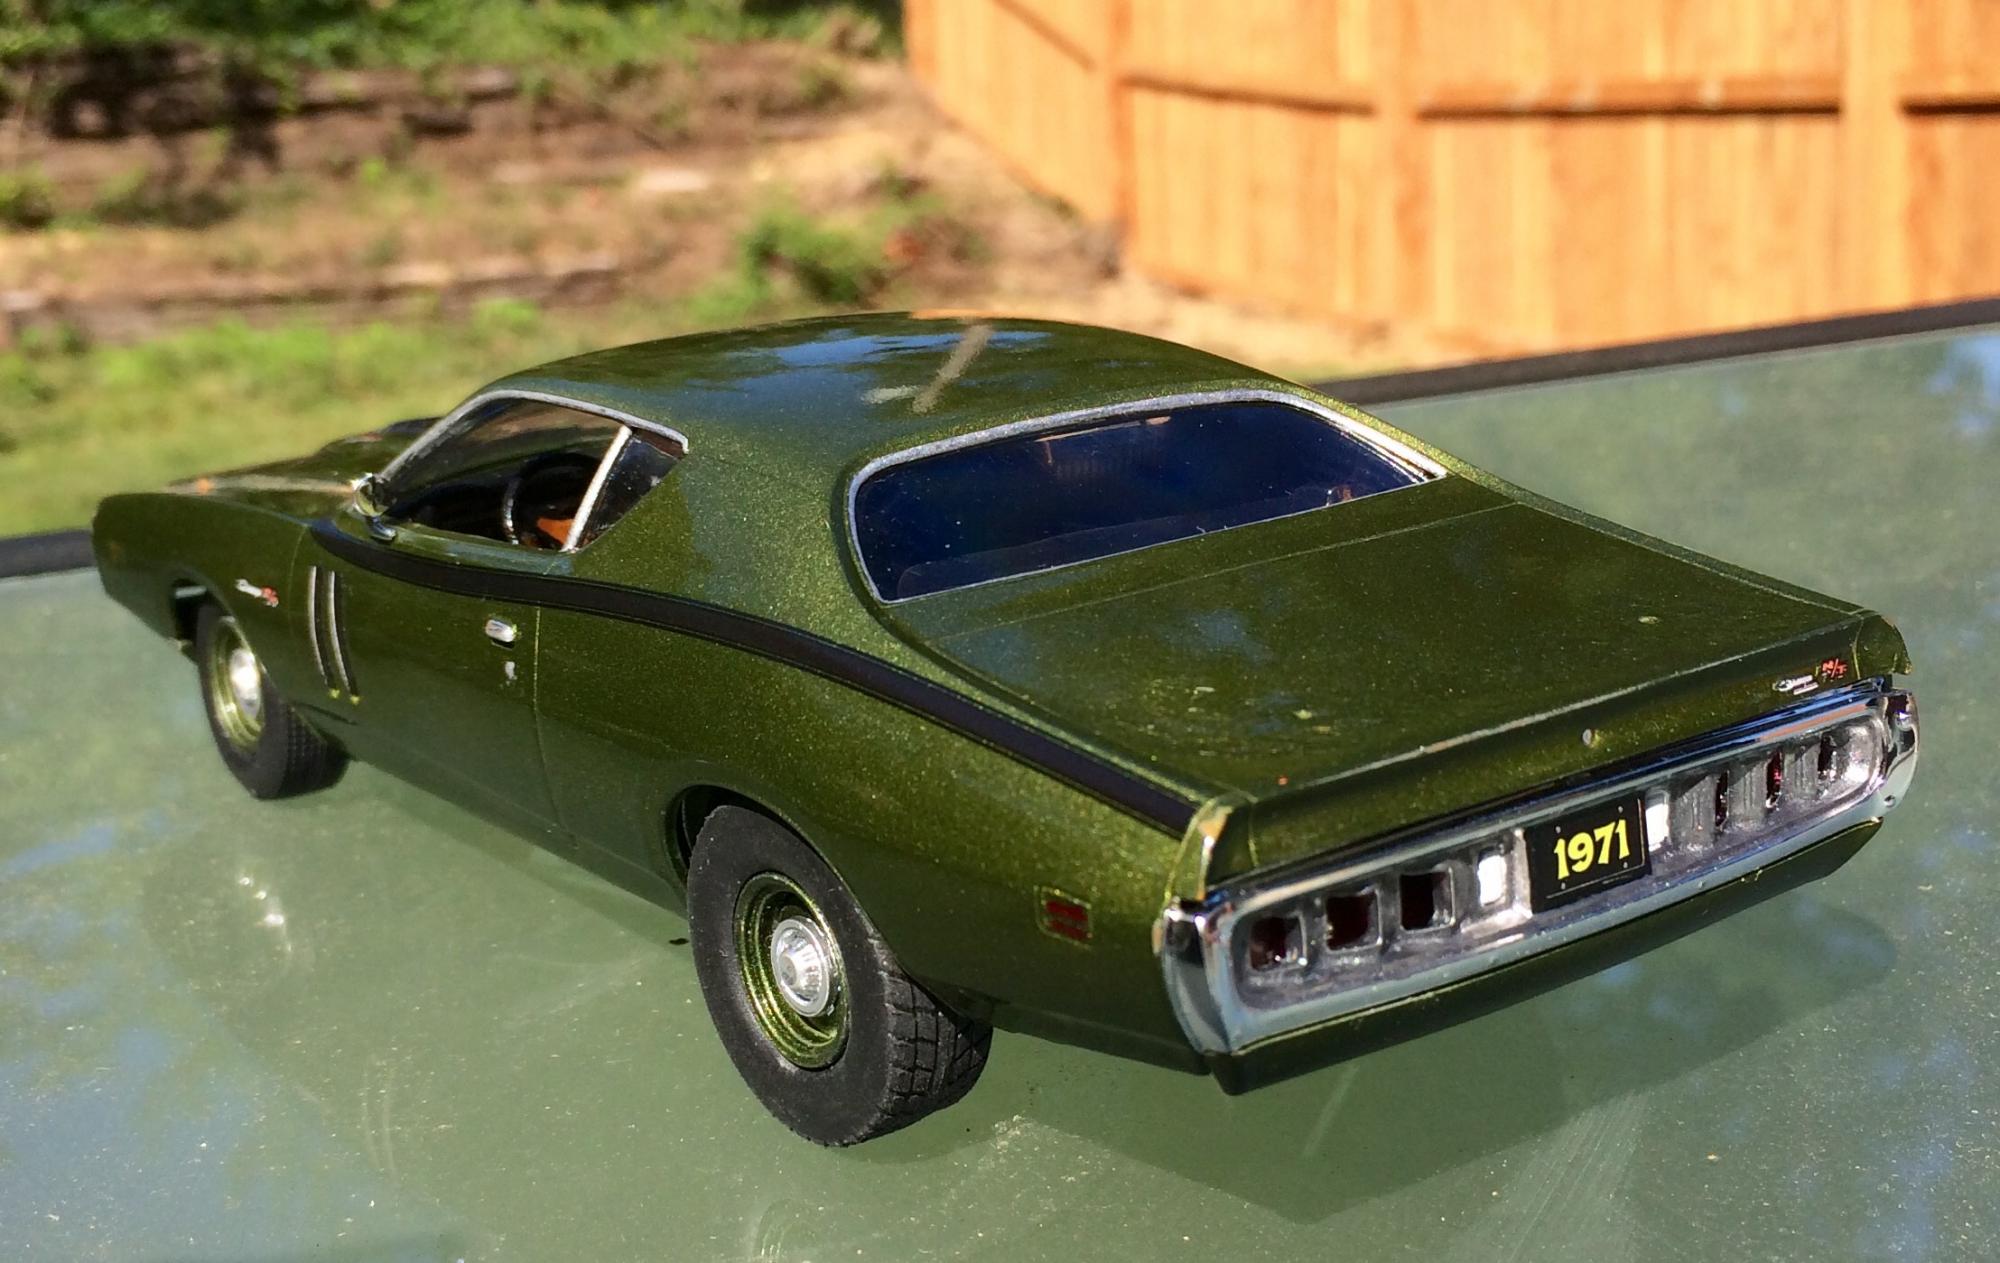
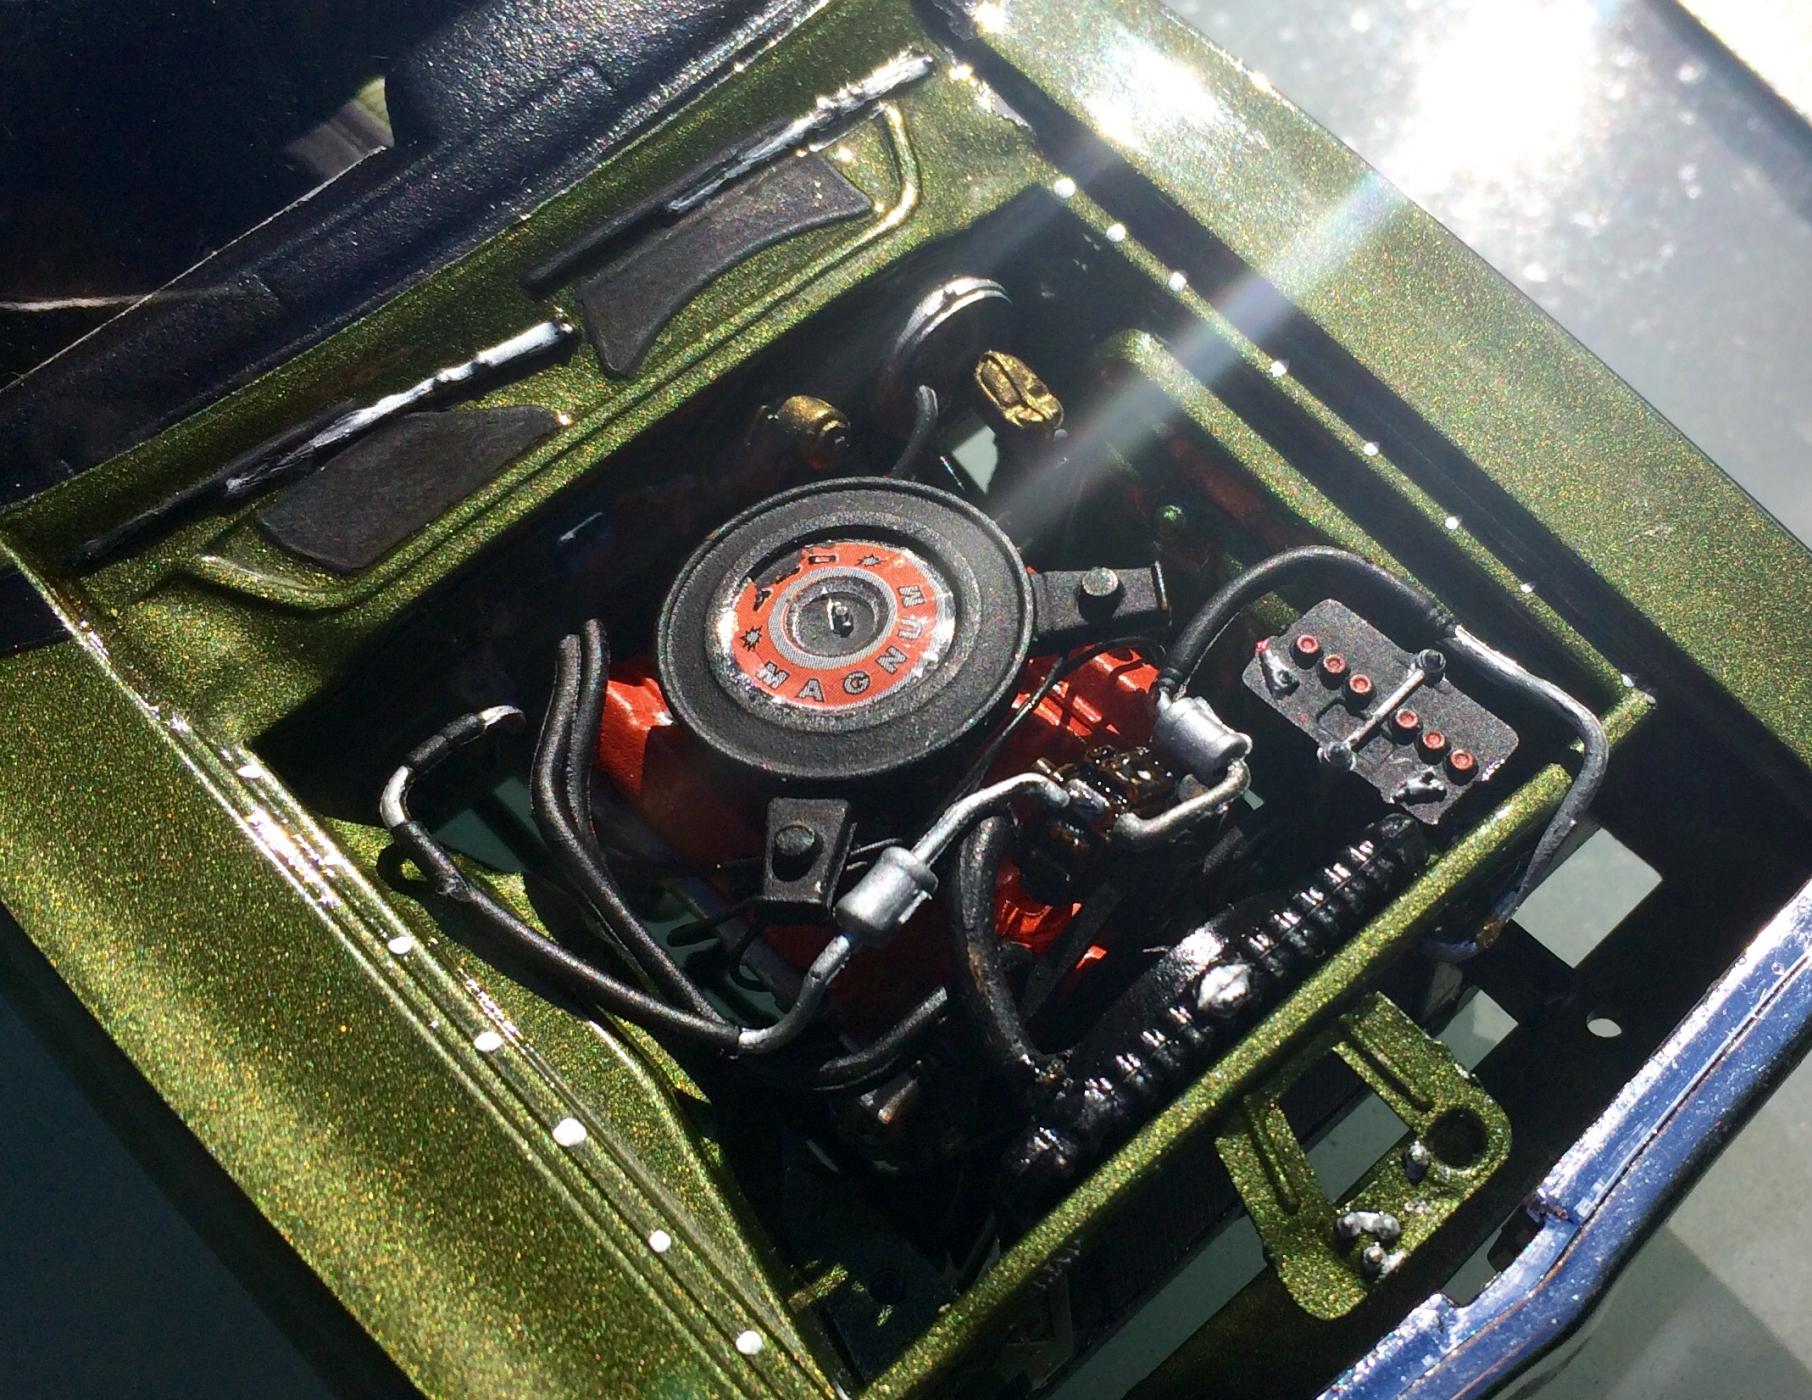
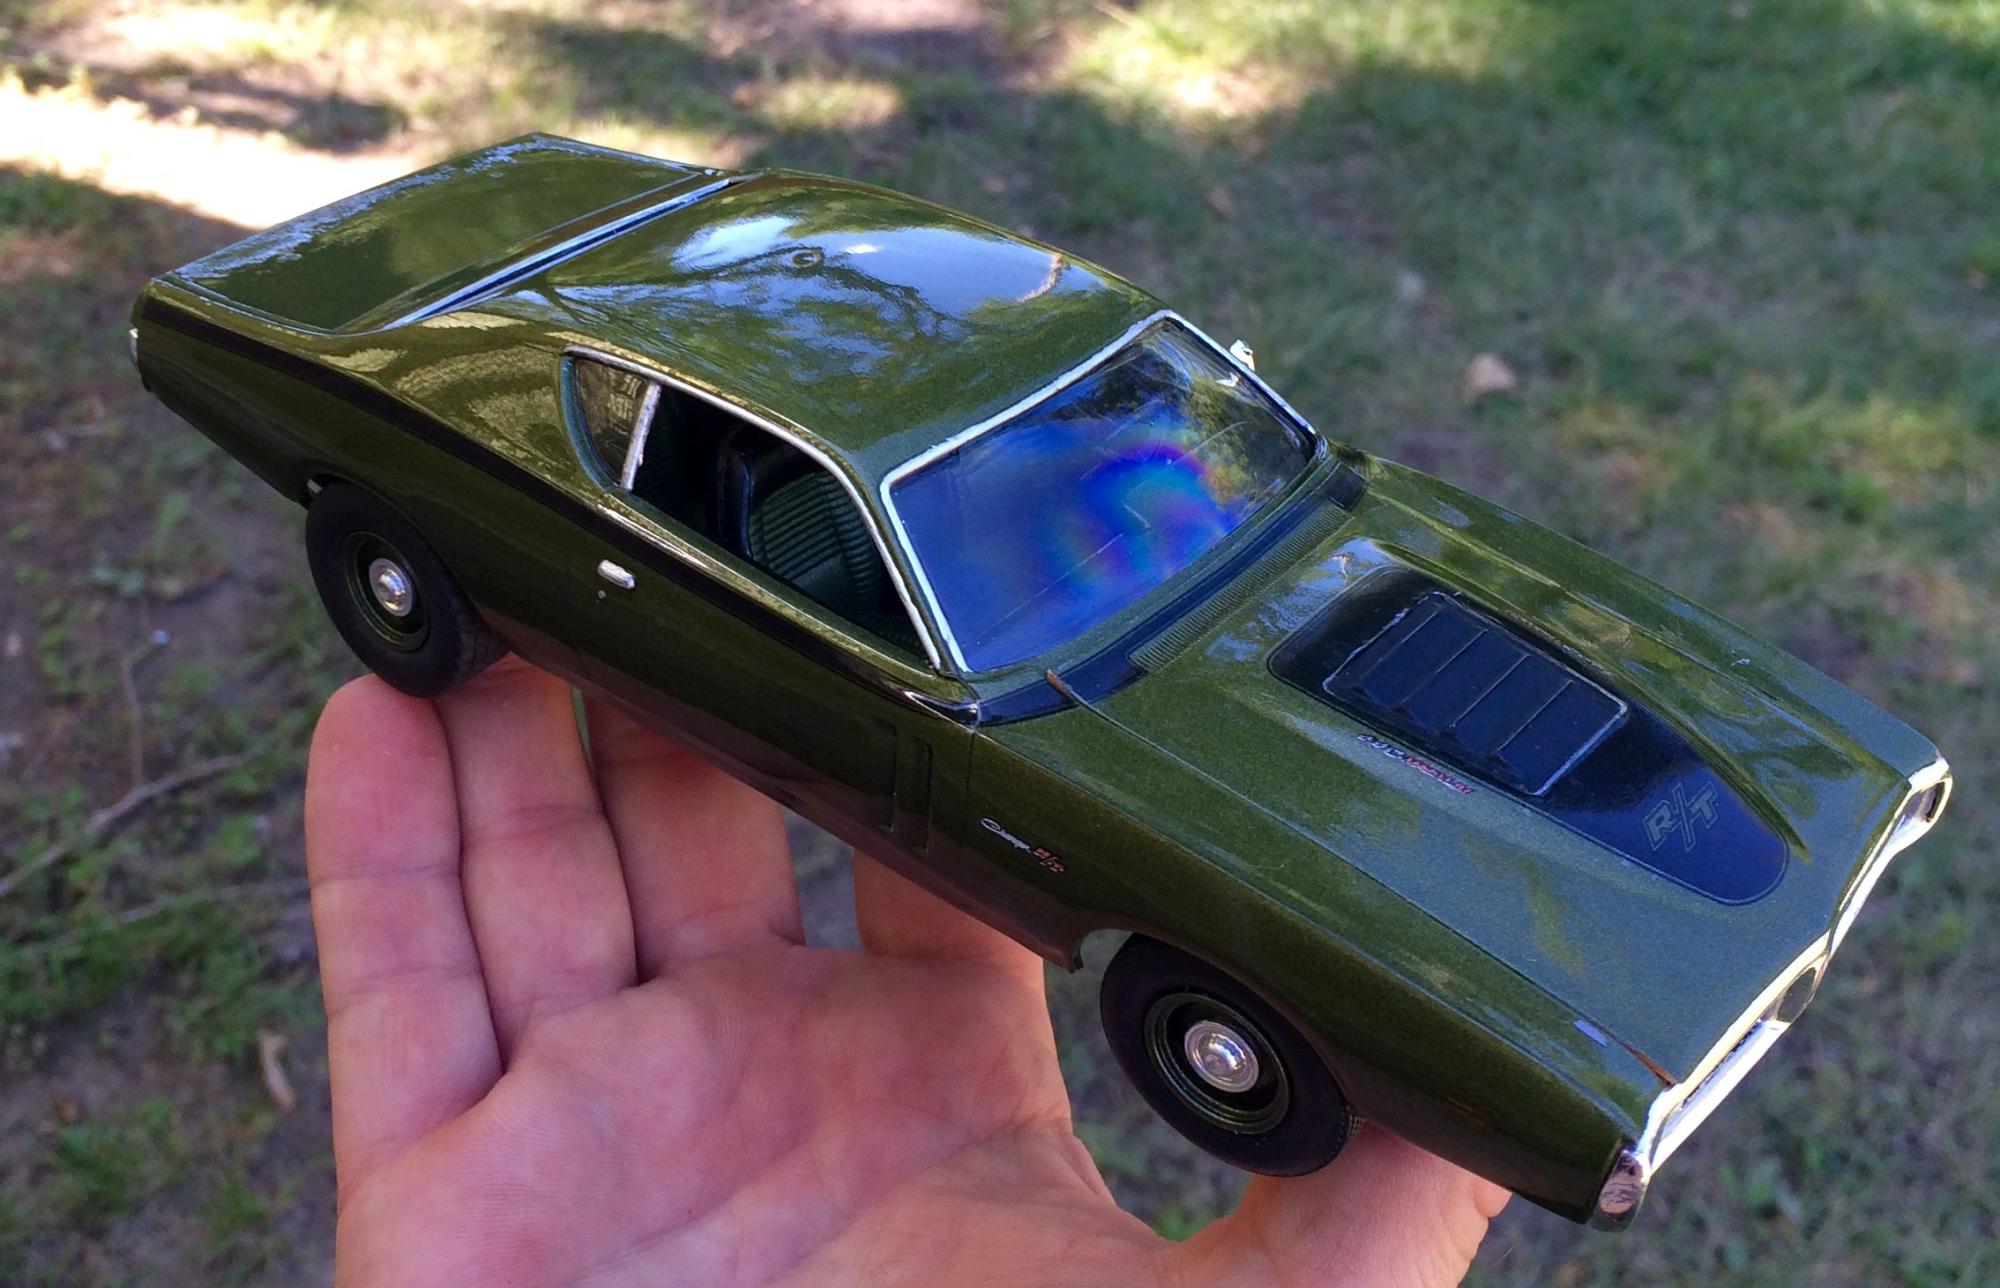
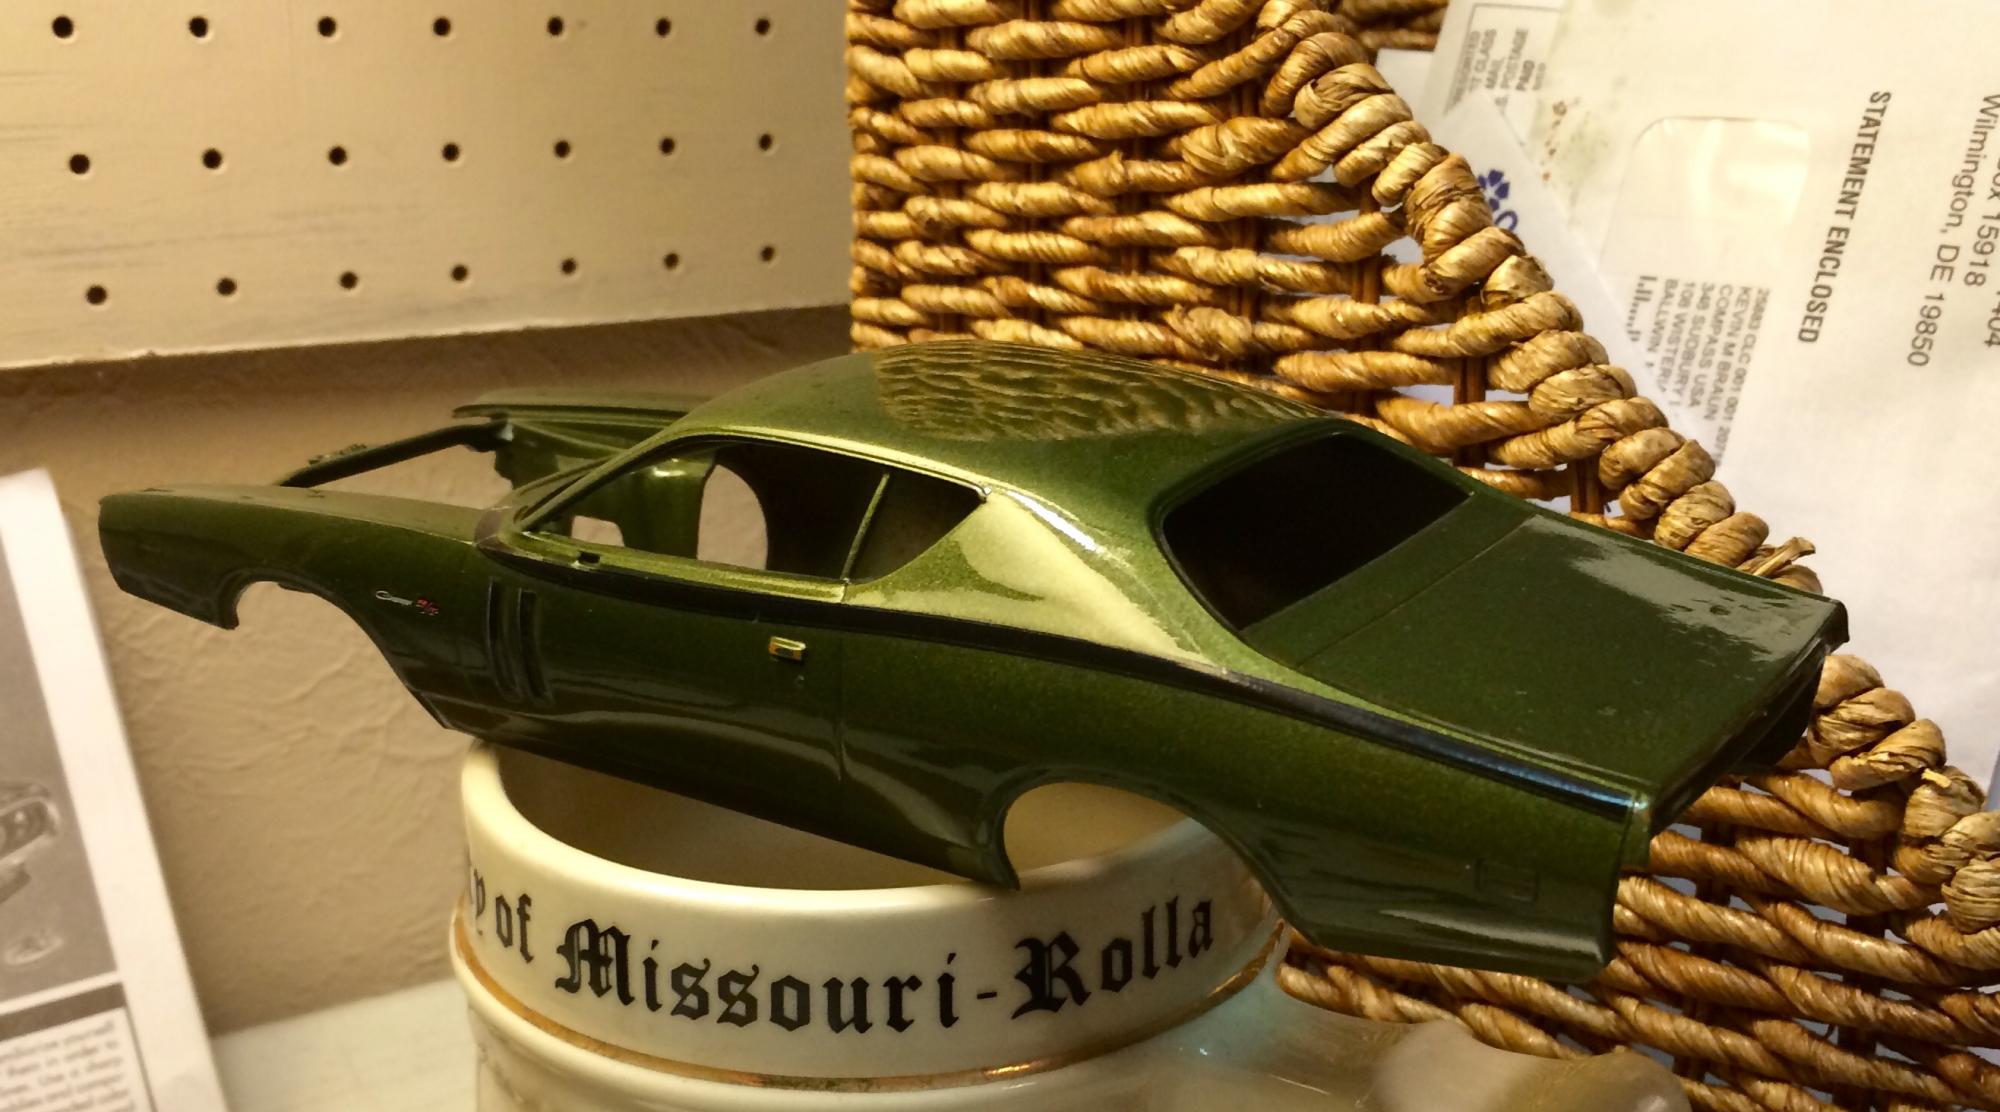
Making a 5-state move left building pretty much impossible for the last several months. I had started on this kit back in April, got a lot of the basic spray painting done, but then it sat. As we started slowly working through the renovation of the new house and unpacking in July, I would get a few minutes here and there to do other spray painting, but didn't have a place to sit down and work until 2 weeks ago. I've had a WIP thread going on this, so I'll let you check that out if you want more details, (Slowly firing back up... 71 Charger) but I finished it this afternoon. Great kit... Nice details, fits together beautifully. Hearing what a good model it was along with the fact it's one of my favorite cars, so it's been on my want list for a long time. Glad to finally add it to my collection. I added a few details.... Flocked the carpet, wired the engine, added some extra vacuum hoses. I did the two-tone interior. For wheels, I found some Revell steelies and dog dish caps from the 68 Charger, and tires are the L-60 Polyglas up front (from a kit that had only one side pad-printed, so I reversed them since my tears are not lettered). I was going to use the same in the rear, but wanted a little more beef and rake, as these cars were huge and needed some bigger tires out back so they didn't look too wimpy. So, I ended up using the fatter rear tires from the Moebius Belvedere kit. They worked perfectly for what I wanted. I may have to add some tire decals down the road, though. What's the GM twist? I bought a can of Pontiac Verdoro Green from Automotive Touchup, and a can of their spray clear. I actually bought it for my 70 'Cuda build... So now I have 2 Mopars with this color and no Pontiacs. Oh, well.... I LOVE this color. On to pictures... This color HAS to be photographed outside... It's just amazing in the sunlight. And one of the best things about this color... Looks different in changing light. Shade: Thanks for looking.
-
Fabulous job, Ron!!!!! Wow, they're all beautiful. I've loved that red convertible since I saw it, but I think you've topped it! (No pun intended)
-
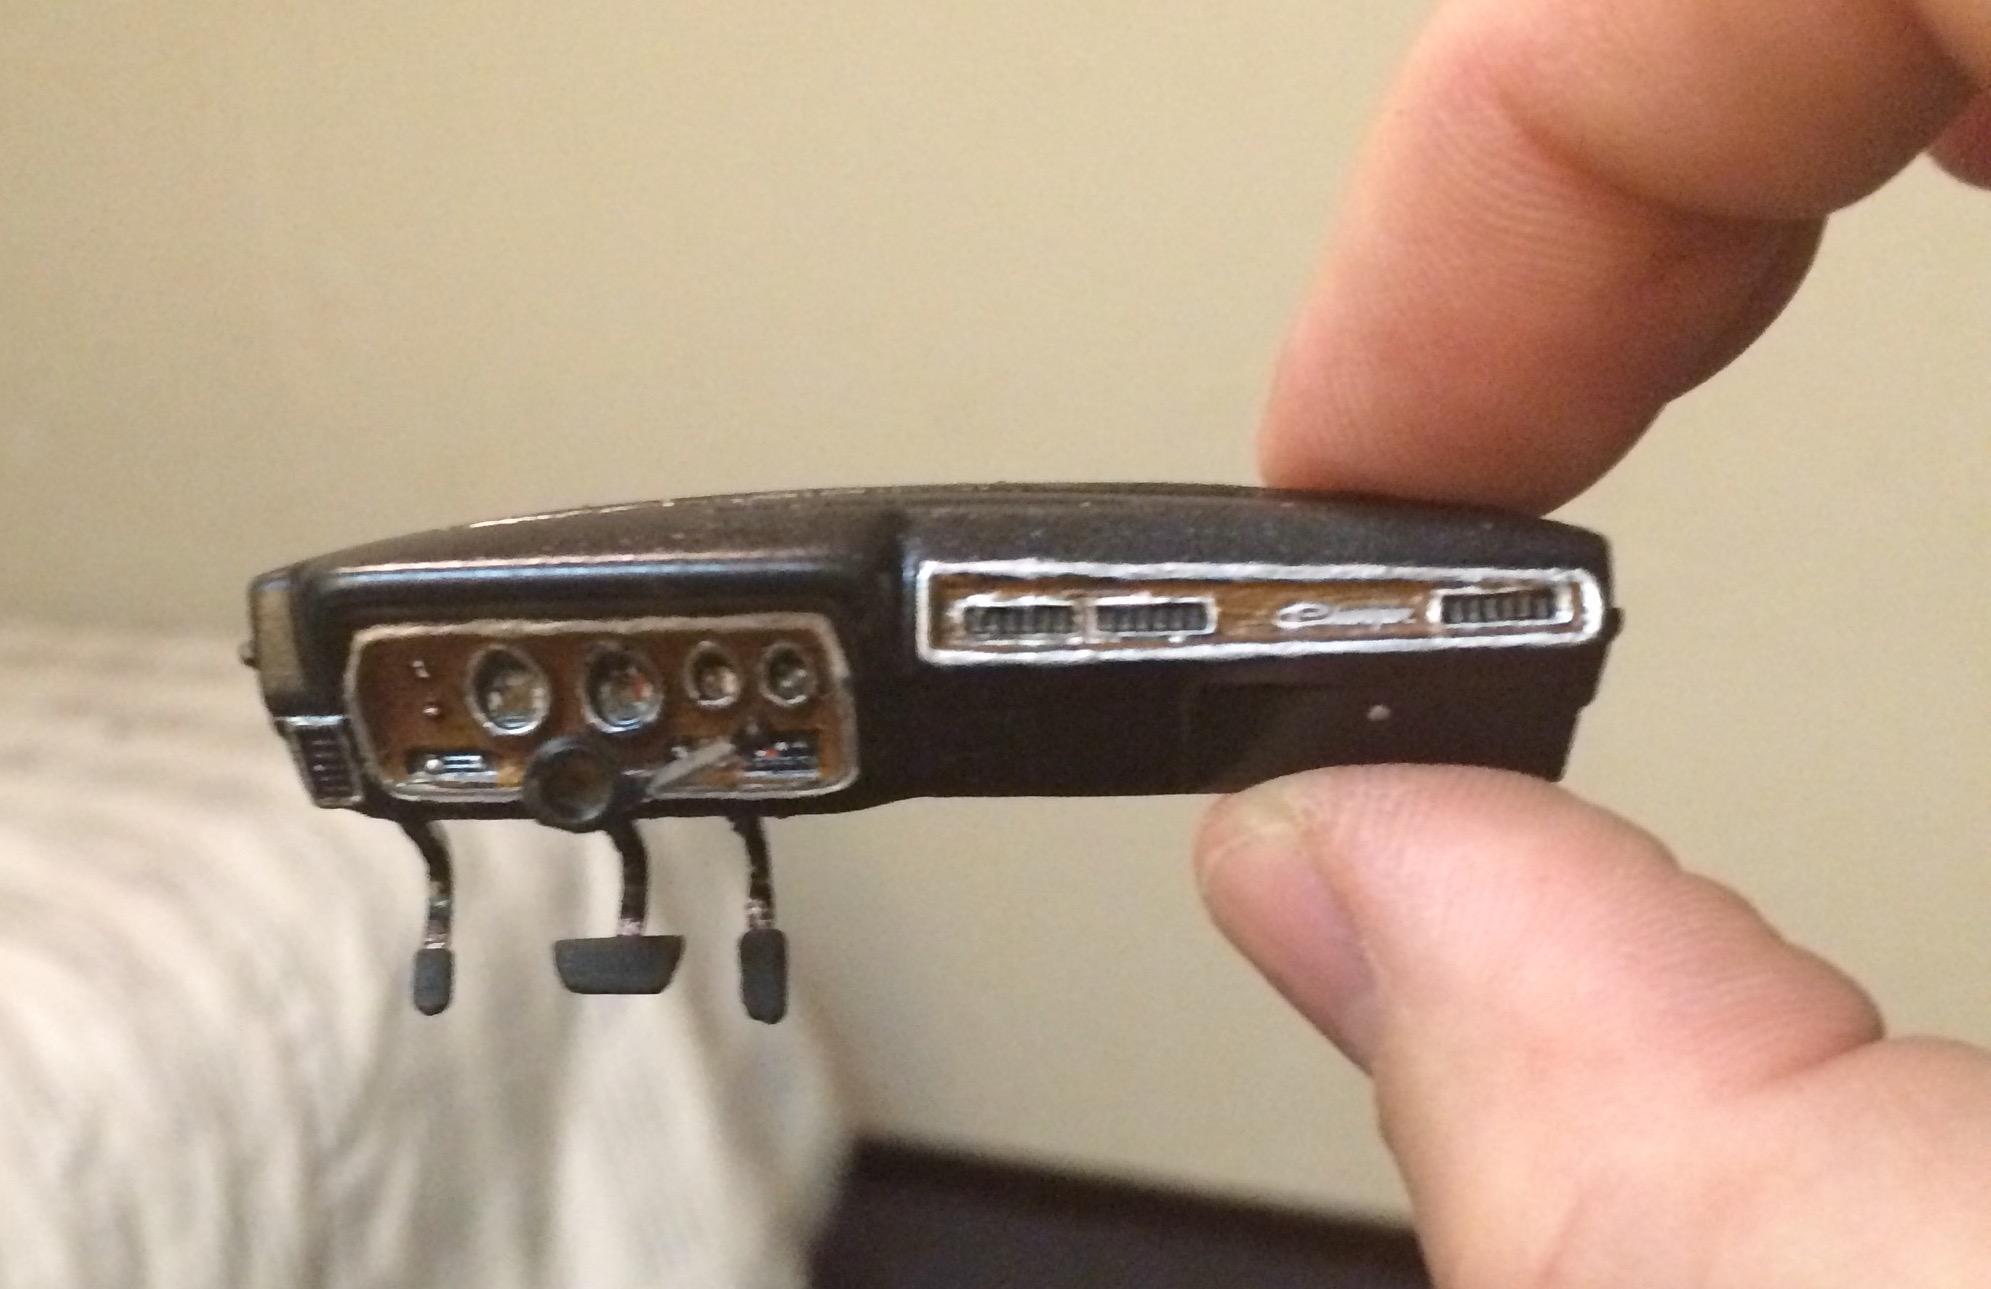
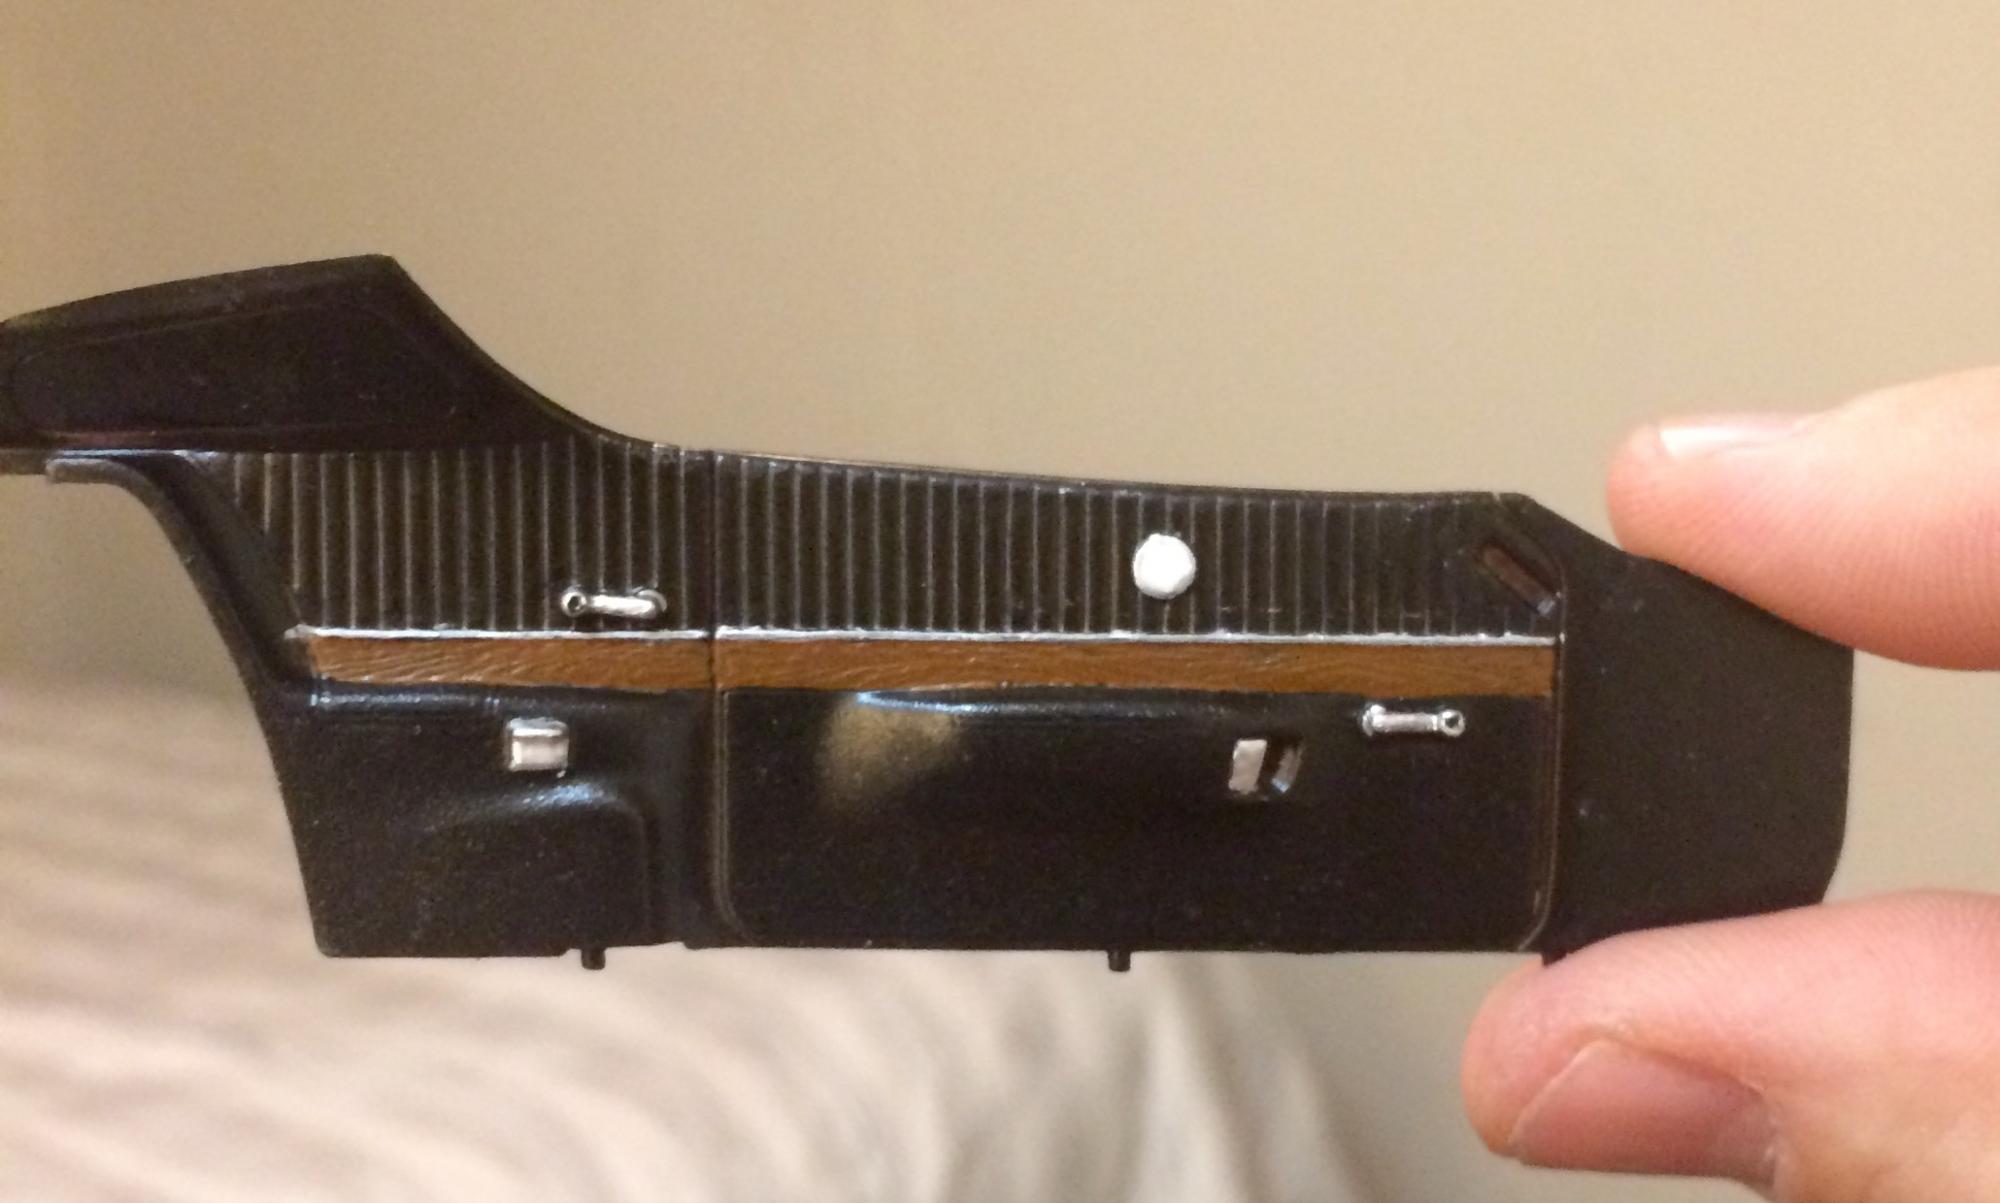
Got my interior together.... Dash: Took one of the Charger R/T decals and cut the RT off, making a nice emblem for the dash. Always see things I need to touch up when I take my pics, though. Then I moved to door panels: And got the firewall in place and joined the chassis to the body. Gave me a couple issues at first, and I haven't glued the front frame down, but it's close to situated. Moving into final assembly, I painted my front fascia. Home stretch now, but still some things to take care of to make sure it's right. Funny how big these cars are... Those L60 Polyglas tires, which really fill out the fenders everywhere else I've used them, look positively tiny up front, which is why I moved to bigger rears.
-
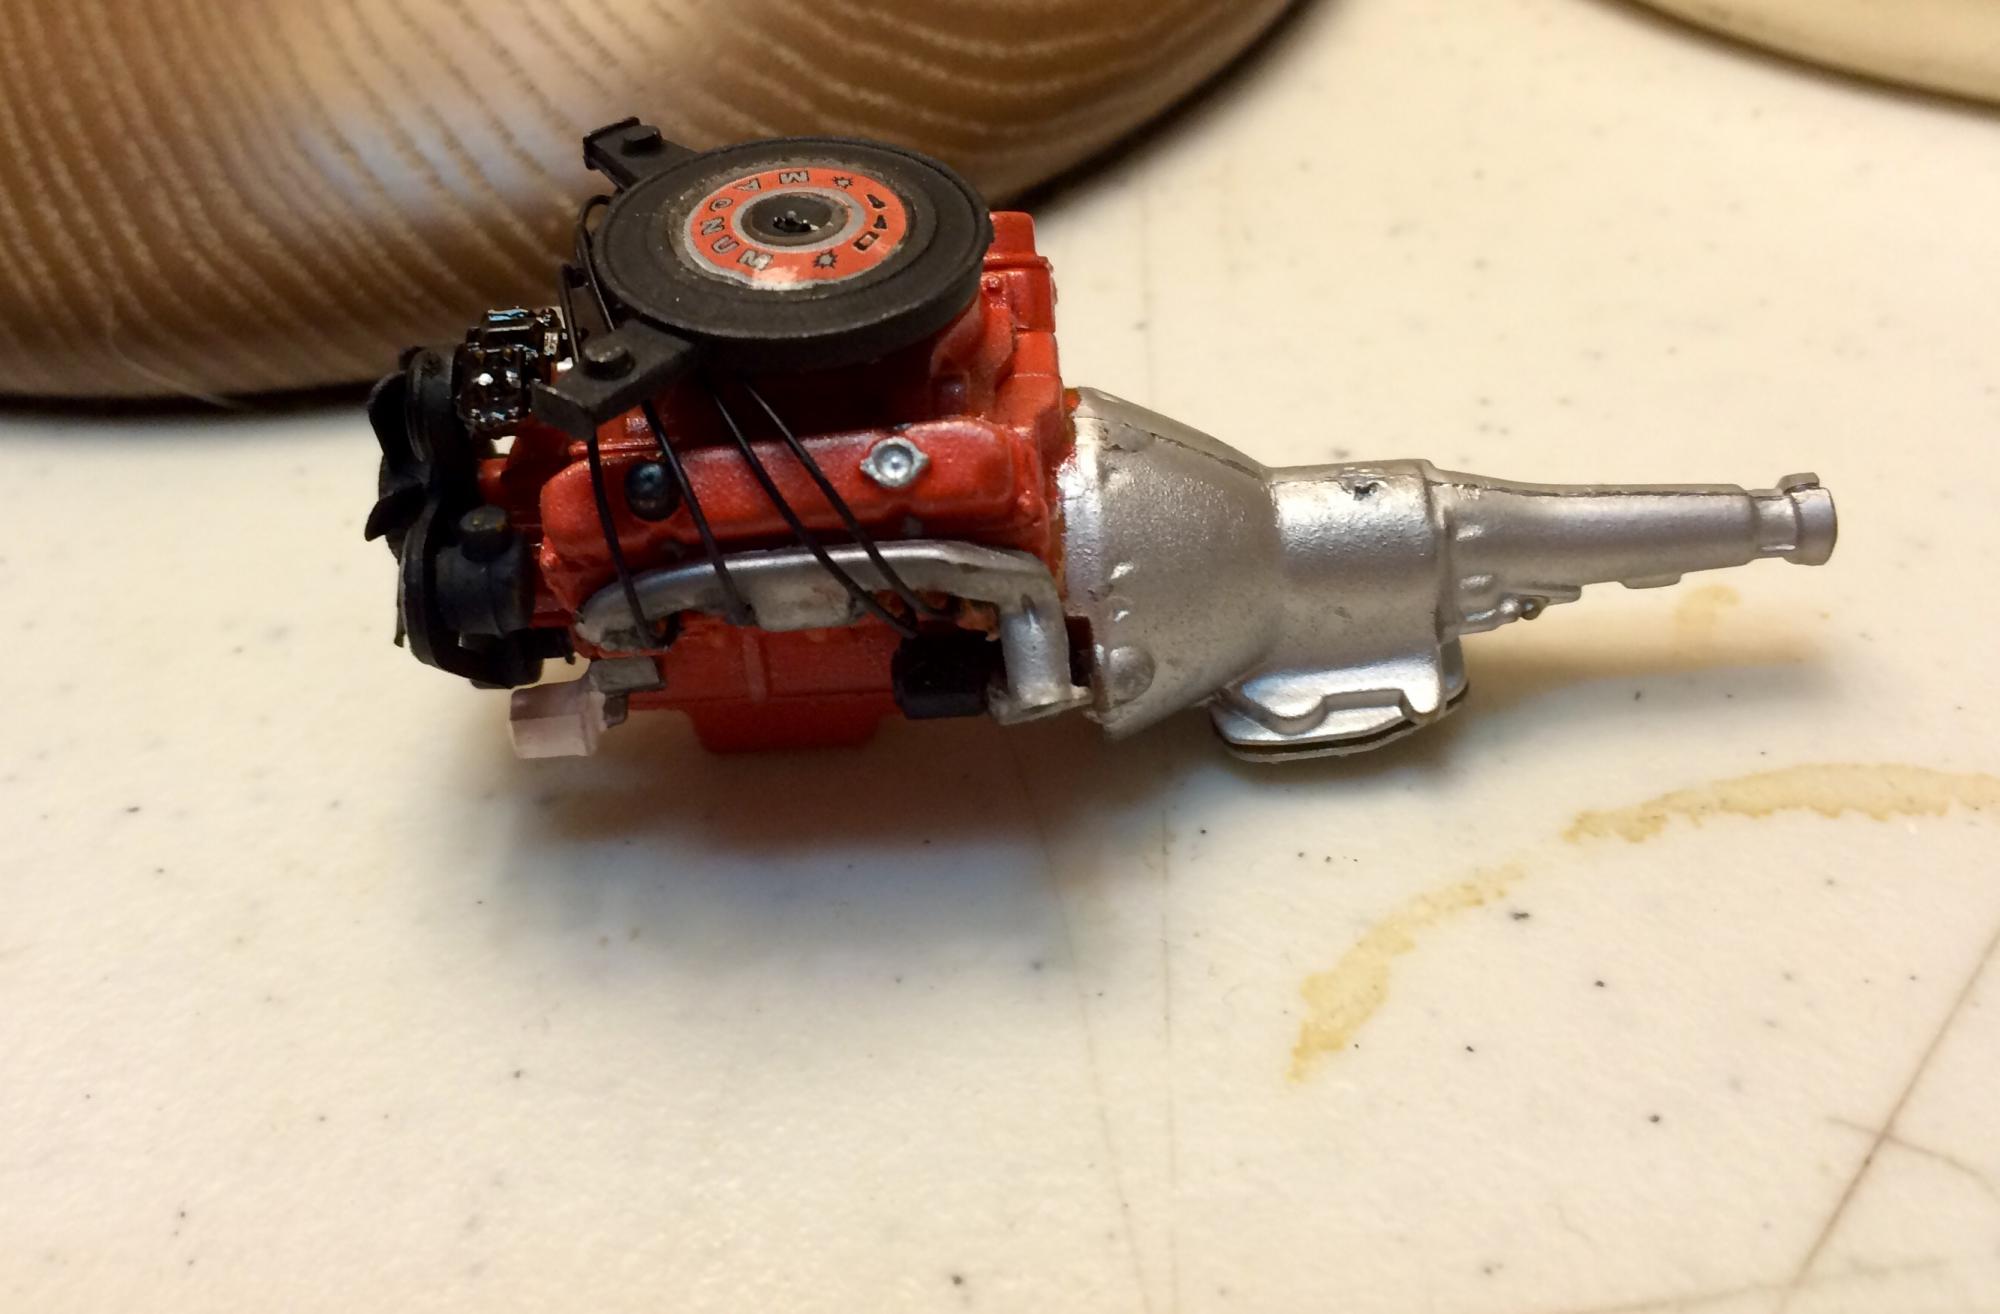
Got a lot going on with work, but made some progress today. Finished up my engine and got the front frame assembly together: Detailed the firewall, with a couple finishing touches still to come: And tonight I finished up my rear suspension, which allows me to test my stance. I'm using the pad-printed Goodyear Polyglas in front... In the rear, I decided to step it up a little. Im using the wide rears from the Moebius 65 Belvedere kit. They are nice tires, and add the right width and circumference to beef up the rear without going overboard. This looks just right to me.... More to come.
-
it's a Decocolor paint pen. $2.99 at Hobby Lobby. Here's a shot of it to help if you're looking for one, Carl.
-
Small bits of progress.... Got my engine together and my wired distributor placed. Then wired her up and got the air cleaner on... And then went back to the body... Painted in the under hood vents and wipers, and used my silver paint pen to make the window trim. (A few touch-ups still needed) All that's left outside are door handles and lock cylinders on the doors and trunk. I also made a lot of progress on door panels and dash, but I'll post when completed. All for now.
-
This is a rattle can finish.... Go to automotive Touchup.com, and type in any late 60s/early 70s model year... I think I picked 1968 Firebird... And it will give you all the available factory colors, including verdoro green. You can order cans to mix into an airbrush or 12 oz. spray cans. This is their spray paint and spray clearcoat.
-
OK... House is mostly settled and I now have a place to work. Got a little more progress on the Charger. Got the decals on the body, assembled part of the engine and drilled out the holes for the spark plug wires. Painted the oil filter and starter for installation. The big keys to making this kit really look good, in my eyes anyway, are detailing the engine compartment, getting the interior detailed with the wood grain inserts and chrome trim, and the grill/front end has to be detailed correctly. Those are all still to come, but at least I have some progress.
-
Wow!!!! I'm sorry for all of your frustration on this project, but don't be too hard on yourself. This is an AMAZING model and one of the best black paint jobs is ever seen. Really... take a bow. Great build!!
-
Consider this the keyboard equivalent of a standing ovation. Excellent work!
-
one more pic... Better light. I'm just in love with this color.
-
I didn't see a good color name for it in the 1954-1957 range of the 300 SL. So, I did a Bing search on Mercedes B396 Blue, and found a picture of a 1968 Mercedes coupe that looked exactly the same as my reference Gullwing pic above. So I went back to Automotive Touchup, looked up 1968 Mercedes, and found a listing for "Blue 396" and ordered that.
-
I've never seen it in a store... Website only. But, they deliver promptly, and their paint is amazing. I've bought 2 colors from them... This and Pontiac Verdoro Green, and they are perfect.