Kmb0319
-
Posts
468 -
Joined
-
Last visited
Content Type
Profiles
Forums
Events
Gallery
Everything posted by Kmb0319
-
I've heard lots of tremendous things about Revell's 69 Nova kits, and definitely had them on my list. I found a local hobby shop near my house recently... not sure how I missed it the last 3 years.... and when I stopped in, they had the 69 SS kit. Given a choice, I would have probably gone with the COPO for the dog dish caps, which suit a Nova perfectly, but I was also excited to build a "normal" 350 Nova. I really didn't have any ideas of what to do with it. I mean, I always build stock, but I didn't have color a color scheme or an idea of wheels, etc. As I was looking around the shop, I found a paint that gave me a little inspiration... it was testors split pea. A perfect, UGLY green color that actually reminded me of every relative's avocado green kitchen appliances when I was little. That seemed like a great interior color for the utilitarian Nova. So, I had an interior color... I usually start my builds with the engine, but this time the interior got priority. Then, I went back to my usual process and built/wired the 350, adding in the vacuum hose from the carb with some leftover hose material. But, now what do I do with the exterior? With that green, I could really only go one of two ways: white or green. I was planning on white.. again, fitting the utilitarian and sleeper vibe of the Nova. But, "fate" intervened and pushed me another direction. I picked up 2 kits at the hobby shop; this Nova and the Revell 67 GTX. I was also working on the 67 Shelby Mustang that I posted here a couple weeks ago. When I first looked at my 3 models, I bought Duplicolor Deep Jewel Green for the Shelby, Midnight Blue for the GTX, and thought I'd do the Nova in white. Well, first I swapped, deciding to paint the Shelby Midnight Blue and the GTX green. Then, I got the GTX painted, only to have disaster strike and ruin my finish. When that happened, I stripped the GTX body down and got a different idea for it. But, I loved that green and wanted to use it. So, it became the color for the Nova. The finish came out nice, but the contrasting greens don't fit together especially well, and the body color is prettier than my intention. The other issue I had was with the wheels. I intended to use some mags I painted to look like torque thrusts and the smaller of the two sizes of AMT Goodyear Polyglas tires. However, I was having issues fitting them under the rear fenders, and they are so soft and pliable, they kept collapsing back and and pushing the wheels out. I needed to get it done, so I grabbed some spare magnum 500s and used the kit tires. I might revisit that. Anyway, it's done... this really is one of Revell's best kits. I'll build another one sometime and get everything just as I want, but I'm not unhappy with it. Here she is:
-
I will pick up a case at Hobby Lobby before I take it over to her..... THANKS!
-
WOW!! First of all, Joe, I missed this one until now, but this is absolutely the best build I've ever seen of this model. Thanks so much for sharing, as I'm about to get one of these, and I have my inspiration! The color, the finish, the vinyl top, the details, the wheels... just everything is phenomenal. If I may ask, I have two questions: 1. Those wheels... where are they from??? I've never seen 1/24 aftermarket wheels. What are they and where did you find them? 2. The vinyl top. You said it's just textured paint, but the seams... did you lay down styrene strips to make those? I've never done a vinyl top, but I've been thinking about trying for a while... especially with that Rustoleum textured paint. THANKS!!
-
I agree that adding the BMF will improve detail.. or just paint in the side marker lights and the vent window. BUT.... WOW, what a beautiful finish, and the engine is fantastic. Great, great job. I'm also going to try your paint process. I've been using an entire polishing kit to polish out the paint, but once I start clearing, the polishing kit doesn't really do anything to smooth it out. I'll try your way, as your finish is exactly what I'm after!!!
-
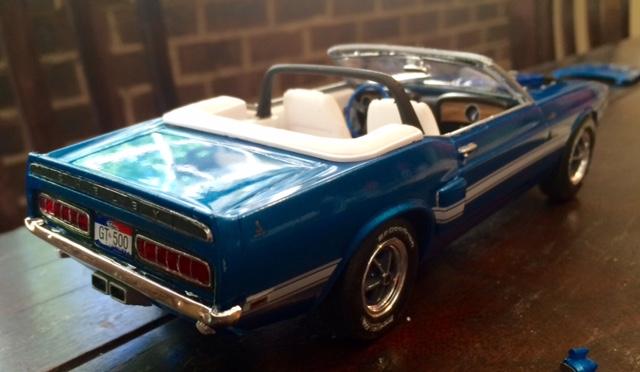
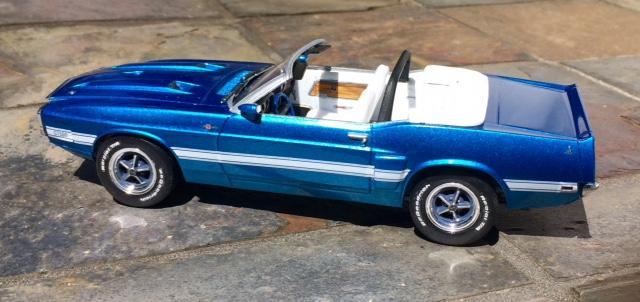
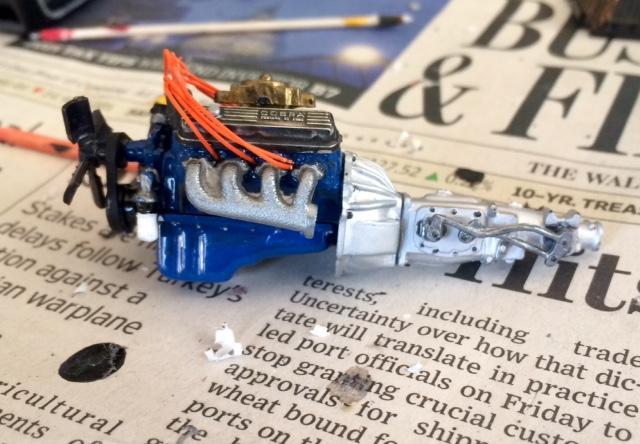
One of my wife's best friends is a great girl.... one of those people who can walk into any environment and immediately fit in with most everyone, while still maintaining her own personality. She is also a creative person, having been involved in music and theater, and now has a business doing balloon animals for children's parties all over the state. We hadn't seen her in a while, but she came over a couple weeks ago. While hanging out, we got talking cars, and I was finishing up my 67 Shelby I just posted. She thought it was really cool, and said a Shelby Mustang was her all-time dream car. She wasn't sure which year, but said "the one that kind of looked like a boat." A-HA! I pulled a picture up on my phone, and sure enough, it was the 1969 Shelby GT500. Revell has nice kits of both the convertible and coupe, so I asked her what her dream Shelby would look like: "A convertible in that pretty light blue metallic that they made them in, with a white interior, white stripes and blue glitter shift knob and steering wheel." OK, done, done, done...huh? That last one is gonna throw me a little, but I'll make it happen. Duplicolor Bahama Blue paint, Rustoleum acrylic crystal clear Wired the engine, added a starter and ran the vacuum hose from the air cleaner to the breather. Also ran some wires from the master cylinder and added battery cables Used some 235/60 BFG tires from Fireball Modelworks, as the kit tires were too low profile to fill the fenderwells Glitter fabric paint made up the wheel and shift knob I've trimmed up the "hinges" a little... have a little more to do to get the hood to sit all the way down, but I'll deliver it to her this week. It was really fun to build something for someone else... I hope she likes her dream car in miniature. This kit does have a VERY nicely done engine: It's convertible weather!!!

-
I only have 1 1/24 Monogram in the collection now. I'm planning on the 70 Chevelle and 2 71 GTXs... one GTX will be converted to a NASCAR racer, and the other, along with the Chevelle, will get lots of aftermarket help to detail them up, as they are great kits. Anyway, like someone mentioned... from the early 80s until the mid-90s, Monogram was the ONLY place you would go to build a NASCAR model. Here's my one:
-
Those Shelby wheels are awesome... and I think they were $5.99 on ebay. They are slim, so they'll fit any tire and wheelback, and come in white resin. Sprayed them with Duplicolor chrome, then used a toothpick to fill in all the centers, which were so crisply molded, it was easy. If you're building anything that would need them, I highly recommend them.
-
Thanks, everyone. SO, most of the feedback was that the Goodyear decals were out of scale.... and I have to say I agree. I still don't know about those tires... never seen them on anything but Shelby Mustangs, so I wanted to try to replicate, but those NASCAR decals were too big. Got out the hobby knife.... BETTER???? (I think so)
-
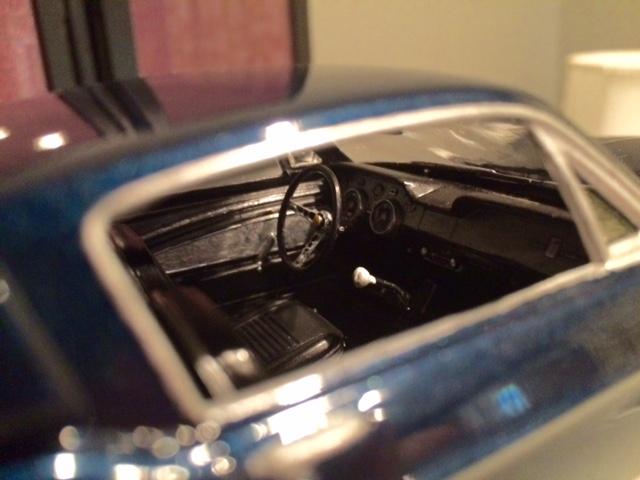
Stepping away from the 67 Camaros, I have a few other projects brewing. I realized my collection is heavily lacking Ford products, so I needed to add a Mustang to the mix. My favorite Mustangs are the 67-68 models, and my research told me the AMT 67s were the best kits. Hobby Lobby had the 67 Shelby, so I grabbed it up. Looking over the parts, it IS a very nicely detailed kit and fits together wonderfully. I debated colors, and decided on midnight blue with white stripes. Using a Duplicolor paint, my finish went on nicely... the kit decals, not so much. They fractured in a couple places, were very hard to move into place once I laid them down, and didn't conform well at all over the rear spoiler/trunk section. I wasn't happy with the result, but pressed on. Then, since these stripes are so prominent, covering a large section of the body, I wanted to clearcoat them into the finish to look more realistic. After letting them sit over 10 days, I shot the clear, and they shriveled in places. So, I had to throw the body into brake fluid and start all over. I reshot the finish, and used the silver stripes, but decided not to use the stripes over the top again. Looking at research photos, I like that look anyway. Wired the engine, used some seatbelt material to at least make the belts hanging from the roll bar inside. Mixed black paints with the bare black plastic throughout the interior to try and capture the 1:1's look. The wheels in this kit also bothered me... I detailed a couple, and I've seen other builds of this that look great with the kit wheels, but they didn't have a deep enough offset to look real to me, and it kept bothering me. So, I found a nice resin set of the Shelby 10-spokes on ebay and detailed them. They were a little too big to fit into the kit Firestones, and the groove in the sidewall doesn't look right to me, so I used a Revell tire. One other detail that I tried to replicate somewhat was this: I've never seen this on any other car of the era, but my research showed this repeatedly on Shelby Mustangs.... what are those tires with just Goodyear in white lettering? Was this a Shelby exclusive thing? I really didn't see Polyglas GTs showing up regularly until 1969... but I hadn't seen a white letter tire with only the Goodyear name before looking at Shelbys for this build. I replicated it as best I could... poorly. I had some 70s Goodyear decals from a Nascar build... they're too big, but oh well. Anyway, here is the build... hope you like it.
-
Tim, I've been looking at this kit for a year, and I WANT one, but I'm too afraid to bite the bullet.. don't want to end up overwhelmed. You not only tackled this thing, you even had the guts to go with a black finish!! I don't how much better that could have come out, but it gets a standing ovation from me.
-
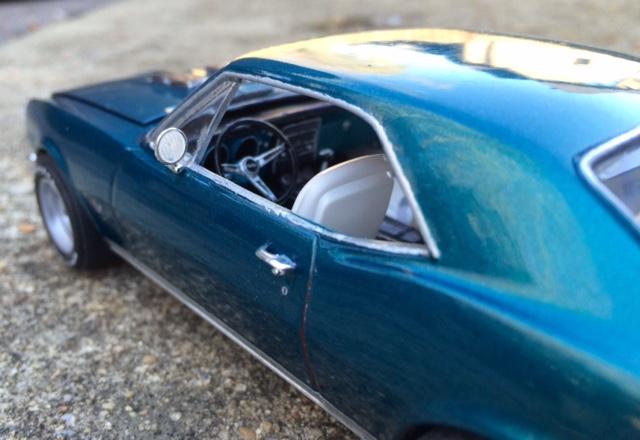
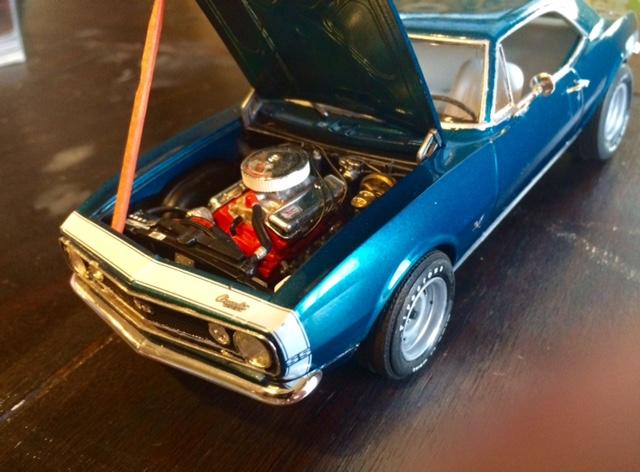
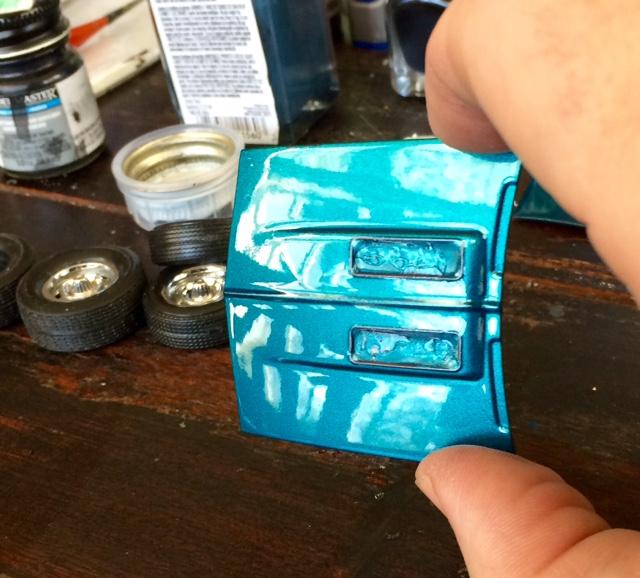
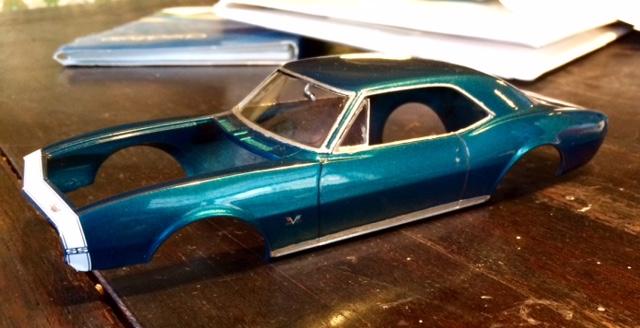
I know there's been a lot of these posted... Tyrone just posted an amazing build of this kit... but I had one more. When I built the Better Off Dead Camaro, I ruined the hood in the midst of the build. I didn't want to wait weeks for a replacement part, so I just bought another 67 Camaro. When building the BOD car, I used a resin RS grill I purchased from ebay, which looked great and was the proper piece for that car, but wasn't what I would have preferred. That got me thinking... the BOD car was my wife's all-time dream car. While I loved it, would it be my ultimate Camaro? So, I got to thinking about it, and decided to do my dream version. I prefer the open headlight look on the early Camaros to the RS grill... just my preference. I love the 67 nose stripe, so I have to have that. There's nothing like a beautiful black car, but something about those fender haunches have always looked best to me in one of those beautiful 60s rich colors. But, it had to be a little mean-looking... preferably with larger rear tires and I've always loved the idea of bare rally wheels to give the car some menace. Wired the engine and installed battery cables Found resin bare Rally wheels on ebay, painted them with MM aluminum metalizer White interior, with body color dash face and tops of inner door panels used the same tire combo as my BOD build, but brought the rear end down a bit over those tires After researching colors, the color that just talked to me was Tahoe Turquoise. Found a Duplicolor GM turquoise that matched extremely well No rear spoiler, as I like that look better. Also, had I used almost any other color, I would have done the SS black taillight panel. I just didn't like it for this build So this is my dream 67 Camaro.... hope you like it: Back in the garage, check under the hood... OK, put it away with its twin: BTW, the hood wasn't quite down... that's my fault. Didn't want to get a fingerprint on it for pics, but it pushes into place.
-
Tyrone, this is AWESOME!!!!! I just finished my second one of these as well... I was going to post it today, but now it's practically embarrassing. Phenomenal job! I used the same RS grill on my first build of the kit (Better off Dead Camaro) but wanted to use the regular grill for the one I'm about to post. I also used the wheels from the 67 Chevelle on the BOD car. For this one, I bought some resin bare rally wheels on ebay to give it a meaner look. Your build is stunning... the blue is beautiful, and that vinyl top is incredible. I keep trying to get up the guts to try one....
-
I need to go ahead and throw in a question here for the experts.... this Camaro is shown as a Special Edition, which is usually a skill level 3 with the higher parts count. This intrigues me, but maybe I'm missing something. I'm about to finish my 2nd of the 67 Camaros, which are great kits. I've built 2 69s previously as well.. the SS396 Convertible and the COPO. To my knowledge, I've never seen a Revell 69 Camaro classified as a Level 3... all of the various iterations I've seen have been Level 2. Has Revell ever put out a 69 Camaro that was listed as a Level 3 kit before? And, if not, does that mean this is a new tool with more detail parts to it?
-
Well, we're nearing completion, and hit the stopping point. I assembled the interior, suspension and joined everything up, now I wait for my ebay wheels. I'll have a few decisions to make at the end. Finally, couldn't resist... I set the body on the tires to get a preview. I'll have to get the stance right, and I will have to decide about the front bumper. In some ways, it looks incomplete without it, but I also think it looks meaner without it.... TBD
-
OK, made some progress over the weekend. First of all, from the hood issue posted, I had a spare hood laying around, so I painted primed and painted it up.... it came out great, except for one issue: It's not as easy to see in this pic posted as it is on my camera, but the spine of the hood just didn't get color. I used 3 coats of Duplicolor, it seemed clean, but there's a big line of primer right down the middle of the hood. Bummer, because it got a nice, clear finish, as you can tell in the Vallejo bottle reflection. So, I also took the messed up hood down and worked it over per everyone's advice... if for no other reason than to practice my polishing skills. I rubbed it out with 3 coats of my compound, and while it lost some shine, it did remove most of that clouded mess. When I was done, it was smooth enough to shoot it with one more coat of clear. So, the original hood is back in!! Thank you everyone for your suggestions! Then I got to work on finishing some small detail painting leftovers, decaled everything and started some assembly. Got all body decals in place and installed the glass: Used my Fireball Modelworks decals on my tires, then shot them with a quick coat of dull clear: Finished and installed the engine: Started the interior: And, finished up the dash and pedals: I'll get the interior and chassis together this week. Then I'll have a little stopping point as I wait for my wheels from ebay.
-
Hawk, between these, your big Z-28s and Corvettes, I've NEVER seen anything like your paint finishes. Could you post a tutorial on how you do your paint jobs??? I'm using rattle cans, so it probably won't help me, but JEEZ.... you make the most beautiful paint jobs I've ever seen.
-
Thanks, all!! I will tell you, I photographed in certain ways. If you look closely, the hood won't sit down. Also, you can't see it, but on the left C-Pillar, I went to touch up a tiny spot at the left corner of the rear windshield with my white Sharpie paint pen, and it malfunctioned, pouring white paint down the C-Pillar. The windshield wipers are complete slop... but I no longer cared to try to properly paint them. The frame is sticking out underneath the bumper in back... The Chrome trim rubbed off in places, and worst of all, the finish is very ... how do I say it... non-smooth. If I really wanted to get it right, I should have stripped it again after the paint pen incident. I should have done a better job stripping it when the white messed up and not ended up with a lumpy finish. The white hides some of the issues, at least in the pics. I was happy with the interior and engine, but then things started getting crazy. If this was one of AMT's really good kits, like the 70 Camaro or the 71 Charger, I would have. But, I had other projects I was more excited to move to (including the AMT 67 Shelby GT350), and I kind of gave up and just did what I needed to call it done. It's not the best kit, but I've seen others do phenomenal jobs with this car. I aimed for the precipice, hit the side of the mountain multiple times, and finally decided to just let myself roll down the hill. But, in fairness, we all are our greatest critics, so I'll hopefully look at it on the shelf in a year and say "it's not soooo bad".... then again, maybe not
-

Ricky Rudd 1973 Torino
Kmb0319 replied to yellowsportwagon's topic in WIP: Stock Cars (NASCAR, Super Stock, Late Model, etc.)
This is just awesome!!! I'm just loving it -
You're right... I hadn't invested in sanding sticks. I bought the bag with all the different pieces of sandpaper from 400 to 12,000 grit, but I've seen a few instances where I could really use the precision of a sanding stick... There's enough value to pick some up.
-
Randy, this is fantastic!! I'll also question the source of those wheels. If those are in the kit, I may be adding it to my collection. Also, I'd love to see an under-hood pic. Great job on this!!!
-
OK, first of all, THANK YOU to everyone for the suggestions... I've begun painting another hood, but I will attempt to polish this one out and see if I can fix it enough. I've never had that glue do anything like that... and I've used it for rearview mirrors and other small body components where the gel keeps it from running all over the body, but I will not be using it on body parts anymore after this experience. Also, not a lot of progress, but continuing to paint all the little pieces: Added the SS stripe painting up components. I like to use two different steel colors in the exhaust system, so the mufflers and pipes are set off from each other. Went ahead and painted the transmission... need to detail some bolt heads, etc. Painted up the firewall And, painted the crossmember and the fuel lines on the chassis Getting close to assembly, but I will have a couple weeks to wait on my wheels
-
OK, I had been considering this as a separate topic, but this seems like a good place to bring it up without completely hijacking Mr. Buick's thread: Let me say, first of all, that I don't mean to come off and it isn't my intention to complain... I am extremely thankful for what Round 2 is doing in giving back to us some great kits of the past, and I'm happy to purchase anything from them to continue supporting some of the awesome subjects they continue to put out. However, I just posted my 68 Road Runner in the Under Glass section, and lamented the poor quality of the kit in several areas. AMT, beyond any other brand, is SO inconsistent in its quality... and I realize these kits are reissues of old ones with old tooling, so going from one AMT kit to another can be apples/oranges. BUT... and this is less a question of Round 2 than of AMT originally... would it have been so hard to utilize components from other kits to improve reissues back before they were acquired and became Round 2? For instance, I've heard the AMT 71 Charger is a fantastic kit, with a lot of detail, and I've seen lots of people utilize the chassis from that kit to build other cars, like the 68/69 Road Runner/GTX. I've built the 70 Camaro from AMT, and that was a great model with a ton of detail. I have the 67 Shelby GT350 sitting in my basement as the next car to build, and was amazed at the level of detail and how nicely it builds up from my research. I've heard the 70 Monte Carlo is just as good, as are several other AMT kits. Meanwhile, the Road Runner I just completed was plagued by fitment issues, parts like the exhaust system cast way too thick, killing their realism, and wheels with far too wide of a lip, making them appear toy-like. The AMT 68 Camaro I built was the worst, least detailed model I have ever built... there was almost no detail in the interior or engine bay. I've seen plenty of upgraded tires to the pad-printed variety... what stopped AMT earlier and Round 2 now from utilizing suspension, exhaust and other components from other kits to bring reissues up to speed without casting all new parts? The 289 in the 67 Shelby is nicely detailed... far more than this half-transmission engine in this Mustang reissue, and the wheelbase can't be that far off.. As Mr. Buick said, he's not been at this long enough to feel confident kit-bashing, but why should he have to? There are components from other kits that could be utilized to fit other kits without molding new pieces that could be utilized, minimizing tooling costs and making better models. That would make sense to me, but I'm genuinely asking the question, not griping. I hadn't built a model in 28 years until I got back into it last year, and I don't claim to understand everything that goes into molding/tooling costs, but I do feel like there's an opportunity to vastly improve some of the kits like this one that would be big sellers if they were improved.
-
I used a Duplicolor paint for a Tahoe Turquoise 67 Camaro I'm working on. It isn't listed as Tahoe Turquoise on the can, just seemed to be a close match in my mind. I remember looking at a couple lighter turquoise colors that reminded me more of emerald turquoise, so if the MCW stuff is hard to get or you don't have an airbrush and have to use rattle cans like me, you can find a close Duplicolor paint. This is my Camaro body:
-
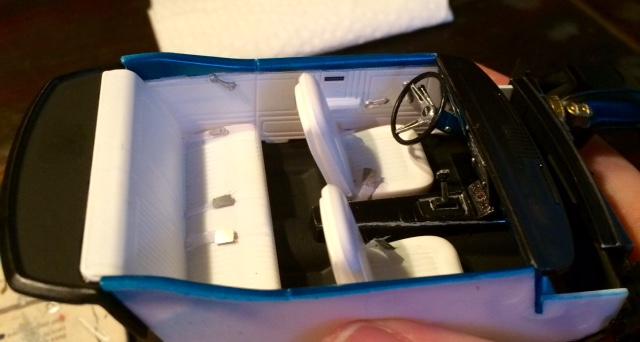
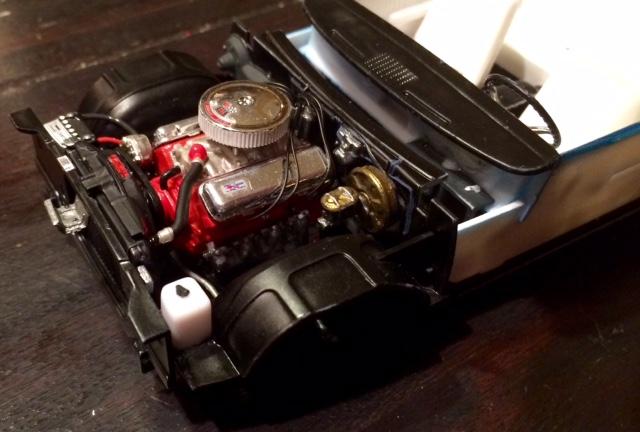
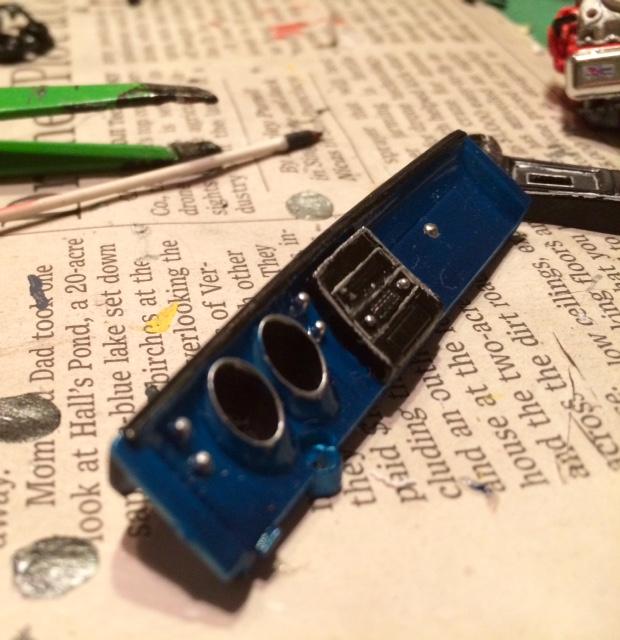
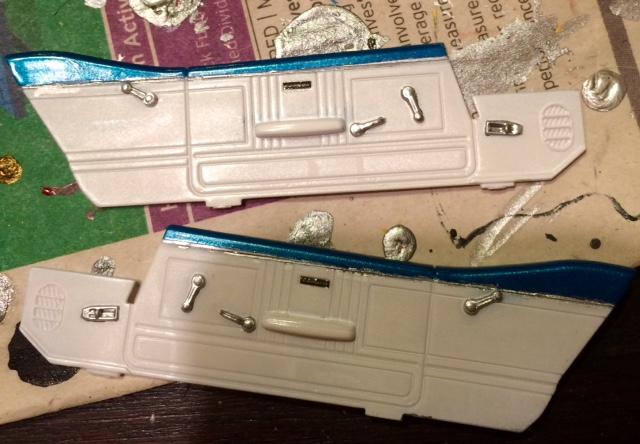
I've never done a WIP thread before, so I thought I'd try. When I was building the Better Off Dead Camaro, I had a major paint error in the hood. I already had a large part of the chassis painted/assembled, and wasn't willing to wait weeks for a replacement part from Revell, so I bought another 67 Camaro. I incorporated the clean hood from the new kit for the BOD car, then worked on the messed up hood, getting it stripped down to a reusable state for this kit. I didn't have a real plan for this one, but wanted to utilize the same tires as the BOD car, since I love the stance I came up with. I also knew I wanted to use the standard grill and incorporate the SS front end stripe. From a color standpoint, I just wanted to make the car a good 1960's example. I did a little research, and the color that struck me was Tahoe Turquoise. I found a Duplicolor that replicated that very closely, and used my "system." Sand the body, prime, wet sand the primer, two coats of paint with a wet sand after each, 4 coats of my Krylon clear, Meguiar's ultimate compound, wax. Keep in mind I don't have an airbrush, so I just have to rattle-can it, but this has worked very nicely my last couple builds. I am wiring the engine, and I'll add some additional hoses and battery cables. So, WIP: I almost always start with engines. I've got this one wired. I haven't painted the transmission yet because I LOVE using Vallejo acrylic metal colors, but they tend to smudge a lot when handled, so I'll paint it when it's ready to install. I also love the oil filter decal Revell has in some kits... of course, I put mine on upside down. OOPS. Painted the chassis flat black, then detailed in semi-gloss on the frame rails, steel on the gas tank. This isn't complete, as I need to paint in the fuel lines and connectors. With that turquoise color, I've decided to go with a white interior. I sprayed the seats, but not with a wet coat.. tried to texturize a little and give them a vinyl appearance; To really make it "pop," I've seen some early Camaros that had the tops of the inner doors and the dashboard face in body color. With this deep turquoise, it was a definite. I've painted and detailed them. I have the Camaro emblems on the doors, put the radio decal into the dash and put the gauge decals on the glass piece, but haven't glued those in yet. Also painted up the console and added the auxiliary gauge decal I painted the body weeks ago, and was very happy with my results: With my finish complete, I painted my chrome. I'll make myself try again someday, but my last time trying BMF was a nightmare, and so I have just gone the tiny brush/testor's silver route, touching things up with a testor's silver paint pen. Took these late last night... great look at the shine I got on this one, as I can read the Revell logo from the box on the trunk and some of the newsprint . r However, I also had an unfortunate event. Remember, this is the hood that got ruined in my BOD Camaro build, but was salvaged. I had submitted a part request, and received my replacement hood two days ago, however, as I no longer needed it, I was about to throw it away. But, last night I decided to go ahead and insert the hood vents, just to get as much of the body work done as possible and not handle it until final assembly. I glued them in using Loctite Gel Super Glue, which I have used regularly, including on body components before with no problem. Furthermore, this car has been painted for a full month, so there's nothing still curing. I glued the vents in right before dinner. A few hours later, I came back to do a couple little things before putting it away for the night, and picked up my hood. The paint all around the hood vents was completely fried... it was now a dull haze: So, it looks like that spare hood will be put to use after all. I'll be priming and painting that today. Once I get the hood redone, I'll look to add the white SS stripe. I'm ordering a set of bare Rally wheels from ebay... I want a little bit of a meaner look with this "pretty" color and my big/little tire set up, so no chrome trim rings or center caps. I love this kit, and can't wait to see this one come together. More to come.
-
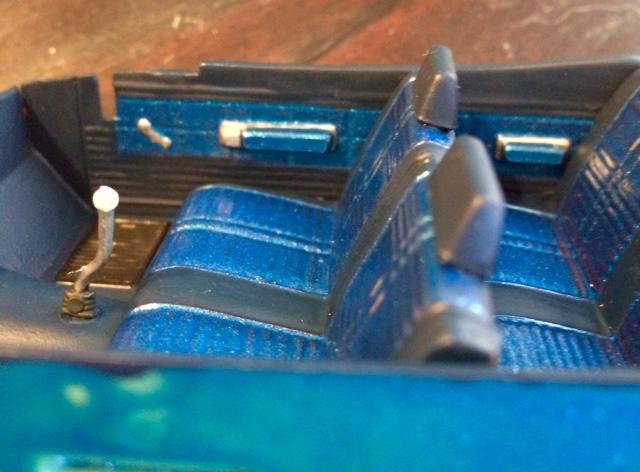
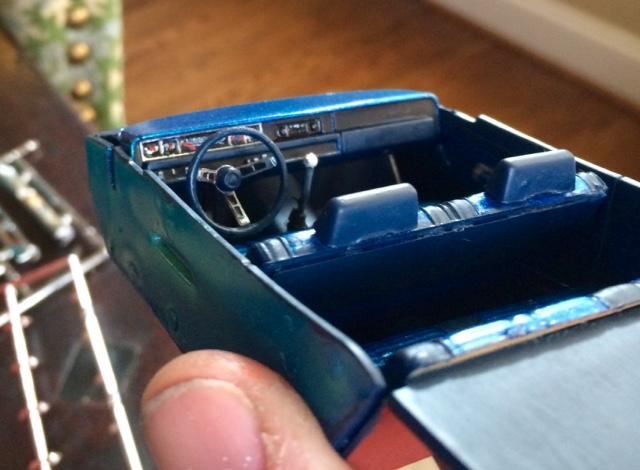
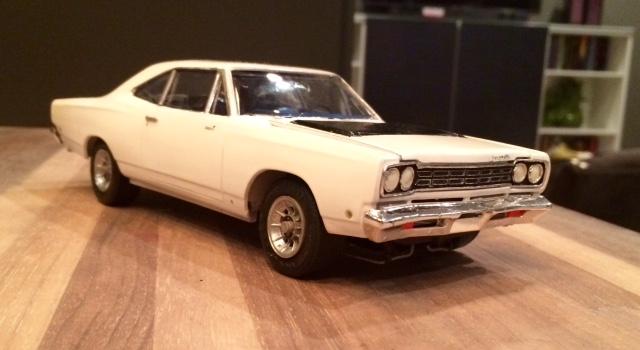
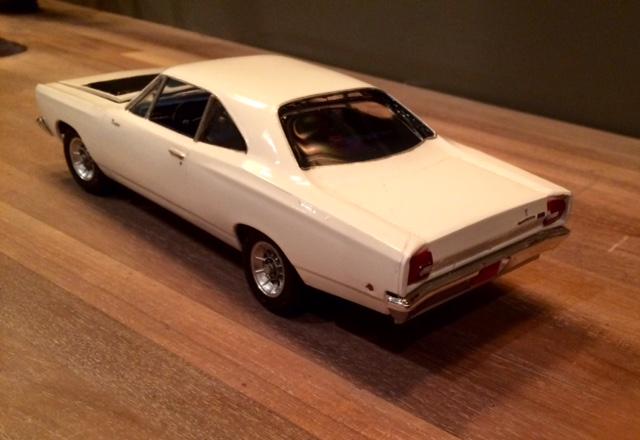
After a run of several builds I was quite happy with, I was bound to have a clunker at some point. I've seen a lot of the 68 Road Runner, and some VERY nice builds of it... I've always loved the Road Runner myself (my high school ride was a 73), so the last time I stopped in Hobby Lobby for supplies, I grabbed the kit. With the pad-printed Goodyears/redlines and the nice builds I've seen on this board, I was excited. I did some research... I wasn't sure what to do with the car, but I loved the two tone interiors, so that was definitely in the plan. Color-wise, I bought a can of Testors Root Beer metallic, but wasn't committed. I also thought about doing my first vinyl top, but wasn't sure. After looking over the interiors, the two-tone blue was the one that struck me the most, so the root beer lacquer was set aside. With that interior, I had three choices... white, blue or silver. My gut was telling me to do it in white... but I generally don't prefer white cars, so I settled on doing another blue car (I'm in a rut lately).... I shot the body with Testors Star Spangled Blue. I wasn't very happy with it.... I've seen a lot of these builds in blue, and while I love this color, it just wasn't "speaking to me" on this car. But, it was painted, so onward. Then, I went to shoot clear coat and everything got weird. My clearcoat that has worked perfectly with model paint, auto paint, lacquer, enamel.... bubbled and looked like curdled milk when I shot it on this body, instantly ruining the finish. I wasn't too upset, as I wasn't sold on that color anyway. Then, I got confused again on my direction... root beer with white/gold interior, or white with the blue interior. In the end, the low-option nature of the Road Runner got me thinking about white, and the blue interior was my favorite anyway. I shot the white, wet sanded, clear coated, wet sanded again, polished with compound, and then moved into the rest. This model, to me, is OK... great subject, not AMTs best effort. Certainly not on par with the 71 Charger, 70 Camaro, 67 Mustang/Shelby and some of AMT's best kits, but the engine went together nicely and I built up my interior and was very happy. Everything was going along well until everything started coming together. As I got into final assembly, I ran into all kinds of problems with parts fitting correctly. The interior didn't want to position correctly with the body, while the frame seemed very loose. The firewall/inner fender assembly went together perfectly and lined up, so I don't know why I was having this problem but it was frustrating. Then, I took everything apart to paint the headliner, laid the body on a polishing cloth so it would be on a nice, soft surface, and when I flipped it over, the roof was all grooved, ruining the finish. I tried to polish it out, with very middling results, and then had a drop of glue land on the paint anyway.... so it got stripped again. Third paint job wasn't very good, but I no longer cared. At this point, I just wanted it done. Also stealing my mojo were the tires.... this kit comes with the very nice pad-printed Polyglas GTs on one side, redlines on the other. I had bought a set of BFG Radial/TAs with General Lee wheels from Fireball Modelworks to use the tires for my 72 442 convertible build, but those wheels were just too small and kept falling through the tires. So, I ended up stealing the tires from this kit for the Cutlass. That was fine with me, because I could just use the General Lee wheels, since the kit Magnums have such a large lip and weren't in the plan. Except, while the tires obviously fit the wheels, they were too big for the wheel backs, falling off every time I touched the car. In the end, I threw on a set of MPC Nascar tires and called it done. In my pics, I didn't have the rearview mirror or exhaust tips on yet.. realized and put them on after. This isn't a great kit... I may try another and see if I can adapt the 71 Charger's chassis or if any of the 69 GTX/RR from AMT or Johan are better to combine into one detailed car. I don't think I did this one justice, but it's done. First pic shows the hemi and the tires I was going to use: Interior was the highlight of this build: