modelfink
-
Posts
361 -
Joined
-
Last visited
Content Type
Profiles
Forums
Events
Gallery
Everything posted by modelfink
-
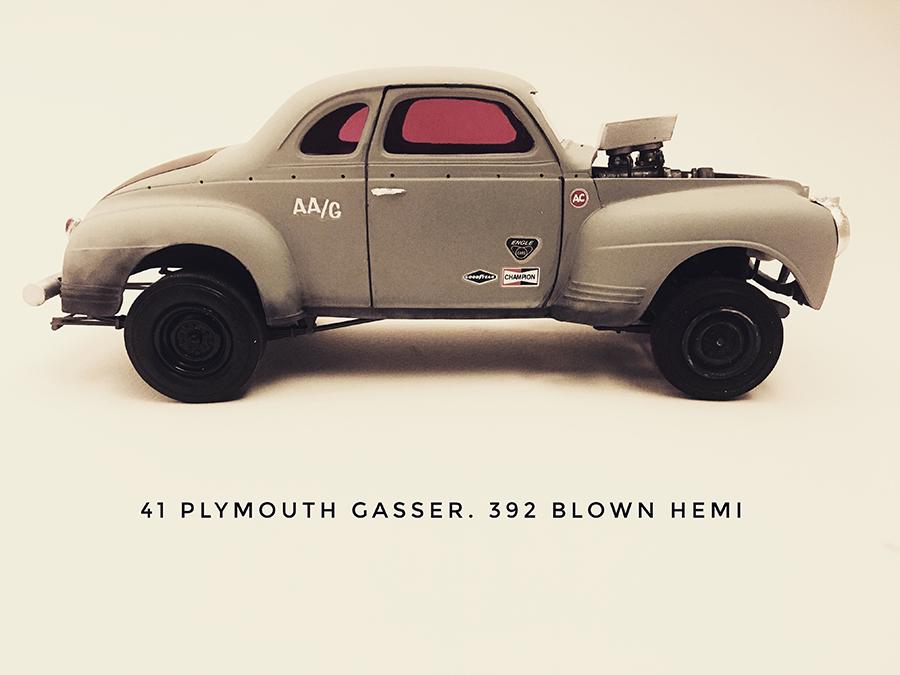
This is my first build after years away from the hobby. I have included a link to the build thread so you can see the steps along the way. This build was inspired by the Southeast Gassers and the gassers that ran in the 60s. A no frills, all thrills drag strip machine. I started with an AMT 41 Plymouth and cut the front clip off and replaced it with a one from a 53 pickup. Front axle and both sets of leaf springs are from the pickup as well. I scrachbuilt the shocks, front steering arm, draglink, and wheelie bars. Ladder bars are from the Revell 32 Ford kit. Rear slicks are Goodyear Blue Streaks from the AMT 51 Chevy, front tires are firestones, AMT steelies from the 53 pickup. The 392 Hemi is from the MPC Winged Express. Scratchbuilt external fuel and water pumps. scratchbuilt fender well headers and scoop. Model MAster metalizer was used throughout the running gear with liberal use of black pastels and flat black washes. Body is rattle can grey, rust and black primer. Windows were painted with transparent red (which turned out looking pink, which was cool) It's not perfect and I learned a few lessons with this one, but I achieved the look and attitude I was going for. Thanks for looking.

-
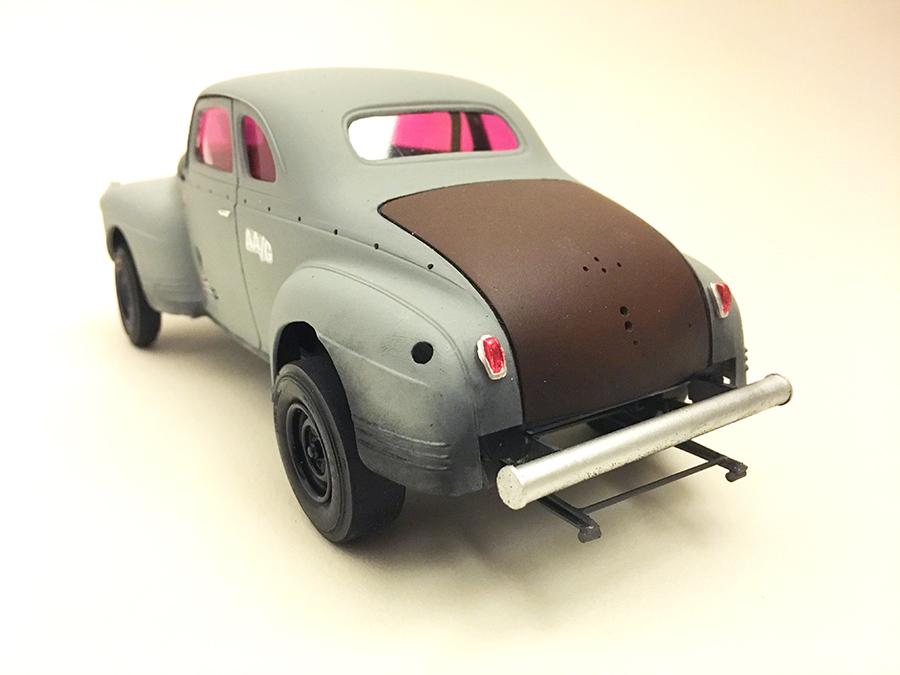
She's done. Some detail painting on the underside and it will be completely finished. ( I glued the interior tub to the frame before painting the bottom of it. GRRRR.) I'm putting it up under glass and start on my next build.
-
Was it this one? https://www.youtube.com/watch?v=bUQWLKpcg0w The Car in the beginning of the thread belongs to Tony Turner. He runs it with the Southeast Gassers. If you can catch one of their races you totally should. Old school straight axle gassers.
-
Slow and steady progress on the gasser. Just working on the body details, front window is in, headlights, tail lights, weathered the bottom with black charcoal to simulate burnt rubber from burnouts. The rest of the windows, hood and decals should be all thats left before final assembly.
-

Tweedy Pie II question
modelfink replied to modelfink's topic in Model Building Questions and Answers
Thanks Mark, You provided Lot's of good info. I found another thread covering the same topic as well. -
I'm curious if anyone has info on the parts used in the Tweedy Pie II kit. I was sourcing it for parts and The Chevy engine looks very cool, as does the rear brakes and quick change rear end. Seems more detailed than most Revell kits. What size Chevy engine and tranny is this kit based on?
-
Thanks Gary, She's raised but sits level. I think the stance will be period correct
-
Thanks John, The headers are 16 gauge wire with the white insulation left on. I would recommend painting them after you are 100% sure of their shape. I reshaped them after paint and they flaked which adds to the worn look, but may not be desirable in all cases. 16 gauge is a little thick to be in scale but for this project it seemed to work out.
-
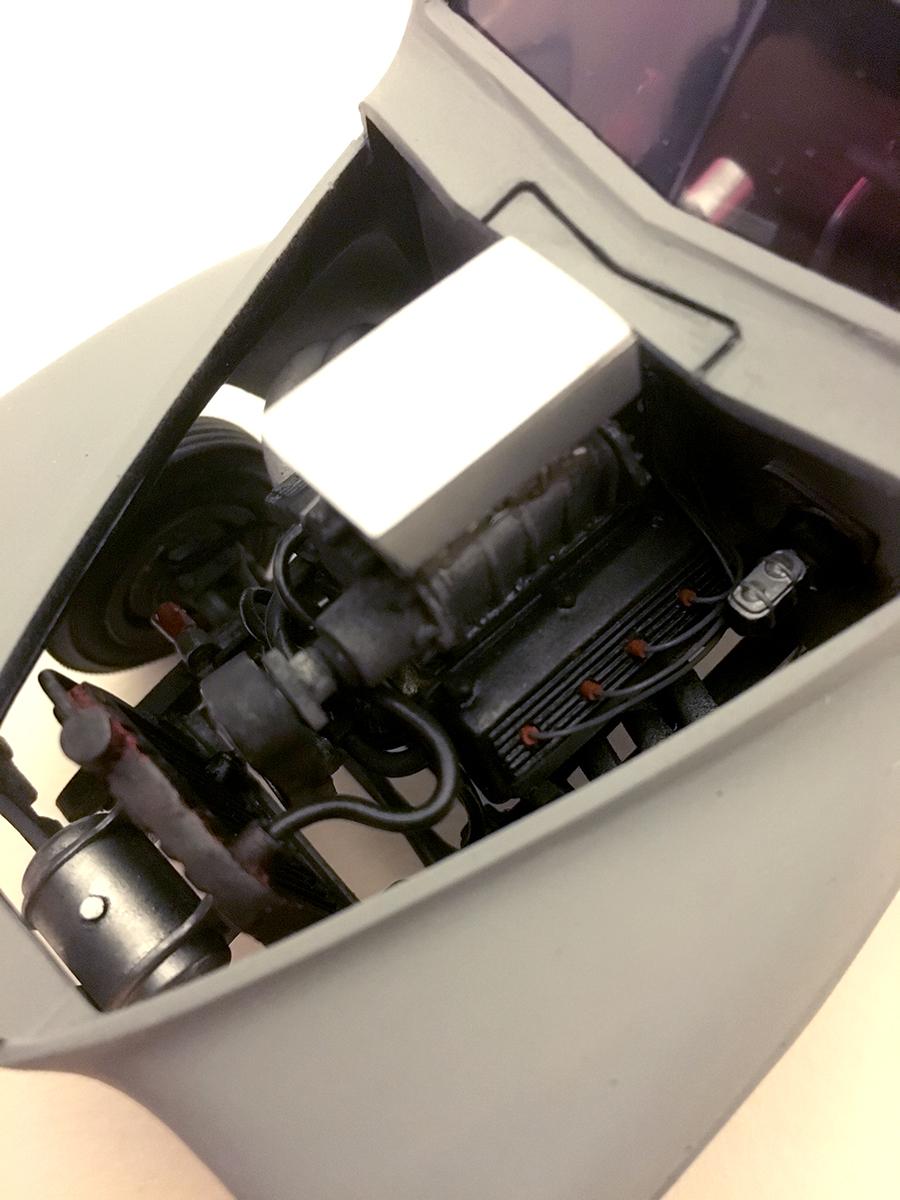
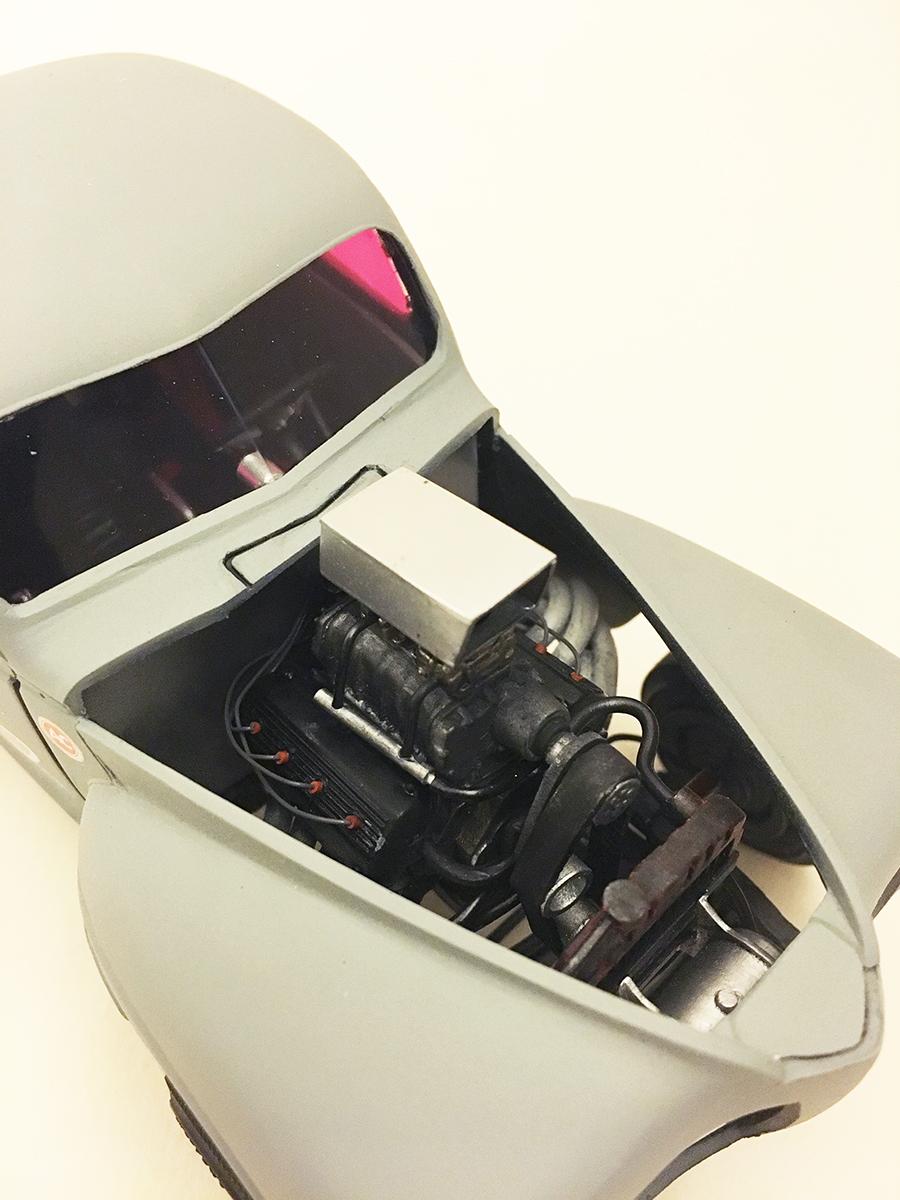
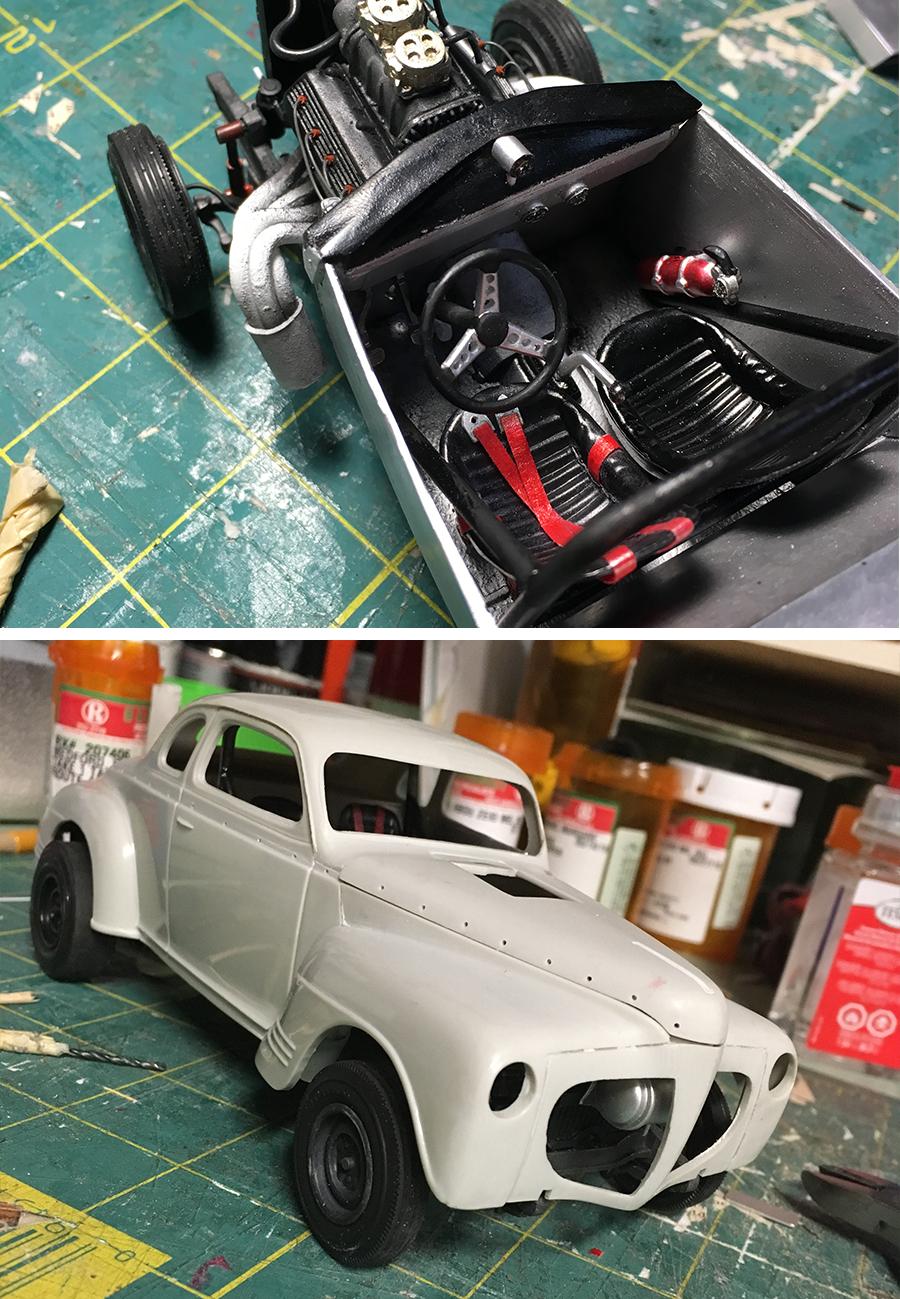
Lots of progress this weekend. Engine is wired, plumbed and mounted, interior is detailed and mounted to the frame. Engine weathered. Next step is getting the body painted, windows, lights, etc. and it should be ready for the strip....er, I mean Atlanta.
-
woah. this is some next level stuff! bravo
-
1971 Pinto Wagon Street Freak Showcar - Done!! 4-18
modelfink replied to Impalow's topic in WIP: Model Cars
Those headers are perfect. -
How would you fill the tires without them? :)
-
That's some resourceful kit bashing!! I love it.
-
nice body work!
-
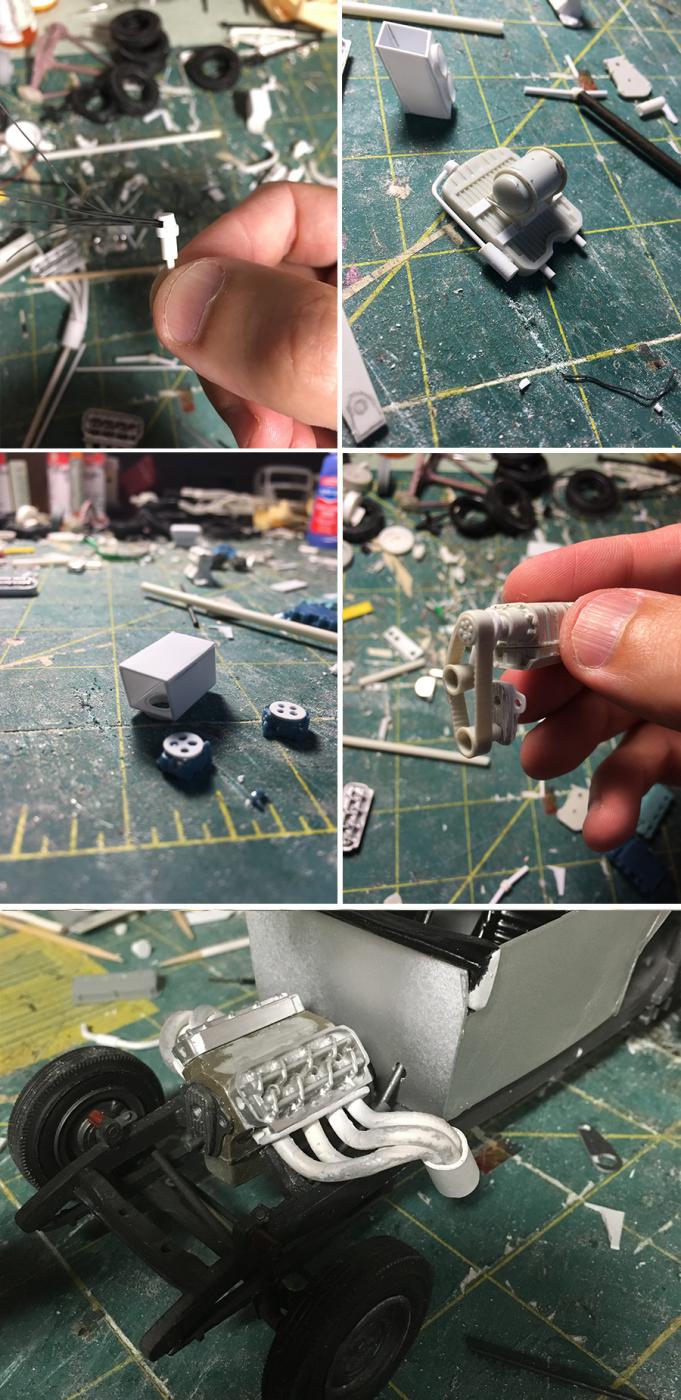
A little progress has been made. I built a magneto, radiator/moon tank assembly, scratch built a front cover with water inlets, did a little carb details and scratch built a mailbox style scoop. The last pic shows the engine mocked up with the headers installed. My original configuration of the headers did not match up so I had to bend them in place which caused them to pop off the heads and get a little crusty from handling. Still not 100% satisfied w/ the headers but they will work for a shade tree gasser. The engine will get some touch up paint before other components are added. Lesson learned: make sure everything is mocked up and fits before paint.
-
nice hot rod!
-
Cool Project. I was thinking of doing something similar with the Revell 5 window
-
After scratch building an intake this weekend, I nixed that idea and am keeping it blown. 2x4 carbs on top of the blower. The tunnel ram looks better on a Chevy. I'll save that for a 55 gasser.
-
It may not be 100% accurate or within the rulebook, but it will be one of a kind and in the spirit of shade tree hot rodding.
-
yeah, that thing is over the top. Mine will be much tamer.
-
Hey all you Hemi dudes. I'm building a 396 Hemi but I wanted it to look different and not be blown…but still retain the tall look with 2x4 carb set up. I'm looking into scratchbuilding a tunnel ram intake because the one I have is from a Chevy. The old breadbox TR2 and Ridge Runners are cool but I'm not finding any online for the 392. Would a homemade intake be period correct for a late 60s Hemi gasser? Something similar to this pic without the slanted carbs.
-
Thanks john, I made those headers out of 16 gauge electrical wire I found at Lowes. It's coated copper wire so it holds it's shape when bent. I drilled 4 holes in a strip of styrene to use as a flange, bet them into shape and used a styrene tube to collect them at the end. The Hemi is from the Winged Express kit. It's a great motor, I would love another one. The valve and piston detail is great for something that gets covered up! It's my first Hemi build so I'm educating myself. I have some reference pics. I think I'm going with this set up: blown using 2 carbs. Electric fuel pump and water pump. (most of the southeast gassers are using electric pumps) water inlets in the block and outlets in the front of the heads. Radiator in the stock position. My thought is that a shade tree guy would be able to throw a blower kit on and keep his carbs without forking over the big bucks on fuel injection.
-
I had some bench time over the long weekend and made more progress on the gasser. I got the frame painted and weathered, wheels and tires are painted. Pictured in the top left are the rear slicks before and after black pastel weathering. I made a roll bar, removed a section of the stock dash and replaced it with sheet styrene. The tunnel mods can also be seen in the interior bucket pic. I made some fender well headers out of 16 gauge coated electrical wire and styrene flanges and collectors. It was my first time making headers and they went together pretty easy. everything fits snug without glue. I made risers for the seats. Seats are from the Hurst Hairy Olds kit. The last pic shows the Hemi block mocked up in the finished frame. You can also see the aluminum painted interior bucket. In retrospect I'm not too happy with my motor mounts. But the headers should cover them up. Always learning for the next build.
-
1971 Pinto Wagon Street Freak Showcar - Done!! 4-18
modelfink replied to Impalow's topic in WIP: Model Cars
Dang, that's a game changer. -
1971 Pinto Wagon Street Freak Showcar - Done!! 4-18
modelfink replied to Impalow's topic in WIP: Model Cars
Love these pics! I need to make the same type of headers. What did you use to heat them up?