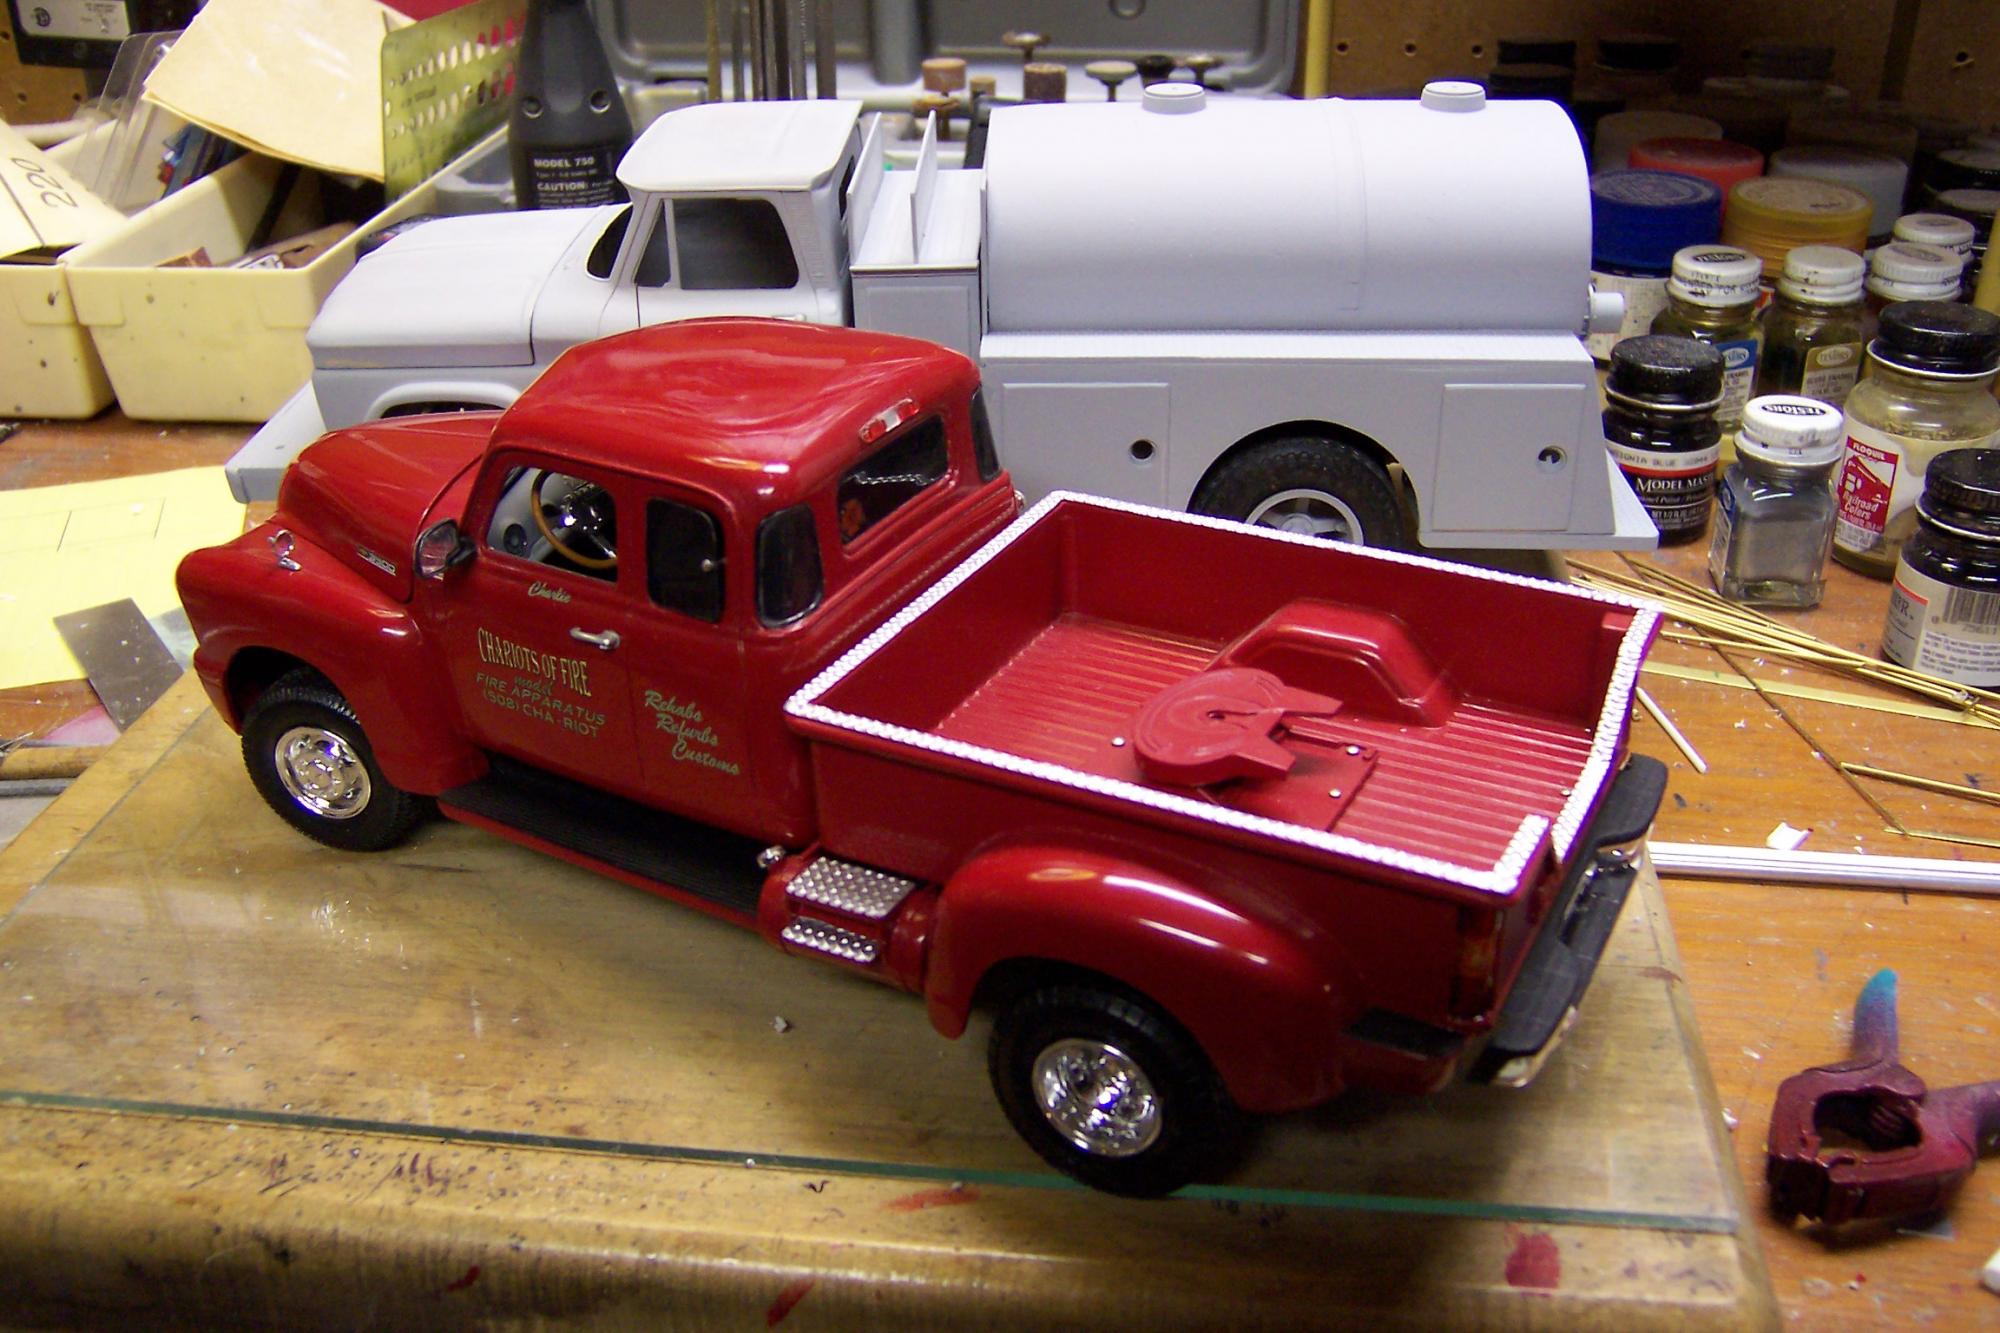
Chariots of Fire
-
Posts
2,781 -
Joined
-
Last visited
Content Type
Profiles
Forums
Events
Gallery
Everything posted by Chariots of Fire
-

1950 Chevy Texaco wrecker
Chariots of Fire replied to mchook's topic in Model Trucks: Pickups, Vans, SUVs, Light Commercial
Weathering has to be subtle to be right. Yours is right on! Just where it ought to be. Rust stains are perfect. Excellent work! -
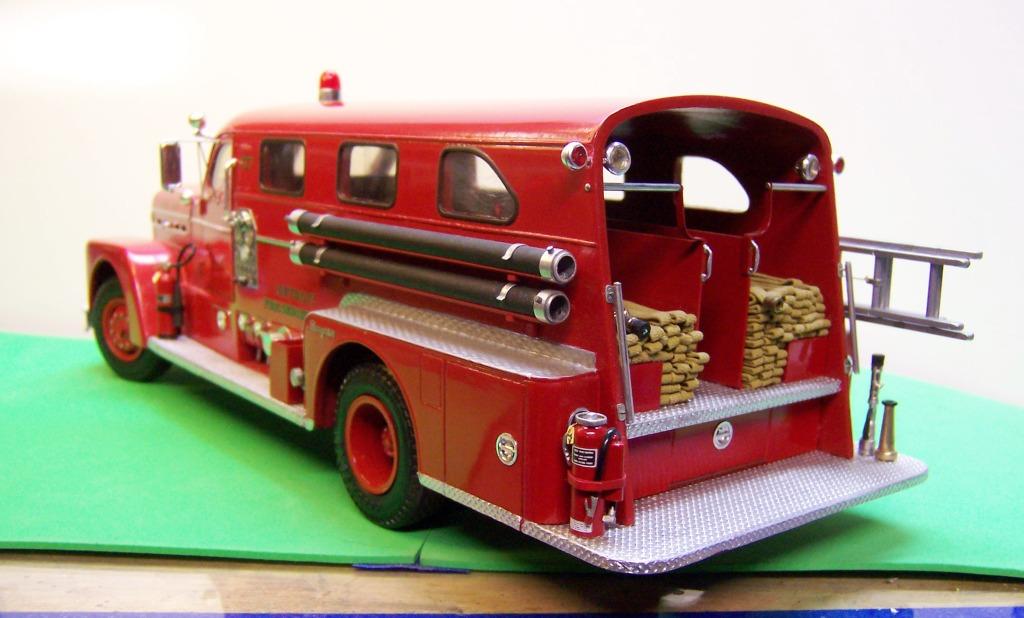
Did this one a few years back by bashing the 1950 Chevy with the 1999 version. Cab was extended and the grill and front end were modified using the 1999 front bumper. I use it to haul the trailer and a fixer-upper.

-
Mack DMM W Theam conveyor
Chariots of Fire replied to gotnitro?'s topic in WIP: Model Trucks: Big Rigs and Heavy Equipment
NIce work Jeff! Will be watching progress! -
gmc crackerbox
Chariots of Fire replied to jacobus's topic in Truck Aftermarket / Resin / 3D Printed
Here's a cab that started out as the AITM cab but has been heavily modified. JeffH is doing the work. Many changes were made along the way and the frame and accompanying details are all scratch built. But as you can see he did not change the vent window. Perhaps not officially correct but not enough to take away from all of the other details. (IMHO)
-
Whatever Happened to......
Chariots of Fire replied to 7000in5th's topic in WIP: Model Trucks: Big Rigs and Heavy Equipment
Dave: Glad to hear from you. I've got some ideas for building the nose of a 2010 Workstar that would fit the Prostar cab. There is one here locally that has been built into a brush truck that is on my plate to model. Are there any good sources for line drawings of the Workstar front end other than the usual sales brochures that could be used for obtaining measurements, etc? -
Eisbrenner Seagraves
Chariots of Fire replied to Chariots of Fire's topic in Model Trucks: Big Rigs and Heavy Equipment
The one thing I never understood about the Quantum is that they never matched the lines of the front wheel wells with the rears. The front lines probably would have looked hideous on the back so it would have meant some kind of compromise, but hey........... what do I know! -
Eisbrenner Seagraves
Chariots of Fire replied to Chariots of Fire's topic in Model Trucks: Big Rigs and Heavy Equipment
Say hello to Tim for me, will you? We met years ago at a MassCAR show back about the time he ventured into a new modeling mag called "IN SCALE". I still have the one and only first issue. -
Chevy Titan 90
Chariots of Fire replied to Ken Gilkeson's topic in Model Trucks: Big Rigs and Heavy Equipment
That's what I was looking for! Nice build for sure!! -
Chevy Titan 90
Chariots of Fire replied to Ken Gilkeson's topic in Model Trucks: Big Rigs and Heavy Equipment
Looks pretty nice, Ken. Any front views? -
1977 Mack Cruise Liner
Chariots of Fire replied to V8 Trucker's topic in Model Trucks: Big Rigs and Heavy Equipment
Nice clean build. I like it a lot! -
Eisbrenner Seagraves
Chariots of Fire replied to Chariots of Fire's topic in Model Trucks: Big Rigs and Heavy Equipment
Browsing through some old S..... A... Mags (that other model mag) I ran across this article in the Model Firehouse section by Tim Bongard. April 1990 issue #66. To bad the photo is so poor but the written part is clear enough.
-
Eisbrenner Seagraves
Chariots of Fire replied to Chariots of Fire's topic in Model Trucks: Big Rigs and Heavy Equipment
AJ: Thanks for posting your Detroit Seagrave! Where did your info come from, Matt Lee's books? Really nice work! David: that would be an awesome build! I'm studying the trailer and some of the details I see there. The trailer I did for my '37 Seagrave is almost identical except for the series of compartments along the sides. The way the rear fenders and front fenders of the trailer are laid out are exactly the same and the aerial looks similar. If you ever want to give it a try let me know. I have photos and dimensions of all that stuff. -
Eisbrenner Seagraves
Chariots of Fire replied to Chariots of Fire's topic in Model Trucks: Big Rigs and Heavy Equipment
Hey, Guys. Anybody else out there have any info about Mike Eisbrenner and his Seagraves? There must be more examples using his castings. -
Eisbrenner Seagraves
Chariots of Fire replied to Chariots of Fire's topic in Model Trucks: Big Rigs and Heavy Equipment
Hey, guys, this is getting a little bit heavy to handle. I appreciate your kind comments, I really do. But I want you all to know that if God gave me any talent it was meant as a gift to be shared. I love modeling and have since I was a young boy but there is joy in sharing it and passing on to others things learned about building models over quite a few years now. In and of itself, model building is not very important; in fact in some ways it is a complete waste of the time that we have been given. But in other ways it is a means of passing on to someone else blessings that have been conveyed upon us. I know of One who in his brief life of 33 years here on earth worked many of those years as a carpenter, a master craftsman and builder who worked with His hands. I hope many of you know of whom I speak. I know that some of you already do and He can change your life in an instant. God bless. -
Eisbrenner Seagraves
Chariots of Fire replied to Chariots of Fire's topic in Model Trucks: Big Rigs and Heavy Equipment
I'm glad you posted yours, Greg. It confirms what I remembered that the second edition castings were numbered. The photoetch "Seagrave" came as a package of three originally and were known as McKeans Miniatures. There were two larger ones for the sides and a smaller one to use in the grill. Don Mills picked up the McKeans line years ago including the treadplate that he still sells. McKeans also produced the American LaFrance script and maltese cross in photoetch. -
Eisbrenner Seagraves
Chariots of Fire replied to Chariots of Fire's topic in Model Trucks: Big Rigs and Heavy Equipment
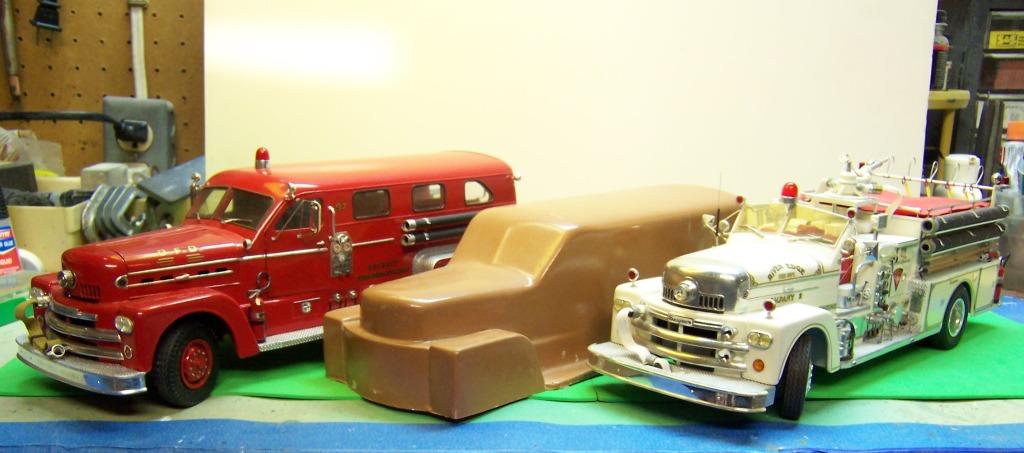
May as well go all the way, eh? Here are some photos of the second River Edge piece. This one was done based on Seagrave drawings and some help from the River Edge FD, Co. 2. When the model was delivered I got to ride the actual truck! Awesome experience! The hood on this one is hinged brass. Nose is covered in Bare Metal Foil. The hose body is slightly higher than on the first model and more closely resembles the modifications that River Edge did after a few years on the job. Initially it had white rims and a standard height body. See? I actually did build two! River Edge insisted the model had to have the American flag flying from the radio antenna. You can see it in the last photo. With the opening hood I was able to open up the horizontal holes in the hood sides and put a piece of material behind them which is prototypical and a detail I left out of the first two.
-
Eisbrenner Seagraves
Chariots of Fire replied to Chariots of Fire's topic in Model Trucks: Big Rigs and Heavy Equipment
The initial ones were fiberglas I think. But the second edition ones like the two I built definitely were not. As far as the builds go they are really no different than working with plastic bodies. You just have to put a lot more into obtaining all of the other stuff that finally gets it done. Mike Eisbrenner can be thanked for giving us the opportunity to turn his castings into models. Without his efforts there might not have been any. As I indicated to Danno I think Mike worked for either GM or Ford and was aided at least in the beginning by some of the craftsmen to get his molding started. Maybe Greg can verify that. Hope he posts his rig as well! -
Eisbrenner Seagraves
Chariots of Fire replied to Chariots of Fire's topic in Model Trucks: Big Rigs and Heavy Equipment
I wish I had a complete second edition shell, Jim. You would really see the difference. all I have left is the top and rear fenders portion of the casting as I cut the last one I had apart to do the second River Edge piece. Imagine the shell that you see with the outline of the windshield, windows and wheel openings. Also the scribing for the hood and doors. Other than that what you see is what you had to work with. I used AMT ALF frames under mine, changing the front enough so that it would extend toward the grill. Even the curved grill trim and front bumper had to come from some other source. -
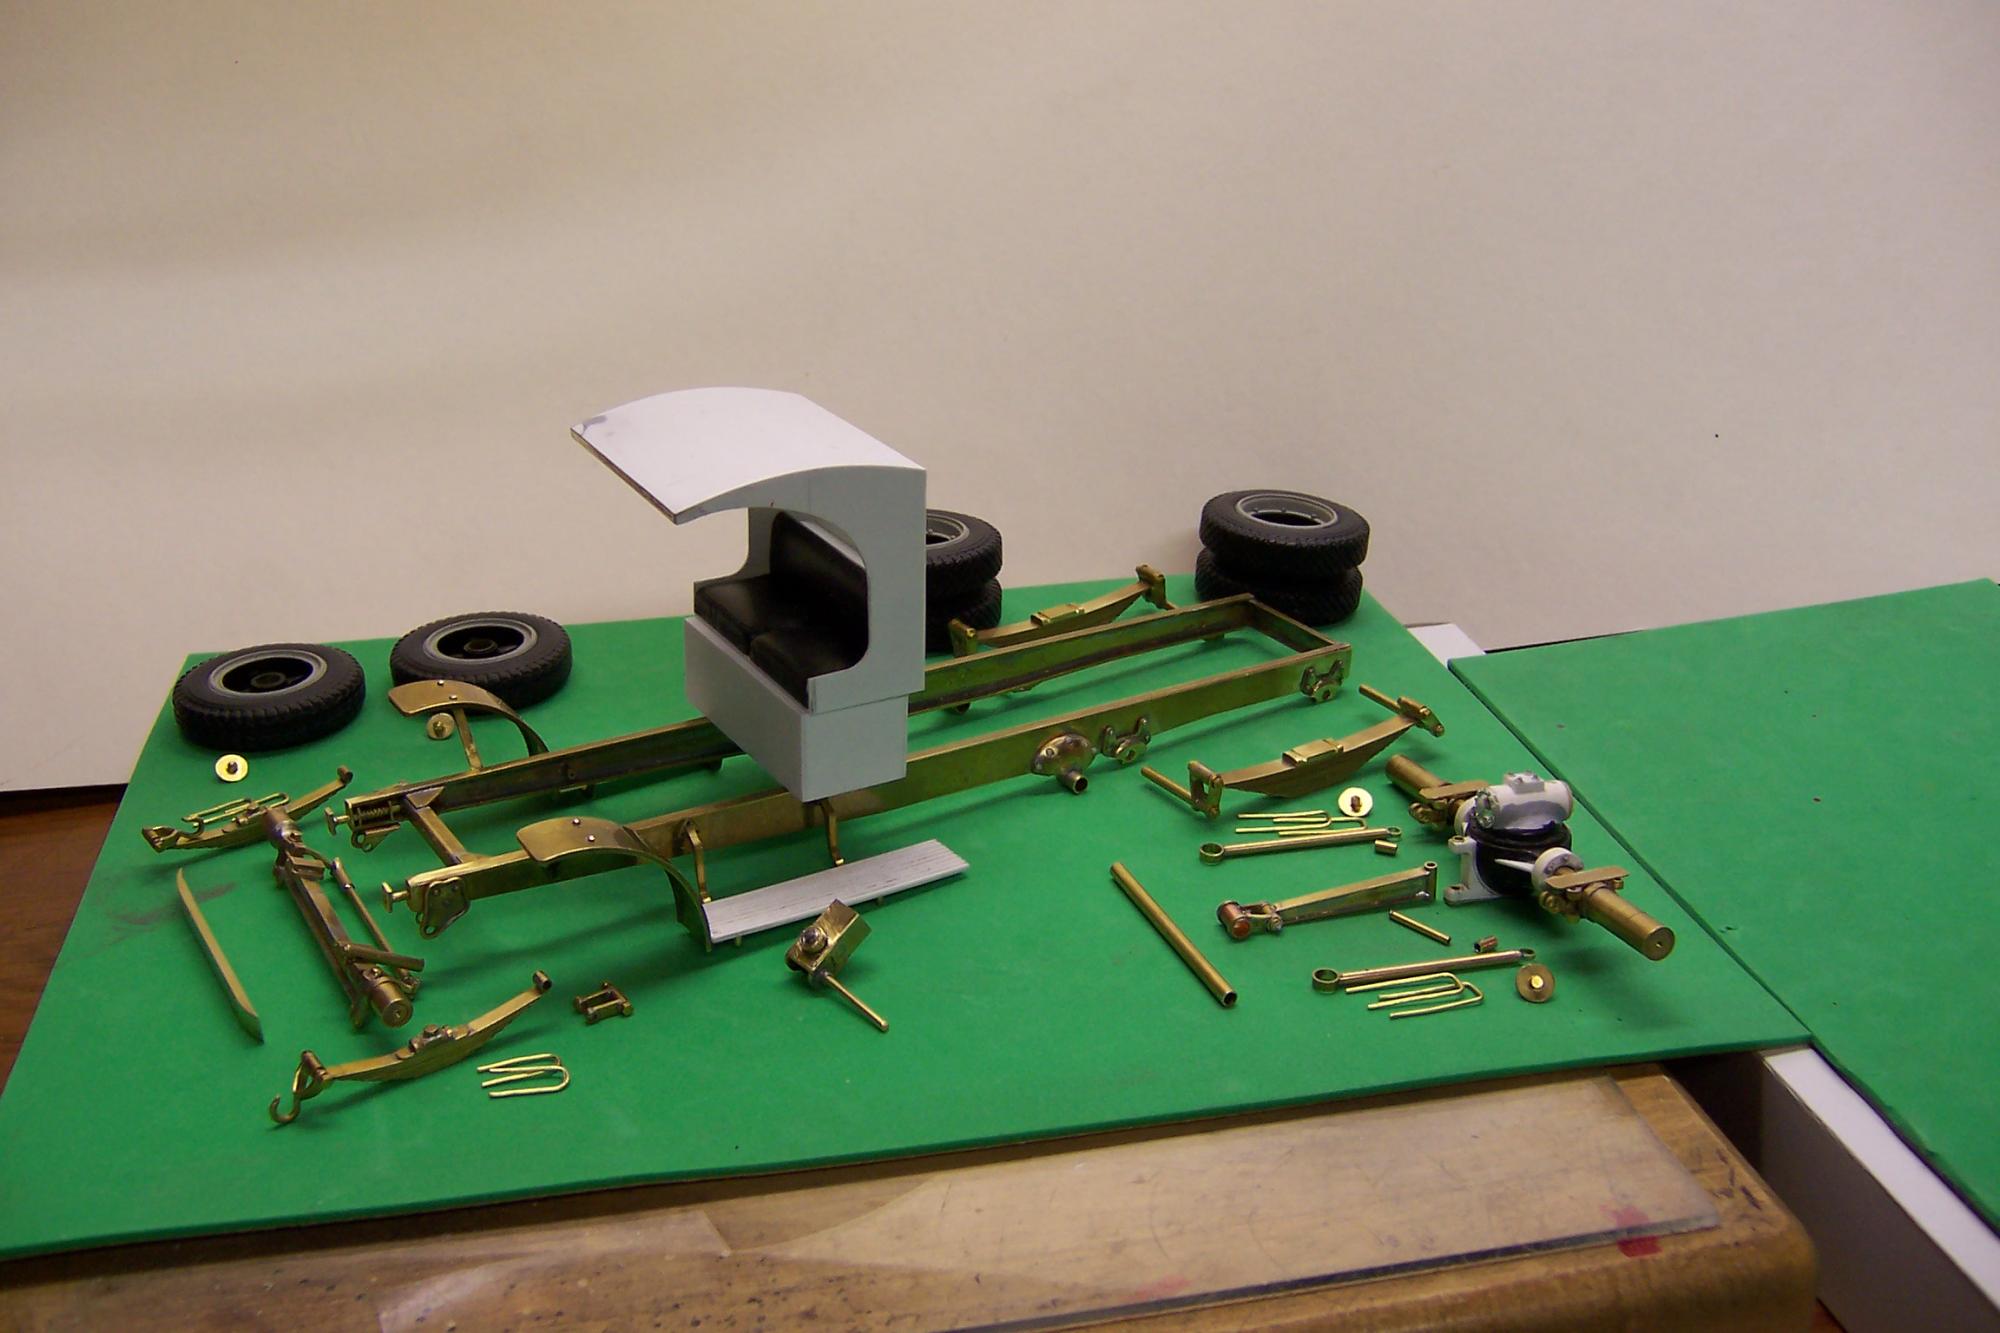
Danno: Got your message regarding the Anniversary Series Seagraves that Mike Eisbrenner did back in the '80's. I first met Mike at the Toledo Toy Show back when it was in Toledo at the Civic Center. I think by then Mike was doing the second series of castings at that time and I remember purchasing one from him along with his pewter Ahrens-Fox piston pump kit. Along the way I ended up with 2 other second series castings and one of the original "smoothies" as I will call it. I thought the first one was numbered but it must have been the second series. It was marked with a felt marker on the inside of the casting as #18. The numbered one was used on one of the rigs I built. The first castings were smooth on the outside and may have been done as a slush mold judging from the rough quality of the inside of the casting. You can see that in the photos below. No detail whatsoever on the outside so it was up to the builder to mark out the windshield, side windows, scribe the door lines, hood and cut out the wheel well openings. The back also had to be cut out if the sedan version was going to be built. Notice also that above the rear fenders there is no hint of the treadplate that Seagrave used. That came on the updated casting. The later castings had raised trim and that shows up on the Detroit Sedan below. The later castings were also much thicker, and made of a different material something like alumilite. When it is sanded little flecks of metal seem to show up. The resin is also very brittle as was evidenced by one of the castings I obtained. The corner of the fender had broken off and had to be glued back in place. The trim lines being raised made it easy to cut out the various openings and get them lined up. In actuality it may have been more correct to sand off the raised portion after the openings were cut out. If you compare it to a 1:1 rig you don't see the rubber trim around the windshield. In the rear view you can see the Seagrave treadplate that was applied to the top of the rear fender compartments. I added my own to the side of the running boards and rear step. If you look closely at the rear view of the Detroit piece you can see how thick the casting was at the sides of the body. The top has a small lip to it that makes it appear even thicker. When I did the windows I trimmed them close so I could place them nearer to the outside of the body. Gluing them directly to the inside of the opening would have been hideous. Information on how the Detroit sedans looked was obtained from Matthew Lee's books on Seagraves. Here is actually the first Seagrave I did using the second series Eisbrenner casting. This rig I saw for the first time at Croton-On-Hudson, New York at an annual fire muster. It's a '62 model but contains some details that were not with the original when first delivered to River Edge such as the bright wheel rims, the raised deck gun and higher hose bed. One of the most fancy Anniversary Seagraves around... and it still is around at River Edge, NJ. I ended up doing another model of the River Edge rig and it is still on display at Company 2. A real class outfit. Here is a shot of two models with the original casting in the middle. Now that I look at it I think Mike made some adjustments in the second series of castings in addition to the raised window outlines. The unmarked windshield looks high and the corners of the hood appear much sharper. I'm glad I got these when I did and had the chance to build them up. These were the days of real classic fire apparatus design.
-
Dodge L700 updated 6/2
Chariots of Fire replied to dshue76's topic in Model Trucks: Big Rigs and Heavy Equipment
You did a good job on this rig! Not the easiest to put together and have it look right. So many things that adjusting and tweaking. I'm with the other guys! Great work! -
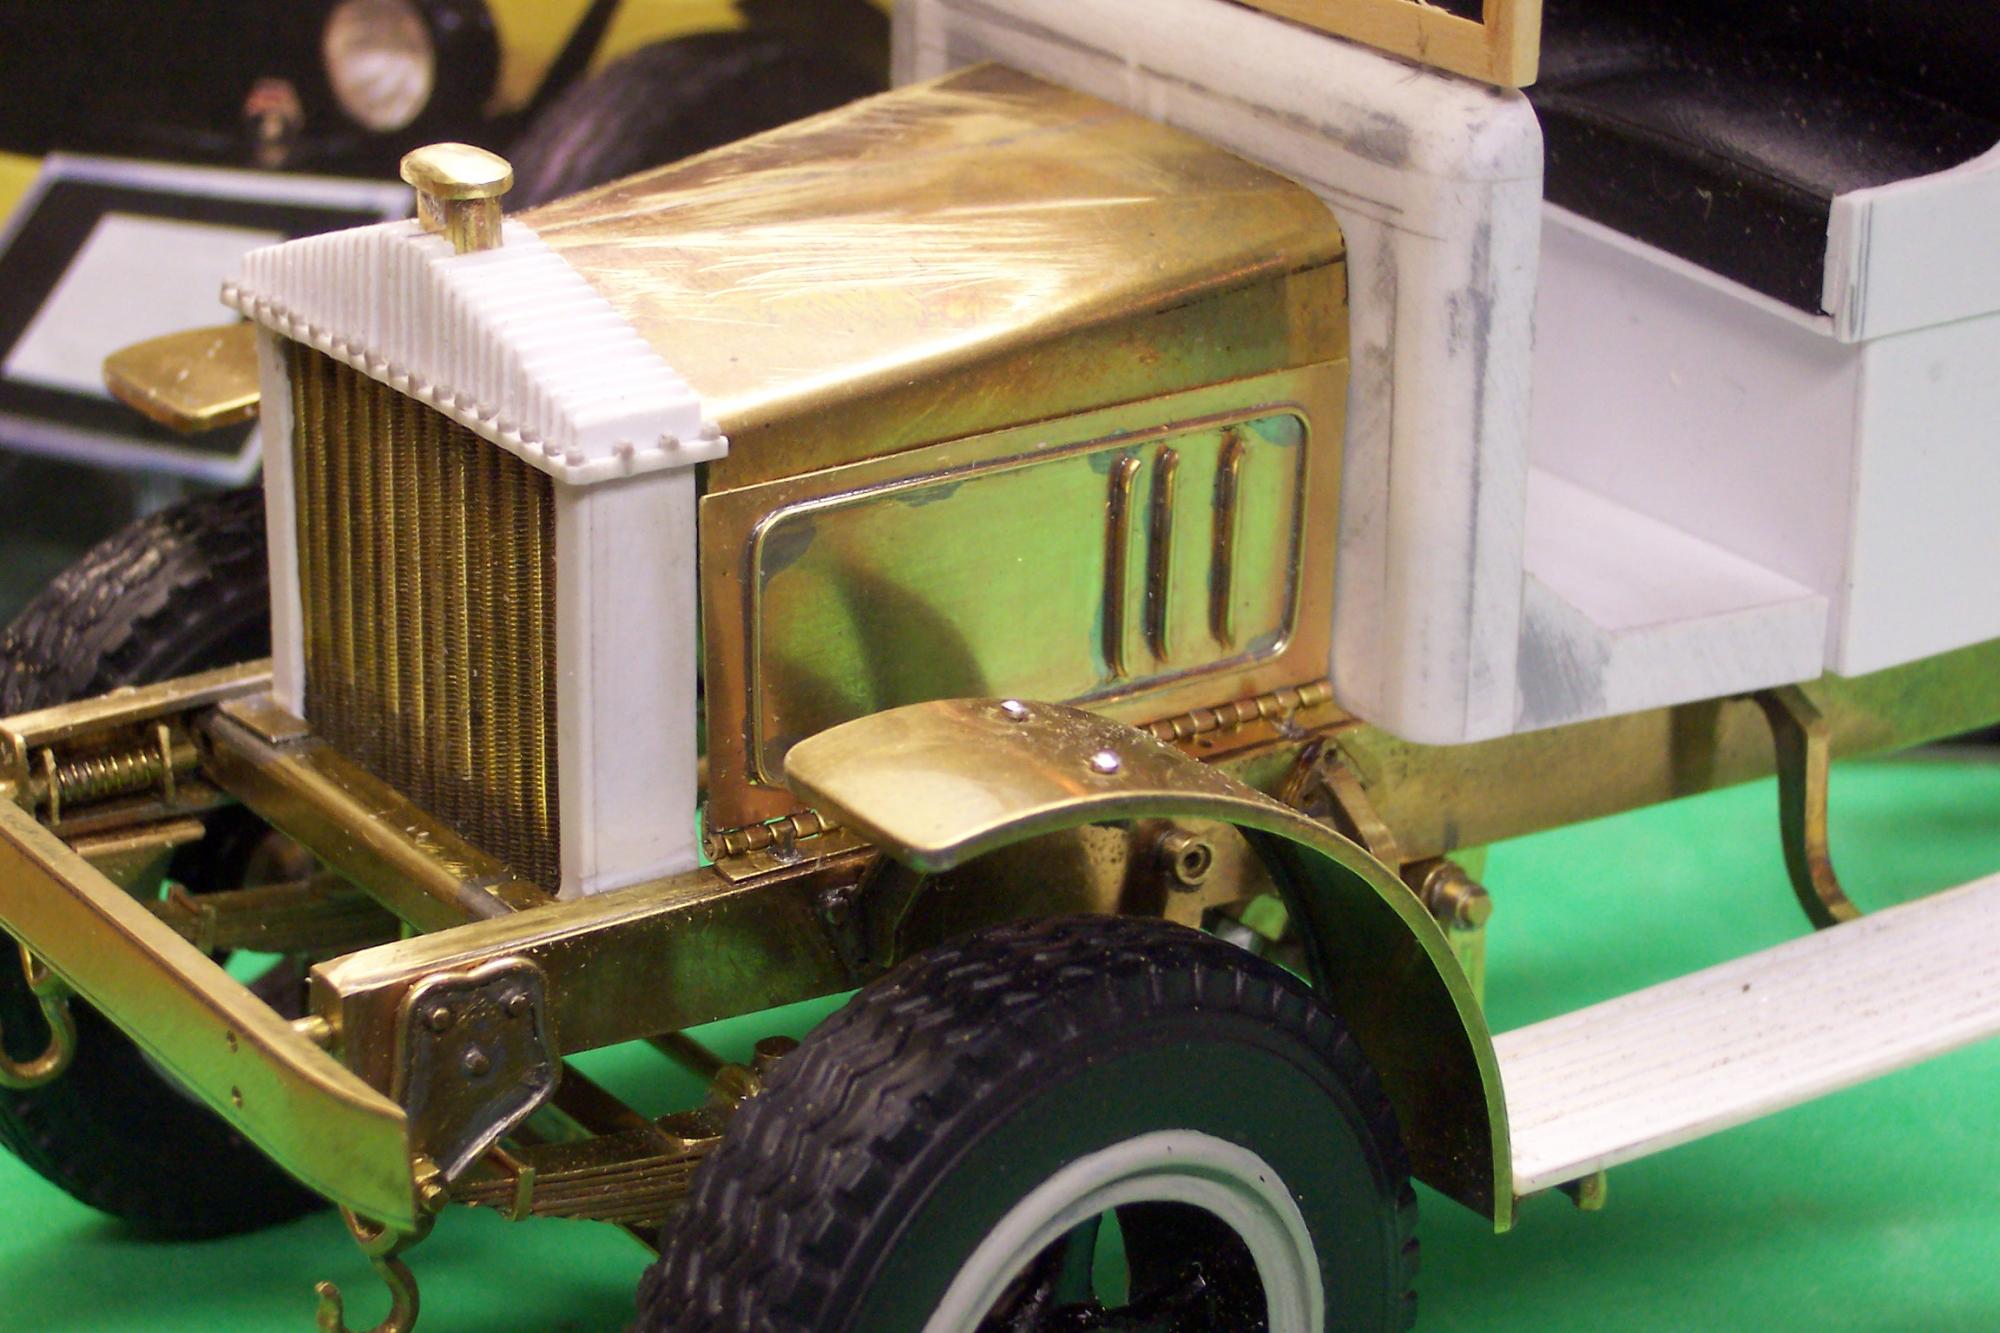
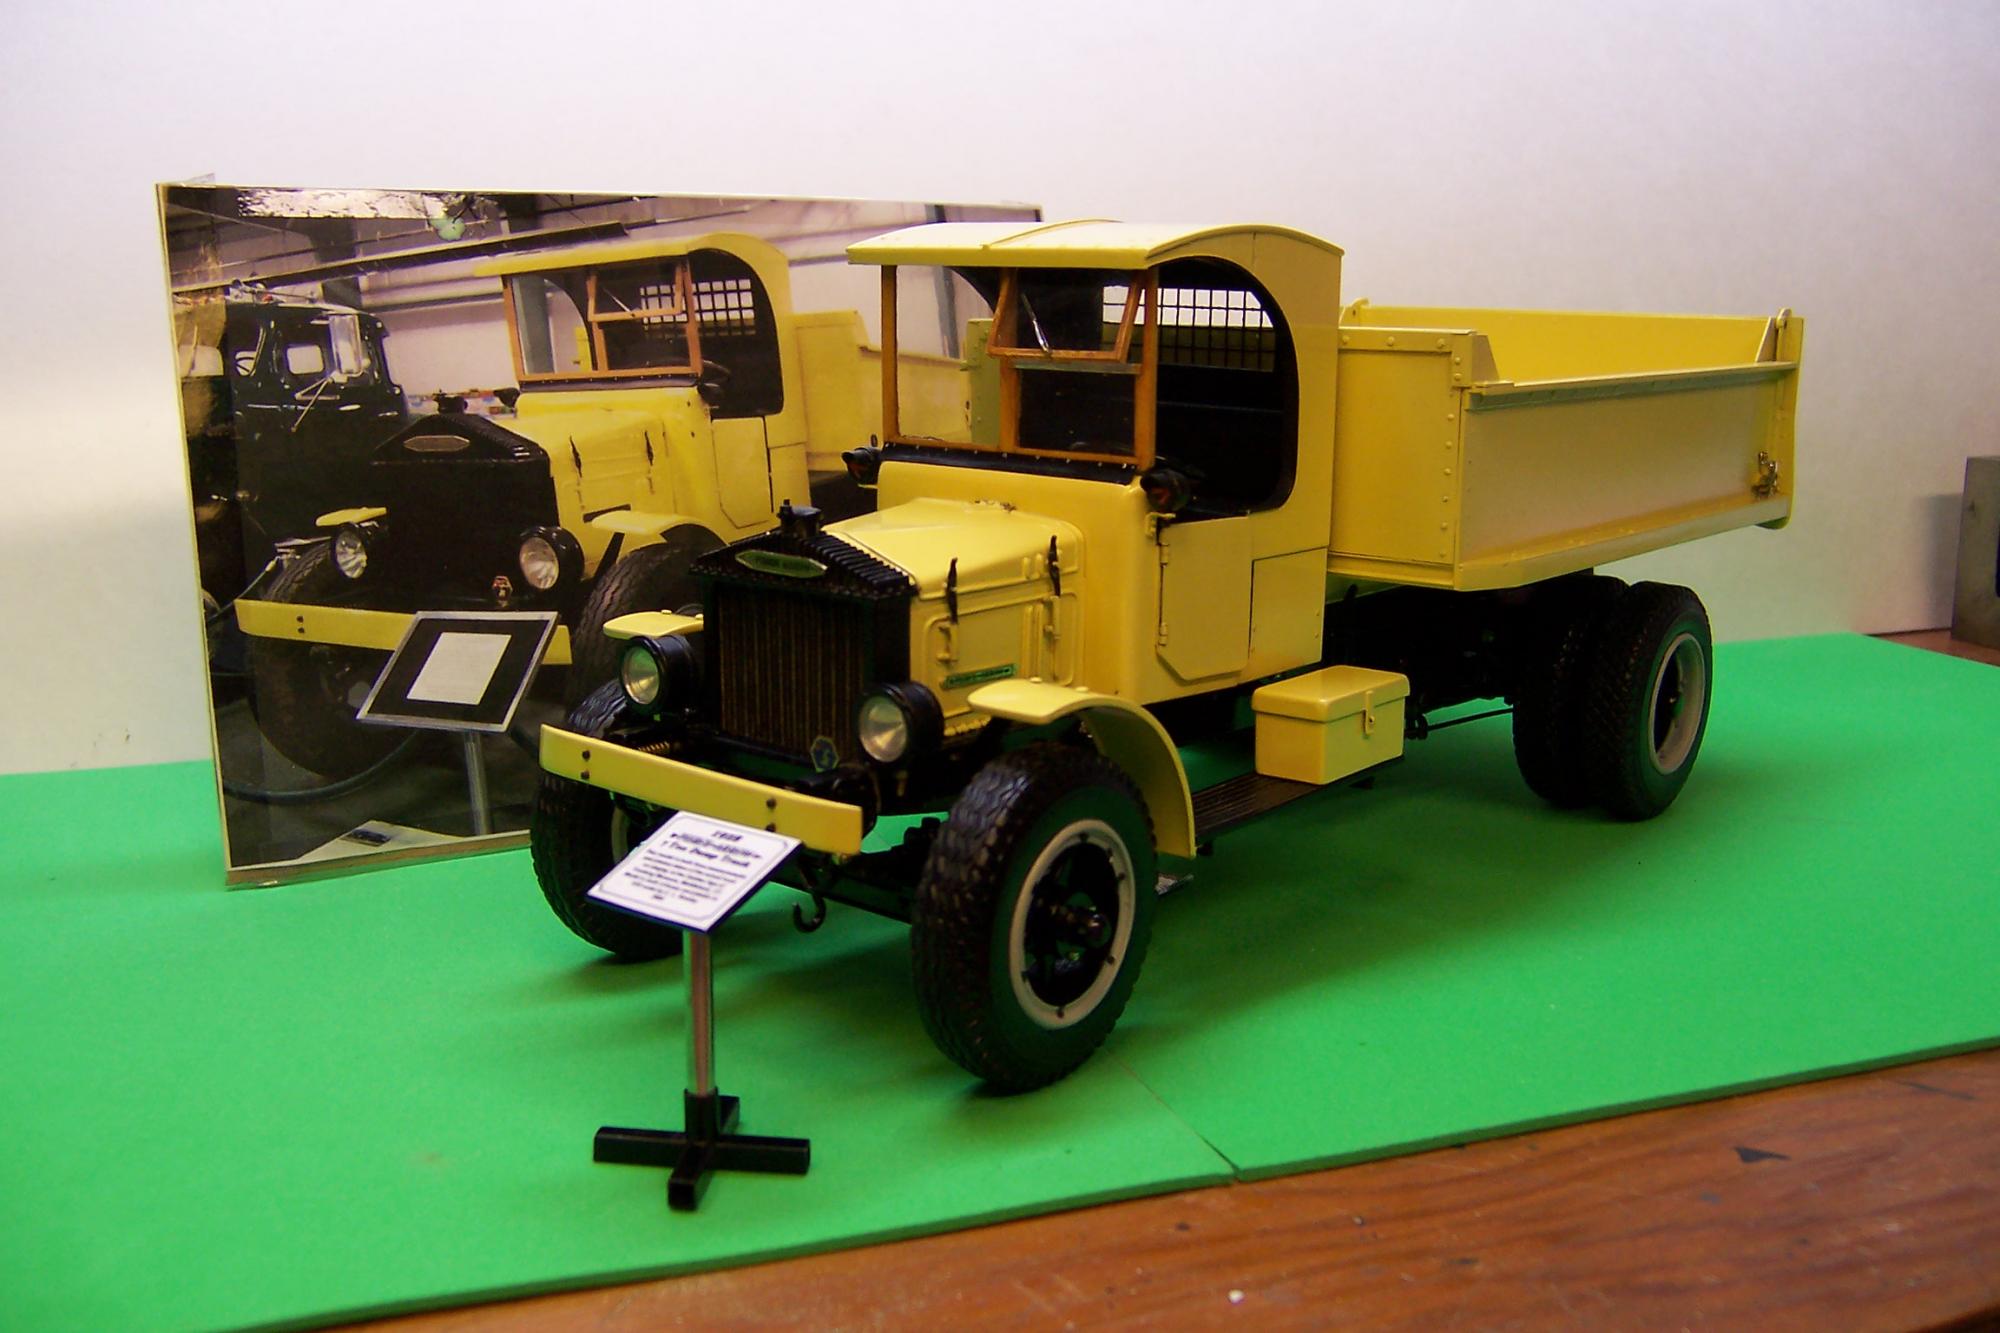
Here are some pix of the Pierce Arrow. The real truck was in a truck museum in Middlebury, CT along with many other trucks of the past. I photographed it and took a lot of measurements on several trips to the museum. Tom Coolidge cast the tires from masters that I made up. Lots of soldered brass strip stock, tubing, structural shapes, nuts and bolts and working steering box. The last photo shows a shot of the real truck with the model in the foreground. Scale is 1/25.
-
That's the Coleman that is in pieces. The Pierce Arrow is off to the left with the dump body up.
-
Harry: That is a brushbreaker. Our part of the country has a lot of pitch pine, white pine and scrub oak. A truck like this is intended to "break" its way in to the fire and pinch it out by following along the flanks of the fire to put it out. They will take down a 6" tree easily. The whole idea is to go around as many as possible but if and when it is necessary to take one dowm it can be done. Long Island, NY and the Pine Barrens of New Jersey have similar natural cover but they use "stump jumpers" not breakers. Tom: My avatar is a 1928 Pierce Arrow. I will post some pics of it. Way back in the "On the Work Bench" there may still be some in progress pix but I'll post some new ones.
-
Thank you Chuck.
-
What a beautifully built model, regardless of its source! Just exquisite! I don't think I have ever built a model out of the box or otherwise that did not need some tweaking here and there to get the result I was after. These forums are great when the information presented is taken at its best. Glean it for useful hints and techniques. So long as the criticism is positive let 'er rip! That's when we all get the most out of it!