Chariots of Fire
-
Posts
2,781 -
Joined
-
Last visited
Content Type
Profiles
Forums
Events
Gallery
Everything posted by Chariots of Fire
-
 Mark: Give some thought to using aluminum tubing for the hydraulic cylinders. By using telescoping tubing you can easily make the assembly so that the piston end of it moves in and out nicely. Here's one I did as an example.
-
2008 Chevy Silverado
Chariots of Fire replied to Mad Slammer's topic in Model Trucks: Pickups, Vans, SUVs, Light Commercial
You did good! Congratulations! -
1954 Maxim 750 Pumper
Chariots of Fire replied to Chariots of Fire's topic in WIP: Model Trucks: Big Rigs and Heavy Equipment
Talked with the manager of a camp ground where the current truck is stored. Will be getting the critical measurements and some more photos this coming Wednesday! Can't wait to get started on this one. -
Here's an in progress pic of an AP Mack that was built about 3 years ago. I started with the AC but made new fenders based on Autocar A64B fenders. The front tires are resin castings and the wheels are straight from a later Mack kit. Rear wheels are from the AC kit but the tires are resin castings made from a Renshape master.
-
Hey you guys! I see lots of great stuff in this post! Everybody! "Gitter done"!! They are awesome!
-
Hi, Gabe. Nice feeling getting something done, eh? Next time you post try getting in closer with the camera so that you can crop the image and get more of the model. Will be easier to see all of the nice detail you put into the work.
-
1974 Monfort W900
Chariots of Fire replied to KJ790's topic in Model Trucks: Big Rigs and Heavy Equipment
That's a nice job KJ! I like your setting. It makes the rig look as it were ready to go. -
The Secret to Building a Better Model
Chariots of Fire replied to afx's topic in Tips, Tricks, and Tutorials
The topic post says the "secret to building a better model". To me there are no secrets. Just a bit of patience and experience will solve a good part of the answer. Look at other people's work that is better than what you do. Ask the builder about how he (or she; gotta be PC here!) did it. See if that technique works for you. Chances are though, that through time and experience you will develop your own techniques that do the trick. There are a lot of things that have been said above, however that are a must if you want a model to be of contest winning caliber. NO need to spell them out again. Bill Geary has the right idea. Consider each part a model in and of itself and do it up right. A little patience here will make the parts fit better and look better. As some of you may know I'm a scratch builder. As such I build models of things that interest me. I never start a build with the idea that I am going to build a contest winner. But I do set an occasional goal for myself to do something better that I may have done before. I also make notes and sketches of techniques or particular details that worked and that I might want to use again. Last and not least, master the basics of model building as have been pointed out here. Every model, no matter how much time you have spend in building, should all have been built using the basics before anything else. -
Art's right. Sanding the tread gets rid of the casting flash but leaves the tire opposite to what it should look like. Repainting the tread with a darker color and doing a lighter wash in the groves will improve the appearance. Flat appearance on the sidewalks is a plus as well. Here's an example of the former treatment on a resin cast tire. Not the best shot but you can see the interior portion of the tread is lighter as if it may have been driving on a dirt road.
-
Mack DMM W Theam conveyor
Chariots of Fire replied to gotnitro?'s topic in WIP: Model Trucks: Big Rigs and Heavy Equipment
That is nice work! I love seeing scratch building coming together. And that's quite a support you have for the end of the boom! Congratulations on the new addition to your family. As the Bible says " train up a child in the way she should go and when she is old she will not depart from it" God bless! -
1954 Maxim 750 Pumper
Chariots of Fire replied to Chariots of Fire's topic in WIP: Model Trucks: Big Rigs and Heavy Equipment
Photos and measurements are the only way to go. Once the cab is measured I can do up some working drawings to go by and begin the construction. The grill is perfectly round in front so it will be shaped, cut out and have some photoetch mesh installed. Chrome trim gets added just prior to final paint and then rubbed out to reveal the BMF underneath. -
1954 Maxim 750 Pumper
Chariots of Fire replied to Chariots of Fire's topic in WIP: Model Trucks: Big Rigs and Heavy Equipment
There is really nothing that comes close to the look of a Maxim cab. So it will be scratch built. I did it once for the Maxim aerial but used a Kenworth windshield and interior. But even that won't quite cut it this time. Square plastic porch railing material will be used for the fenders. Brass for the hood, doors and hopefully the cab top. We'll start as usual with the frame, springs and axles. -
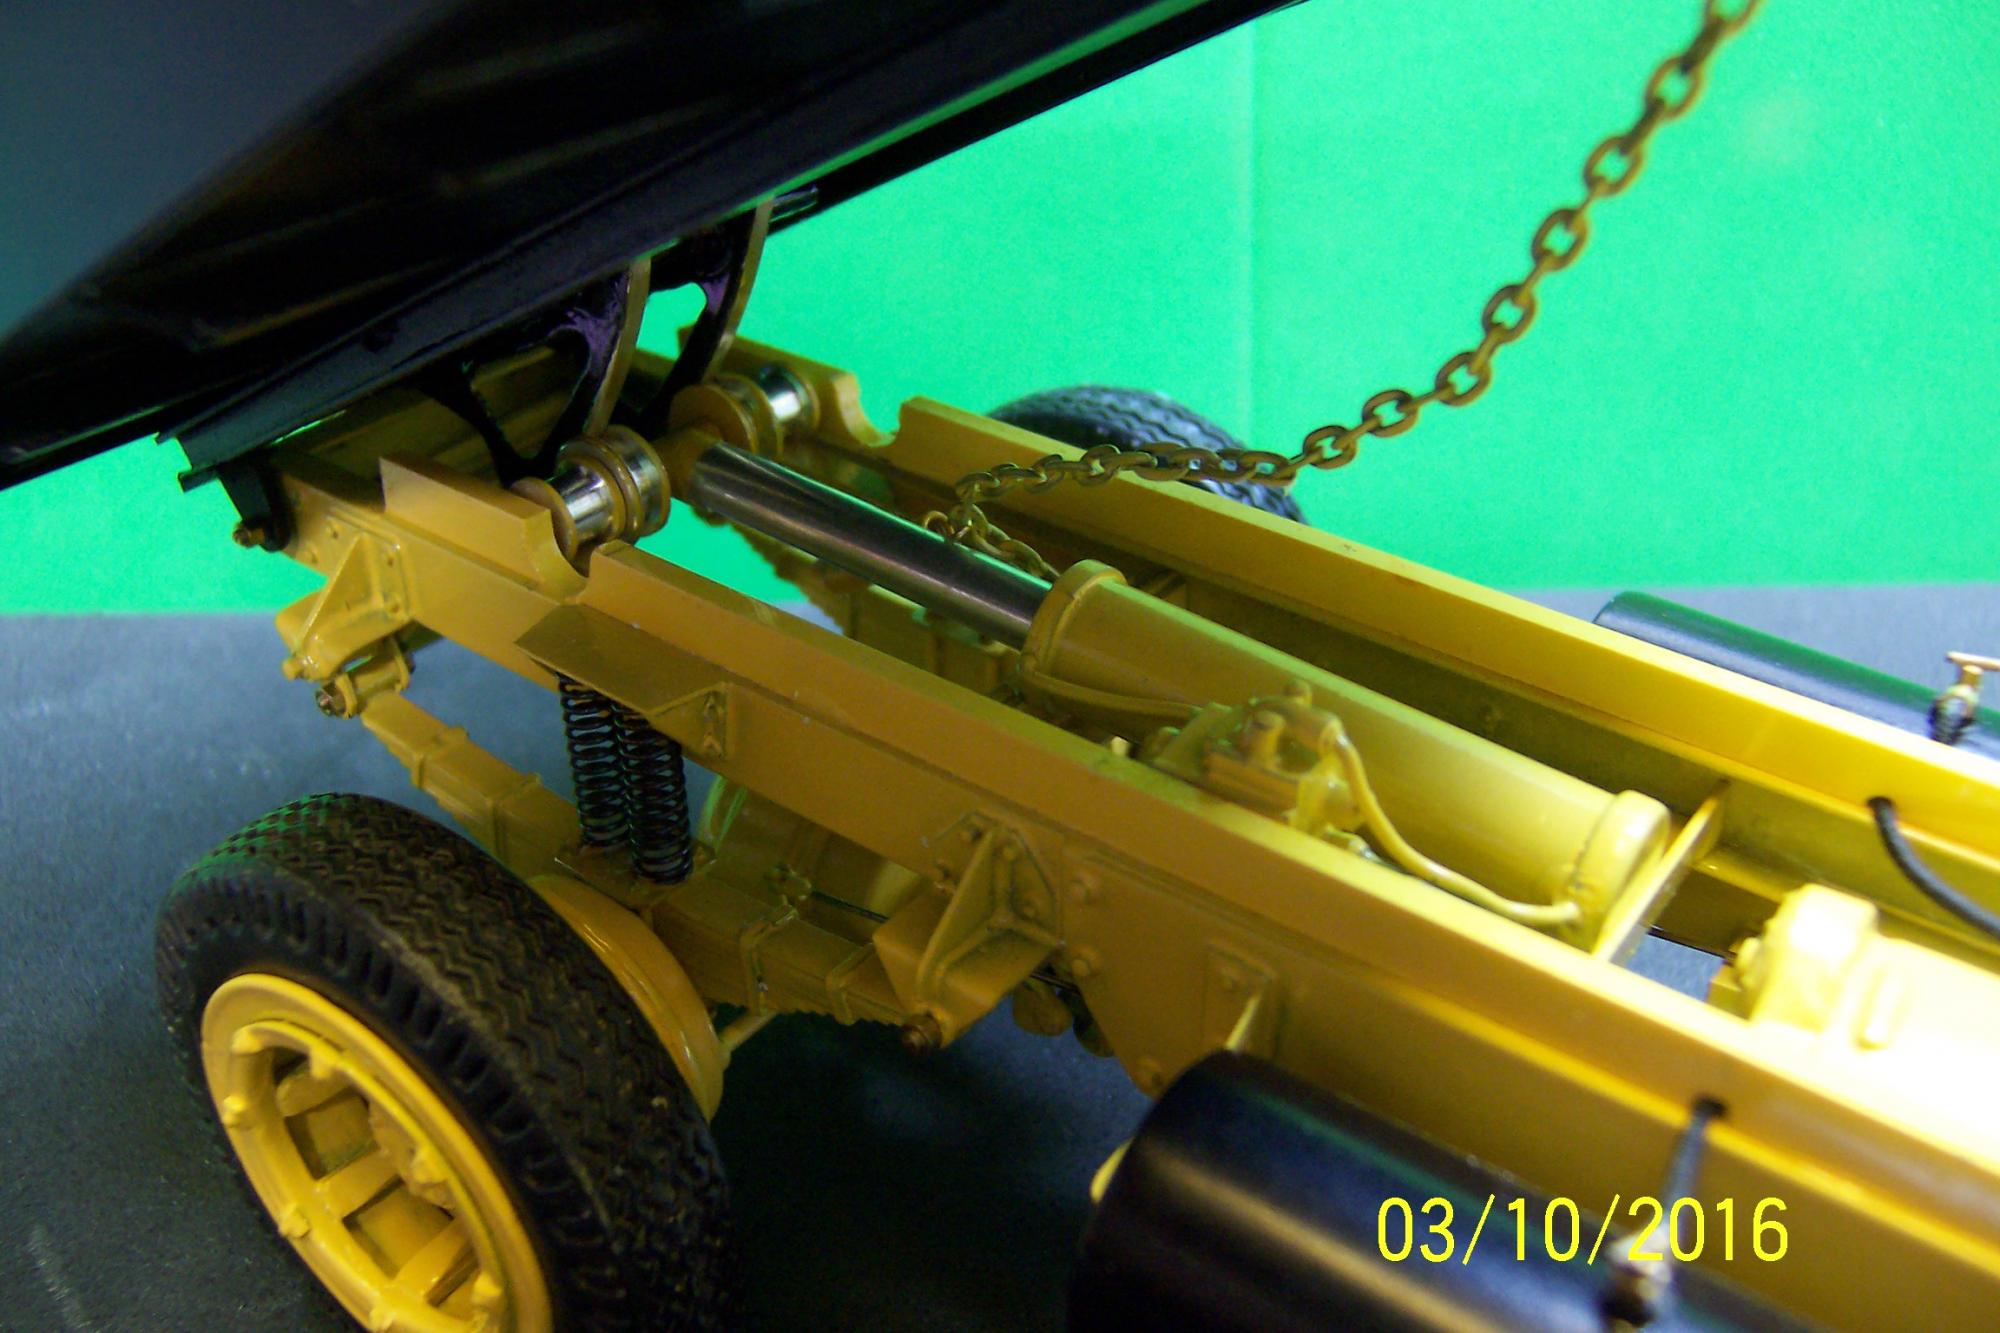
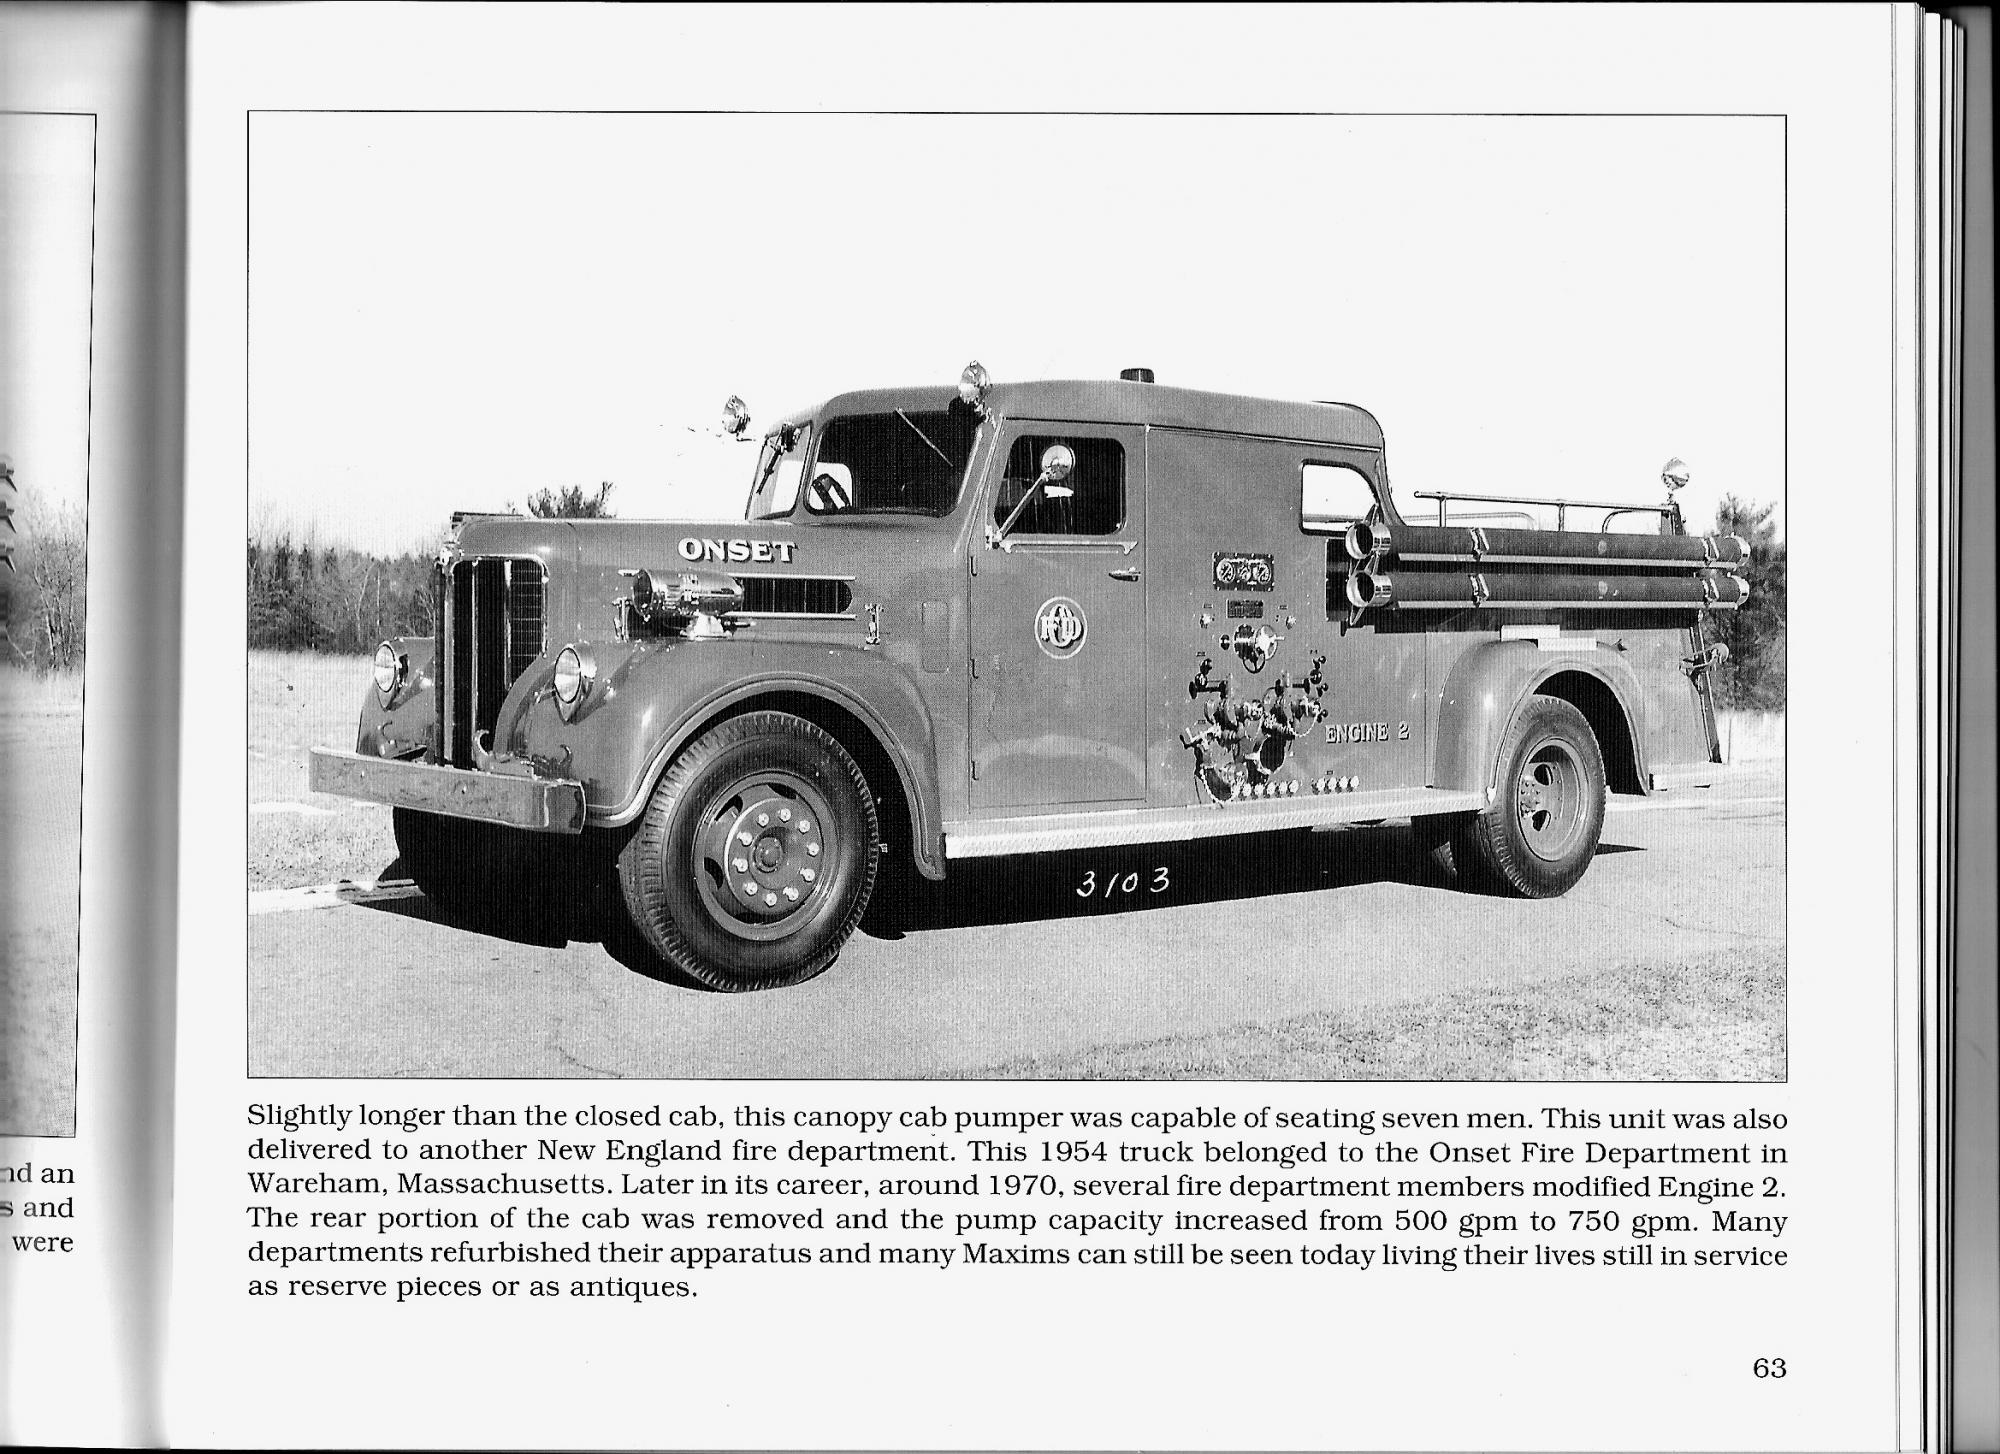
It's been a while since I posted anything that is new. The last build finished in June was intense and I've needed a break from building. But now that fall has really set in and the winter snows will begin (but not yet) the building juices are beginning to flow a bit. For a long while now I have wanted to augment my '55 Maxim aerial with a pumper of the same style. The Onset Fire District in my home town had one that was unique in that it had a partial canopy cab. It is still around, privately owned and the cab has been cut down but the rest is intact. So here is what the real truck looks like and over the next few weeks I'll be collecting measurements for the build. I have several detail photos to go along with the delivery photos so there is plenty to work with. We'll keep posting once the build commences. A few years back I experimented with making a brass door in 1/25 scale with a working outside handle. It will be used as a template and somewhat improved upon so that both outside and inside door handles will work. Expect more brass work on this one. So keep tuned! As Ahhhhhnold once said; "I'll be baaaaack!"
-
Looks like it will be right on track, Terry. One thing, though. I'd ditch the antennas. In real life they would be about an inch thick. Cut them off, drill out the top of the mirror bracket and install some spring wire or stretched sprue.
-
W300 Dodge Project
Chariots of Fire replied to Chariots of Fire's topic in WIP: Model Trucks: Big Rigs and Heavy Equipment
It very well could have been Brian. I never did pay much attention to other than the lines of the cab being a close representation that I could work with! Thanks for the info! -
W300 Dodge Project
Chariots of Fire replied to Chariots of Fire's topic in WIP: Model Trucks: Big Rigs and Heavy Equipment
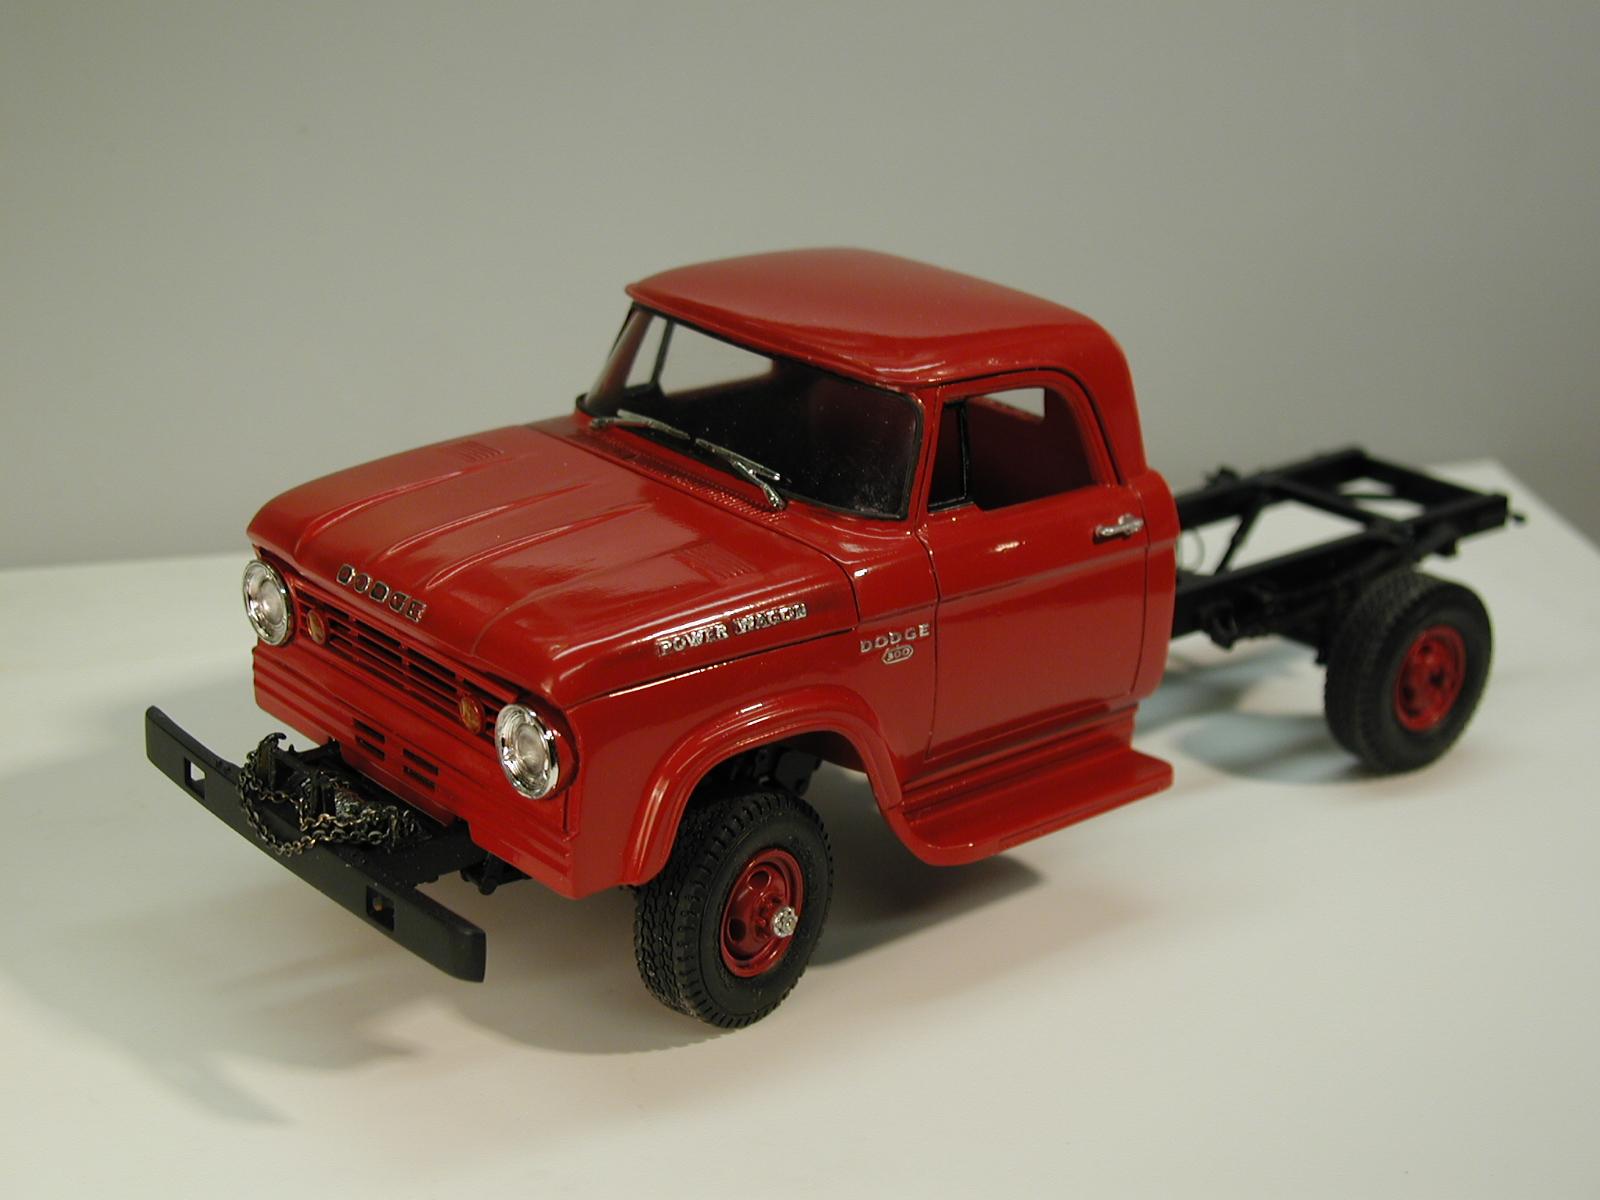
For some reason this got posted twice. Not sure why. Anyway, here is another shot of the W500 cab that was done from the W300. In this one, the fender flairs were made wider, the rear window was made full width and the grill was changed. I also made the inner fender wells separate as Tom said the first castings with the inner wells intact made it difficult to cast. You can also see the windshield much better and it stayed the same as on the original master. I didn't mention it in the earlier post but there is also a drip edge that is above the windshield and that wraps all the way around to be hind the doors. It was made with 030" x 020" strip stock glued in place and then scribed next to the cab.
-
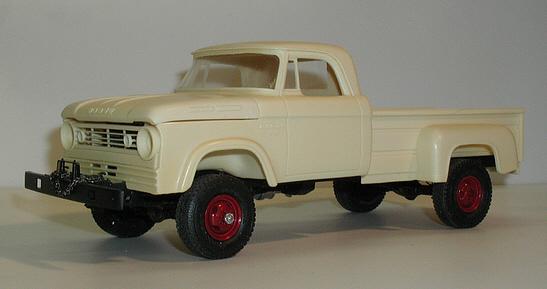
Not sure if this is the right part of the forum for this but I have been asked about the Dodge W300 and W500. I am not doing them but you will find a reference to someone who is further down the list under resin. I am posting some in progress pix of the W300 that I first made from a Ford cab back in 2004. I will explain the conversion process and how to produce a windshield for it. So here goes. This is the beginning of the W300 build using what I think was a'71 Ford p/u cab. It was not new when I got it but it had the basic lines of the Dodge along the sides of the front end and doors. In this photo you can see several changes that were made. The changes were made according to drawings that I found in a Dodge Body Builder's Guide so I think they are reasonably accurate. First the hood and cab were cut longitudinally in half and a 1/4" wide strip of evergreen was glued in. The two halves were then glued back together. You can see that in the photos. Next was to re configure the front fenders. In this photo you can see a diagonal line just back of the fender well. That is where the Ford fenders were cut away and new plastic sheet stock was glued in. Fender flaires were made by first cutting out the opening and glueing in sections of plastic strip stock. The stock was then built up to get the final opening by sanding and using some Squadron putty as a filler at the top of the flair where it meets the fender. The outer lip of the fender opening was made by glueing another piece of strip stock over the first one and then grinding away and sanding the inner wheel opening line to the shape found in the Builder's Guide. The hood of the Ford was changed also by slicing it in two places parallel to the outer edges and forcing the inner portion down. The inner portion was then glued back to the outer sections to form the depression found in the Dodge hood. It was also sanded flatter in front. It really should have been sanded more than I did after studying the final result and comparing it to photos of the real trucks. Alas, it is what it is today! The windshield and door lines were changed also. The Dodge windshield is quite short vertically and it begins with a raised lip at the base that turns the corners and becomes a portion of the side vent windows. You can see that in the photo above with the strip of plastic that curved around at the cowl and continued into the first part of the doors. The photo also shows some pieces of strip stock at the top of the windshield. This was the initial stage of extending the cab roof forward a bit and also dropping the top of the windshield. The Ford windshield is way too high. I have seen other Dodge castings that omit this and it really shows up as not consistent with a Dodge look. On to the doors. The Ford doors were the wrong shape as well but the basic contouring was ok. I filled in the concave portion of the door with plastic as you can see in this and the next photo.You can also see that the original door outline has been filled in and a piece of plastic has been added to the top of the window opening. Dodge doors had a slight taper downward at the top rear. Once that was sanded smooth, the outside of the door was re-scribed. In the photo above the amount of work necessary for the back of the cab is visible. First it was completely cut away from the Ford and reshaped by pieces of plastic sheet and strip stock. Much sanding and filling was necessary to achieve the final result. The pencil lines are indications of where some scribing will be done with a Dremel cutter for the final look. In the next photo you can see the hood and the beginning of the windshield work. The latter is not complete yet but the transformation from Ford to Dodge is apparent. Below is the first pop of the W300 after all of the work was done on the cab. This is a Tom Coolidge product based on the master built up from the Ford. In this photo you will note a strip around the upper portion of the windshield that lines up with the line of the windows in the doors. Now the windshield shape is about as it should be; much less height than the Ford windshield. The pickup body is also a resin pop that Tom did. In order to made a windshield of clear material I first made a template of paper the just fits behind the trim around the windshield opening. After the template was completed it was traced flat onto a piece of clear acetate. At this point it has no final shape but that it easily taken care of with a little hot water and some patience. Running the acetate under hot water will soften it just enough so it can be bent by hand. This was done to both ends to follow the general curvature of the windshield. After a lot of trimming and final bending, the acetate fit into its opening behind the trim pieces without any glue. Because of the way that Tom cast the cab there was a small groove at both top and bottom of the windshield that the acetate seemed to just pop into. It could be pushed into the corners with very little effort. One note about the acetate. Some material tend to craze when they are bent. I wear oxford shirts as a rule, the kind with the button down collars. (Guess that dates me). But when you get them from the store they have clear acetate to hold the collars in shape that you have to pull out and discard. I don't do that. I use it for windshields. It seems to bend easily without crazing. If any of you happen to have purchased one of Tom Coolidge's resin castings of the W300 but don't have the windshield template you can contact me. I still have it and would be glad to mail you out one so you can make up a windshield for your Dodge. Here's a look at the finished cab with the windshield in place. In this photo you can see the many changes that were done to the Ford to made the W300. Incidentally the headlight surrounds are the same as those in the L700 kit.
-
How about making a ramp for the back that the car would ride up on; something like the Ford LN race hauler? You could still leave some of the side compartments for tools etc. Can't see how you would get the car off the bed the way it is without some really long portable ramps.
-
If you are using the rear mount ladder just cut off the turntable part, make a ramp and keep the side compartments for tools and spare parts. You can fill in the jack locations as well with some sheet plastic or keep a pair of them to support the car when it's being loaded.
-
I'm with Zil! I love the color! Nice clean work. Got room for an extinguisher on the rear step?
-
Thanks, Harry. Much appreciated.
-
yup!
-
Just finished this relatively easy build using two different sources for some items. Monogram supplied the basic kit which thankfully had the right cab sheet metal for a solid cab that I could cut away and apply to the roadster cab. Tires and wheels came from the parts box as the kit only had hot rod tires and wheels. Paint is Krylon Hunter Green and Duplicolor Engine Black. Krylon satin black was used for the frame and top. First photo is the real truck. Photos of the Model taken in the same location as the real one.
-
One at a time. More than enough to keep me busy!