jaymcminn
-
Posts
1,762 -
Joined
-
Last visited
Content Type
Profiles
Forums
Events
Gallery
Everything posted by jaymcminn
-
That is insanely pretty. Unusual color for a Gullwing but it really works. Great work!
-

What do you use for chrome? Show your work.
jaymcminn replied to ctruss53's topic in Model Building Questions and Answers
As long as your base is smooth, Molotow is surprisingly unfussy as to how it's airbrushed. It doesn't need any sort of thinning at all. I apply much as you would apply metalizer- 15psi and 2 medium coats. I applied this over polished bare kit plastic and it laid down perfectly! -
What do you use for chrome? Show your work.
jaymcminn replied to ctruss53's topic in Model Building Questions and Answers
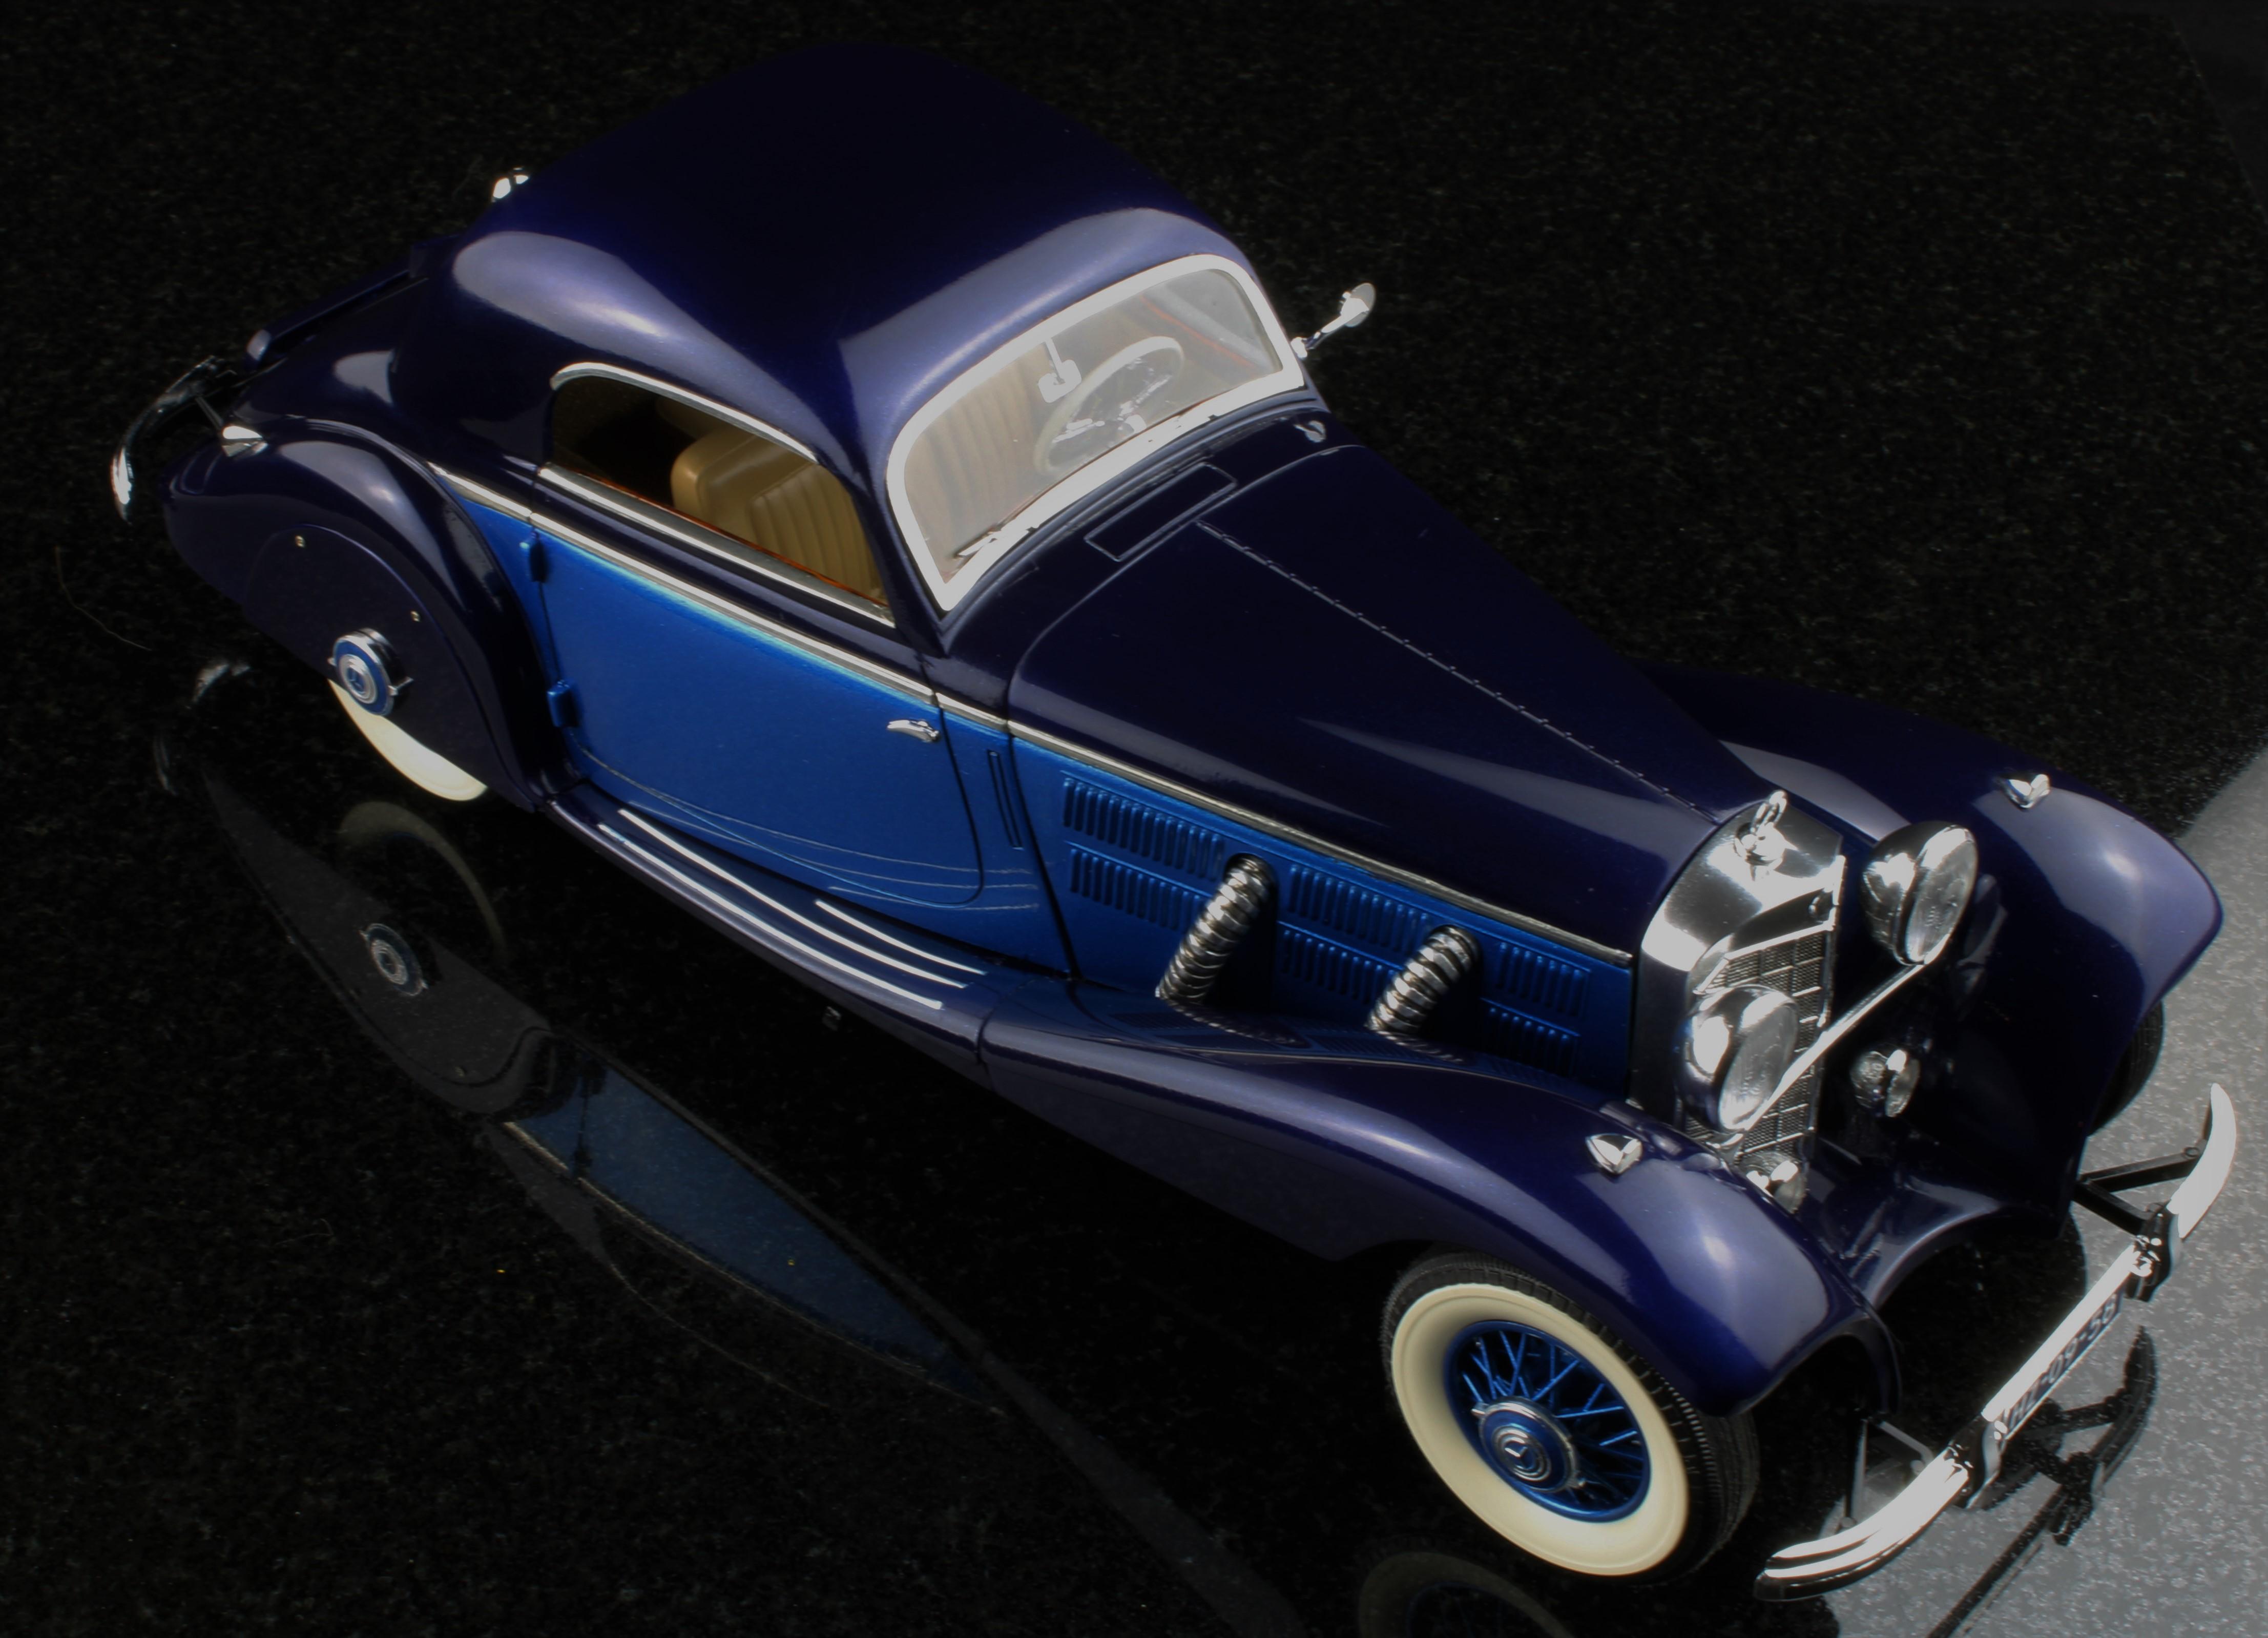
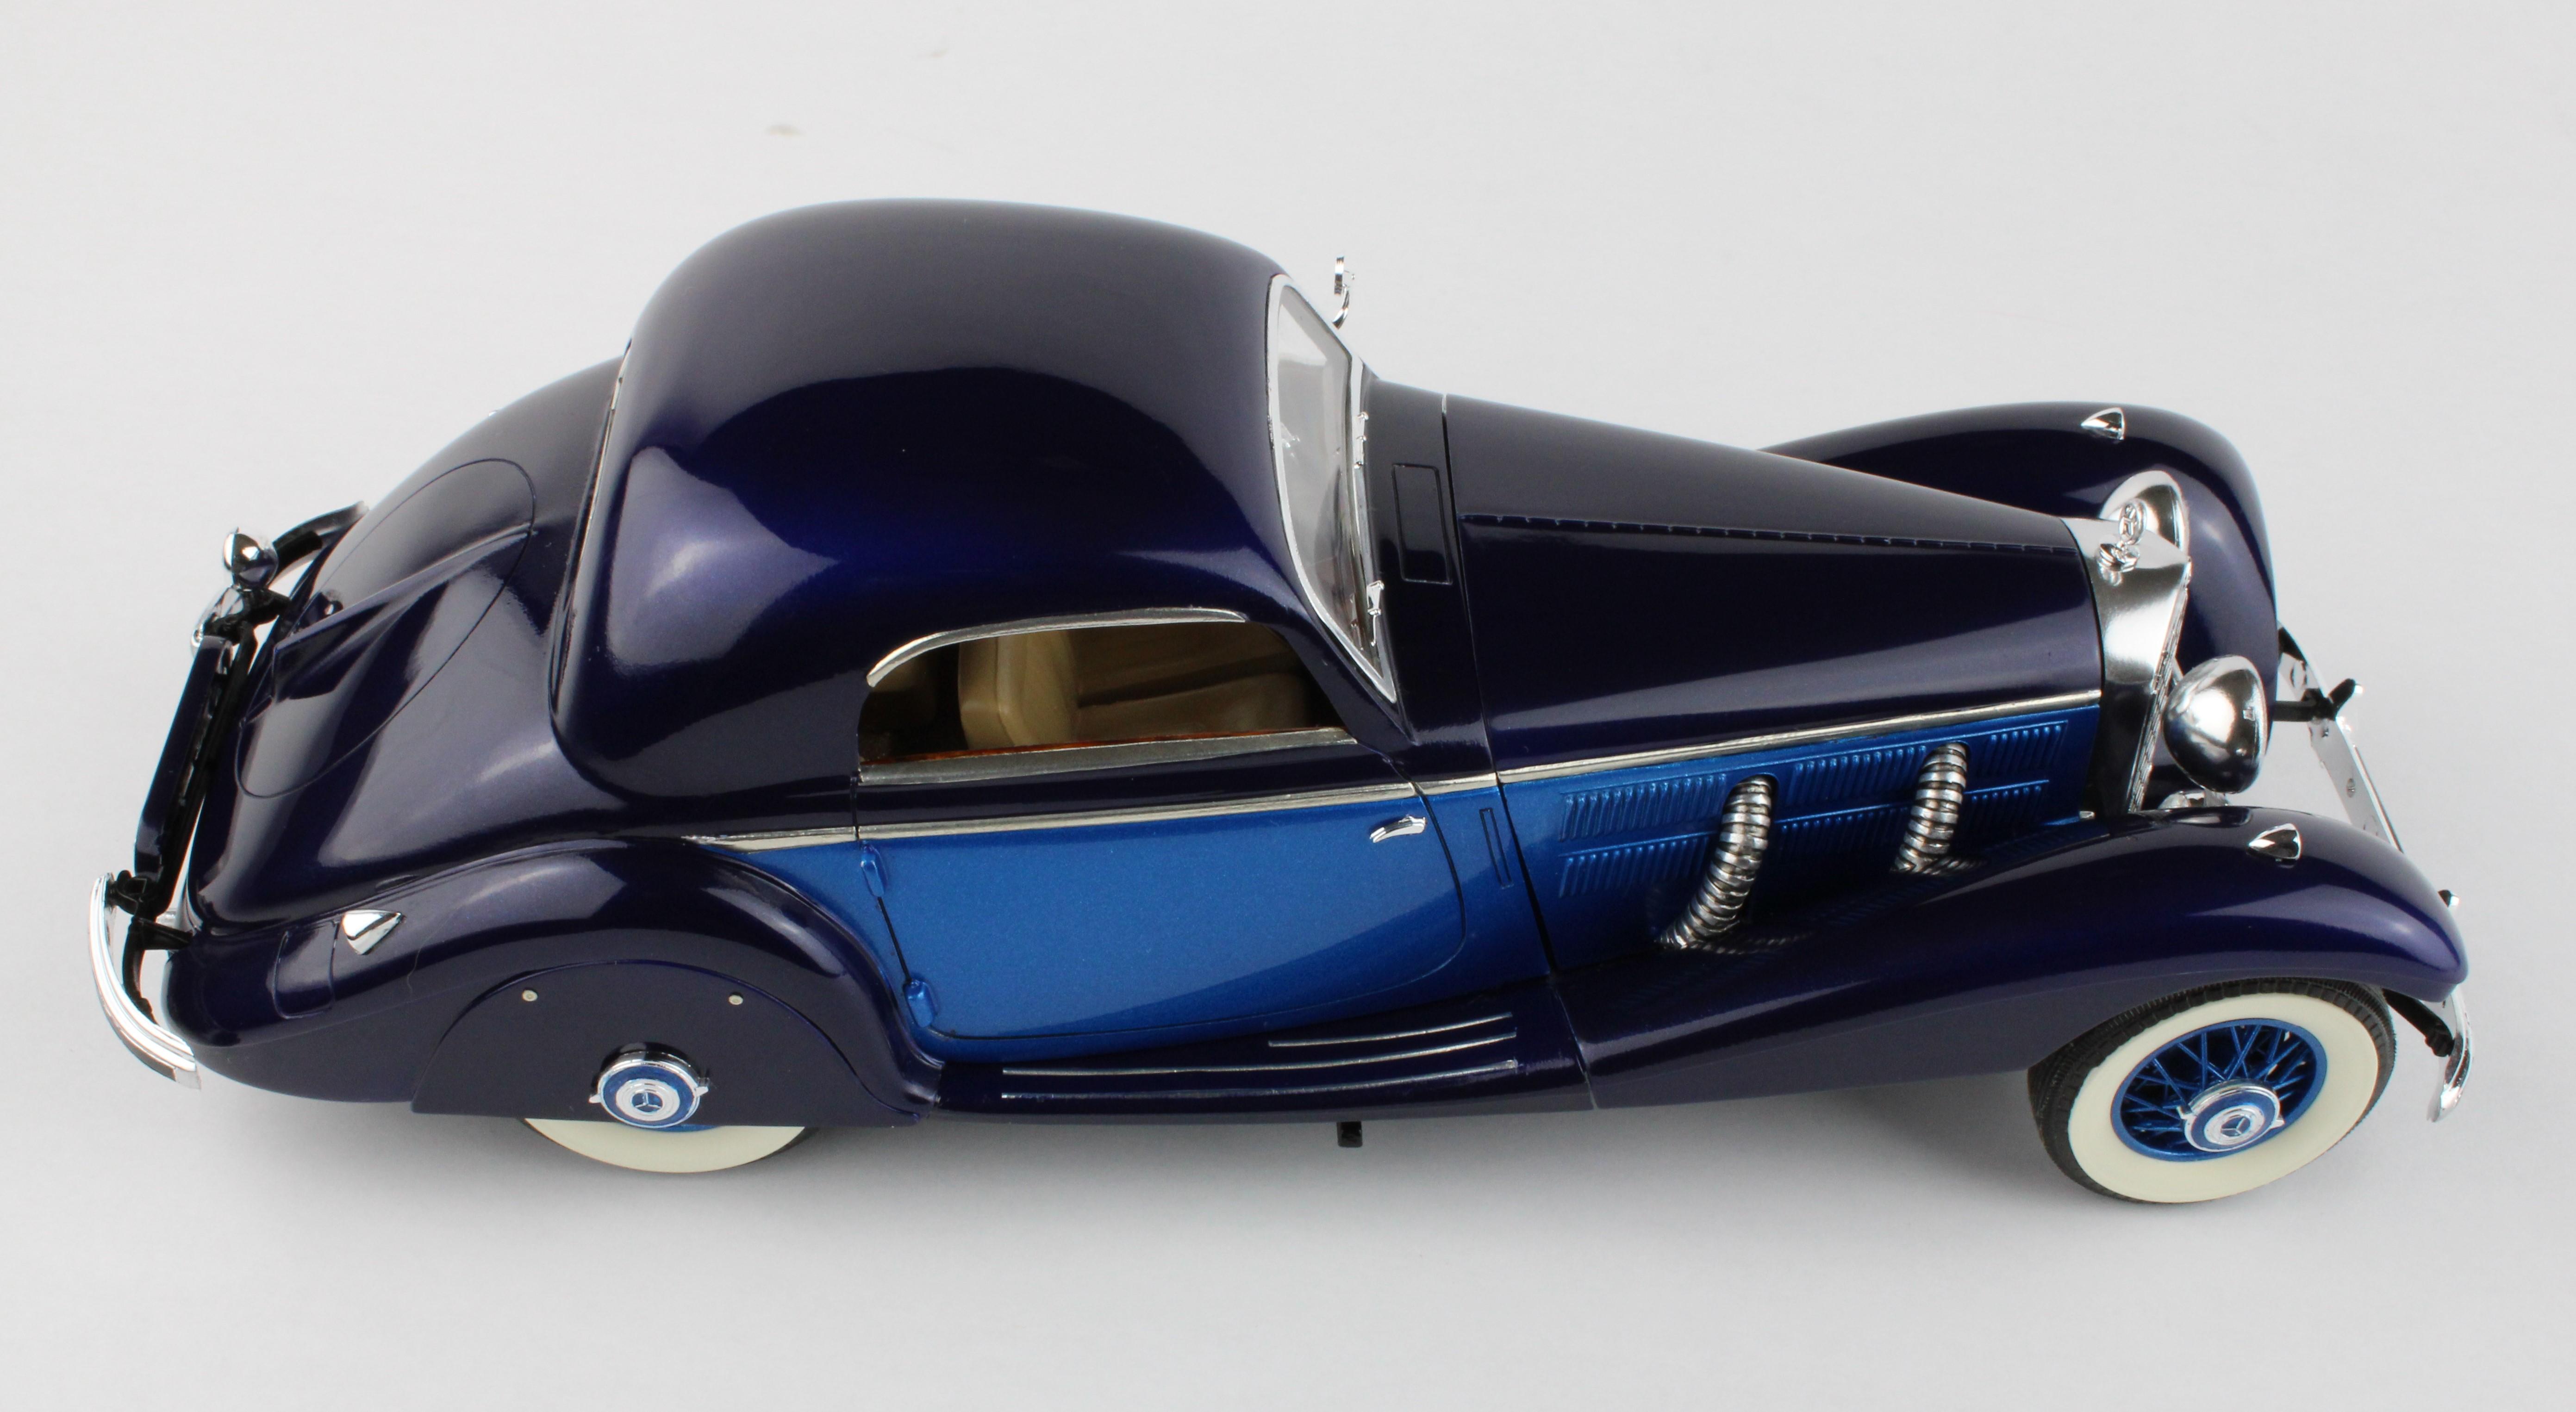
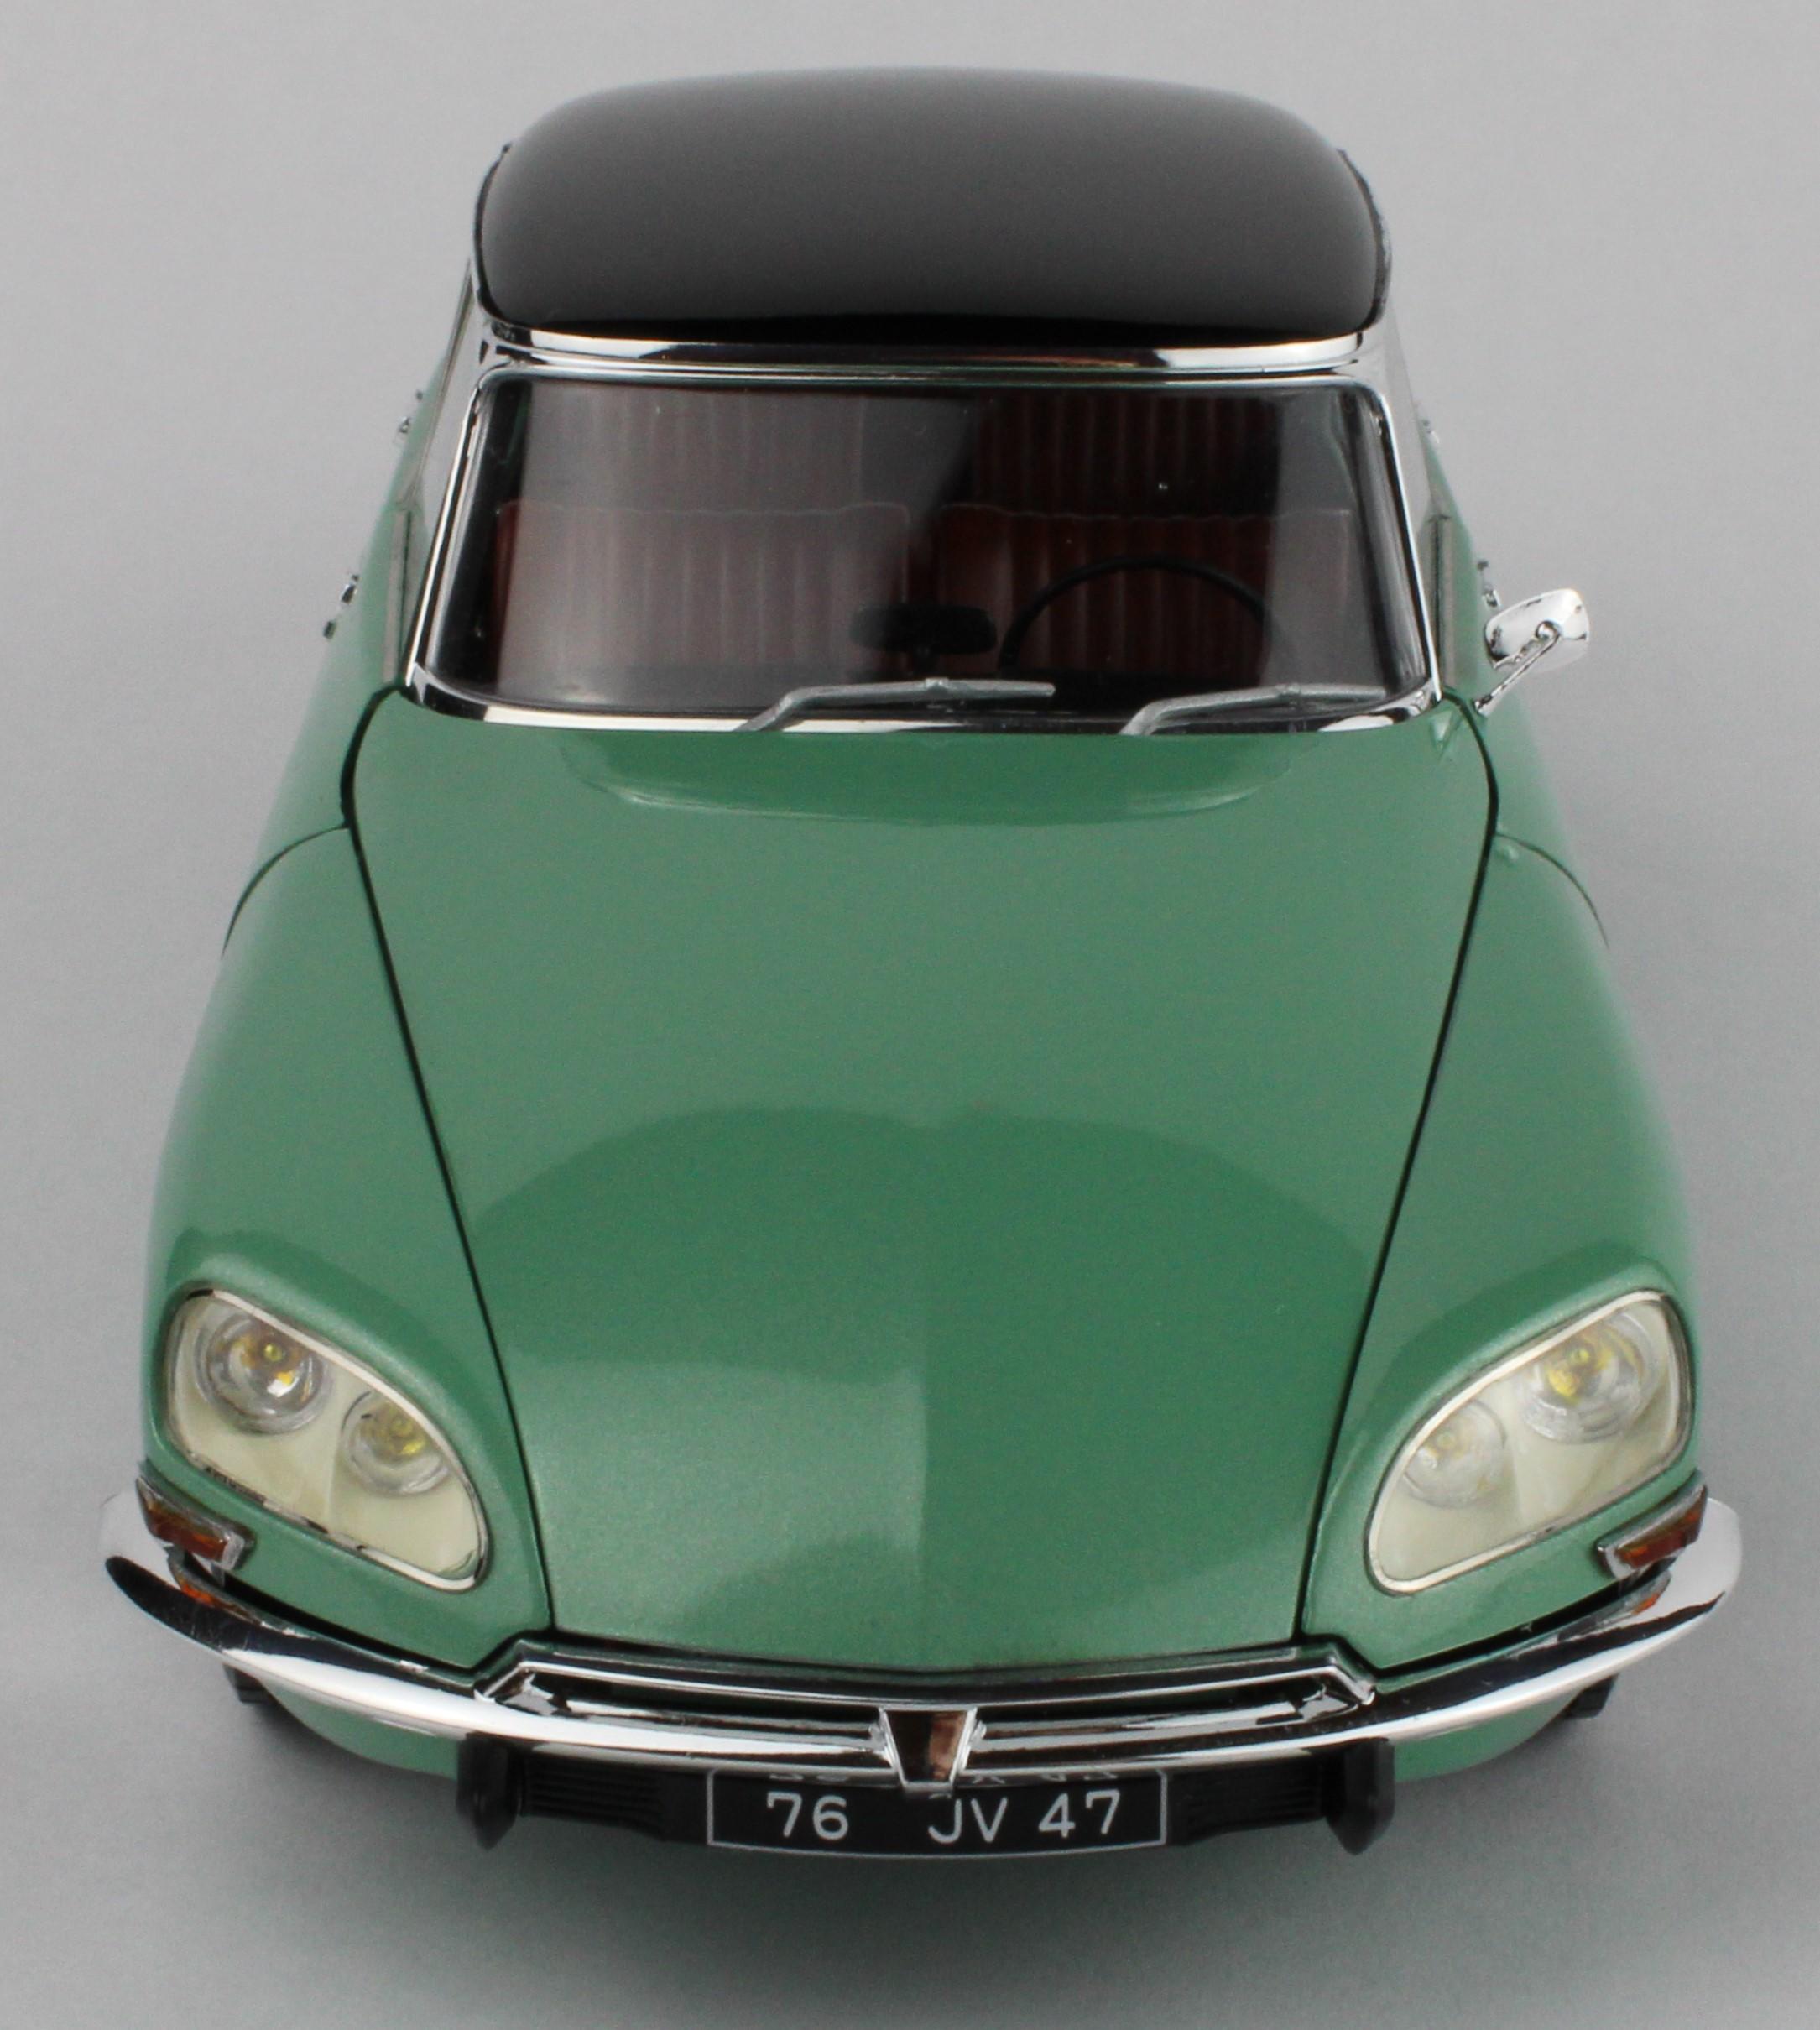
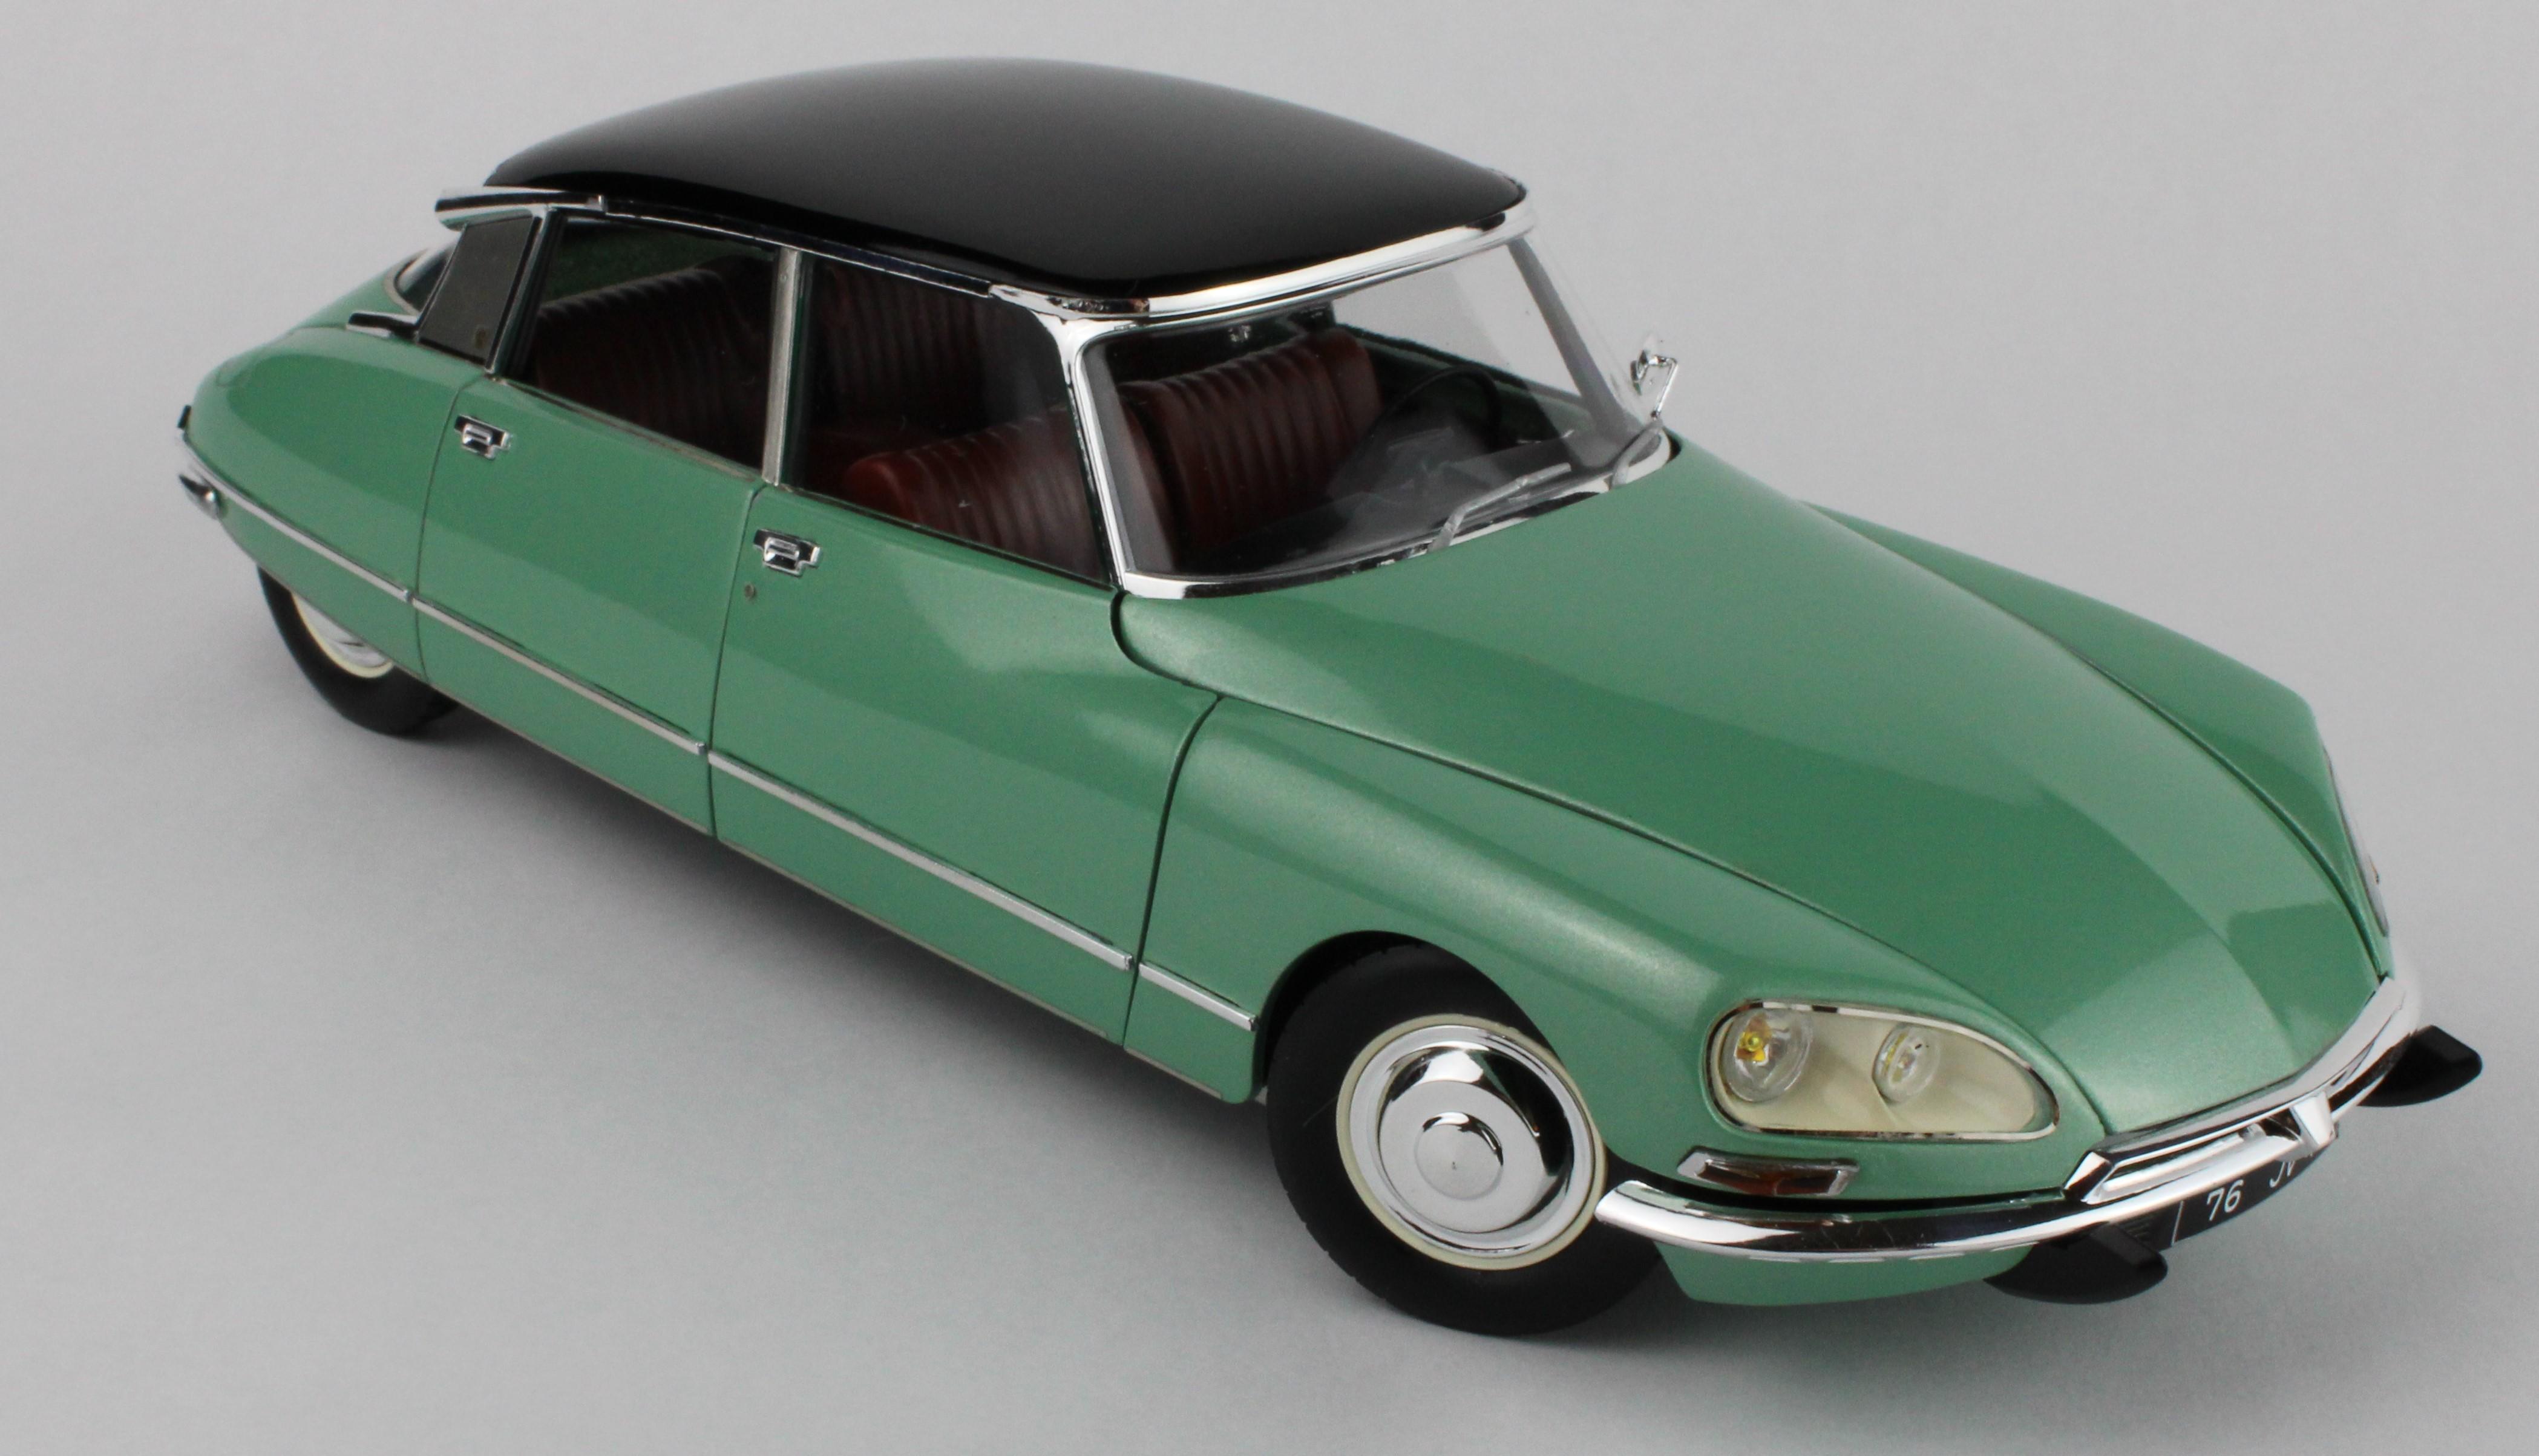
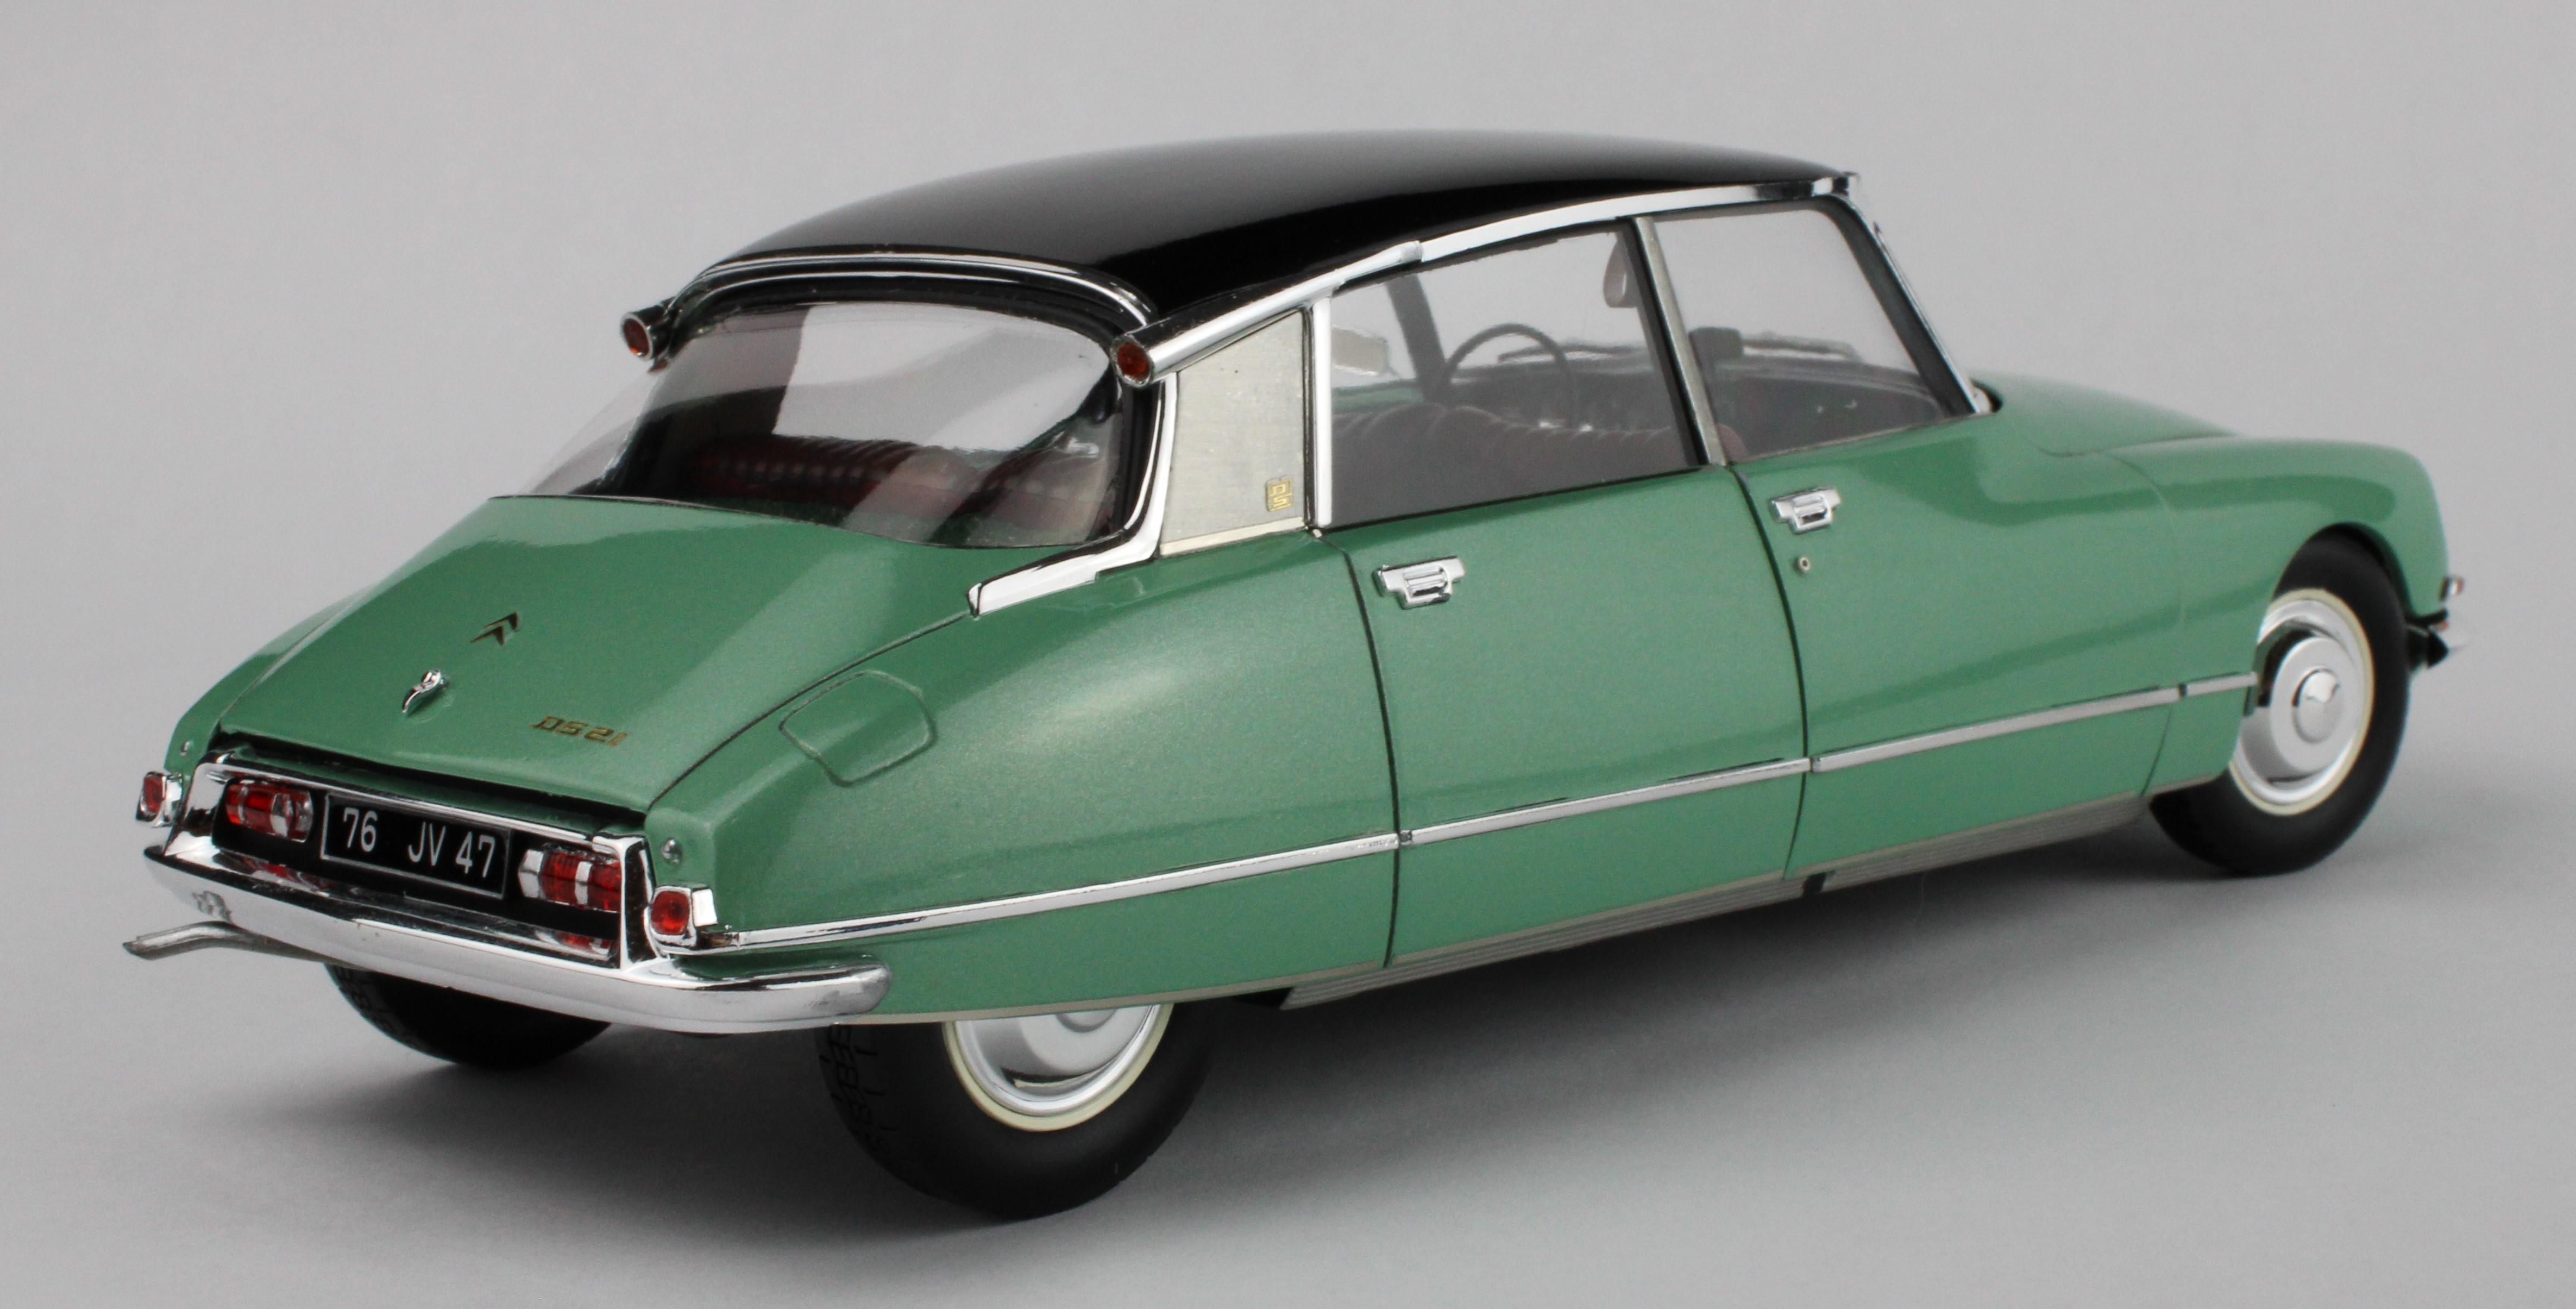
Molotow chrome airbrushed from the refill bottle is fantastic for large surfaces. I also apply it with a brush for small areas. I don't like the pen applicator at all. If it's allowed to dry for several days before handling it is more durable, but it will always be fragile. In my experience it's also the best match to touch up attachment points and mold lines on kit chrome. Below is my Monogram Mercedes 540k. The grille shell (other than the actual grille surface), side pipes and the headlights are airbrushed Molotow. When brushed, Molotow is great for fine details. The vents and chrome trim on this Ebbro Citroen DS21 were done using a 10/0 brush. I can't imagine trying to foil this.
-
Just won an eBay auction for the Tamiya 1/12 Caterham BDR kit. I got it for a great price for a sealed example. This is often called the best kit Tamiya ever produced and I'm massively psyched to build it. Of course it'll be a WIP on here!
-
Lots of effort to get there, but the body is beautiful. I can't believe these kits are going for that kind of money now, glad I got mine when I did!
-
I can't understand why Aoshima tooled up 3 BTTF DeLoreans and never got around to a factory stock version. Yours really shows off the clean lines of that Giugiaro design.
-
I don't see why pictures of a guy pointing up at the sky would be problematic, but that's just me. I usually only point at the sky while driving.
-
Needs a dog for the tailgate. Otherwise it's perfect!
-
That is fantastic. The washes you used really bring out the detail in the wheels and trim. I particularly like the running boards and the trim strips for the side curtains. The engine bay and interior detail are clean and crisp and the paint is beautiful. Shooting your pics in the booth really catches the look of the shot you included of your 1:1 inspiration as well.
-
1- WEAR GLOVES. Place parts/trees into a plastic container with a tight-fitting lid and spray Easy Off over parts, enough to cover them. Easy Off will cling to the parts, you don't need to submerge them completely. Do this outside and don't breathe the fumes. Place the lid on the container and give it a good shake. Periodically shake the container to make sure the Easy Off gets to all surfaces. After an hour or so, rinse the parts in water (gloves again), scrub with a toothbrush and let air-dry. Just make sure you don't have the fume-free stuff. Old school Easy Off has lye for its active ingredient, which makes it good for cleaning both chrome parts and your nasty oven!
-
What a clean build. I'm eyeing the one in my stash now!
-
Great build of the Deux Chevaux. Absolutely spot-on.
-
Thanks Trevor! Model Roundup actually has this kit in stock right now. Not sure how much shipping is to Canada, though.
-
Thanks man! This kit had some of the nicest chrome I've ever seen. I touched up attachment points with Molotow and used Molotow on the ends of the rear bumper where I had to sand down some mold lines. Other than that, it's all kit chrome. Thanks Bob! I'm not a huge proponent of converting classic gas cars to electric, but the DS would be the perfect candidate. Ditching the tractor engine for something quiet and powerful would make the DS into the car it was always meant to be! Thanks Mike! I'm hoping for a Safari and a Convertible from Ebbro as well. I'll buy 'em all!
-
Murky buckets!
-
Thanks Ryan! I've honestly been thinking about stepping away from weird French cars and prewar European stuff to build something American for a change. Post up that Packard, is it the Monogram 1930 Roadster? Thanks Matt, the pics against the white background needed no editing whatsoever beyond cropping but the dark background required judicious use of photo editing software. That engine bay is maybe a little too tidy, I used some washes and Tamiya pastels to give it the "well-kept driver" look. I was tempted to give the model a more weather beaten look with mismatched panels, missing trim, etc. but I just couldn't bring myself to do it. Maybe if I get my hands on a DS19 some day...
-
Yup, stripping the aluminum layer but leaving the clear is only half the battle. That clear layer is usually pretty thick and, especially on engine parts, can obscure the molded detail. I've always used oven cleaner with lye and have been happy with the results.
-
Some people get great gloss finishes on bodies with water-based paint and clear. I'm not one of them. I airbrush Vallejo, Tamiya and Revell acrylics for interior and mechanical parts, but still rely on lacquers for exterior paint. I do have a decent respirator and a spray booth for painting inside as well as using nitrile gloves while holding parts during painting, no point in taking any chances with my health!
-
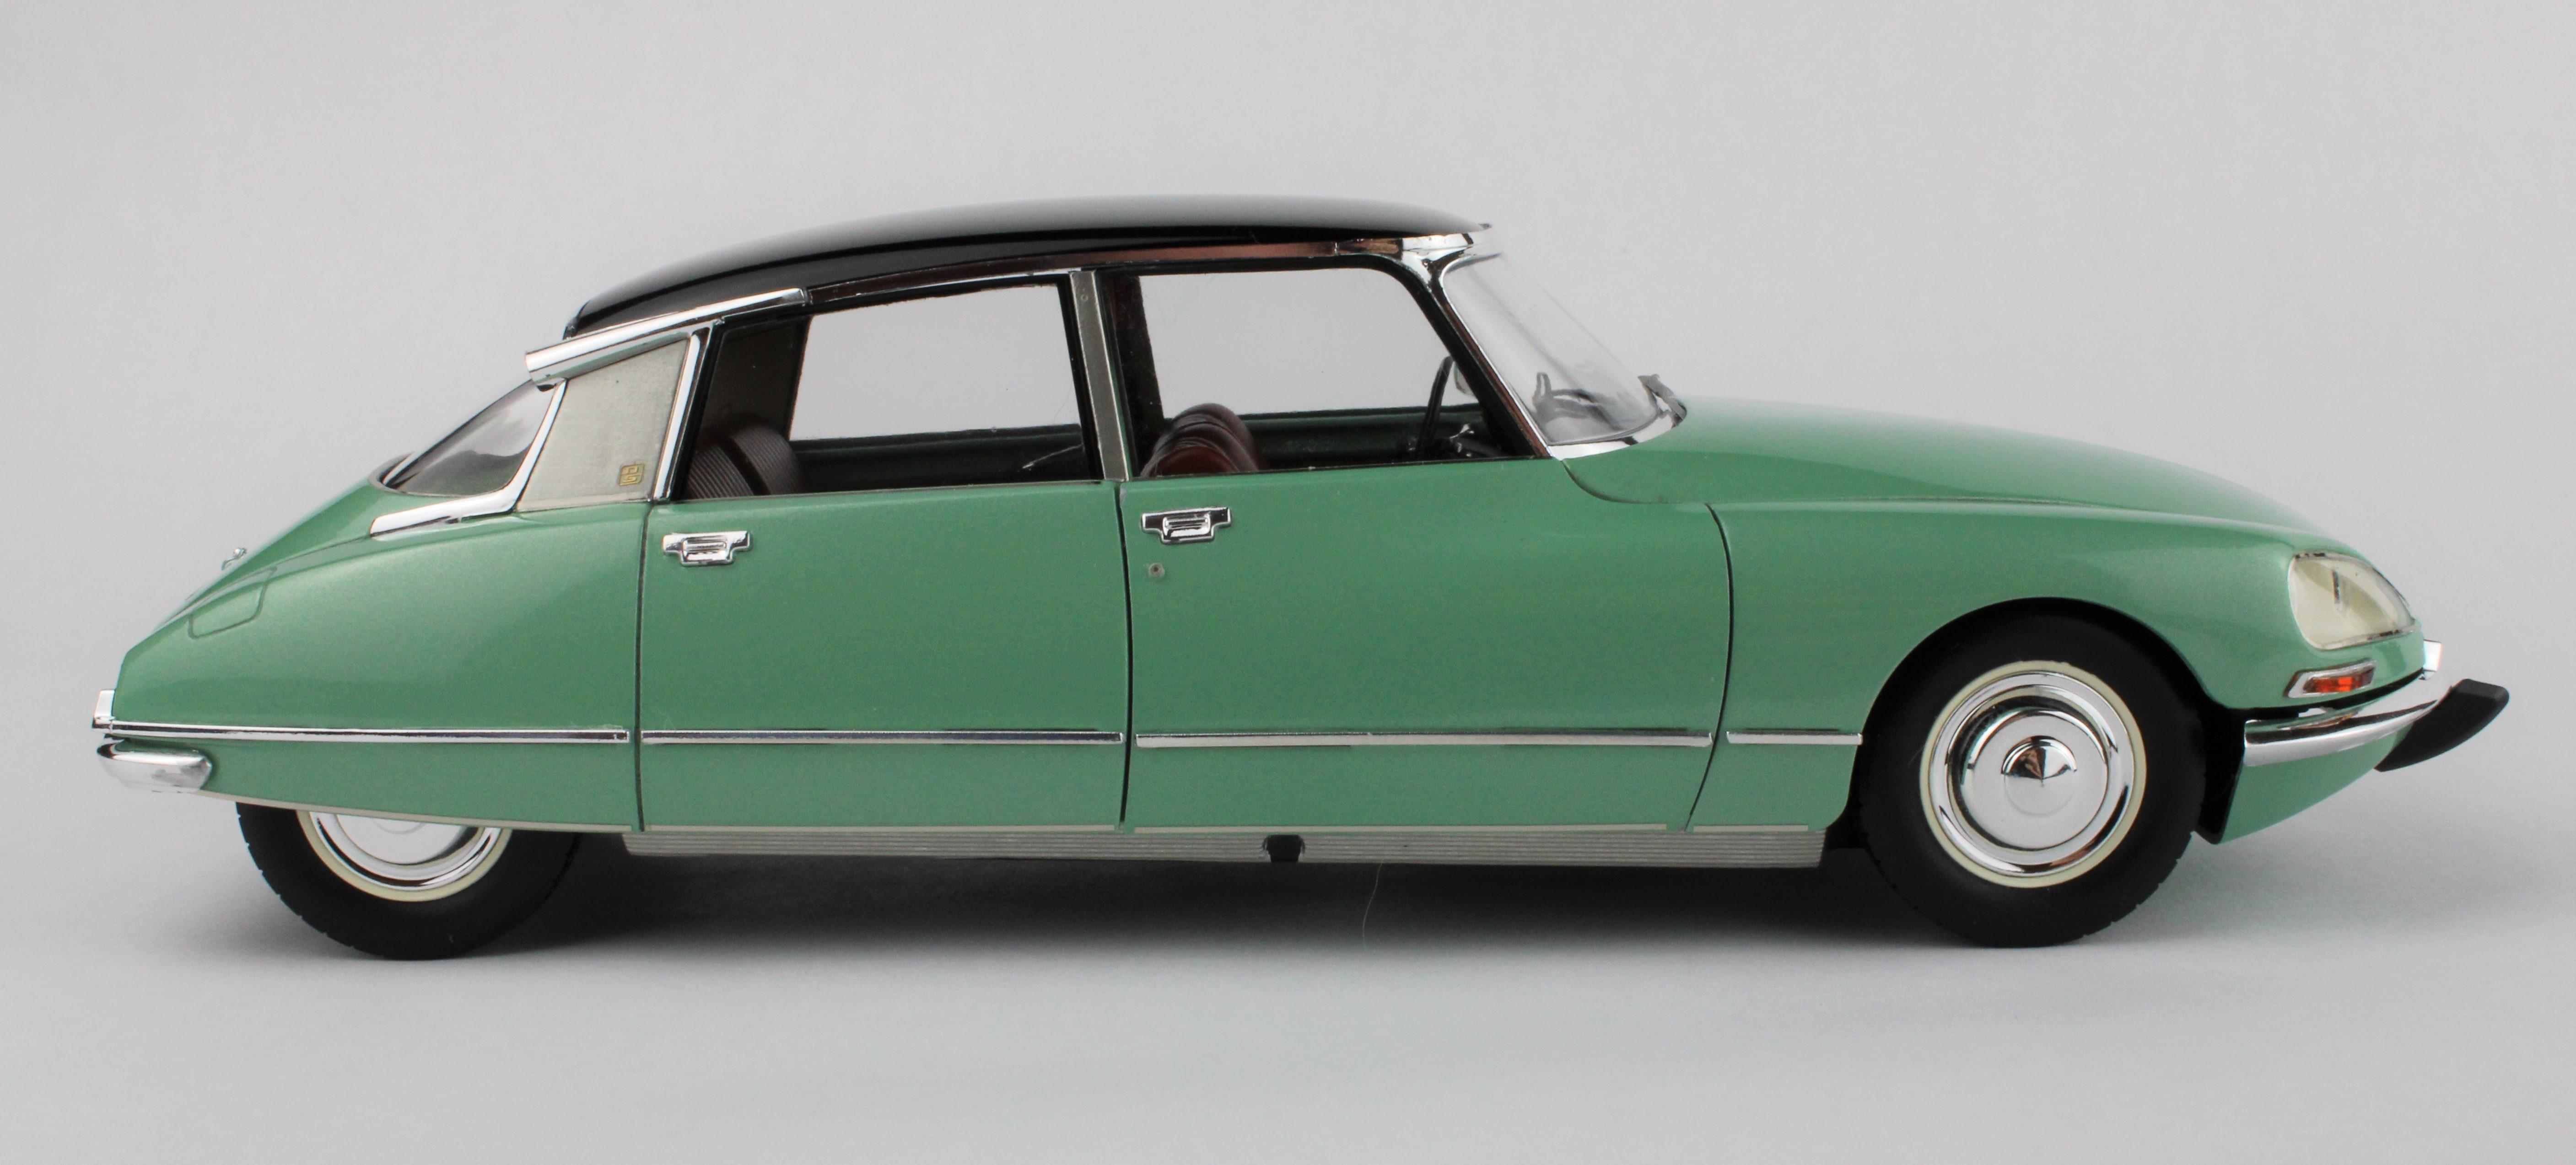
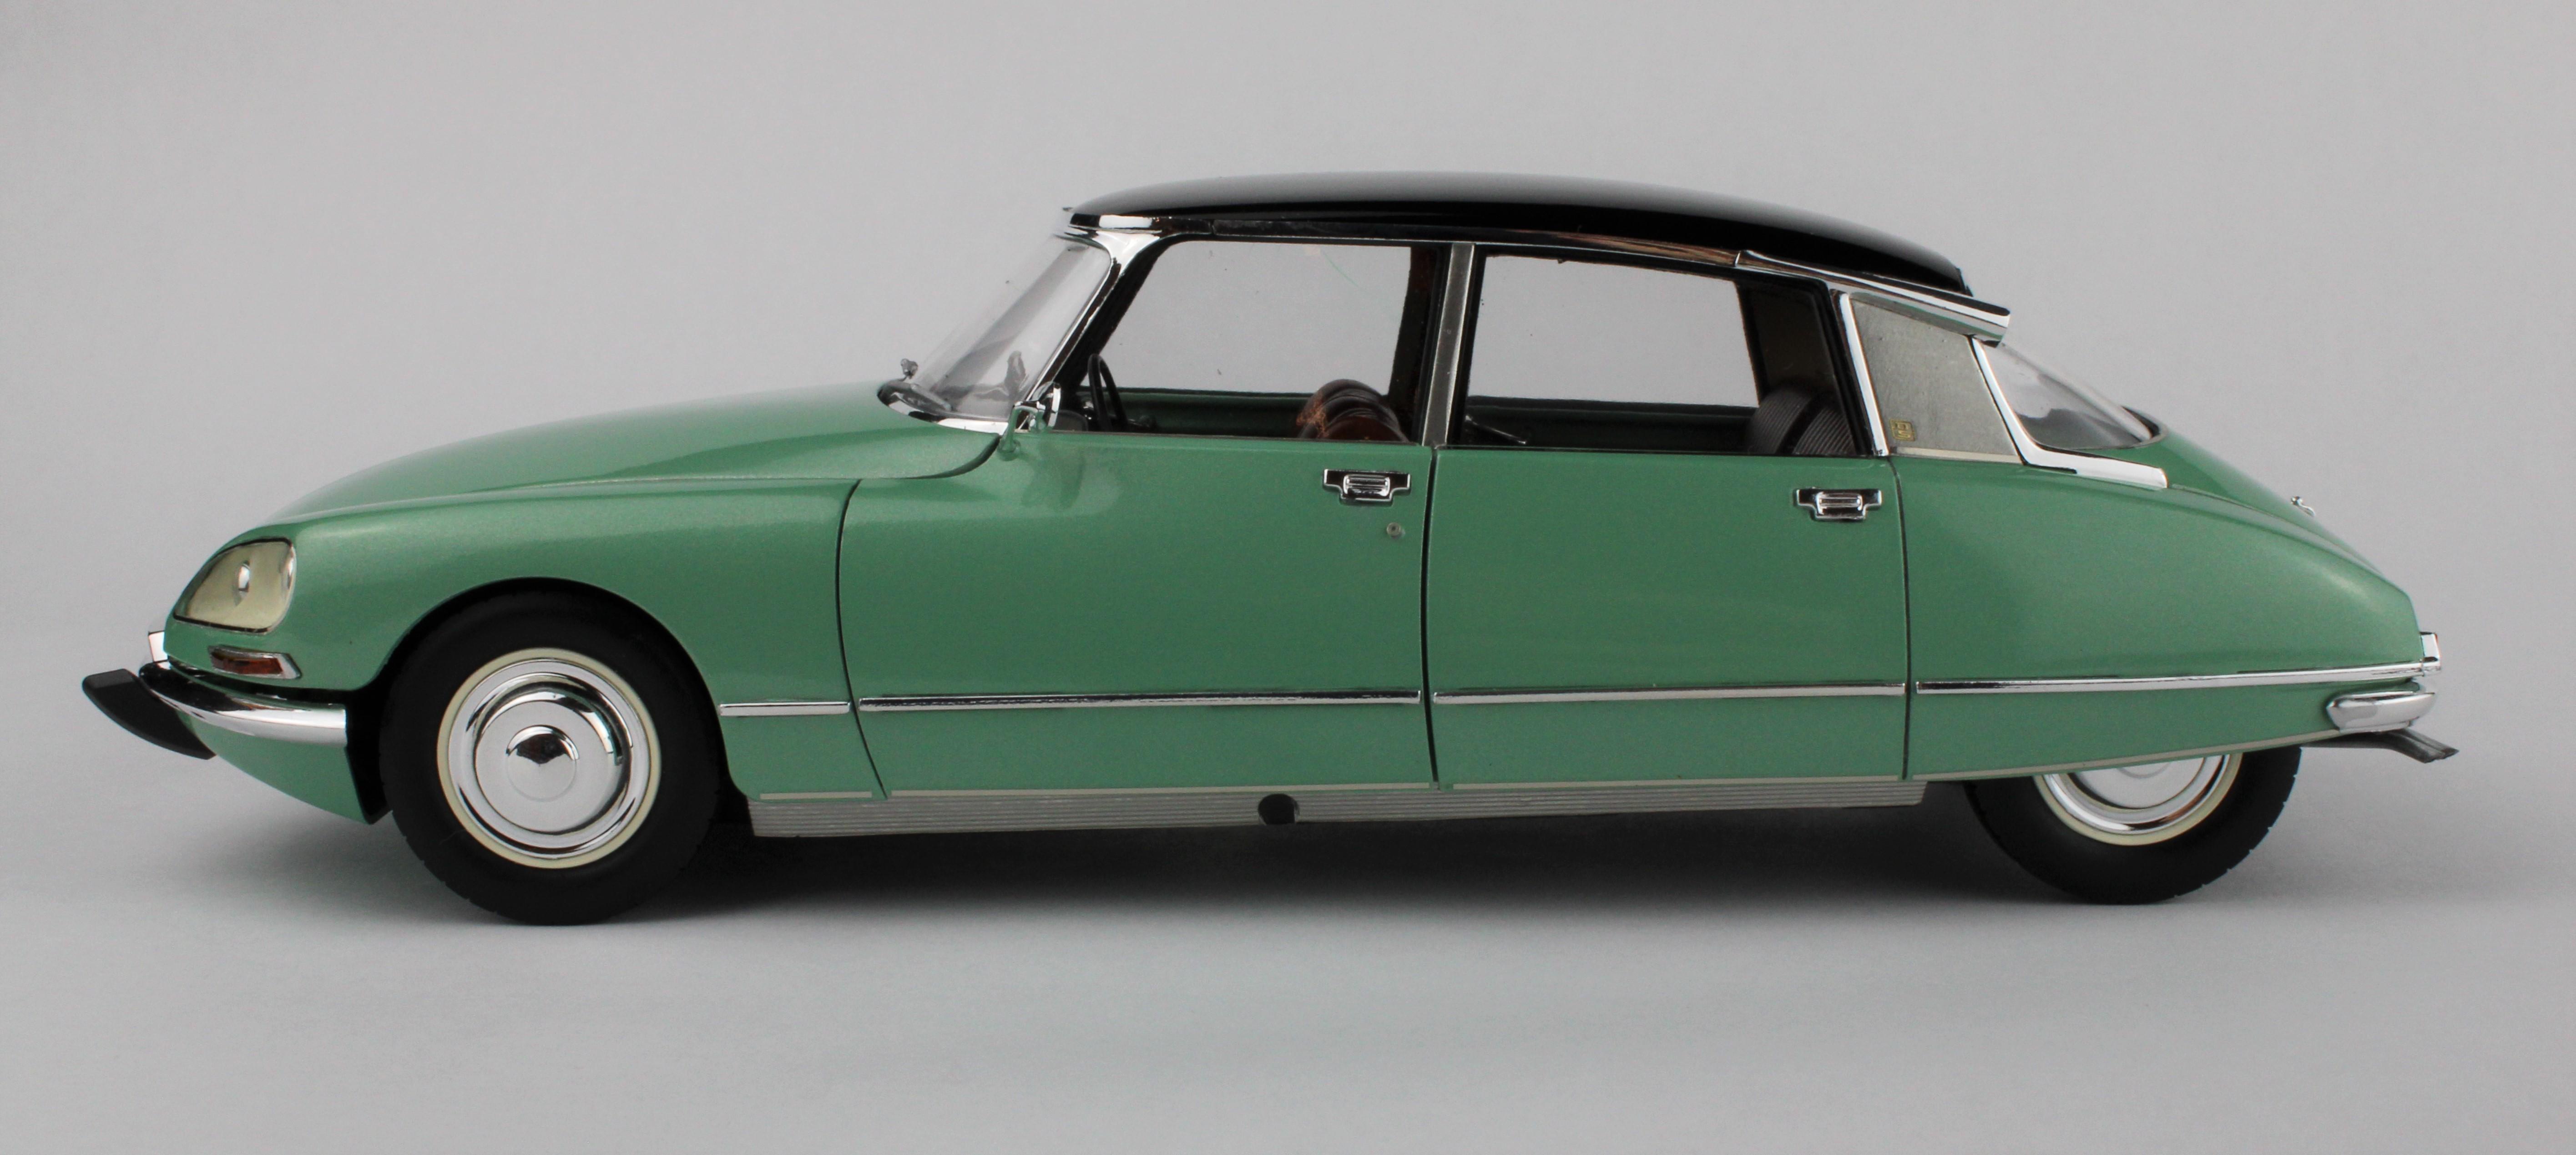
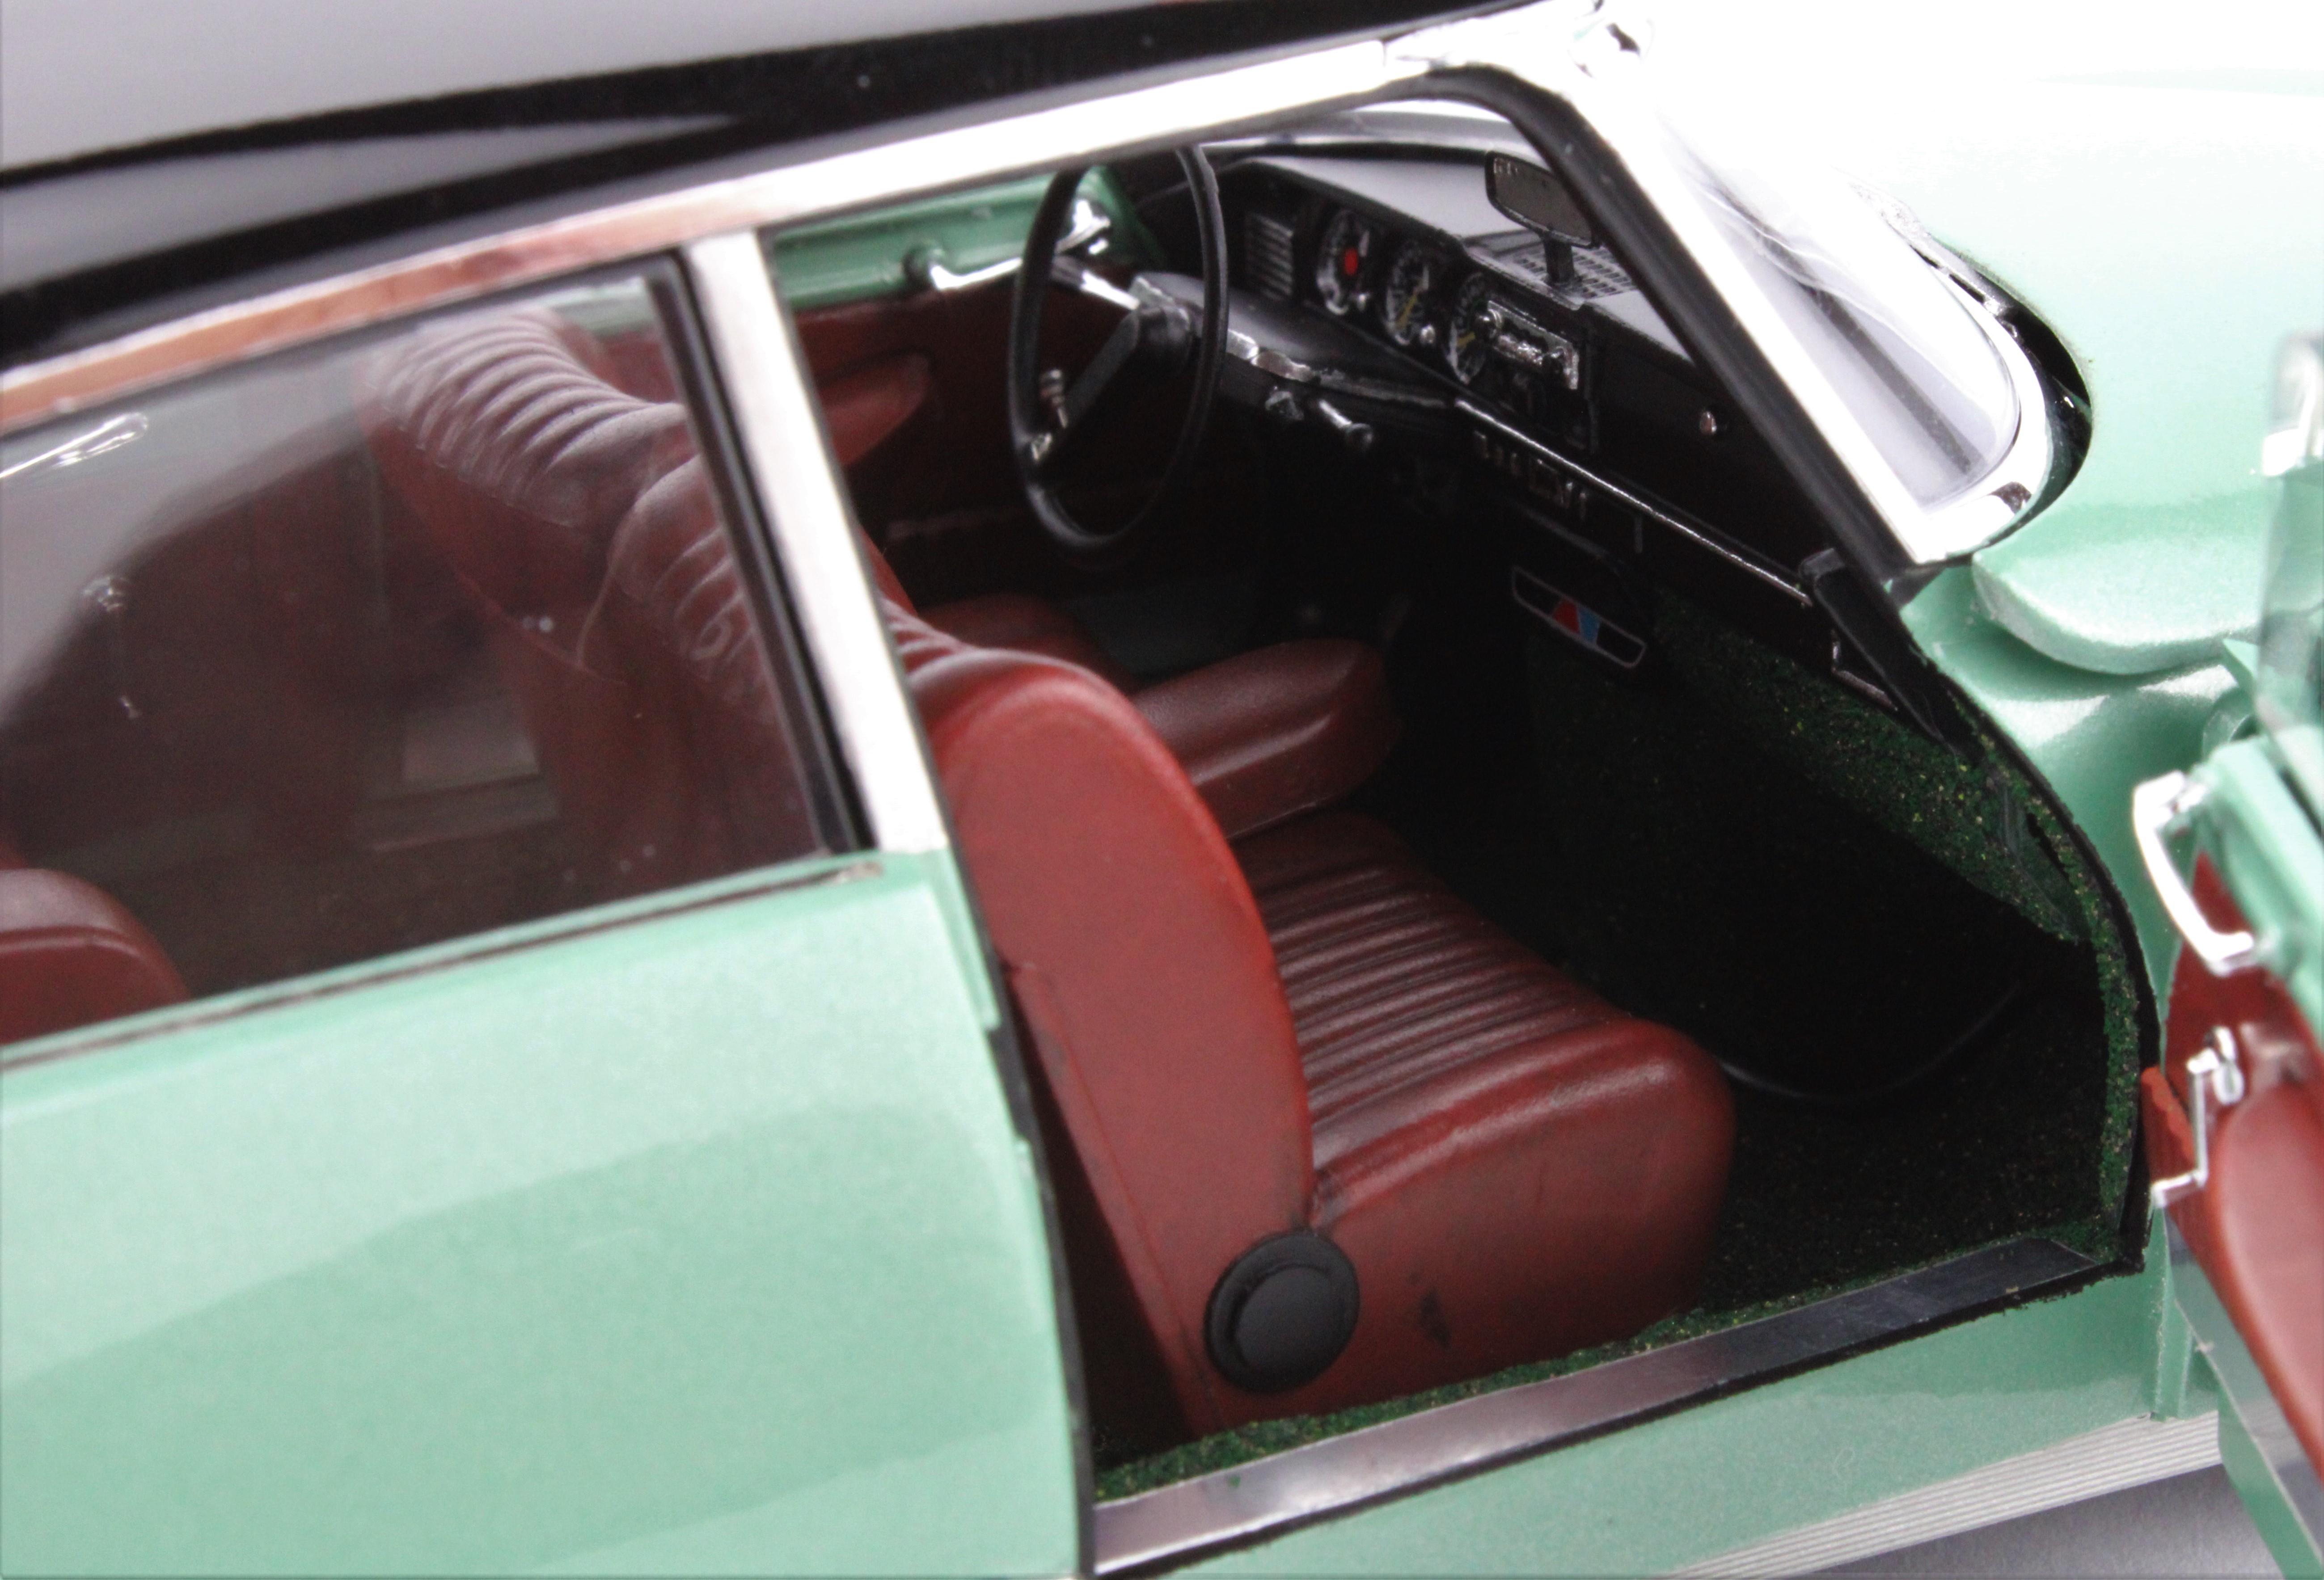
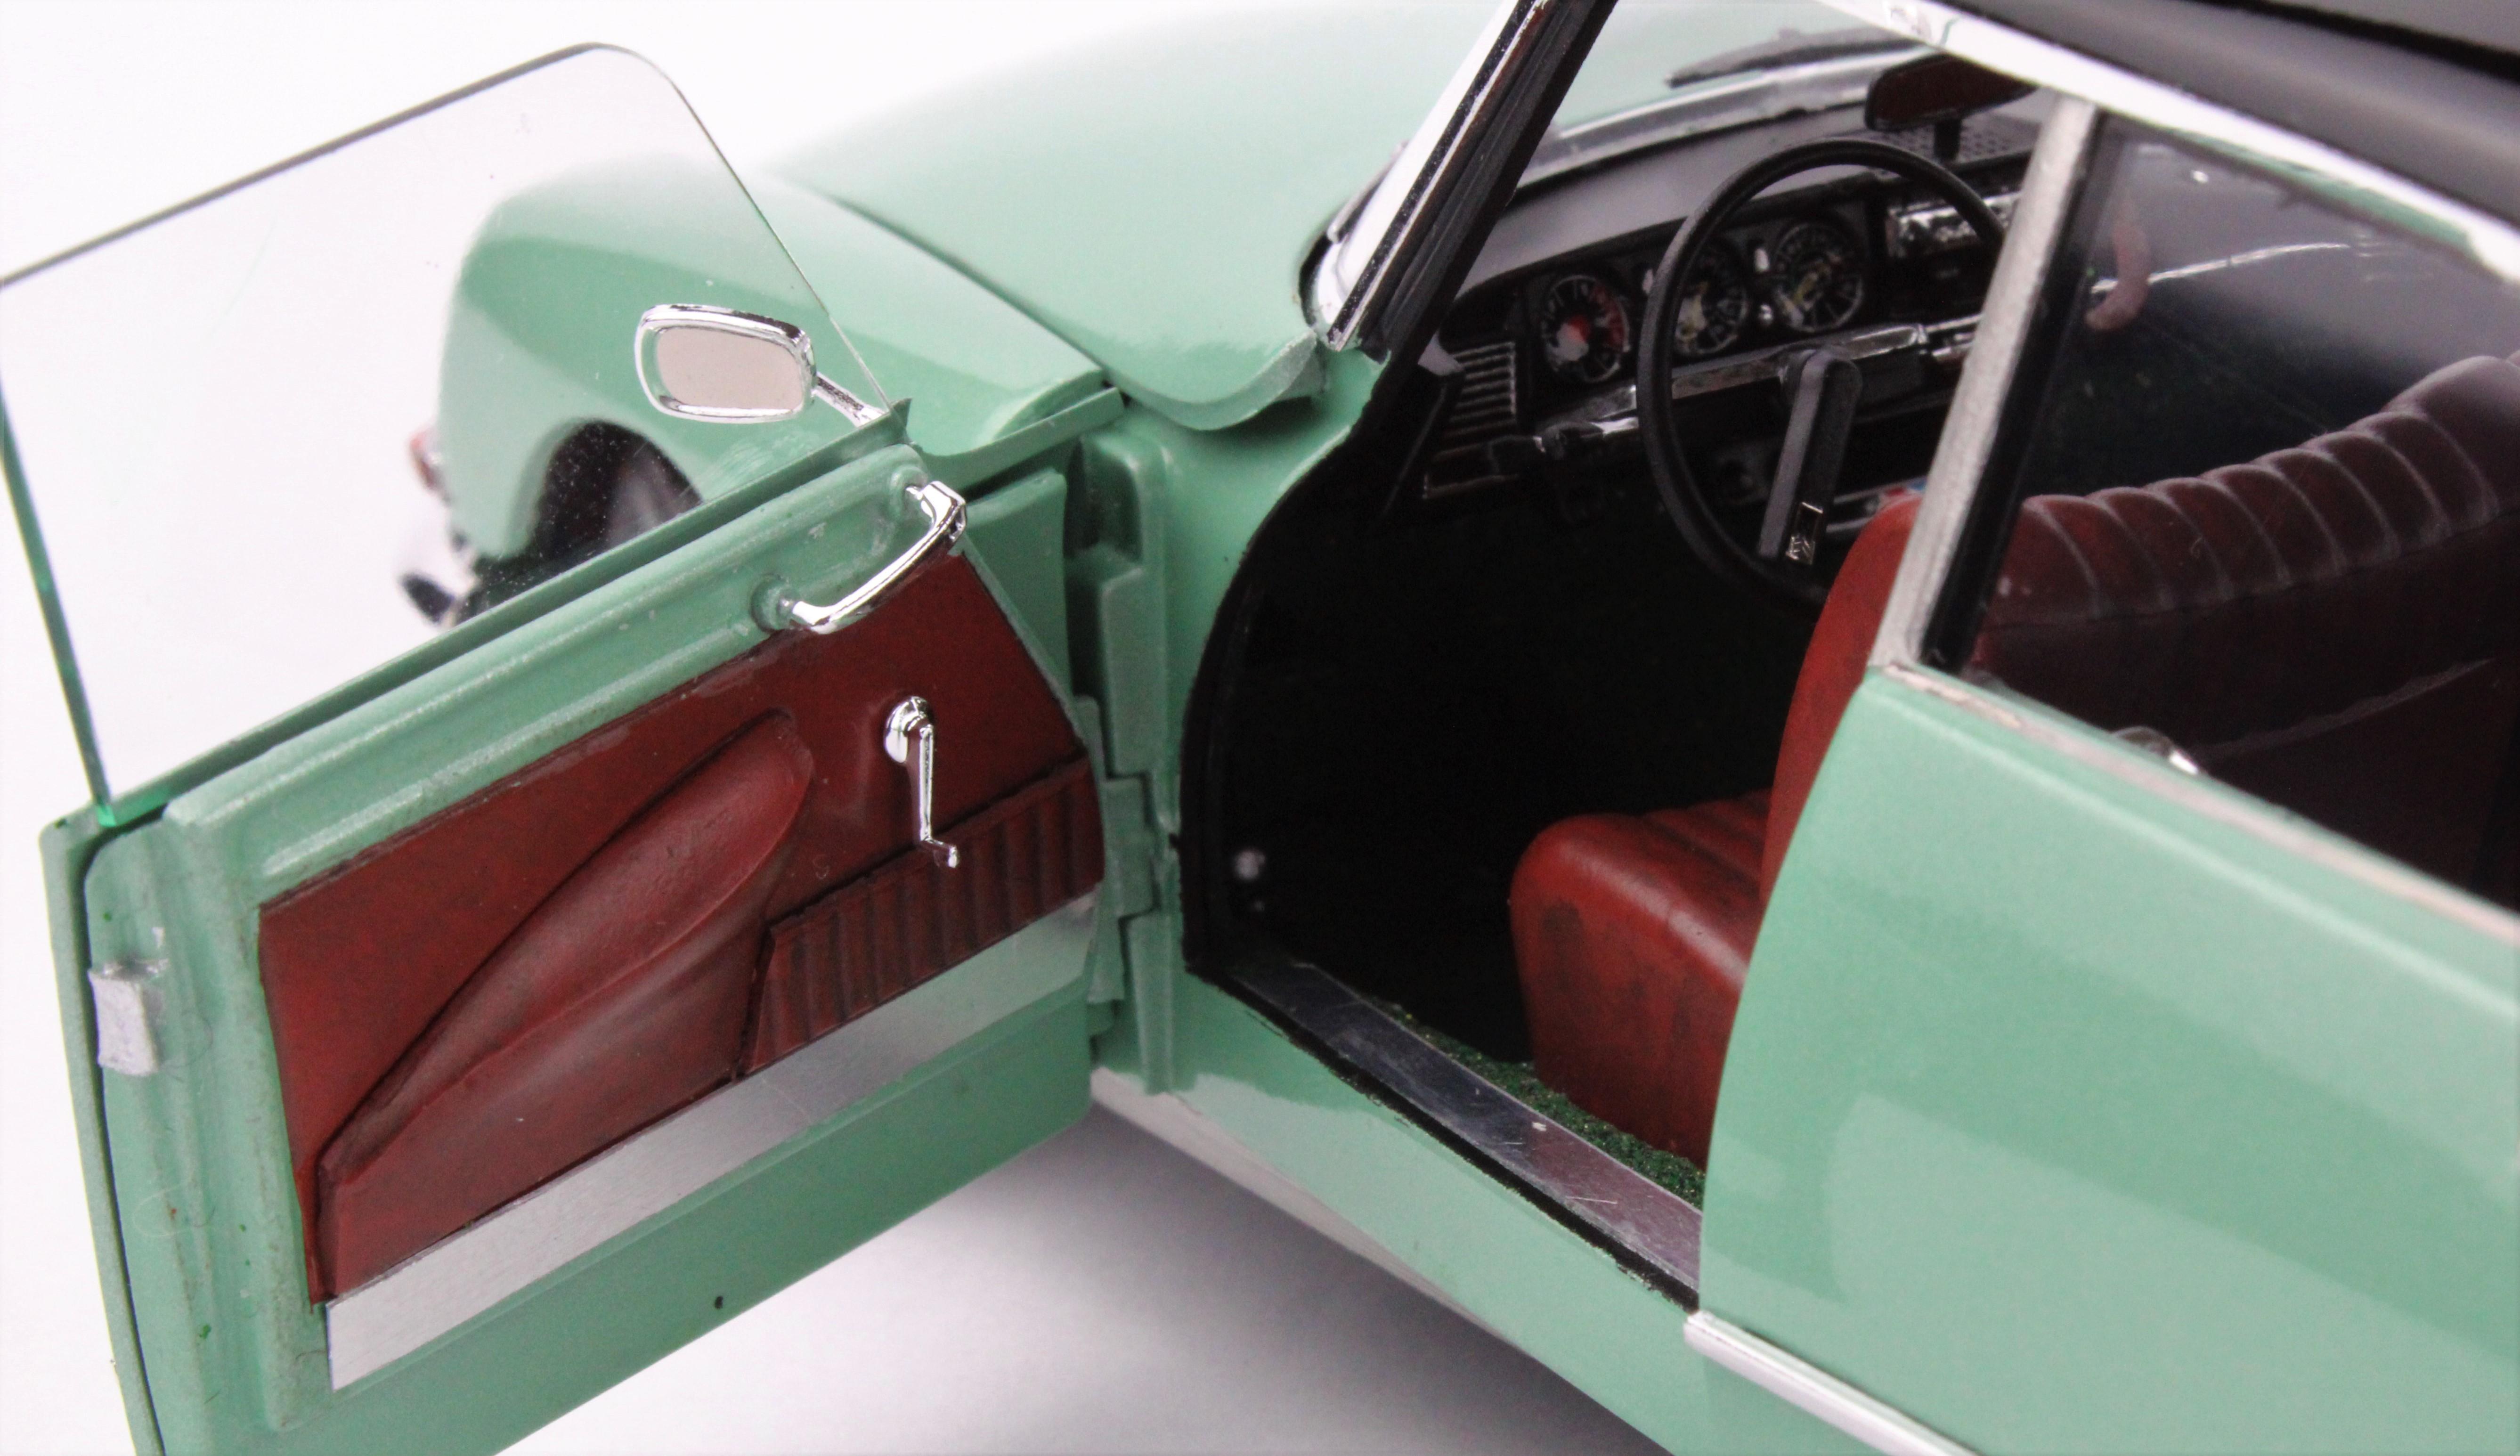
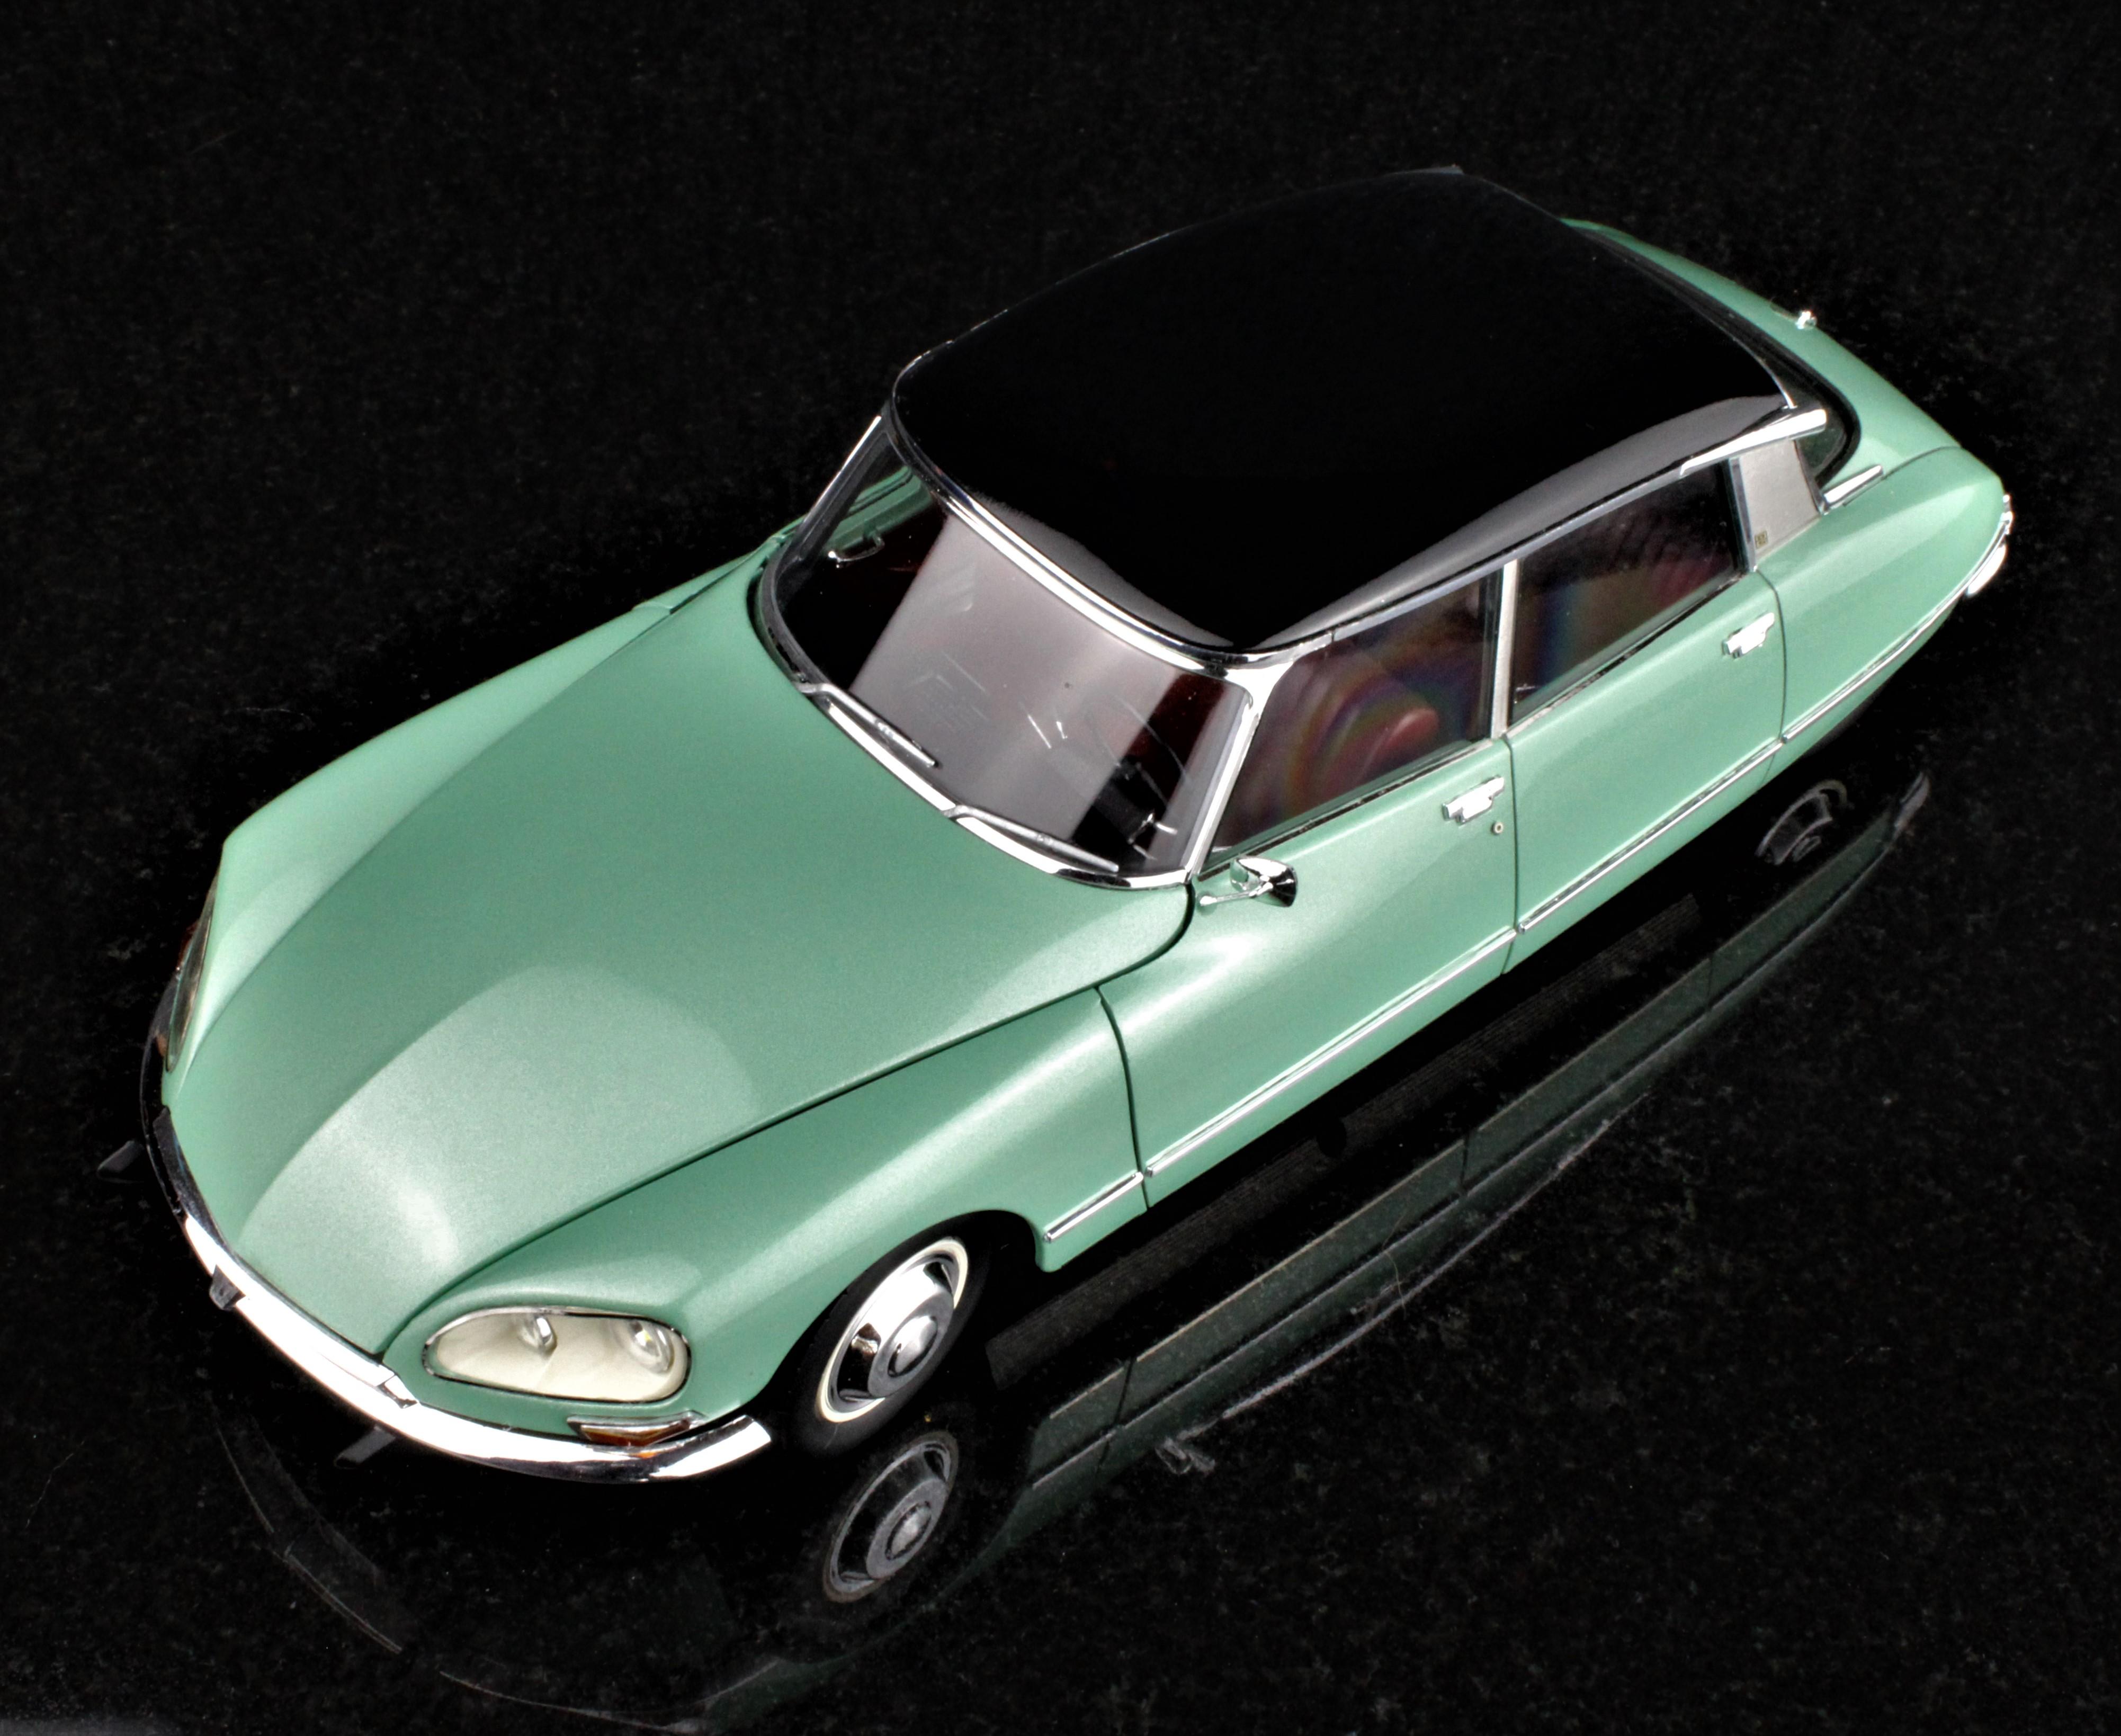
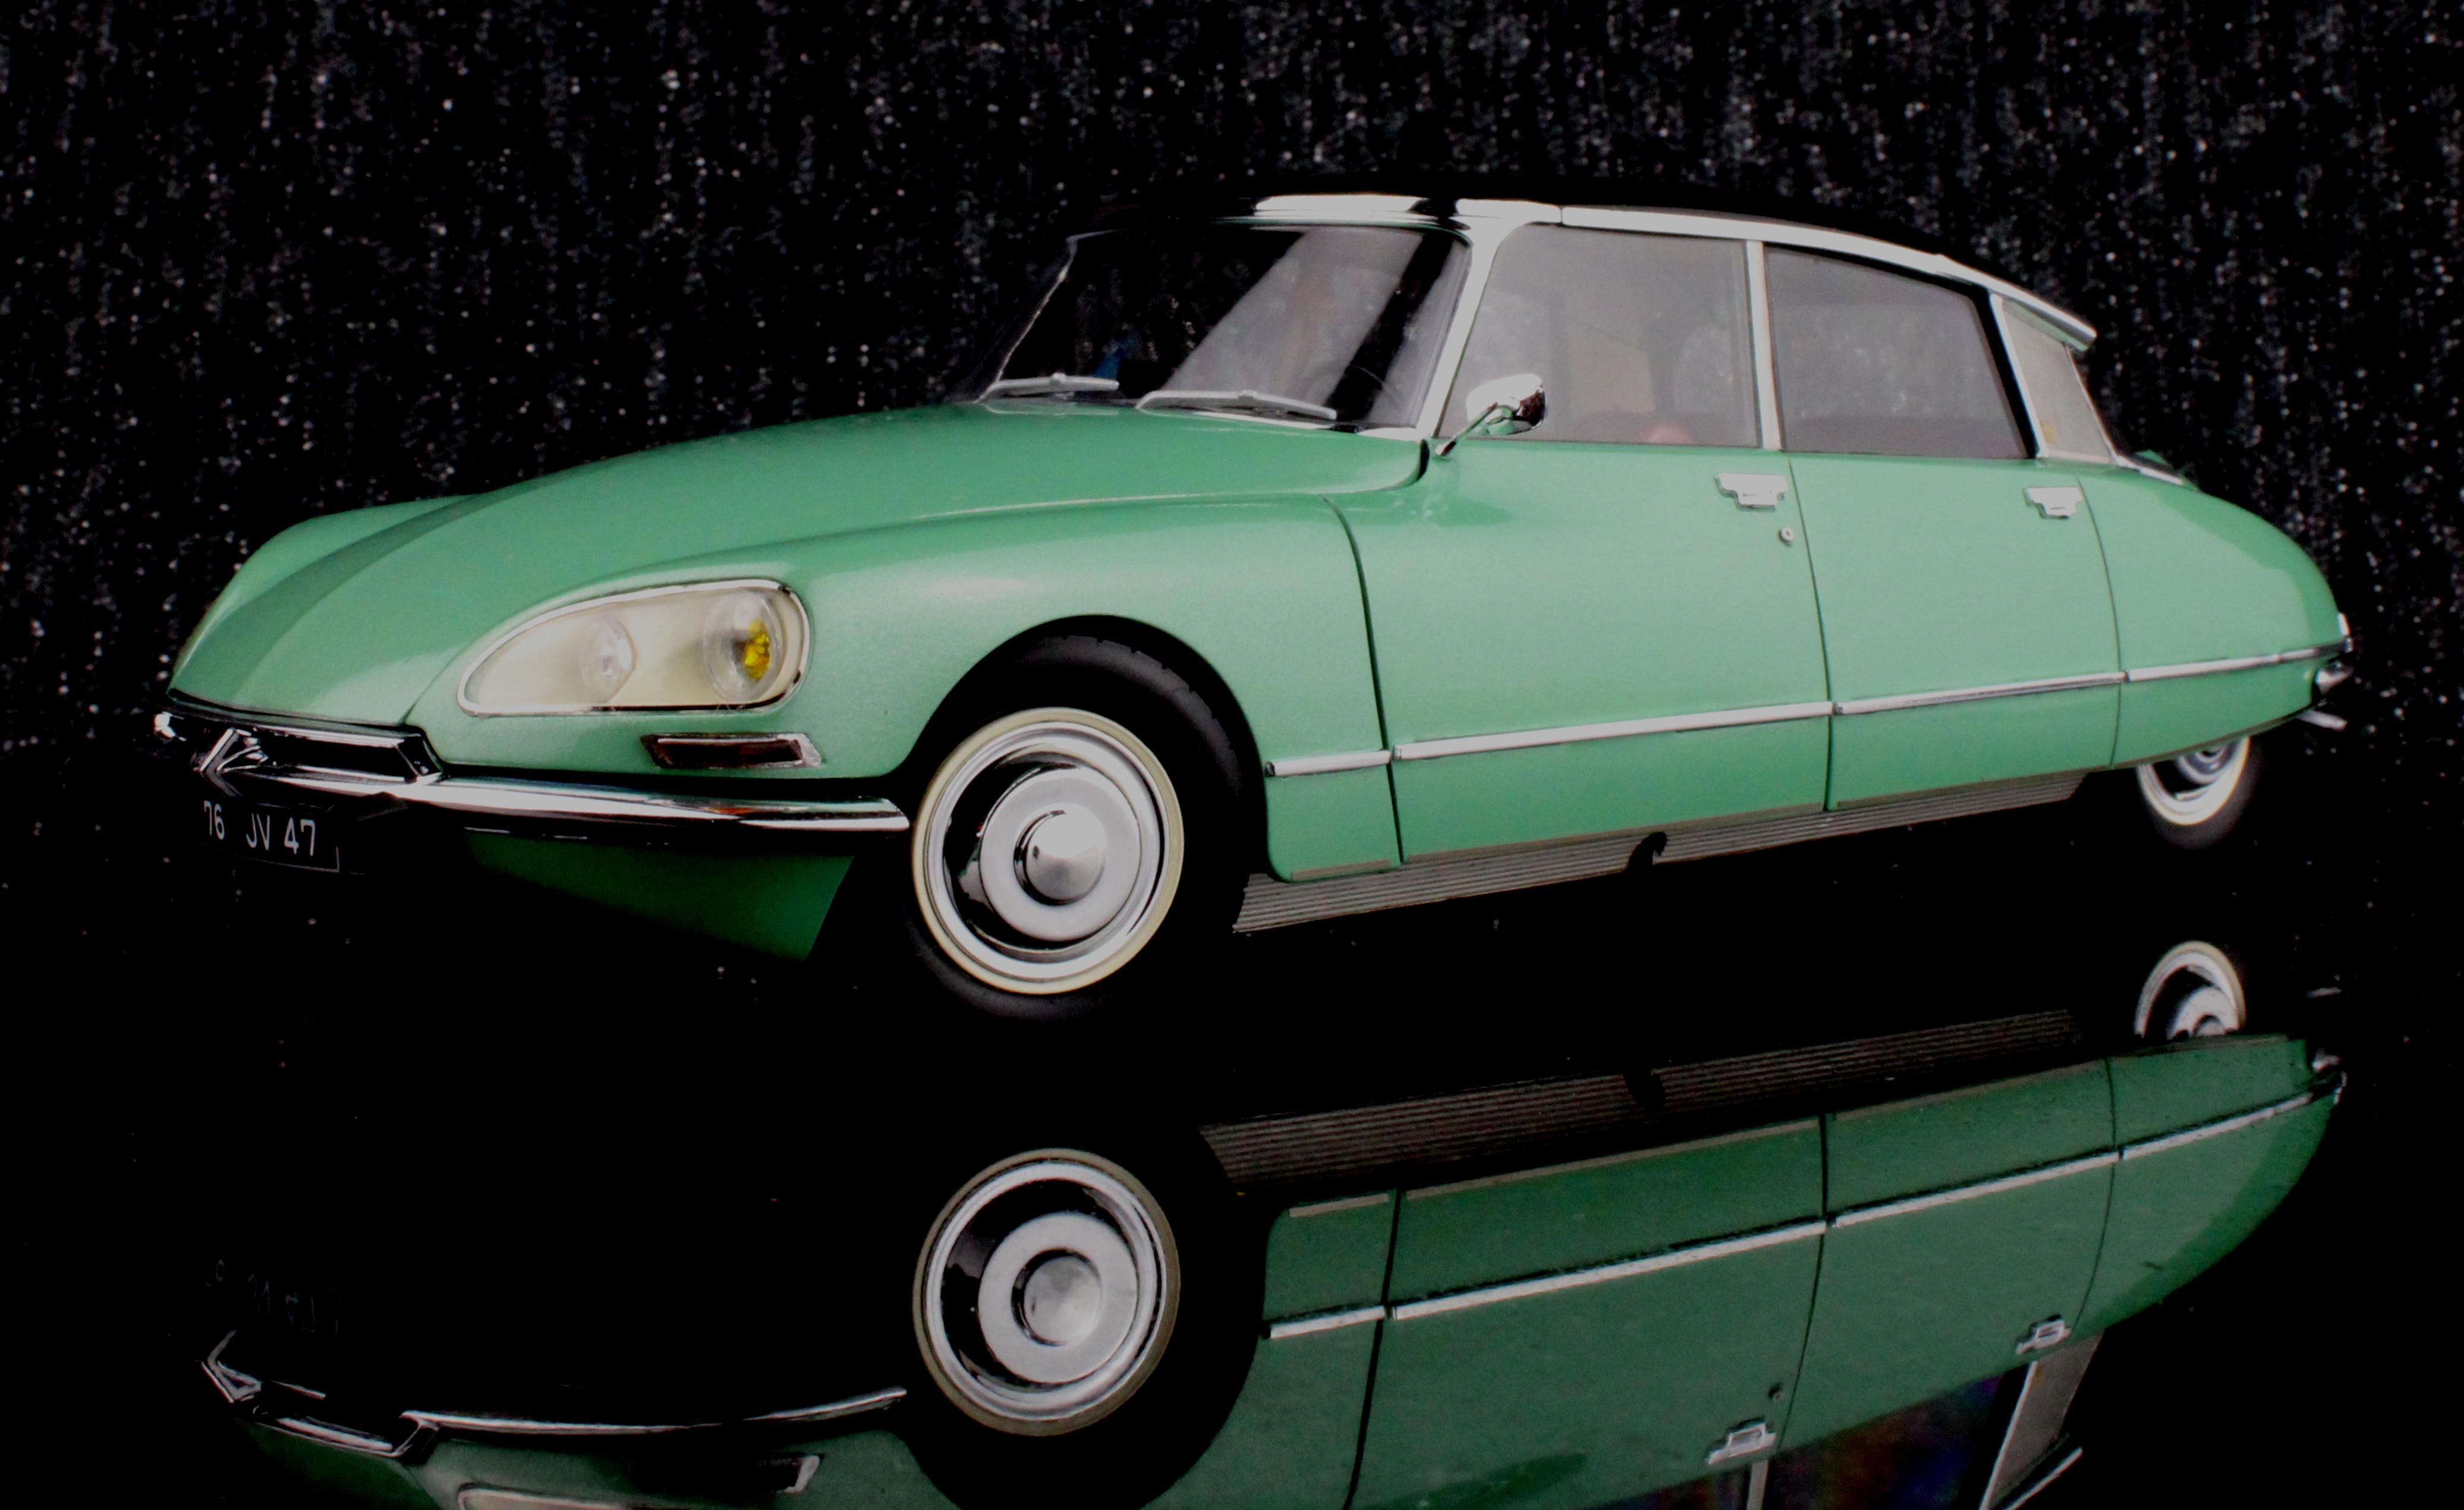
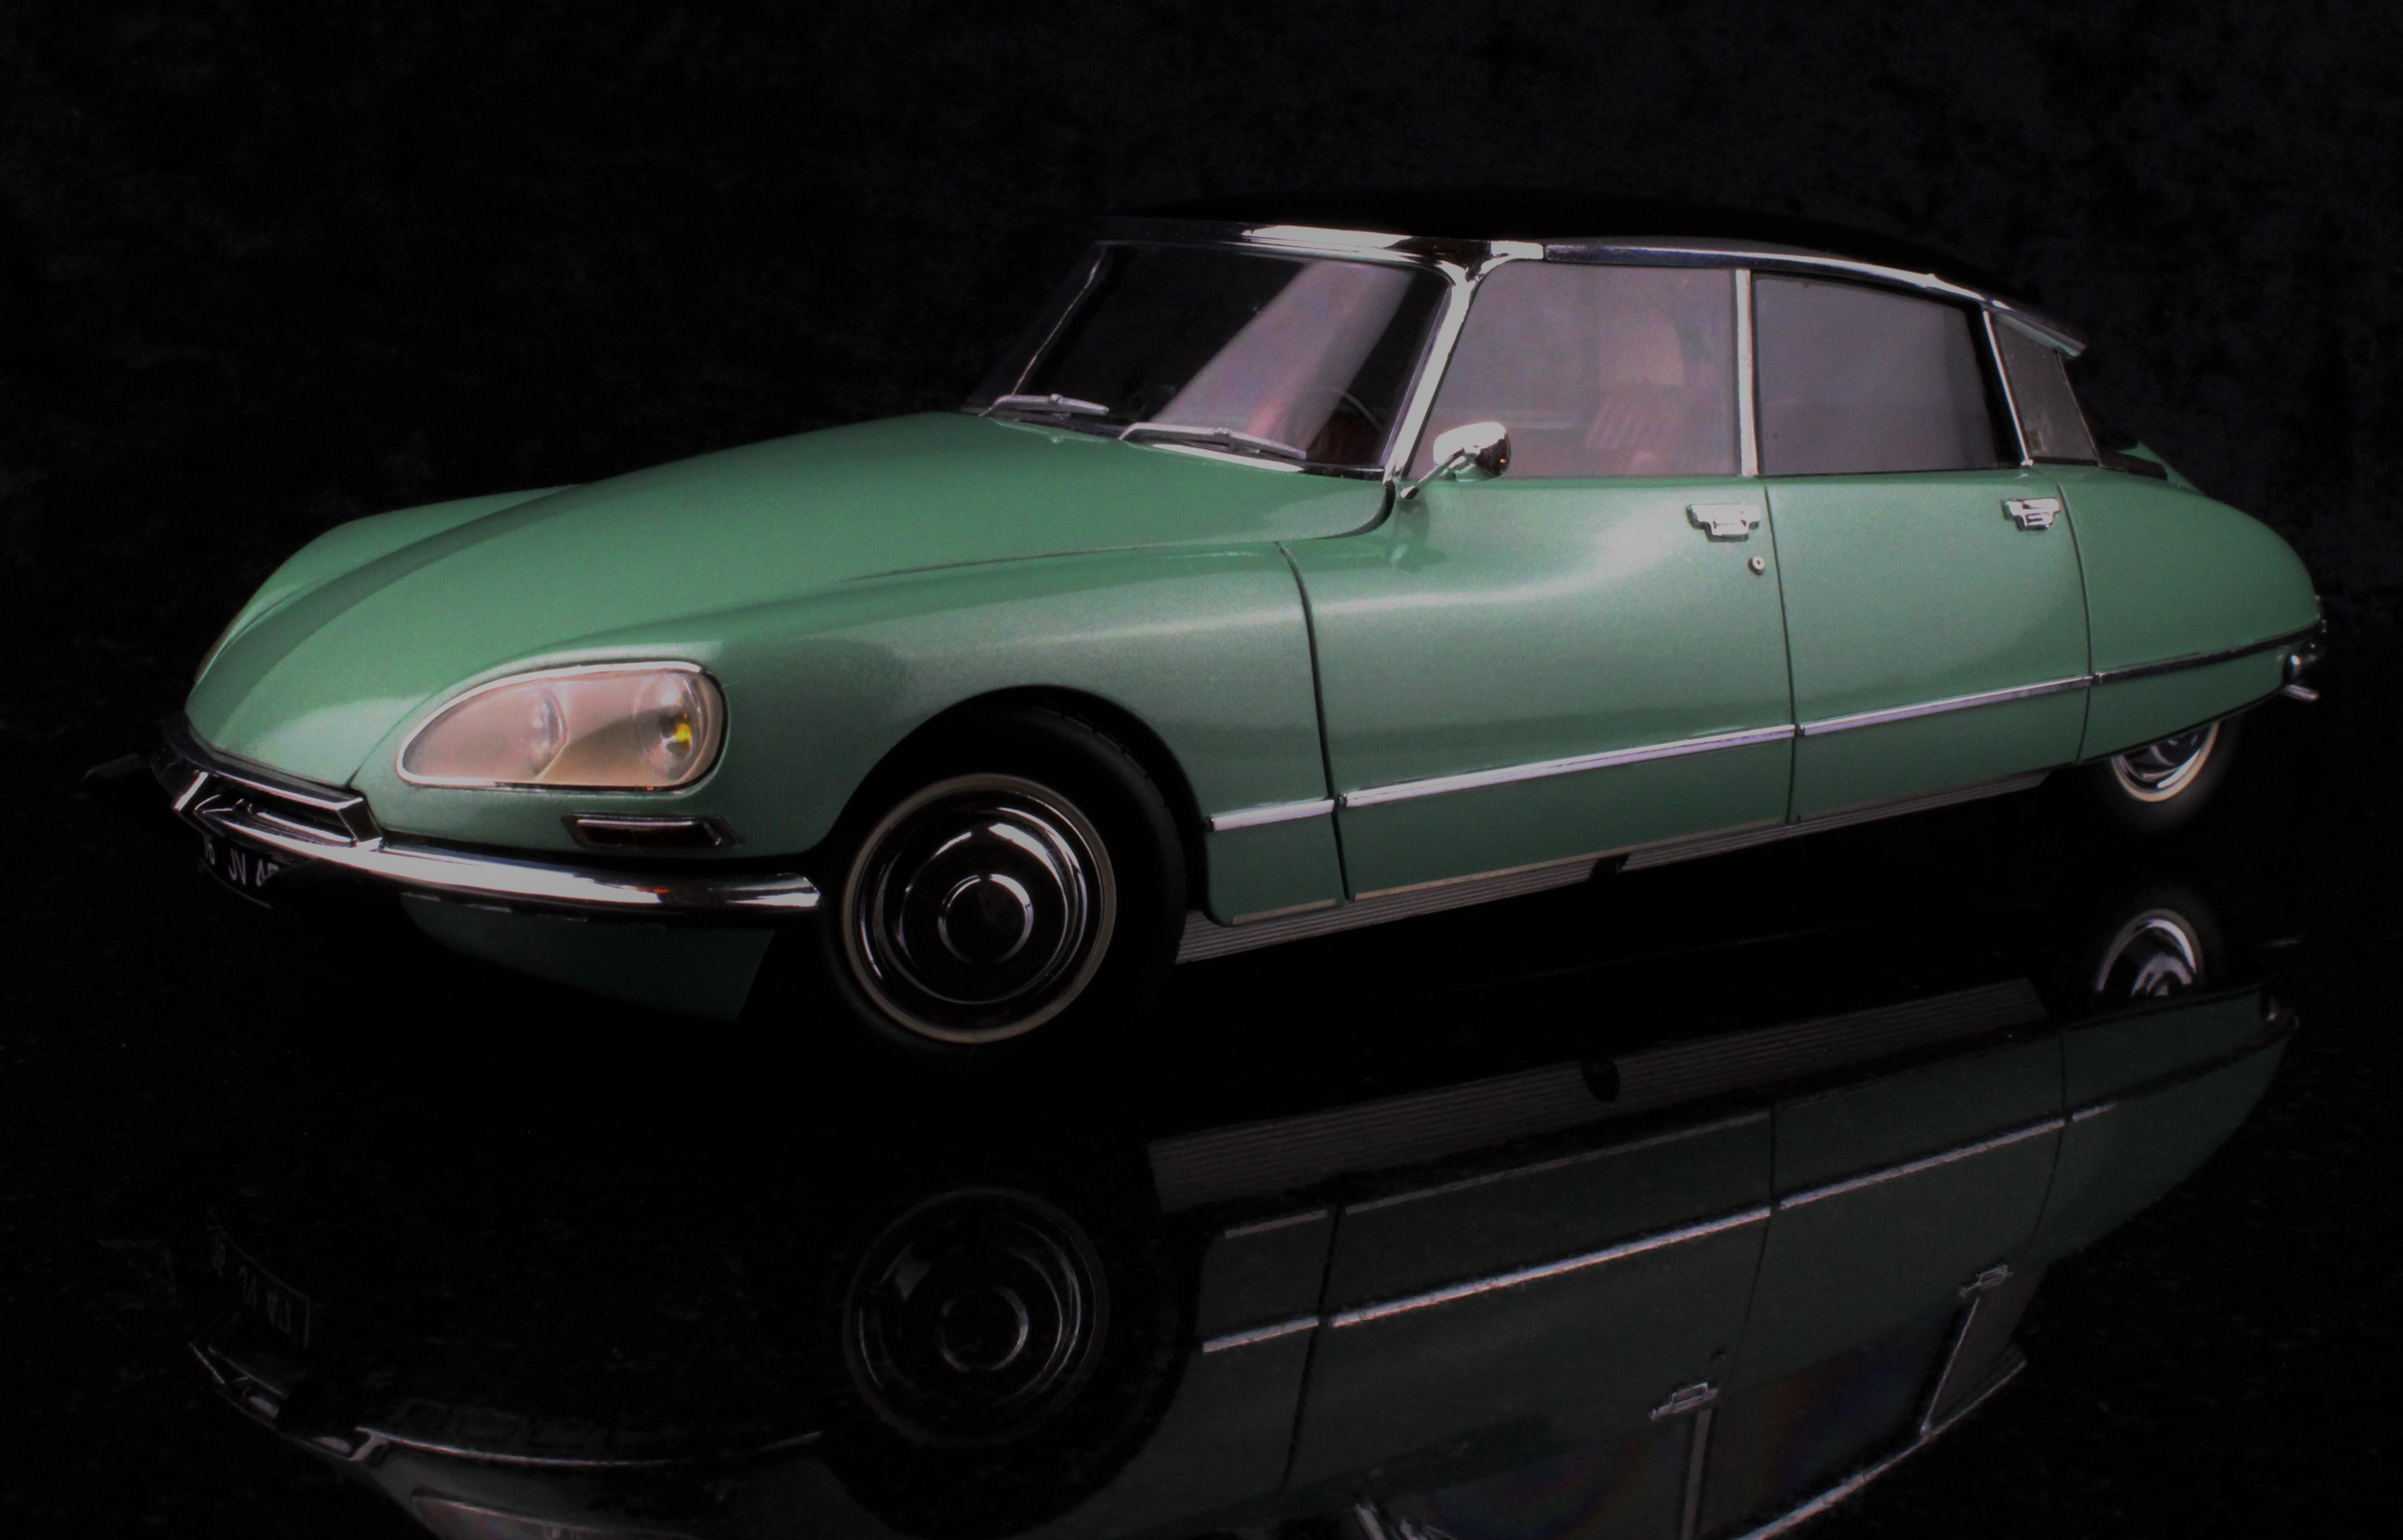
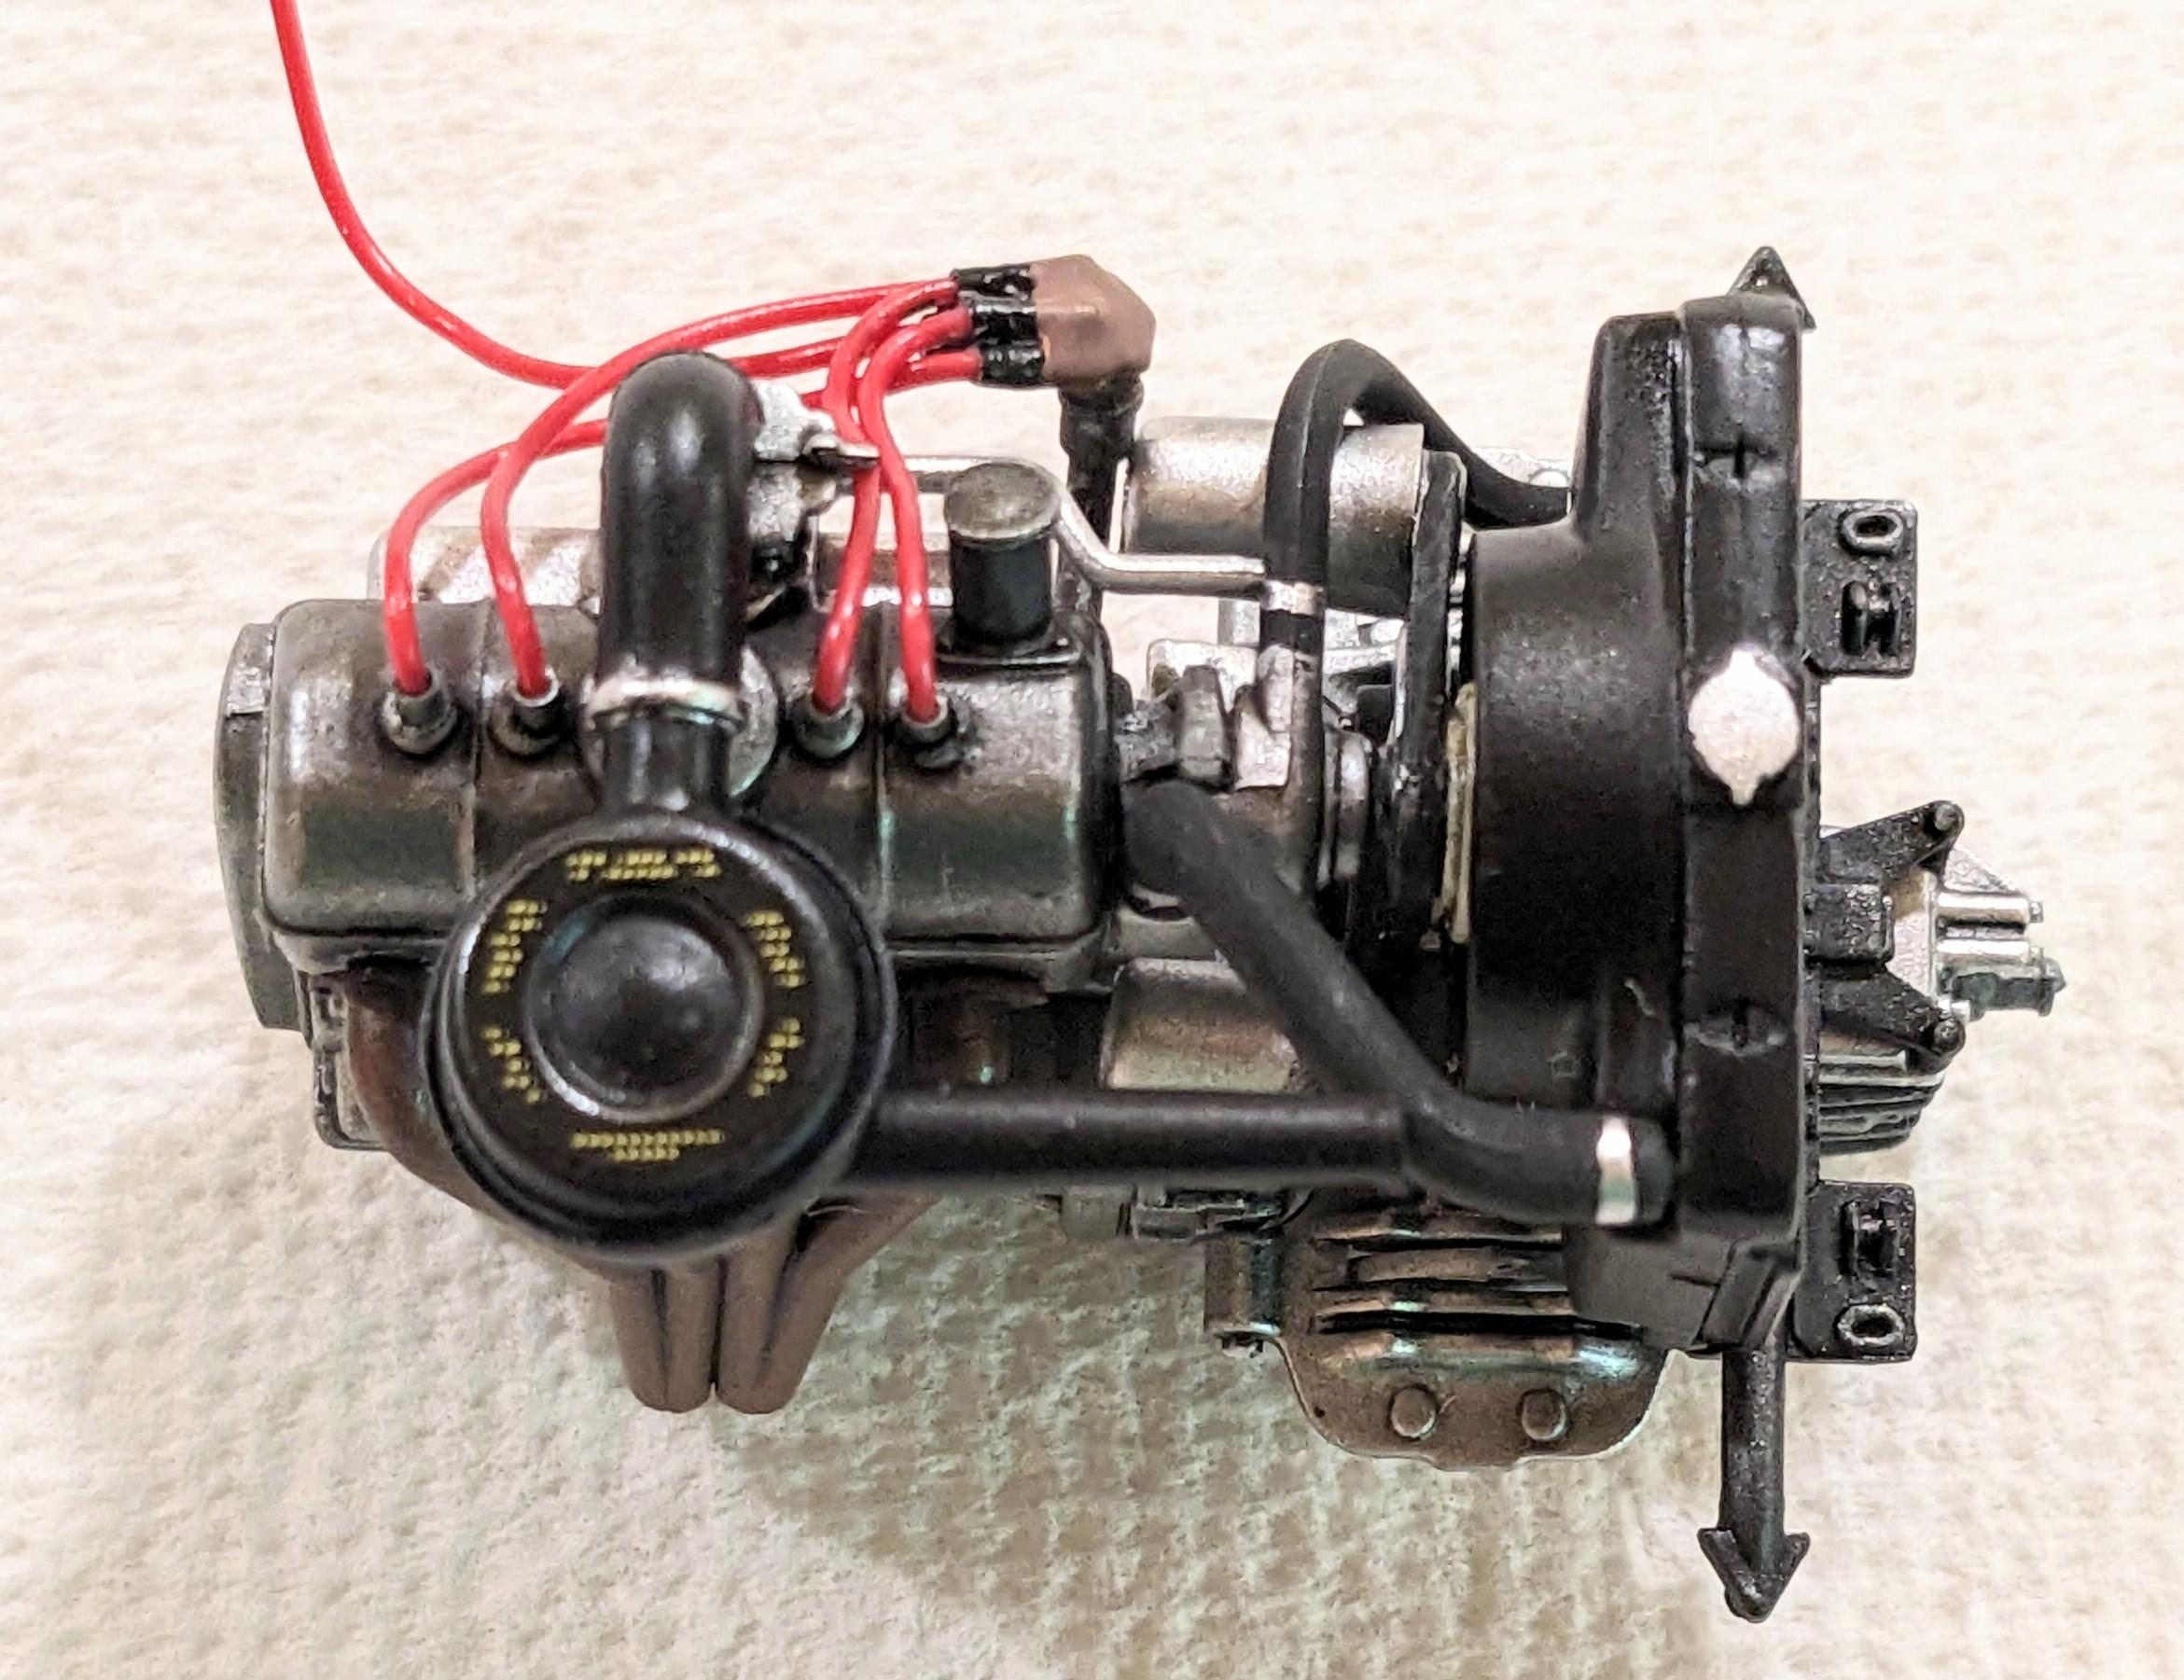
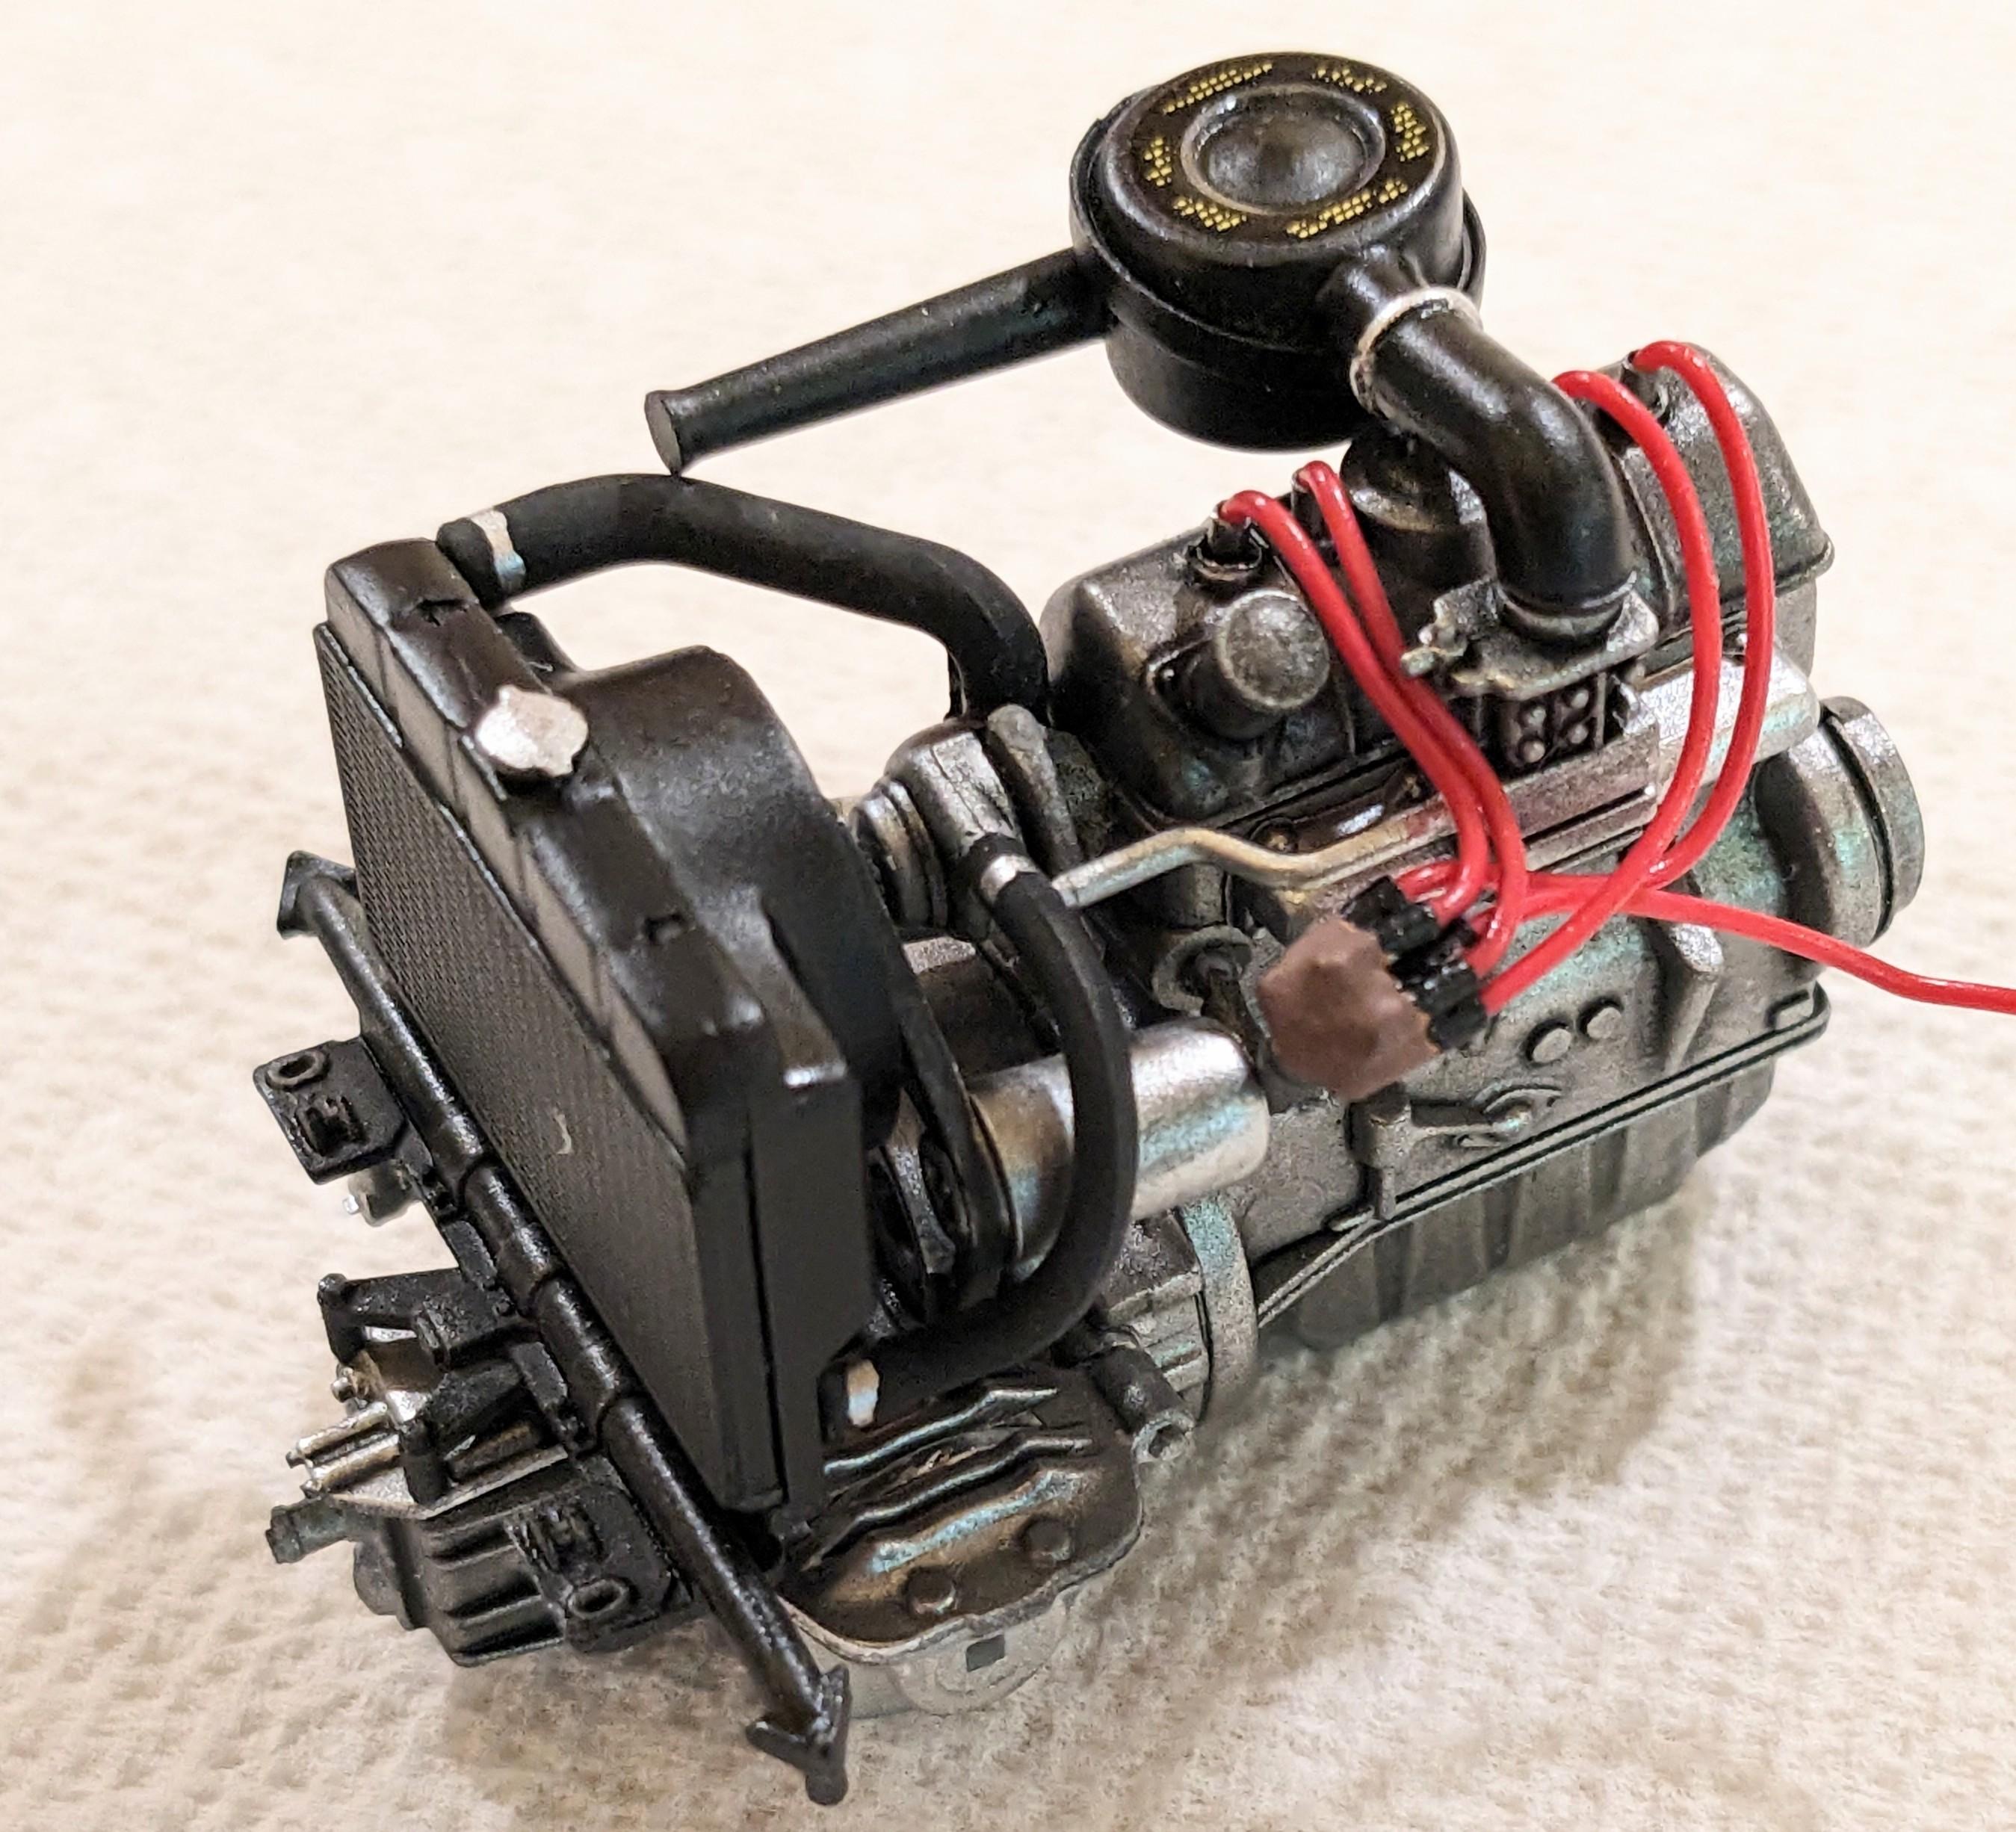
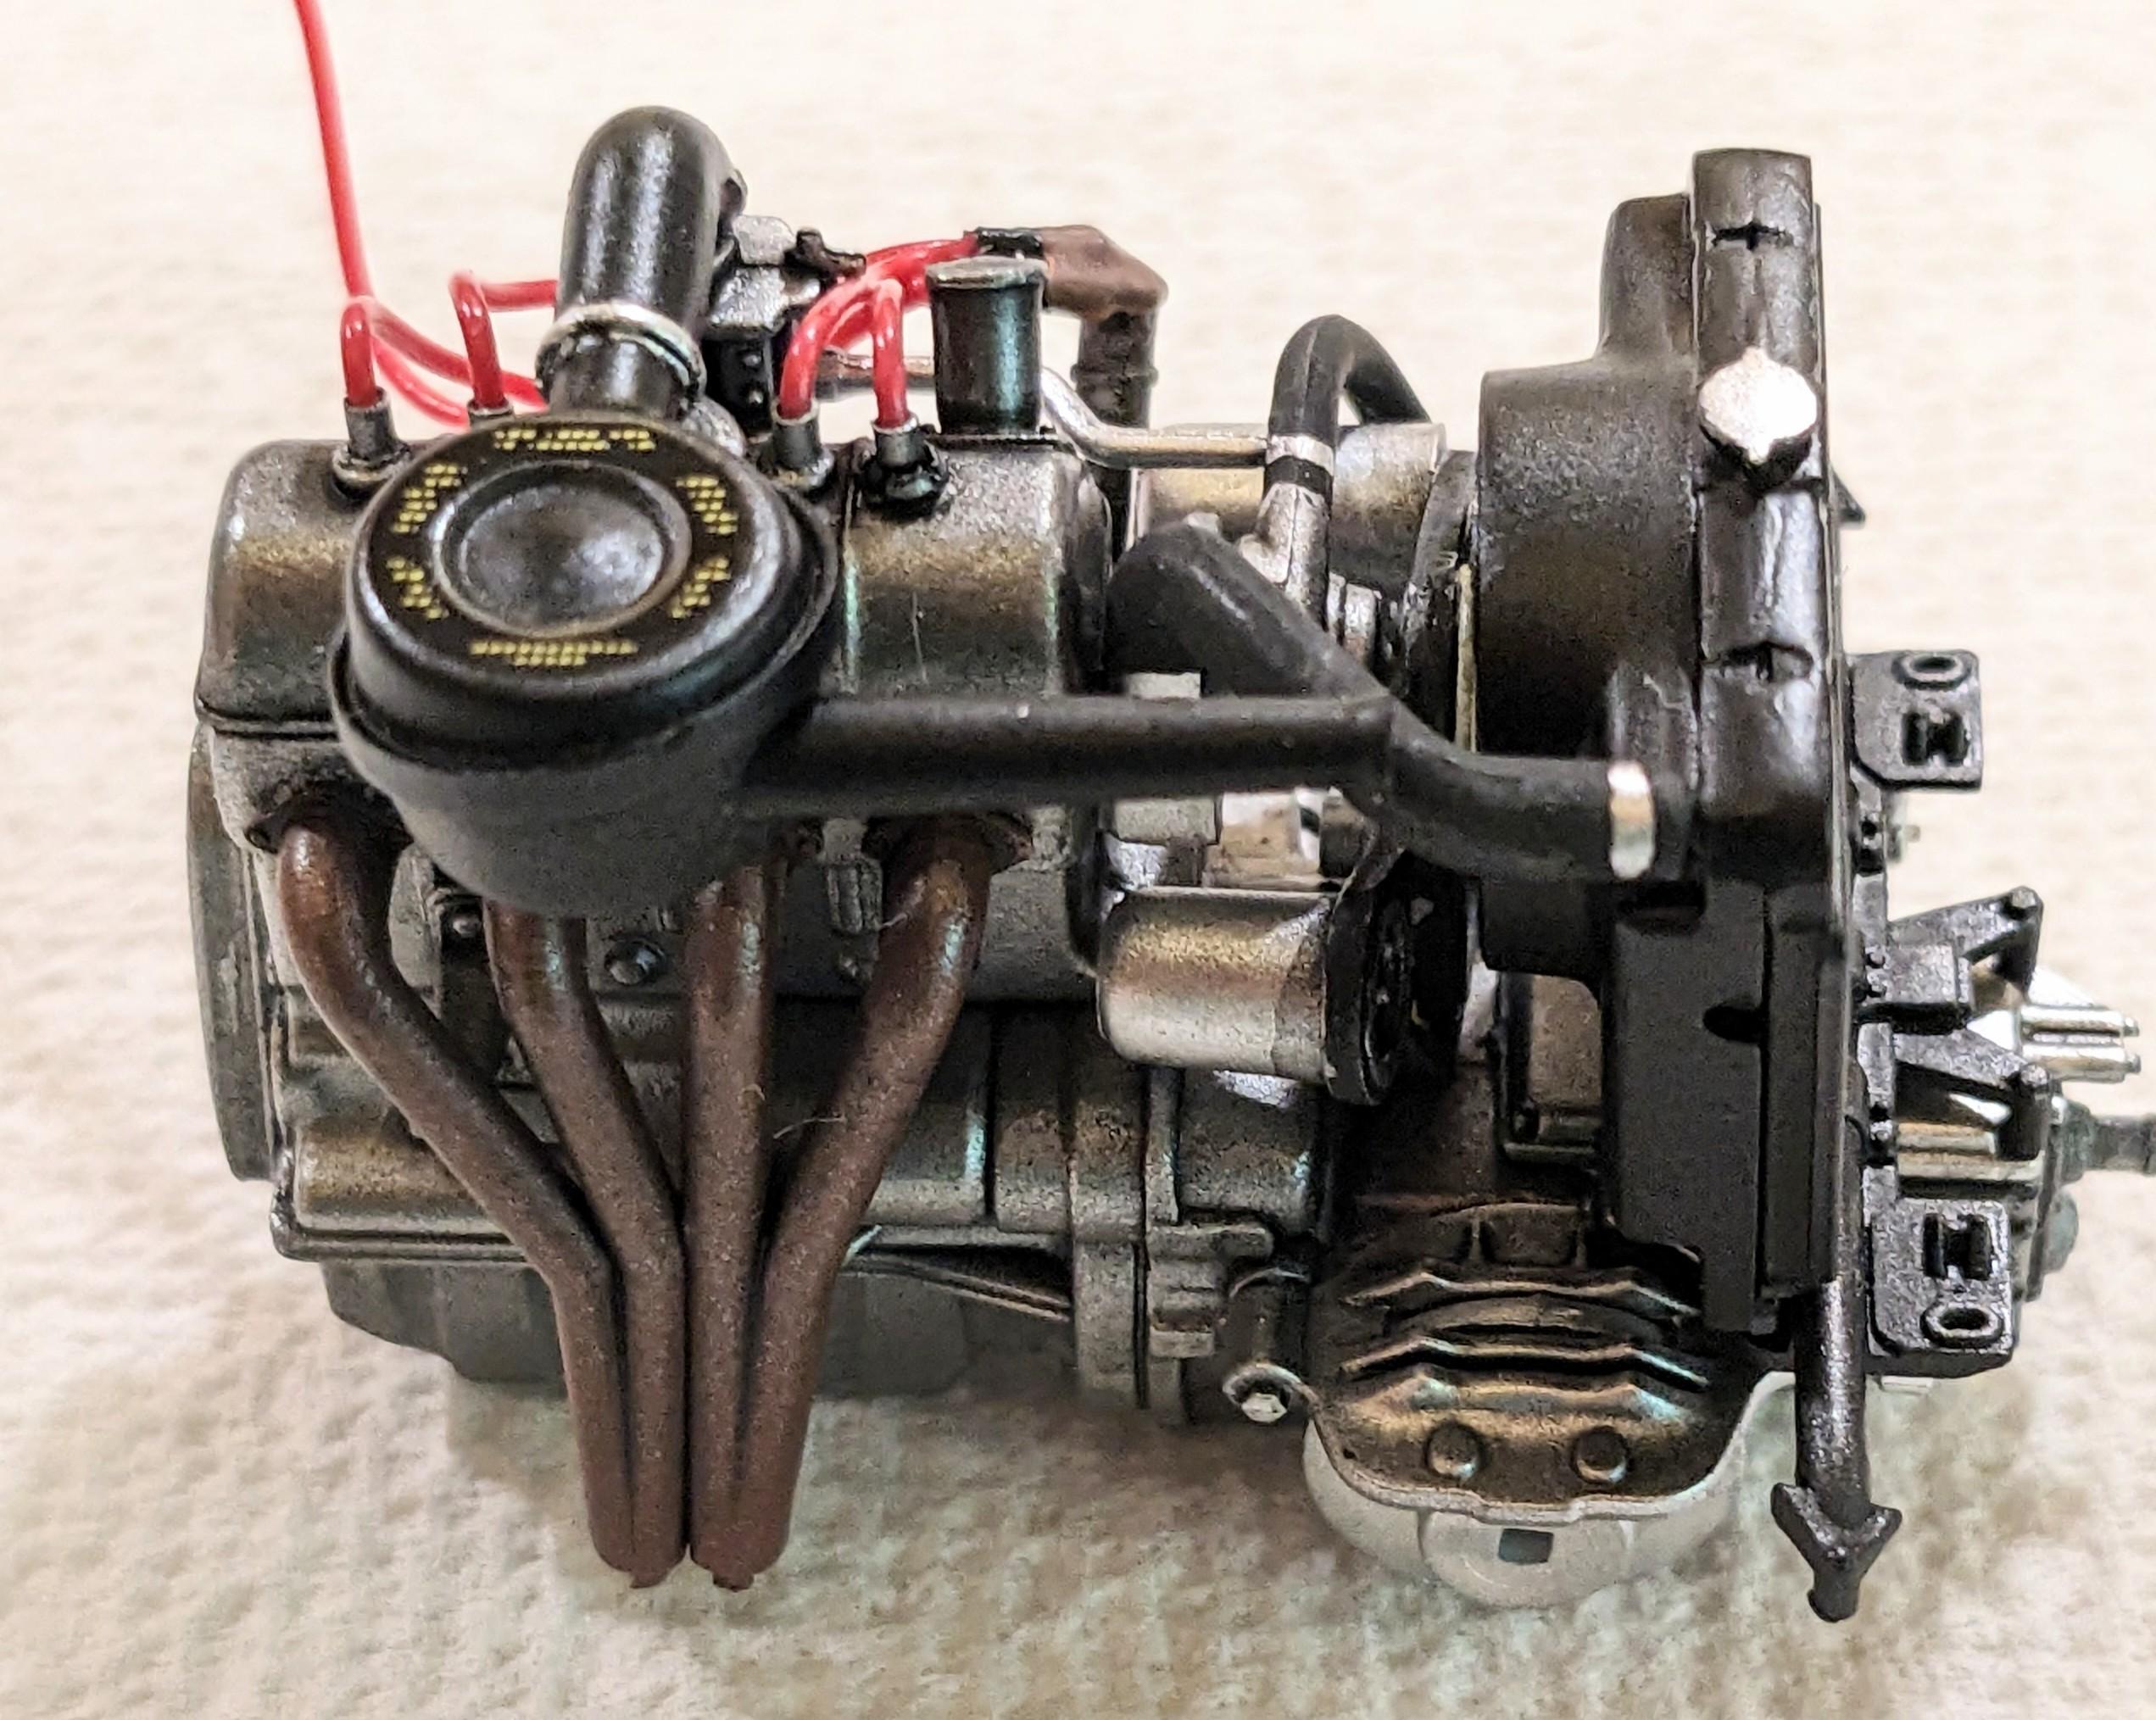
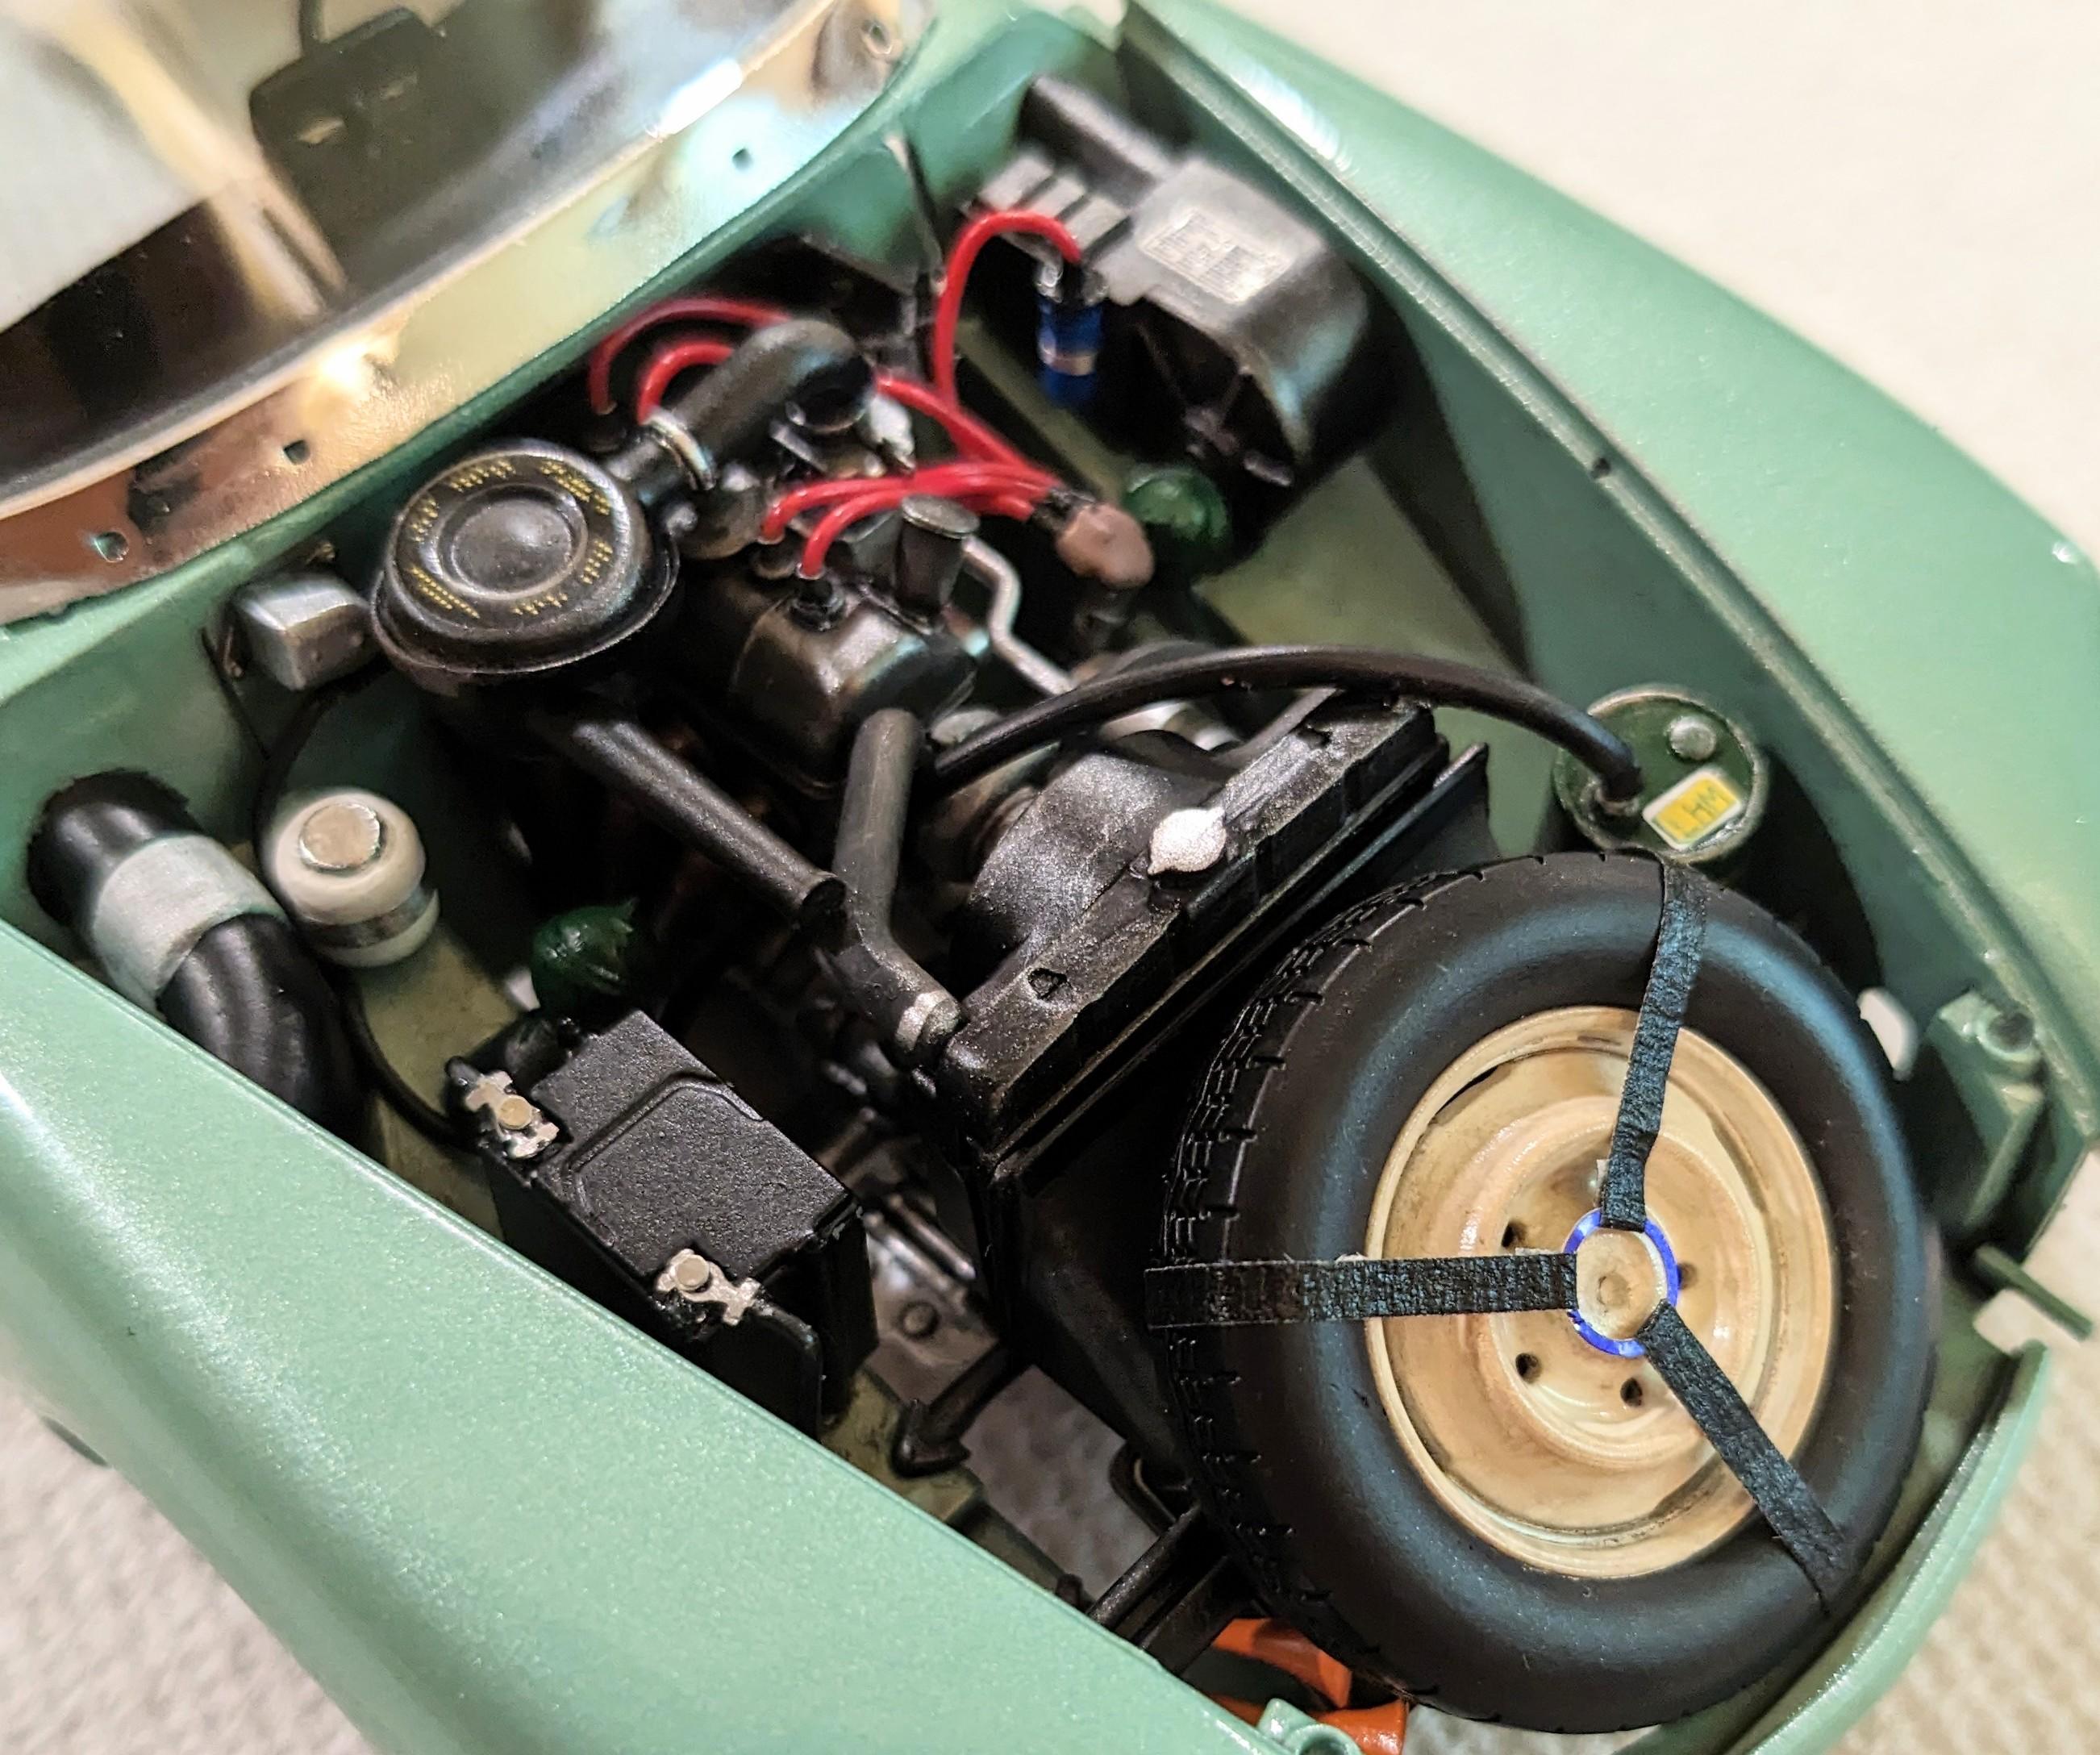
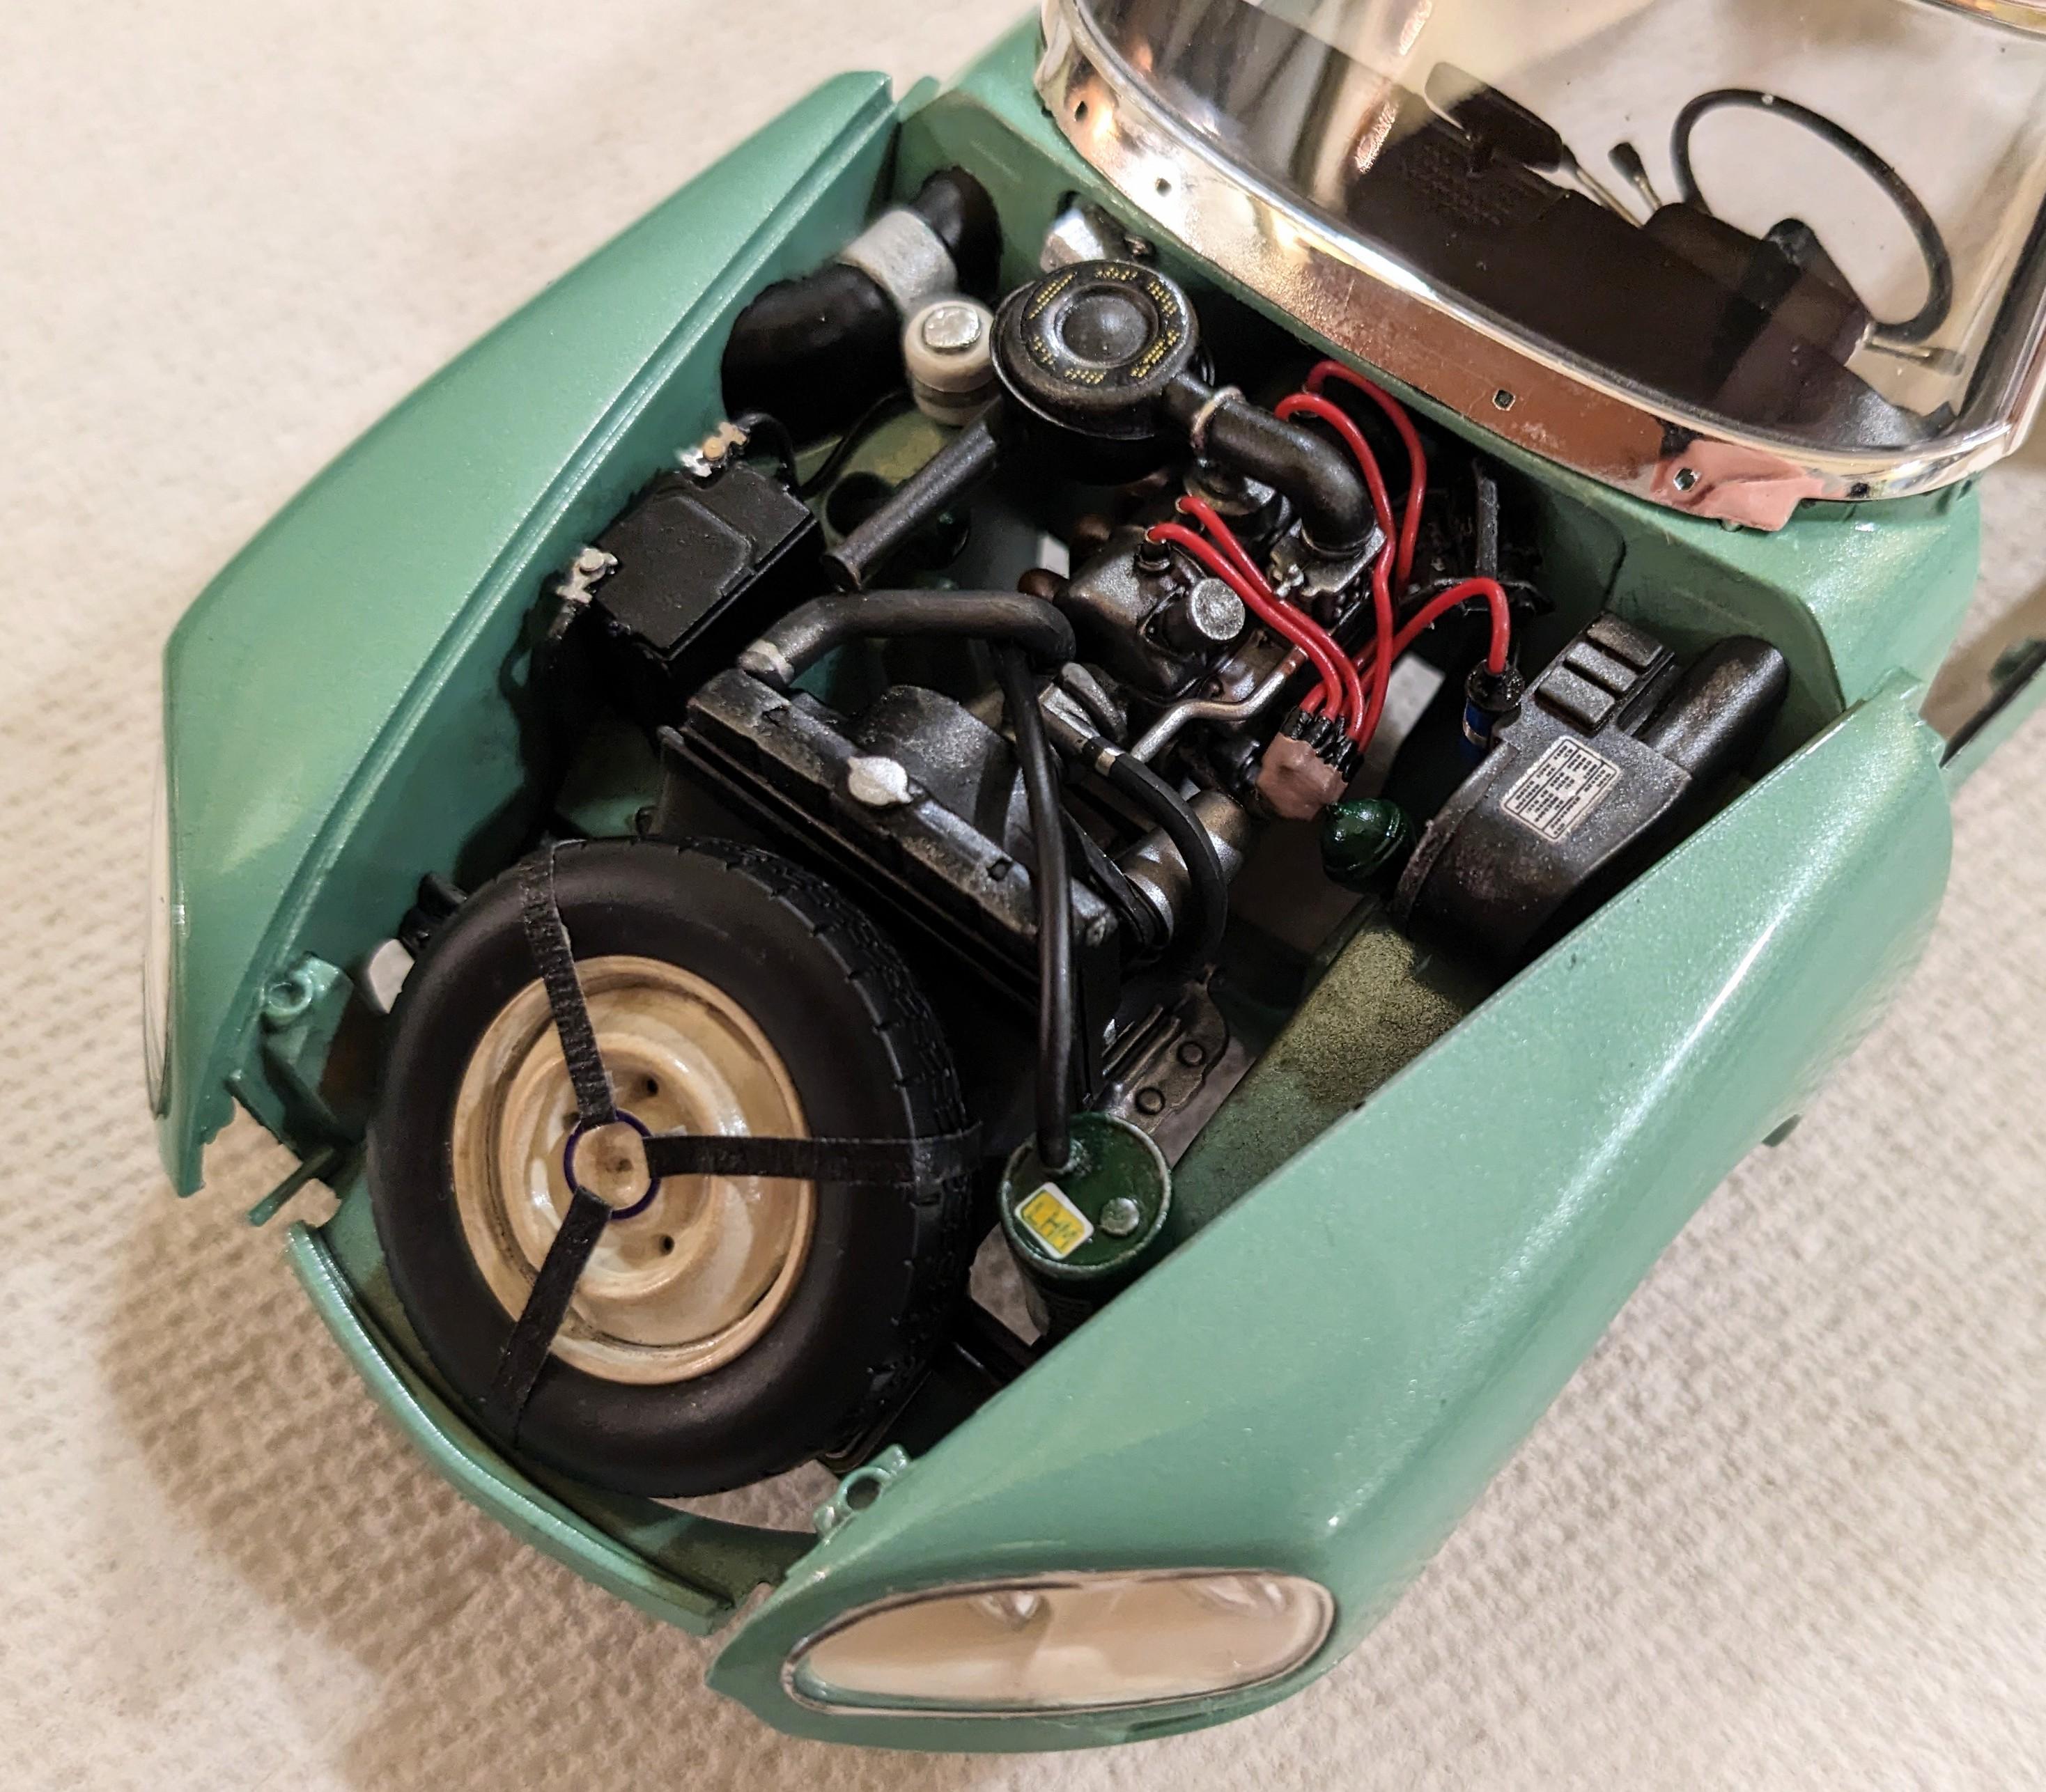
This is Ebbro's 1/24 scale Citroen DS21. When the DS19 was introduced in 1955, it was like nothing else in the world. Its complicated hydropneumatic system provided an incredible ride, a clutchless manual transmission, effortless braking and light power steering. Its styling, both inside and out, was radical. The DS was originally slated for an air-cooled flat-six engine, but development issues caused it to be produced with a development of the 4-cylinder unit in use by Citroen since the mid-30's. The DS 21 was introduced in the late 60's, and introduced a sleek front end treatment with covered headlamps as well as more power and an updated interior. Ebbro's kit represents (sort of) an early 70's model. The DS was built until 1975. Much like the 1:1 DS21, the Ebbro kit is an update of their DS19 kit with an updated engine, interior (sort of) and body. It's a fairly intimidating kit when you open the box... parts are as scale-thin as possible, the front doors open and the chrome tree features nearly all of the chrome trim molded as thin separate parts. The remaining chrome trim, as well as the gold badges, are foil "wet transfers" that are applied like waterslide decals but feature a grippy adhesive that gives you seconds of working time before they become basically part of the model. There's very little on this model that didn't come in the box. I added some scratchbuilt details to the door cards to better represent a DS21, aluminum sill plates on the interior, and custom-mixed embossing powder for the dark green carpet. I also added styrene pieces for the seat adjustment mechanisms. Under the hood I added scratchbuilt hold-down straps for the spare tire and a partially-scratchbuilt distributor with Albion Alloys tubing and Tamiya Epoxy Putty. Paint is Tamiya TS60 Pearl Green over grey primer. This looks pretty close to Citroen's Vert Argent color. I used Tamiya Red Oxide primer with Vallejo washes and a satin clear coat for the cognac upholstery. This was an incredibly enjoyable build overall. It's not an easy kit, but it went together beautifully (check my build thread in WIP for in-progress pics and tips) and really builds into a nice replica. I highly recommend it for anyone looking to build something a little different. On to the pics!
- 35 replies
-
- 12
-

-

-
Well, this one is finished up. Honestly, once the floor pan and body shell went together it was just fiddly stuff. The side trim fit perfectly, I used 5-minute epoxy to attach the pieces for its relative strength and ability to position the pieces perfectly. The doors are an extremely tight fit and it's pretty tough to tell they're opening panels when closed! The foil wet transfers for the badges and fine chrome trim strips are pretty tricky... they are applied like waterslide decals but the adhesive is pretty aggressive and grips almost immediately. Keeping some soapy water on the surface gives you a few extra seconds to position them. As is usual with this sort of thing, I started to get the hang of it right about the time I was positioning the last one. Other challenges? Well, the inner headlamps are supposed to swivel like the ones on the 1:1. Since, unlike the 1:1, they don't swivel with the front wheels, I decided to glue them in place. The windshield wipers interfered with the hood fit until I widened the mounting holes on the scuttle and thinned profile of the wipers a bit. Honestly, I kept waiting for some major issue to crop up during the entire build process and it never happened. This is no "shake and bake" Tamiya kit, mind you, but it was really enjoyable to build and produces a fantastic replica. A couple of pics below, with a lot more in the Under Glass thread coming shortly!
-
Fantastic. The Lusso deserves a subtle color and that is a great choice. My Italeri 275 Spyder in Nocciola...
-
On to the motor... The mighty beating heart of the DS21 was a 2.2 liter 4-cylinder making a whopping 115 hp. The FWD configuration is unusual by today's standards, with the engine mounted longitudinally behind the transaxle. The parts were airbrushed in Vallejo Metal Colors, which have completely made me stop missing Model Master Metalizers. It's insanely good paint and can even be used for brush painting small details. I used Metallic Grey, Duralumin and Chrome. Vallejo washes were used to bring out detail. The distributor was heavily modified with Albion Alloys 1mm tubing for the boots and Tamiya Epoxy Putty. I also inset the Albion tubing into the valve cover for the boots on that side. Next I installed the engine/transaxle unit into the body shell and added the rest of the underhood detail. I scratched up a coil from styrene and the Albion tubing and used a "Wizard O" from Scale Motorsport and some black adhesive-backed material for the spare tire tie-down. I dirtied up the engine bay a bit with Tamiya Weathering Master. Next up, finishing up the interior and installing the floor pan!
-
1960 Mazda R360. Mazda's first passenger car. Although they don't usually look as cool as this!
-
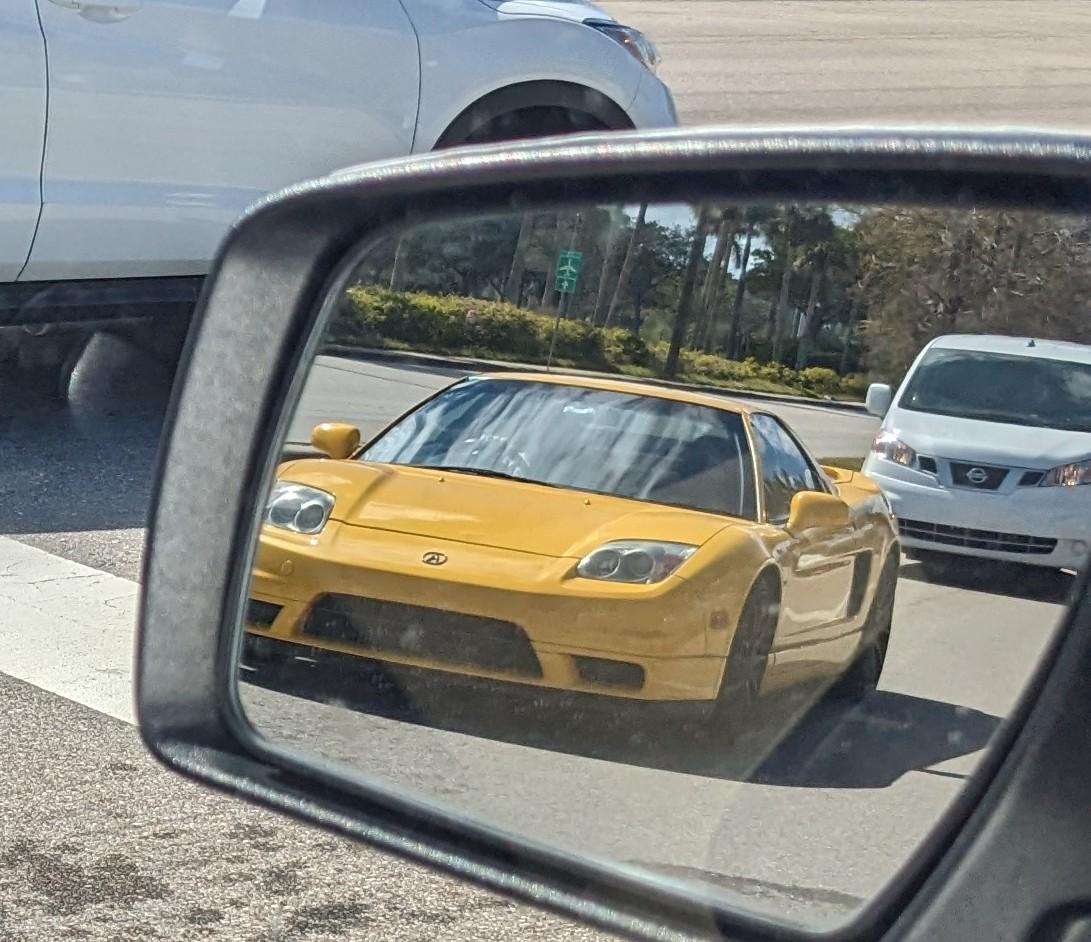
What did you see on the road today?
jaymcminn replied to Harry P.'s topic in General Automotive Talk (Trucks and Cars)
Running errands (one of which was a new battery for the Miata, or that's what I would have been driving) and this was among the sea of Porsches and McLarens on the road. Late first-generation NSX.
-
Looking forward to this build. Your paint looks awesome. I've had one of these in the stash for years!