jaymcminn
-
Posts
1,756 -
Joined
-
Last visited
Content Type
Profiles
Forums
Events
Gallery
Everything posted by jaymcminn
-
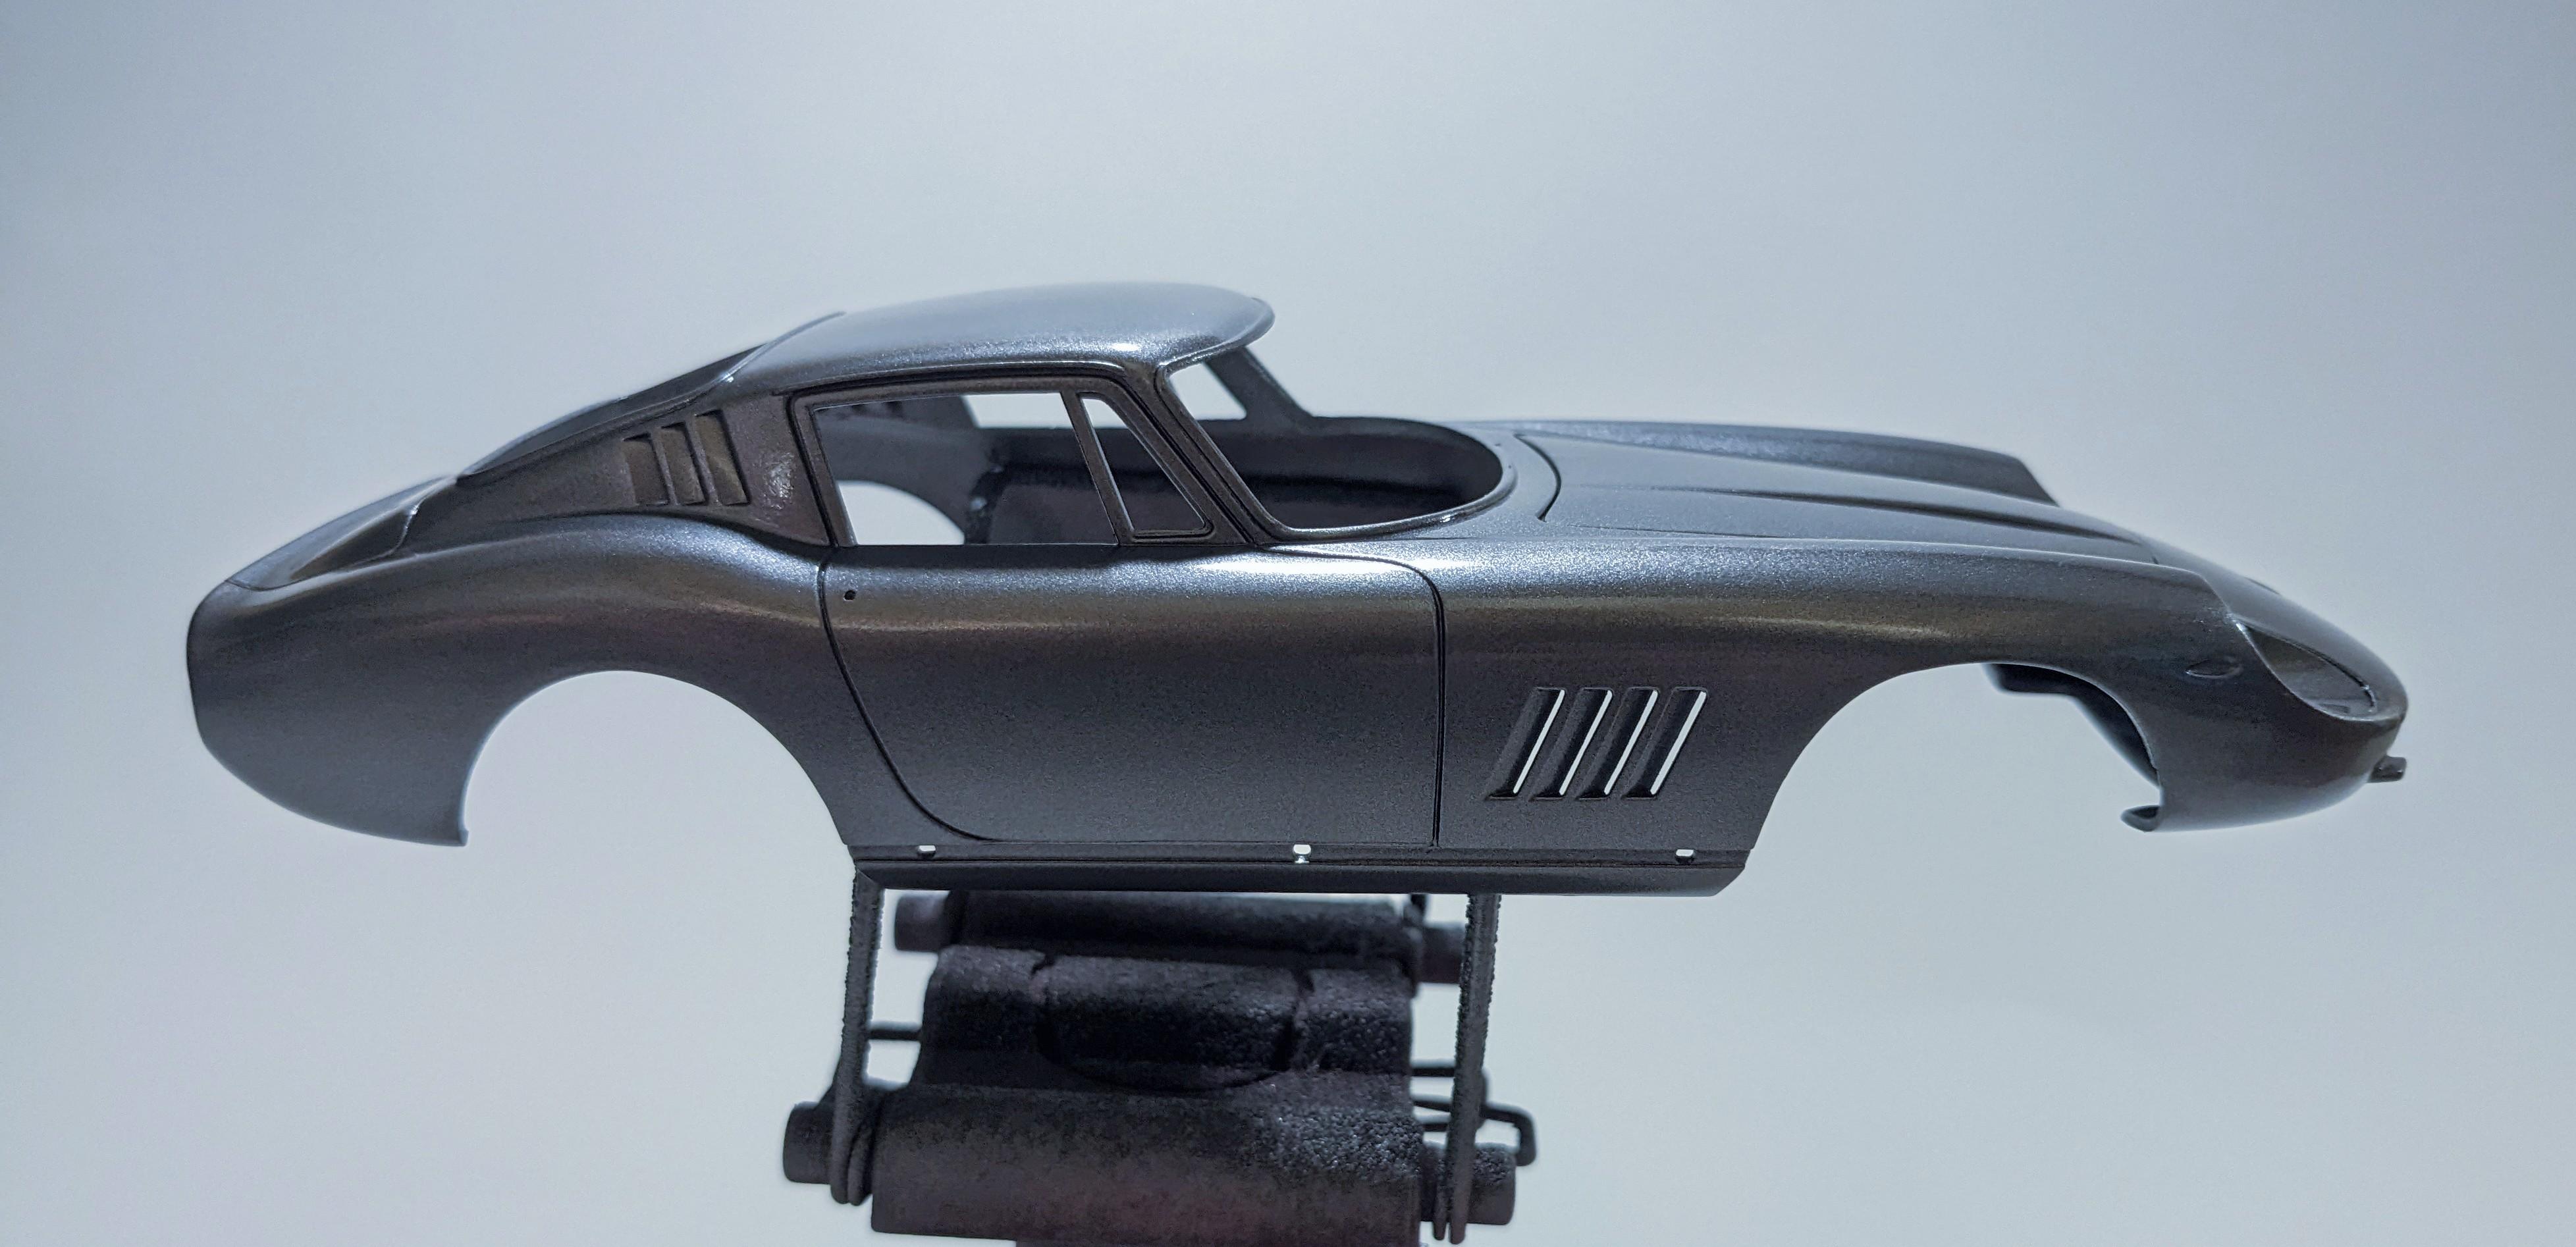
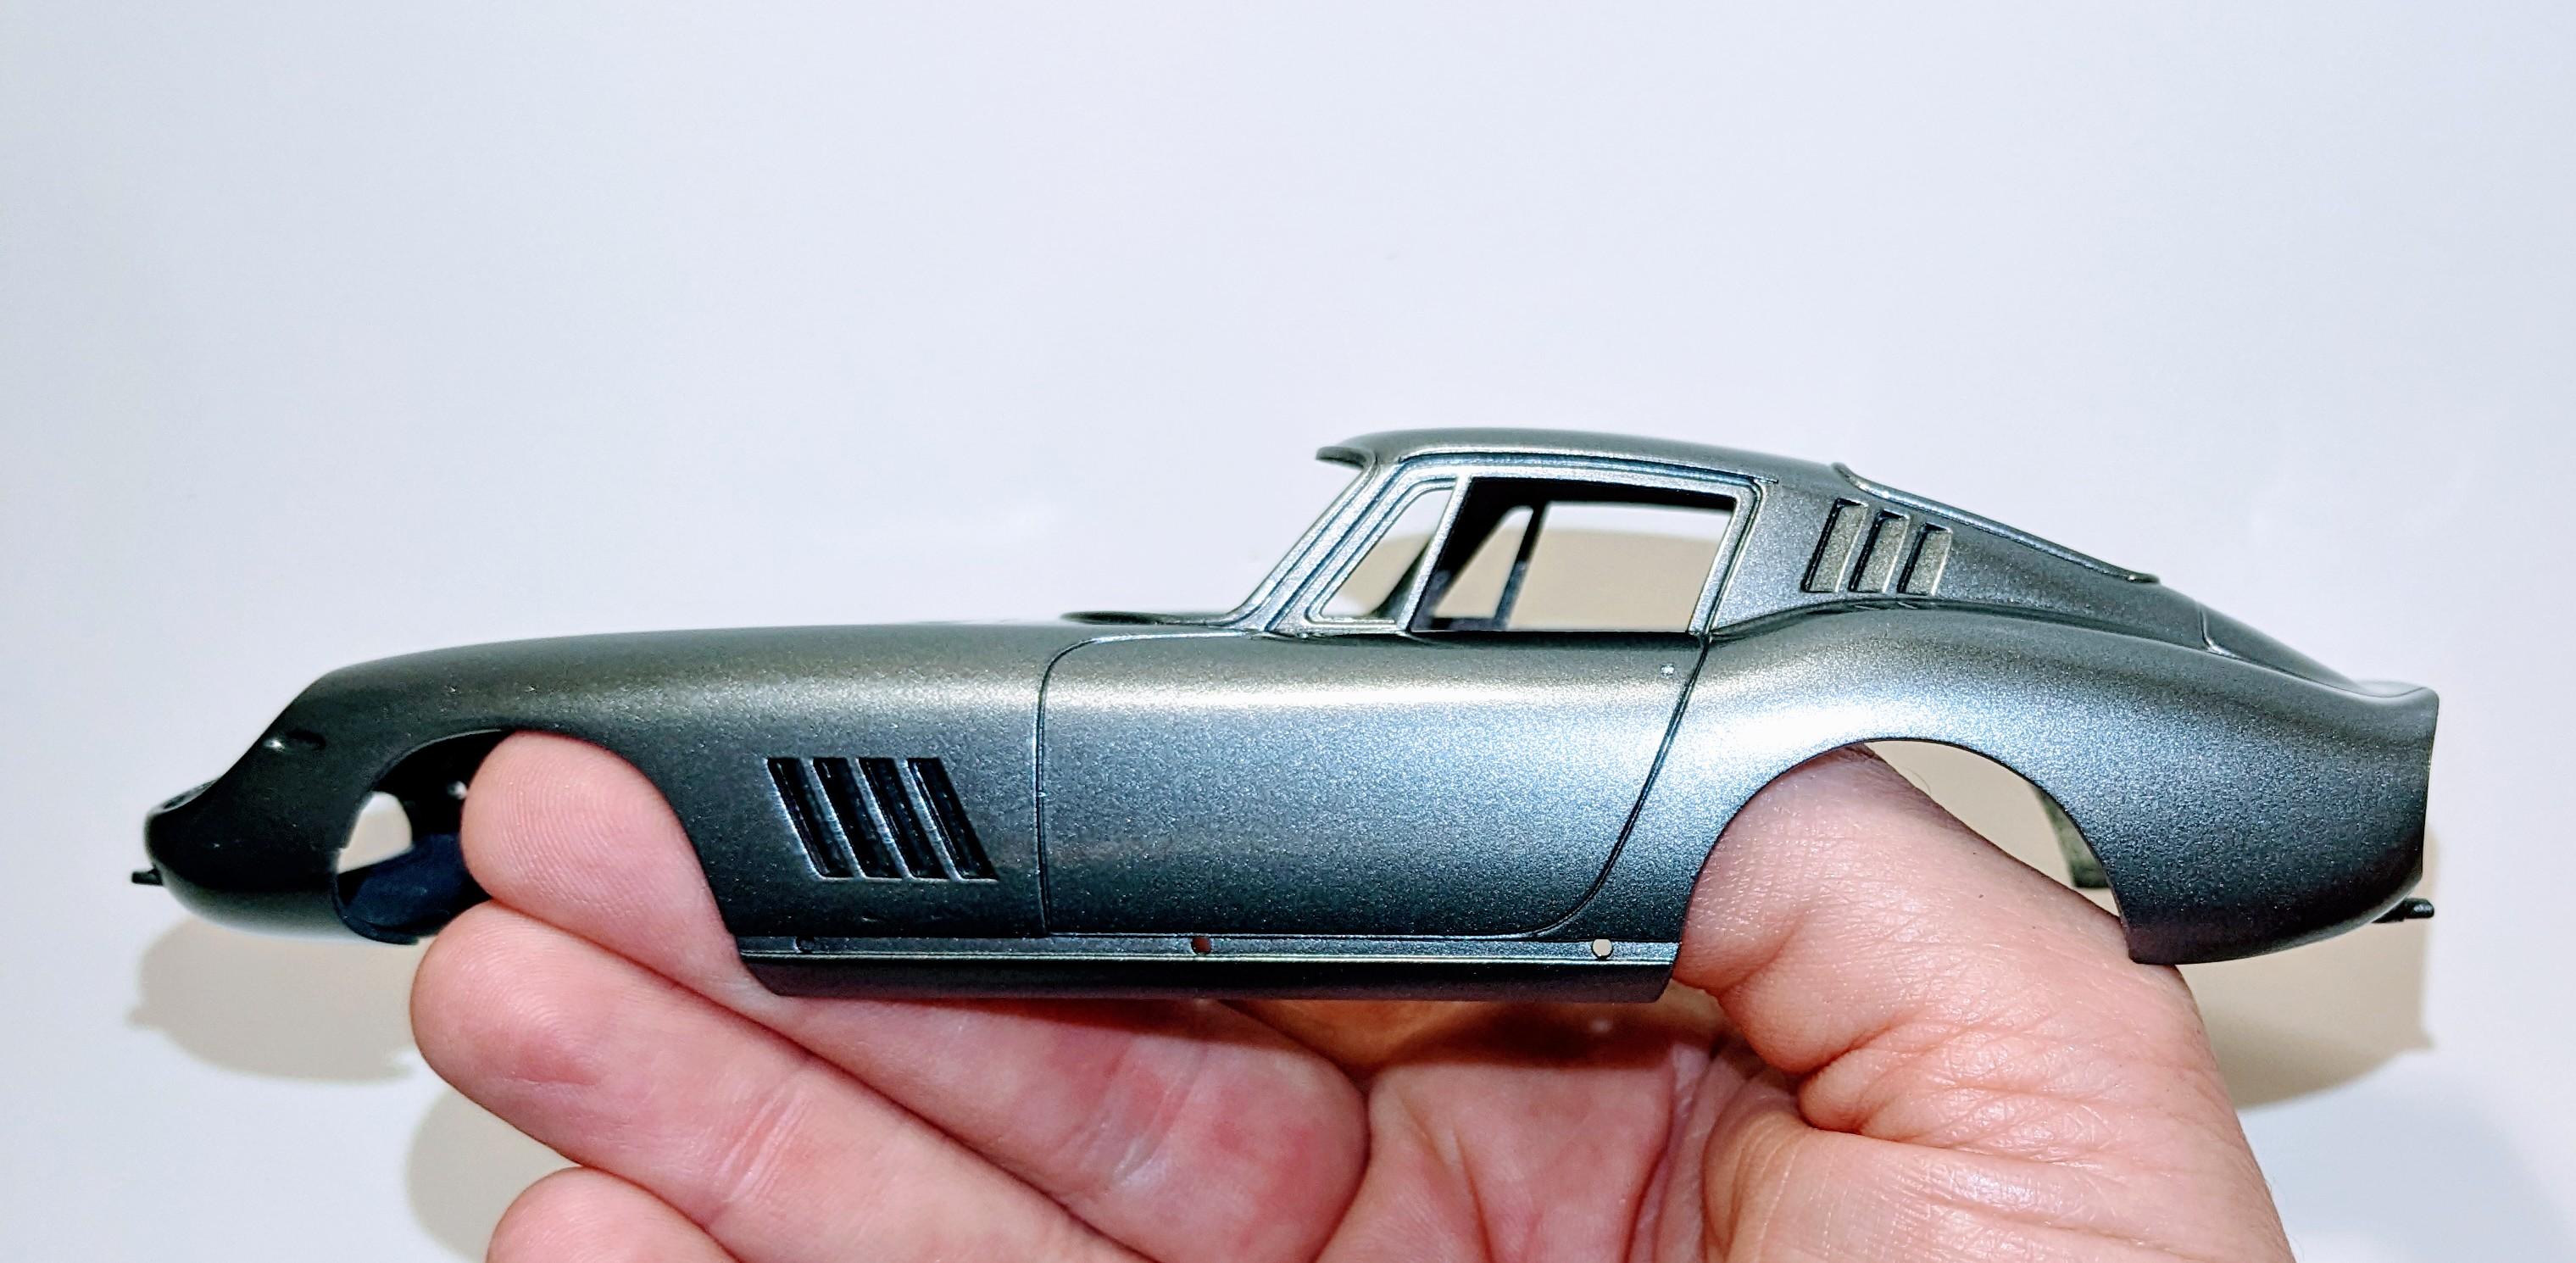
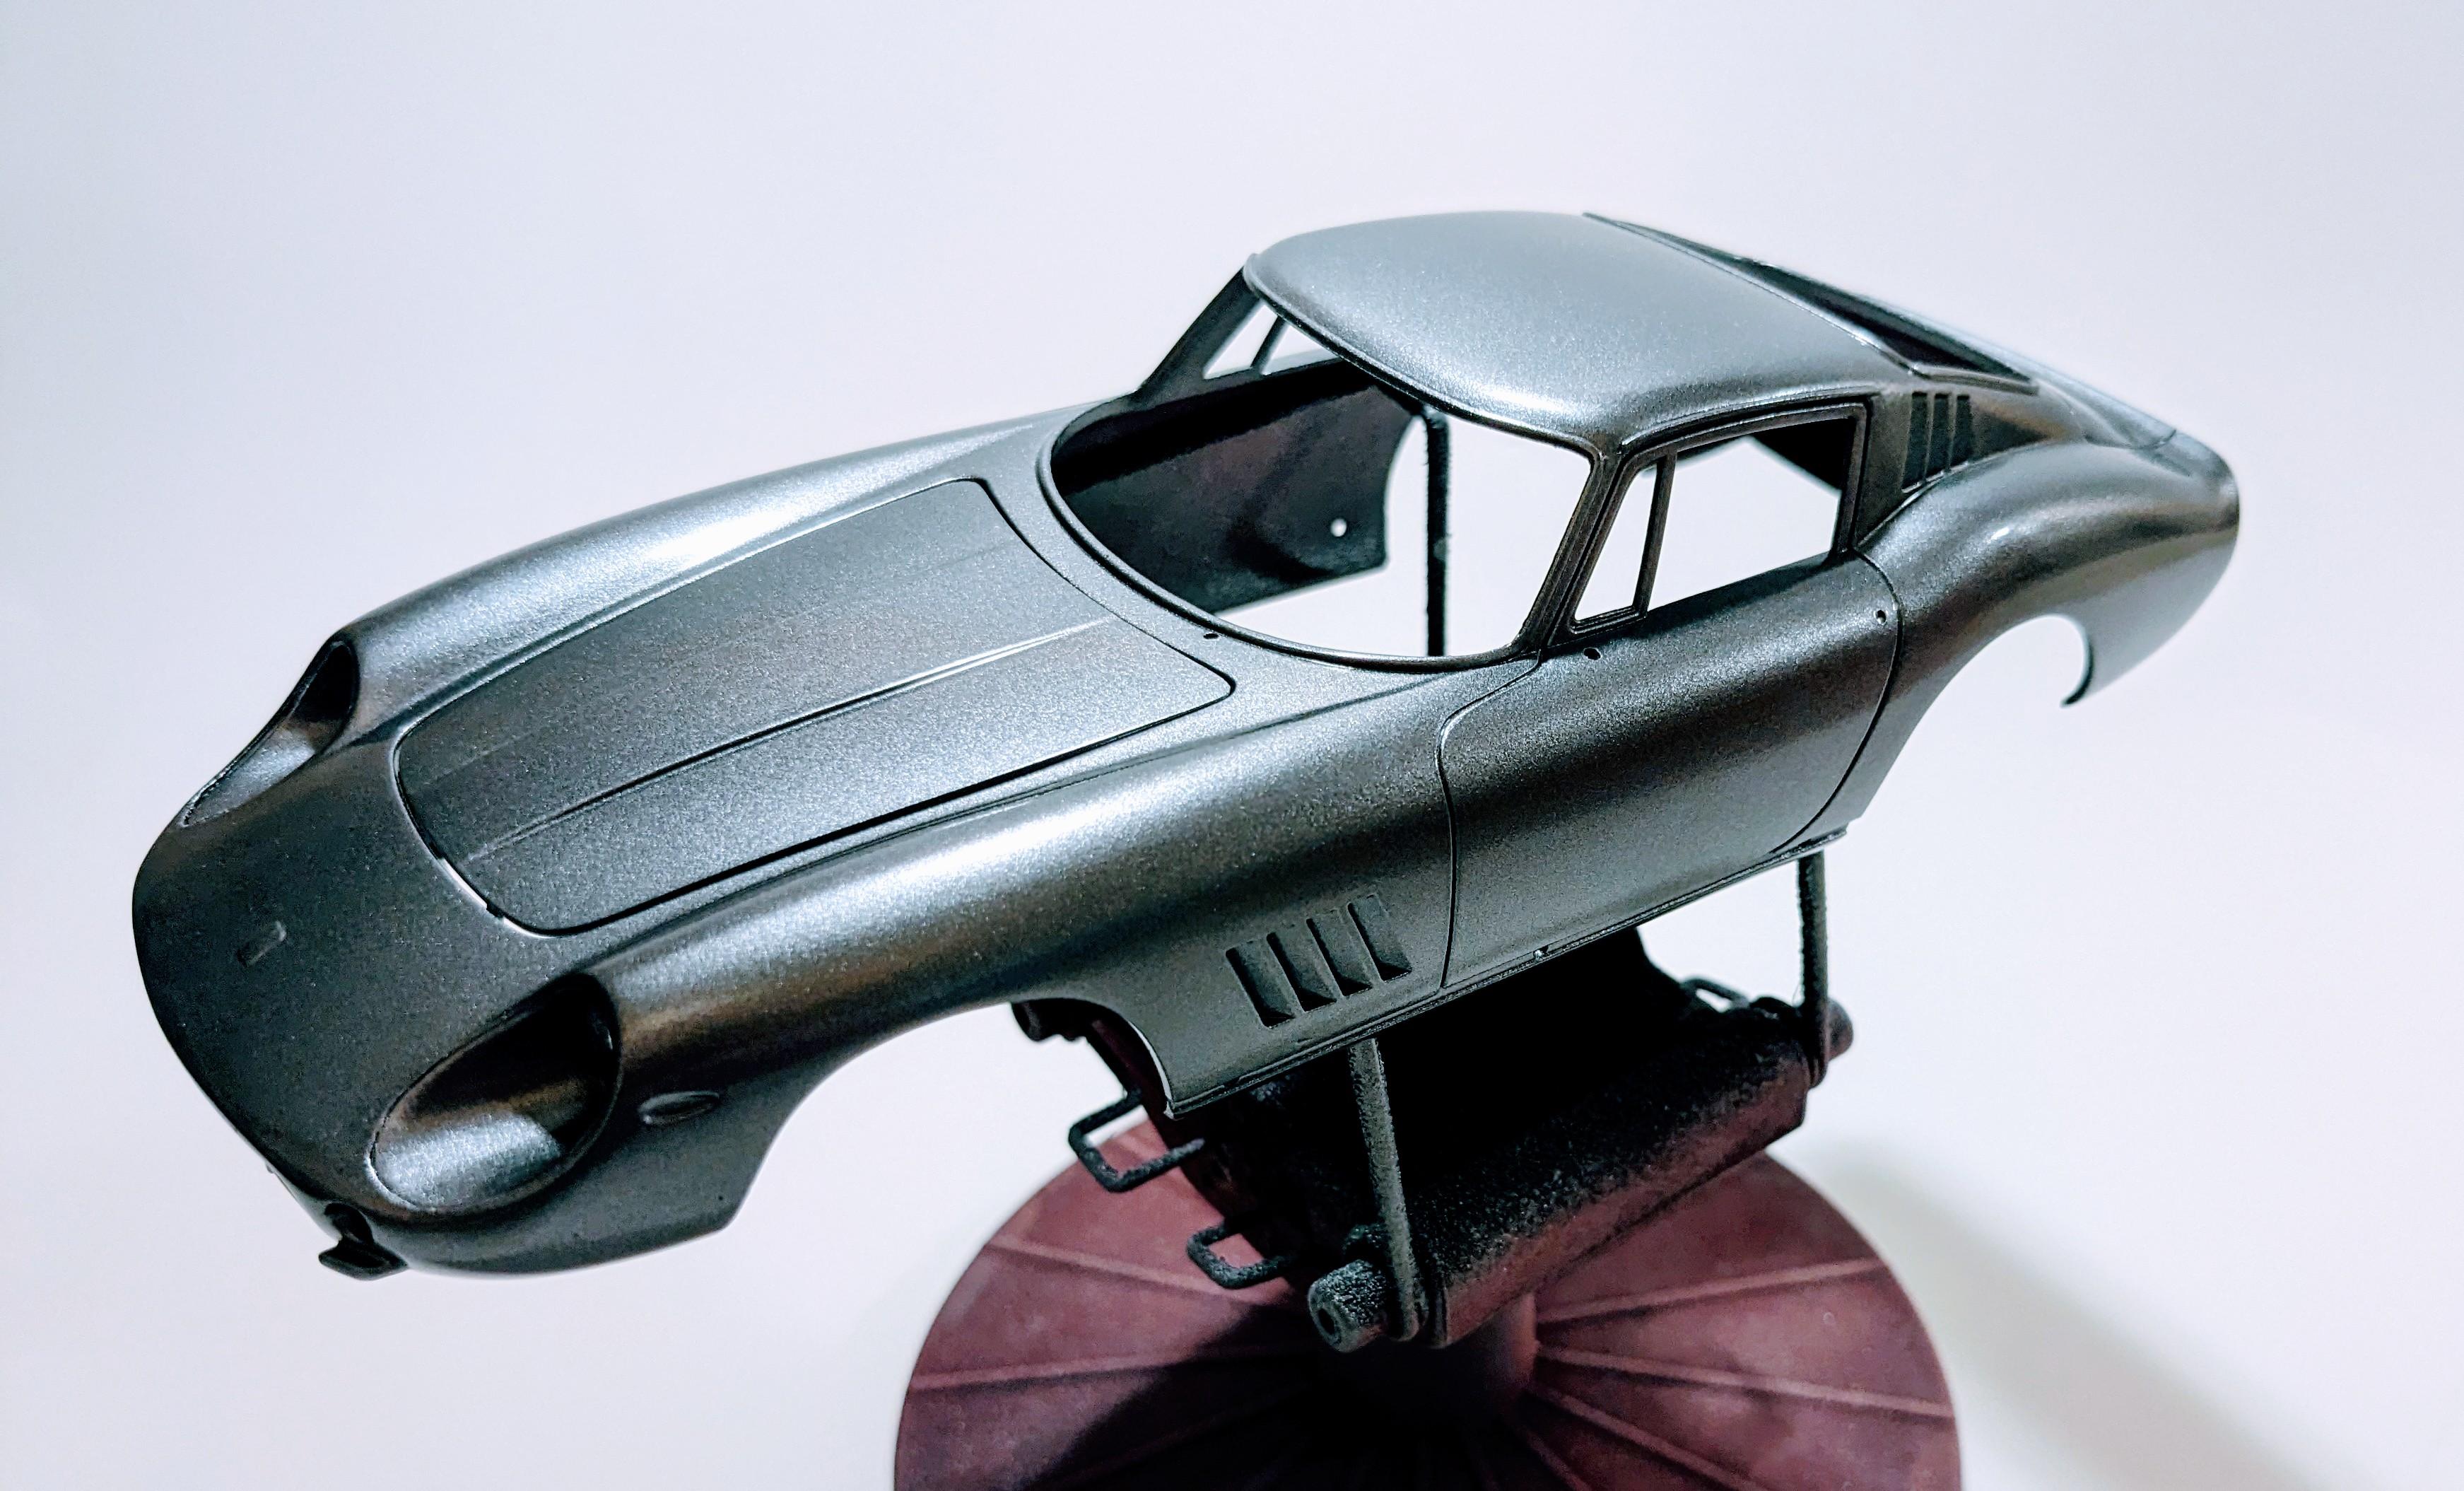
Paint is on... Tamiya Light Gunmetal with TS-13 Clear top coat over Tamiya grey primer. My technique with TS paints is to apply two light coats of color followed by three wet coats 10 minutes apart. For metallics I'll then hit it with two fairly wet coats of clear after 30 minutes flash time. I'll give it a week or so to gas out before polishing with Meguiar's Ultimate Compound and Polish. Given the less-than-optimal painting conditions (90°, 79° dewpoint, 70% humidity) it turned out pretty good with minor orange peel and no blushing or junk in the paint. Next up will be the tedious part of any build... removing parts from sprues, pre-assembly and cleanup, then mounting to craft sticks for paint.

-

Fujimi/Testors 1/24 Dino 246GTS Spyder
jaymcminn replied to Justin Porter's topic in WIP: Model Cars
Really enjoying this build. I did the GTS (in dark green as well!) a few years back. I will tell you that the body-to-chassis fit is something you only do once, it's really nerve-wracking. It does fit neatly into place without glue, though. -
Thanks Matt! Yup, there's no way that joint would hold up without reinforcement. I have a nice thick bead of gap-filling CA running all the way around. Thanks Gerry! I have the 250GT in the stash as well, that's another one I'm holding off on until I figure out exactly how I'm going to build it.
-
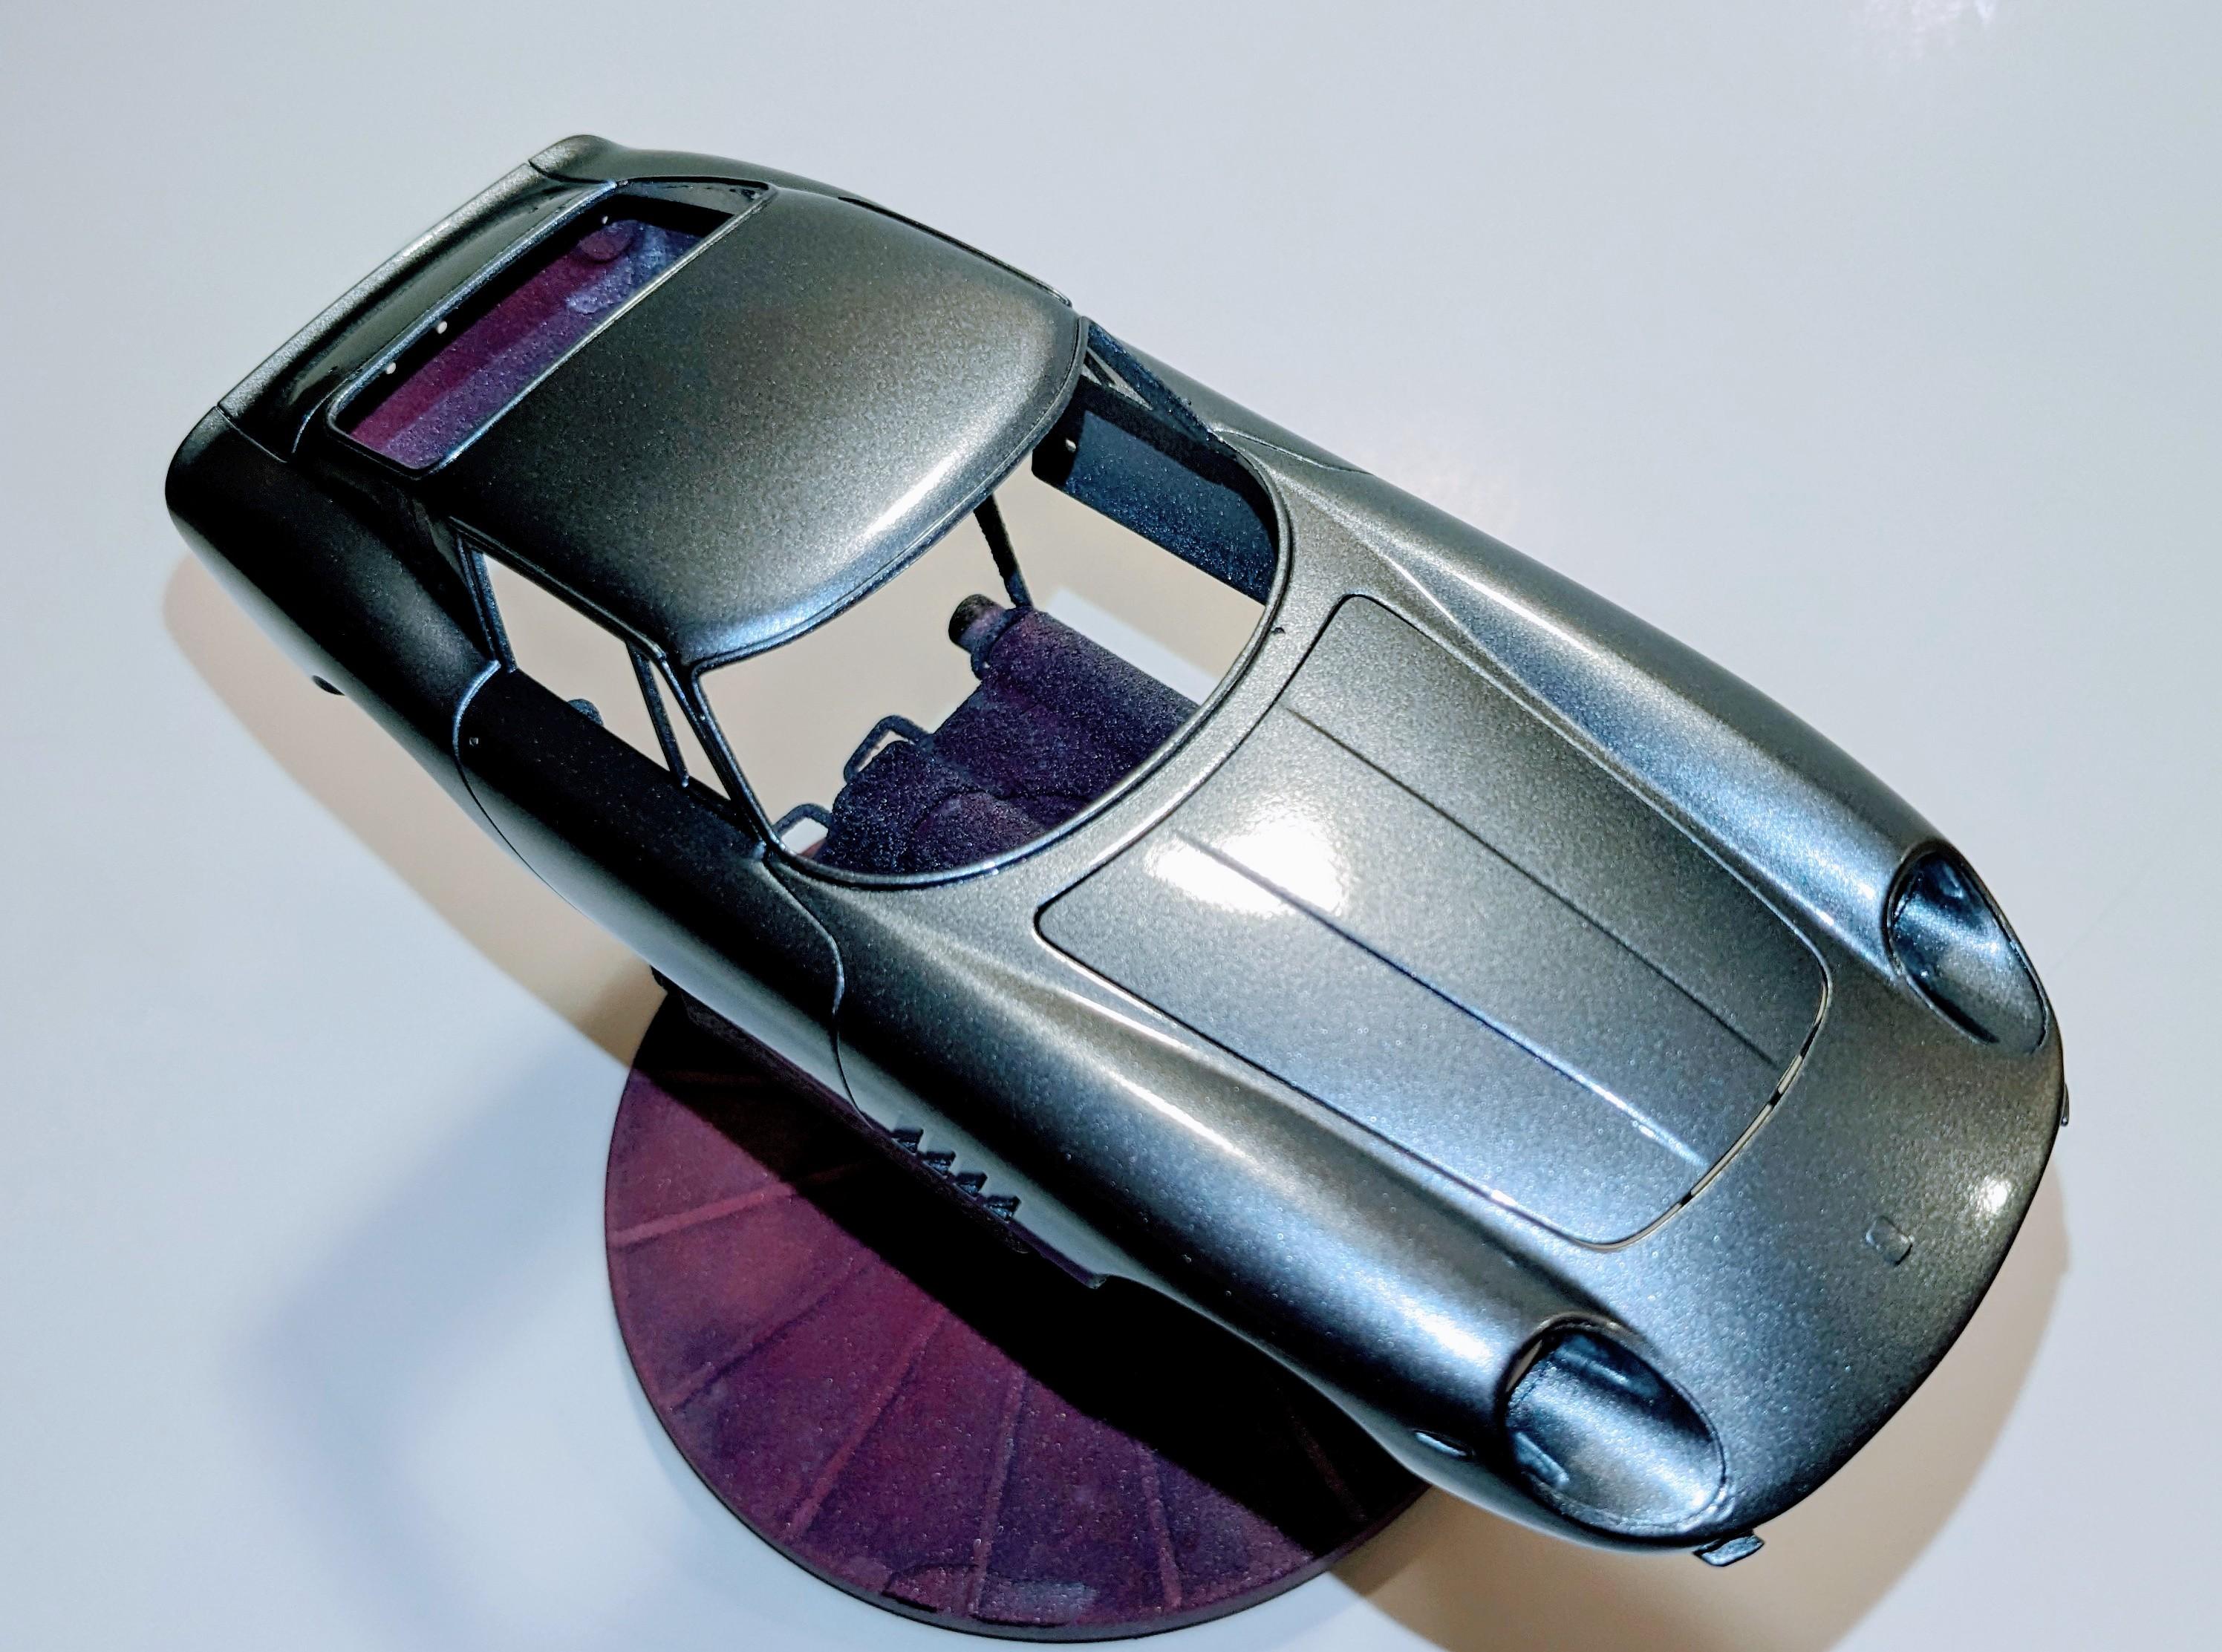
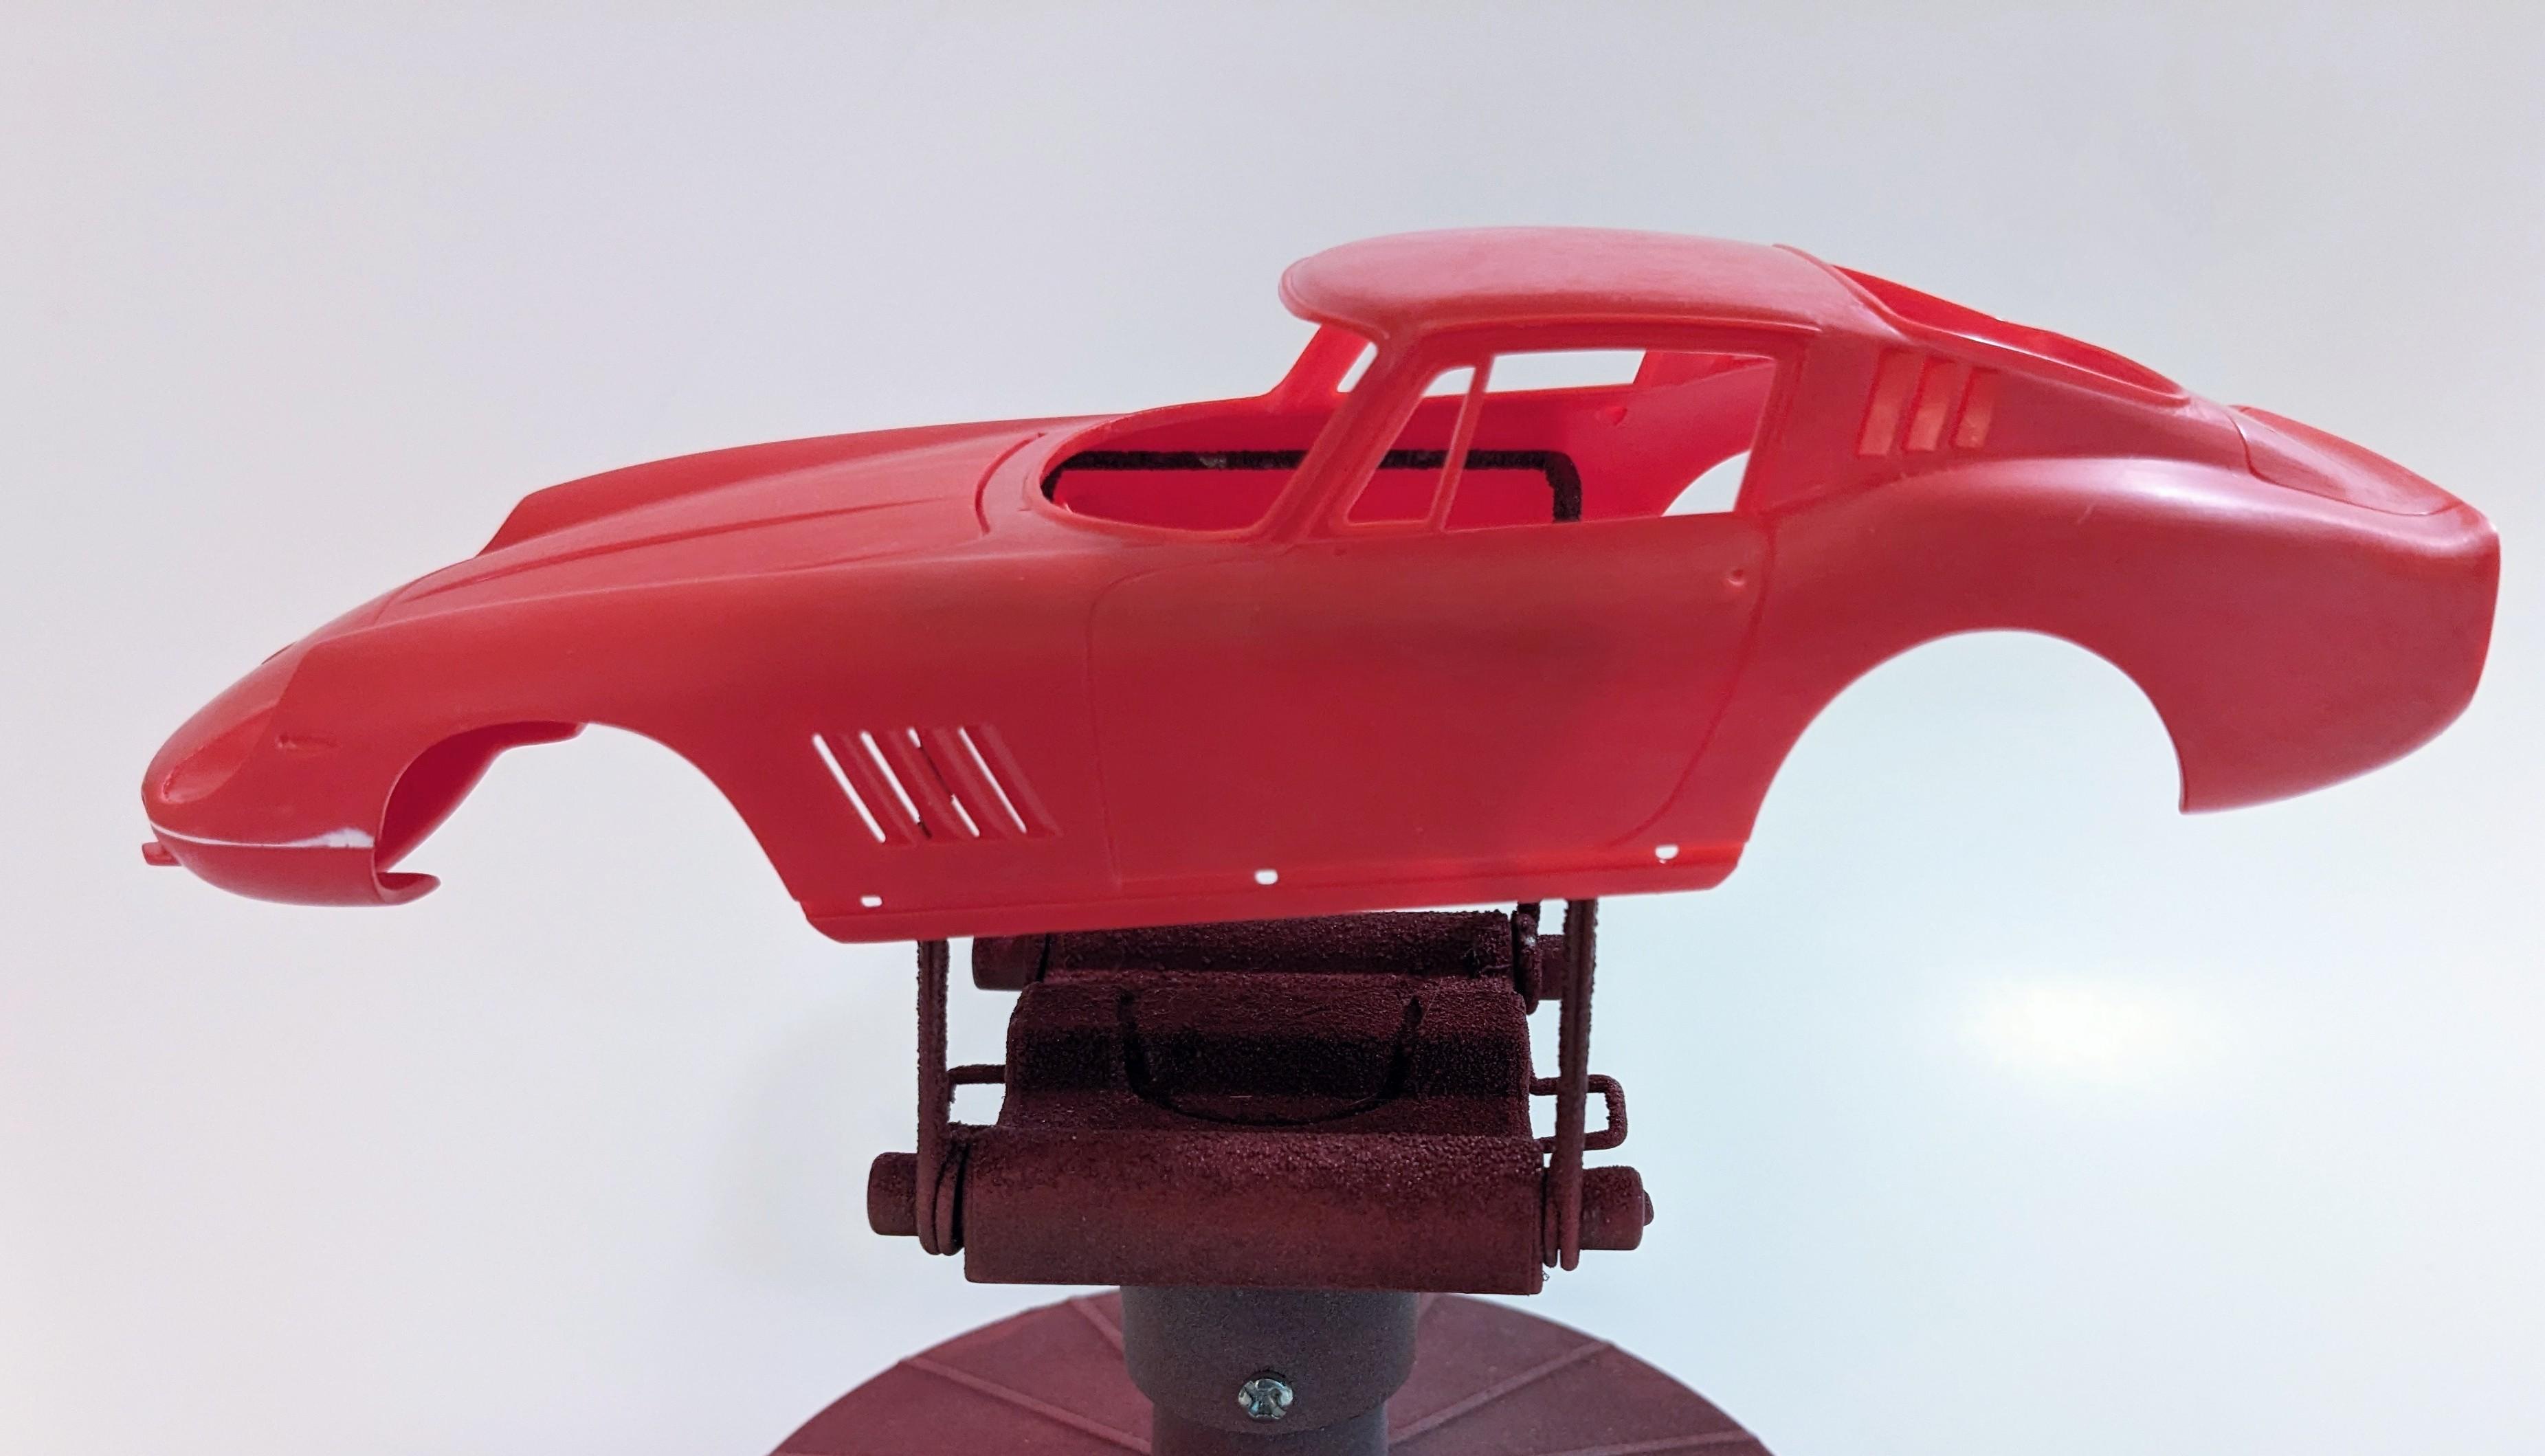
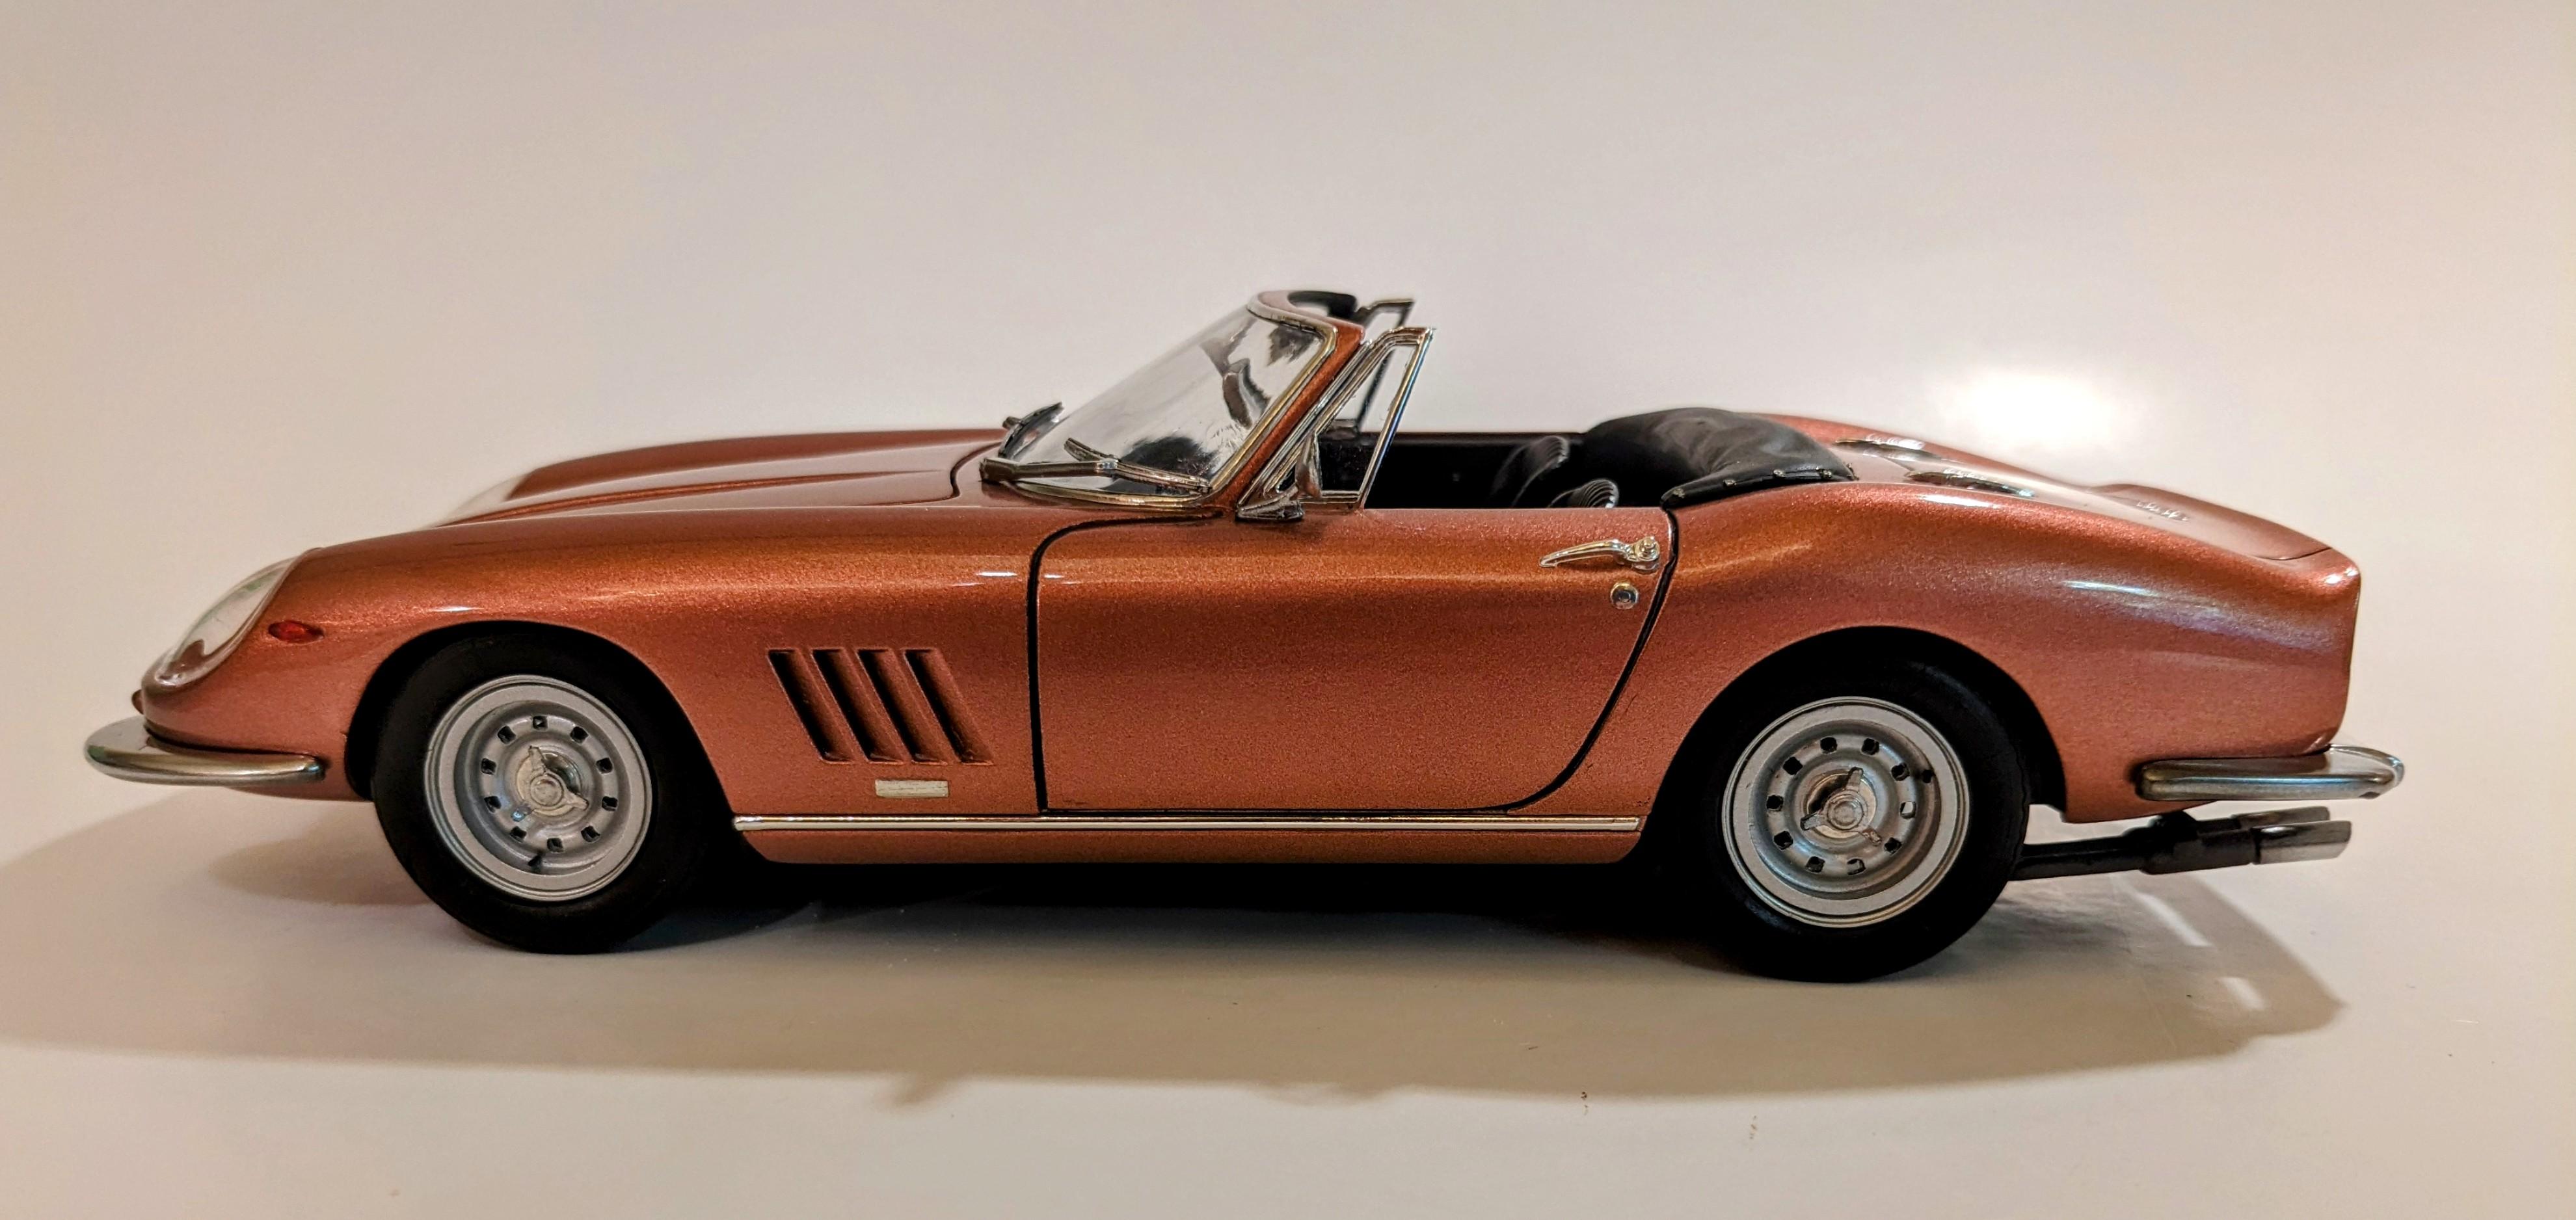
Several years ago my LHS got in a consignment of vintage car kits. I scored a Fujimi Enthusiast Dino, an Enthusiast Porsche 930, and this... the rare Italeri Ferrari 275gtb. This kit has been released twice as far as I know... once by Revell in 1991 and then a year later by Italeri. When these kits (rarely) show up on Ebay they tend to command some pretty high prices. My LHS had it priced at a whopping $29.99! This has been in the stash for a few years now waiting for the right time. I've got some experience with this kit having built the Spyder version already (paid $100ish on the 'bay for that one!) and it's a great little kit with a few caveats. The wheels and tires are Italeri's usual two-piece Borranis with Dunlop "truck tires". The headlights aren't great either. But the proportions are great and the detail is very good and the kit responds well to simple detailing. I'm several hours into the build, pretty much body prep so far. The front and rear valances as well as the headlight buckets have been attached and minor divots and gaps were filled with Tamiya putty. Panel lines were rescribed and trim edges were sharpened up a little. The body was then block sanded. The kit headlight locating hole was drilled out for parts box headlights with actual reflectors. Primer is going on soon! Wheels and tires are going to be Fujimi's excellent 3-piece Borranis with Michelin XWX tires from the Enthusiast Daytona kit. You used to be able to get these as a wheel set from Fujimi but that set has been OOP for a while. I have a Daytona parts kit that I'm going to use for these. I was tempted to order up a set of RMCM Campagnolo wheels but I used a set of these on the Spyder and wanted to go with something different on the Berlinetta. Color is going to be Tamiya Light Gunmetal, which is a pretty good stand in for Ferrari Grigio Fumo. Interior will be navy blue over grey carpet. Here are some pics of the body so far... Bandit obviously approves of my choice of subject matter! A couple of pics of the Spyder below...
-
Perfect color combination and absolutely flawless build! I did the 695 Assetto Corsa version several years back and loved every minute of it. Those 90s Tamiya "modern classics" kits are among their best.
-
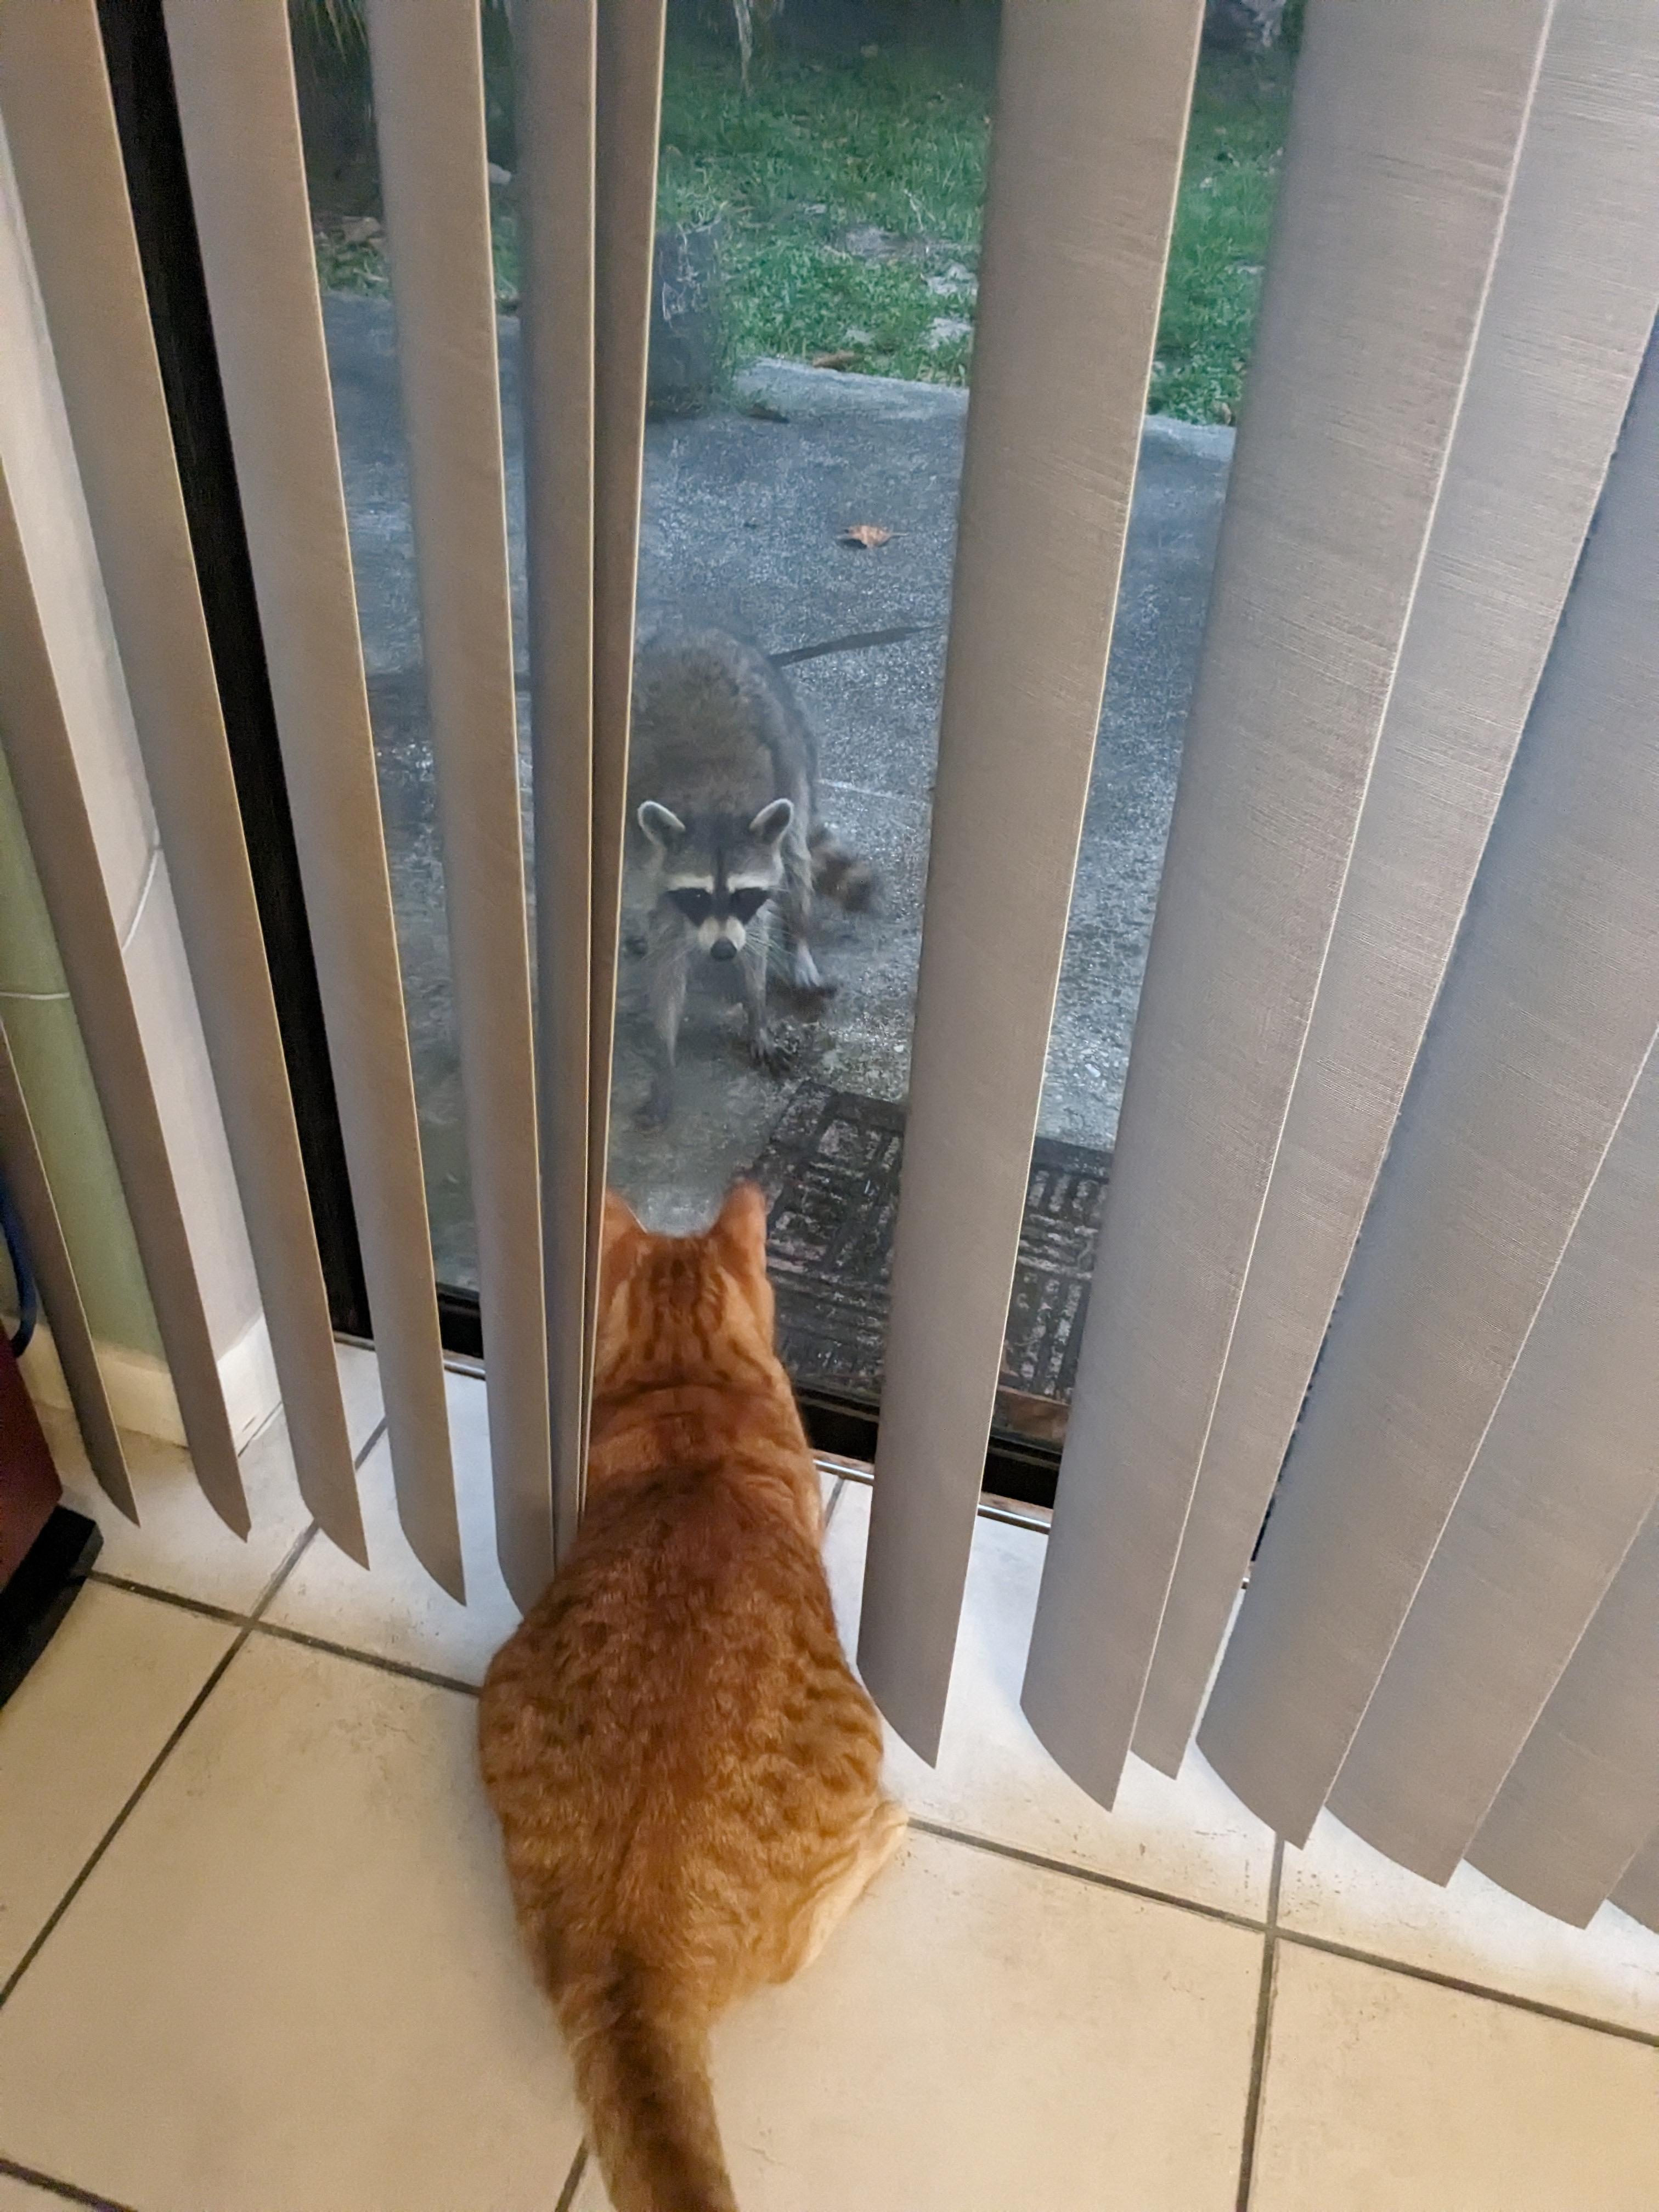
Last night about 8:30pm Bandit bolted straight for the patio door and started pawing at it. I figured it was one of the neighbor cats, but not quite... This standoff went on for about 5 minutes until the "trash panda" wandered off (absolutely NOT due to being scared away by 17 pounds of ginger fury or me taking pictures and laughing). The mighty defender of home and hearth was rewarded with Temptations and belly rubs.
-
Beautiful build of this kit. The color is subtle and perfect for the 80s. Awesome!
-
In the display case with two of its contemporaries, Italeri's Fiat Mefistofele and Alfa Romeo 8c.
-
I actually just snagged the 1/12 Italeri Fiat Abarth 695SS for $119.99 shipped. Not a bad deal. I got it from Model Expo through their Amazon storefront.
-
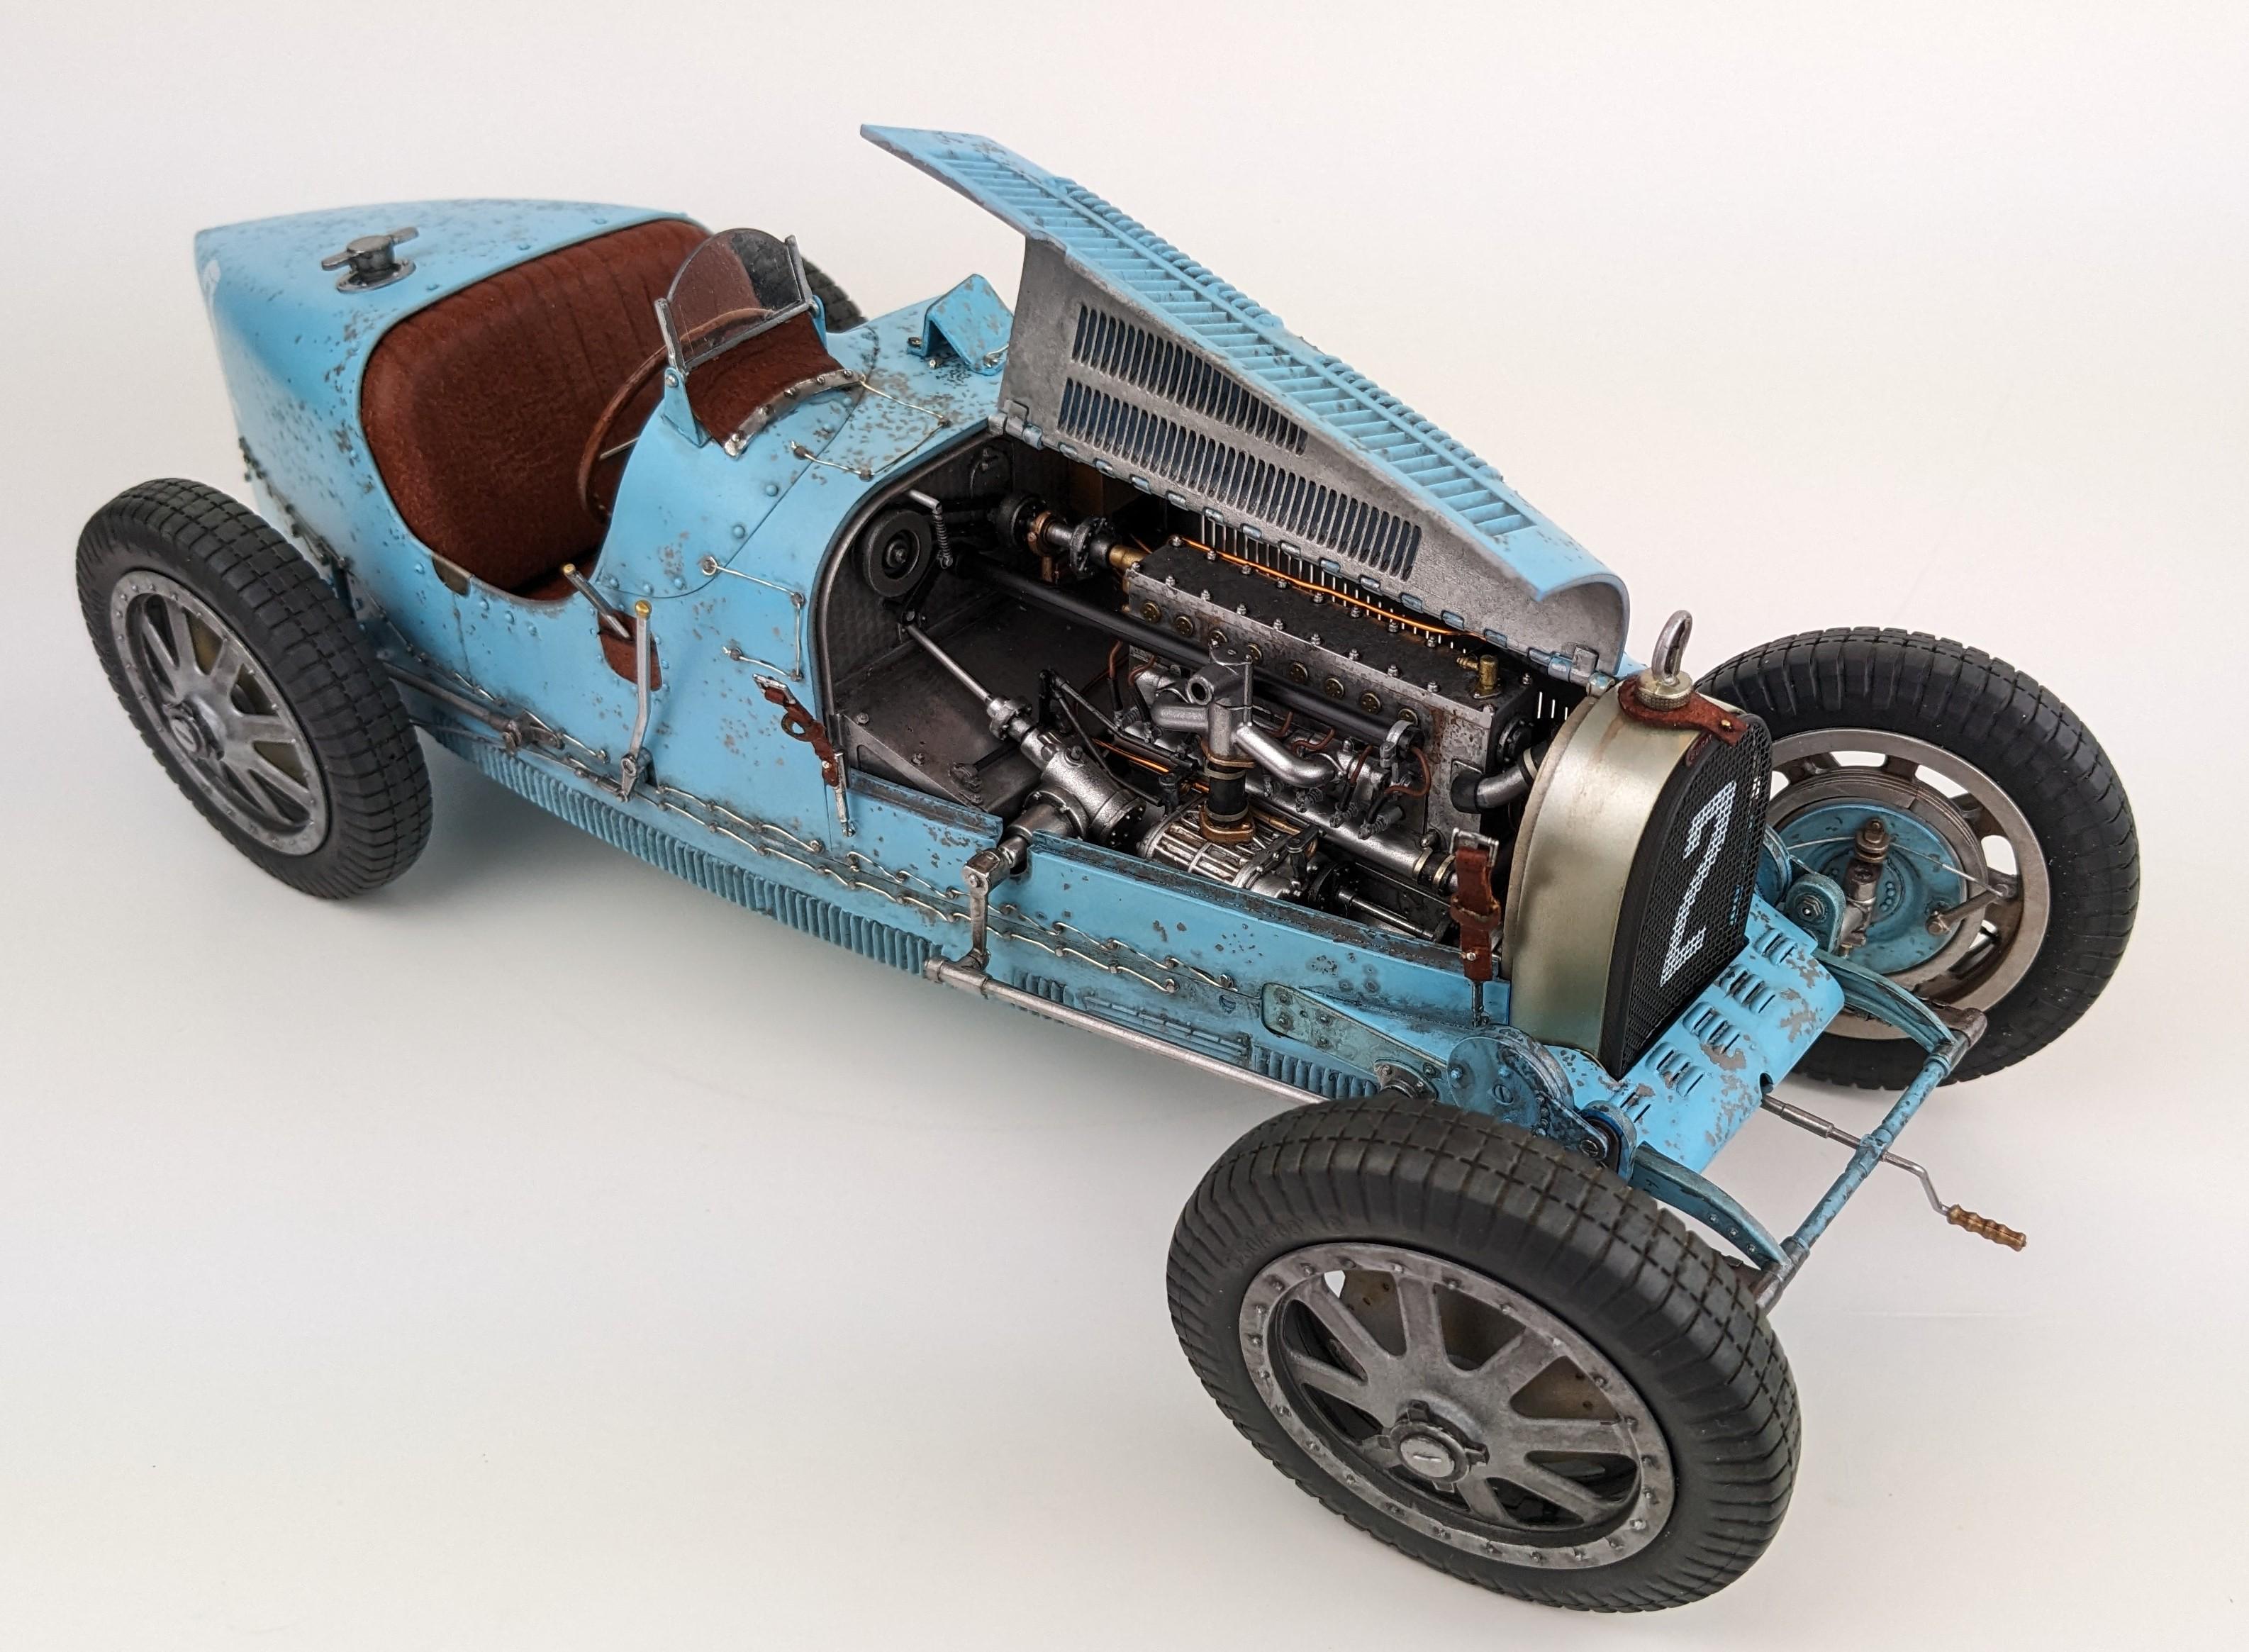
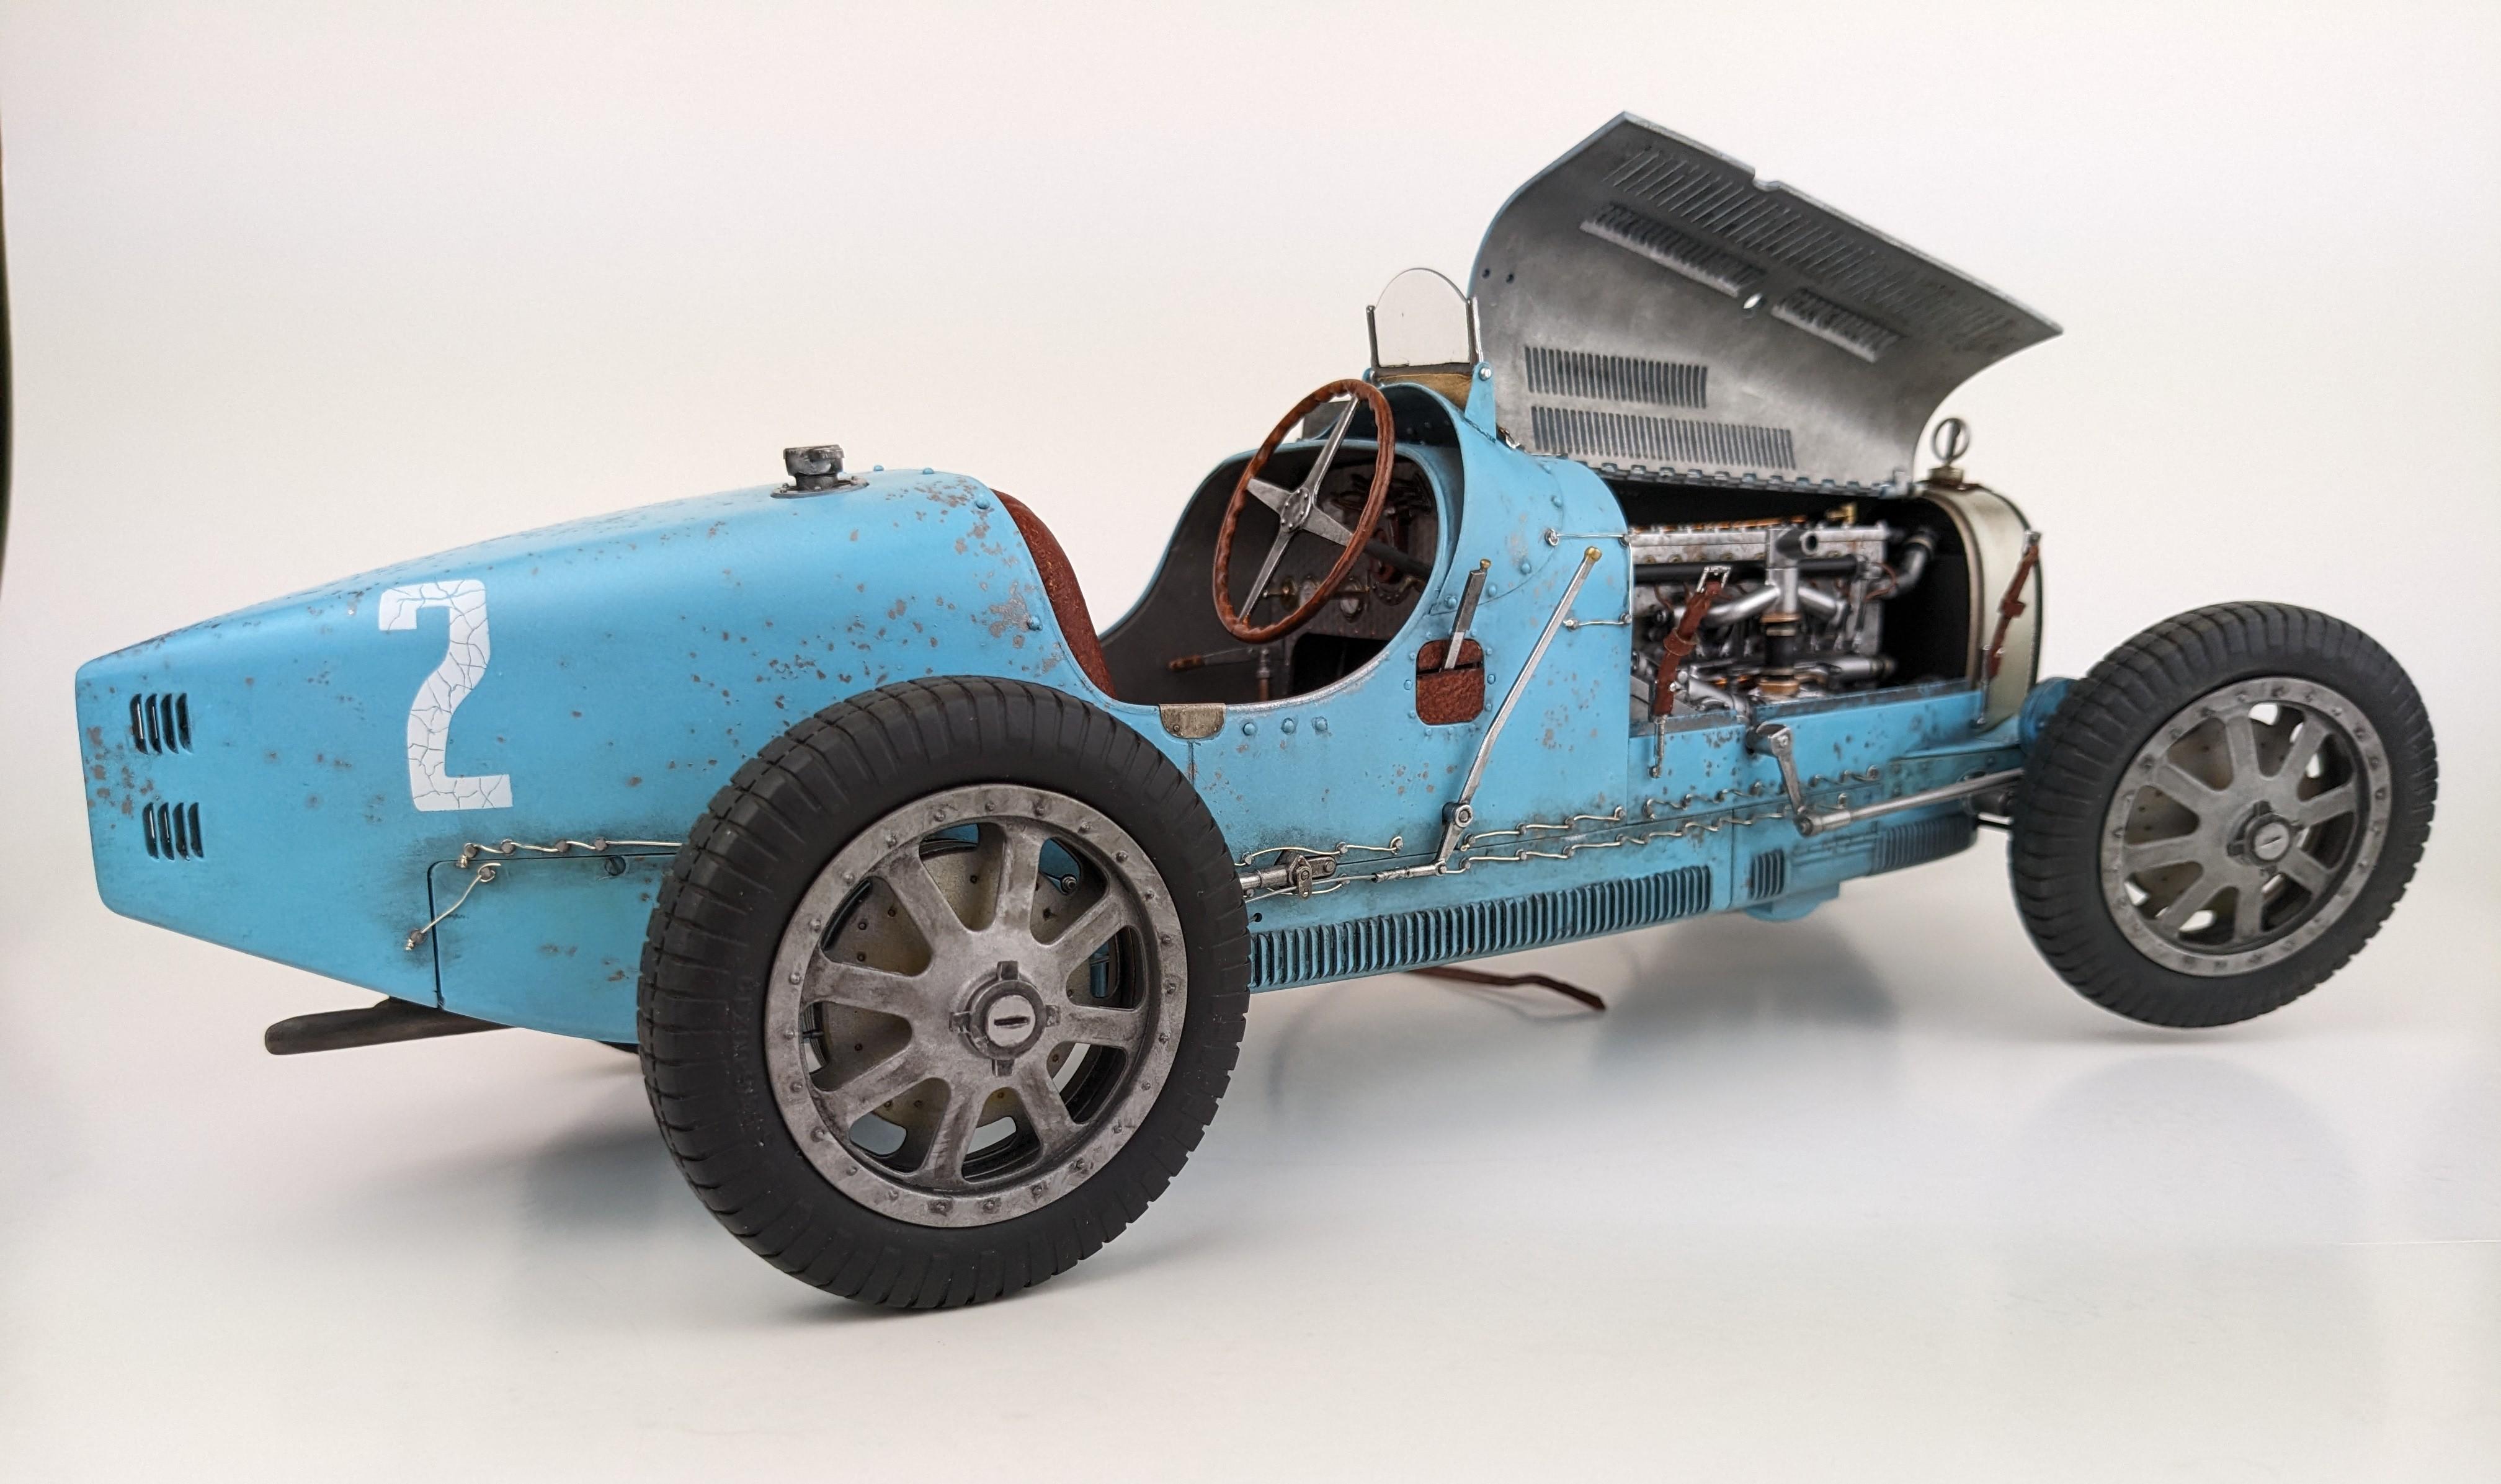
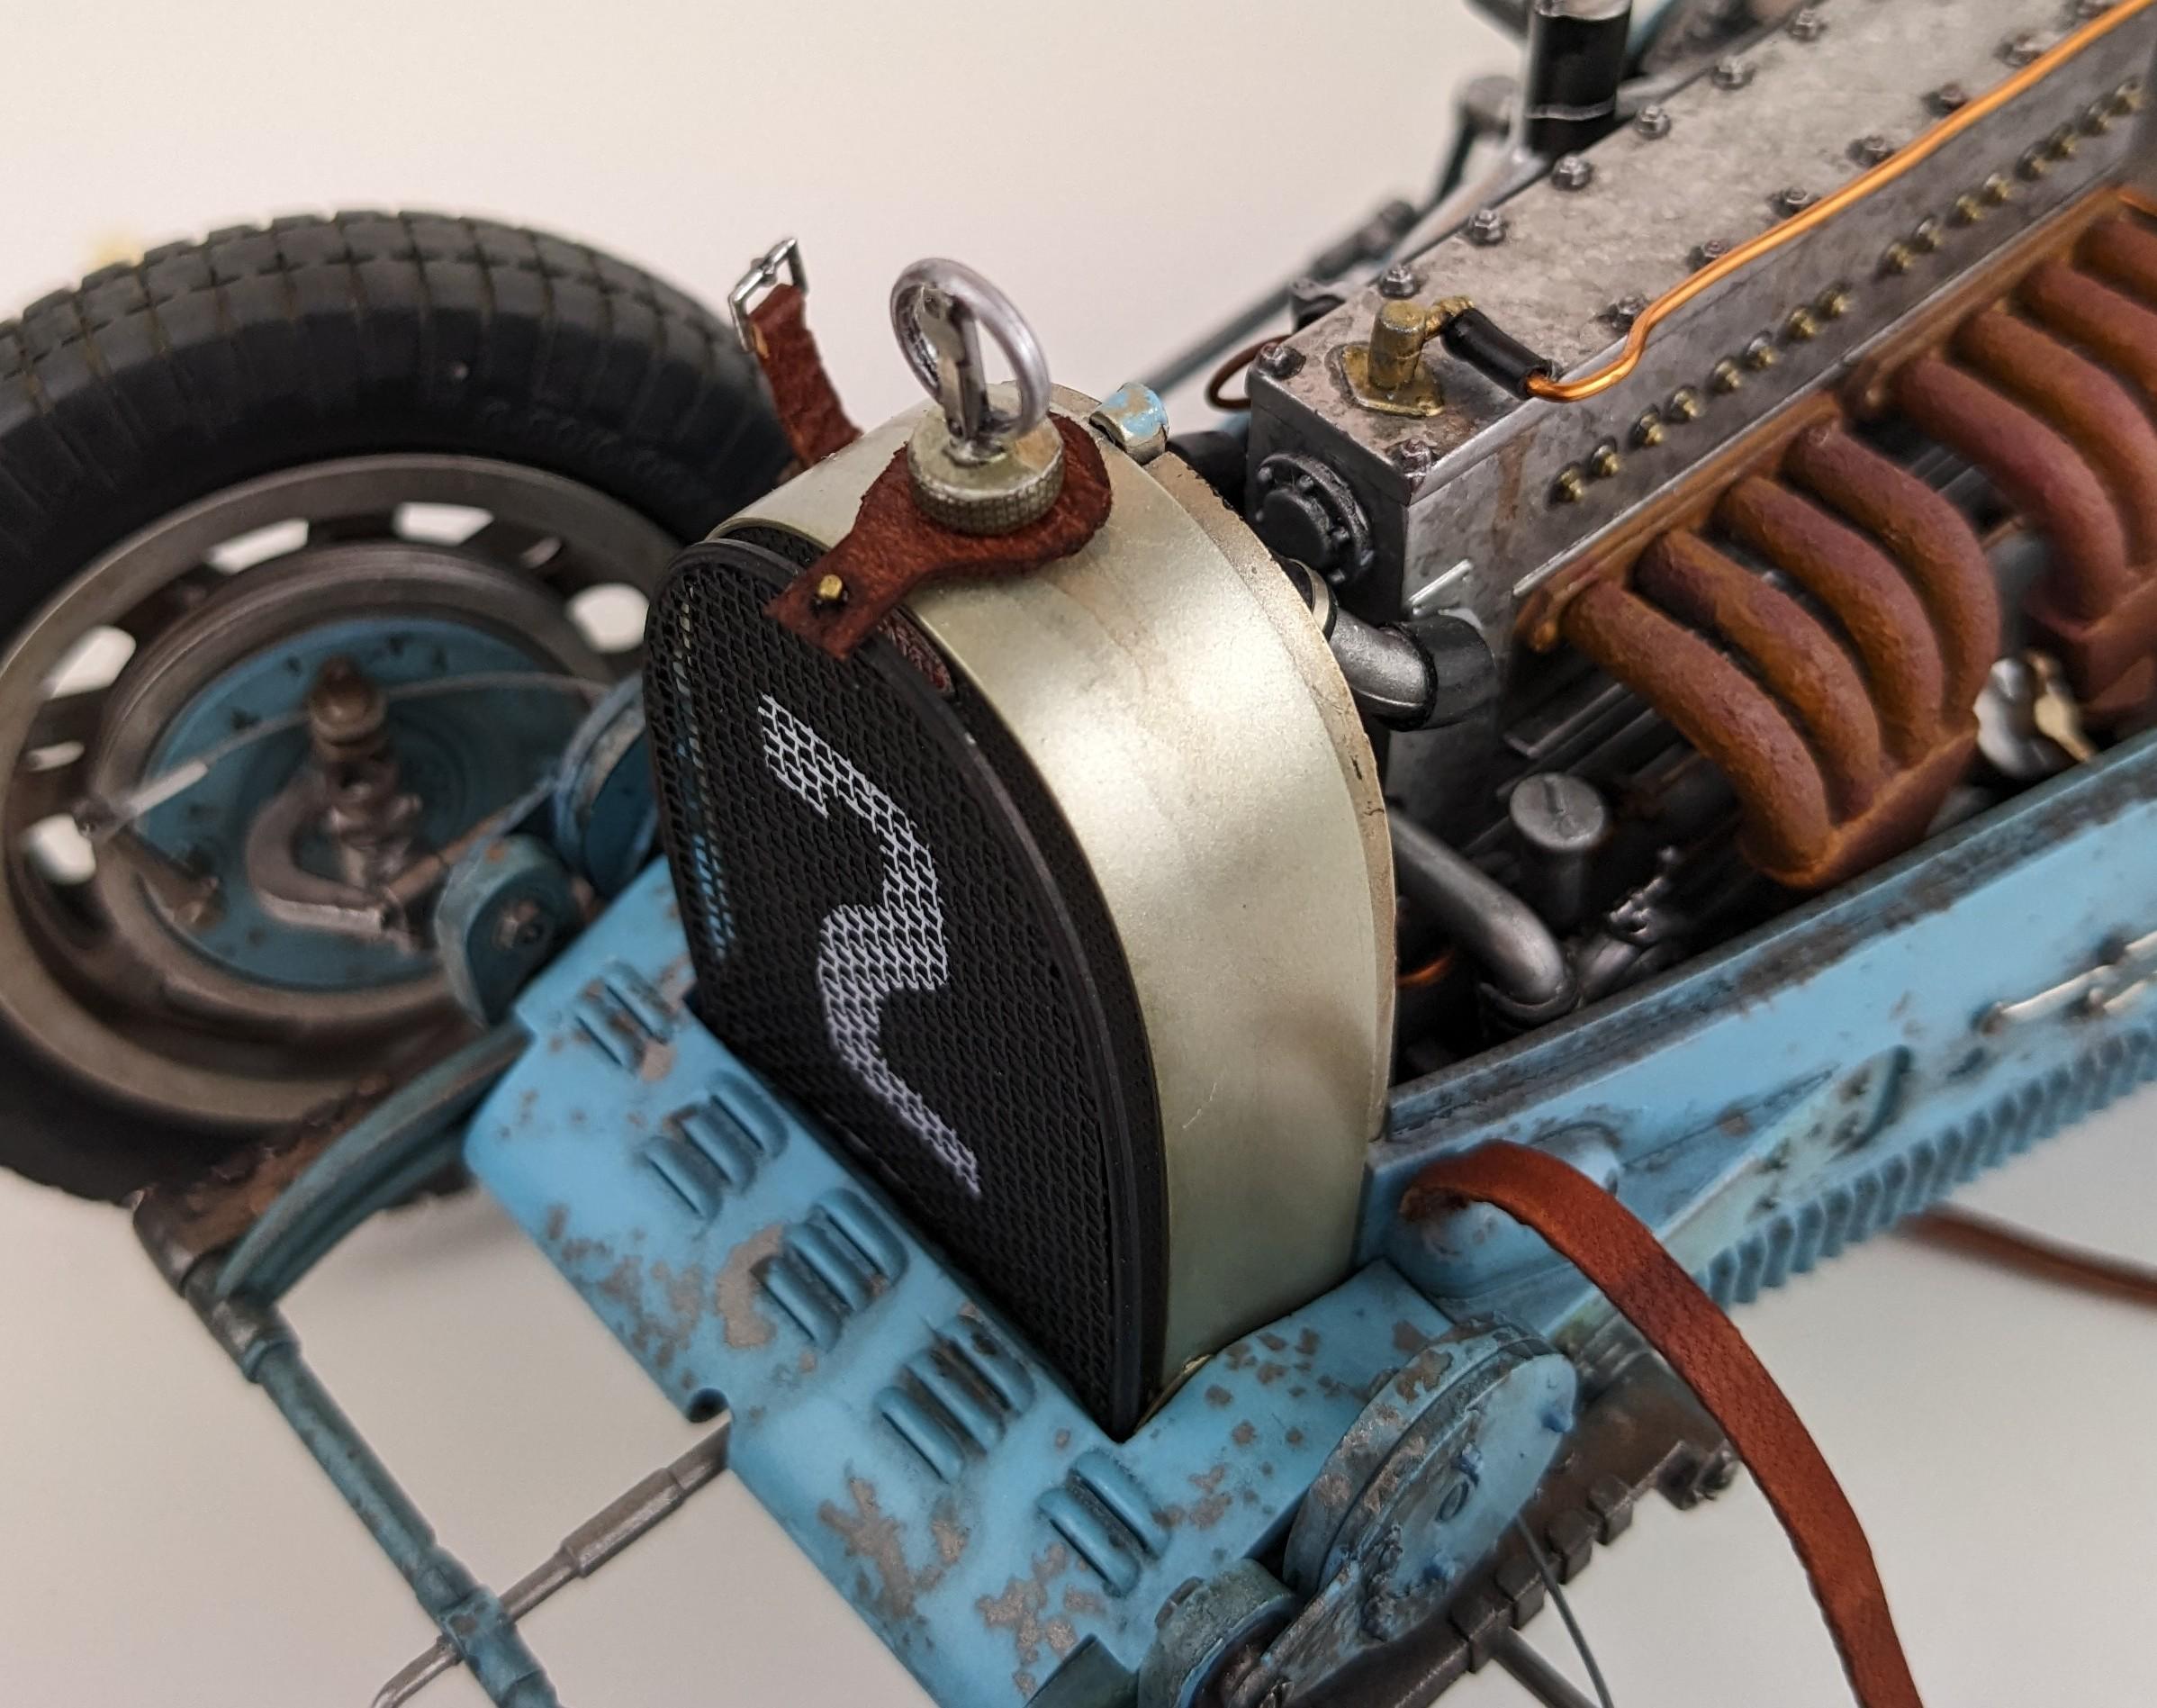
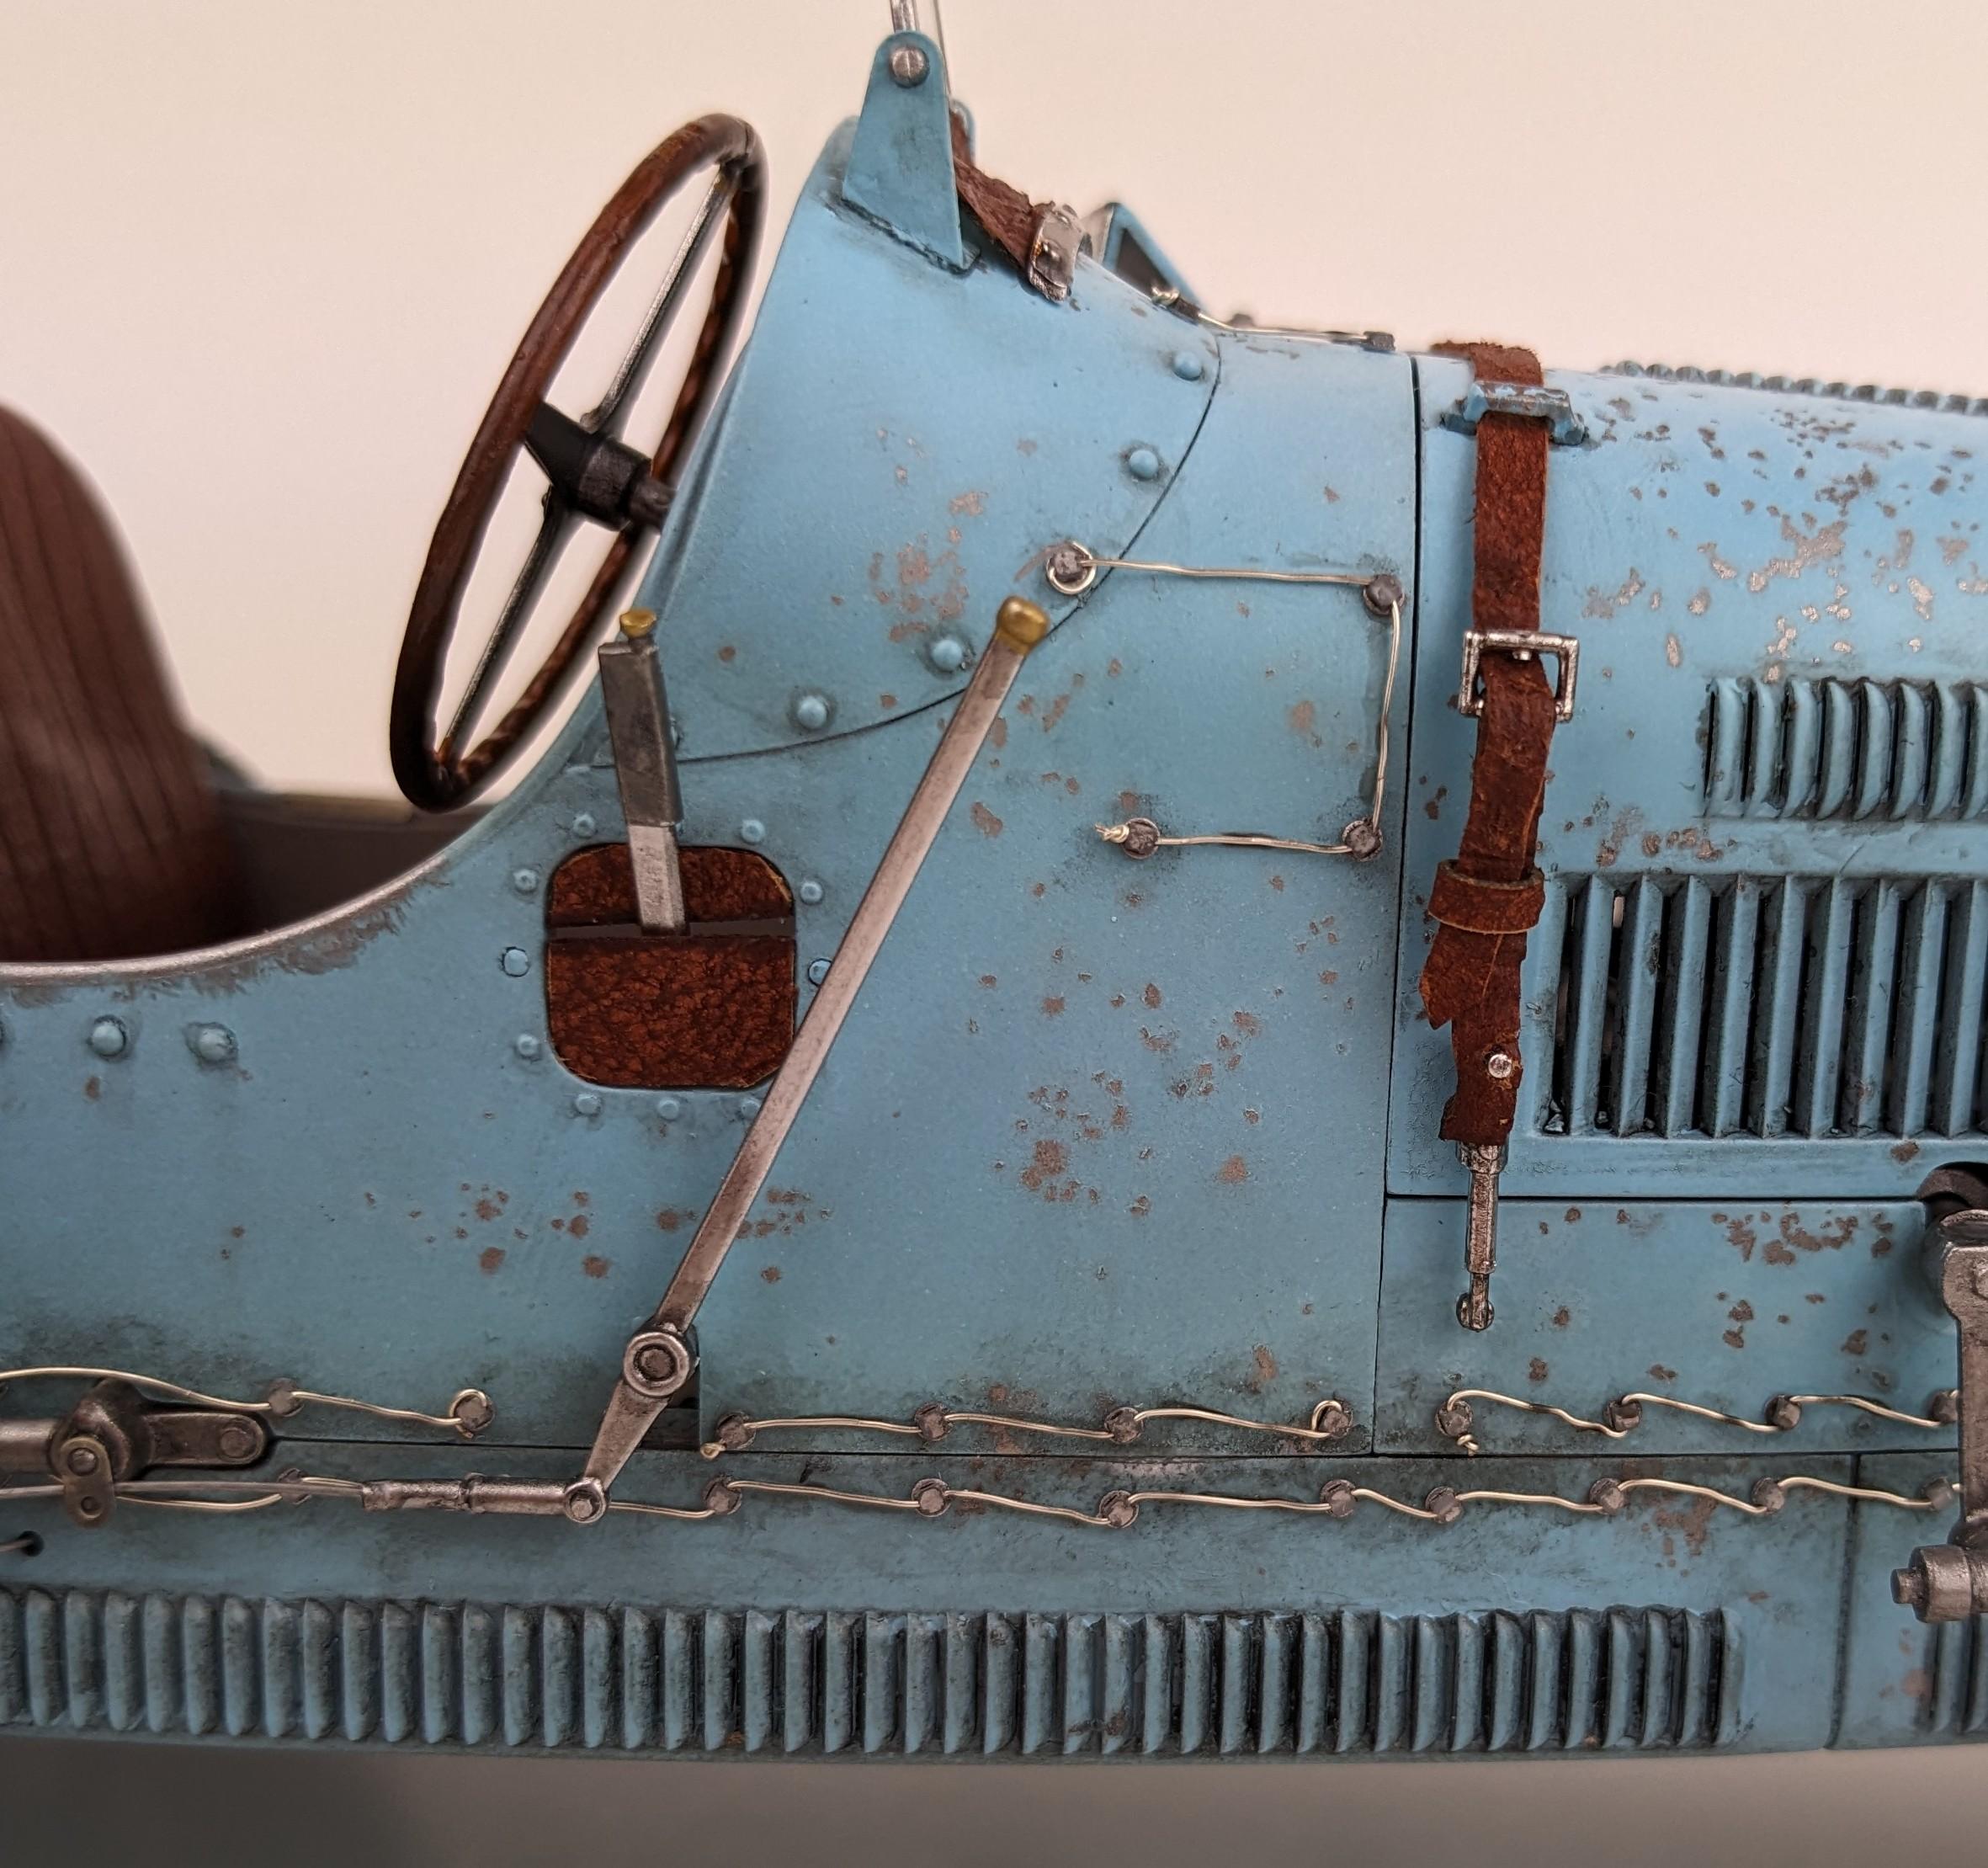
Thanks Pierre! I'm really happy with how the metal finishes turned out. A lot of it comes down to the Vallejo Metal Color paint. The pigments are Metalizer-fine, but Metal Color is water-based and pre-thinned for airbrushing. It doesn't mind being brush-painted over small areas either. A lot of the chassis components were painted with their Gunmetal Grey and then drybrushed with the Chrome to give it depth and shine like the alloy components of the 1:1. Salt weathering is FUN. Definitely going to go into my bag of tricks for future use. It's a really random effect, which is a challenge for me since I like to control every aspect of my builds, but I couldn't be happier with how it turned out. The barn-find aspect of the build suffered from "mission creep" as it progressed. The more you research these cars, even with tatty (or sometimes no) paint and wrecked leather, you realize they are still loved. Which makes sense as they are mid 7-figure cars these days. By keeping the mechanicals shiny and everything else a bit rough, I think I hit that aesthetic.
-
Thanks man! The exhaust manifolds were done using Perfect Plastic Putty, which is an acrylic putty. I thinned it down to a very thick paint consistency and stippled it on with an old brush. Once dry I primed with Tamiya red oxide primer, misted with Tamiya grey primer and gave it a wash with thinned Revell light brown acrylic. The leather was pretty easy, the hardest part was getting straight cuts on 1/32 in thick leather that wants to bunch up on you as you're cutting. Ask away whenever you'd like. I built the 8c a few years back and it's just as good as this kit. Here's a pic below, I didn't go as crazy on the weathering as I did on this one.
-
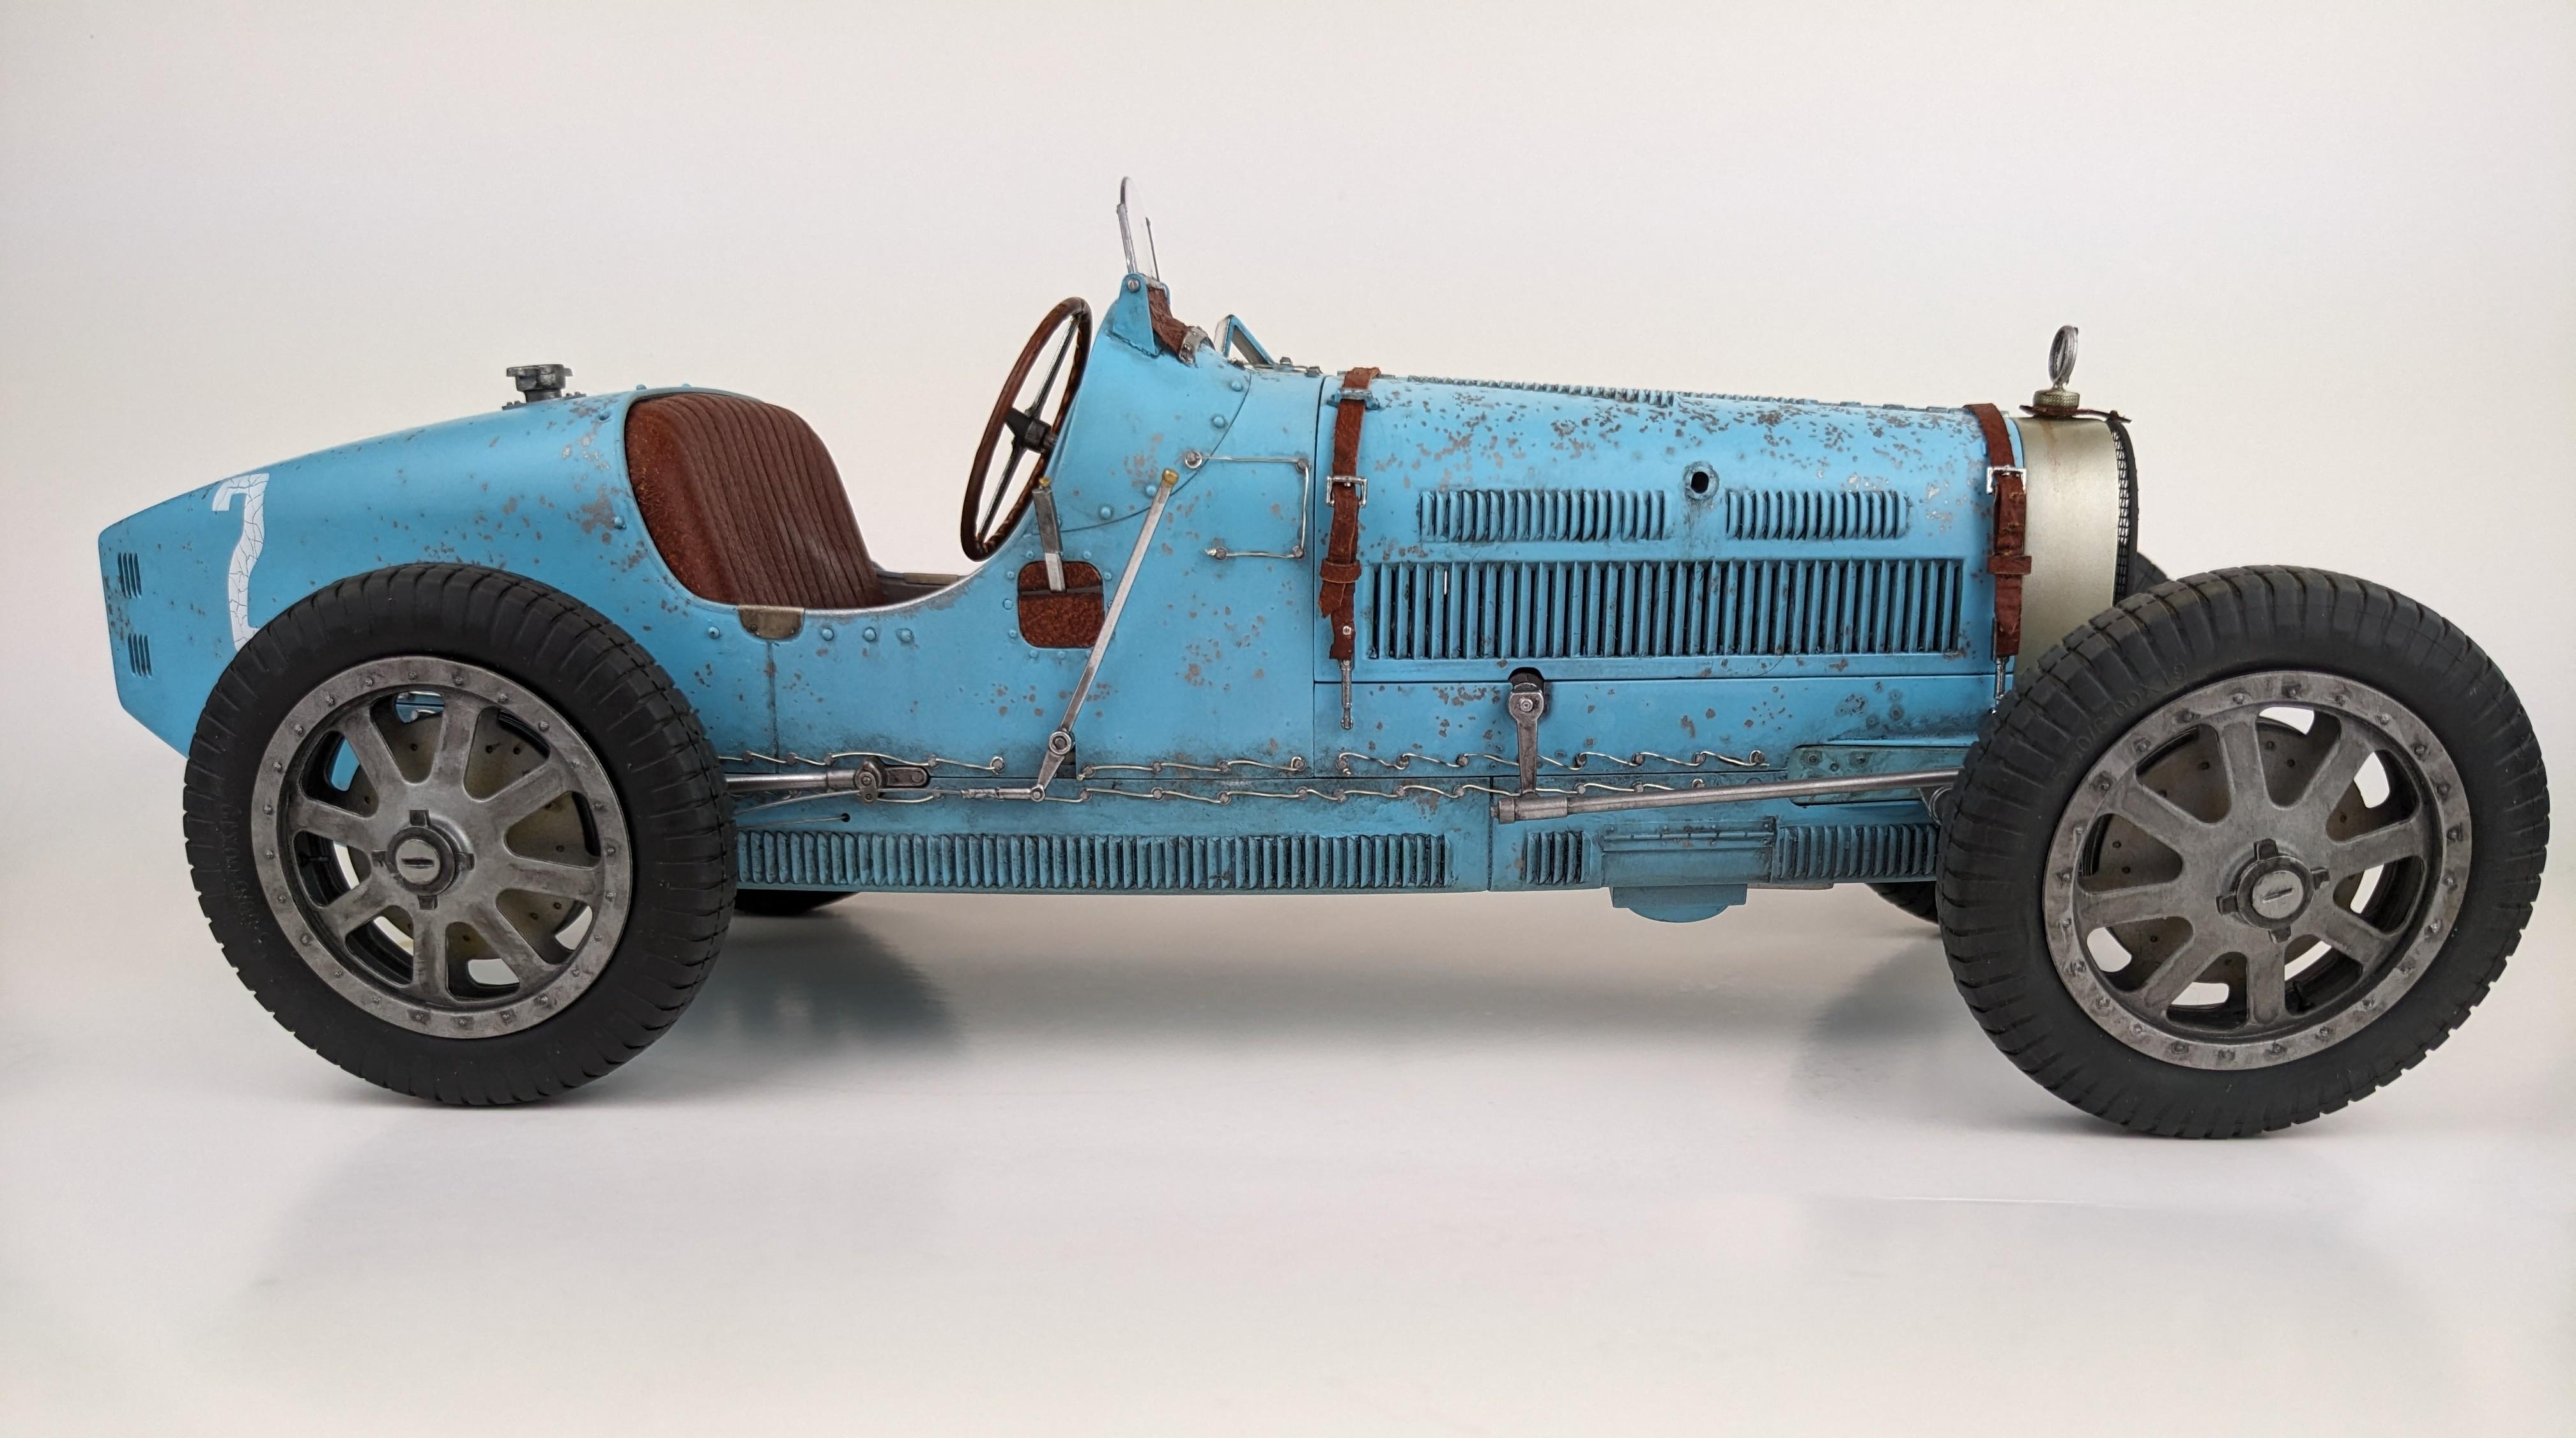
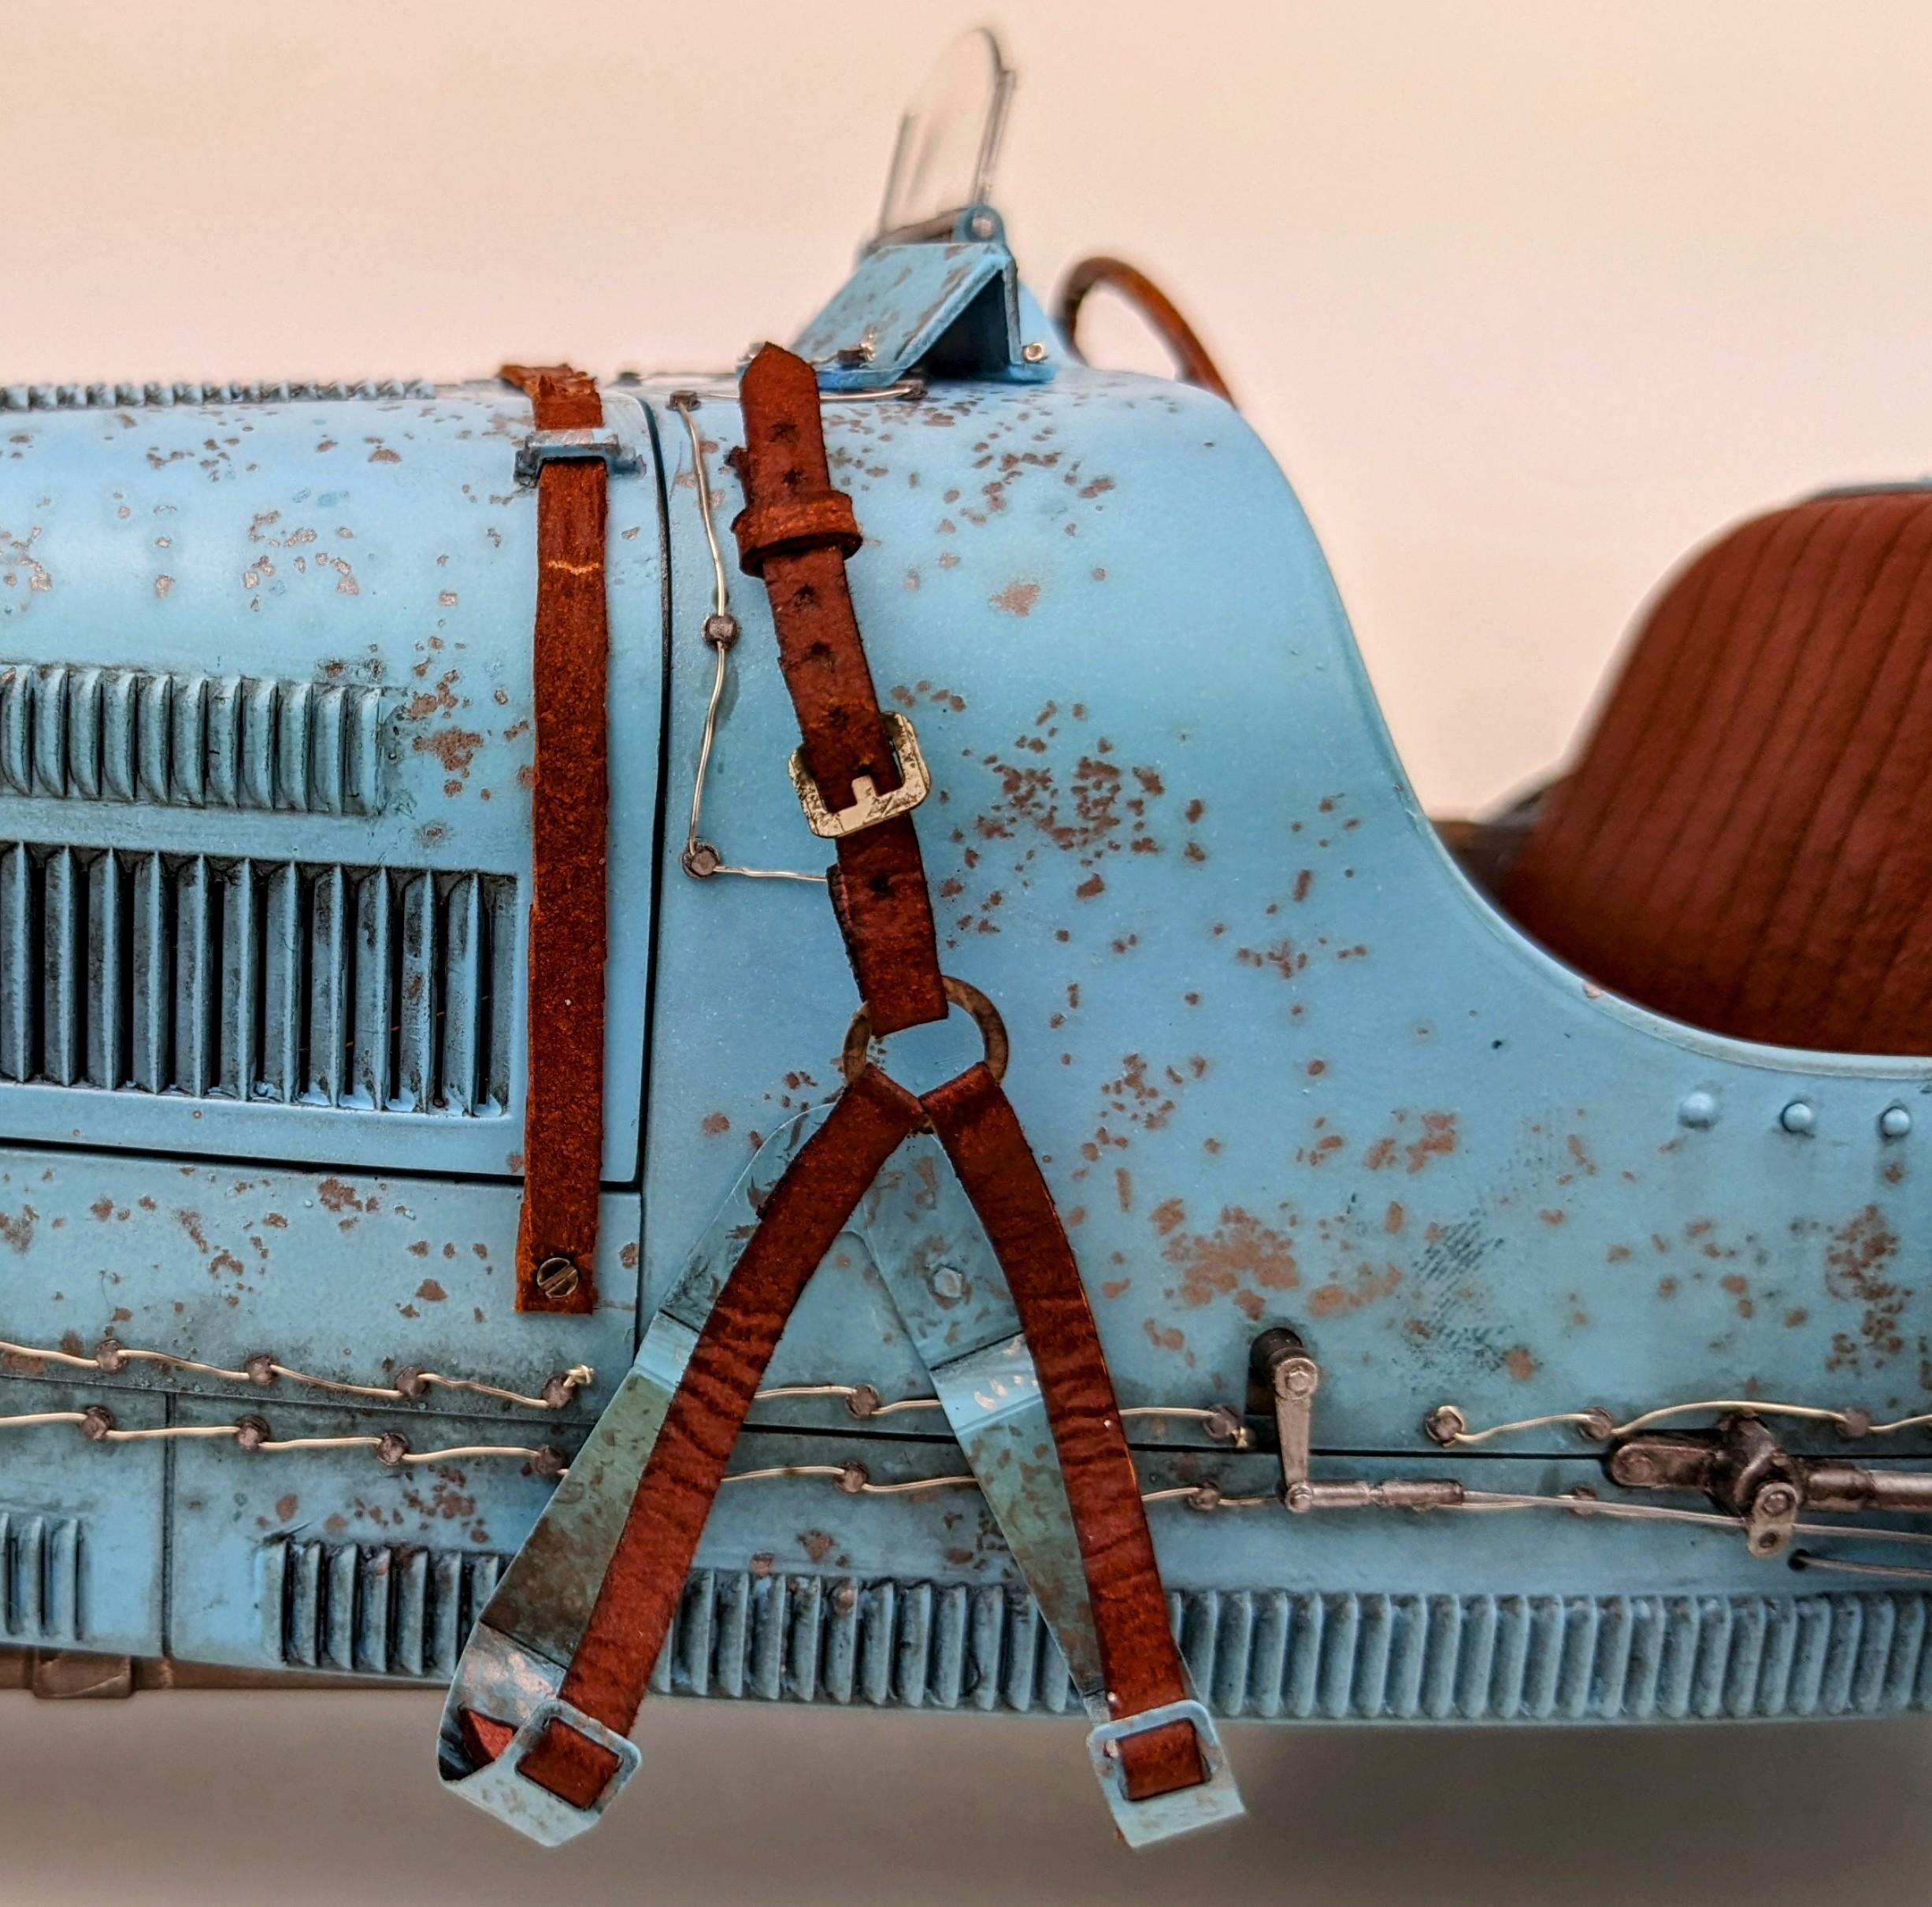
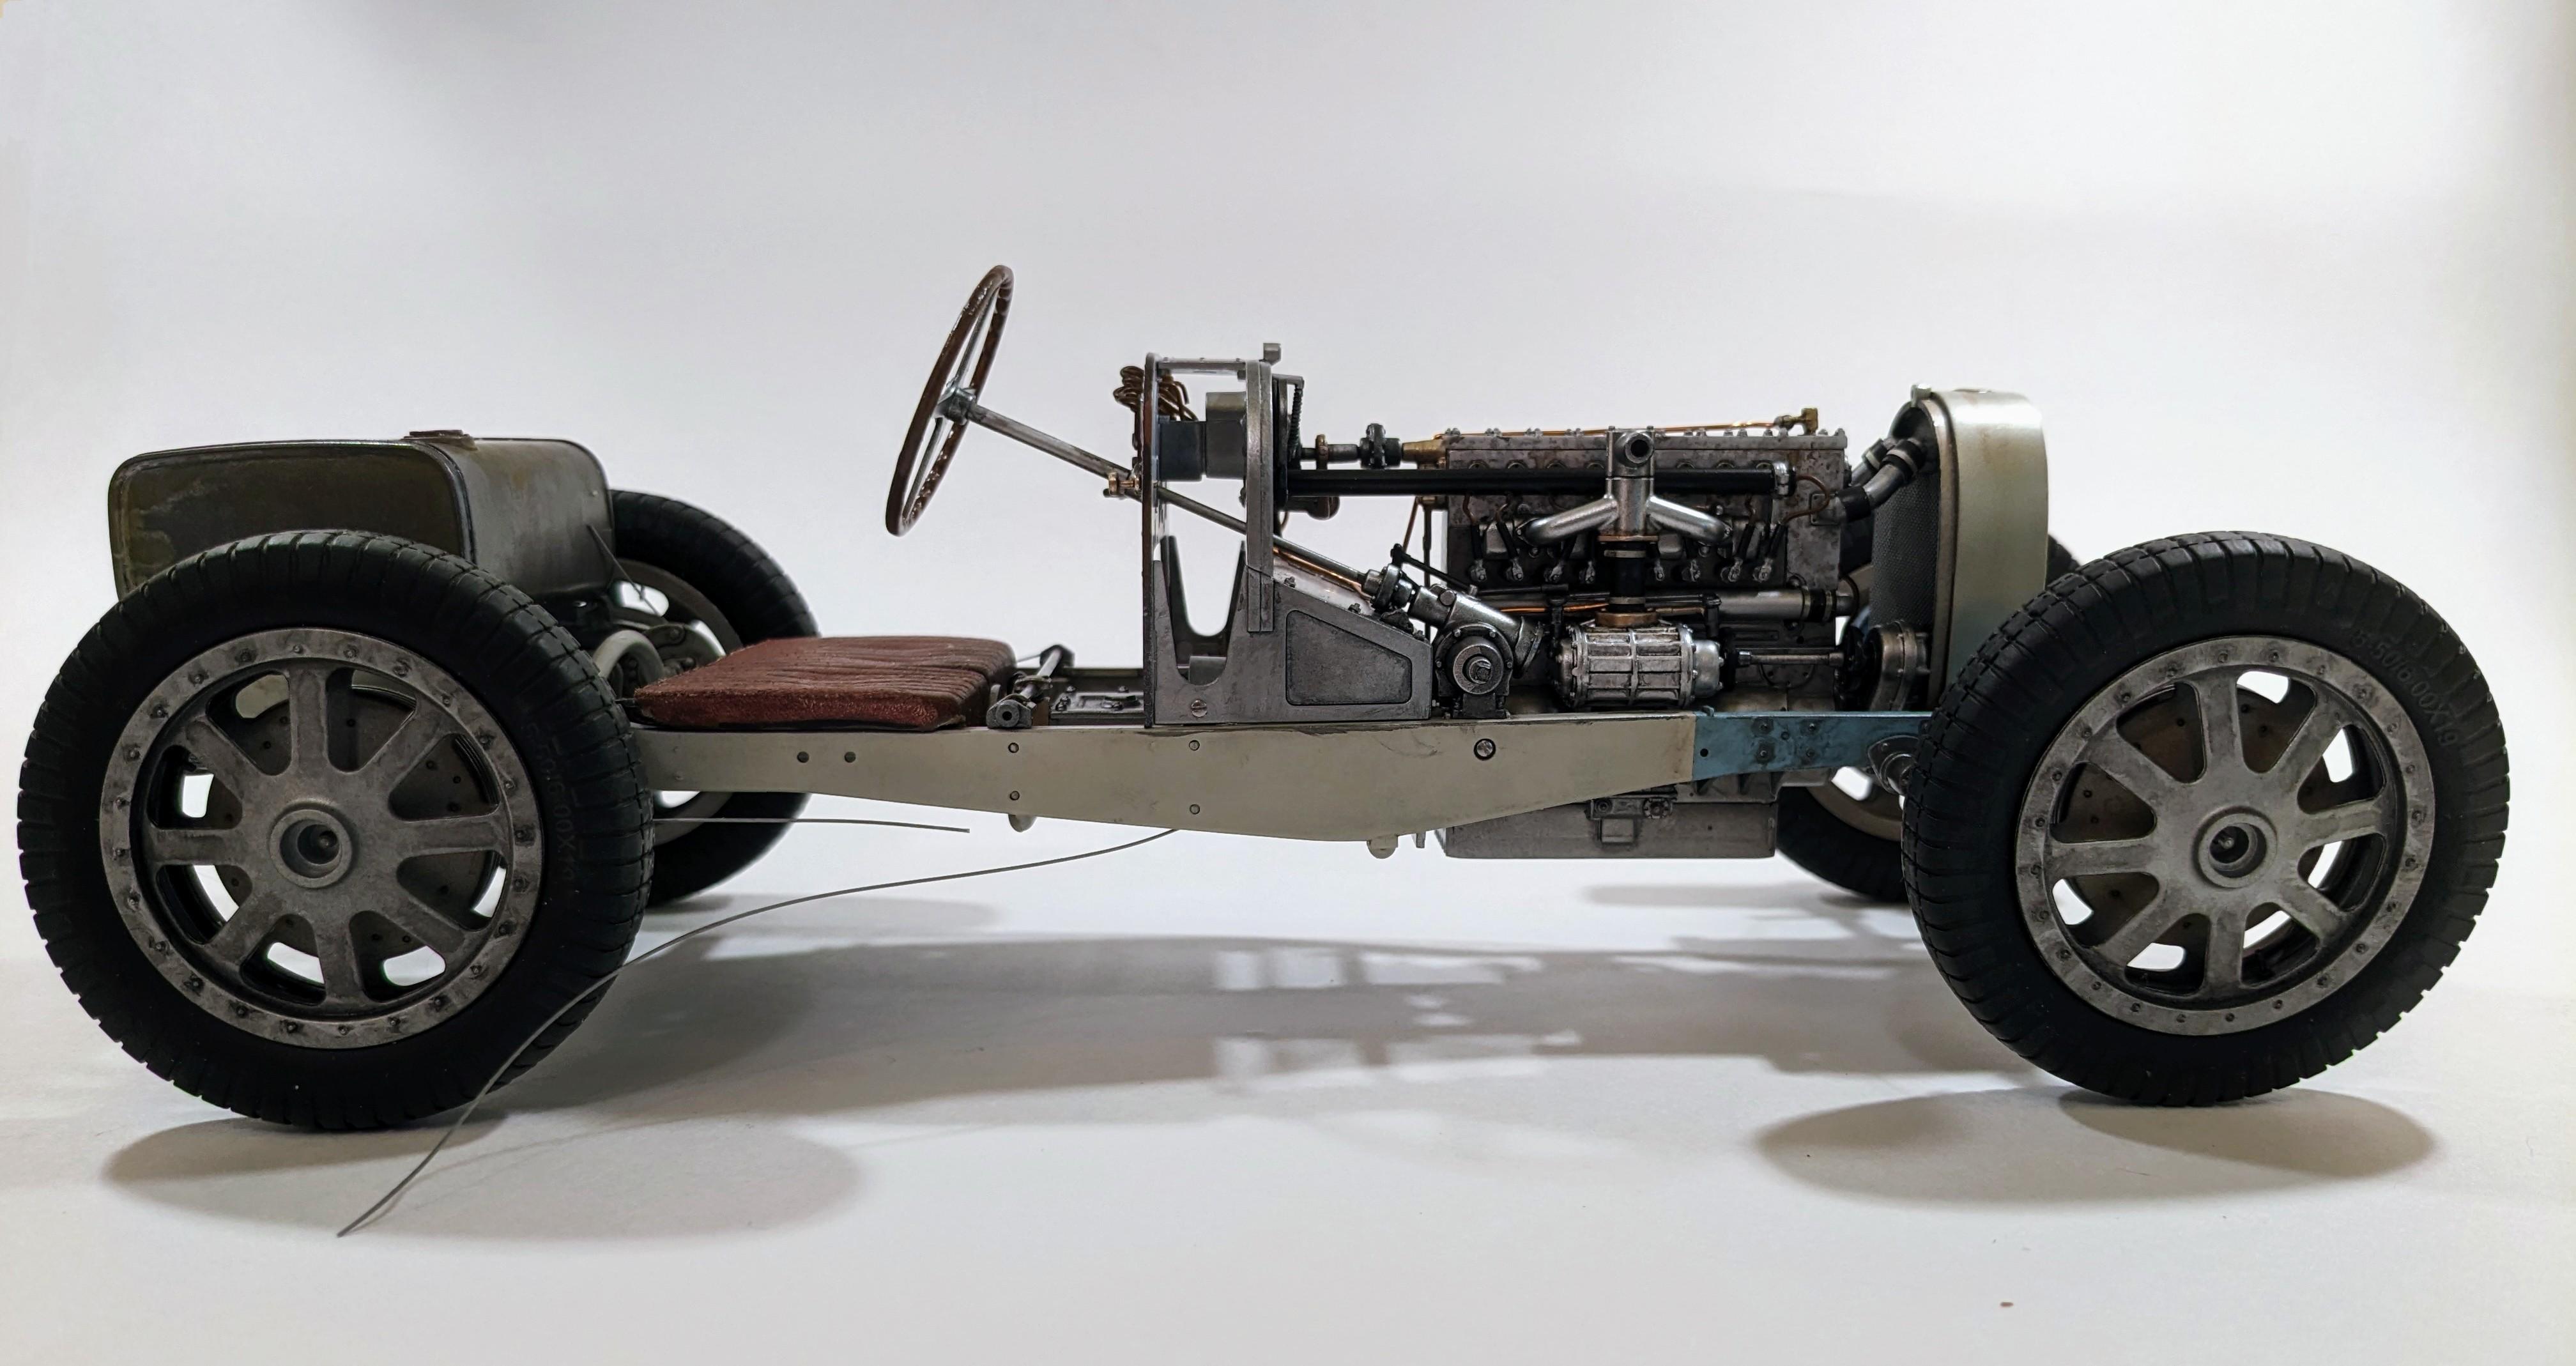
Yes, but not 100% accurate to how Bugatti did it. The locking bolts are 3d printed by a company out of the UK called Unobtanium. THey're an ingenious design that uses a jig to drill .3mm holes for 30 gauge wire through each bolt. They're designed for the 1/12 Italeri Alfa 8c, which is a slightly different design to Bugatti's locking bolts. It looks good though, and this design is less fragile than the accurate ones would be. The wire is 30 gauge soft jewelry wire. Thanks!
-
Just noticed the nasty fingerprint in the last picture, must have happened yesterday when I was applying a final touch up of acrylic wash on the metal plates on the sills. Already cleaned up with a little alcohol and water mix.
-
Link to Under Glass thread below. I was expecting drama in the final assembly stages, and it never materialized. This is a real sweetheart of a kit and was a blast from beginning to end. I can't recommend it enough! http://www.modelcarsmag.com/forums/topic/182869-le-chaton-112-italeri-bugatti-35b/
-
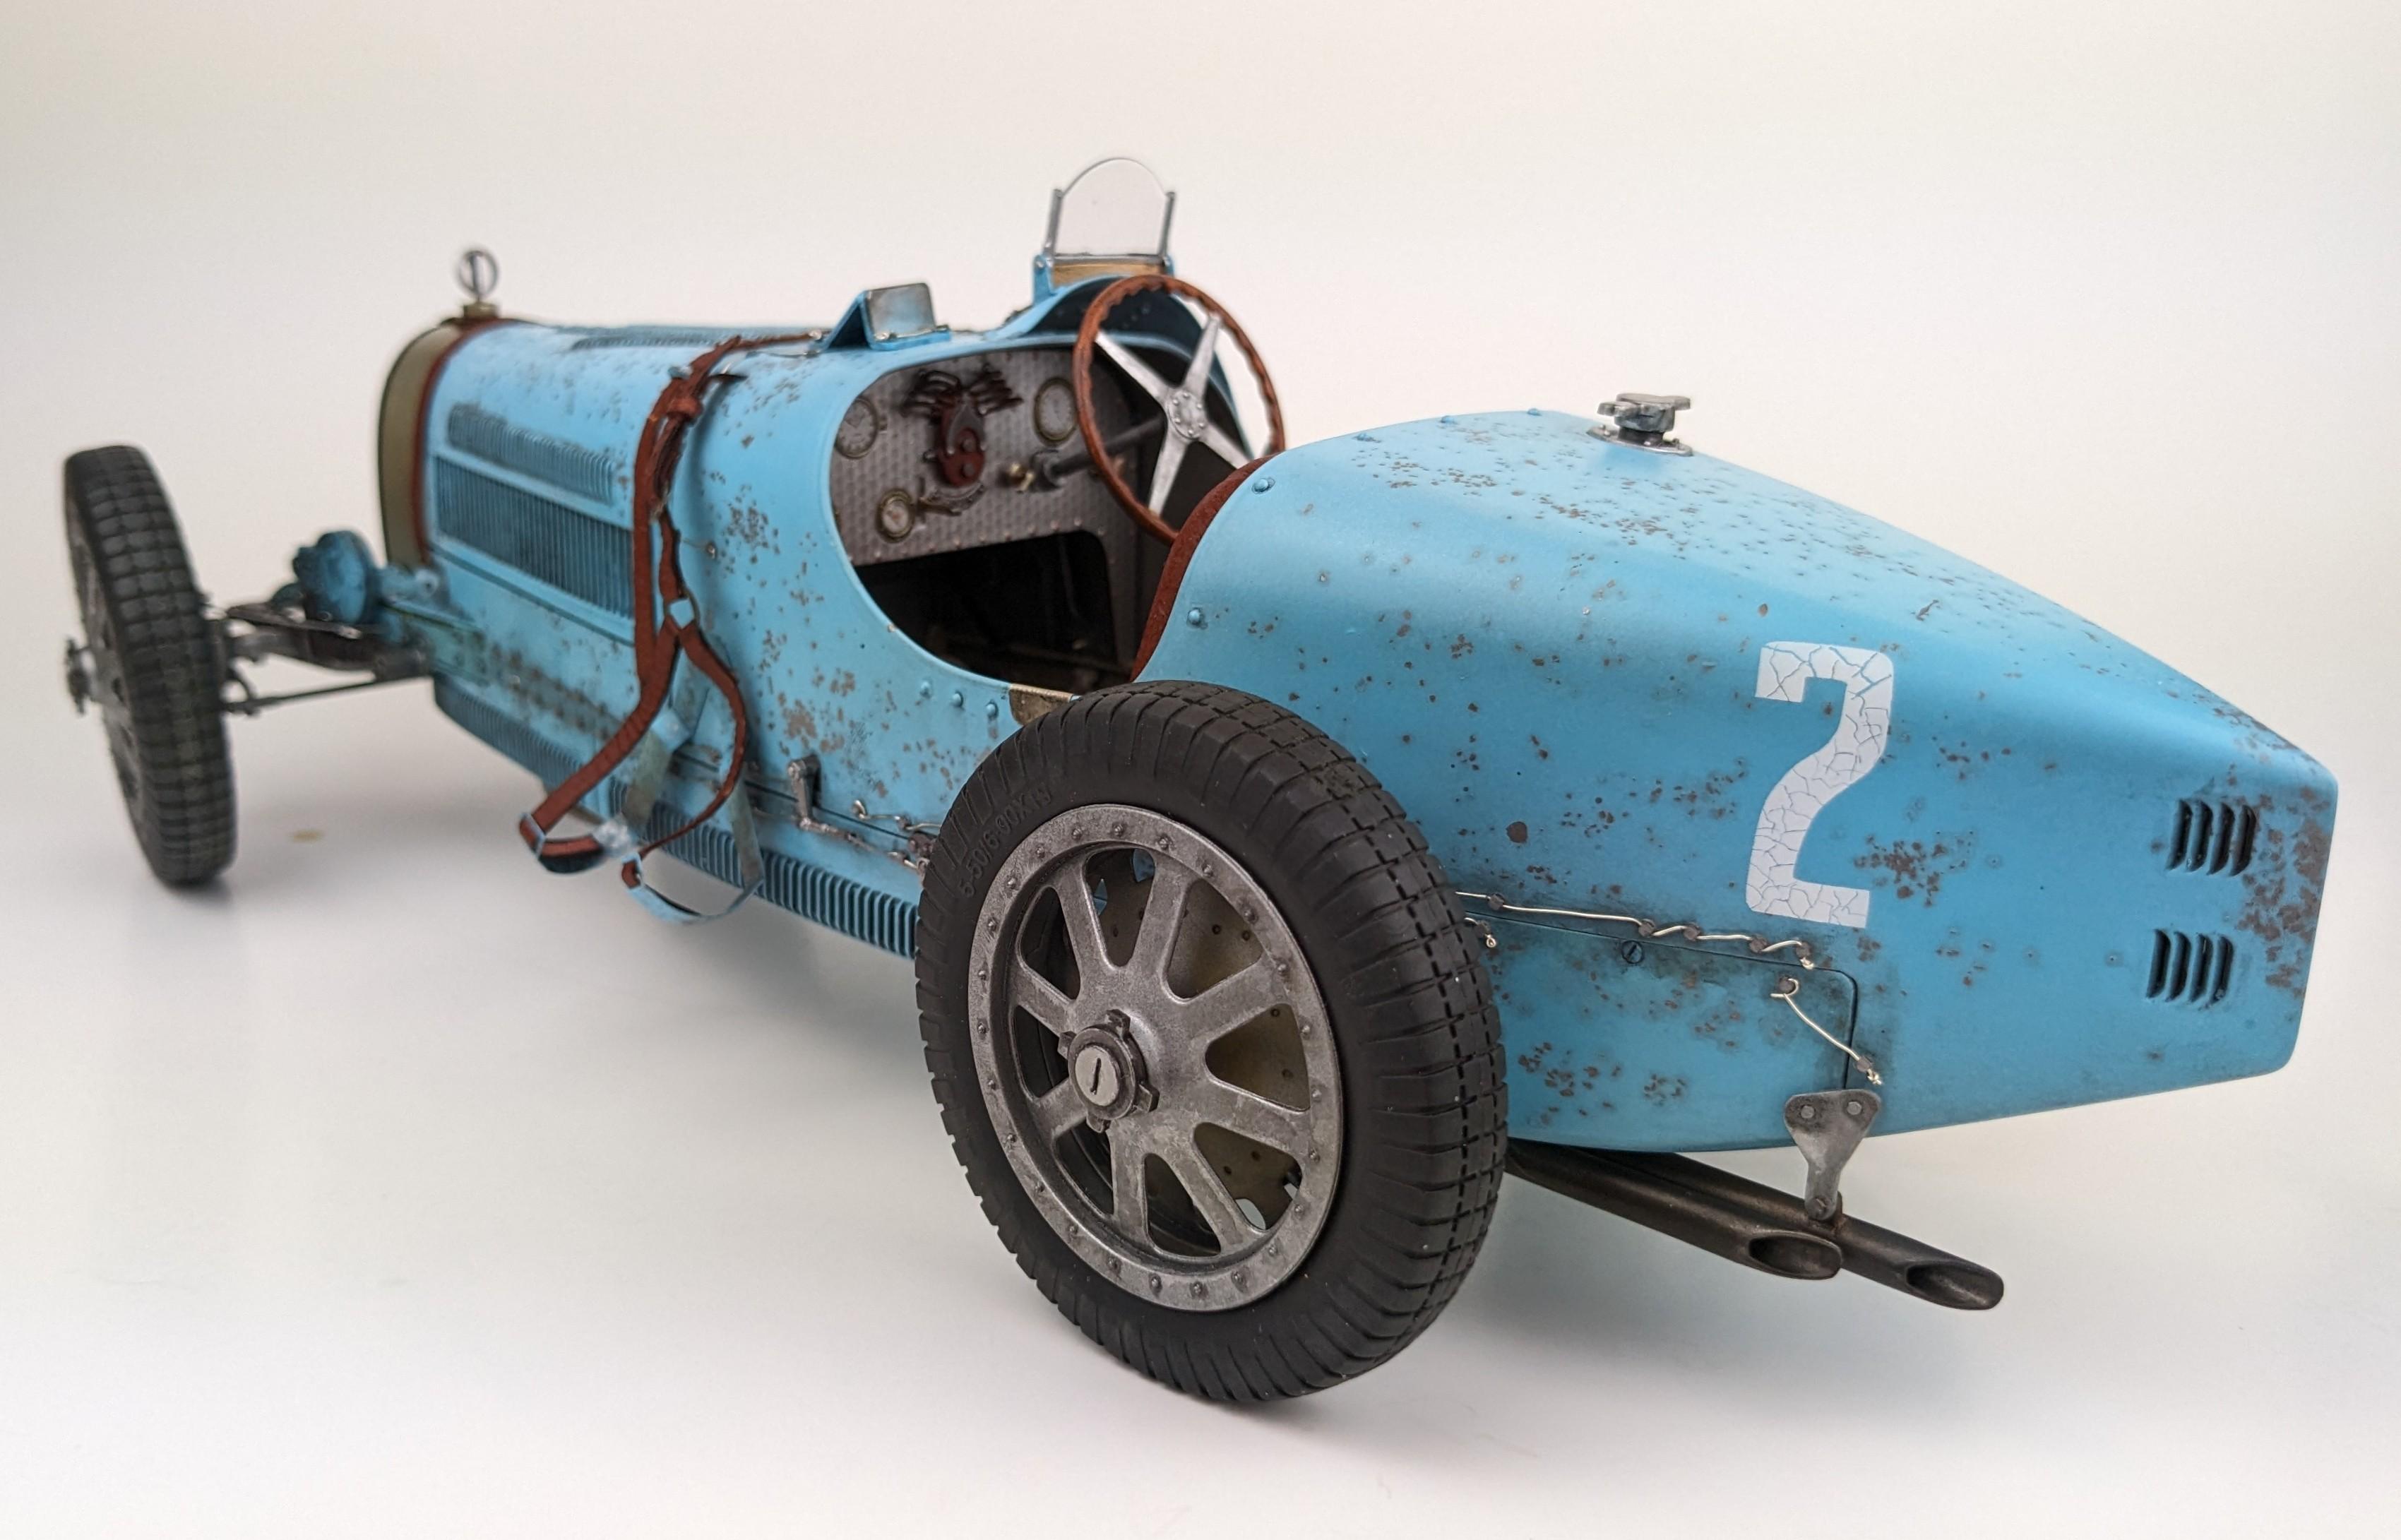
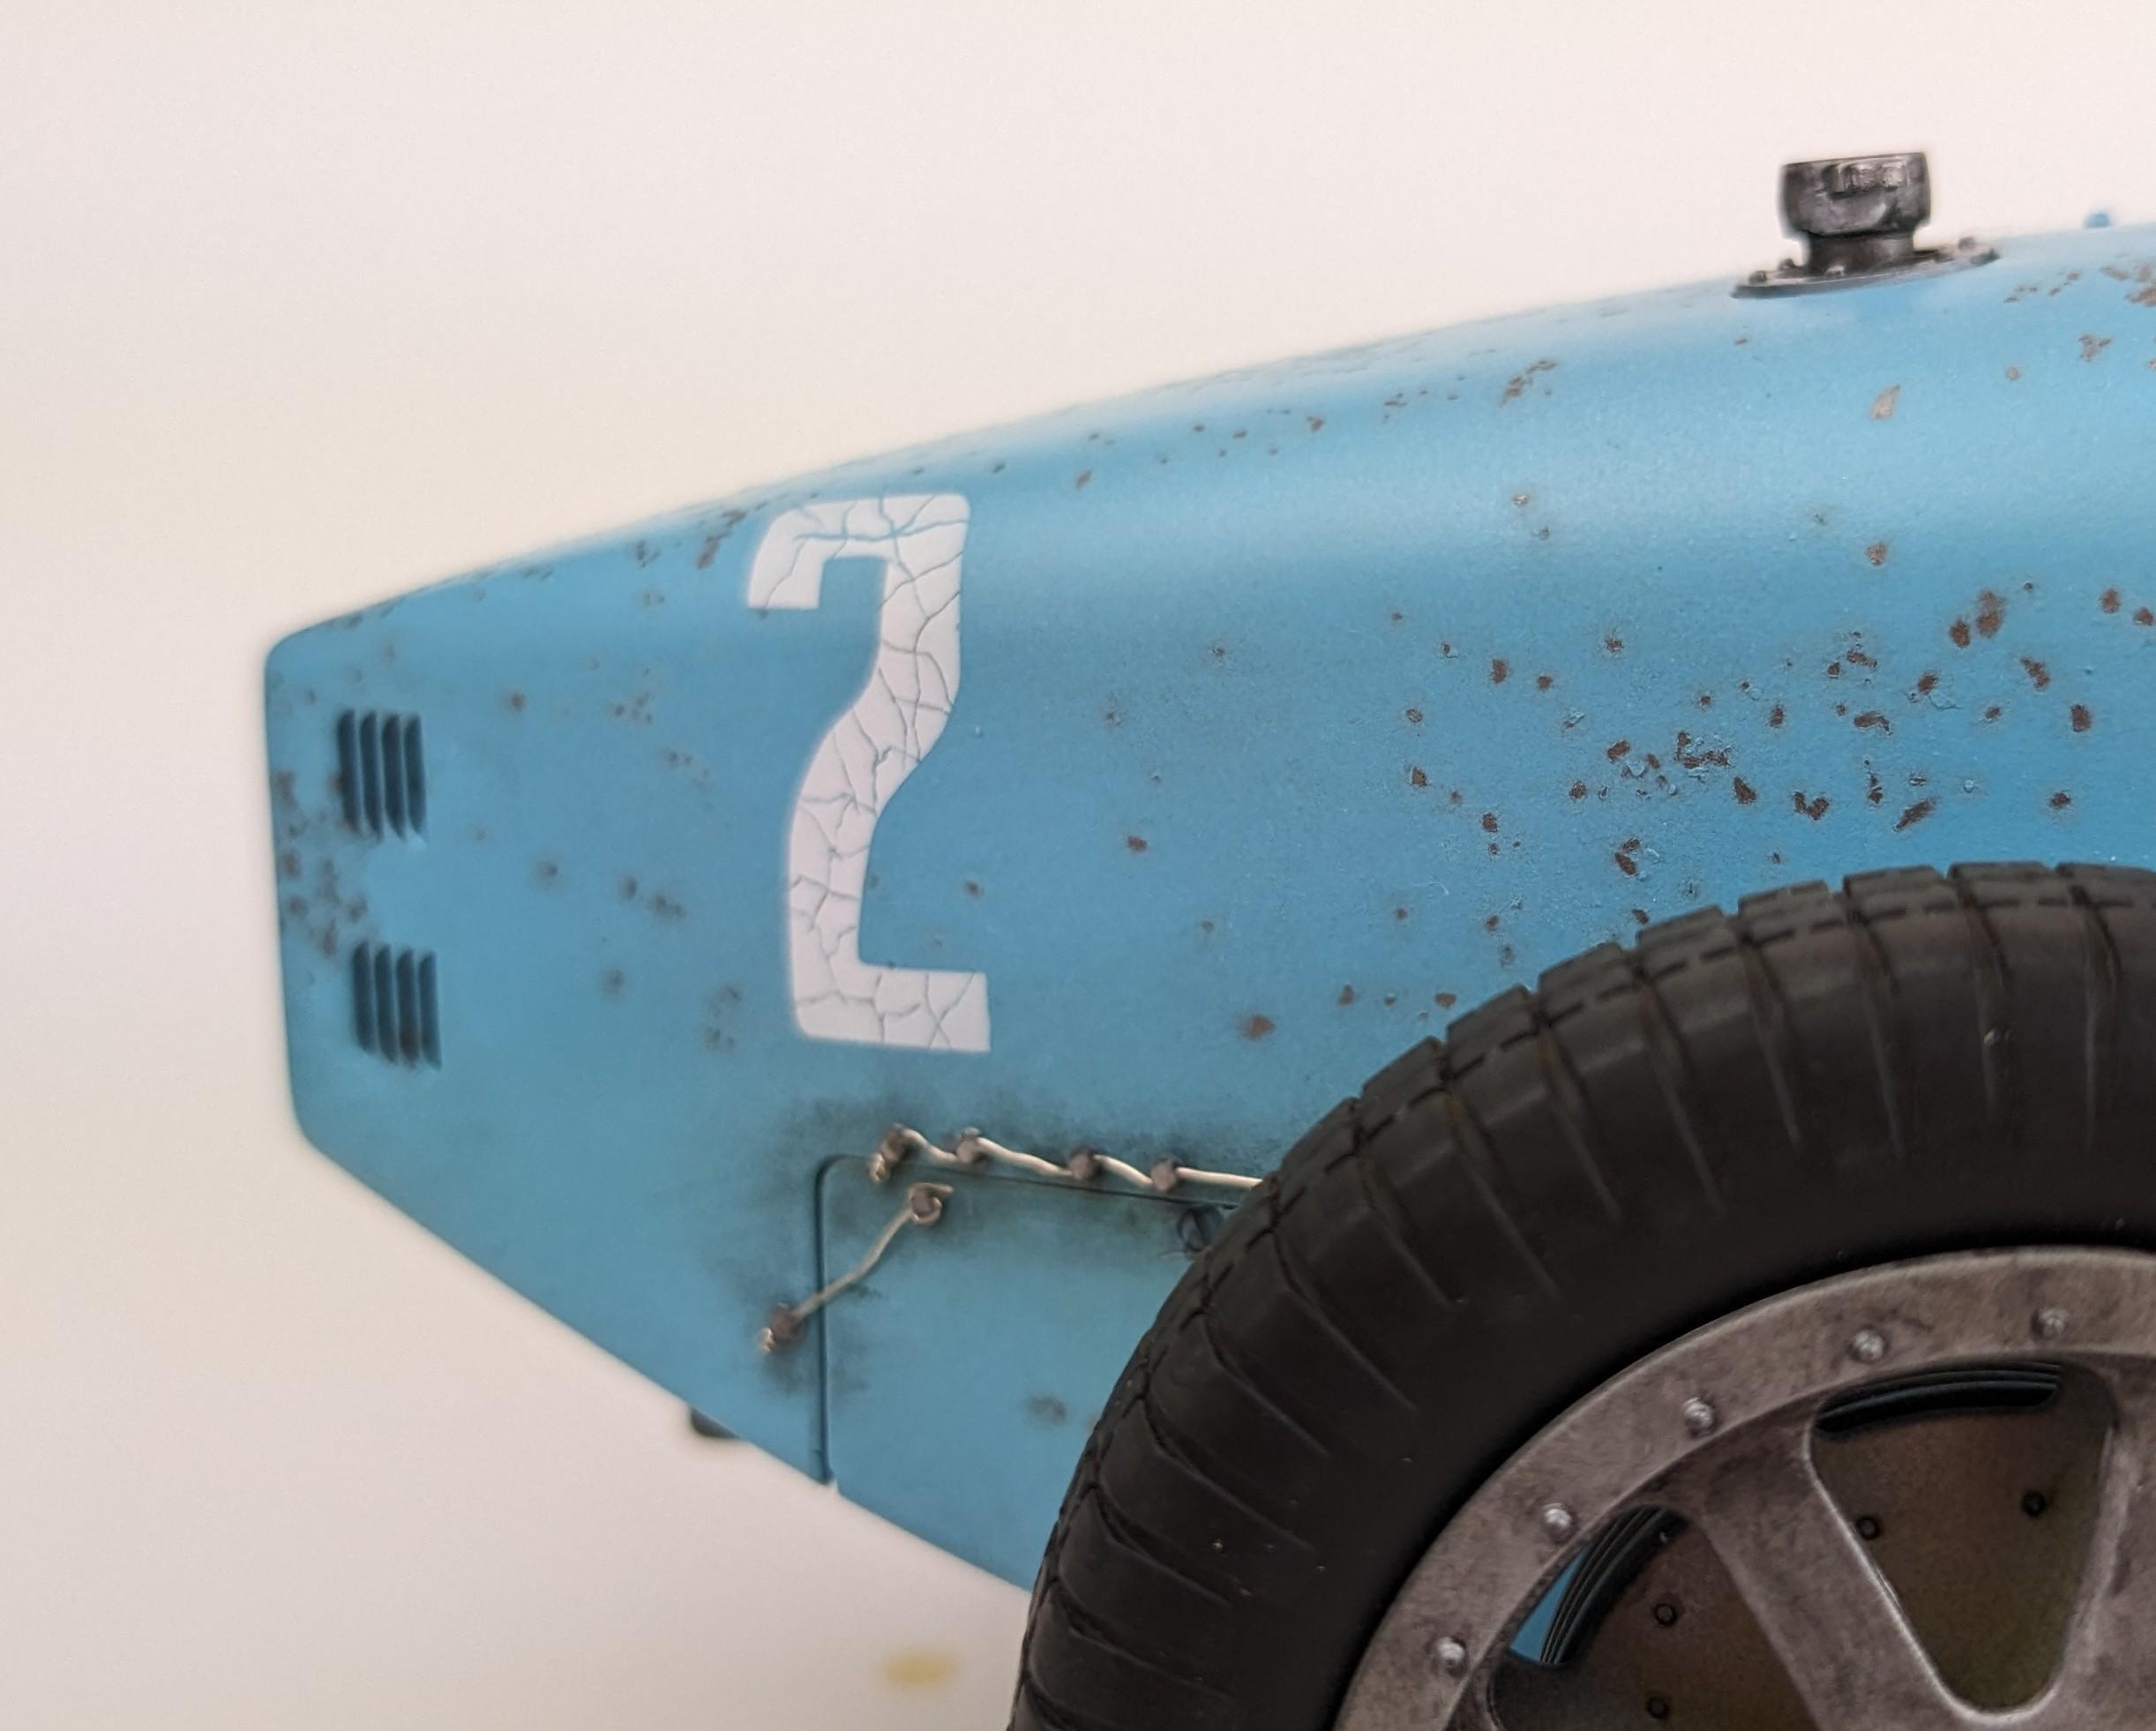
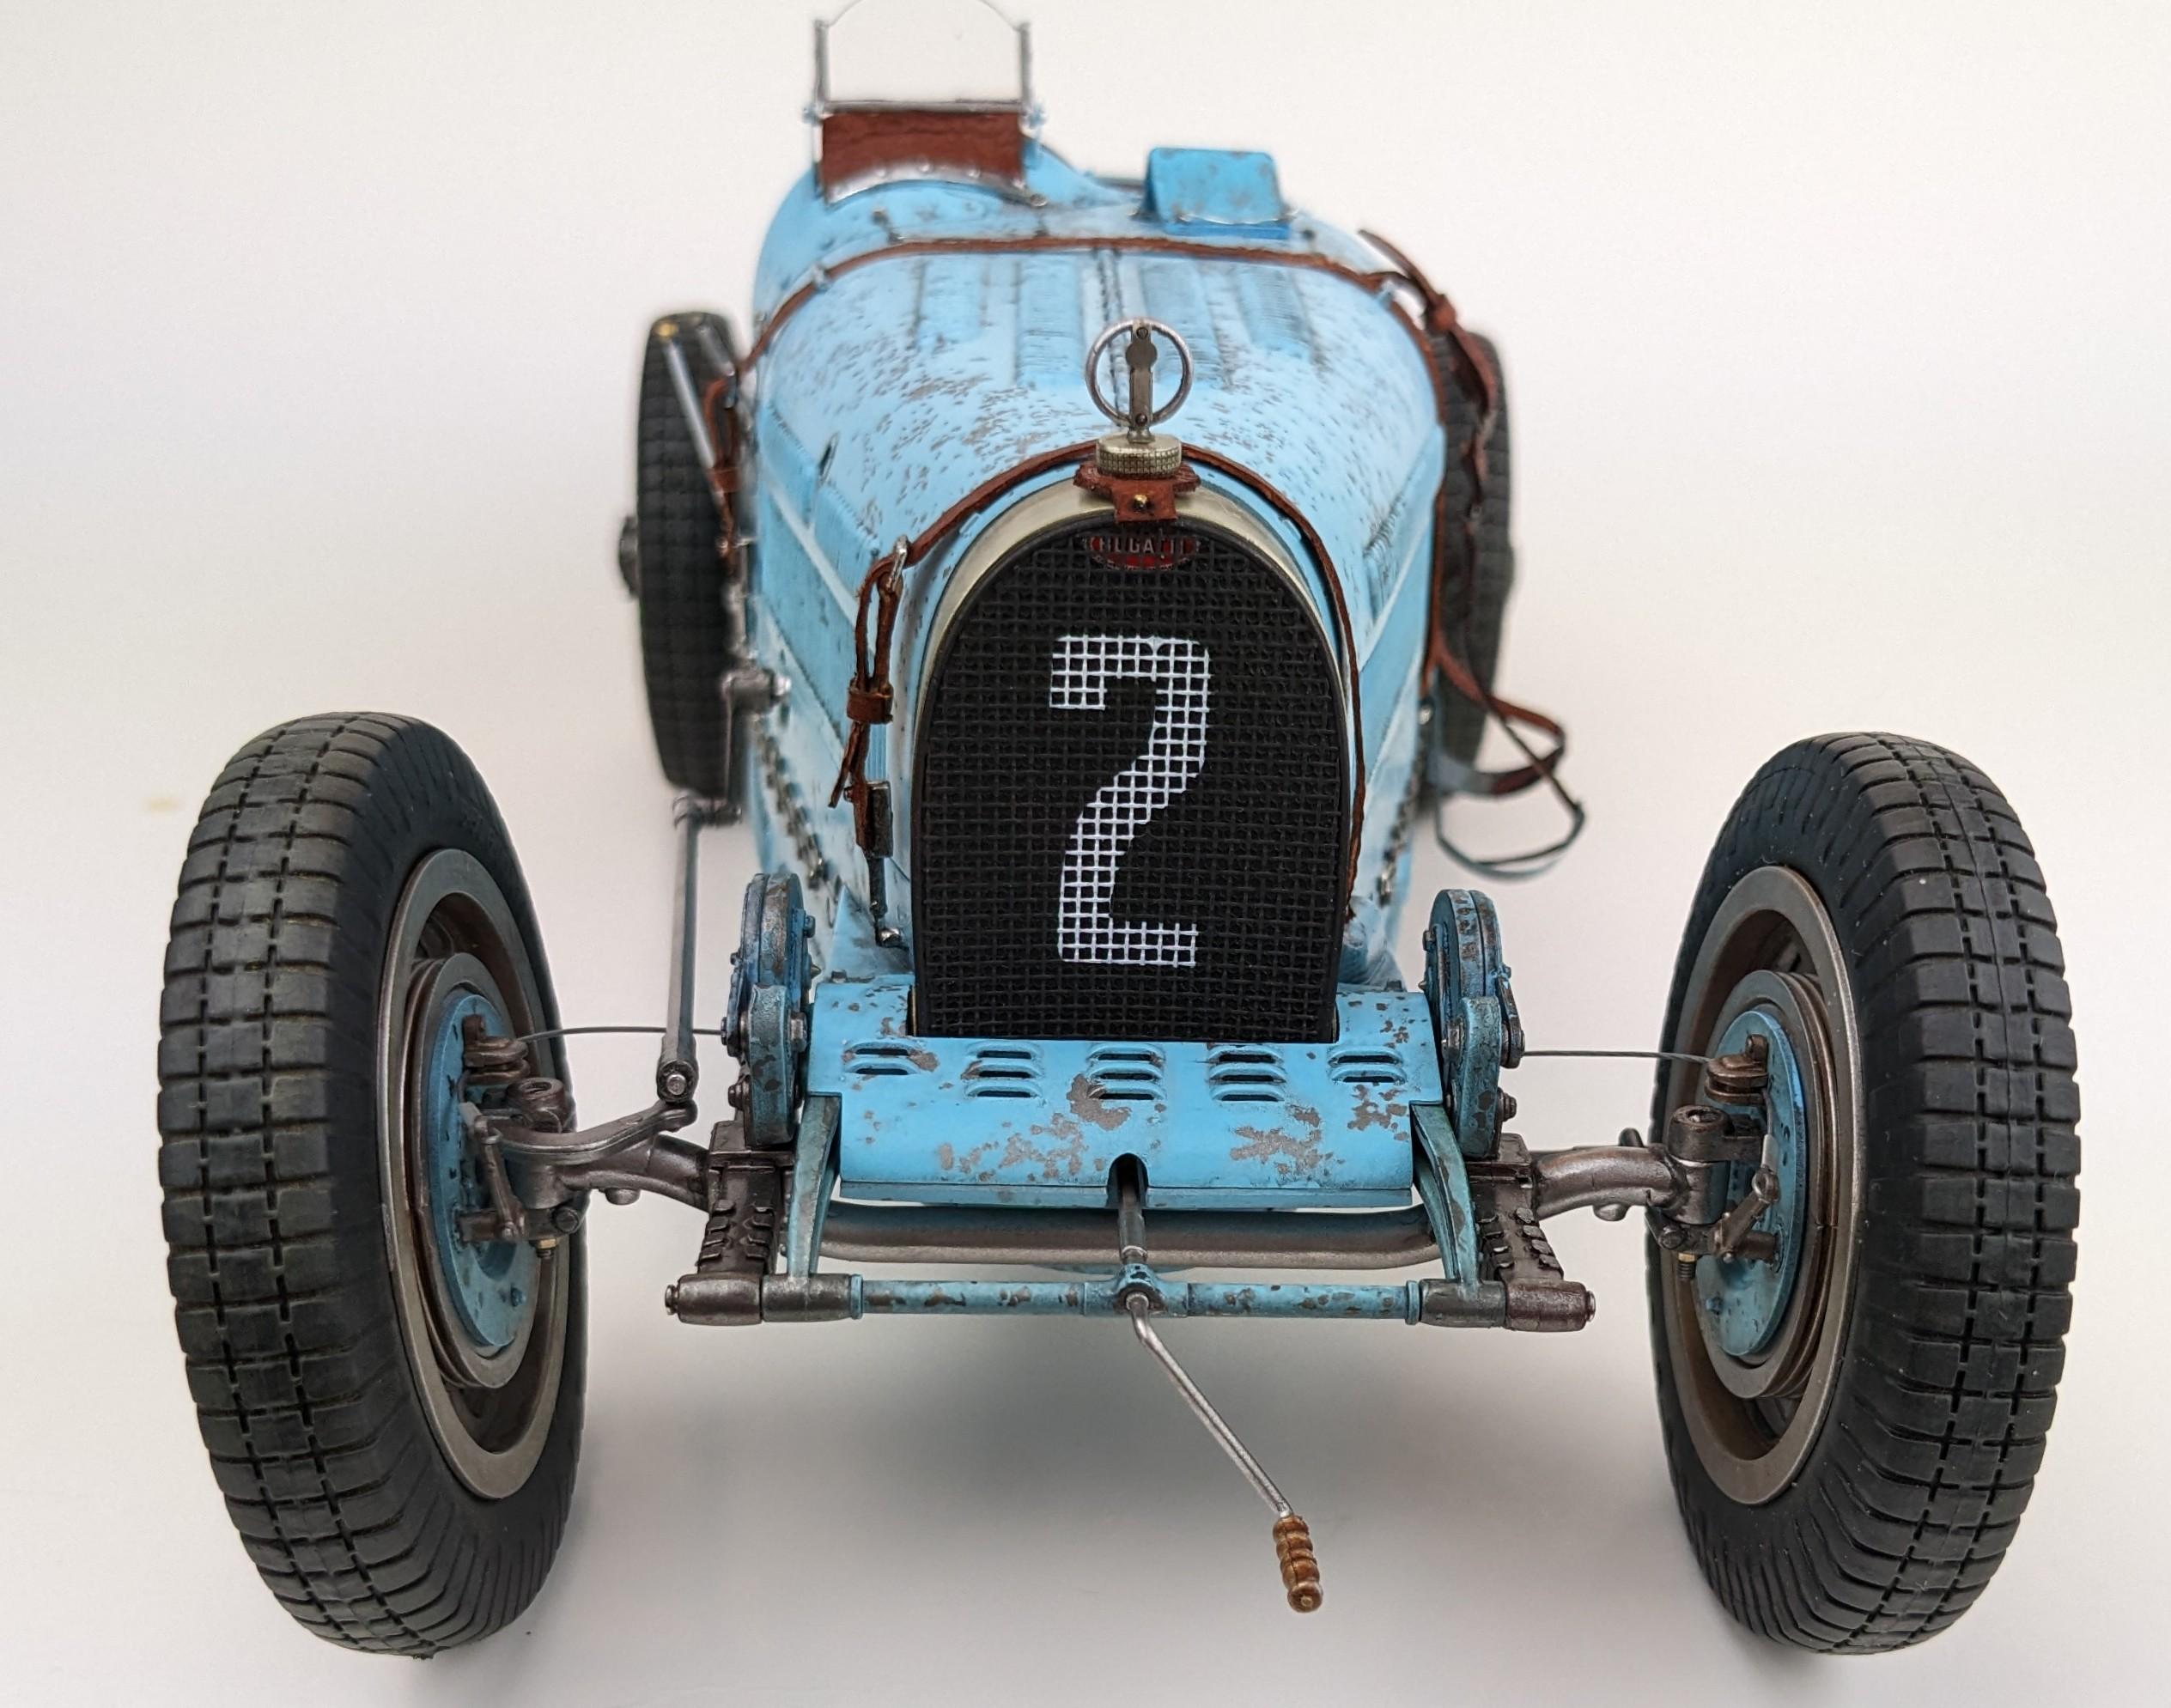
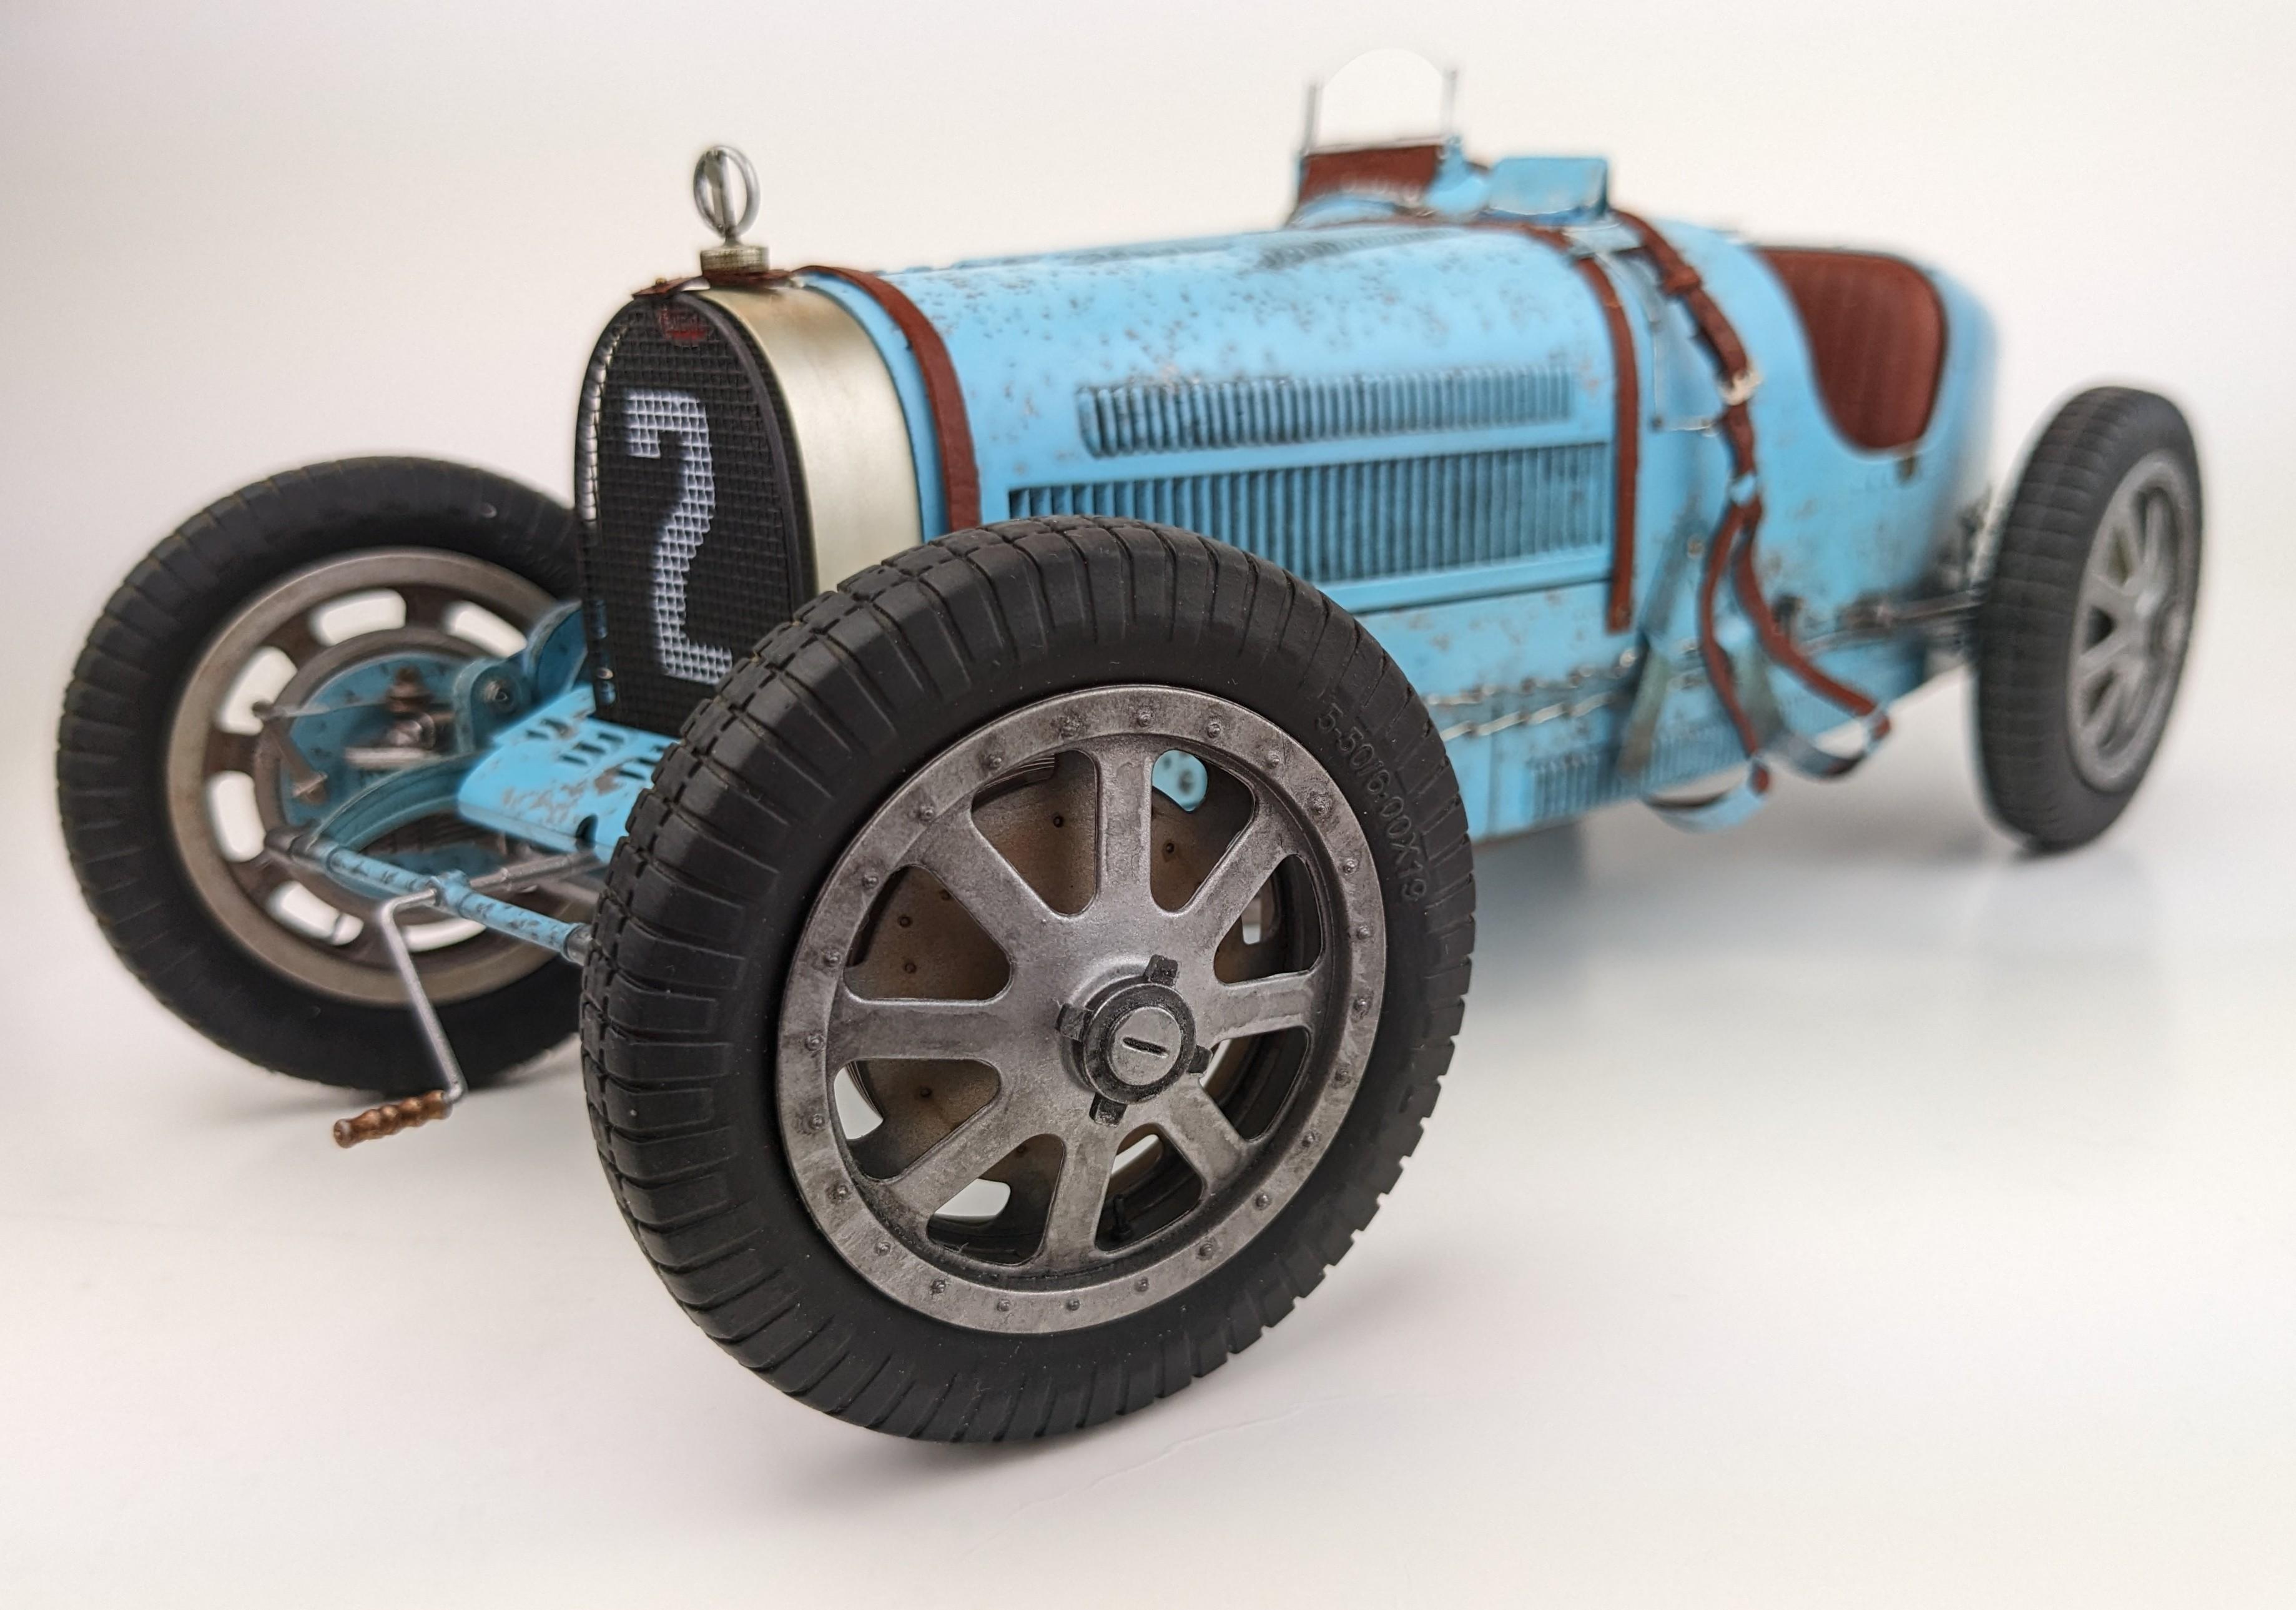
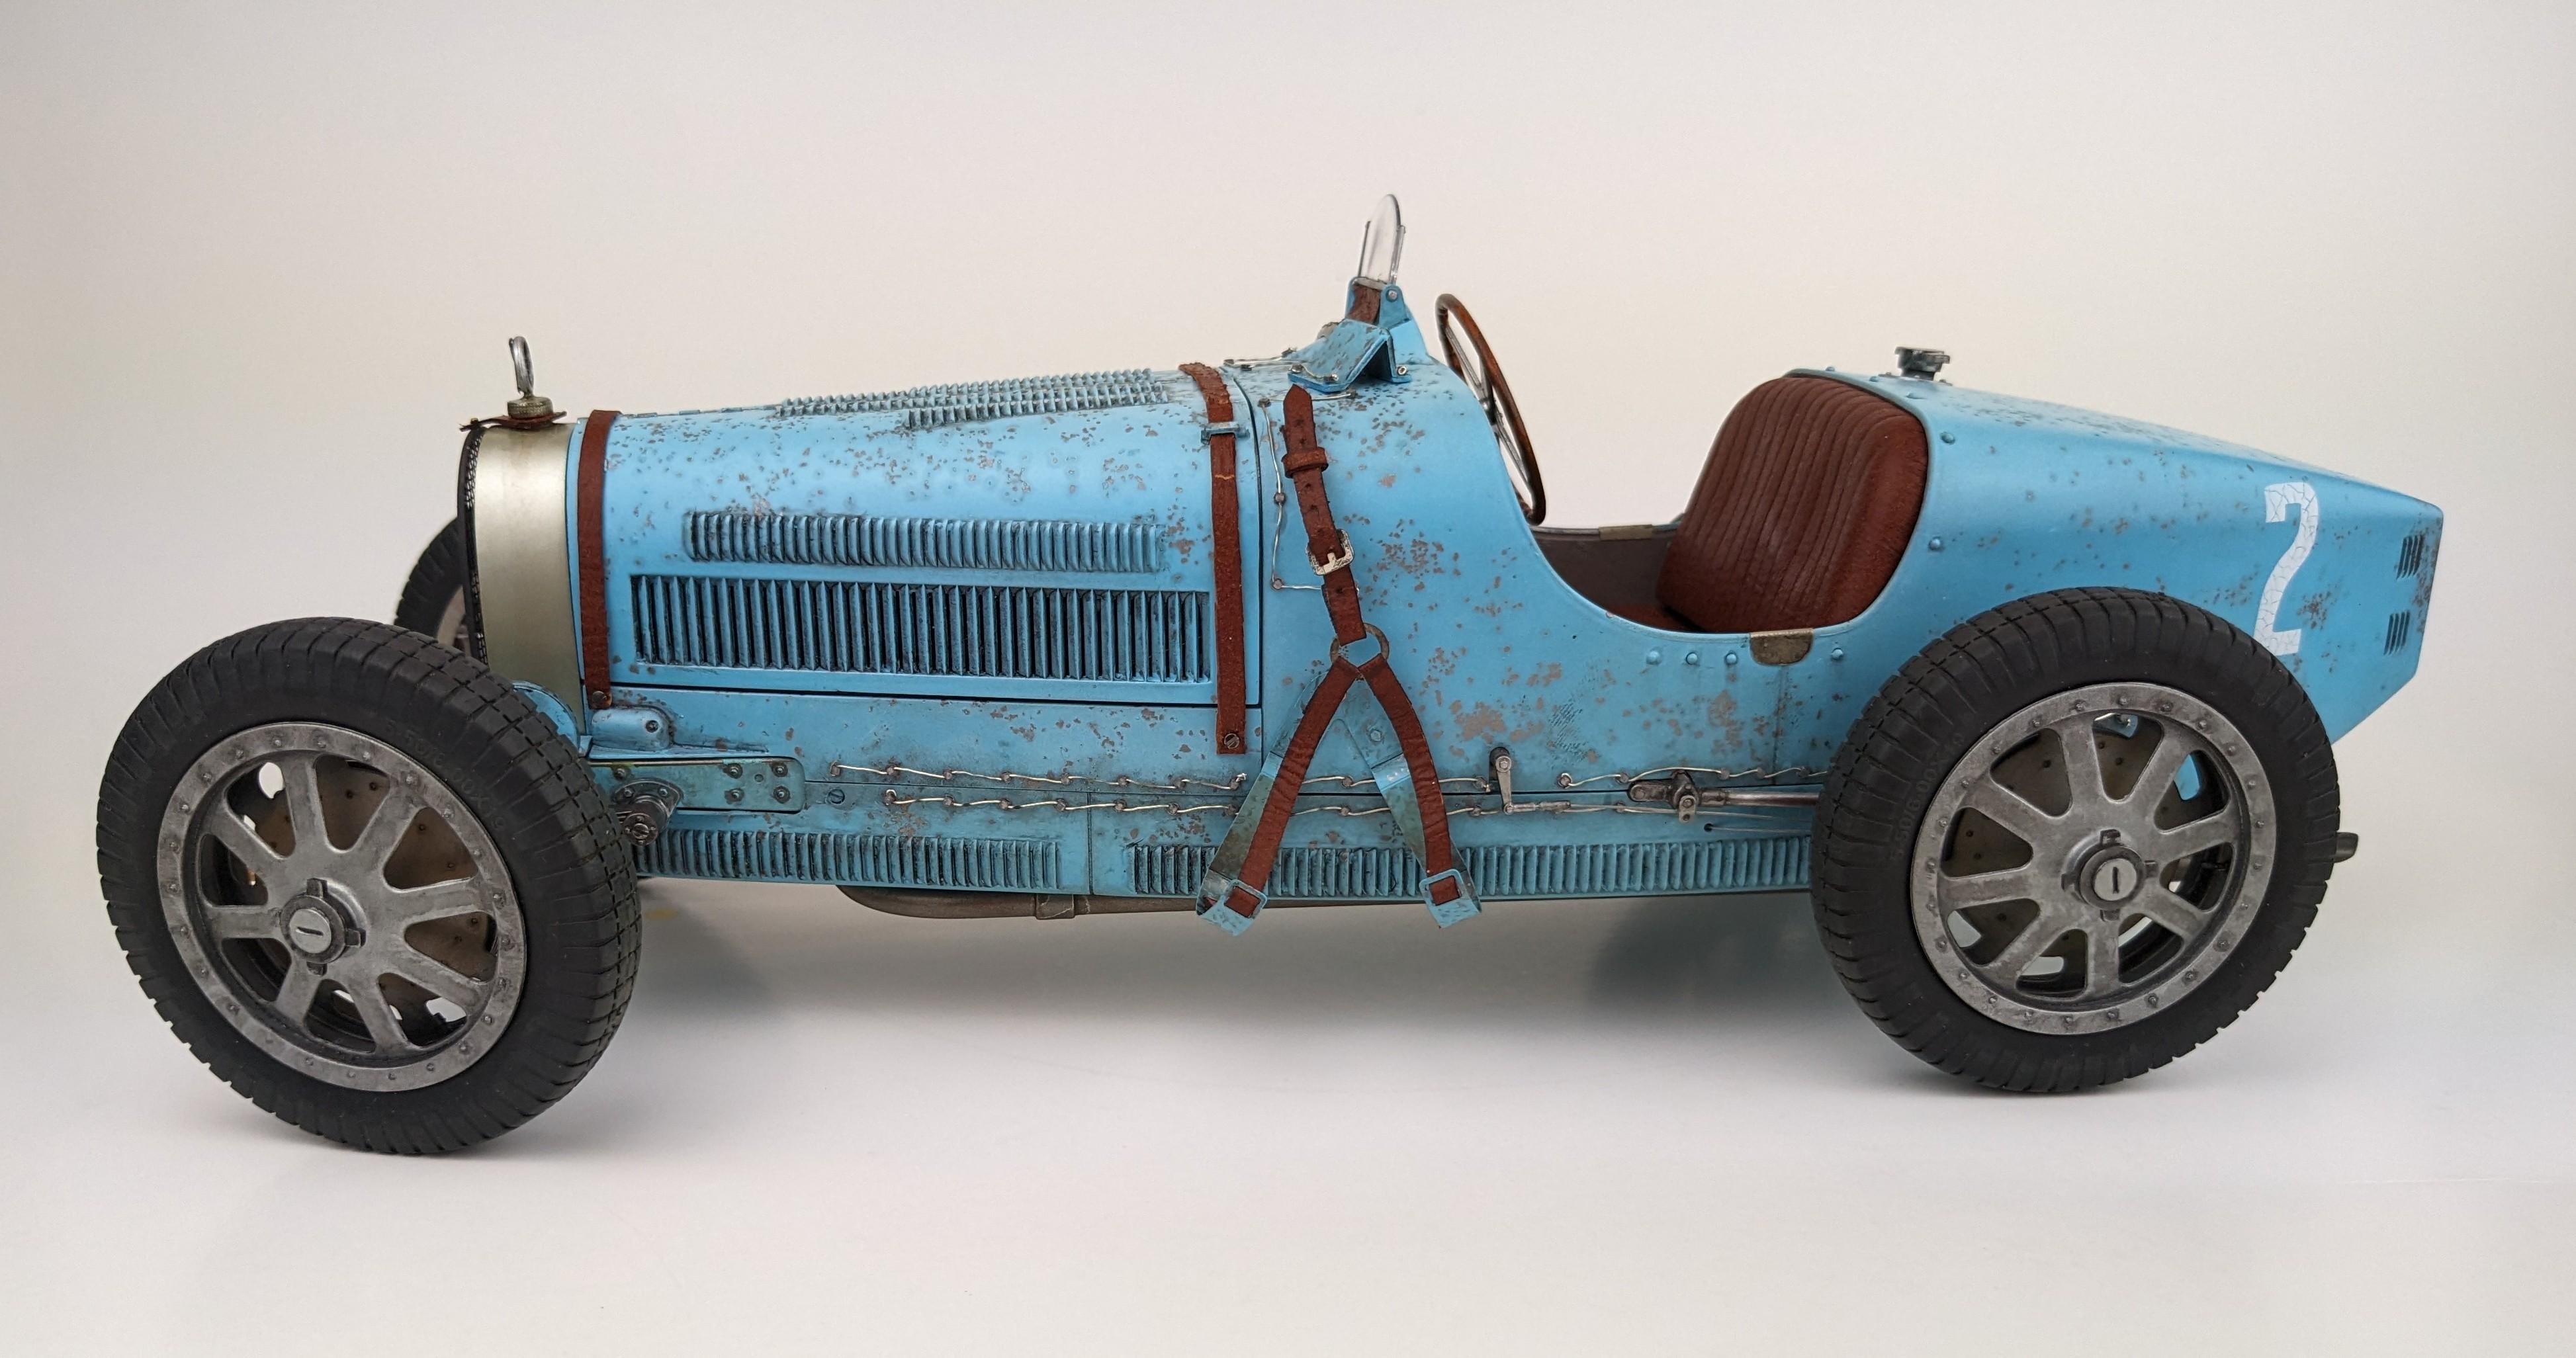
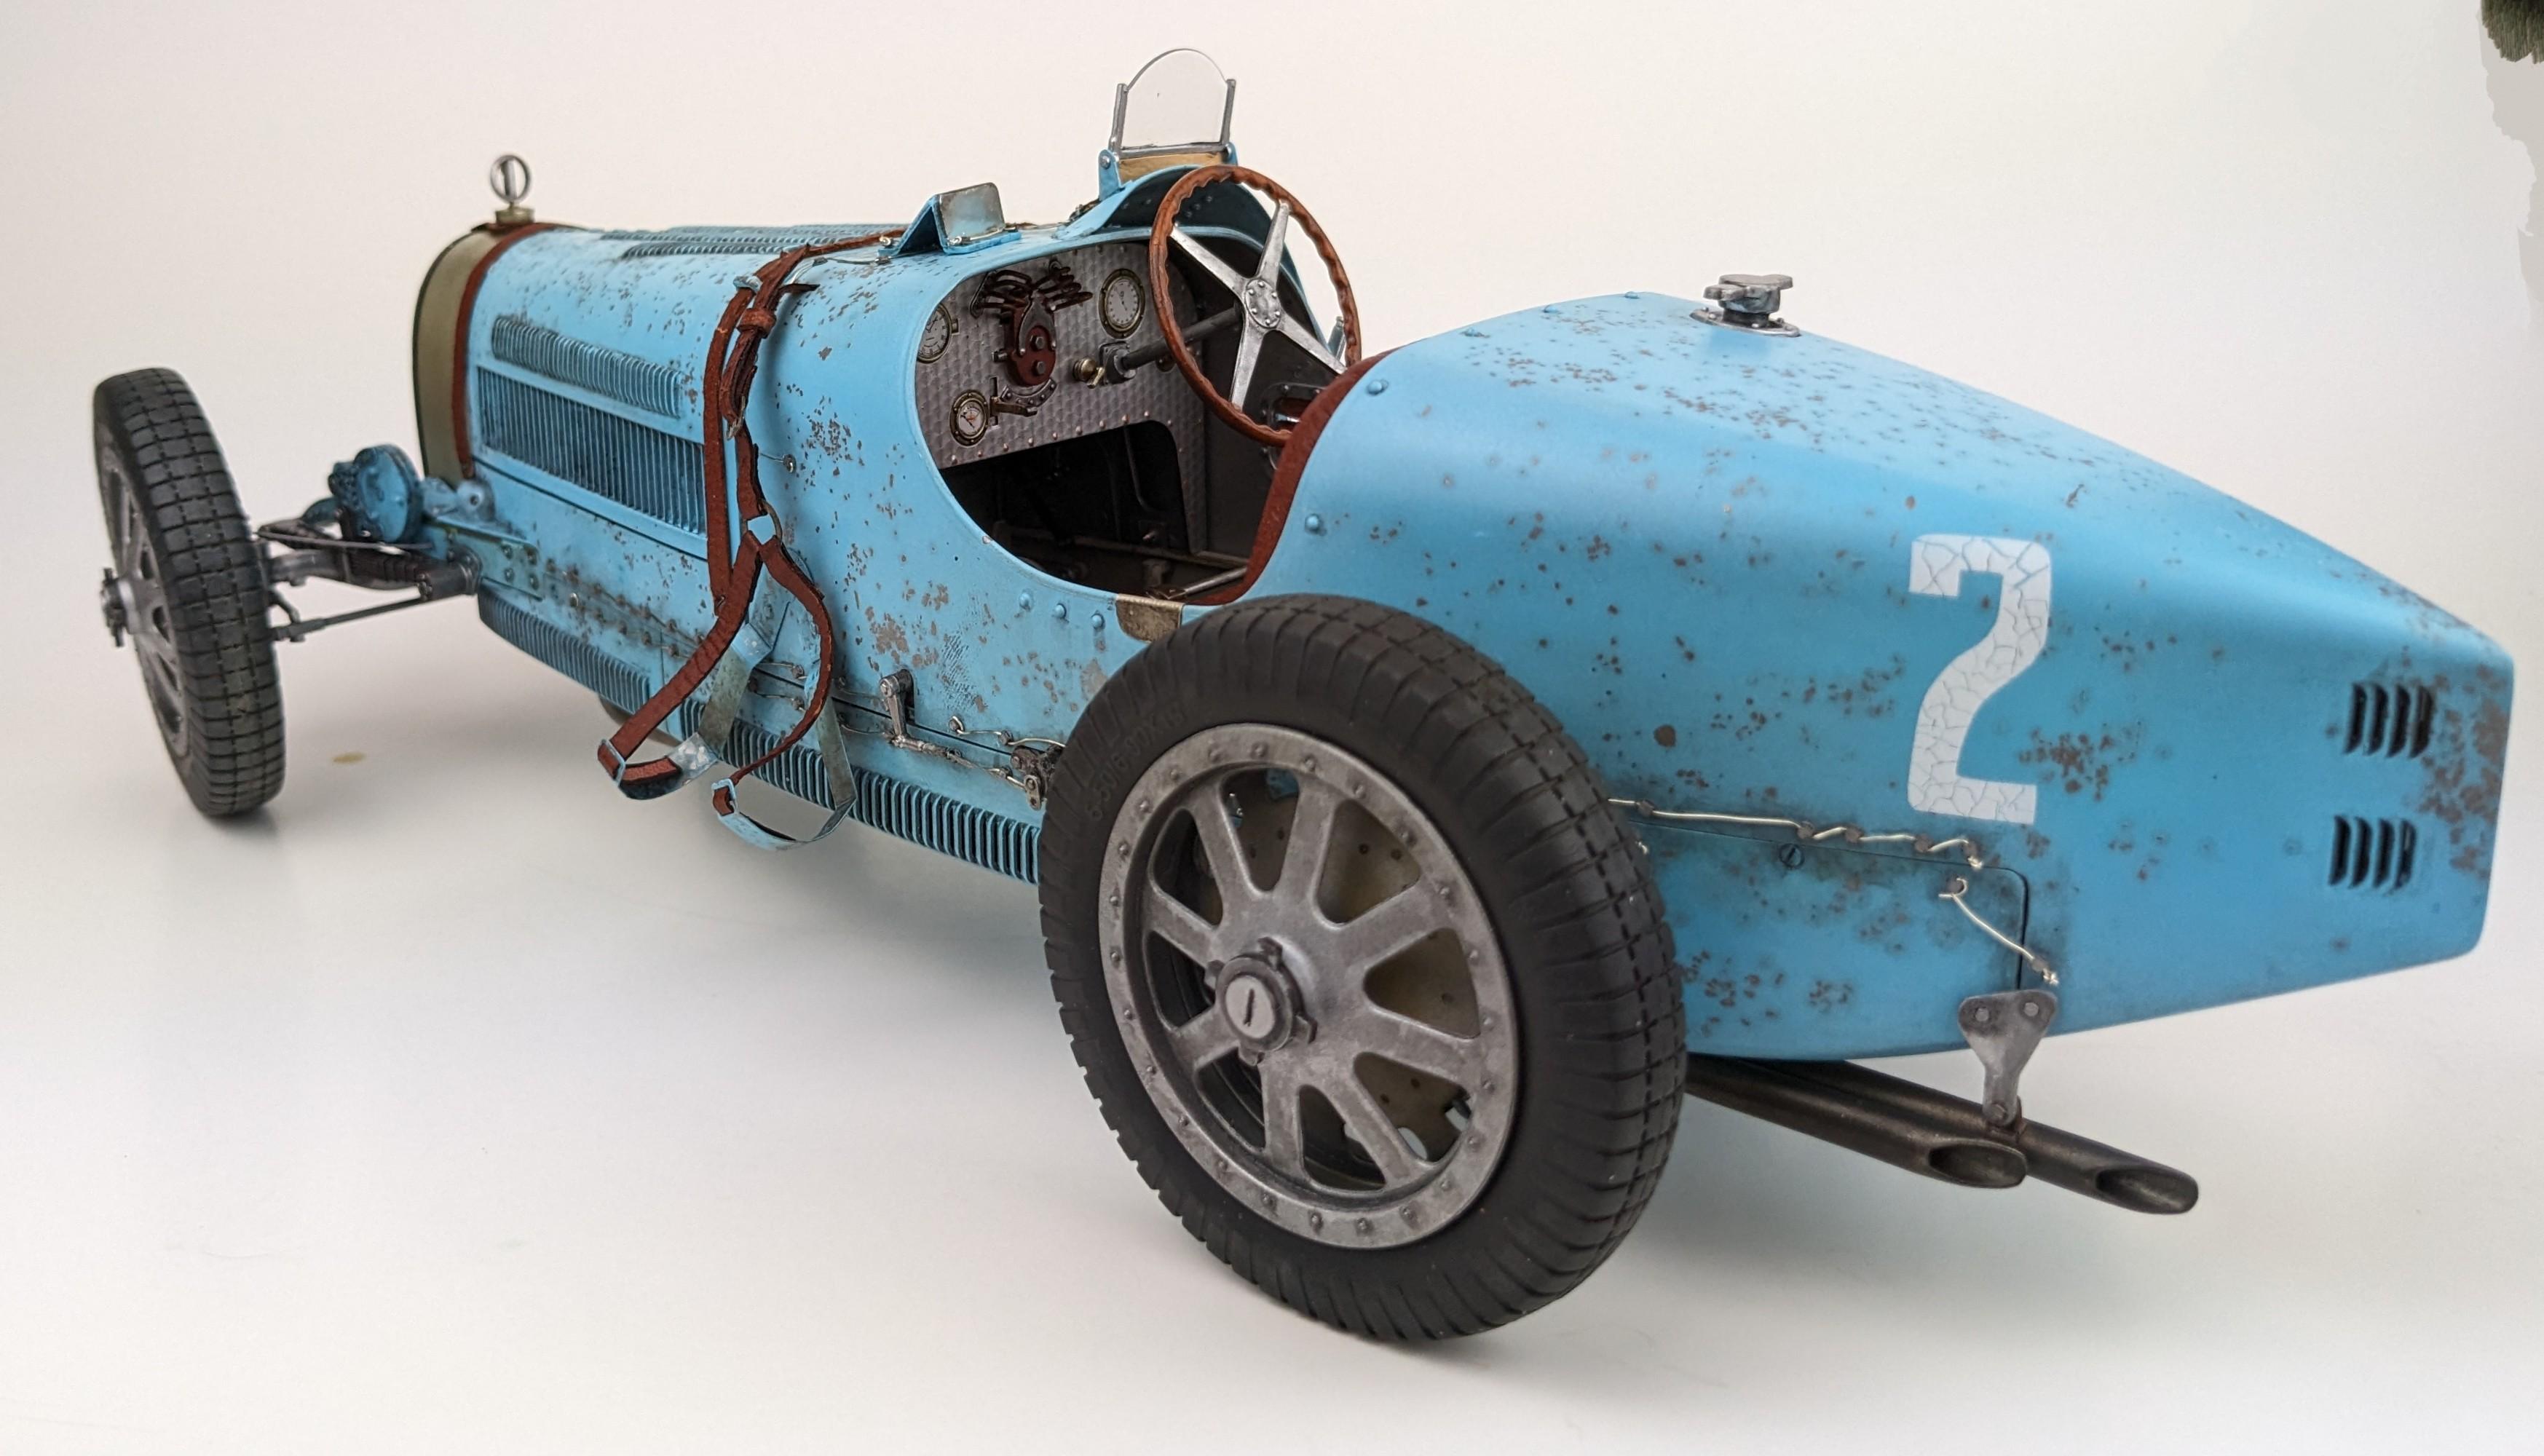
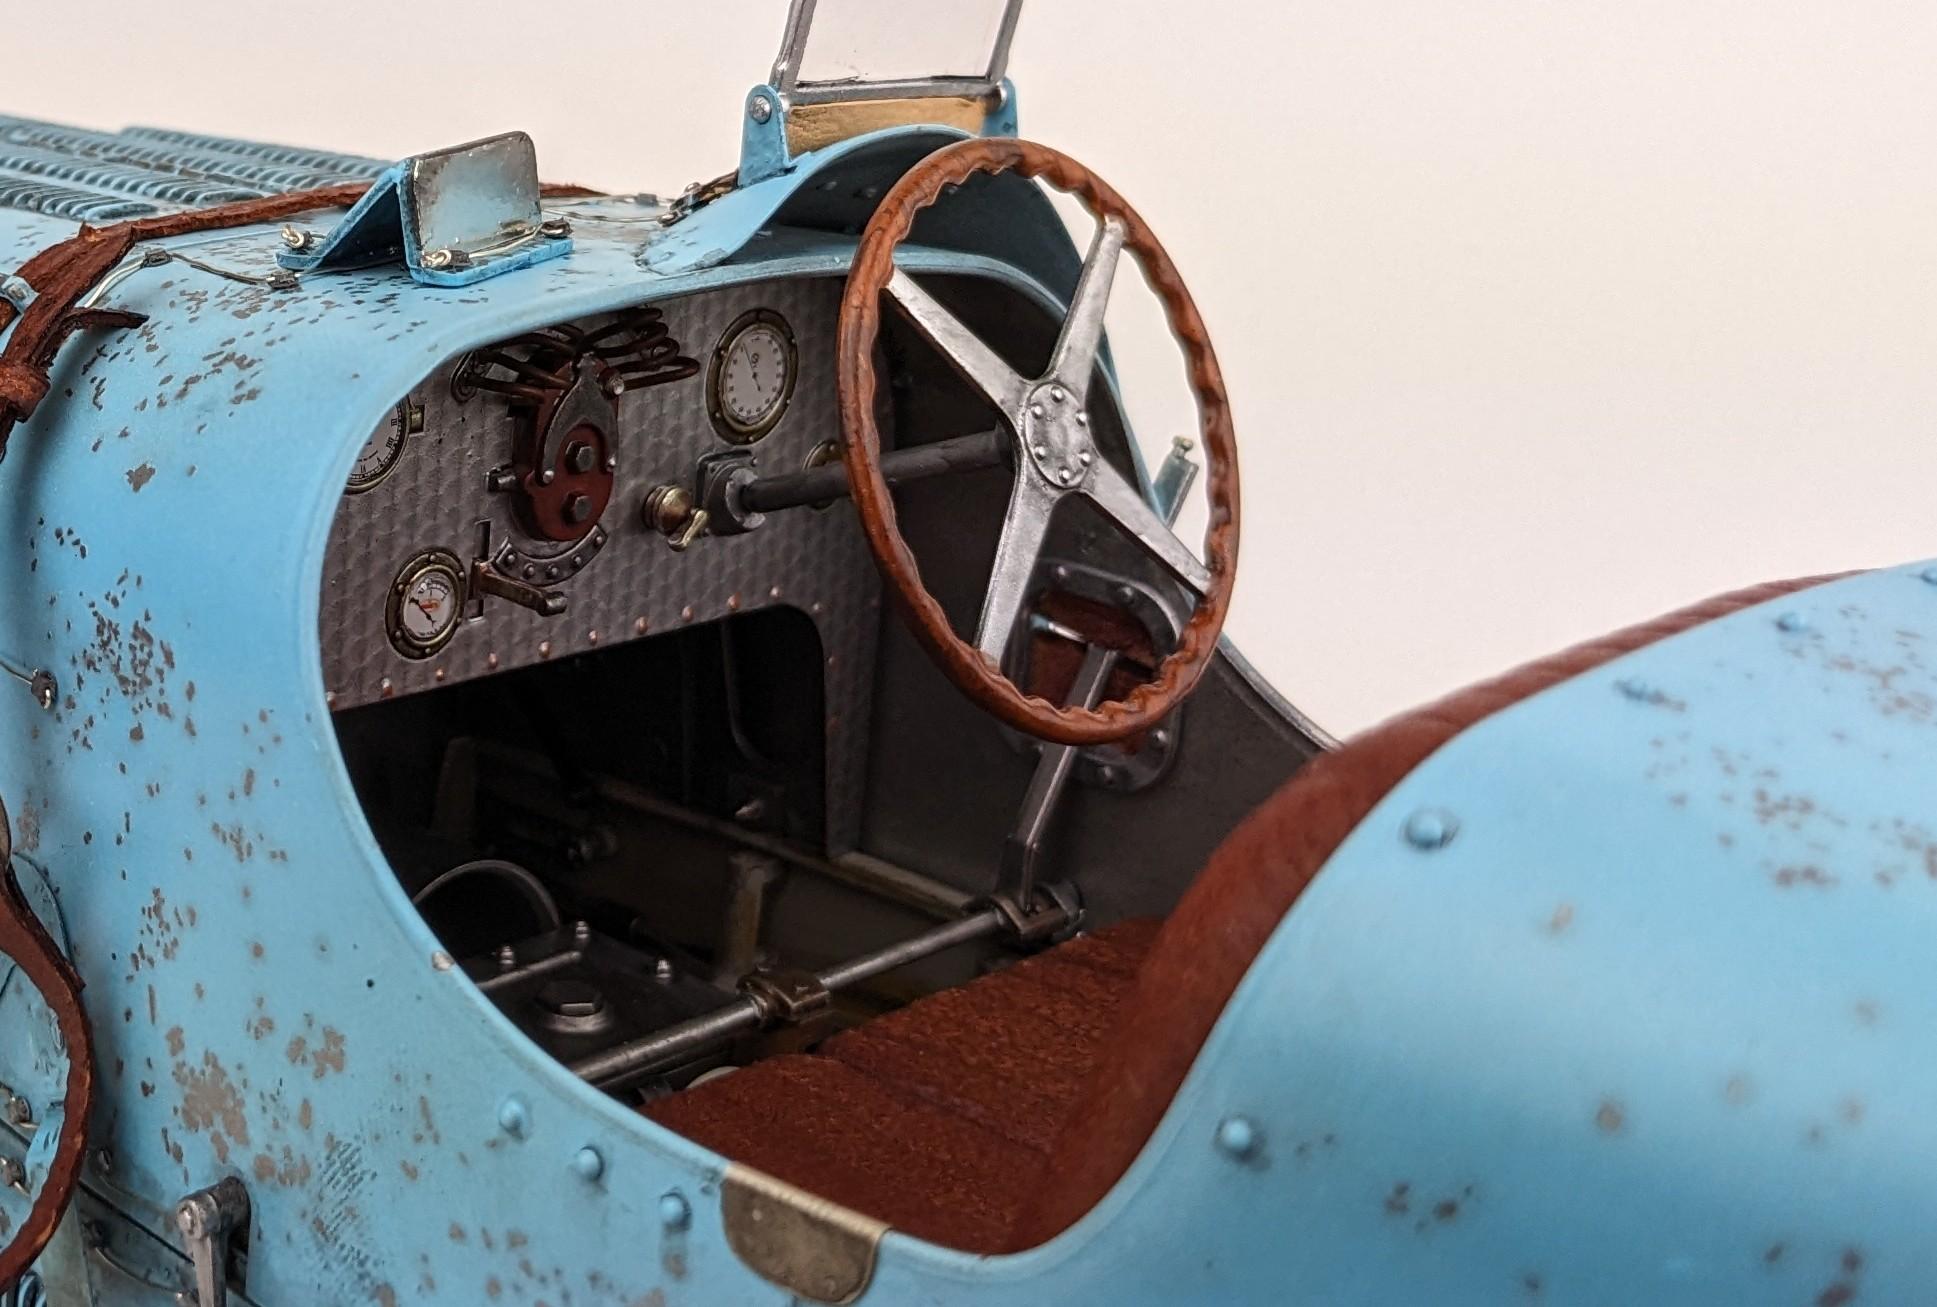
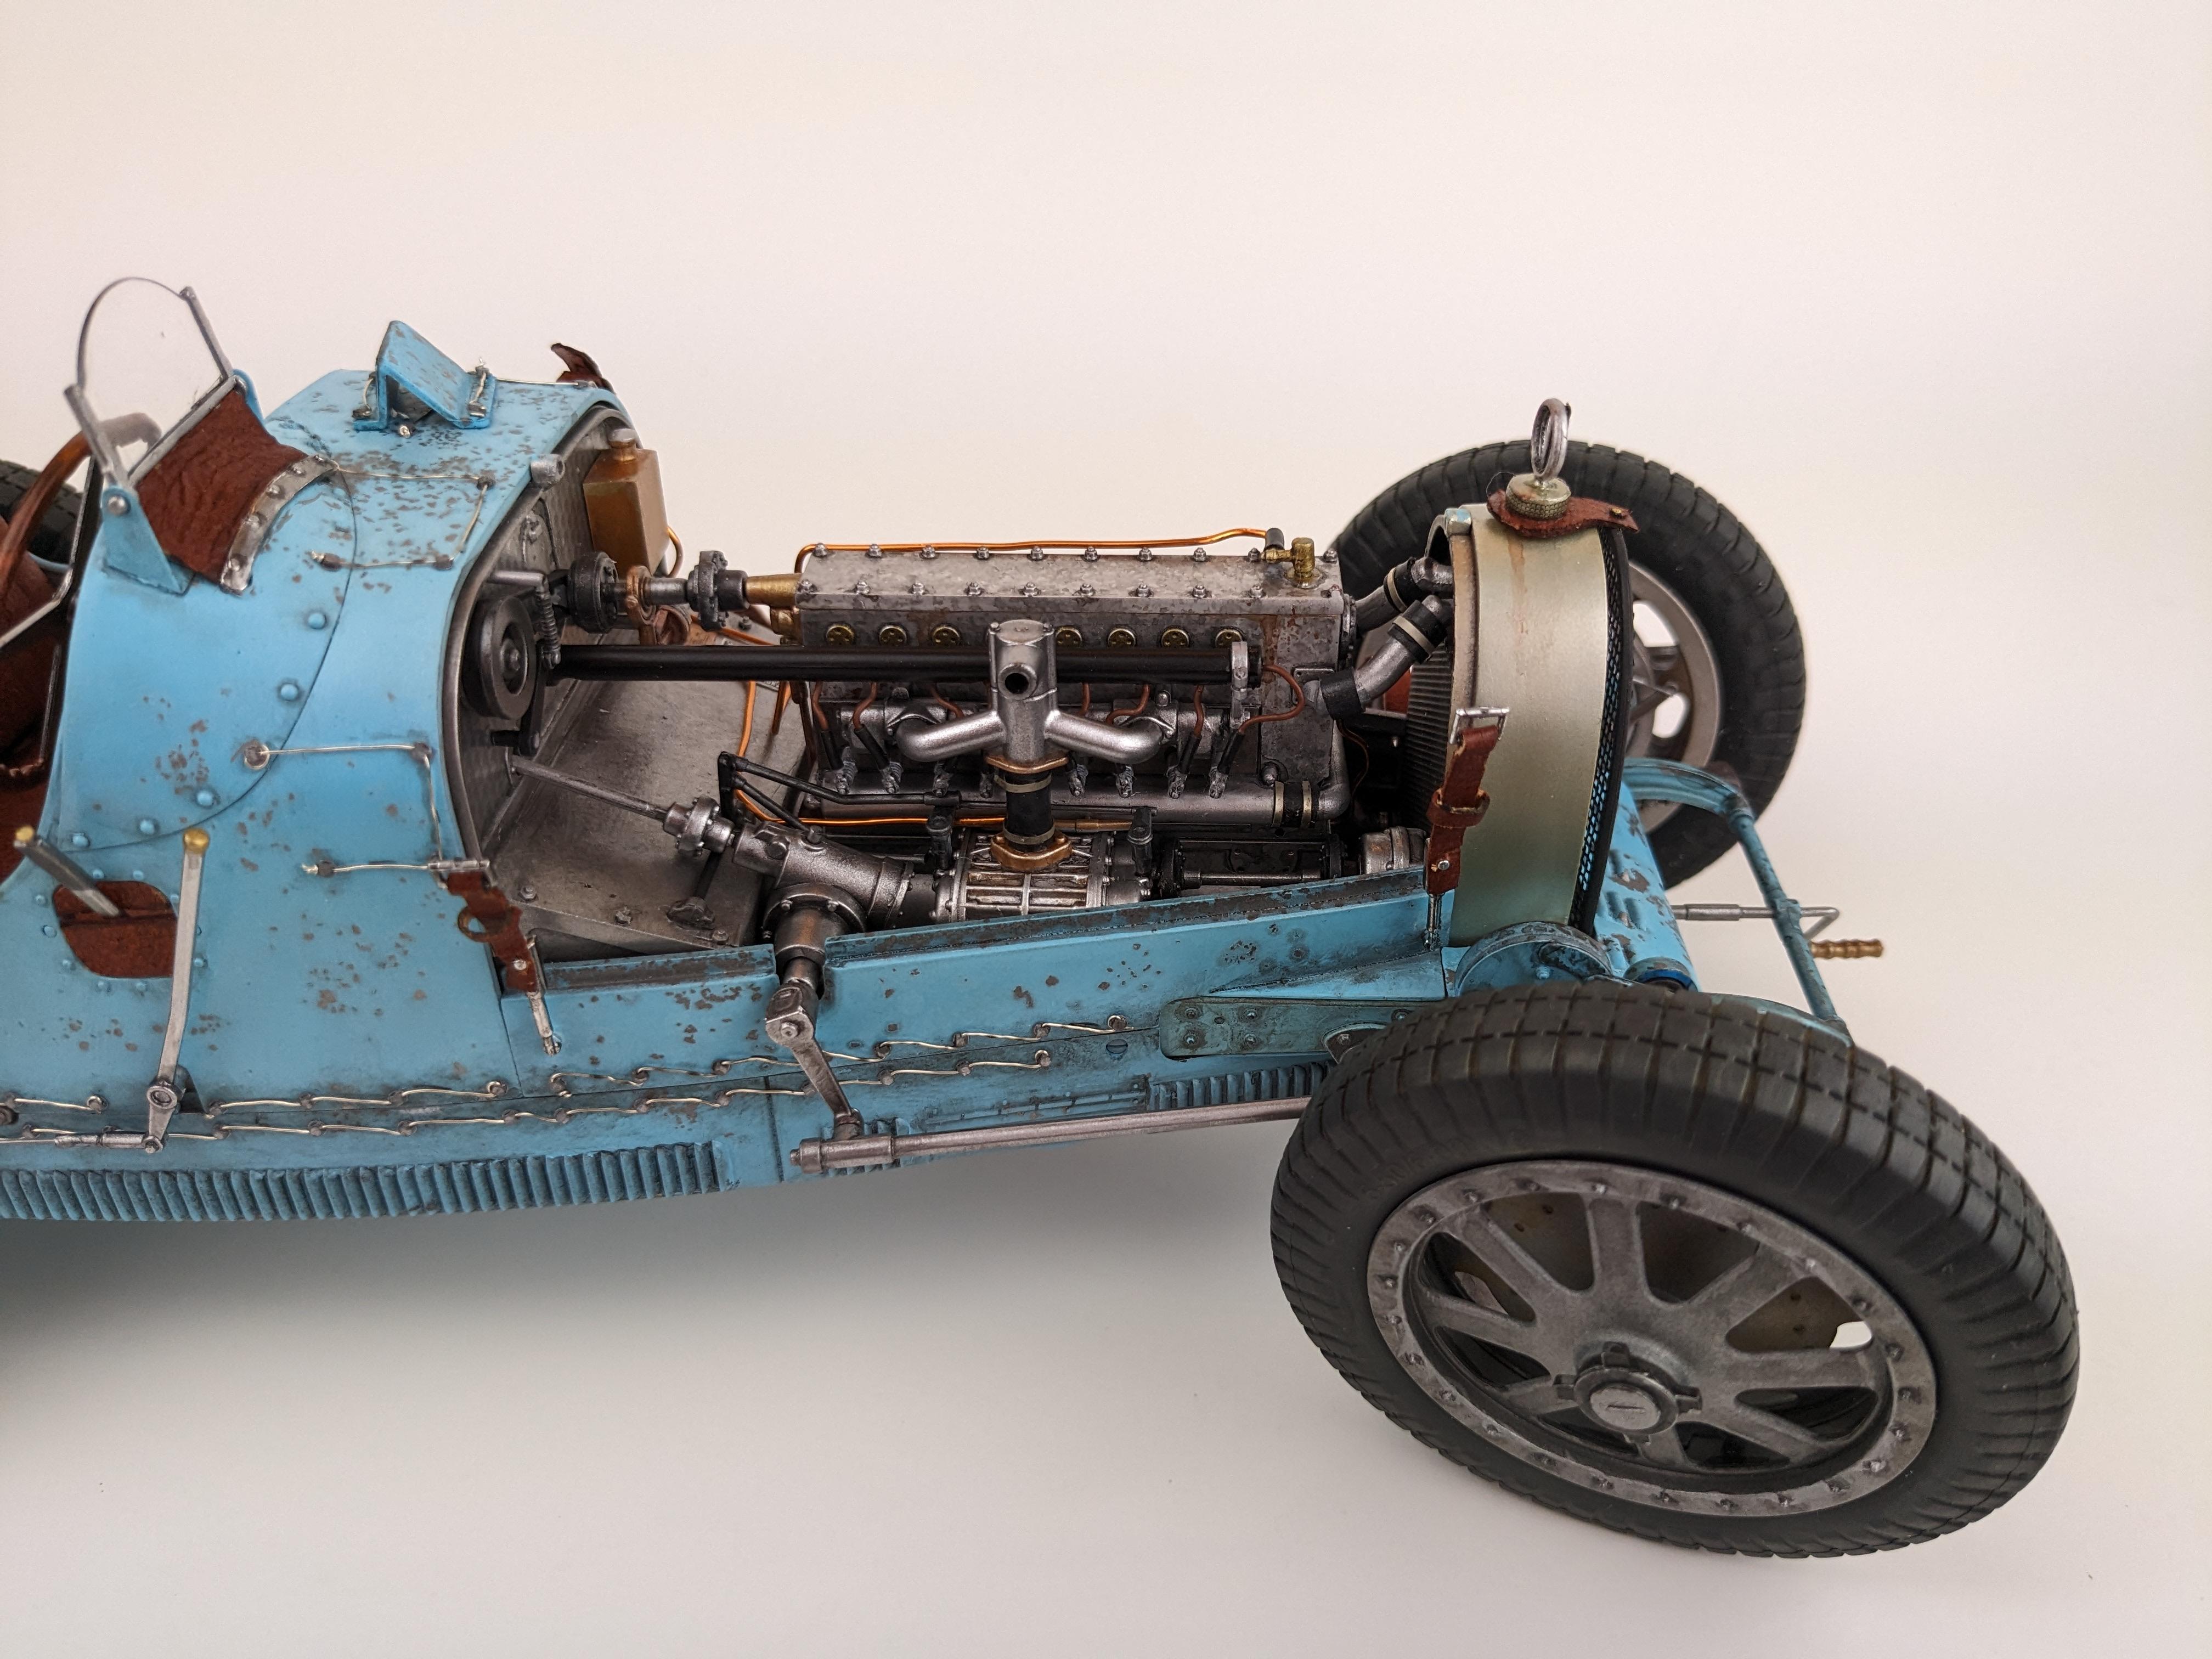
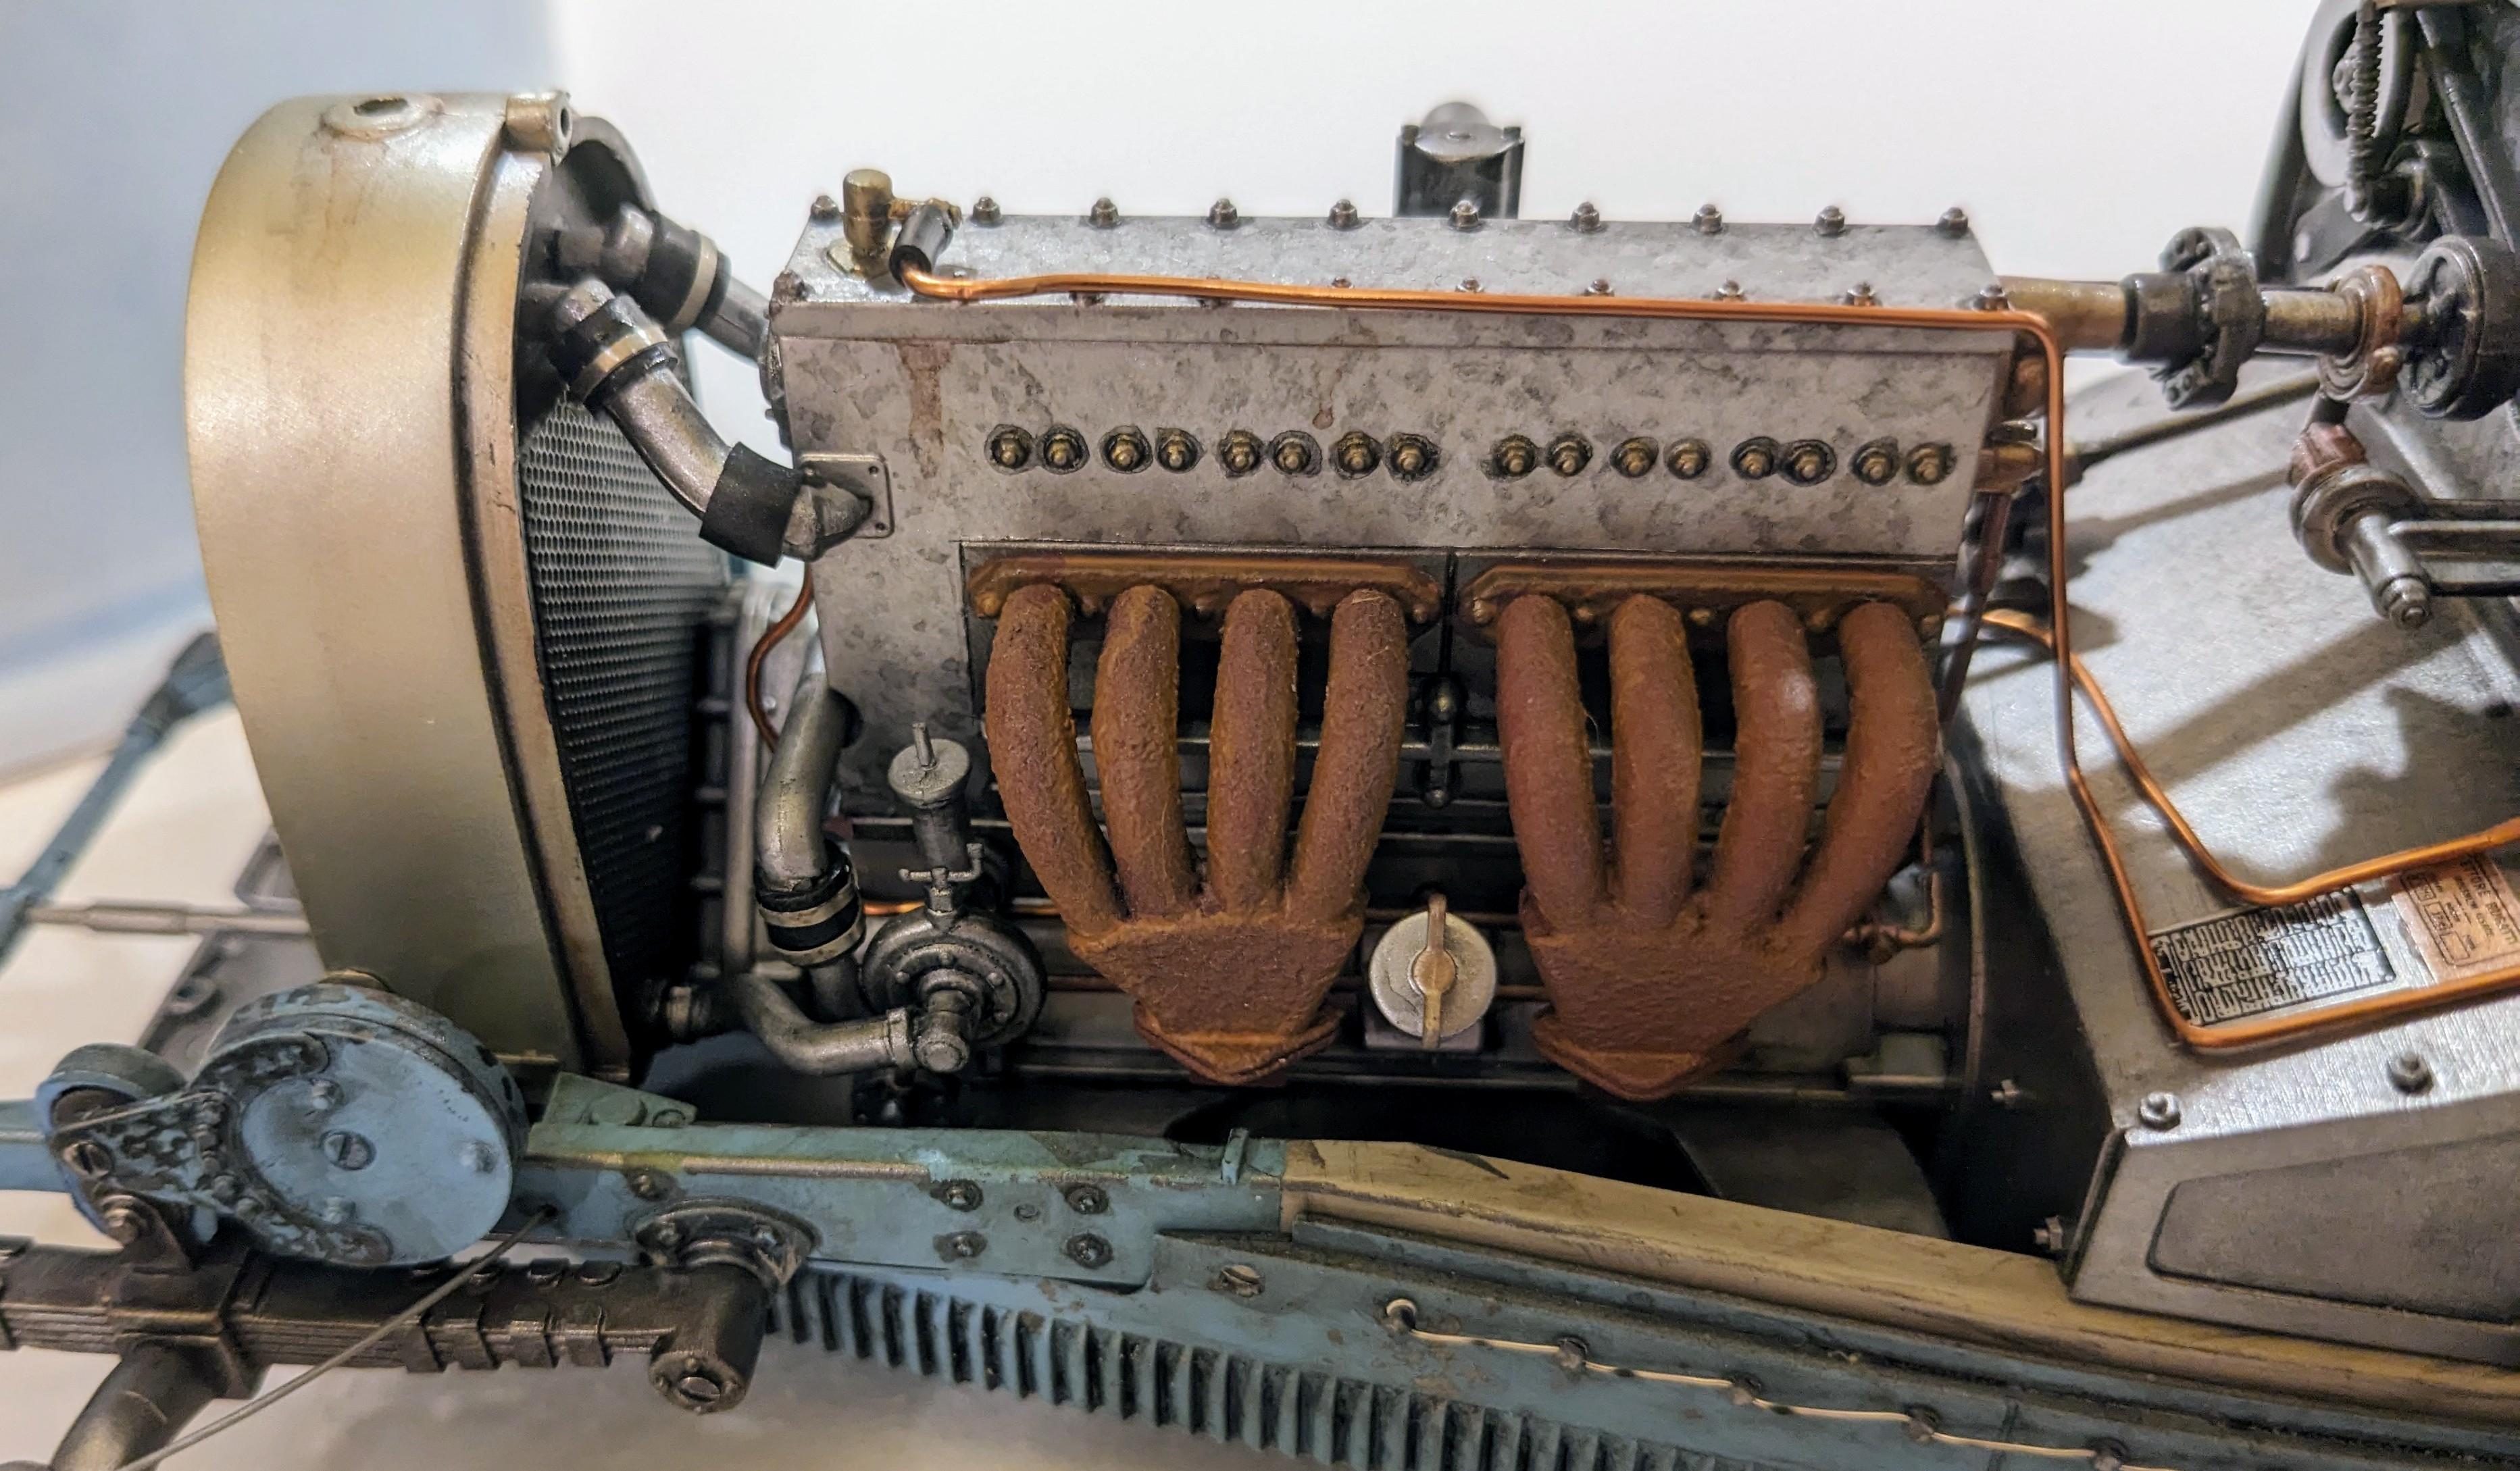
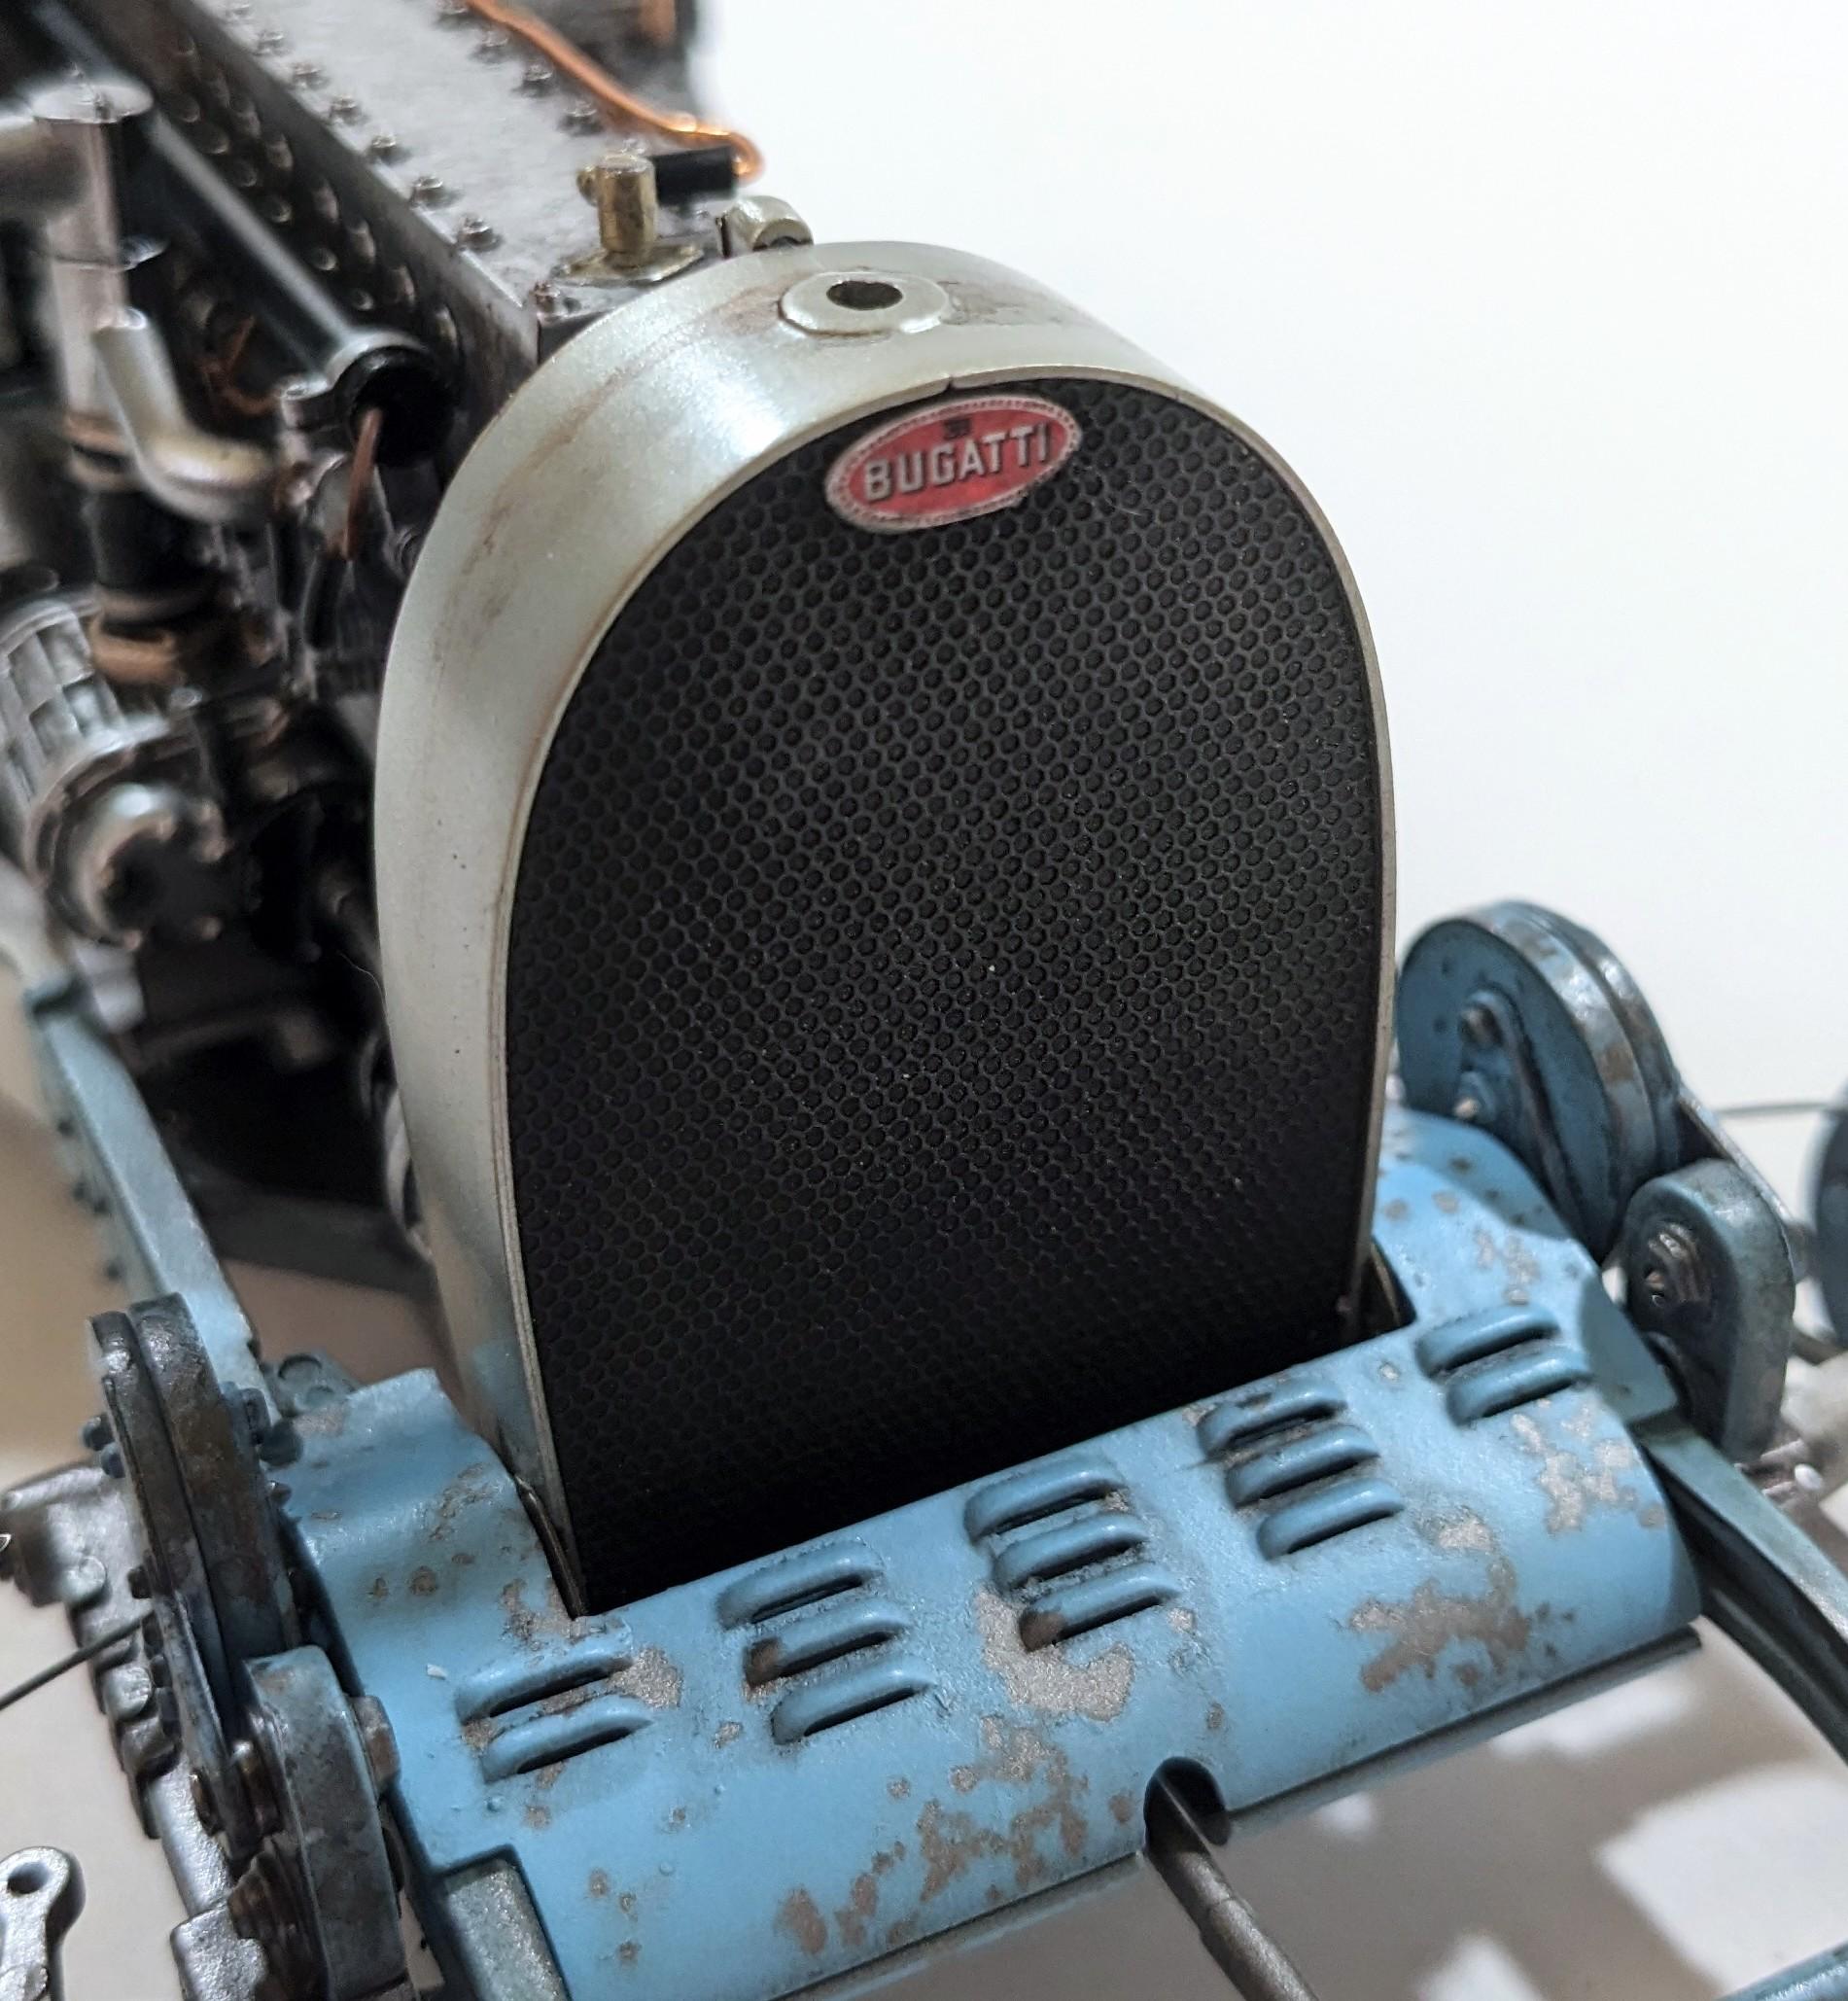
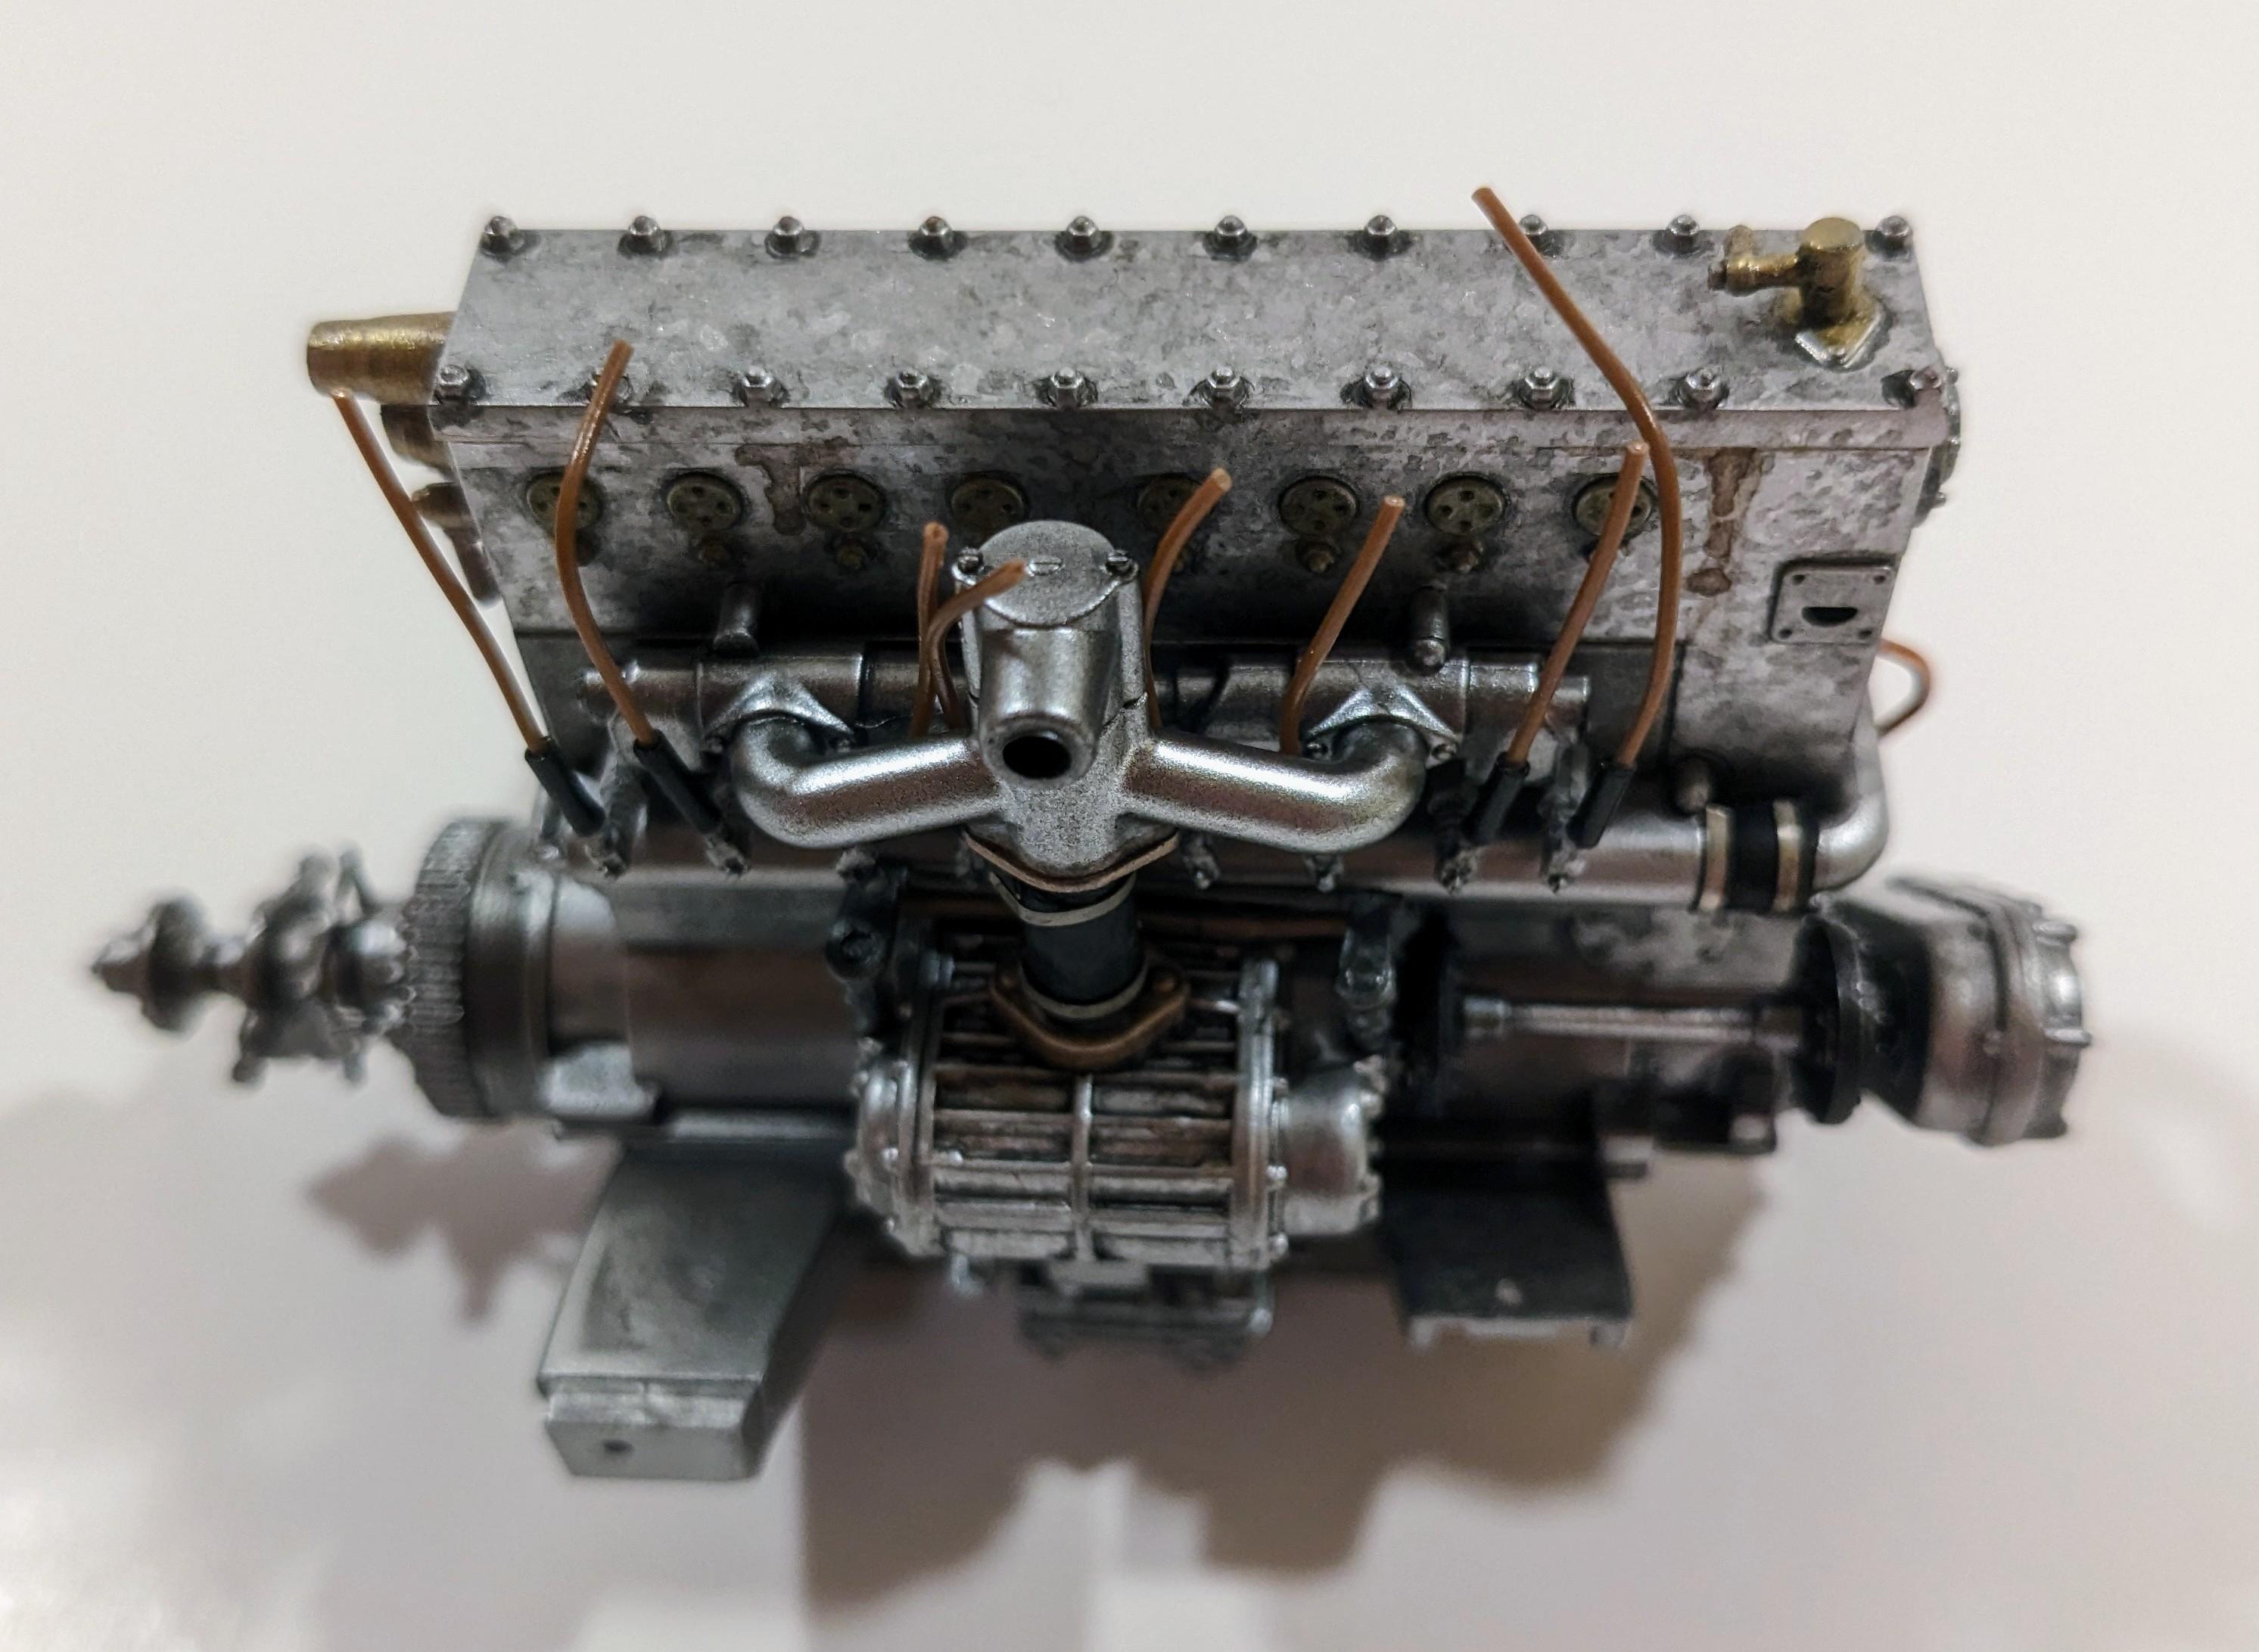
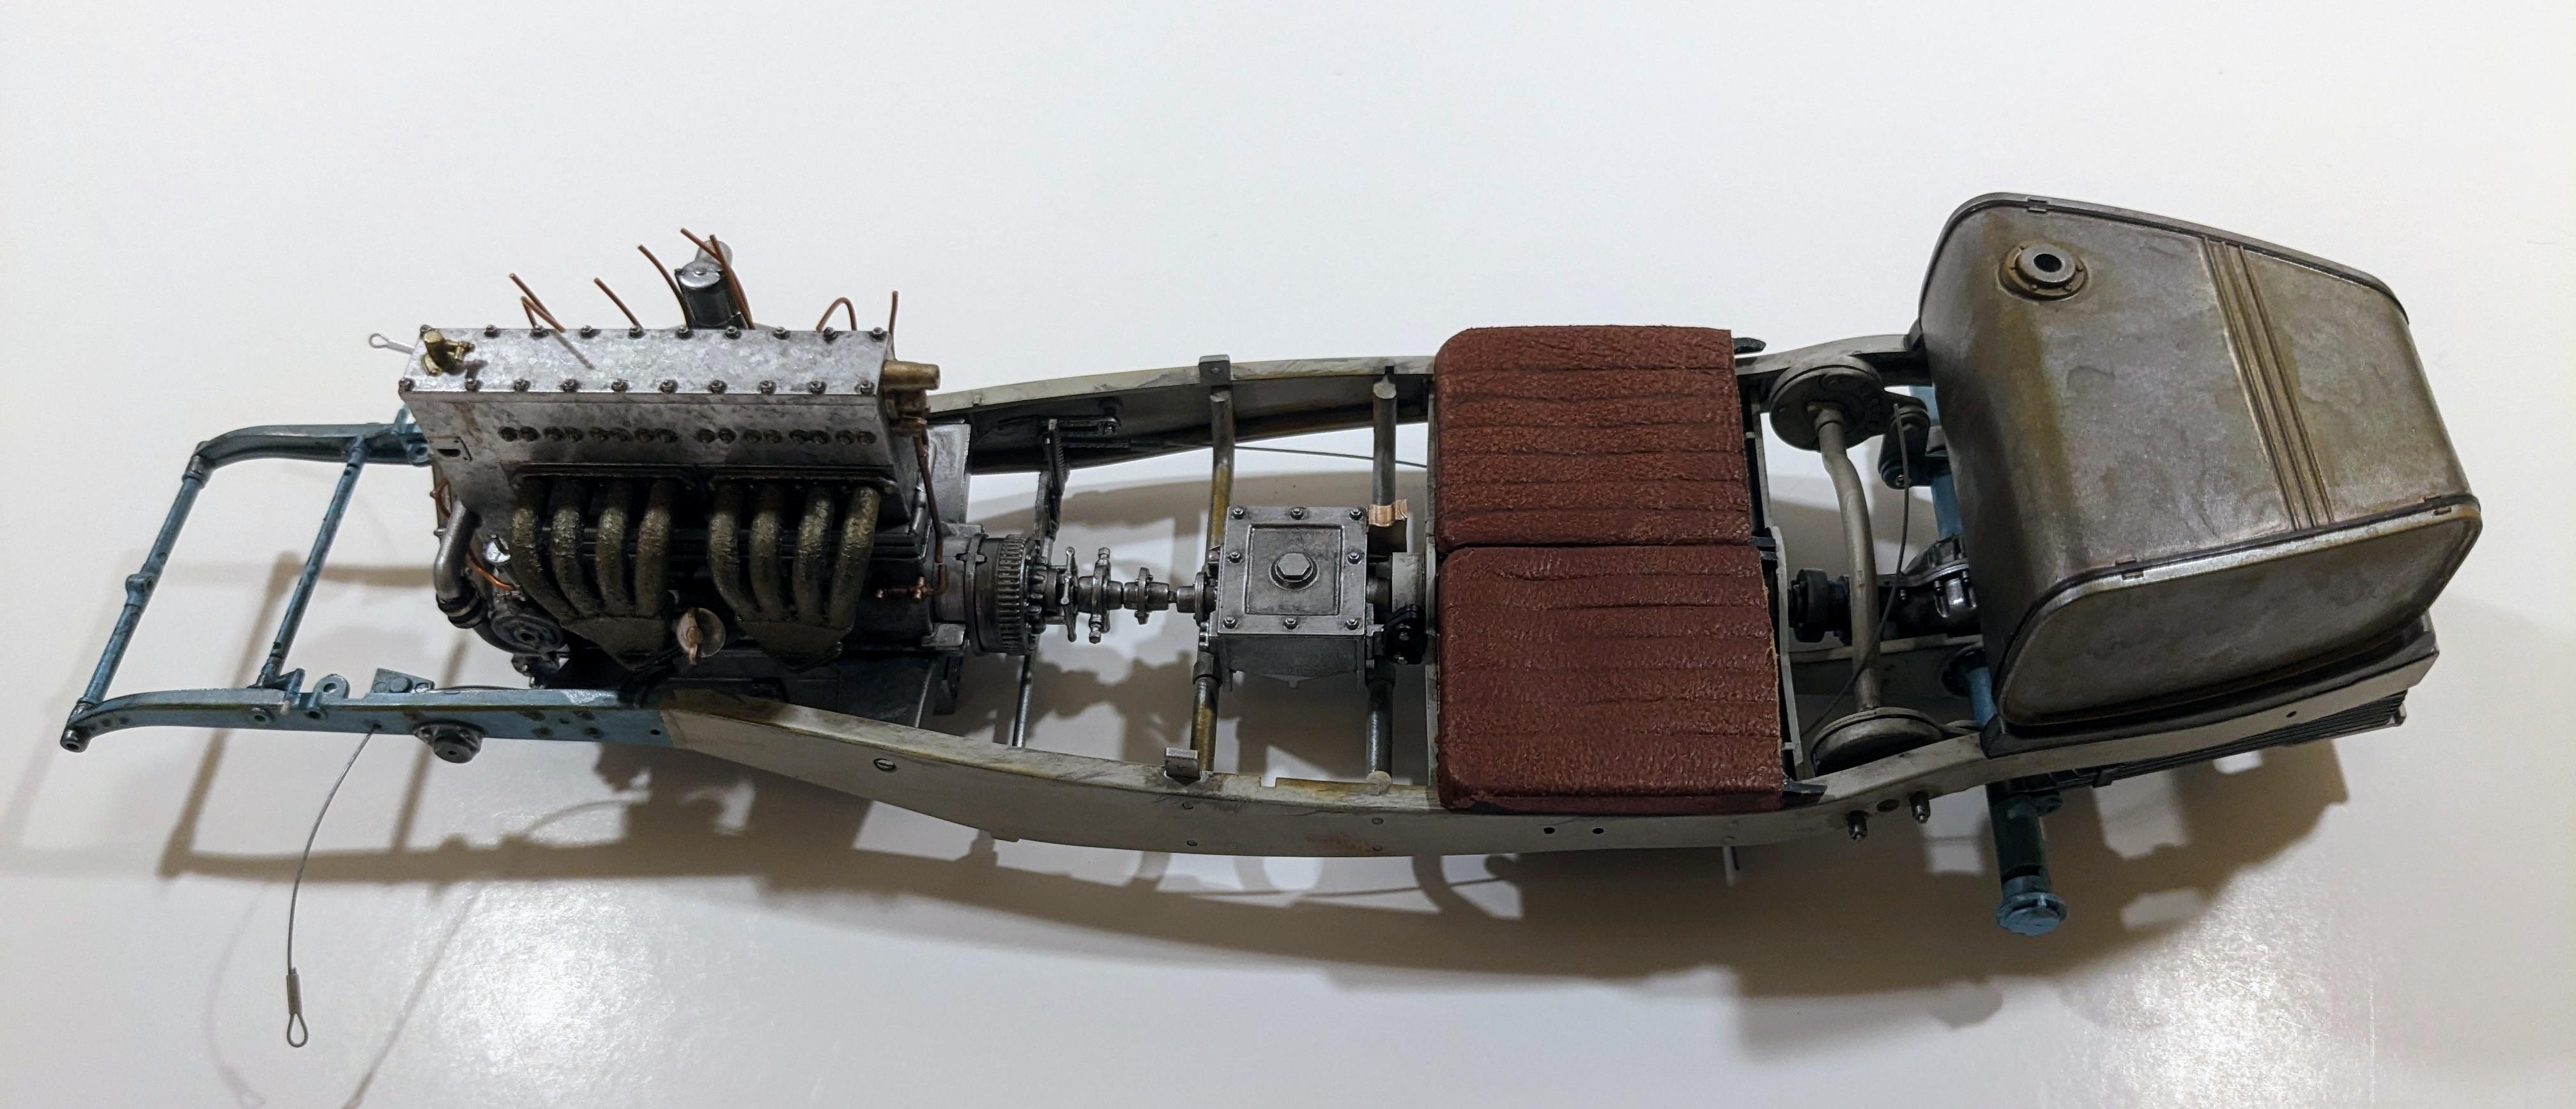
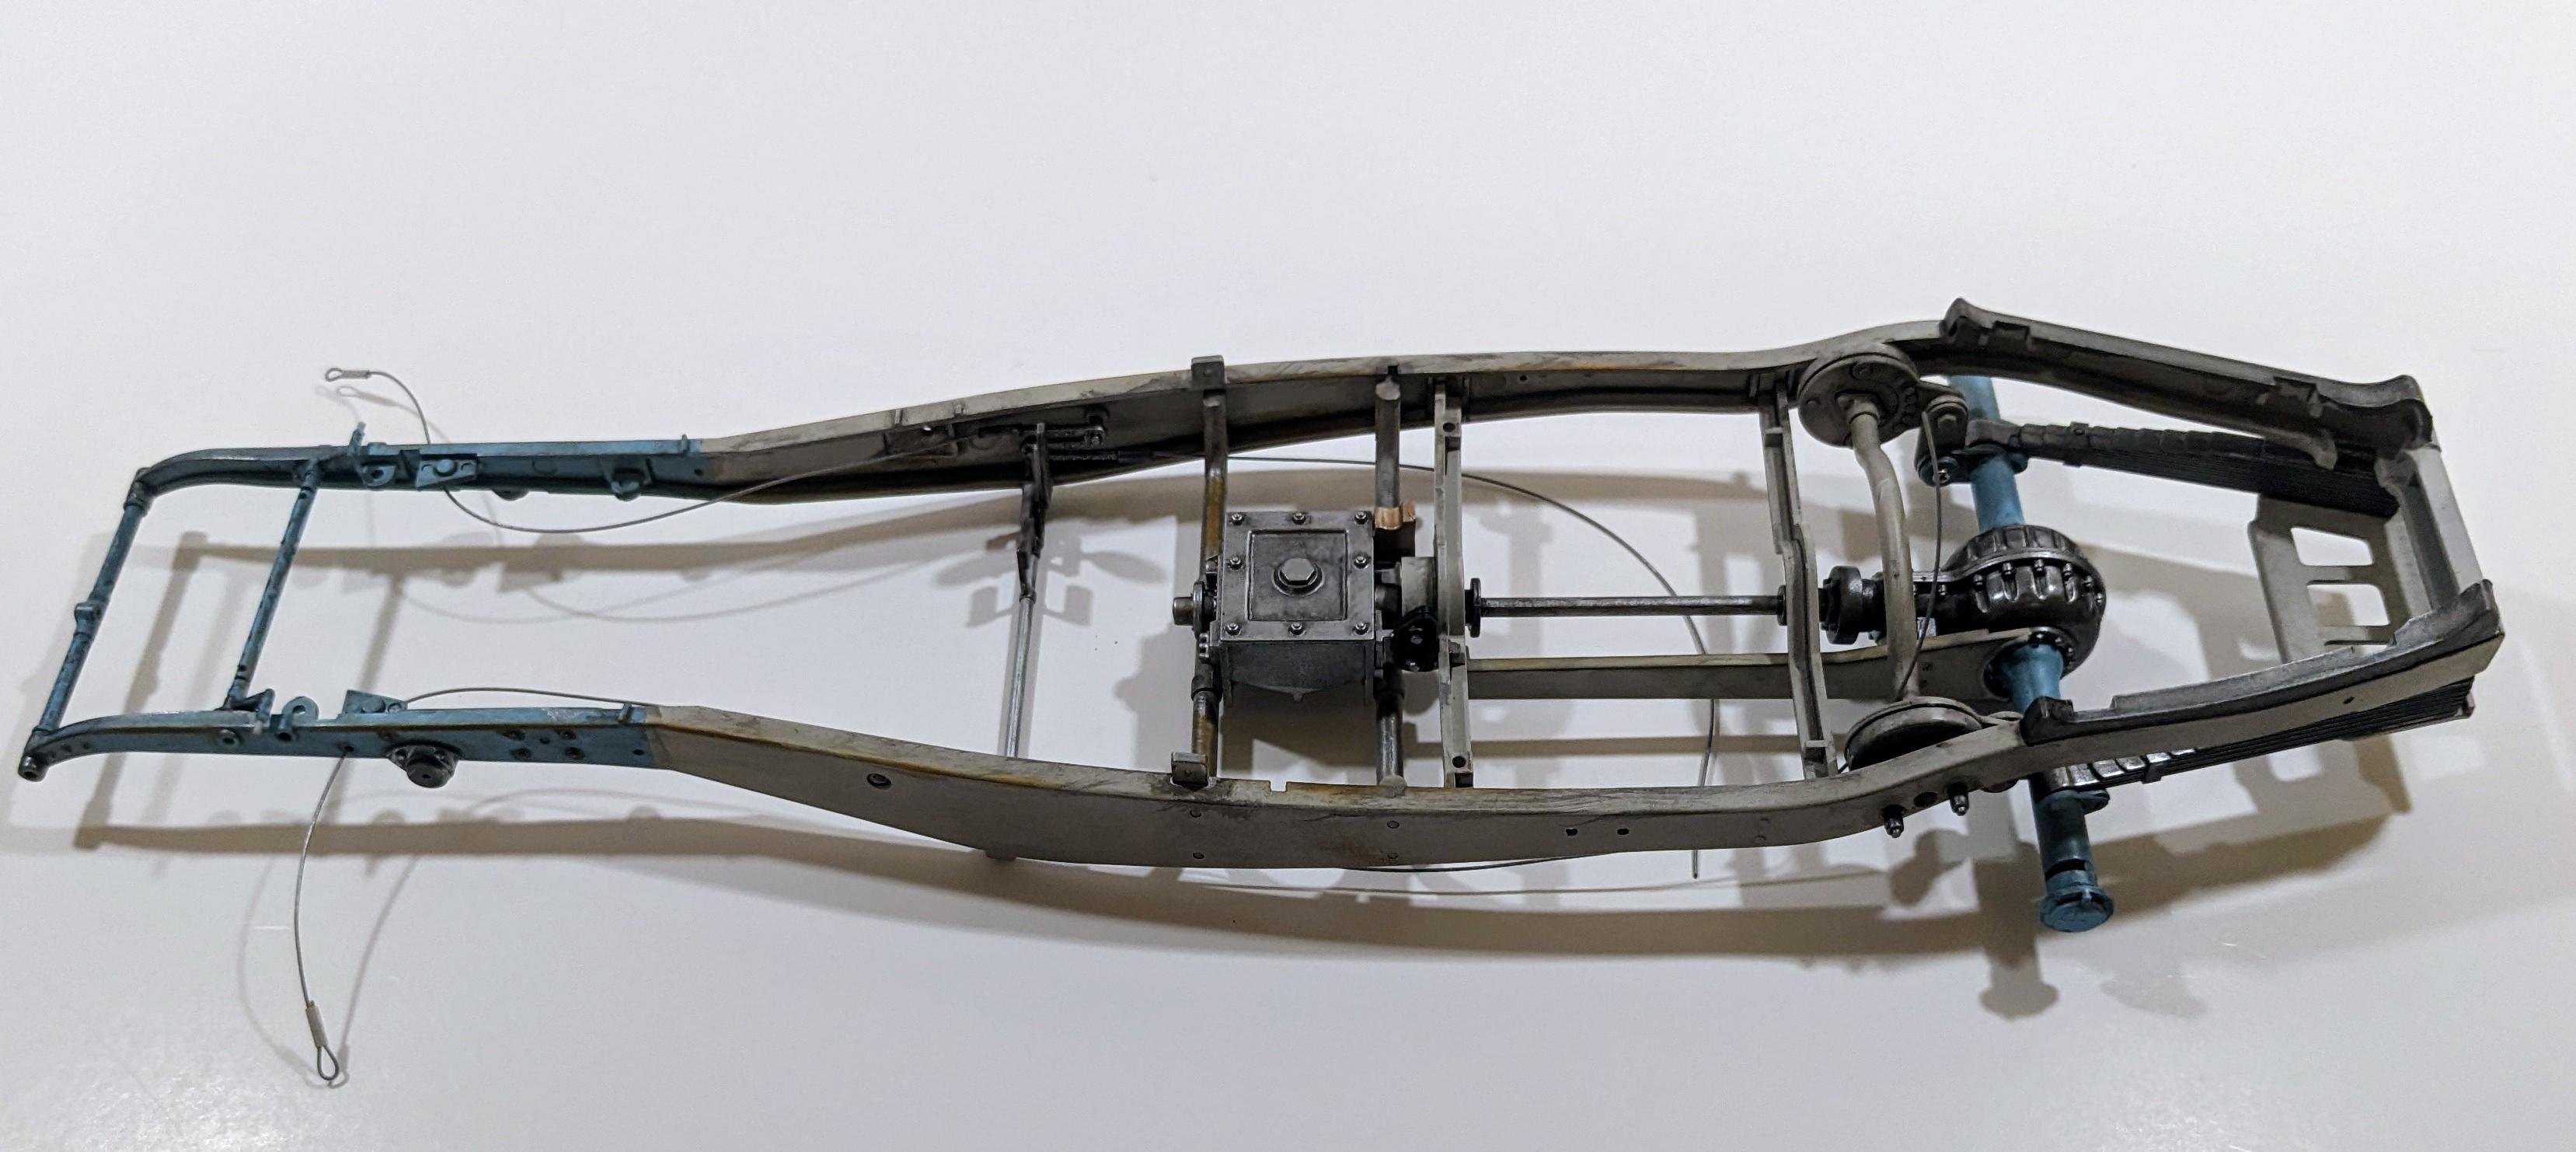
This is Italeri's new-tool Bugatti 35b in 1/12 scale. It's a beautiful kit and a great starting point for a detailed build. I started building this model in my head when the kit was announced in February 2022. My plan was to replicate the carefully preserved patina that the best examples of Bugatti's racing cars all seem to have. It's a tricky combination of careworn paint, cracked leather and polished (but not too polished) metal. First step was to remove the molded rivets and locking bolts for Tichy Train Group styrene rivets and 3d printed locking bolts from Unobtanium. I used a salt weathering technique on the body to allow the bare aluminum base coat to peek through the Vallejo Sky Blue paint. The racing numbers were painted on using masks from Orlee. The leather throughout the car is 1.5oz thin bookbinding leather in distressed Cognac. Brake cables are thin braided stainless steel. Metallic finishes are all Vallejo Metal Color. Weathering was done with Vallejo washes and Tamiya Weathering Master pastels. This was an excellent kit overall. Most of the locating holes needed minor reaming out, largely due to paint thickness. The screws, which are slotted instead of Phillips and not magnetic, were a challenge as well. I genuinely enjoyed this build. Sometimes you're just "in the zone" when building a model and this was one of those cases. It's the first time I used the salt weathering technique as well as my first time using leather for upholstery. I'm sure it won't be my last... I have a LOT left over! Anyway, on to the pics!
- 34 replies
-
- 13
-

-
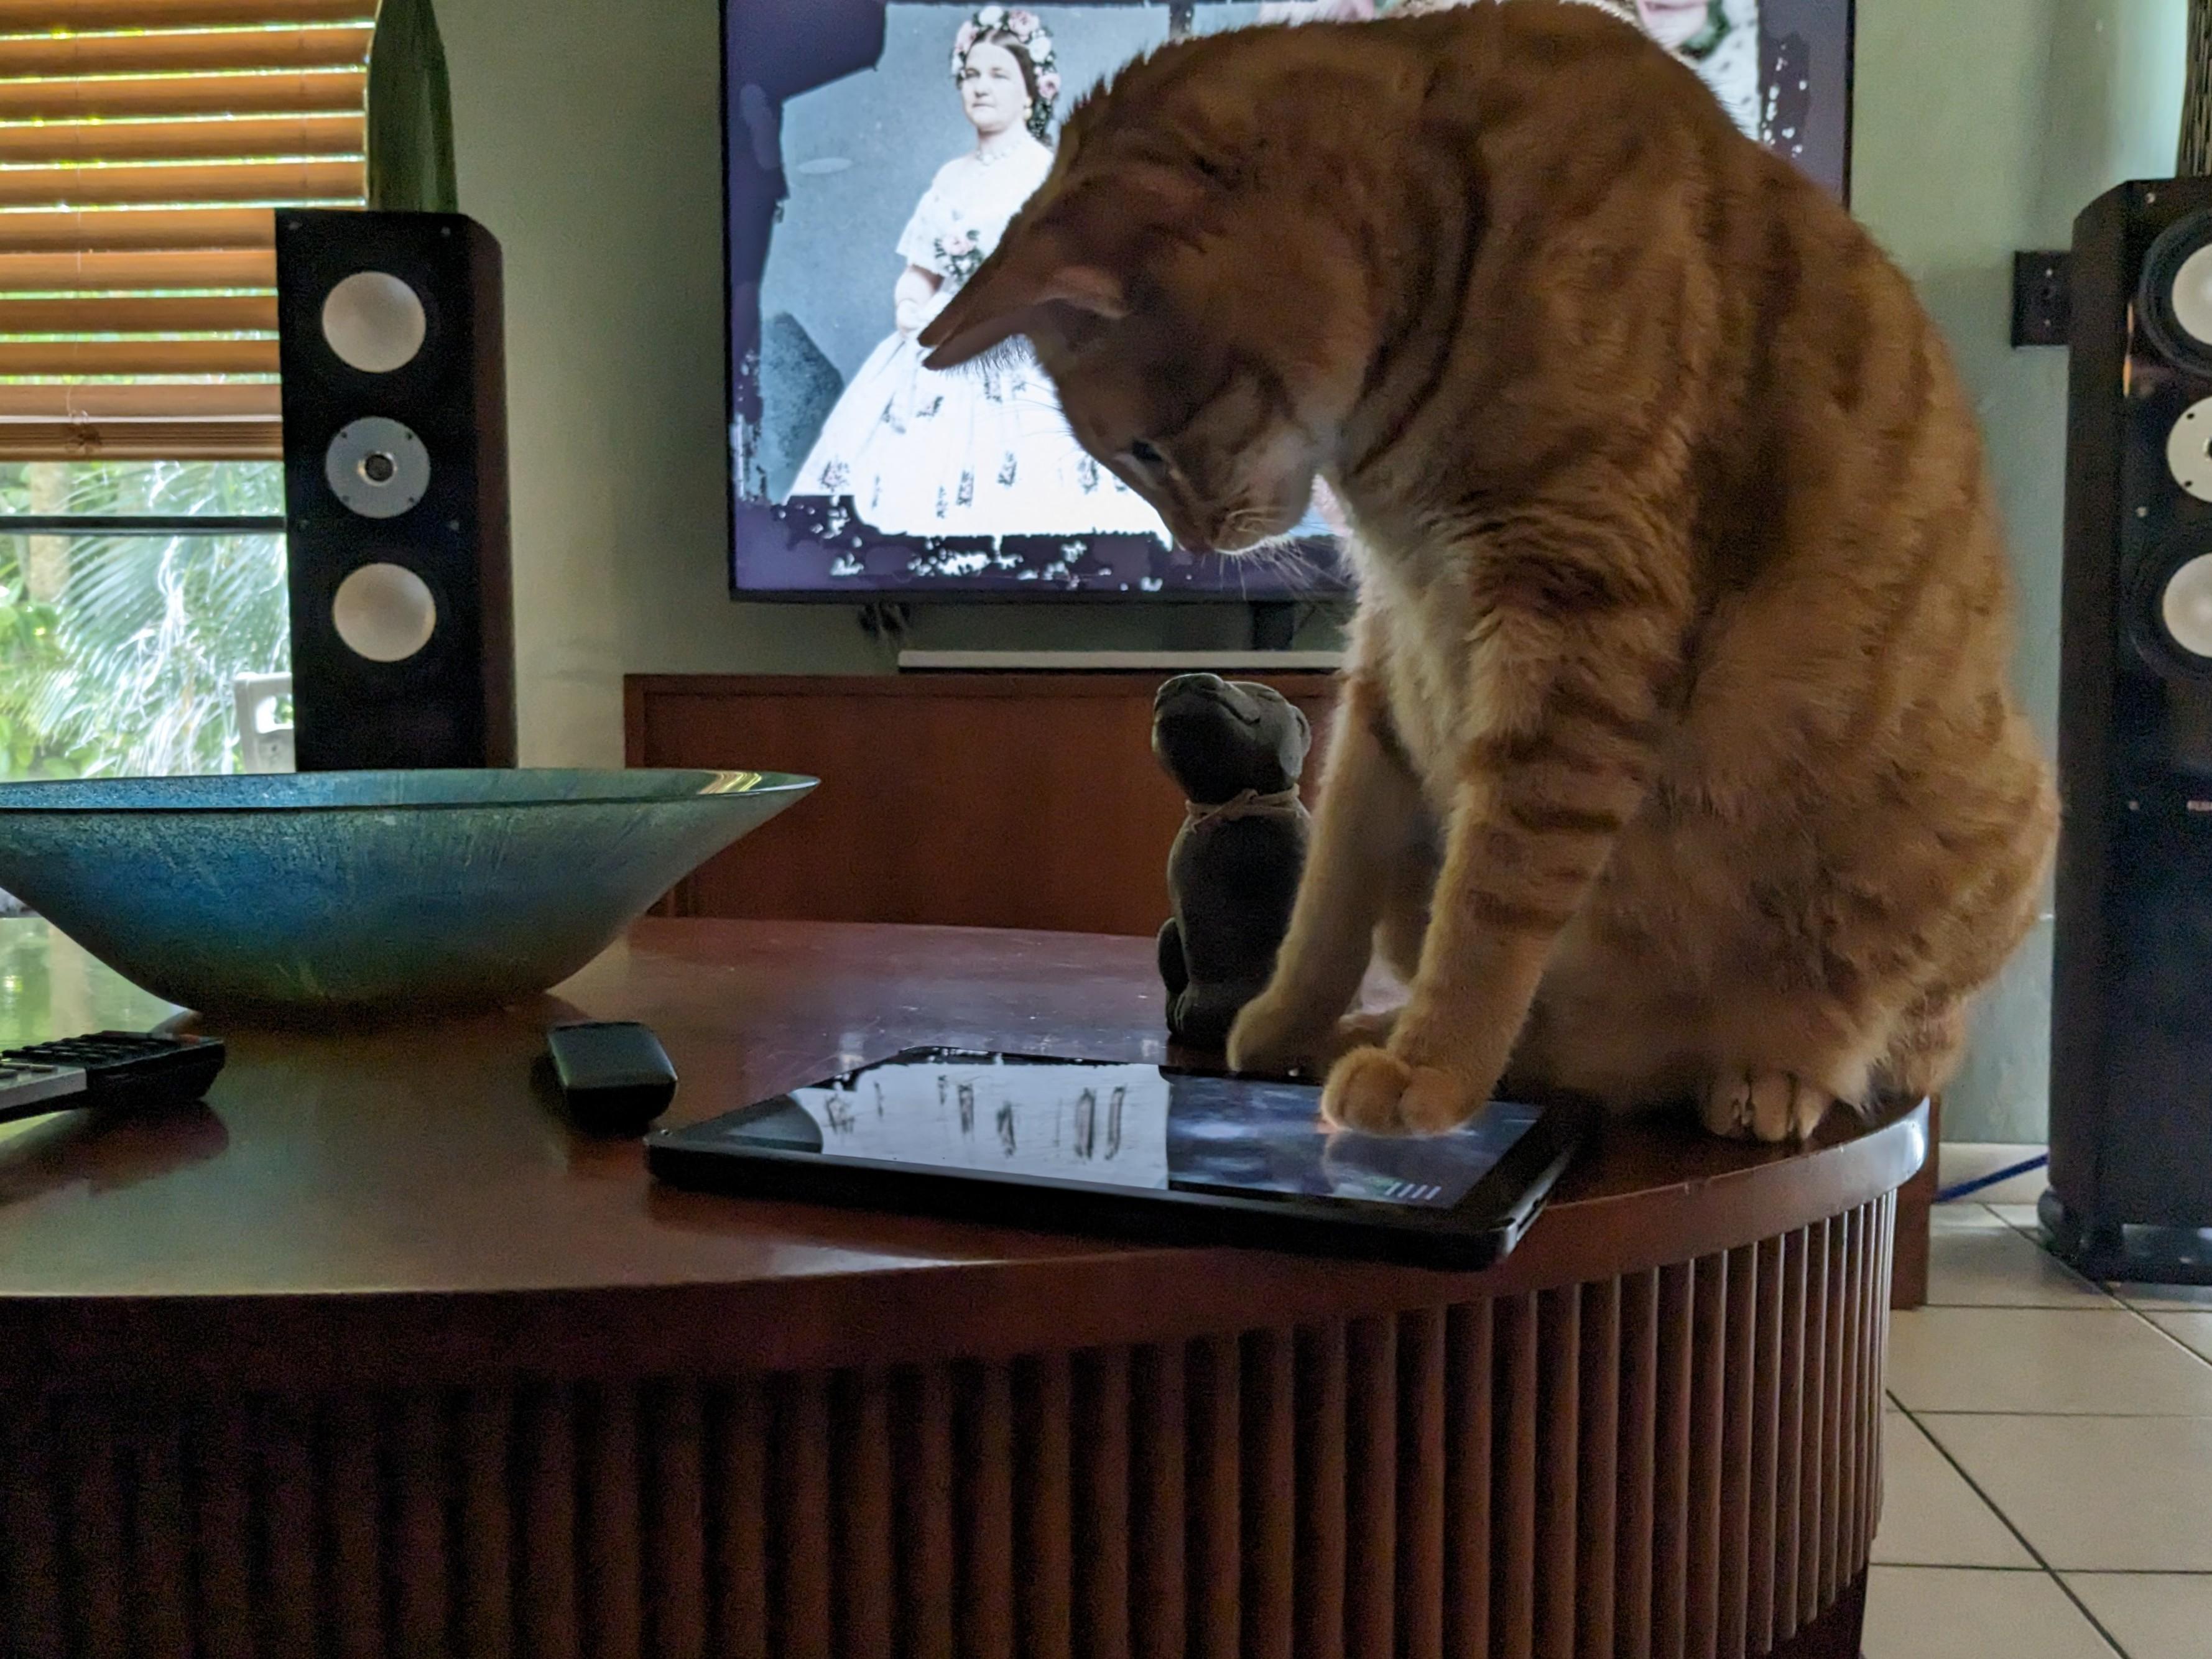
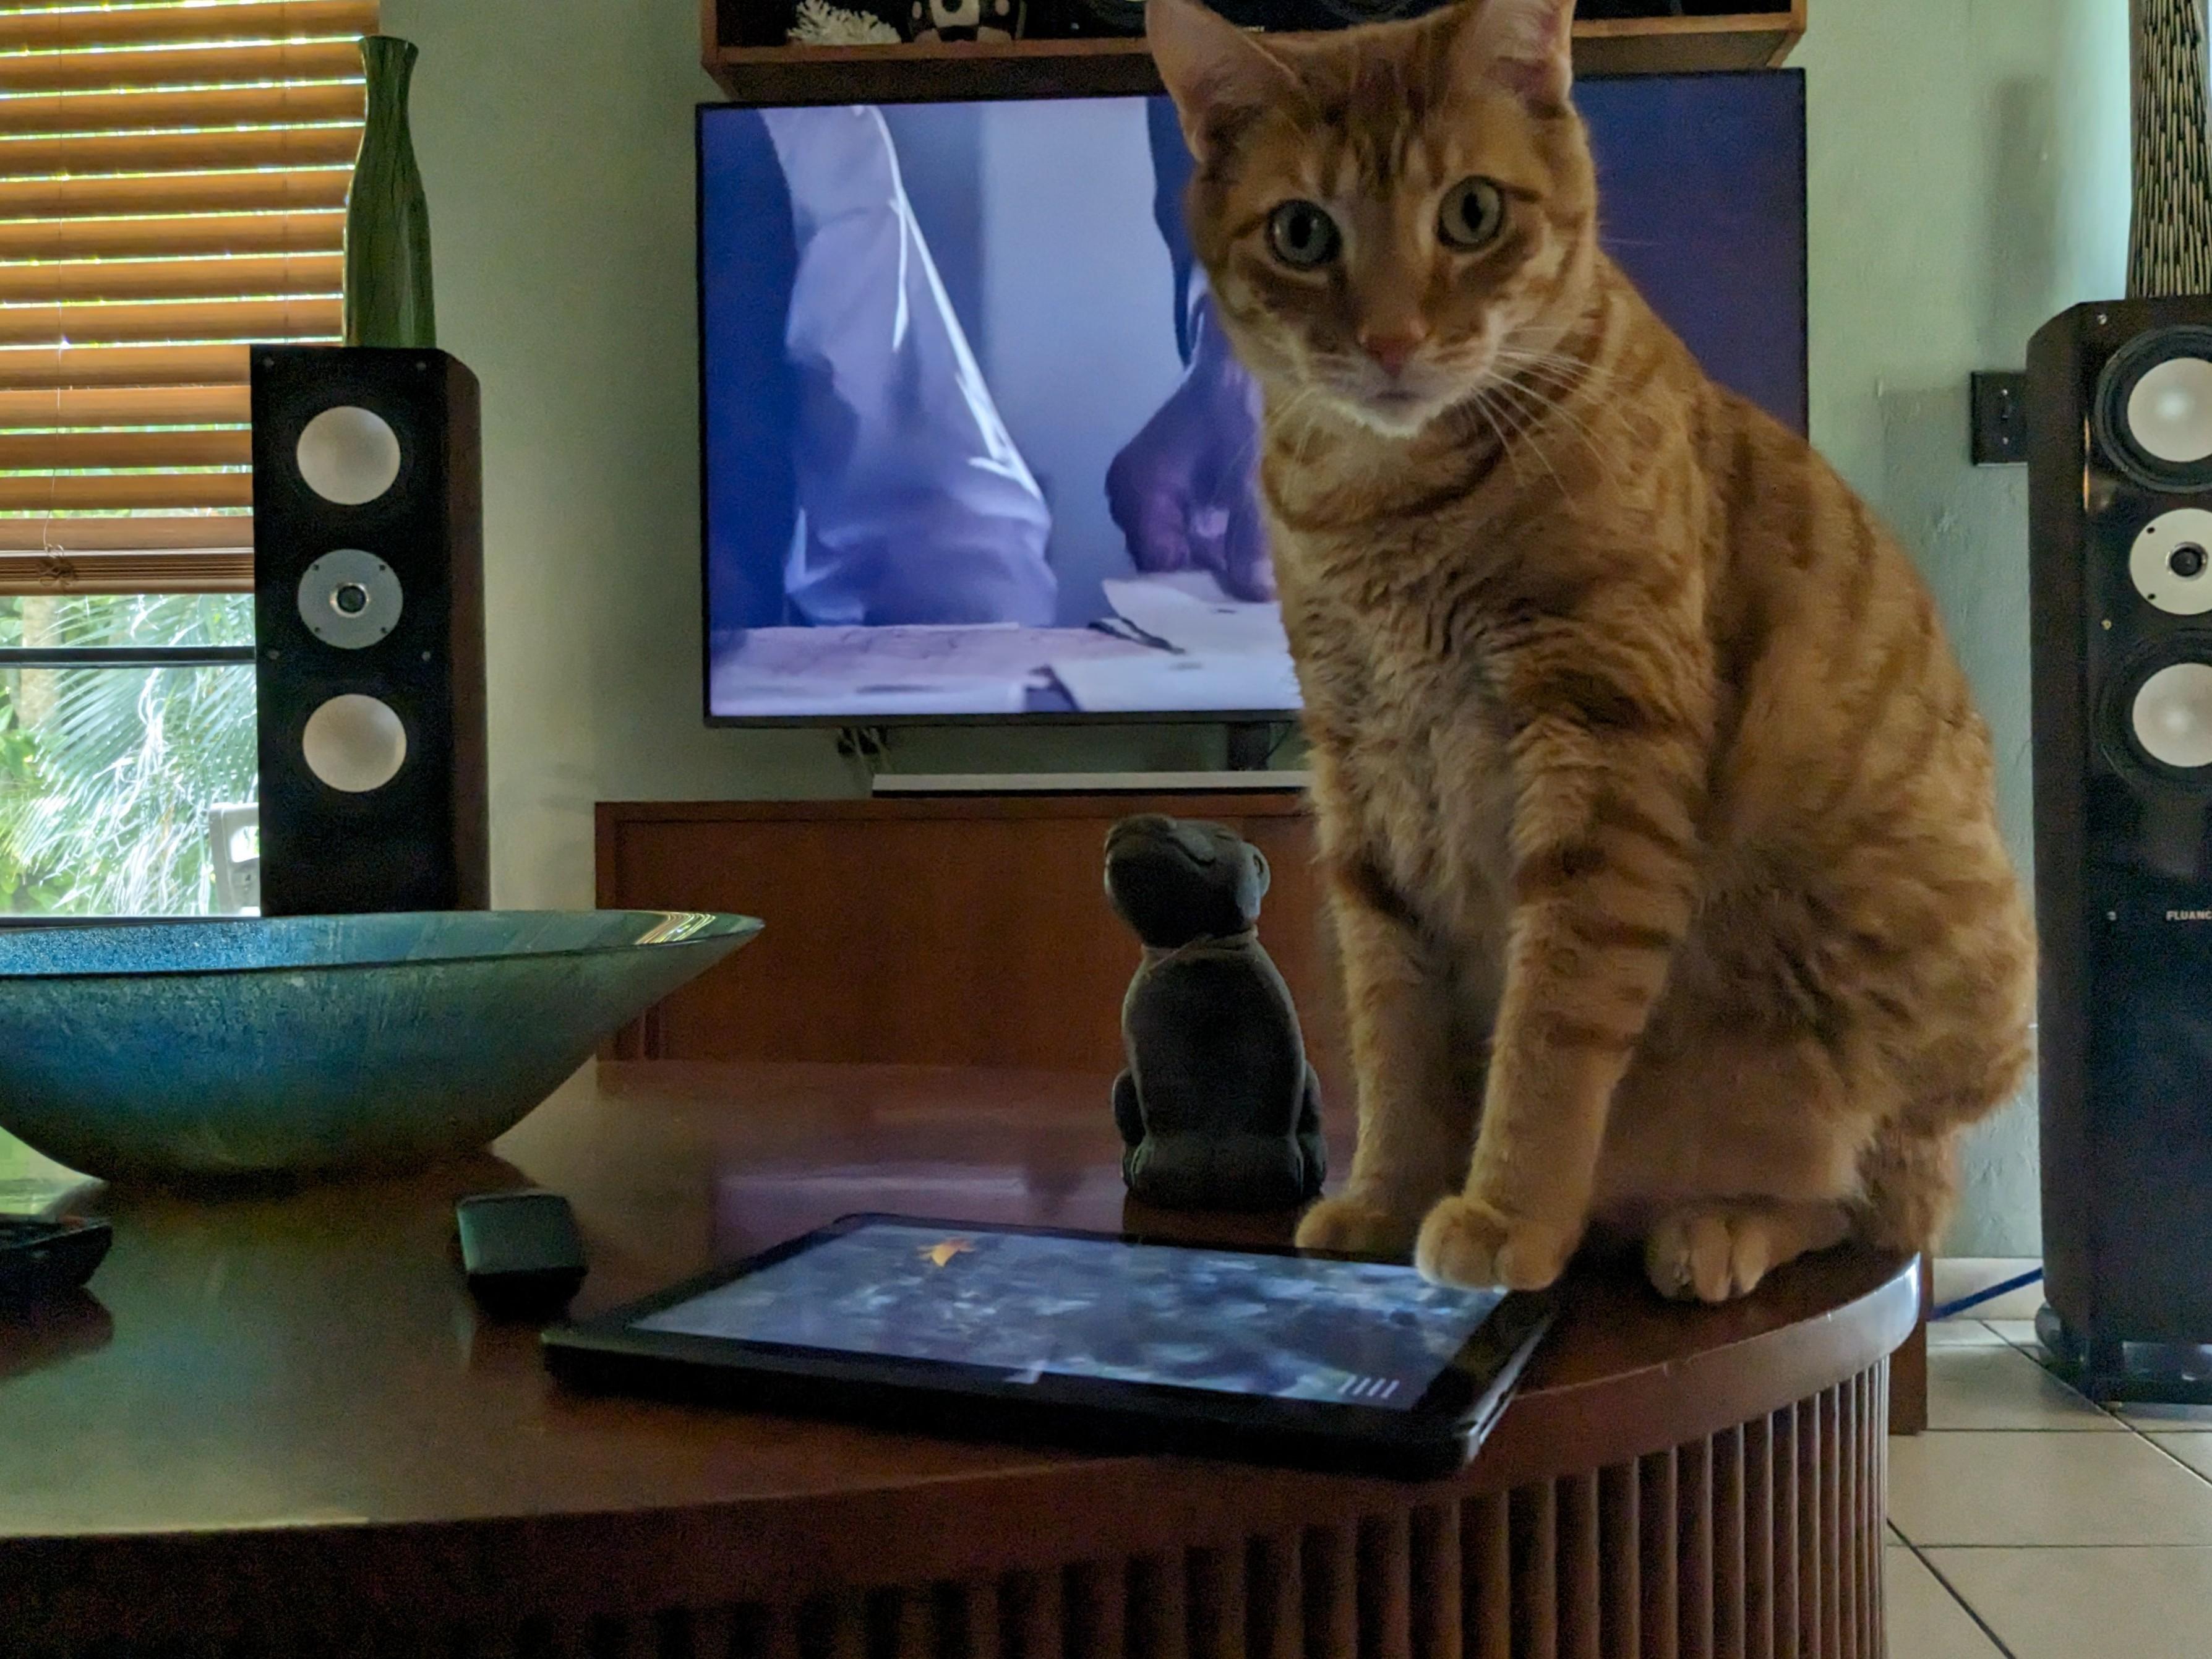
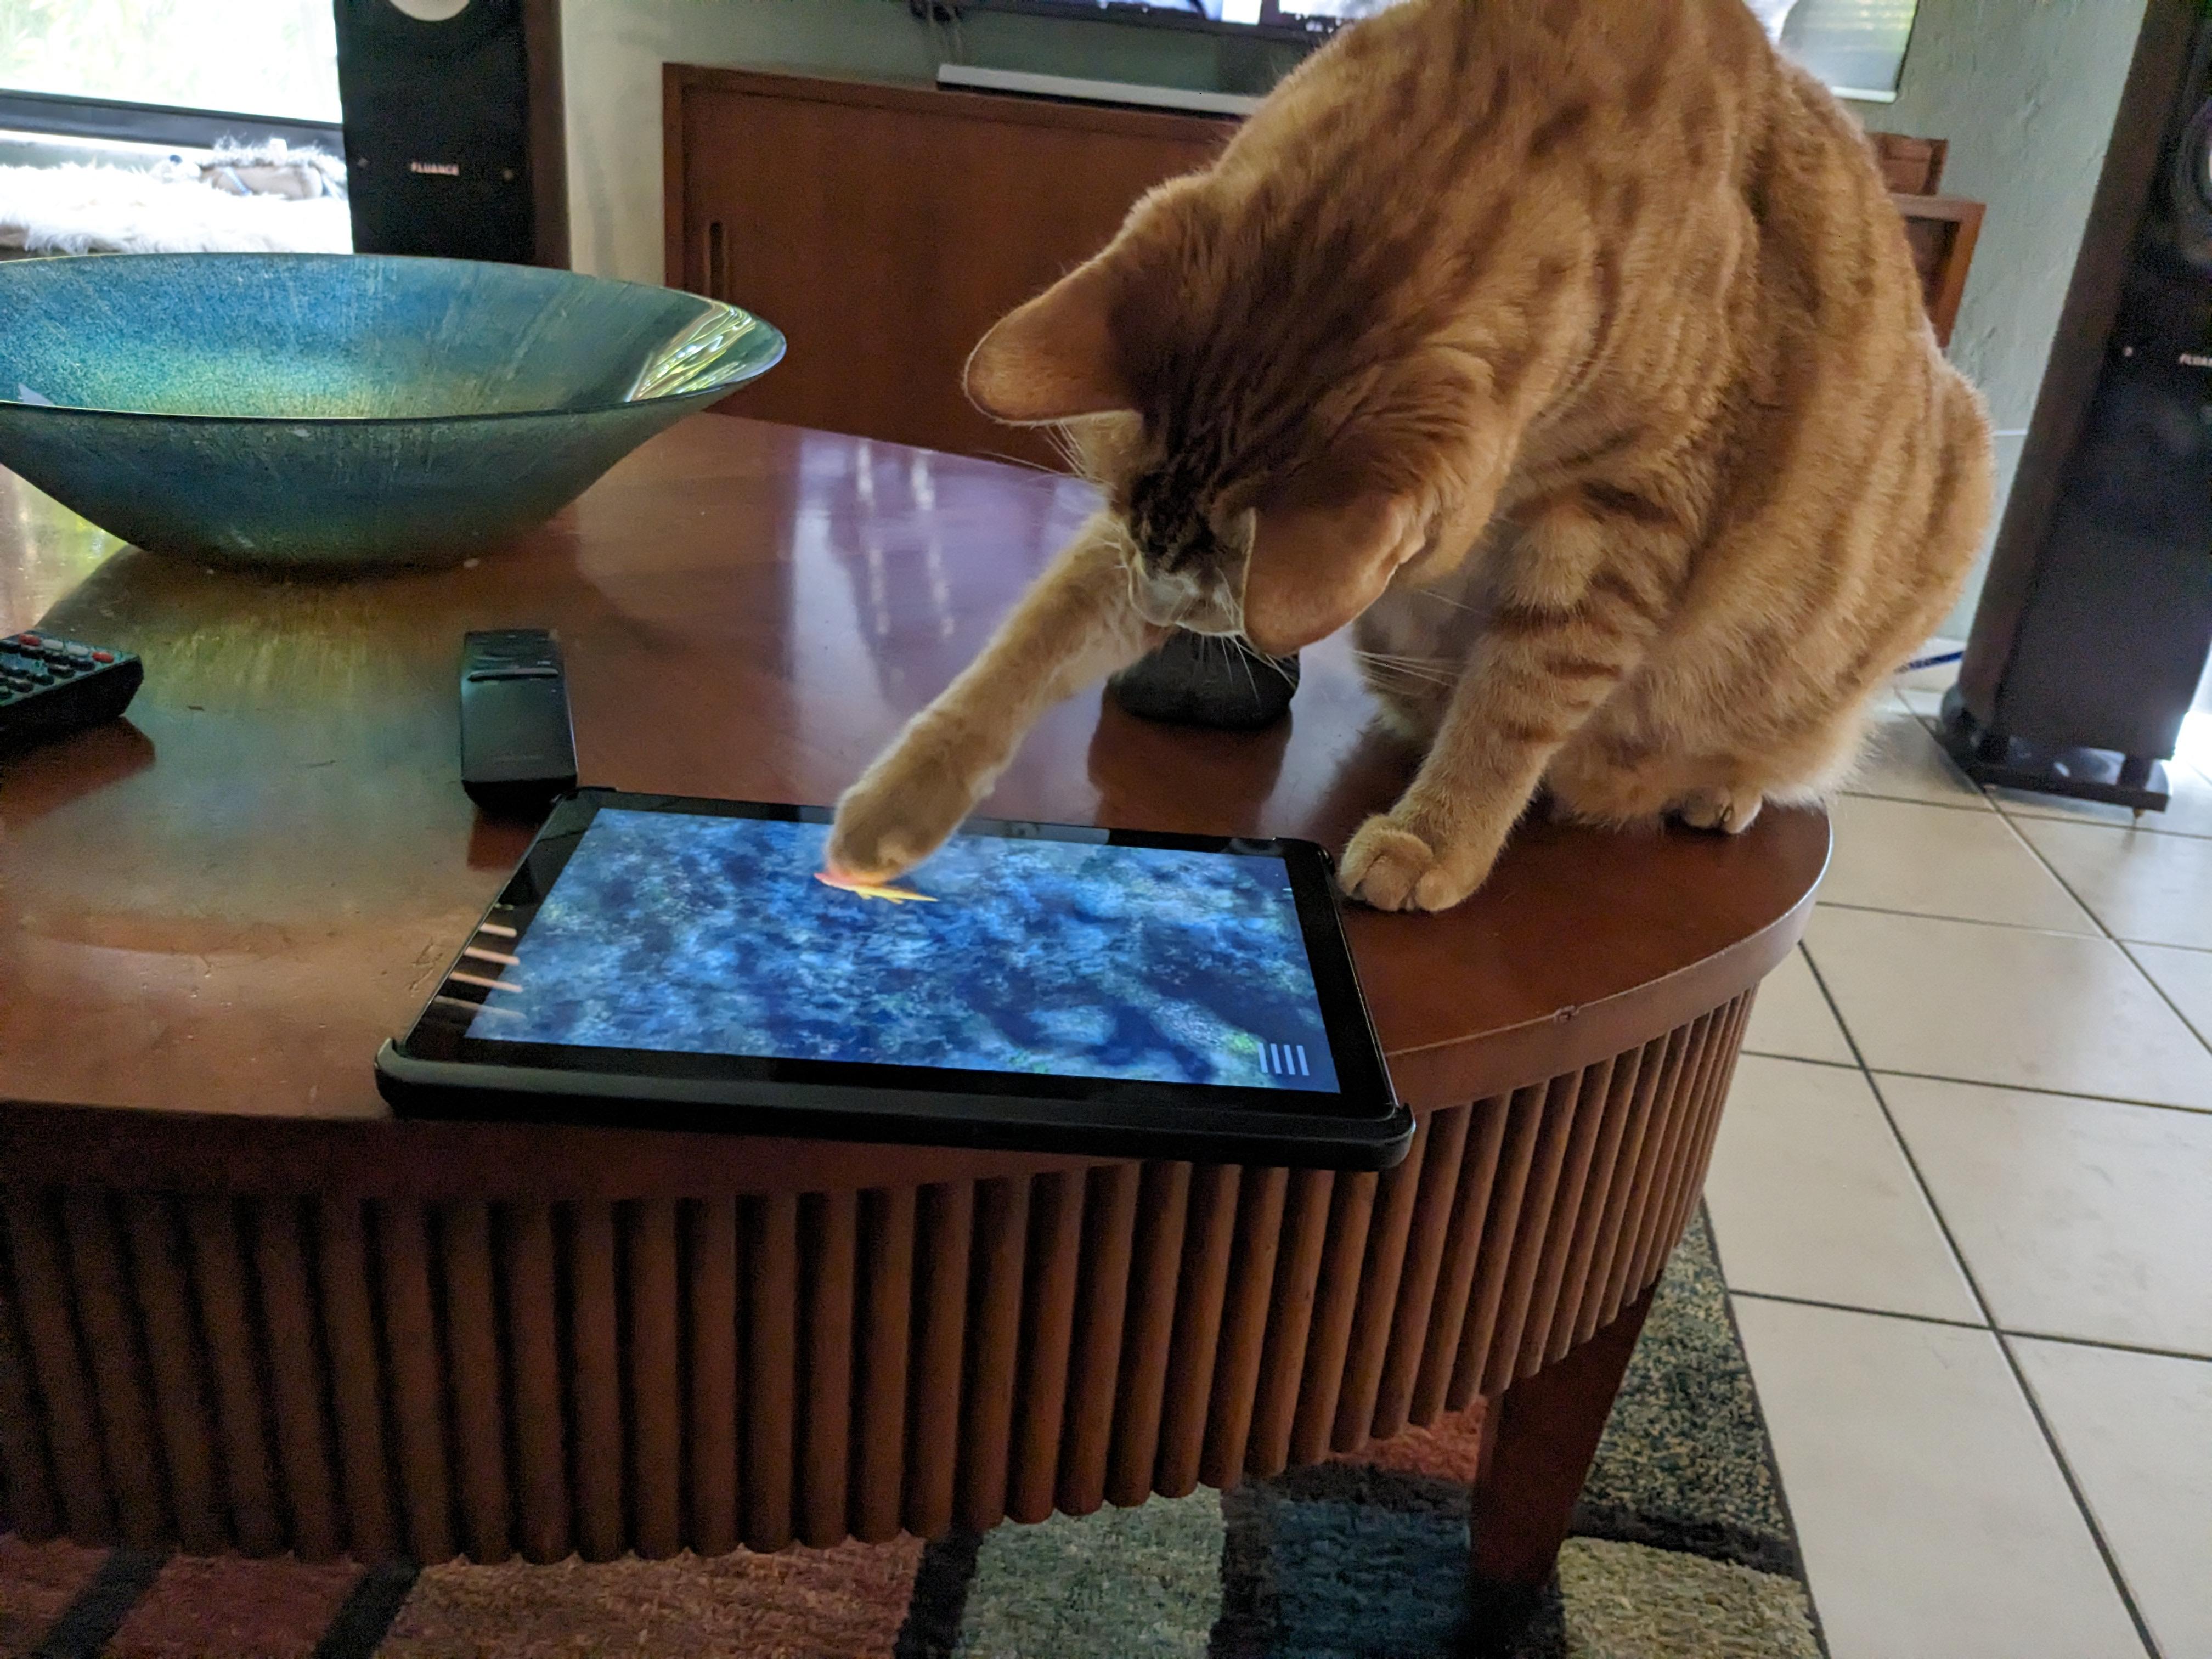
Downloaded a fishing game for cats onto the tablet.
-
IMSA Porsche RSR 3.0
jaymcminn replied to afx's topic in WIP: Other Racing: Road Racing, Land Speed Racers
Great clean build. Sits just right too. Have you seen the Singer 934/5 that they just debuted? It's a knockout! -
Thanks all! Next pics will probably be in Under Glass (I'll throw a couple of completed shots in to close out this thread) because once the bodywork starts going on there's not much left to do.
-
Chassis is ready to install into floor pan so I figured I'd get some shots before it disappears forever. The level of kit detail is very good (if a little soft) and really comes to life with a little work. One thing about this kit... the decals are outstanding! No carrier film and they settle down nicely with a little Mark Fit and heat. The turned aluminum on the dash and firewall are beautifully printed. I'd buy these decals by the sheet. The radiator shell was stripped of chrome and painted in a mix of Vallejo Metal Color Chrome, Aluminum and Gold to represent the color of worn nickel plating over brass. Staining was done with Vallejo washes and Tamiya Weathering Master pastels. The grille guard and radiator cap will be installed a bit later after the floor pan is installed. I decided to repaint the exhaust manifolds, btw. Glad I did, the rust color works so much better. On to the pics!
-
Been a while since I did an update and I've gotten a lot done. The engine is complete, or at least as complete as it's going to get until the firewall is installed. The 1:1 has a machined finish on the block that I tried to represent. I used a base coat of Vallejo Metal Color aluminum followed by a stippled layer of dark grey wash and a final stippling of Vallejo chrome. The Vallejo chrome was also used on the intake manifold. It does a great job of representing polished aluminum. I'm not sold on the paint finish on the exhaust manifolds yet... I might try something else. They aren't glued on at this point as I want them to be positionable when the exhausts are installed later. The other end of the ignition wires will mount into a tube that runs into the firewall. The chassis is built up to the point where it receives the engine. Lots of washes and dry brushing to bring out the details. Most of which will never be seen again after it's enclosed by the body and belly pan. A quick test fit with the firewall and bodywork in place. It's starting to get tight. One thing I've noticed on this kit is that the tolerances are very... intolerant. Next will be the instrument panel and firewall... more pics soon!
-
I've seen a few of these built and have one I've been tinkering with for years. That's the best I've ever seen that fuel tank assembly done. Great job on wrapping the springs too!
-
Great job on engineering those doors. I've been thinking about picking up the Zonda kit but I've always had some trepidation about building a kit that has been out for a few years and yet somehow you never see built up. If your Huayra is any indication this will turn out great!
-
Ukrainian Scale Car Production does an engine bay transkit as well as interior side panels for this kit. I have the side panels and they're beautifully executed. Great job on this build!
-
Was this a bribe so he'll let the pug have the blanket once in a while?
-
National Lampoon's "Vacation" Wagon Queen Family Truckster
jaymcminn replied to spencer1984's topic in Model Cars
That color looks a little bright for Metallic Pea, but I guess it'll do. And everybody knows the "Princess Power" V8 was lavender, not lilac. ? (Seriously though, absolutely awesome build of an all-time classic movie car. I love it!)