jaymcminn
-
Posts
1,757 -
Joined
-
Last visited
Content Type
Profiles
Forums
Events
Gallery
Everything posted by jaymcminn
-
Just chilling on the couch.

-

Milsbo glass door cabinet-extra shelves??
jaymcminn replied to Safire6's topic in General Automotive Talk (Trucks and Cars)
Not the best pictures, but I have the Ikea Fabrikor cases. I bought several acrylic risers that allow me to display my large-scale builds at different levels.
-
These guys are alright but the service is awful. Like legitimately, objectively terrible. But they do have a decent selection and fair prices. Unfortunately you're going to be on the wrong coast, but K&K Hobbies in Port Charlotte is very good as well as Family Hobby Center here in Naples.
-
That is amazing. Beautiful detail and great photography. The fabric you used for the carpet looks exactly like German square weave!
-
Pippa would like to speak to your manager...
-
Zut alors! Can't wait!
-
News from Nuremberg:Tamiya Giuilia Sprint GTA is back!
jaymcminn replied to Matt Bacon's topic in Car Kit News & Reviews
Sweet. Have to pick one up to restomod since I built one stock way back when. -
Tamiya TS-17 Gloss Aluminum is good stuff. Fine metallic flakes and doesn't mind clear coat.
-
Day off today, so grocery store and other errands this morning. It's 78 degrees out so I put the top down on the Miata and gave her a bit of a workout. Right now I'm watching Grantchester while the cat takes a nap and laundry is in progress.
-
The GSW looks great. Vallejo's Metal Color Chrome is loads better than the Model Air, but still does a better job of representing polished aluminum than actual chrome.
-
Some good stuff coming out this year. The 1/12 Stratos that was supposed to be released in 2023, the welcome "fenders and lights" version of the 1/12 scale Bugatti 35b, a rerelease of the old Protar-based 1/24 Alfa Giulia Spyder, and modified rereleases of the 1/12 Fiat 500 and 1/24 Bugatti Royale. Link below... https://www.italeri.com/en/article/830
-
Brie can't decide whether she's a tortie, a calico or a tabby!
-
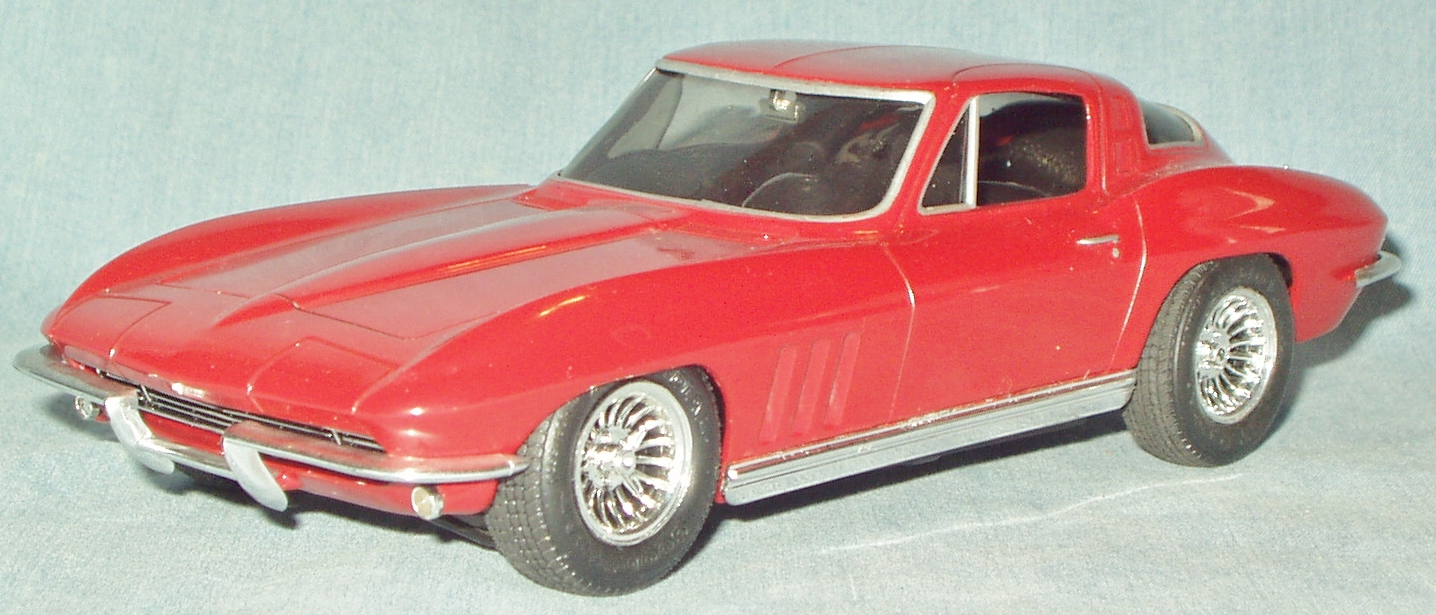
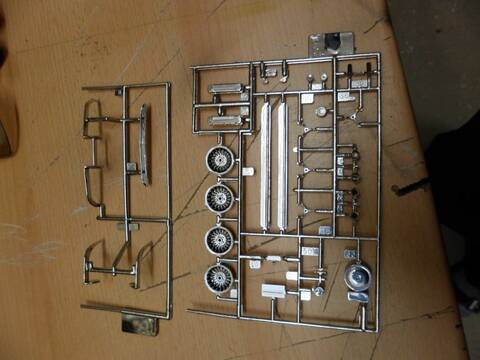
C2 Corvette Kit question
jaymcminn replied to TarheelRick's topic in Model Building Questions and Answers
I think the Monogram 1/24 1965 kit had a release in red that included the Vector Wheels. Here's a shot of the chrome tree from the original "street machine" issue showing the valve covers and air cleaner...
-
I used the old "hole drilled in a block of wood" technique when I was using Plastruct. I've since moved on to Tamiya Extra-Thin, which has a great bottle design.
-
Bandit prefers nature programs...
-
Why is my clear coat coming out textured?
jaymcminn replied to Milo's topic in Model Building Questions and Answers
I hear that if you thin Behr Premium Plus with kerosene and cat pee you get a really amazing finish, but only if you set the airbrush at 120psi. -
As much as I like "yearbook season", it means that builds like this get "buried". I'm glad I (finally) noticed this. What a fantastic build!
-
Karmann Ghia, VW Beetle, Fiat 500/695, Citroen 2CV, Jaguar Mk2 all come to mind immediately as Tamiya kits that would look really good with proper weathering. As would all of the rally cars, of course. The Alpine A110 would look great a little beaten up as well. Tamiya has a big back catalog. If I have any complaint it's that they underutilize it and don't rerelease their greatest hits enough.
-
I built one of these several years ago and, for a kit from the early 70's, it's pretty nice. There is some stuff to be aware of, however: The interior is largely made from a weird soft-touch rubbery material. I didn't want a black interior so I used adhesion promoter followed by flexible primer and acrylic paint. It's been holding up well. The same rubbery stuff is used for the windshield and rear window seals. I was able to install them with Kristal-Klear. Running a line of black paint around the edge of the glass on these parts will make the rubber seals "blend" better. The door fit is fine, but the panel gaps need tweaking. I added styrene strip around the outside of the doors and sanded back to get even gaps. I also used magnets to help them stay "latched". Link to my build thread below: And a couple of pics of the finished product... it's a really nice kit.
-
Why is my clear coat coming out textured?
jaymcminn replied to Milo's topic in Model Building Questions and Answers
I guarantee you will see many more spectacular results from practically any other paint manufacturer. The 2x stuff you're using is, as pointed out above, basically an enamel. It doesn't like to be coated with lacquer, even if it's had weeks or months to cure. Enamels, even "big box store" ones, can produce decent finishes... when properly cured they are rock-hard and non-metallic gloss colors can take polishing well. Most modelers have moved on to synthetic lacquers like Tamiya and Mr. Color for ease of use and not having to wait a month while the paint on a body dries. I have to ask, why are you trying all these weird combinations of paint and primer when pretty much everybody who responds to your threads is trying to steer you in a direction that works? If you don't have a decent hobby shop nearby you can order Mr Color and Tamiya online as well as any number of companies like Splash Paints, who do a fantastic range of airbrush-ready lacquers. -
Great selection of wide-ranging subjects, all beautifully done. What's not to love?
-
Incredibly creative builds on display here. The patina on that Chevy truck really turned out well too!
-
As the year comes towards a close...my models of 2023
jaymcminn replied to traditional's topic in Model Cars
Beautiful work all around. The '32 Sedan is especially nice and the color combination is fantastic. -
Great builds this year. I love that Grand Sport!
-
Those are three pretty fantastic builds. Definitely quality over quantity.