jaymcminn
-
Posts
1,756 -
Joined
-
Last visited
Content Type
Profiles
Forums
Events
Gallery
Everything posted by jaymcminn
-

How opaque are the Tamiya pearl lacquers?
jaymcminn replied to Monty's topic in Model Building Questions and Answers
This is the Pearl Green over Tamiya grey primer. It's very translucent... the color doesn't start building up until the third coat or so. Even light grey primer tones the color down quite a bit.
-
My Stratos finally arrived from Italy today, I'm enormously impressed by the look of this kit so far. Italeri really swung for the fences with this one!
-
AMMO Cobra Motor paint
jaymcminn replied to TransAmMike's topic in Model Building Questions and Answers
Justin Porter used the Ammo Cobra paint on his Alfa GTA. Looks like it came out nicely for him. I think he has more on the application in the WIP thread. -
Mercedes Benz SSK
jaymcminn replied to Pierre Rivard's topic in WIP: Other Racing: Road Racing, Land Speed Racers
Amazing Pierre. It takes real skill to get that lump up to the standard you produced. Have you come up with a good source for wheels and tires? -
Your Favourite Vintage Car Commercial
jaymcminn replied to Falcon Ranchero's topic in The Off-Topic Lounge
Surrealism at its finest. -
I'm eagerly following this build. Can't wait to get started on mine when it arrives!
-
1/12 Lancia Fulvia teaser from Italeri?
jaymcminn replied to The Creative Explorer's topic in Car Kit News & Reviews
Italeri doesn't seem to have any interest in tooling up new 1/24 these days. The Fiat and Escort are both old ESCI tools. I think Italeri has found their sweet spot in 1/12 scale, which must be doing pretty well for them given the number of releases over the last several years. -
Rare/unusual auto options.
jaymcminn replied to Chuckyg1's topic in General Automotive Talk (Trucks and Cars)
The Imperial "Mobile Director" package was available for Imperial Coupes in 1967 and 1968. The center console folded out into a desk and the passenger seat could swivel 180 degrees. The theory was that it would be an office on wheels, perfect for the modern executive on the go. In practice they only built 80 or so. The idea would possibly have been more successful if they could have applied it to the sedan but the swivel seat couldn't have been made to work on the sedan platform.
-
After a few hours on I-75 last week, I've decided that a lot of Ram owners tend to treat it less like a name than an instruction.
-
Hi Francisco, welcome to the forum! An admin will probably move this post to the Q&A section where you'll get more responses. All I can say is that Tamiya Pearl White absolutely needs to be applied over a white substrate. That can be Tamiya white primer or the new TS-101 Base White. Tamiya's whites in general offer pretty lousy coverage and no matter how much you apply you'll never get a true white when applying over grey primer. On the plus side the pearl effect on the Pearl White is particularly nice when you get the hang of applying it, so it's definitely worth the effort! I would recommend stripping and starting over with white primer. Hope this helps!
-
It's an engine bay insert with some added detail, so it's really more like half of a decent engine.😁
-
I took the opportunity to use a set of RMCoM Dunlop wheels on mine. This kit is incredibly frustrating as there's so much about it to like but the execution is lacking in several areas. The bonnet to body fit on mine was terrible and took a lot of tweaking to get halfway decent. In the end it looks like an E-Type and all four wheels touch so I'm happy!
-
Specific resolution? To finish the 1/12 scale Lancia Integrale kit I started a few years back before starting the new 1/12 scale Lancia Stratos I just ordered. General resolution? To keep having fun while producing models I'm proud to show off here!
-
Have you looked under the cat?
-
1/12 Lancia Fulvia teaser from Italeri?
jaymcminn replied to The Creative Explorer's topic in Car Kit News & Reviews
I caught that on the FB page yesterday. There's no way they posted that without intentionally teasing the Fulvia. I'm surprised they didn't go with the 037 but the Fulvia is a car I've wanted in scale for a long time. Looks like Italeri will continue hoovering large amounts of money out of my modeling budget... I have the Stratos winging its way across the Atlantic right now! -
Back Before the EPA
jaymcminn replied to thatz4u's topic in General Automotive Talk (Trucks and Cars)
Many of these are already going up in price. My '95 MX5 Miata has jumped in value over the last several years. I can see early New Minis being the next "big thing". They're incredibly appealing little cars. Add XJ Jeep Cherokees to that list... good ones are rare on the ground these days and priced accordingly. -
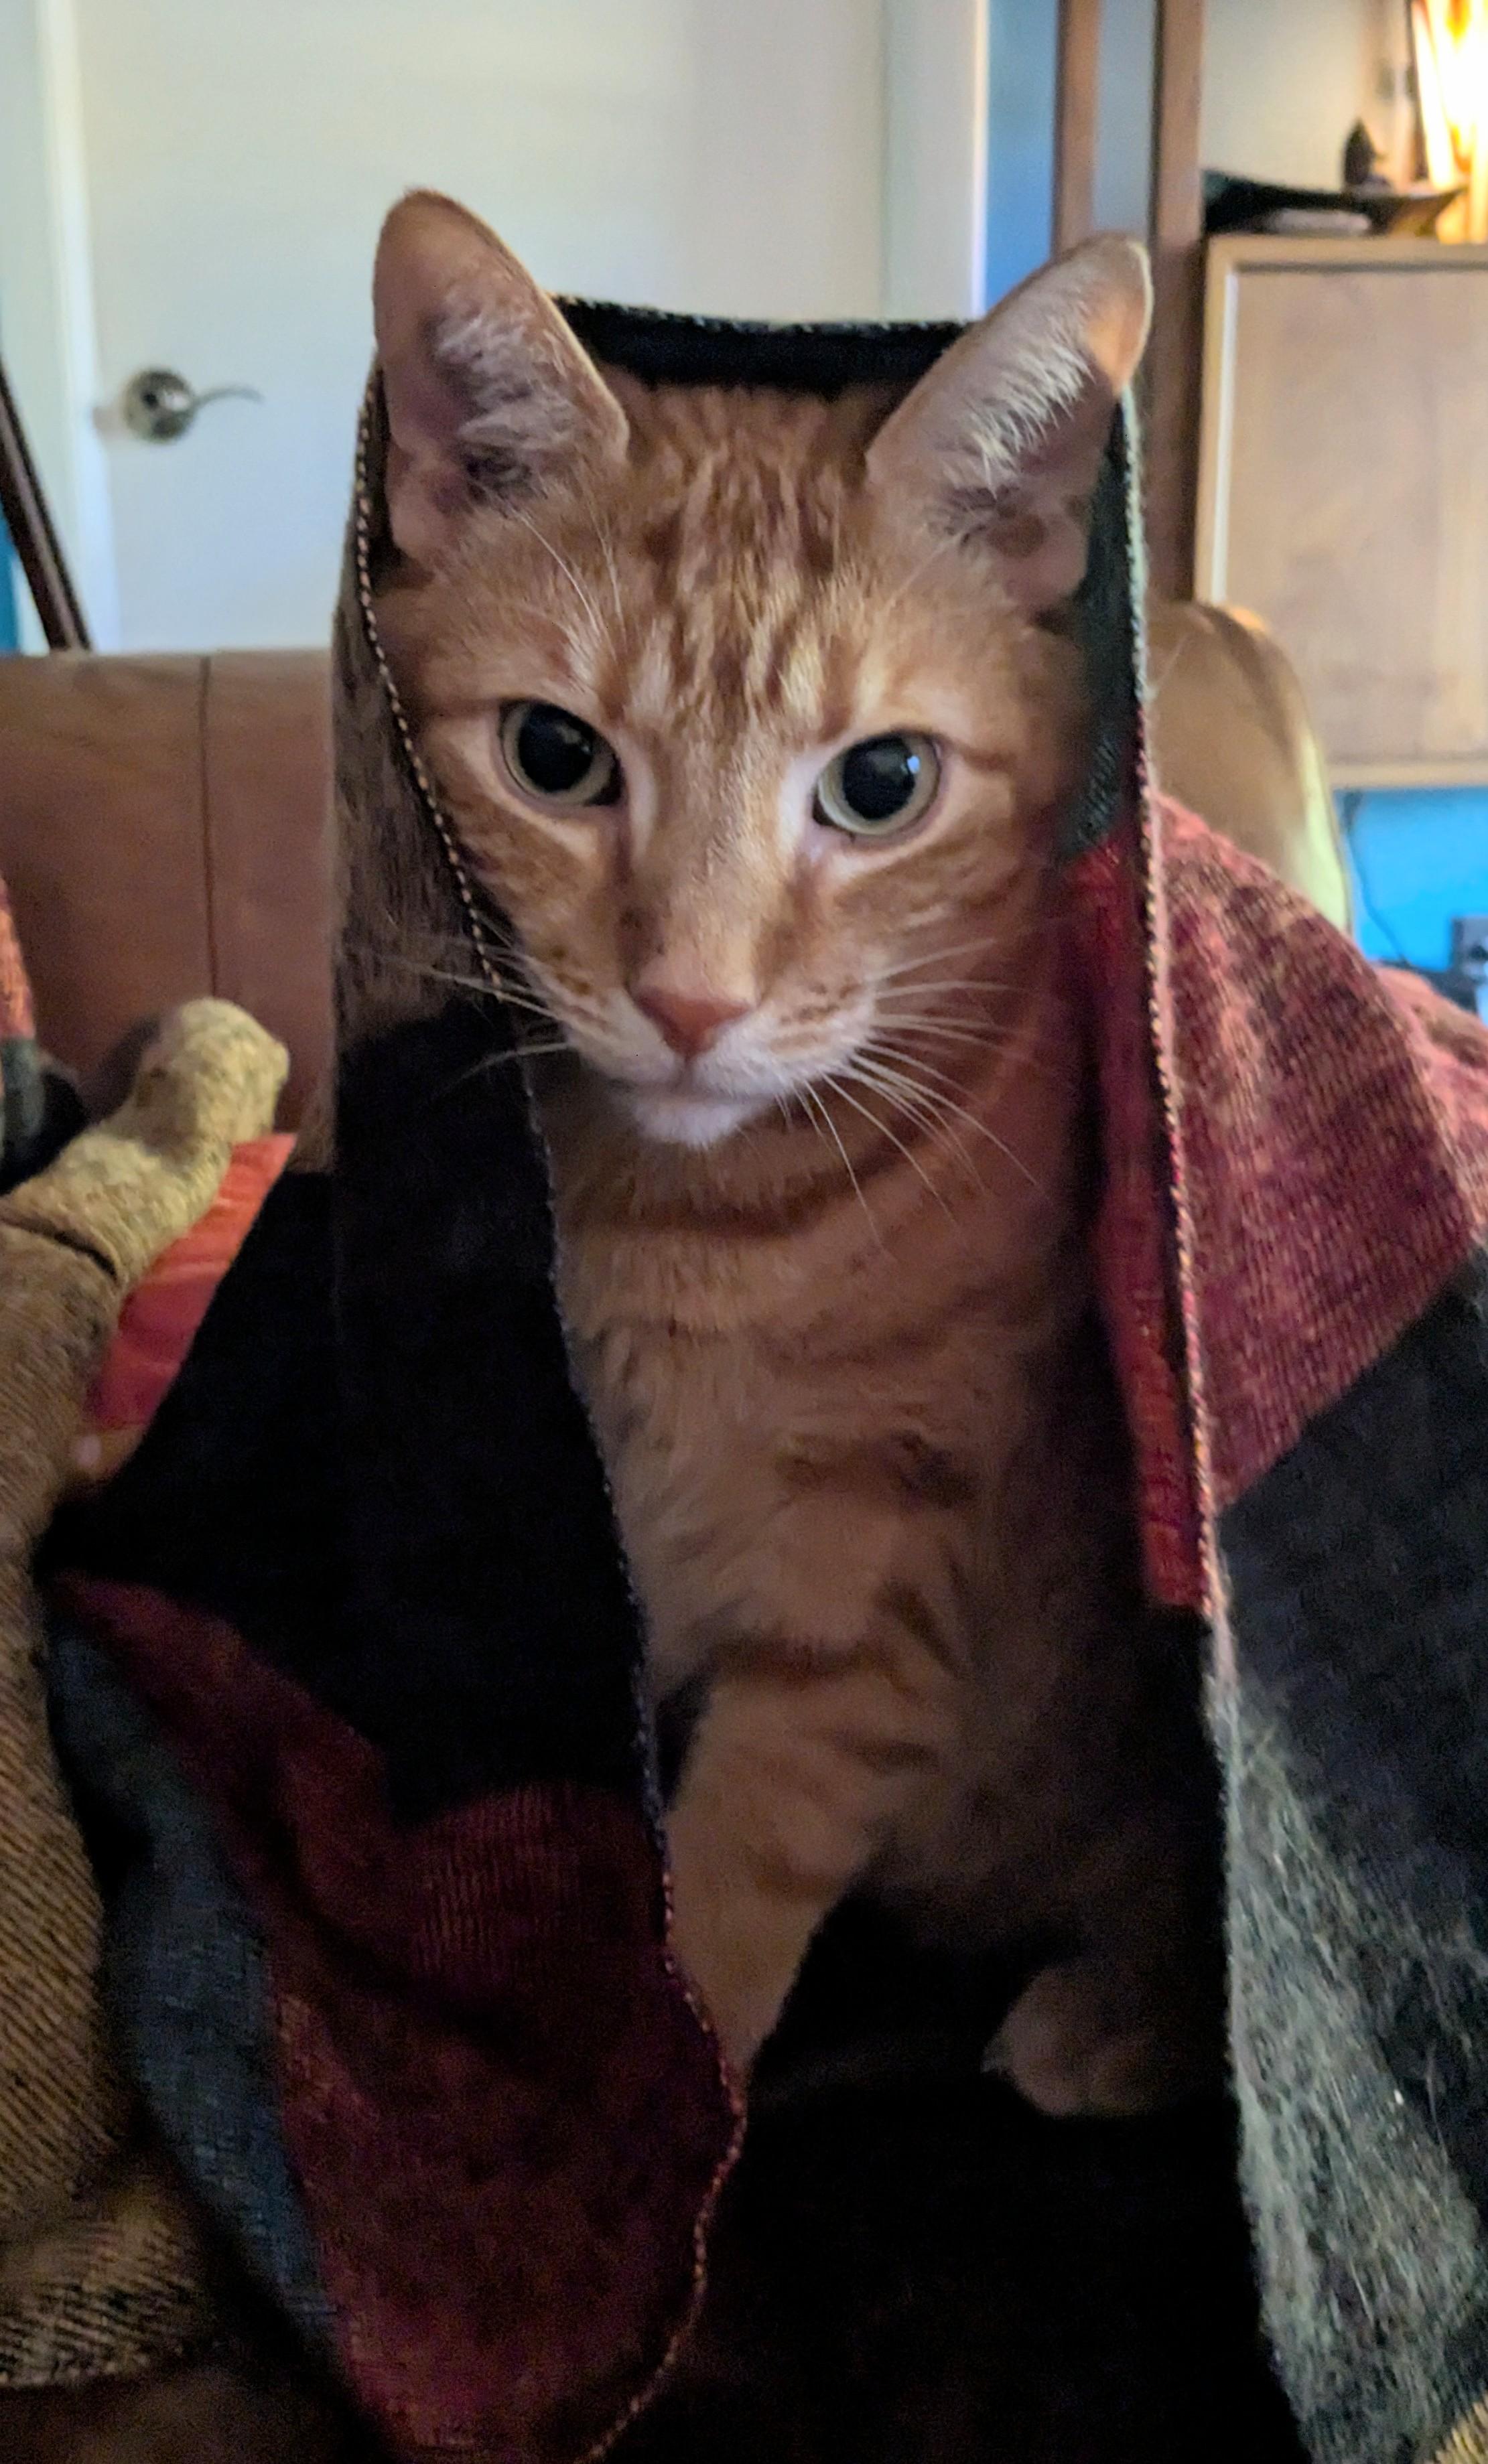
Bandit trying to "Jedi mind trick" me into giving him Second Breakfast this morning...
-
Tamiya is pretty parsimonious about their automotive rereleases. My rule of thumb with recent releases from them is to pick them up if I'm interested because they might not be back around any time soon. That reissued Mugen CRX is in the stash whispering "build me" as I speak! This is pretty tame by 80s tuner standards. There's a site called "1000SEL" devoted to 80s German tuner cars where you can see some true horrors! Thanks Steve! The foil work on this thing was pretty nerve-wracking. Several hours went into sharpening up the trim before primer so I could get crisp lines on the foil!
-
That Mica Red is an incredible color. I wasn't too sure about the pink primer but I think it really brightens it. I'm positive that this kit was modeled after a specific car. When I went down the 80's car phone research rabbithole I actually found the correct model of phone that Tamiya used here!
-
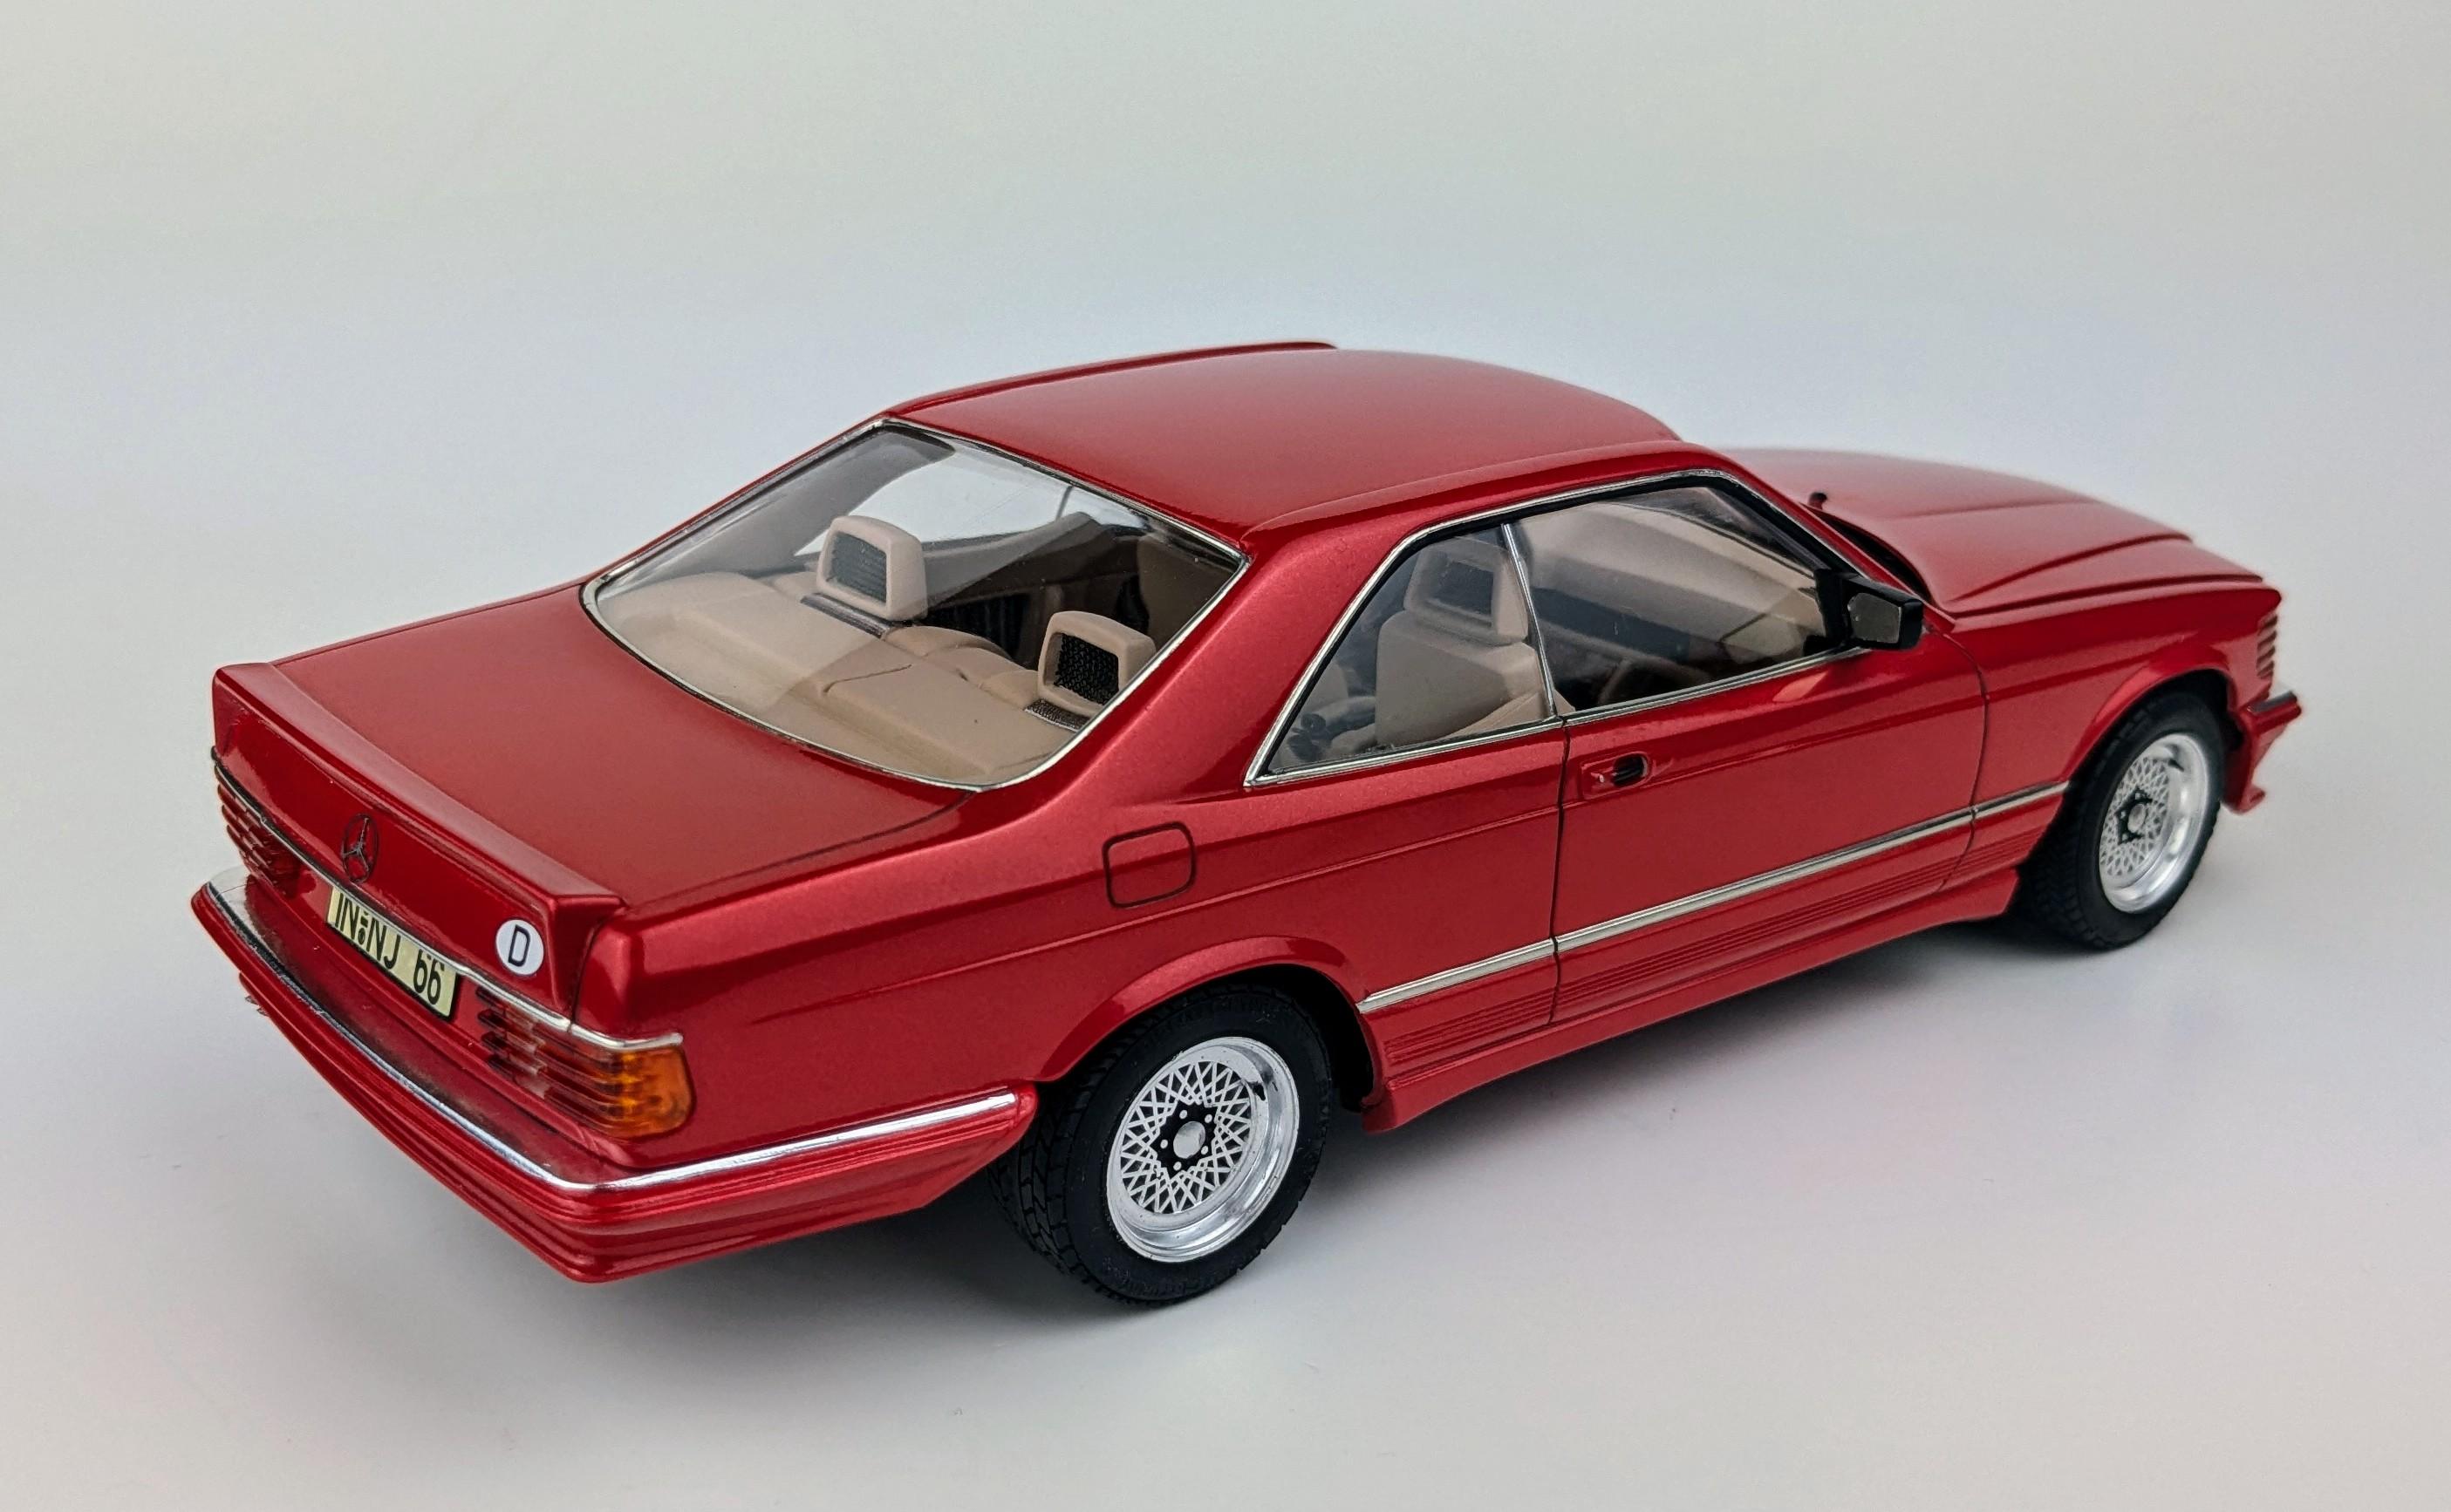
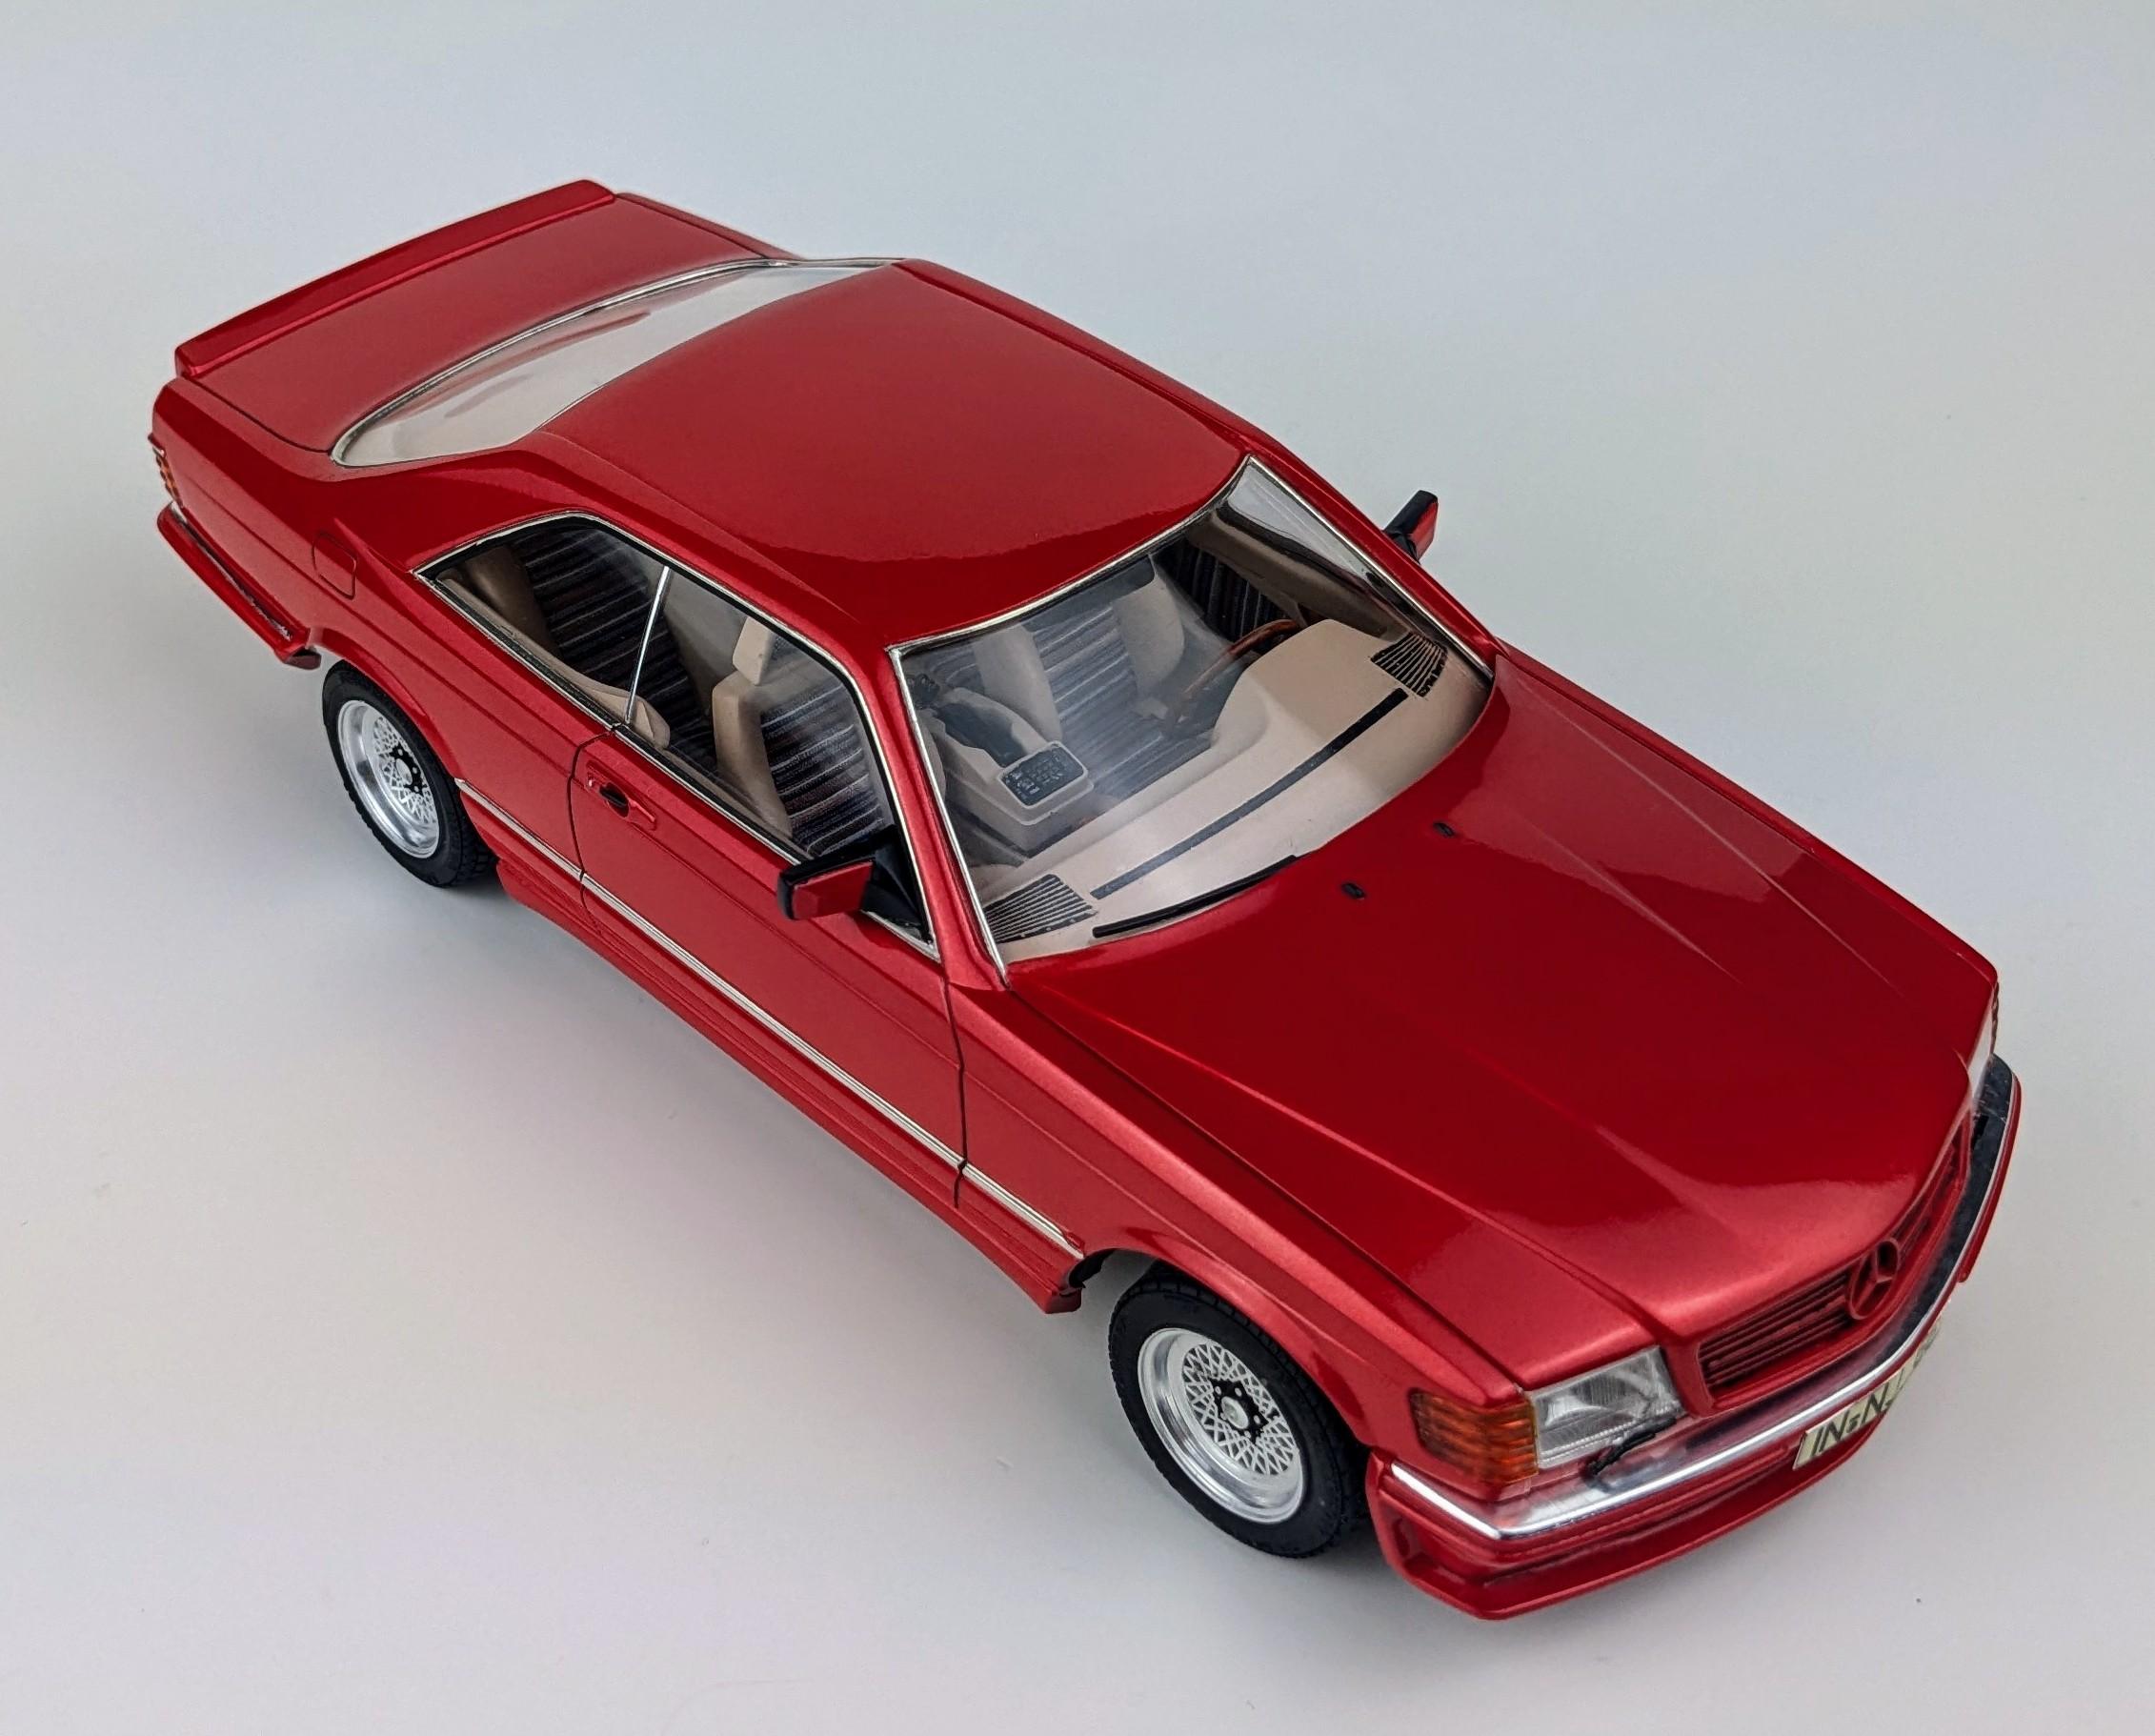
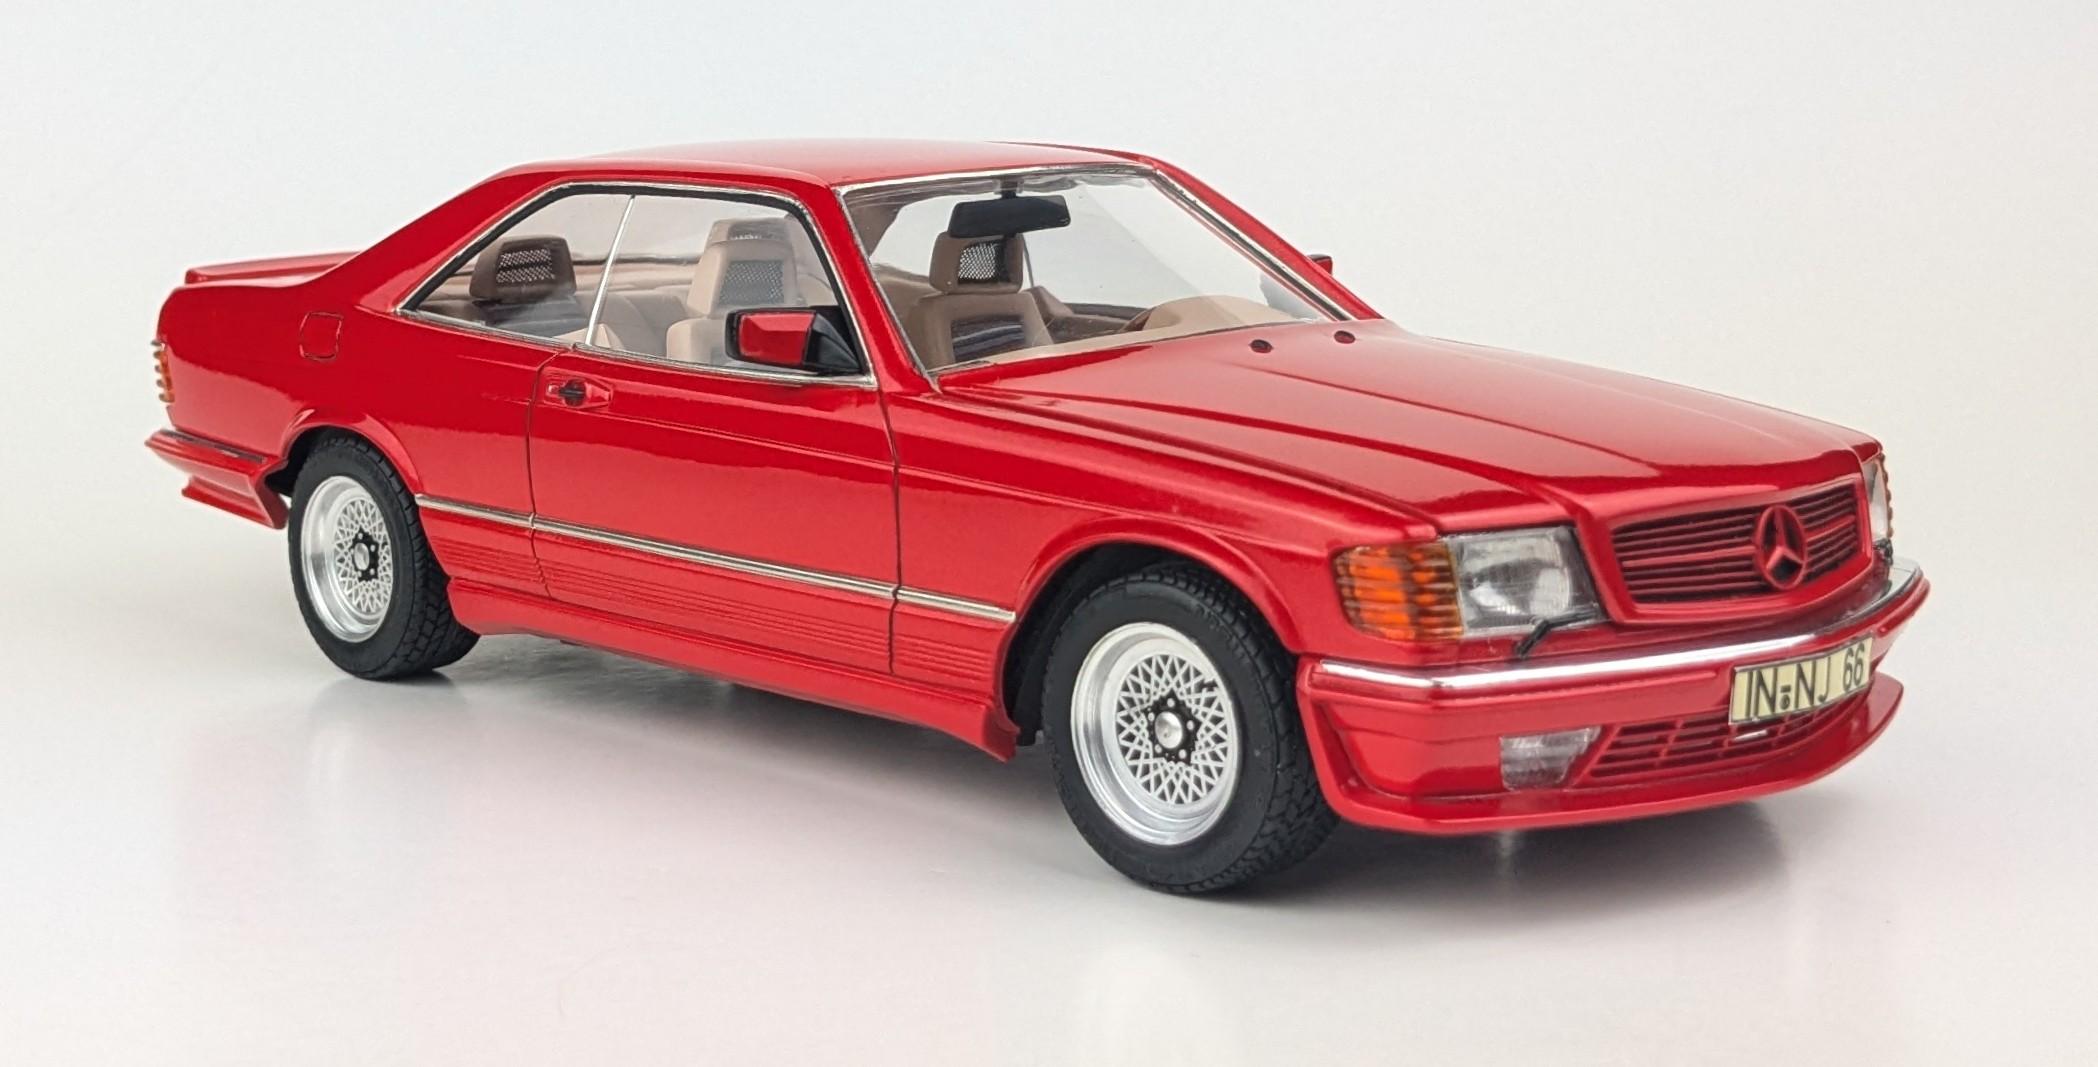
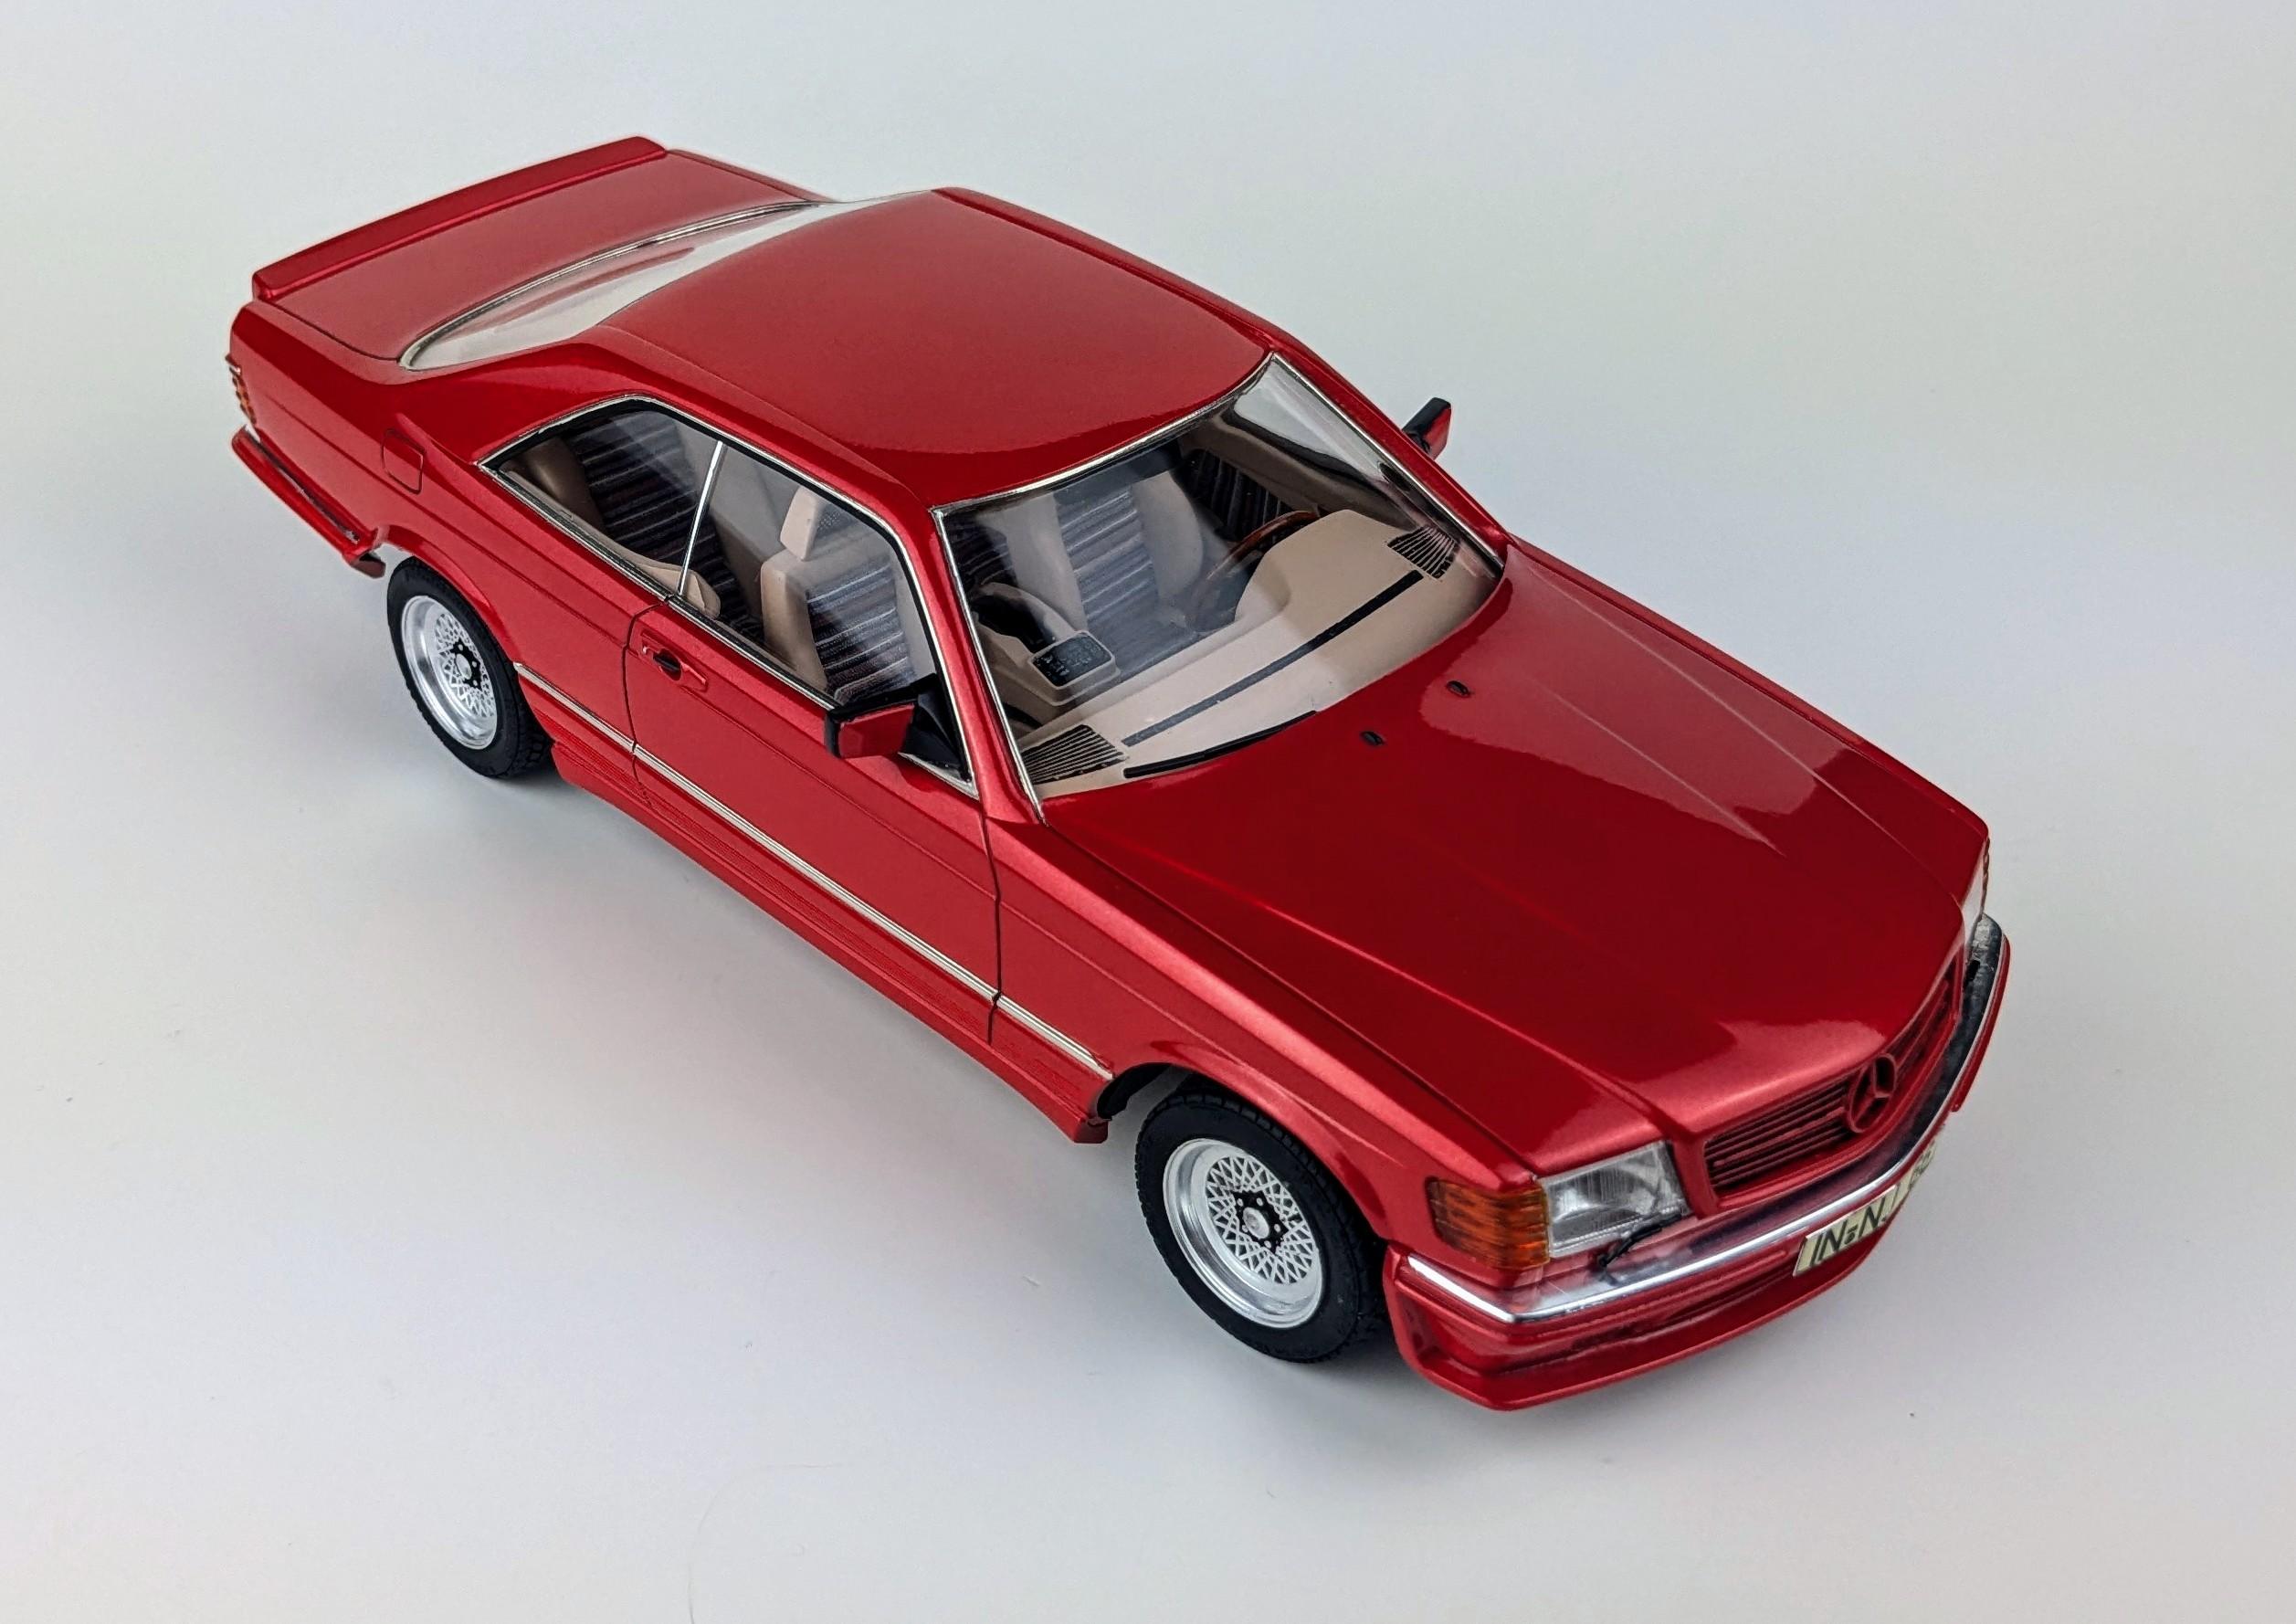
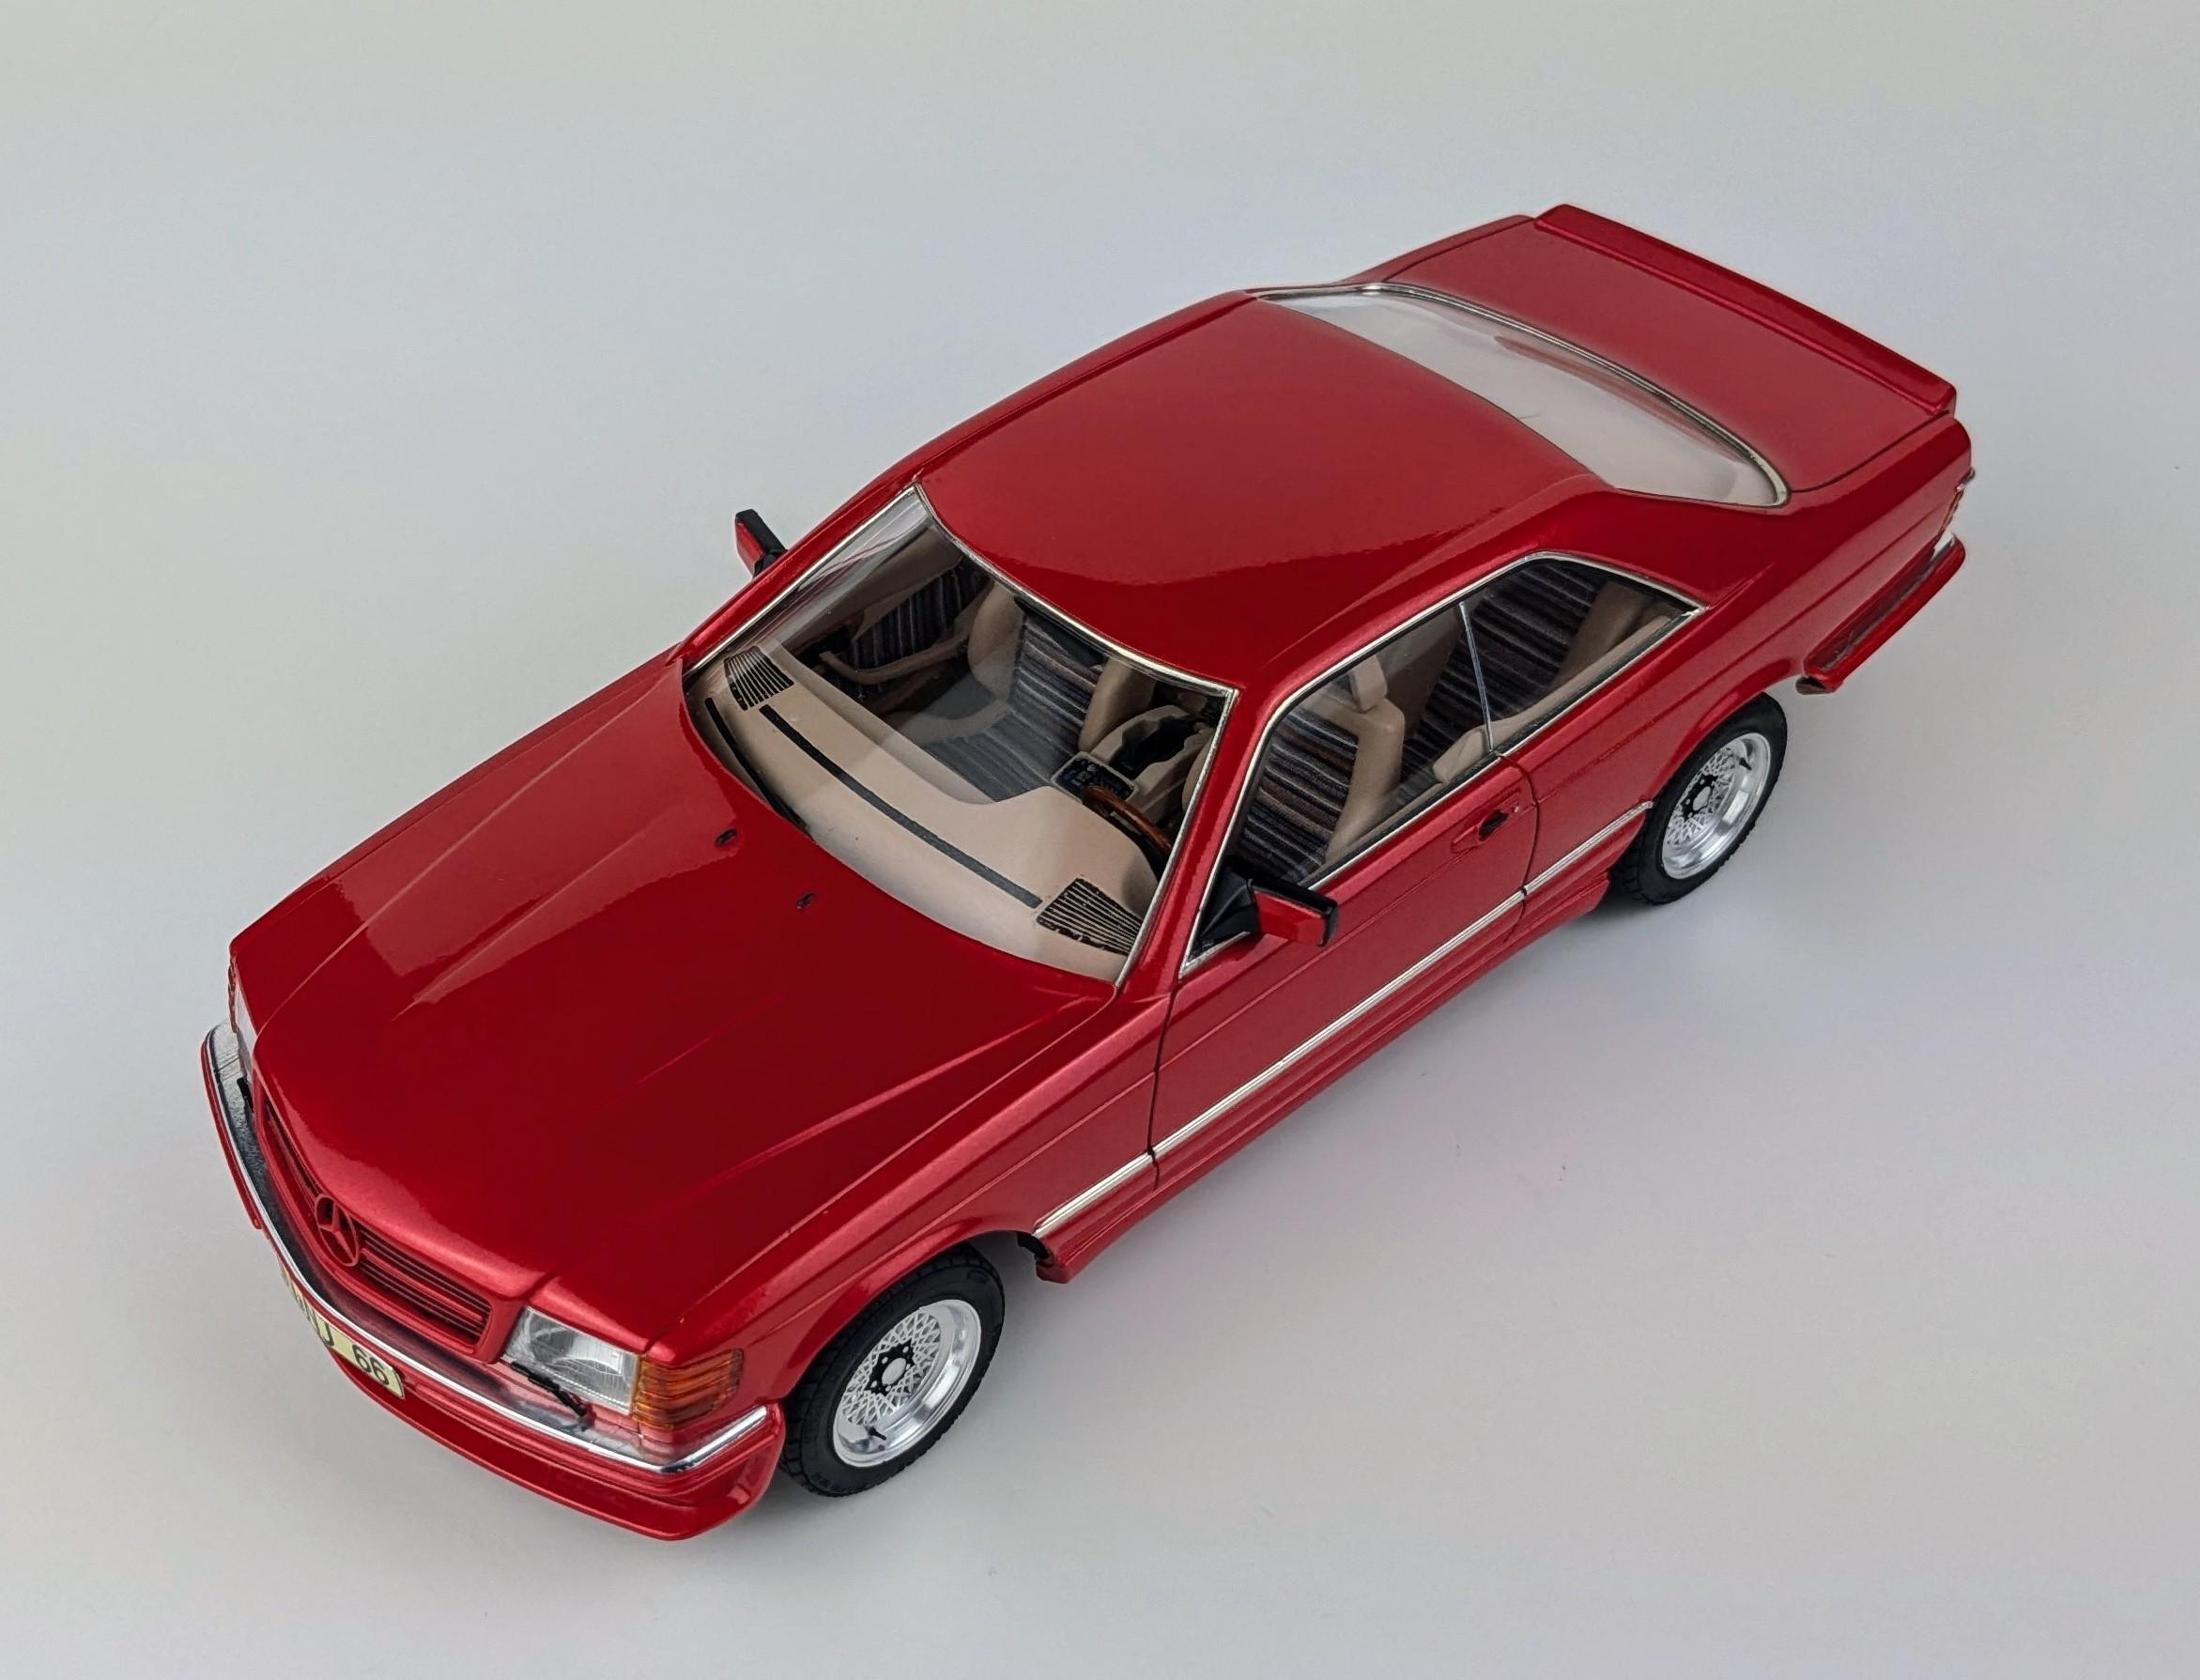
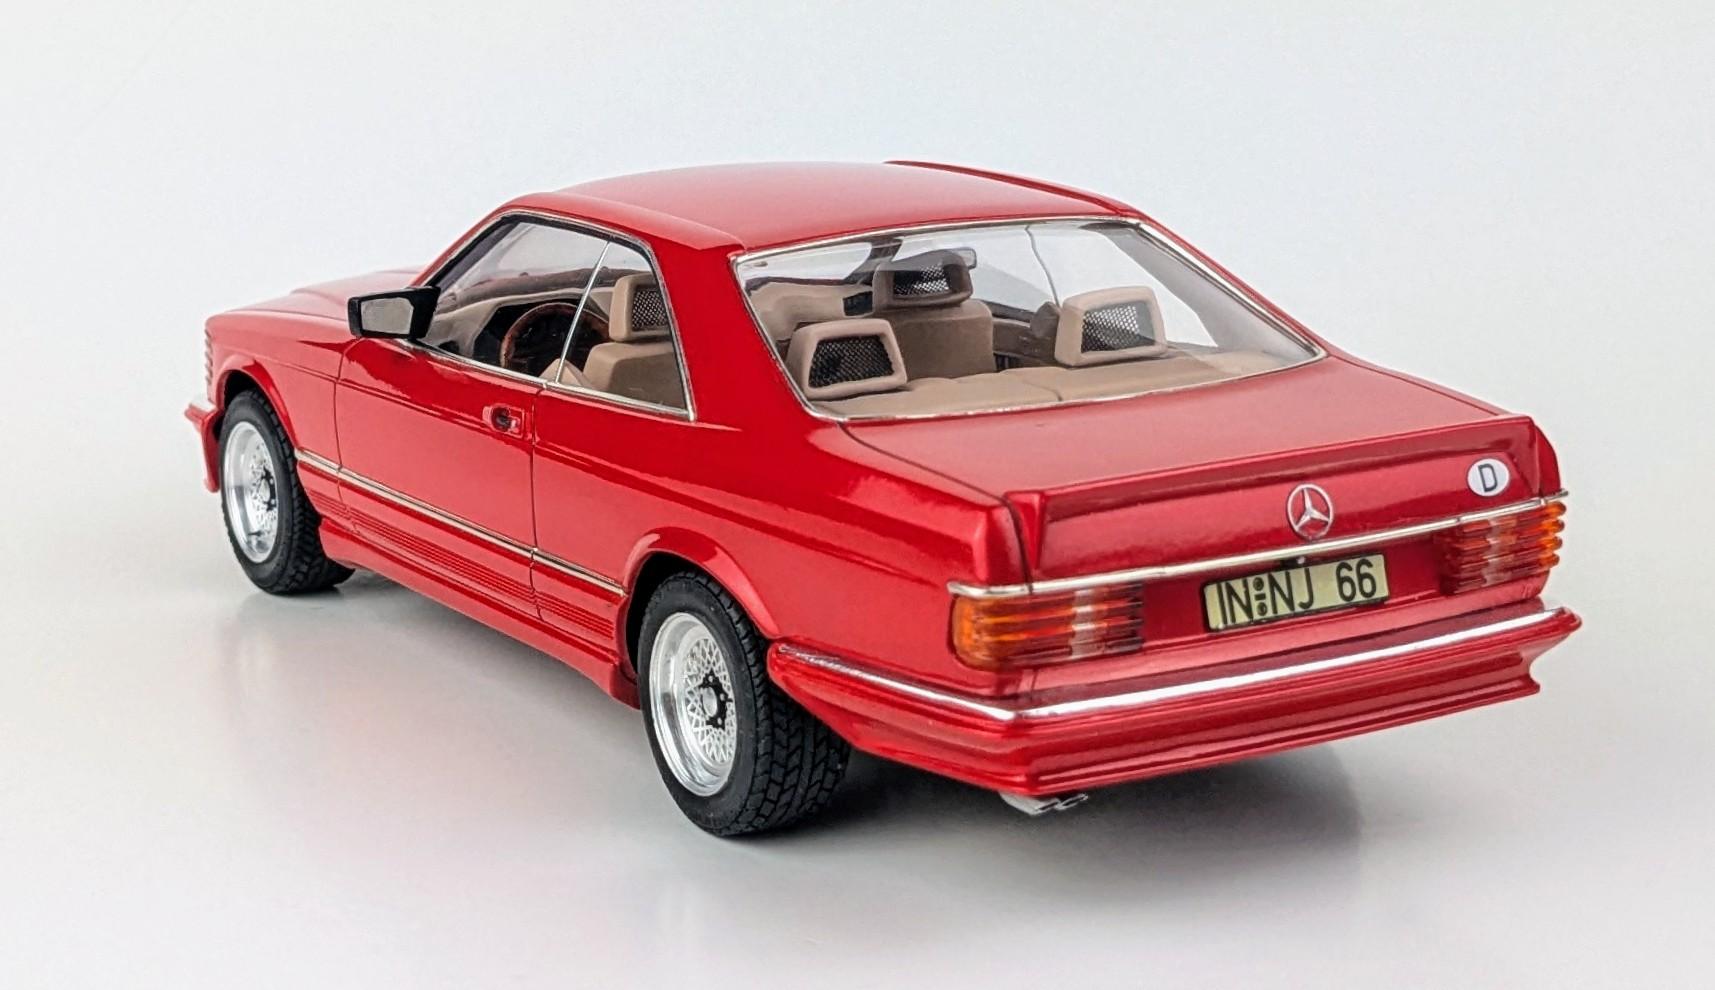
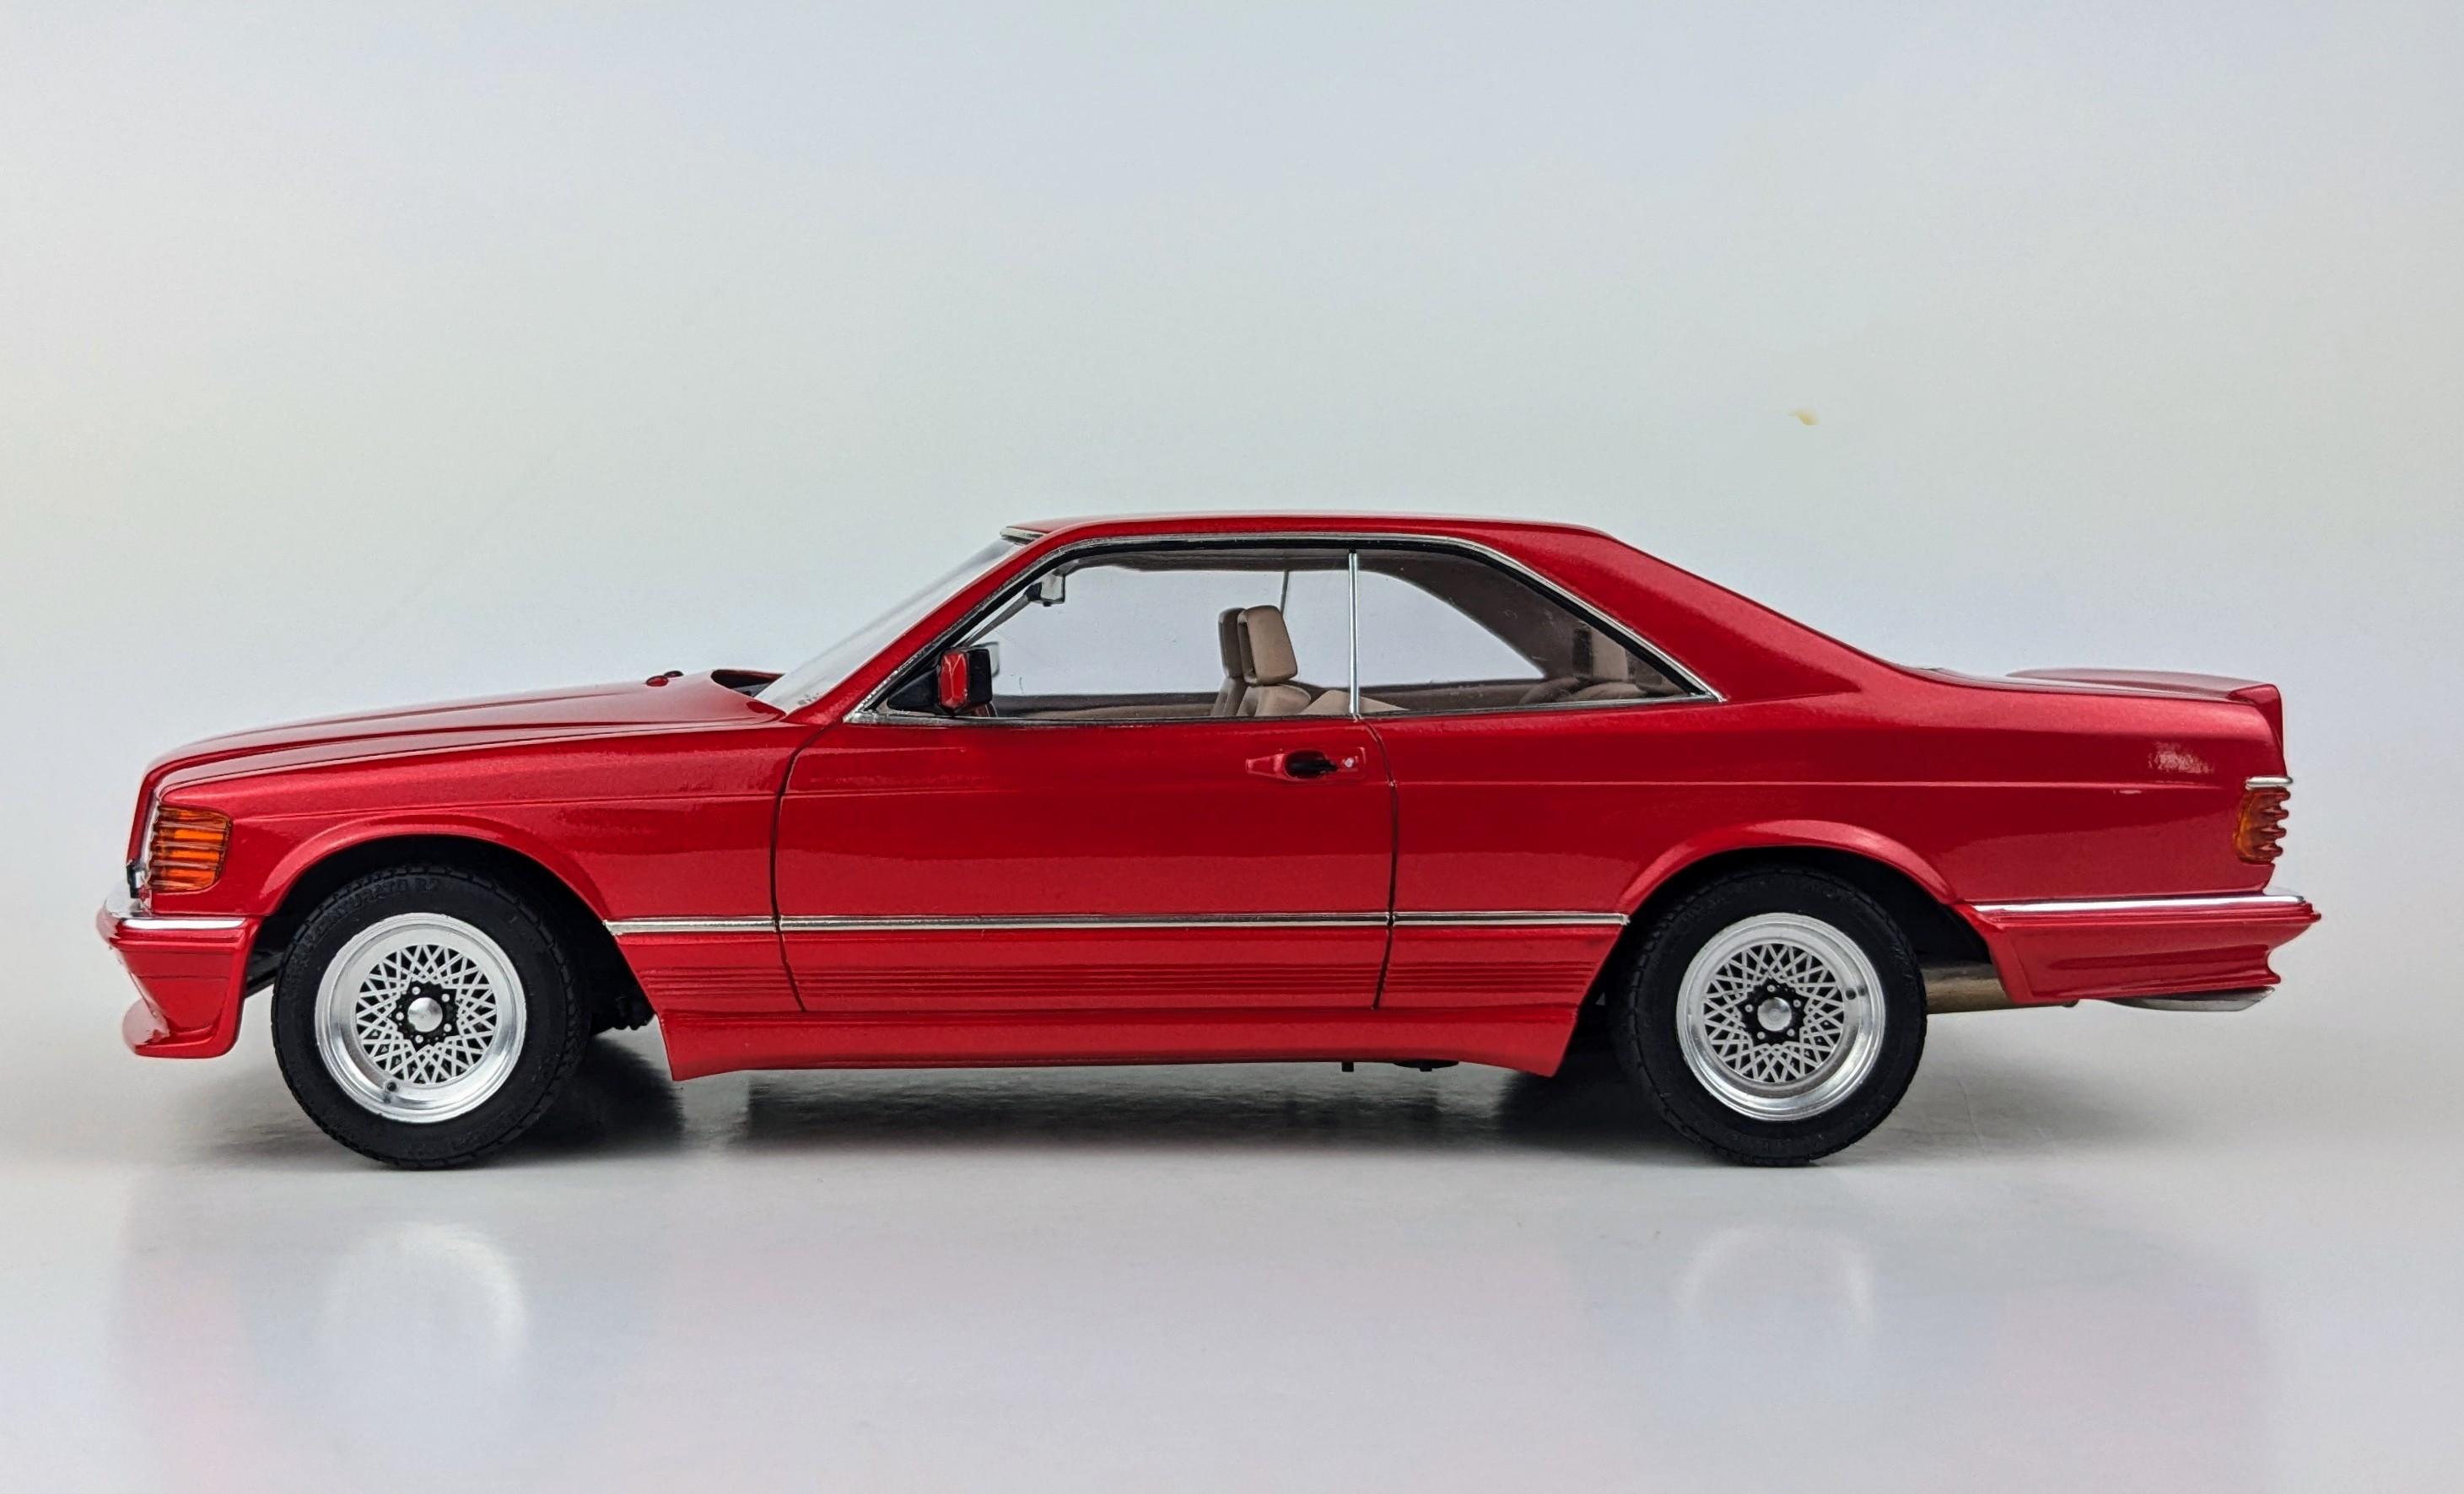
Thanks Bart! I'd love to do another one of these up as a convertible conversion. The interior of this kit puts most modern kits to shame! Agreed. I was in the market for a "weekend toy" a few years back and really wanted an SEC. Online research and common sense intervened before I did something expensive and stupid! Thanks Rob! You won't be disappointed when you get to it. The only thing I did fitment-wise was to take about 1/16 inch off of the hub/poly cap carriers to get the wheels to tuck in a little bit. The taillights needed a fair amount of sanding down to reduce the height as well. There's a lot of prep involved in getting the trim sharp and the body ripple-free but it is a 40 year old kit!
-
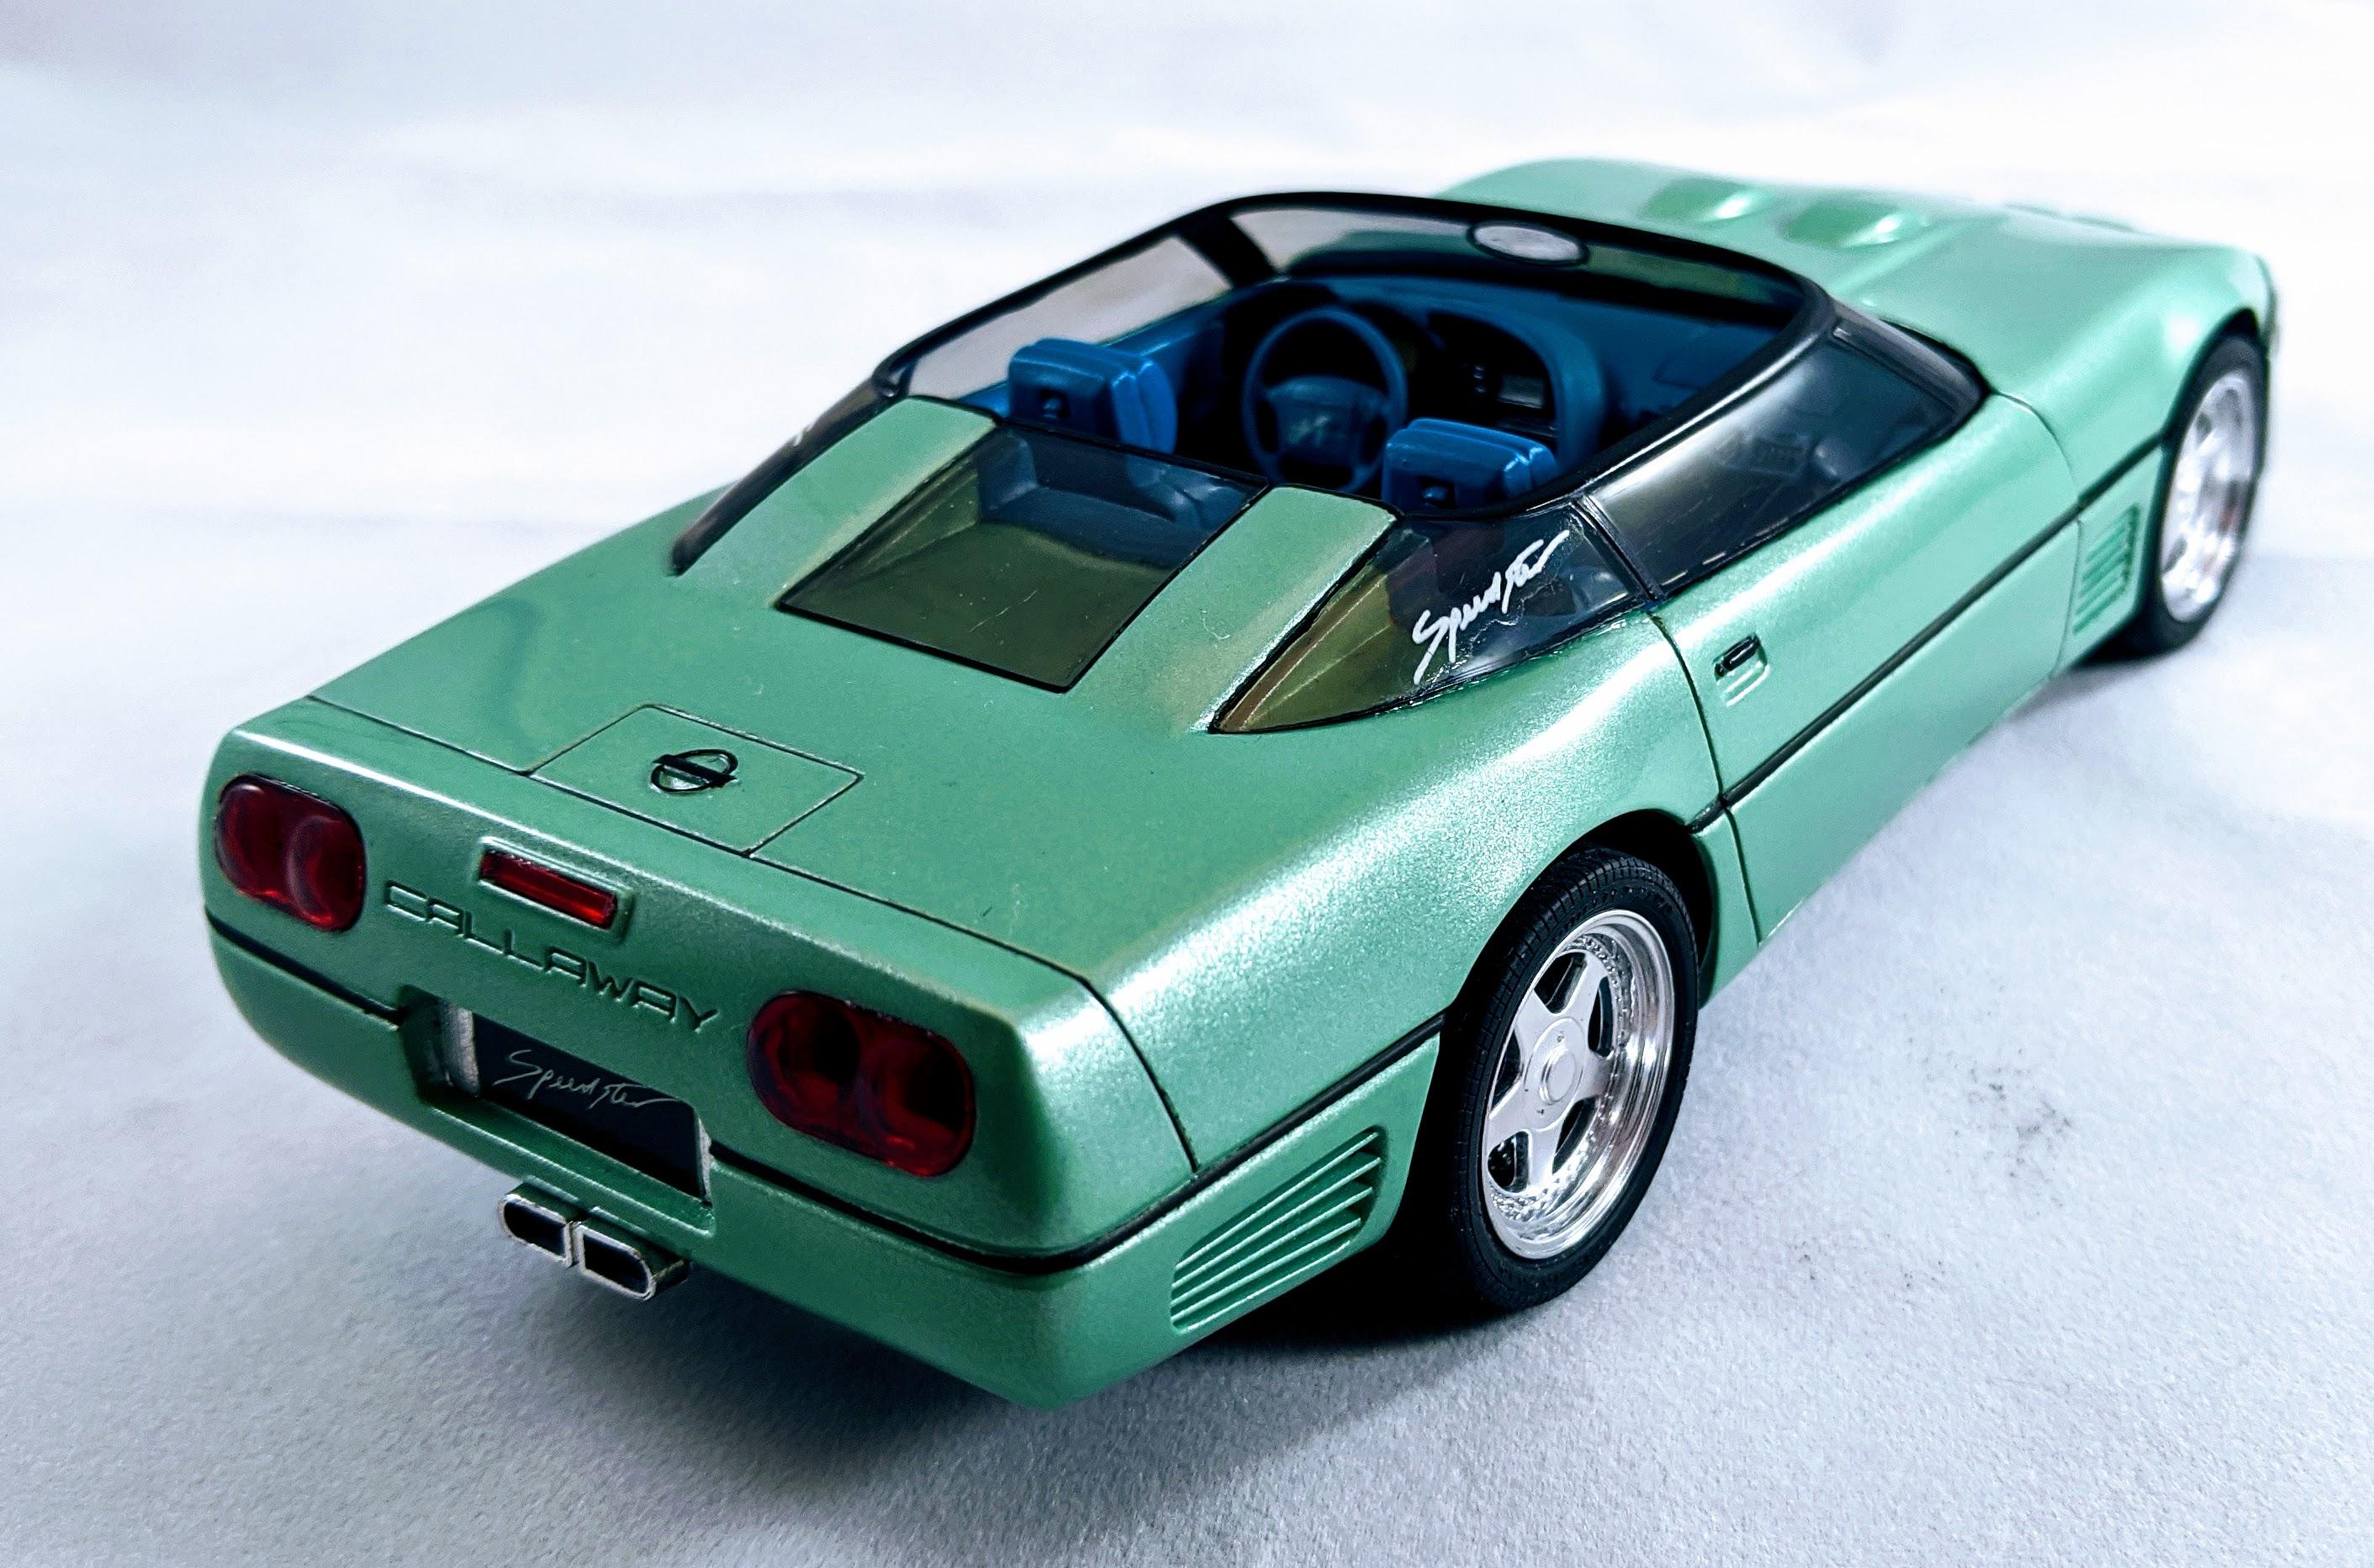
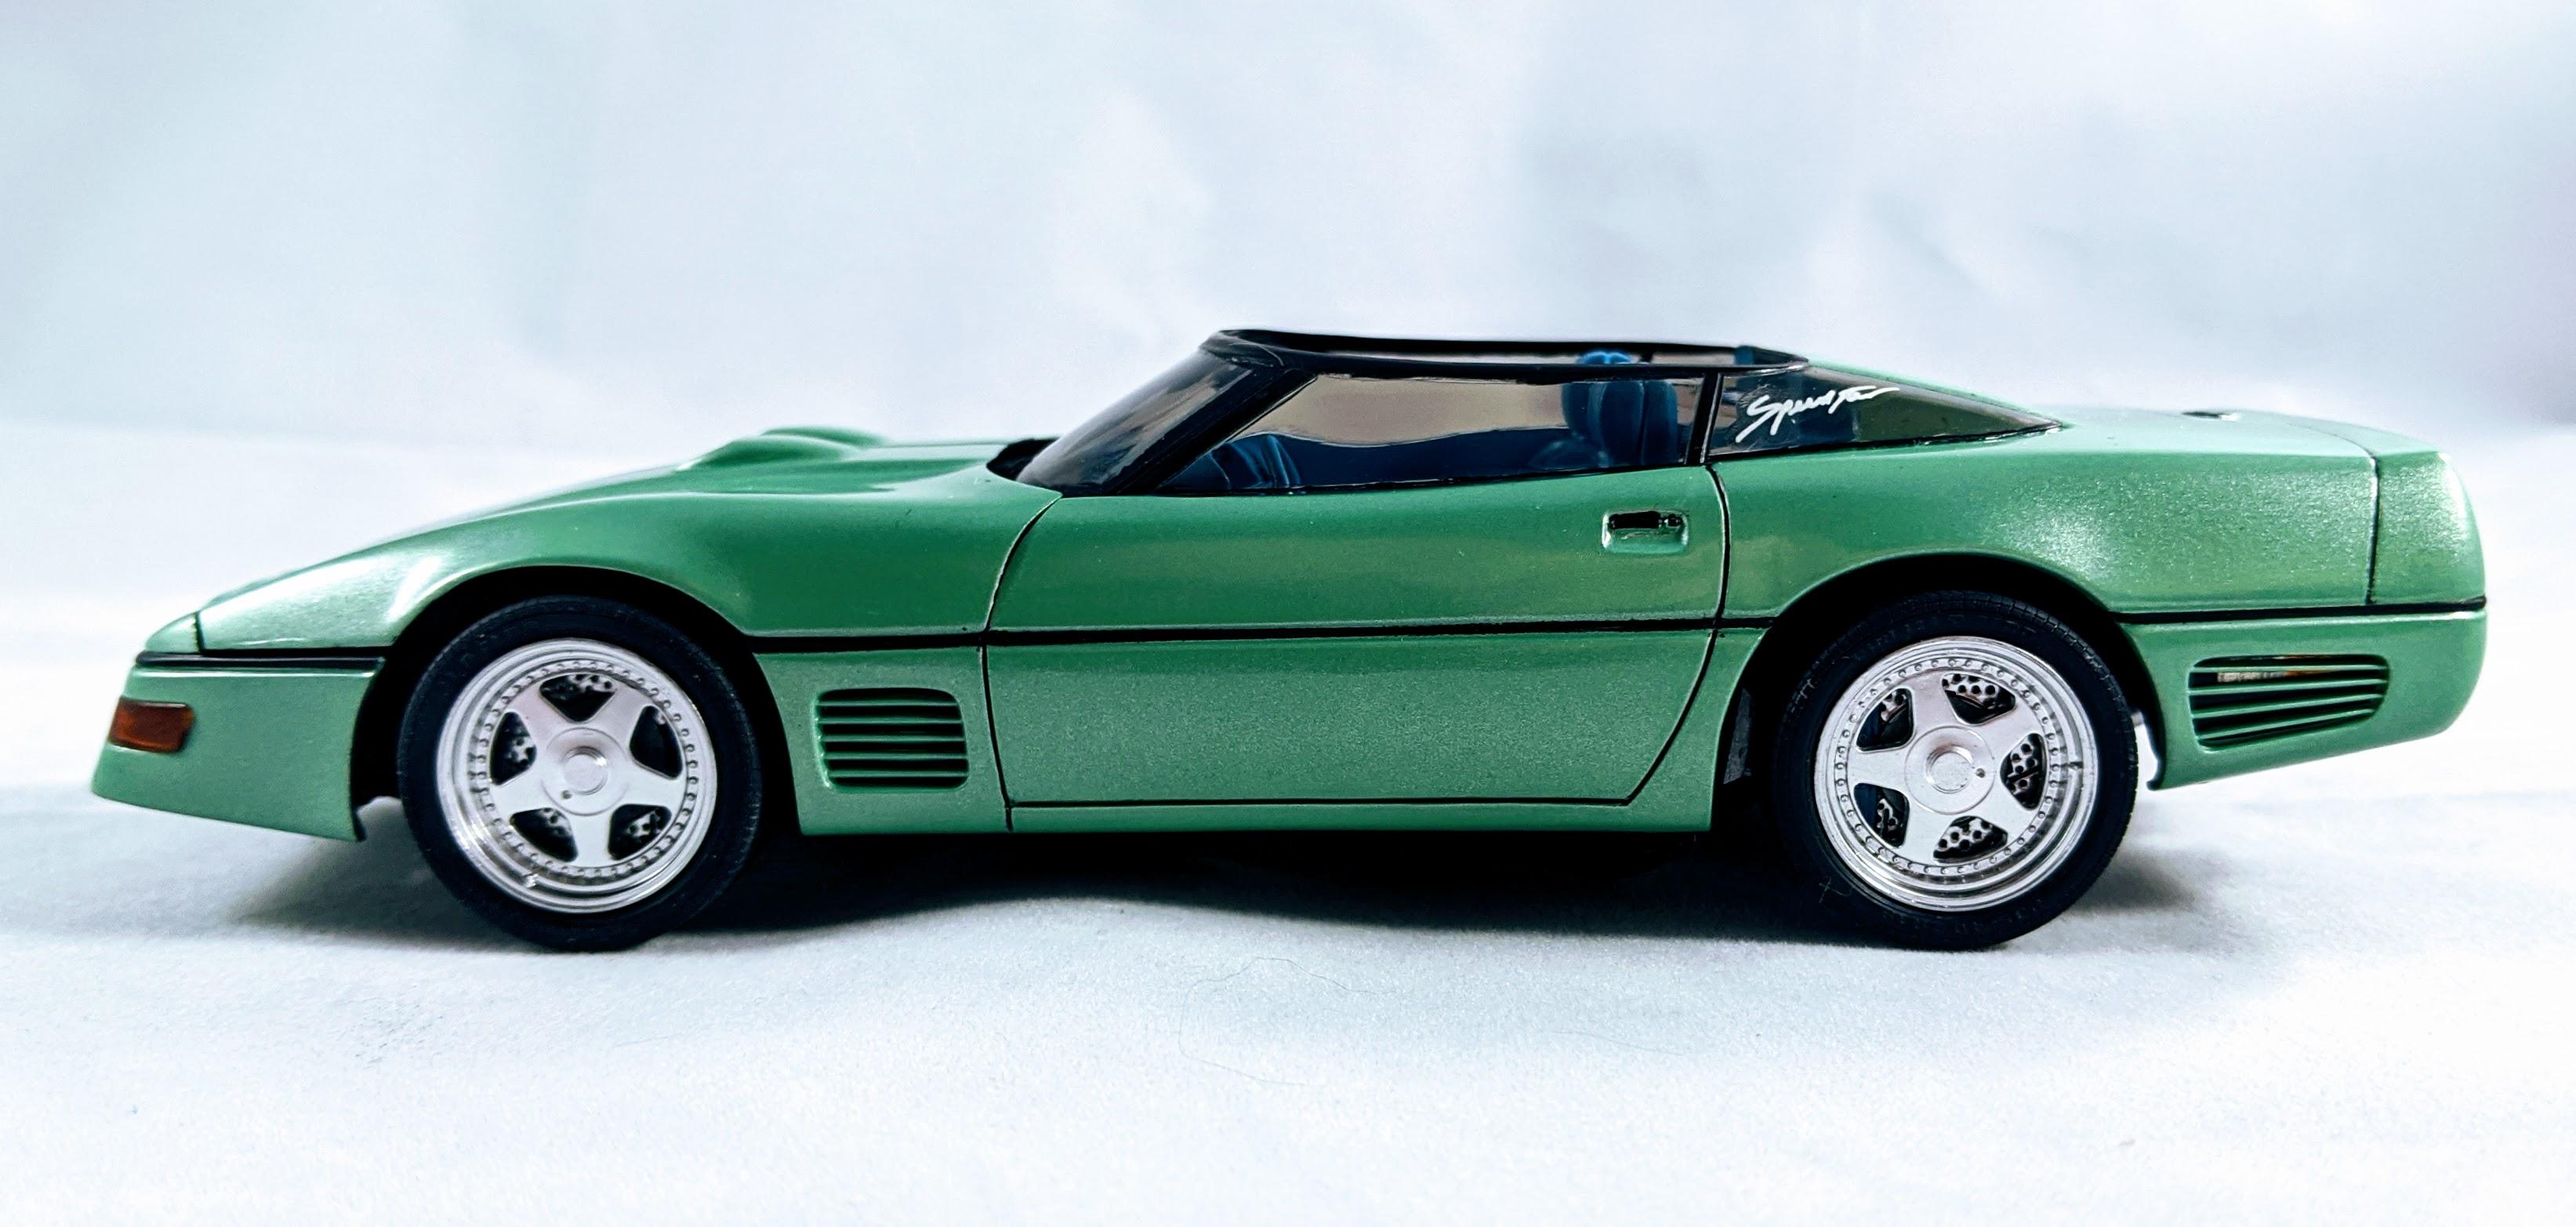
If you were a German industrialist or Saudi prince in the 80s, just walking into a Mercedes dealer and leaving with a bog-standard car was out of the question. To fulfill this need for exclusivity, companies like AMG, Duchatelet and Lorinser were there for you. Modifications ran from simple body kits to Testarossa strakes and gullwing doors, car phones to stereos that took up the entire dash. Tamiya's kit of the Mercedes 500SEC came out in 1982 and was a high water mark for their 1/24 efforts. A year later they reissued it as the Lorinser version, representing a lightly modified car from a tuner that tended to focus on appearance and comfort modifications. Newly-tooled parts included the body kit, very nice BBS "Mahle" wheels, and interior parts including Recaro seats and a Telefunken car phone. Sadly, this version has never been reissued. They go for silly eBay money these days but I got a good deal for this one at a show a few years ago. I wanted to have fun with colors and finishes with this build. Paint color is Tamiya Mica Red over their pink primer. I used Mr. Model upholstery decals for the seat and door inserts. Since the interior is very visible I added a cord for the car phone as well as removing the molded mesh in the head rests and replacing it with real mesh. Burl wood was replicated with swirled Tamiya browns with a top coat of clear orange. I added mild weathering to the chassis as well as the engine, which received a 3D printed distributor. Aftermarket details for the exterior were limited to a photoetched 3-pointed star on the trunk lid as well as USCP 3D printed valve stems. I'm debating adding a proper antenna for the car phone, which would be ugly but accurate. On to the (many) pics!
- 37 replies
-
- 19
-

-
Radwood Ready... Tamiya Mercedes 500 SEC Lorinser
jaymcminn replied to jaymcminn's topic in WIP: Model Cars
Closing out this WIP with some pics of the finished model. Final assembly was as drama-free as the rest of the build. This kit is a classic for a reason! Under Glass thread to follow soon!
-
Radwood Ready... Tamiya Mercedes 500 SEC Lorinser
jaymcminn replied to jaymcminn's topic in WIP: Model Cars
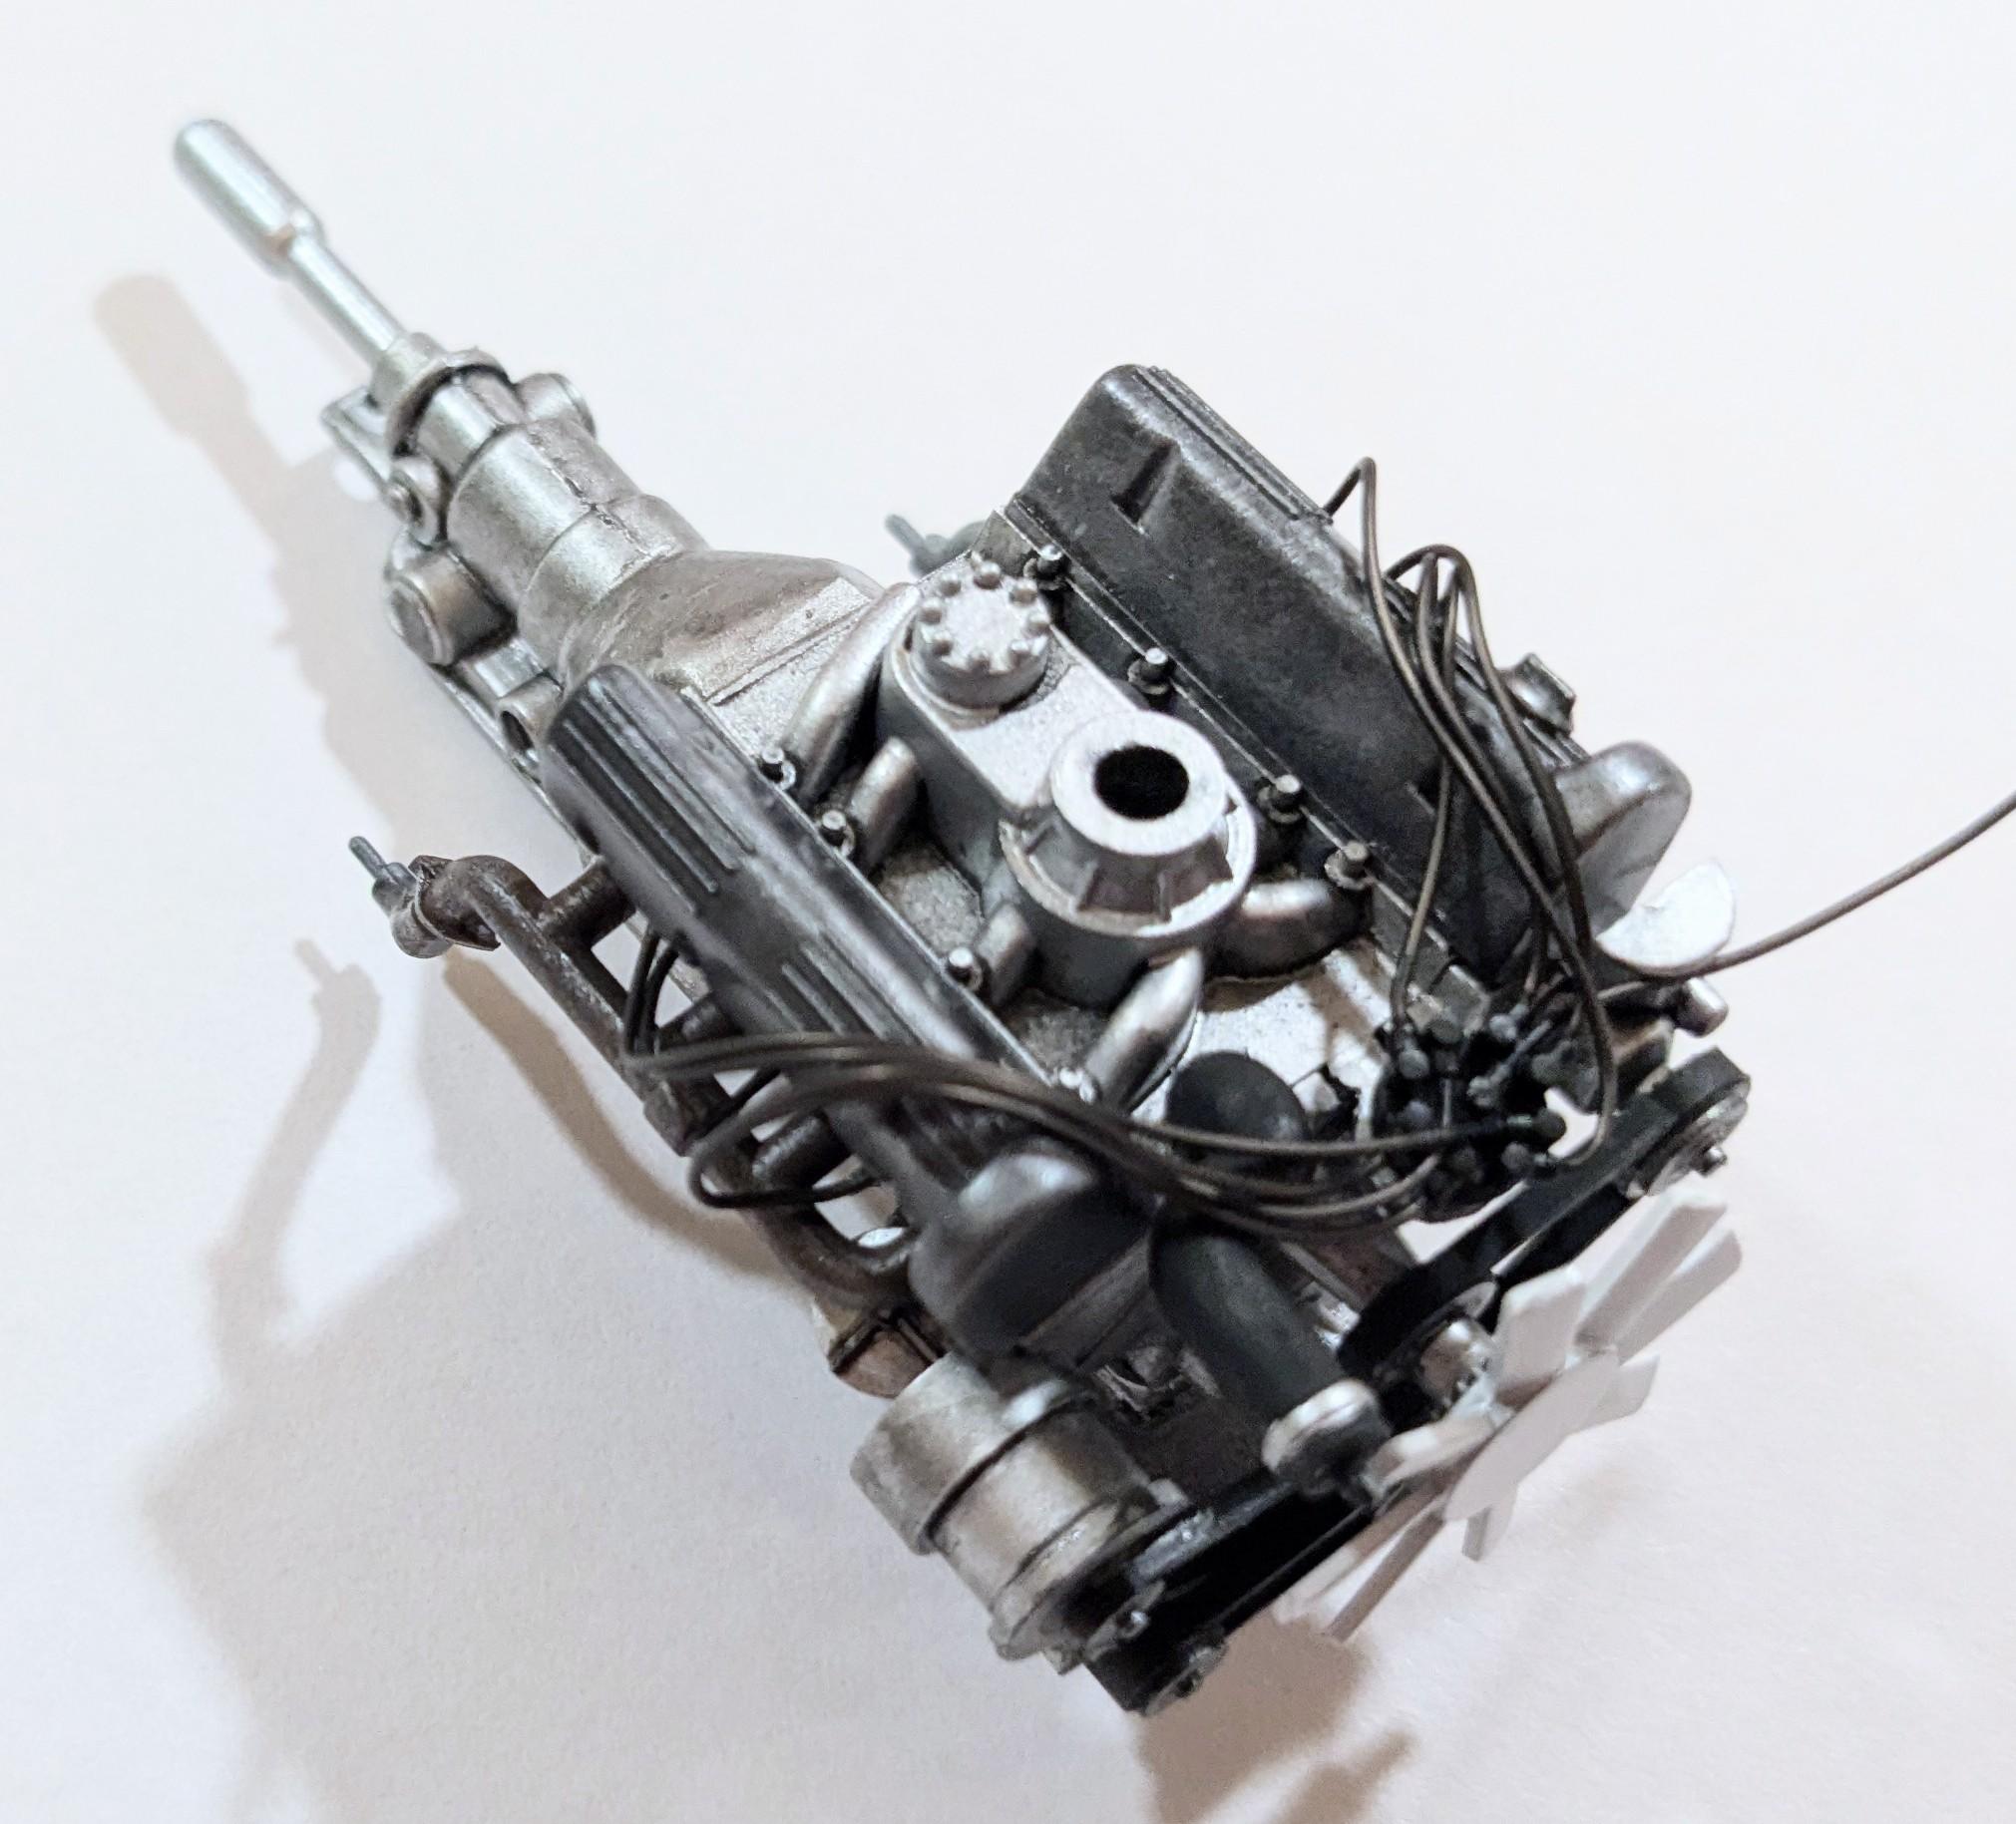
Quick update... The chassis was painted in the body color and weathered with washes and pastels. The exhaust was done with Vallejo aluminum and pastels. The chassis in this kit is as well detailed as the rest of the kit. Surprisingly for Tamiya the steering isn't poseable! The engine is simple but nicely represented and responds well to washes and dry brushing. I added a 3d-printed distributor and ignition wires. I'm trying to think of Tamiya ever did full engine detail on a 1/24 kit before this one and I'm coming up blank. The air cleaner/intake plenum will be fitted once the engine and radiator are installed.
-
What Did You See In Your Yard Today?
jaymcminn replied to Tim W. SoCal's topic in The Off-Topic Lounge
Welp, I was wondering how Bandit the Cat's iguana buddy was doing after our recent cold snap. Got my answer today... Since I seem to have a "pet" Iguana now I think he needs a name. In honor of his stripey tail I think I'll call him Tiger!
-
If the carpet is staying, get a large clear vinyl mat to go under your desk and building area. Great for paint/glue spills and will help stop the "carpet monster" from swallowing small parts.


.JPG.1440de0d03e02cbe0f2969bfddb8f409.JPG)
.JPG.a00817b49f63a8eb849d9ffed9c6f484.JPG)
.JPG.4446c7e26621d2cceedc7ea34c4a5a55.JPG)
.JPG.1721e661a3d5adcb19cb024e780a3605.JPG)