jaymcminn
-
Posts
1,755 -
Joined
-
Last visited
Content Type
Profiles
Forums
Events
Gallery
Everything posted by jaymcminn
-

What Did You See In Your Yard Today?
jaymcminn replied to Tim W. SoCal's topic in The Off-Topic Lounge
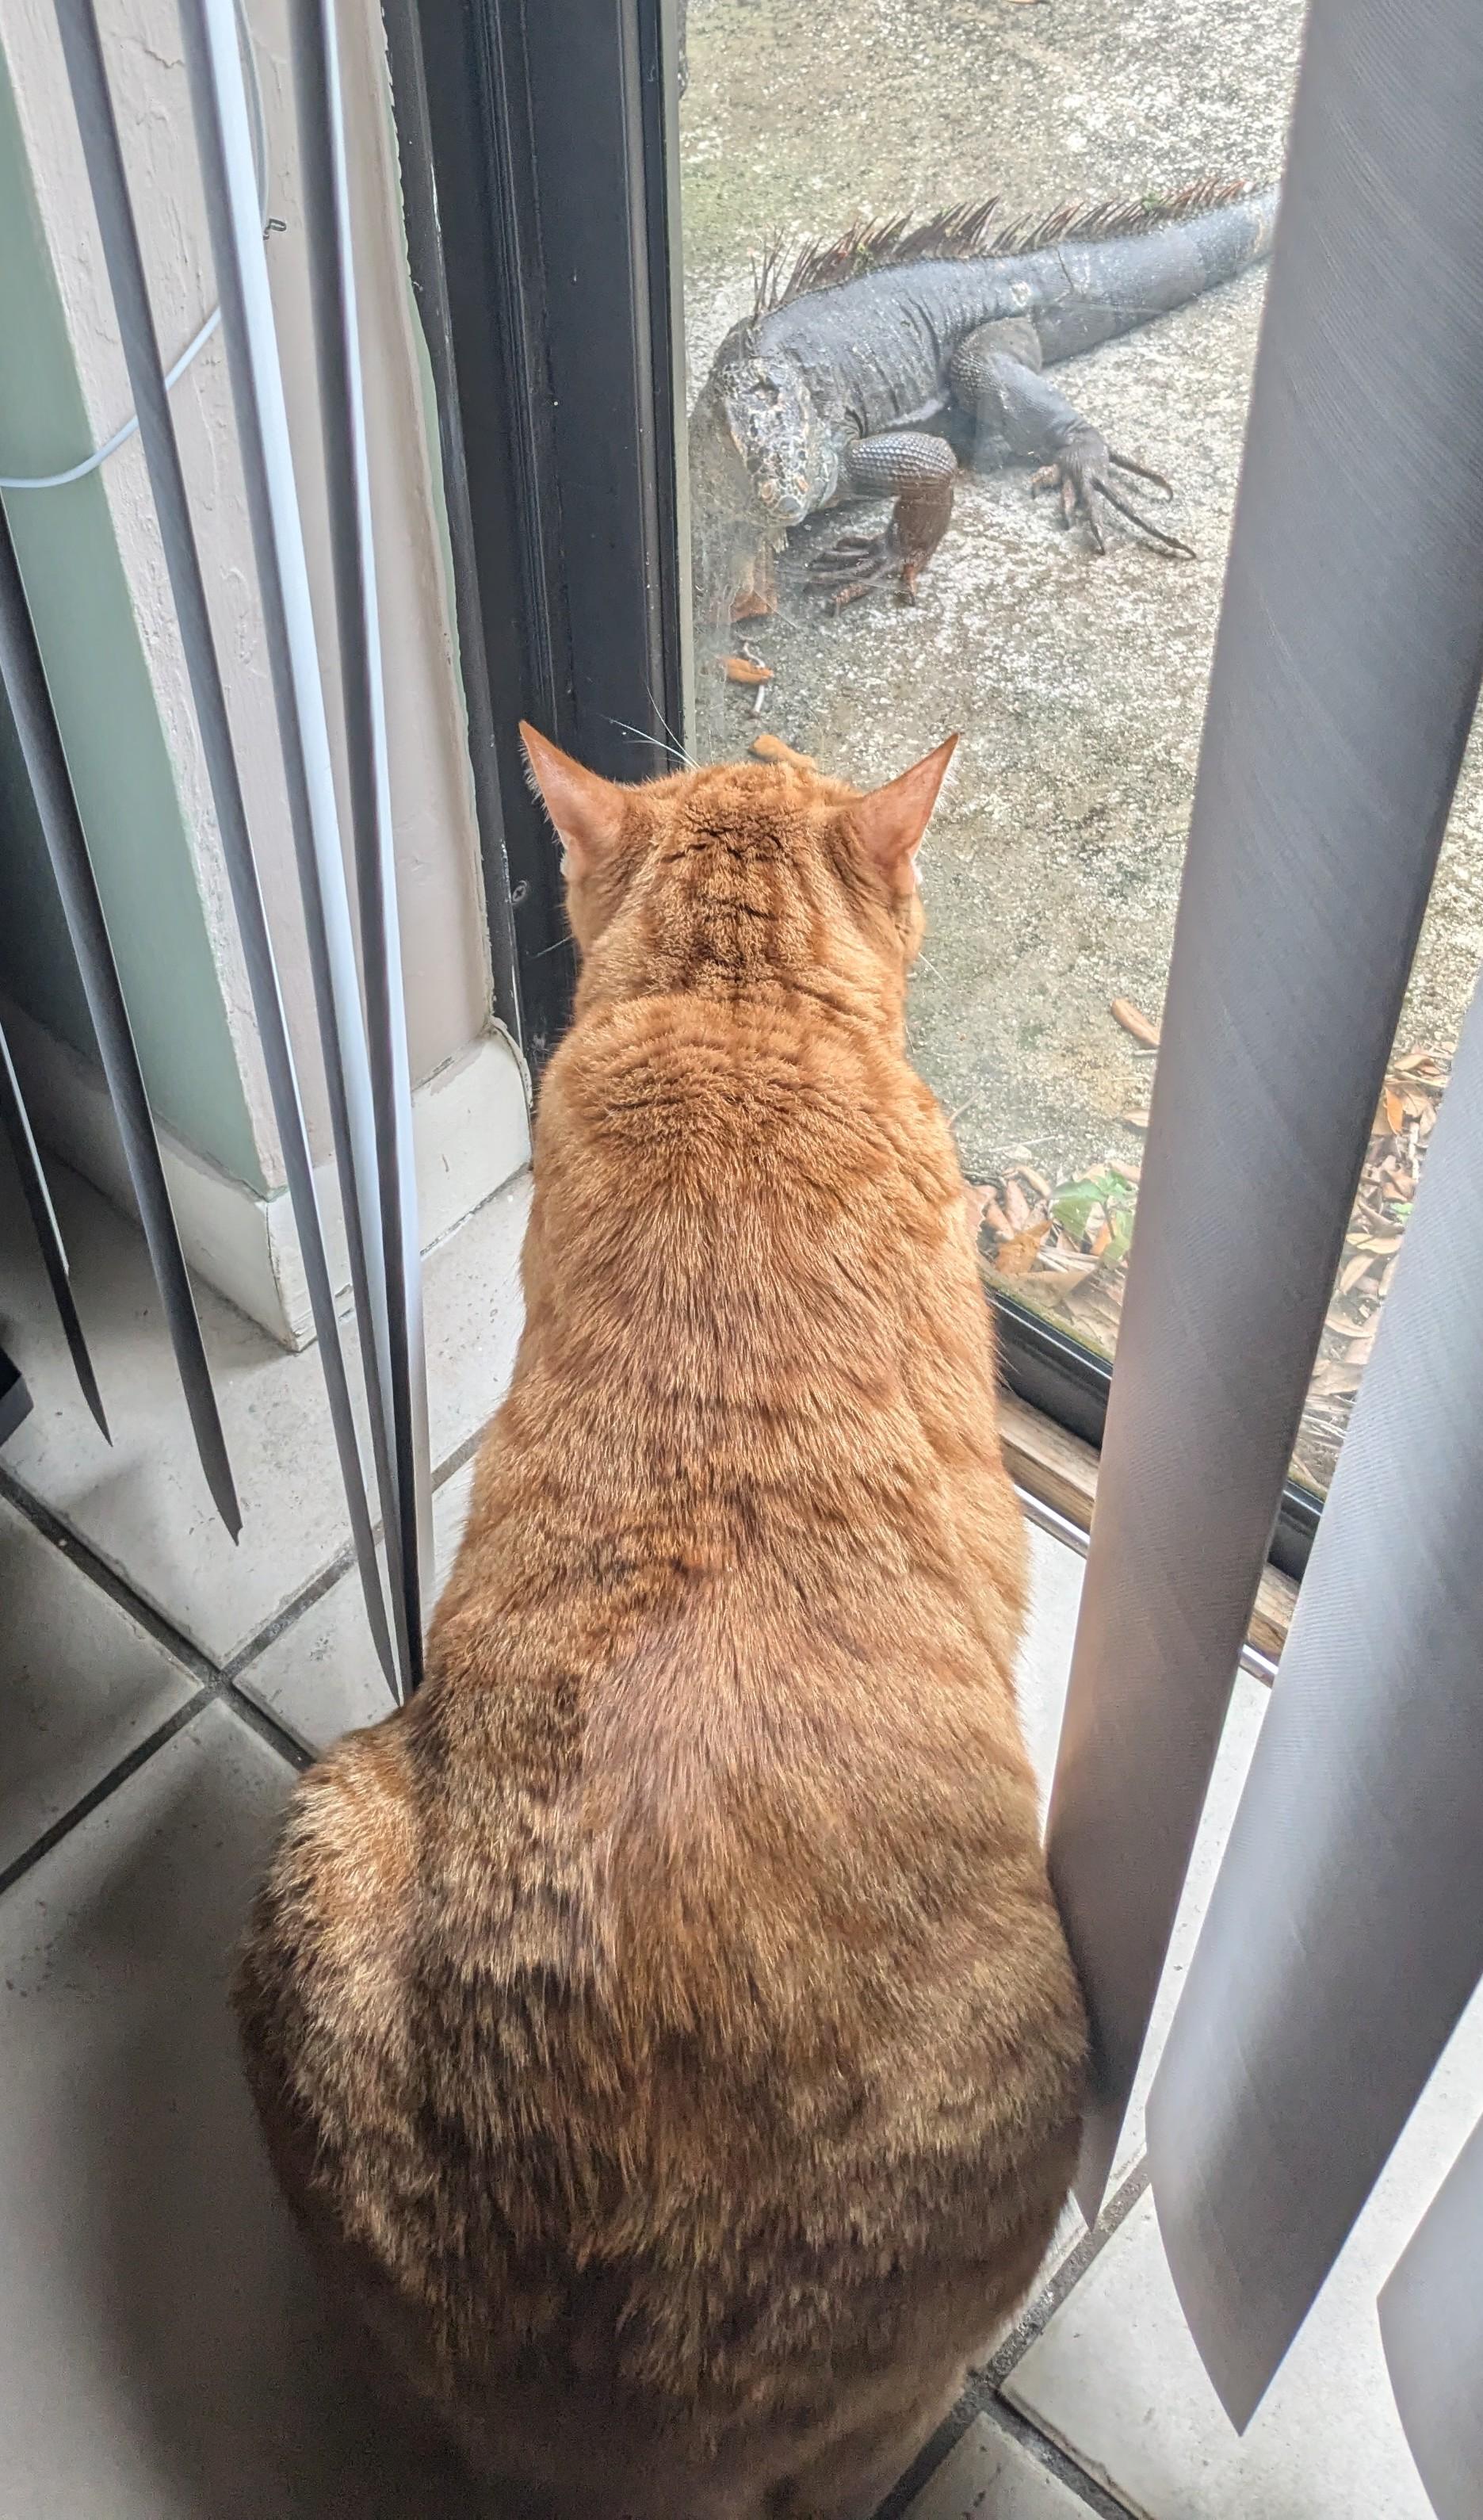
Pretty often. There was a big one basking in the road the other day. This one was about four feet, which is about as big as I've ever seen. They tend to keep to themselves and they're not aggressive unless you're determined to do something stupid. The only time I've ever been scared by one is when it fell out of the live oak tree in my front yard about three feet away from me when I was doing yard work. We both took off in opposite directions at top speed! -
Also posted in "What did you see in your backyard today". The big guy likes to go after lizards that get into the house but I think this one might be a bit out of his league!

-
What Did You See In Your Yard Today?
jaymcminn replied to Tim W. SoCal's topic in The Off-Topic Lounge
Standoff through the sliding door that went on for an hour... all parties involved eventually got bored and wandered away.
-
This is literally my office Christmas decor!
-
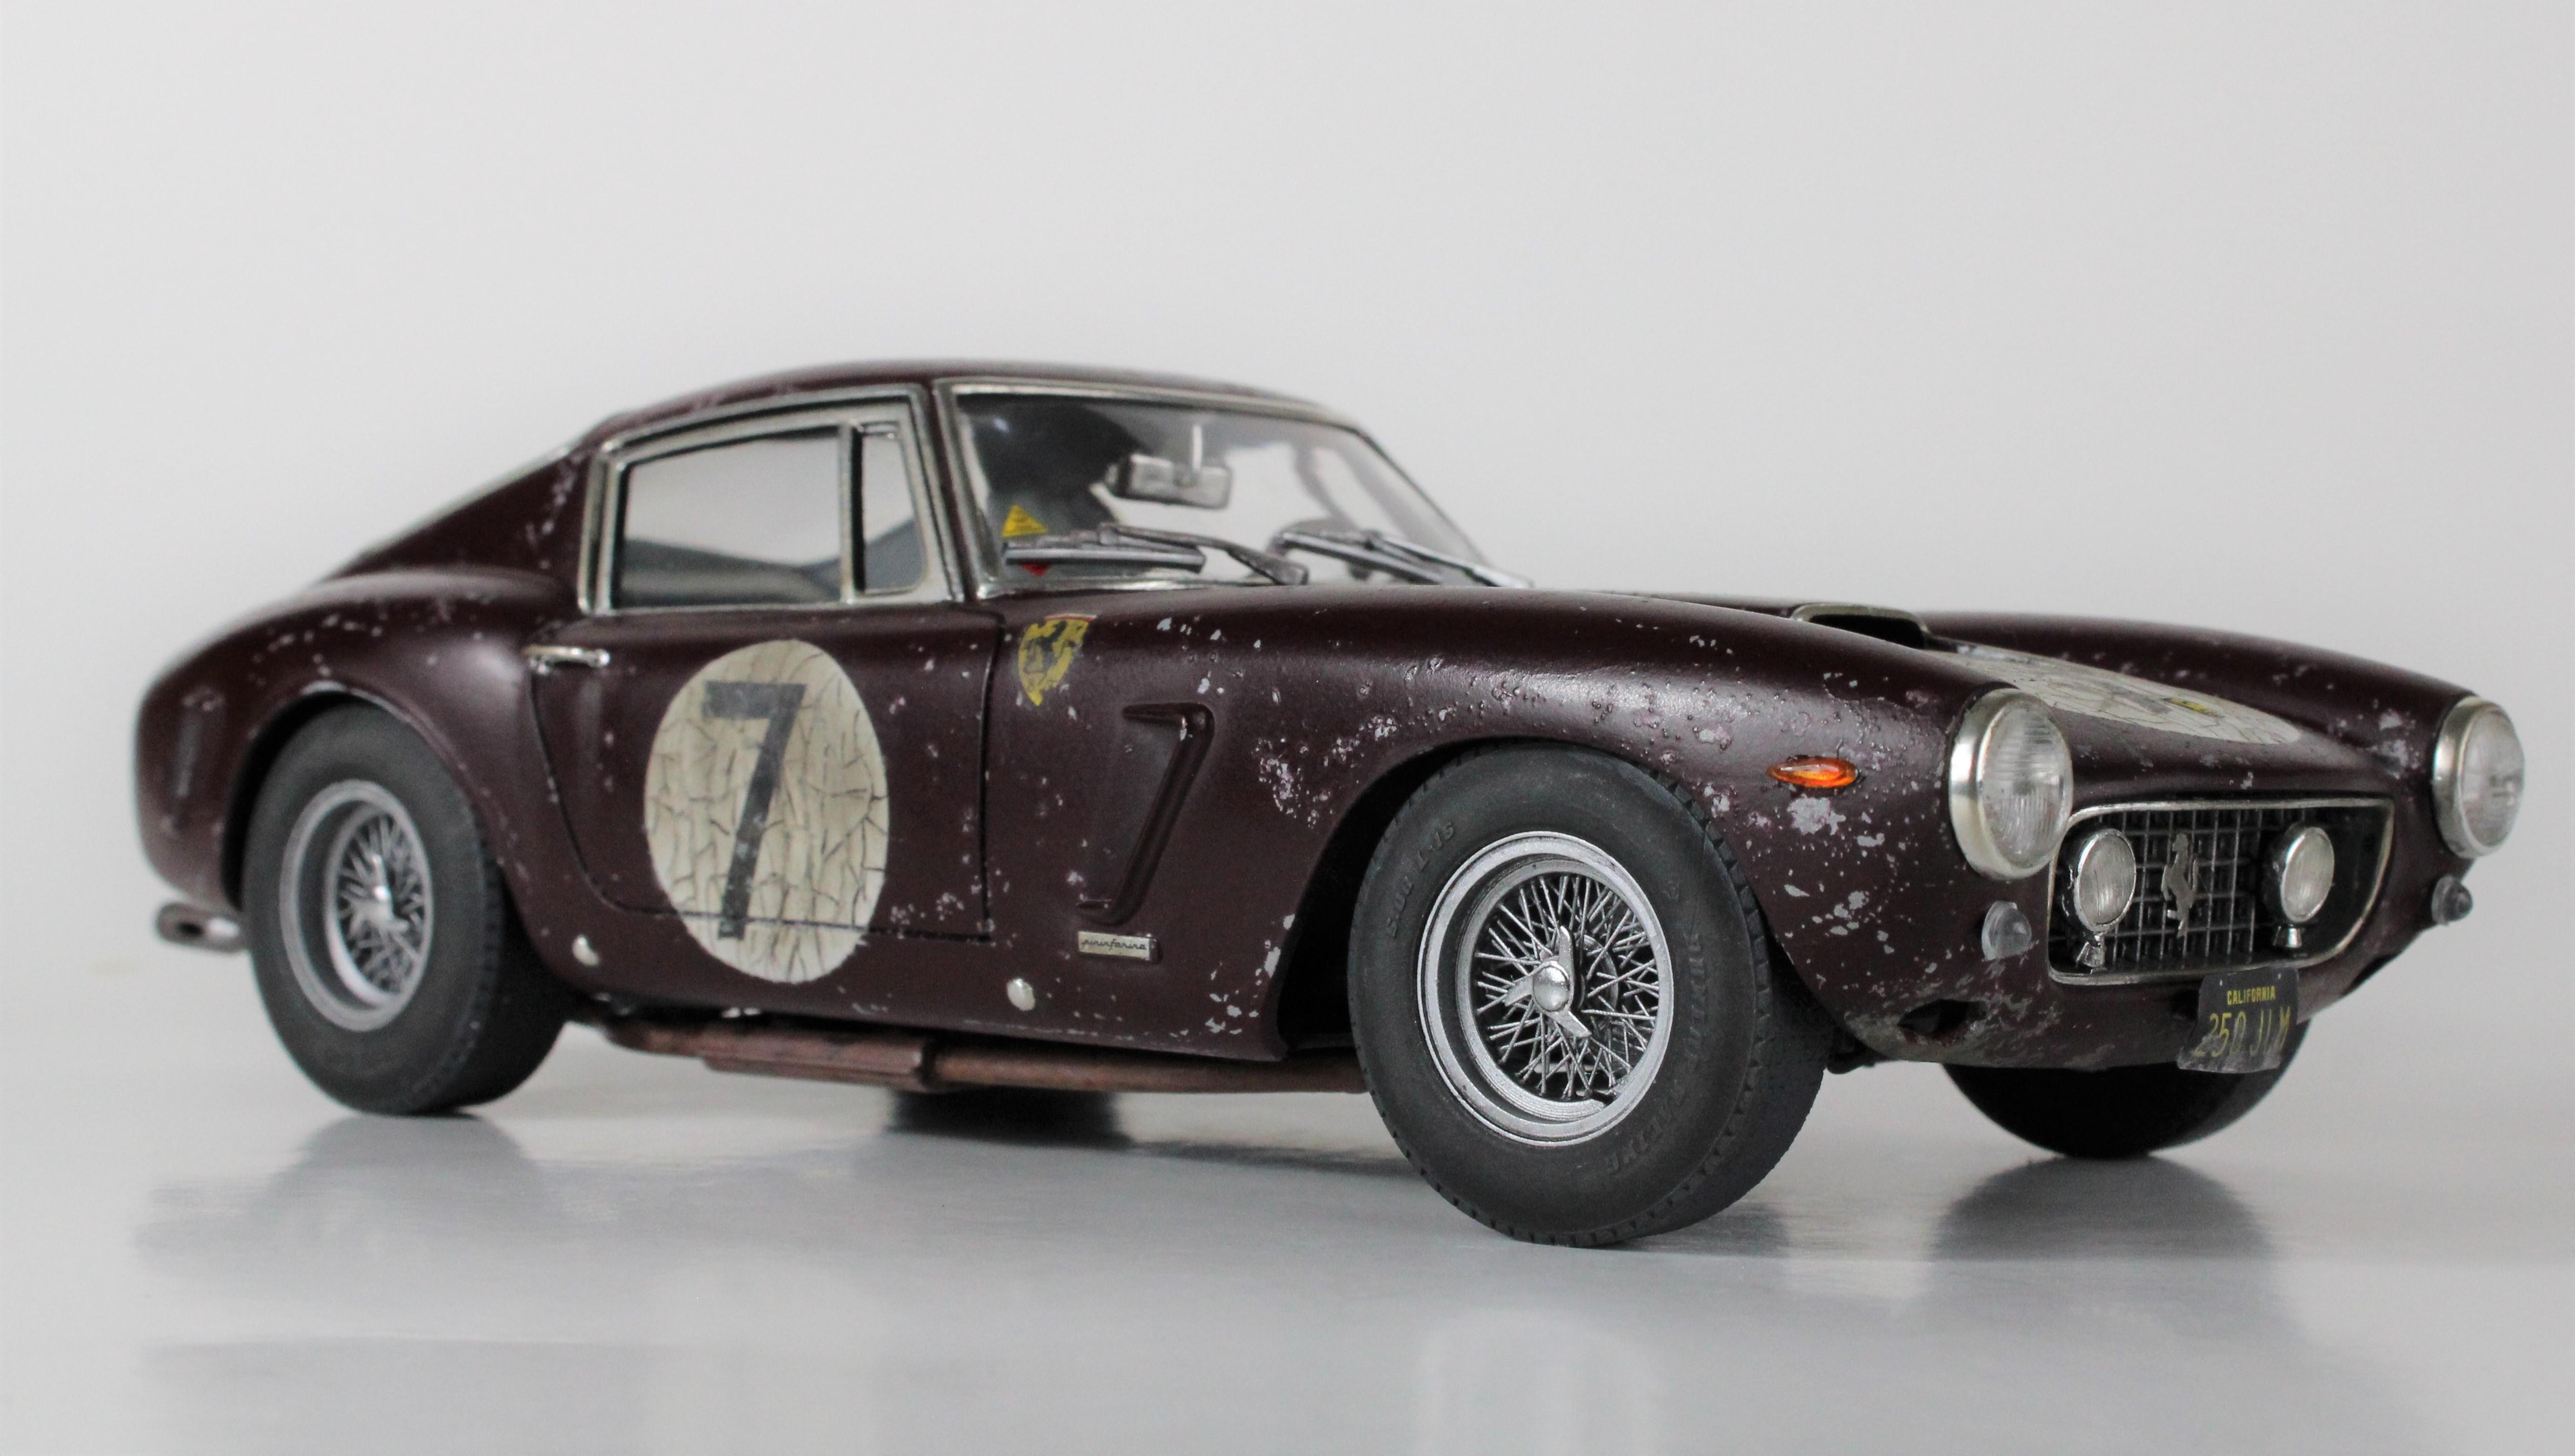
One of those cars that somehow looks even better beat up. Fantastic work!
-
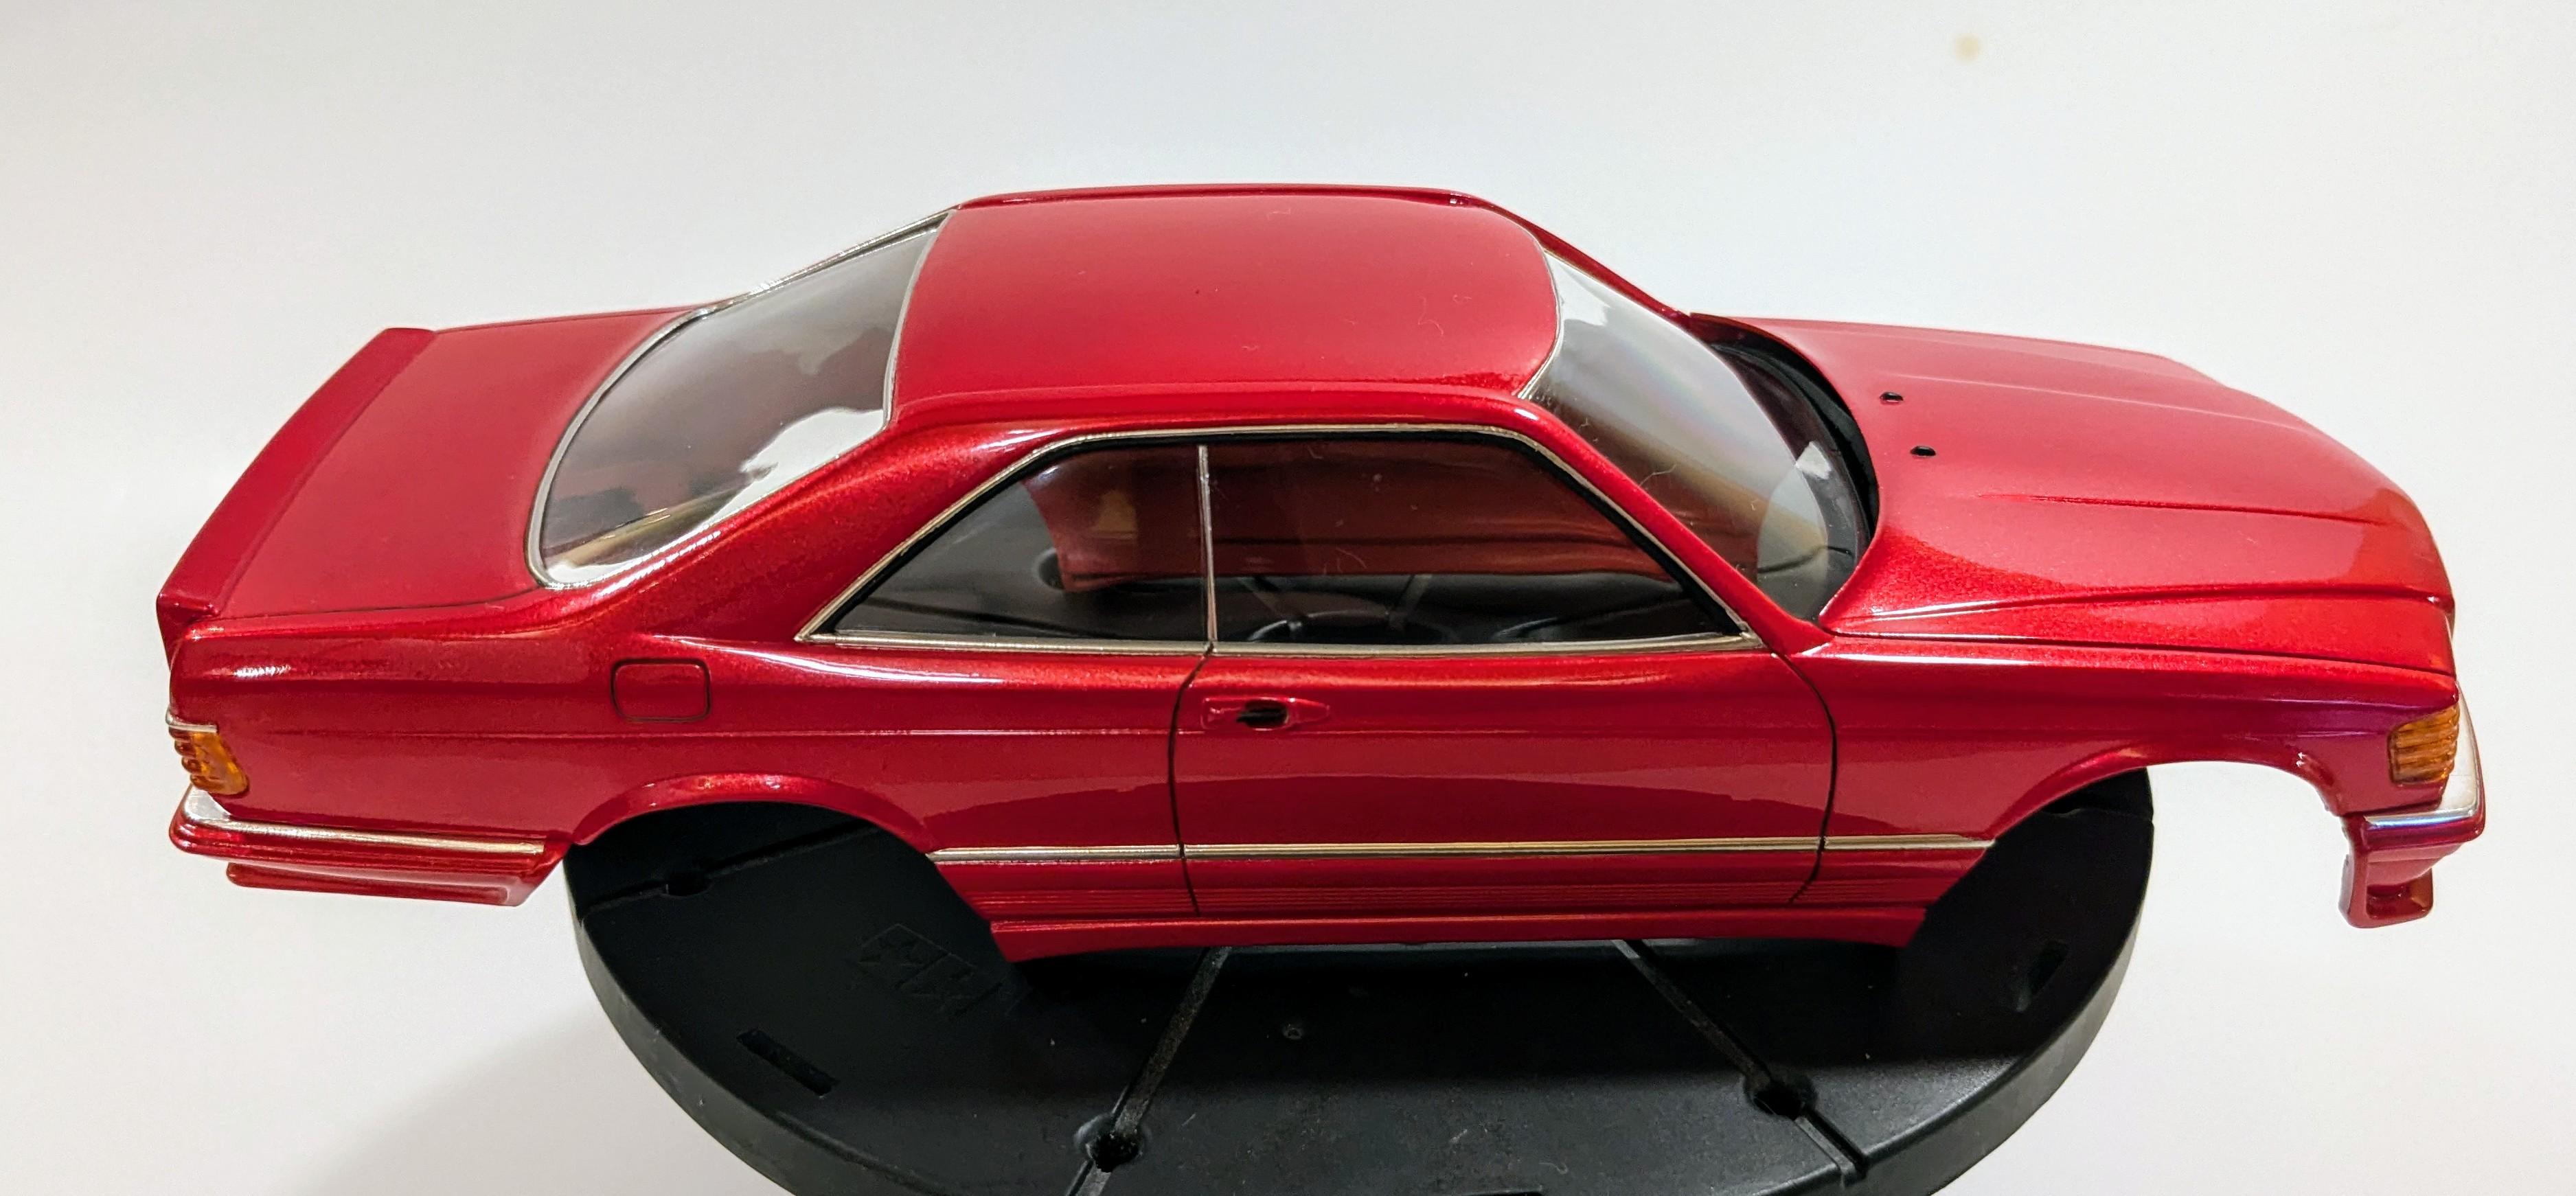
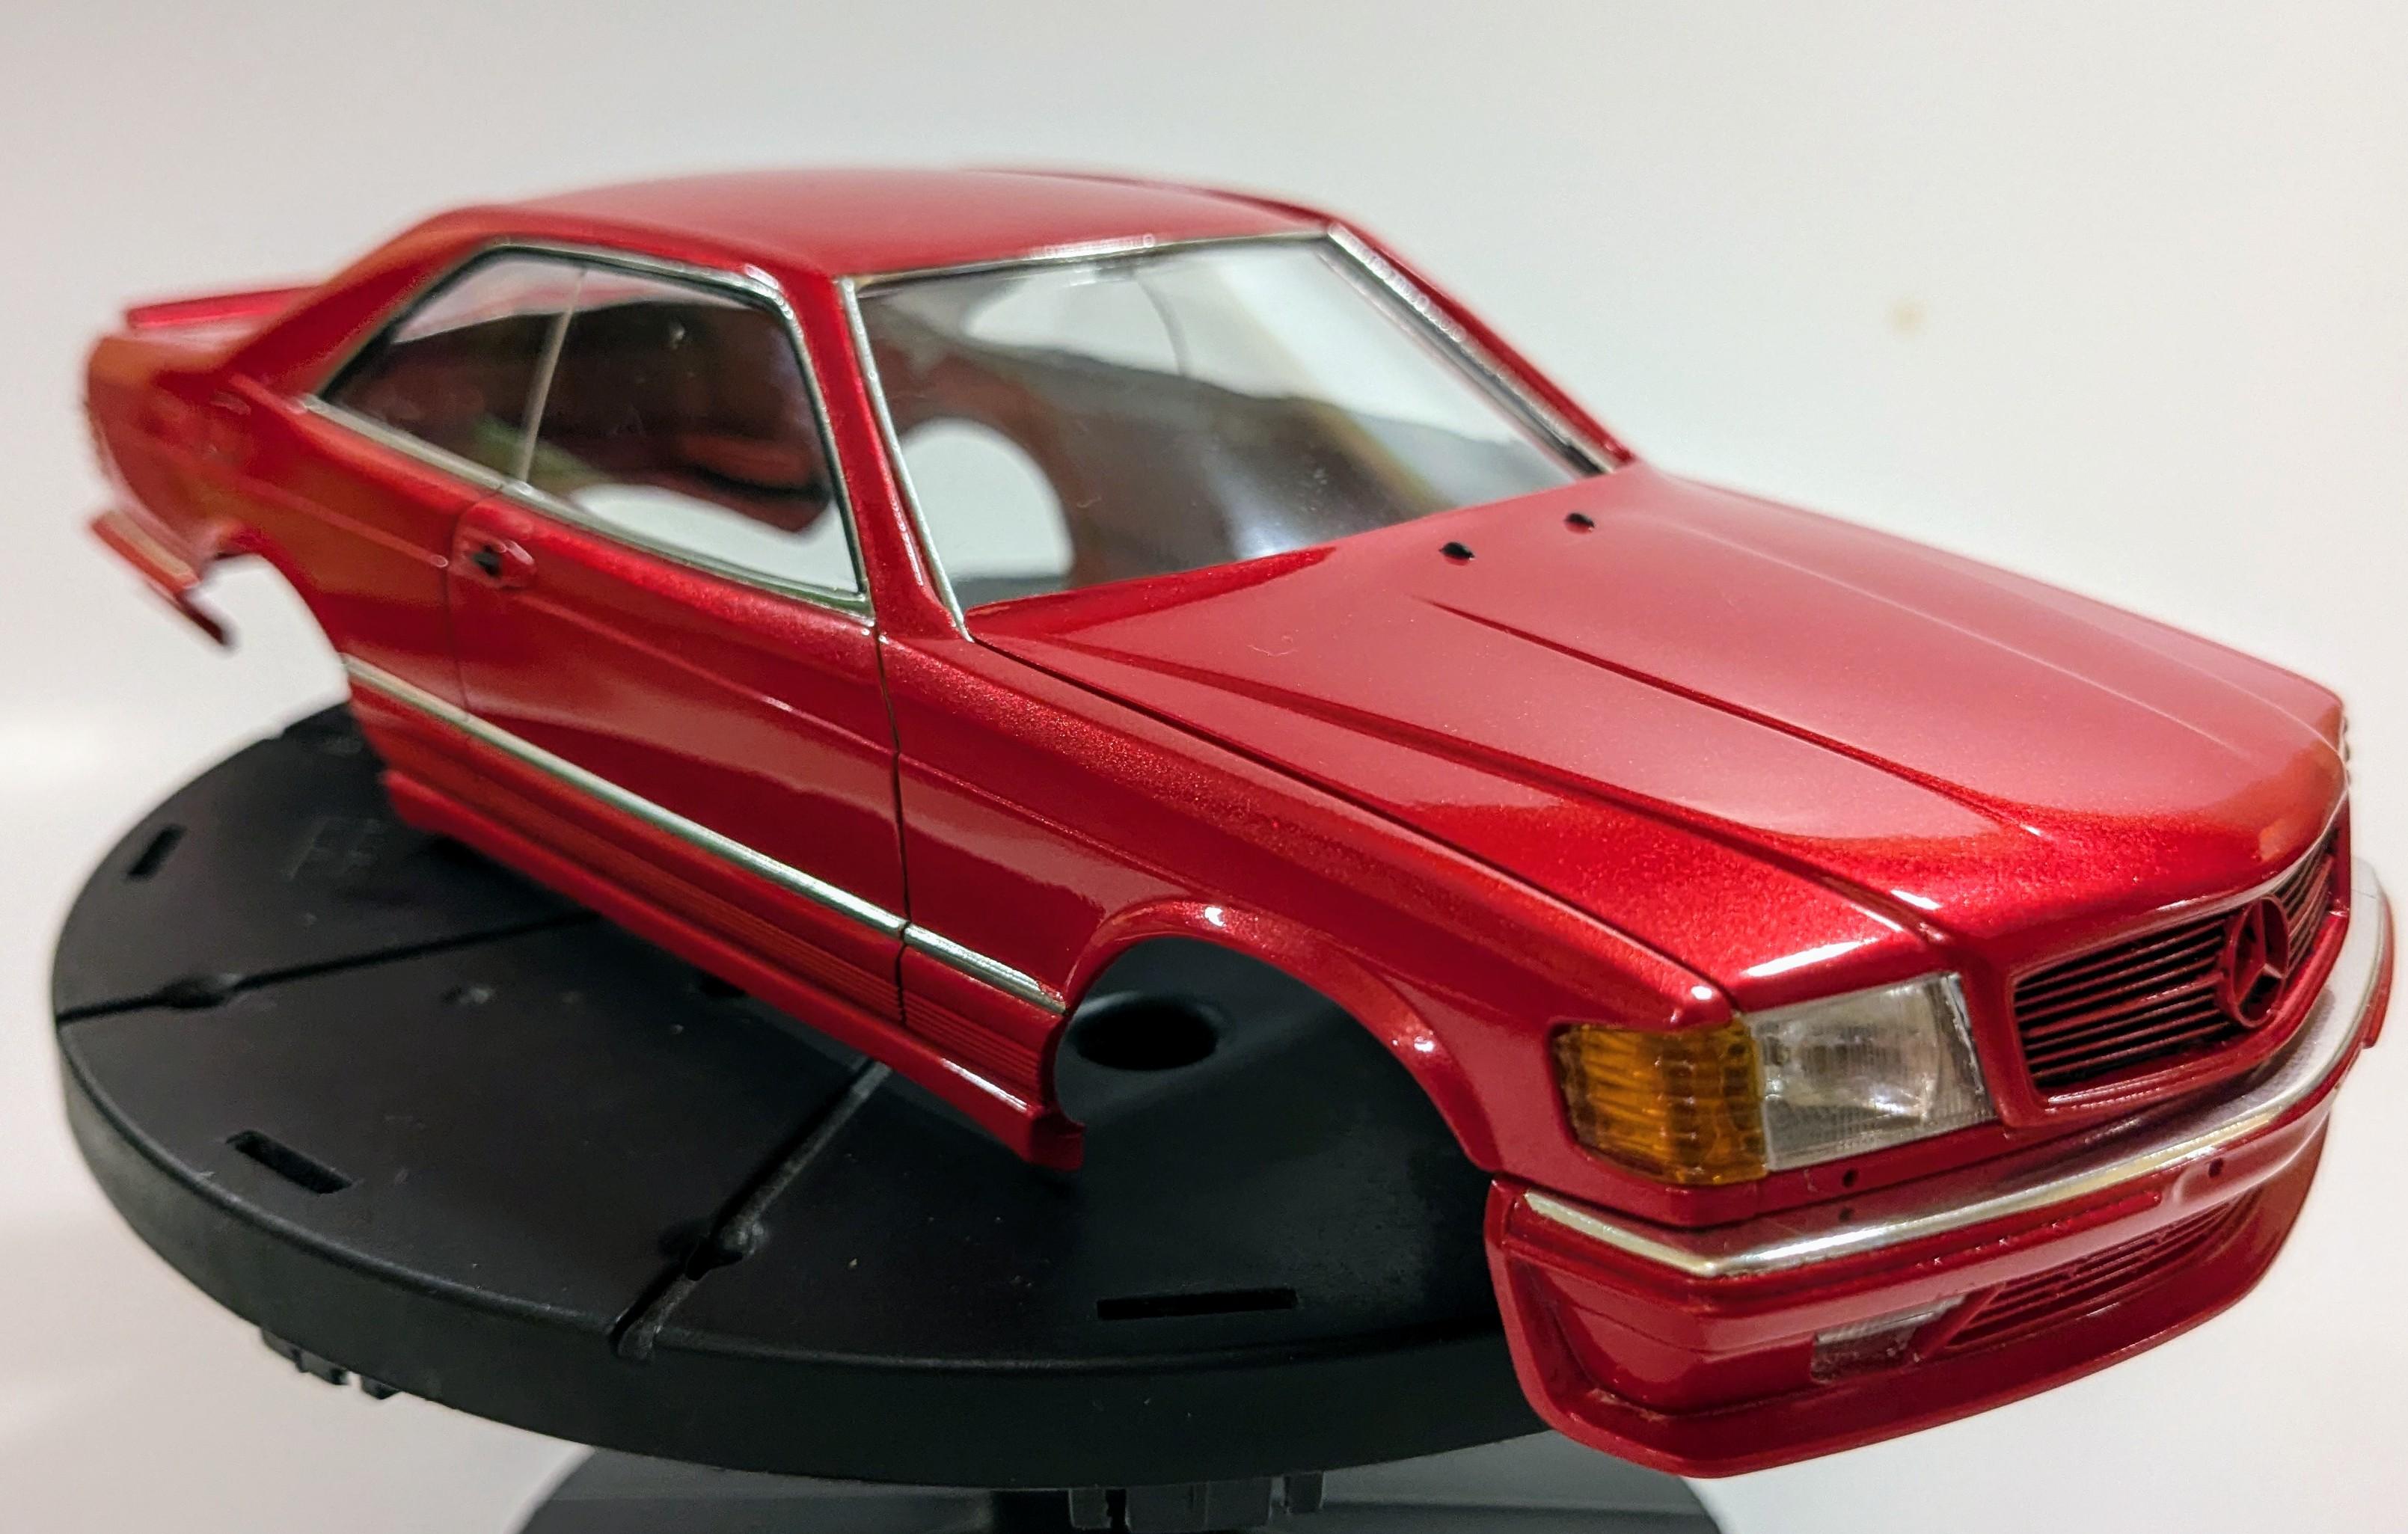
Radwood Ready... Tamiya Mercedes 500 SEC Lorinser
jaymcminn replied to jaymcminn's topic in WIP: Model Cars
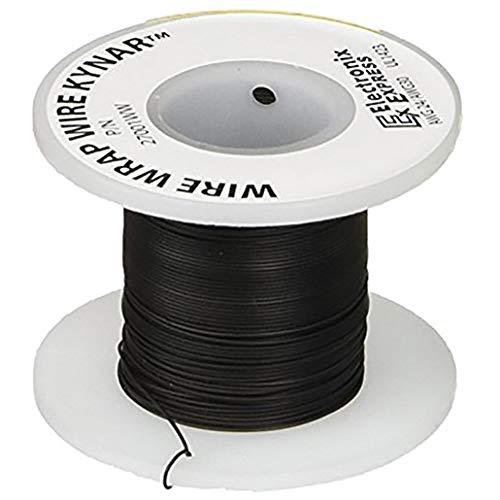
Easy, it's 30 gauge Kynar coated wrapping wire. $11.99 for 100 feet on Amazon. The Kynar coating is thinner and more flexible than standard plastic coated wire. It's my go-to for ignition wires these days.
-
Radwood Ready... Tamiya Mercedes 500 SEC Lorinser
jaymcminn replied to jaymcminn's topic in WIP: Model Cars
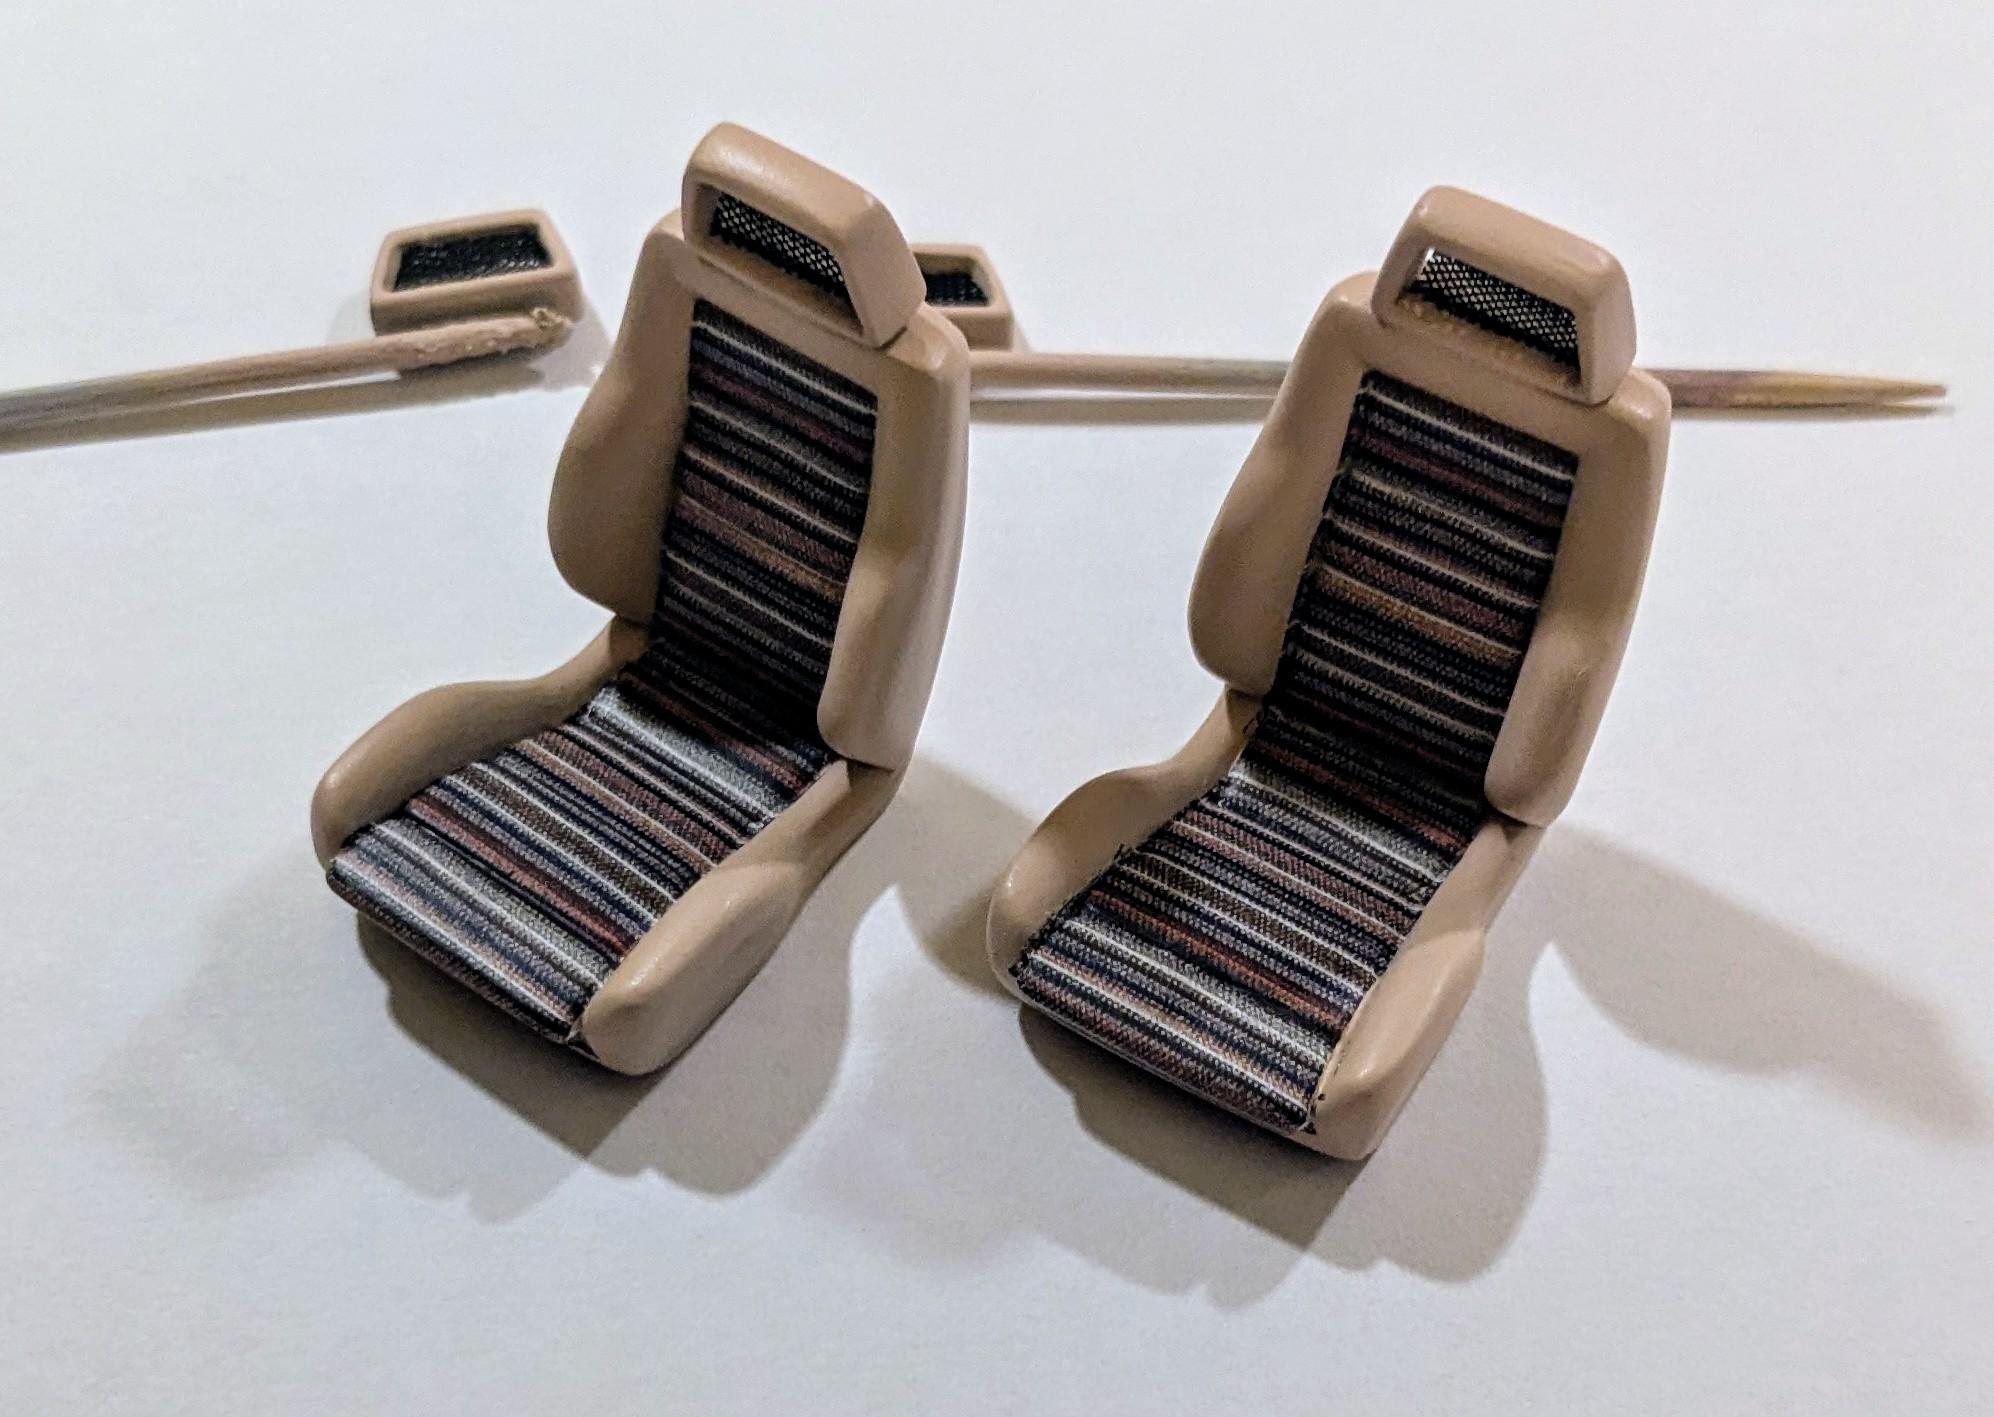
The radio is a bit taller than the molded kit piece it's installed over and butts up against the bottom of the buttons on the center stack. The AC controls would be mounted in the empty space above those buttons. I'm not sure why Tamiya didn't include those details but I wasn't too bothered about them. -
Radwood Ready... Tamiya Mercedes 500 SEC Lorinser
jaymcminn replied to jaymcminn's topic in WIP: Model Cars
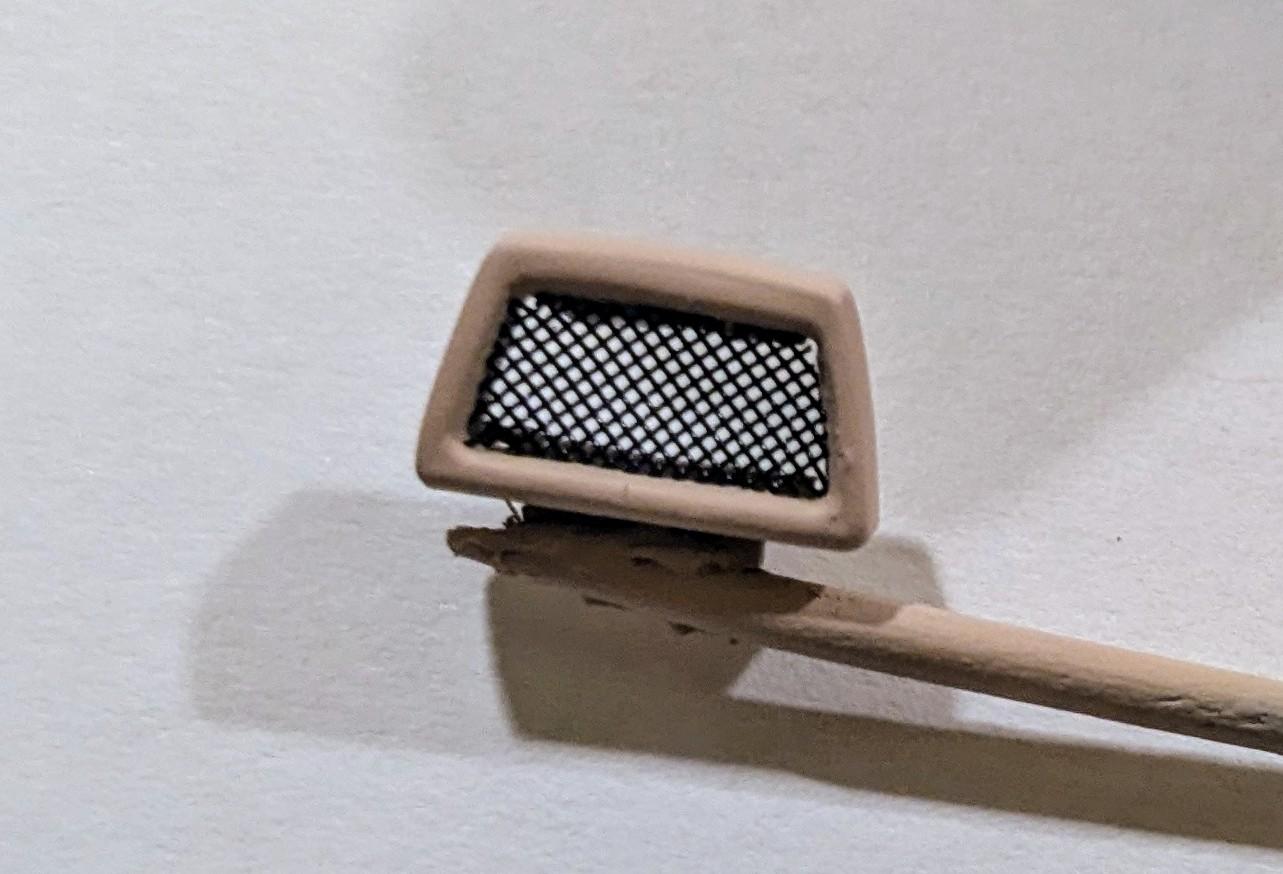
Let's try this again... Interior with custom mixed tan from Tamiya acrylics. Mr. Model "Mexican blanket" upholstery decals. Burl veneer done with thinned Tamiya acrylics with a clear orange top coat. Removed molded mesh in headrests and replaced with real mesh. Telefunken phone with cord made from 30awg wrapping wire. The interior on this kit is seriously nice and could go toe-to-toe with the best new tools of any manufacturer today. Once it's in place the interior will be very visible through those big windows so this was effort well-spent!
- 32 replies
-
- 11
-

-
Posted reply in wrong place. Internet is not my friend tonight.
-
Radwood Ready... Tamiya Mercedes 500 SEC Lorinser
jaymcminn replied to jaymcminn's topic in WIP: Model Cars
I'll post an update on this as soon as the site lets me. It's not allowing photo uploads for me right now for some reason. Grrr. -
Can't post an update with pics on a thread due to a "page can't be found" error. Any ideas?
-
Update on the new Italeri 1/12 Lancia Stratos!
jaymcminn replied to jaymcminn's topic in Car Kit News & Reviews
It's up for sale on Italeri's site. Too bad they don't seem to ship directly to the US, but it should be available through retailers that do ship here soon. -
White glue for test fit
jaymcminn replied to fcriscuo's topic in Model Building Questions and Answers
Elmer's is fine. "Aileen's Tacky Glue" is better. The nice thing about white glue is that it doesn't sink into or otherwise react with the plastic and a lot of the time you can pull the assemblies apart and peel the glue off. If it's a bit stubborn, warm water will loosen up the glue. I mostly test assemble for clearance of major assemblies, stance, etc. No need to test-fit every little part unless you're concerned they may interfere with overall fit (air cleaners, radiator hoses, etc...) I'm actually surprised that anyone would exclude clear parts such as windshields from test-fitting as they can often be the biggest culprits in causing an interior tub not to fit! -
What to build?
jaymcminn replied to Jordan White's topic in General Automotive Talk (Trucks and Cars)
I recently finished a build of the Italeri Ferrari 250GT that absolutely fell into this category. It languished in the box for years because I couldn't decide between a racing or street car, what color combination, etc. I wanted to get it right because it's unlikely I'll get my grubby mitts on another one anytime soon! Finally I started getting into "preservation class" cars and everything clicked. I built it as a resurrected barn find "gentleman's racer" and couldn't be happier with how it turned out. I'd rather wait for inspiration to hit than build something out of some obligation to get it on the shelf in a timely manner.
-
Dang Andrew, I somehow missed that this long strange trip had reached its conclusion. Every bit of the extra work you put into this replica shows!
-
Scale Motorsport shutting down
jaymcminn replied to jaymcminn's topic in General Automotive Talk (Trucks and Cars)
Got mine on Saturday, placed the order right before I started this thread on November 2. -
Batmobile
jaymcminn replied to Pierre Rivard's topic in WIP: Other Racing: Road Racing, Land Speed Racers
That duct technique is ingenious. Going to have to remember that... I might even try it with heat shrink tubing! -
Great color and nicely applied!
-
What’s your favorite clear red paint?
jaymcminn replied to Monty's topic in Model Building Questions and Answers
Sorry, this pic was actually to point out the taillights...the body color is Tamiya Mica Red over pink primer. I masked the clear section of the taillights and then airbrushed the orange. Probably about 5 thin coats. I then let it dry for a couple of days, masked off the orange areas and then hit it with the red. The orange provided a nice base coat for the red to grab onto and it only took about 3 coats to get the color I wanted. -
What’s your favorite clear red paint?
jaymcminn replied to Monty's topic in Model Building Questions and Answers
Tamiya LP lacquer clears thinned with Mr. Leveling Thinner are fantastic for airbrushing. It takes multiple coats to build up the color but the results are excellent.
-
Radwood Ready... Tamiya Mercedes 500 SEC Lorinser
jaymcminn replied to jaymcminn's topic in WIP: Model Cars
Bodywork is done except for some fragile detail bits that will go on in final assembly. The headlight and taillight buckets were painted in Molotow chrome and the red and orange lighting elements were airbrushed with Tamiya LP clear red and orange. Tamiya did a great job of molding the deeply-louvered taillights, which is a mixed blessing as they were VERY tough to mask! BMF was used for the chrome trim, and the work I put in on the body prep paid off again as the lines are much sharper than they would otherwise have been. Still to be added are the headlight wipers and a PE three-pointed star for the boot lid. I used a mix of thinned red and black Revell acrylics for the panel lines. On to the pics... Next update will be wheels and chassis while I dither about exactly what to do with the interior. Stay tuned!
- 32 replies
-
- 12
-
-
Radwood Ready... Tamiya Mercedes 500 SEC Lorinser
jaymcminn replied to jaymcminn's topic in WIP: Model Cars
Thanks Justin! Agreed that it's a really good kit. I built one when I was 13 or so and was pretty pleased with it at the time. Like most of their 1/24 kits of the time it's an easy box-stock build and not difficult to detail up. The only fitment issue so far is a slightly wide rear track that was easily corrected. Thanks Bob! Not quite RS, the kit wheels are earlier "Mahle" wheels with exposed lug nuts and no bolts around the perimeter. I was toying with a set of 17" RG's I have in the stash but the kit's rolling stock is perfect for what I'm envisioning. More pics soon, foil work and lighting elements are done on the body and the aforementioned wheels have been detailed a bit with valve stems and paint! -
Having built one of these beasts I can give you some insight... the fit issues are REAL. The backbone chassis will need some trimming at the top to bring the ride height down. I also had to move the front spindles up to get the nose level. You'll also want to add positive attachment points for the front and rear bumpers and side skirts as the kit's attachment points are vague and minimal.. These kits are complex and challenging and a nce replica can be built from them, but test fitting is necessary every step of the way!
- 43 replies
-
- 12
-
-

-
Just what winds up under the sofa...
-
Scale Motorsport shutting down
jaymcminn posted a topic in General Automotive Talk (Trucks and Cars)
If you need carbon fiber decals, Wizard "O"s or any number of detail bits, Scale Motorsport is sadly shutting down with 50-75% off of their regular prices. There are some great deals over there while they last. I stocked up on carbon fiber and upholstery decals as well as Wizard Os and PE saw blades.