jaymcminn
-
Posts
1,762 -
Joined
-
Last visited
Content Type
Profiles
Forums
Events
Gallery
Everything posted by jaymcminn
-
 Got paint (Tamiya Pearl Green and TS13 clear) on my Ebbro Citroen DS21. The other panels are painted too except for the roof, which will be black. After a few days drying time I'll polish with Meguiar's Ultimate compound and polish. No dust, boogers or cat hair in this one!
- 39,276 replies
-
- 3
-

-
- johan
- glue bombs
- (and 1 more)
-
Didn’t really know where to post this.(Barrett Jackson)
jaymcminn replied to NYLIBUD's topic in The Off-Topic Lounge
Barrett Jackson- Tommy Bahama, Oakleys, light beer. Gooding & Co- Brooks Brothers, Ray-Bans, Simi chardonnay. Artcurial (Retromobile)- Armani, Persols, Veuve Cliquot. At least everybody's still day-drunk. Several years ago it was '70 Chevelle SS454s. It seemed like every other car on the block was yet another '70 SS454. That was what cured me from watching B-J. It's just an endless parade of high-dollar me-too mobiles punctuated by dimwitted commentary and the occasional insanely overpriced tax-deduction charity car. The "cheap cars" on the early days are definitely more interesting... as the price goes up the interest level goes down. -
Very nice build. It shows what a skilled builder can still do with those old Italeri Ferraris!
-
Tamiya putty, applied thin with a pallette knife. Allow it to dry for a day or two then sand using sanding sticks like Greg posted above. (top tip... you can get the same basic thing at Sally Beauty supply!). Prime, sand, and you should be good.
-
Looking for a Good Maroon Color
jaymcminn replied to Jim B's topic in Model Building Questions and Answers
Make sure to take the pot off the burner first...? -
Lovely. I'm just at the "admiring the parts while waiting for bits to show up" stage now. It actually only arrived a few days ago from a German eBay seller. First impression is that the molding is really nice, even better than the Alfa 8c from 2020. The decal sheet is excellent (printed by Cartograf) and includes incredibly convincing turned aluminum decals for the dash and firewall. I'm going to replace the fake leather/canvas material for the hood straps with real leather like I did on my Fiat Mefistofele. I have a set of 3d-printed wire locks for it coming from Unobtanium in the UK as well.
-
Just saw in News/Reviews that Italeri's next 1/12 release will be a Lancia Stratos. I'm chuffed that one of my favorite cars is going to be released in my favorite scale by a manufacturer that's been on a hot streak lately. It's great that Italeri has stepped into the large-scale arena and is obviously doing well enough there to continue developing 1/12 scale kits. If they keep releasing them I'll keep buying them!
-
Italeri is getting waaaay too much of my money (and my display space) lately. In the last 3 years I have purchased their Alfa 8c, Fiat Mefistofele, Lancia Delta Integrale and I just got my Bugatti 35b, which I can't wait to get started on. After the Delta Integrale this was a pretty logical next rally car release, and I couldn't be happier. The old Doyusha kit was the only game in town before and costs a fortune these days. Hopefully we get a Lancia 037 in 2024!
-
Looking for a Good Maroon Color
jaymcminn replied to Jim B's topic in Model Building Questions and Answers
Tamiya maroon will be very different over different primers. This is over Tamiya Red Oxide primer... And over Tamiya grey primer. Tamiya requires 3-4 mist coats applied about 5 minutes apart to build up a base and 3-4 wet coats after. Most of my builds are finished with Tamiya and I never have coverage issues.
-
Very cool. Great execution of an interesting idea.
-
This turned out really well. The detail work is fantastic!
-
Lamborghini Gallardo, my driven birthday present rebuilt in 1/24
jaymcminn replied to thebavarian's topic in Model Cars
Very nice, clean build of the prettiest of the VAG-era Lamborghinis. Well done! -
Toyota finally laid off the "more is more" styling approach for this generation. Better engines, nicer interiors, clean and crisp styling (although I do agree the roofline is a little wonky). It's a very good option for those of us who aren't quite ready to go fully electric.
-
Monogram Lotus Esprit 300
jaymcminn replied to Classicgas's topic in Model Building Questions and Answers
It represents a 1994. Nice kit with a lot of detail but quite a few challenges involved. It tends to sit very nose-high out of the box and the rear fascia and side skirts take some fettling to get them to fit right. I built this example about 6 years or so ago.
- 1 reply
-
- 1
-
-
When you build a lot of Japanese and European stuff you get stuck ordering a lot from Japan and Europe. Most US sellers won't stock a lot of the trans kits and detail stuff I need for my builds. Hiroboy is usually fantastic for shipping, I can't get too bent out of shape at them for the Royal Mail's issues.
-
Great use of weathering and excellent detail!
-
INTERNATIONAL SHIPPING! I ordered the new 1/12 scale Italeri Bugatti 35b from a German eBay seller on 12/25 and it just now has hit US shores. The seller sat on it for more than a week before processing the order and then it sat for another 11 days before moving from Frankfurt. Simultaneously, a large order I placed from Hiroboy in the UK is currently just sitting there due to a cyber attack on the Royal Mail that led them to shut down international deliveries. It's pretty frustrating.
-
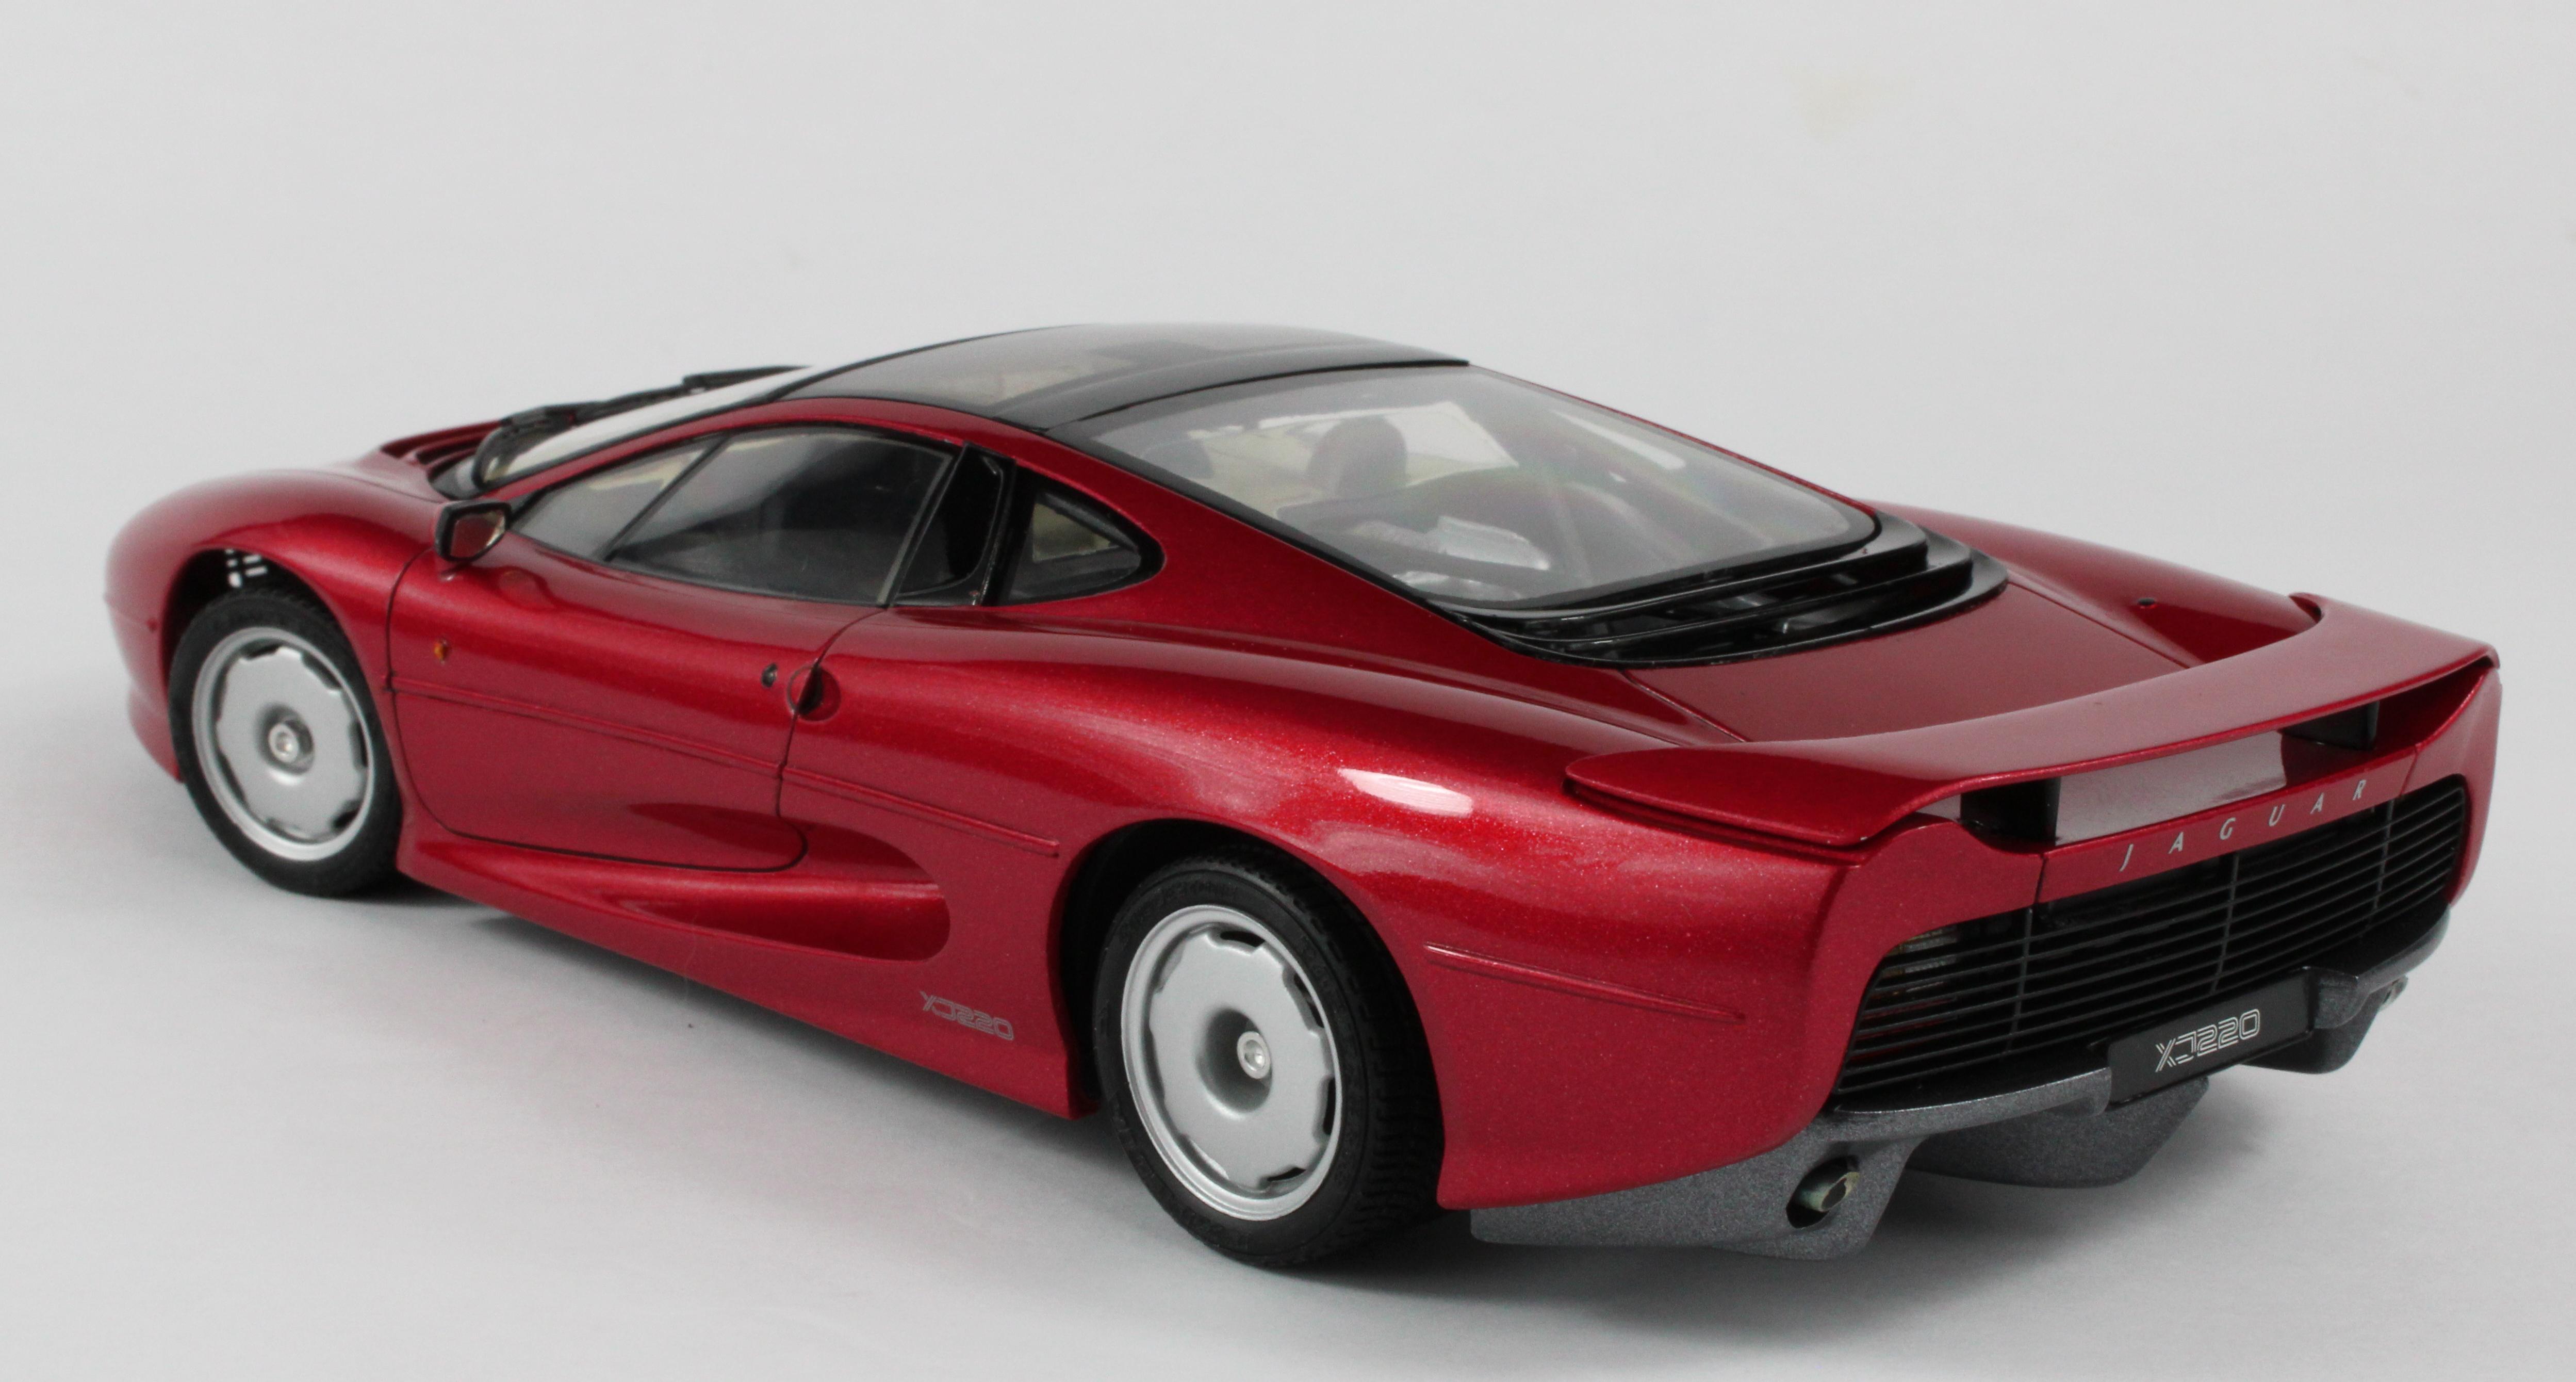
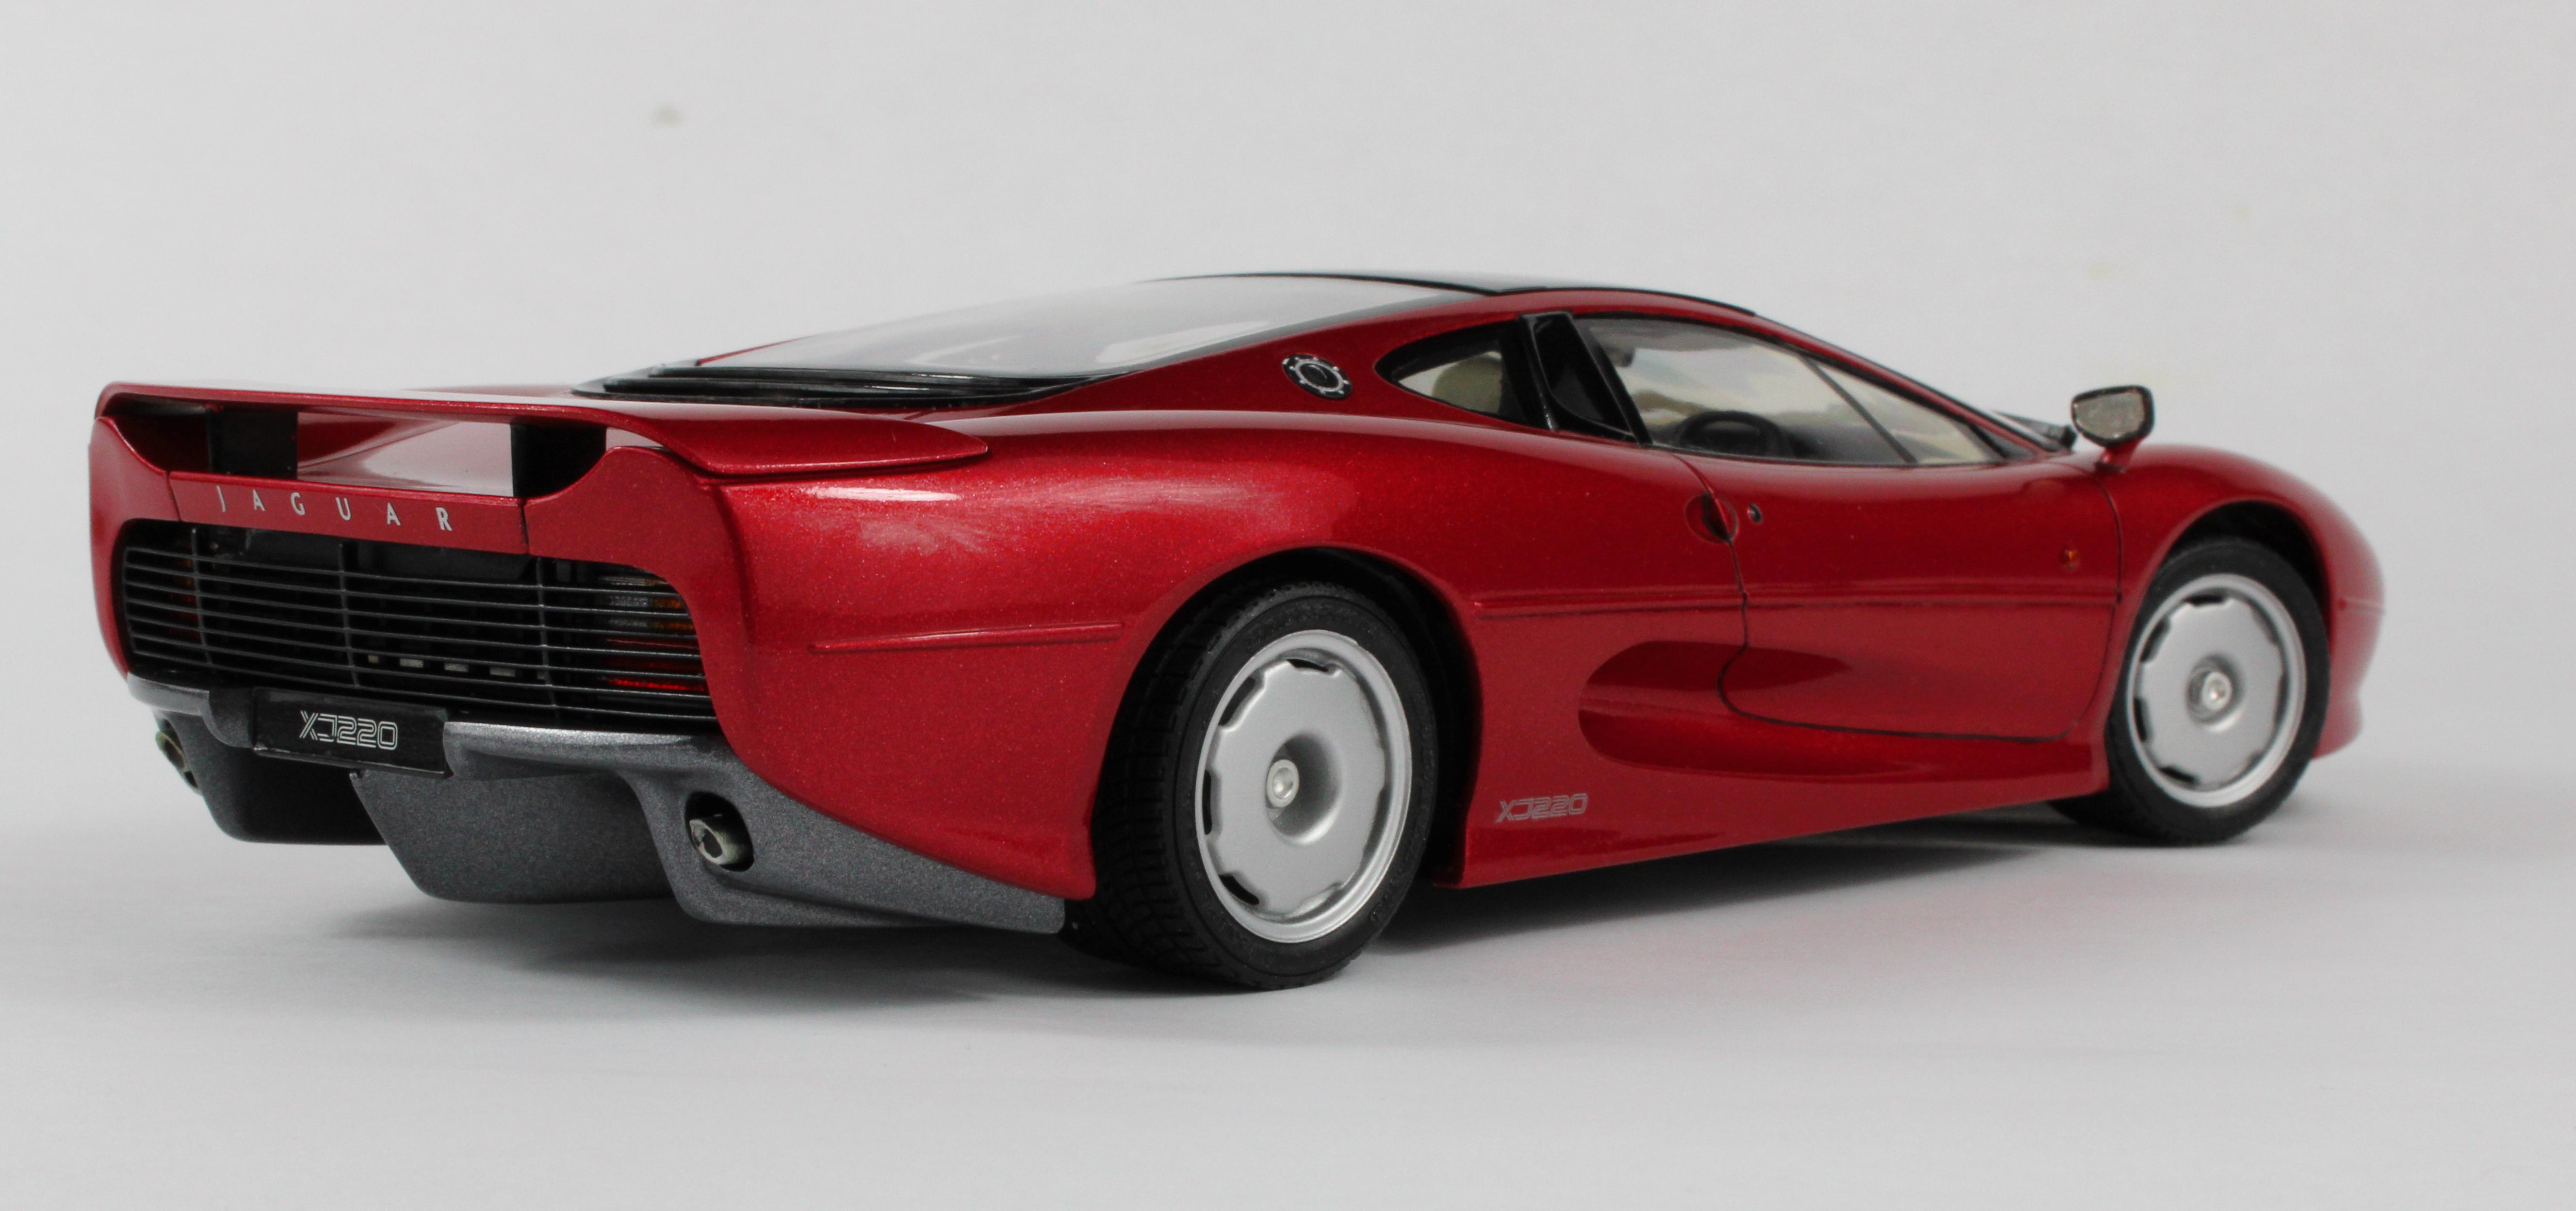
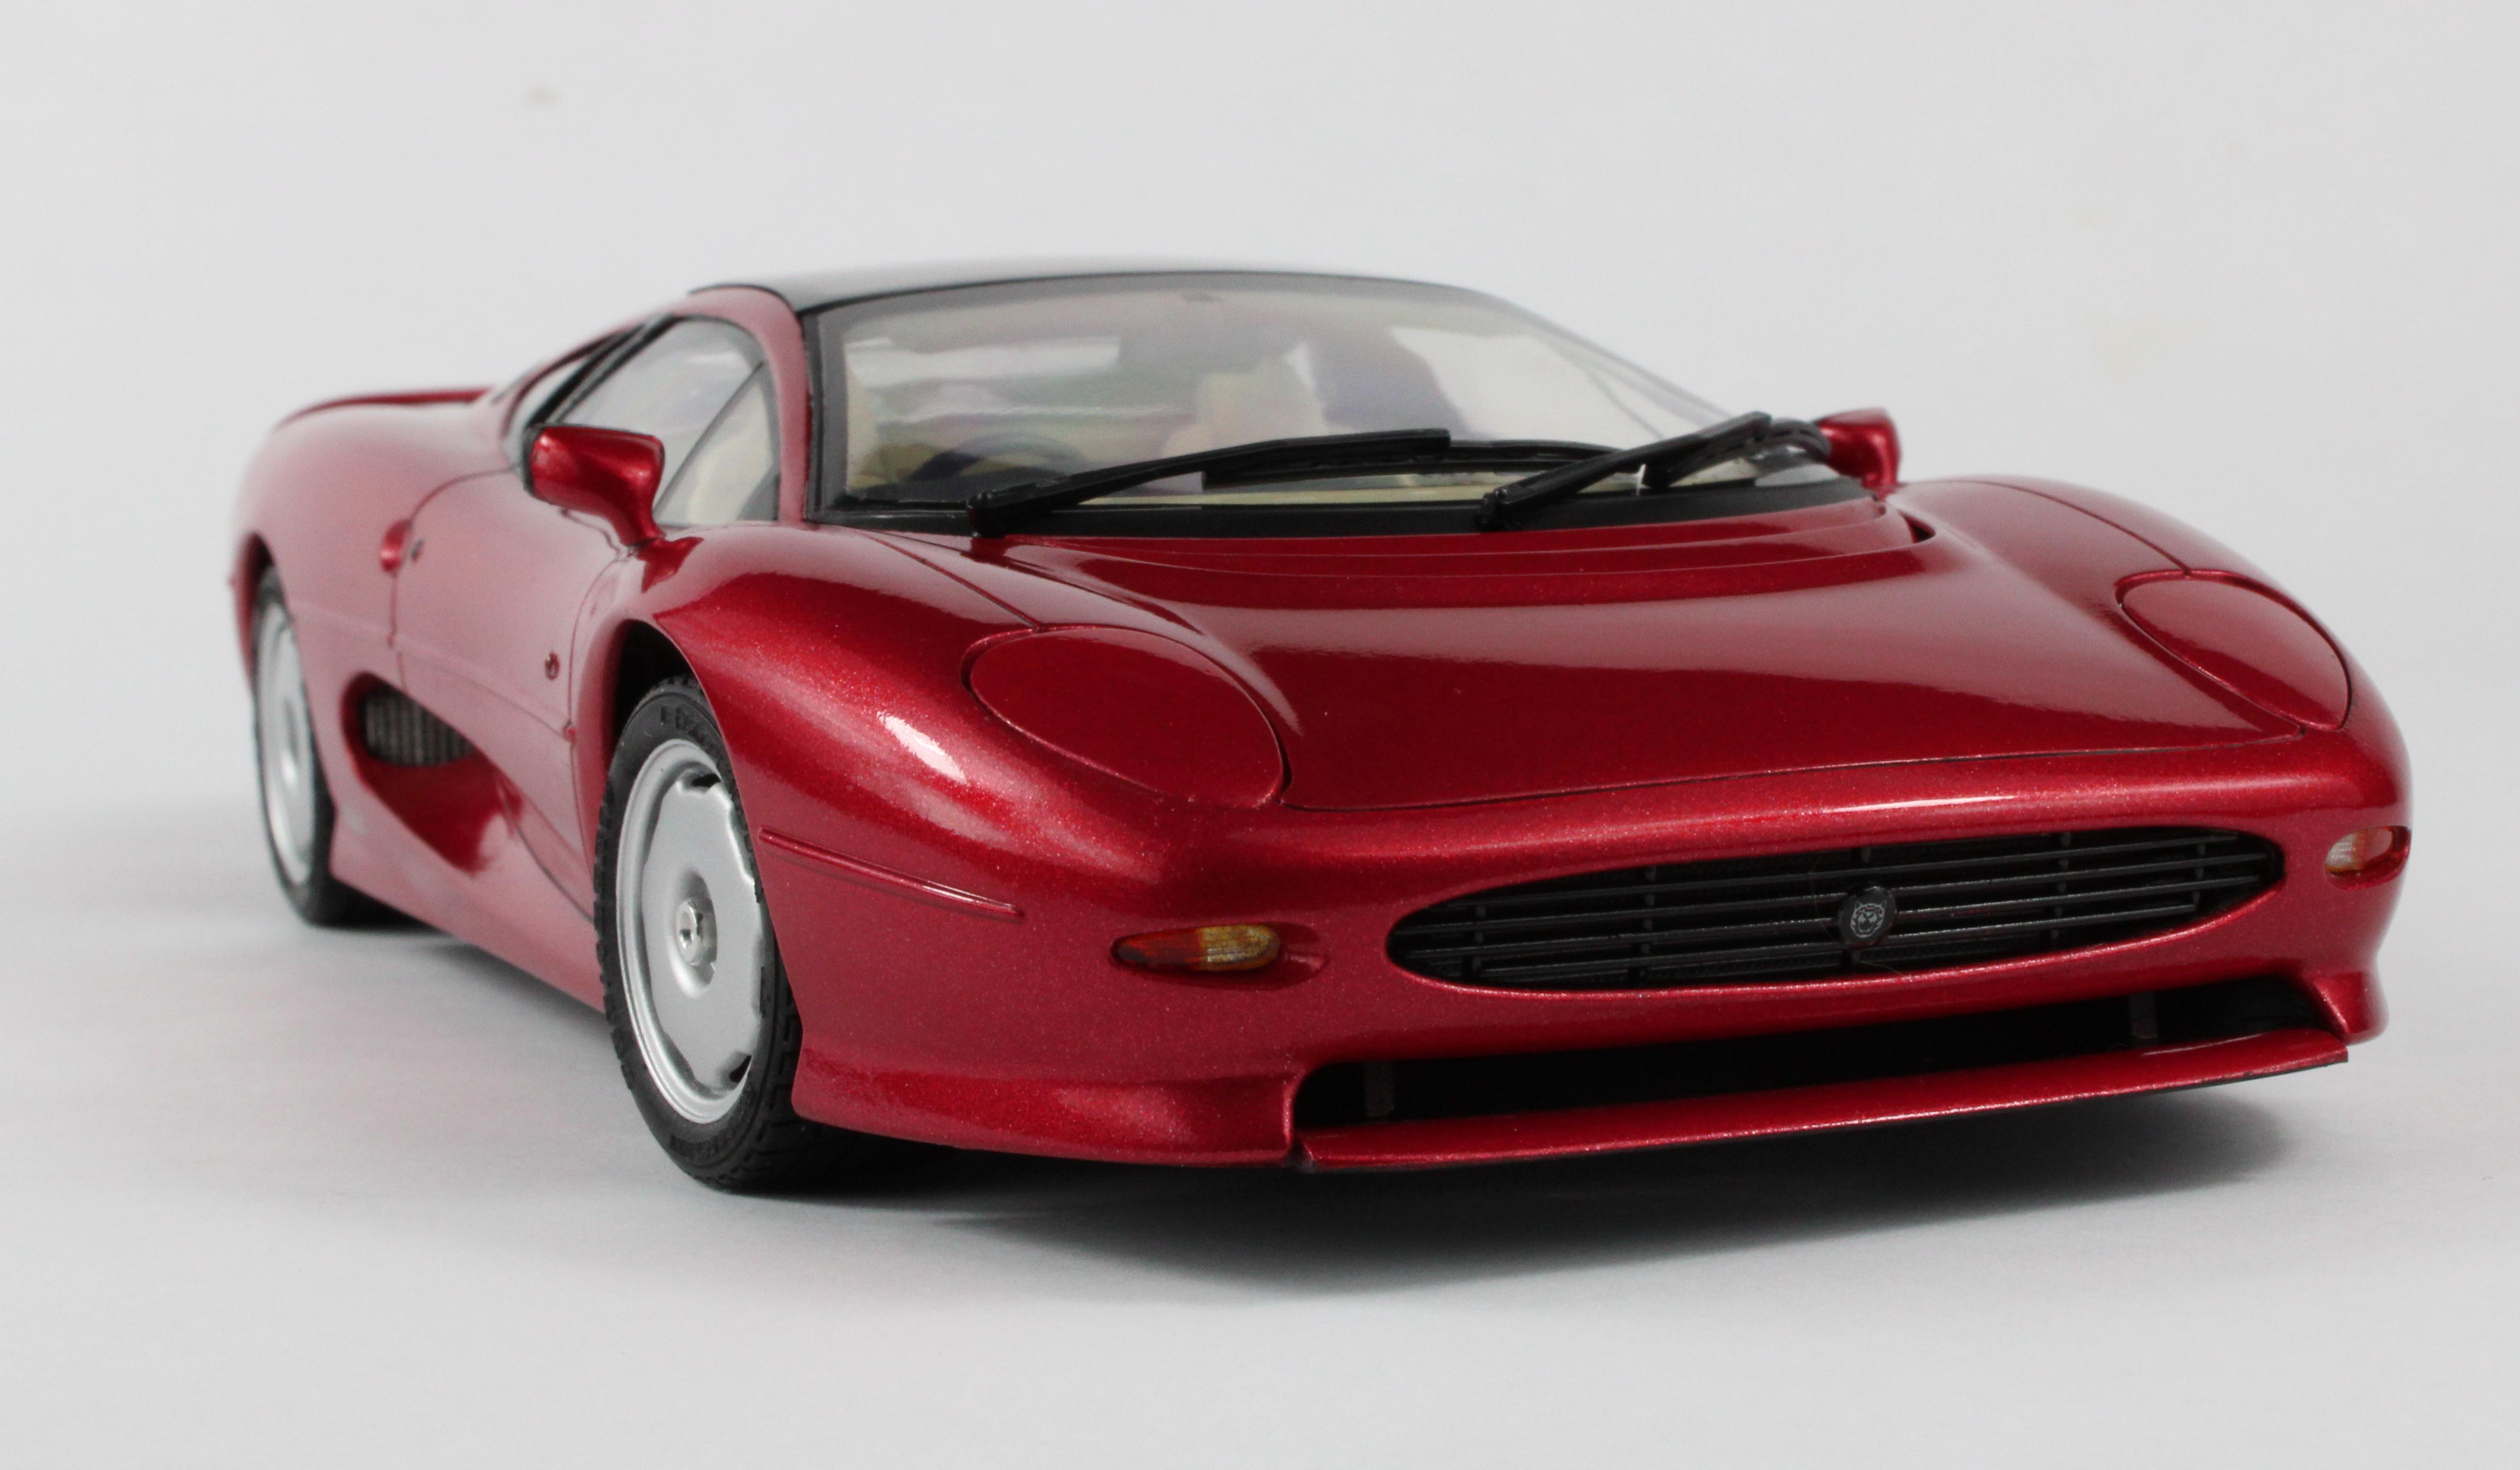
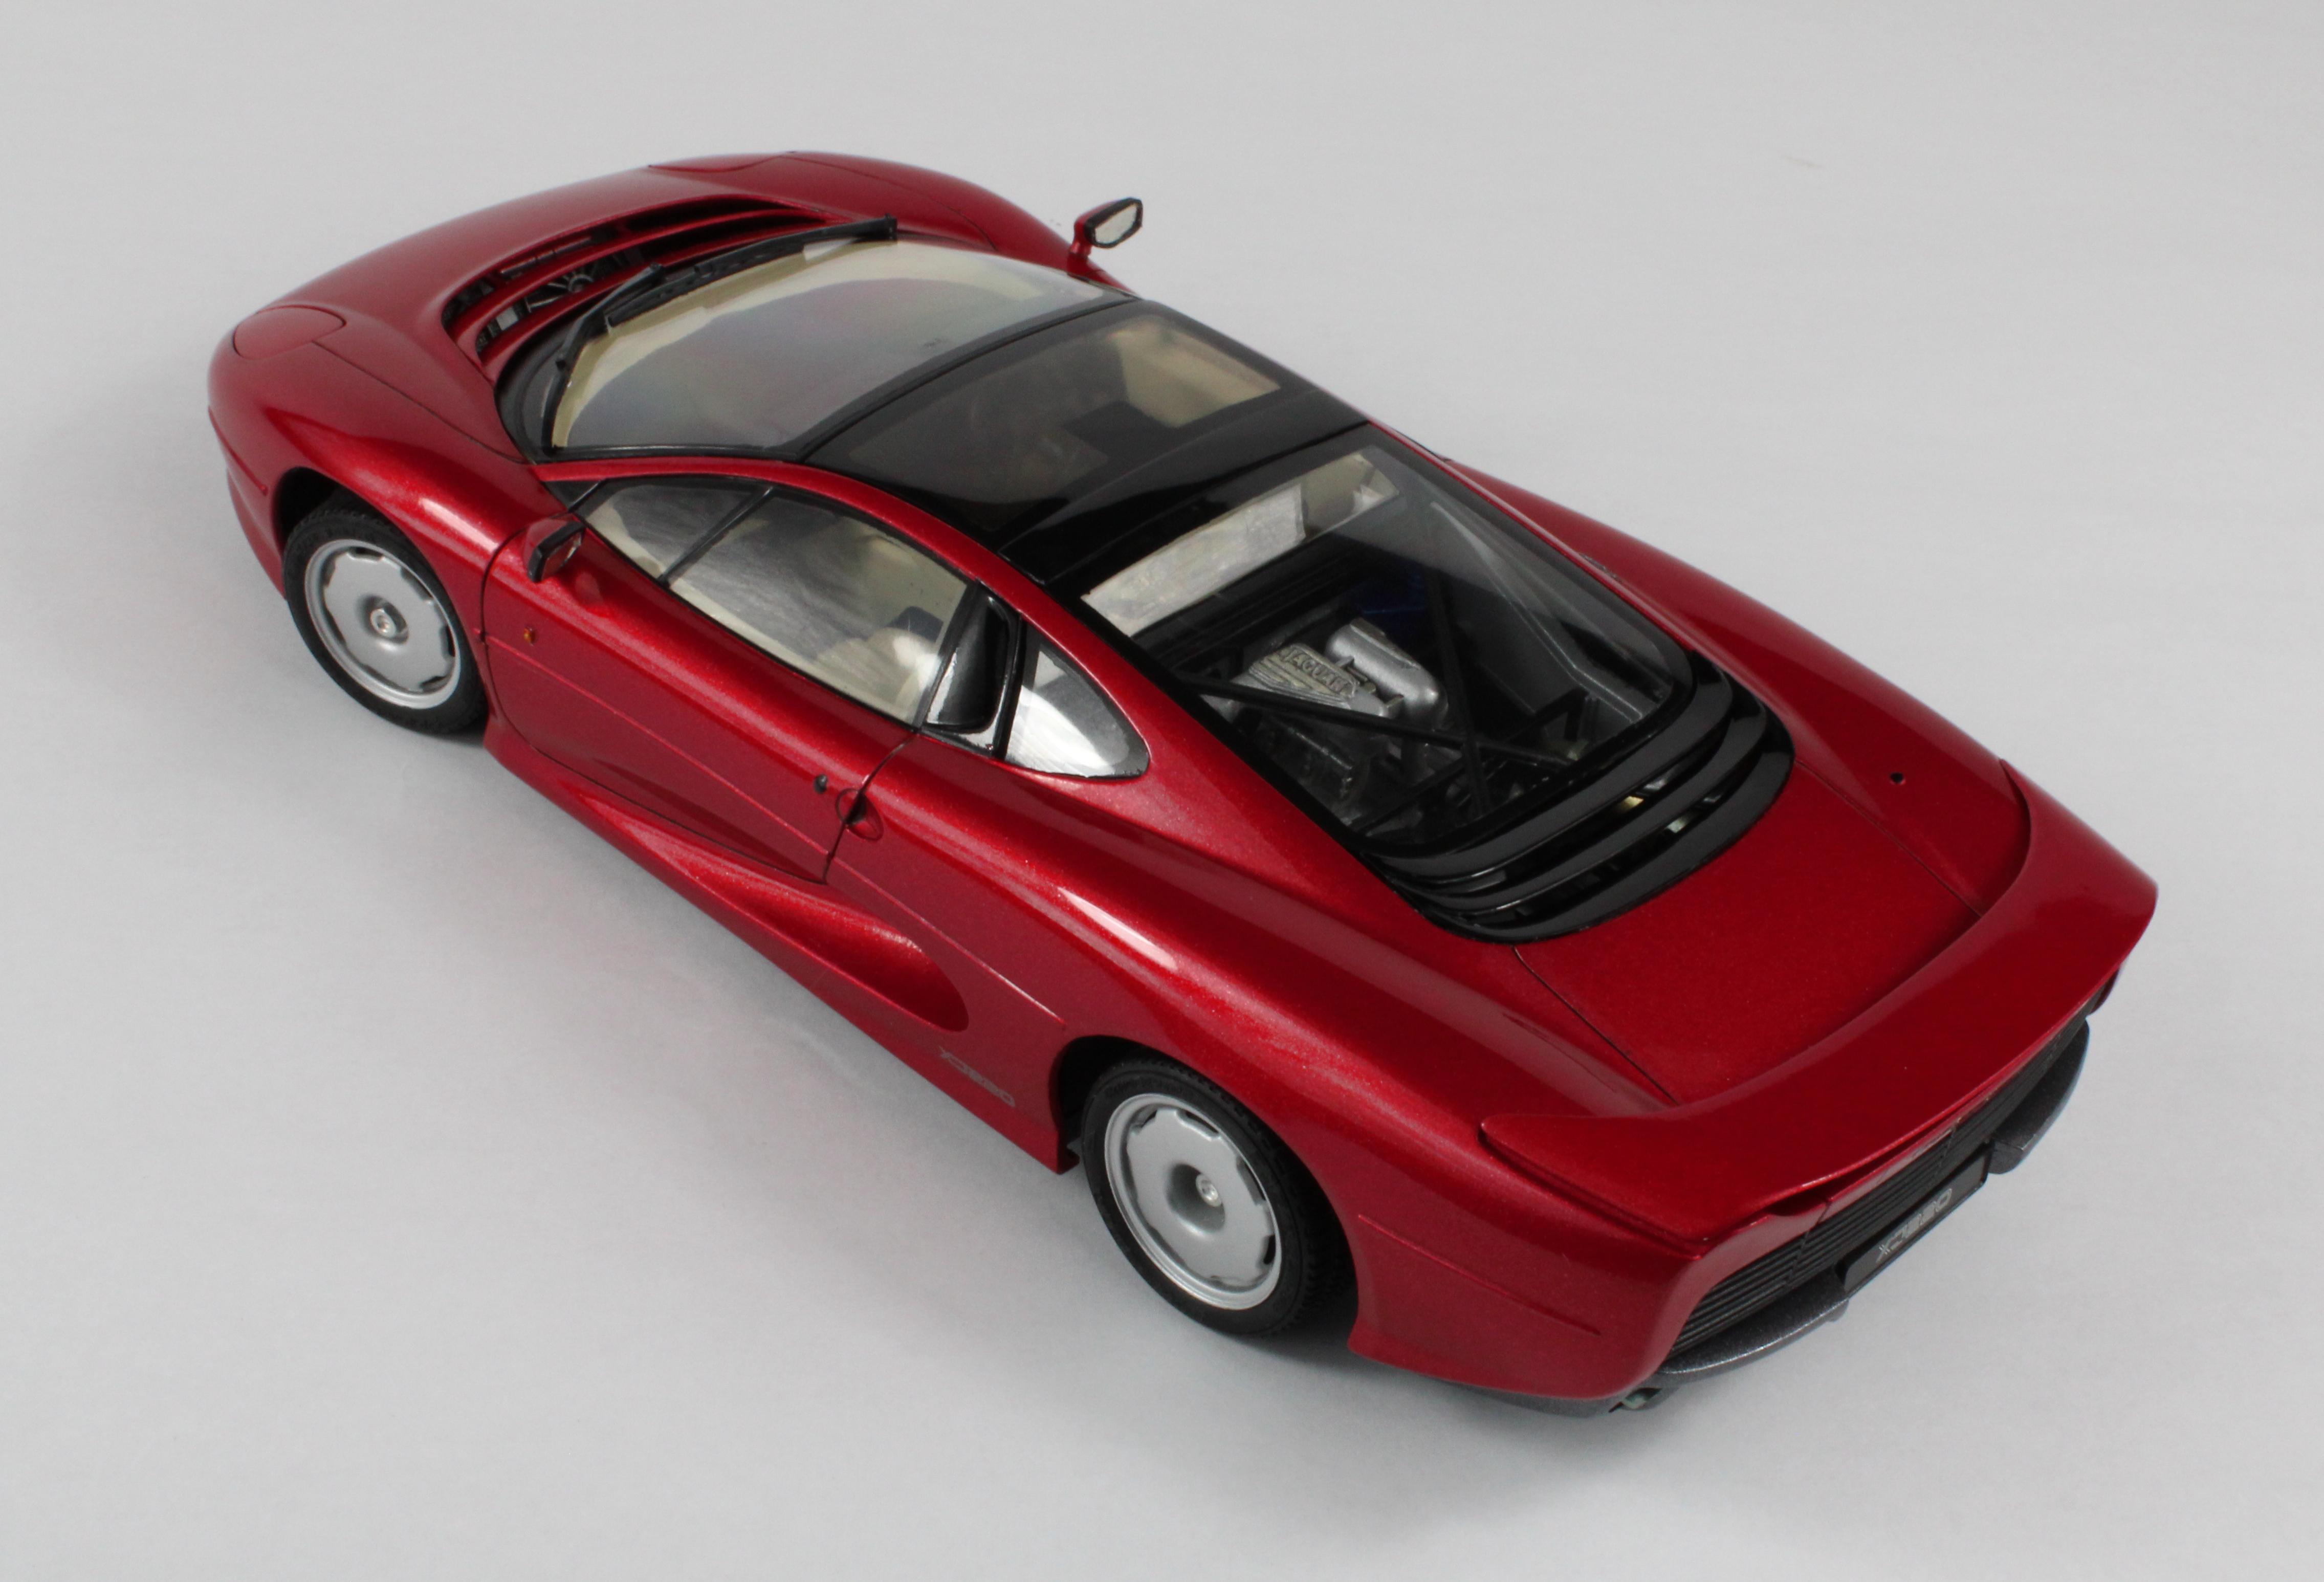
As Francis Bacon said, "There is no excellent beauty that hath not some strangeness in the proportion". Jaguar could have used that quote in the promotional materials for the XJ220. It does accomplish its mission of looking like it's doing 220mph while just sitting still, though.
-
I NEED A MODEL CAR IDEA
jaymcminn replied to yo mama's topic in Model Building Questions and Answers
As far as first posts go, this one is pretty random. -
Thanks! Italeri and AMT both kitted this car up as well. The Tamiya kit was state-of-the-art at the time and is still a nice, if occasionally challenging, kit. The XJ220 is definitely an interesting car... I won't go into a history lesson but its development was troubled, to say the least! Matt Bacon on this forum a few years back did a really nice build of this kit with fantastic engine bay detail. It shows what's possible with a little extra work. I always like to play with color a bit, and the metallic/pearl red seemed a perfect choice for a car that can seem a bit "flat" in the most common colors. Thanks!
-
Great job getting this to fit together as well as you did. These old Heller kits aren't for the faint of heart!
-
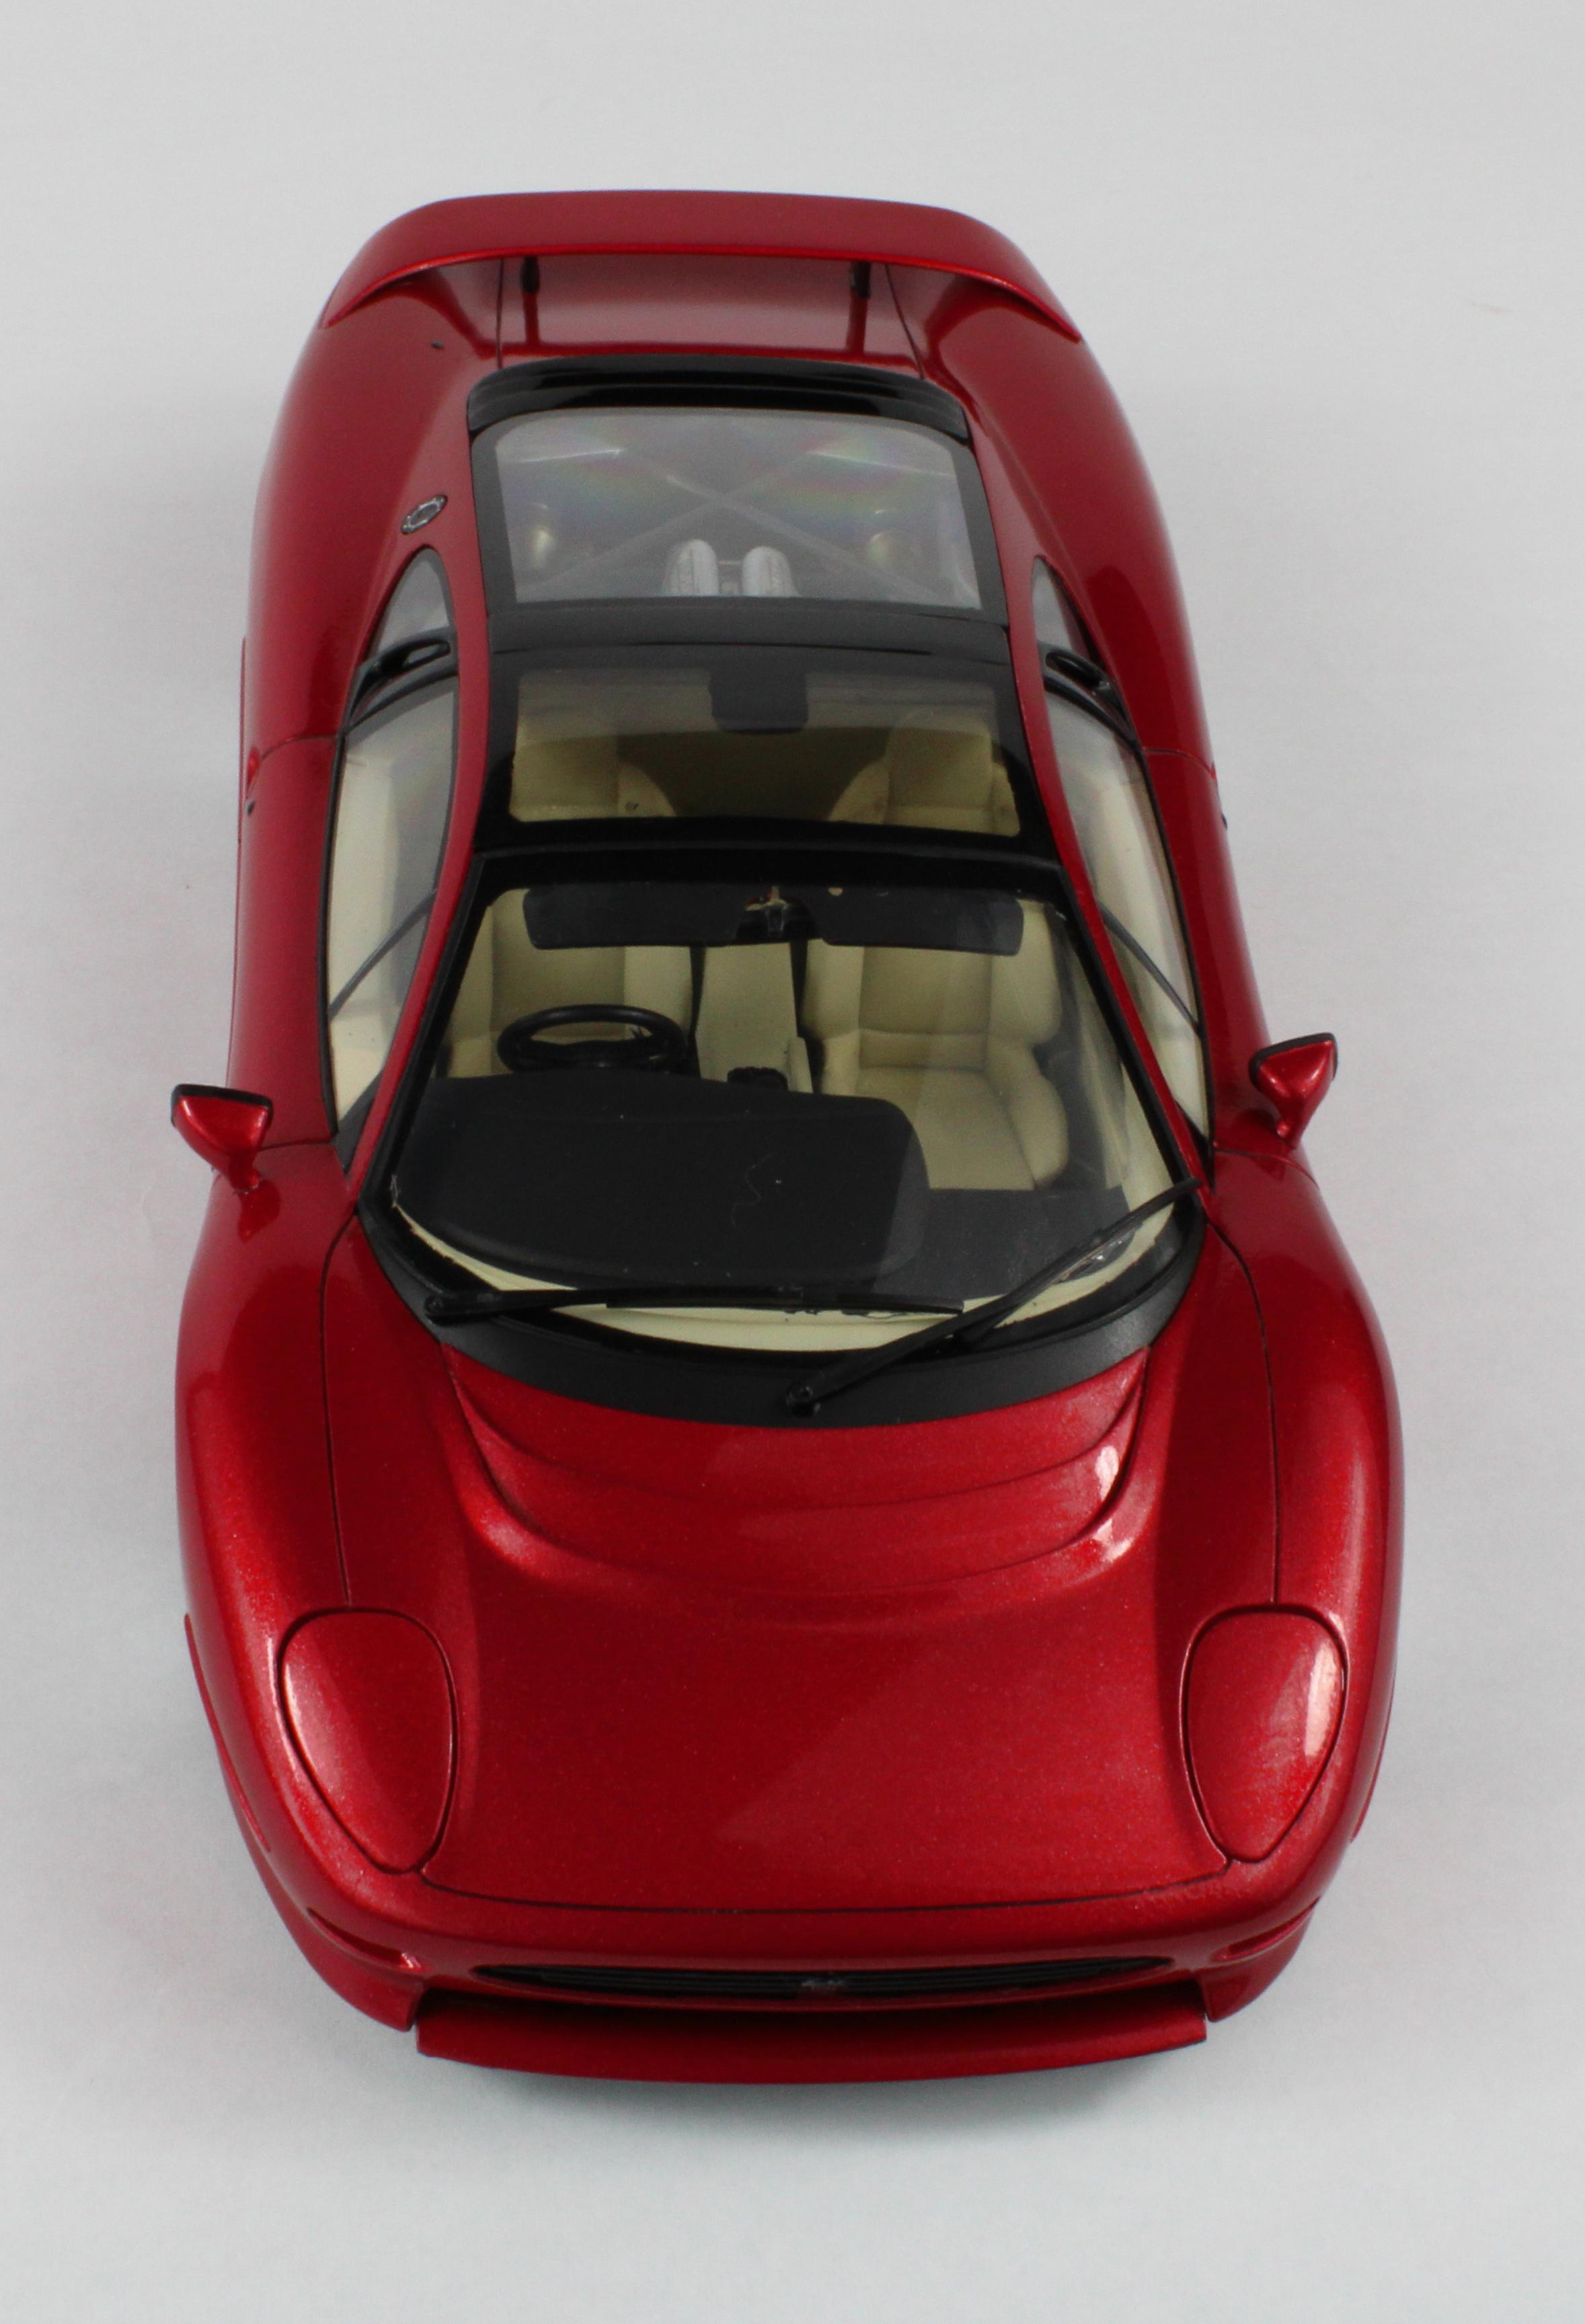
Last week, after nearly three years of dodging that particular bullet, the Virus That Shall Not Be Named finally got me. After two days of praying for death followed by a day of just sleeping, I started looking for something to kill the time while I was still quarantined. About three years ago as well, I put a very nearly finished Tamiya Jaguar XJ220 back in the box because my 1/12 Italeri Alfa Romeo 8c showed up and I wanted to get stuck in. The Jag has been patiently waiting all this time... When I opened the box I realized that a lot of good work had gone into this kit. It was basically ready for final assembly when I packed it in. The paint is Tamiya Metallic Red with a cream interior. I basically built it box-stock with the exception of embossing-powder carpet and assembly stuff like pinning the mirrors. When I test-fitted the chassis and body shell together I remembered another reason it went back into the box: a big warp in the chassis that made it nearly impossible to seat properly. THis issue was exacerbated by Tamiya not including any sort of positive attachment point for the chassis. This led me to my favorite modeling challenge... trying to re-engineer finished components without disturbing a really good paint job. I added tabs at the nose that allowed me to glue the front end down and extensions at the side of the chassis plate that allowed it to snap into the body shell, which also drew the warp out of the chassis. Problem solved. This is a good kit, but comparing it to modern Tamiya releases isn't quite fair. The engineering isn't nearly as good. Many components, like the side windows, are designed with little thought as to how they're supposed to be attached. I was able to use Krystal Klear to get everything into place cleanly. I did glue the headlight covers into place because the kit headlights are fairly terrible and i preferred to make sure the covers were flush. Wheels were finished with Testors Aluminum Plate Metalizer (R.I.P). The Jaguar lettering is a kit transfer and went down perfectly. I just wish they'd done the mirror faces as well! Overall, this is an excellent kit that builds up nicely out of the box. As long as you're not expecting 2023 levels of Tamiya engineering perfection, you won't be disappointed. Anyway, on to the pix!
- 22 replies
-
- 11
-
-
Anyone ever see a Nakamura - Lamborghini Marzal?
jaymcminn replied to 89AKurt's topic in Model Building Questions and Answers
I've seen the parts breakdown and it might be worse than the Merc. -
I've been using Vallejo Metal Colors a lot lately. They take masking really well to duplicate shading differences between different panels. Aluminum and Duraluminium will be the two colors you'll use most. Keep in mind that Mustang wings were actually painted in aluminized lacquer from the factory, as panel gaps were filled and the whole wing coated with a heavy primer to create the smoothest possible surface. The best way to replicate this would probably be a matte aluminum paint like Tamiya XF16.
-
If you have intact chrome plating on the parts you can airbrush Tamiya clear yellow with a tiny amount of Tamiya smoke mixed in to approximate gold over the chrome. When kit manufacturers did "gold plating" back in the day it was a clear lacquer over the kit chrome plating.


.JPG.539d9f7f7c2faf953ab1ed30e59b21d4.JPG)