

jaymcminn
-
Posts
1,762 -
Joined
-
Last visited
Content Type
Profiles
Forums
Events
Gallery
Everything posted by jaymcminn
-
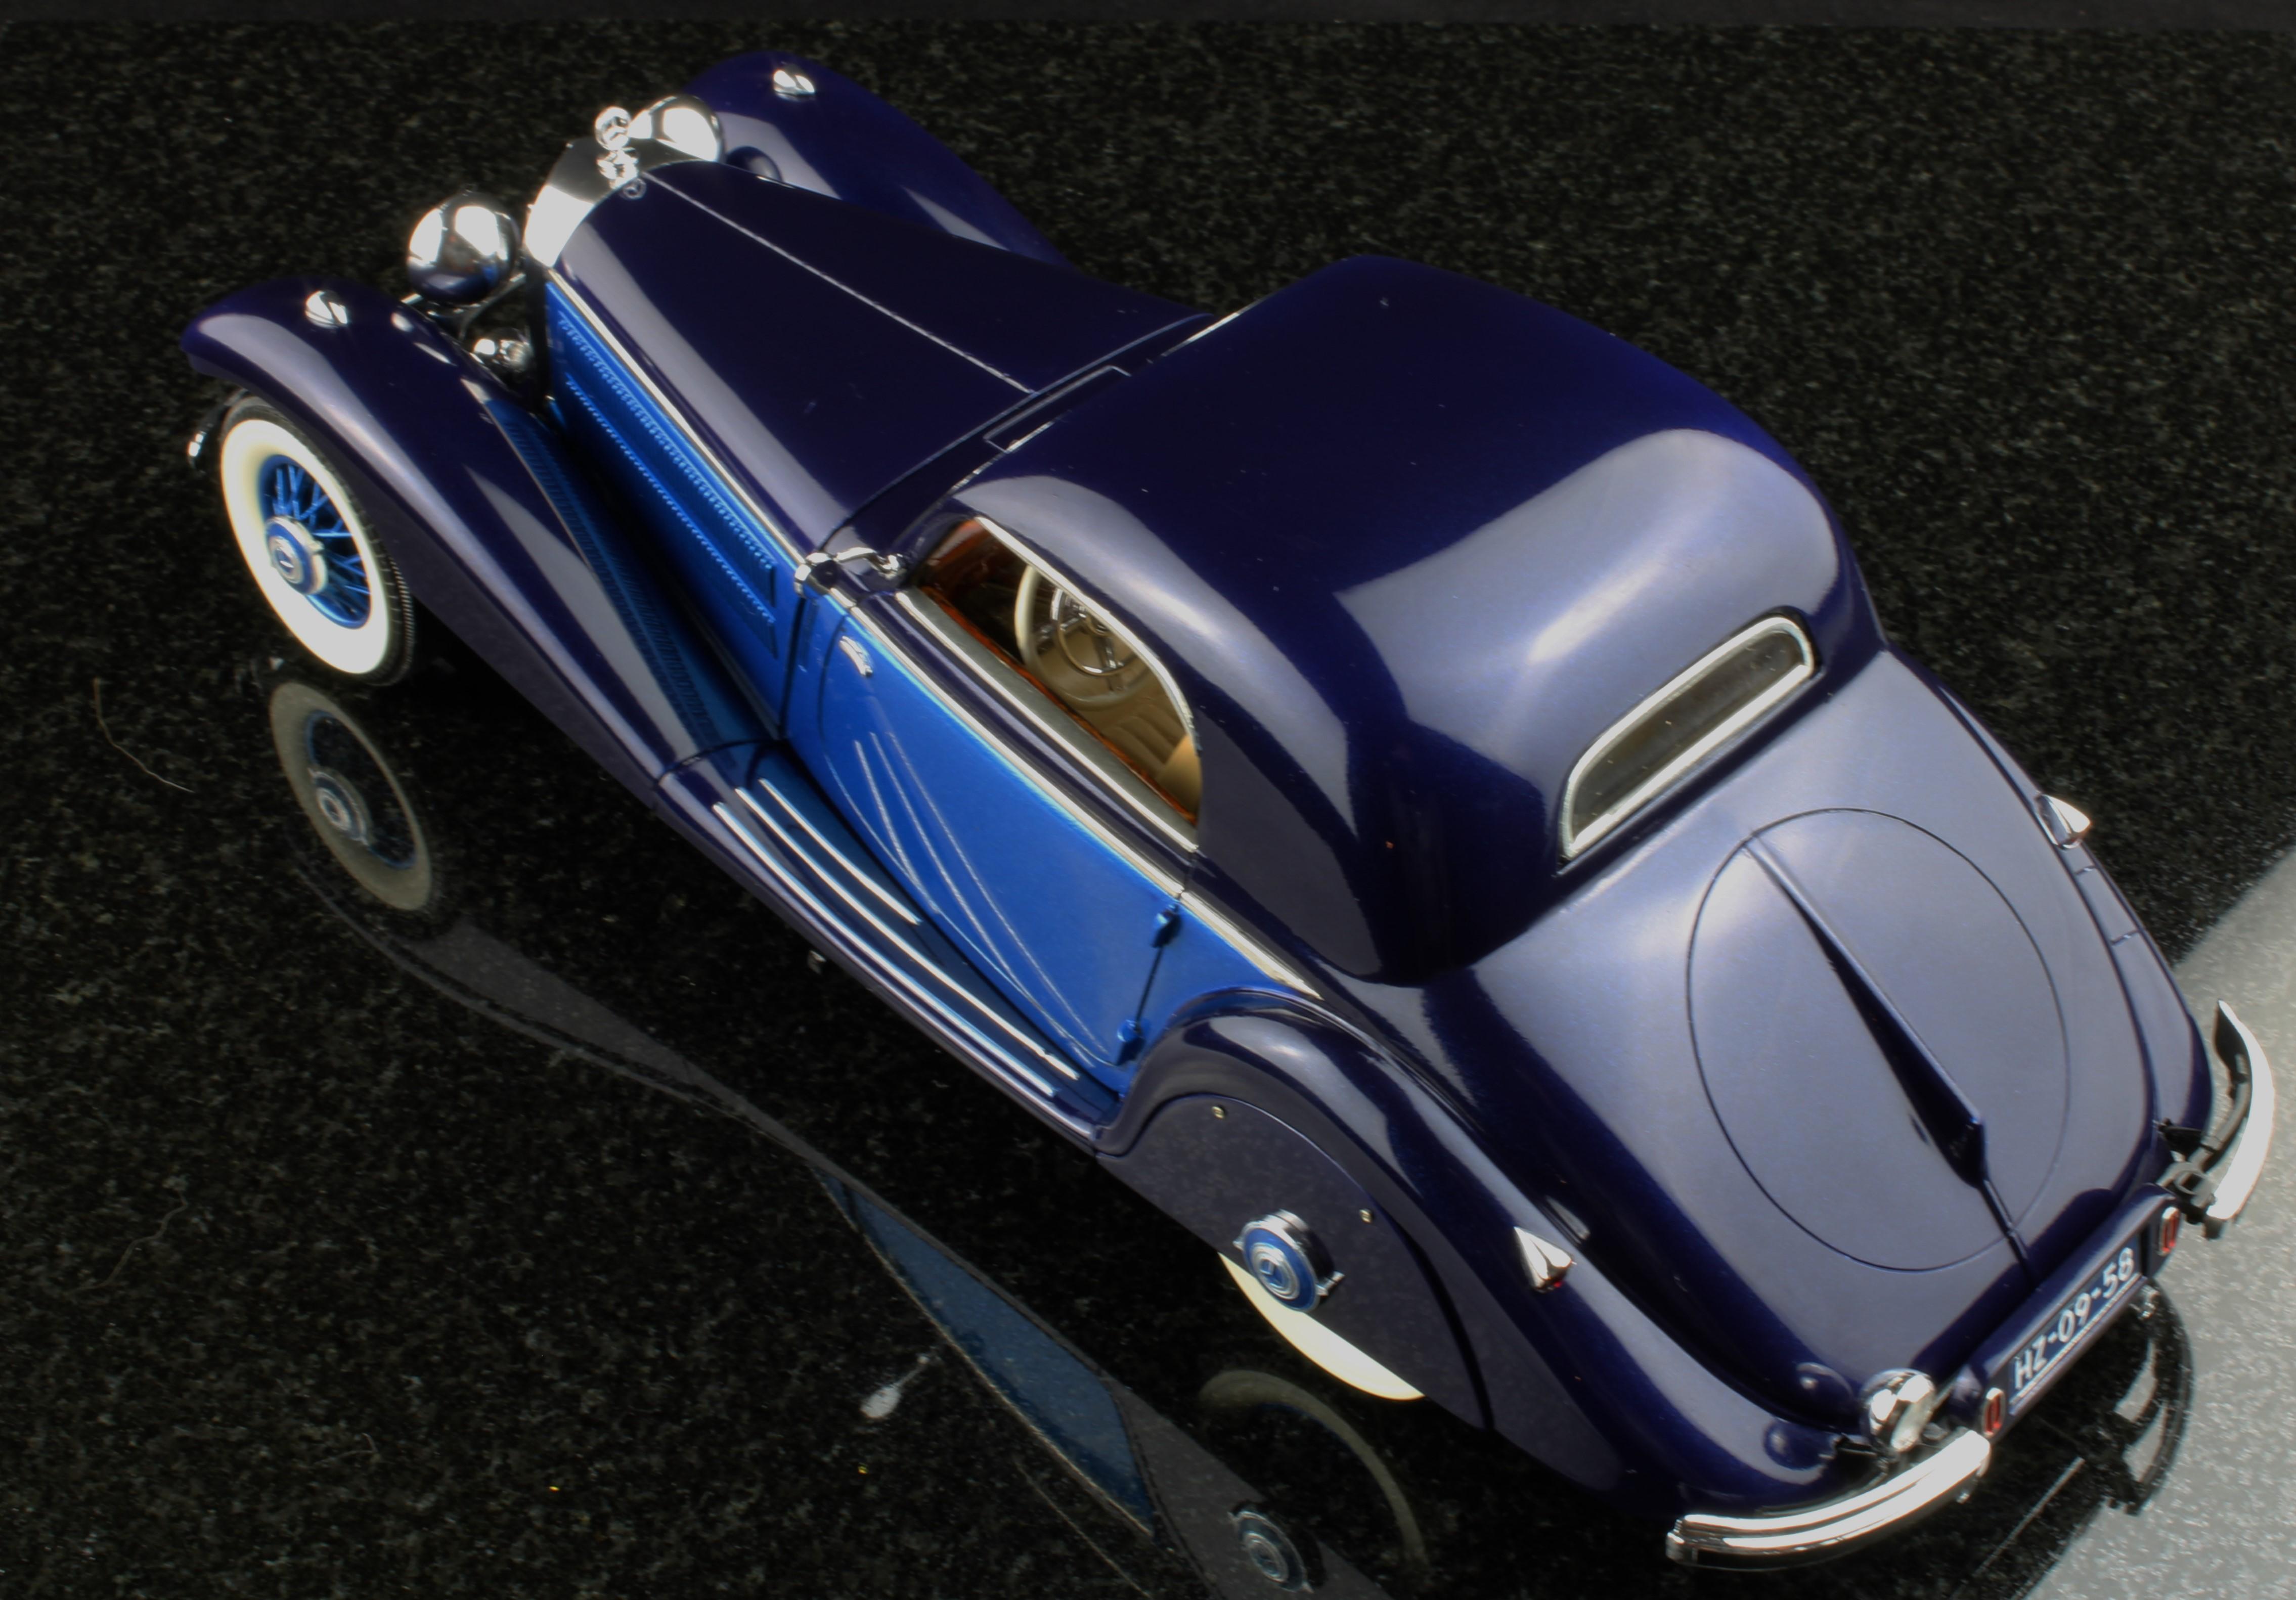
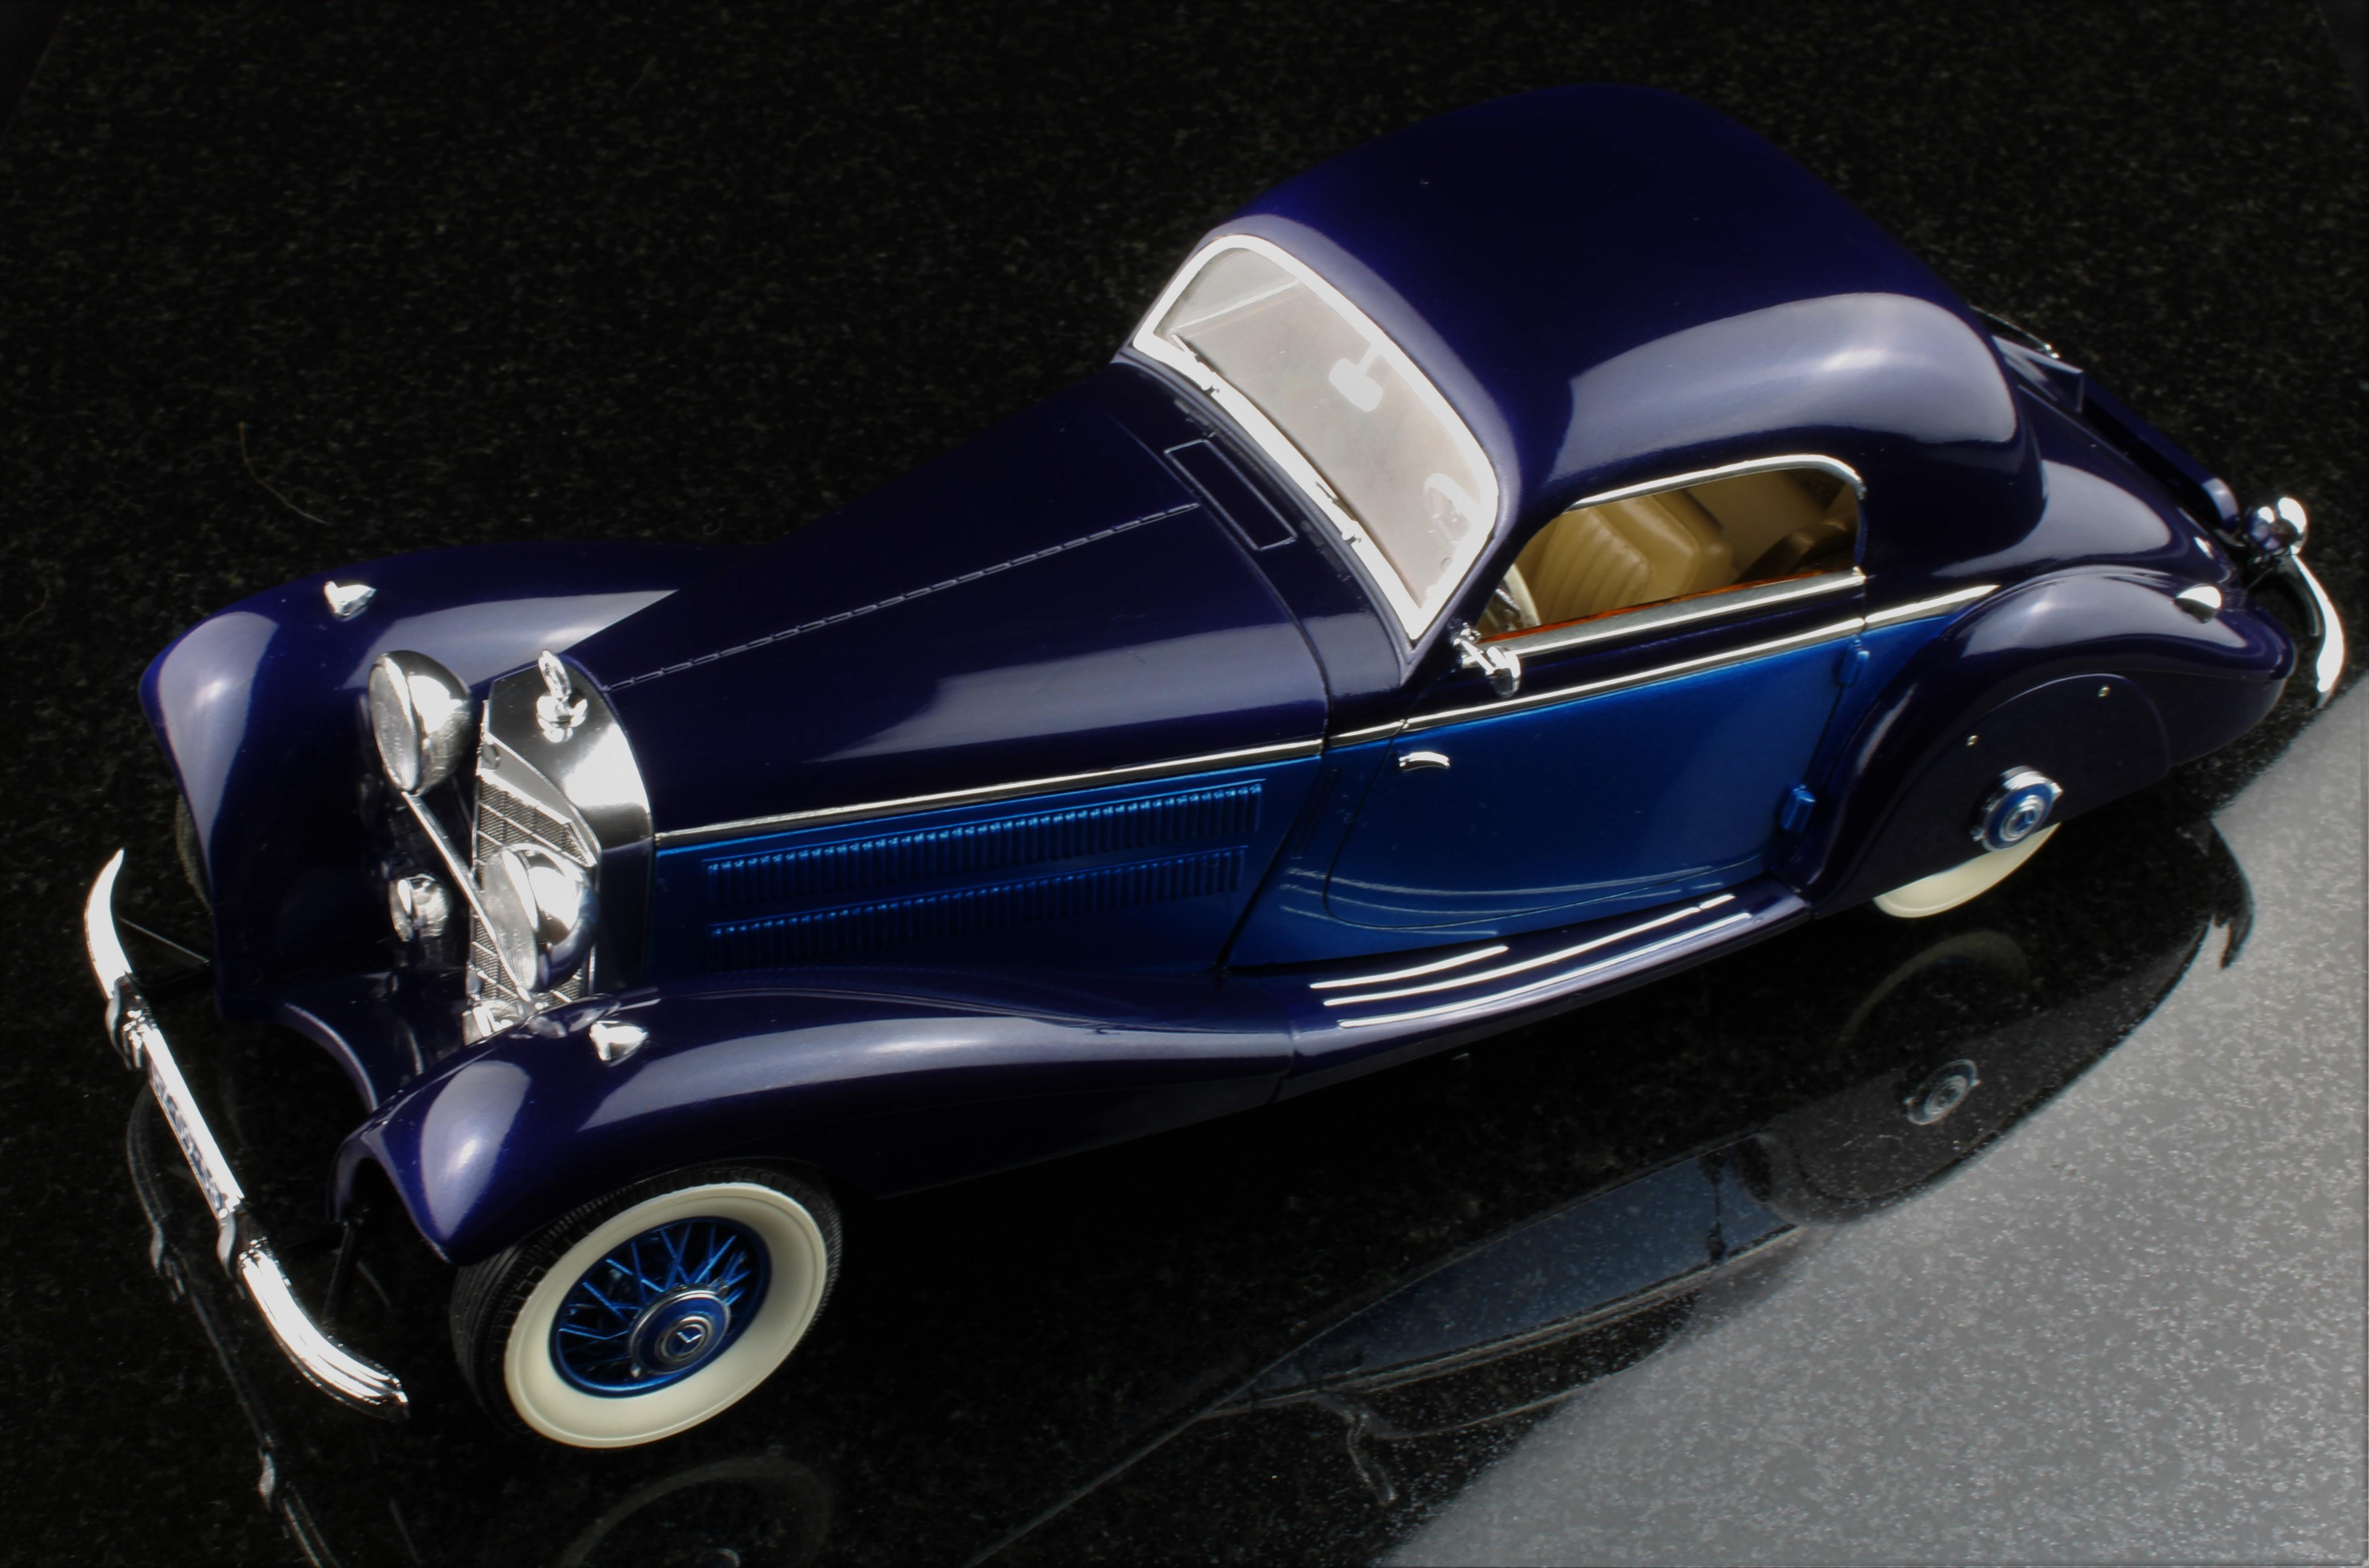
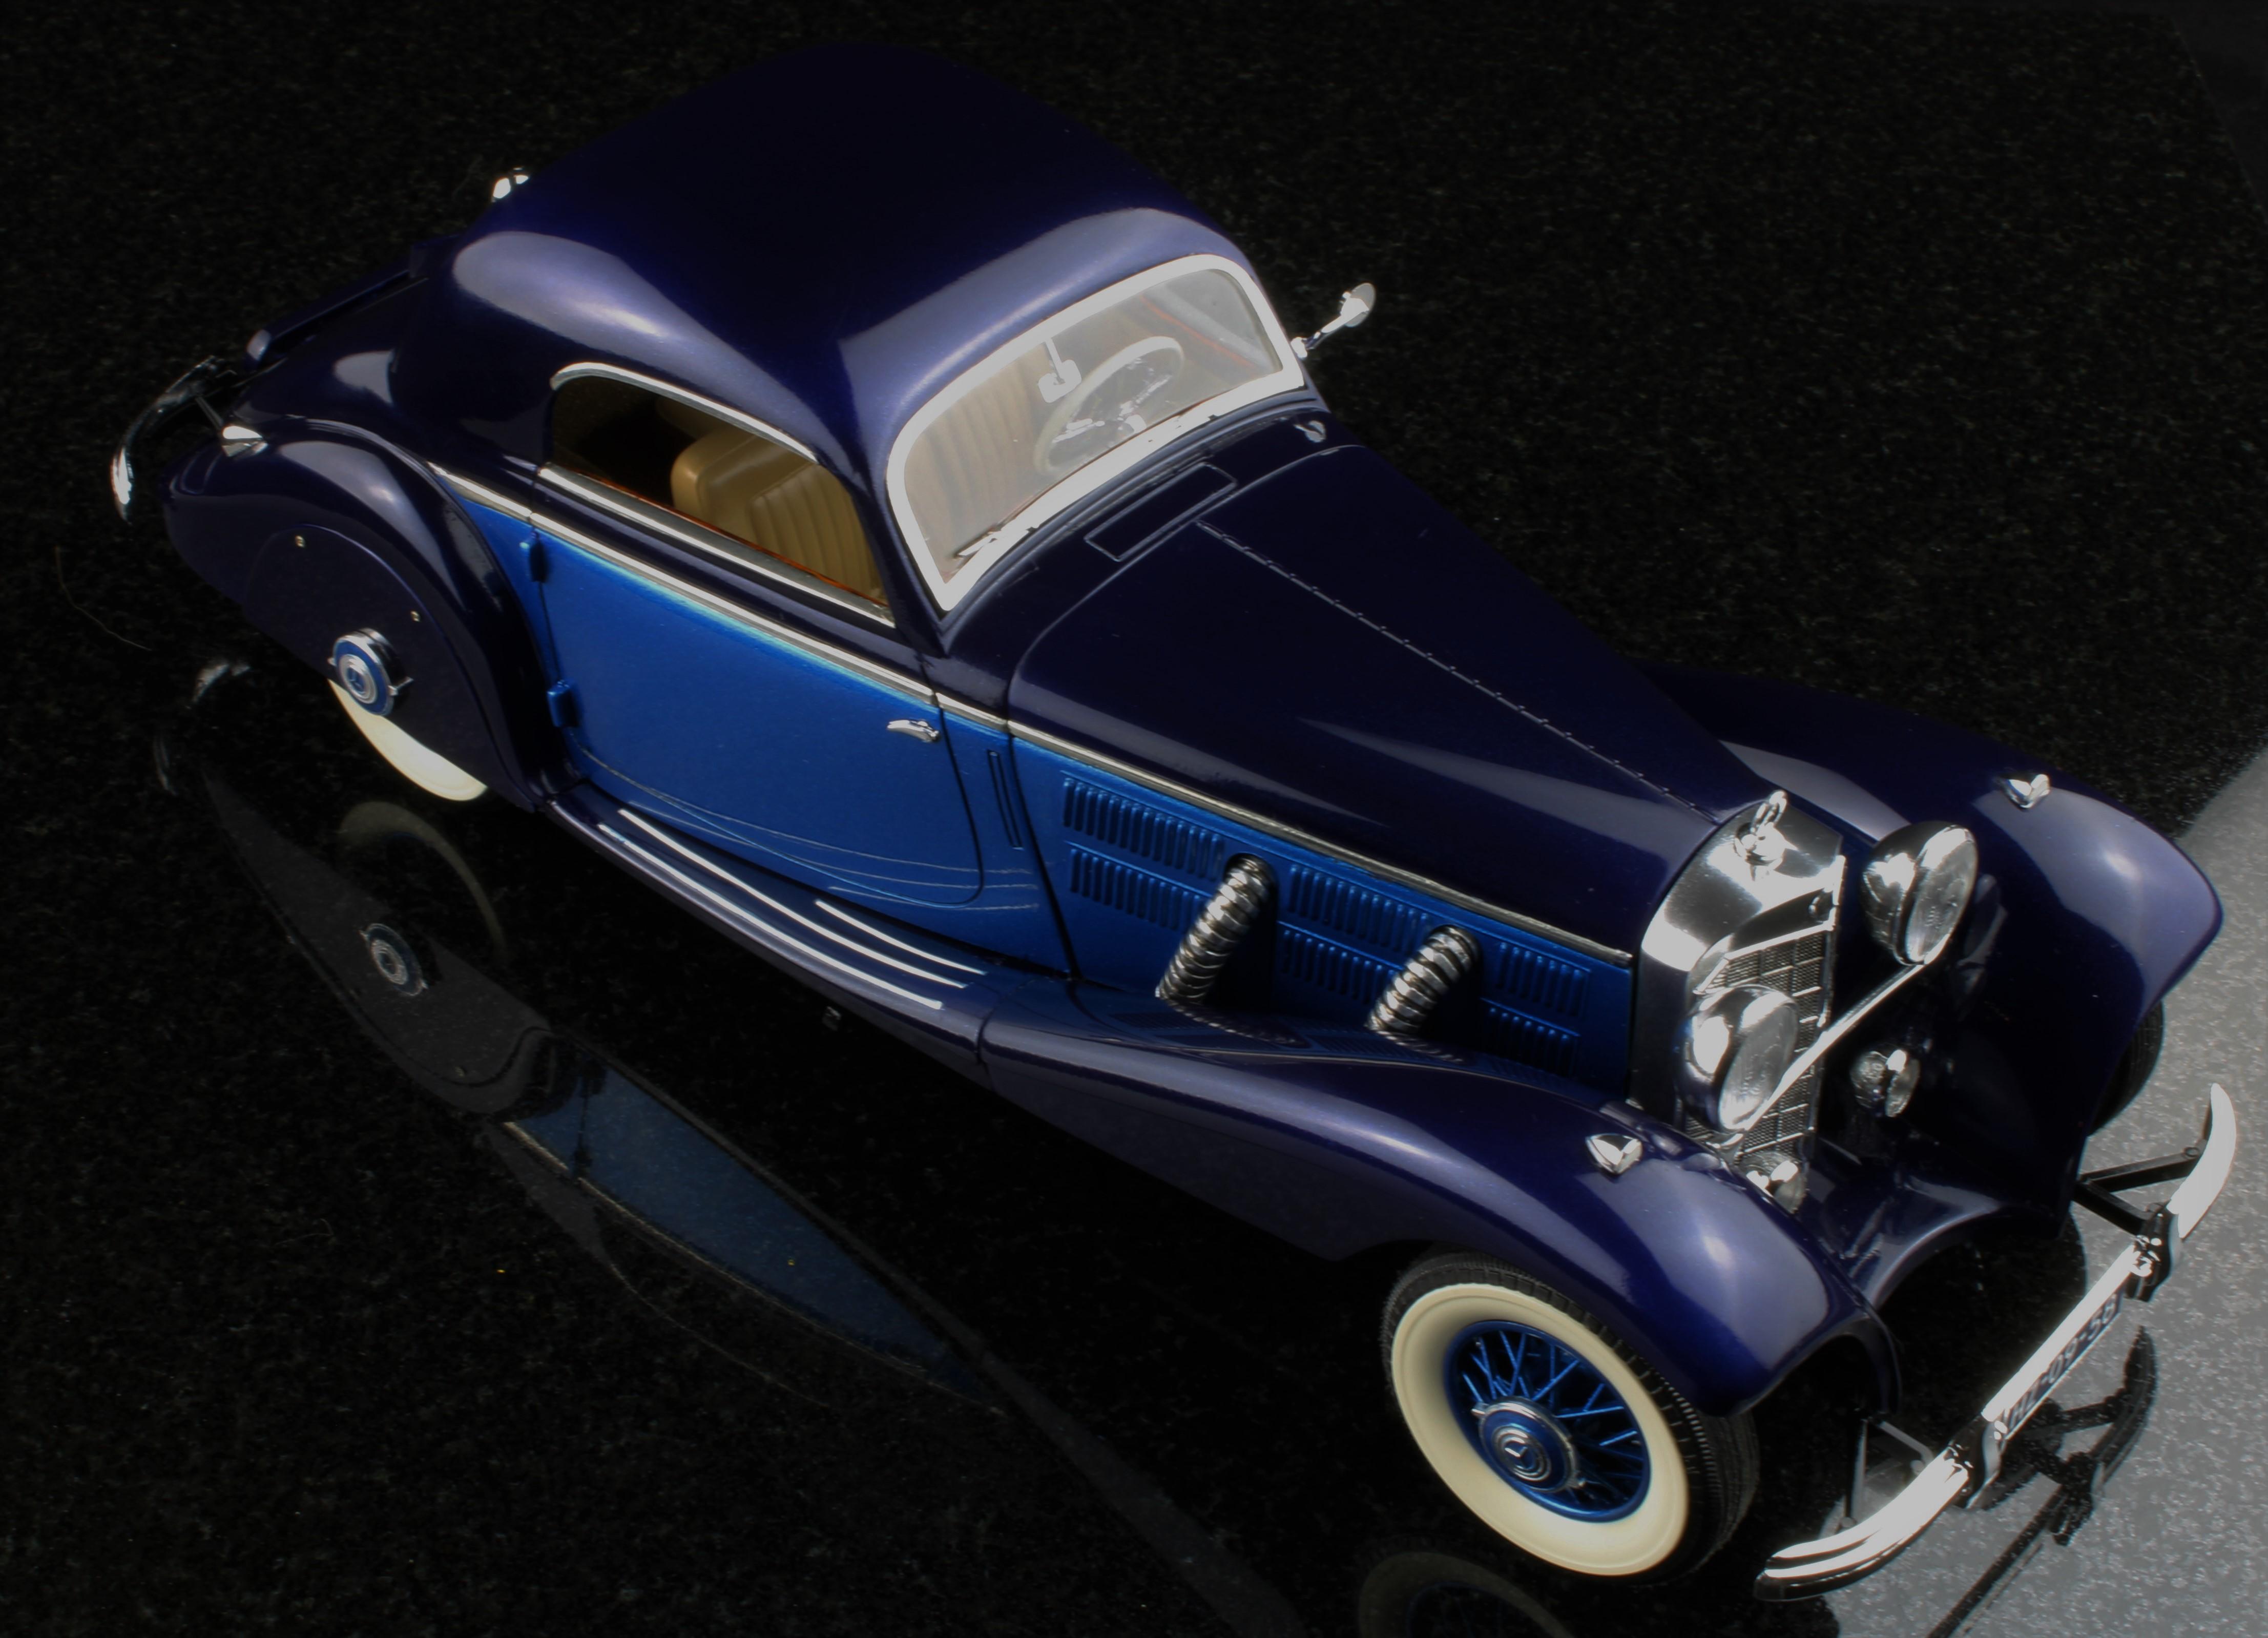
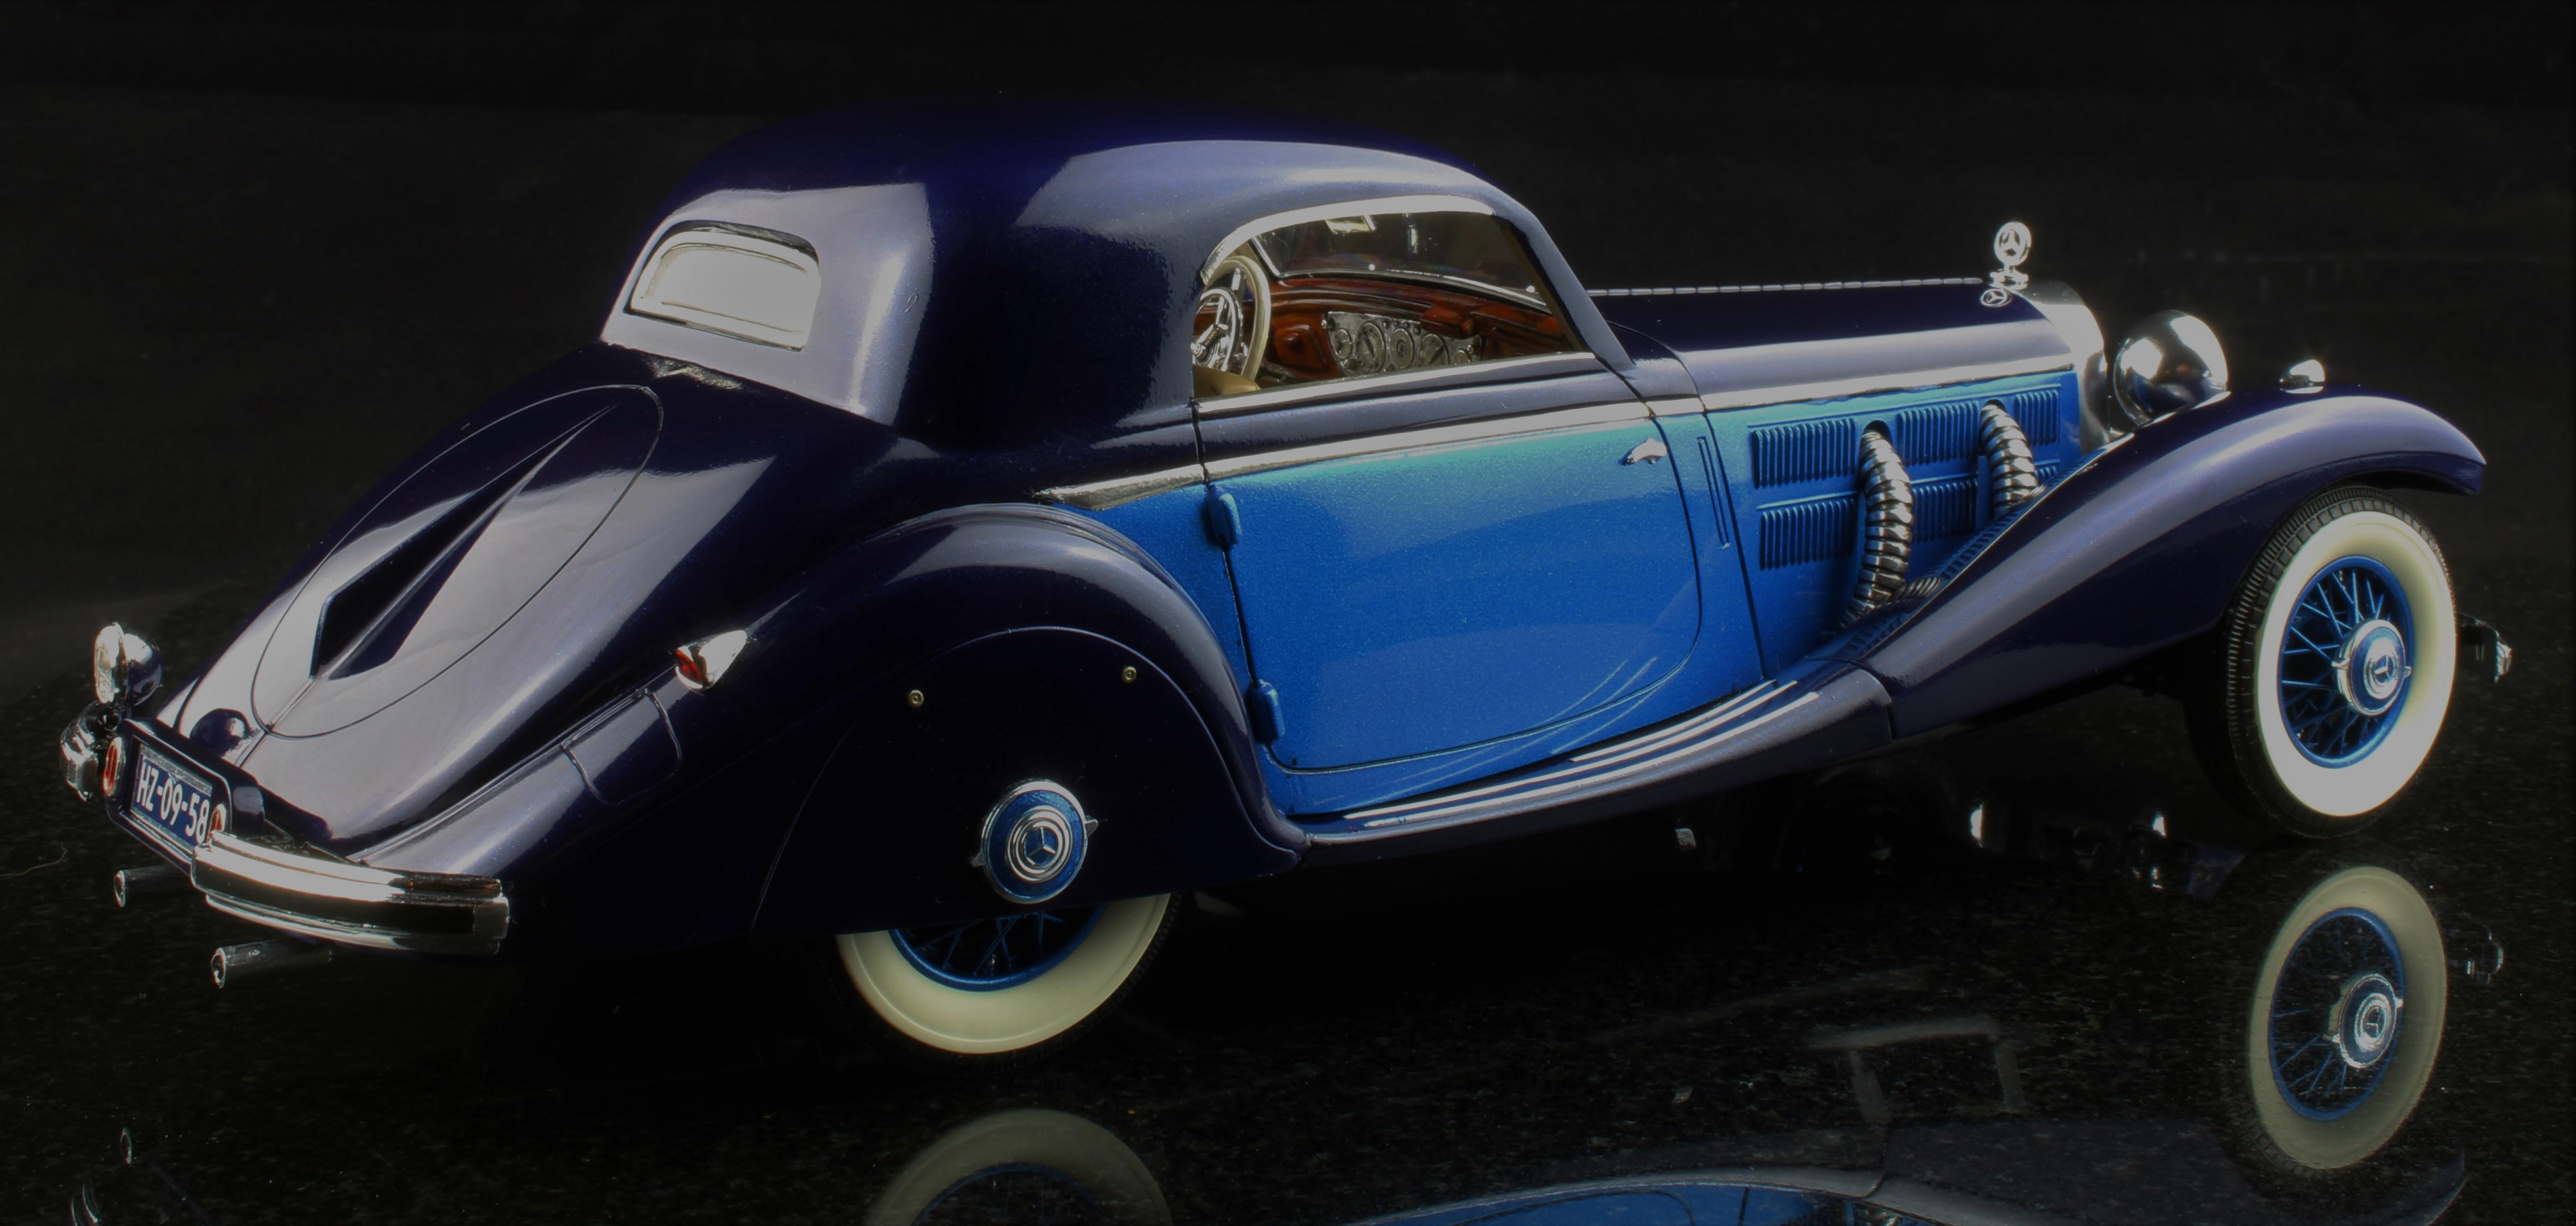
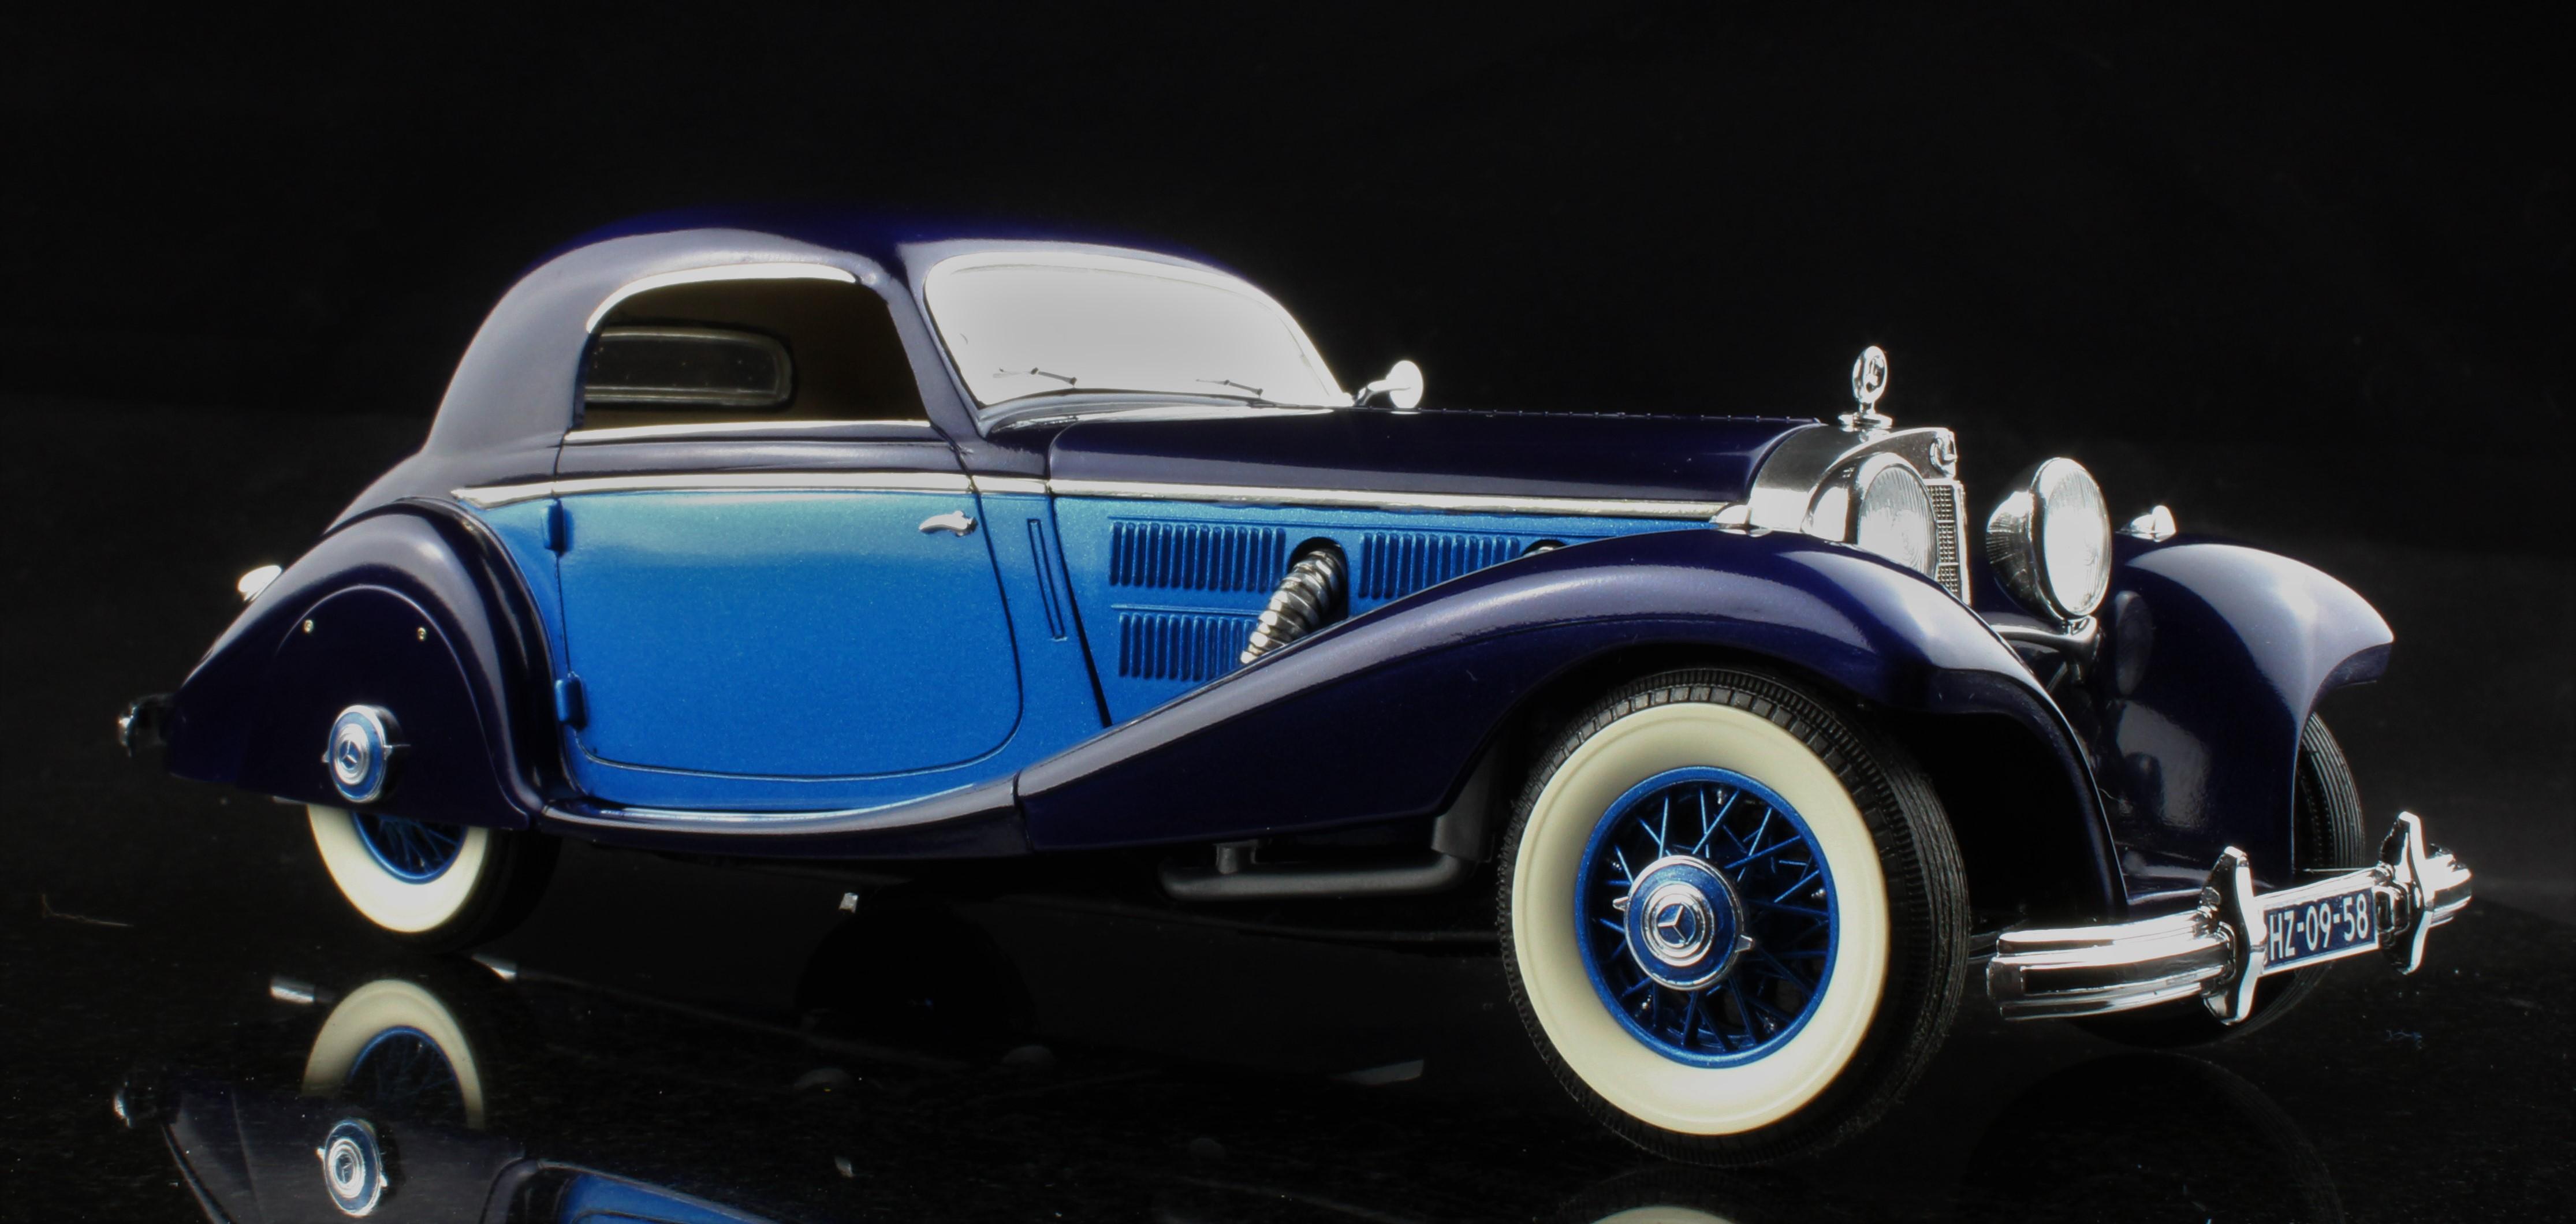
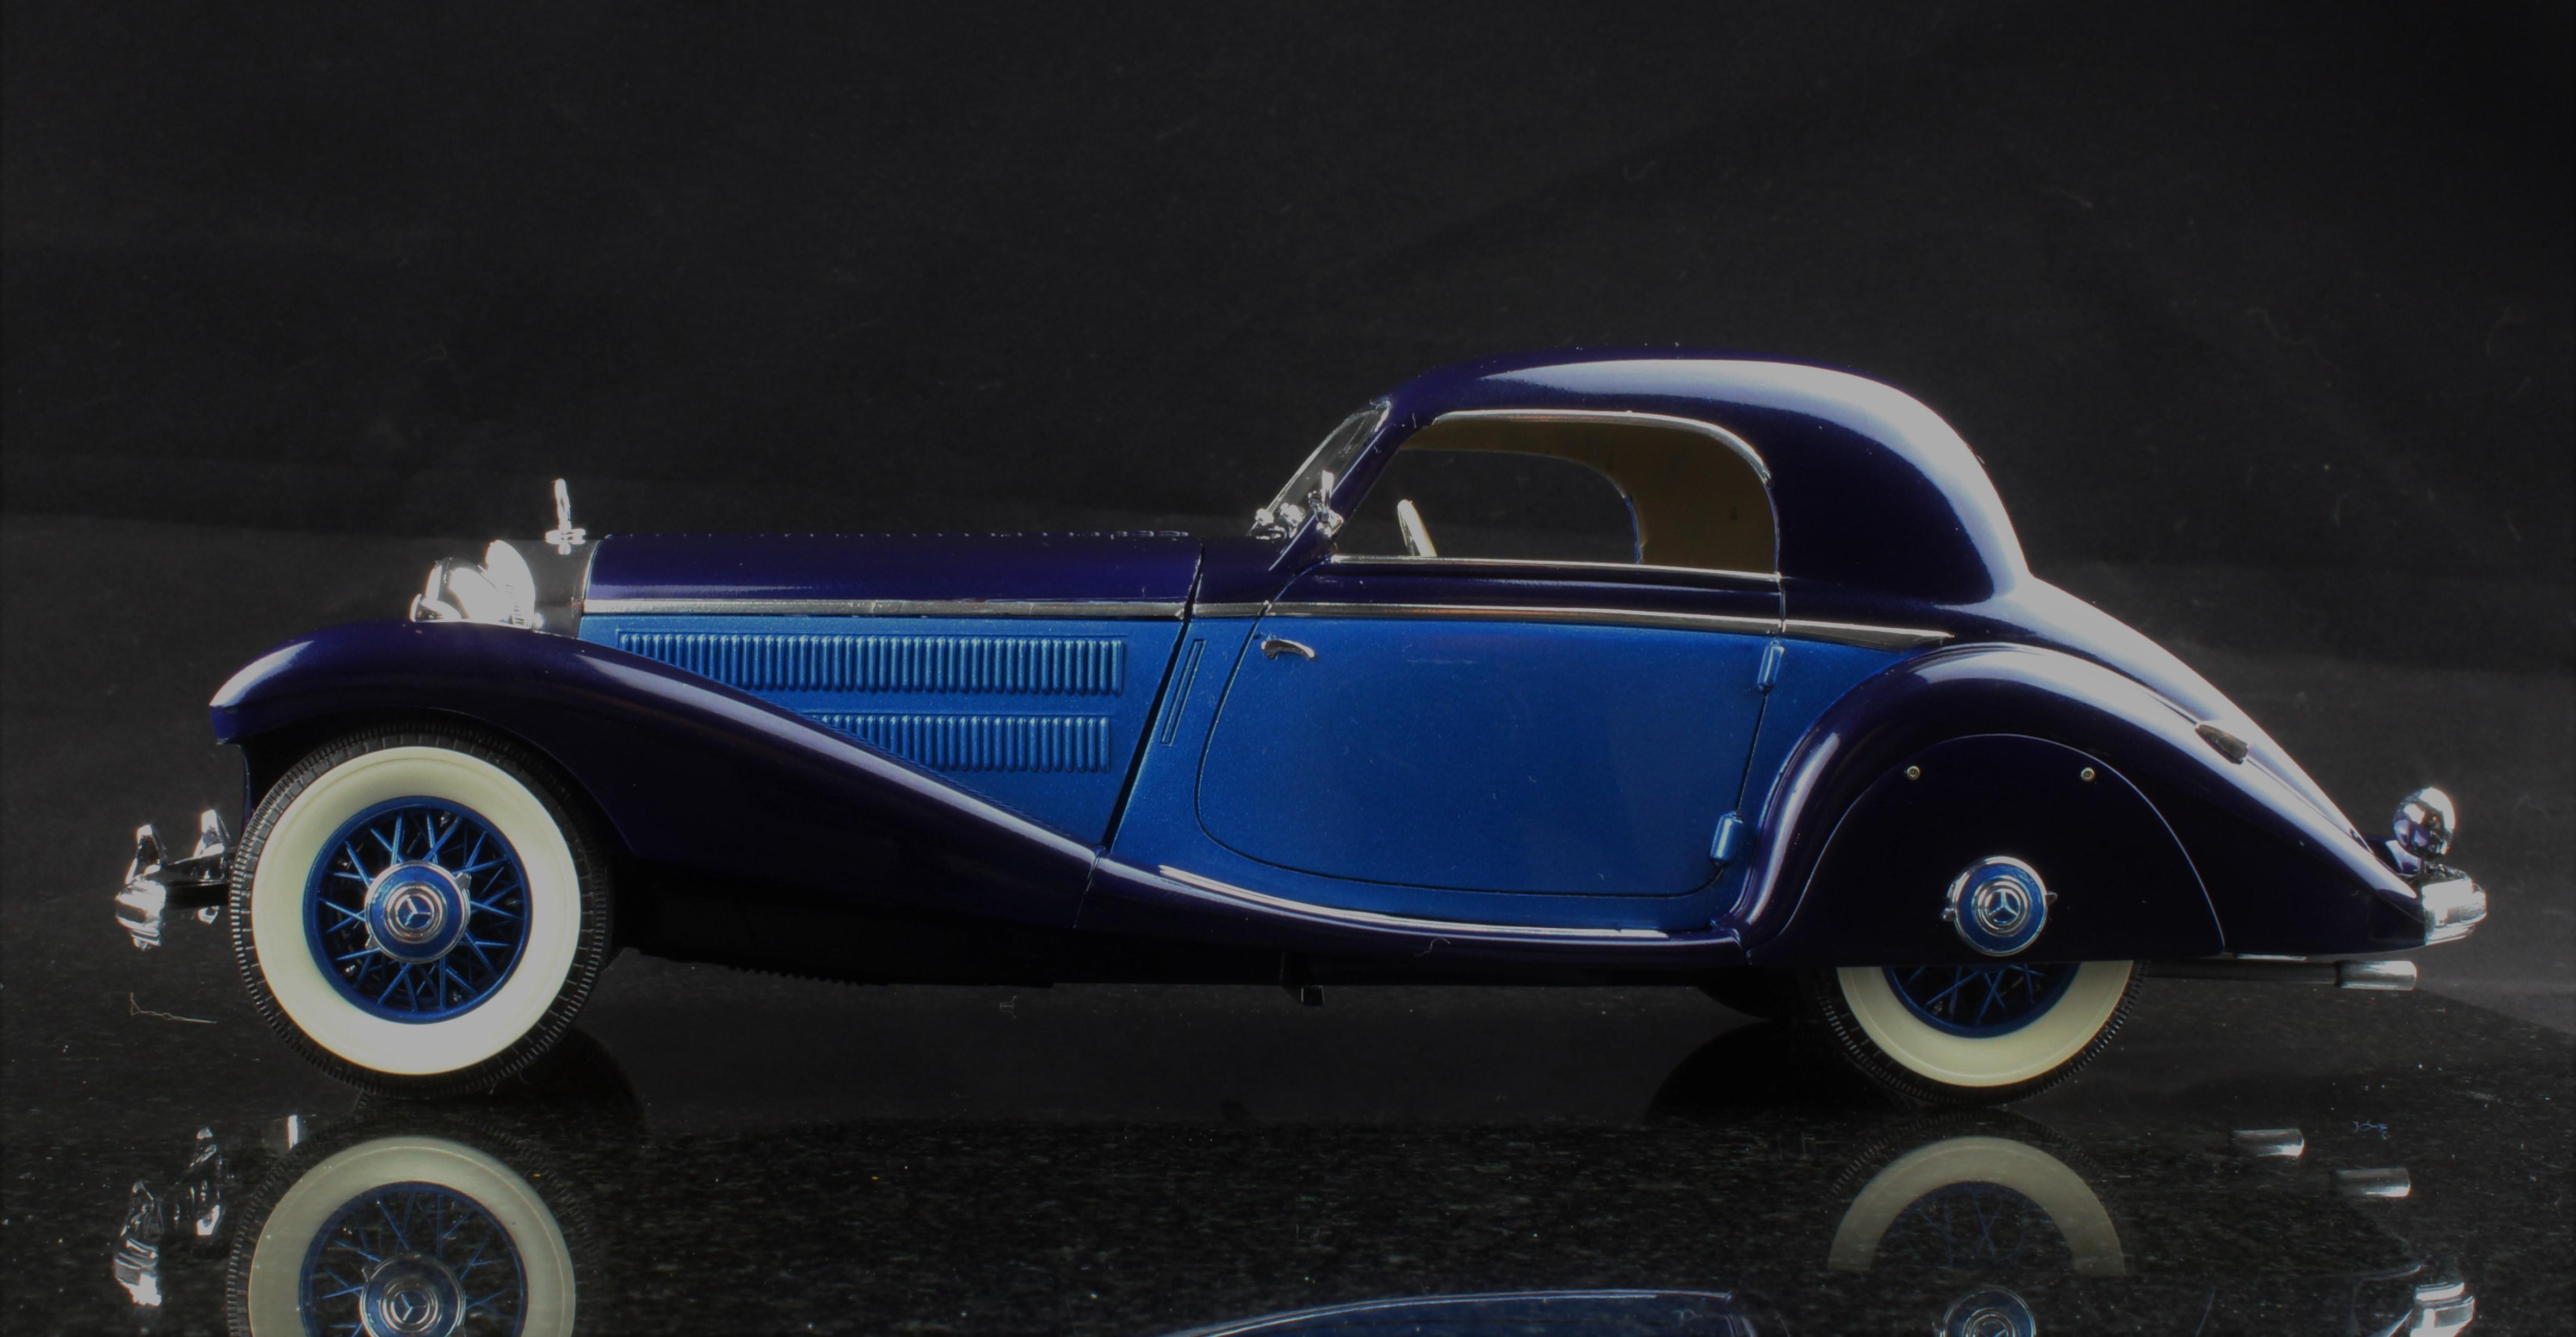
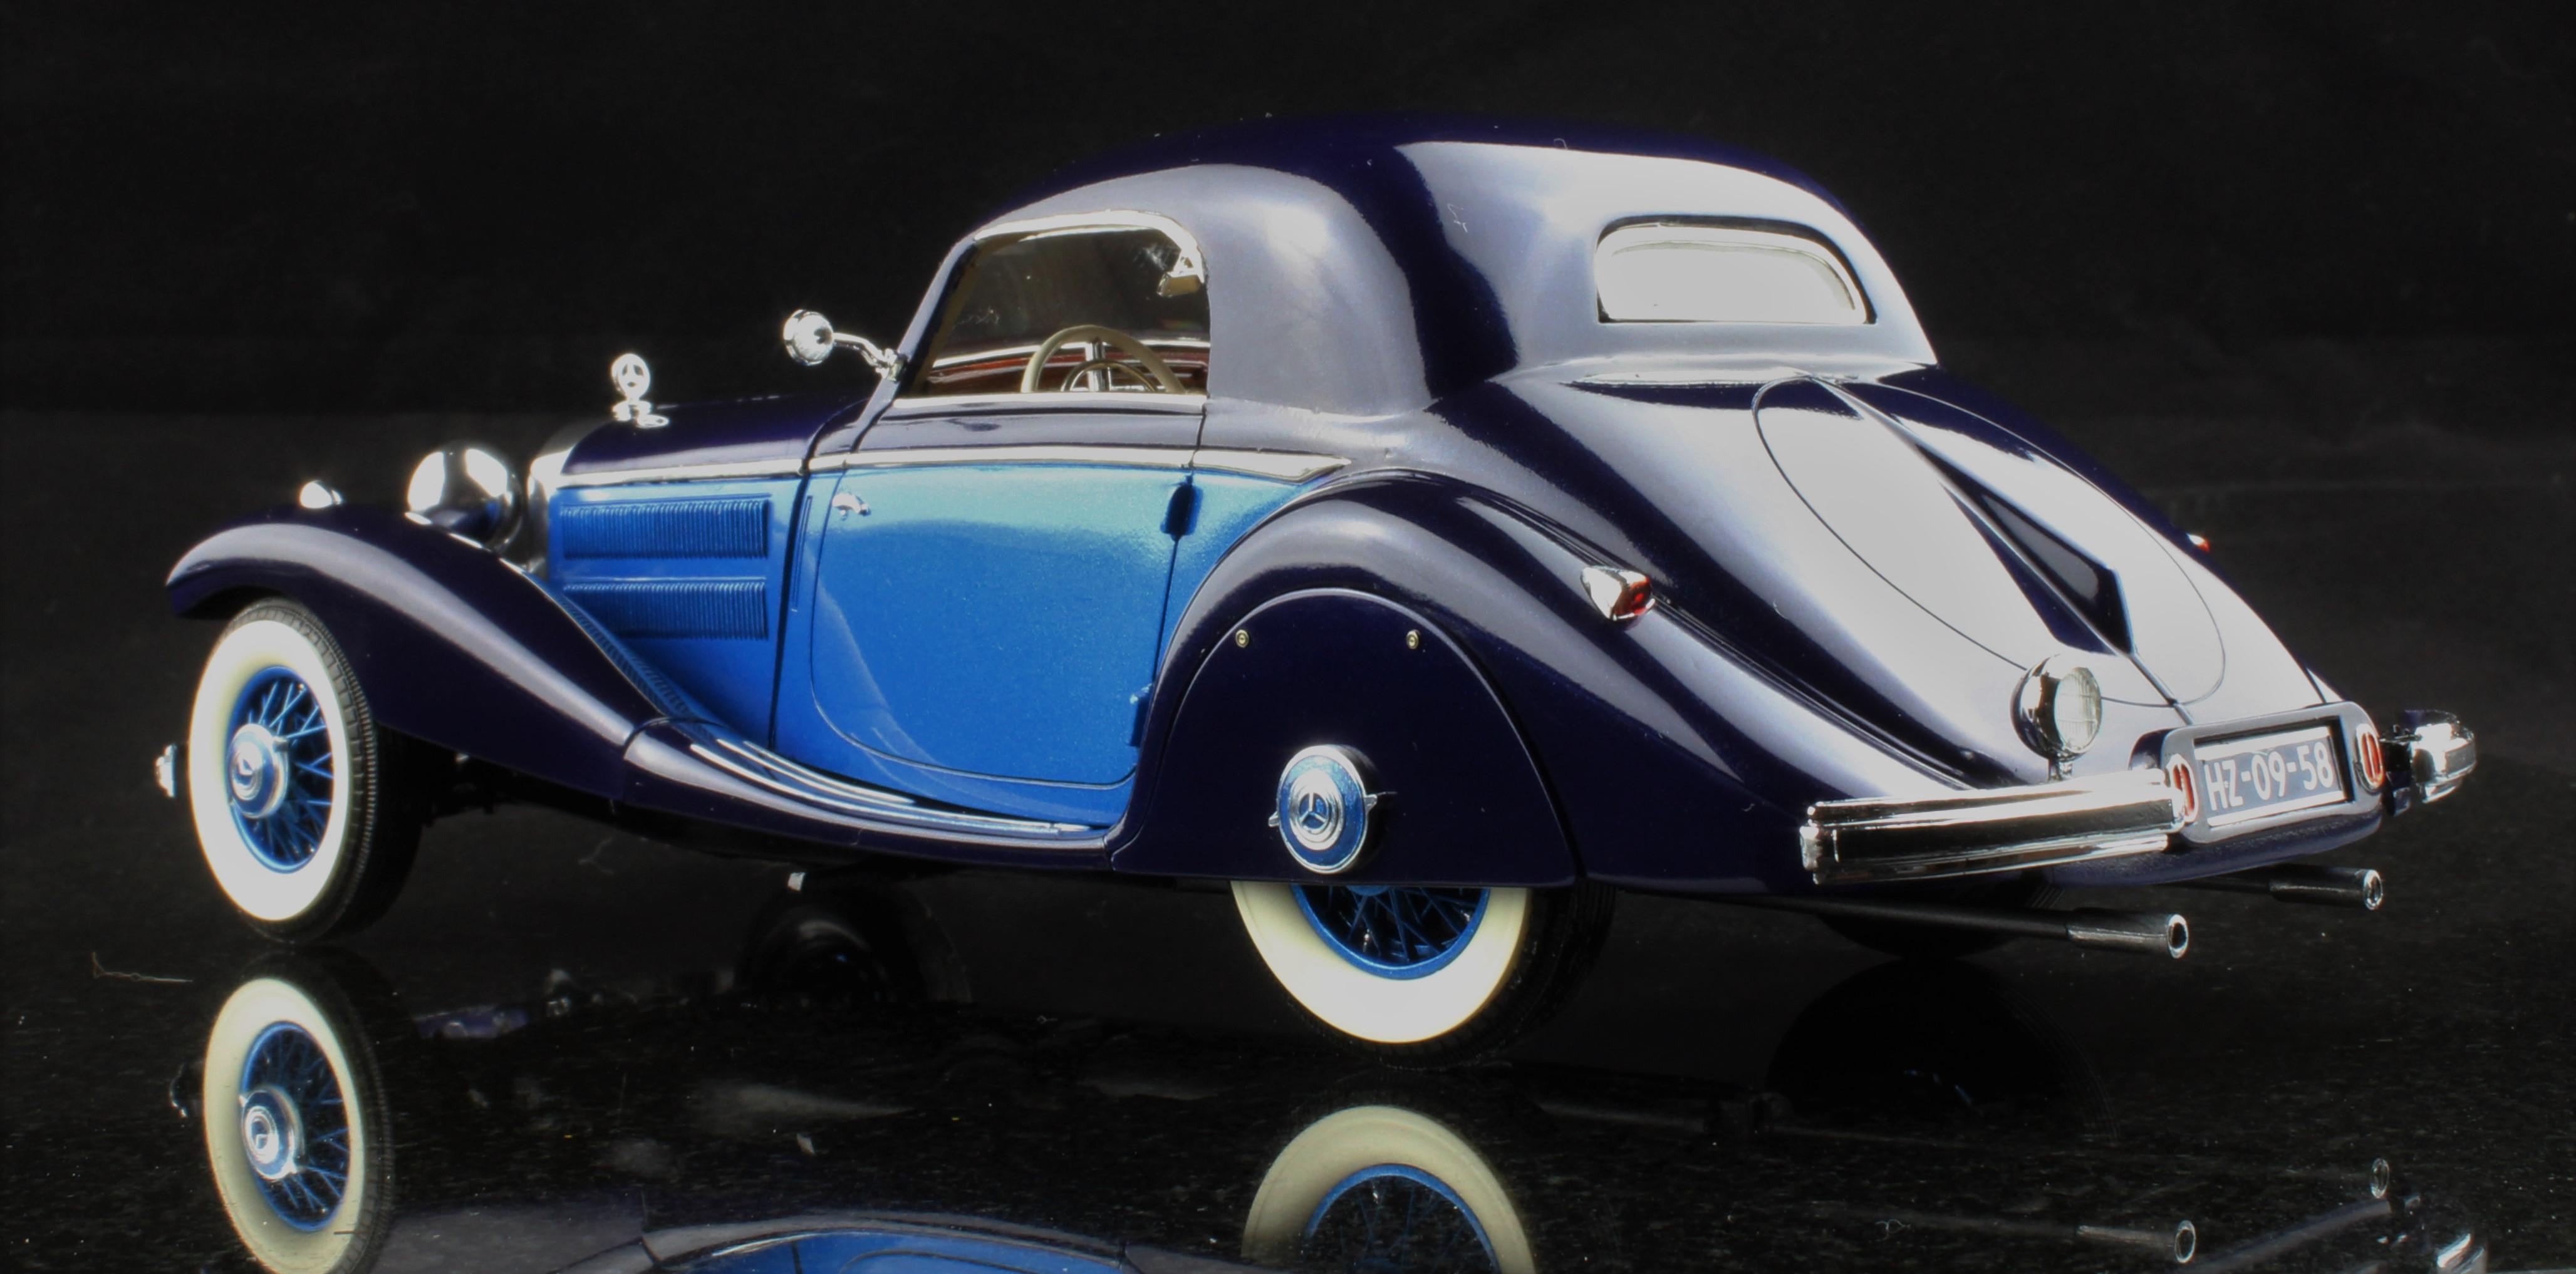
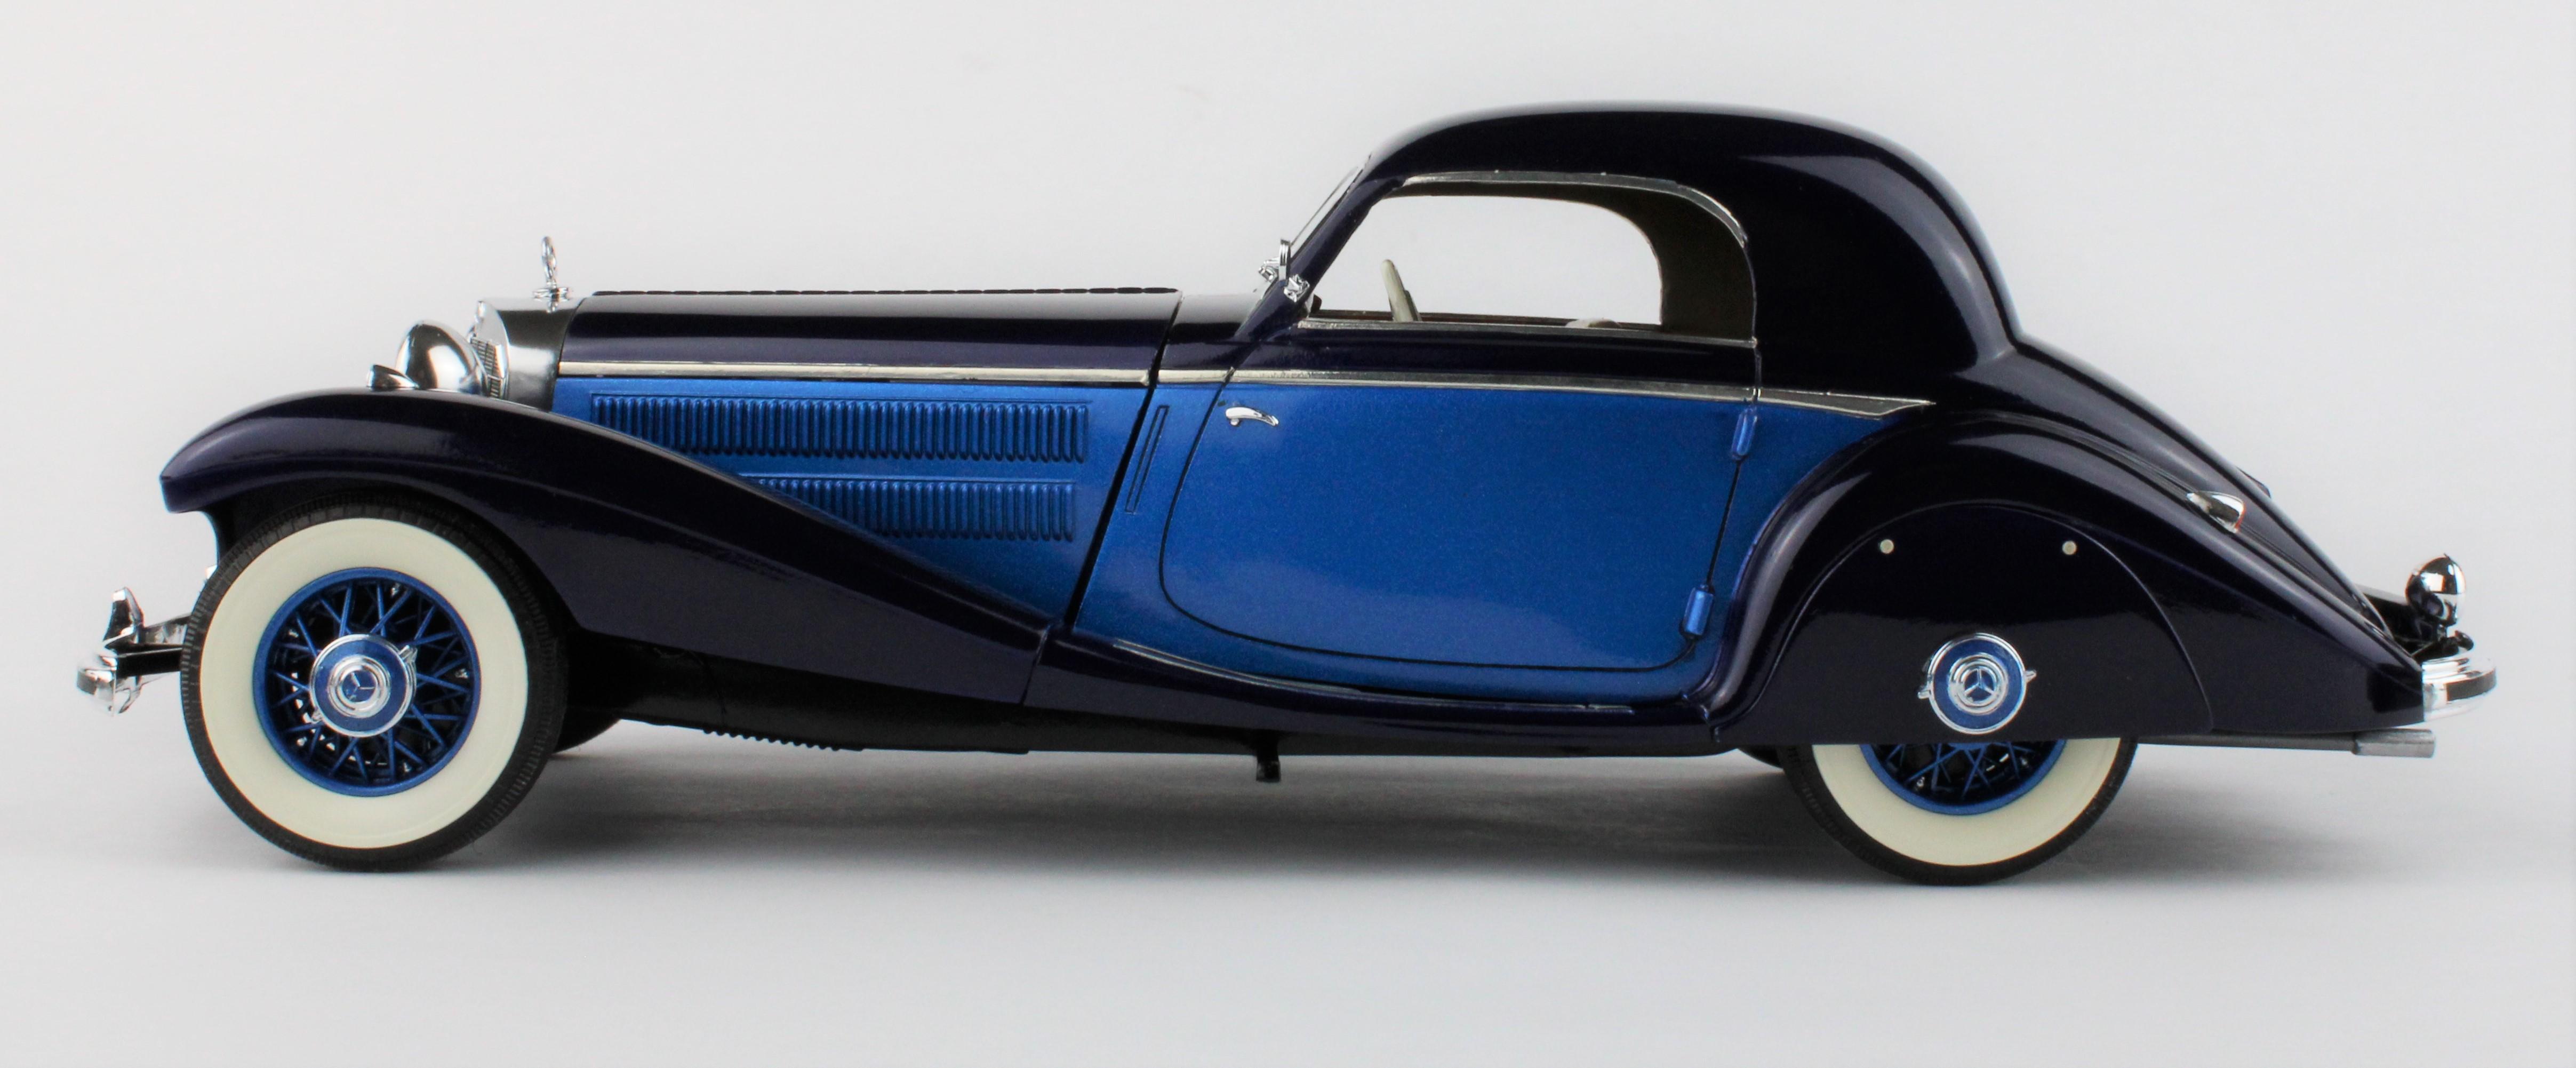
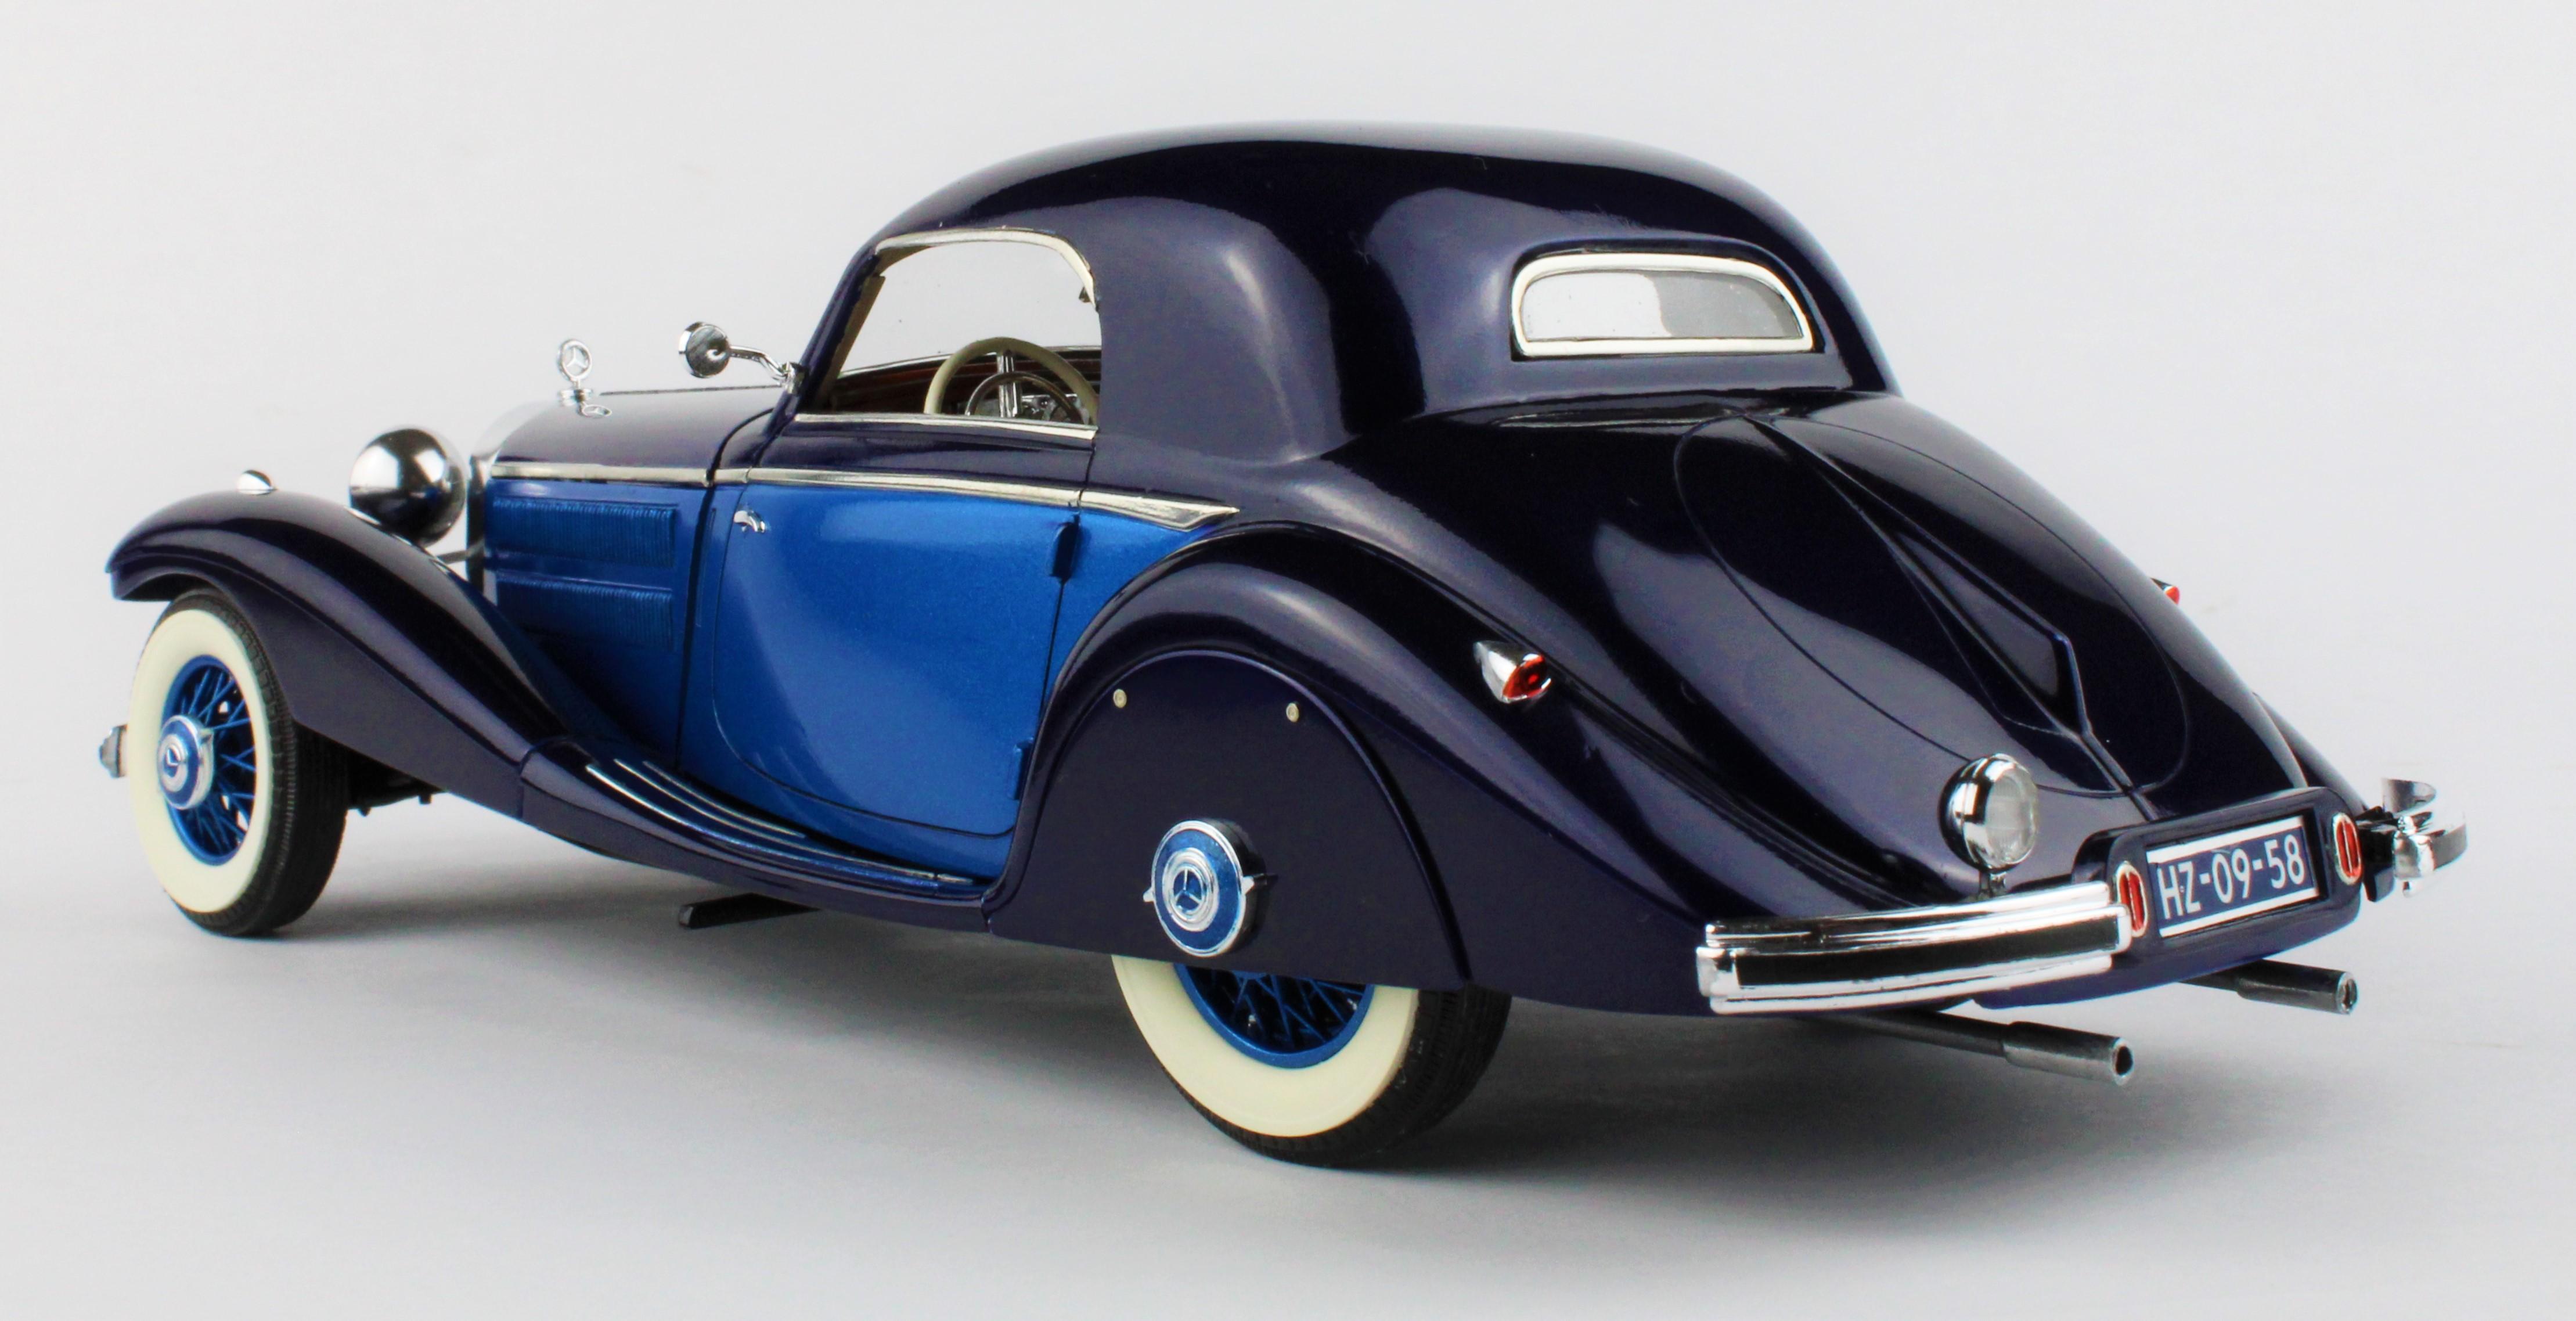
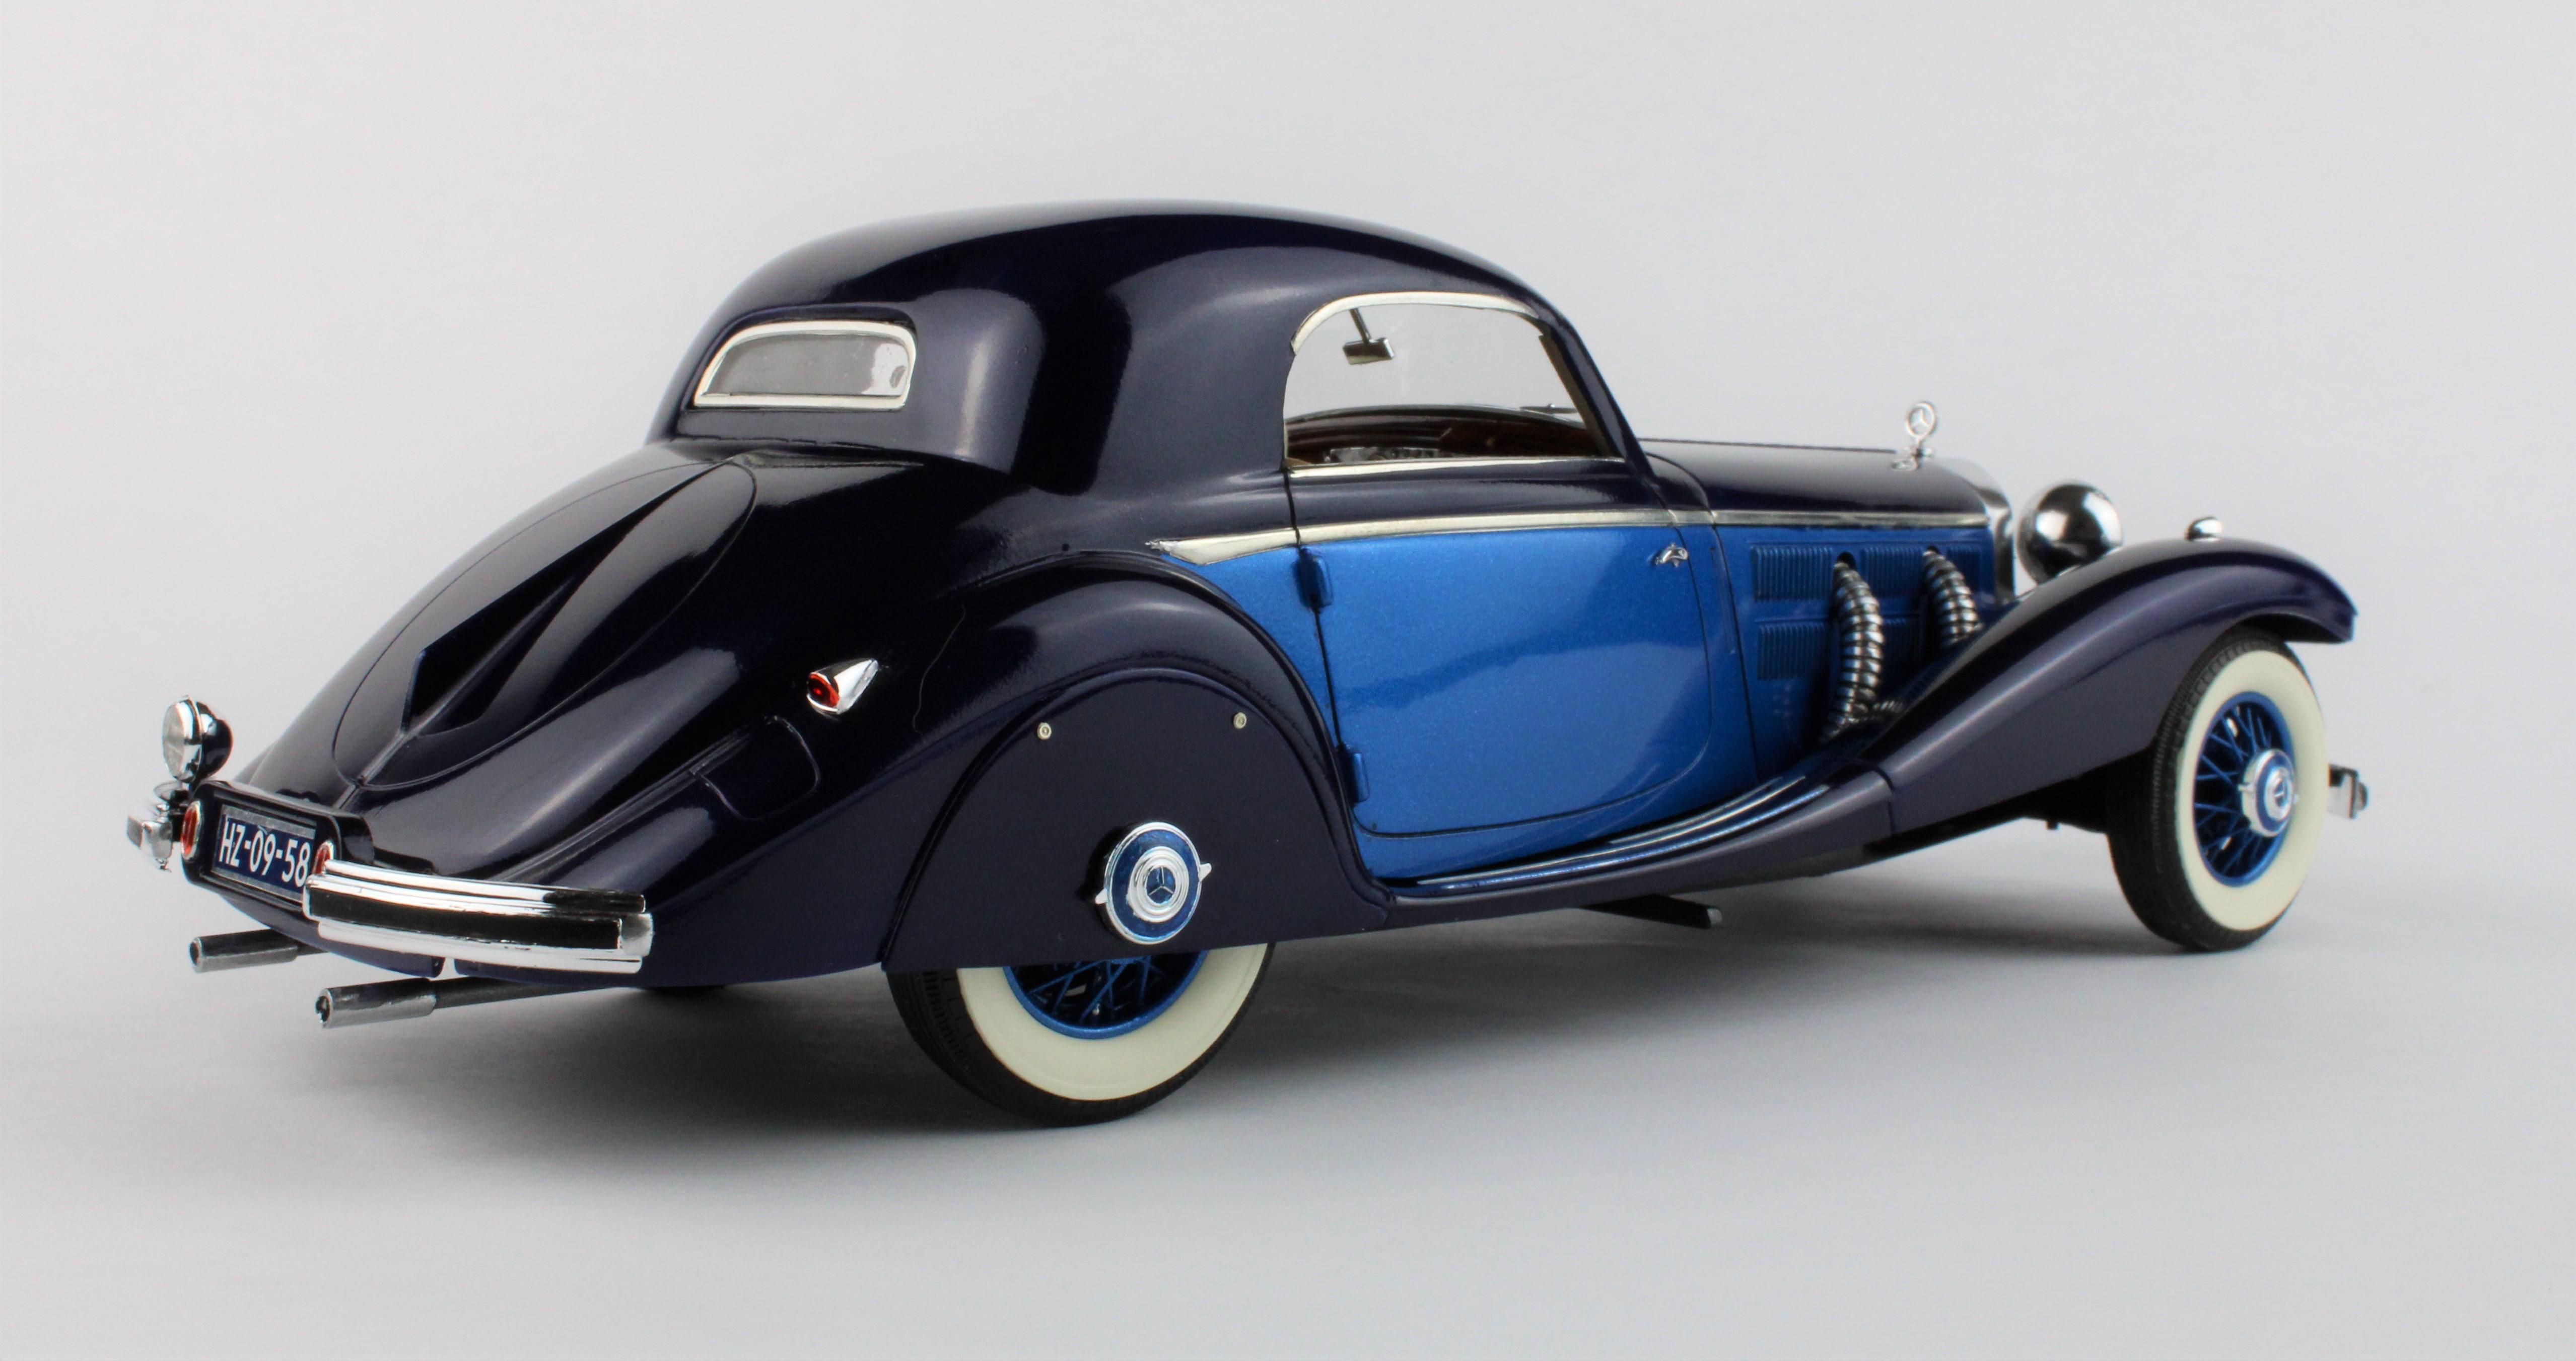
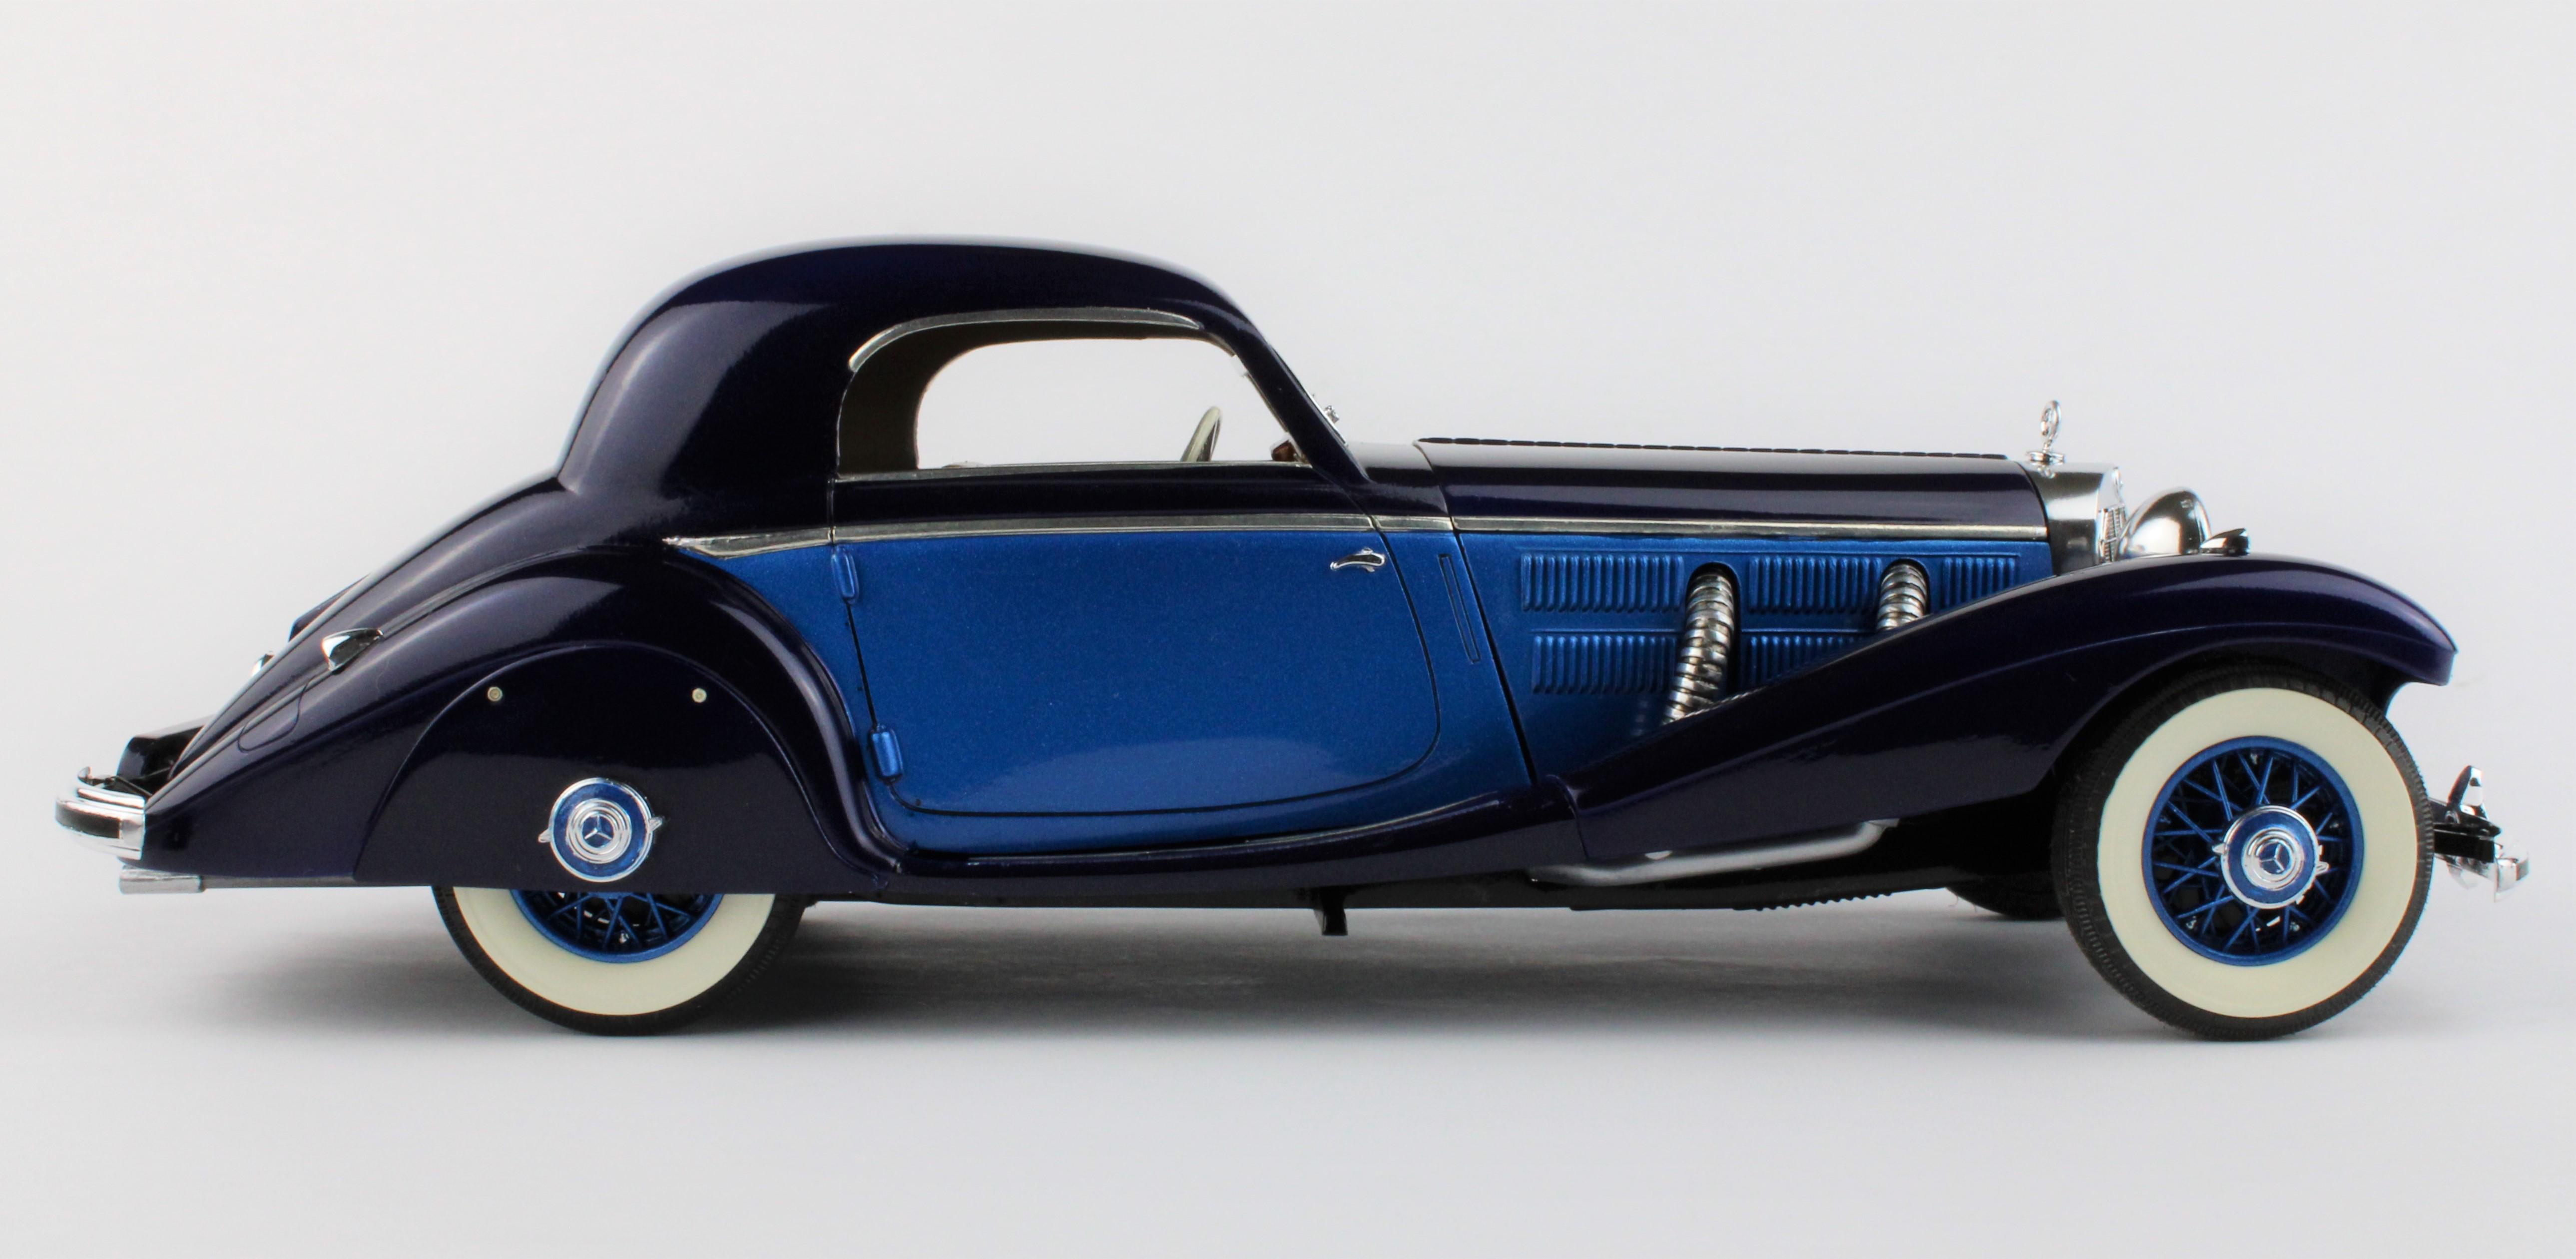
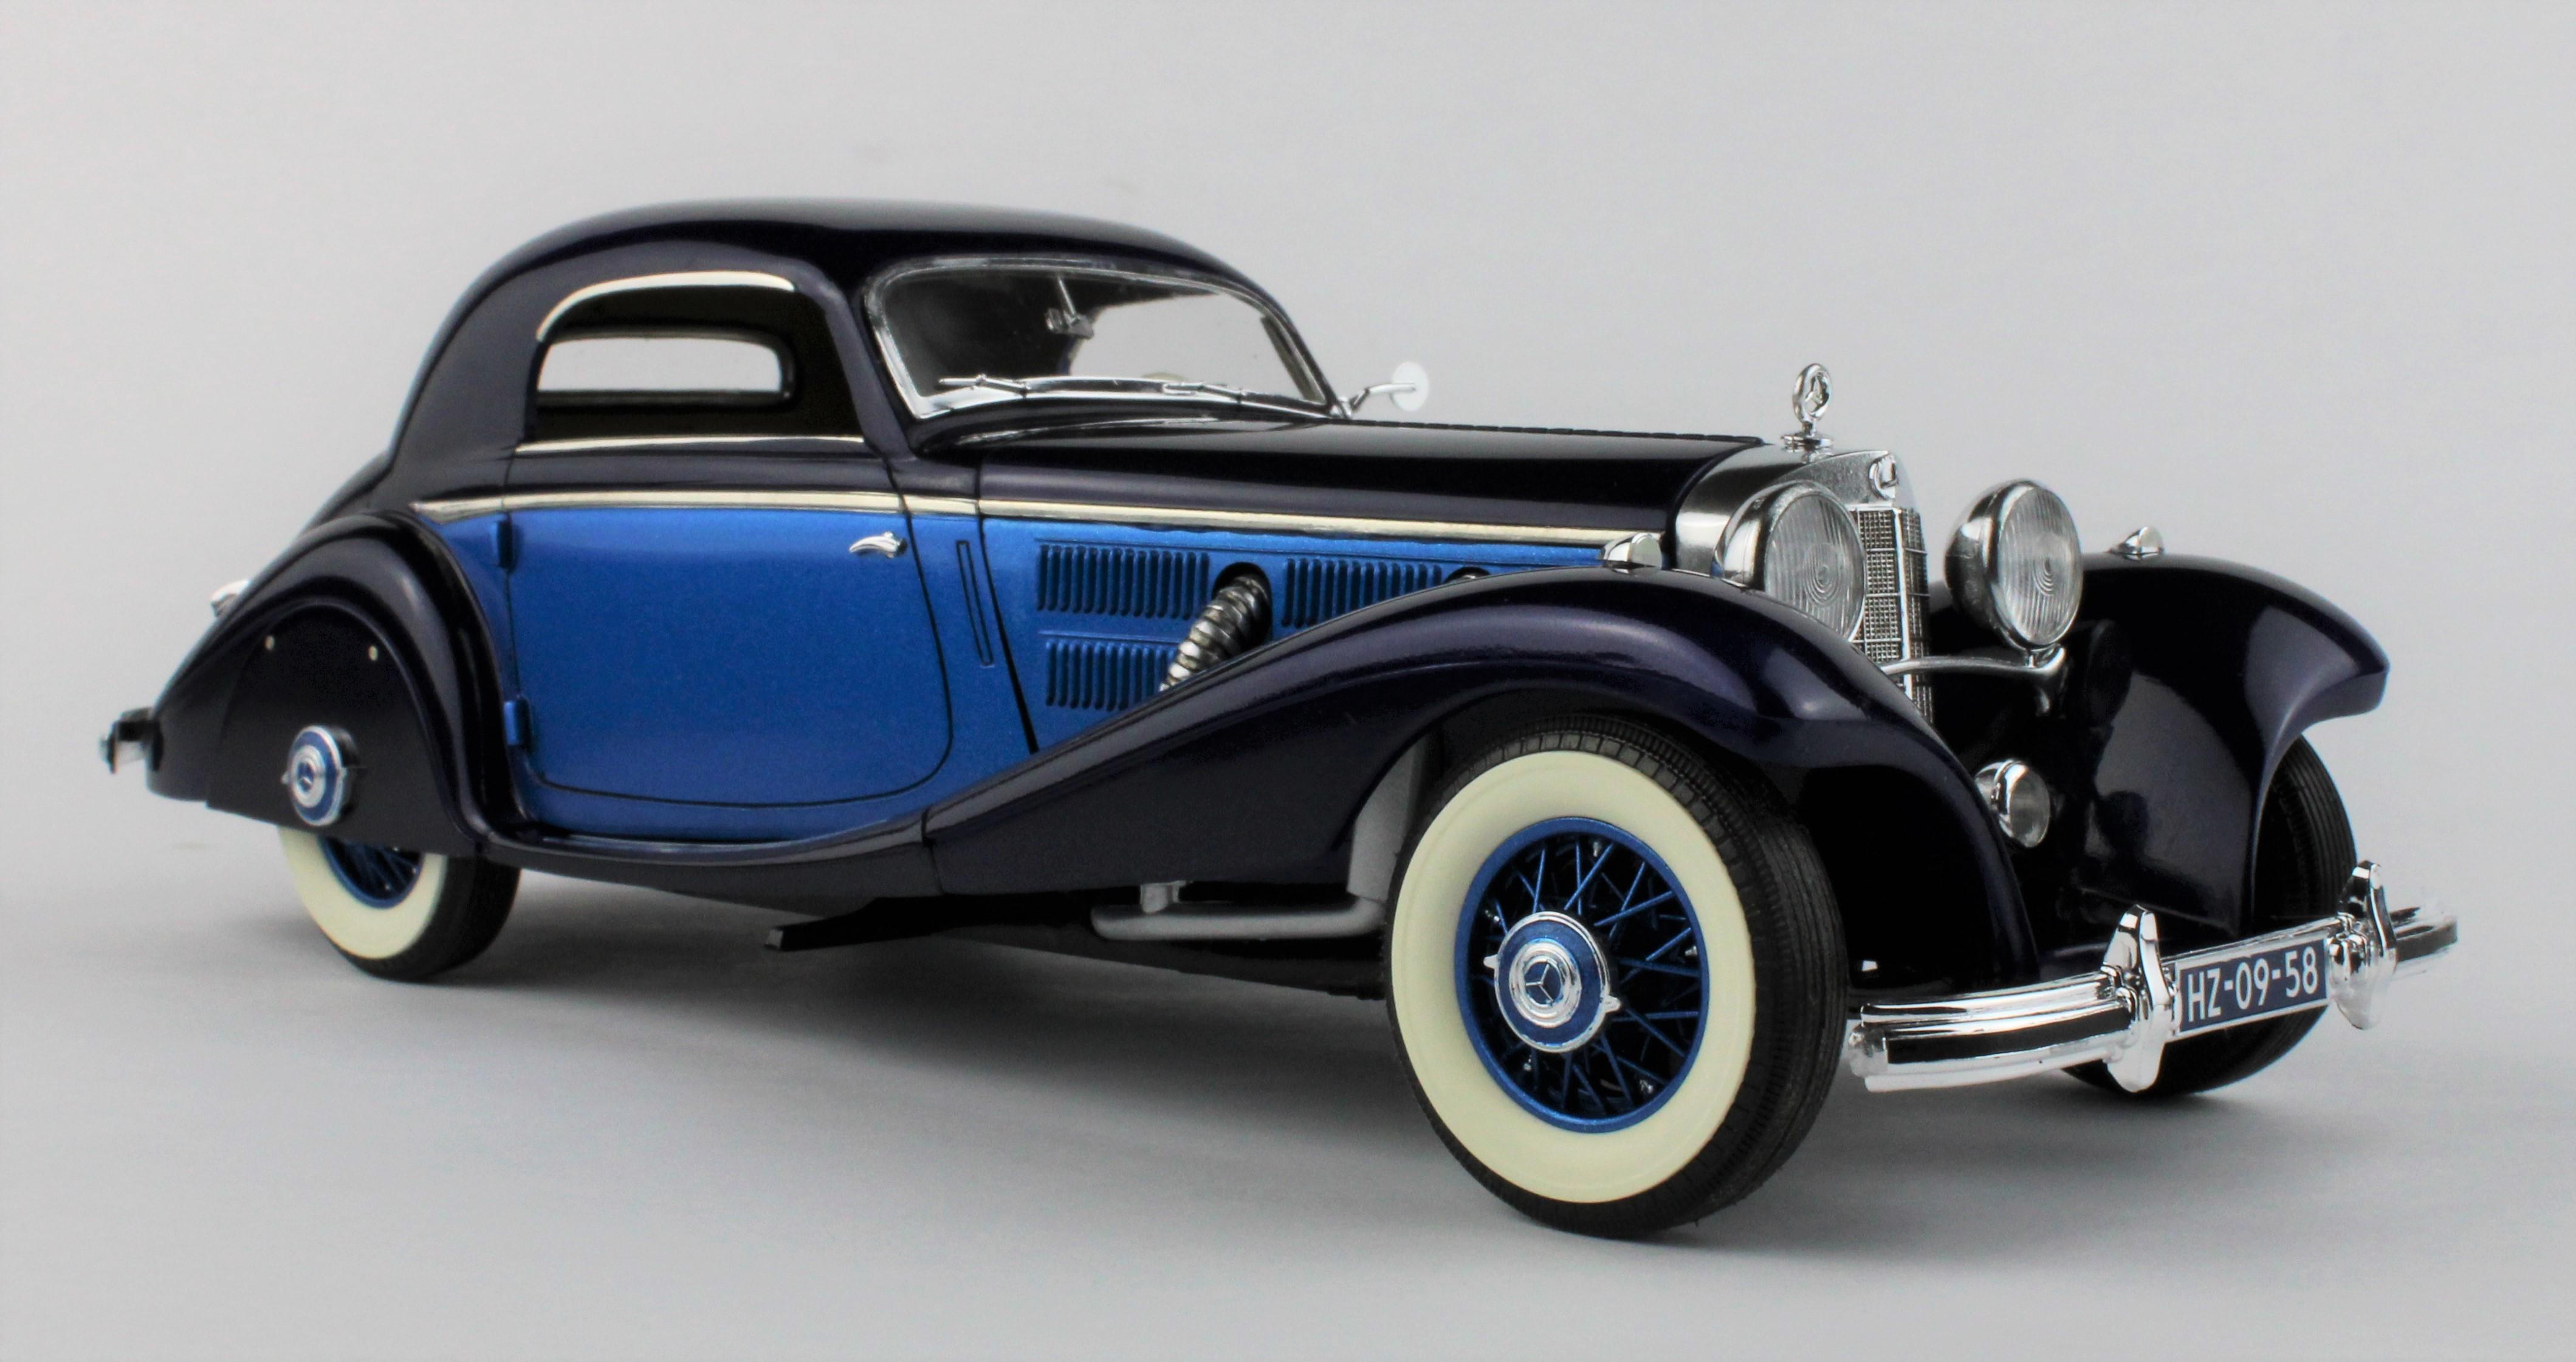
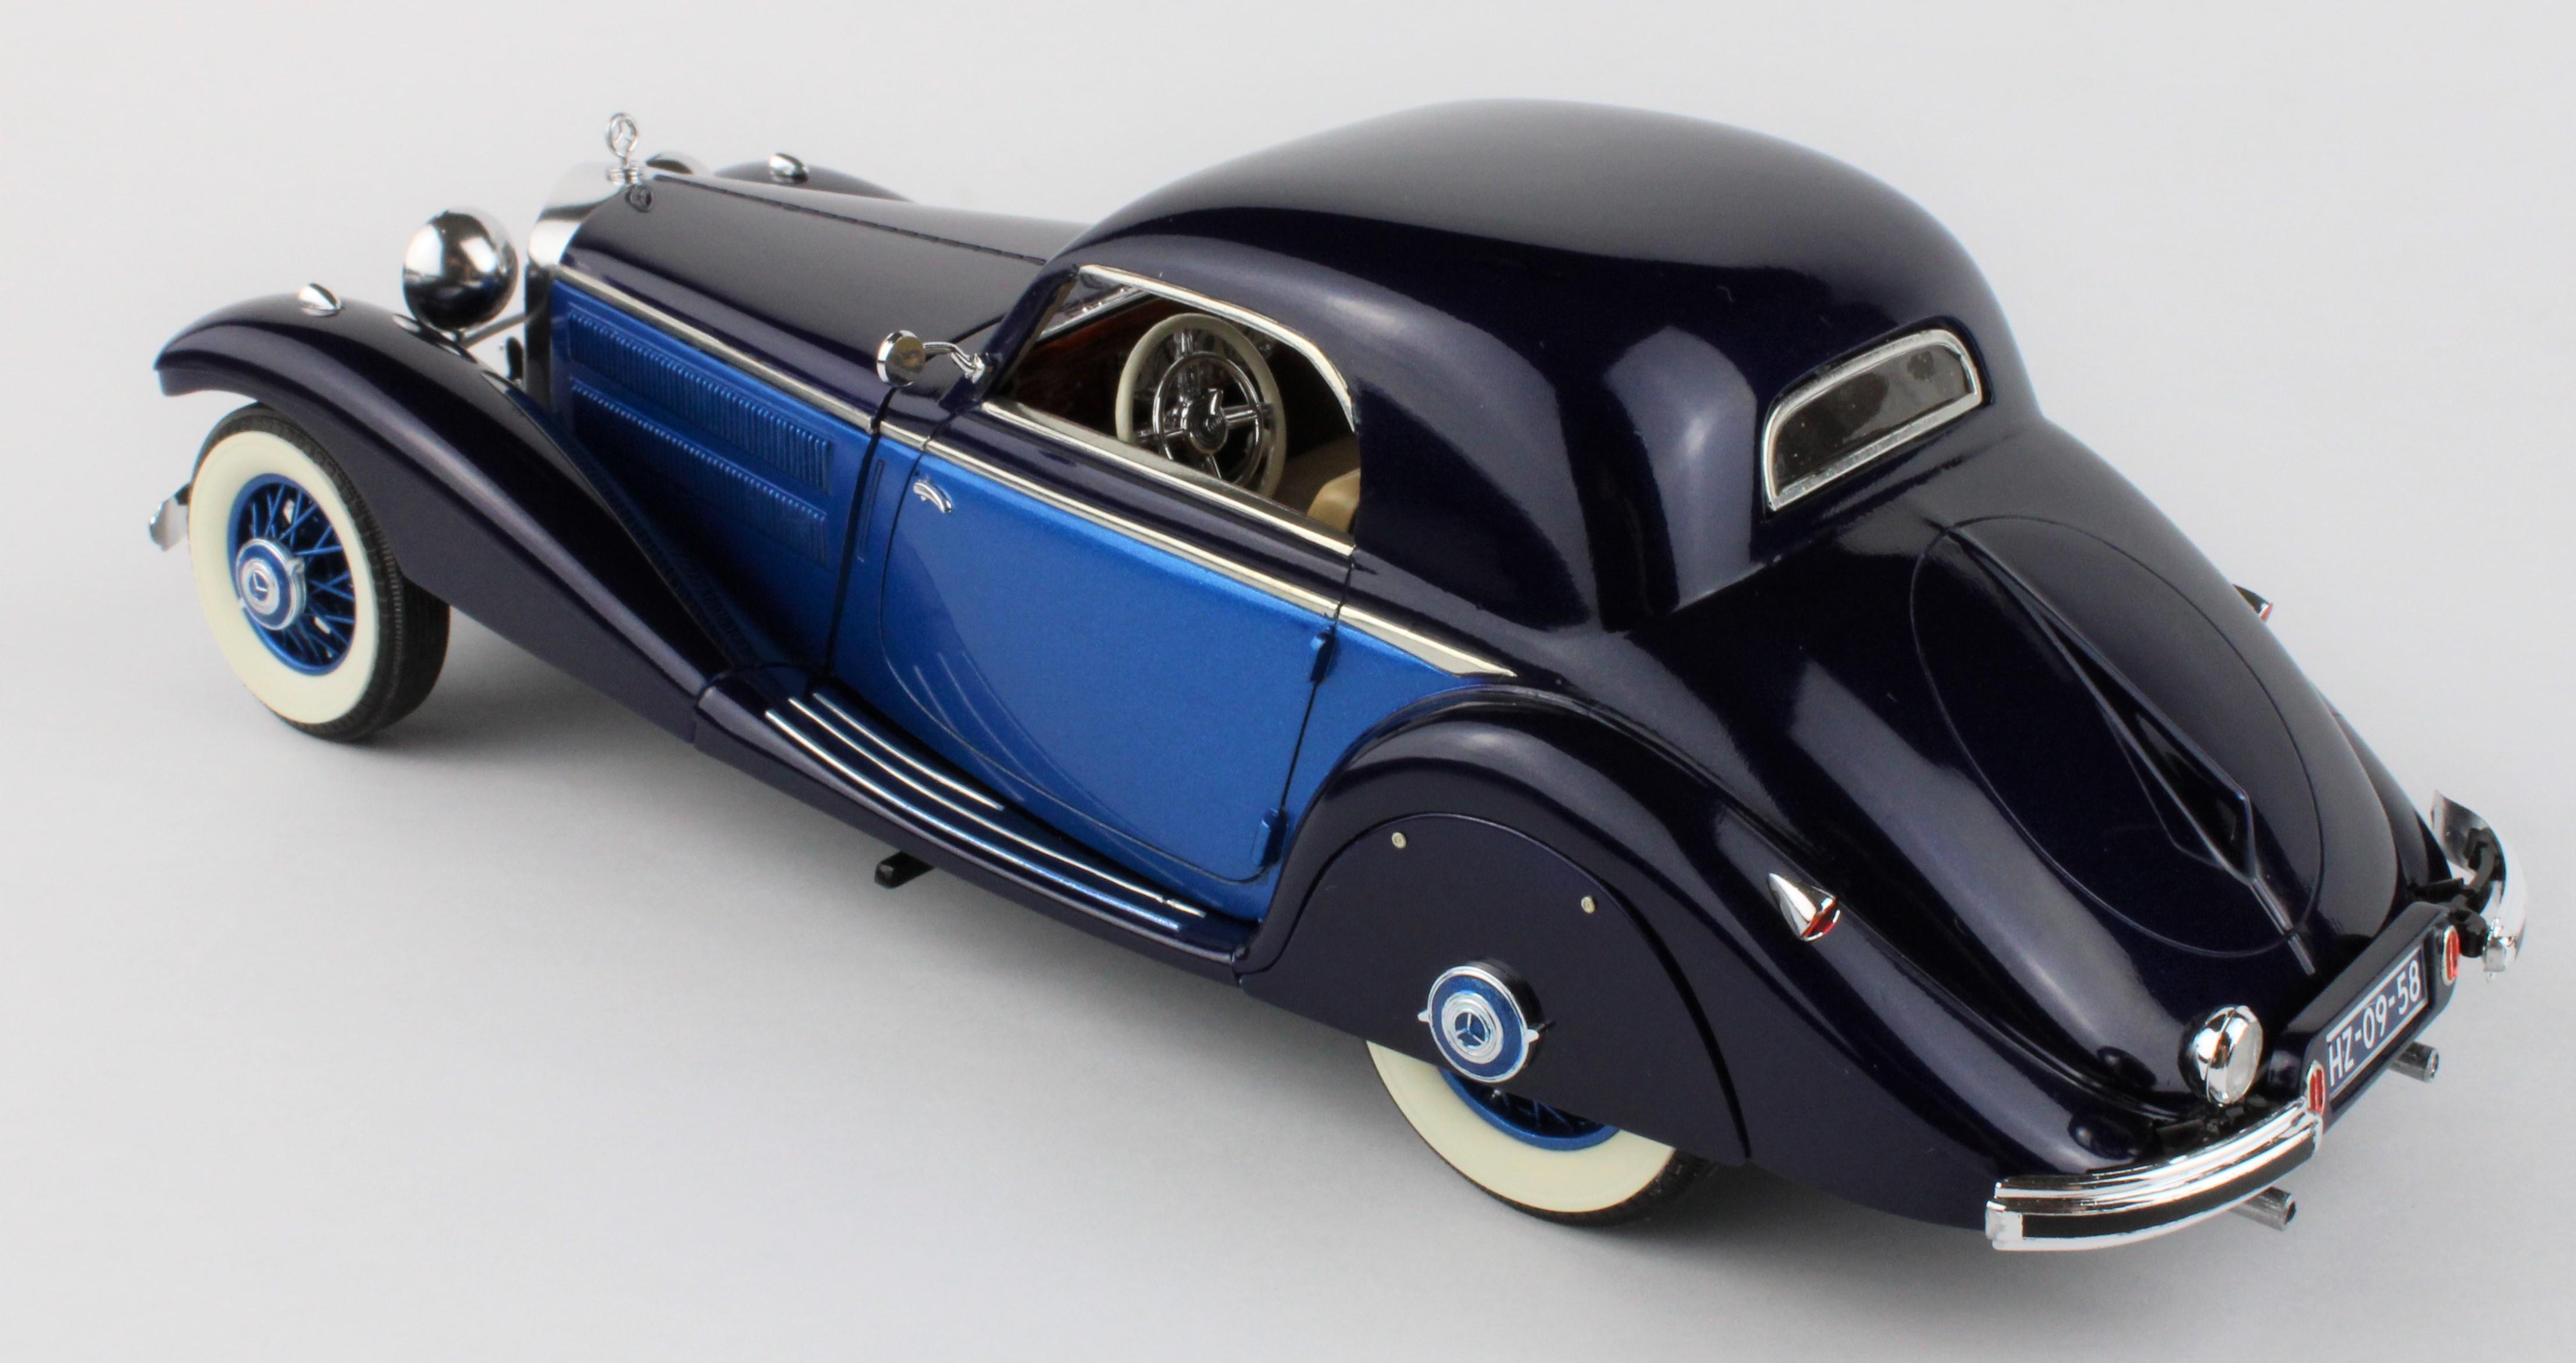
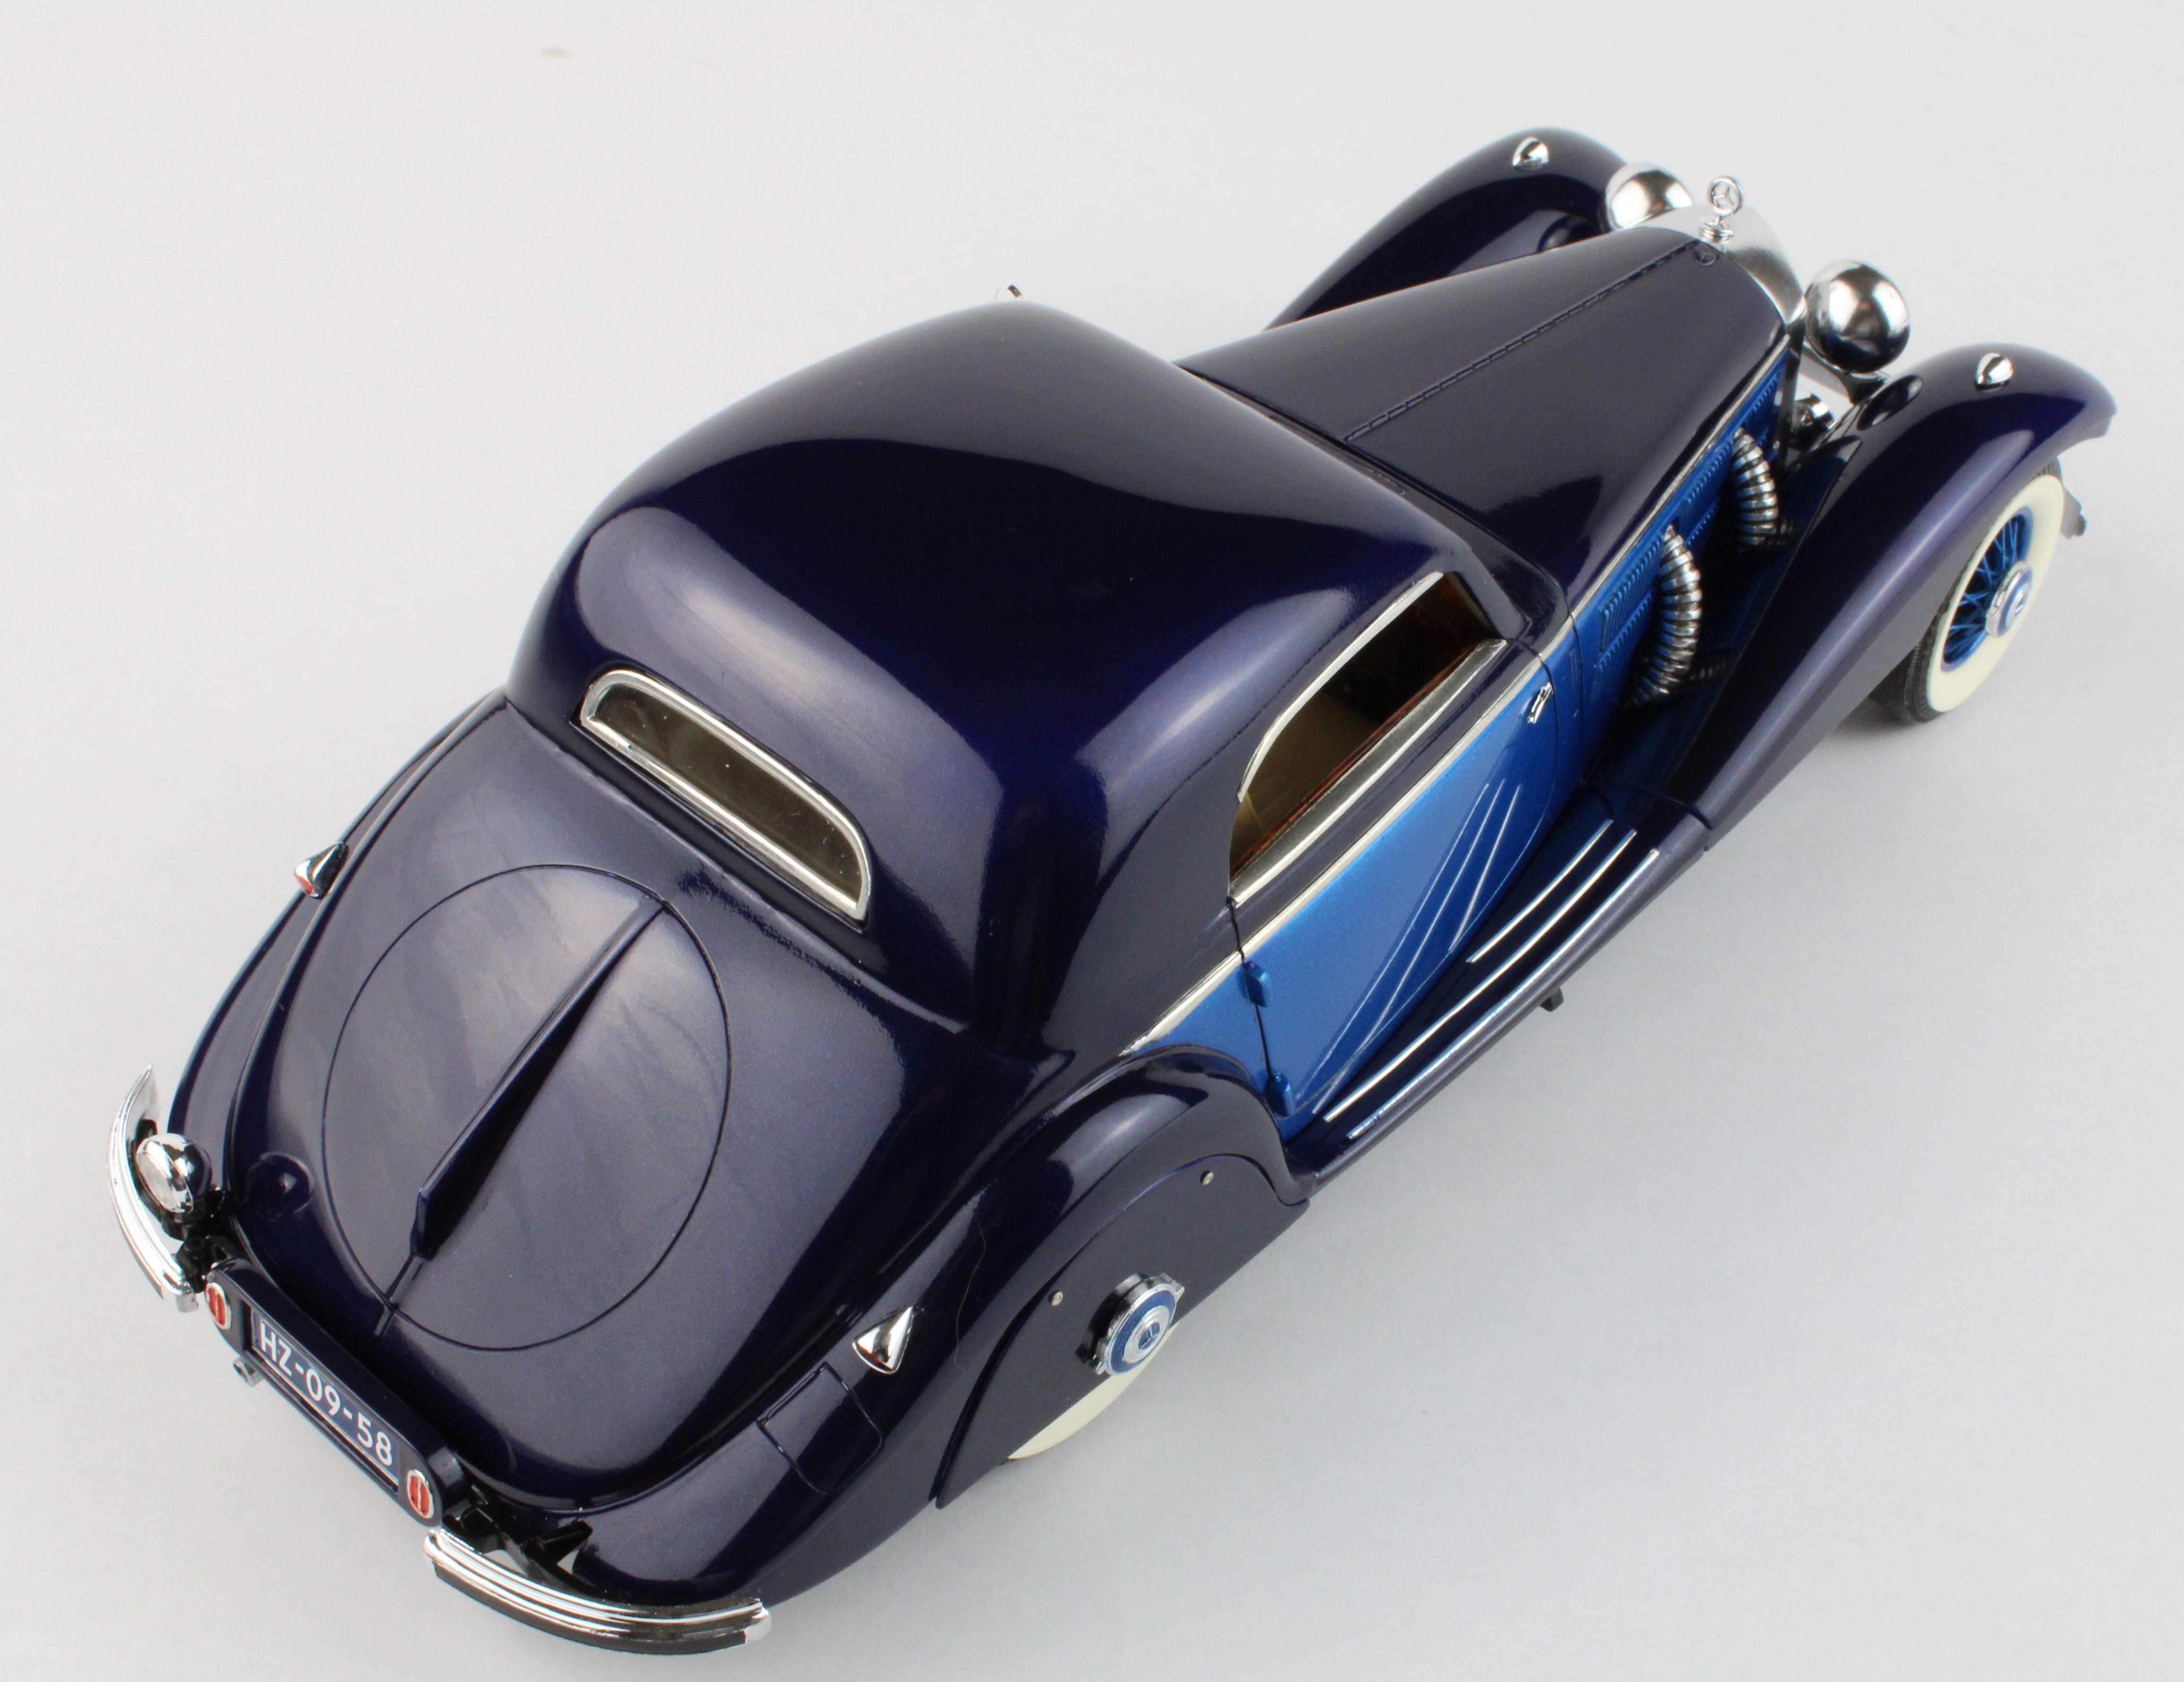
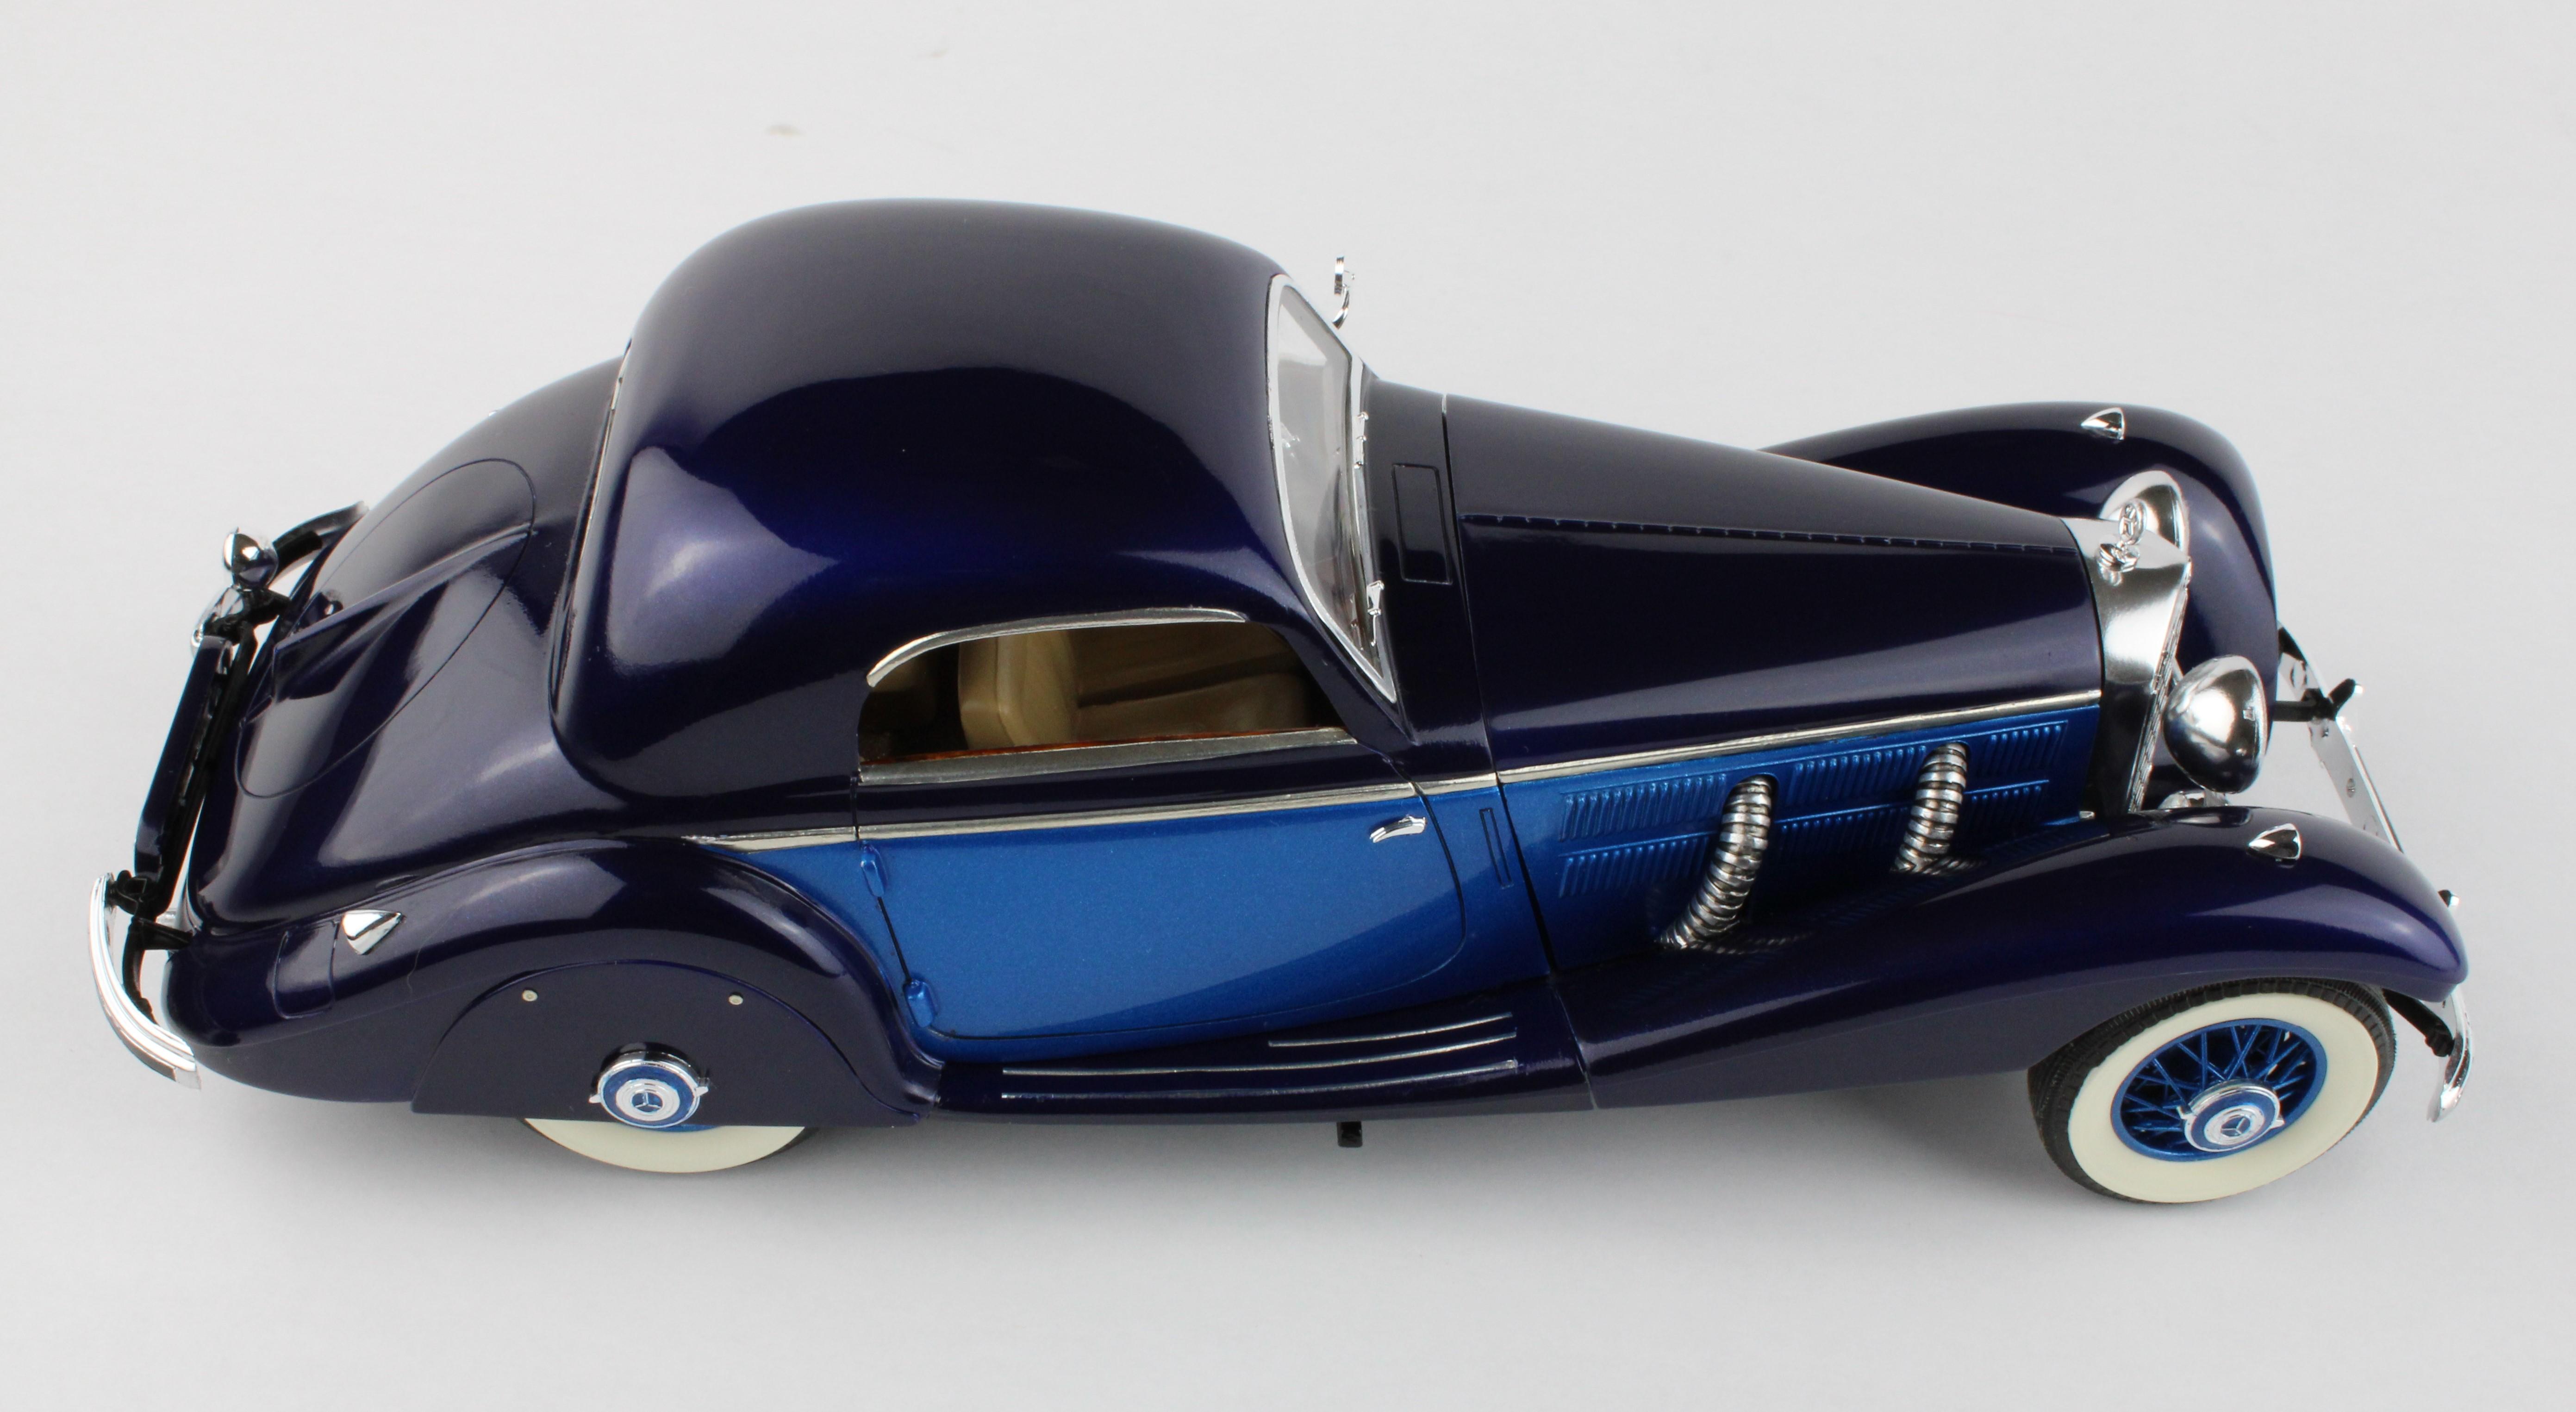
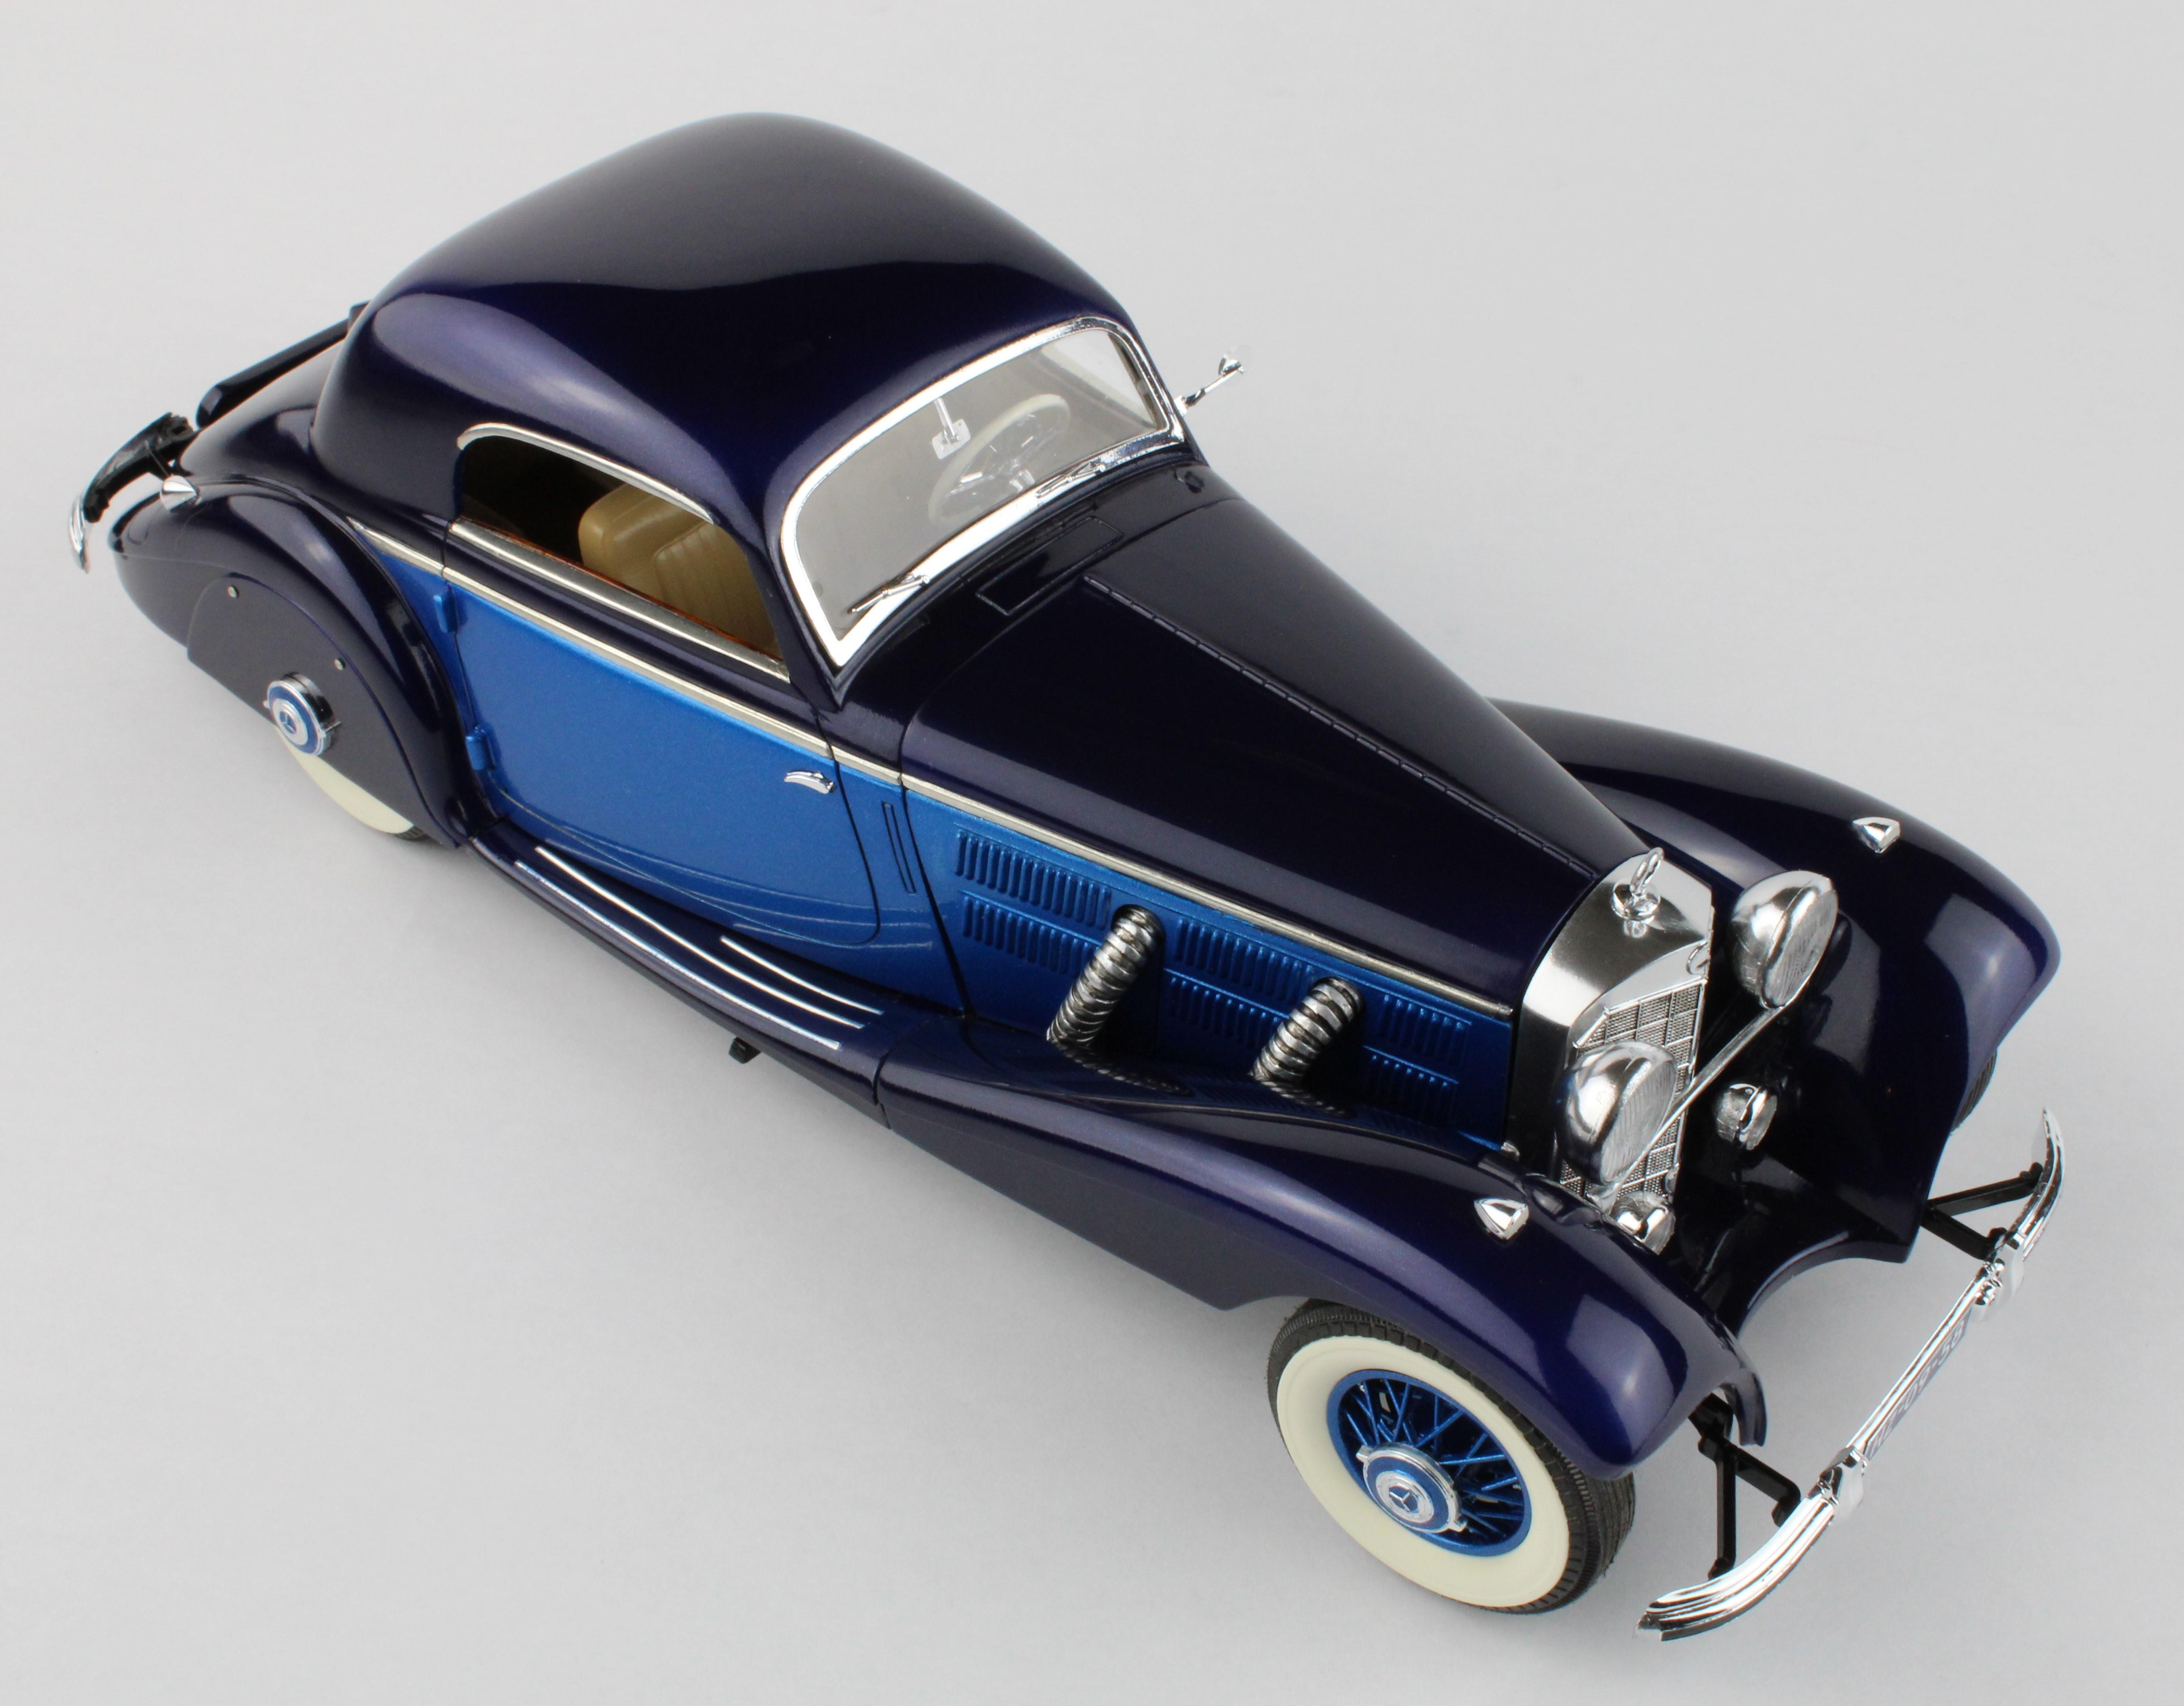
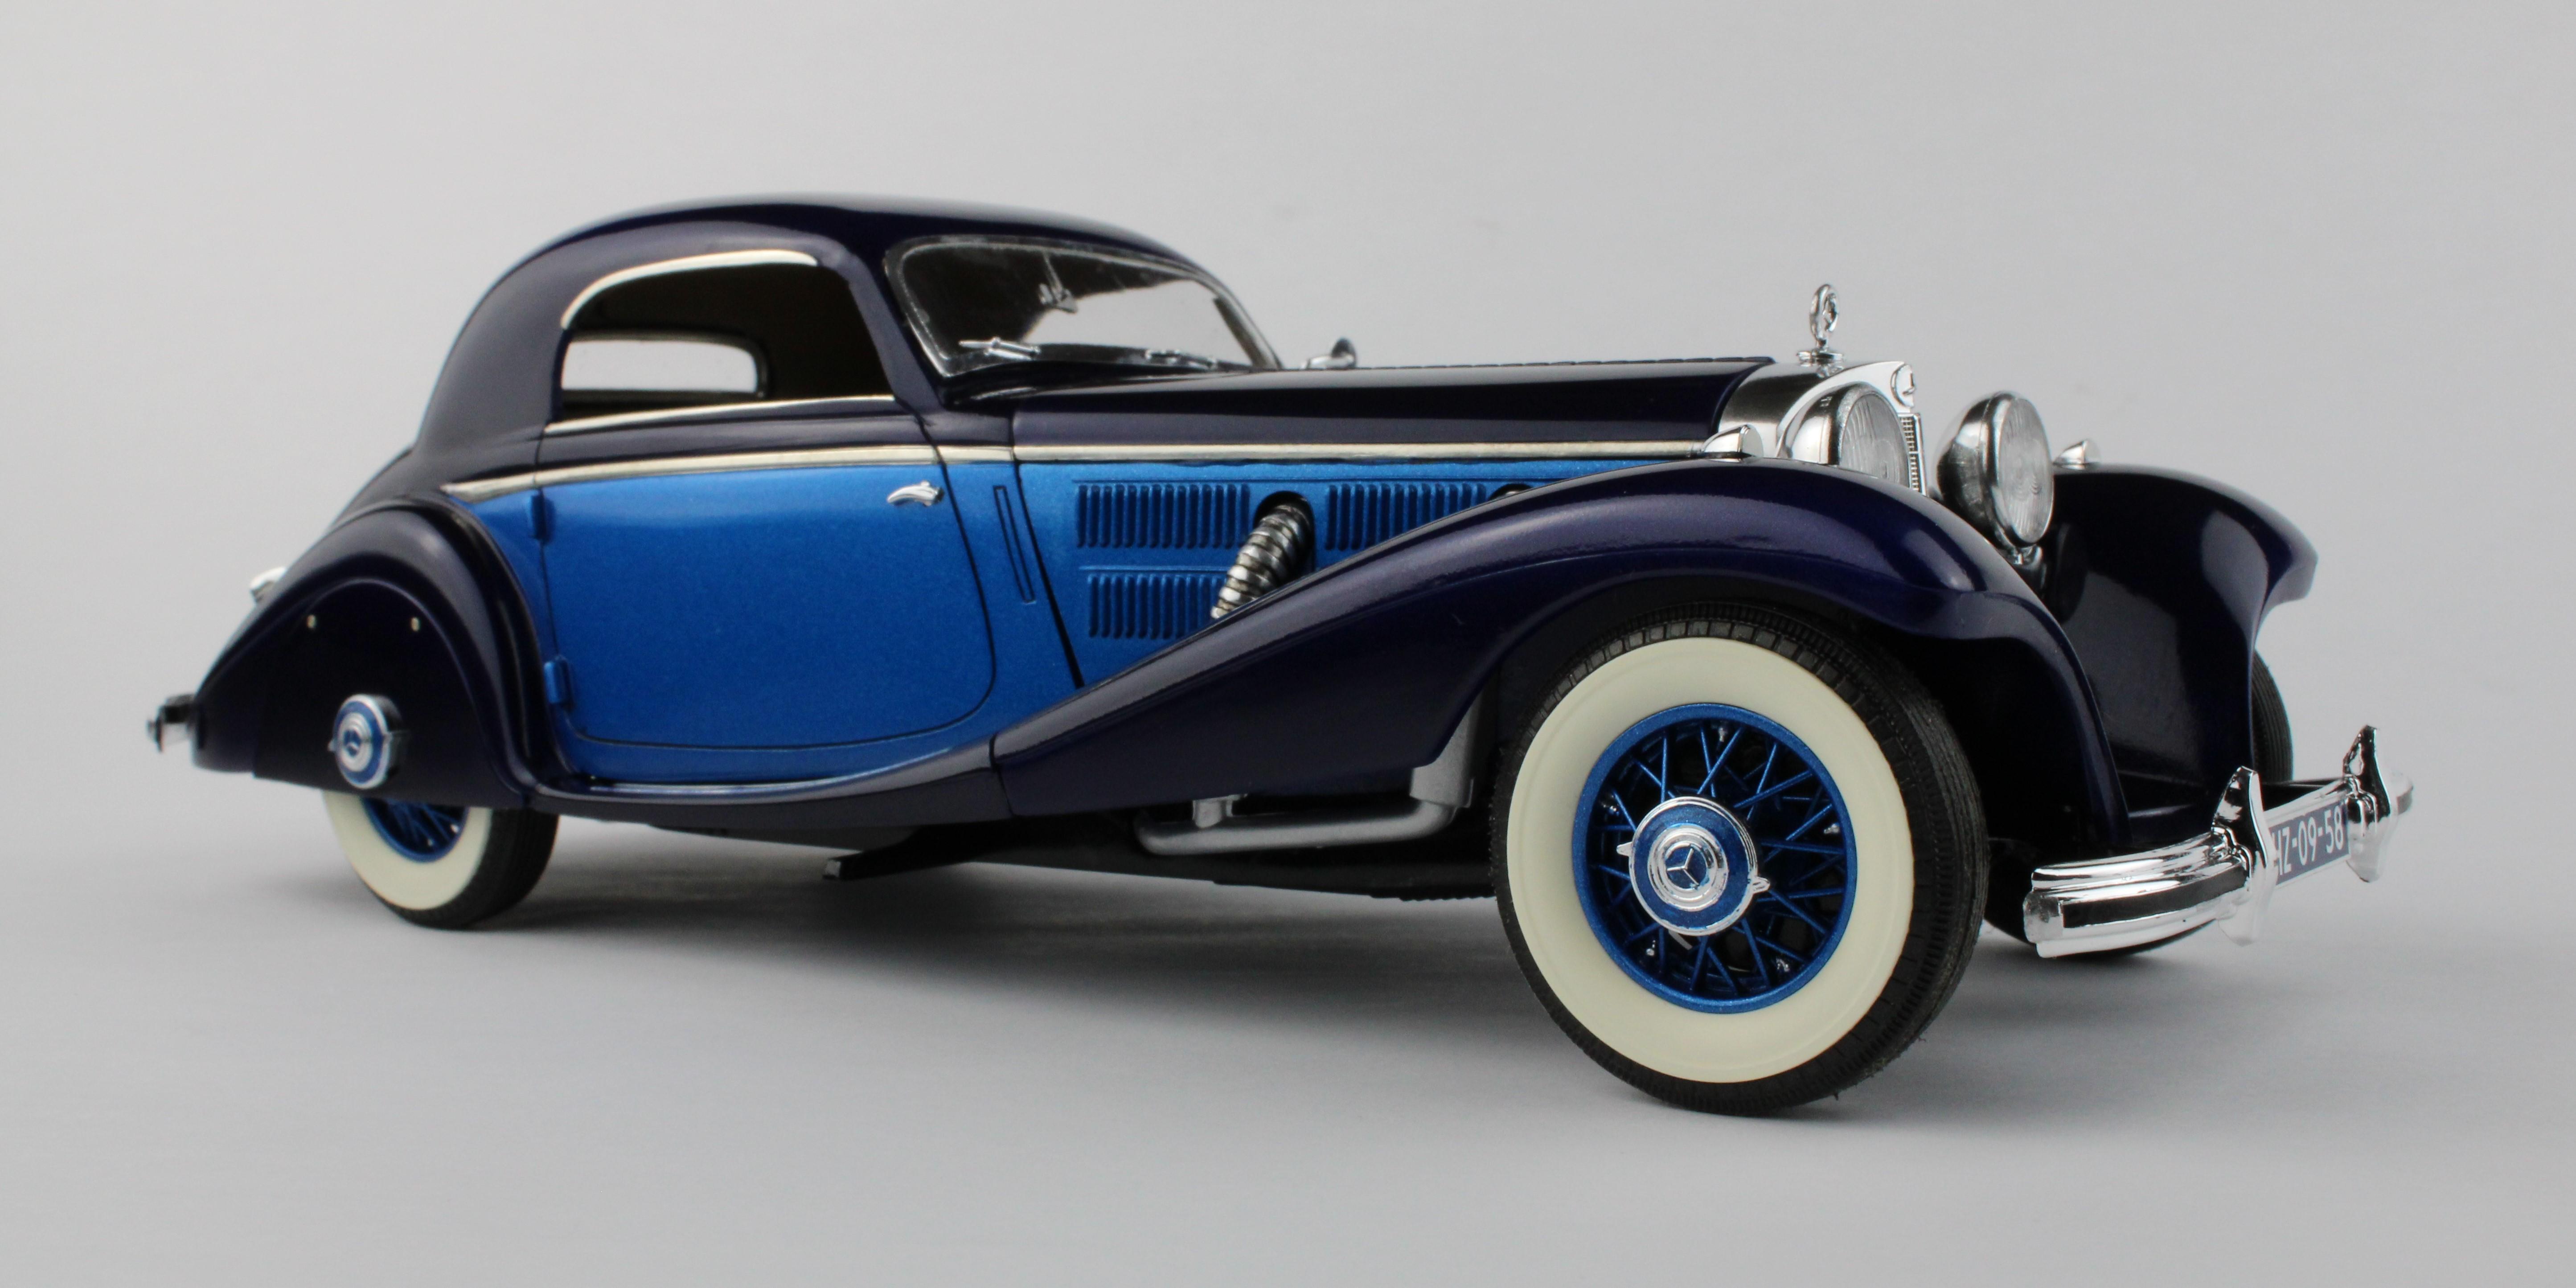
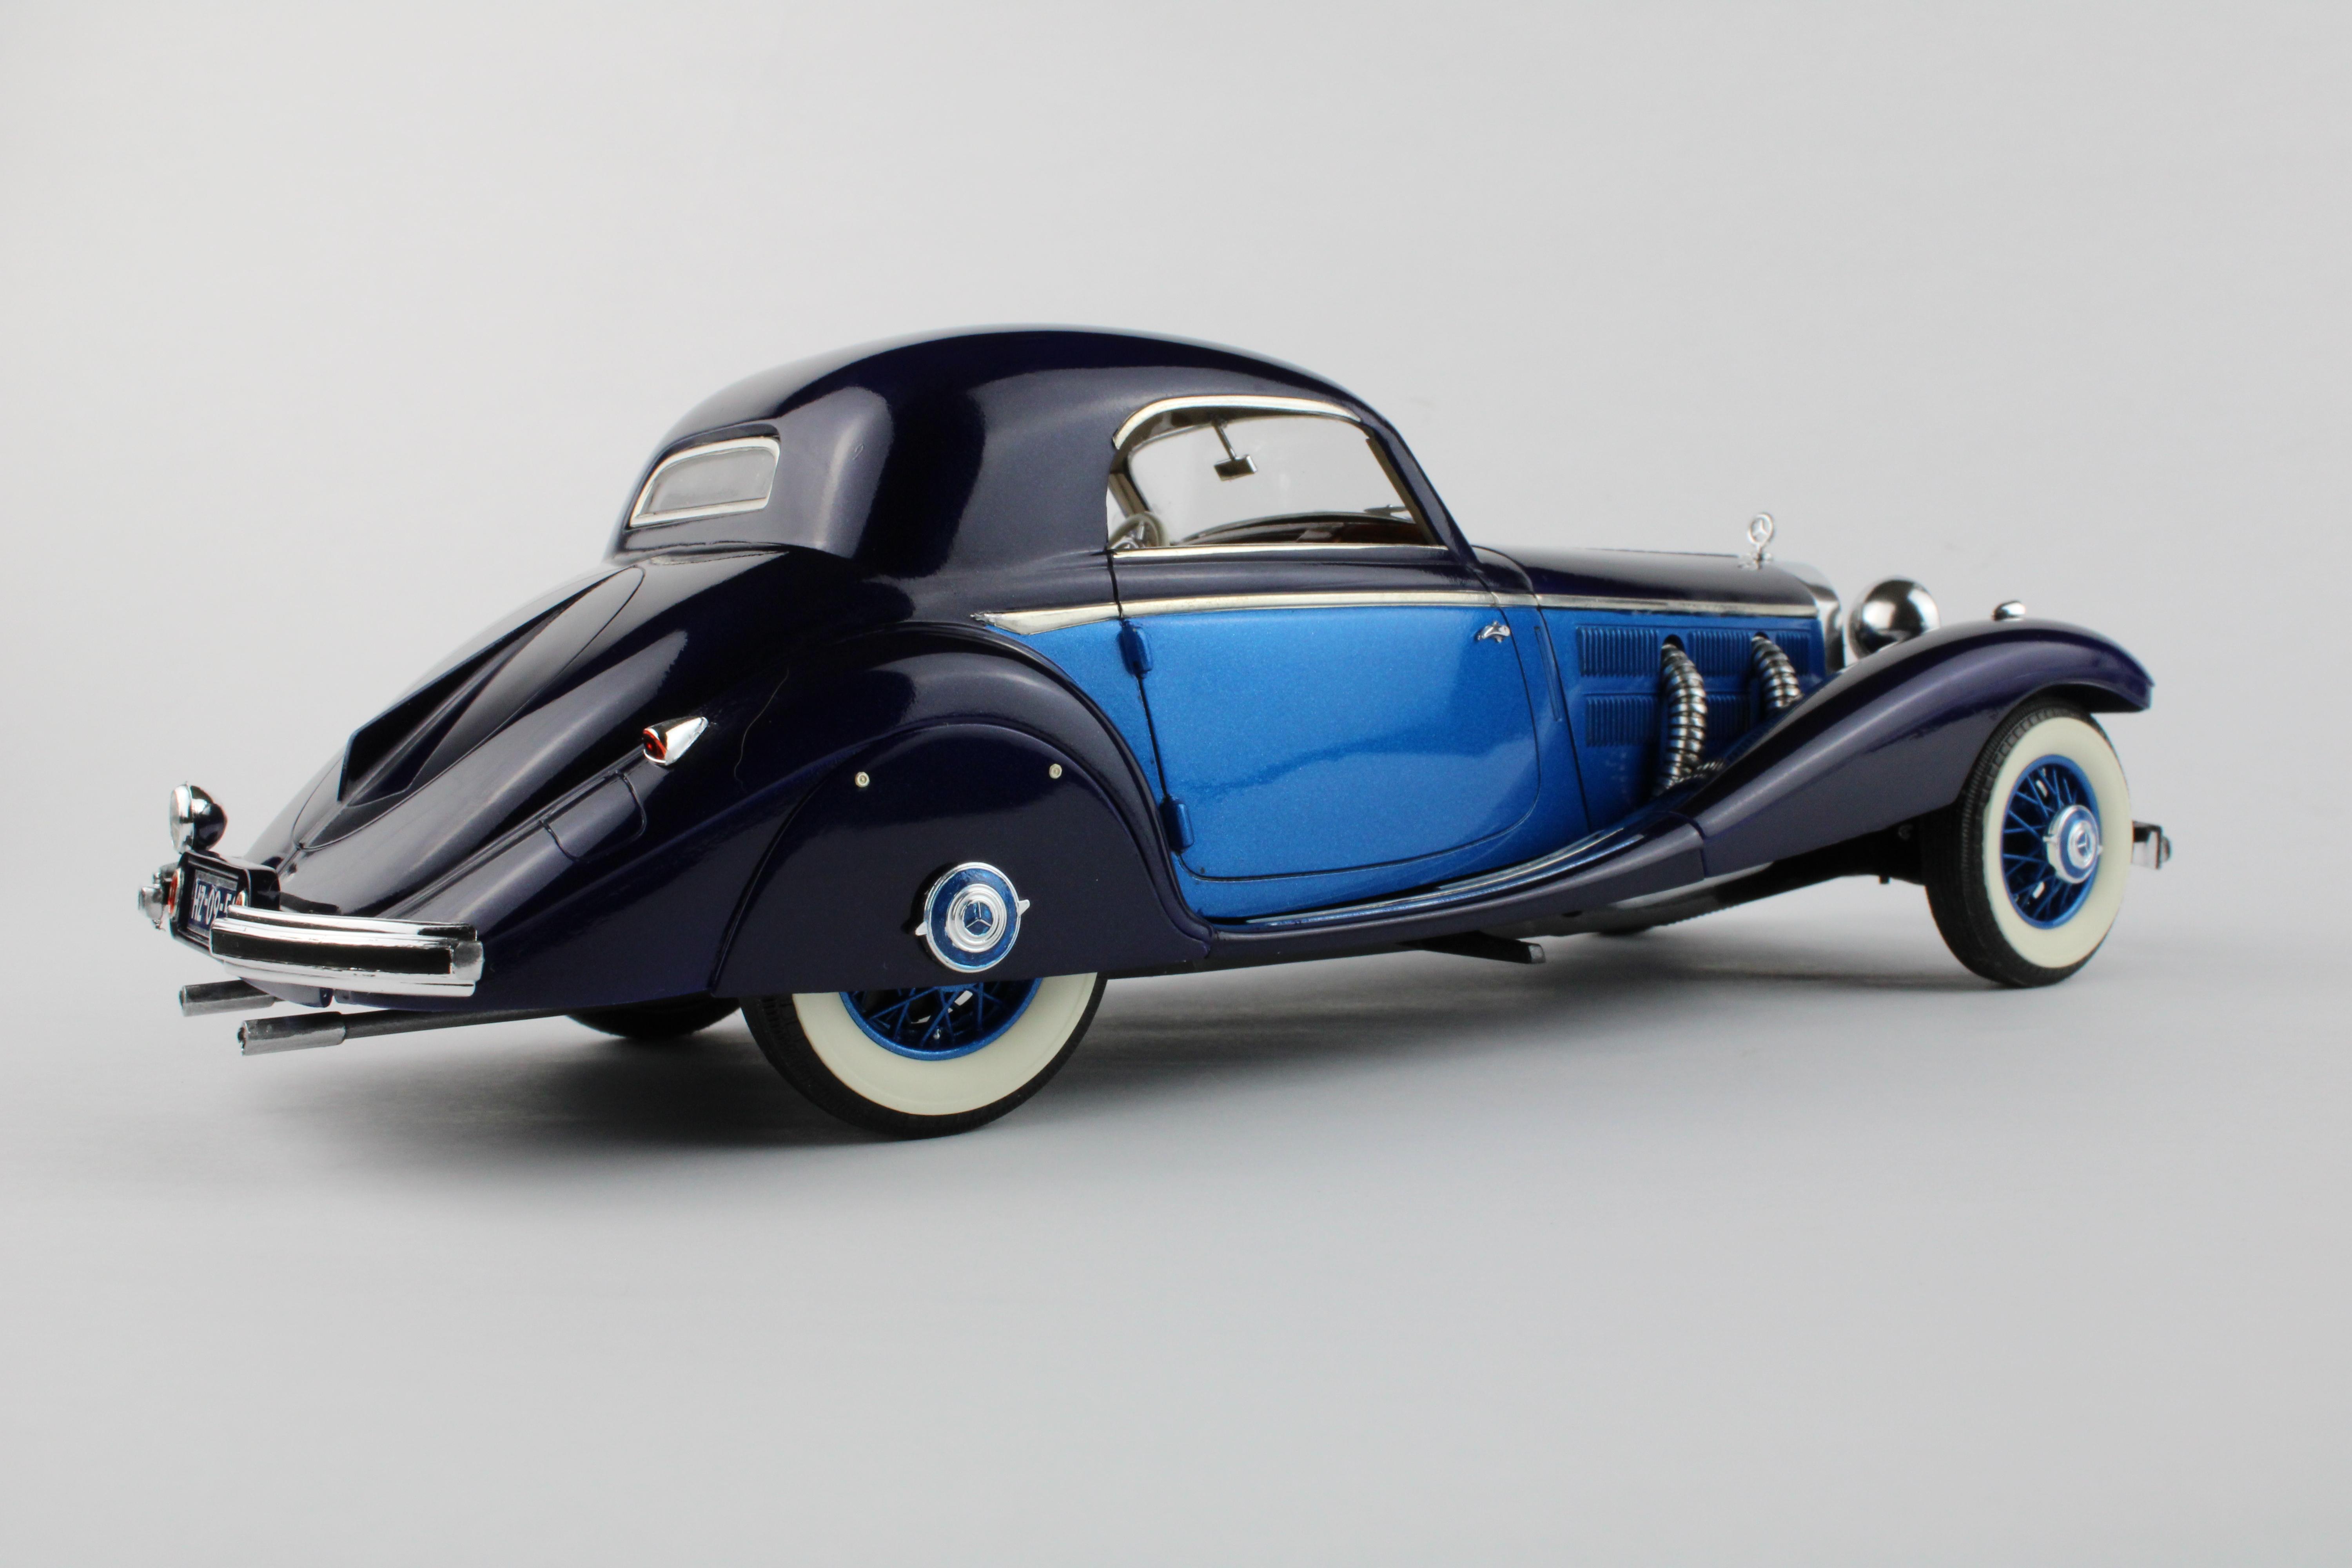
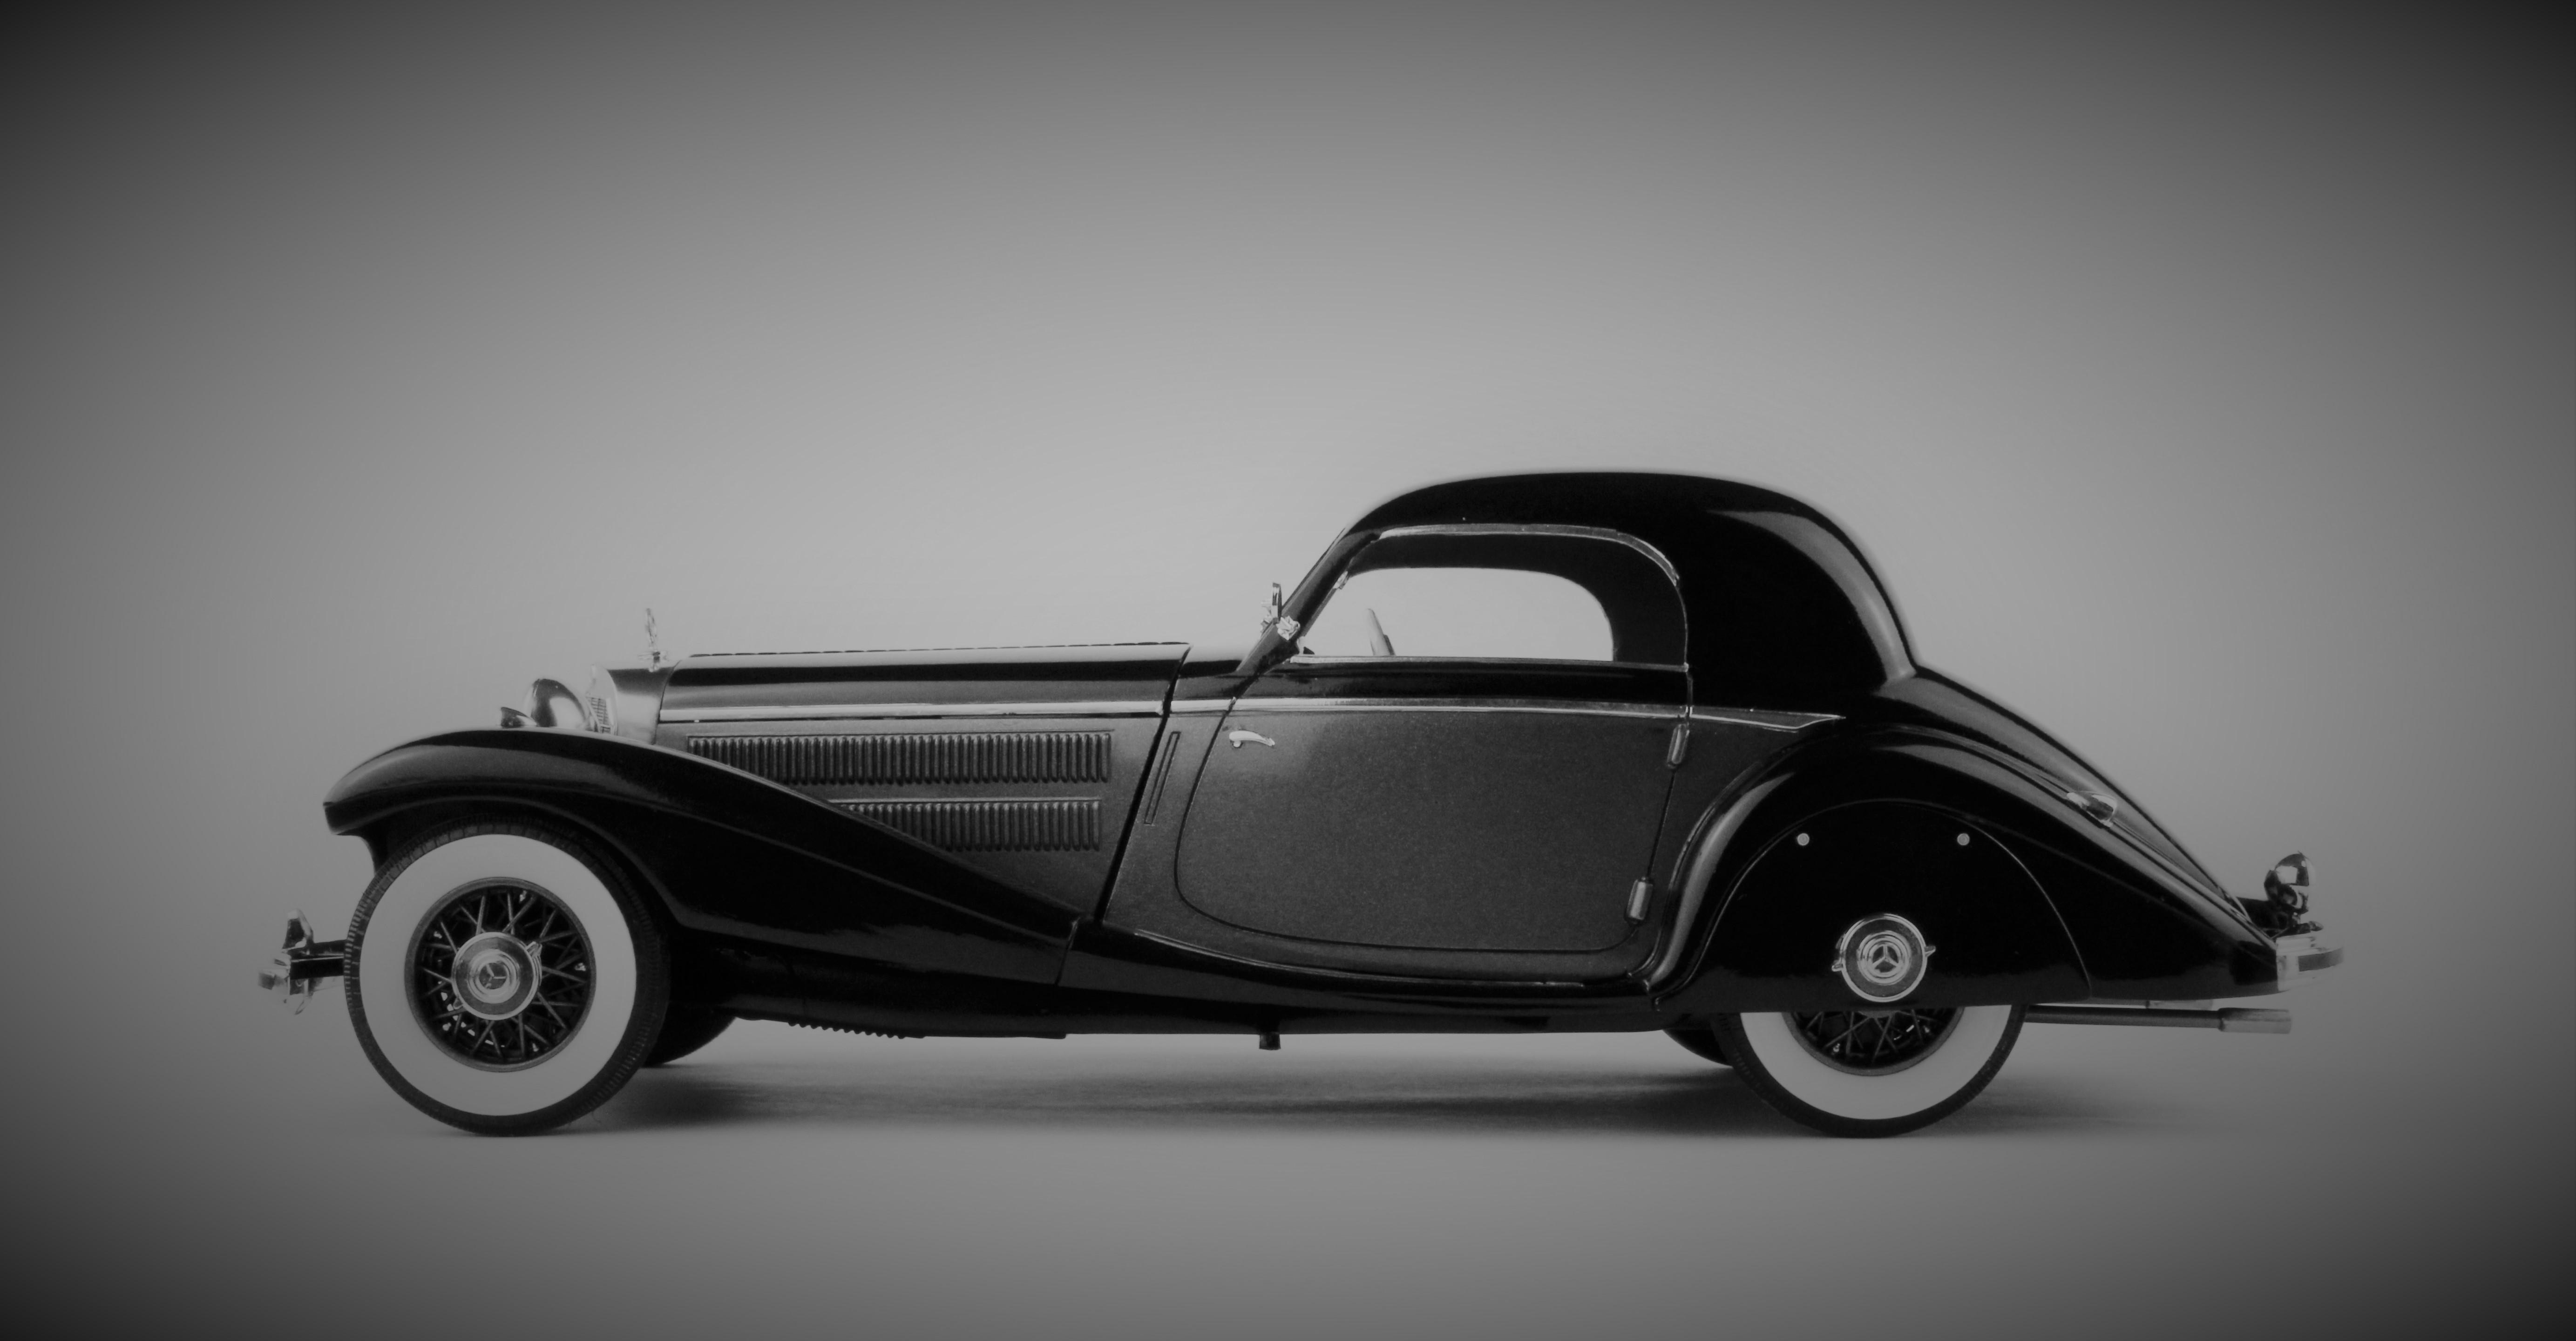
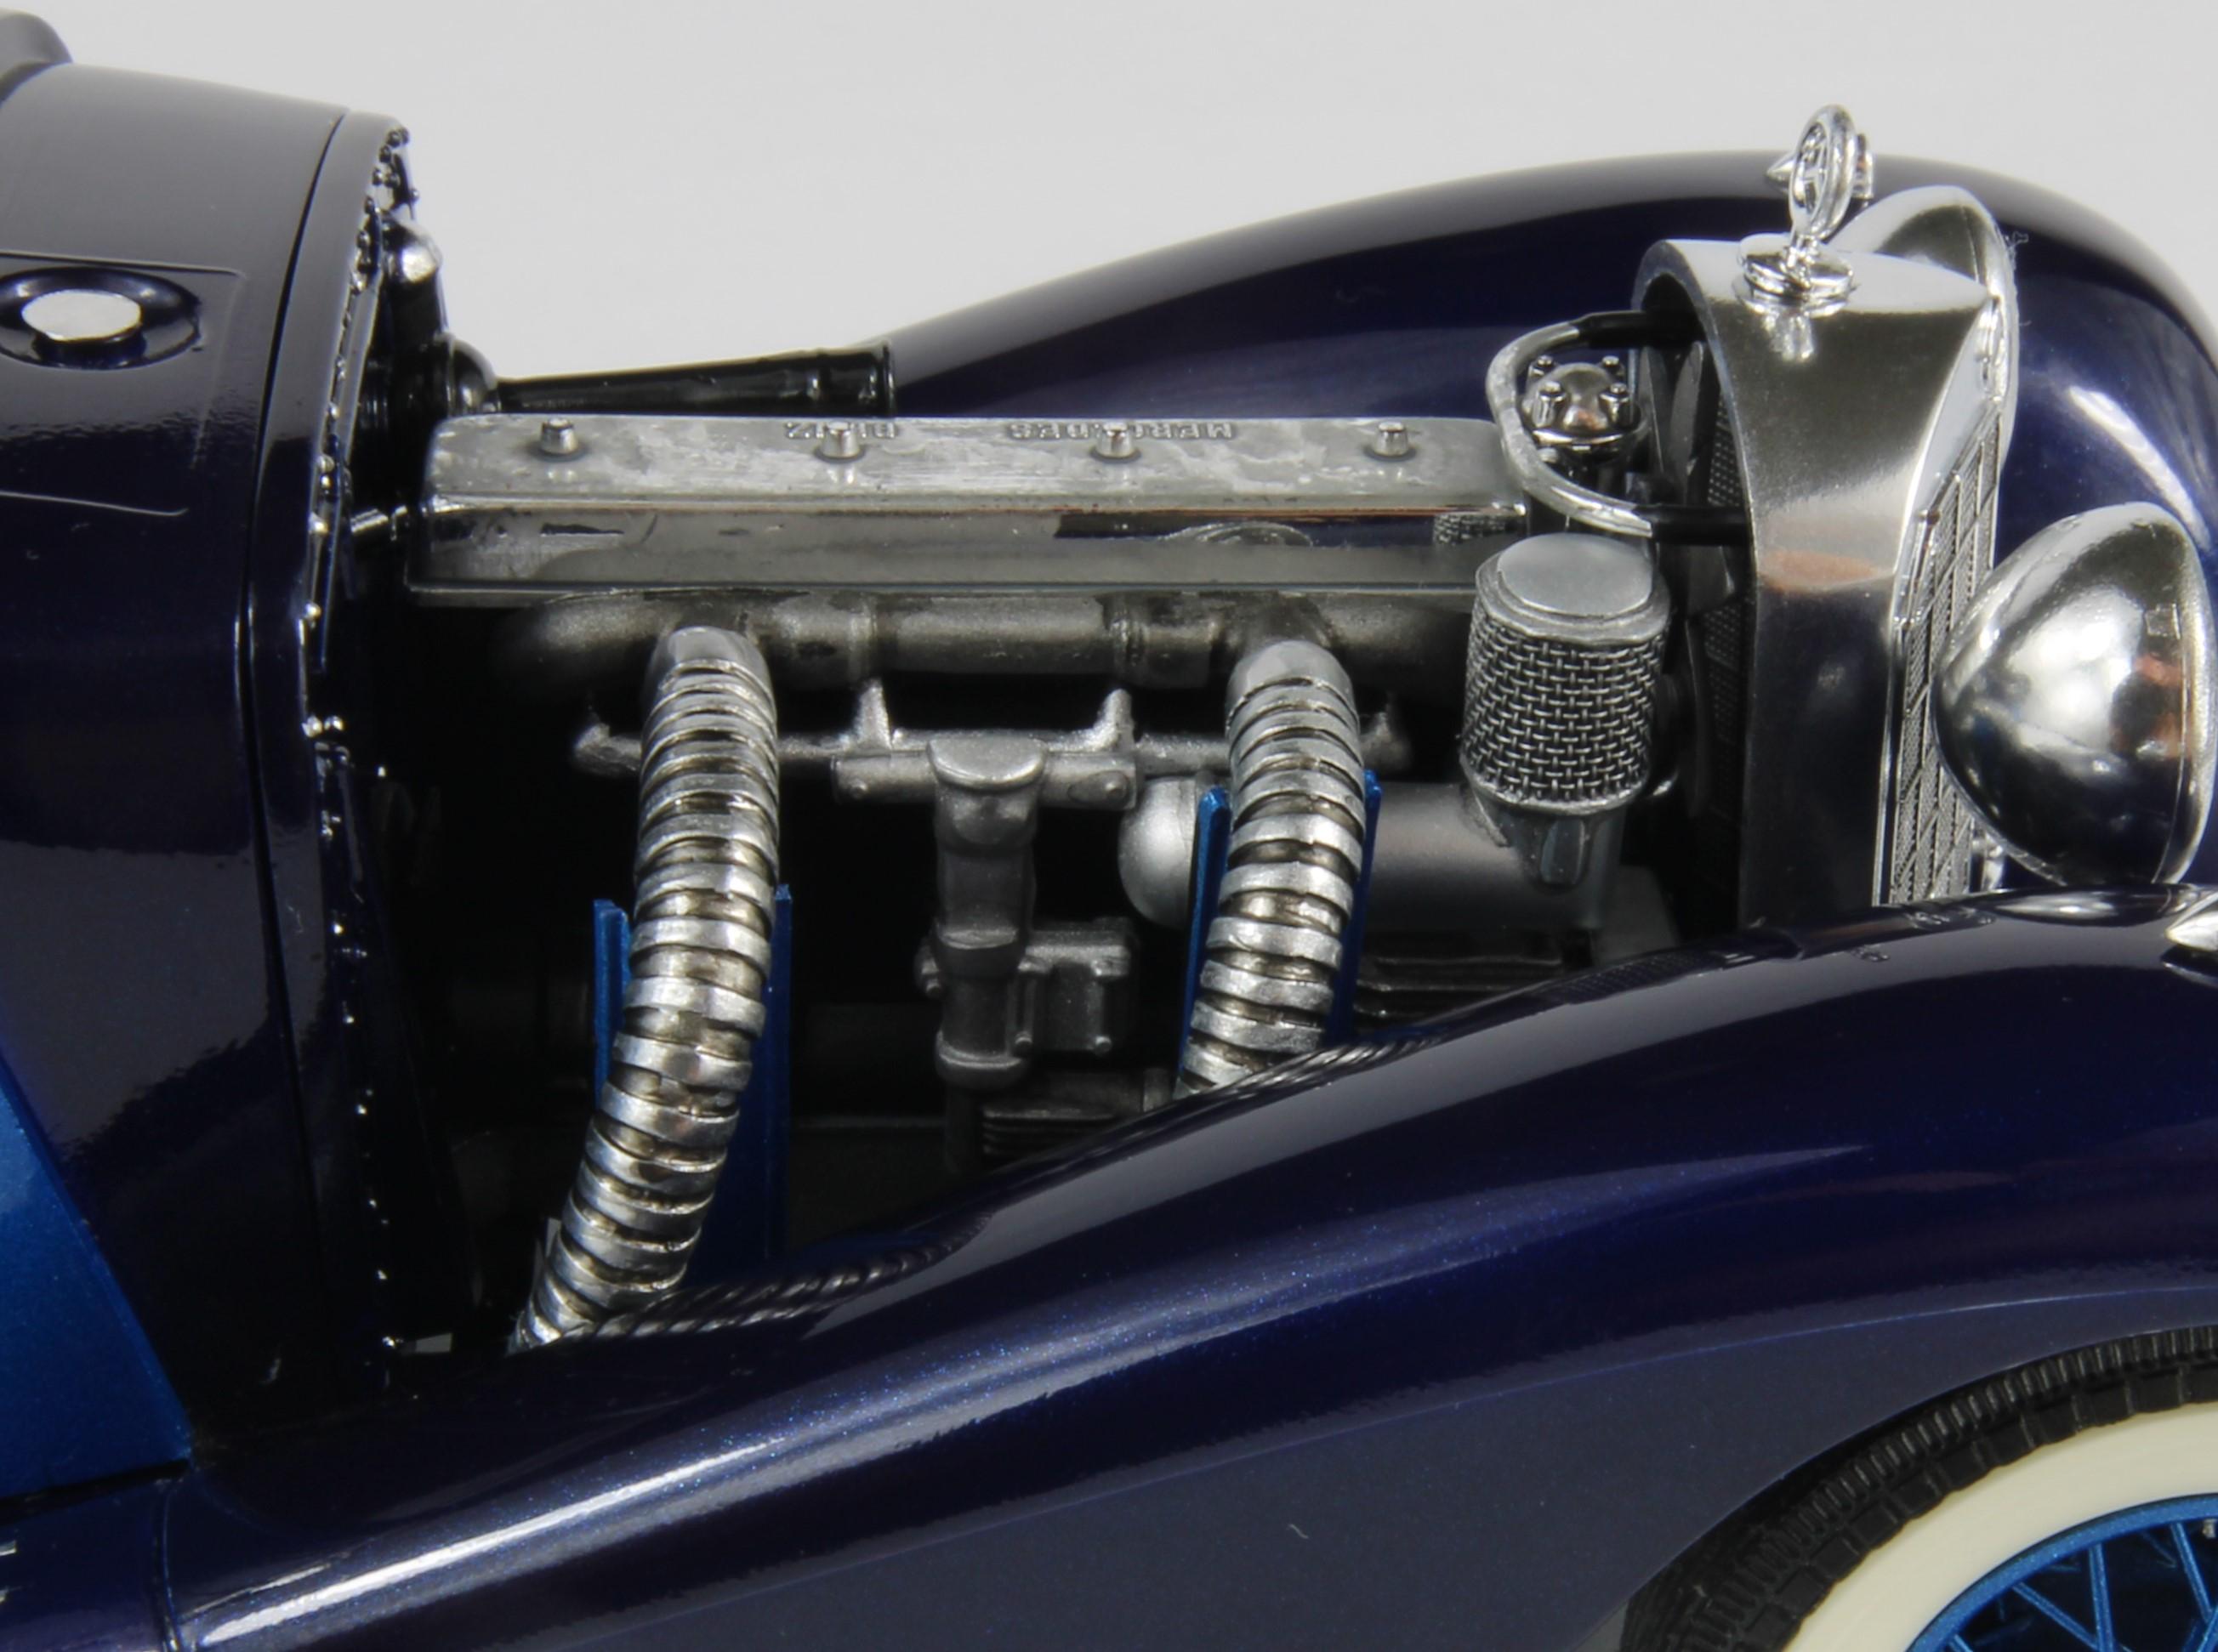
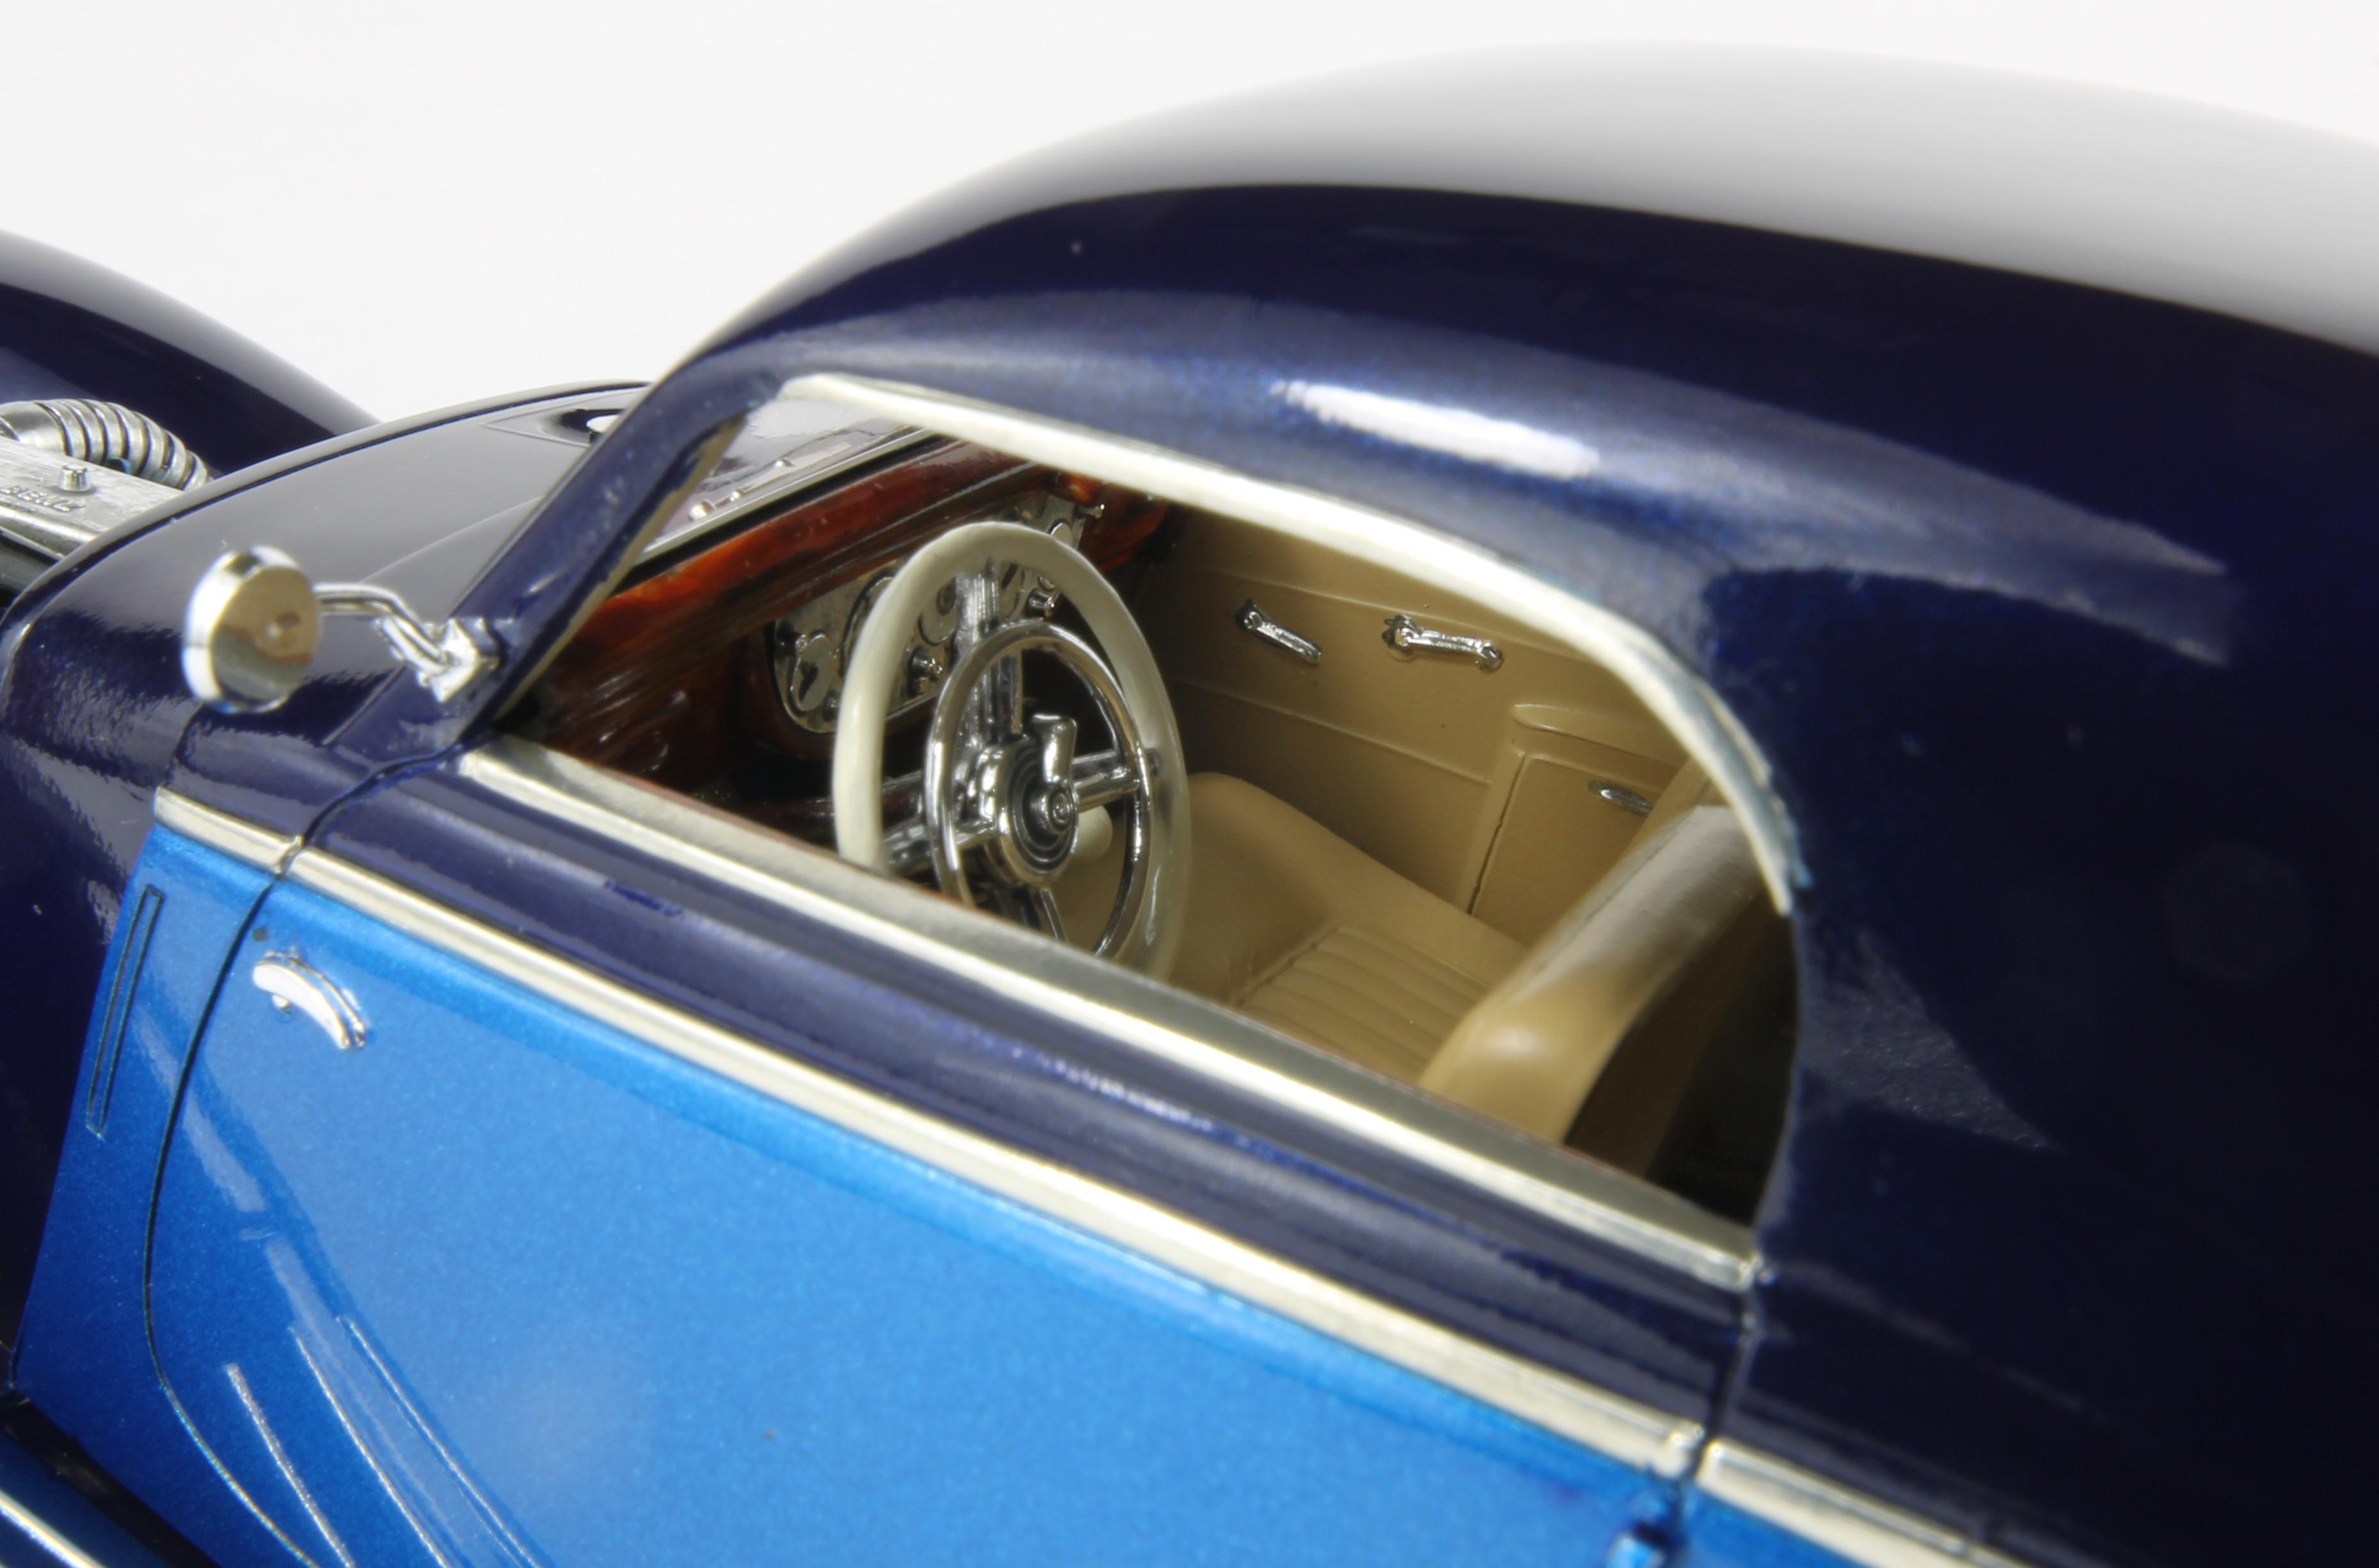
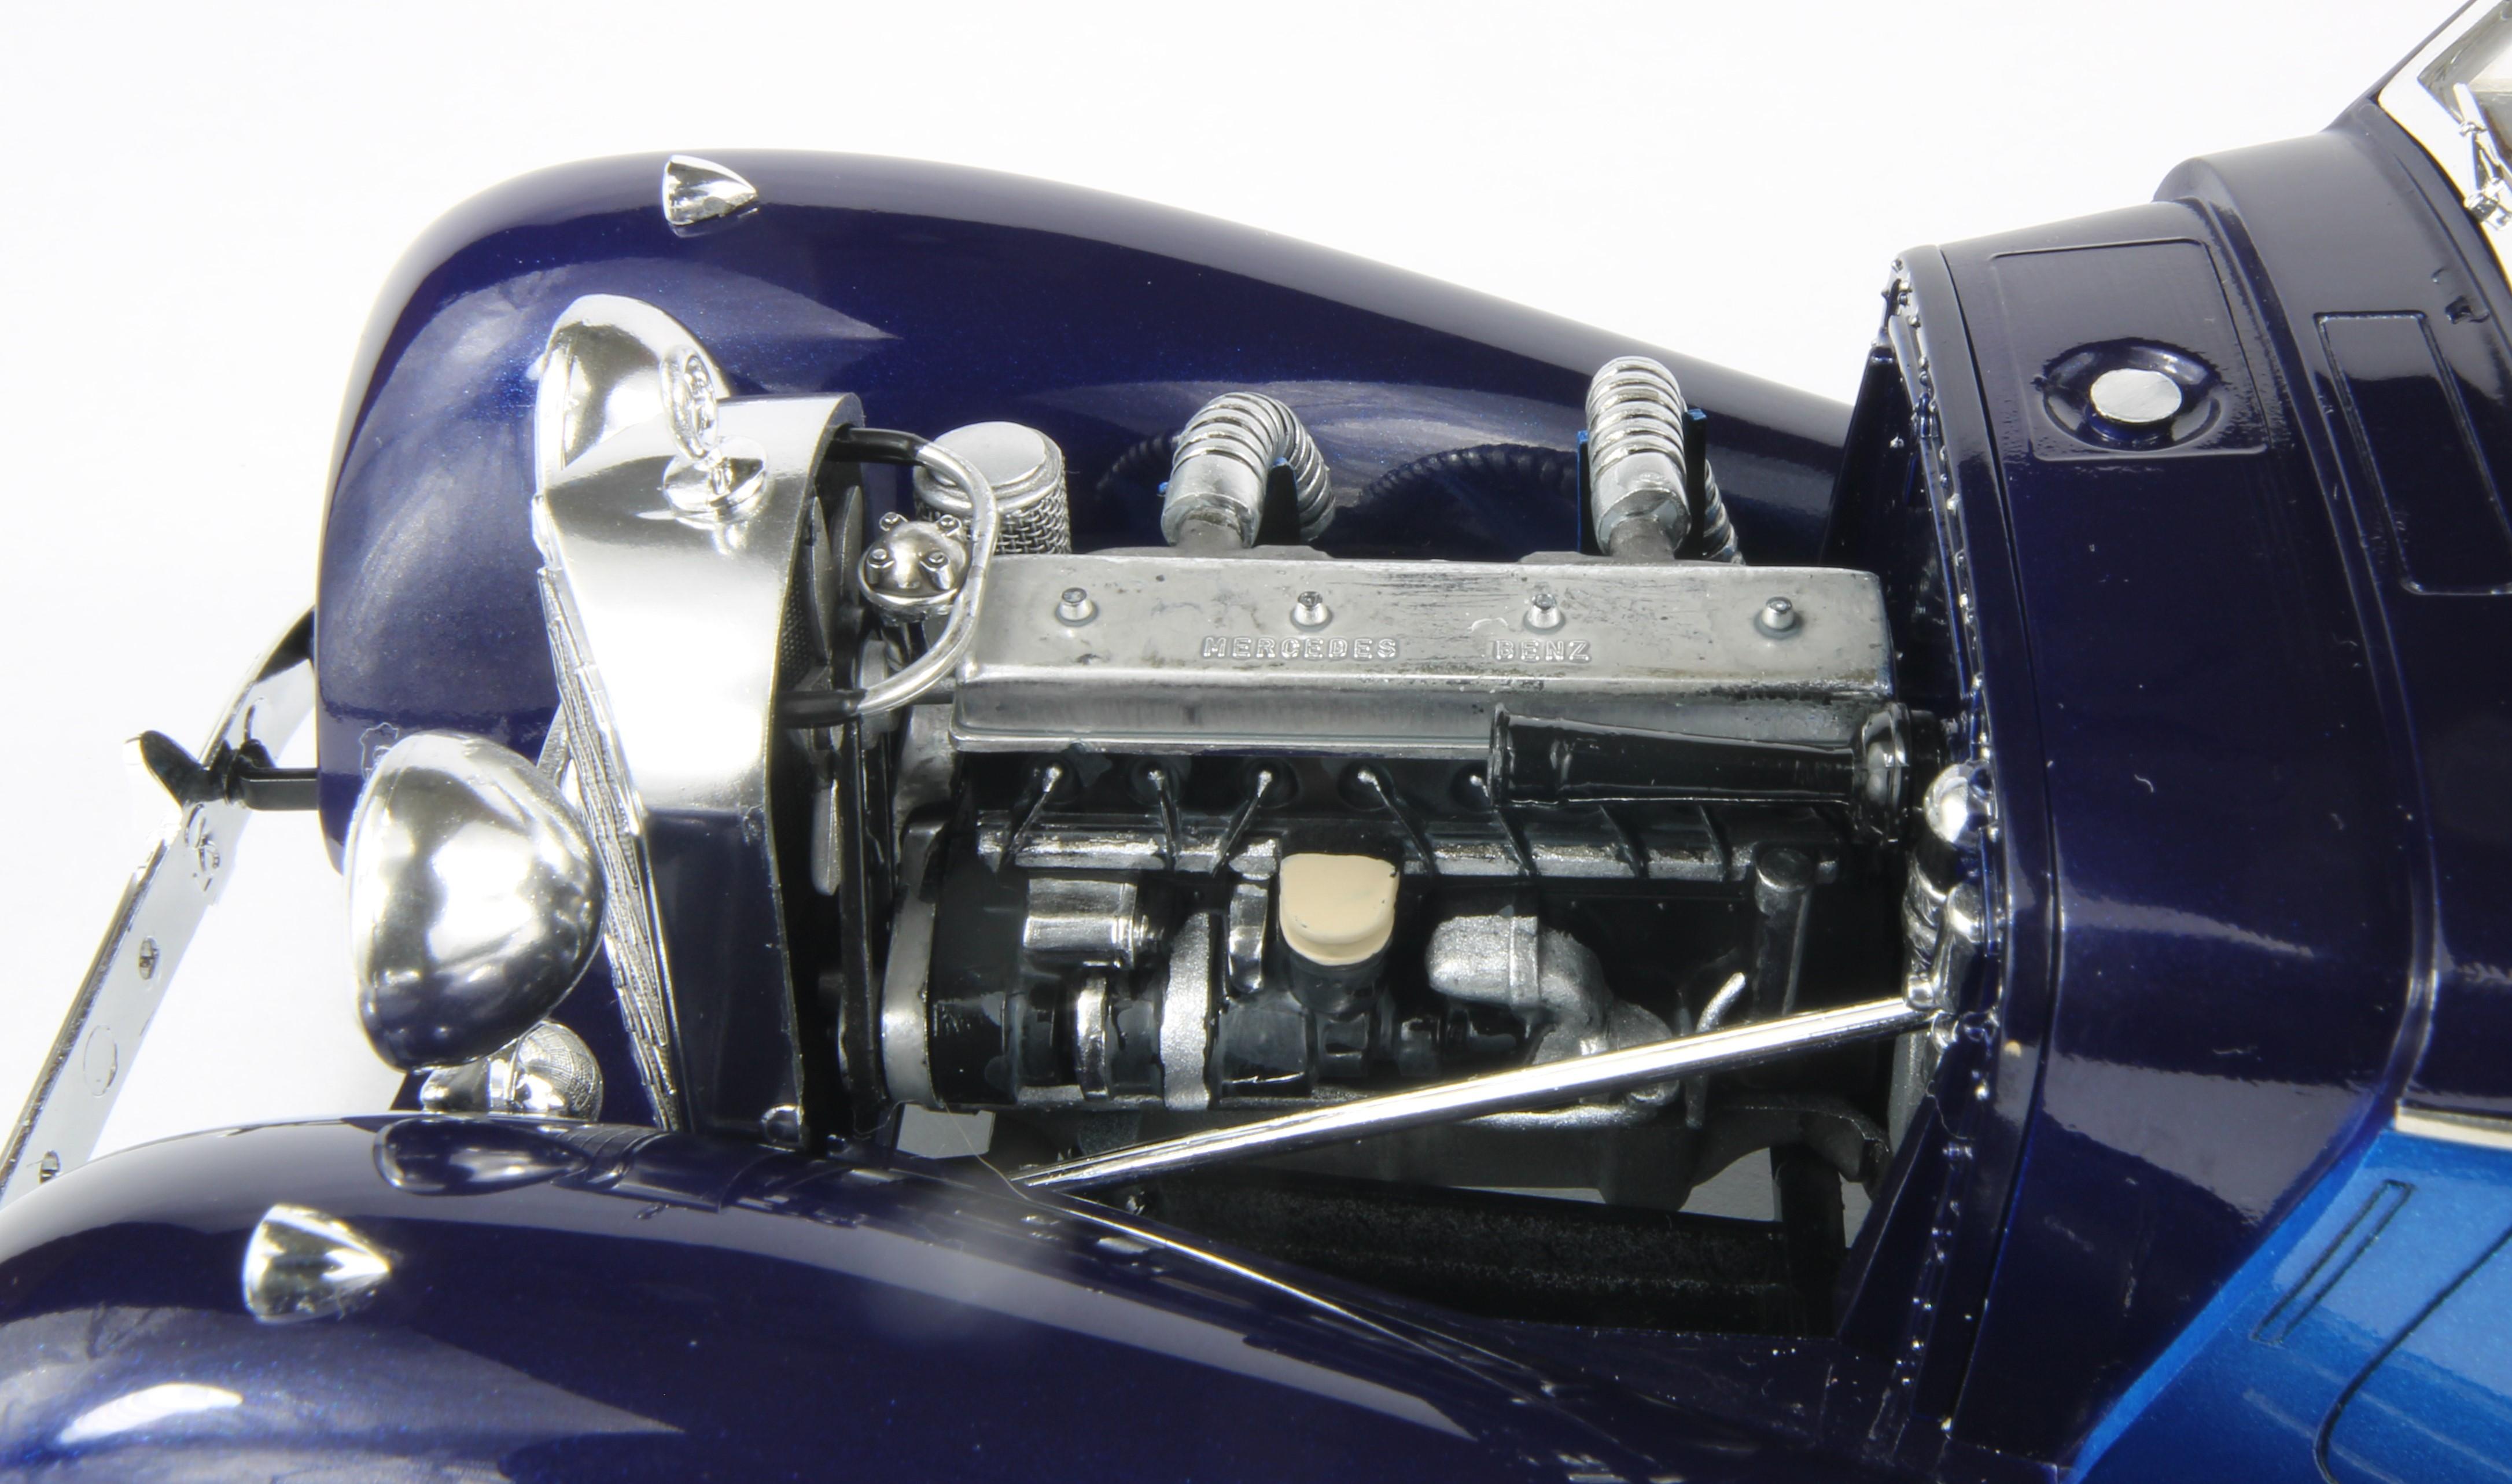
After my highly-detailed and involved 1/12 Tamiya Porsche 934 build I was looking for something a little more low-key to build before jumping into another big project. When I was a kid I started off building the Monogram classic car line in their 1979 series boxing, and wondered what could come from doing a nearly box-stock build of one of these models using the skills, tools and techniques I've amassed over the last 40 or so years. Ironically I decided on the model I never actually got to build back then... the elusive Mercedes 540K Coupe. The 540K Coupe represents a completely half-arsed attempt to turn the roadster kit into something different by adding a roof and rear fender skirts but ignoring the other differences between the coupe and roadster. The few 540K Special Coupes that were built had differences in the fenders, hood vents and spare tire cover vs the Special Roadster that Monogram initially kitted up. My modeler's OCD kept bugging me to fix those inaccuracies but in the end I decided to keep the build pretty close to box-stock. The only variances are some PE bolt heads for the rear fender skirt fasteners and some Tamiya mesh for the air cleaner as well as some styrene reinforcements where the bonnet sides meet the top part. The vast majority of this build was spent fitting and tweaking the bodywork. Mold lines, including a particularly nasty one that ran across the rear fender, deepening panel lines and block sanding the body made a big difference. The bonnet fit was key... my main goal was to get the beltline chrome trim to run in a perfect unbroken line down the entire length of the body. The frame required some grinding above the rear suspension to keep it from interfering with the interior tub which made it sit too high in the rear. The running boards took some work to keep them from fouling the frame rails as well as getting them to sit flush with the line of the fenders. I was able to attach the separate roof piece using Tamiya thin cement and I reinforced the inside of the joint with CA glue. The only filler required was a couple of thick coats of primer. Paint is Tamiya Deep Metallic Blue over Metallic Blue with Light Sand for the interior. Chrome is a mix of kit chrome (bumpers, wheel center) and airbrushed Molotow (grille, headlamps, side pipes). I stripped the chrome from the kit wheels, thinned the spokes and painted them the body accent color. Despite all the work I put into the rest of the build the thing I'm most proud of is that all four wheels actually touch the ground. I never managed that on these classic kits when I was a kid! N I enjoyed this walk down memory lane a lot, enough that I'm looking at the Duesenberg Murphy Convertible Coupe as my next victim... that one might wind up with a bit more detail, though!

-
I love that plaid. I've used it on several builds (see below) and just bought some more for the 1/16 scale BMW Isetta. Looks pretty wild in the Zonda!
-
I wish. I'd love to get an early sample of this kit but I'll wind up buying it just like everyone else. I was just referring to seeing some parts trees and a build up so I can start planning the build in my head. I'm leaning toward a replica of the Louis Chiron factory team 35b that resides in the Revs Institute here in Naples. This car was the 2nd place finisher in the 1930 Targa Florio, and was discovered disassembled but complete in 2006 in Pau. Rather than doing a cosmetic restoration it's been left in partially-stripped bare aluminum as it was discovered.
-
Hopefully we get a test shot soon to drool over. After building the new-tool Alfa 8c a few years ago I have no doubt this is going to be a knockout!
-
I was actually thinking of going with clear blue over the satin chrome on the wheels for an anodised effect. The nice thing about the Huayra is that "tasteful" doesn't really enter into the discussion so I'm going for broke. I like the gold myself, but only if you go with the white. If you go silver, then definitely the black wheels.
-
You're off to a good start. I have one of these I've been getting around to building for several years now. I even have the color scheme picked out... pearl white with navy blue interior and (maybe) blue-tinted carbon fiber. The carbon fiber can't be that much worse than the LaFerrari I did a few years back.
-
 Isn't most of this car's market under economic sanctions right now?
 -
My 1/12 Otaki Lamborghini Countach LP500S showed up today. Got it for a reasonable-ish price on eBay because the kit was unboxed but complete with all parts in sealed bags. Looks to be perfect. Definitely a project for fall/winter when I can spray outside without worrying about the humidity. This is going to be a fun one... I'm always a bit leery when some builders talk about how easy the kit goes together and others talk about what a nightmare build the exact same model is. I've never built an Otaki/Doyusha model either so I'm looking forward to seeing how it stacks up to 70's Tamiya standards. I don't think the "wings and flares" cars are quite as pretty as the early ones but they have a real magnetism to them that I'm looking forward to capturing, and it'll be an awesome companion for my recent 1/12 Tamiya Porsche 934. If I keep building in 1/12 I'm gonna need a bigger house...
-
Cobraman, here's my WIP of the Trumpeter/Magnifier GT40. Hope it helps!
-
Magnifier 1/12 Ford GT 40
jaymcminn replied to cobraman's topic in WIP: Other Racing: Road Racing, Land Speed Racers
Built about 8 years ago. Fit was good except for the warped rear clamshell. I narrowed the door gaps with styrene. There's no distributor in the kit and the engine detail is a bit clunky, but I was able to add that detail in and it looks good. I went with aftermarket tires because the profile of the kit tires is a bit too square-shouldered. I bought aftermarket decals as well for the #1 car. Paint is Ford Acadian Blue and I used Tamiya TS15 for the interior and engine bay blue. Overall it was challenging but there was nothing insurmountable in the build process, and the proportions are just about perfect. I'd love to link to my WIP thread, but for some reason when I try to insert the hyperlink to the topic it links to the main site page. I might post a response to my own topic to pop it back to the front page for you.
-
Absolutely beautiful. The EM 356 series might be my favorite model cars of all time.
-
My '95 Miata may as well be invisible to the hordes of SUVs and big pickups out there. I can't even imagine driving something half its size!
-
Much as I love that Birdcage, the Lancia Aurelia B20 behind it is the car in the Revs Institute I'd most like to own. So pretty.
-
Thanks Rob! Like most of the stuff I do, I mostly was just winging it, and playing off of the translucent plastic the kit parts are molded in. I mixed Tamiya clear orange and smoke acrylics and applied a fairly heavy coat with a wide, stiff brush. I then started stippling the finish, which developed texture and the mottled effect as it started to dry. I hit the engine components with a second coat of smoke with a little orange, since the engine bay parts seem to have more discoloration than the fuel tank on most 1:1 pics I've seen. A final coat of Mr Super Clear flat lacquer toned everything down and blended the colors. I was pretty pleased with how the effect turned out!
-
That is deeply unpleasant on so many levels.
-
Thanks Sonny! If you want the treaded tires you need to look for an earlier release of the kit. Mine was a mid-90s release. If you're looking for one on eBay, look for the Dunlop tire lettering on the box art car. The newest releases have the treaded Dunlops replaced by no-name slicks, which is actually indicated on the box art. The Dunlop sponsor decals seem to be missing as well... I wonder if Dunlop pulled their licensing. FWIW, I don't think new releases include the passenger seat either. Has treads... Has slicks...
-
at what point is too long to wait for something to be shipped
jaymcminn replied to MrMiles's topic in The Off-Topic Lounge
I ordered a not exactly cheap watch from a well-known online watch retailer a few months back. They never updated my order status or marked it shipped and after a week or so I started getting a bit angry about it. I was unable to get anyone in customer service either by email or phone. That night I came home from work and the watch was on my front step and the site still didn't show any updates. The next day, while wearing the watch, I received the email notification that my order had shipped! -
500-540k's tended to be over-restored, including the chrome wheels. A lot of what restorers would do was based off of customer expectations rather than the history of the vehicle, and people paying large sums for restorations in the 60's through the 80's wanted wide whites, chromed wheels and engine turned components that would originally have been left natural or painted. That being said, the period pics on page 1 of this thread show this car with chromed wheels, so there's at least some precedent. Sometimes you'd see painted wheels with chromed spokes as well, but most 500 and 540ks had painted wires with chrome wheel weights.
-
I'm the front office manager of a pet-friendly hotel. The number of people trying to claim their stroller-bound yorkiepoo is a service dog, solely to avoid paying the pet fee, is ridiculous. Invariably these "service dogs" get dumped in the hotel room alone while the owner goes out to dinner or the pool or whatever, at which point the dog starts barking (I don't blame the dog, it's scared and alone) and annoying everyone in the rooms around it. It's a shame when bad people happen to good dogs.
-
Why I rarely finish making the bed...
-
It's a box... and you can see out of it... it's like cat heaven!
-
I wish someone would do an AMG flared body for this kit like the WD car. Great work, those Monoblocs are sweet!
-
Maroon plastic bleed through?
jaymcminn replied to jaymcminn's topic in Model Building Questions and Answers
I think it's the gloss as much as anything else... I actually had bleed through on that same Lindberg '34 molded in yellow. Good idea to test the underside of the hood! I might try the silver paint trick too. -
Starting the old Monogram Mercedes 540k coupe kit molded in lovely high-gloss maroon plastic. I'm planning on building it in a two-tone dark blue and light grey color scheme. Has anyone built a kit molded in maroon and experienced the bleed through issue you sometimes see with red and orange plastic? I'm not worried about the dark blue, but the light grey has me a little concerned. I usually prime with Tamiya Fine White or Gunze Mr. Surfacer grey and my top coats will be Tamiya TS paints decanted and airbrushed with TS13 clear.
-
I'm actually working on the Monogram coupe right now... a 1979 issue I got last week from an eBay seller. It's not as nice as the Jo-han 500K kits, but I'll have fun building a "phantom" 540k coupe with the flush spare tire cover. It's kind of liberating not having to "count rivets" on a build for once!


.JPG.66c6196886a3252deed3383348845a5e.JPG)
.JPG.e48f1100138f2d9e6269268457a38efb.JPG)

