Anglia105E
-
Posts
3,487 -
Joined
-
Last visited
Content Type
Profiles
Forums
Events
Gallery
Everything posted by Anglia105E
-
Gary..... I see why you were drawn to the G-scale railroad item and I suppose the security camera can easily be removed. That store bought backdrop could be used with a variety of different diorama scenes and it is very interesting. David
-
Well Gary.... I thought exactly the same as you, in as much as the hood looks like it opens, but as far as I know, none of the Oxford Diecast model cars have opening parts at all. The Jaguar hasn't arrived yet, but it's due any day now so I 'll have a good look. It is indeed a nice model in 1:43 scale. David
-
You have picked up some nice diecast Fords there Gary, and I like the Danbury Mint Aston Martin as well as the WIX Cobra. Gradually building up my 1:43 diecast collection for the second diorama that is currently under construction..... here is a car that I ordered yesterday from Ebay., which is a Jaguar MK VII. David

-
Your interior work is shaping up nicely Paul, and this is what happens..... you get pulled in as the building evolves, and the diorama takes on a life of it's own. Before you know it, the building itself becomes a living thing almost. This is what I like most about constructing a diorama building, along with the photographic results of course. David
-
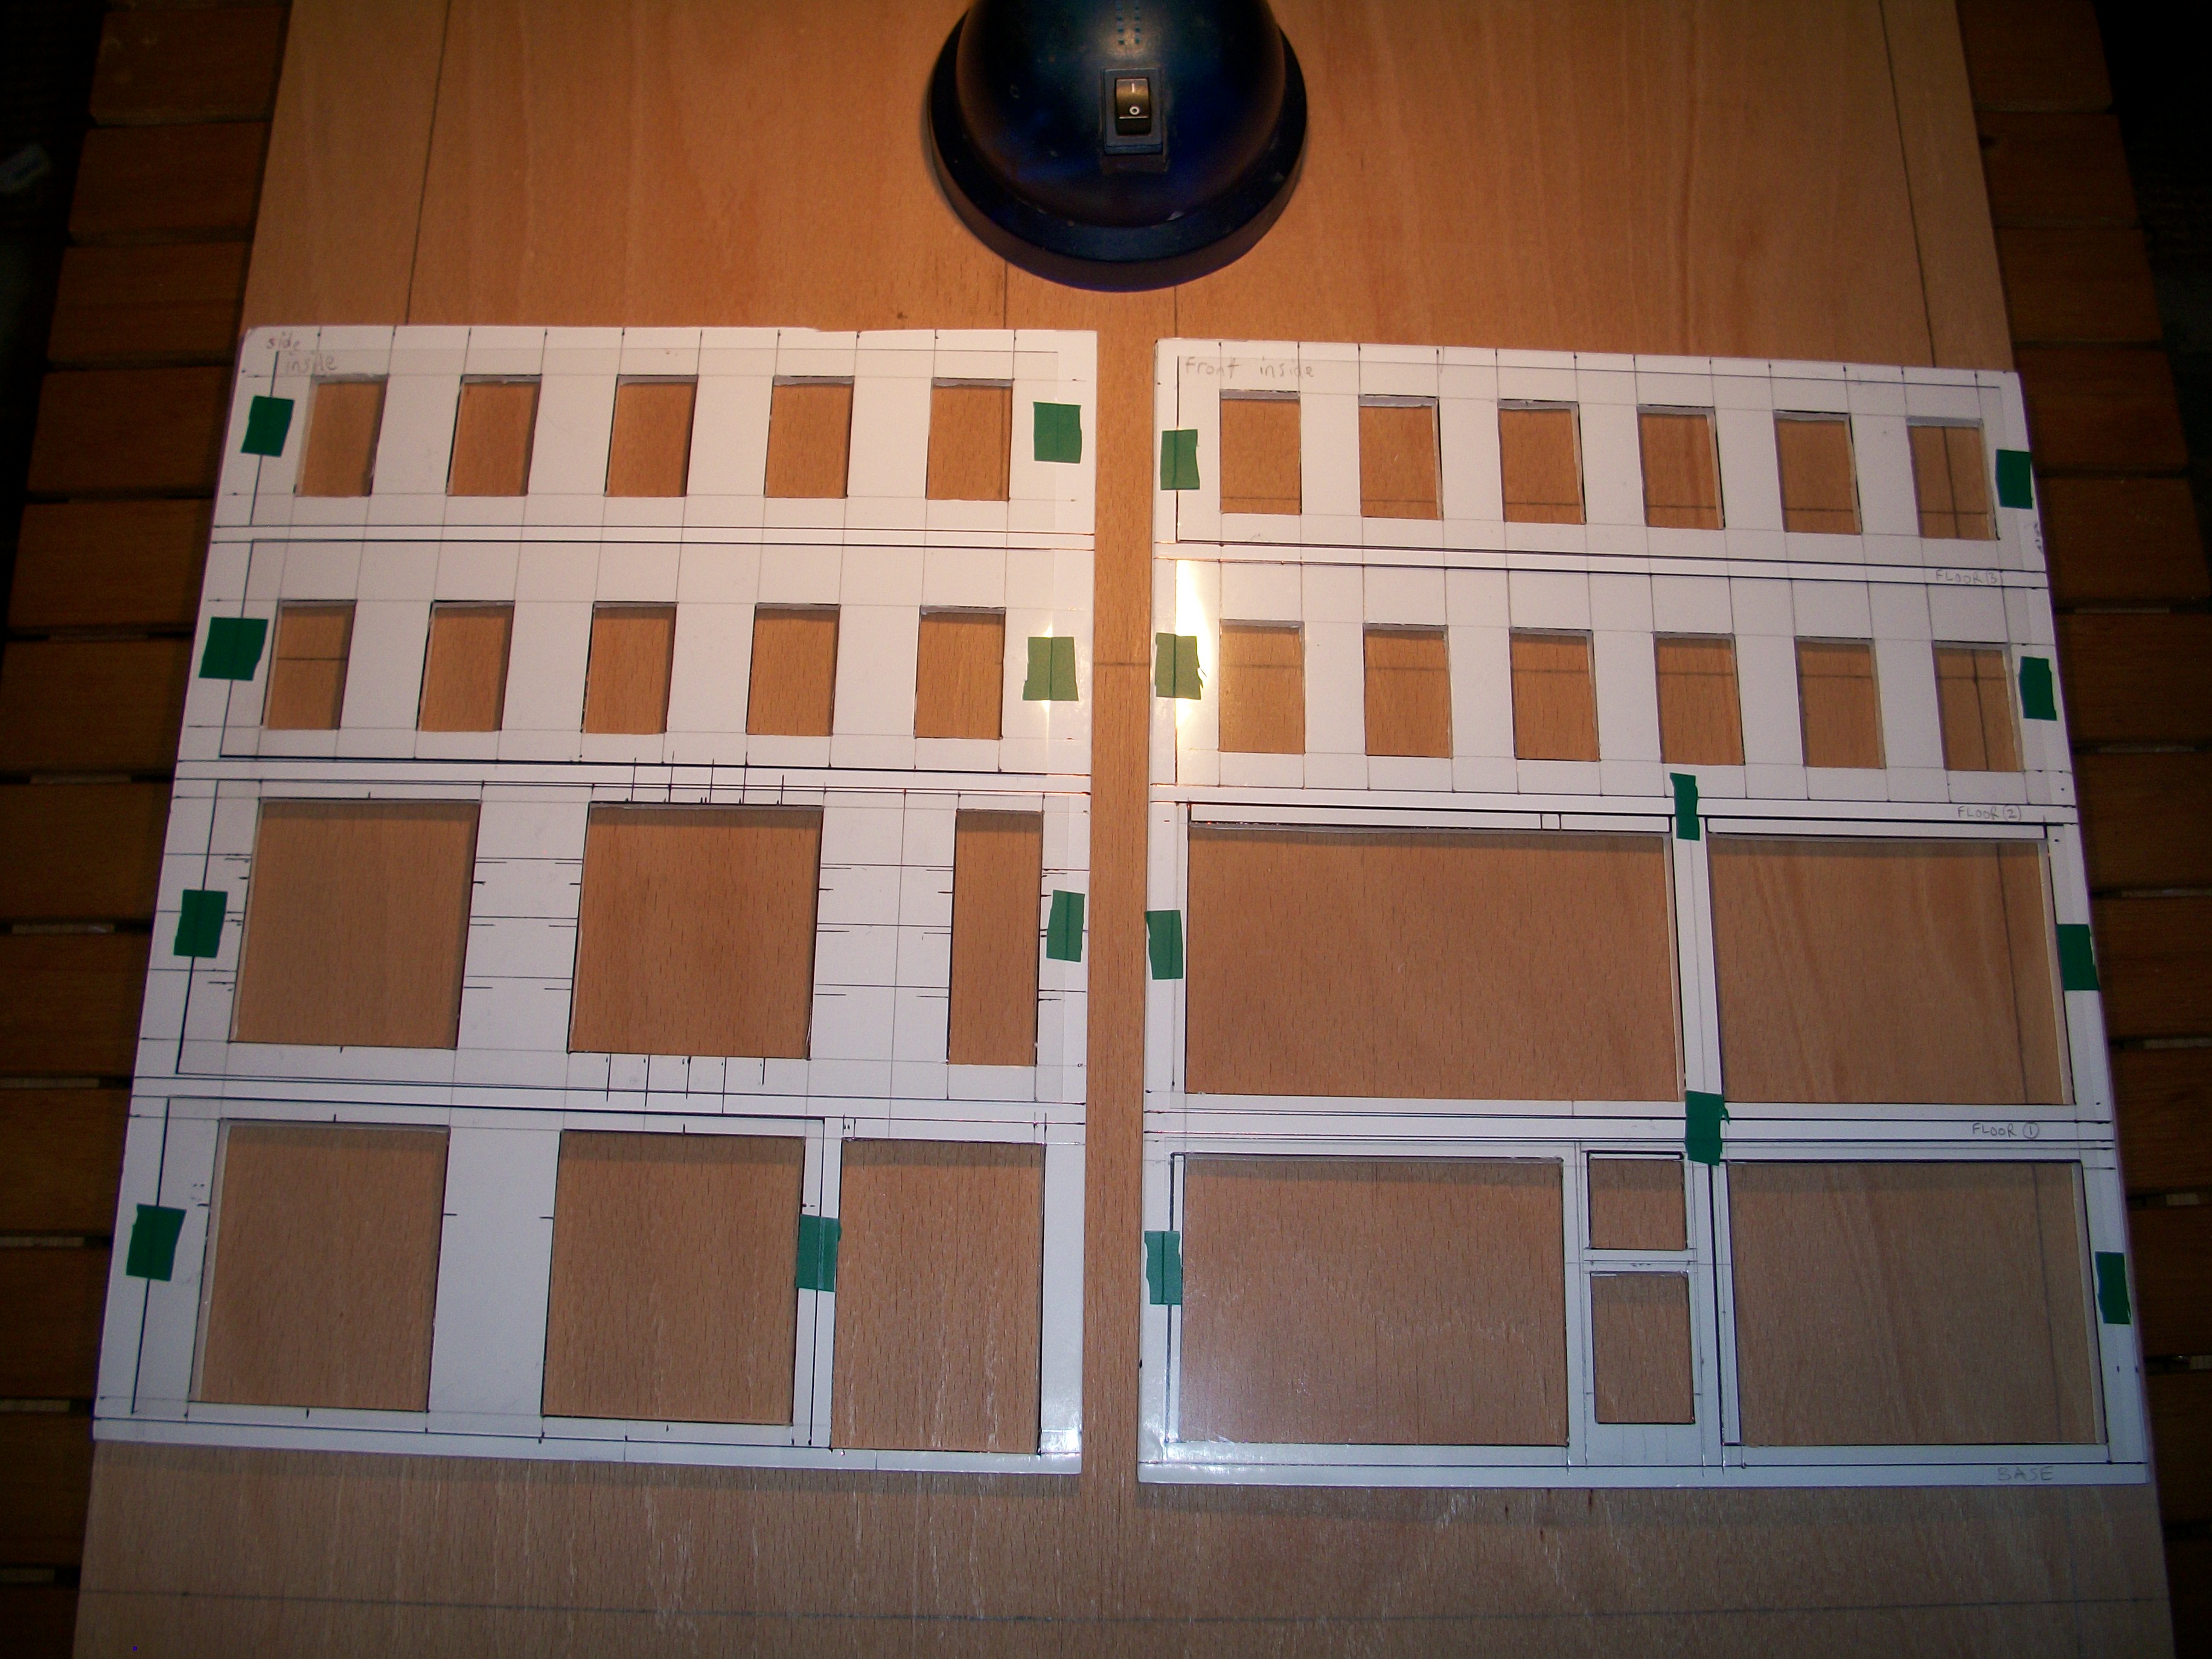
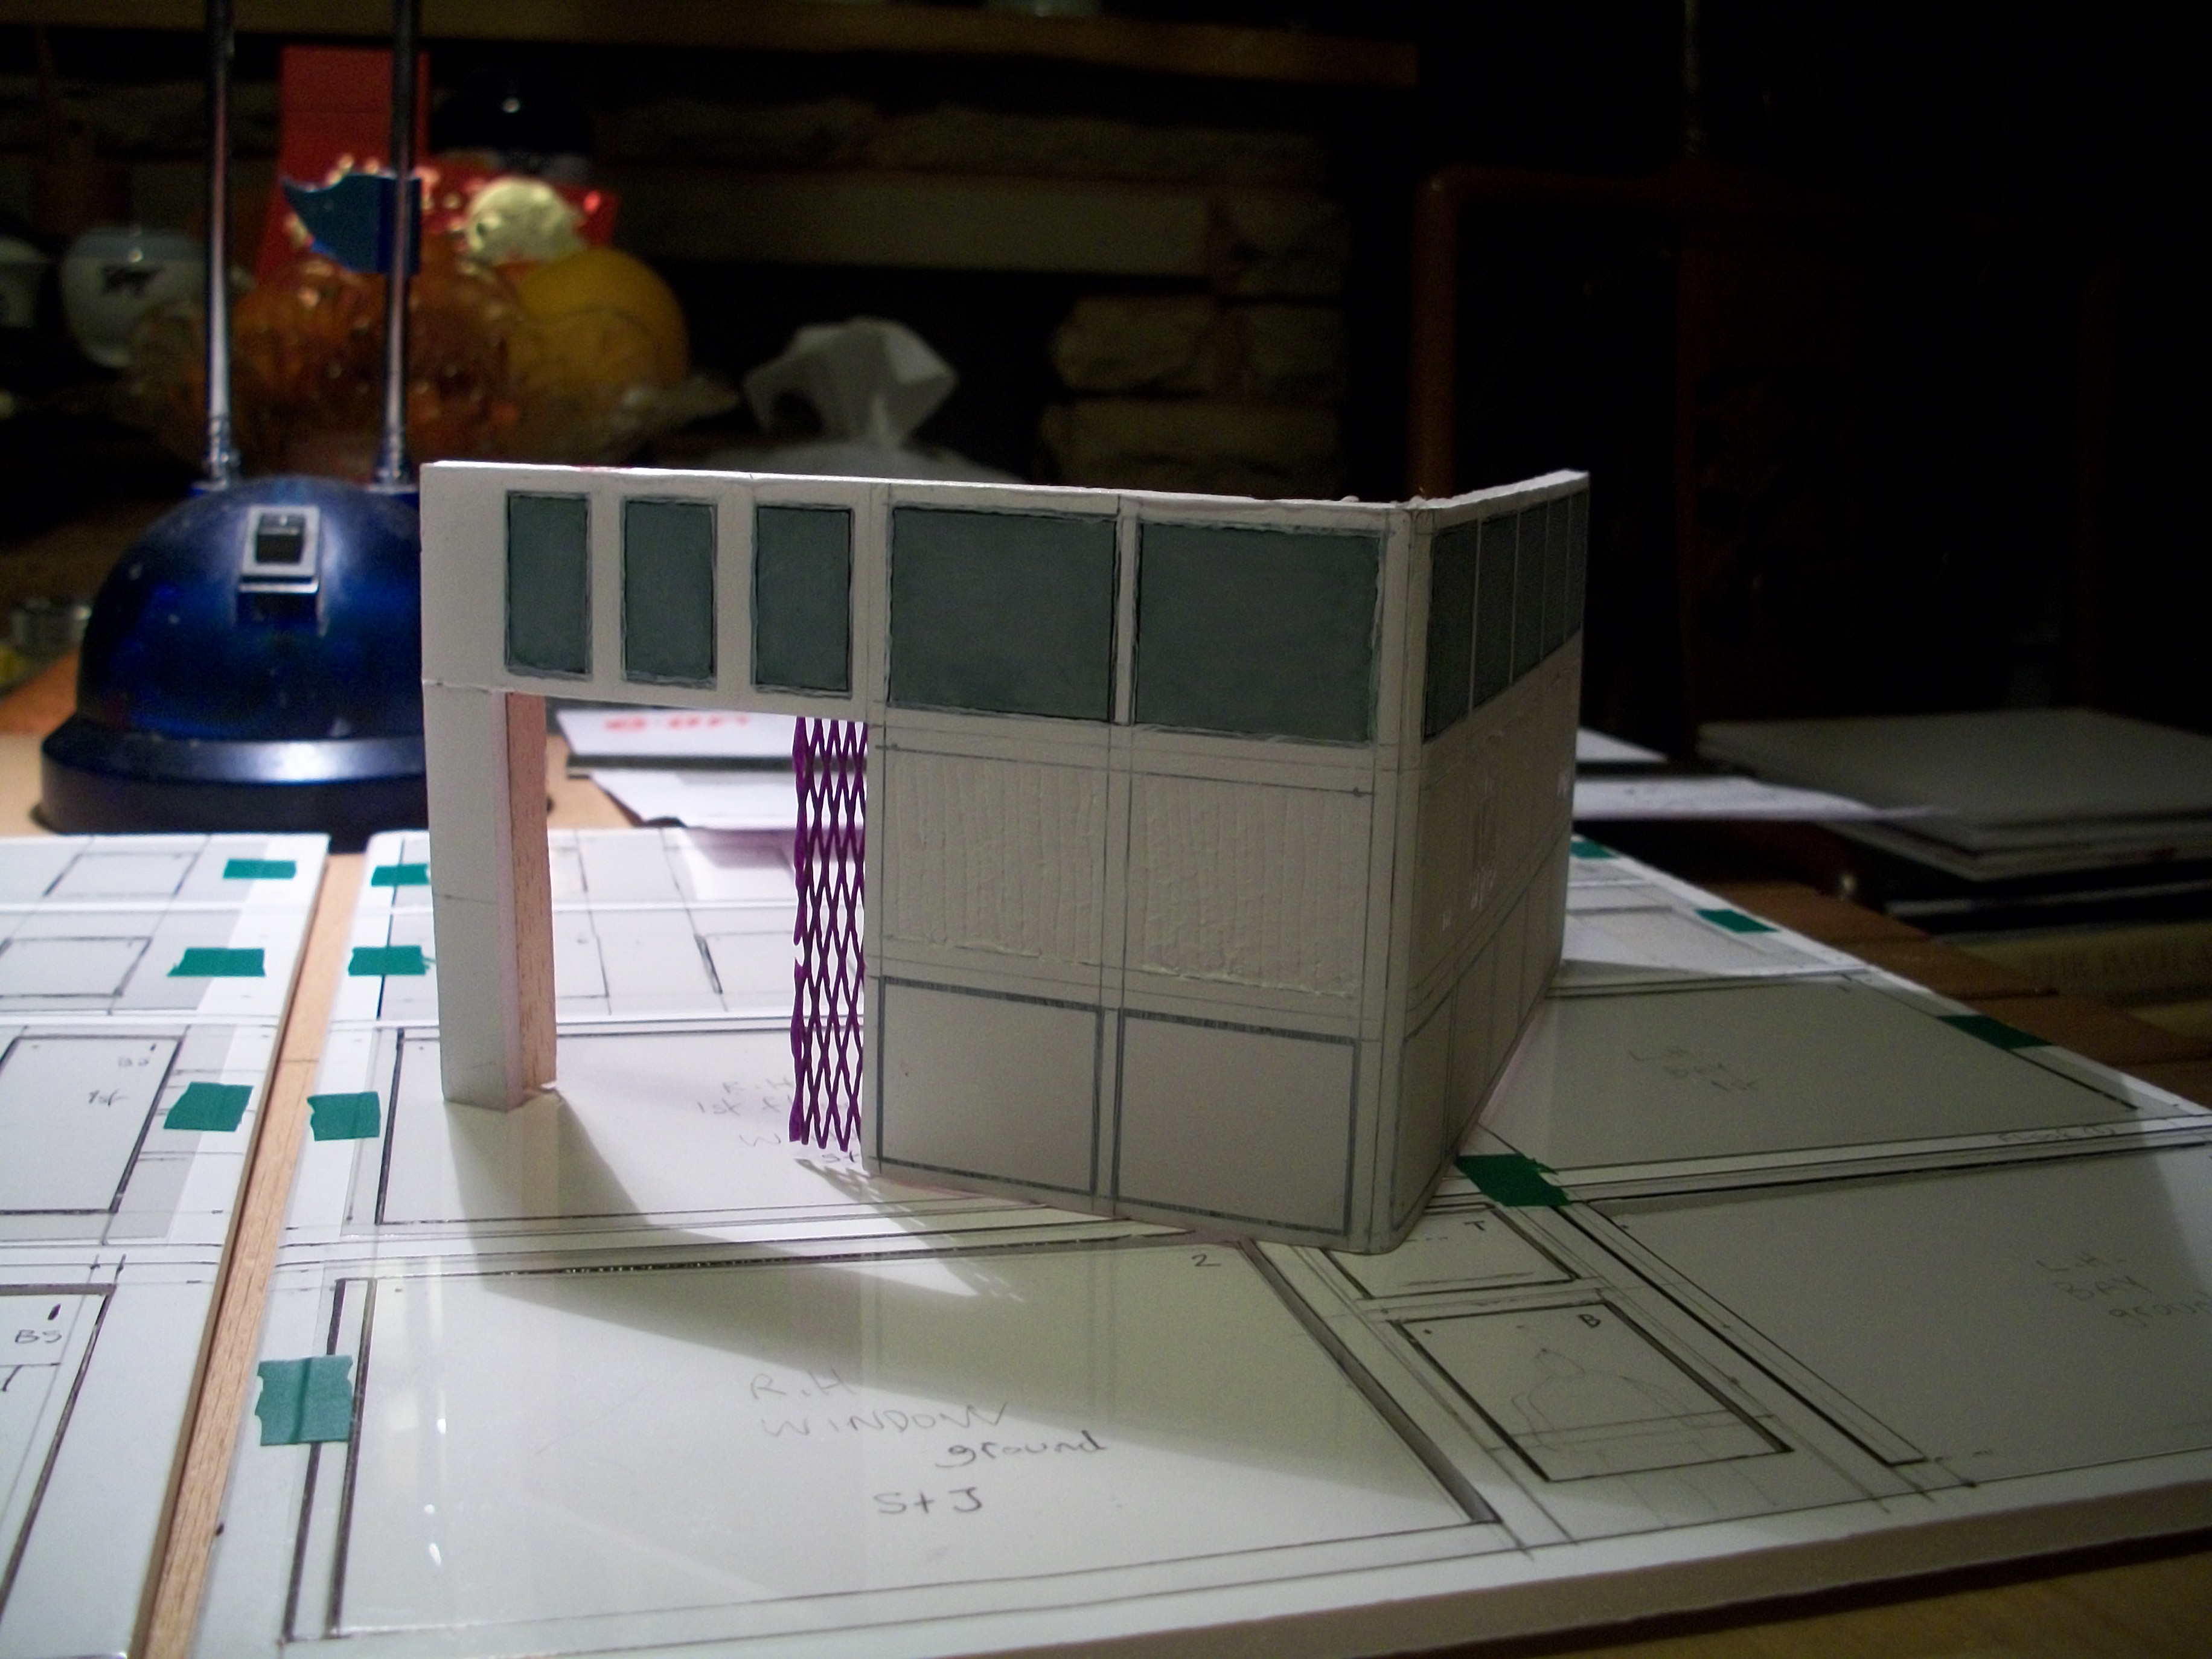
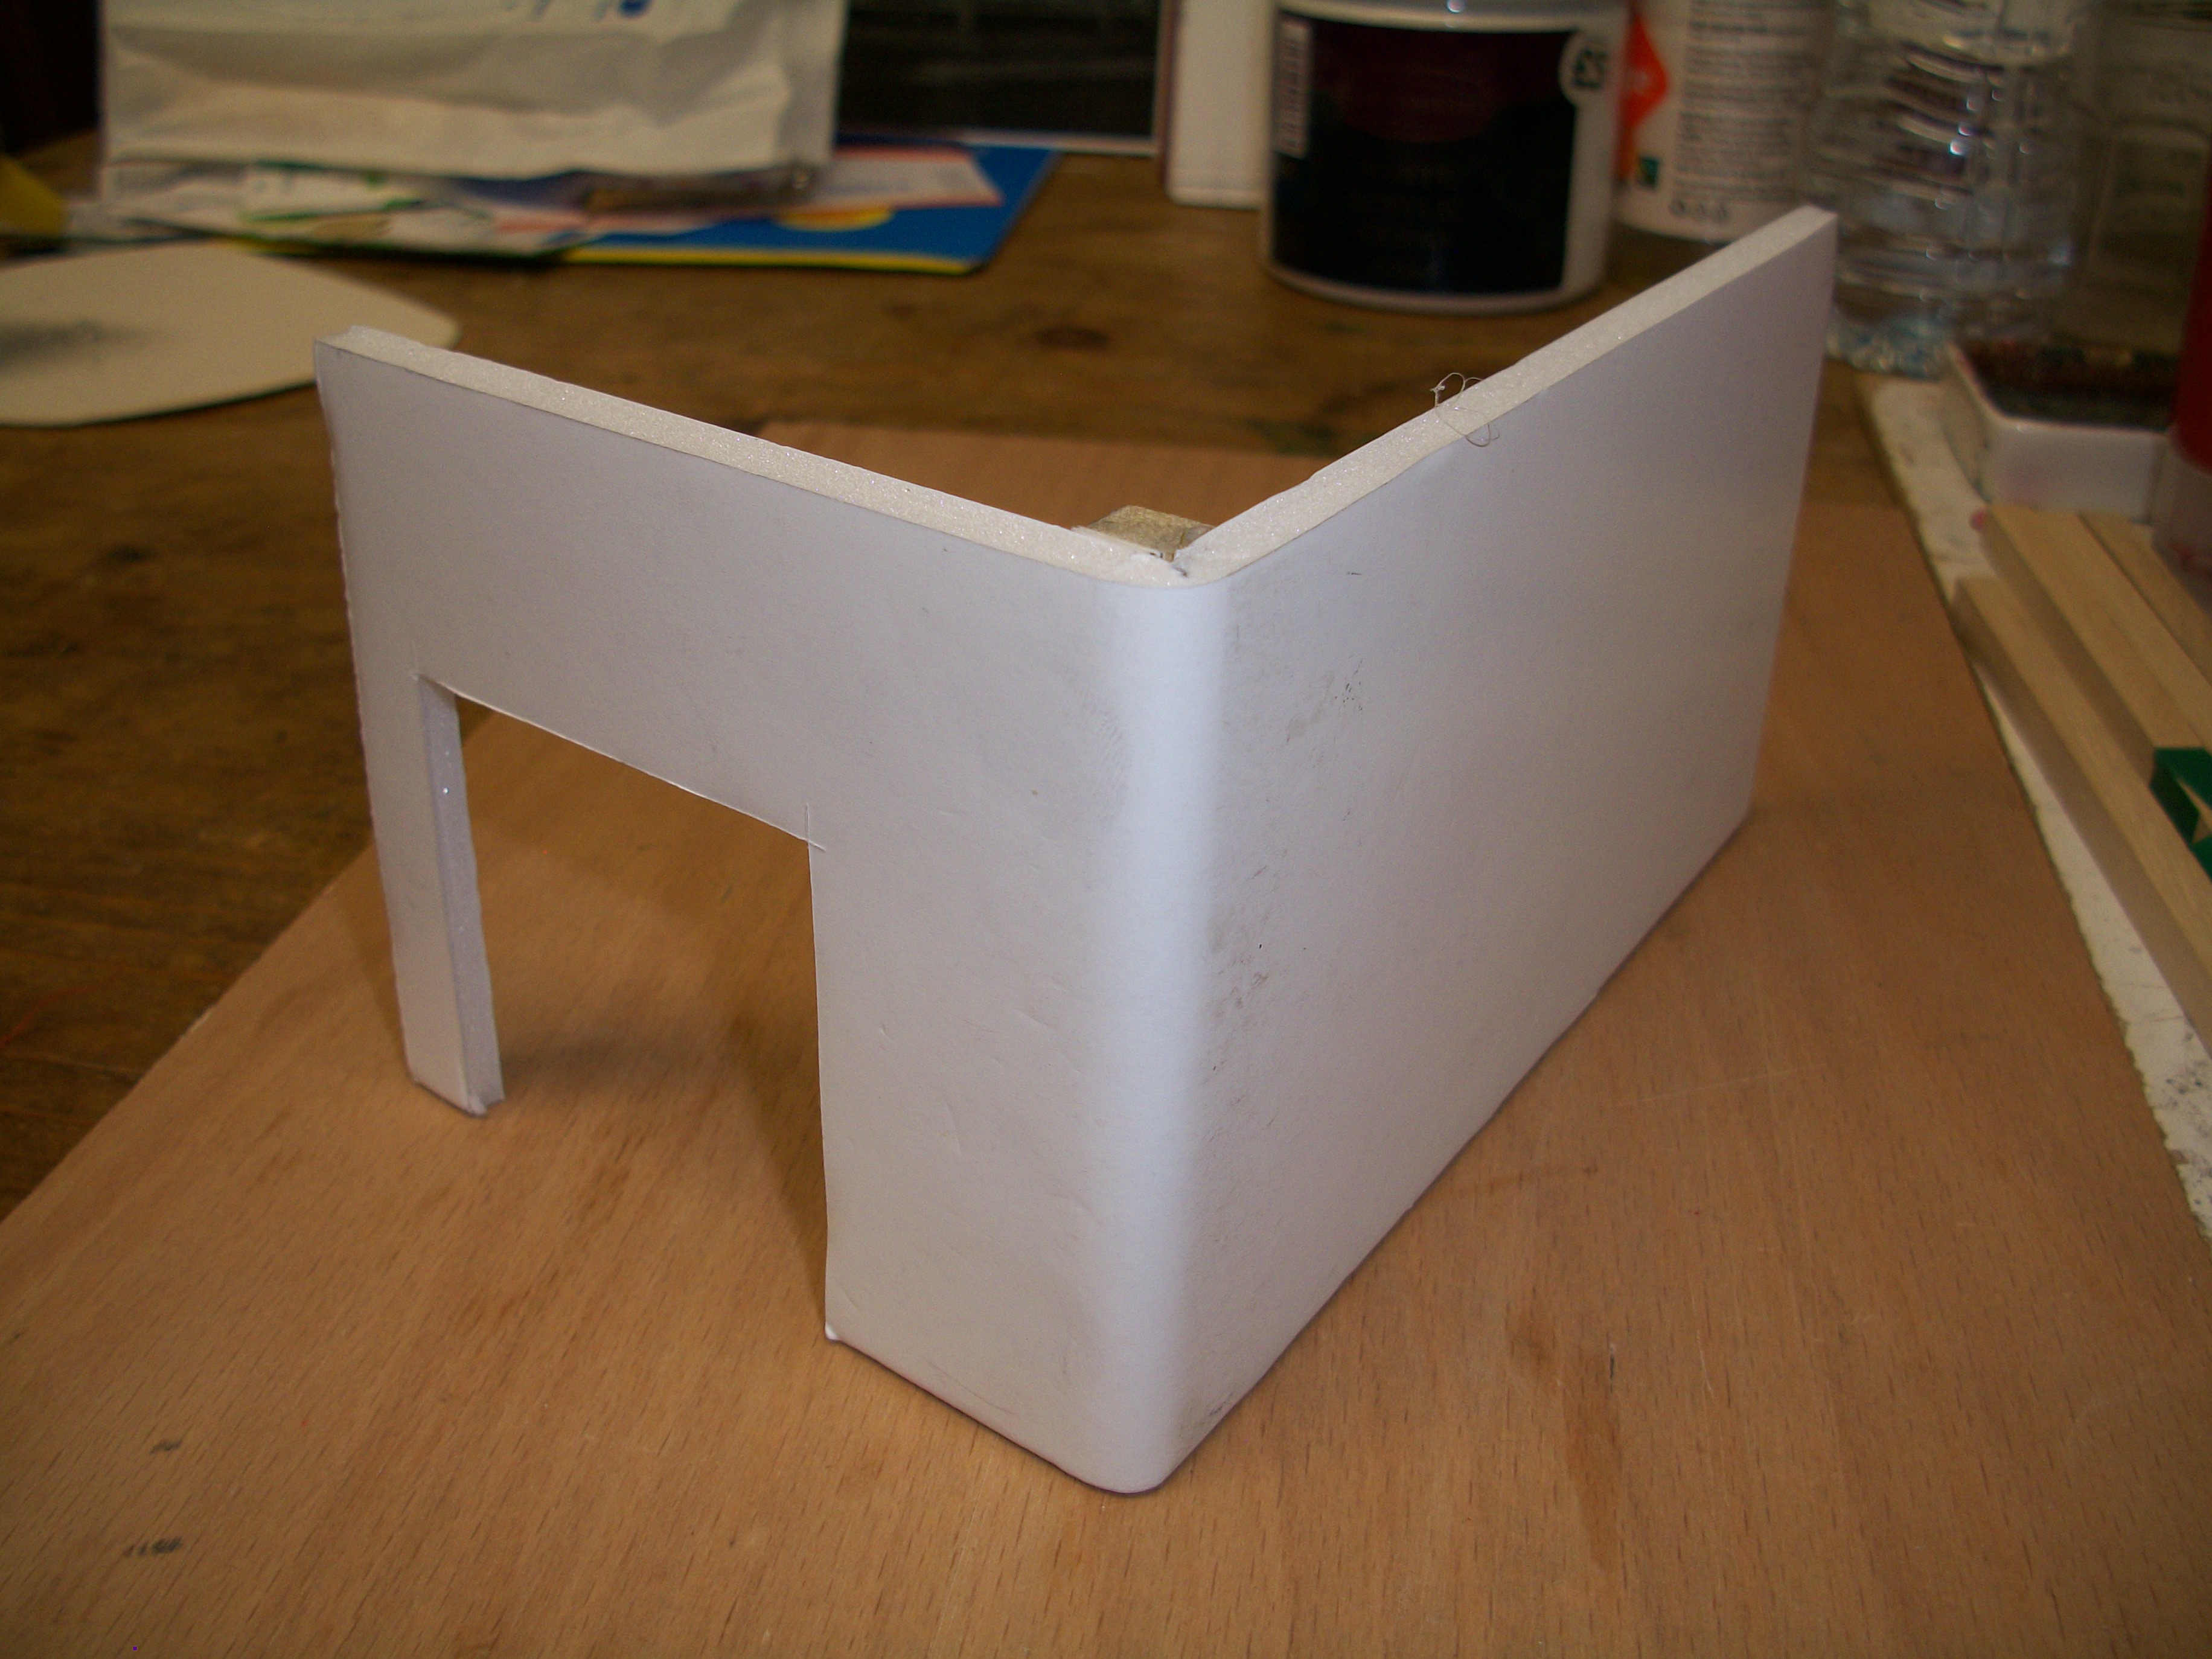
Work is going on with the complicated arrangement of windows in this building. The acetate transparencies have been cut to size and taped into position, ready for the white line painting, when the special Pentel white cellulose paint pen arrives in the post. Having saved all the blocks of foamboard that I cut out of the window apertures, and also having had the foresight to mark each block with a number indicating it's position and orientation, the blocks have been inserted back into their original holes and I shall be able to paint the lines straight across the wall panels, without the clear acetate sheet dipping into the apertures. The vehicle lift door entrance now has a sliding metal shutter, which in a previous life was a flexible protective sleeve that was placed over a Zero Paints bottle. In addition to the complex array of windows that you see in the photos, there is the bay window module that has to be constructed separately, to mount on the outside of the ground floor and the first floor levels. David
-
I support what is being said here by Ellen and Gary..... your diorama work is exceptionally good Yordan.... you have a natural talent in this field. David
-
 The table with the four castors and the tools scattered on top...... simply brilliant ! David
 -
Nice looking shop truck you have there Chuck, and excellent work on the Fujimi figures..... especially the tatoos and the John Lennon sunglasses. David
-
All good so far Yordan, and those leaves are very effective. The creek water is of course the scary bit..... I did try some real water, sprayed onto the surfaces of the streets and pavements of my diorama scene and then got the photography done before the water evaporated. The experiment kind of worked, but it is much more difficult to simulate falling rain, or to create larger volumes of water. David
-
Nice little scene going on there Patrick...... the figures add much to the car's realism, especially the driver with his helmet on. David
-
Very tight Mark..... but you are on top of your game. I want to print the registration number plates ( license plates ) for a 1:43 scale model car, but I don't think my printer will be able to do it. David
-
The patchy static grass, and also the fallen leaves have added yet another level of realism..... you are learning fast Yordan! Making use of materials like the coffee filter is good thinking, and it's like diorama scratch building really. David
-
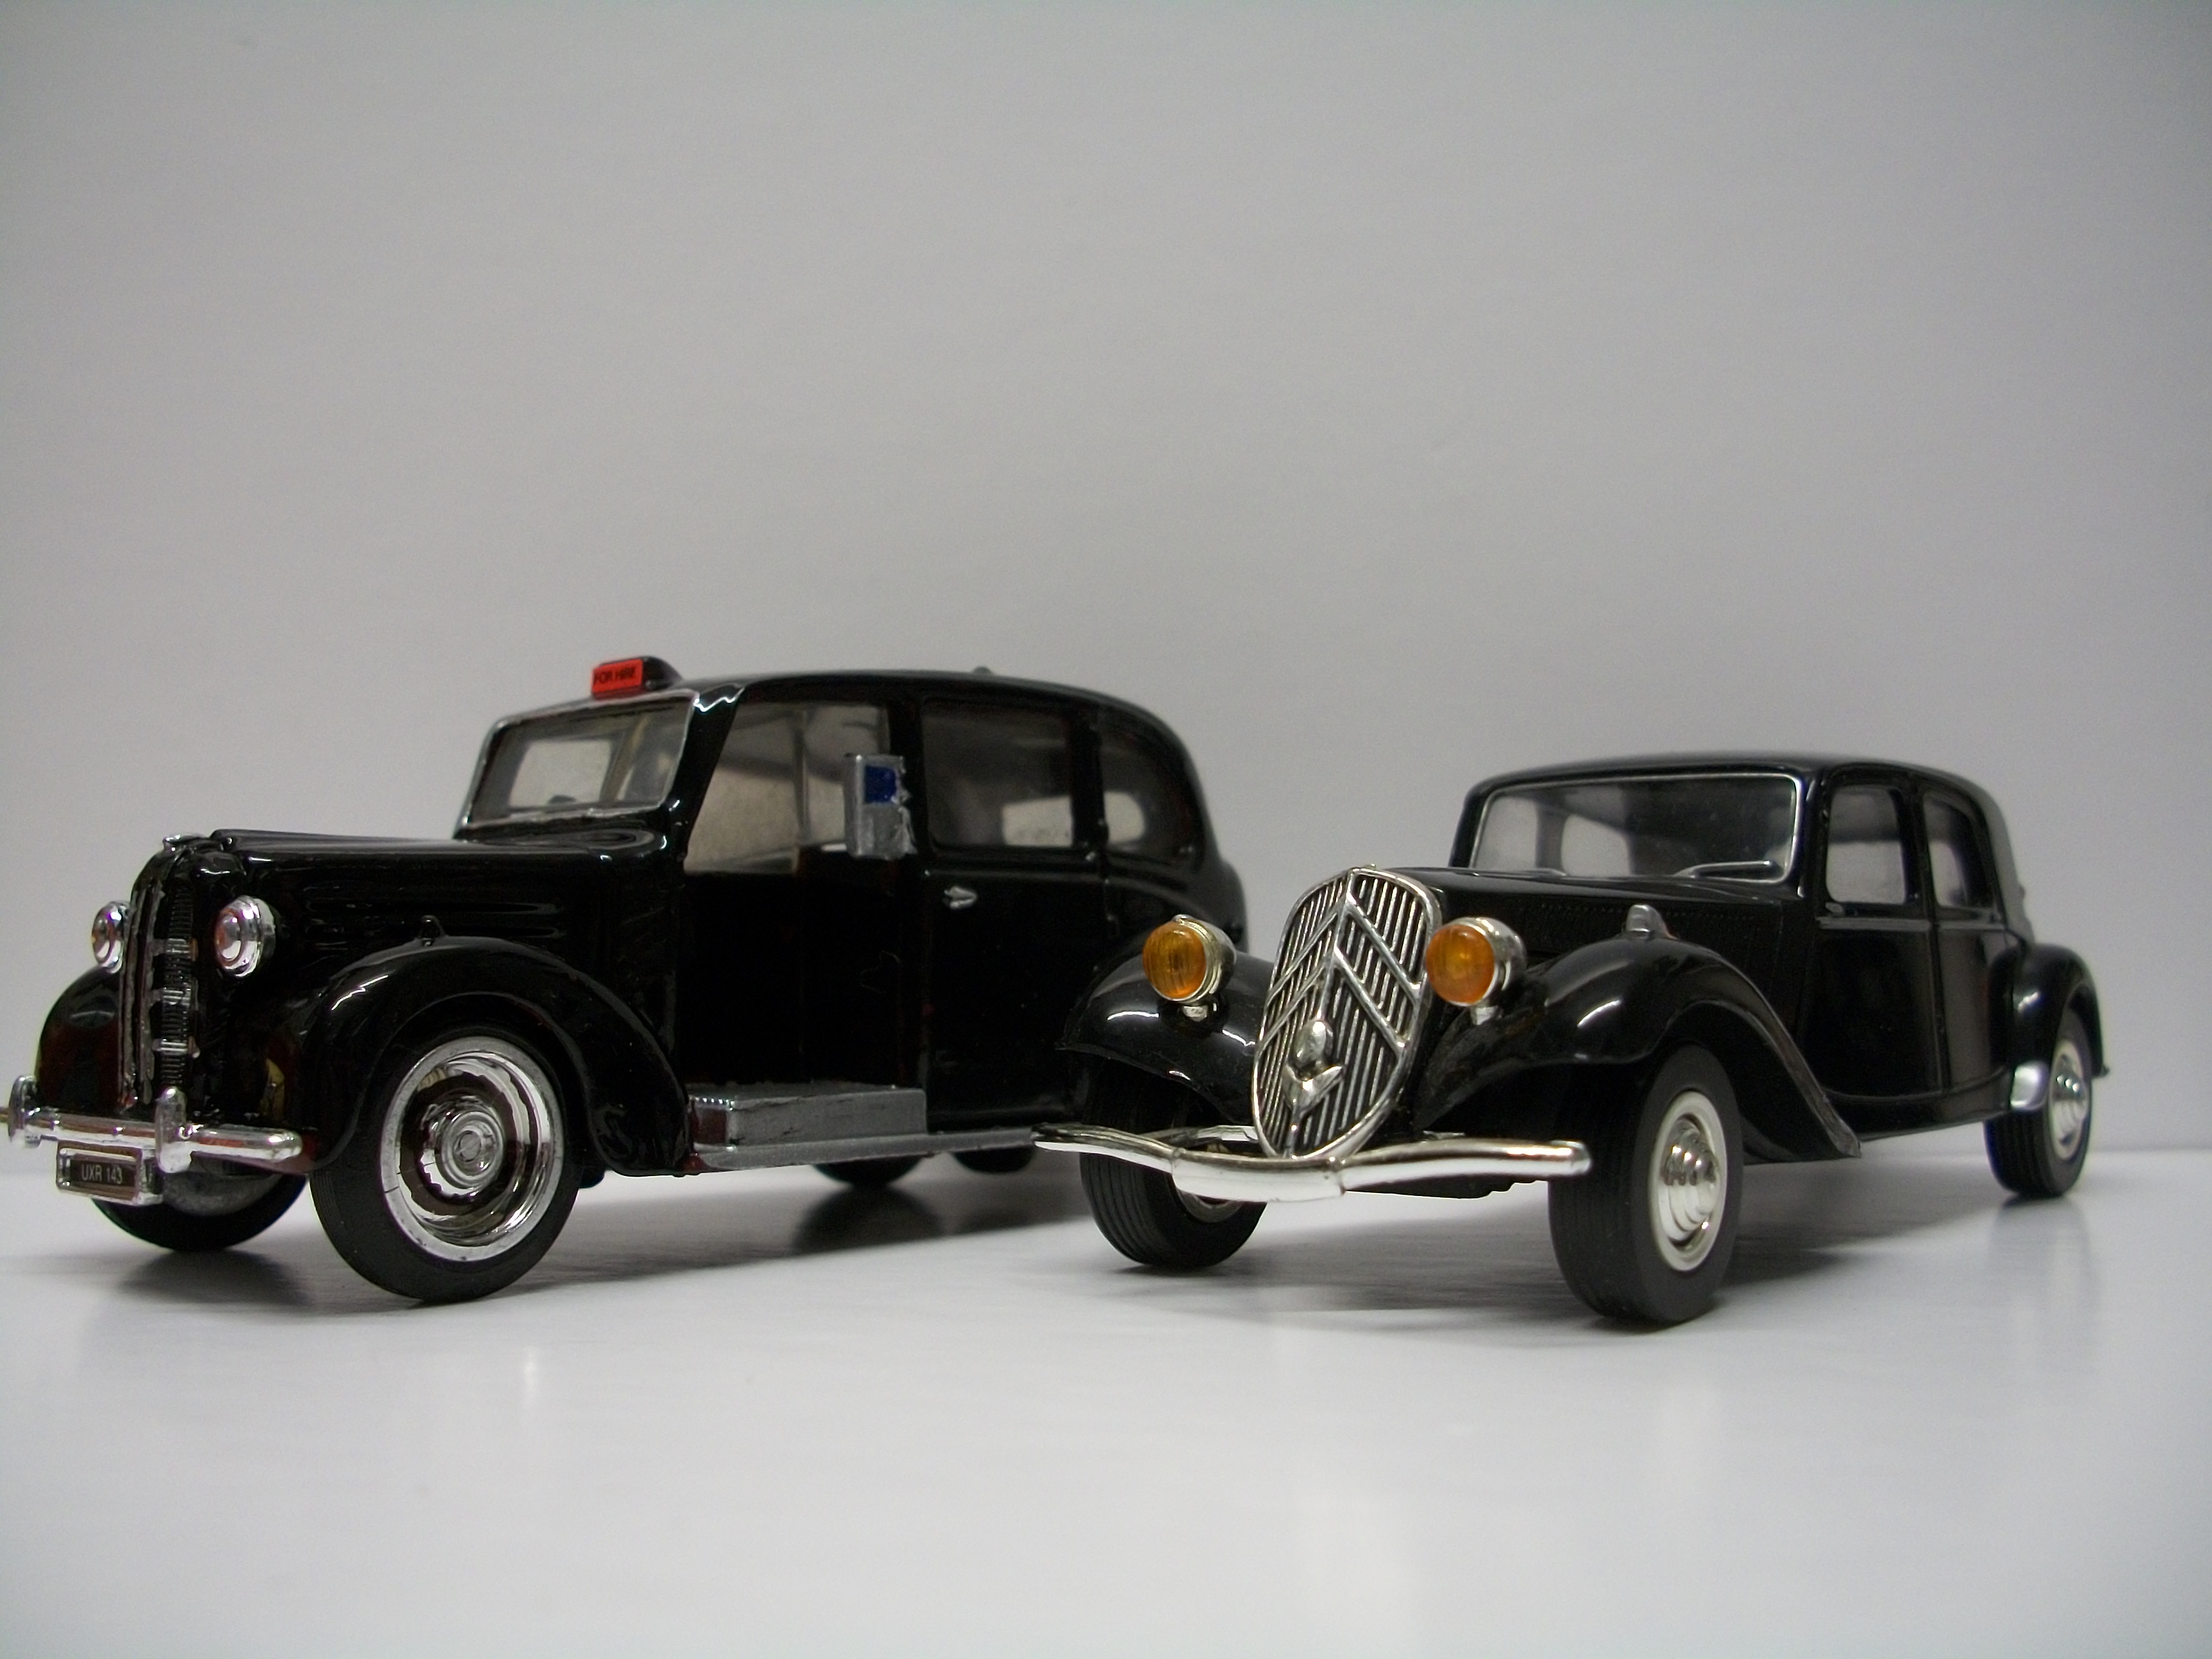
The second office partition wall that I constructed for the ground floor showroom space has turned out to be much better than my first effort. There are three levels to this partition wall, the lower one is wooden panels, the middle one is pleated white curtains and the top level is window panes. There will be some white acrylic paint going over most of the partition wall and then I shall see how it looks inside the lower floor position. The two Austin FX3 taxi cabs are now both painted black and have some additional detailing done. Picked up a nice 1:43 scale 1954 Citroen 11CV as a diecast model for very little money, so it was quite a lot cheaper than Ebay in this instance. David
-
Very nicely built so far Paul.... can't fault it. David
-
Well Guy..... this is quite something..... a 1:16 scale Revell BMW Isetta 250 bubble car! This is a most unusual subject for a build, and an even more unusual choice for a custom build. Everything about your scale model and the superb paint finish is absolutely right. Those modifications are excellent and you clearly thought those through carefully. Several of your photos have captured the look of the real car. Features like the opening front door, the luggage case on the rack, the exhaust , the sunroof make this model very interesting, and even the wheels really suit the whole custom appearance. Looks like Revell came up with a Tamiya-like quality on this one. Until I saw this Under Glass posted topic of yours, I had never even looked at this kit, and I probably wasn't aware that it existed. You must be extremely pleased with how this has turned out Guy. David
-
That is a very nicely built Volvo, Mika..... and very realistic too. The engine compartment ( engine bay if you like ) is first class and well detailed also. David
-
It's not a particularly large engine bay, but you have packed it all in there. I would challenge anyone to tell the difference between this photo of your scale model engine bay and a photo of the real 1:1 engine bay from the same angle. David
-
Welcome back...... and we all come back round to scale model car building eventually, even after 50 years or more. ( second childhood maybe? ) David
-
Nice work on those Weber carburettors Mark, and super detailing on the throttle cable guide too! David
-
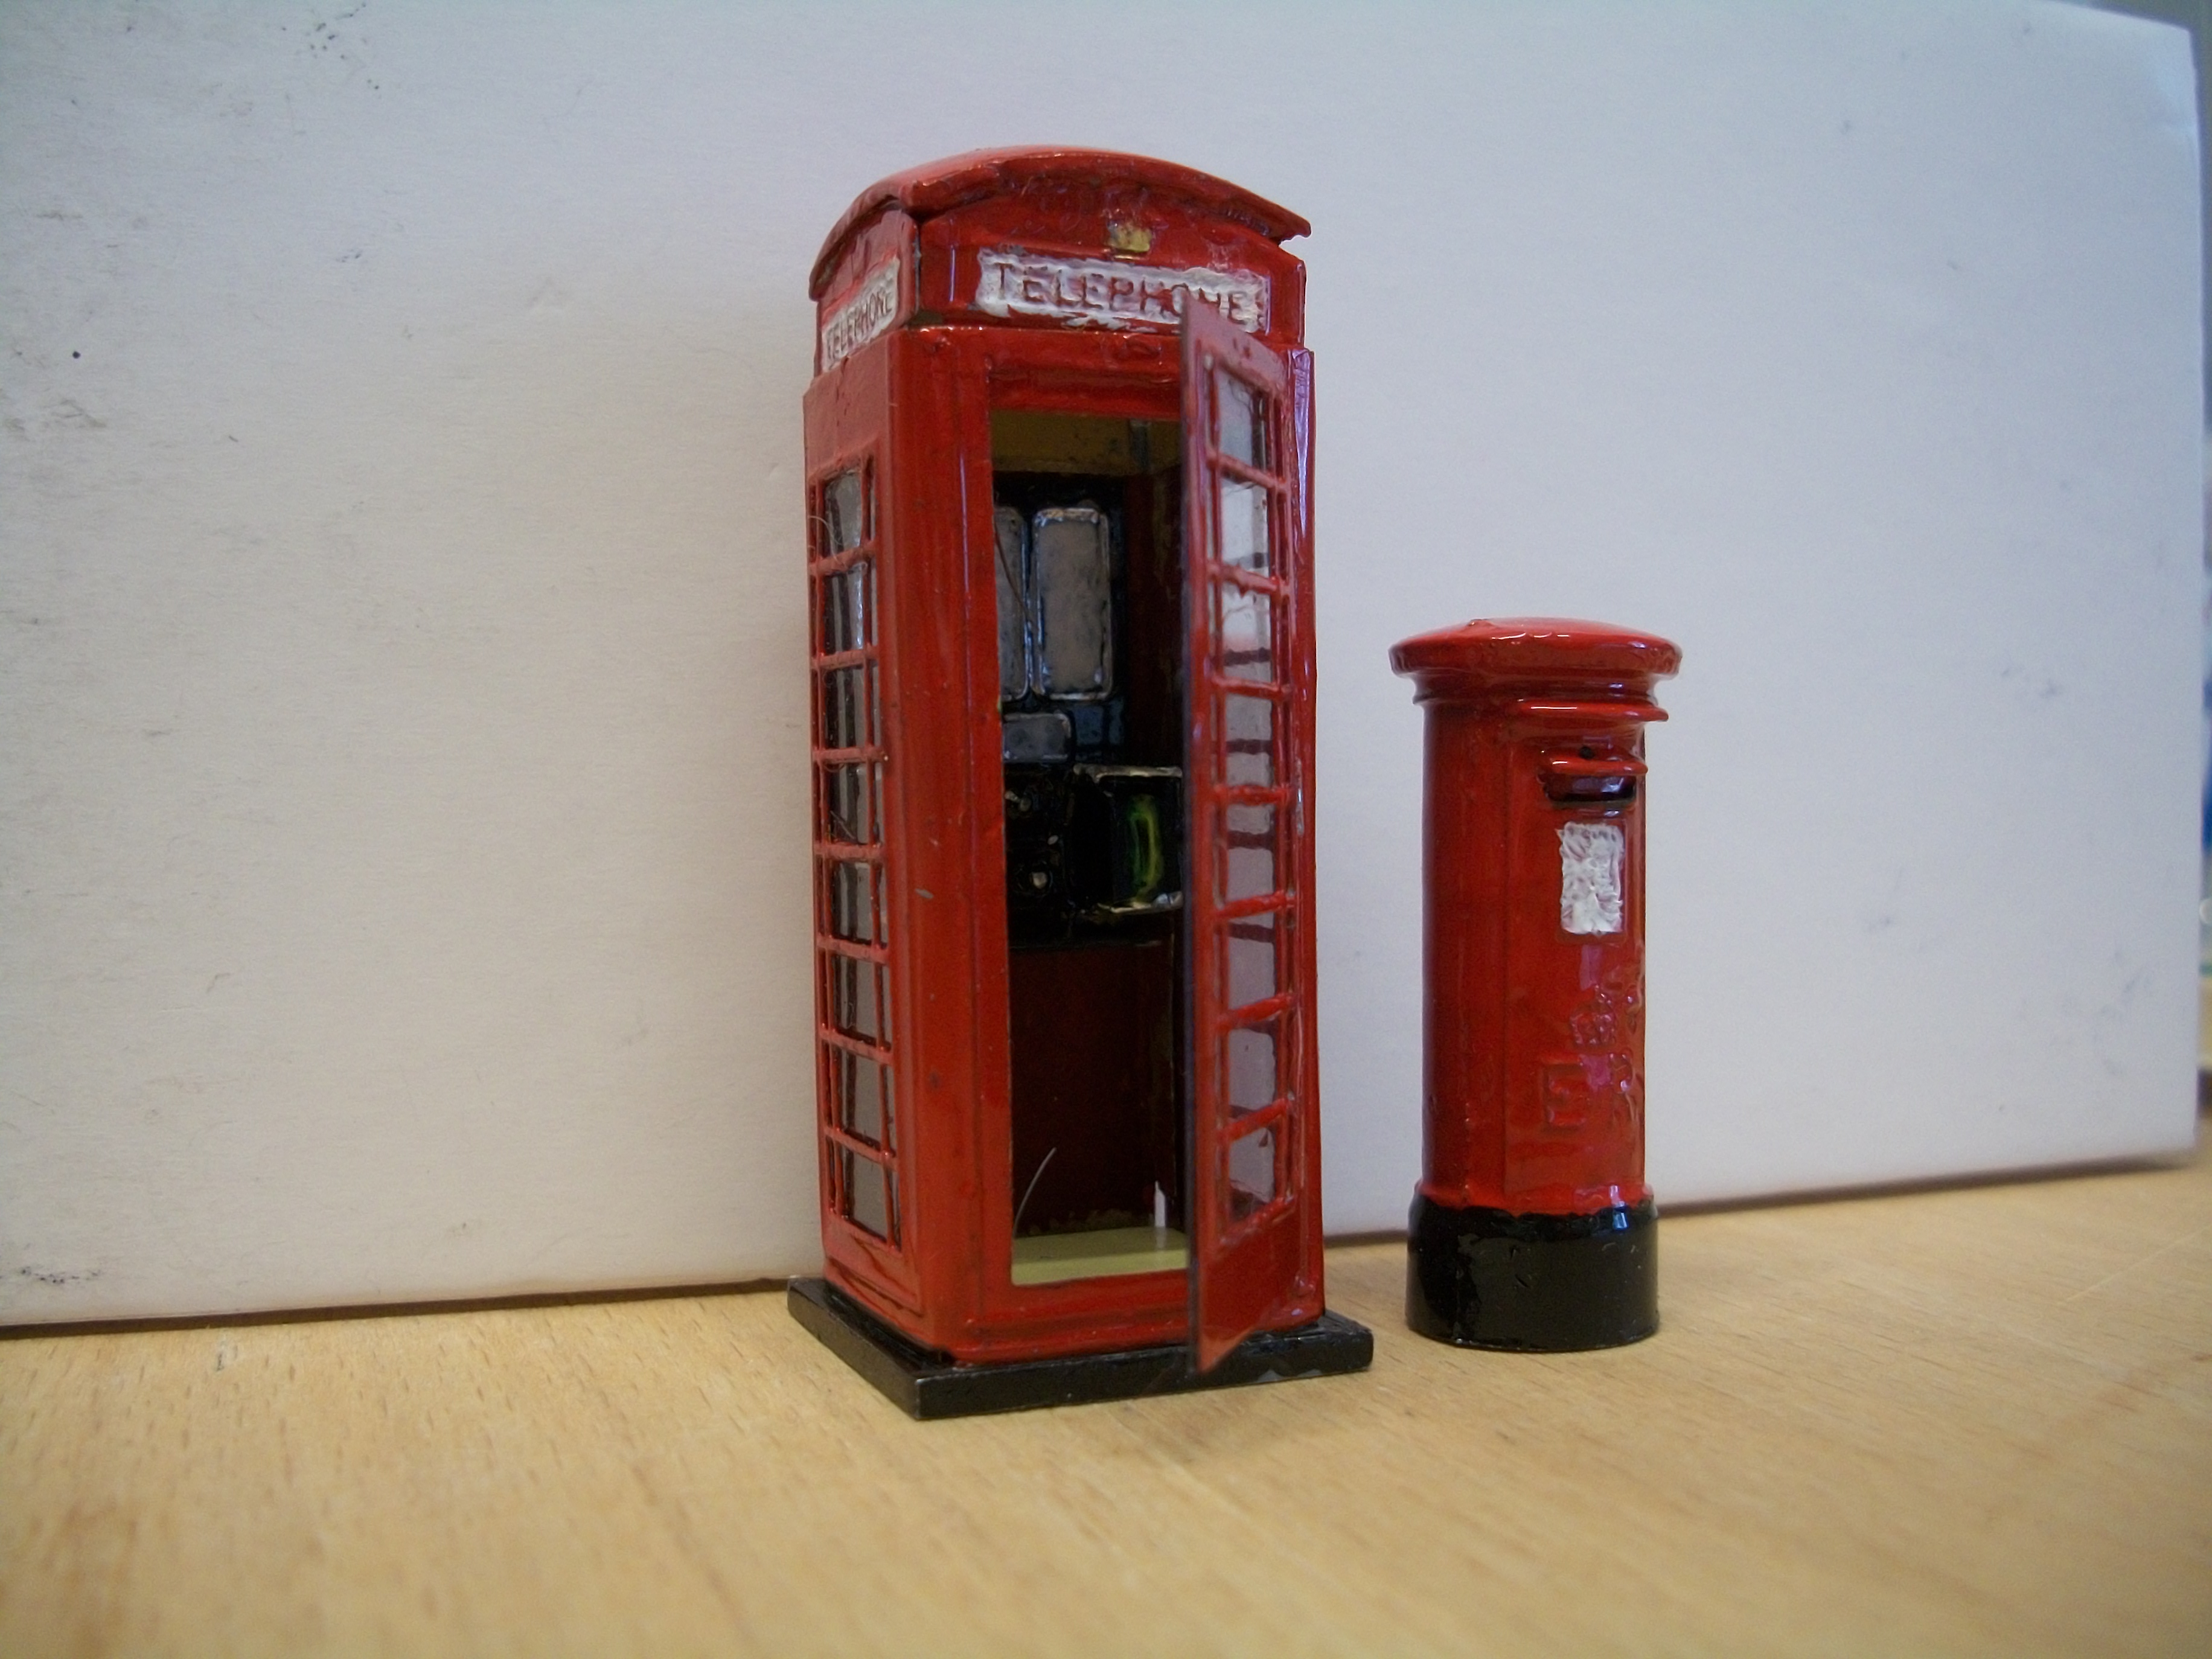
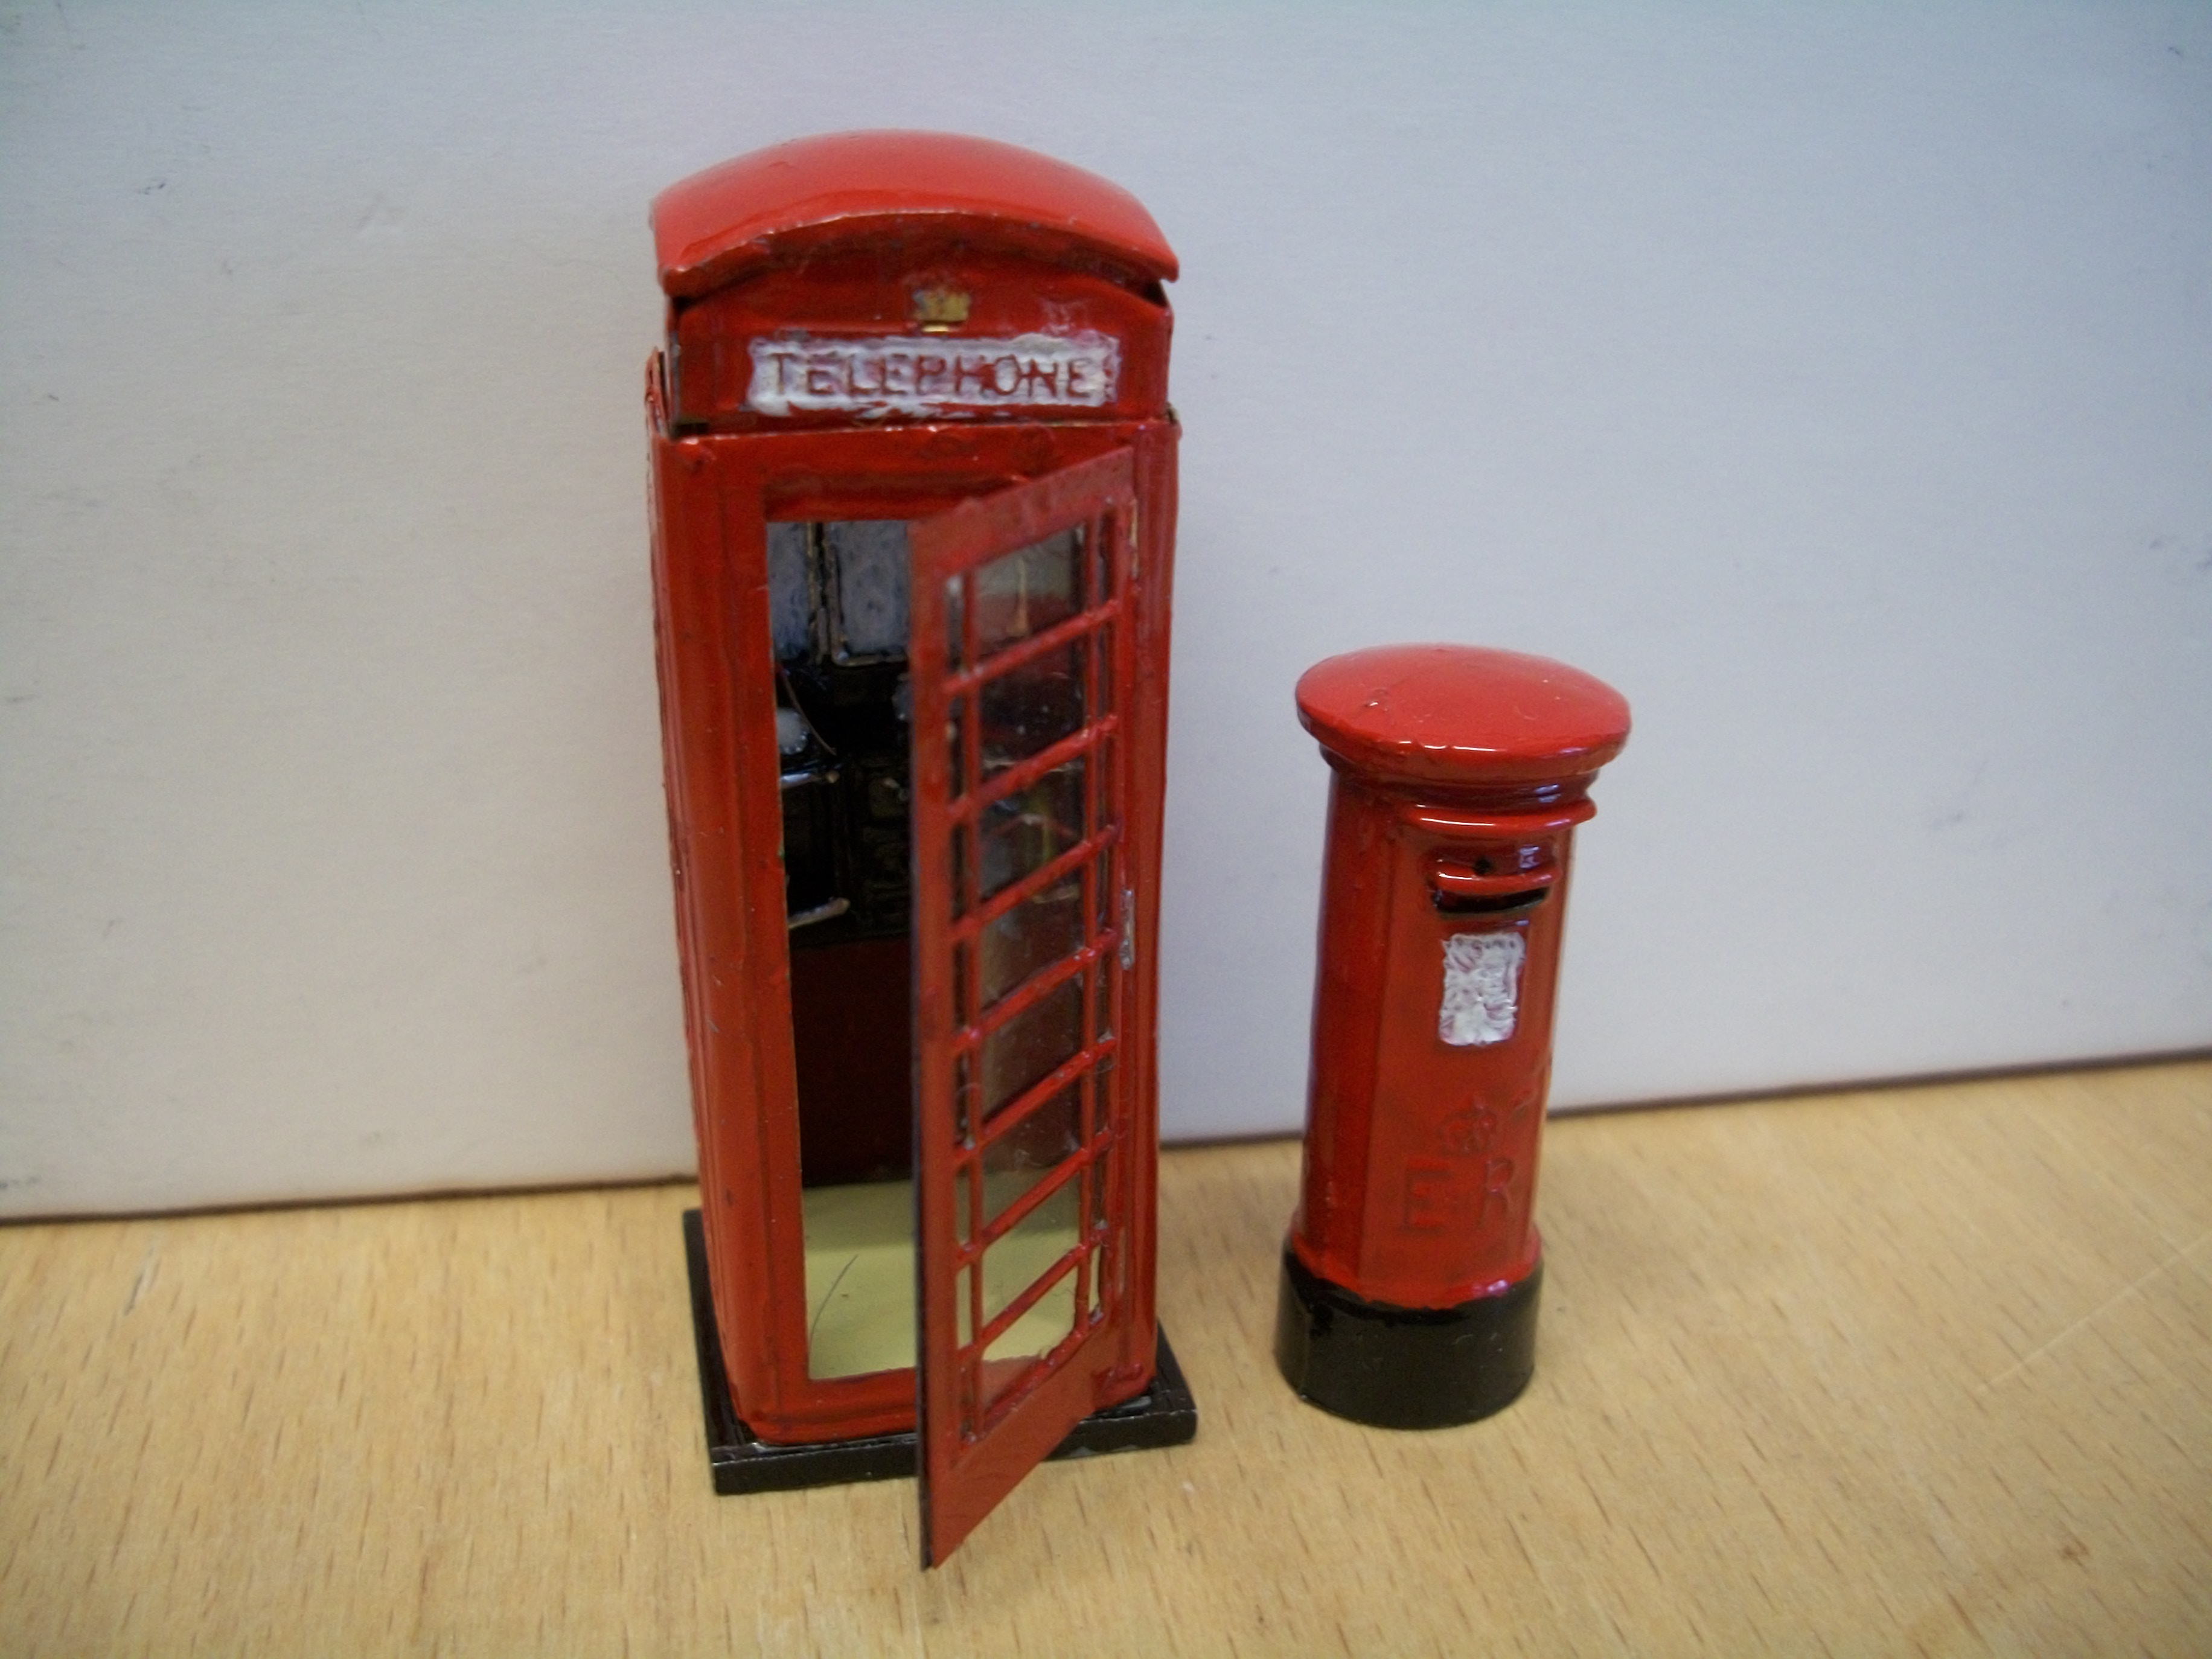
Thank you Gary...... I have decided to make a second partition wall, because I can see that when a motor car has entered the vehicle lift area there is not sufficient space for the office! Bringing the larger part of the wall further towards the main front wall of the building should put that right. Also, the corner is not a perfect 90 degrees right-angle, so I can do better! The 1:43 scale telephone kiosk is now completed....... built from a kit of etched brass parts, tin / lead alloy and clear acetate, making it considerably heavier than the balsa wood 1:24 scale telephone kiosk. David
-
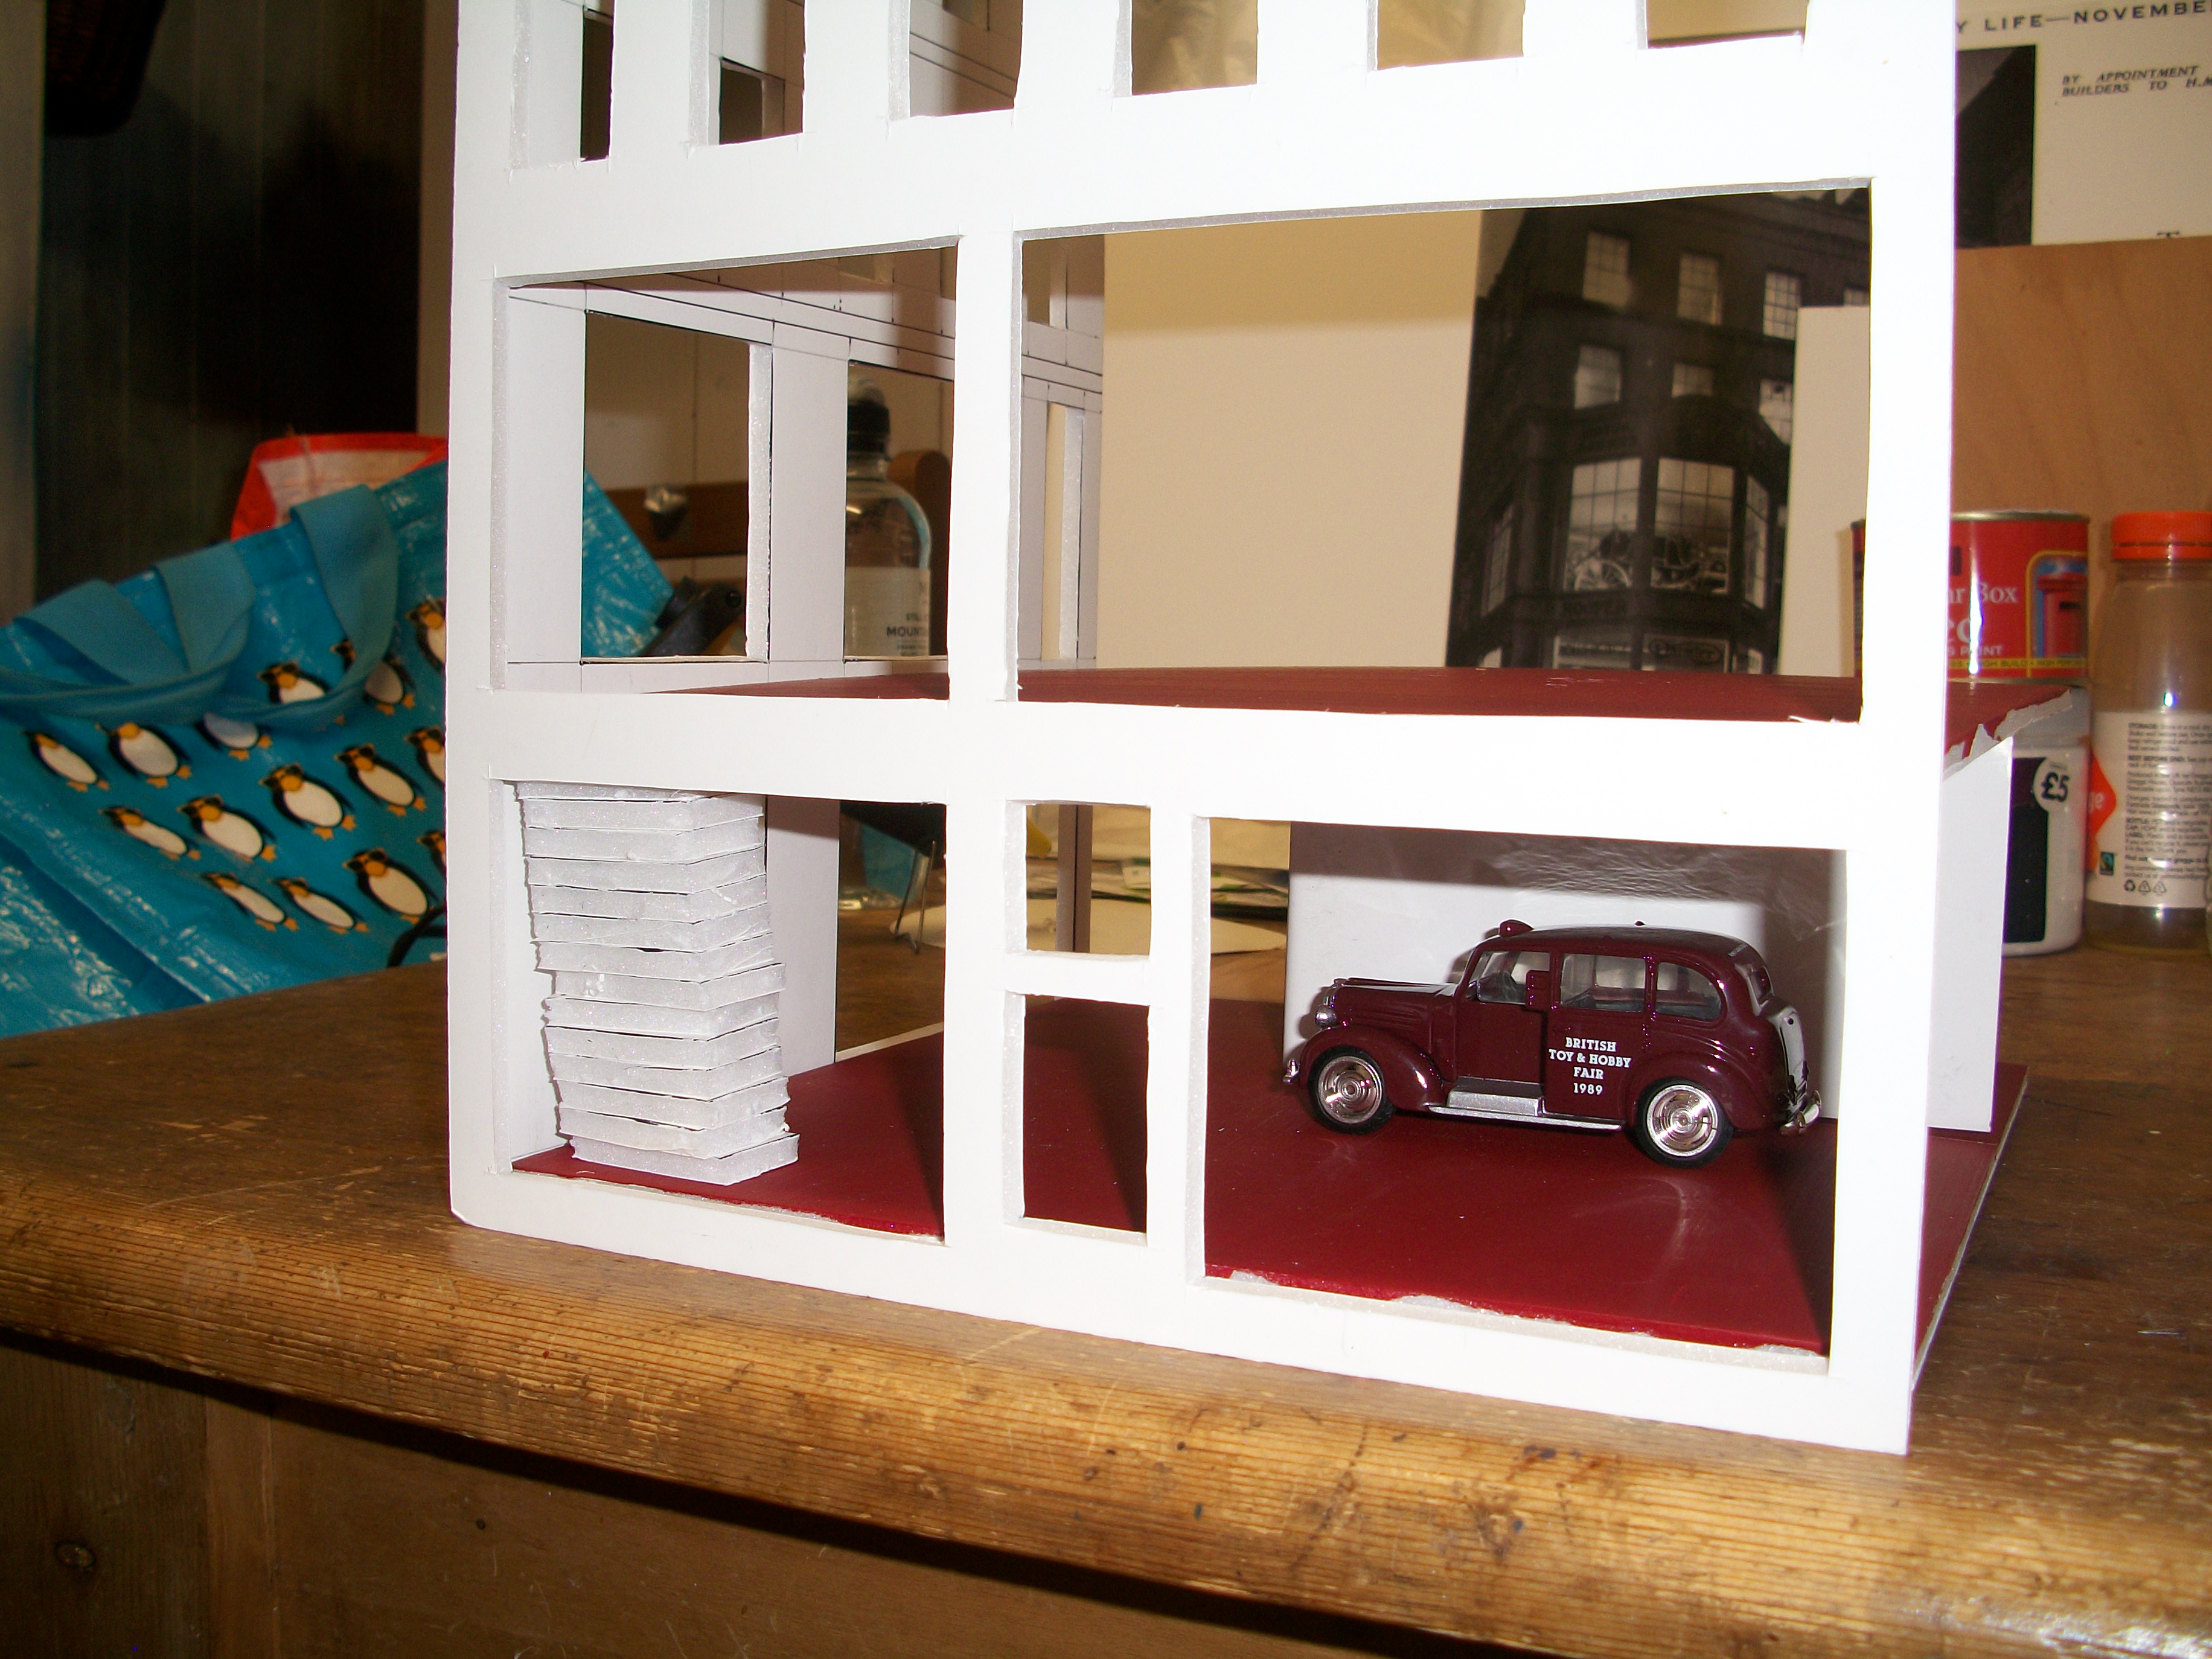
Construction work continues on the Hooper building. Here is a mock-up of the ground floor, first floor, office partition wall and the two main outer walls. The office partition wall has a rounded corner to it, and a supporting wooden post on the inside of the corner. Hot glue gun is being used to attach the edges of the foamboard. These images are done with flash photography, but later the diorama will be photographed without flash. The maroon taxi cab is there purely to visualise scale and proportion. David
-
Ah yes, the lathe..... I just noticed my typo error which referred to it as the ' new and larger lather ' David
-
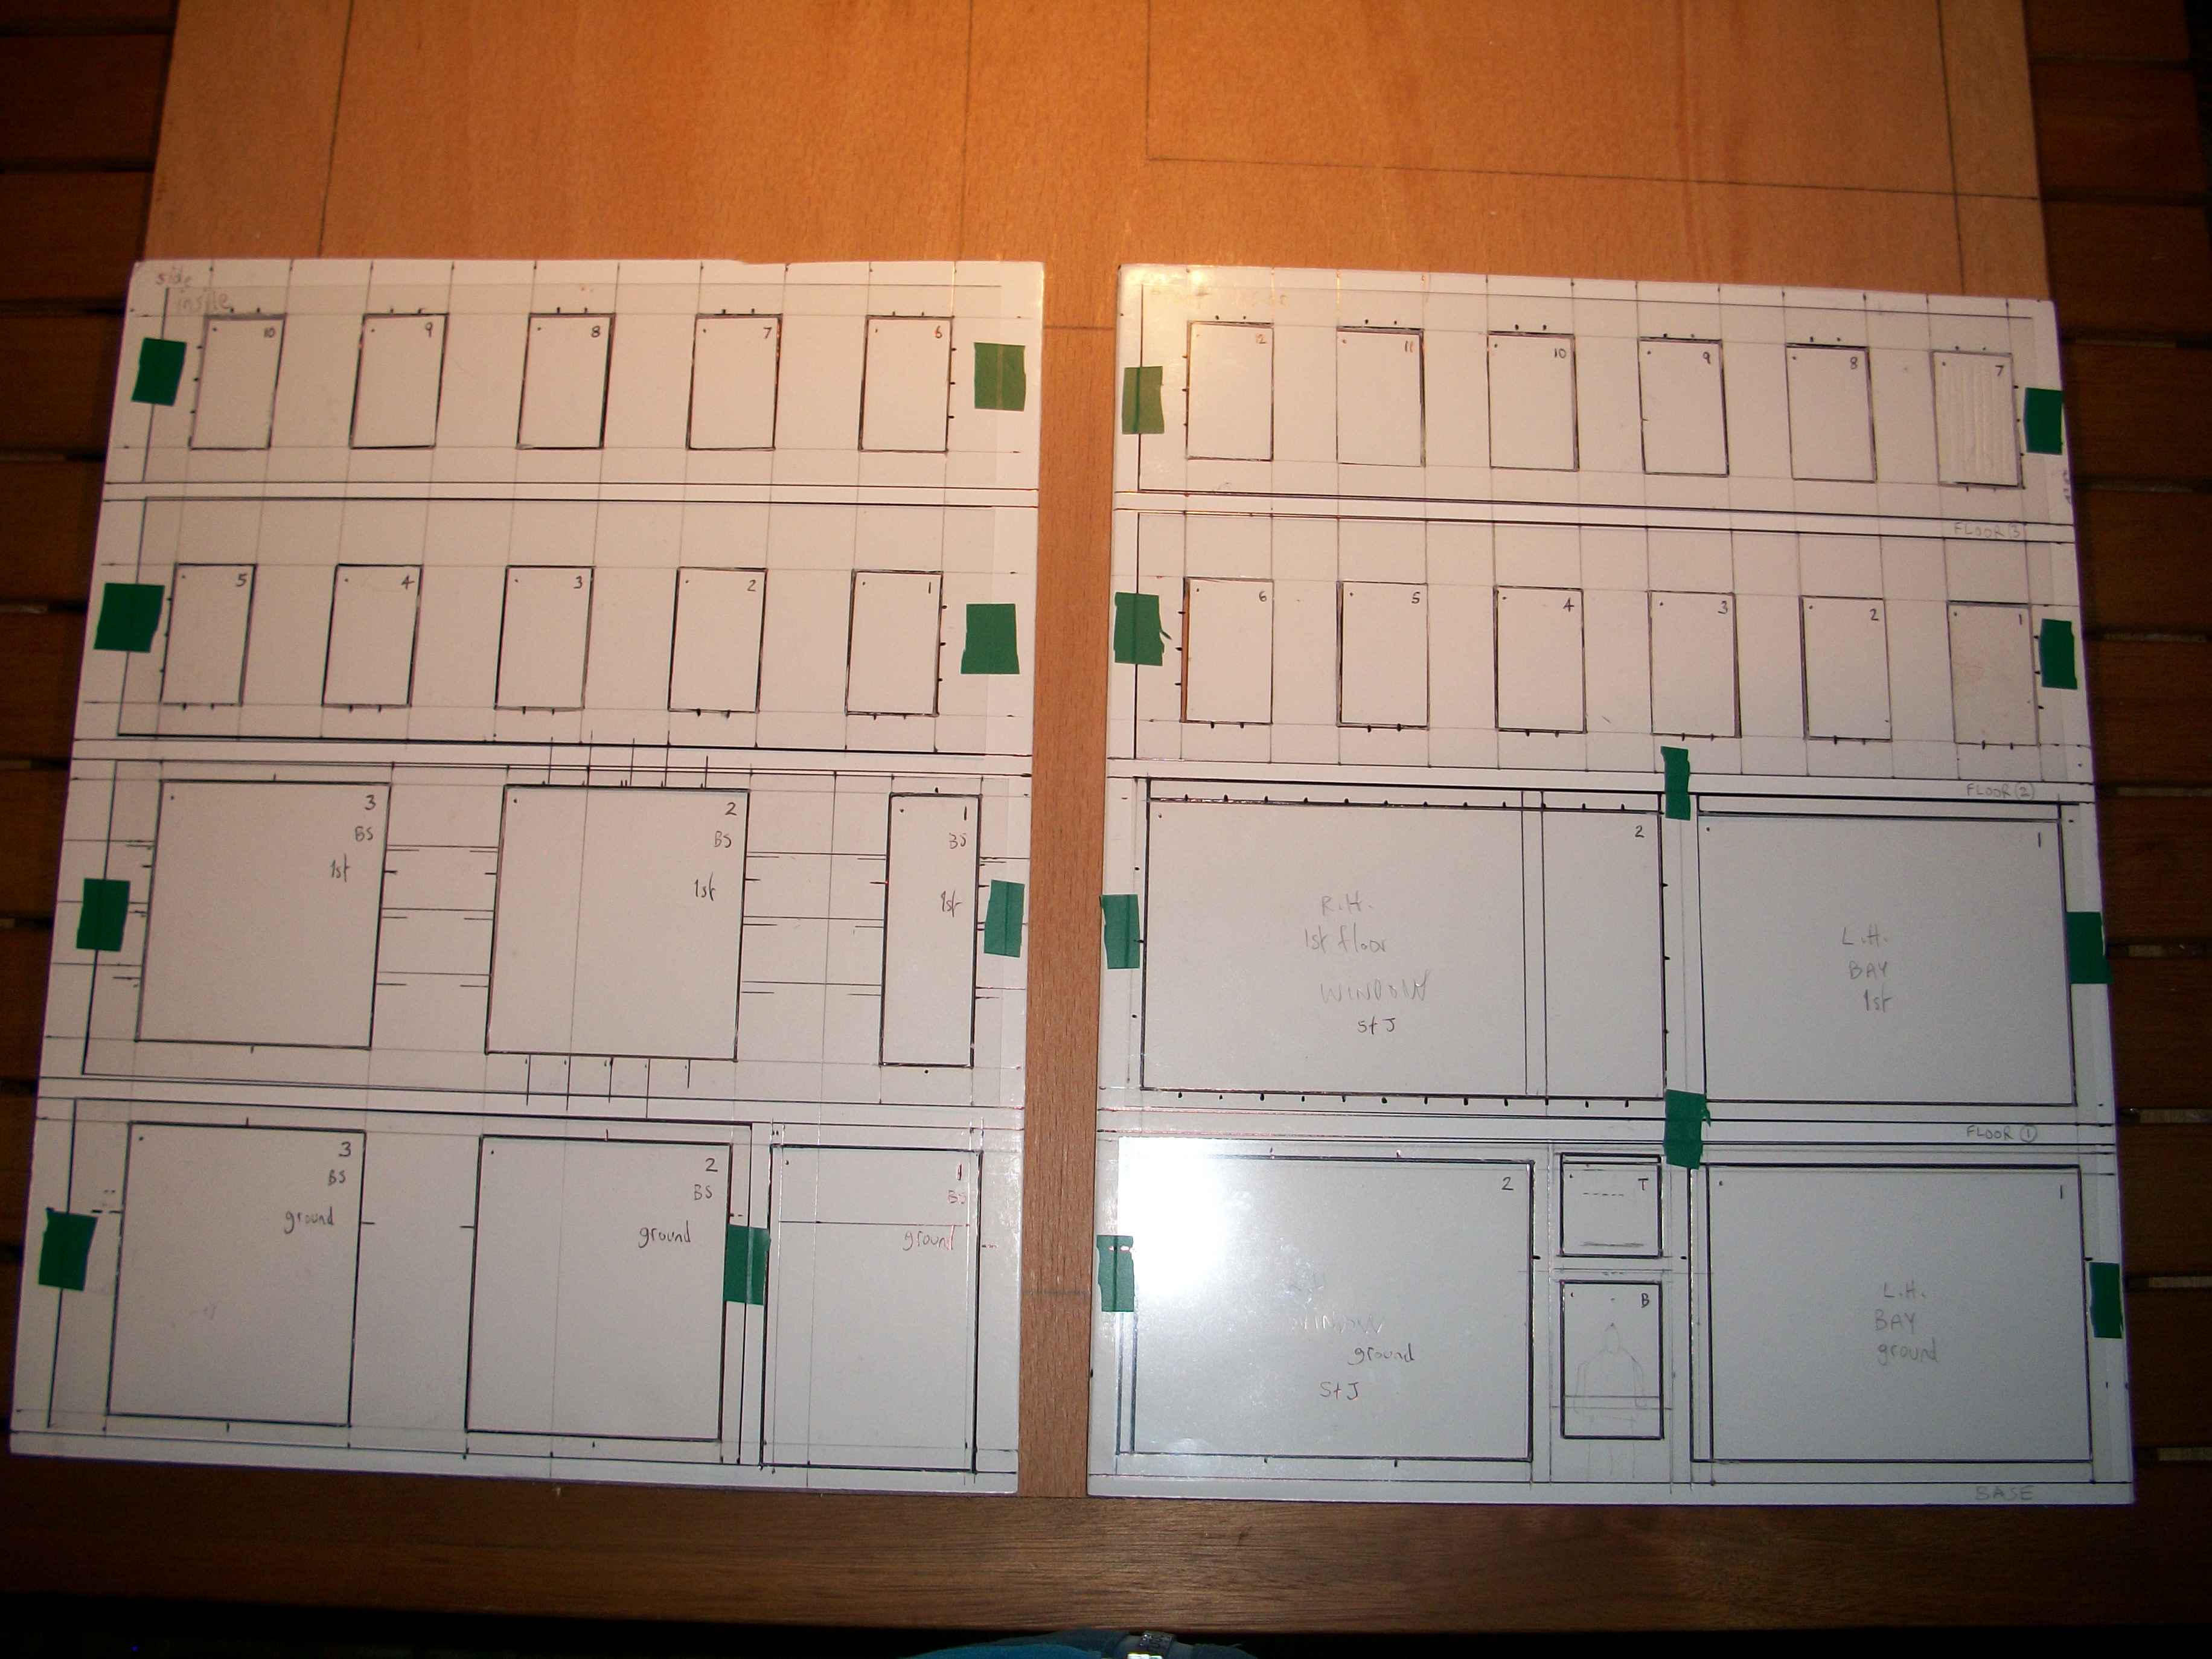
Here are a few photos to show the work in progress with the 1:43 scale Hooper & Co diorama. Also, the first of two Austin FX3 Taxi's arrived today, and this is shown alongside the Hooper Empress Rolls-Royce Silver Cloud I. There will be a second FX3 taxi that is maroon in colour, so will need painting black. You can see the partition wall being constructed that will form the office area of the ground floor. This also has the access doorway to the vehicle lift that takes motor cars and horse drawn carriages up to the first floor. The crimson red polished floors will have a second coat of crimson acrylic, as well as a coat of yacht varnish to produce the finished shine. The shorter section of the partition wall to the left in the photo, will be folded round to the ninety-degree right-angle position. All the window apertures have been cut out now, so the next stage is the clear acetate panels behind the window apertures. Decided I shall try 1:43 scale figures from Shapeways to see if they are good enough for the photography later. Thanks for looking everybody and I shall continue posting on this topic while the work is ongoing. David
-
Yeah..... I was worried about using an airbrush but soon got the hang of it, although it is a cheap one and I can sometimes get better results with a rattle can. What worries me more than the tools, is the chemicals we use as scale model builders. The moulding and casting resins, the cellulose paints, the glues, the thinners and cleaning fluids...... all this toxic stuff and disposable latex gloves and face masks....... I just worry about it. David
-
Thank you Yordan..... and I am following your 1953 Chevy 3100 Truck topic with interest. David
.jpg.b21b54be9515b19117558e744f9536b7.jpg)
.jpg.82228f93bae3ffdbe631a1dc94b0c983.jpg)
.jpg.64c9bad768171b82d7cabab48ba8e698.jpg)