Anglia105E
-
Posts
2,875 -
Joined
-
Last visited
Content Type
Profiles
Forums
Events
Gallery
Everything posted by Anglia105E
-

1:16 Gunze Sangyo 1937 Rolls-Royce Phantom III Sports Saloon
Anglia105E replied to Anglia105E's topic in WIP: Model Cars
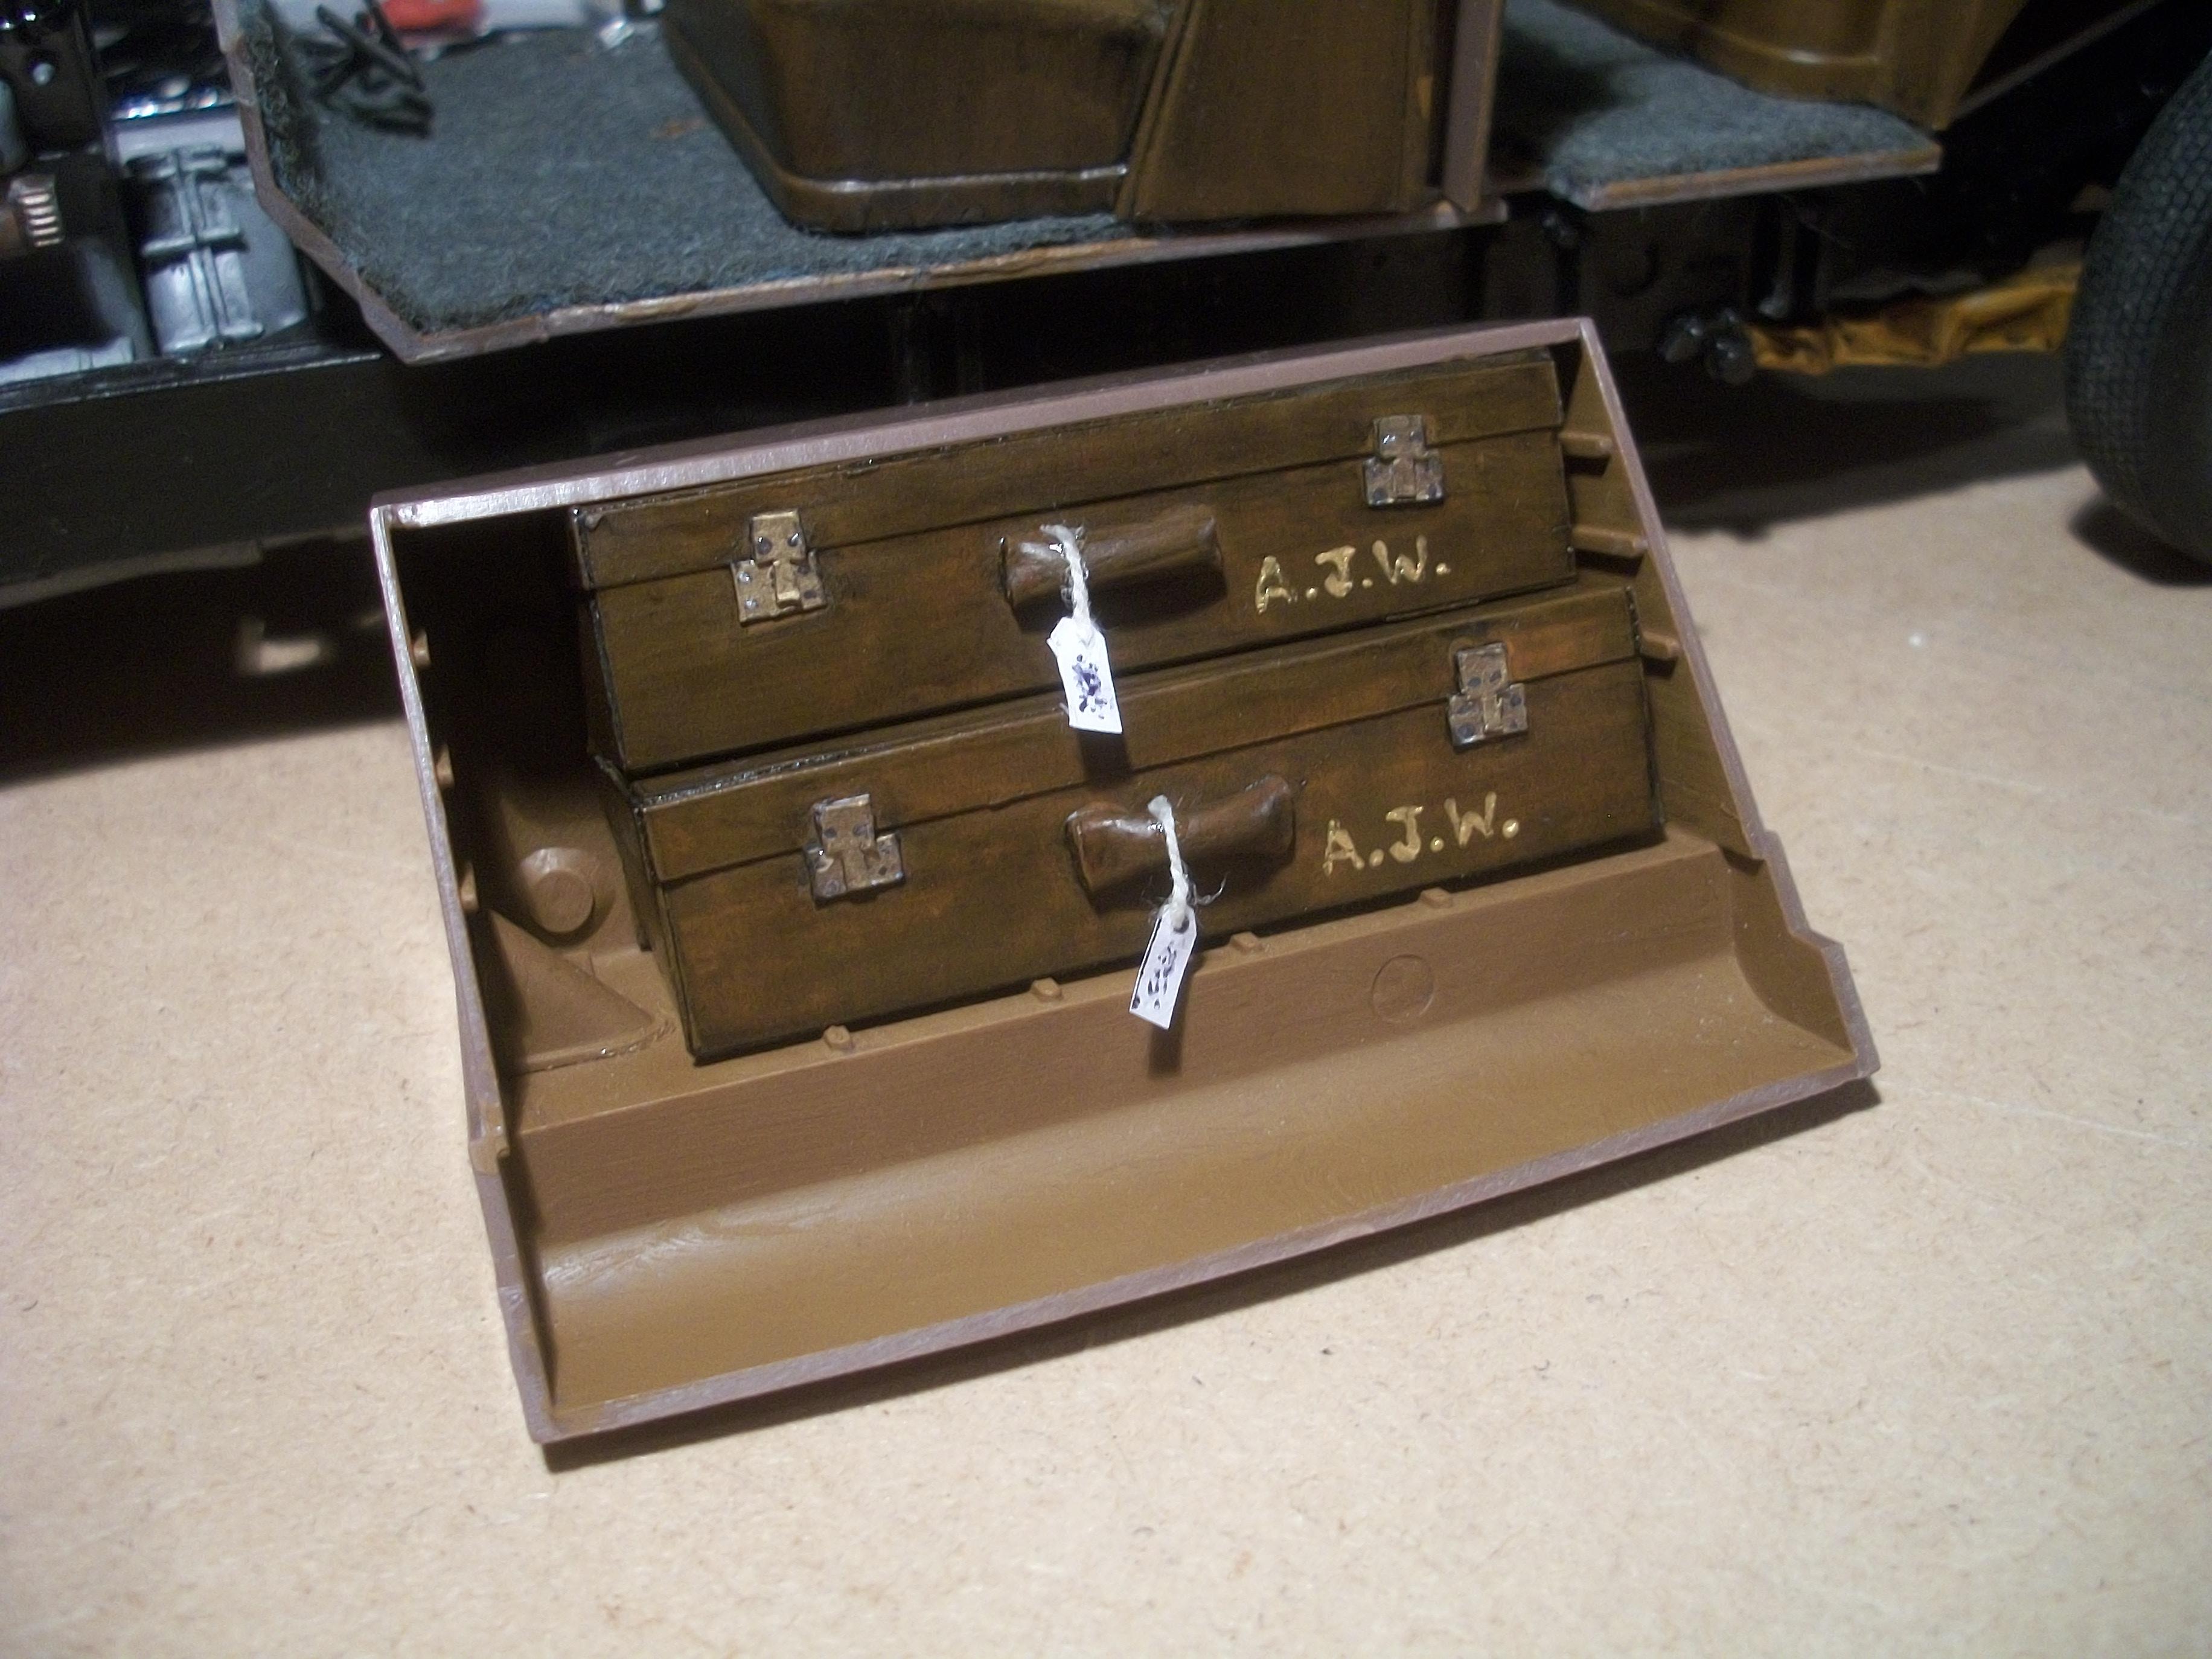
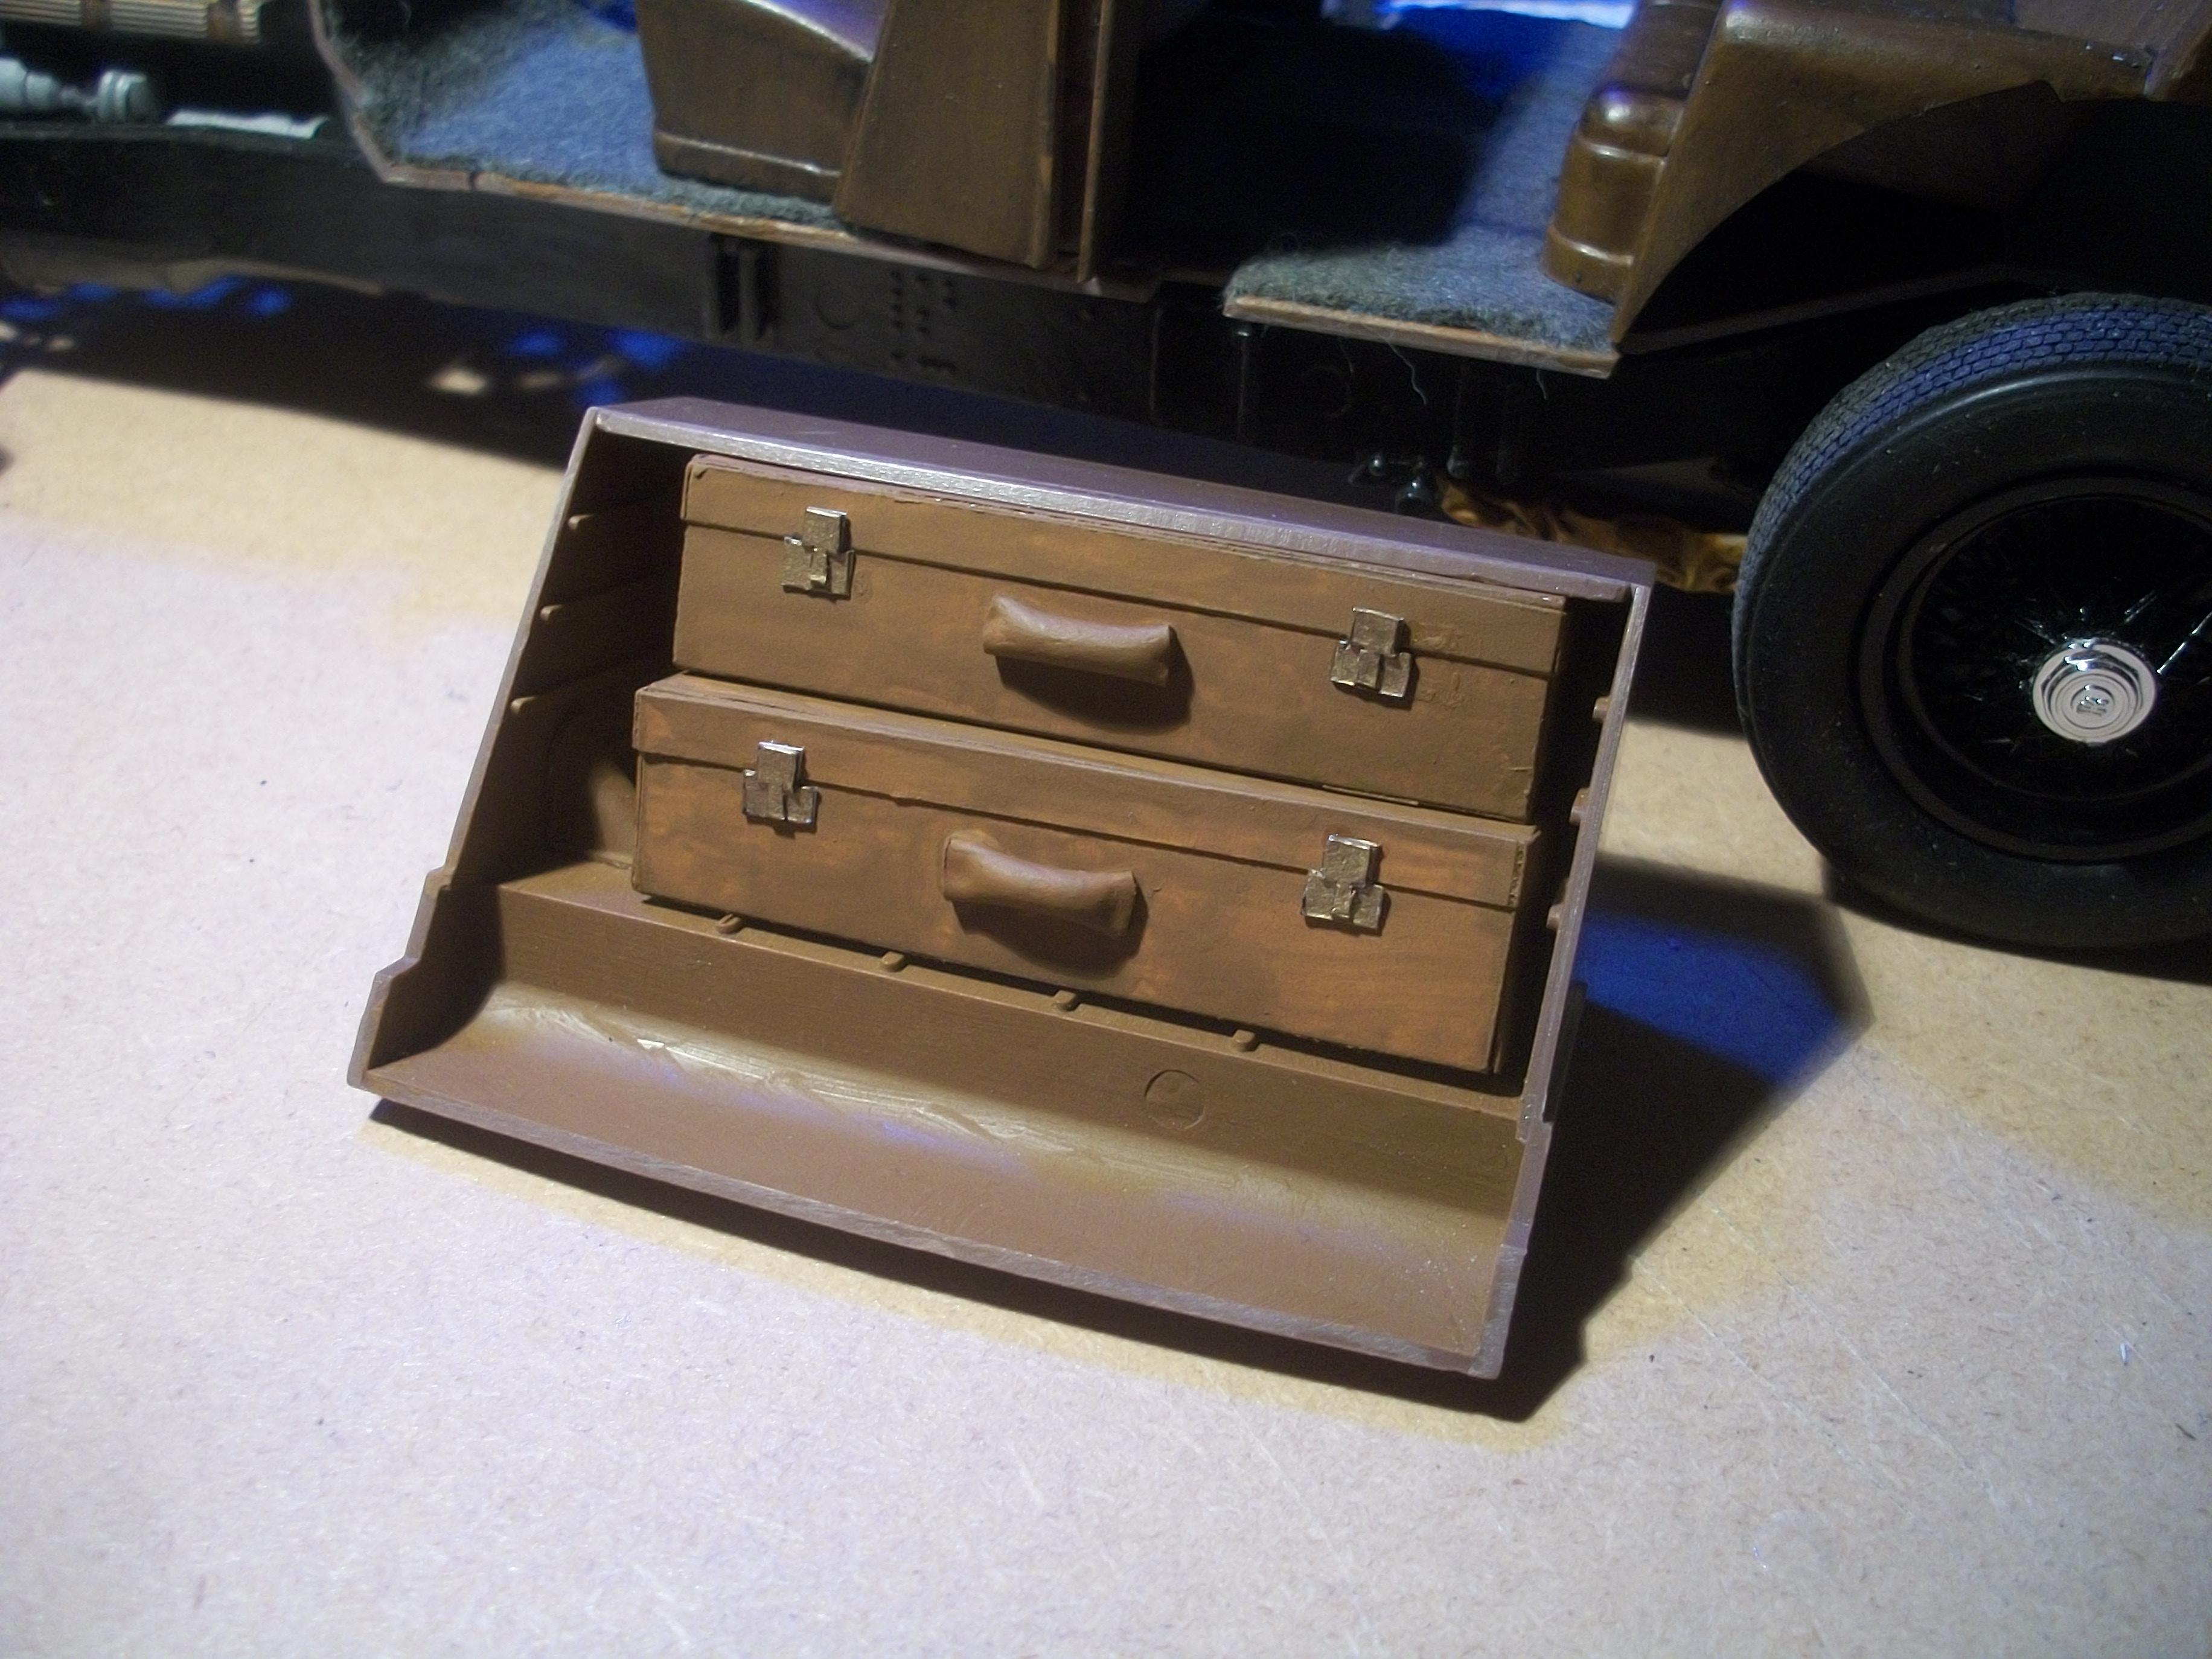
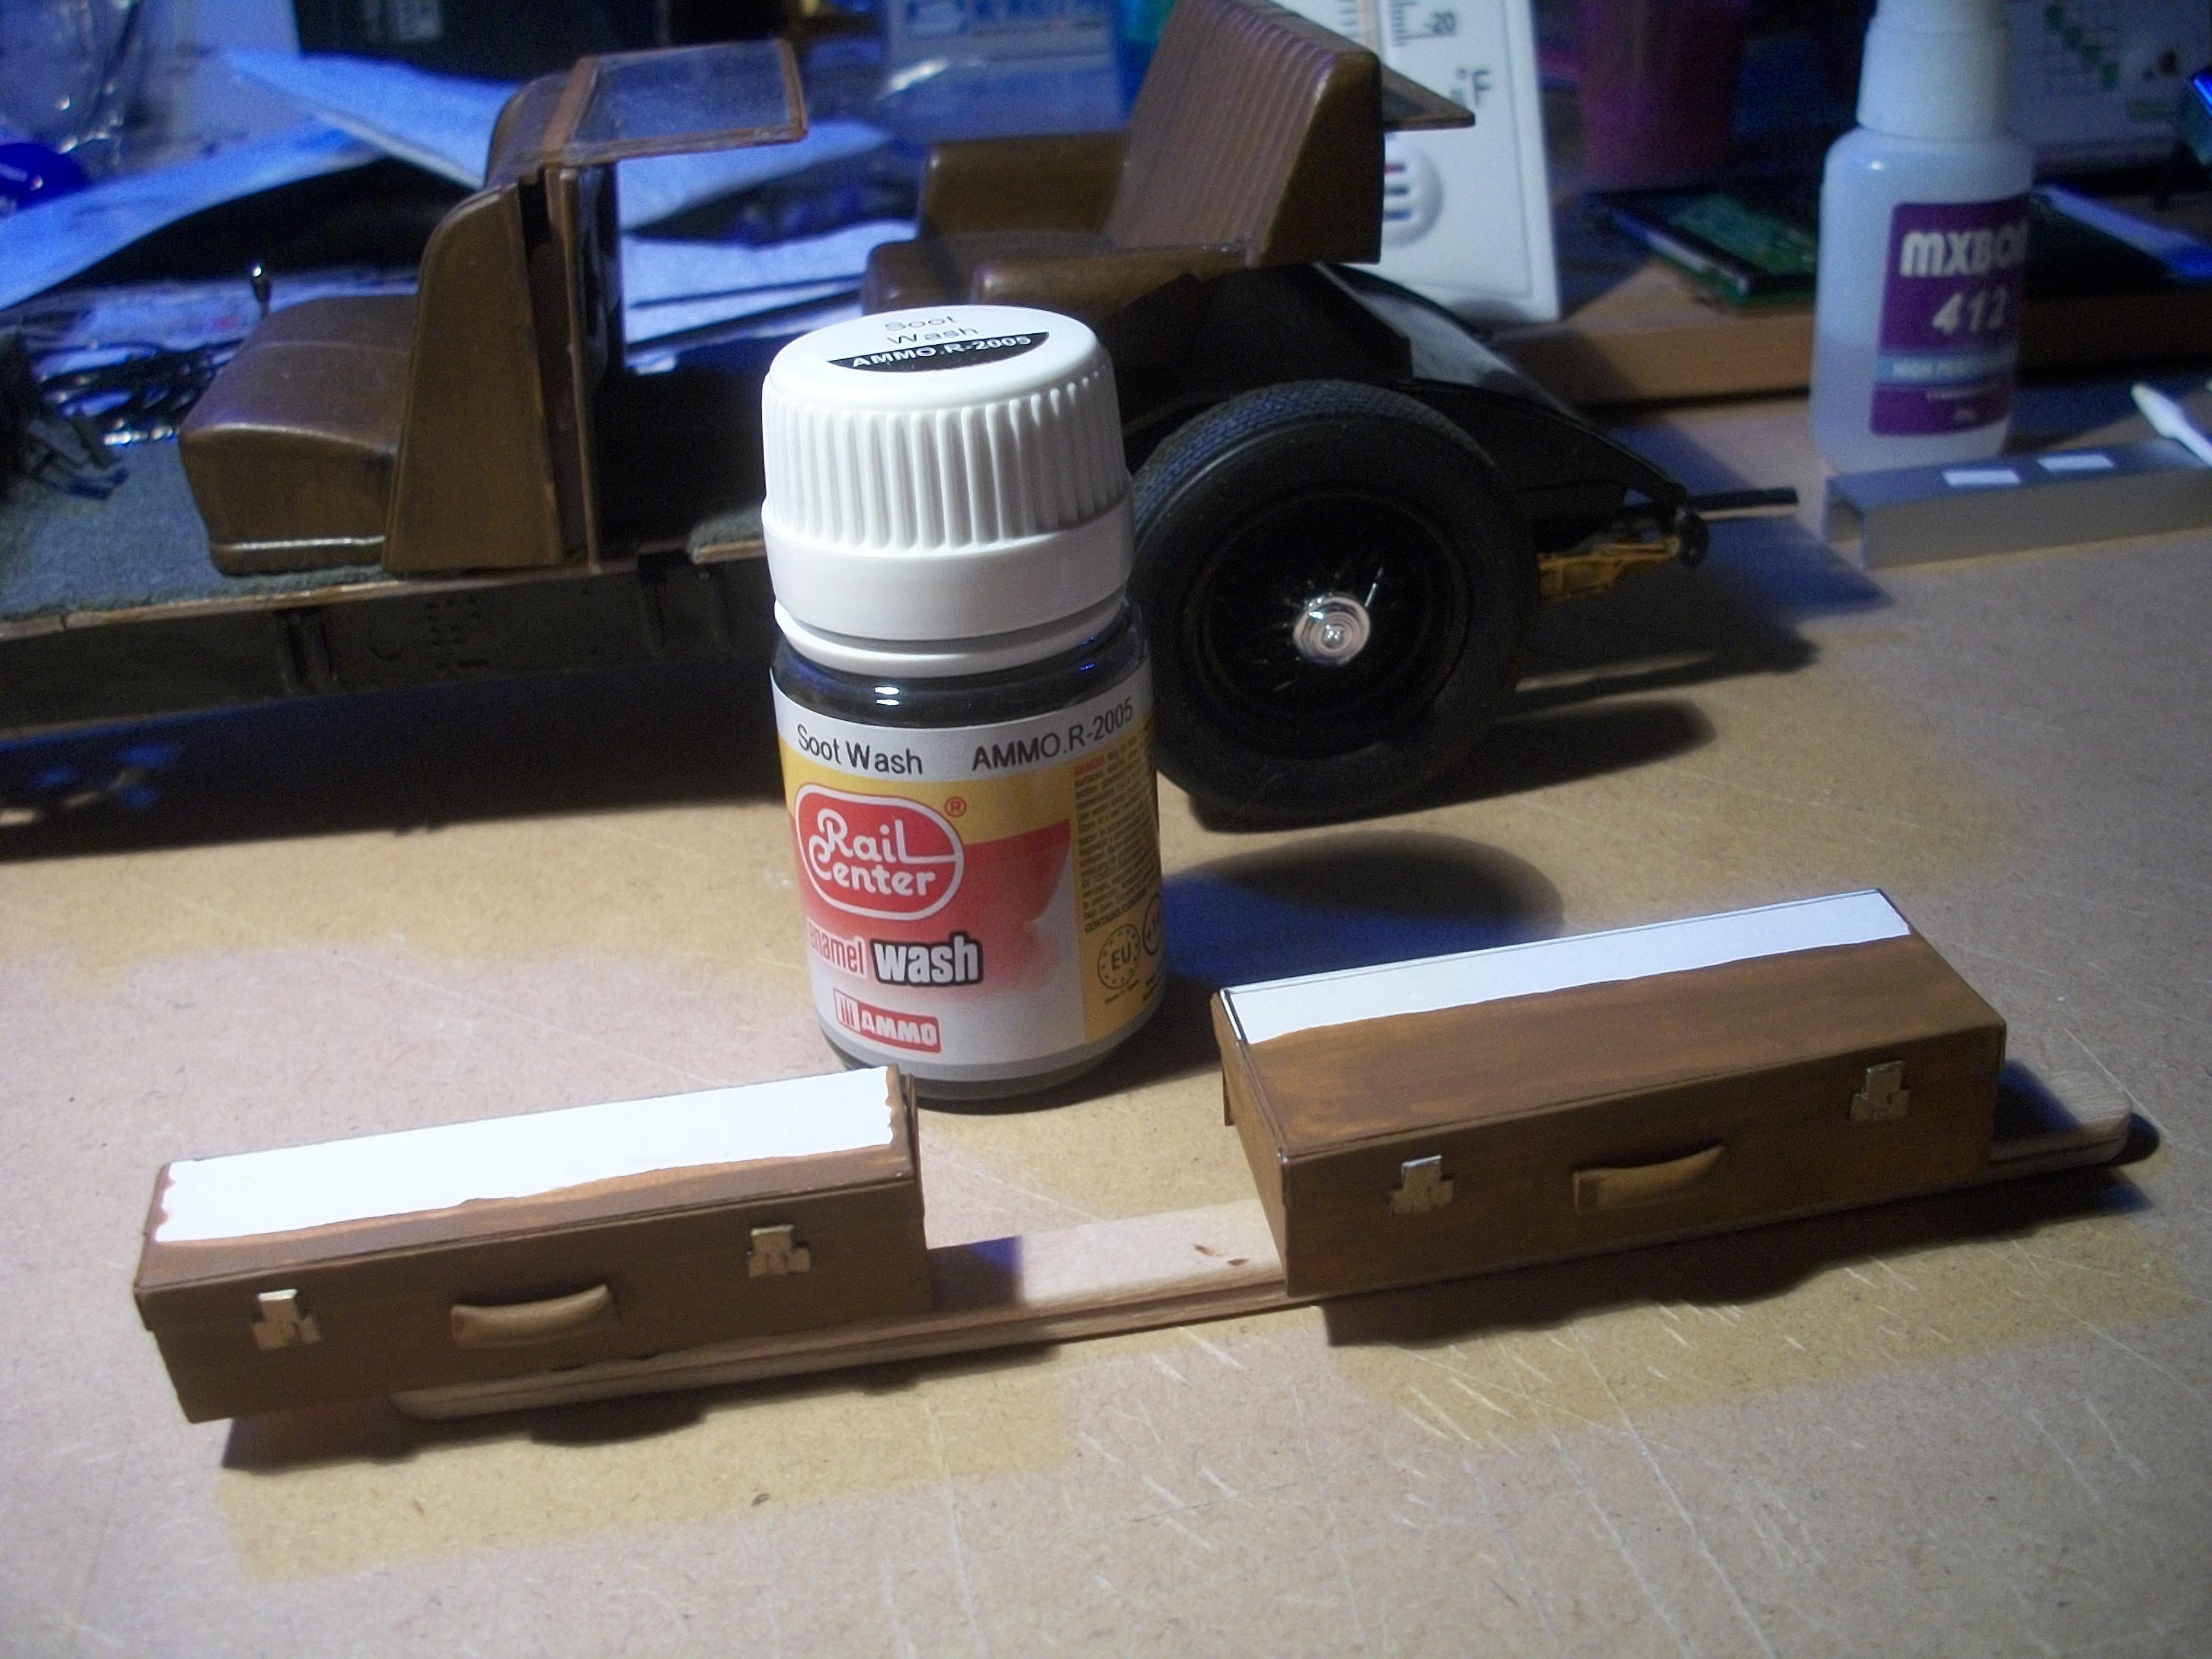
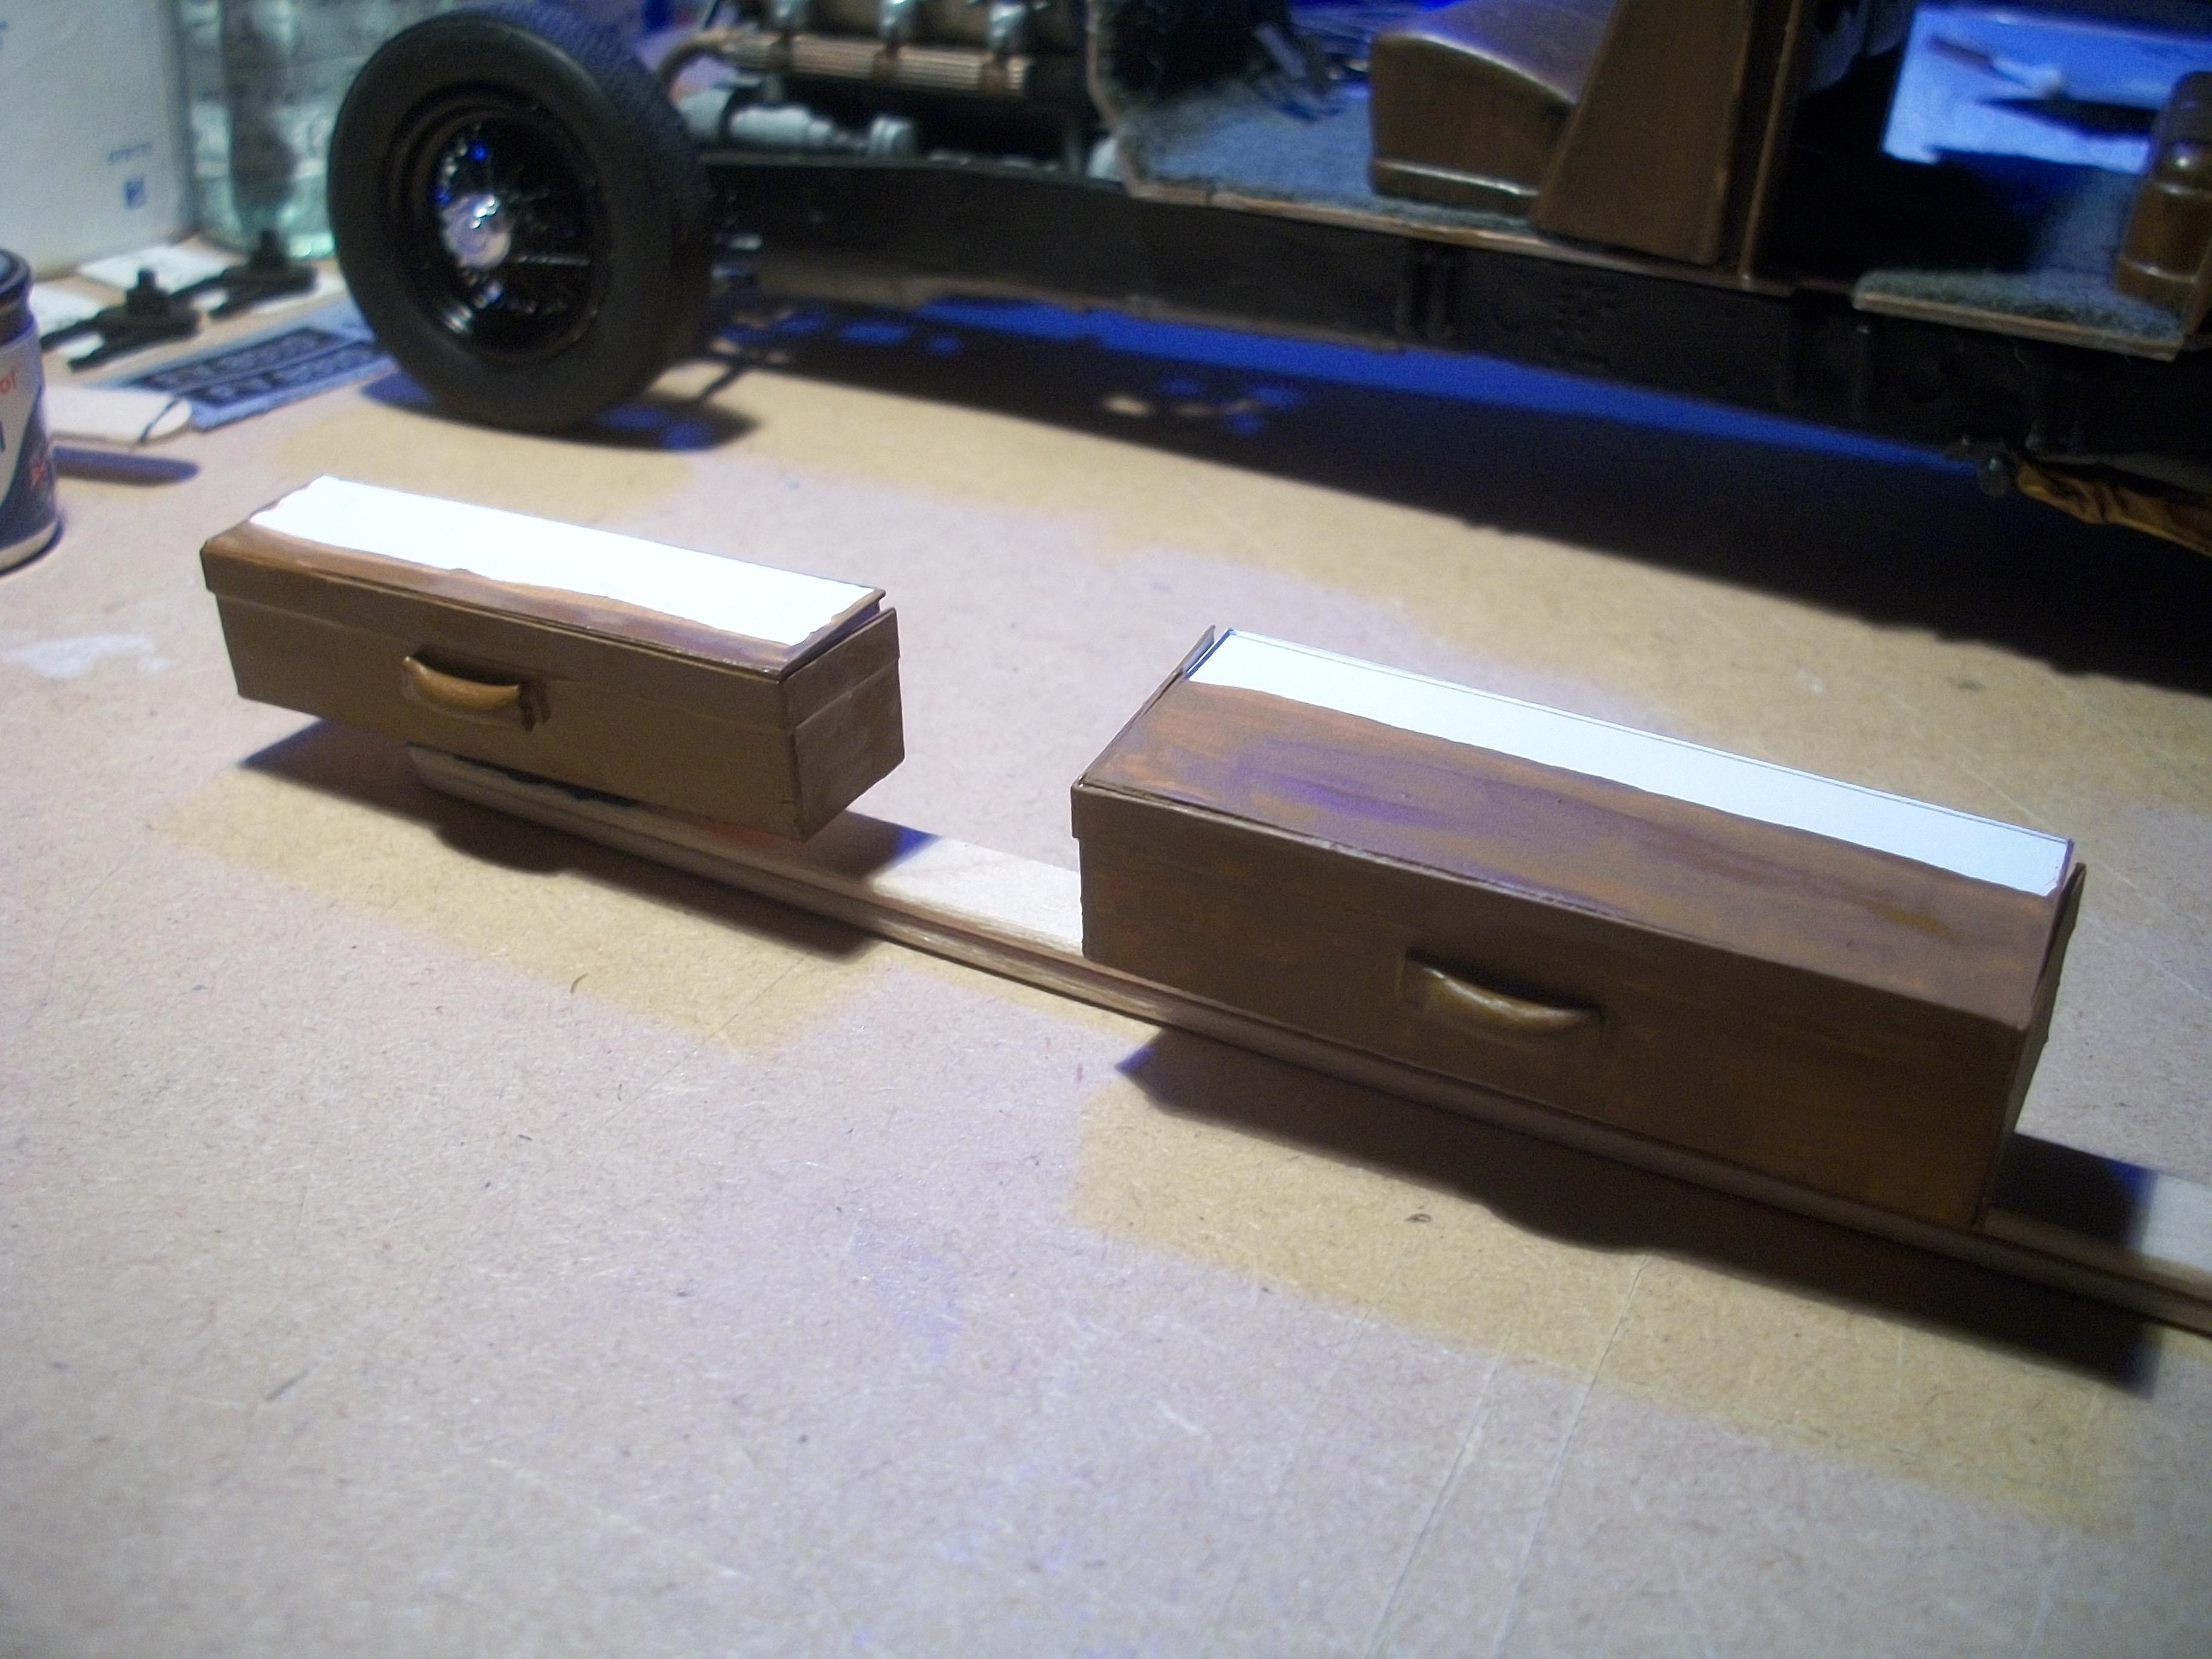
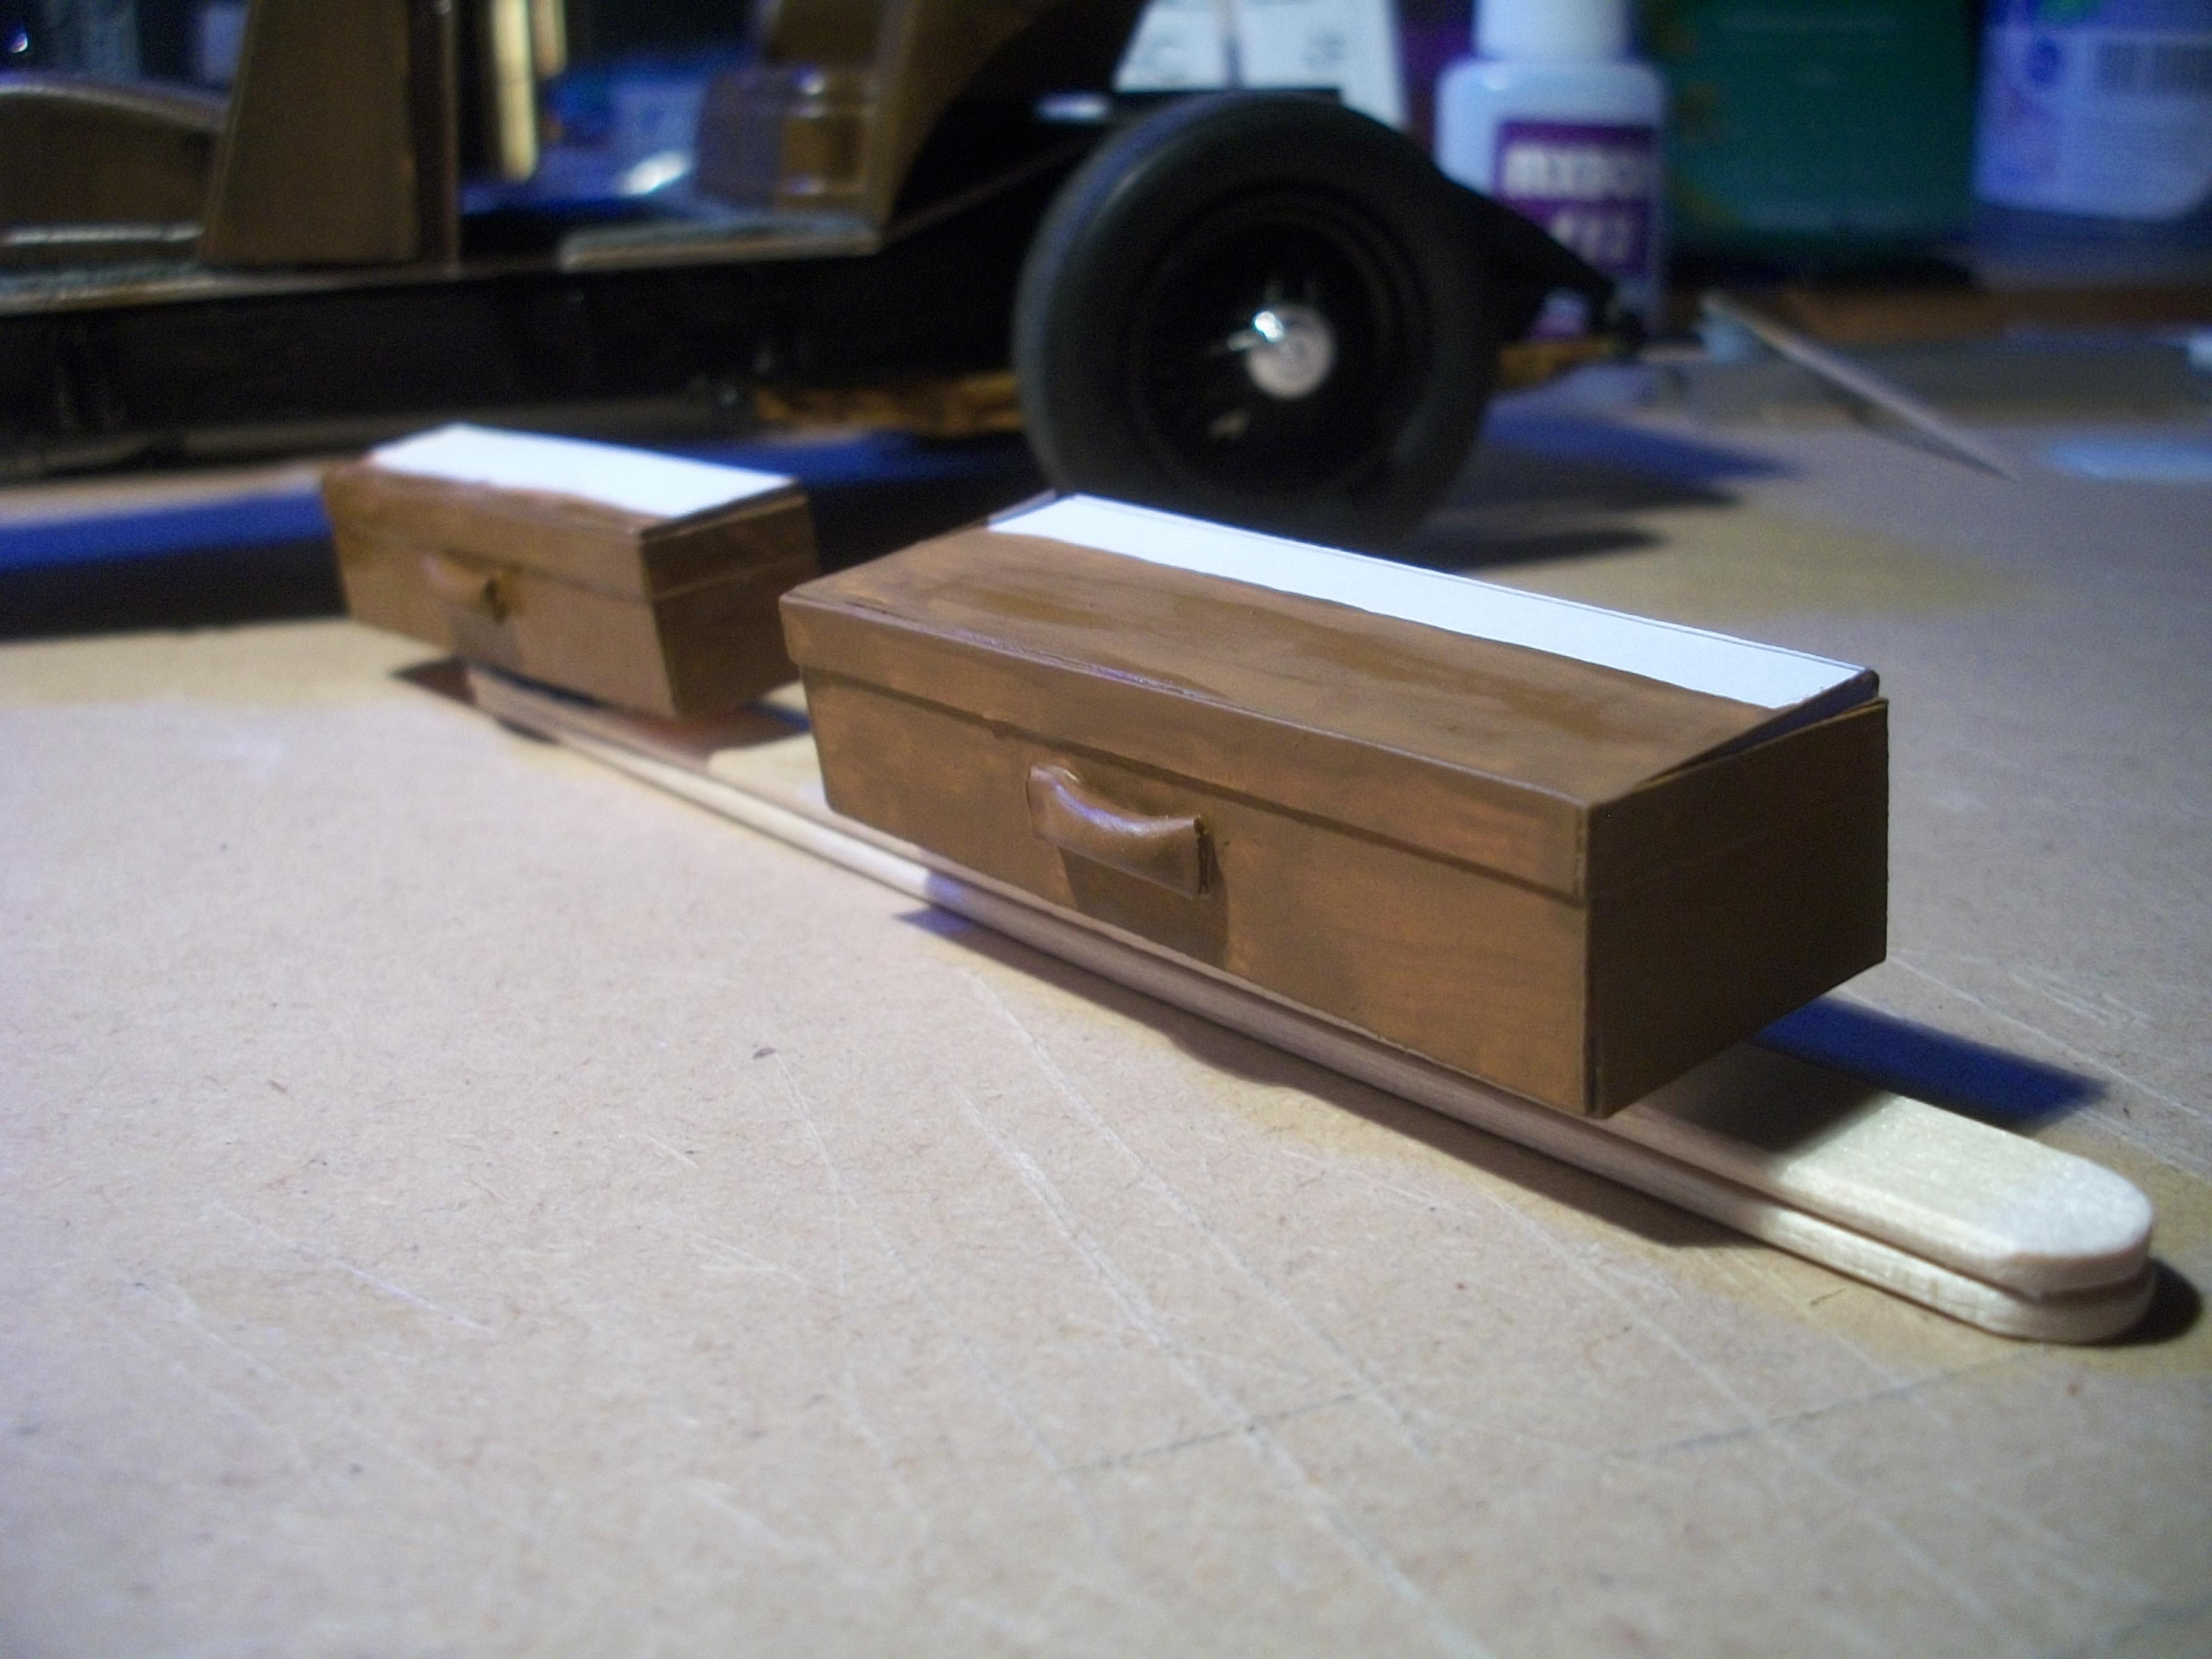
With the mock up of the body components still intact, I particularly wanted to have a close look at the orientation of the inner door post on the driver's side. This was done by attaching a short length of balse rod to the base of the door post, using double-sided tape . . . I was able to see clearly how the door post meets the roof, and also the floor. Then, allowing for the fact that the outer door pillar on the driver's side is bent outwards, I closed both the front and rear doors. Surprisingly, the doors are actually quite a good fit . . . Returning to the suitcases and after applying Humbrol Satin Cote over the black wash, I applied dots of Liquid Chrome to the hinges using the pointed tip of a cocktail stick, so two on the top part of the hinge and four on the lower part. Moving on to the ' A.J.W. ' monogram, this was hand painted using the same pointed tip of a cocktail stick, and Vallejo Polished Gold acrylic paint . . . You can see from the photos below that the lower suitcase monogram has turned out better than the upper suitcase. The two luggage labels have been attached to the handles of the suitcases with white cotton thread, to represent the string . . . The suitcases are now completed . . . David
-
1:16 Gunze Sangyo 1937 Rolls-Royce Phantom III Sports Saloon
Anglia105E replied to Anglia105E's topic in WIP: Model Cars
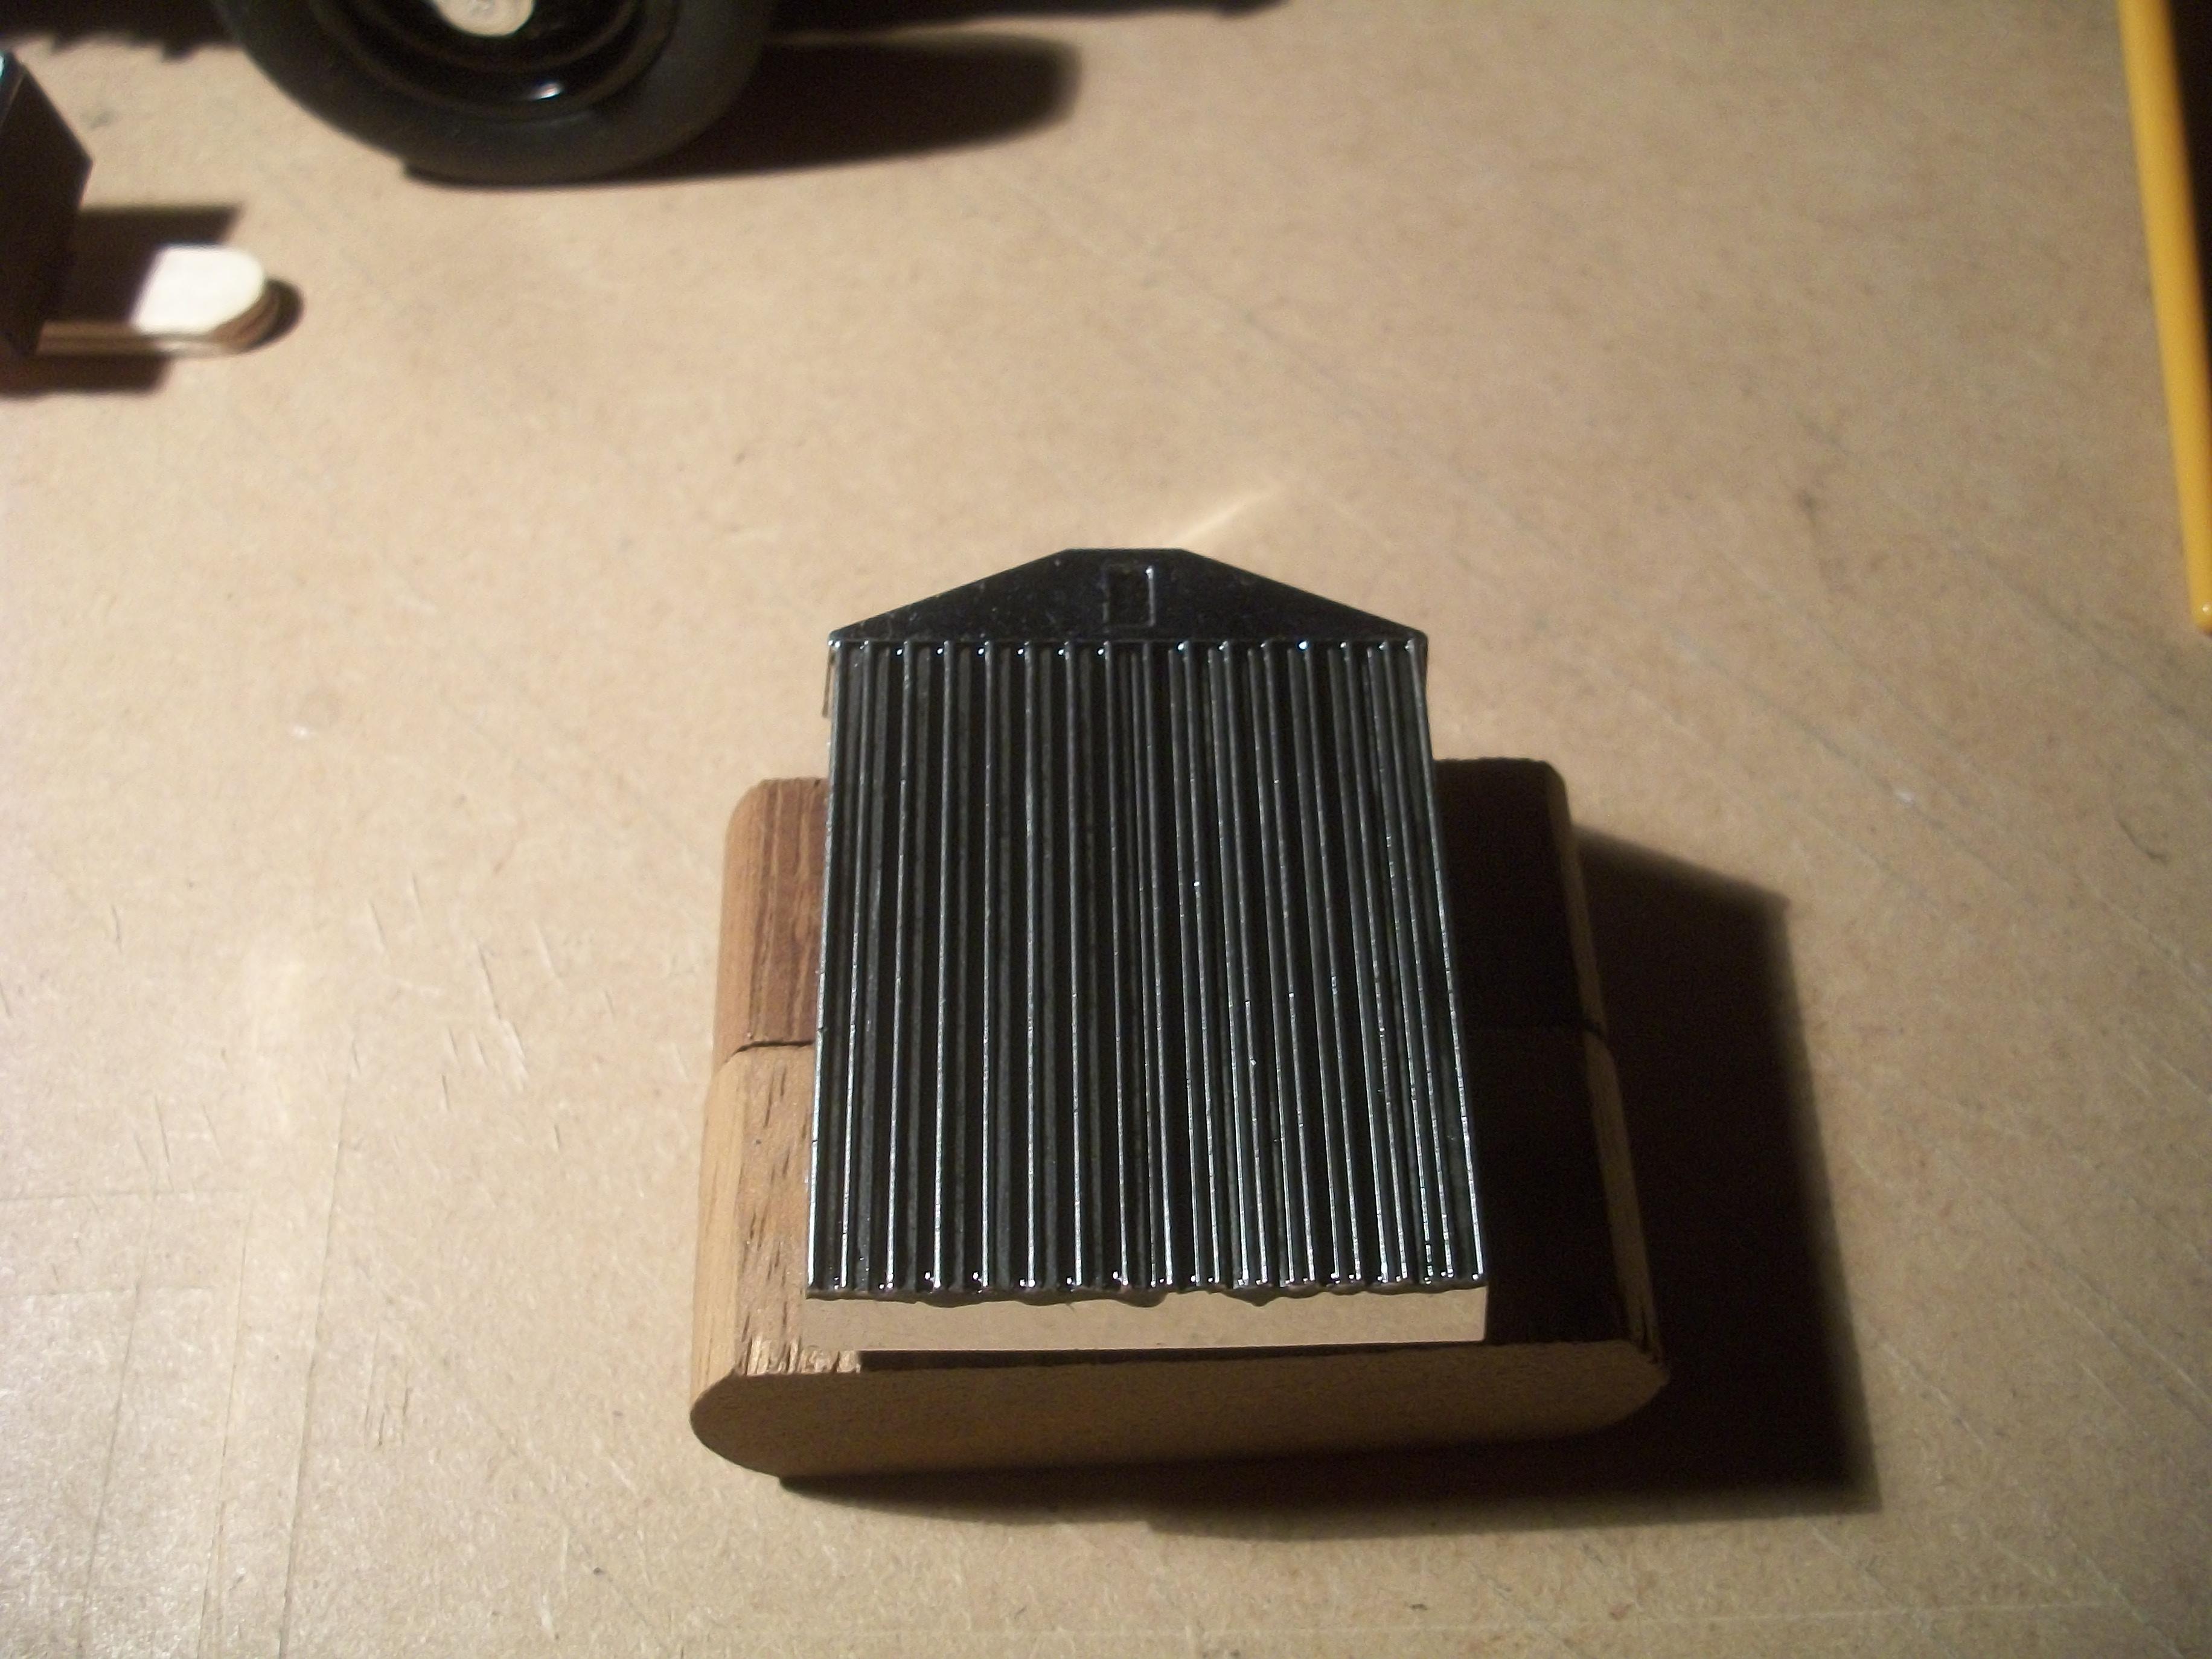
Yesterday I produced four hand drawn hinges for the two suitcases. Initially, the intention was to paint the hinges with gold enamel, but then It was decided that gold Sharpie was a better option . . . Once the gold hinges (brass) had been cut from the thin card with a scalpel knife, these were mounted on the upper section of the cases, using super glue. Having cut out a luggage label from paper, 7 mm x 3 mm, the top corners were cut off at an angle and a black dot represents the hole for the string. White cotton will be used for the string . . . Today, the black enamel wash was applied to both suitcases, and also the chrome slats area of the radiator grille . . . Using some pointed cotton buds the idea was to wipe the black enamel wash from the chrome slats that are open, leaving the black spaces in between the slats . . . Some reference photos show the Phantom III radiator grille fully closed, while others show half the slats open and half of them closed, and some show the slats fully open. The fully open aspect is the one that I prefer, so this model car has all the slats in the open position, with black spaces in between . . . David
-
That is a very nice build David, even before you add the stripes and the numbers . . . The sun roof is particularly good, also the window mouldings, the lights, the rear louvres. the wheels and the tyres and the paint finish. The thought crossed my mind that at this point, you could decide to make this a standard V.W. beetle, and not make this model into a ' Herbie ' love bug . . . That would be a difficult decision for you I would imagine ! David
-
I like the term ' ' FrankenBeetle ', which conveys the process that you were explaining ! I haven't read the book ' Small Wonder ' but I shall keep an eye out for it . . . We have a very good bookshop in our village, and that would be just the sort of book that you might find there. David
-
1:16 Gunze Sangyo 1937 Rolls-Royce Phantom III Sports Saloon
Anglia105E replied to Anglia105E's topic in WIP: Model Cars
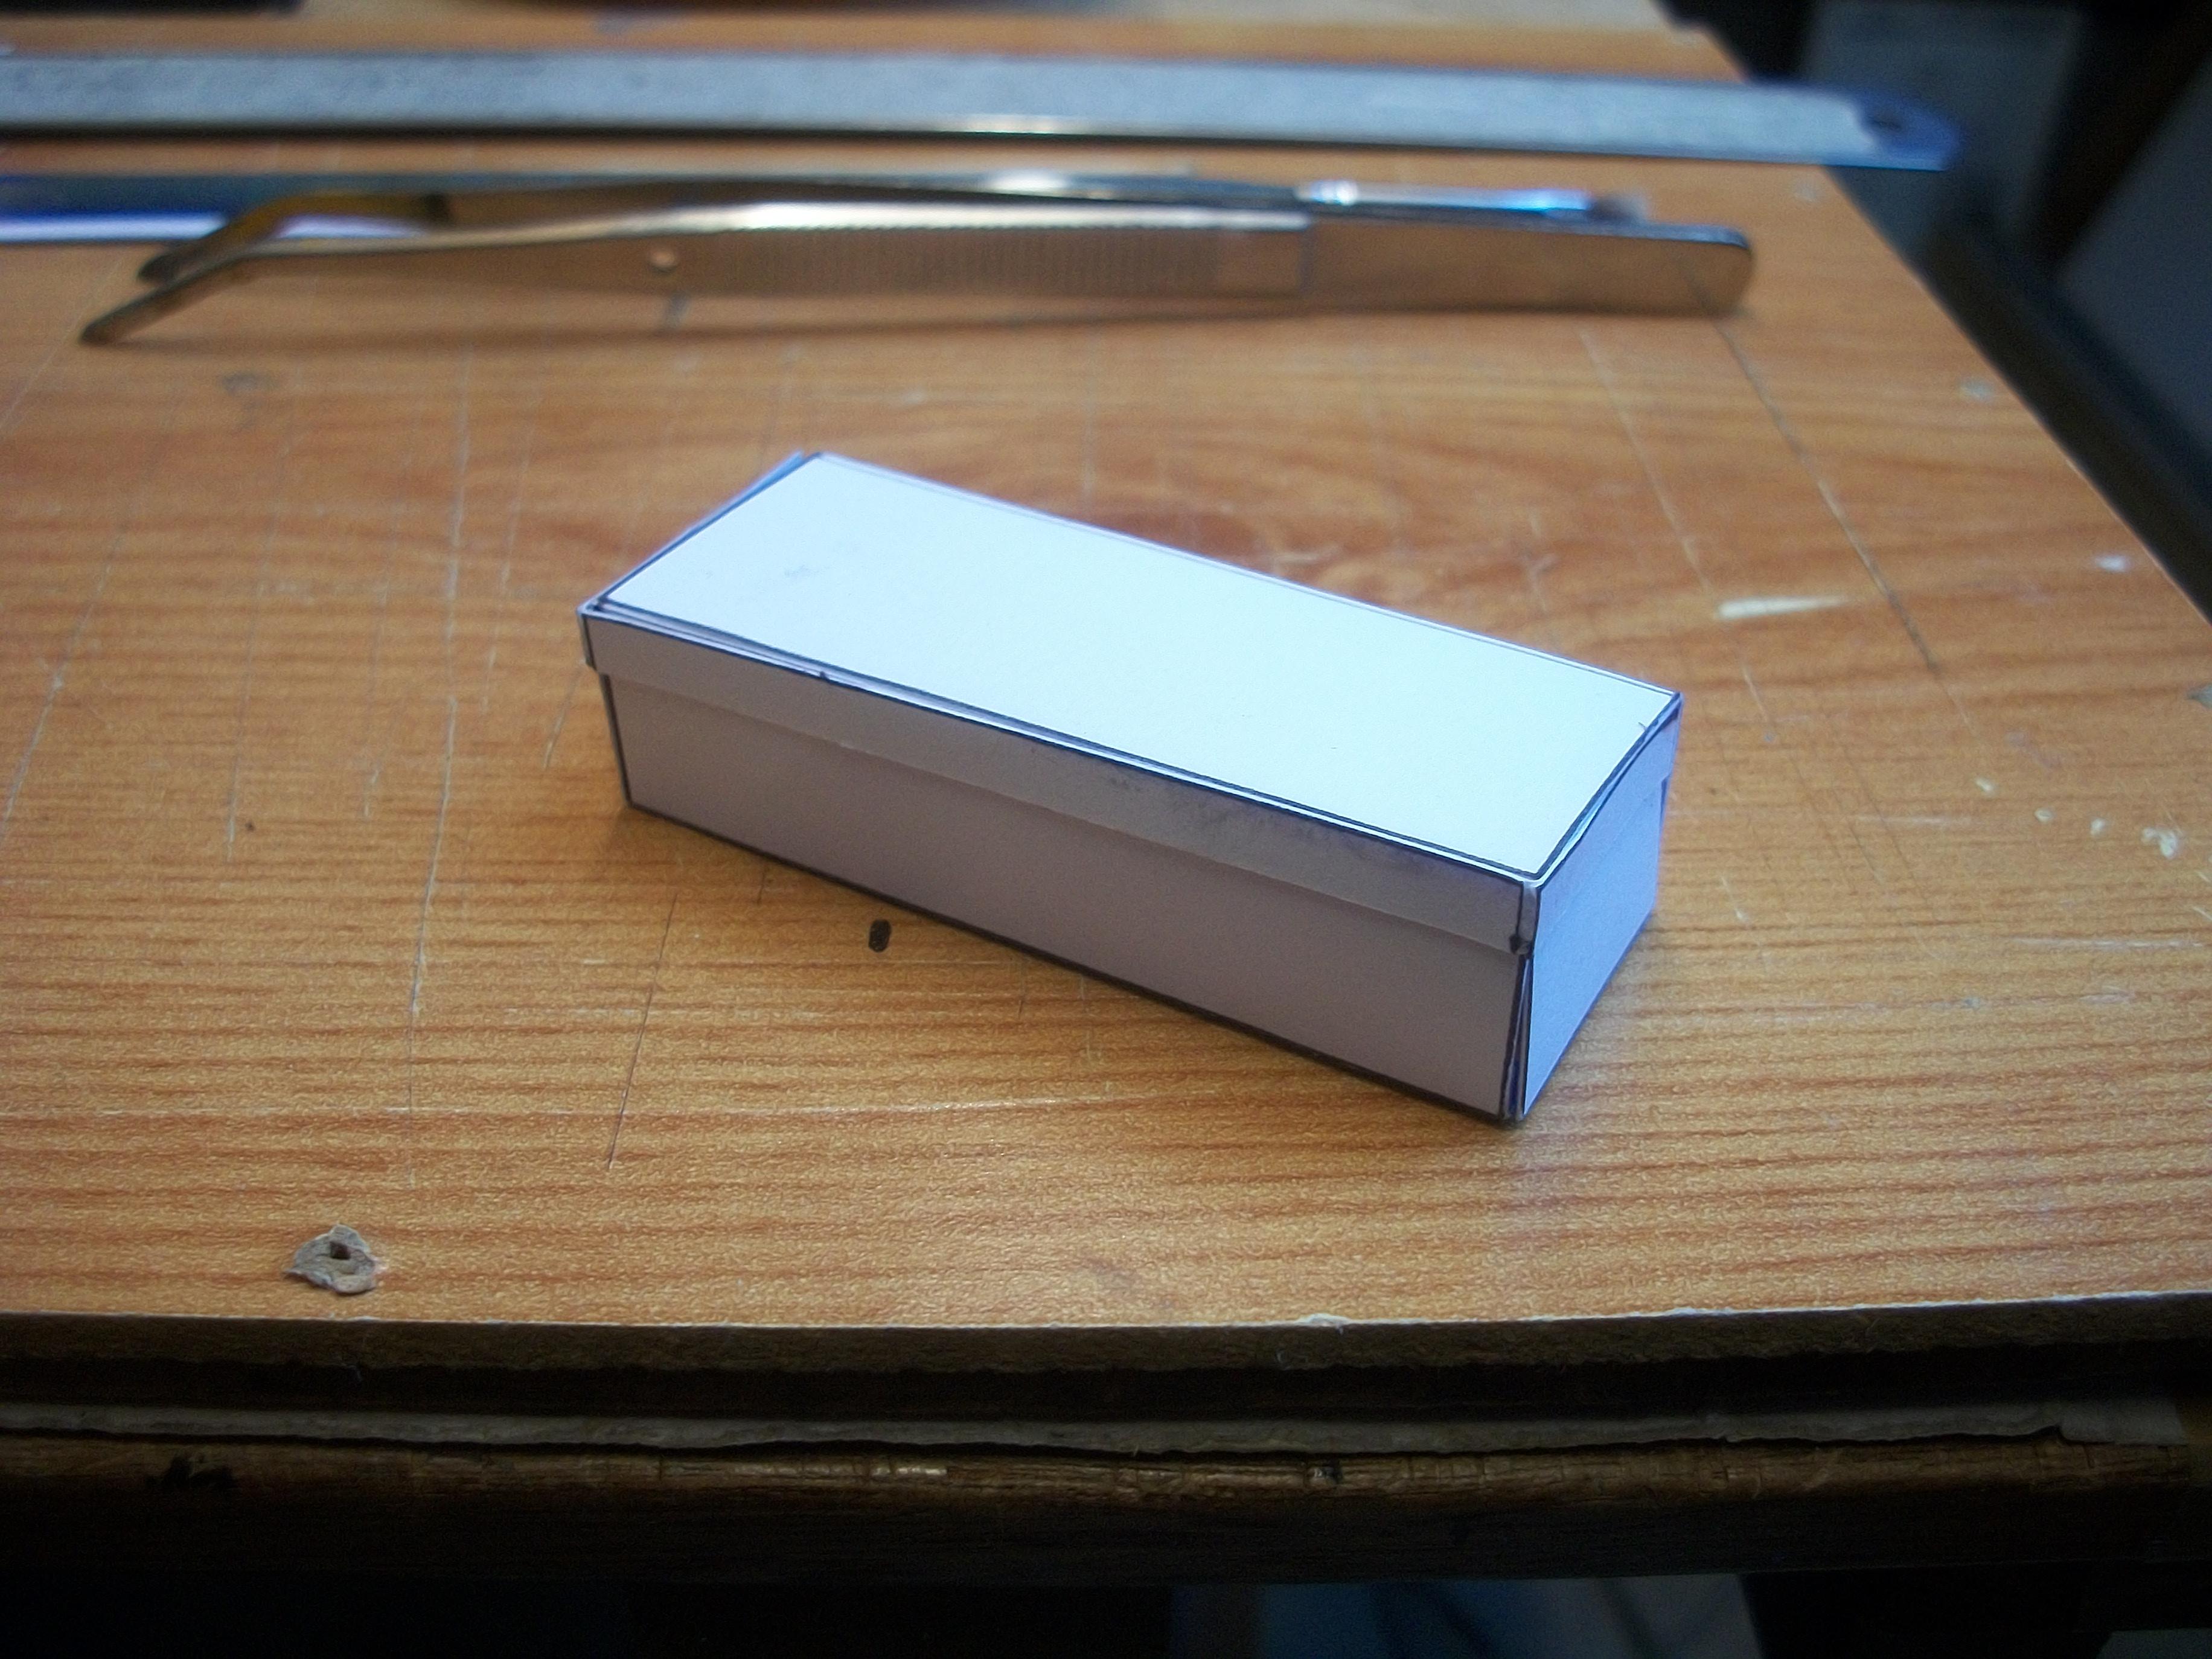
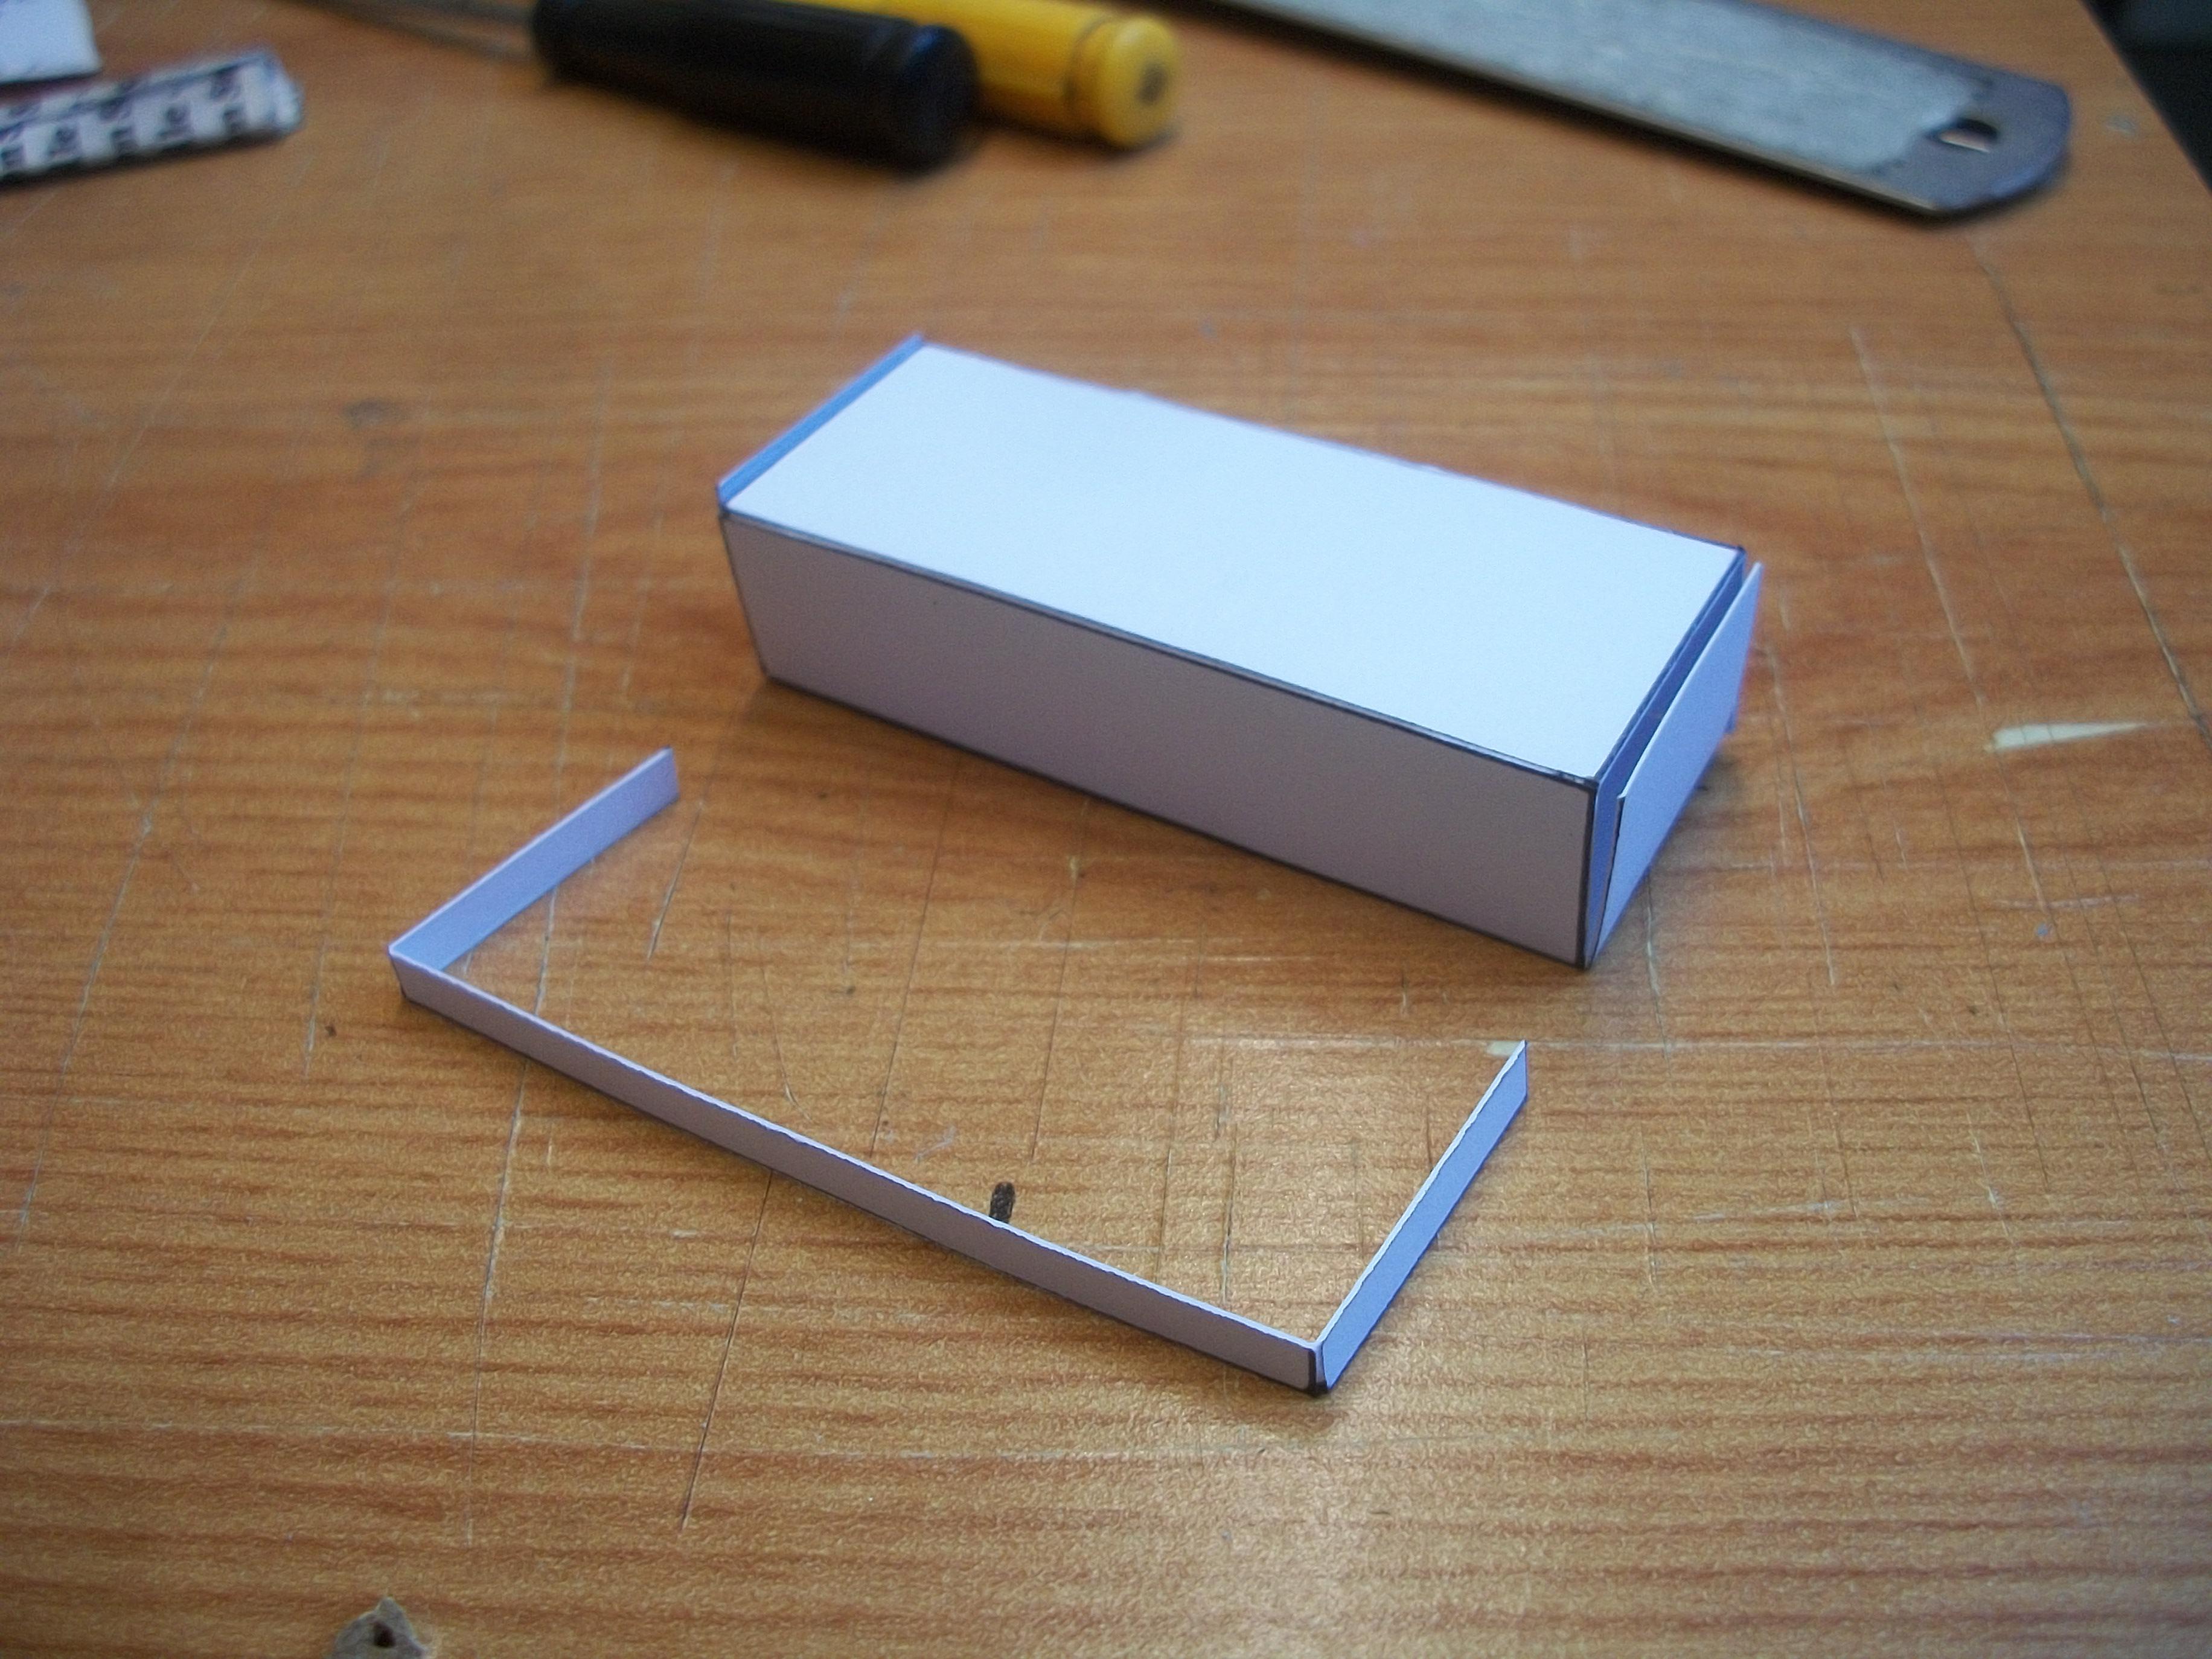
Today was all about reducing the depth of the upper suitcase of the two cases, to enable the boot lid to close fully . . . I fabricated two handles for these cases, by crimping the ends of a short piece of red rubber piping, and super glue was applied inside the end of each tube to keep the shape. Then the top suitcase was cut down by 8 mm in depth, and glued back together as a box shape . . . both of the handles were glued to the each of the suitcases, and having checked that the cases fitted nicely into the luggage bay, the Humbrol Matt Brown 186 enamel paint was applied in a single coat. Once the matt brown paint has been allowed to dry overnight, there will follow a coating of black enamel wash for the cases, and a final coating of Humbrol Satin Cote . . . The plan is to add a couple of brass hinges to each case, along with ' A. J. W. ' monograms hand painted in gold enamel, and possibly a destination label tag hanging from the handle on a string . . . David
-
1:16 Gunze Sangyo 1937 Rolls-Royce Phantom III Sports Saloon
Anglia105E replied to Anglia105E's topic in WIP: Model Cars
I forgot to answer your question regarding the bent door pillar . . . I assume this is due to the age of the kit, and certainly not an engineering feature ! David -
1:16 Gunze Sangyo 1937 Rolls-Royce Phantom III Sports Saloon
Anglia105E replied to Anglia105E's topic in WIP: Model Cars
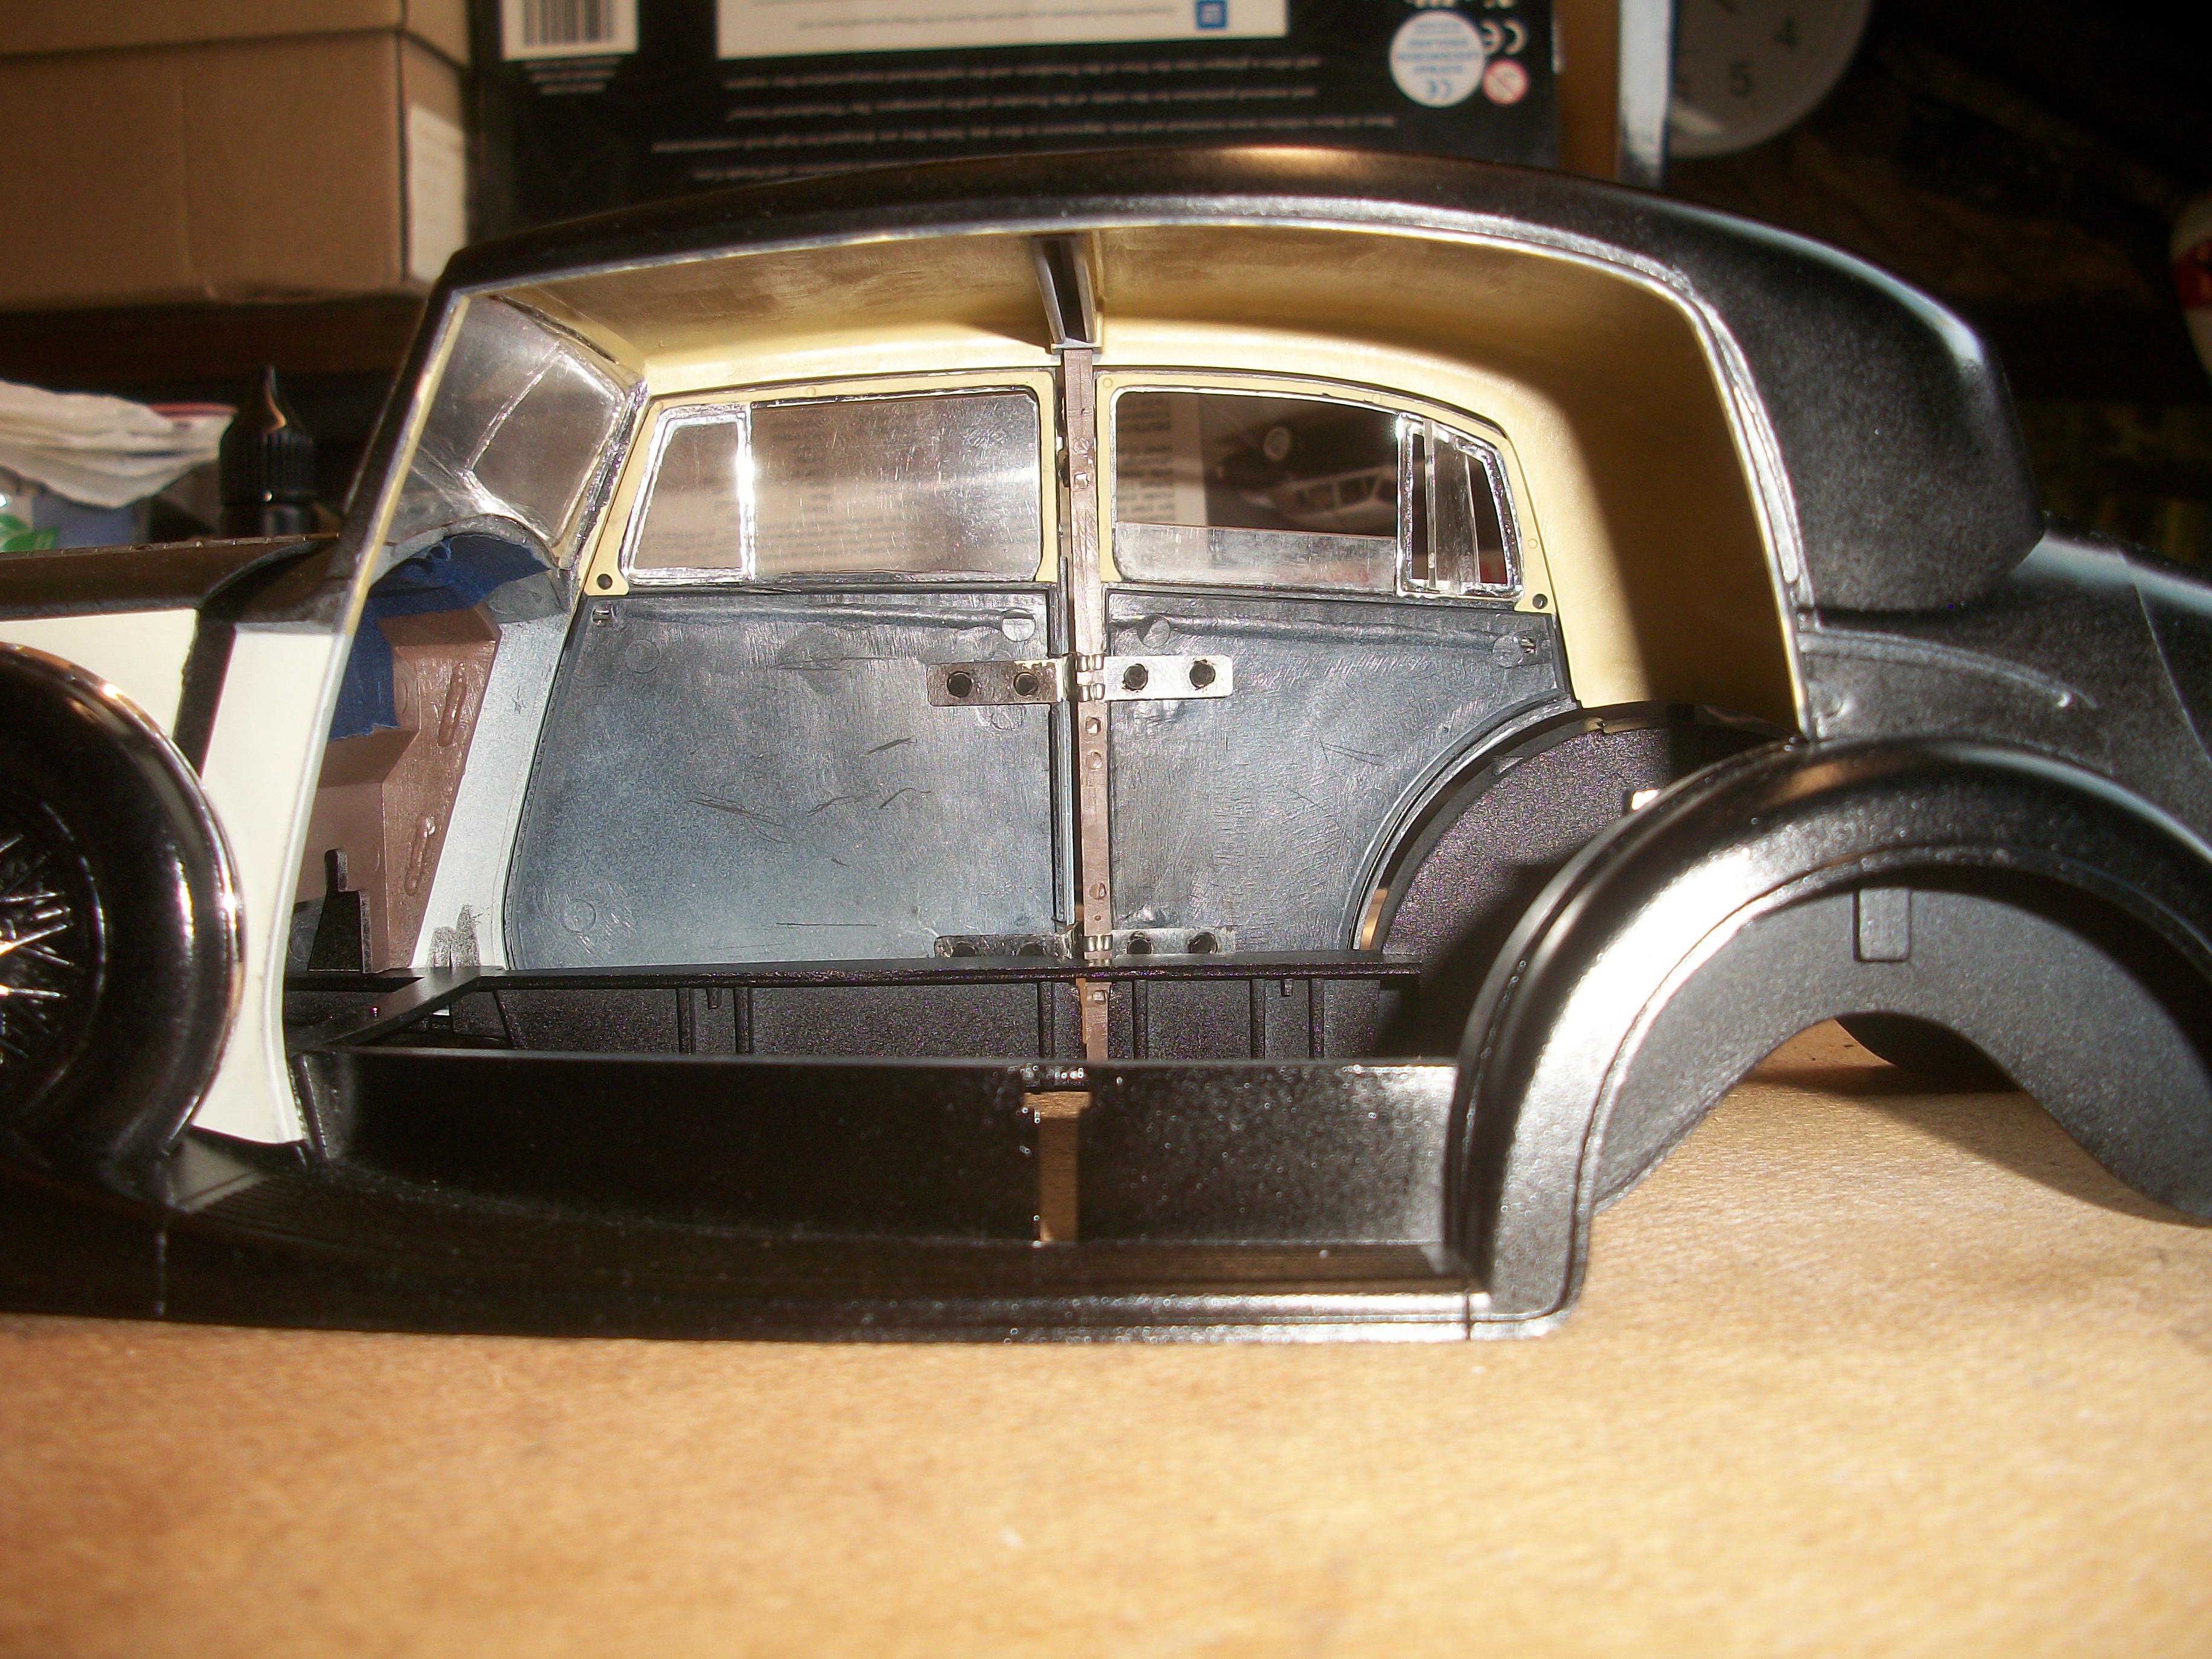
You are right there David . . . When the time comes to actually fit this door post assembly, I shall need three hands, numerous plastic clamps, pegs, probably lengths of tape, numerous wooden blocks and a huge amount of good luck . . . The test fitting was difficult enough, but the final assembly will require five or six main assemblies coming together at the same instance. This will be the one stage of the build that is not made at all clear in the Gunze Sangyo instruction sheet, as they seem to think that the one big assembly stage is broken down into separate smaller stages at different intervals . . . Myself, I can clearly see that such a method of assembly is simply not possible ! This is why I shall wait until after I return from my arranged holiday trip in May, before attempting the ' BIG ' one . . . David -
Your extensive work on the trunk insert has paid off David . . . That most recent photo showing the open trunk lid shows what a really good V.W. beetle this has turned out to be. I used to own and drive a 1960 V.W. beetle that had 6 volt electrics, and I always thought it was a good idea to have the spare wheel and tyre in the front trunk, to balance out the car with the engine in the rear . . . David
-
1:16 Gunze Sangyo 1937 Rolls-Royce Phantom III Sports Saloon
Anglia105E replied to Anglia105E's topic in WIP: Model Cars
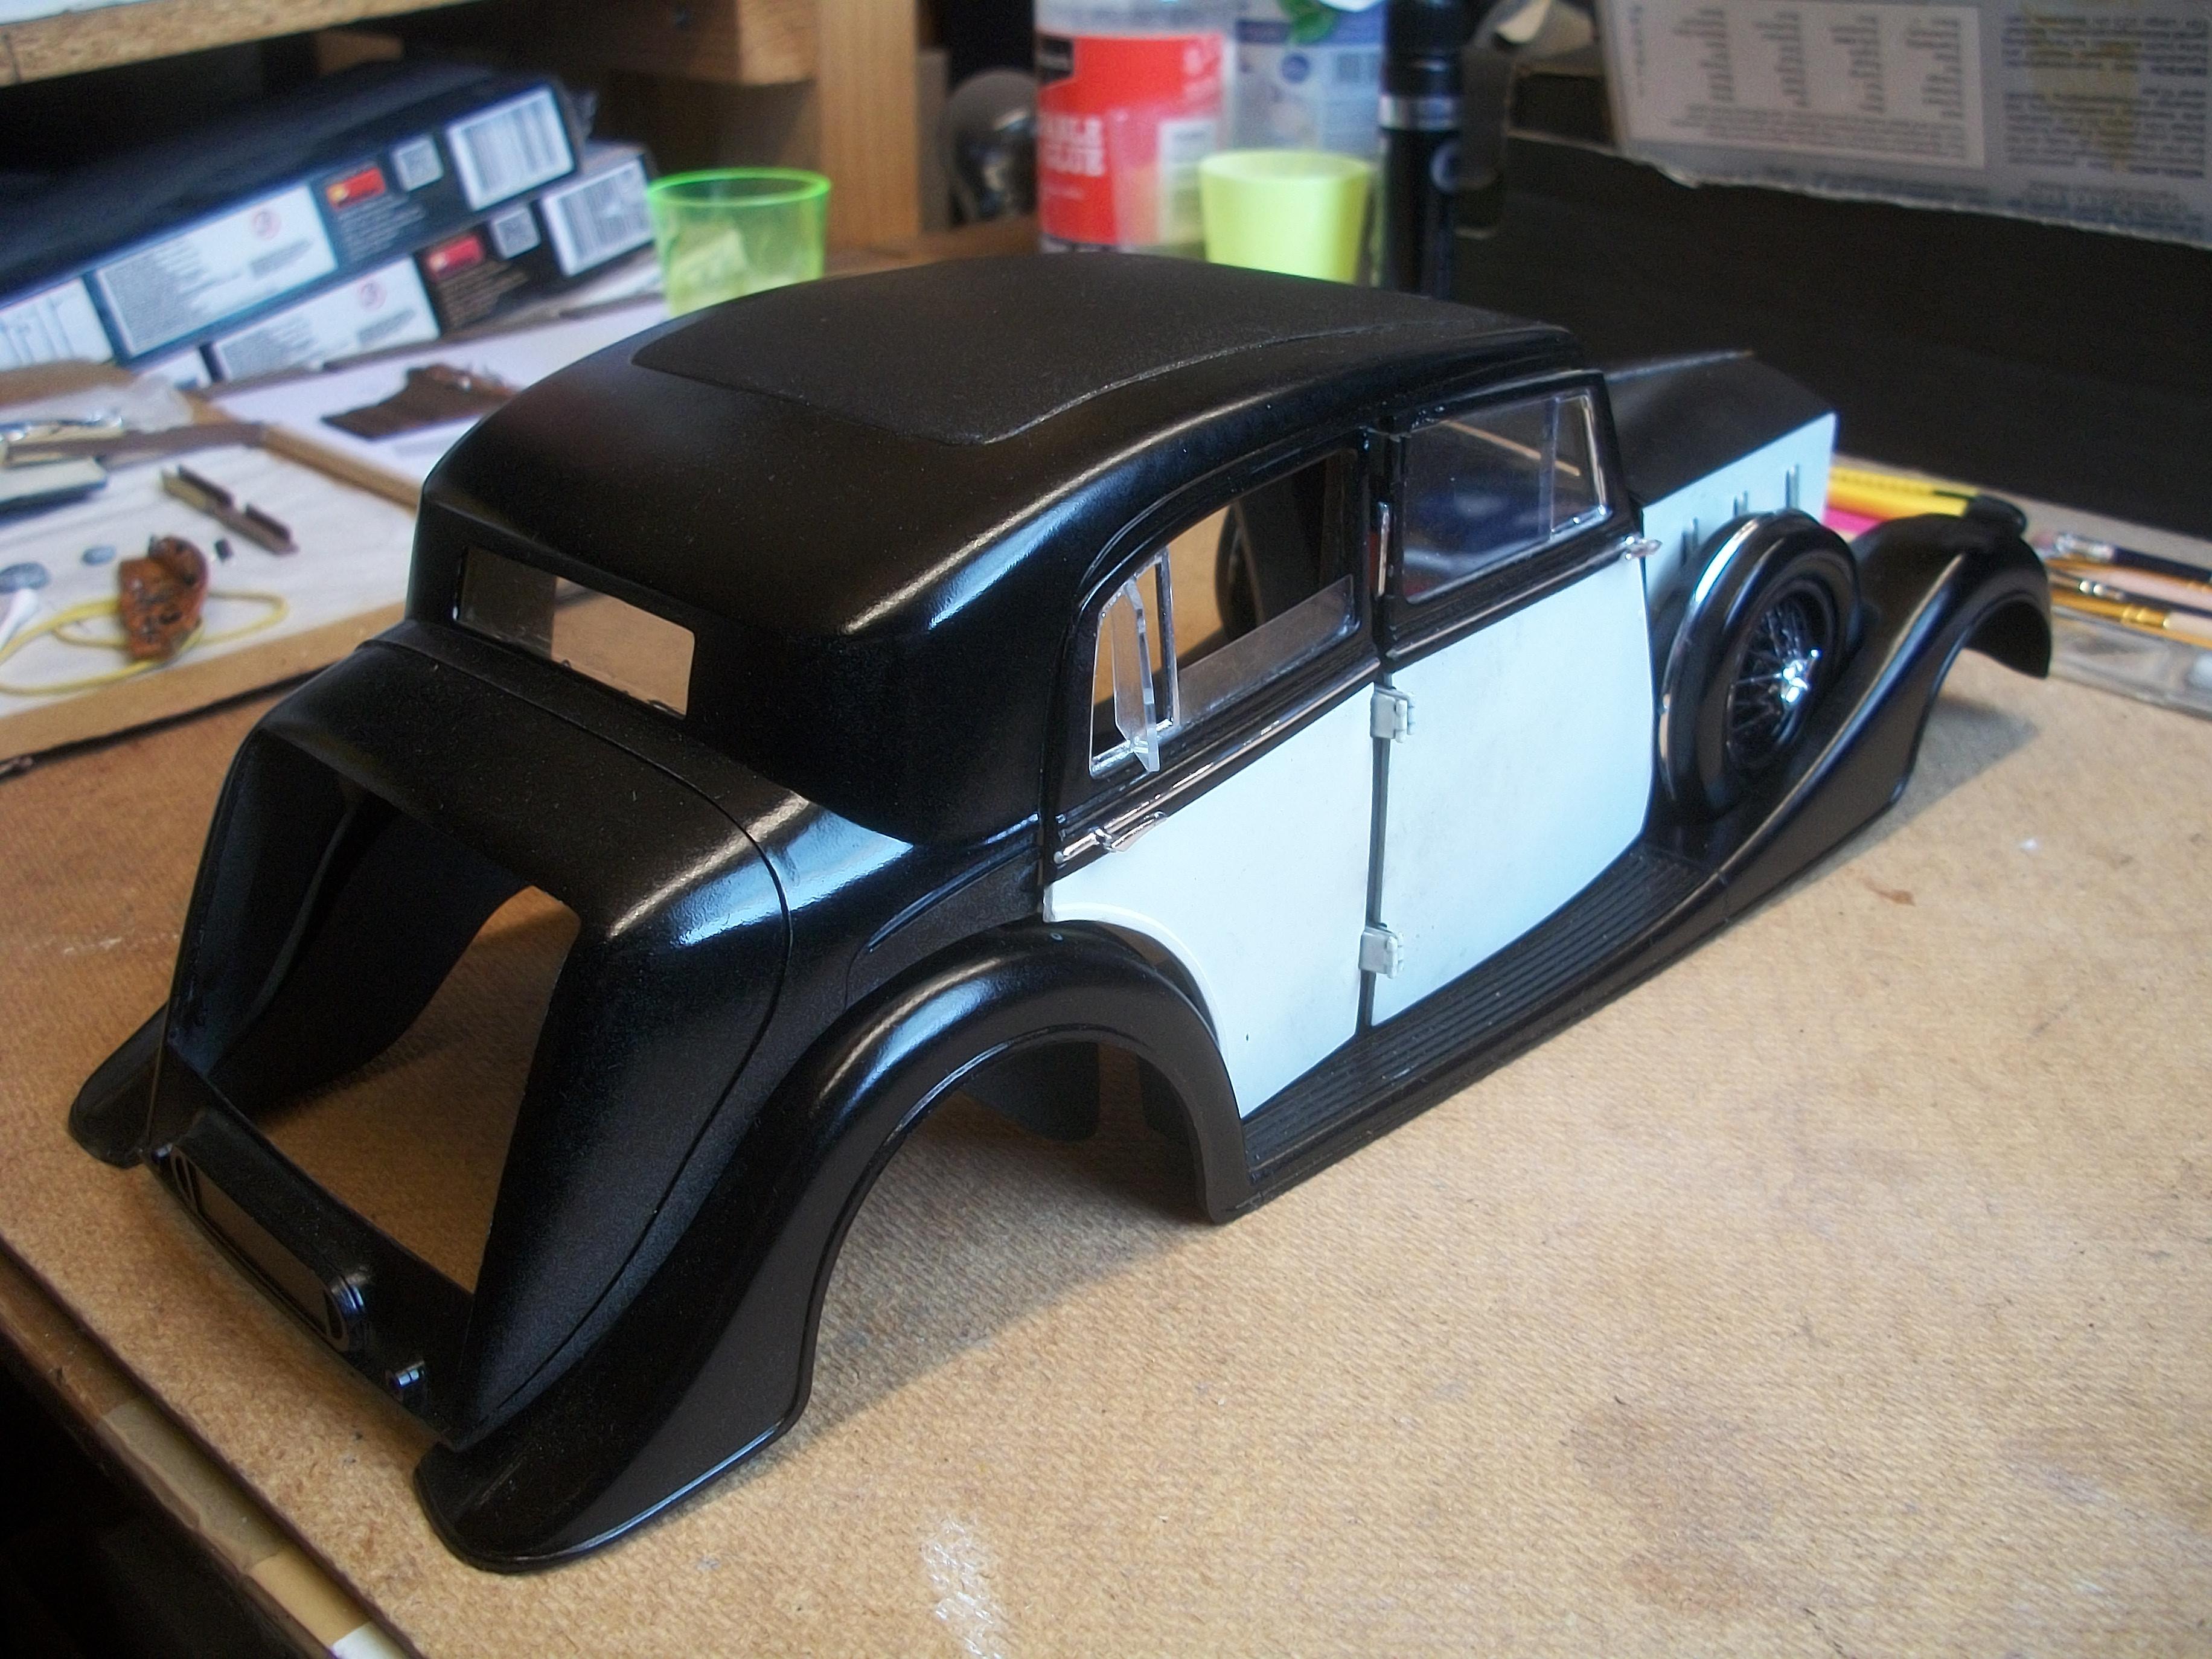
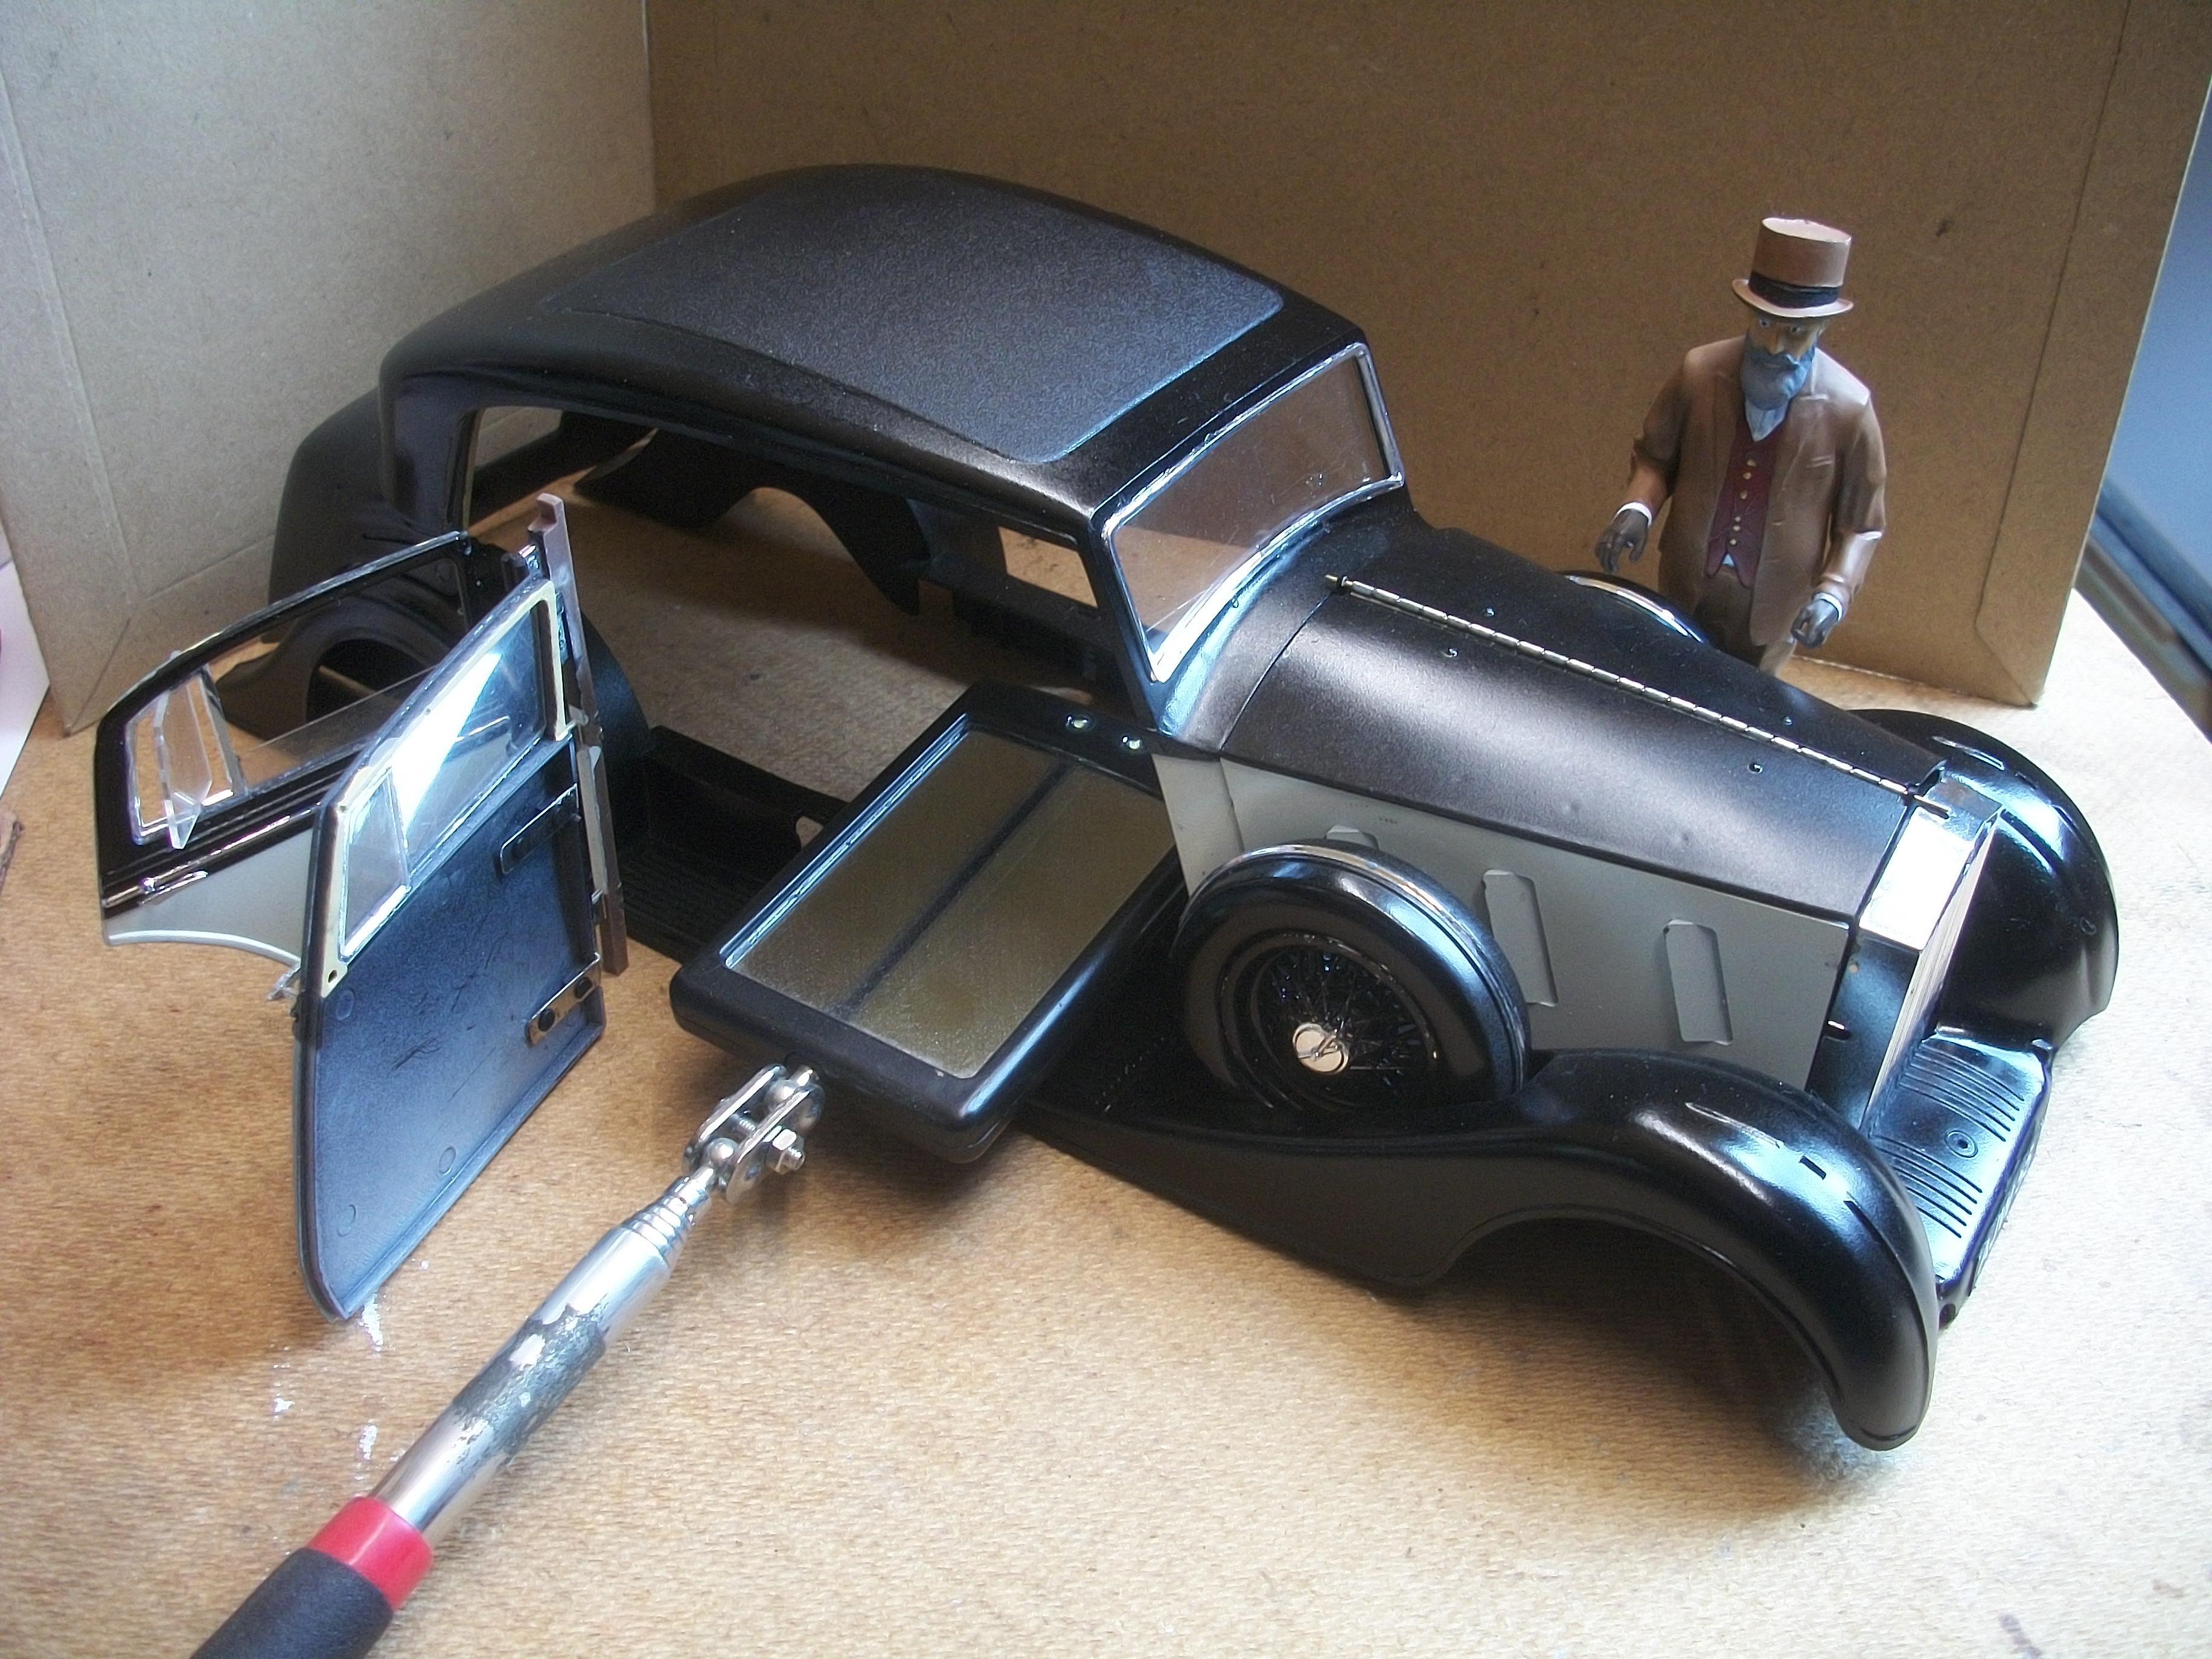
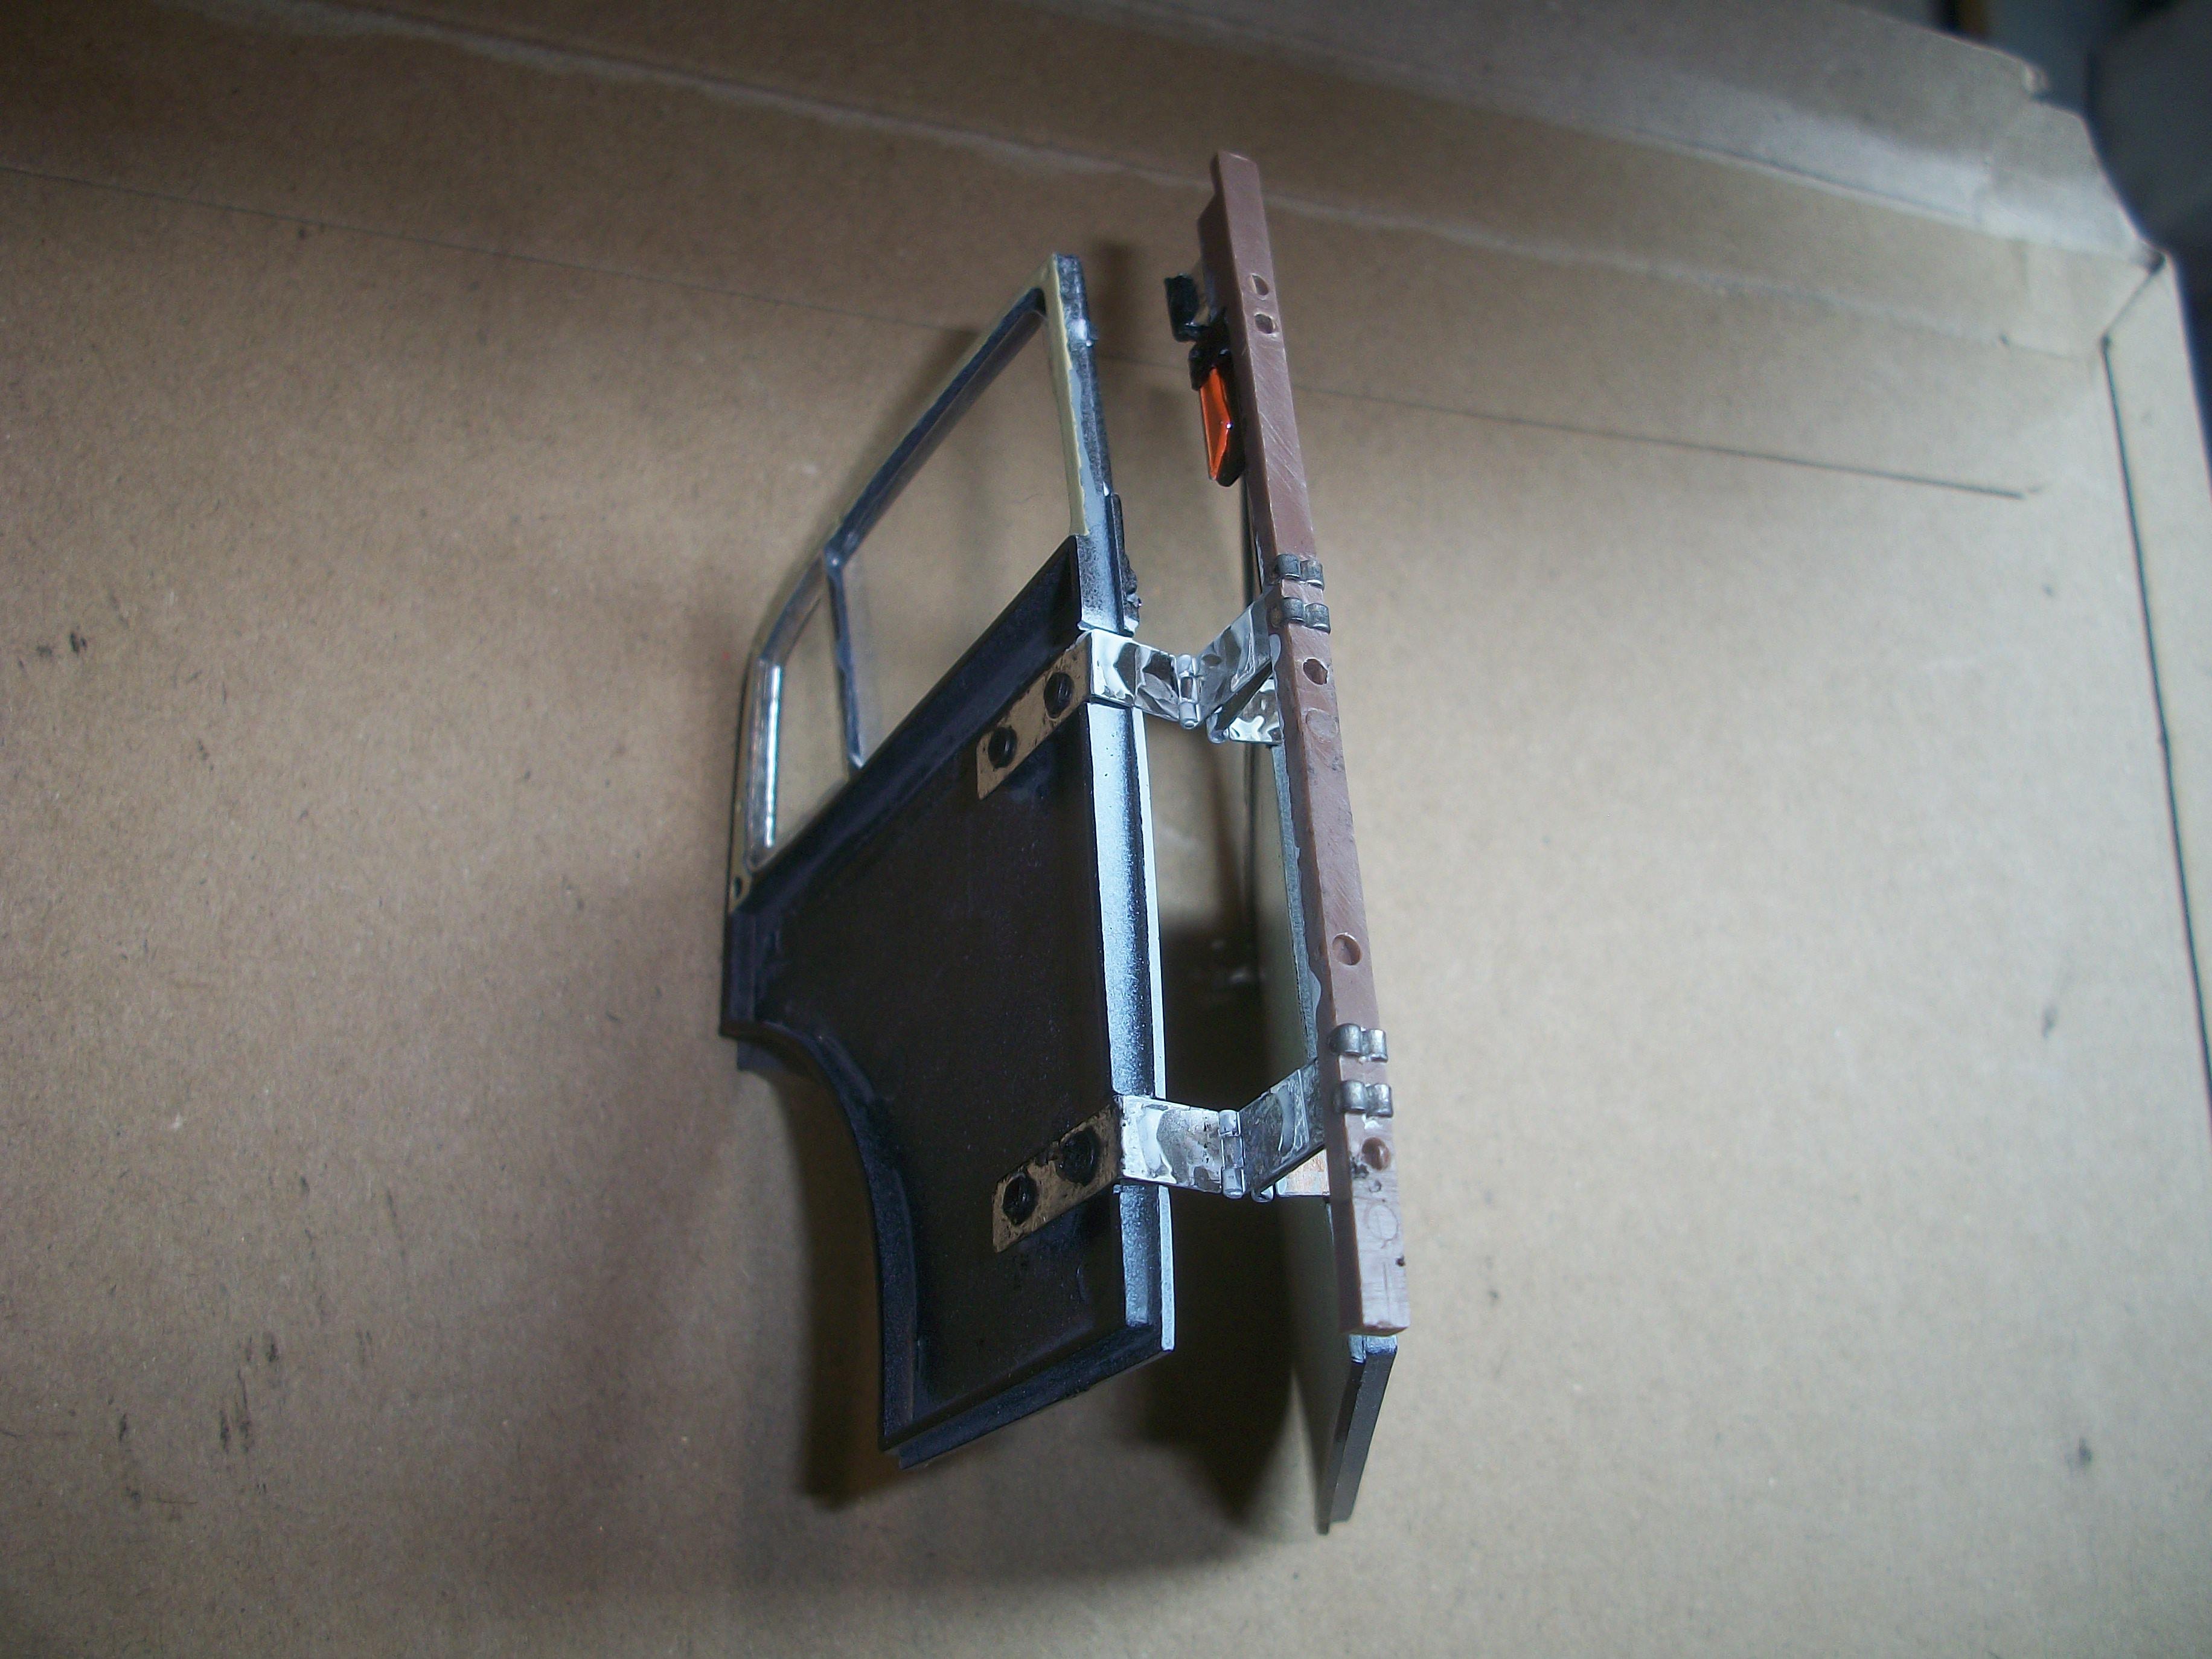
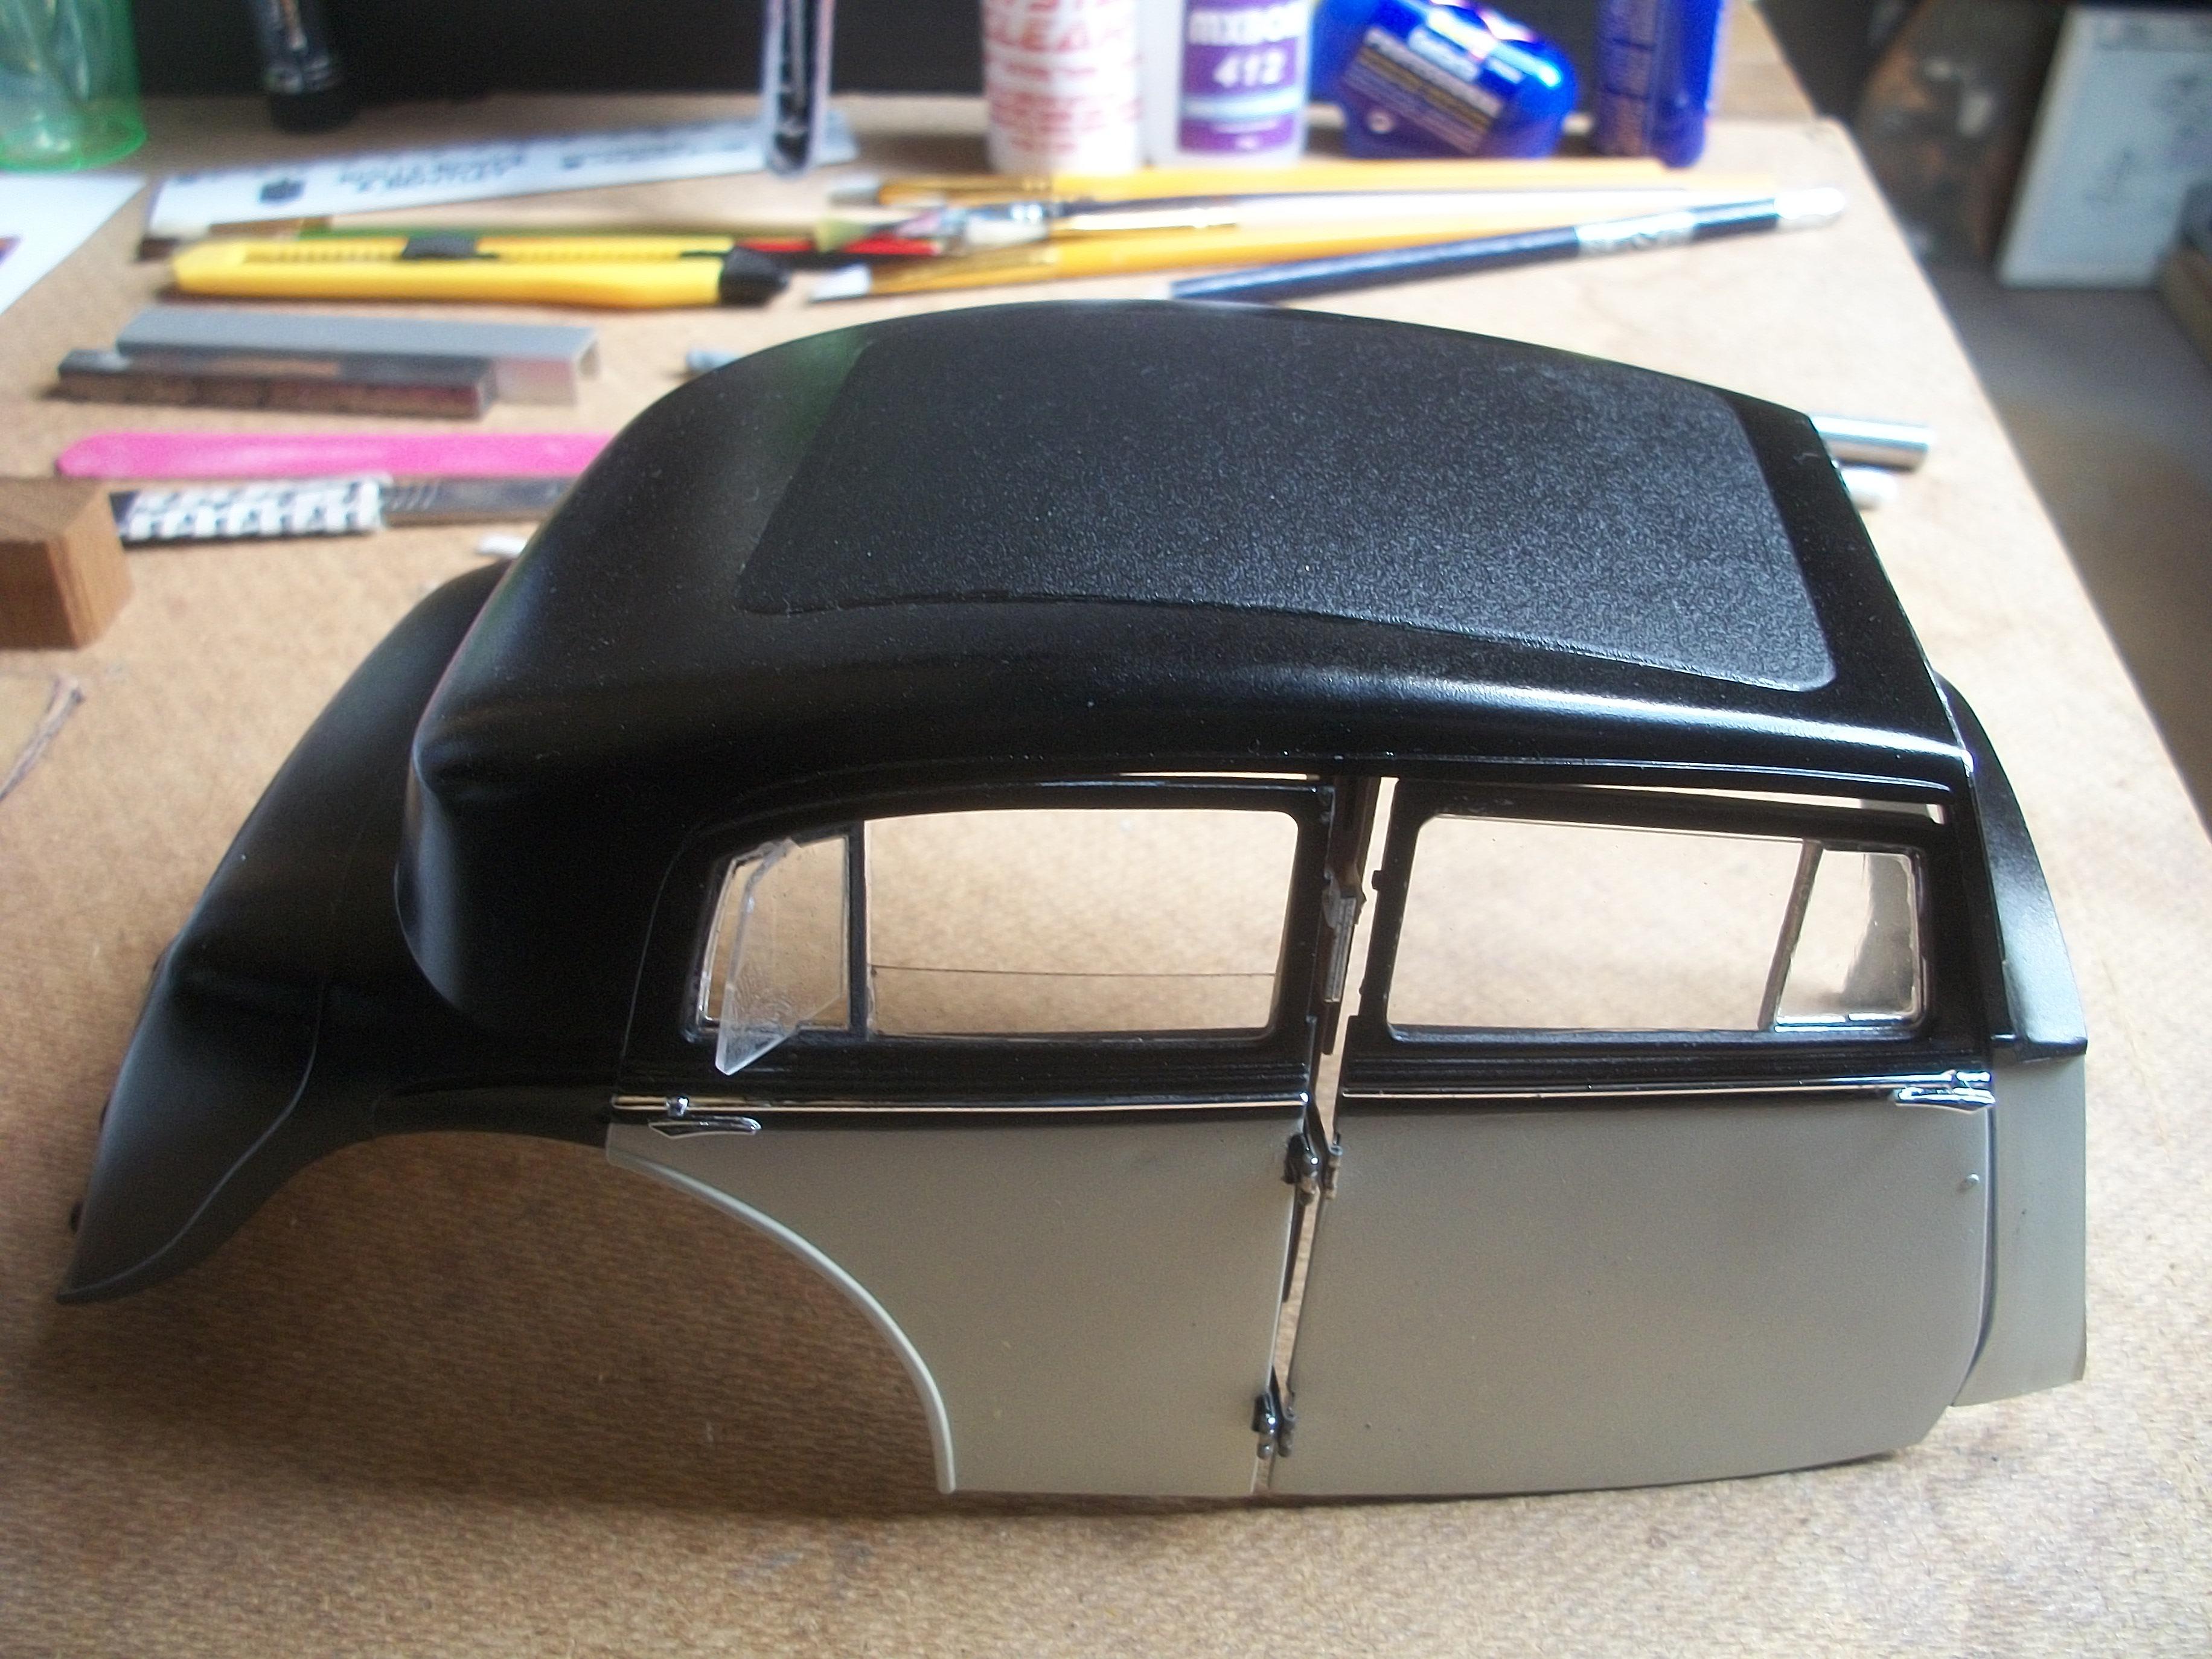
Having used a black Sharpie on the outer edges of the two number plates, the front plate was mounted on the front of the lower body, attached by a single Bostik glue dot . . .These number plates will probably be brushed with Satin Cote enamel wash at some point. Now it was time to test fit the driver's side outer door pillar and doors assembly. A weight was placed on top of the roof, and a mirror was placed on the floor of the car . . . The top end of the pillar and doors assembly was then carefully inserted into the roof socket, while the foot of the pillar was inserted into the floor socket. The upper section of the driver's side outer door pillar is badly bent outwards, so for this reason alone the doors cannot yet be fully closed. Later, the outer door pillar will be glued into the inner door post and clamped, in order to straighten the pillar without breaking anything . . . The positioning of the inner door post and the outer door pillar will be critical to aligning the outer door edges with the upper body frame, in order to close both front and rear doors cleanly. David
-
1:16 Gunze Sangyo 1937 Rolls-Royce Phantom III Sports Saloon
Anglia105E replied to Anglia105E's topic in WIP: Model Cars
Yes, the London Black Cab kit is of interest to me, and more than once I have looked at the kit on Ebay and nearly purchased one . . . I did wonder why Aoshima show a red London taxi on the box art, and then describe the model as a ' London Black Cab ' ? I do have a 1:24 scale Revell version of the London black taxi, and also a 1:24 scale Welly diecast version of the model car. At the time when I purchased these, I was really wanting the older FX3 version of the taxi, and not the later FX4 version. This is because I needed the taxi to be 1958 for my diorama, which was the Hooper & Co. Coachbuilders diorama . . . I think you will enjoy building the London Black (Red) Cab because I do know that Aoshima produce nice quality kits . . . Good to hear that you are continuing to follow my Phantom III build, and I shall try to keep the topic interesting ! David -
1:16 Gunze Sangyo 1937 Rolls-Royce Phantom III Sports Saloon
Anglia105E replied to Anglia105E's topic in WIP: Model Cars
Thank you Bob for your encouraging comments, and I can appreciate that this type of model car is not everyone's ' cup of tea ', so to speak . . . I am pleased to hear that you are following my Phantom III build . . . During the coming three months this car will reach completion. David -
1:16 Gunze Sangyo 1937 Rolls-Royce Phantom III Sports Saloon
Anglia105E replied to Anglia105E's topic in WIP: Model Cars
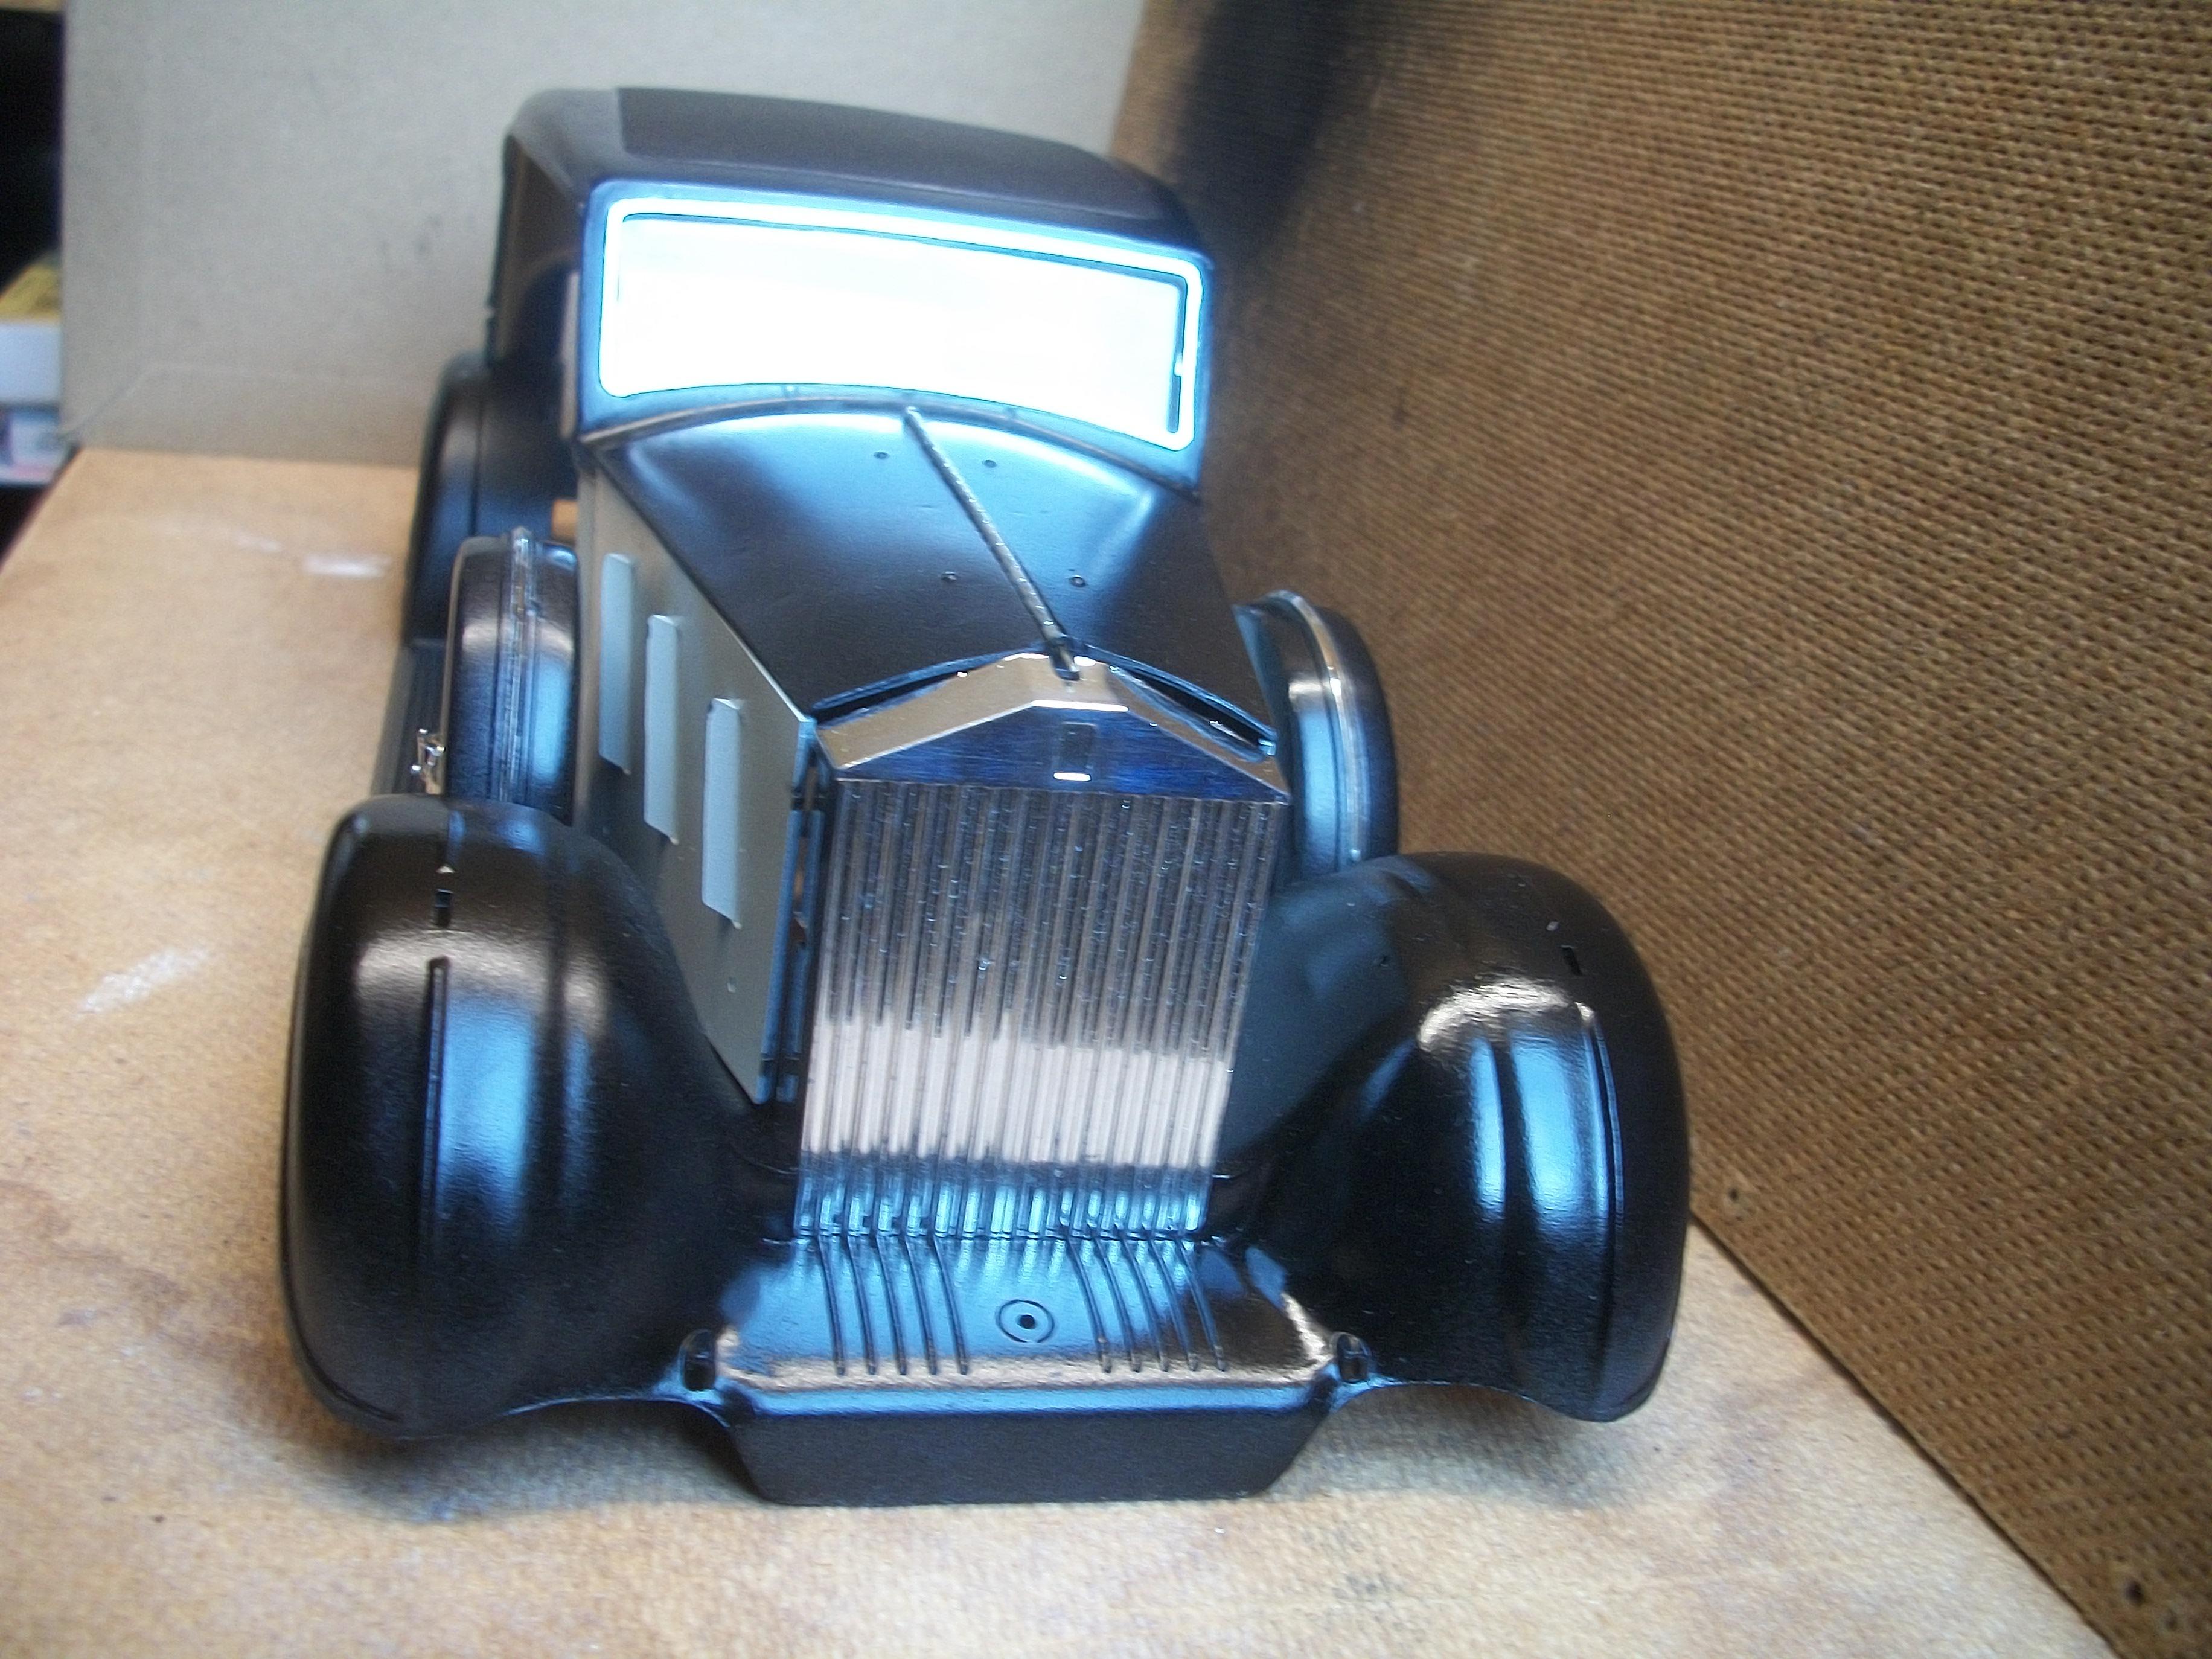
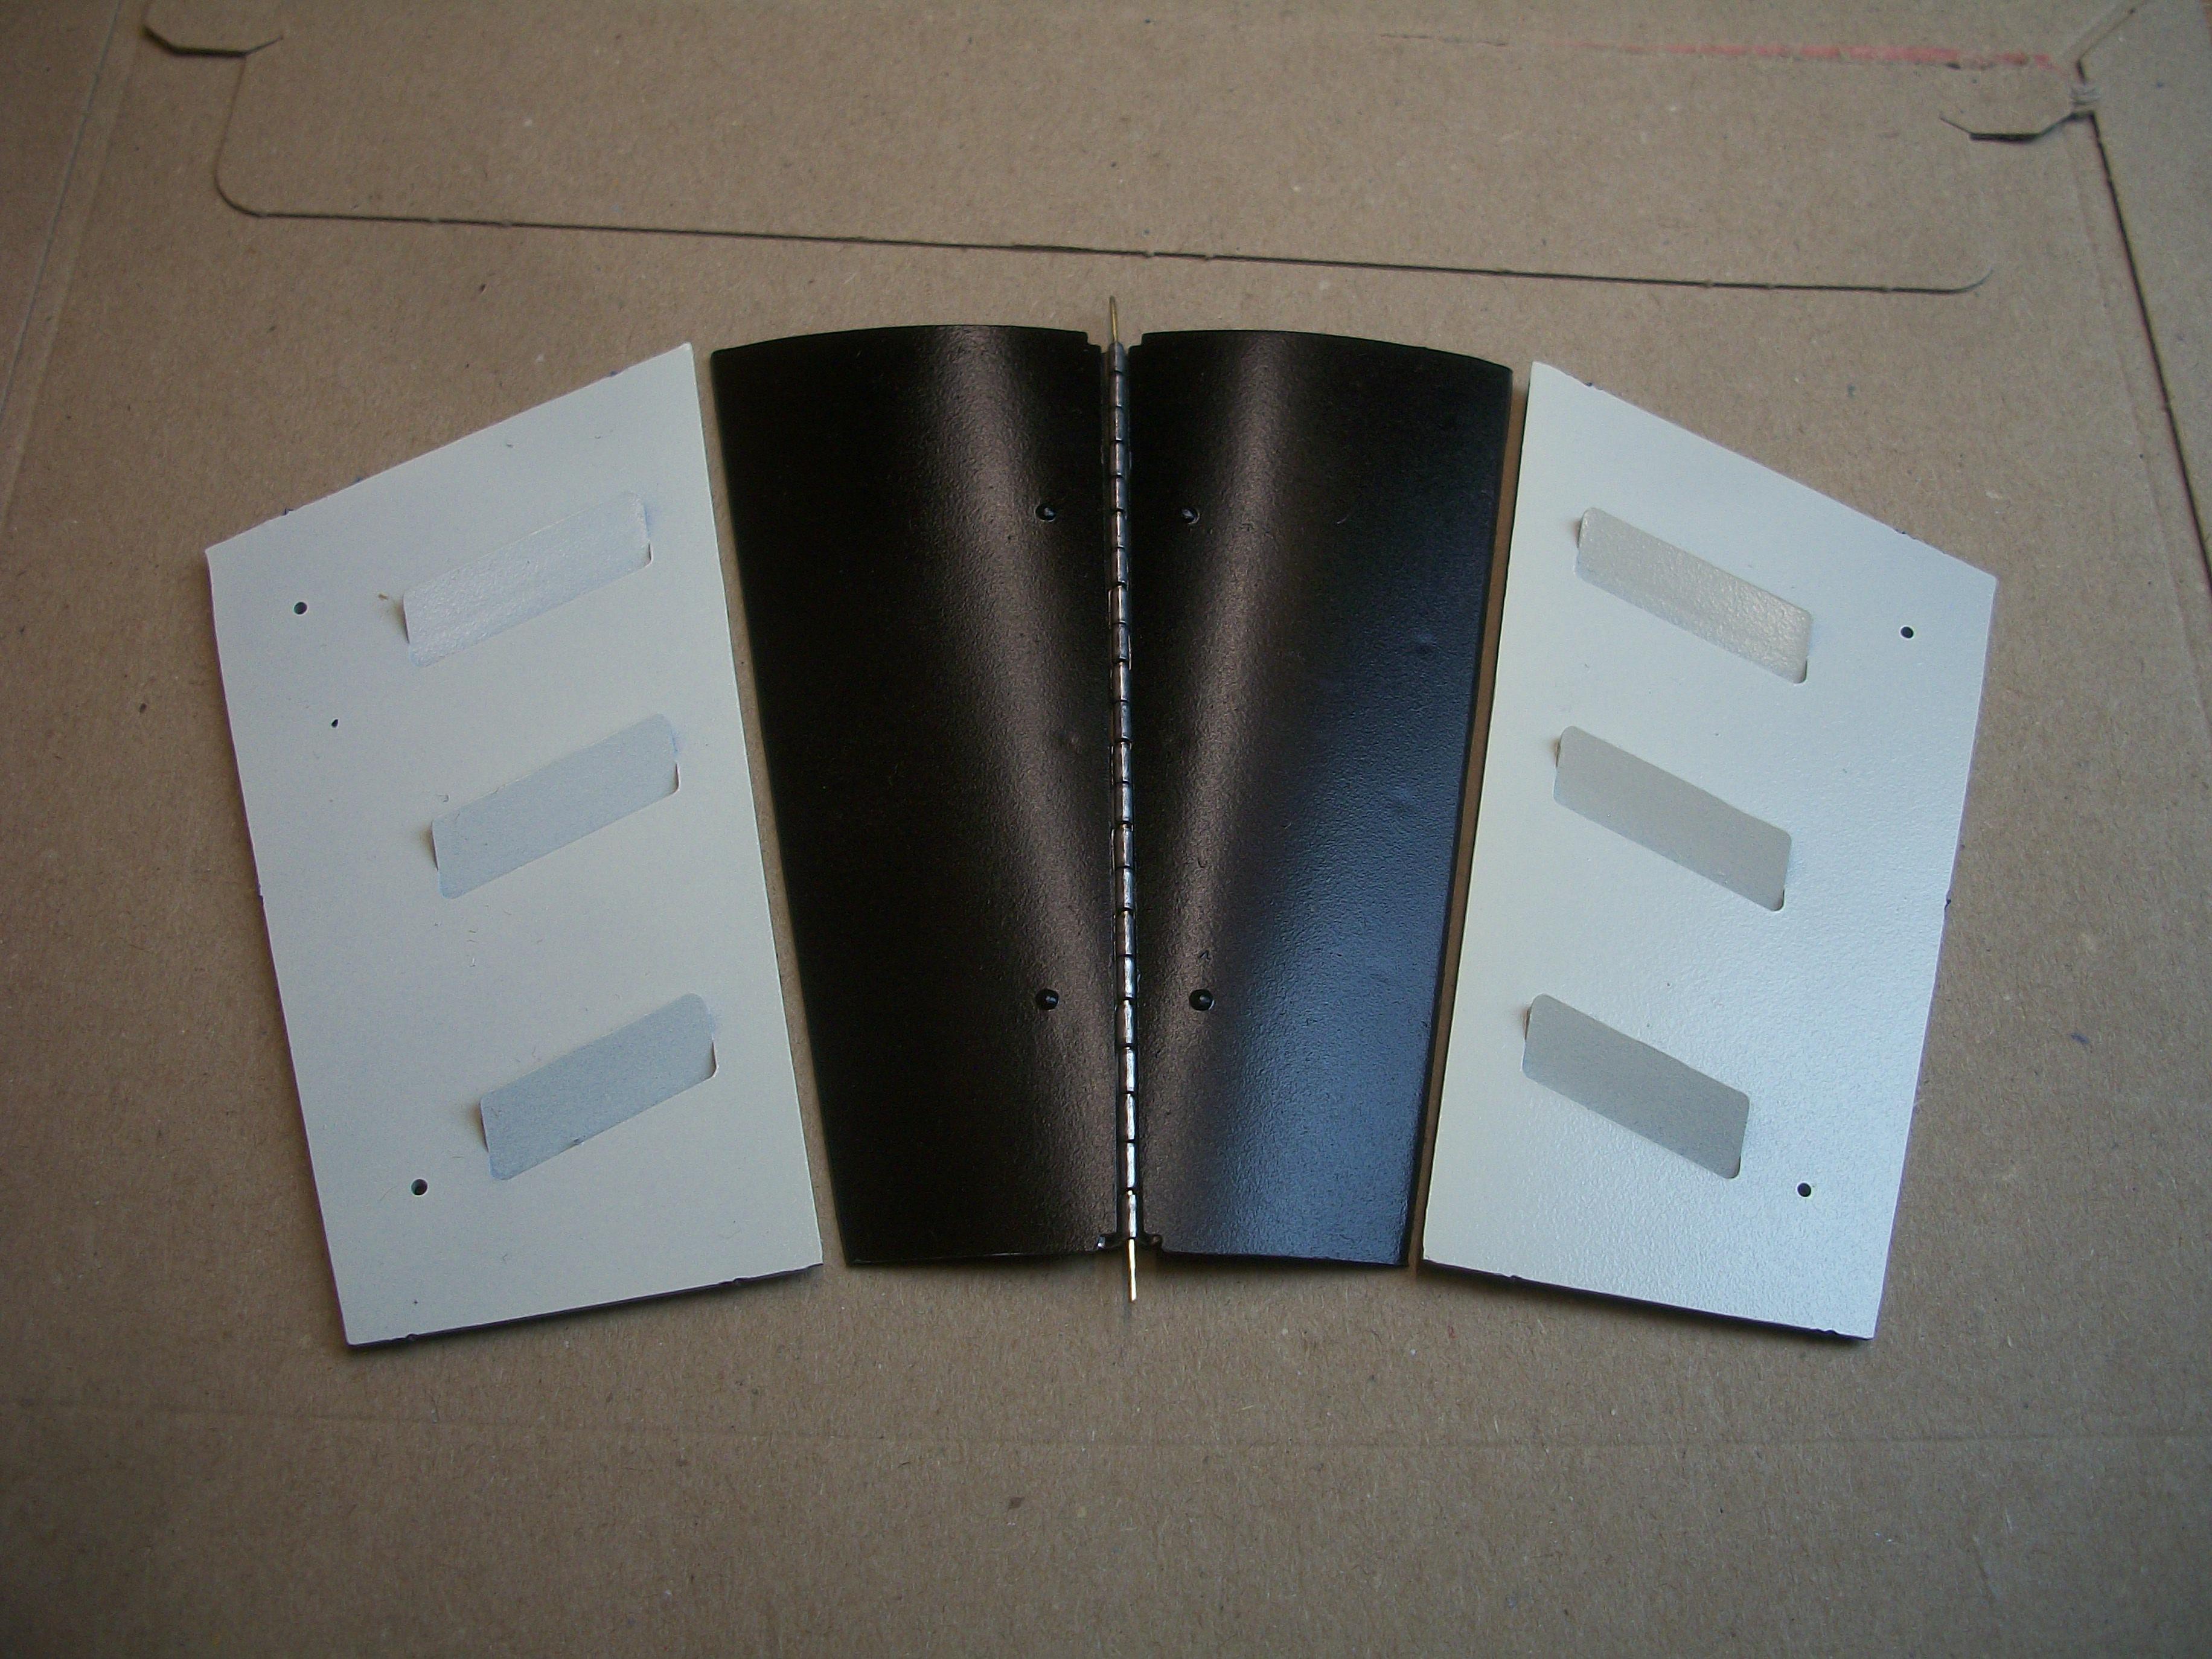
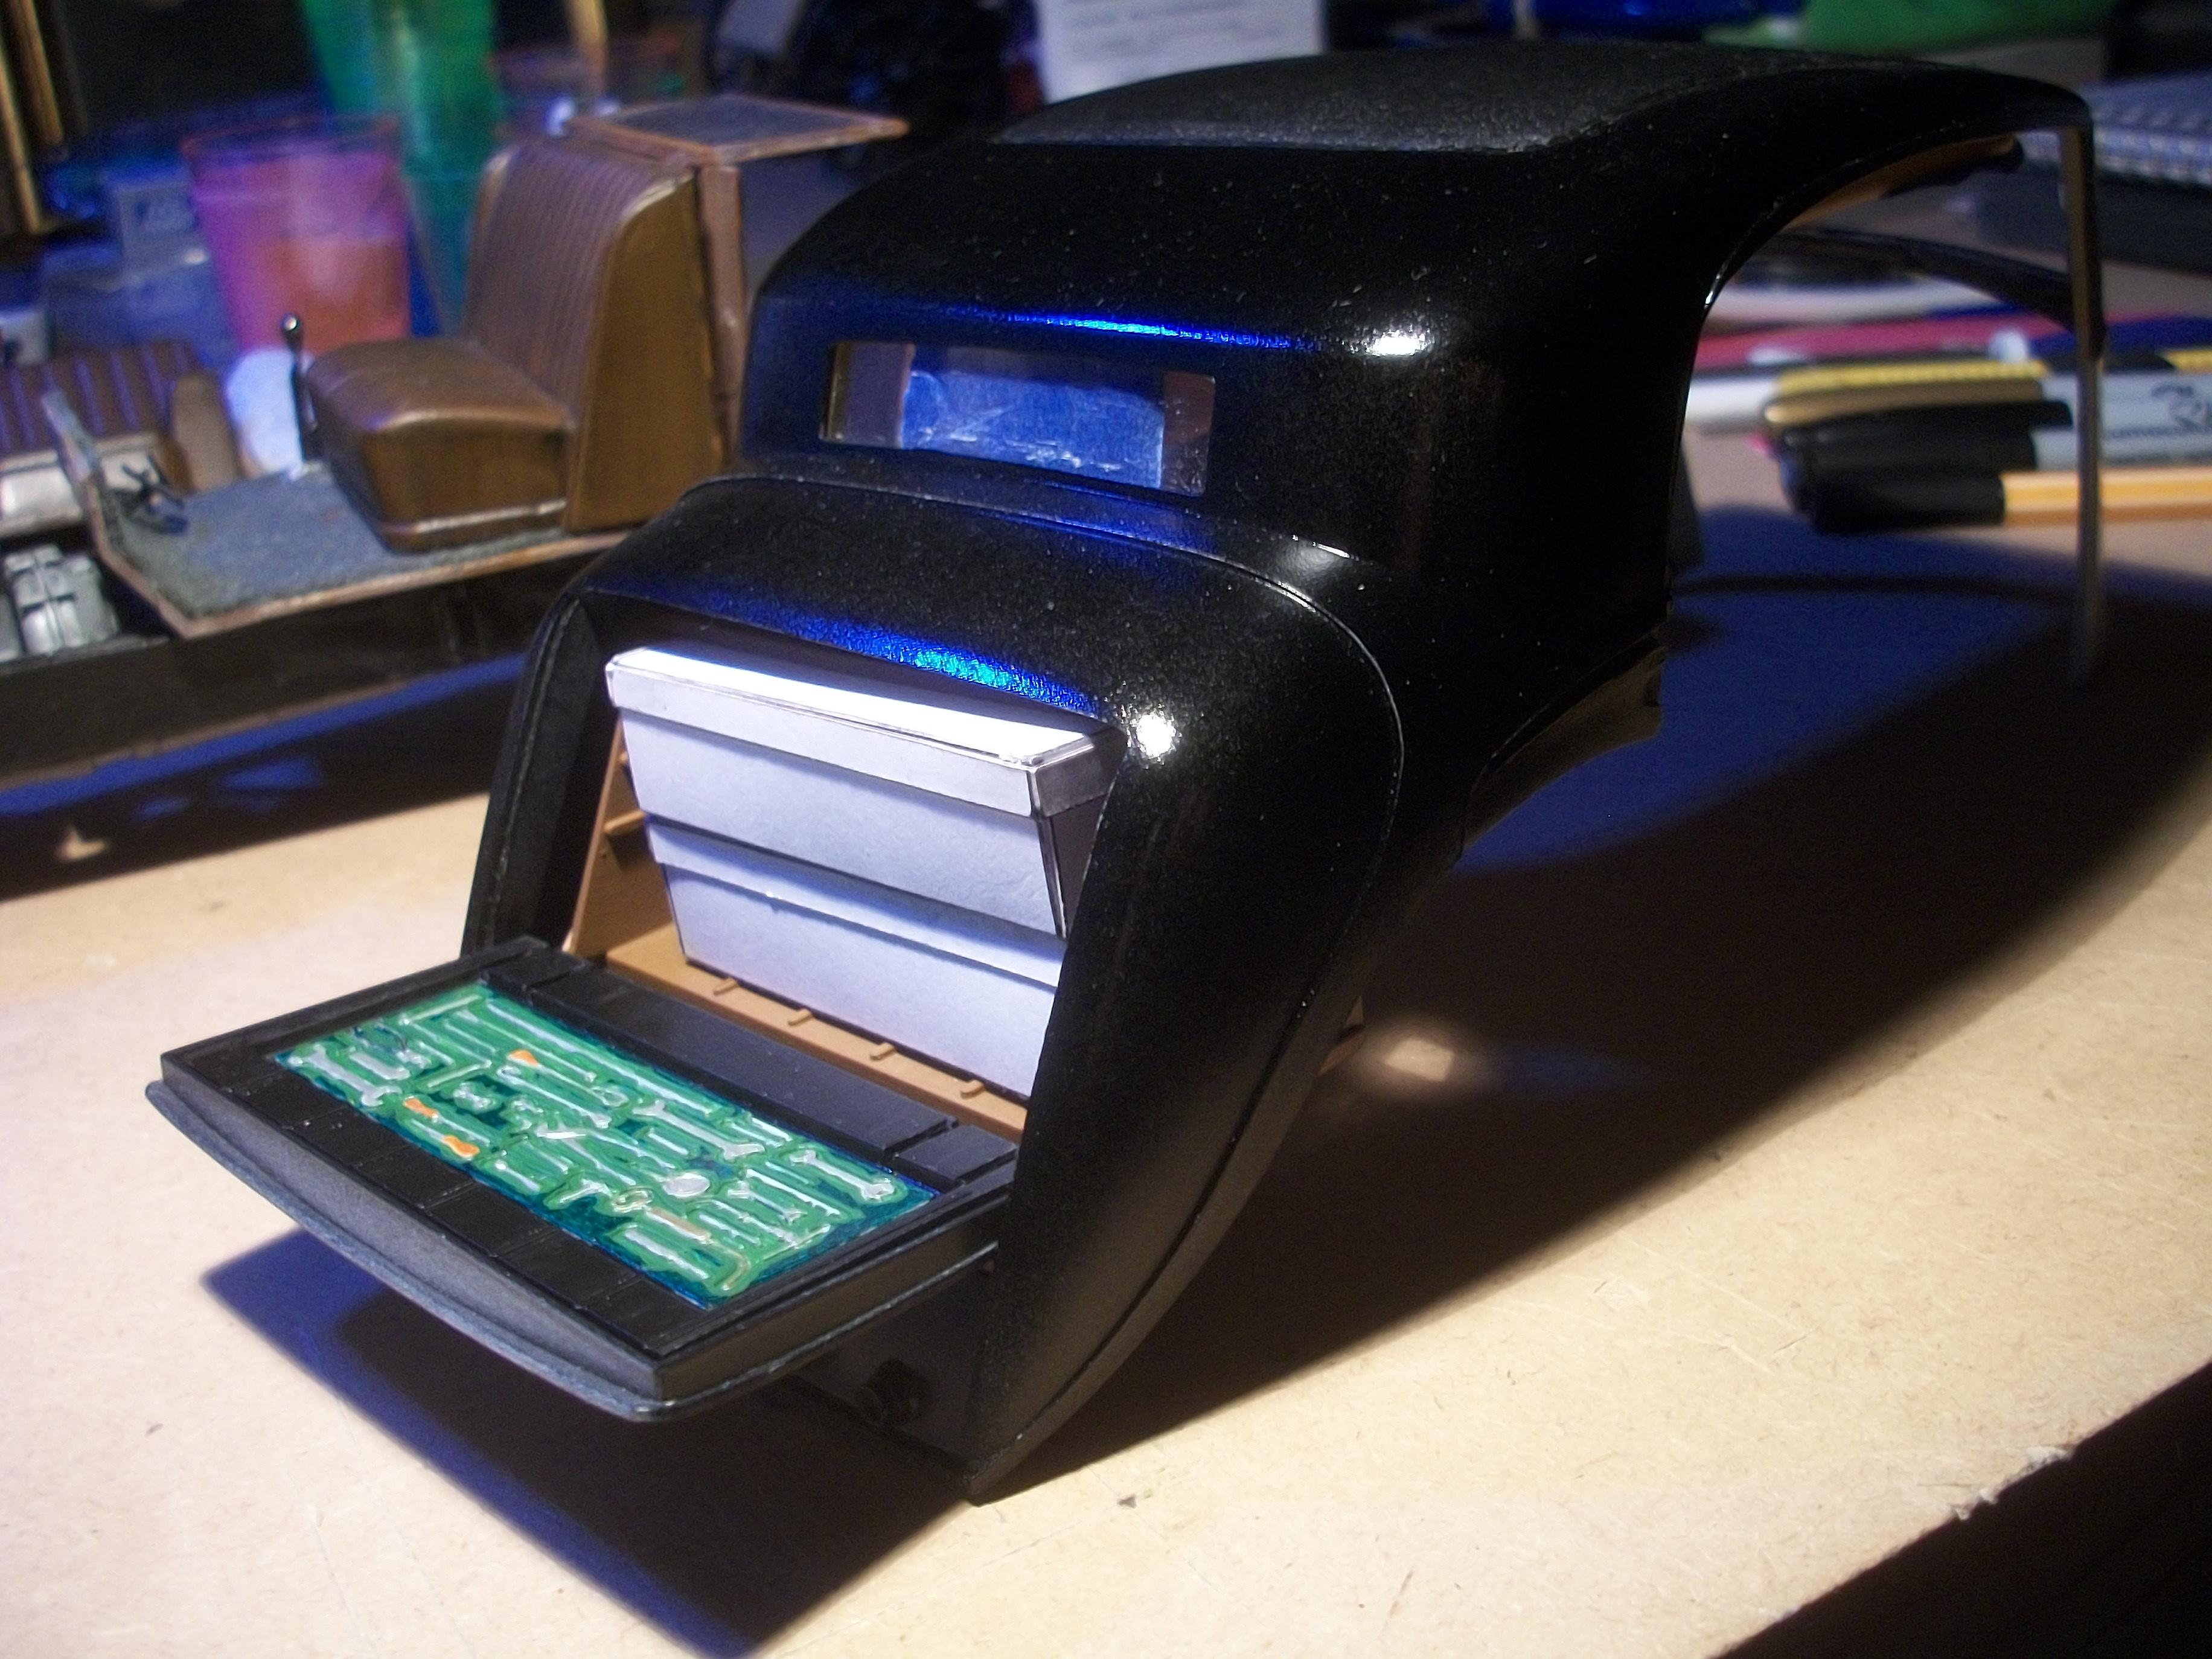
All twelve pins for the two cream bonnet side panels were heat sealed, and the assembled bonnet panels have fitted together well . . . The instruction sheet suggests glueing in place the four chrome lock handles, so two on each side at the lower edges, but I need to use Tamiya Polishing Compound on these four bonnet panels before the lock handles can be attached . . . This was an ideal opportunity to put together a mock up . . . The upper body, lower body, firewall, spare wheel casings, bonnet panels assembly, radiator and radiator grille were dry fitted together, with the help of some blue tape on the inside . . . Now the Phantom III is beginning to come to life. You can appreciate the size and style of this motor car, which looks good from all angles . . . David
-
1:16 Gunze Sangyo 1937 Rolls-Royce Phantom III Sports Saloon
Anglia105E replied to Anglia105E's topic in WIP: Model Cars
Cheers, and thank you Sir . . . Later this evening I shall be posting an update detailing the assembly of the bonnet panels, along with a mock up . . . David -
1:16 Gunze Sangyo 1937 Rolls-Royce Phantom III Sports Saloon
Anglia105E replied to Anglia105E's topic in WIP: Model Cars
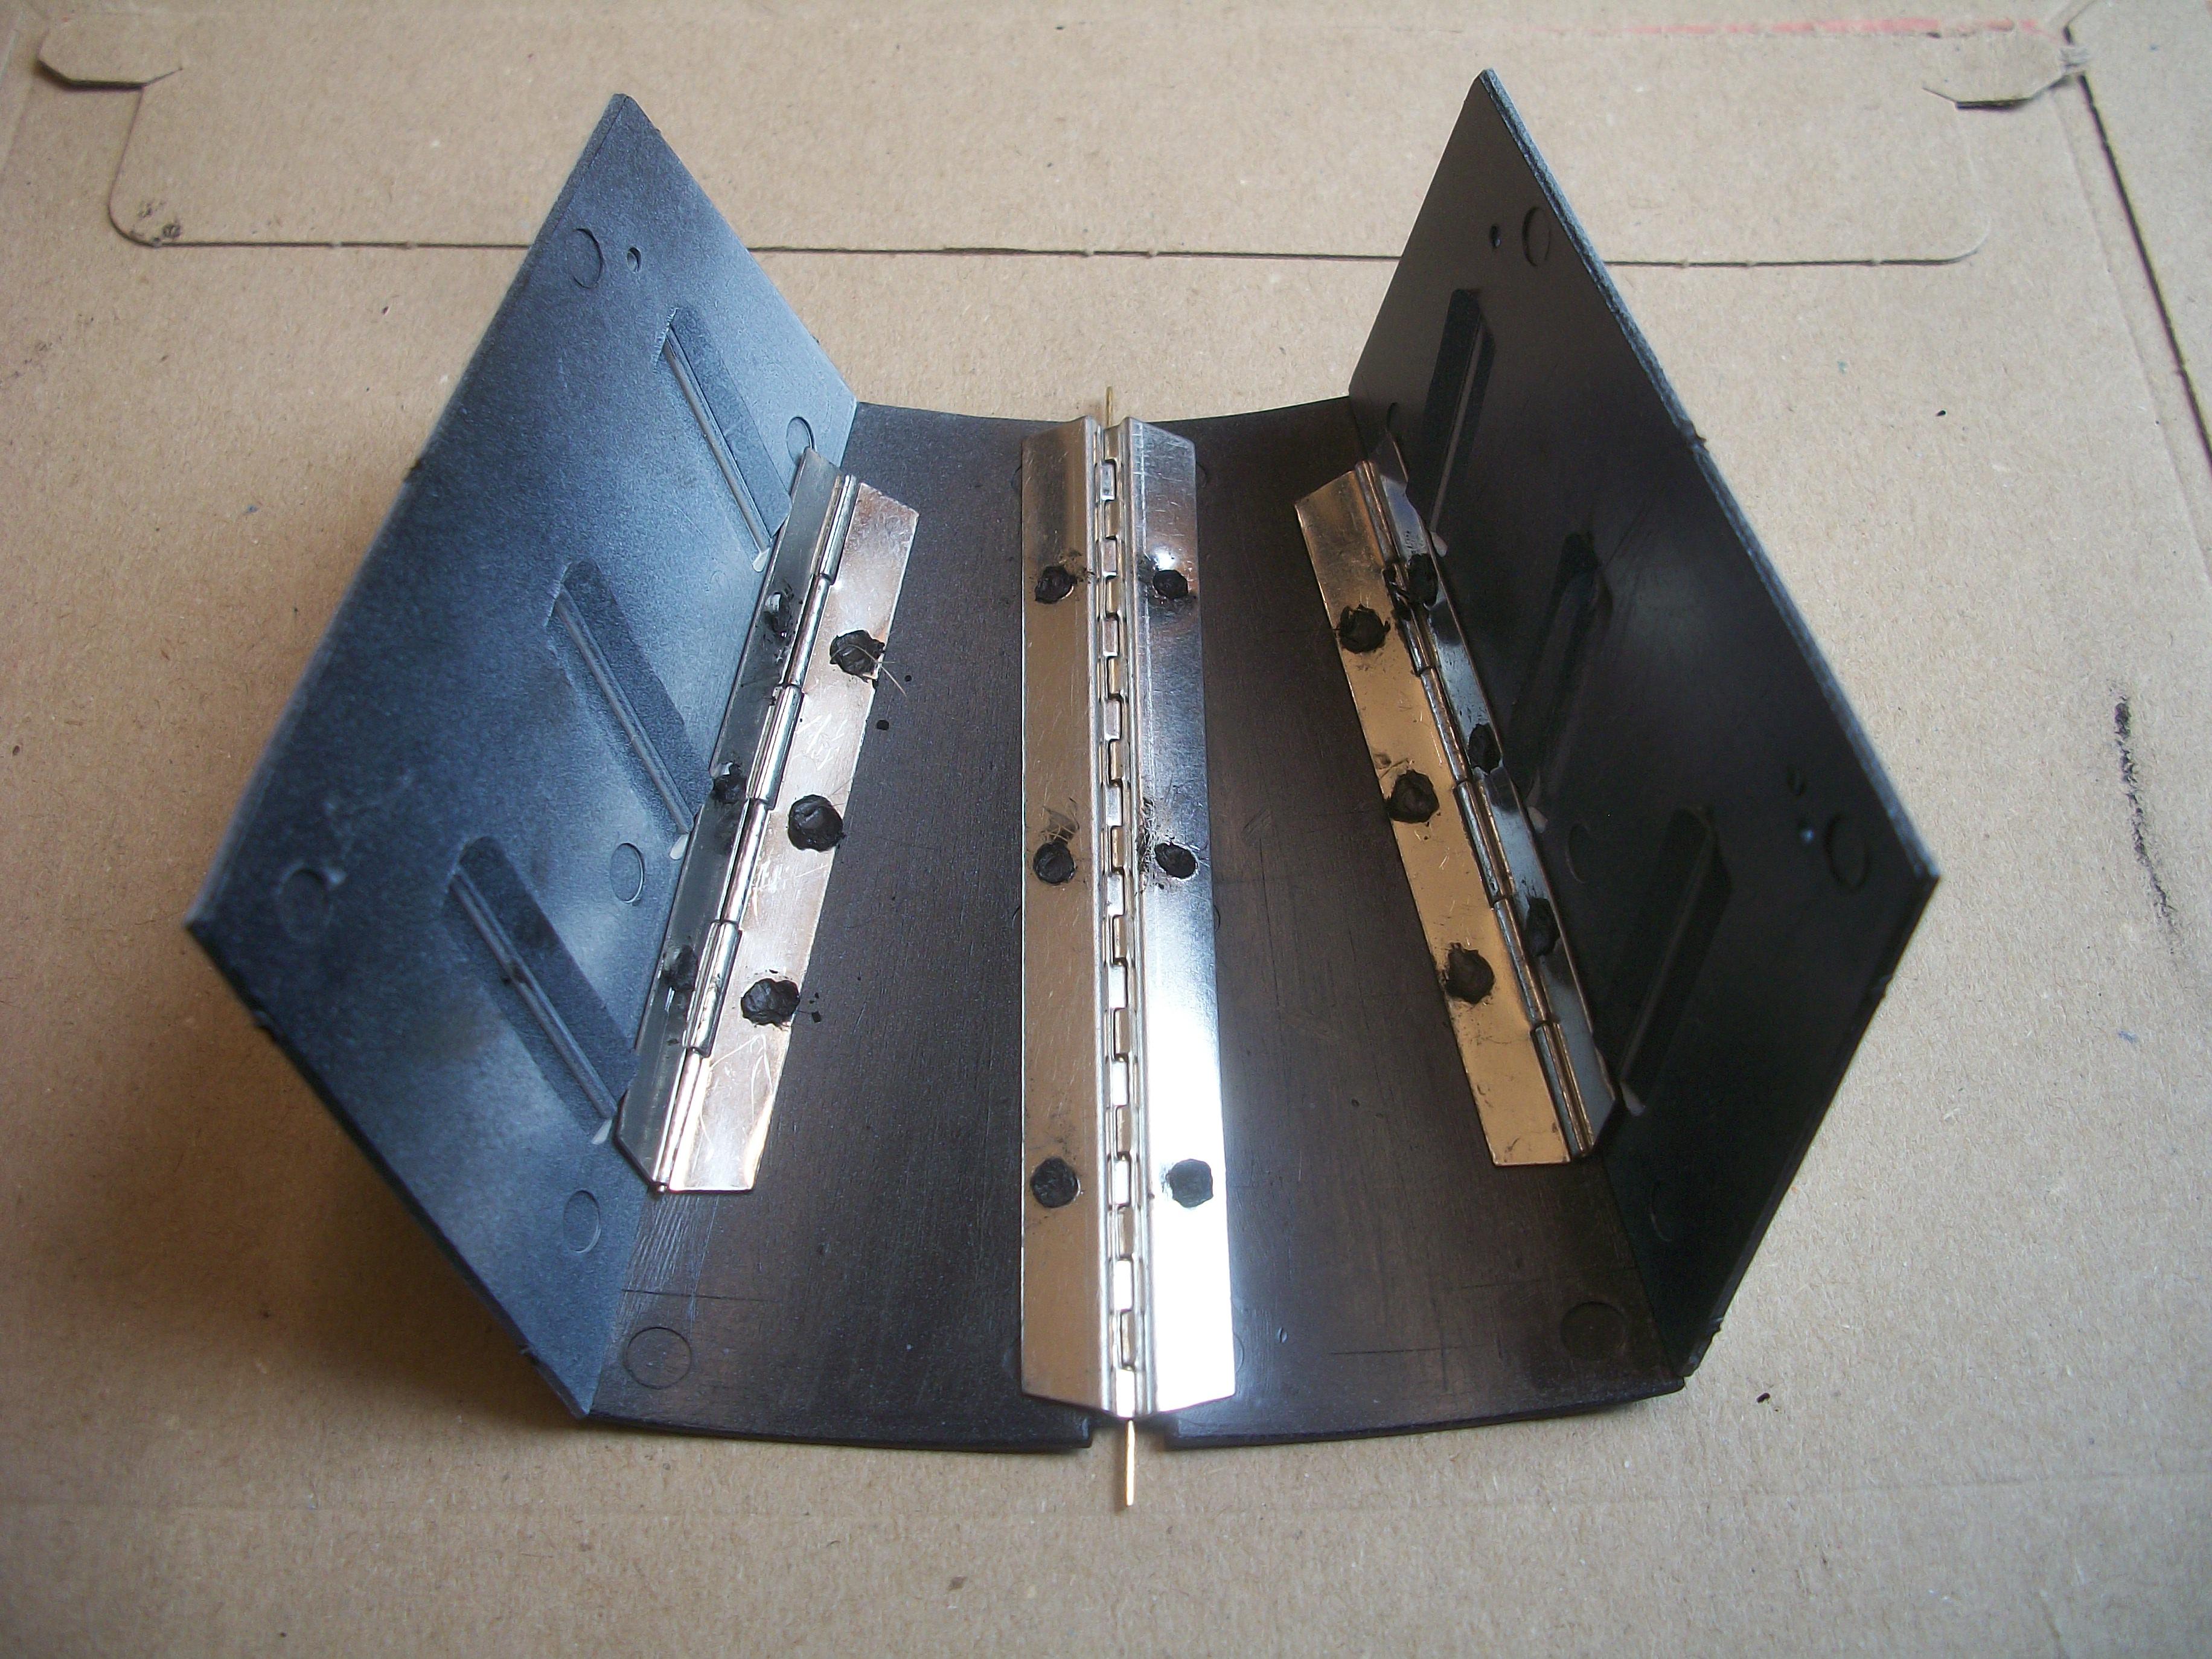
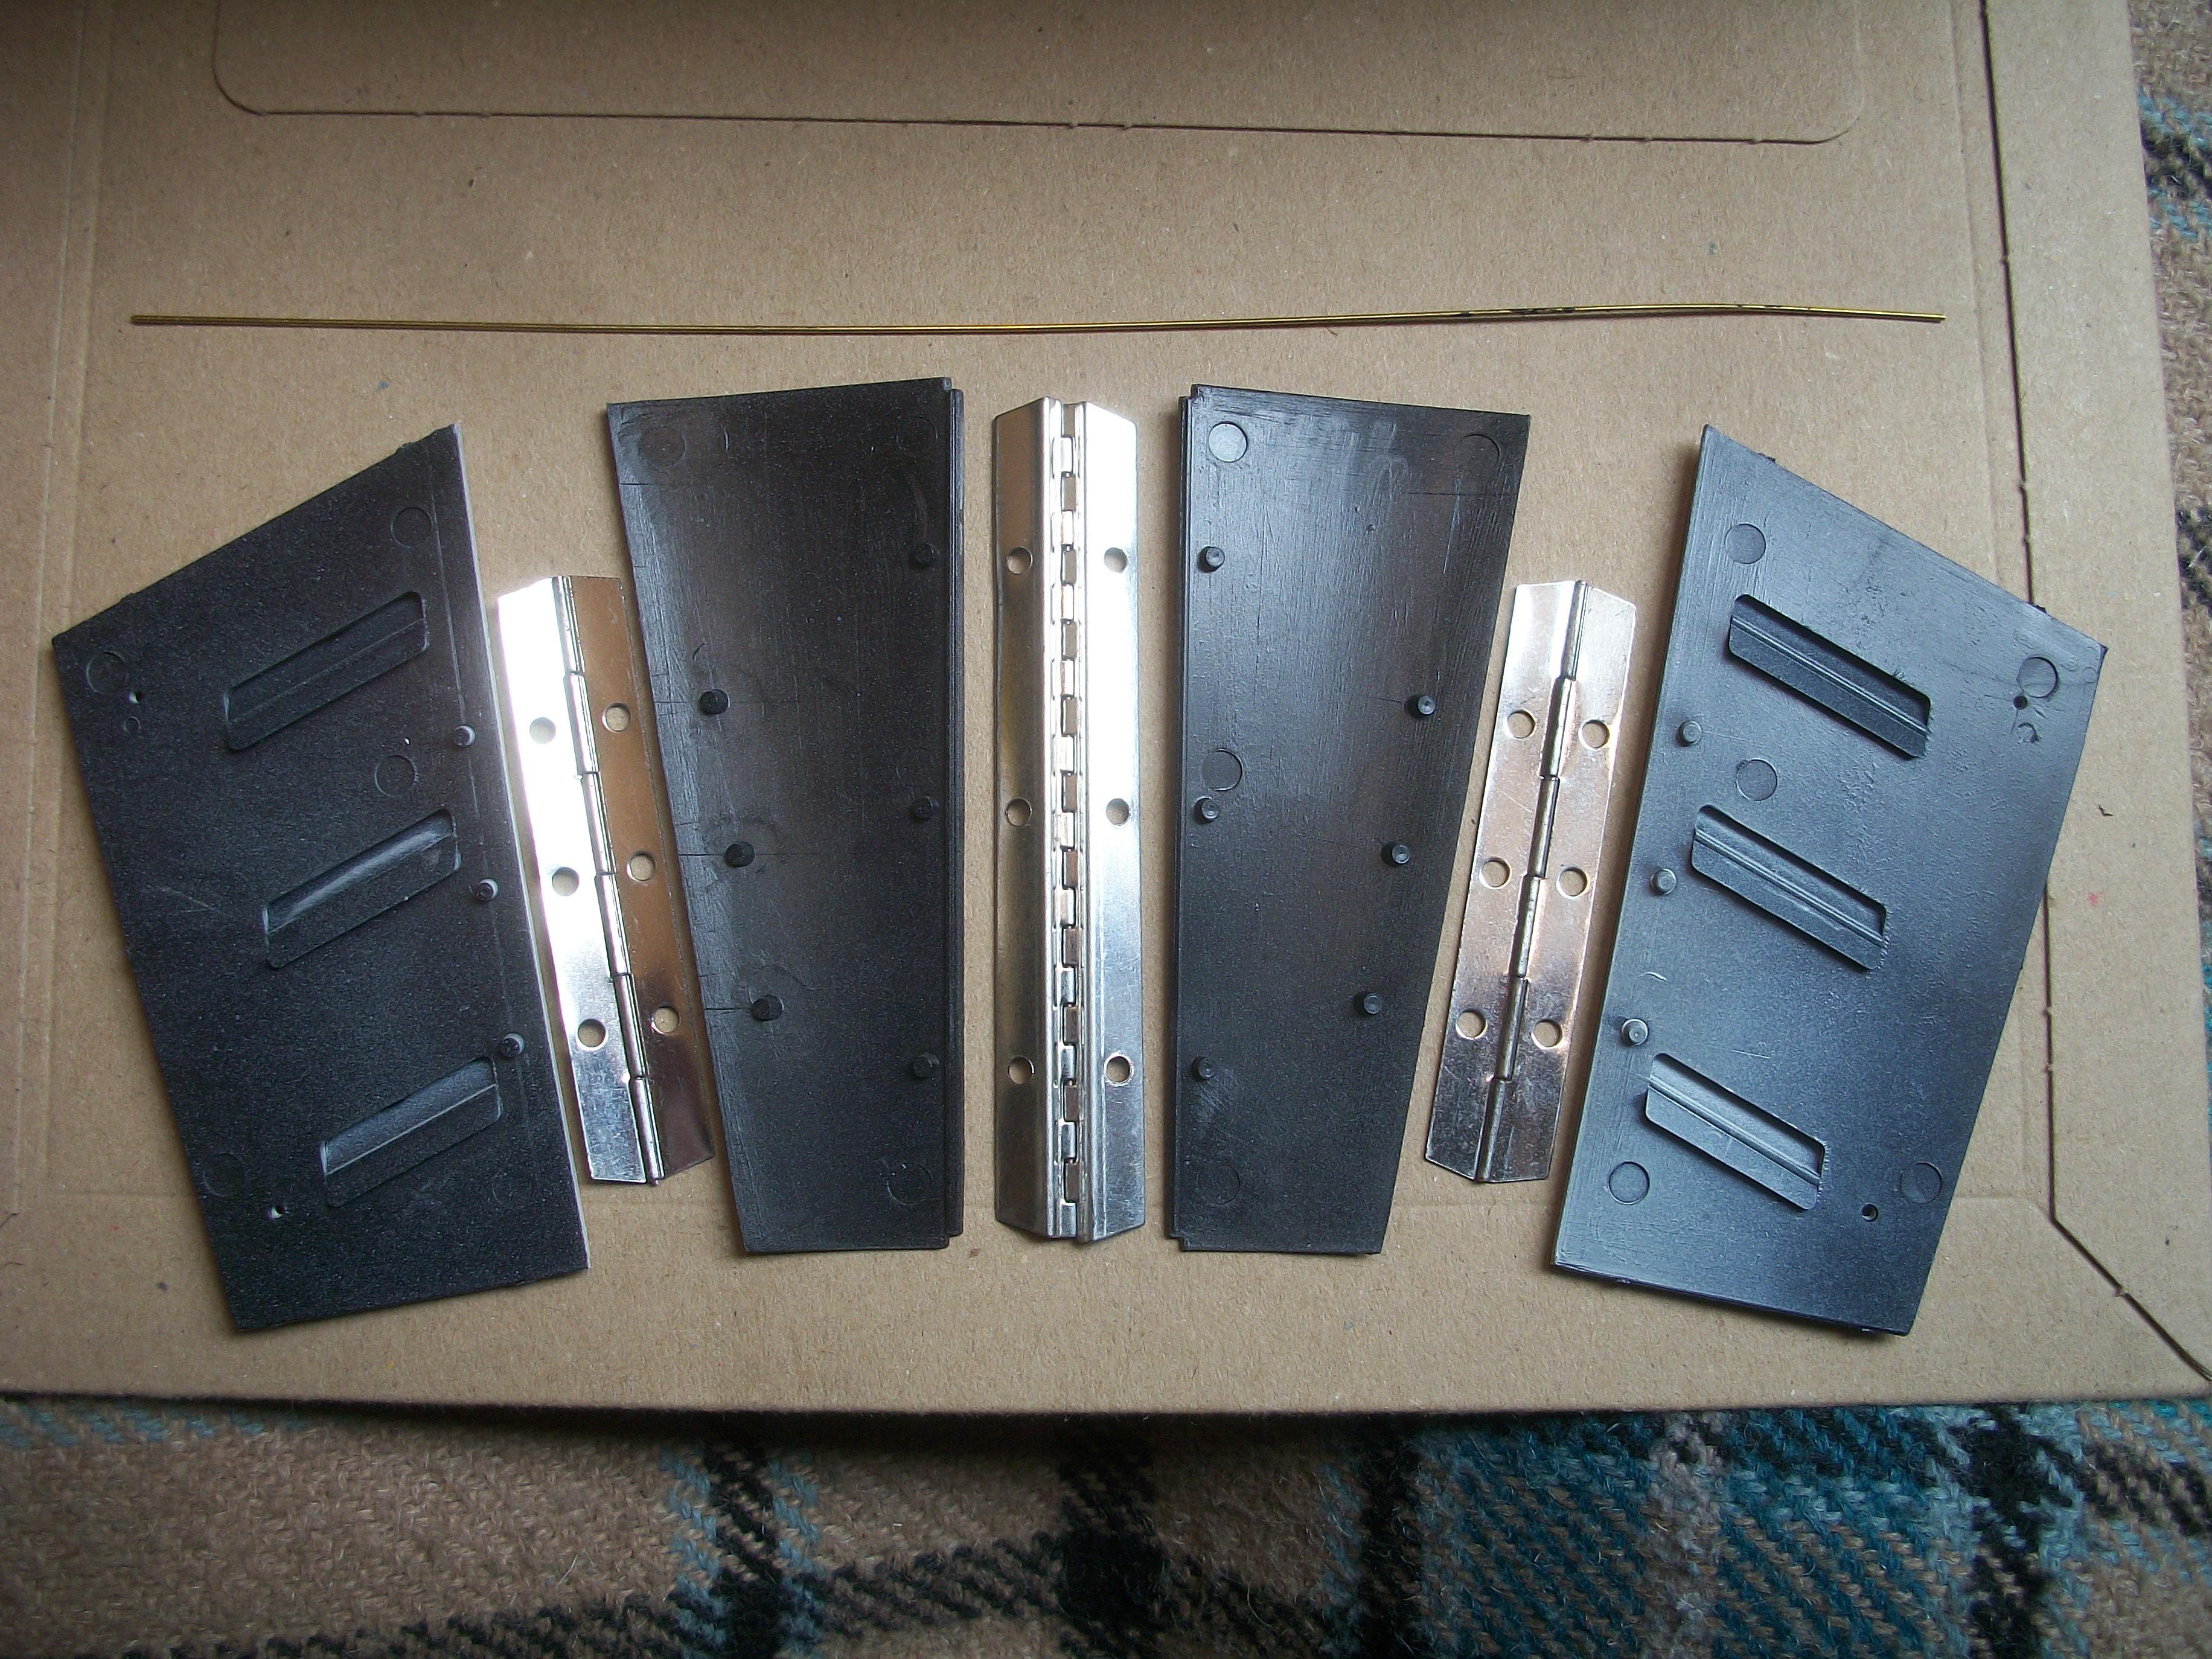
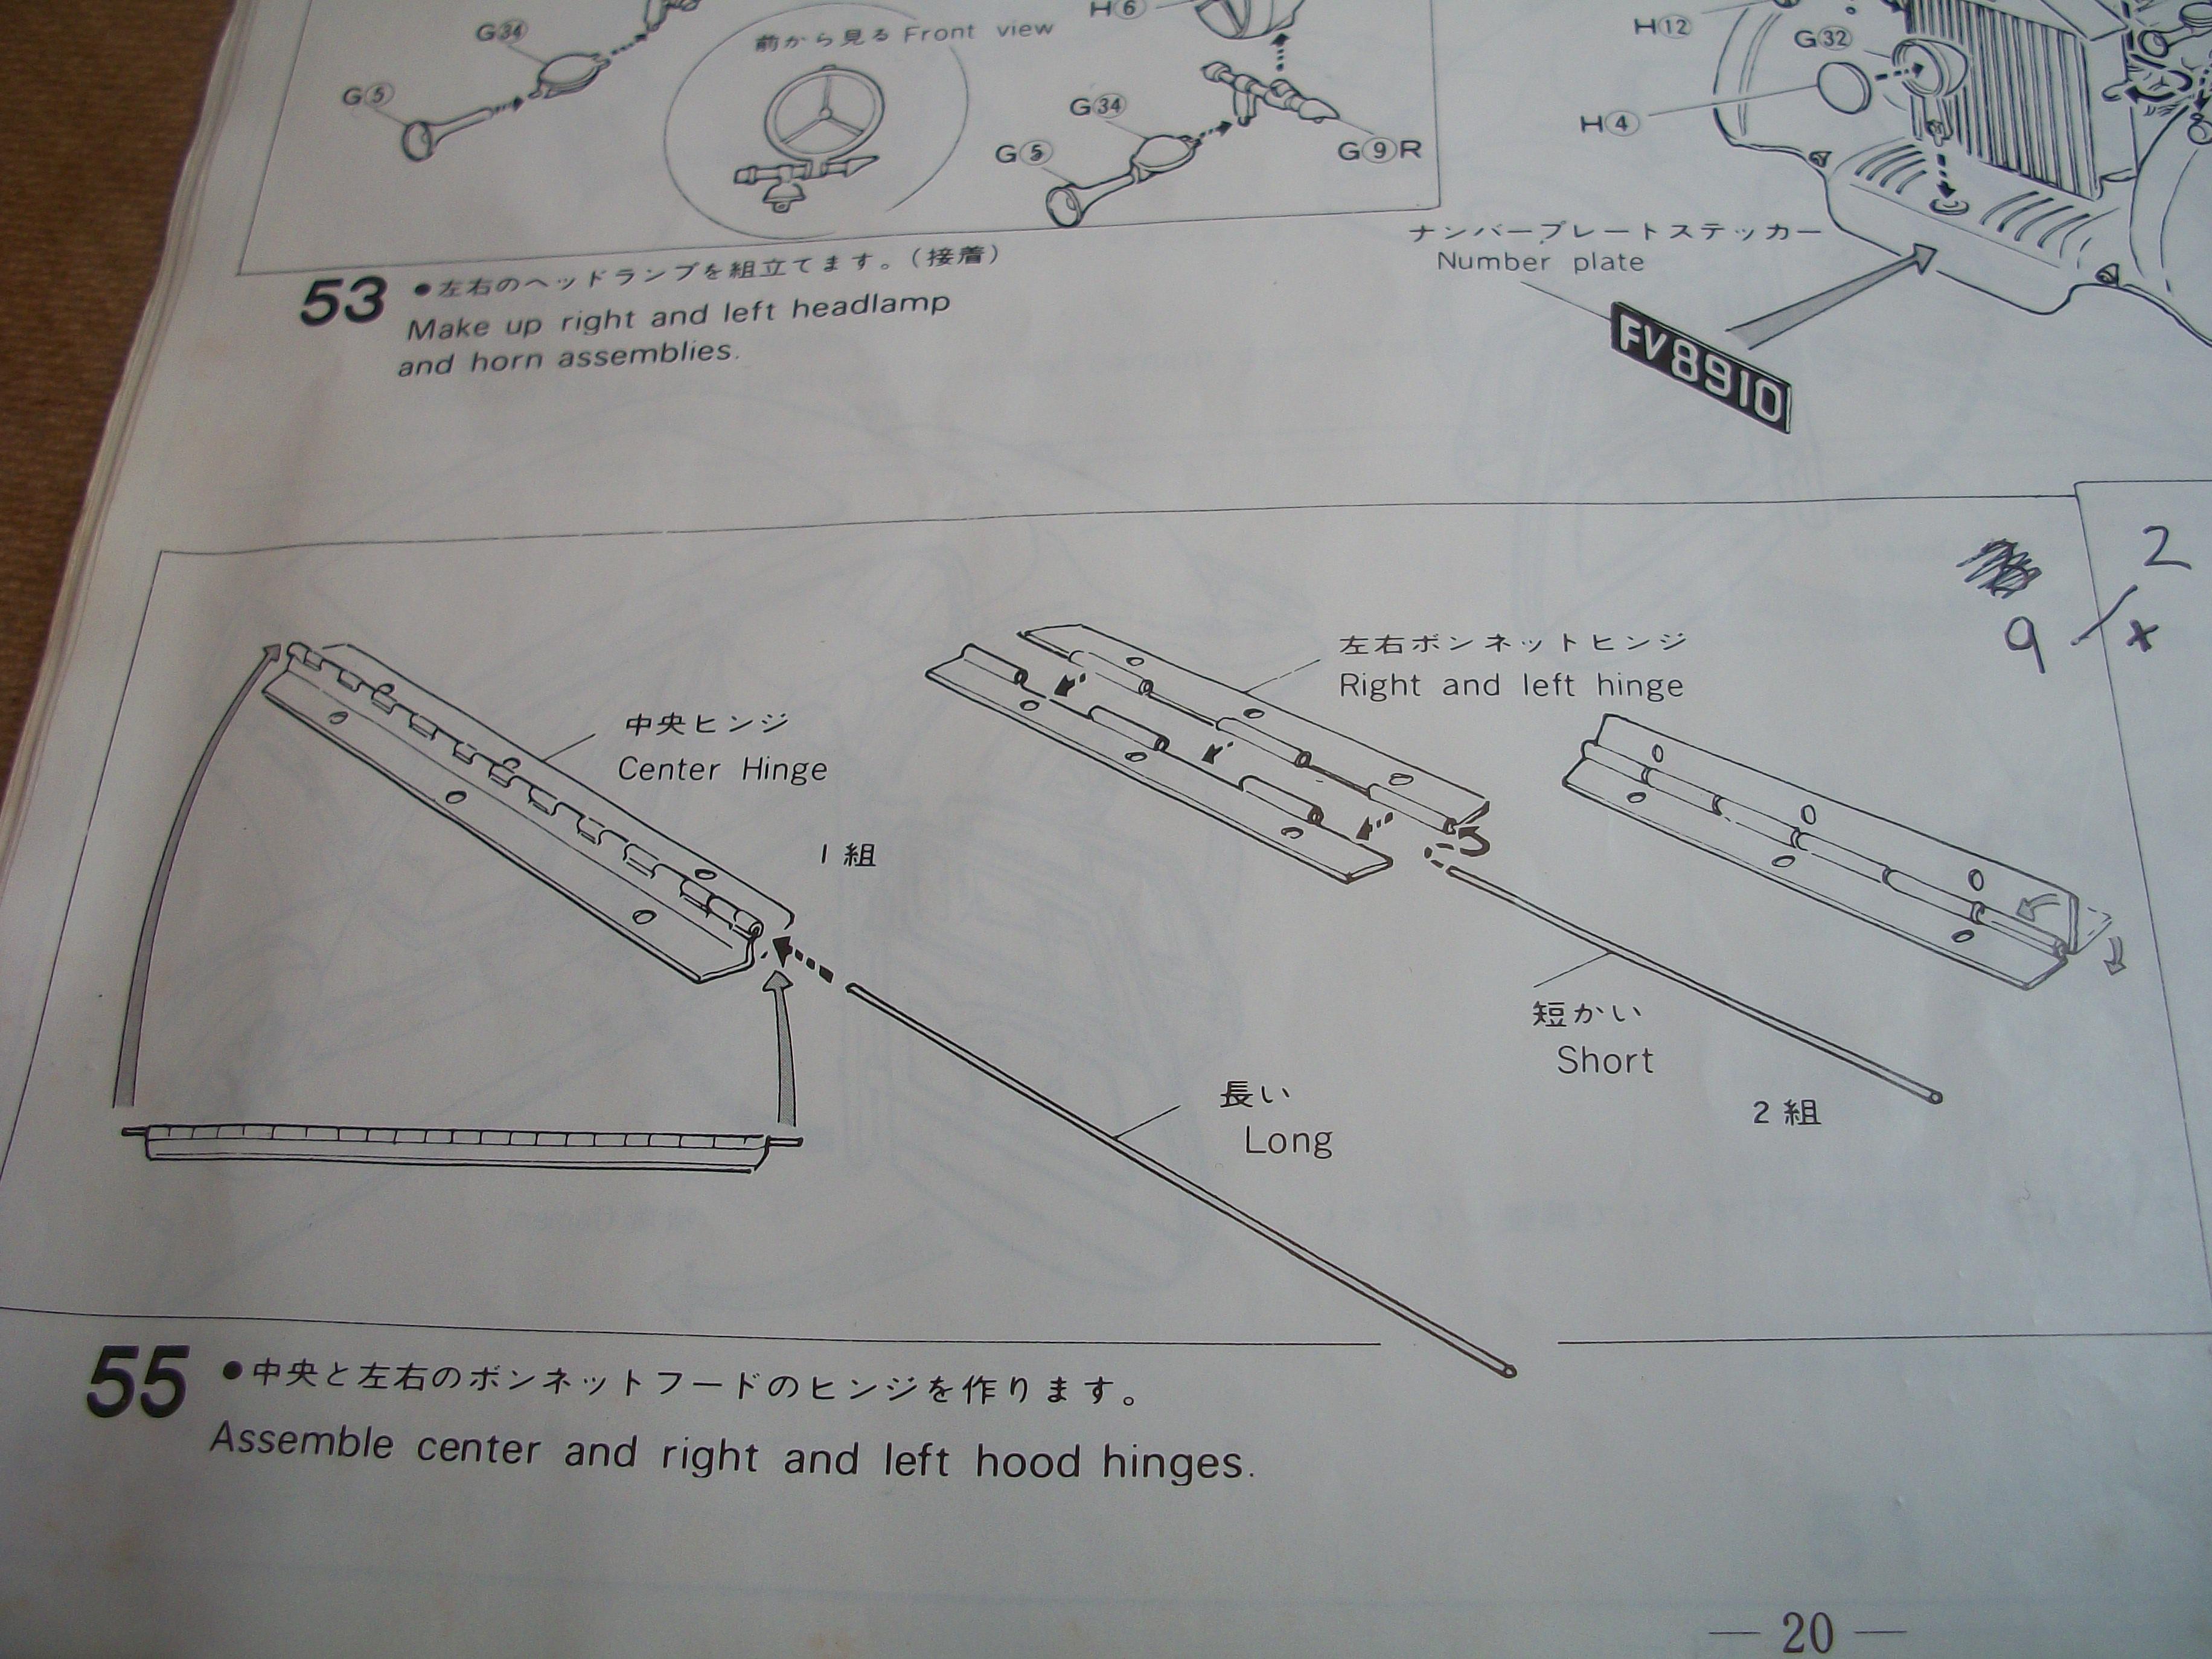
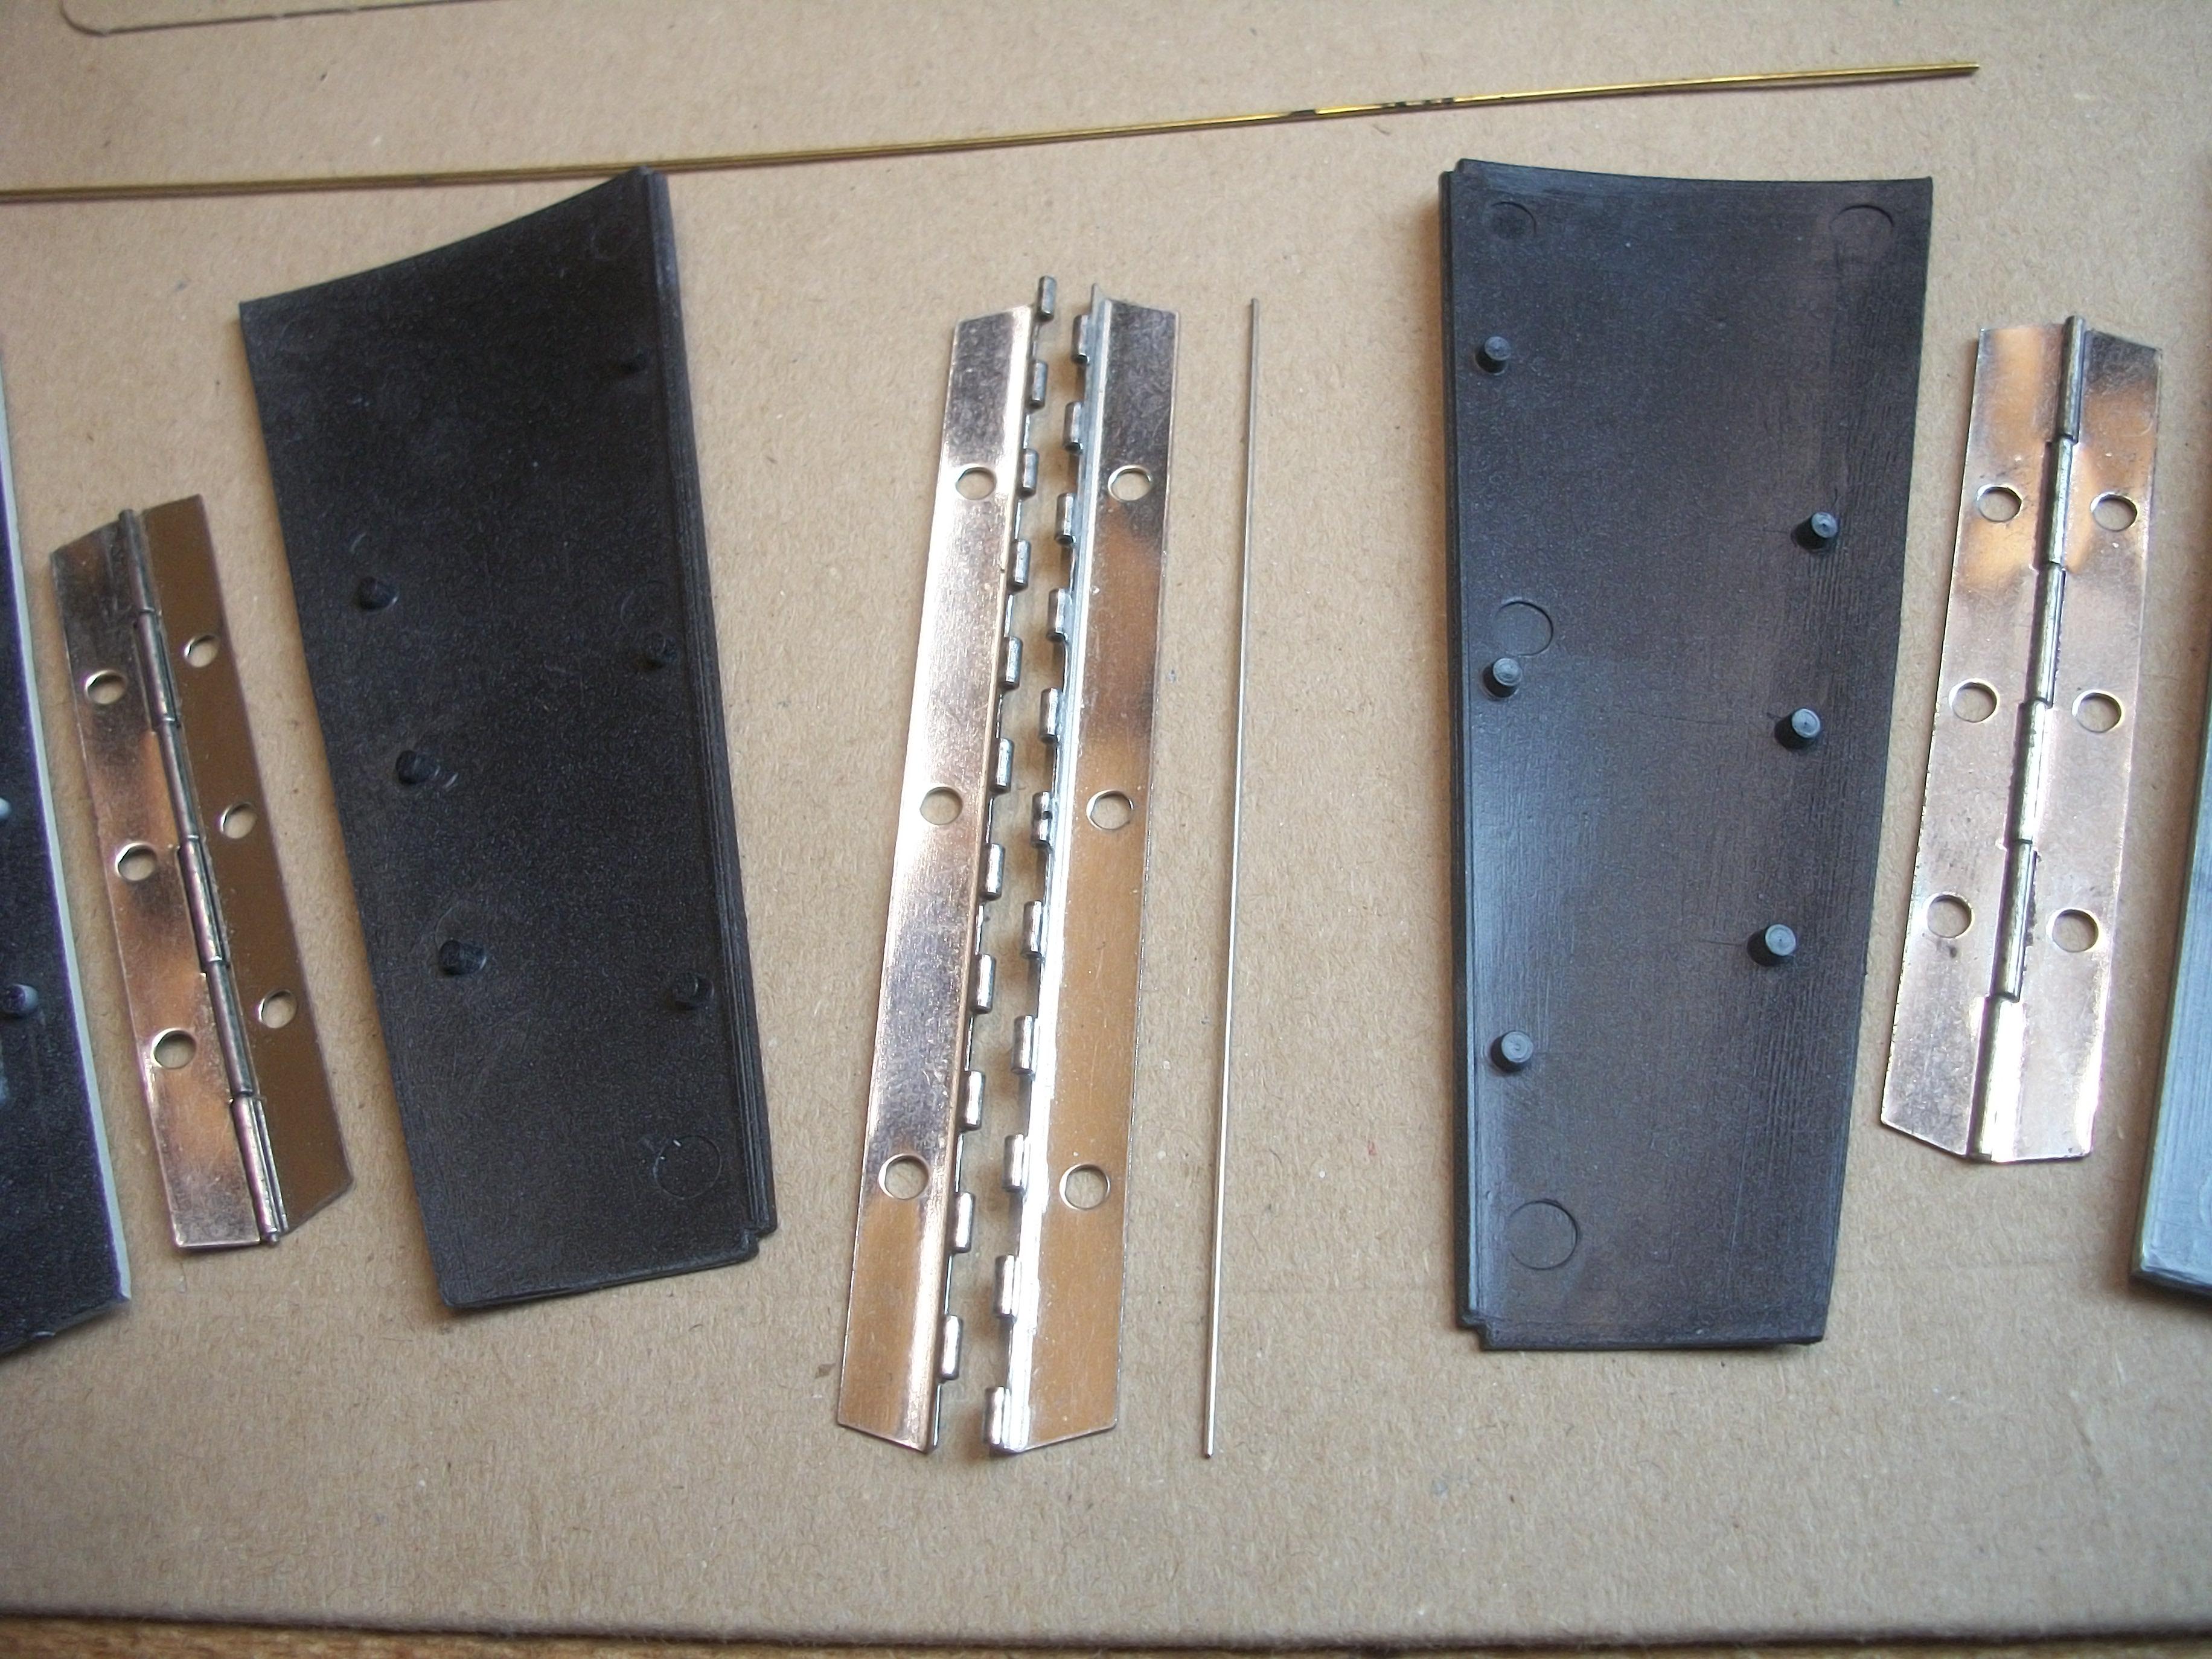
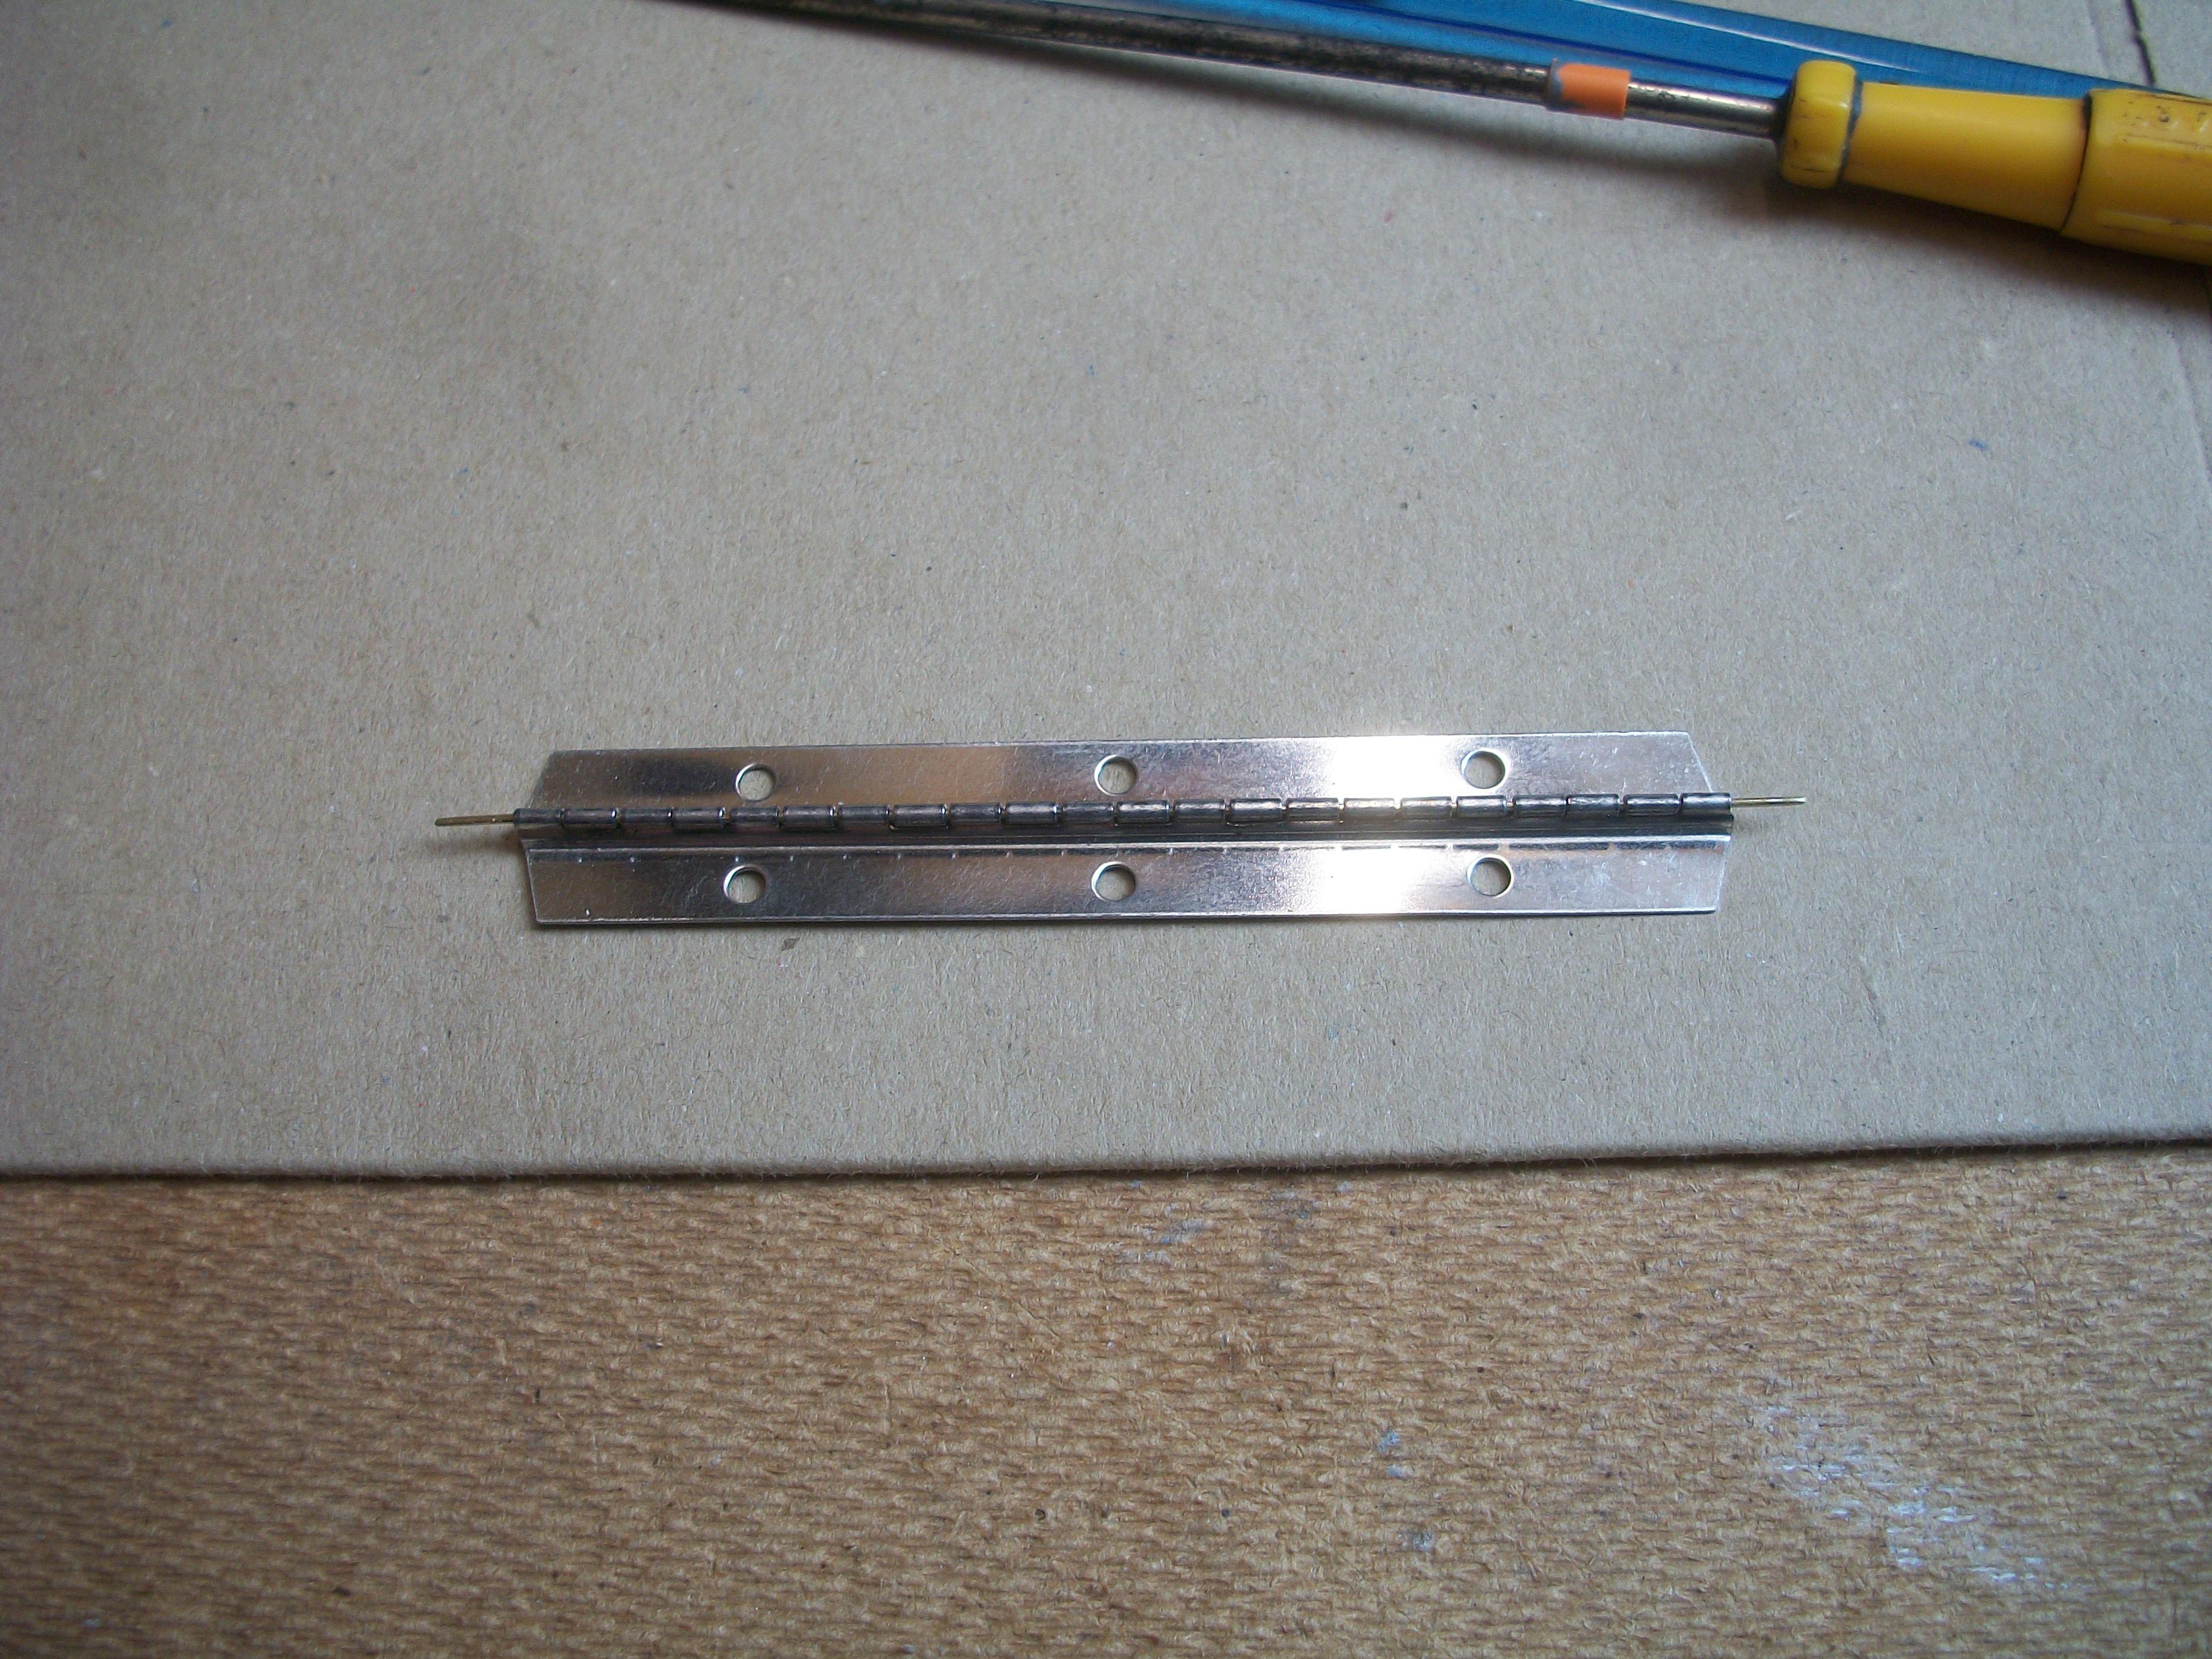
All set up to heat seal the four bonnet panels and three hinges, and then I noticed that something was very wrong . . . The steel rod that runs through the pivot mountings of the centre hinge was too short. Gunze Sangyo have made the rod precisely the same length as the hinge, which means the ends of the rod are flush with the ends of the hinge . . . The instruction sheet clearly shows the rod potruding from both ends of the hinge by a few millimetres when assembled. This is because the rear end of the hinge rod fits into a bracket on the firewall, and the front end of the hinge rod fits into a bracket on the radiator . . . There were two options available to me, the first of which was to cut the steel rod in half, then block off several holes in the centre of the hinge, and then to insert each of the two half rods from either end . . . The second option was to use a length of brass rod, cut precisely to the correct length and insert this through the centre hinge . . . I decided to go with the second option, and the only problem was that the brass rod was slightly too large in diameter, and it would not go through the holes . . . Using 180 grit wet & dry abrasive I gradually reduced the diameter of the brass rod, which was very time consuming, but successful in the end. With the centre hinge and brass rod assembled, I was able to heat seal the three pins on each of the two black upper bonnet panels, leaving the two cream side panels to be heat sealed tomorrow . . . David
-
1:16 Gunze Sangyo 1937 Rolls-Royce Phantom III Sports Saloon
Anglia105E replied to Anglia105E's topic in WIP: Model Cars
Oh dear Dennis . . . This is no place for a Phantom III Will there be further work on this car ? David -
1:16 Gunze Sangyo 1937 Rolls-Royce Phantom III Sports Saloon
Anglia105E replied to Anglia105E's topic in WIP: Model Cars
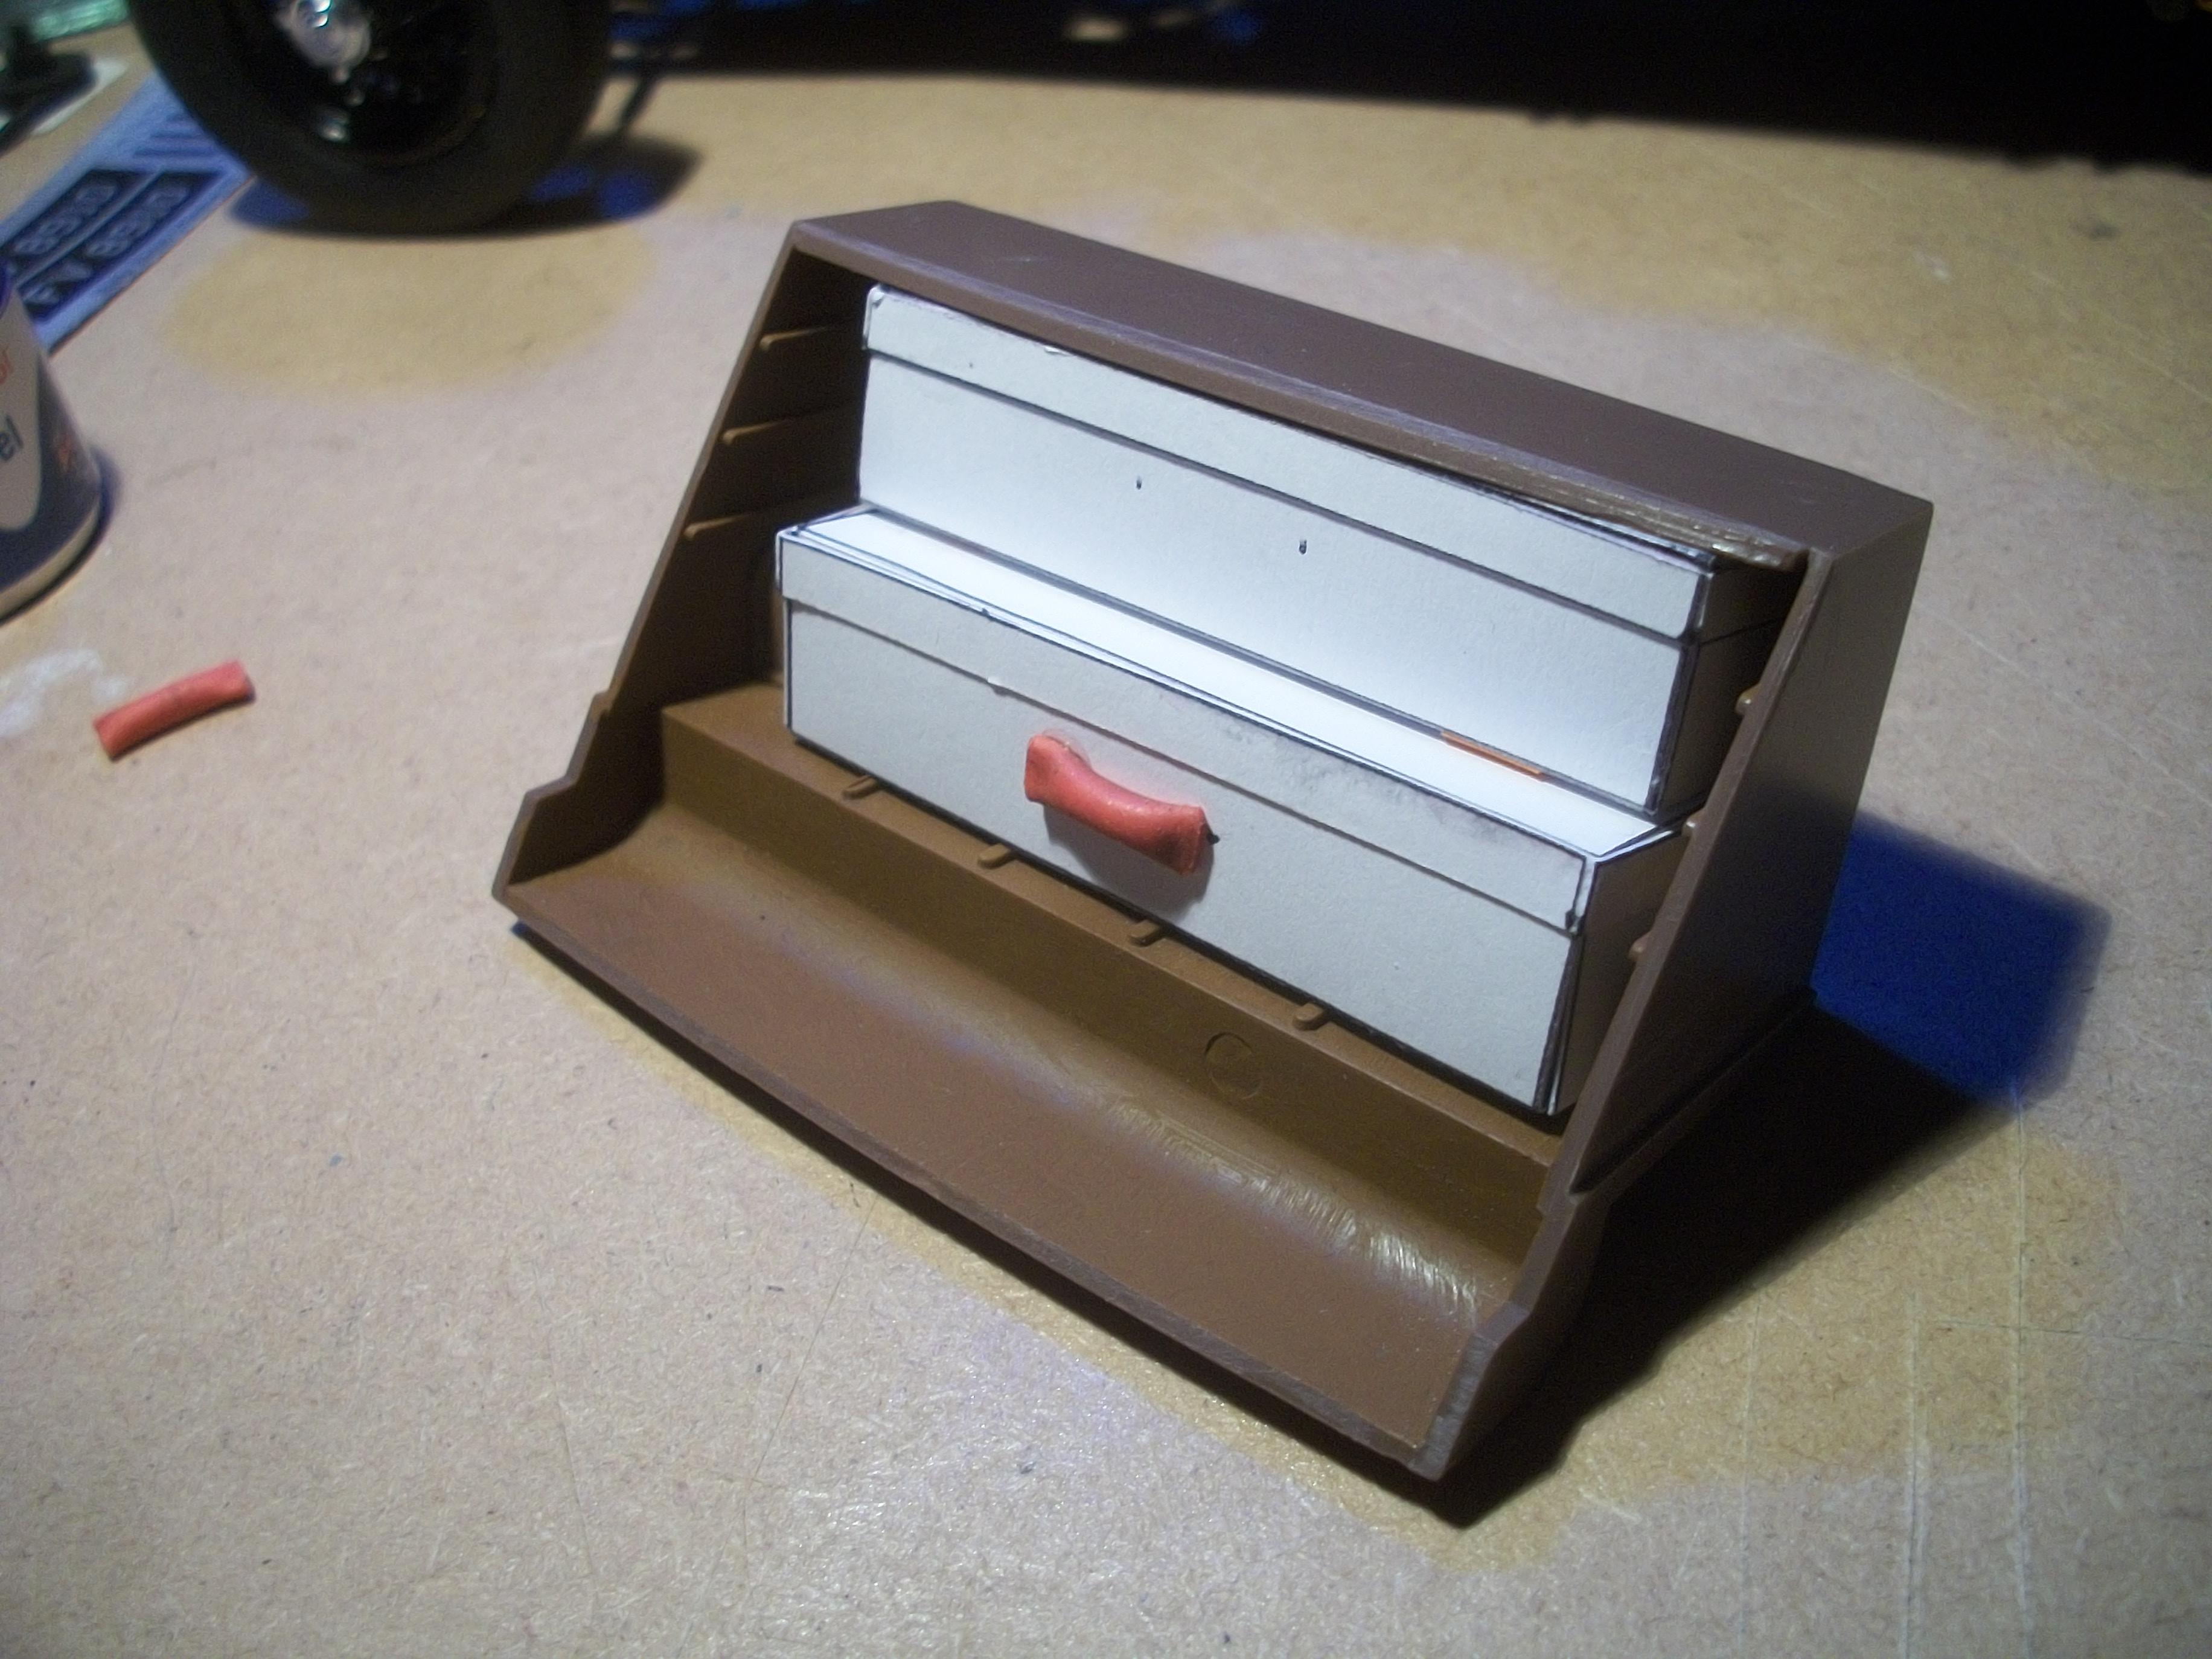
Cheers David . . . No, I haven't done any further work on the Mr. Webb figure, so I think it must be the natural daylight in that particular photo ! The previous photos of Arthur were taken in a room that has no natural daylight, whereas the loft has the Velux roof window, which is great . . . Now that I have had chance to sleep on the suitcase issue, I think you are right. Rather than cut out the thick plastic of the luggage bay itself, and rather than fabricating a smaller suitcase, I can simply shorten the existing case by around 3 mm as it is only thin card . . . I call this thinking outside the box (thinking outside the case). There was an idea at the back of my mind to have a 9 volt battery somewhere inside the luggage compartment, if I do decide to have wired lighting at some stage, although a CR2032 coin cell battery would take up much less space . . . There is one short length of red rubber piping remaining in this kit now that the hoses are all cut to length, and I reckon two of 10 mm pieces of this piping would make very convincing suitcase handles. I can crimp both ends of each handle, paint them matt brown with a black wash, and satin cote to finish in the leather look effect . . . David -
That technique with the chrome moulding set into the black rubber seal has worked really well David . . . The resulting effect has transformed the window glass, and the body shell as well . . . David W.
-
1:16 Gunze Sangyo 1937 Rolls-Royce Phantom III Sports Saloon
Anglia105E replied to Anglia105E's topic in WIP: Model Cars
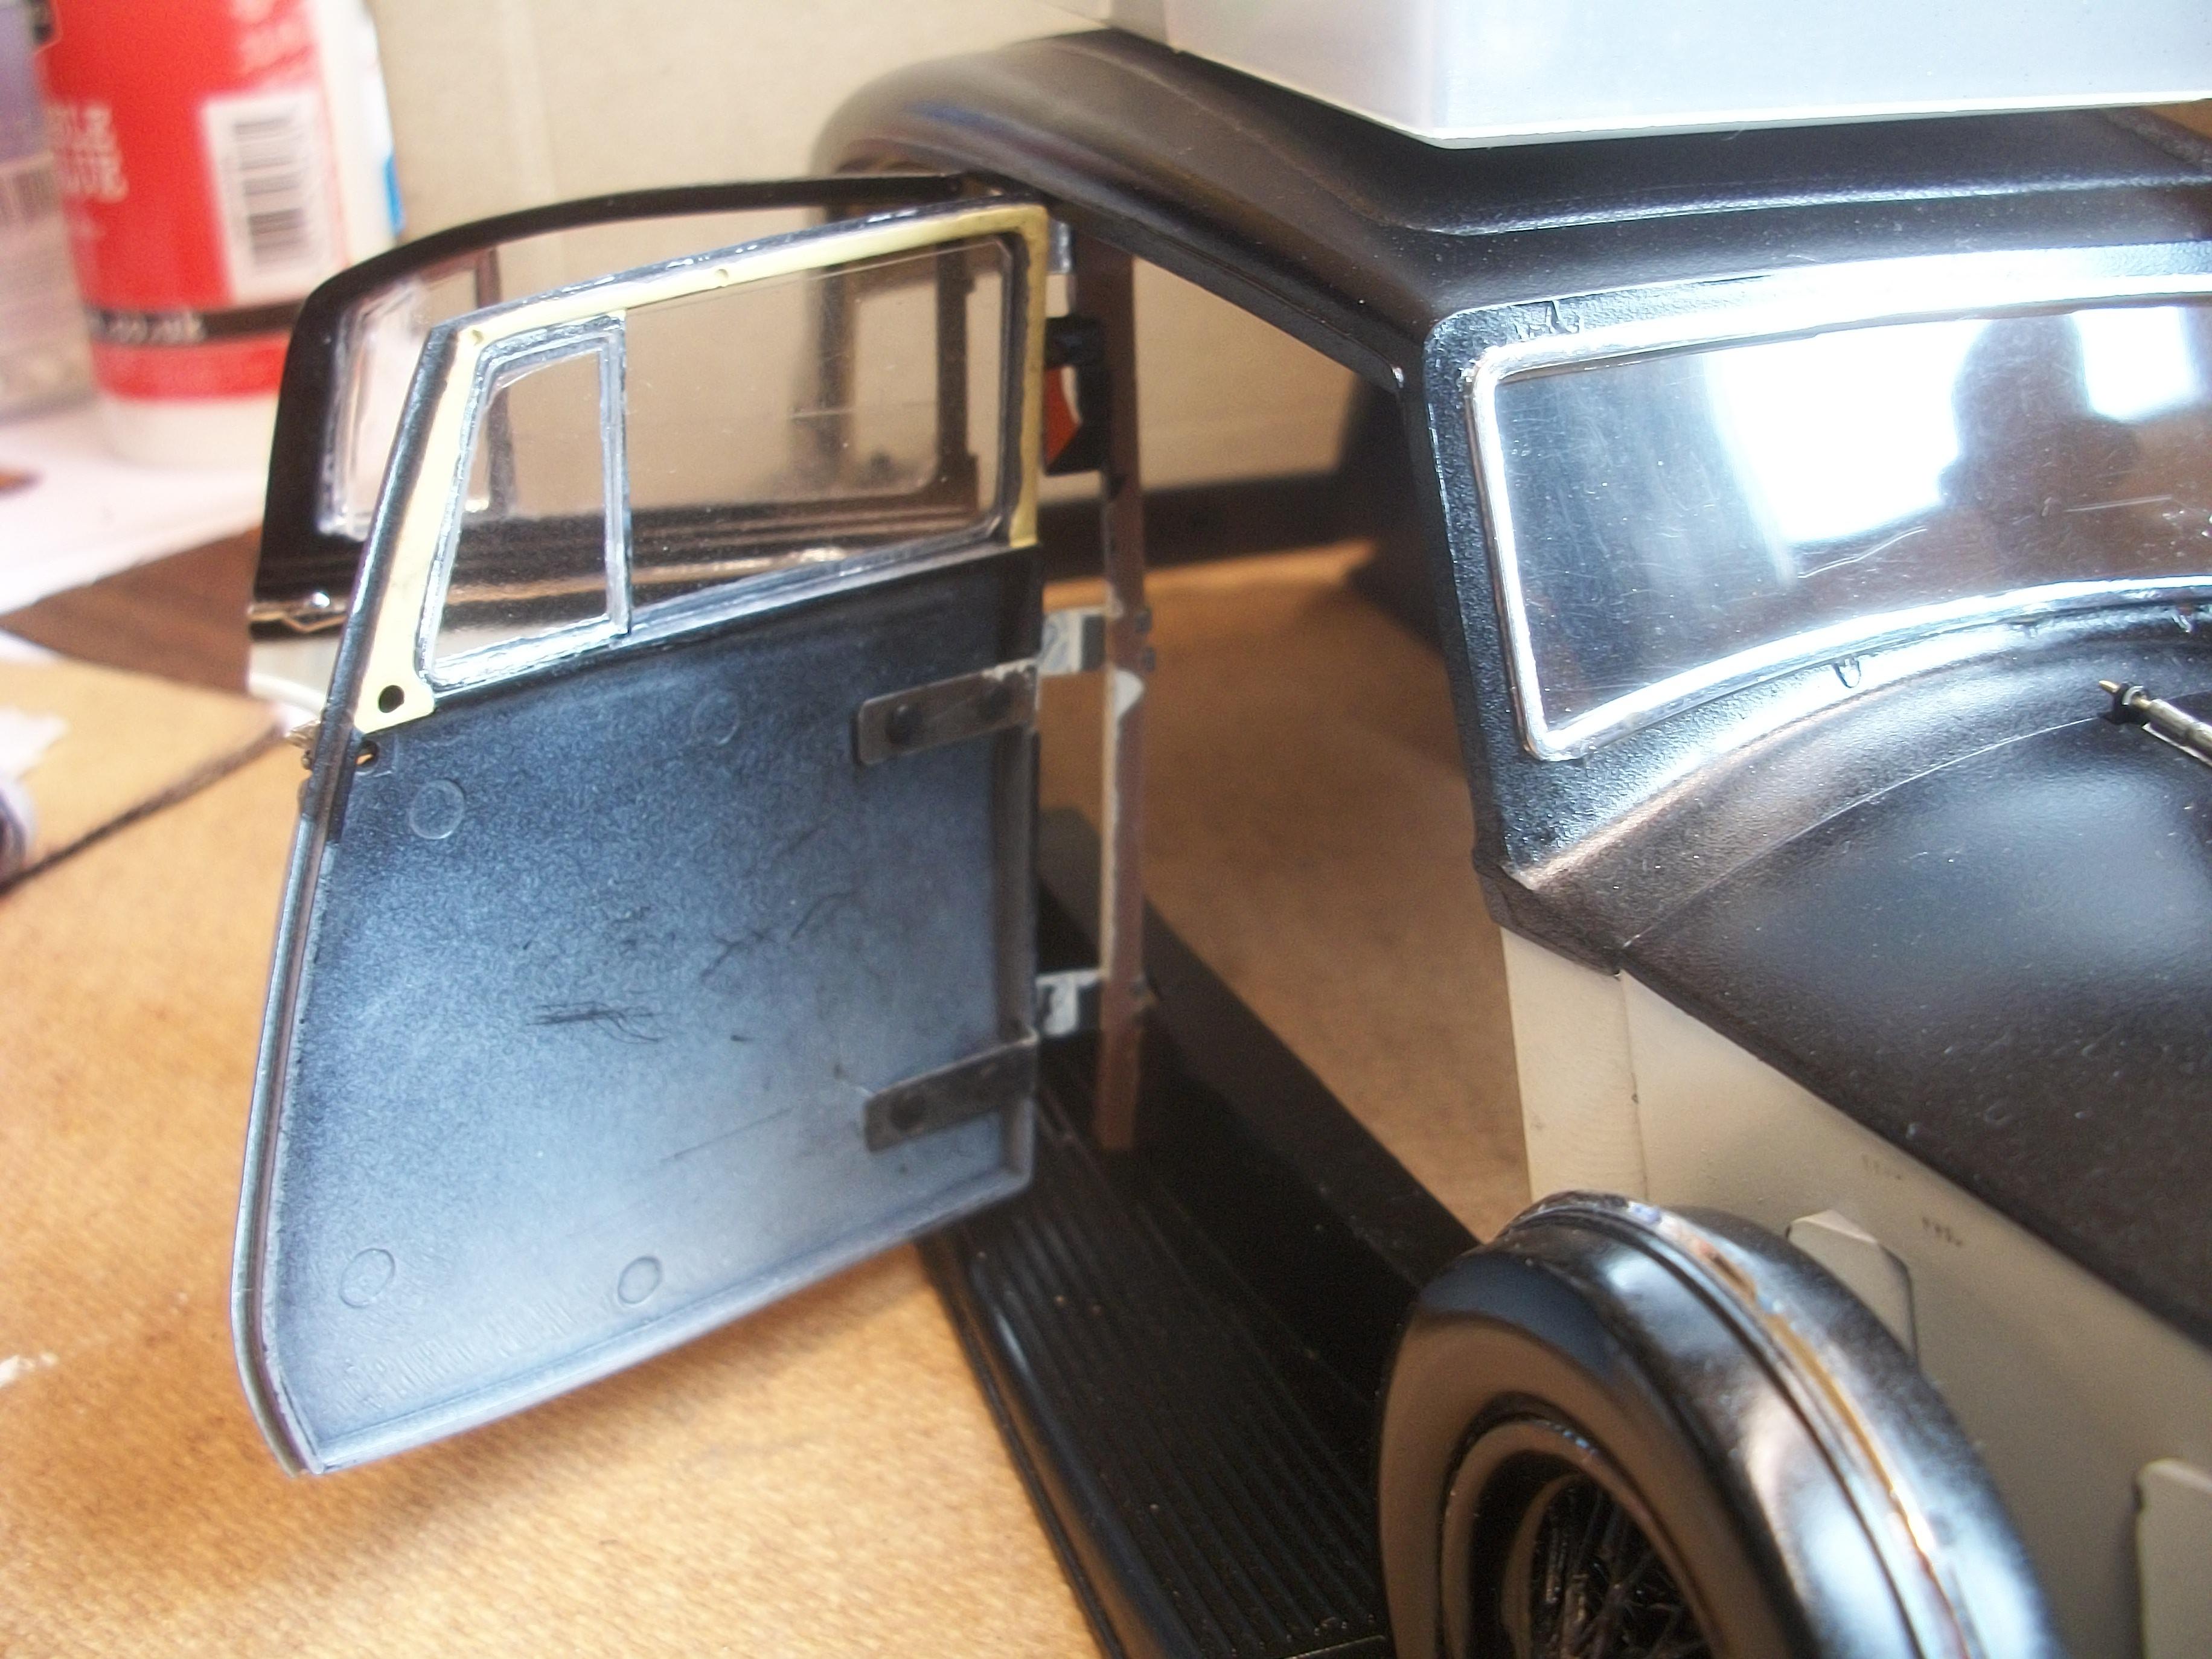
Quite a few hours spent heat sealing the hinges of both front doors during today, because although the third door of four was straightforward, which was the passenger side, the driver's side door turned out to be very difficult . . . I struggled to get the plastic pins to align with the holes in the metal hinges, and two of the pins would not fit through the holes. Careful use of a round file enlarged the holes very slightly . . . Eventually, by filing away material from the recesses in the door panel, I did manage to get everything completed. Just that one door gave me trouble . . . that's model building for you ! I test fitted the interior door panels and examined the components of the outer door pillars. One of the pillars is bent, and in order to get this to fit square into the inner door post later, I shall have to use super glue and also clamp the inner and outer posts. I don't want to try bending the outer pillar by using excessive force for fear of snapping the 40 year old plastic . . . Once the doors have been cleaned up, the interior panels can be glued in place. The two outer pillar and doors assemblies are then ready to be fitted into the car, when the time comes . . . David
-
1:16 Gunze Sangyo 1937 Rolls-Royce Phantom III Sports Saloon
Anglia105E replied to Anglia105E's topic in WIP: Model Cars
No it's okay David, you didn't misread my post . . . From the two photos below, you can see the area of the luggage bay at the rear, where the blue tape is. The idea is to remove a rectangular section of that plastic to accommodate the uppermost suitcase . . . The case will slide under the rear parcel shelf that is part of the rear seat, so the space is there already. You mentioned fabricating a new suitcase, but the ones that I have made are already smaller than I would have liked. The dimensions of these cases is very odd, and they would have been custom made by Rolls-Royce, specifically for the Phantom III . . . David
-
1:16 Gunze Sangyo 1937 Rolls-Royce Phantom III Sports Saloon
Anglia105E replied to Anglia105E's topic in WIP: Model Cars
Two suitcases have been fabricated, and I added a strip of card around the top edge of the box to give the appearance of an opening top to the case. Following a test fit of the two cases inside the luggage compartment, it looks as though the top case will prevent the boot lid from closing. I should be able to cut out a rectangular hole in the back of the luggage bay, and the top case can then move further into the car. I also had the idea to add a monogram in gold for A. J. W. on each case, as well as a luggage label hanging on a string from the case handle, which might have the travel destination ' Geneva ' on the label . . . Both the driver's side rear door and the passenger side rear door hinges have been heat sealed onto the inside of the door panels today, using the tip of a screwdriver heated in the flame of a tea light . . . The heat sealing procedure was quite a tense affair, but all seemed to go according to plan. I am hoping to complete the two front doors tomorrow. David
-
1:16 Gunze Sangyo 1937 Rolls-Royce Phantom III Sports Saloon
Anglia105E replied to Anglia105E's topic in WIP: Model Cars
I understand what you mean about the personalised vanity plates now, and that is actually a relevant description. Yes it was indeed George Bernard Shaw who first used that phrase, and later Winston Churchill used a similar phrase. The mirror plates are triangular metal brackets with three holes in them, and they are used for hanging framed pictures and mirrors . . . David -
1:16 Gunze Sangyo 1937 Rolls-Royce Phantom III Sports Saloon
Anglia105E replied to Anglia105E's topic in WIP: Model Cars
Your compliments are well received here at the coachbuilders' . . . There was probably more work required for those door pillars / posts than I had anticipated, but I feel they have turned out quite well . . . I think the suitcases should be more interesting than simply an empty luggage compartment. When you refer to Mr Webb's ' vanity plates ' did you mean ' registration number plates? ' . . . You were probably thinking of the vanity mirrors, which I shall be scratch building also . . . David -
That gold paint colour is really nice Les, and I like the greenish tinge to it . . . David
-
1:16 Gunze Sangyo 1937 Rolls-Royce Phantom III Sports Saloon
Anglia105E replied to Anglia105E's topic in WIP: Model Cars
Finished the two outer door pillars today, and these are now ready to be fitted later . . . The drop down door window glass had fallen out of the door frame, so this was glued back in place with super glue. Previously I had used Crystal Clear glue, but this wasn't able to hold the glass on a thin channel. The other day I had an idea to scratch build two vintage suitcases for the luggage compartment, and I decided to get one of the suitcases drawn out on thin white card . . . This drawing has now been cut out, and I am hoping to score and bend the tabs to form the box shape. Hoping to spray rubberised black over the white card, then brush paint matt brown over the black textured surface, and then create the leather look using a black enamel wash and Satin Cote to finish . . .The suitcases will have hinges and handles added, and one case will go on top of the other, inside the boot. David
-
1:16 Gunze Sangyo 1937 Rolls-Royce Phantom III Sports Saloon
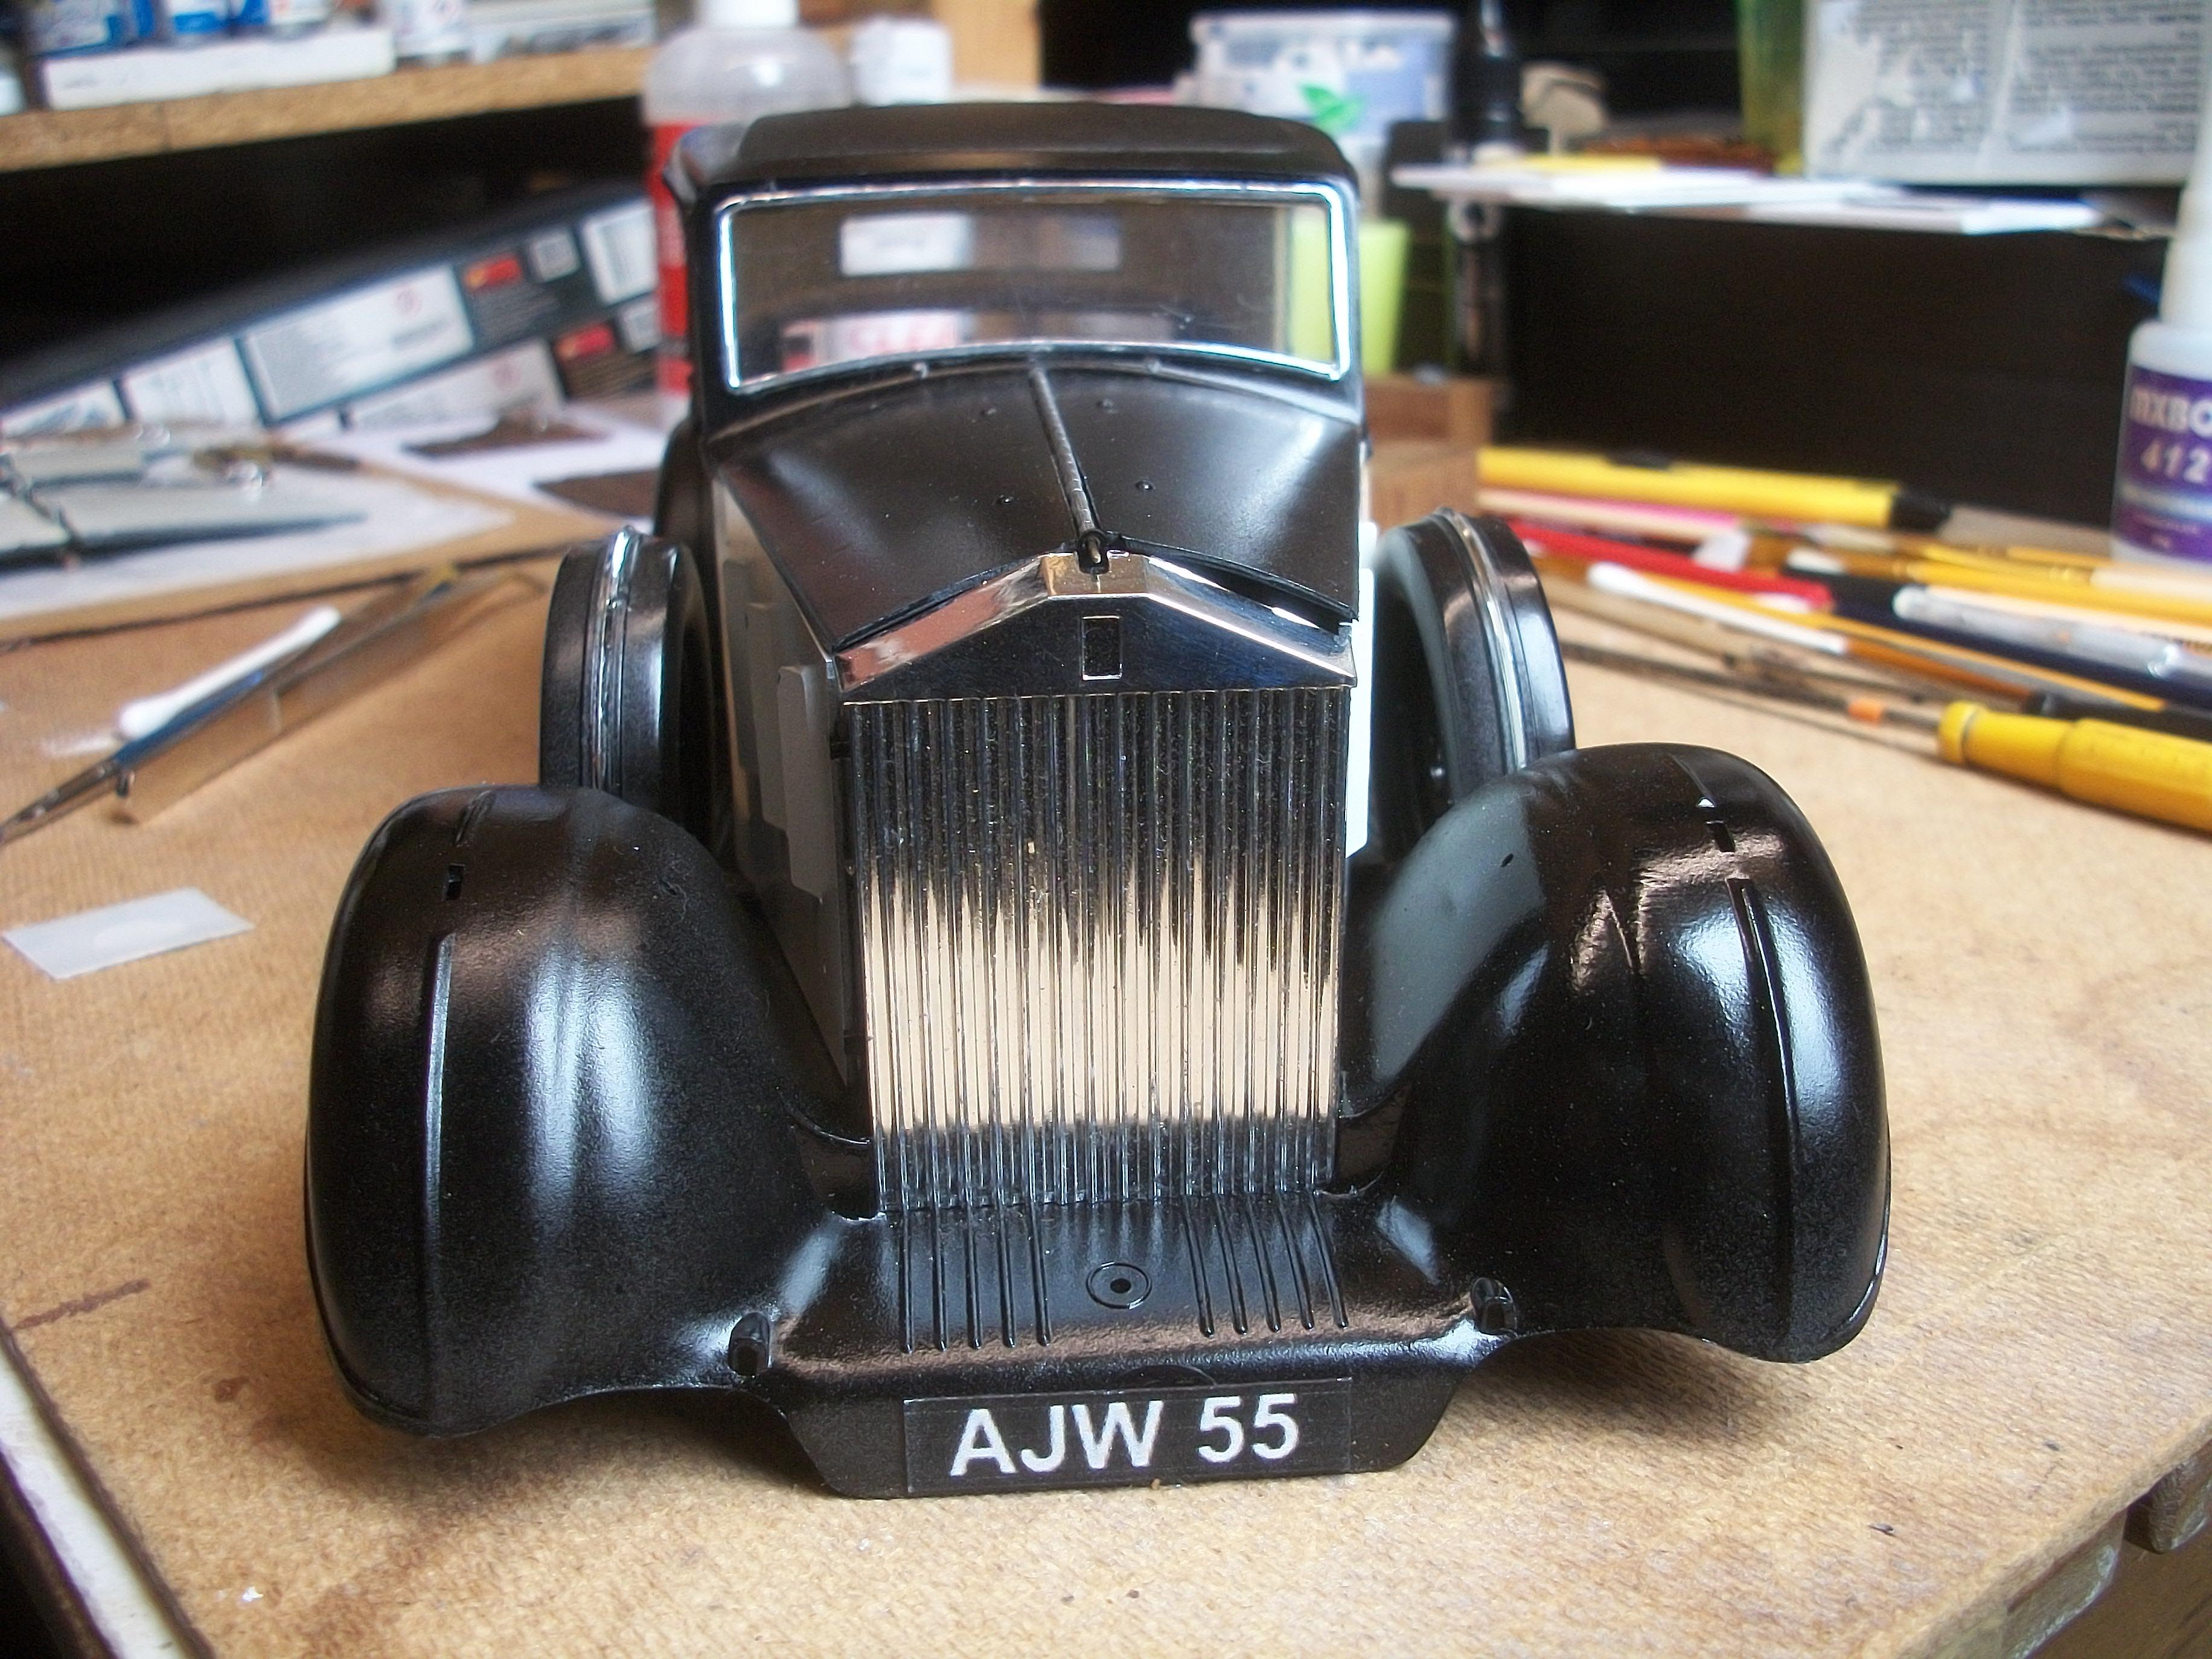
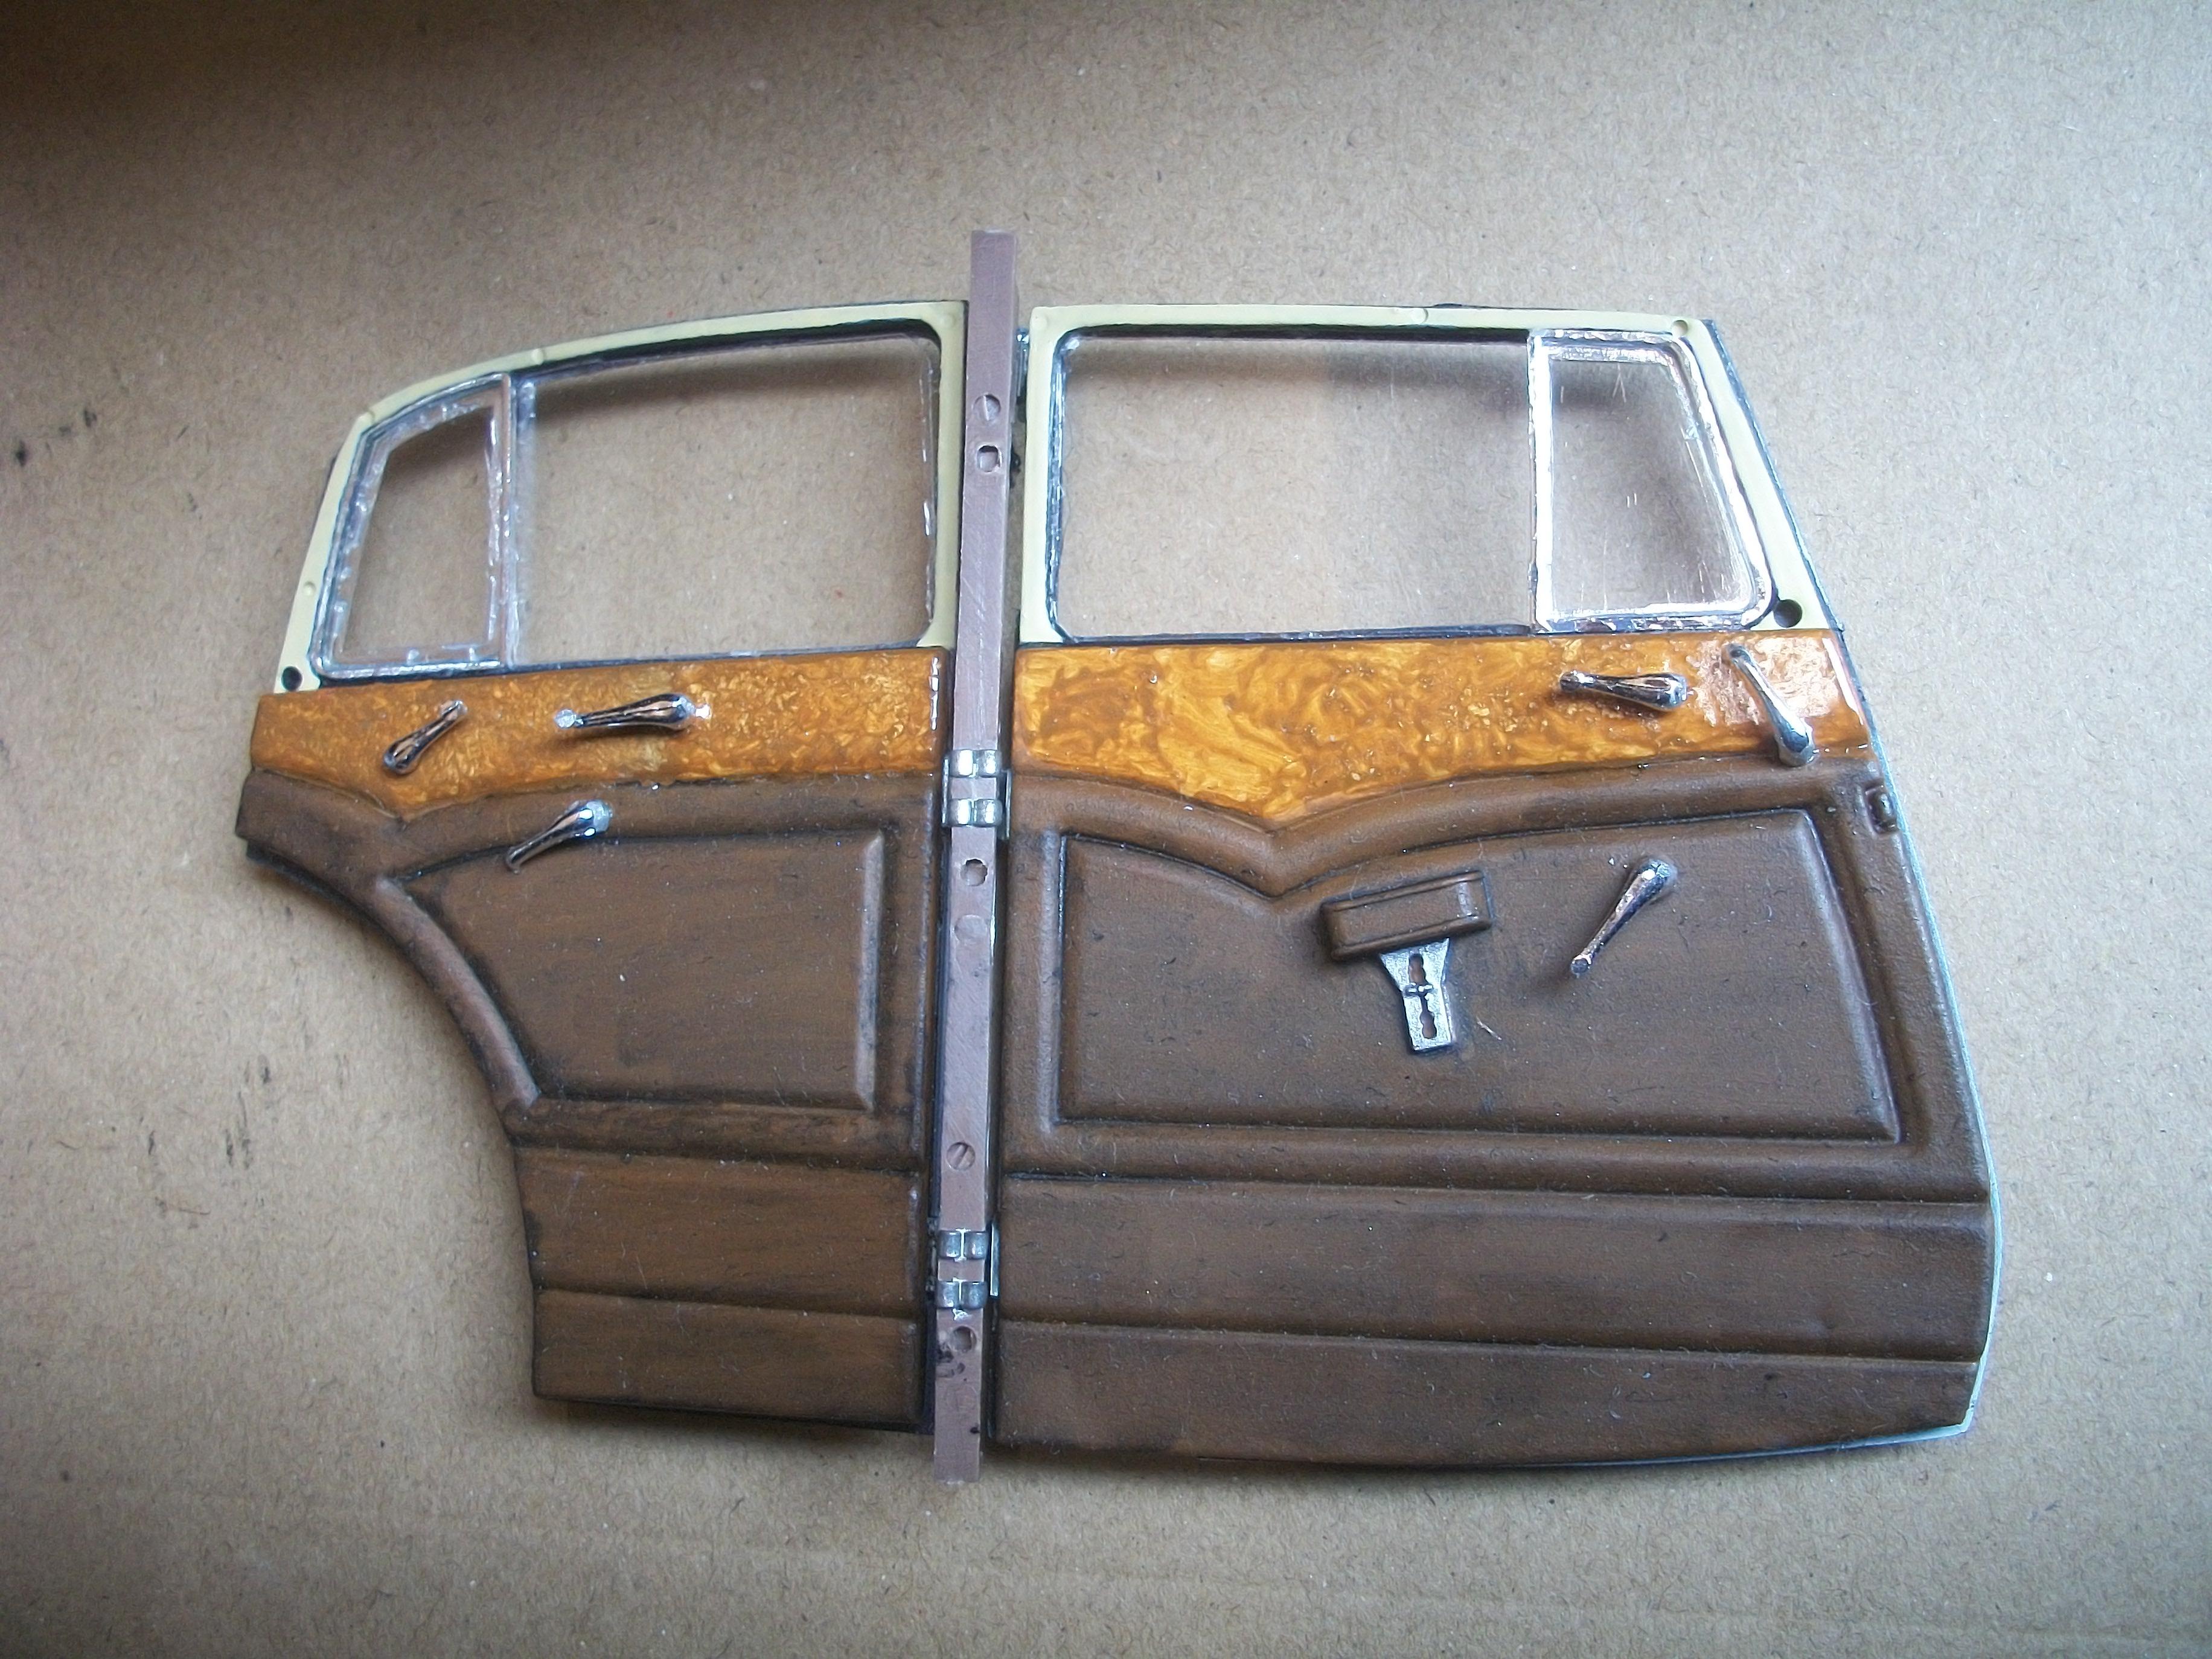
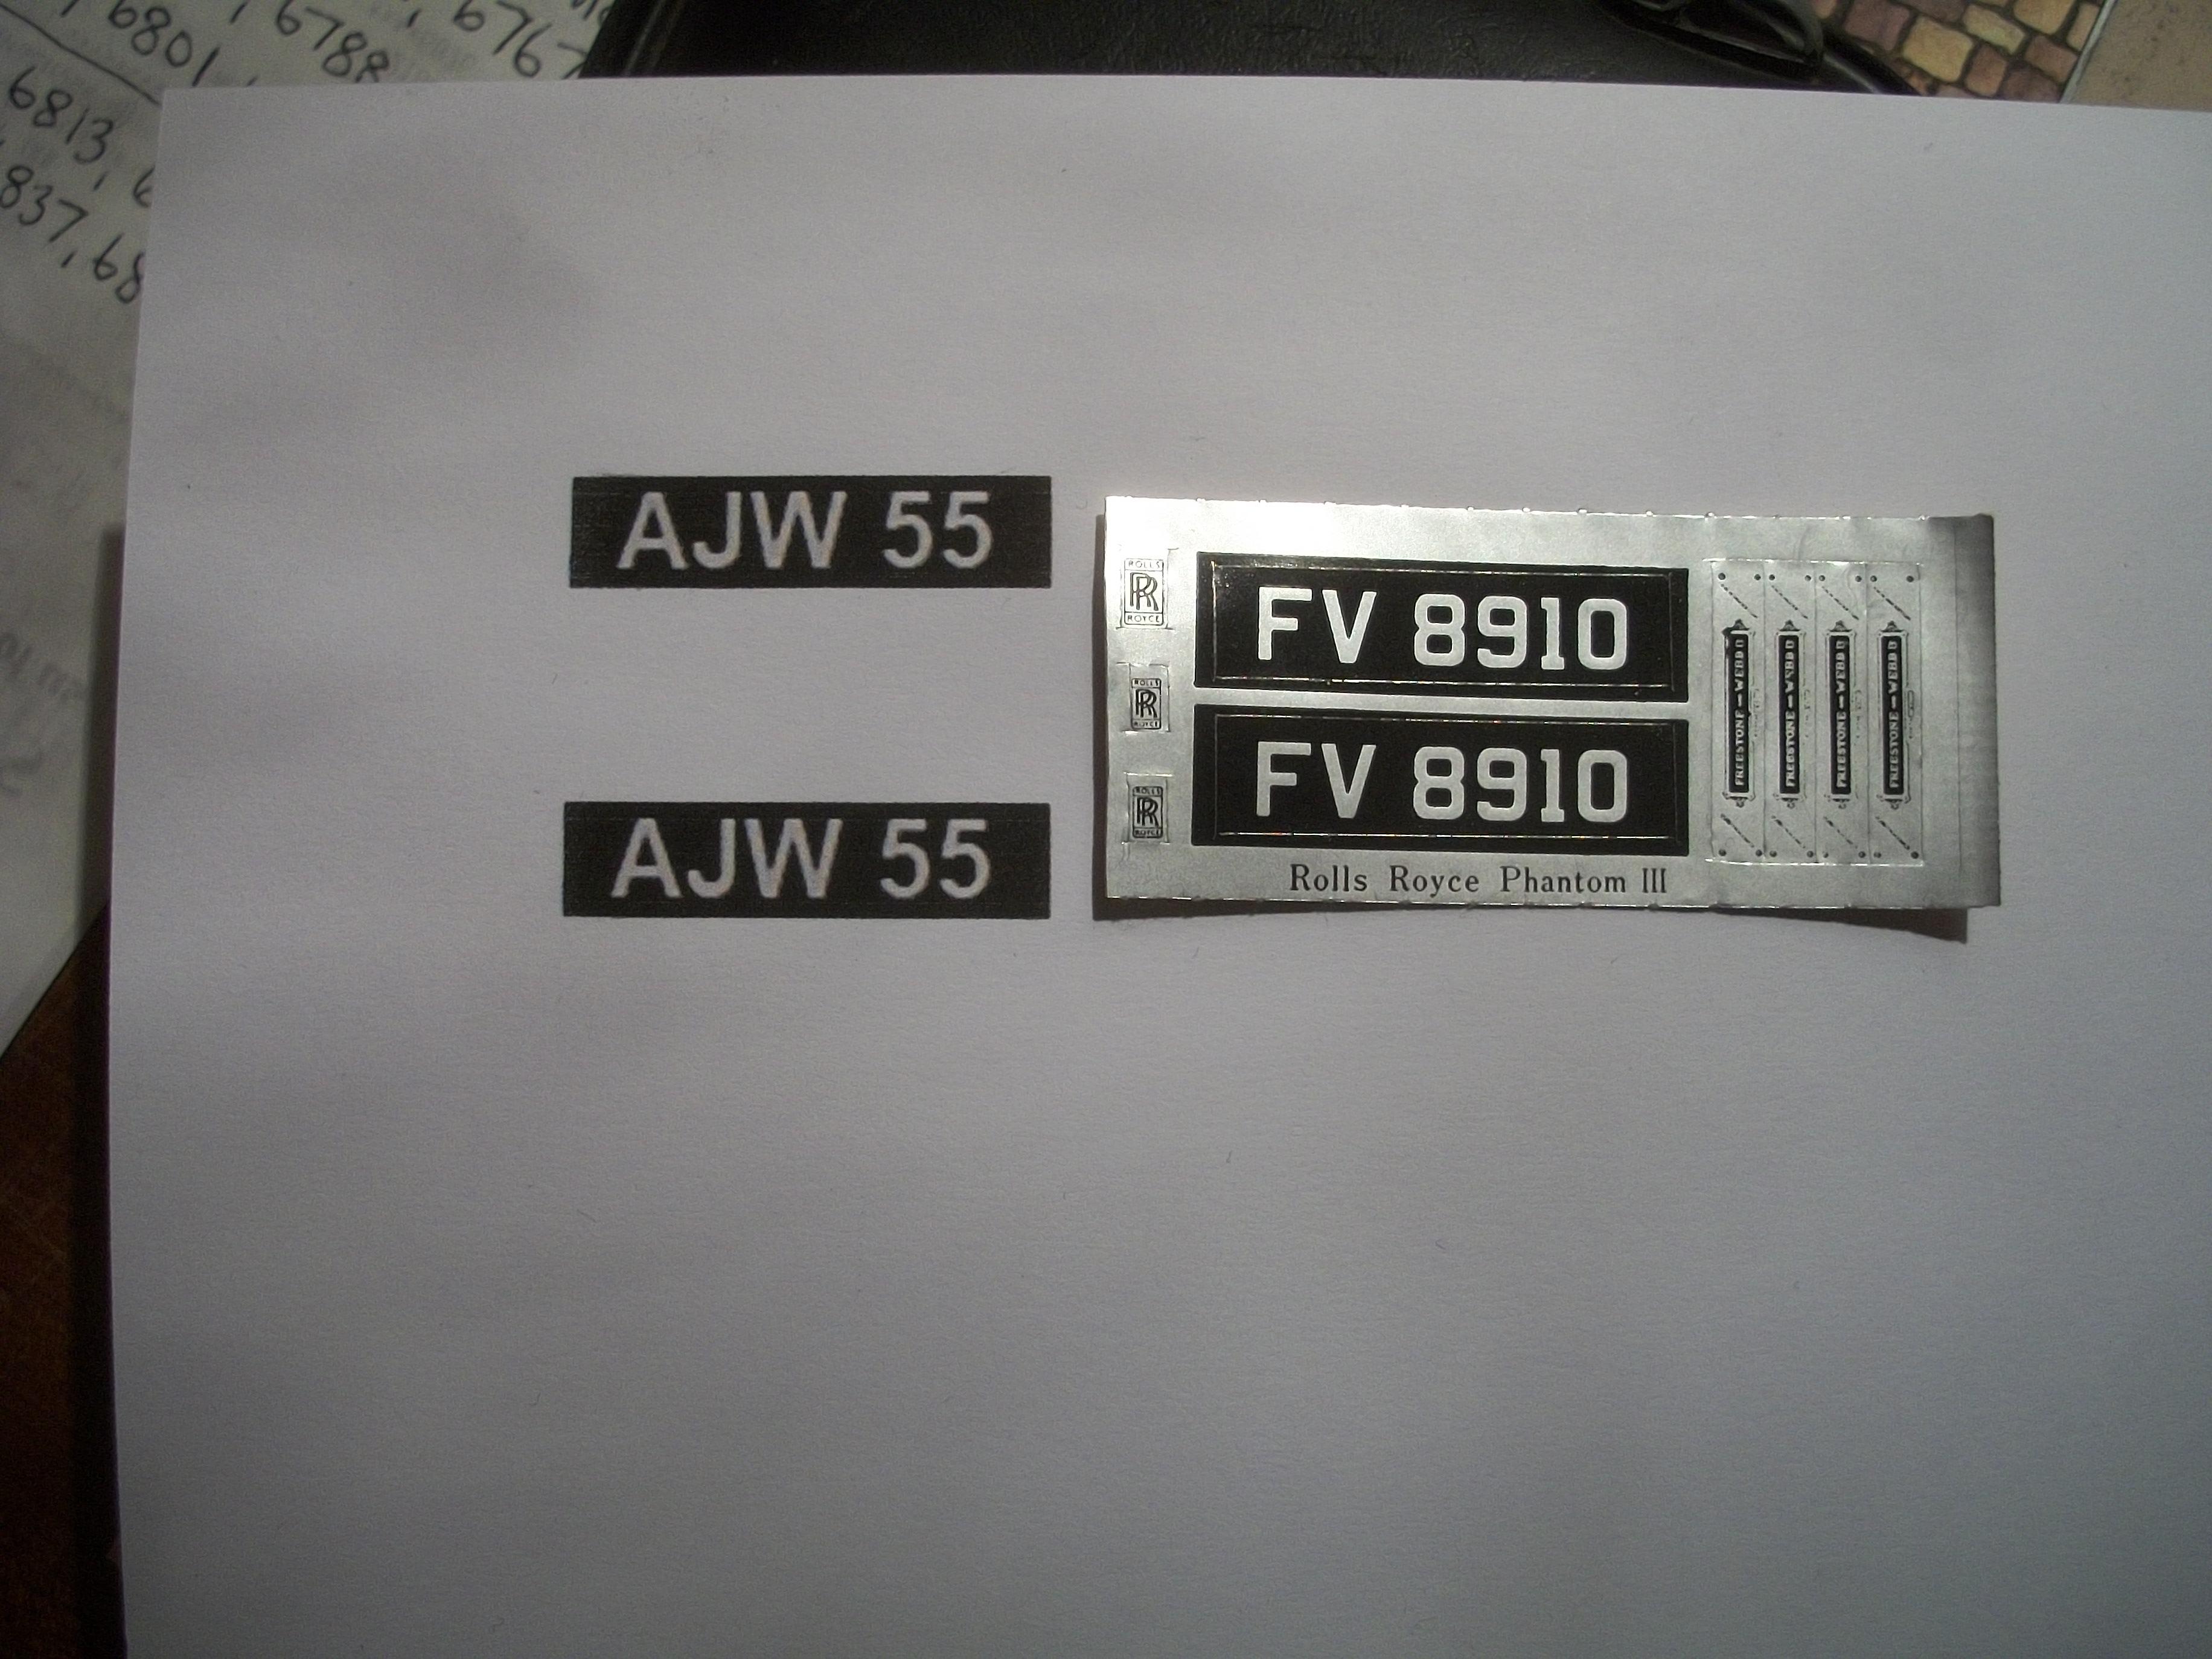
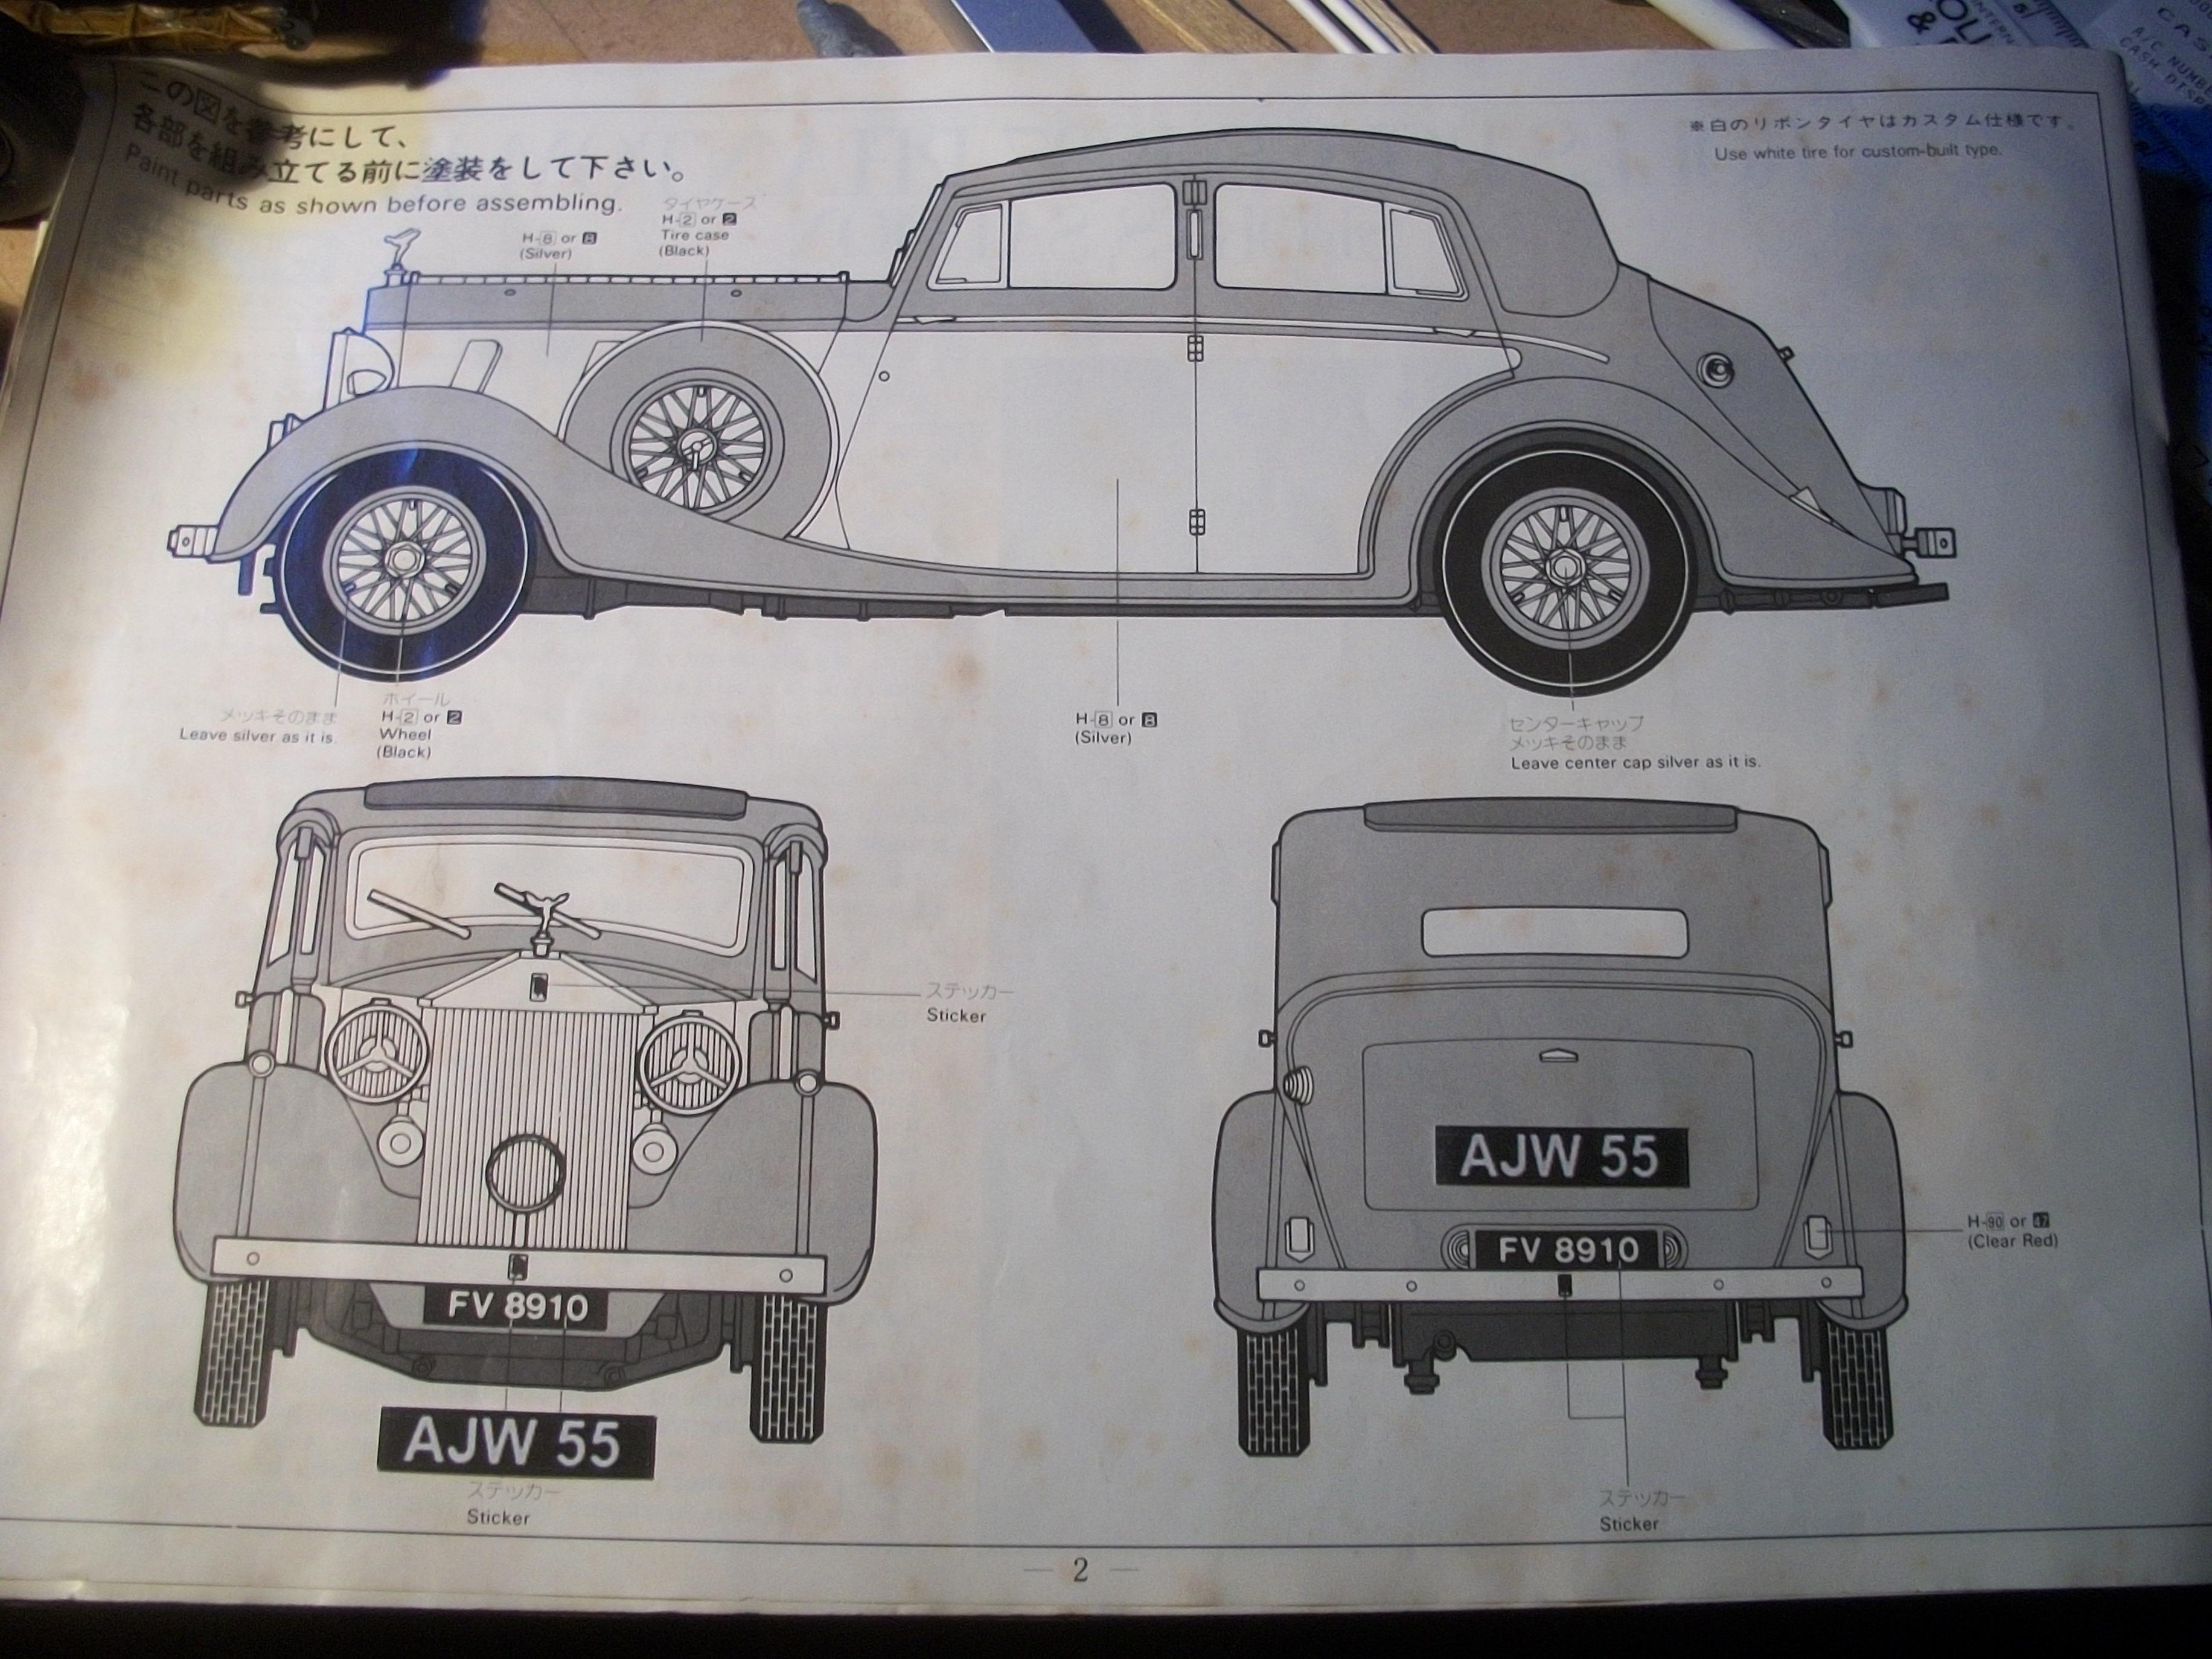
Anglia105E replied to Anglia105E's topic in WIP: Model Cars
The rear end of the upper body has been polished, around the boot lid and rear window area . . . With the boot handle mounted but not yet glued, this work was photographed. The registration number plates that I shall be using are ' AJW 55 ' , as opposed to the kit number plates ' FV 8910 ' . . . The number ' AJW 55 ' was never used, so this is my idea . . . Arthur J. Webb was the business partner of V. E. Freestone, and these two gentlemen founded the coachbuilding company that was Freestone and Webb . . . During 1937 when this particular Rolls-Royce Phantom III was built, A. J. Webb would have been 55 years of age. Mr Webb passed away in 1955, which was also the first year of production for the Silver Cloud model . . . This is how I arrived at ' AJW 55 ' . Having decanted some Tamiya TS-7 Racing White paint into a plastic shot glass today, I brush painted the lower sections of the two outer door pillars. This includes the two metal hinges in the cream body colour . . . Black enamel was then applied to the upper sections of the door pillars, which includes the brackets for the trafficators, and also the two ' dummy ' hinges at the top of the doors . . . David