Anglia105E
-
Posts
3,487 -
Joined
-
Last visited
Content Type
Profiles
Forums
Events
Gallery
Everything posted by Anglia105E
-
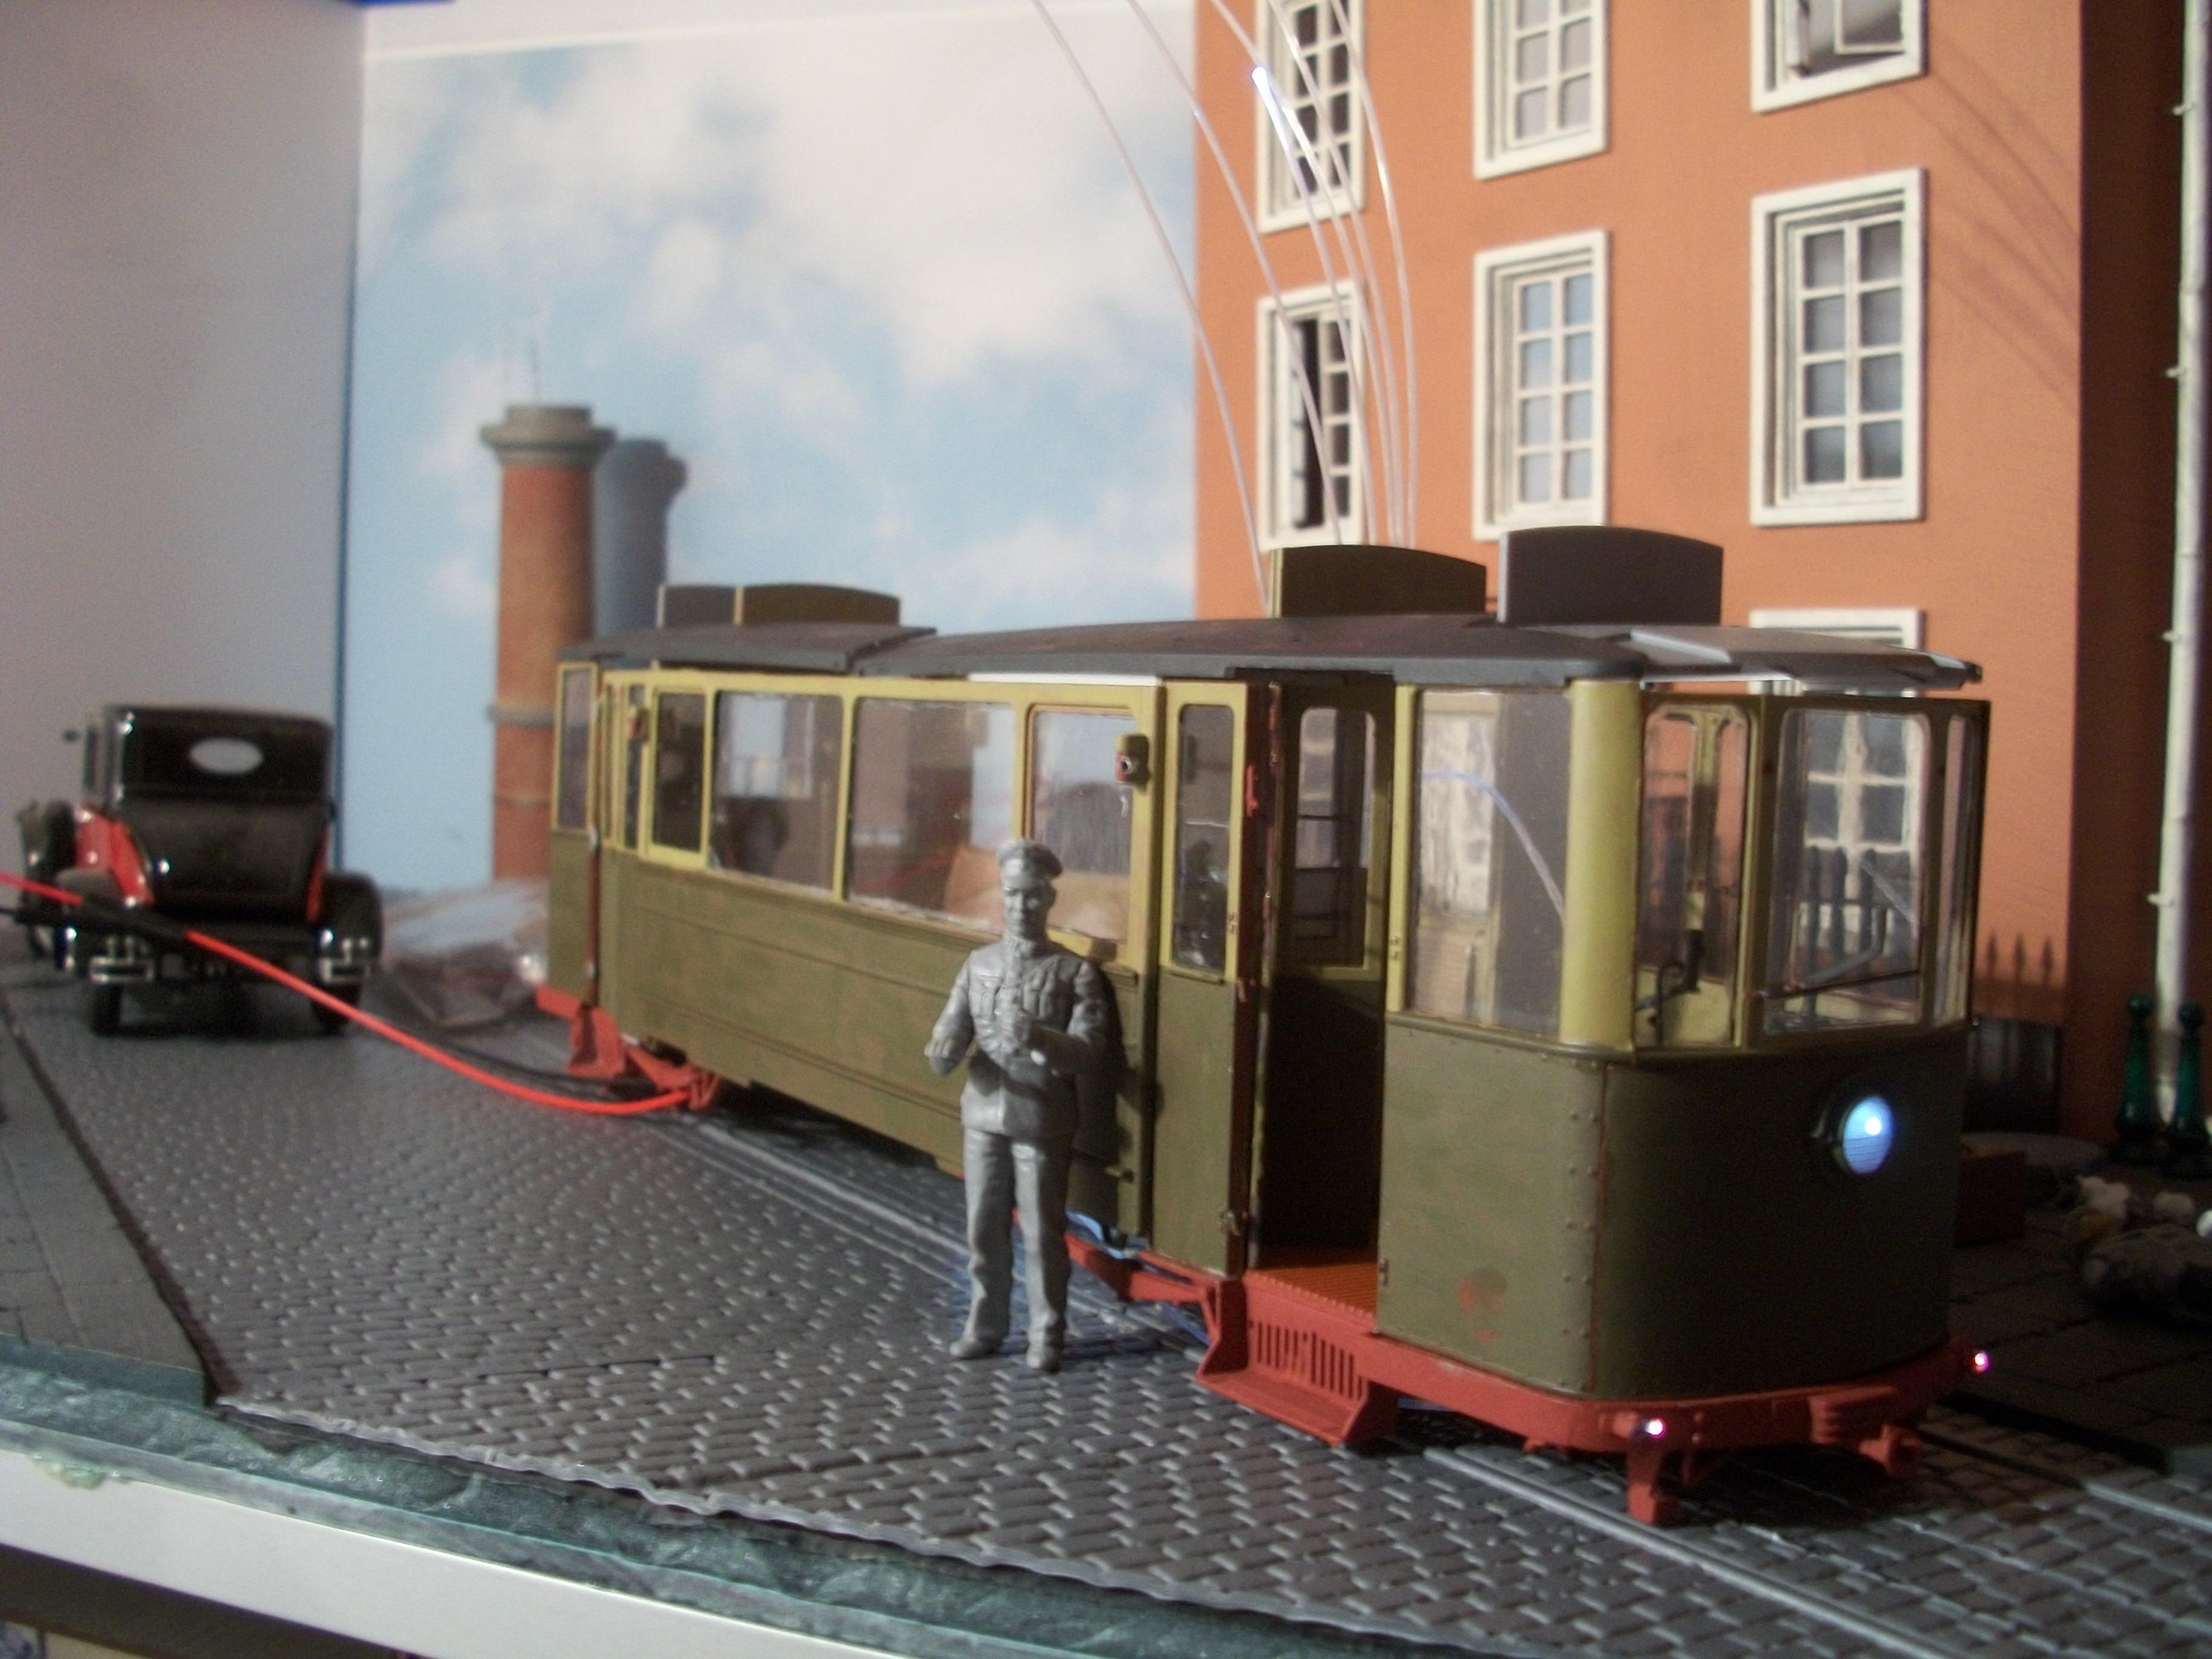
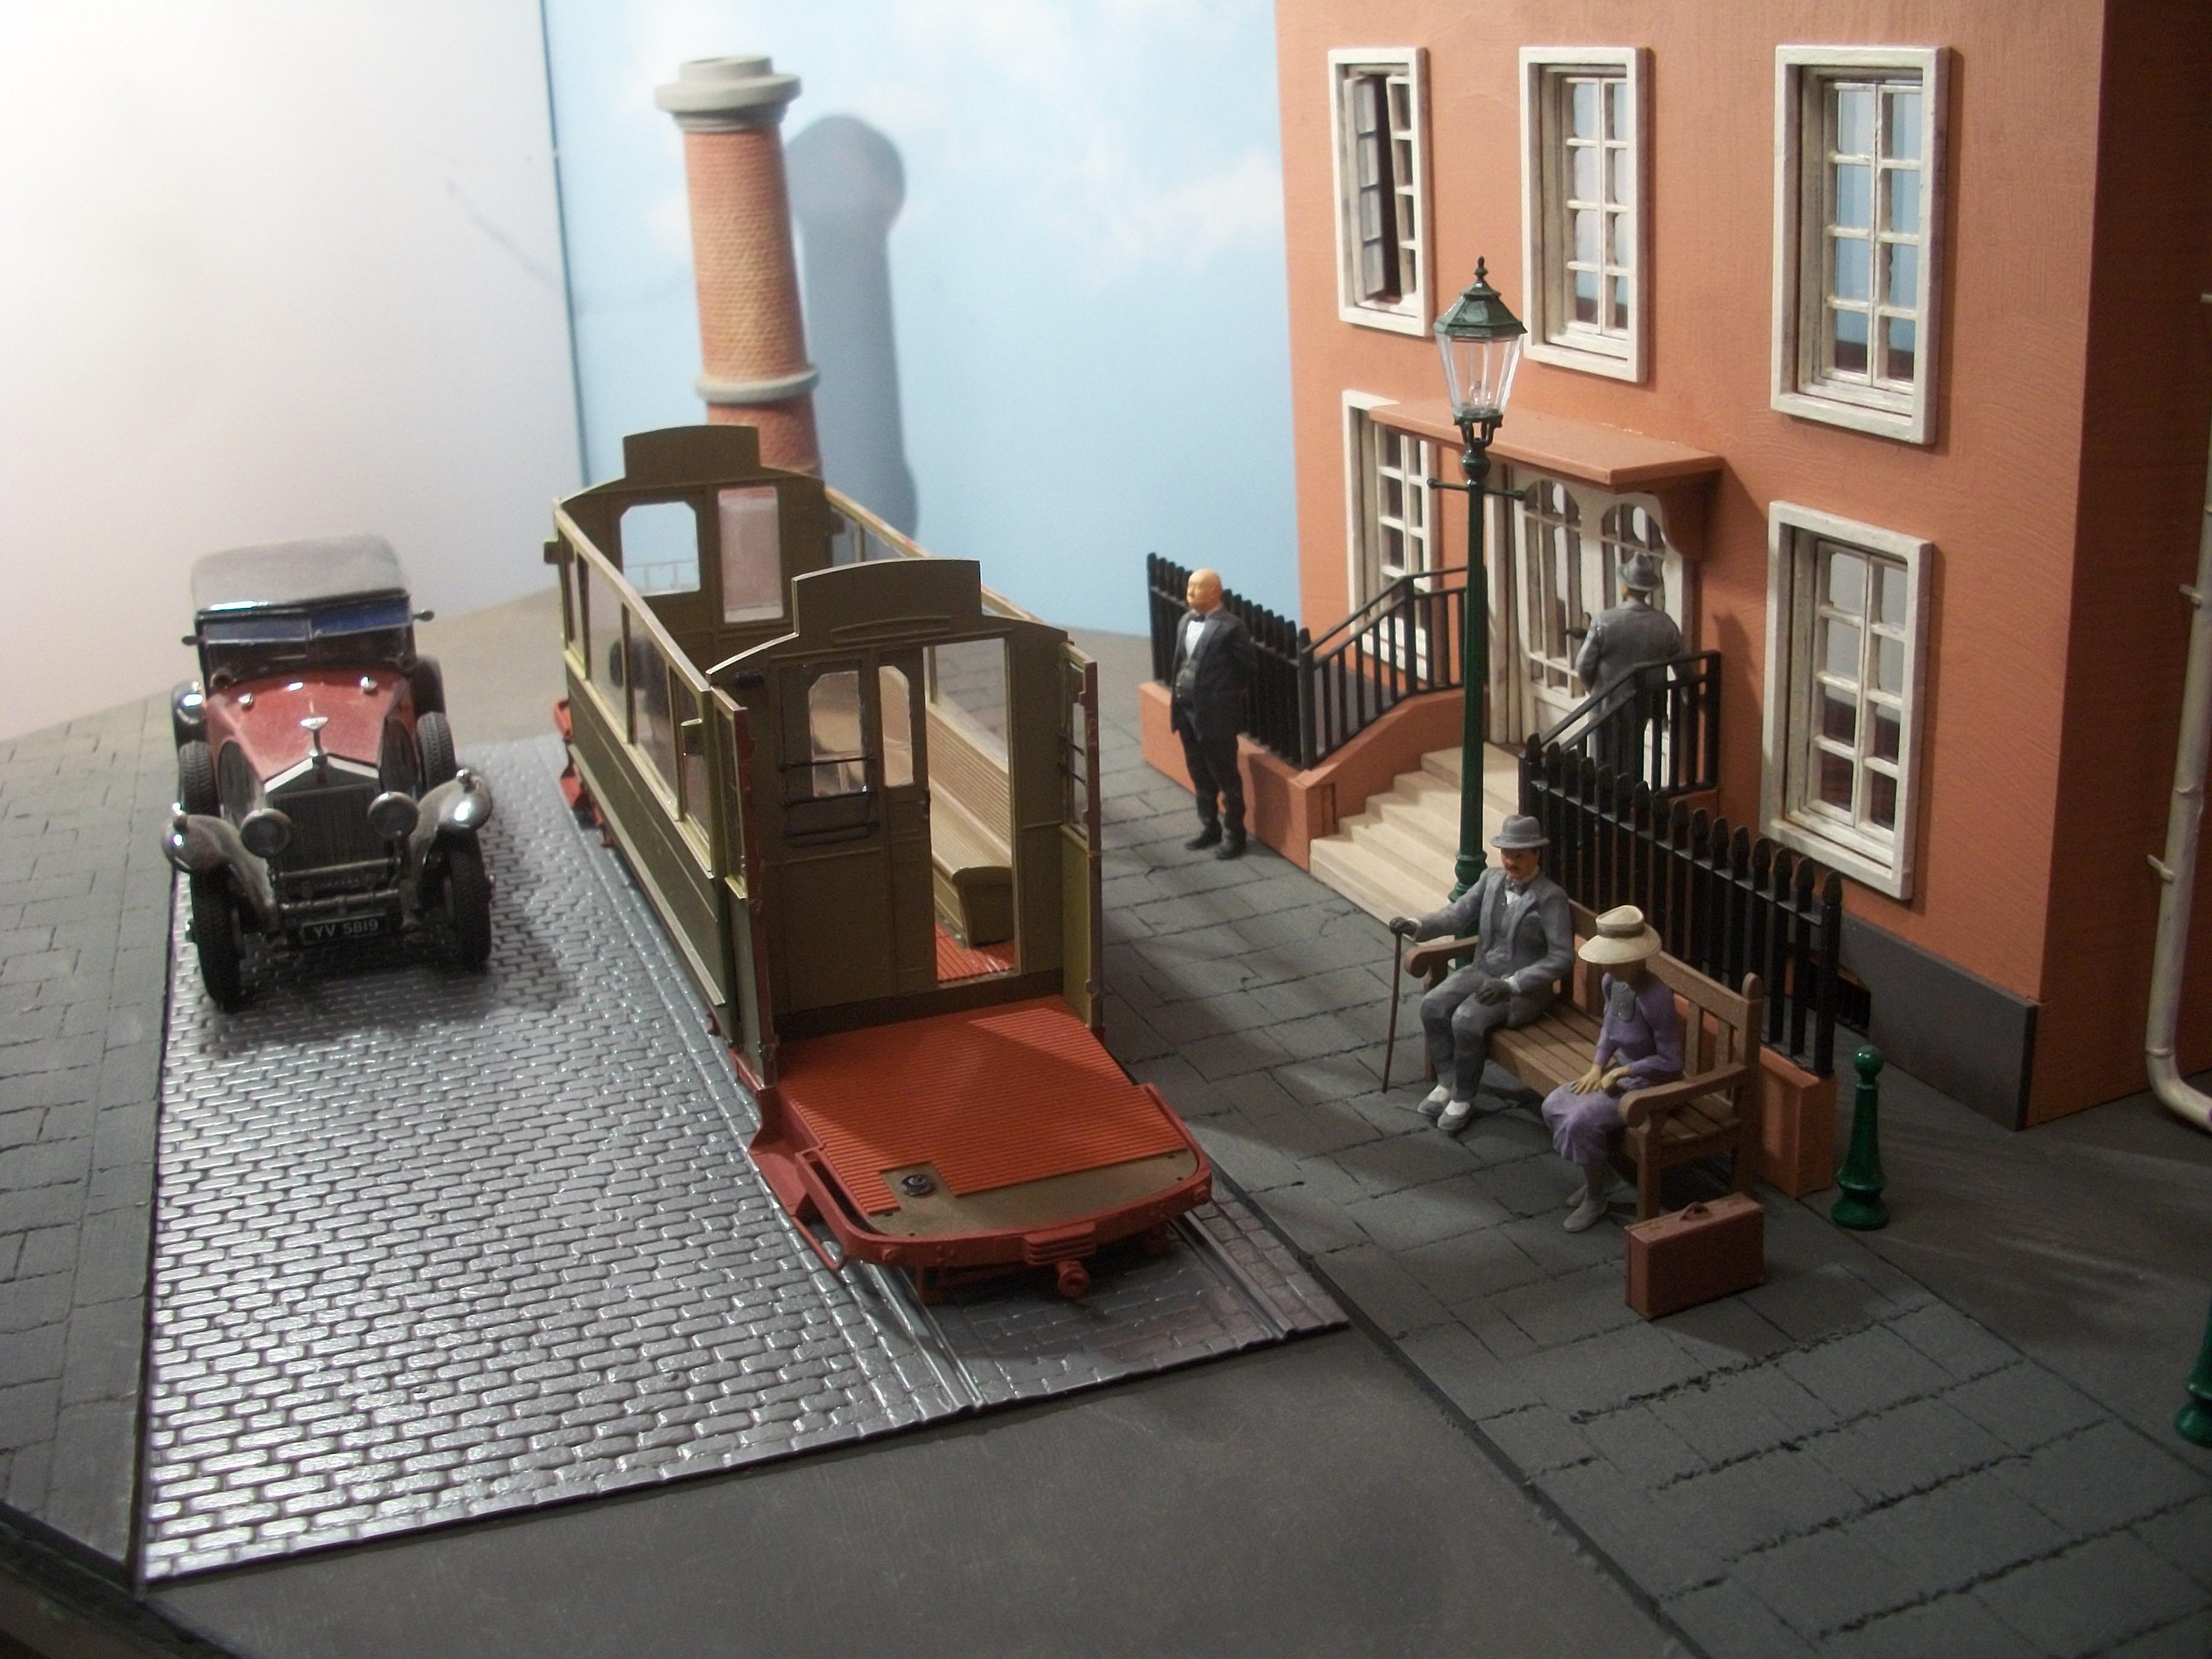
Well spotted, Paul . . . . . the man himself is taking the tram car to the next film set. David
-
Two 300 ml bottles of water should do the trick ! ( and I enjoyed the apple juice also ) David
-
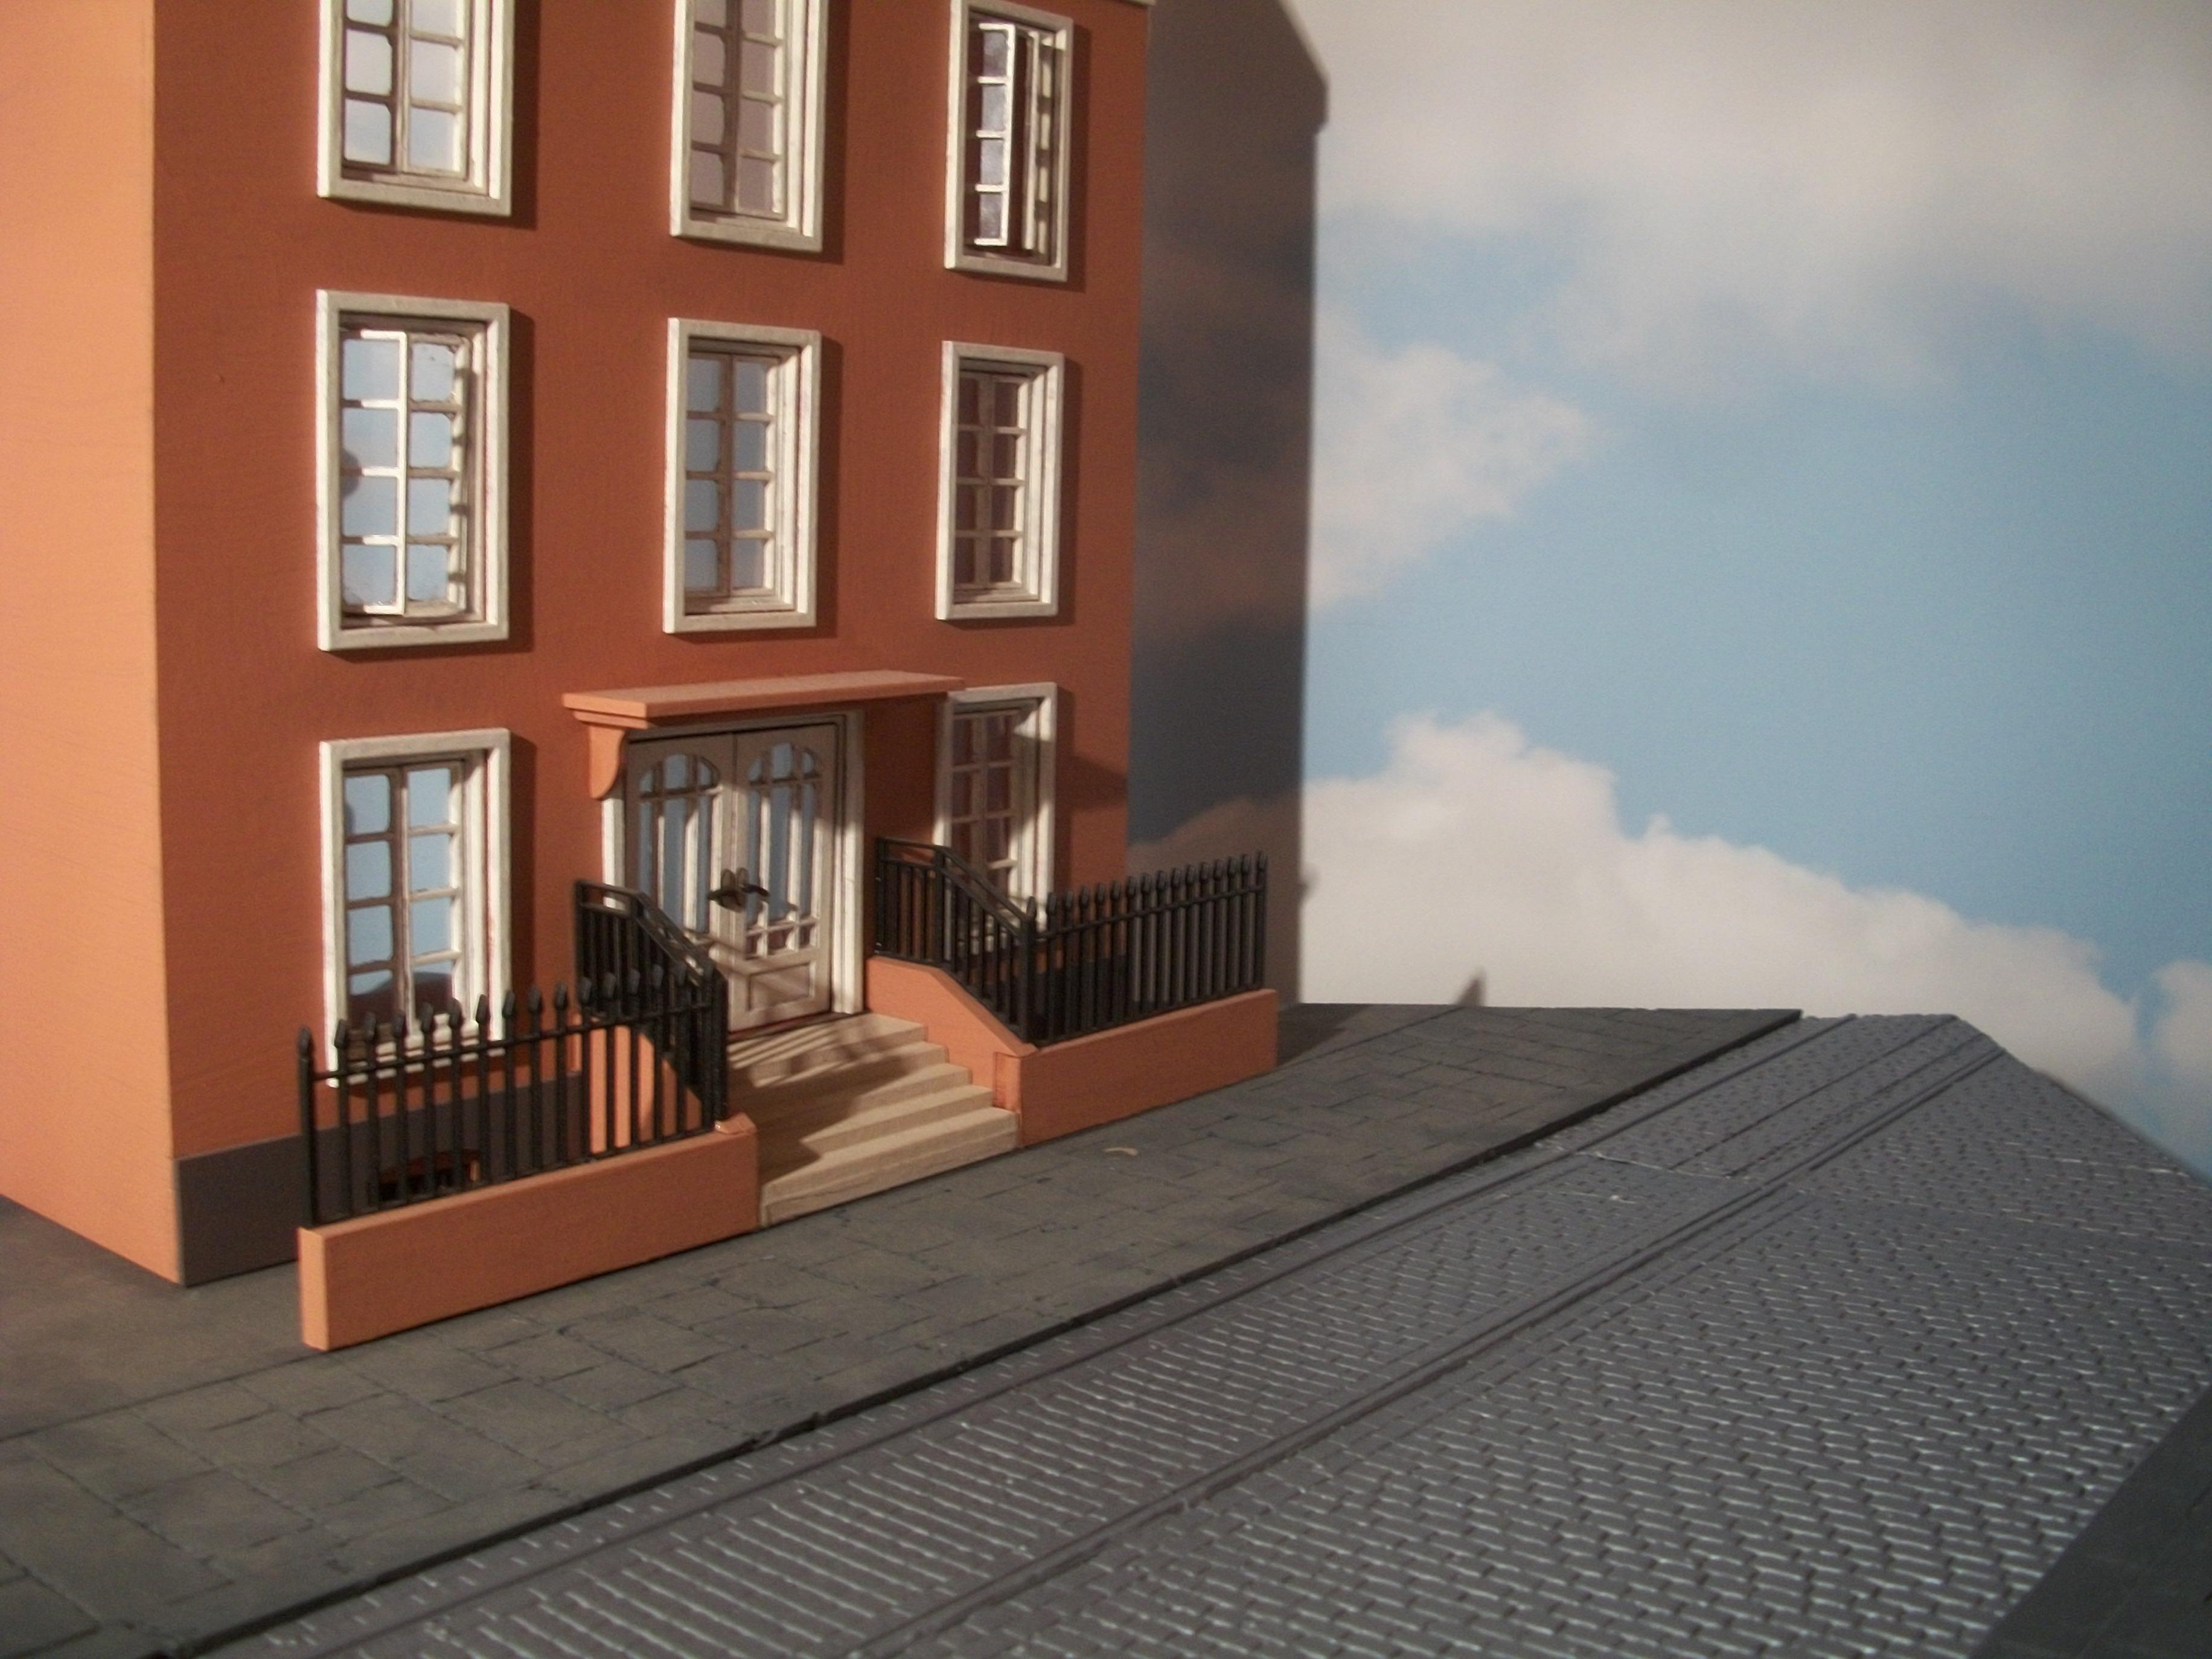
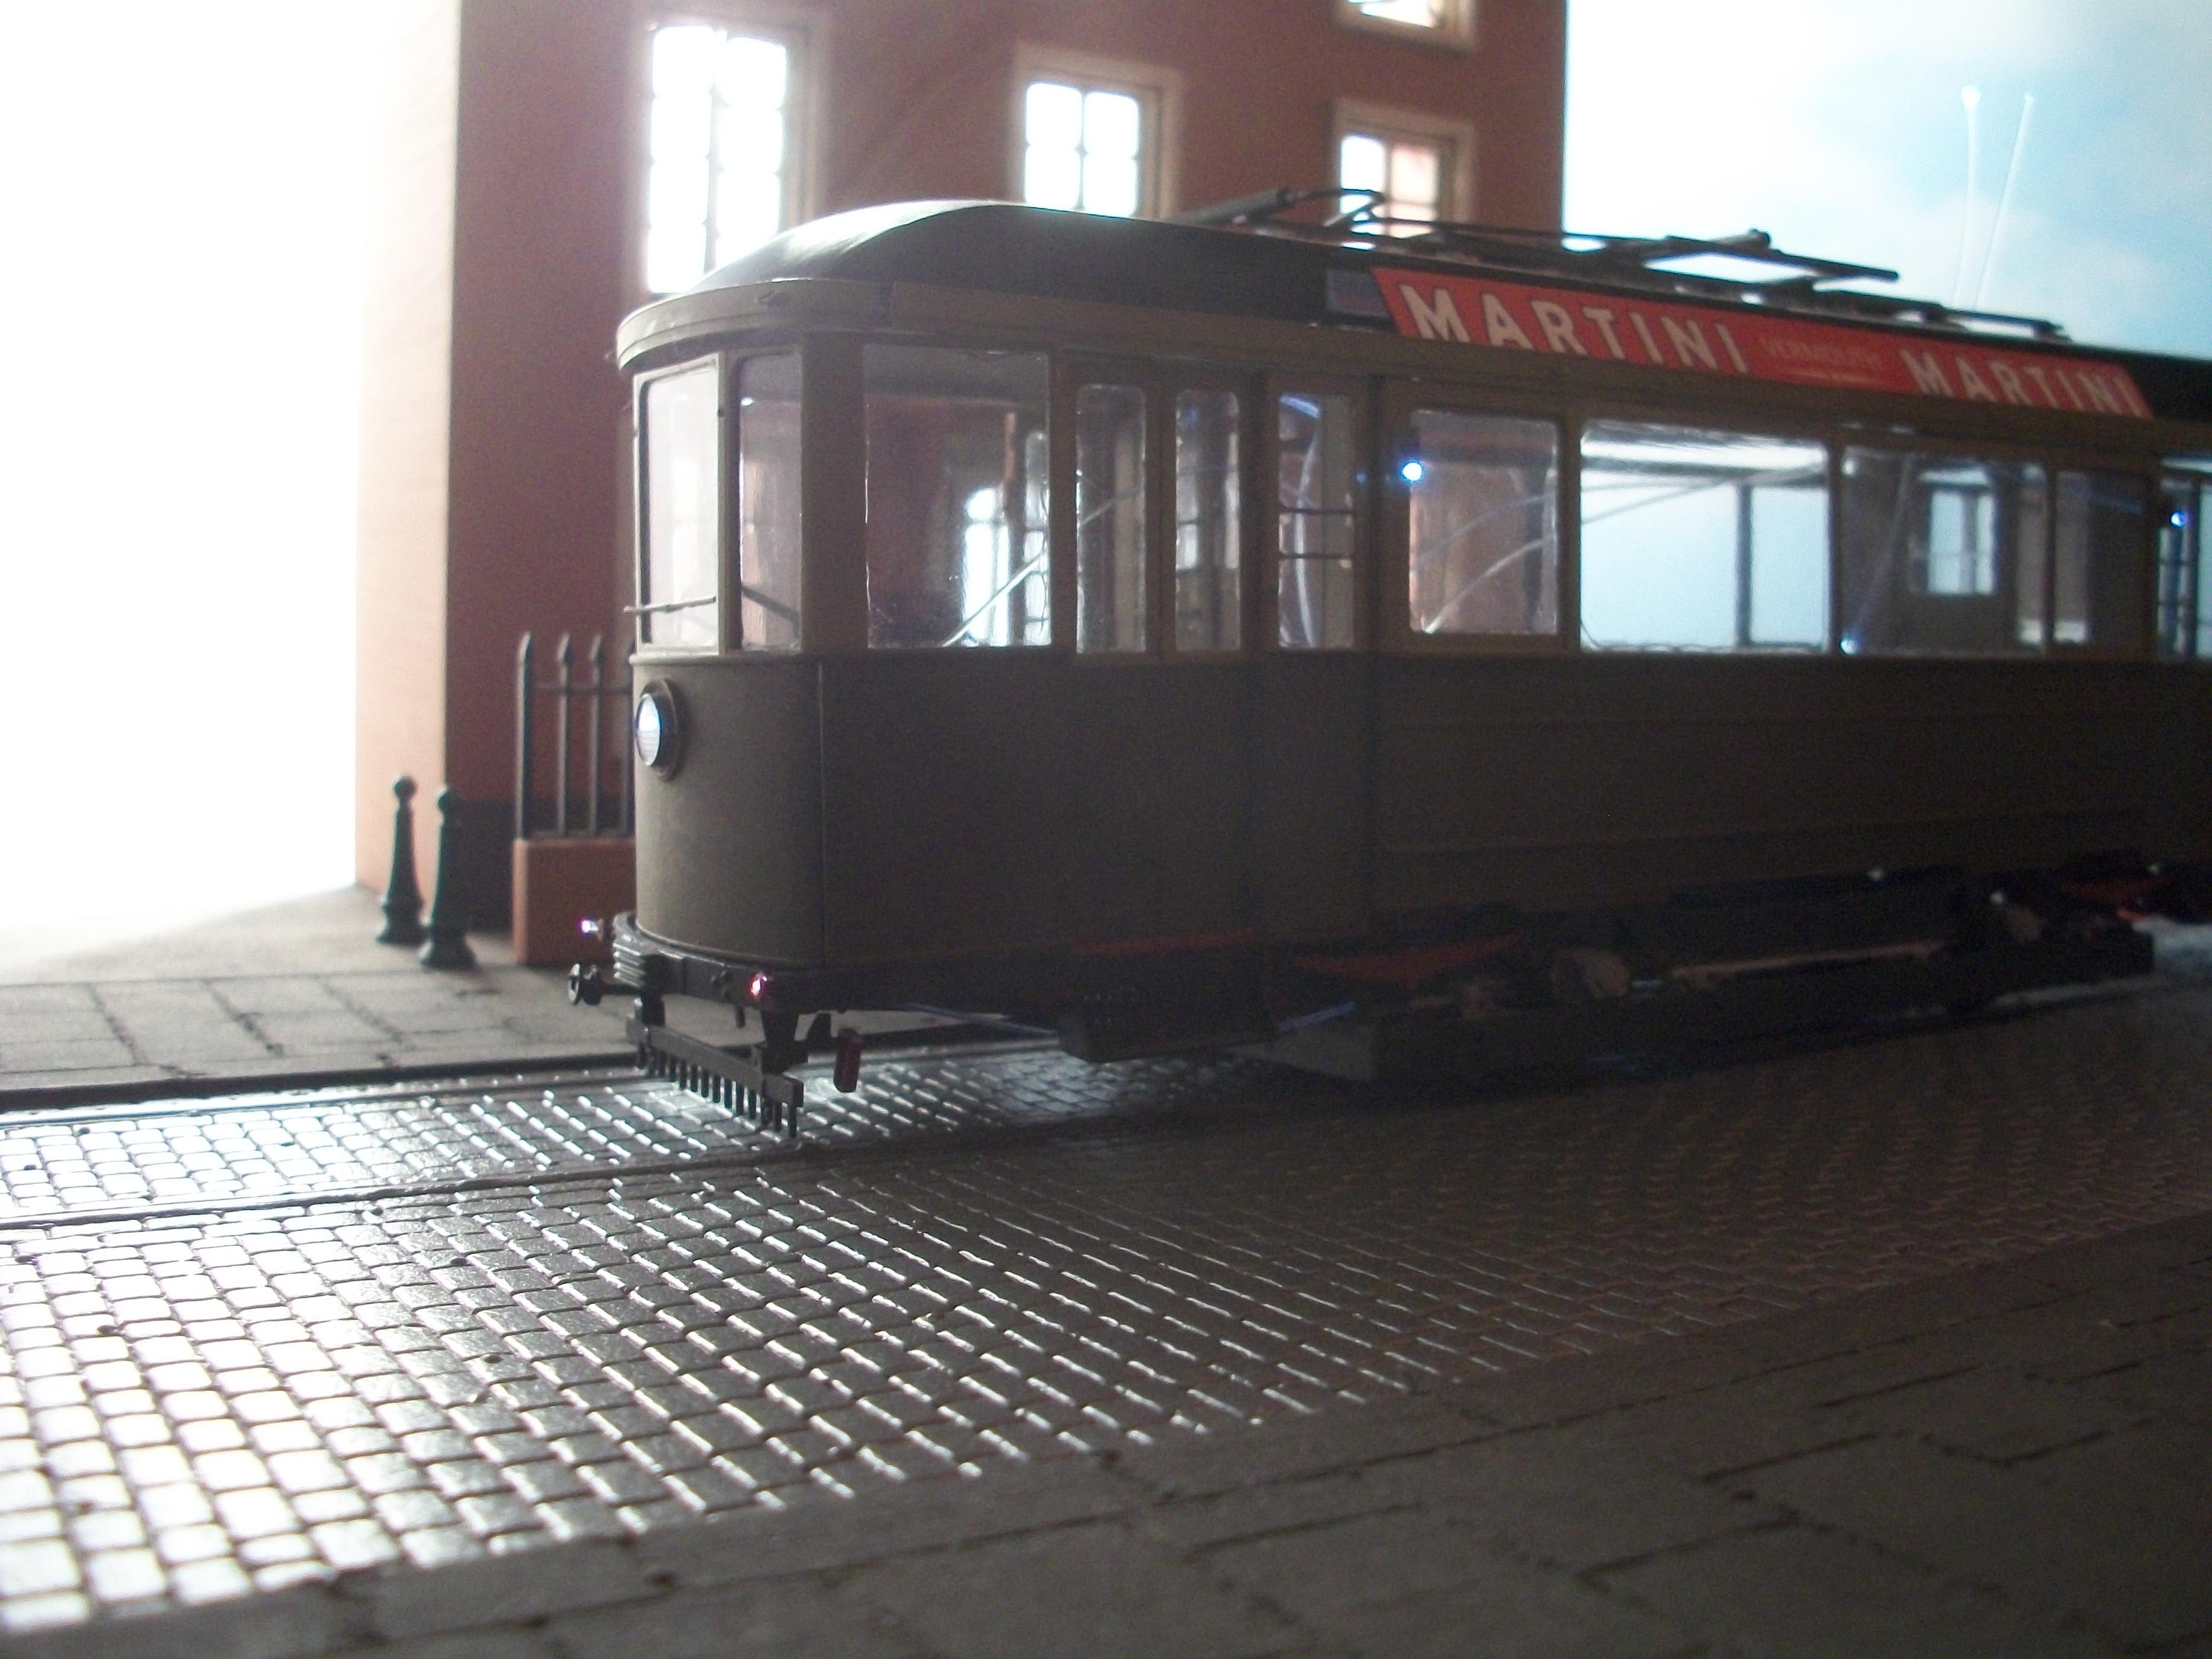
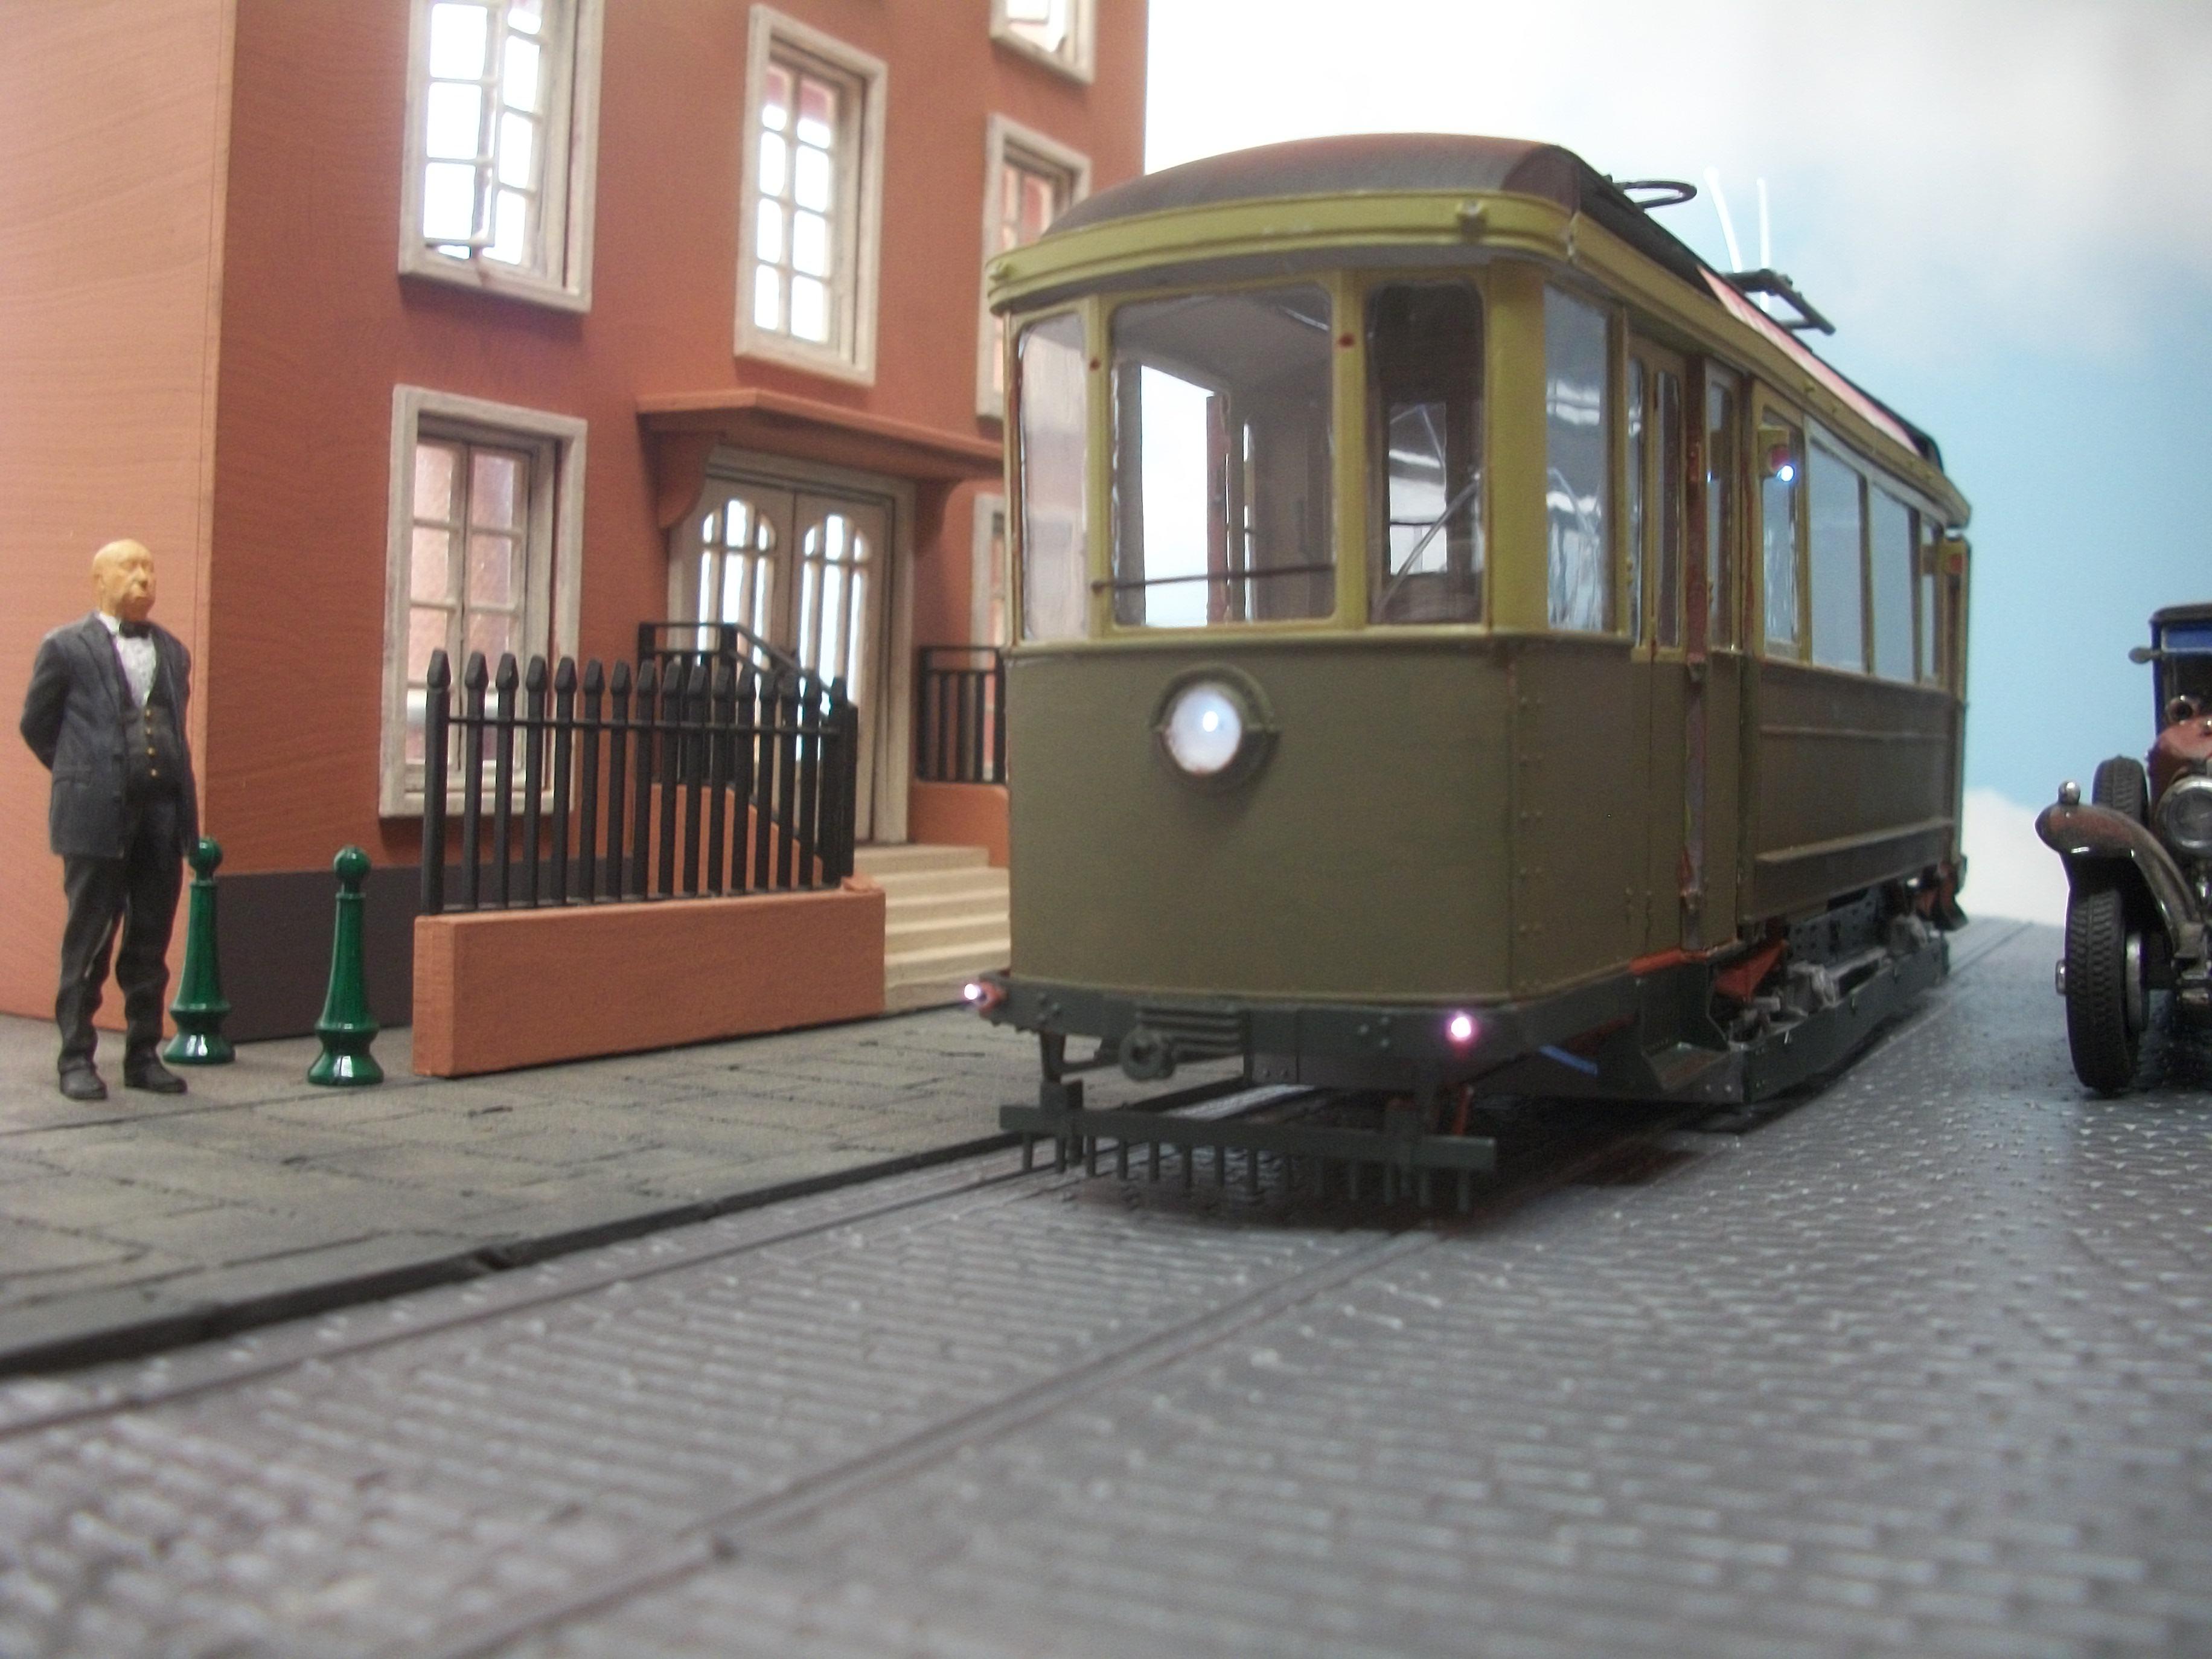
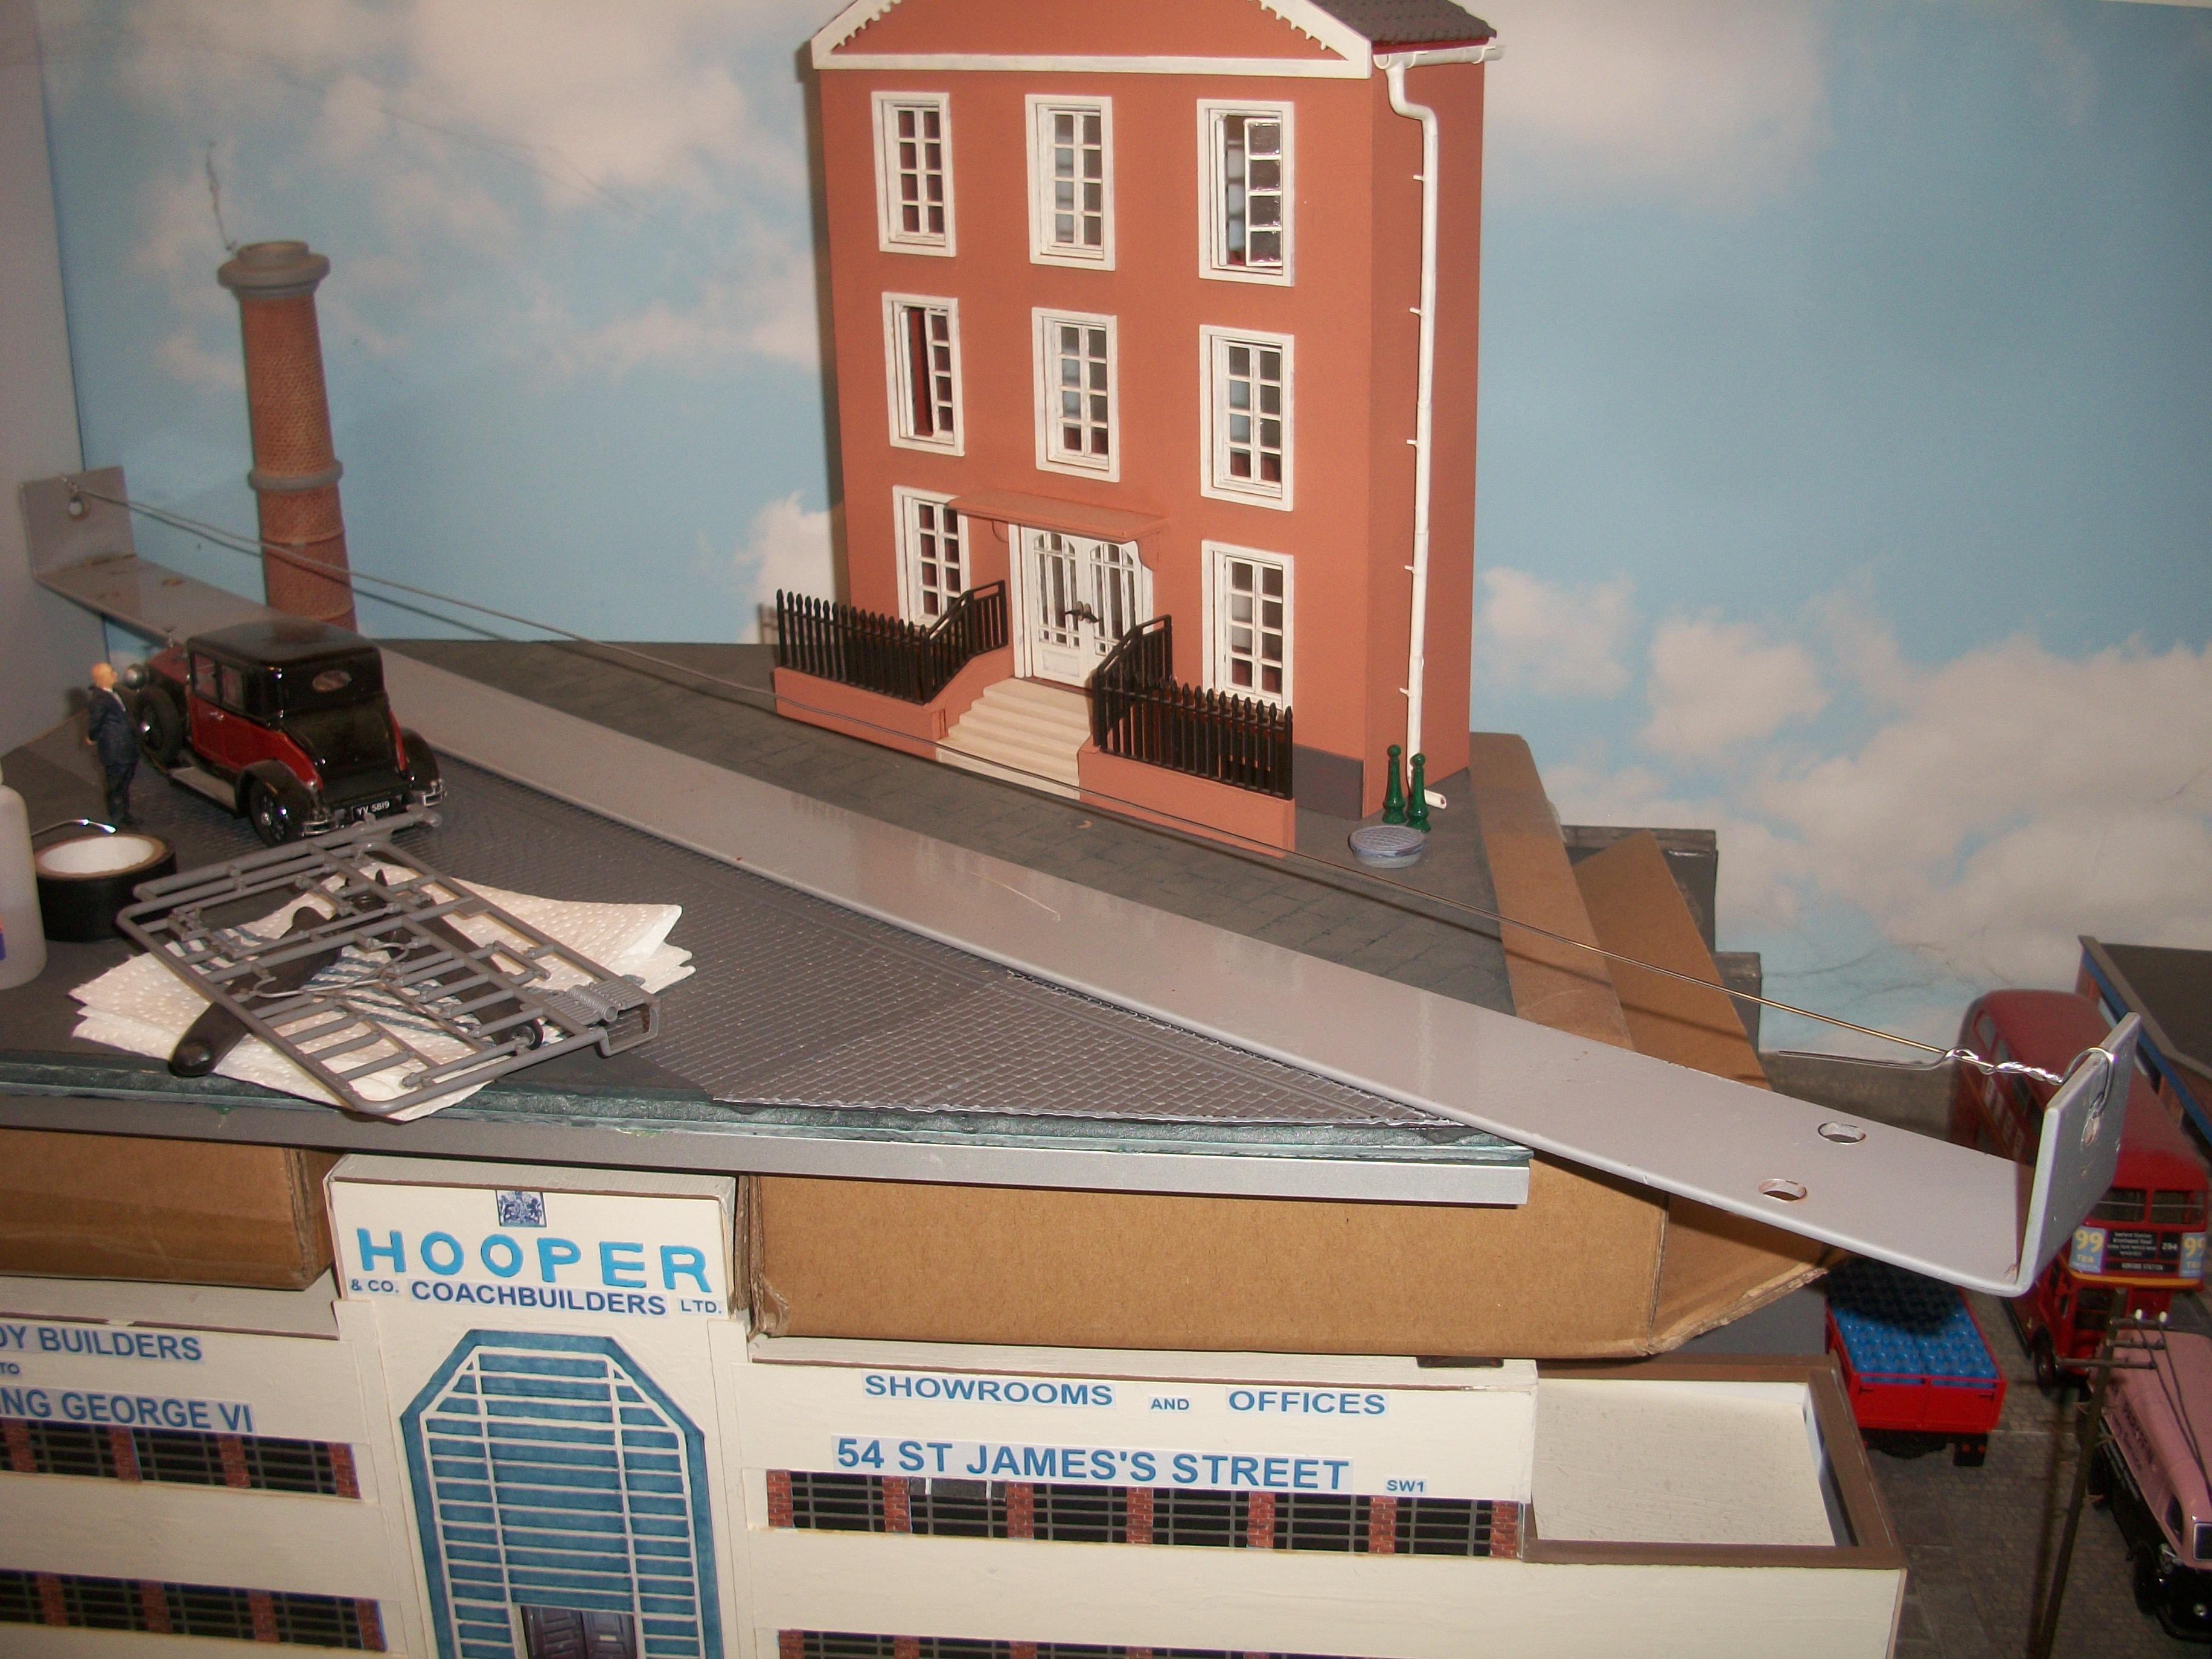
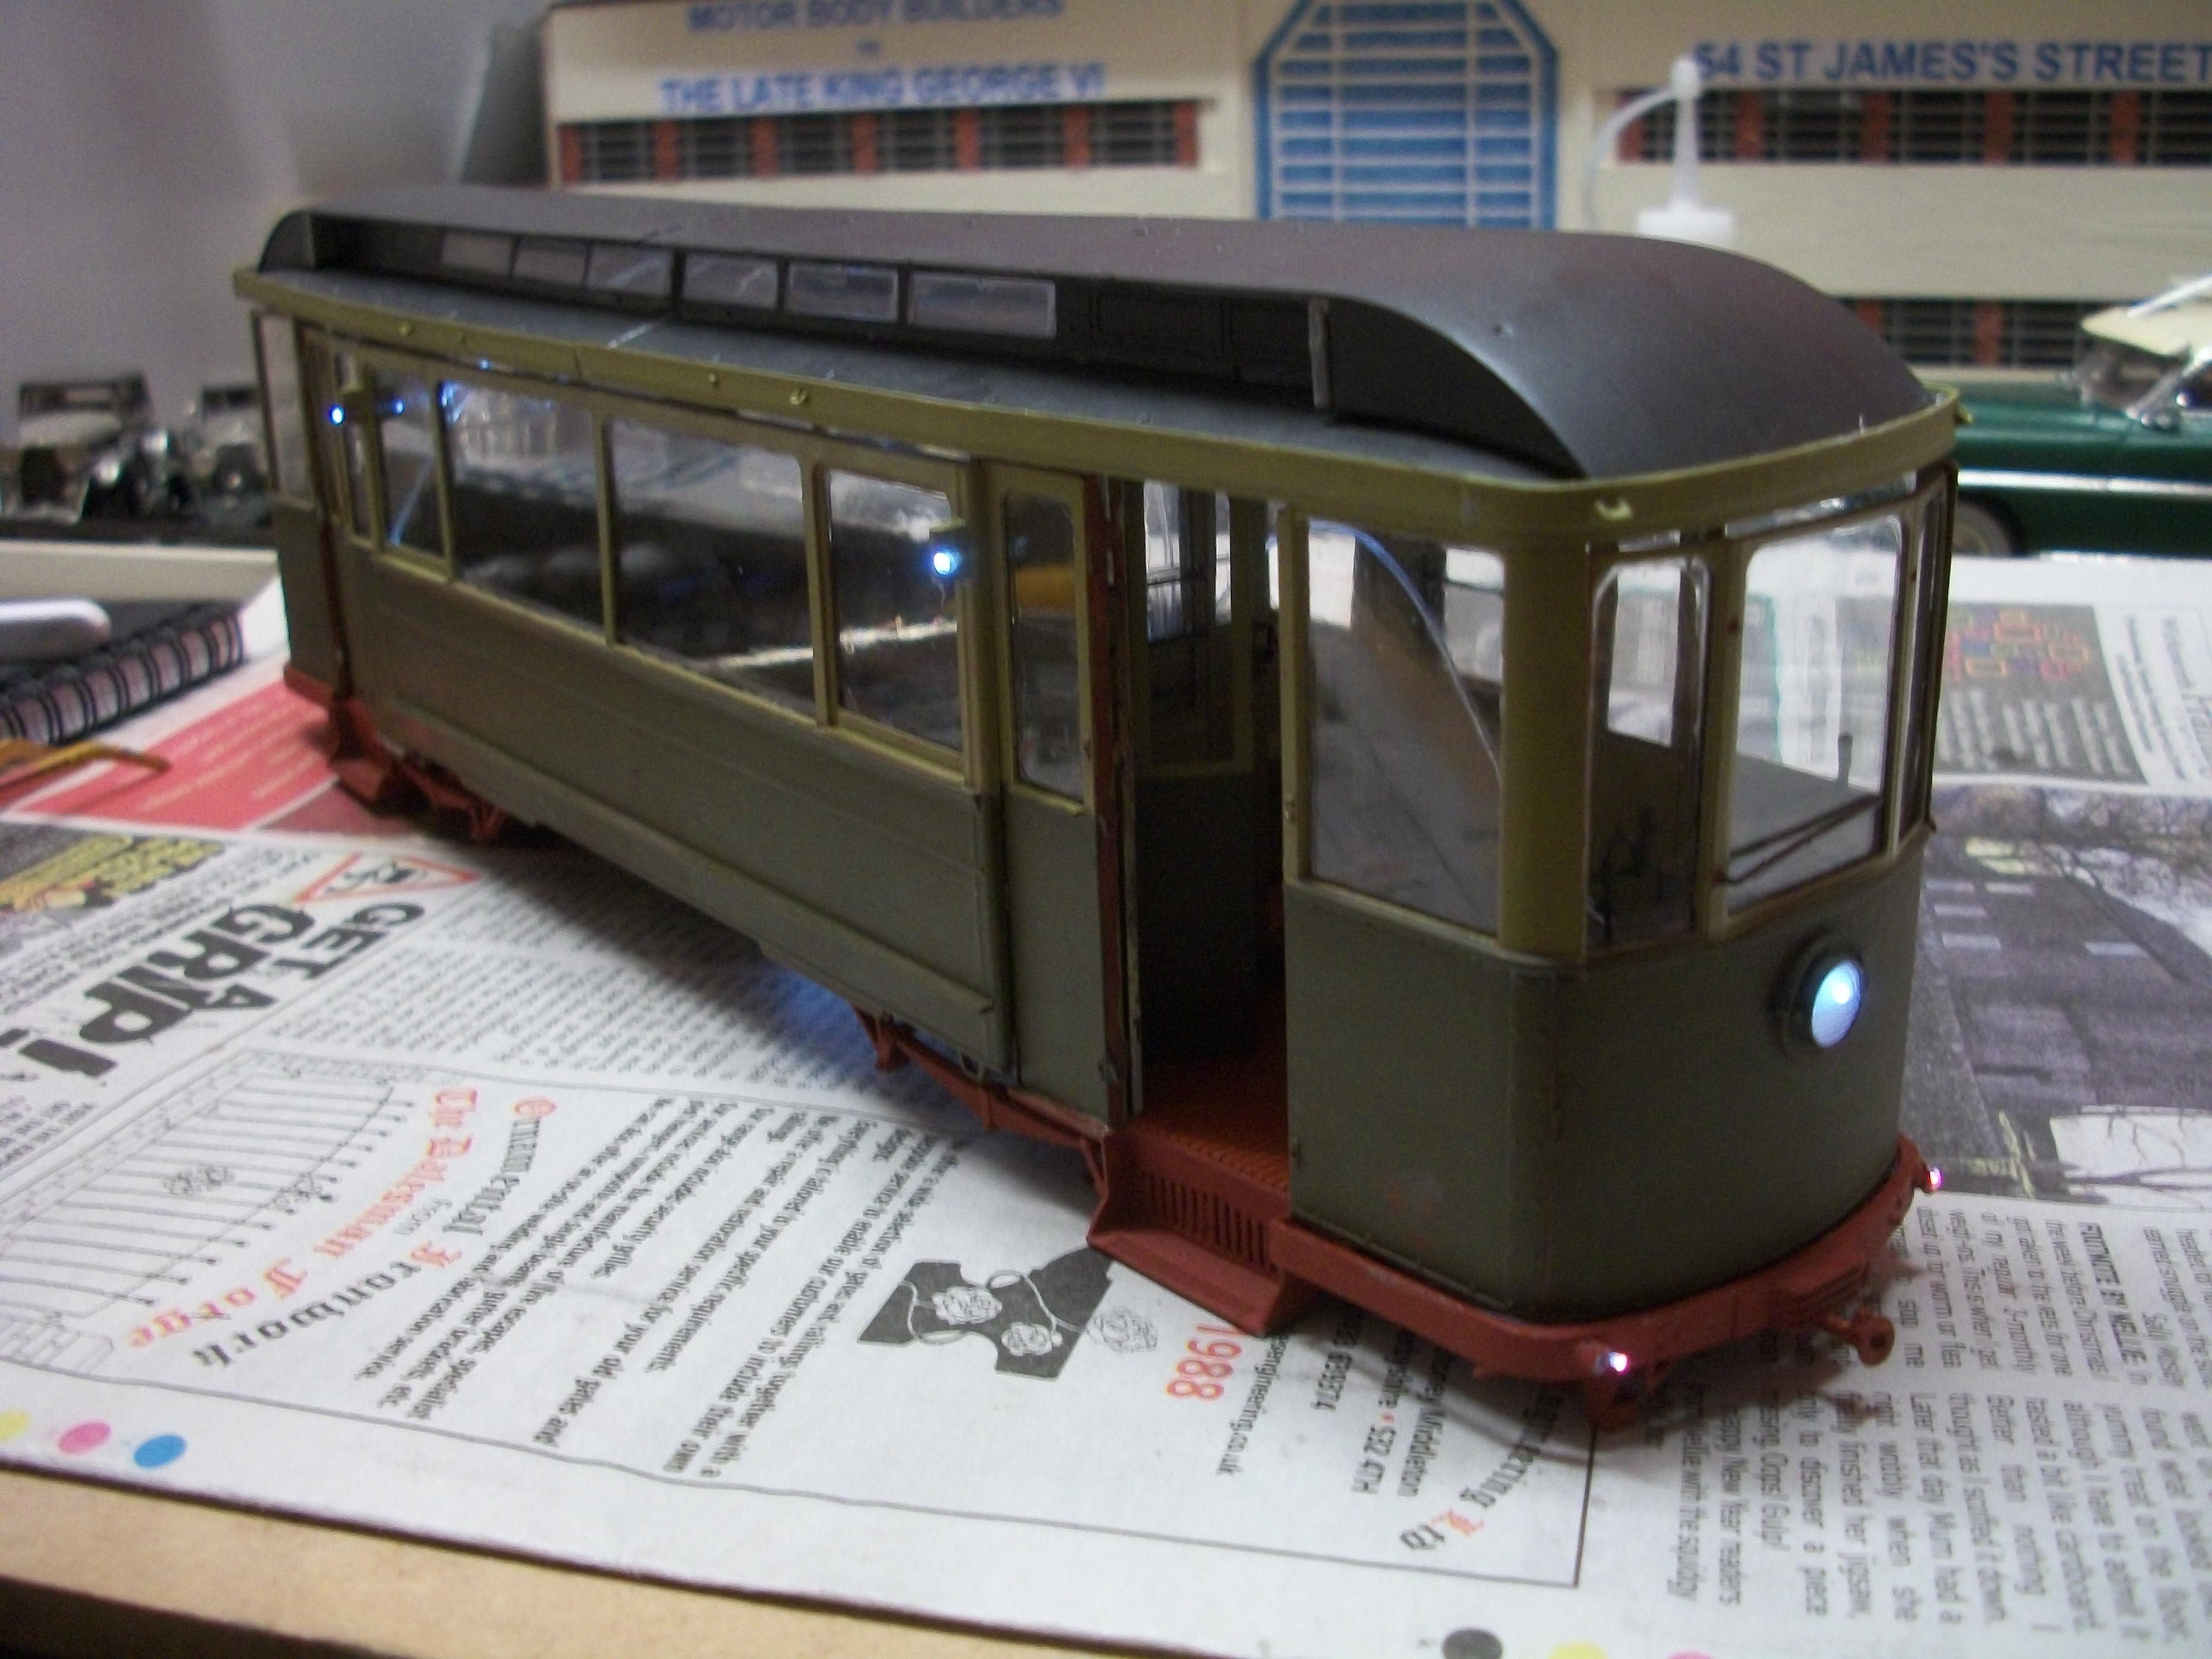
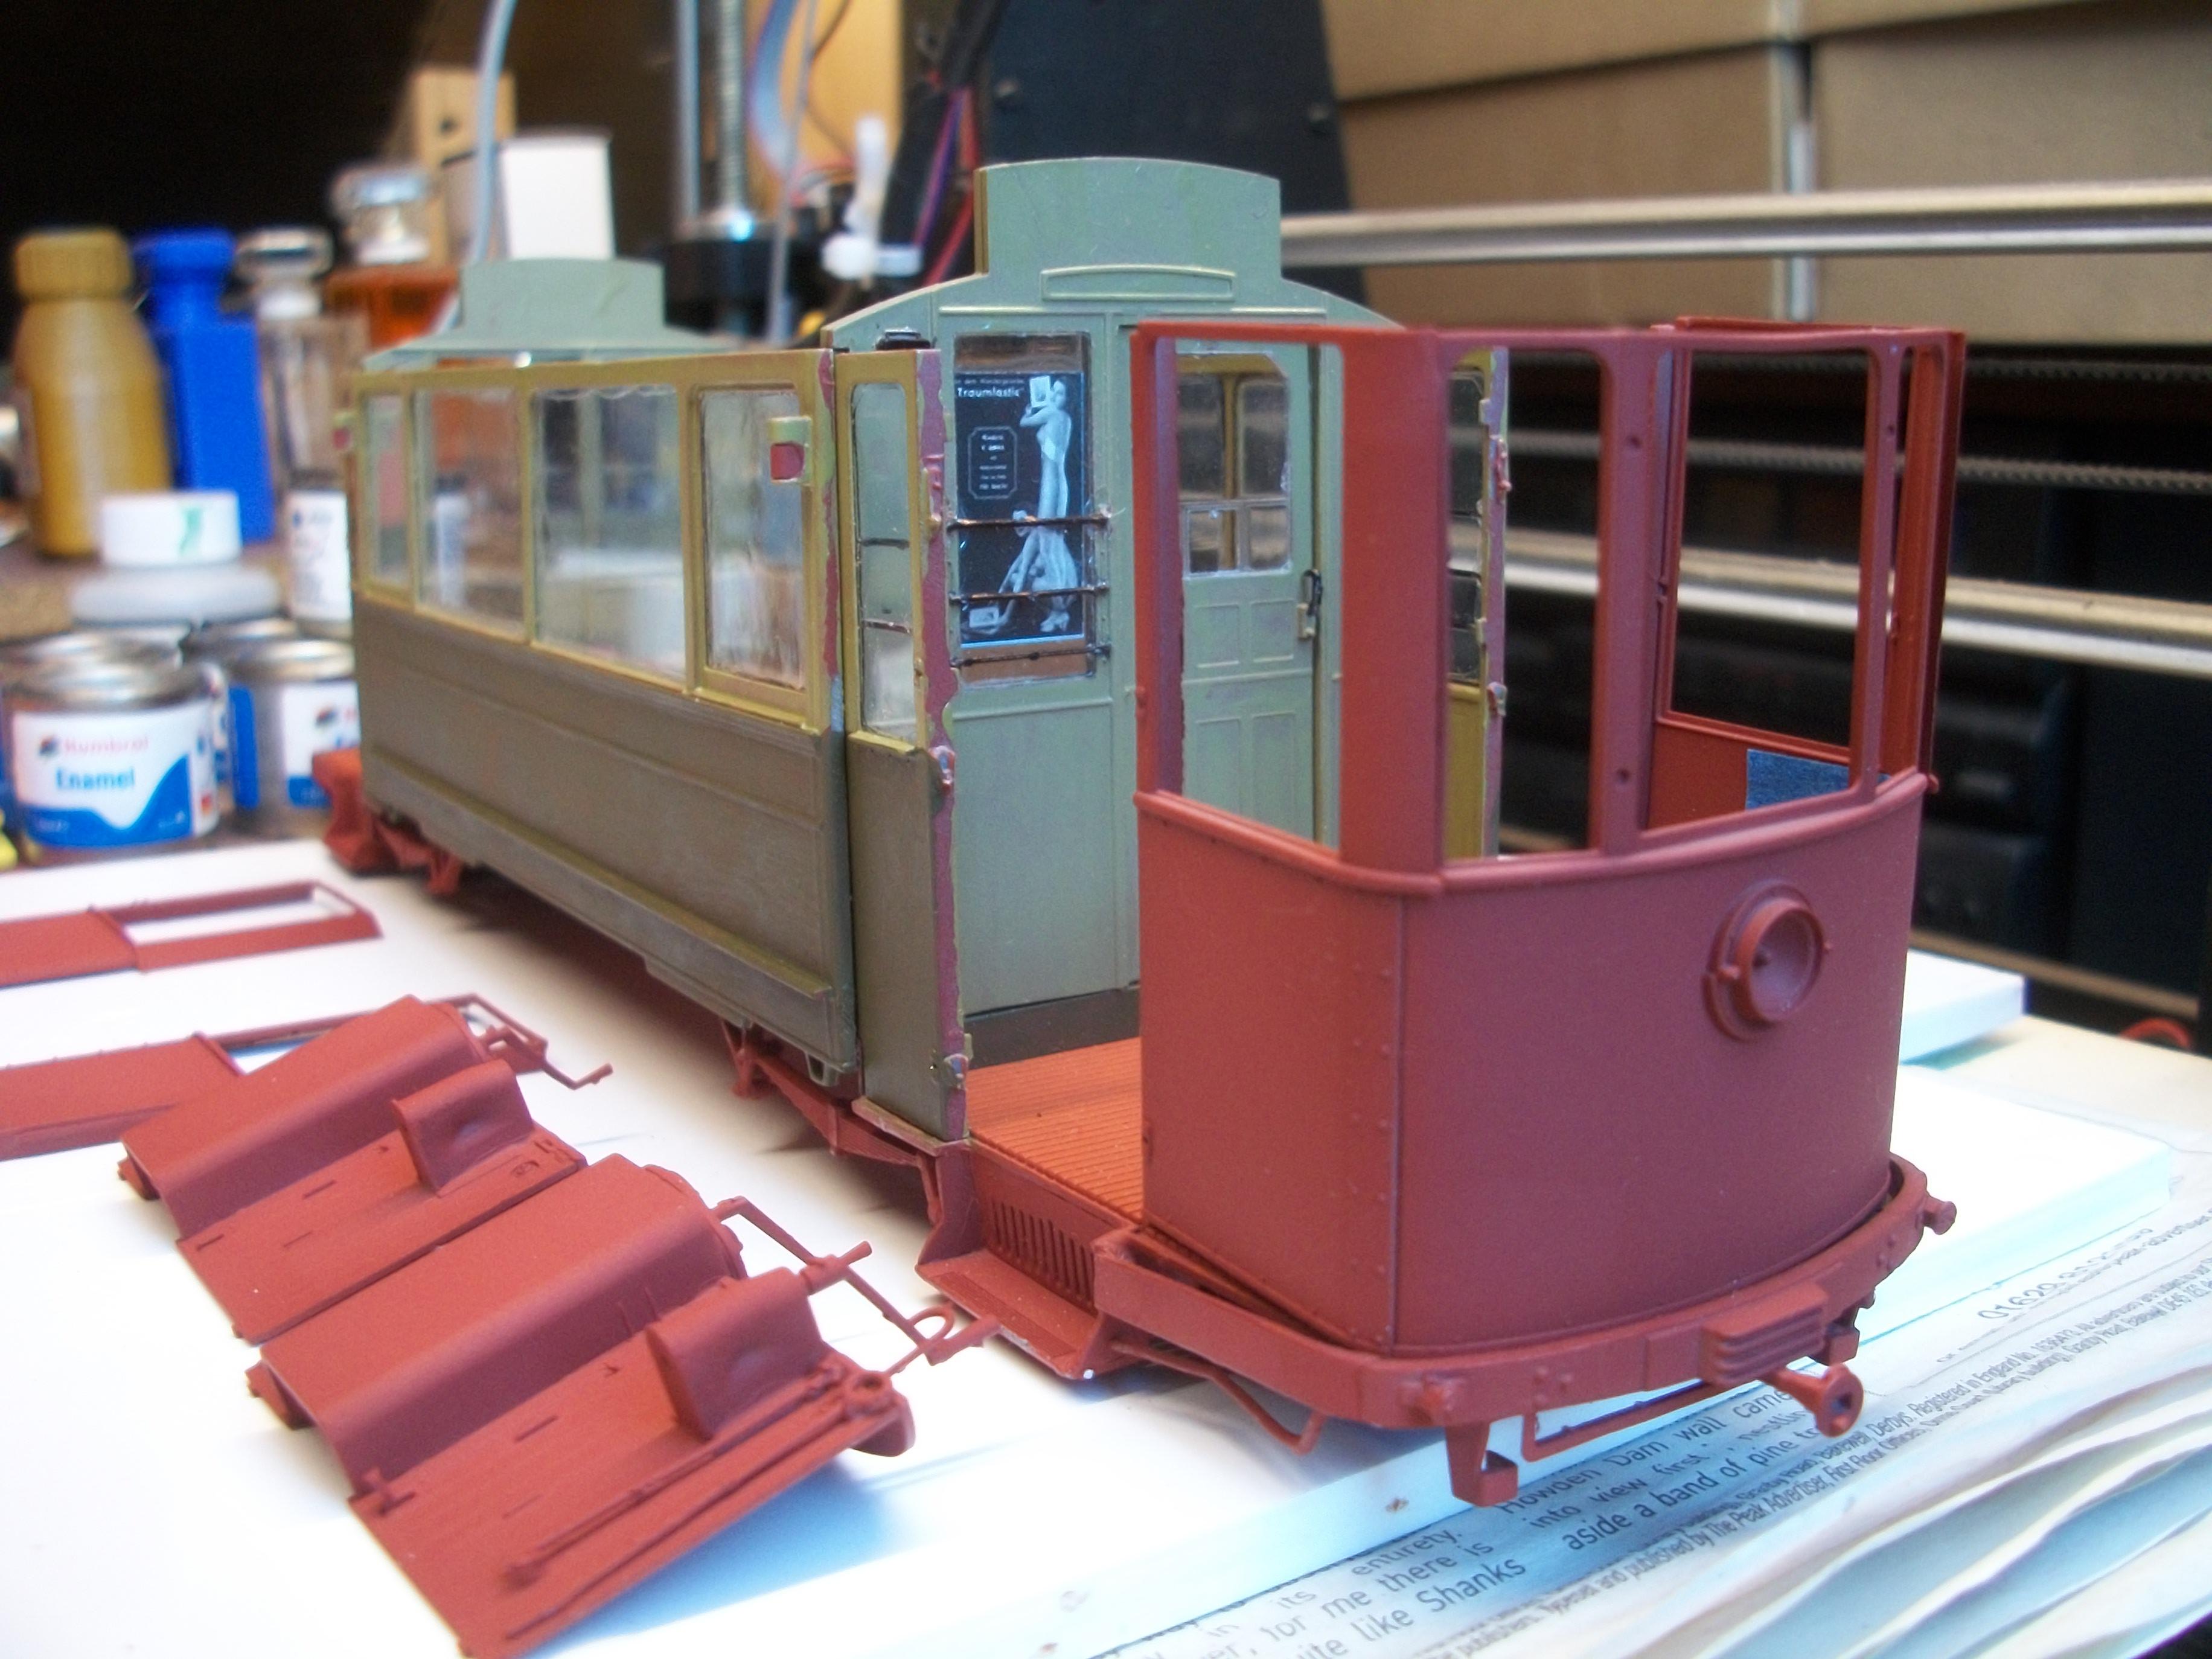
The bogie unit is in place on the tram car, and the fitting was difficult, as expected. I moved the LED / Fibre Optic unit to one side, as it was preventing the bogie unit from fitting correctly when in the centre. The attached photos show the tram car with the wheels on the rails, and the roof is not yet glued in place. There is further work to do with the figures inside the passenger area, and also the rooftop fittings need to be added. Some additional painting has to be done, where red primer is showing, or grey styrene is unpainted. The 1:32 scale car and figure works well in the foreground, with 1:35 scale further back. David

-
That green paint is a great colour, James....... I know exeactly how you feel about those two kits that would not go right, and I have run up aginst such issues myself with other kits. Sometime it is best to move on to a different build, rather than getting bogged down with one that is going bad on you. Well done with the paint recovery, which has clearly given you a hard time ( no pun intended ! ). David
-
I can see from that photo that your daughter clearly has great potential , and her skill must be directly inherited from her father. There is a lot of detail packed into that small space ! David
-
 As you say, very diverse products, Pat . . . . . Nice to see the shop back in business for 2022 David
 -
Really good scratch built boxes, Pierre....... Extremely realistic on your cutting mat, so in a diorama setting, such as a workshop or a store room they will appear absolutely real. David
-
Your body shell is a very accurate representation of the real car ! David
-
Maybe you could have an engine hoist immediately in front of the stock car, and if you are able to remove the engine from the old race car without breaking anything, this engine could be in the process of being lifted out or lifted into the engine bay of the stock car ? David
-
I can just see the street lamp over to the left of your photo lighting up this wonderful diorama, Eric . . . . . and maybe one or two shop window lights too. I am currently experimenting with fibre optics and LED lighting combined as one unit, and it has distinct possibilities. David
-
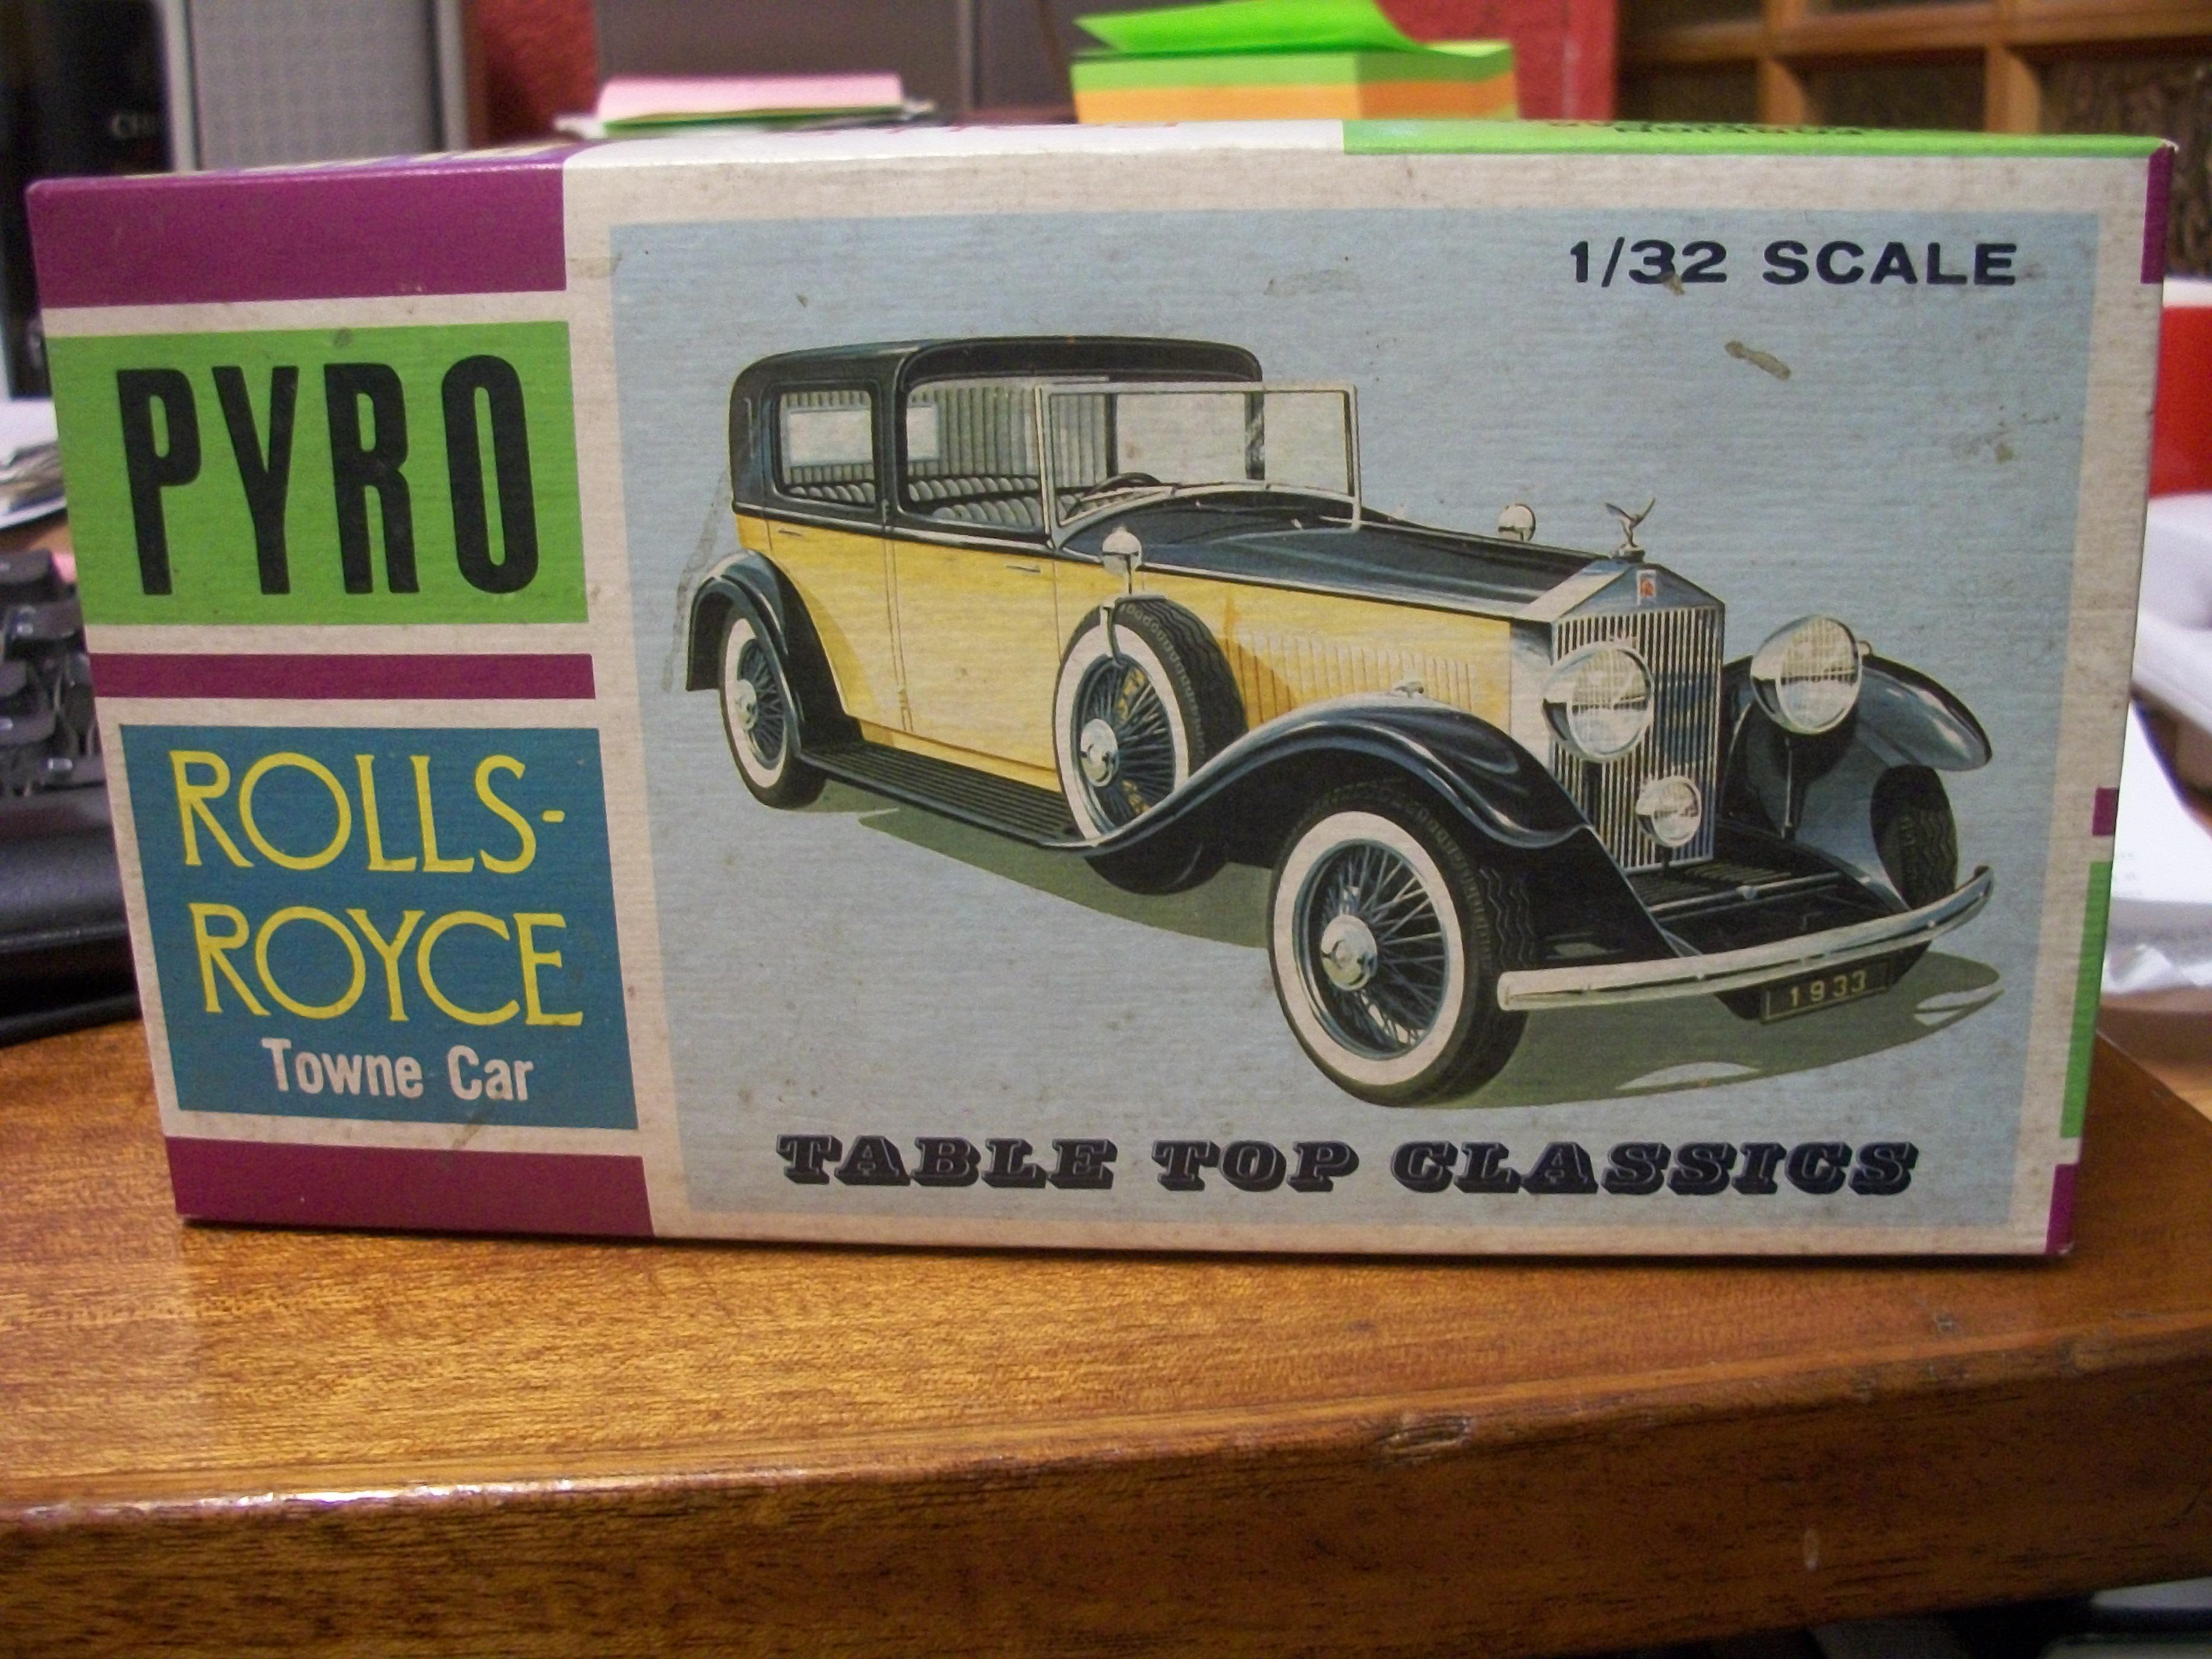
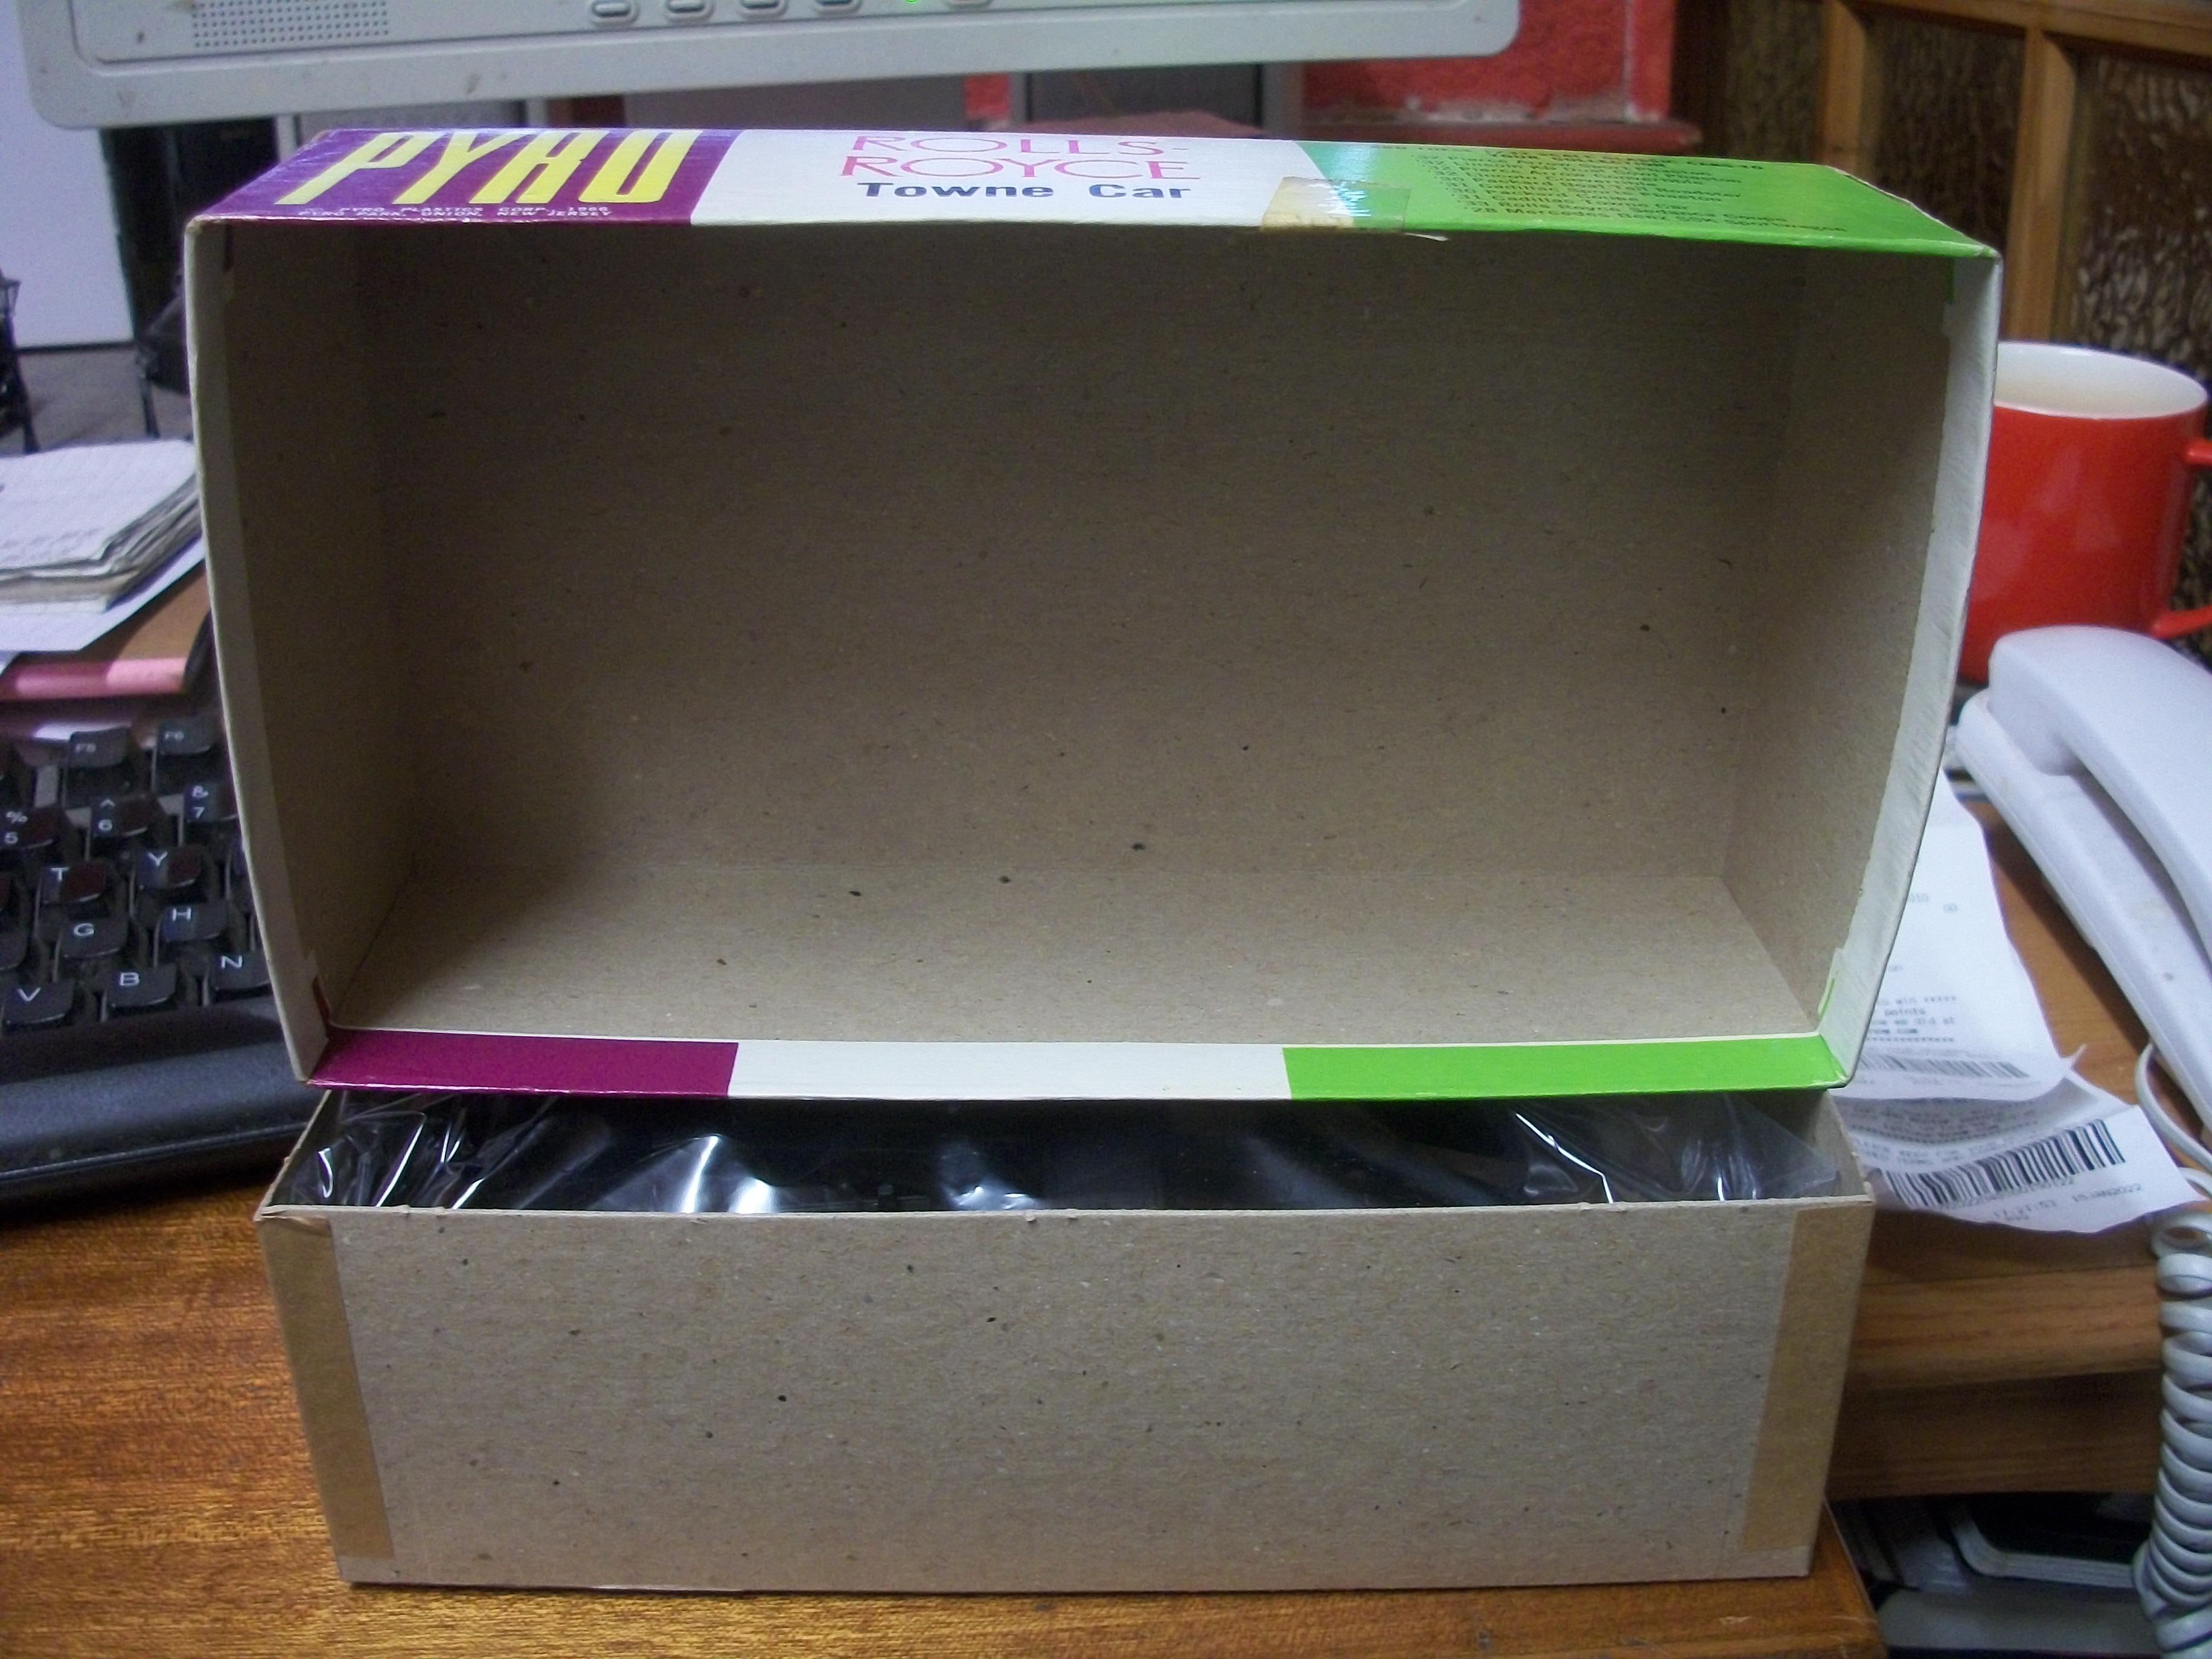
Many thanks, Pierre . . . . . B&W photos and London foggy nights will feature in the tram car photography sessions when the models are ready. I stated previously that the 1:32 Pyro kit of the 1933 Rolls-Royce Towne Car was a Phantom I, but actually it should read Phantom II. David
-
Thank you, Pat...... Following on tomorrow with the assembly of the tram car's pantograph, then the bogie wheels undercarriage assemblies, and the upright posts for the overhead wire. There will be quite a few figures to assemble and paint for this European House diorama,in 1:35 scale and then I can set about the build of the 1:32 Pyro kit of the 1933 Rolls-Royce Towne Car ( Phantom I ). David
-
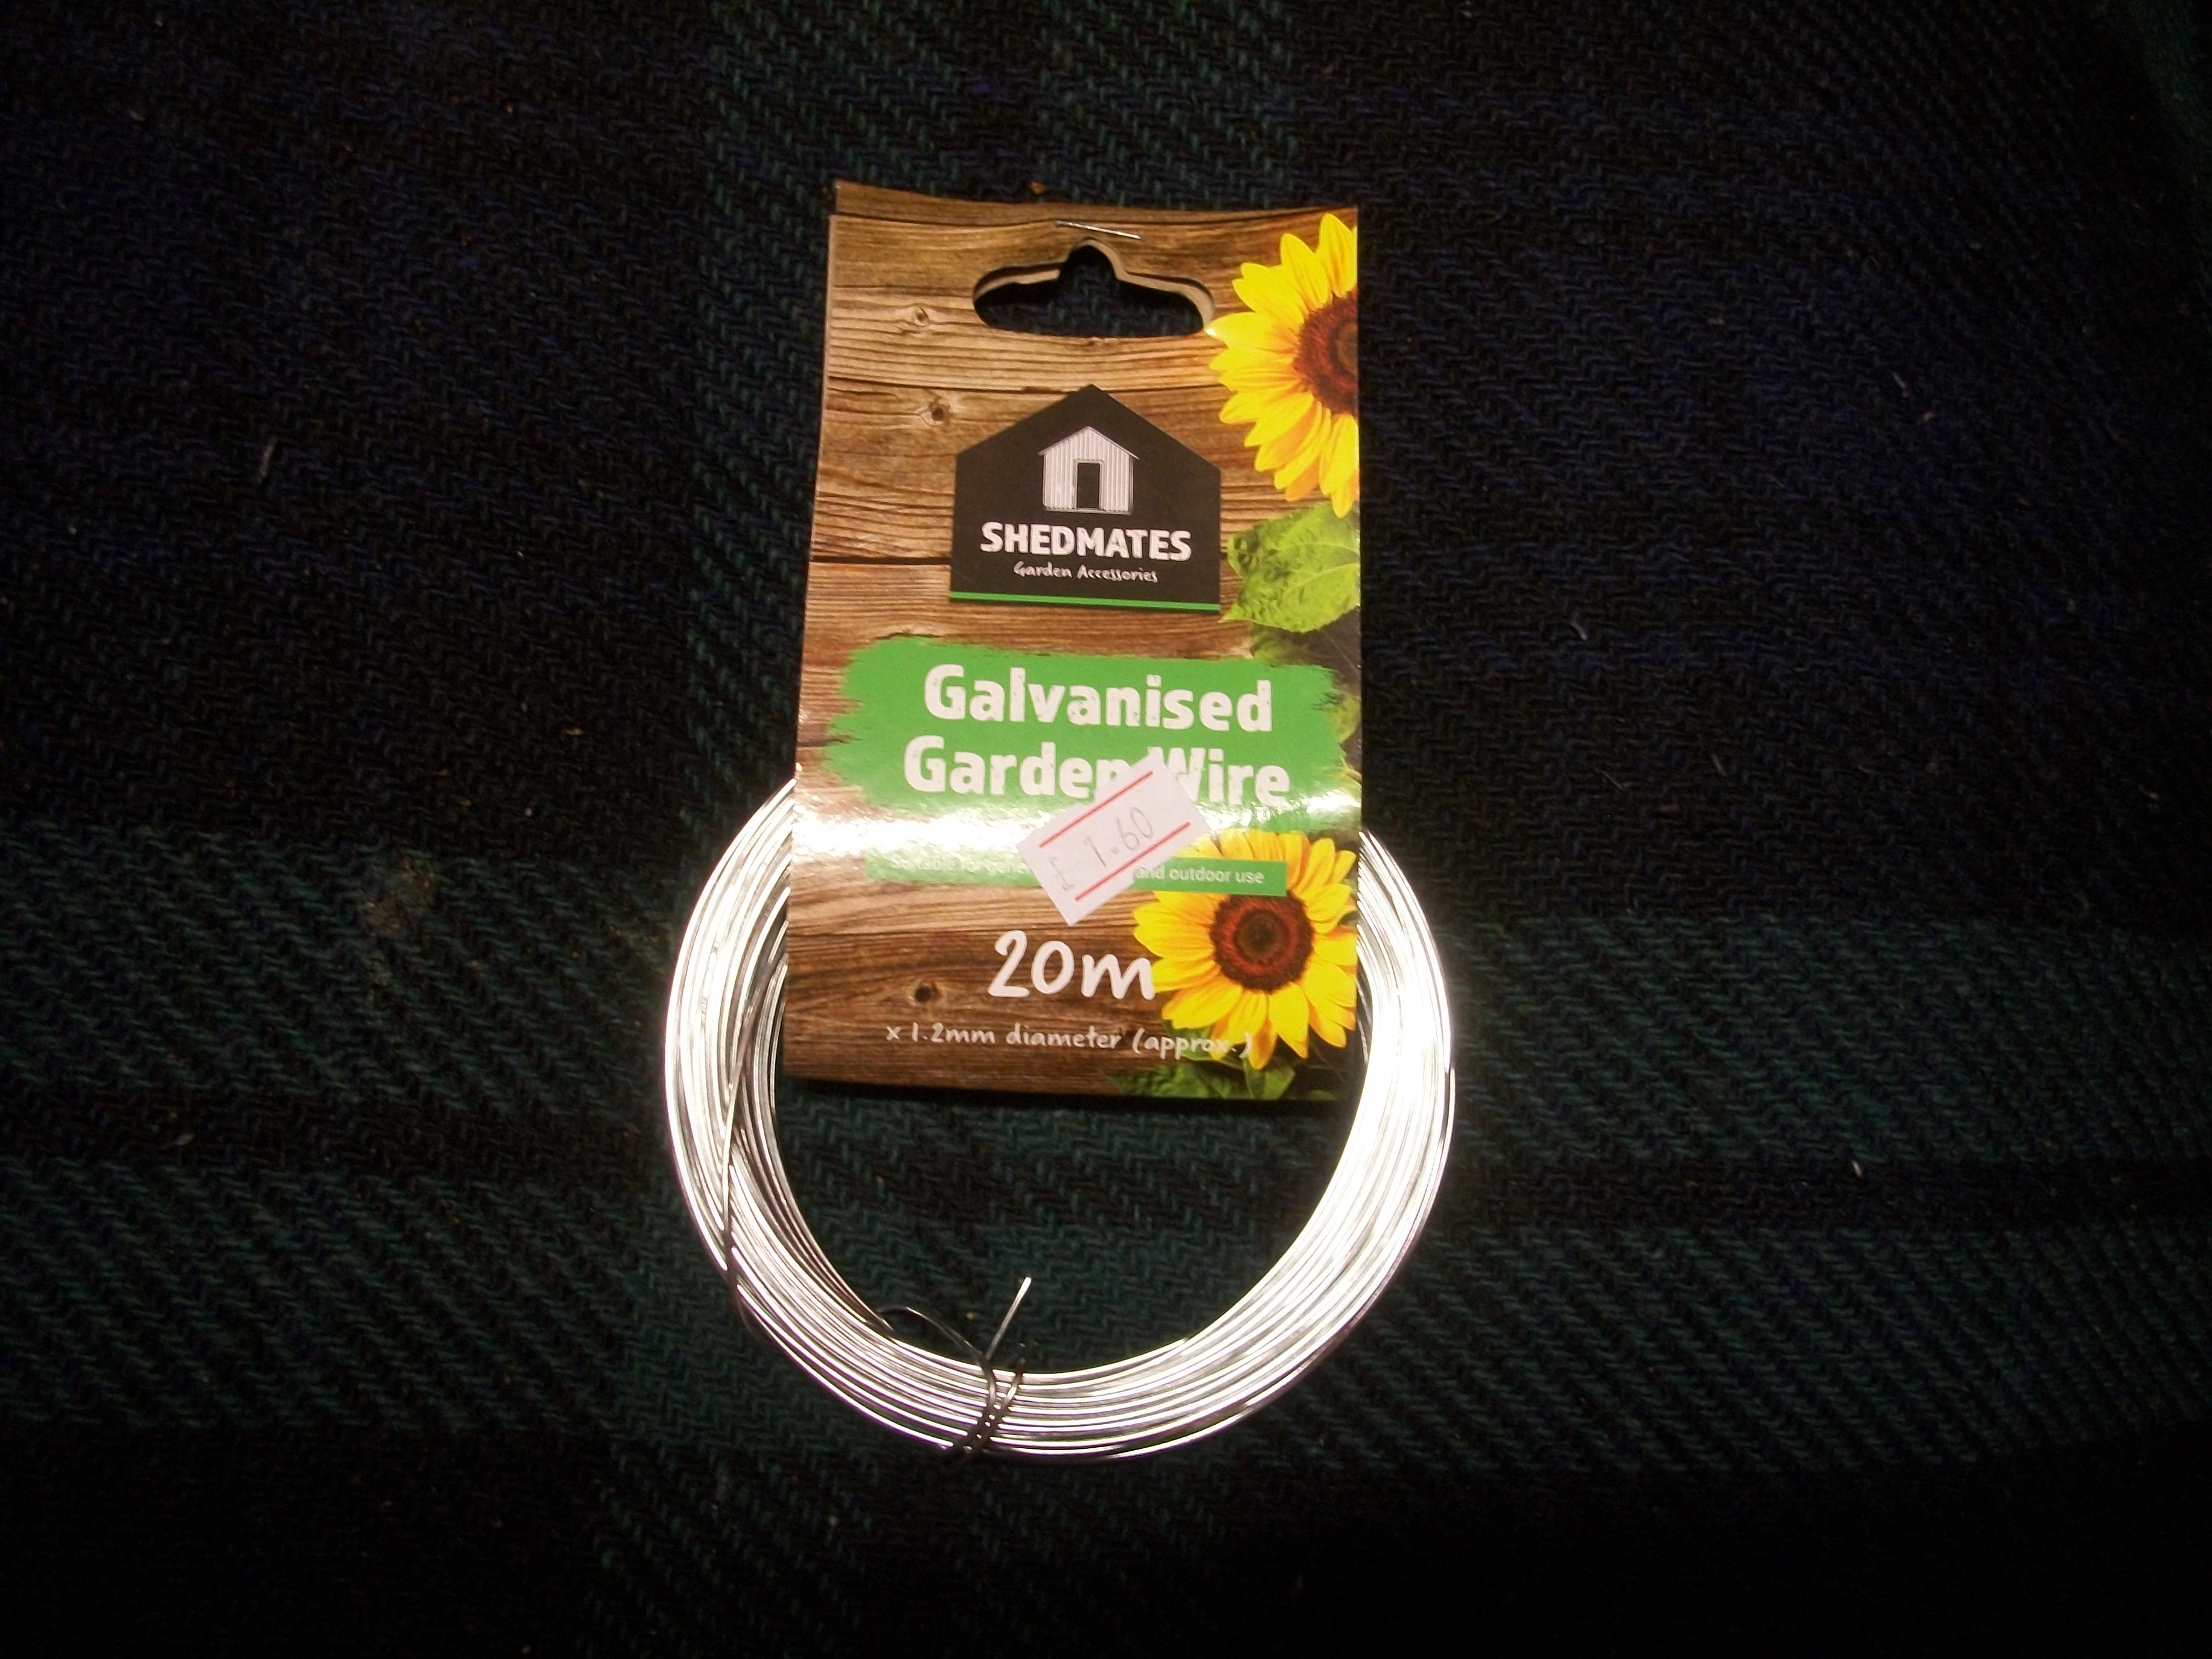
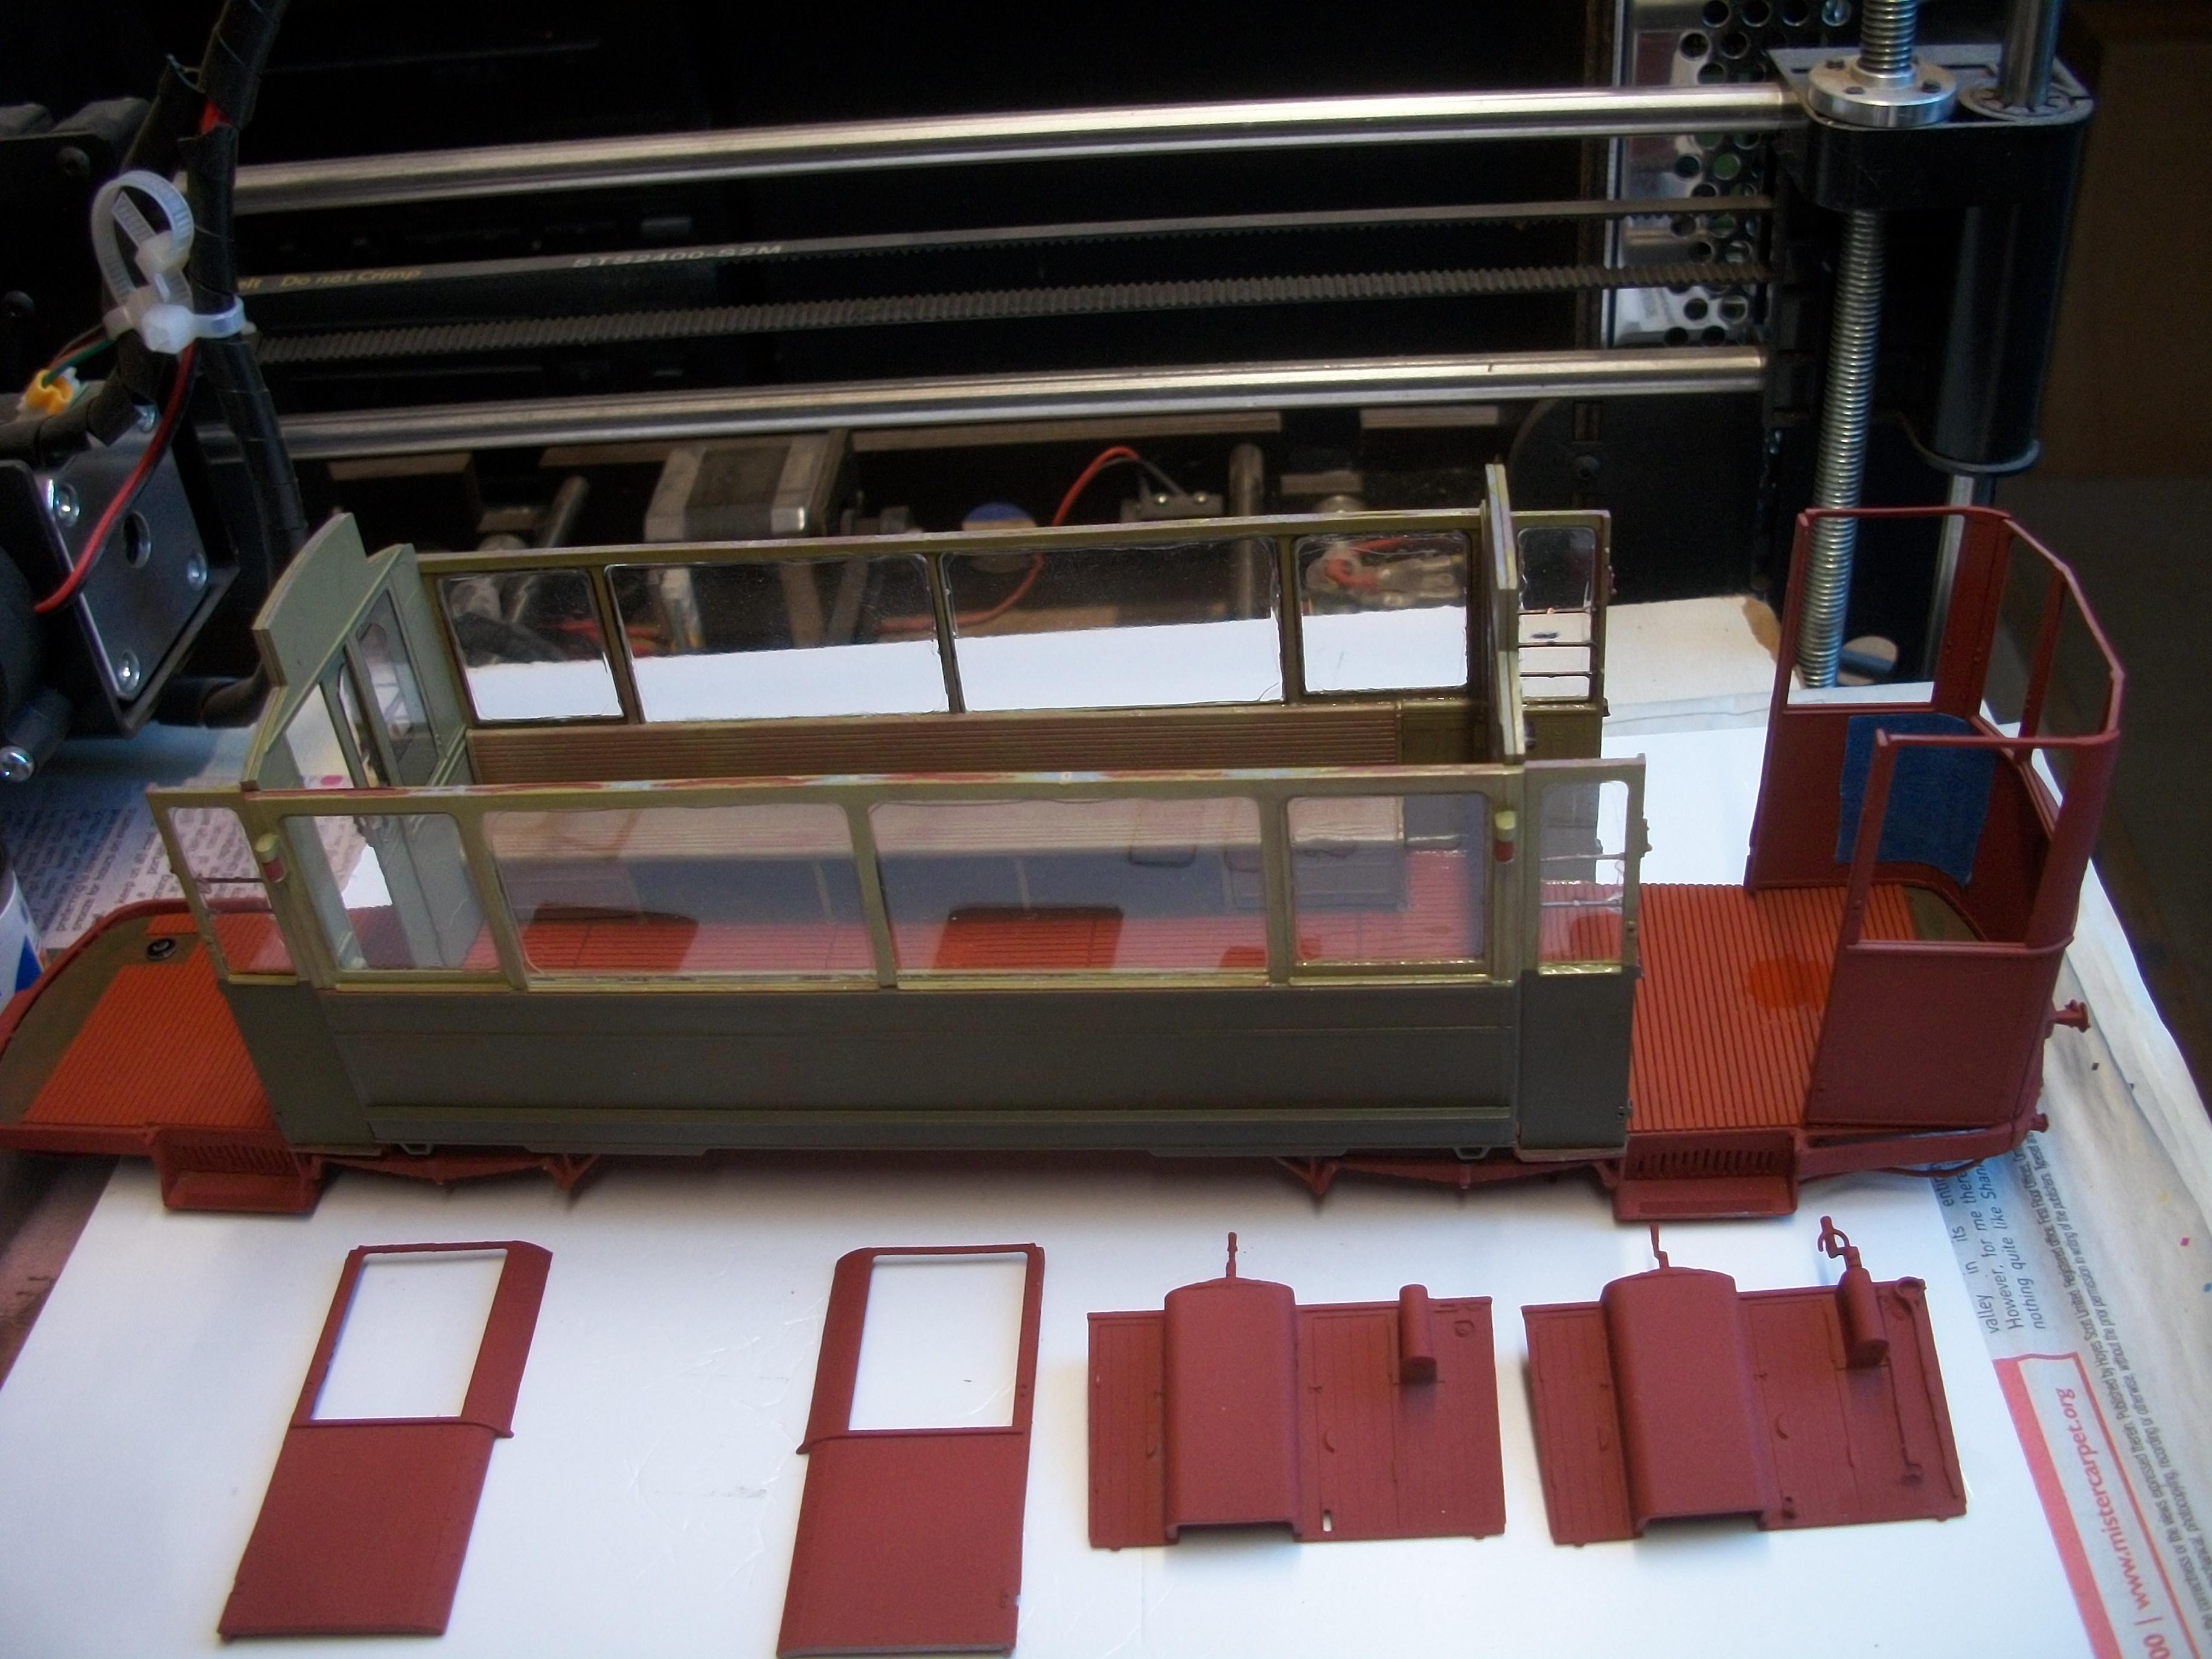
Just spent two days struggling with the upper roof sections, and also mating these up with the lower sections. This was extremely difficult, but somehow I have managed to get it done. The solution in the end was to use super glue to hold the centre of the two sections together, while I super glued the side window frames that were allowing the whole roof to flex upwards. Marvellous though this kit is, I do think MiniArt have not quite got the design right for this roof assembly. The parts do not align well, and too many parts have to fit together at once for the whole thing to work properly. I picked up a 20 metre roll of galvanised garden wire for £1.60 from a local supplier, and this is perfect for the overhead tram wire. I stretched a 3 foot length of the wire between two ends of a metal bracket to get it straight, and I shall be able to cut this to a length of 2 feet when the posts are ready. Not sure how well 2 feet of wire will hold between two plastic uprights, although the tram pantograph will be supporting the centre of the wire. The ' Martini ' advertising boards actually hide the side windows, and also the view of the interior roof lamp clusters when they are in place, so I shall make them removable for the photography. On reflection, having the roof removable is not a good idea, because the fibre optics will be threaded through holes going up, along and down through the roof. David
-
Excellent work Pierre..... I particularly like the circular red tray on top of the tank, with left over oil residue. Those Fujimi tools kits are superb, and I have used some in my dioramas. These are very realistic looking pieces for your project, and they show up well in close up. David
-
Interesting looking conversion, this one...... and as Daniel pointed out, those wheels are Rostyle which are of American origin, and then were made under licence in Britain. David
-
You are setting off on quite an adventure Pierre, and this is probably the most exciting part. Laying out your planned area and gathering together the vehicles and parts that you want to include in the proposed scene is very interesting I find. Many of the smaller pieces for the old race car shop can be found on Ebay, as some sellers specialise in this sort of thing. Scratch building is always an option if you have the skills, of course. Looks like you have a good sound base from which to start this project. My dioramas are under the ' Hooper & Co, Diorama ' topic, if you want to have a look later. Not sure about your model materials suppliers in Canada, as I am in England, but here is a link to a guy in Canada who kindly supplied me with a large box of Rolls-Royce kits some time ago.......... https://www.fullcirclehobbies.com/ David
-
Progress with the build of the tram car is pretty good, and some of the fibre optics are in place. I have assembled but not yet painted a tram driver figure, to determine how the cab and driving controls look. Four pairs of doors are fitted now, and the assembly of the roof sections is also under way. My most recent purchase on Ebay is a Pyro kit of the 1:32 scale 1933 Rolls-Royce Towne Car, which appears to be a Phantom II ...... This kit was manufactured way back in 1967 in the USA, of course. The kit box is in very good condition, and all of the parts are in sealed bags. This car will compliment the 1928 Rolls-Royce Phantom I quite nicely, alongside the tram car and the Citroen 11CV Traction Avant. David
-
I know exactly what you mean Paul, when you say that you wait for an idea to form naturally..... I find myself looking at a particular area of one of the dioramas on a daily basis, and wondering what needs to go there. Then, at some point the idea comes to me, apparently out of nowhere ! Regarding making your own trees by hand...... I did have a go at making a large tree for the 1:24 scale diorama, which wasn't entirely successful, and I discarded the tree from the scene later. You seem to have found a workable solution there, Paul...... Twisted multi strand copper wire and Sculpy clay ' bark '. What did you use for the leaves (foliage) if I may ask ? Liking your old horse-drawn sickle mower, and those hay bales look good too. David
-
Figures in dioramas; is it cheating to 'contract' them out?
Anglia105E replied to W Humble's topic in WIP: Dioramas
I agree with Paul....... Forget the contest, and build for yourself James...... You can be the best judge of your own scale model dioramas, cars and figures, and in your own home too. When you can post topics on this forum later, you will find that many other members will appreciate your efforts. Model on !!! David -
Figures in dioramas; is it cheating to 'contract' them out?
Anglia105E replied to W Humble's topic in WIP: Dioramas
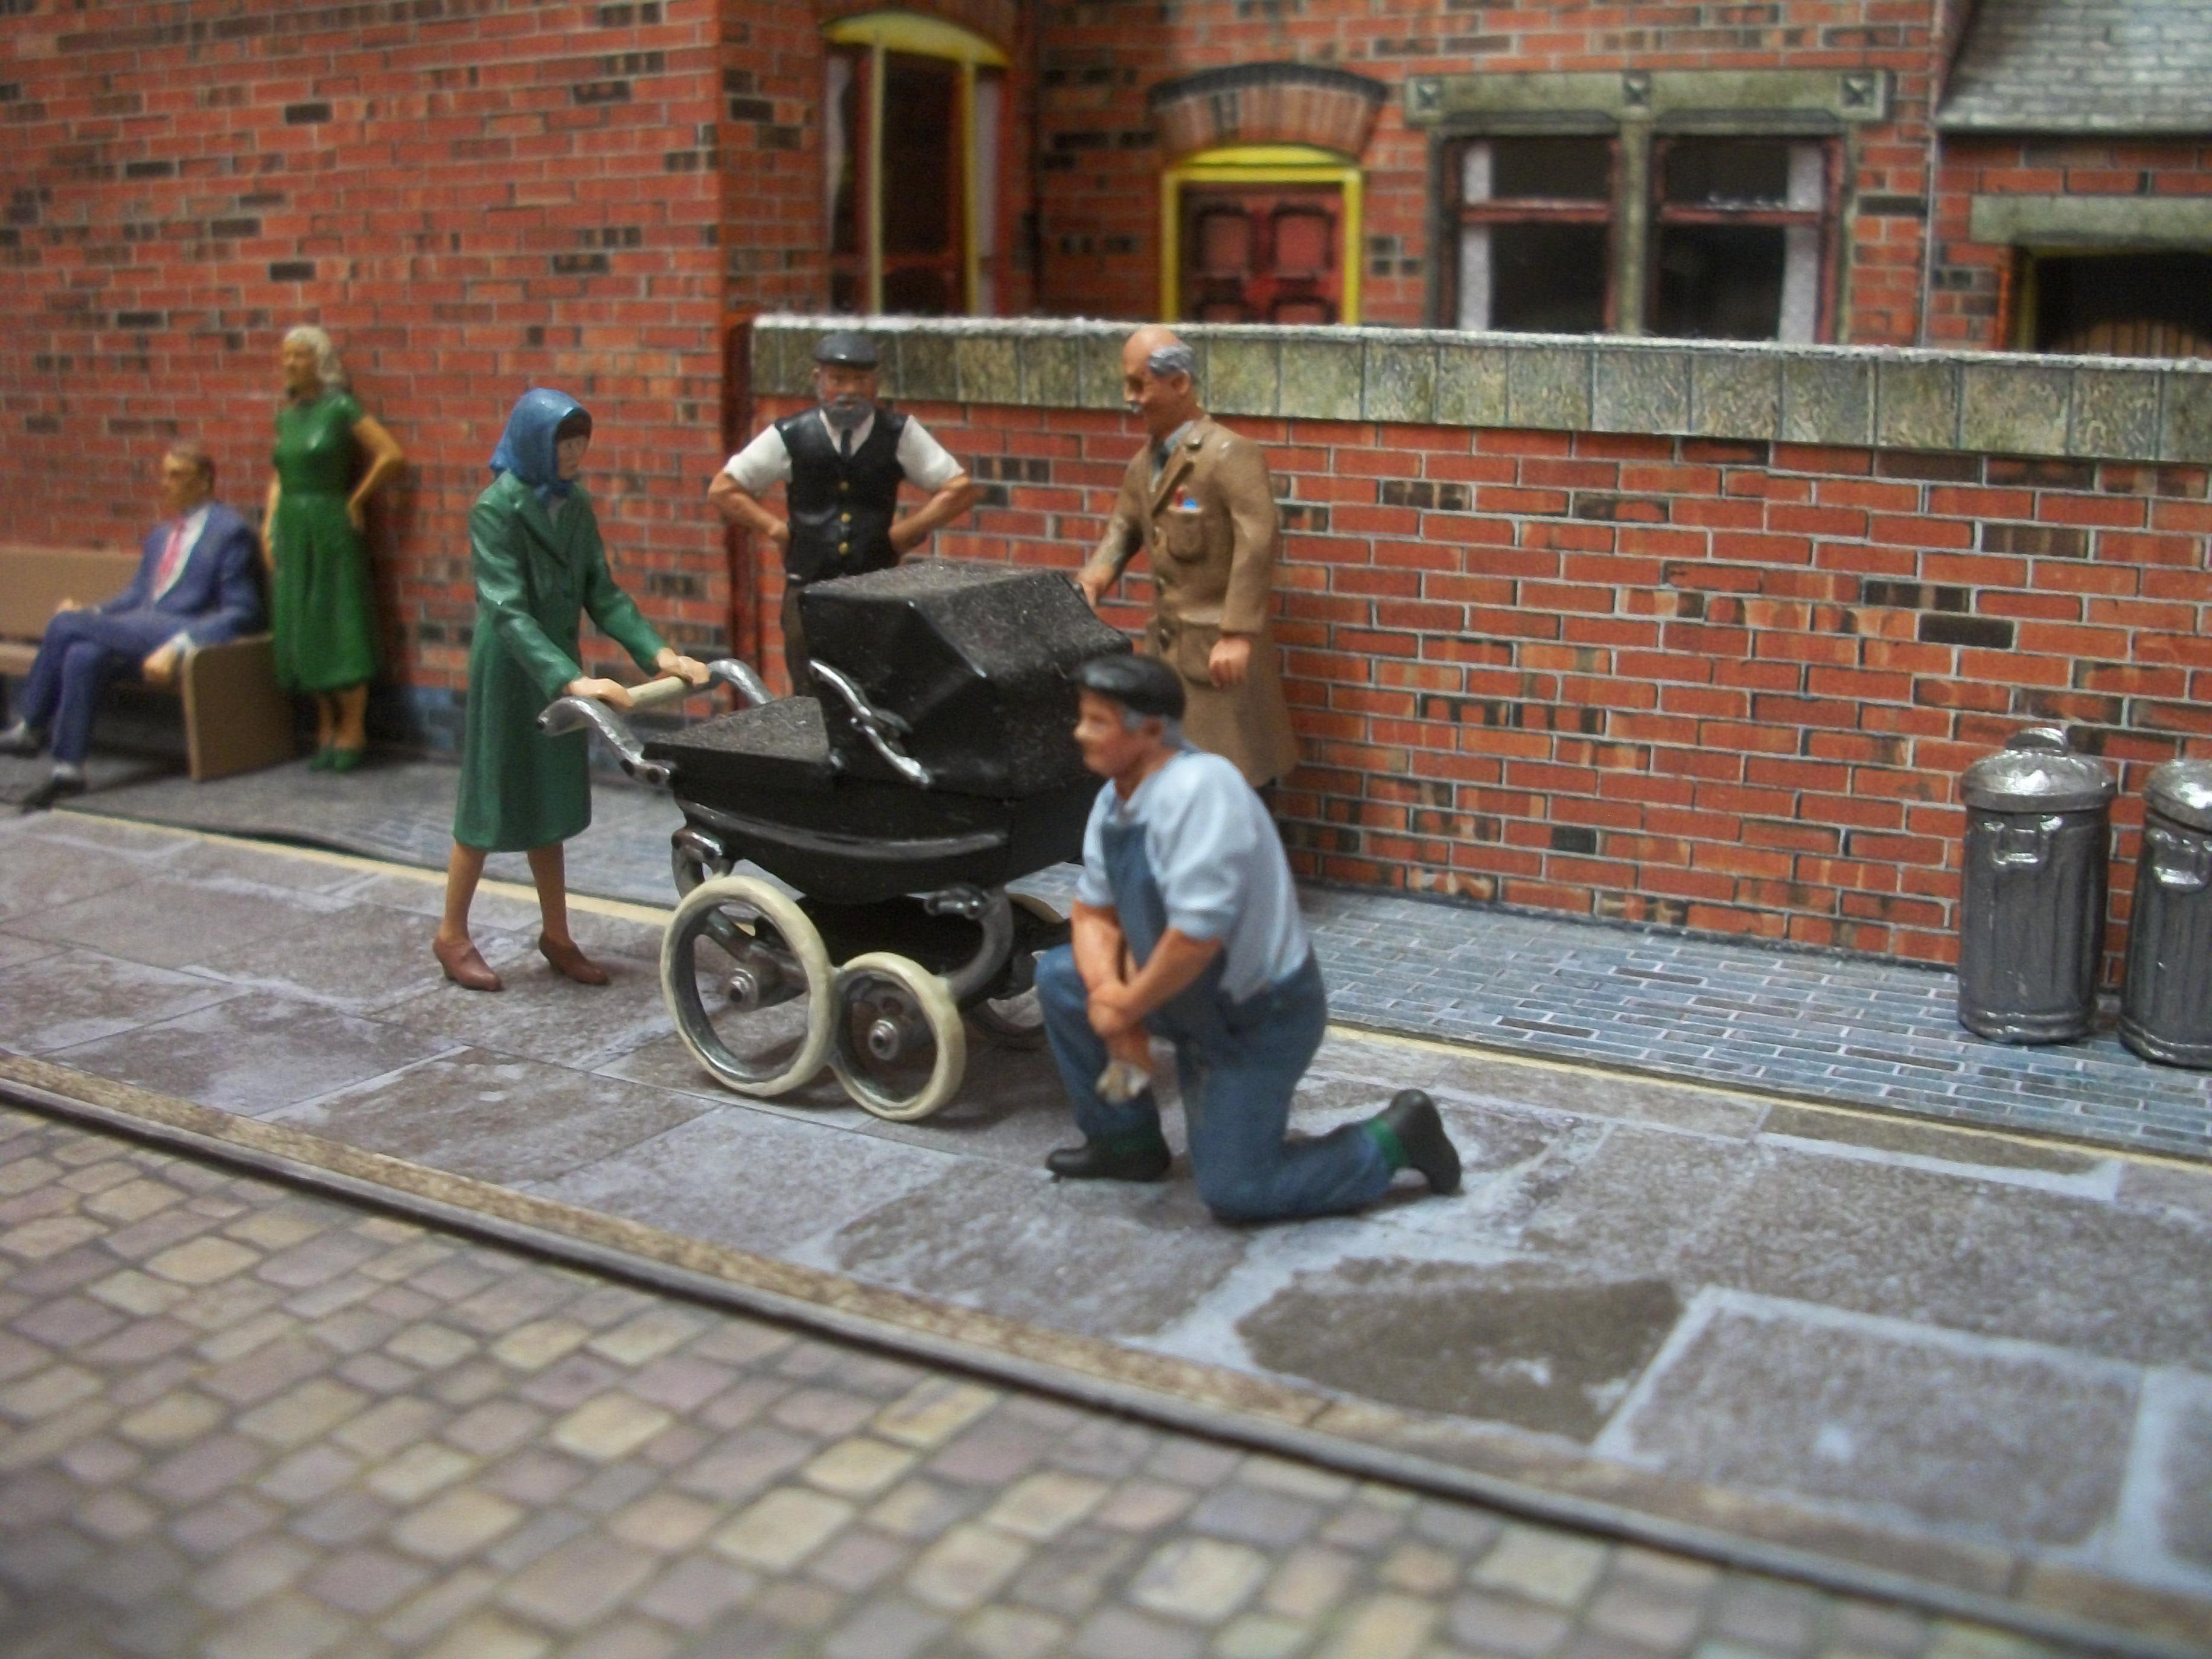
Hello James....... This is just my comment, regarding the issue of figures in dioramas, which I hope might be helpful to you. Myself, I do find painting figures very challenging as I am 68 years of age. When I see some of the incredible detail painting that some model builders have produced, I do wonder how on earth they do it. Using an OptiVisor magnifying device on my head, I can just about paint 1:24 scale figures, but when I then attempt to paint 1:43 scale figures, also 1:35 scale figures and even 1:32 scale, the results are not so great. The difference between my dioramas and yours James, is that apart from one exhibition during June of each year, my figures appear in photographs with the buildings and the cars. What I am saying is that for the purpose of photos the details on the figures don't necessarily have to be perfect, whereas I do understand that you are wanting to enter a competition. I suppose it is fair enough for the competition organisers to clearly state that all models and figures must be built and painted by the entrant, and it is a shame that you cannot make use of pre-painted figures in this case. I purchased some really good 1:43 pre-painted figures from a seller on Ebay, and they look so realistic in my diorama settings. These small figures were not cheap, but to me it was worth paying extra for professionally painted figures. Here are three photos of the 1:43 scale figures........ David
-
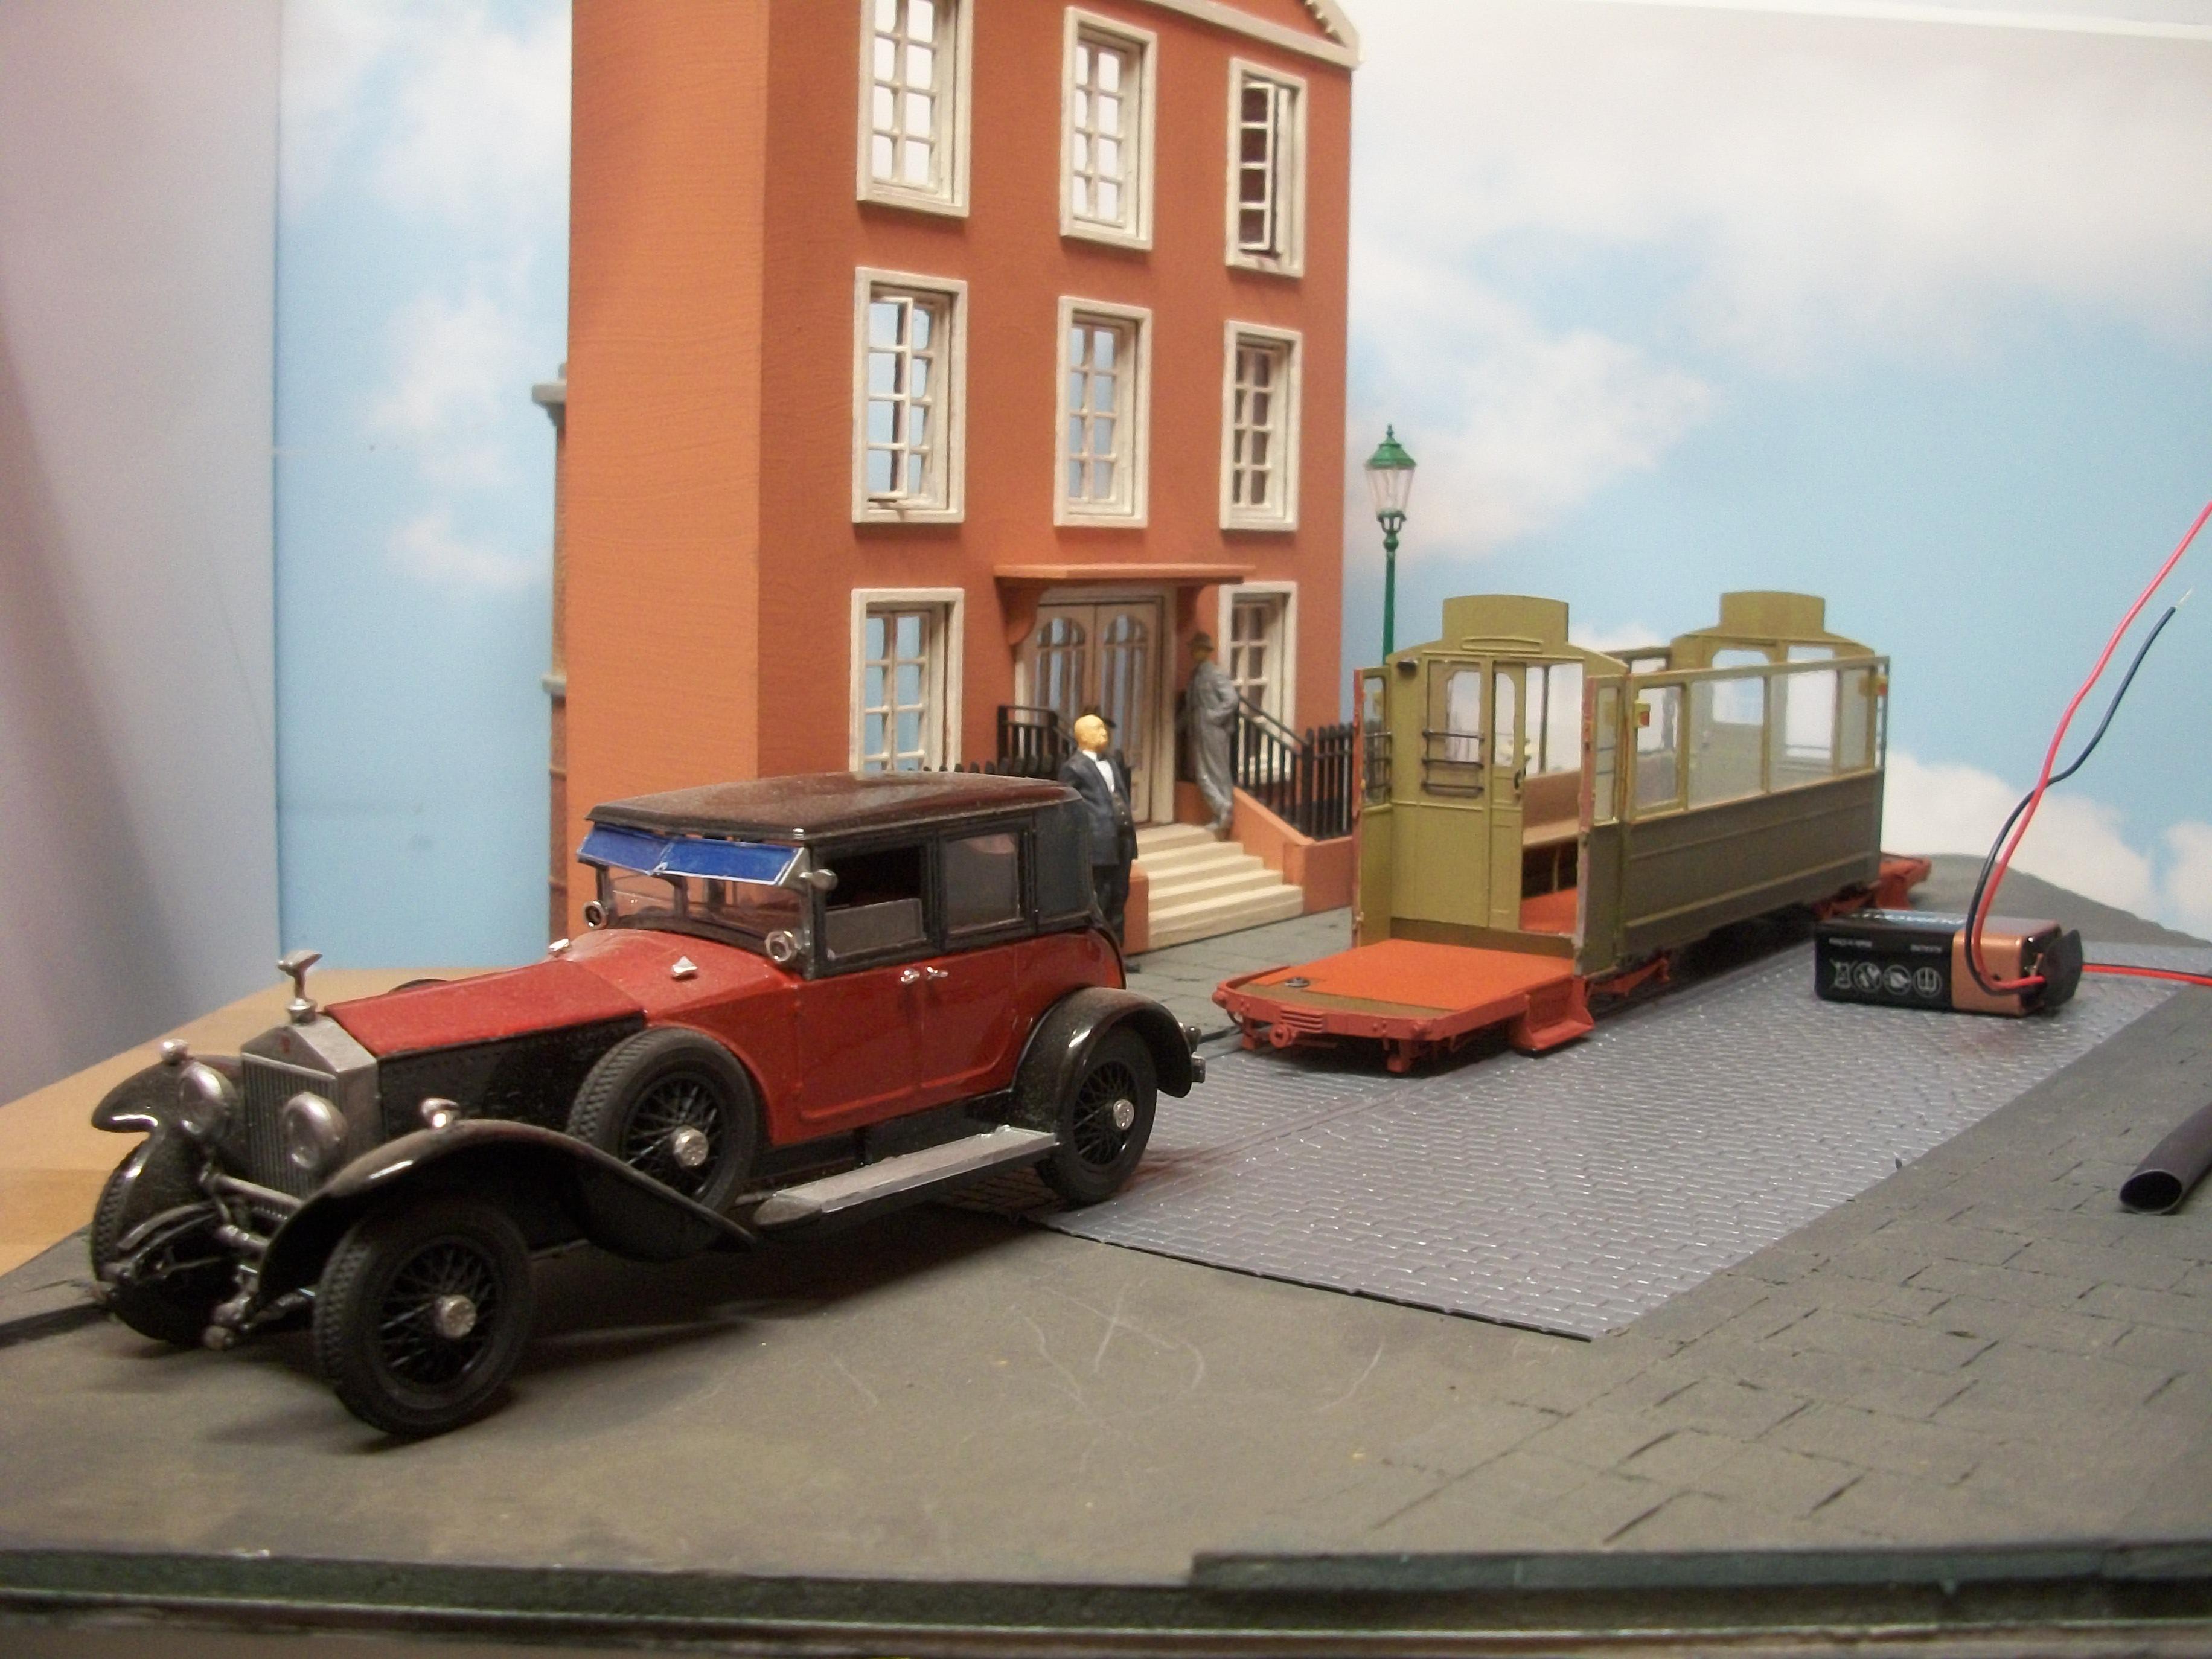
The lighting plan for this part of the Hooper diorama is under way..... The plan is to have the PP3 battery inside the European House building, just behind the window. The two wires will run around the corner of the building, along the ground and through the leaf spring area of the tram car's bogie wheel unit. The heat shrink LED and fibre optics will be attached to the underside of the chassis floor, and then the fibre optic tube wires will be routed somehow to their respective lighting units. In order to have the tram car on the right hand side of the road, with the single headlamp facing forwards toward the camera, it is necessary to turn the diorama base around, otherwise the tram would appear to be on the left side of the road, or even going away from the camera, with the rear light on. Neither the battery pack nor the wiring will be visible in any of the photos, using this method. I might run a fibre optic tube wire up the street lamp and have the street lamp lit also while I am in the process. The Rolls-Royce Phantom I is a Hooper bodied motor car from 1928, and the European Tram Car is 1940's. David
-
Recent work on the tram car includes the assembly of the two cab sections. The eight component parts have a coat of red primer, and these are ready for brush painting. Ten window glass parts have been prepared, and the two control panel units are assembled. I would like to install some simple battery lighting, both for the headlamp and the interior lights, so I am considering drilling out the centre of the headlamp socket for a small LED bulb. This needs some thought before I leap in too hastily ! Conditions in the loft were favourable during Wednesday, so I got the brush painting done for the eight cab parts. Used my Humbrol Ochre and Humbrol Olive Drab, and when I found that my local supplier did not have any Humbrol Matt Black, I got Black Green instead, which is like black with a dark mossy green coating ! David
-
Thanks, Pat and as you say, this is a nicely detailed 3D print of the Hotchkiss engine. I have the 3D printed engine parts waiting on one side, for a Rolls-Royce Merlin V12 engine, which needs assembling and painting when I can find the time. At the moment I am building the European Tram Car in 1:35 scale, as well as quite a few figures for the European house diorama, and a Tamiya Citroen 11 CV Traction Avant kit. David
-
I have not heard of the Hotchkiss light tank before, Pat...... Would that be a straight 6 engine that you have there in your shop ? David
-
The central passenger compartment is fully assembled, and I am now working on the driver's control panel binnacles at both ends of the tram car. Once I have assembled a few more components of this model they will be given a coat of red primer before brush painting. David