camaro69
-
Posts
272 -
Joined
-
Last visited
Content Type
Profiles
Forums
Events
Gallery
Everything posted by camaro69
-
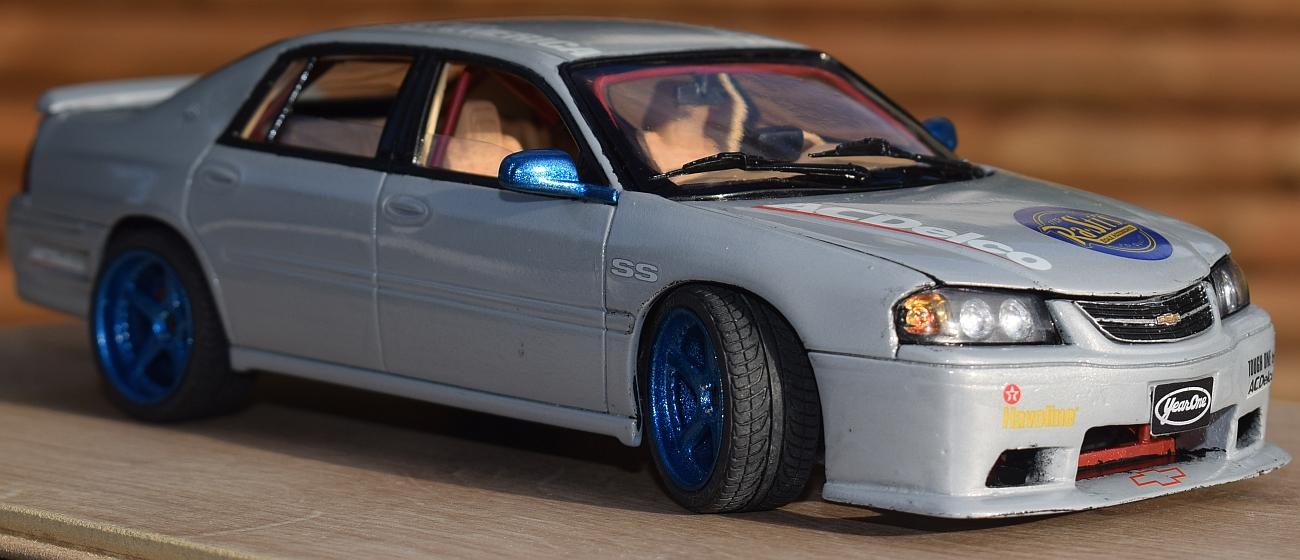
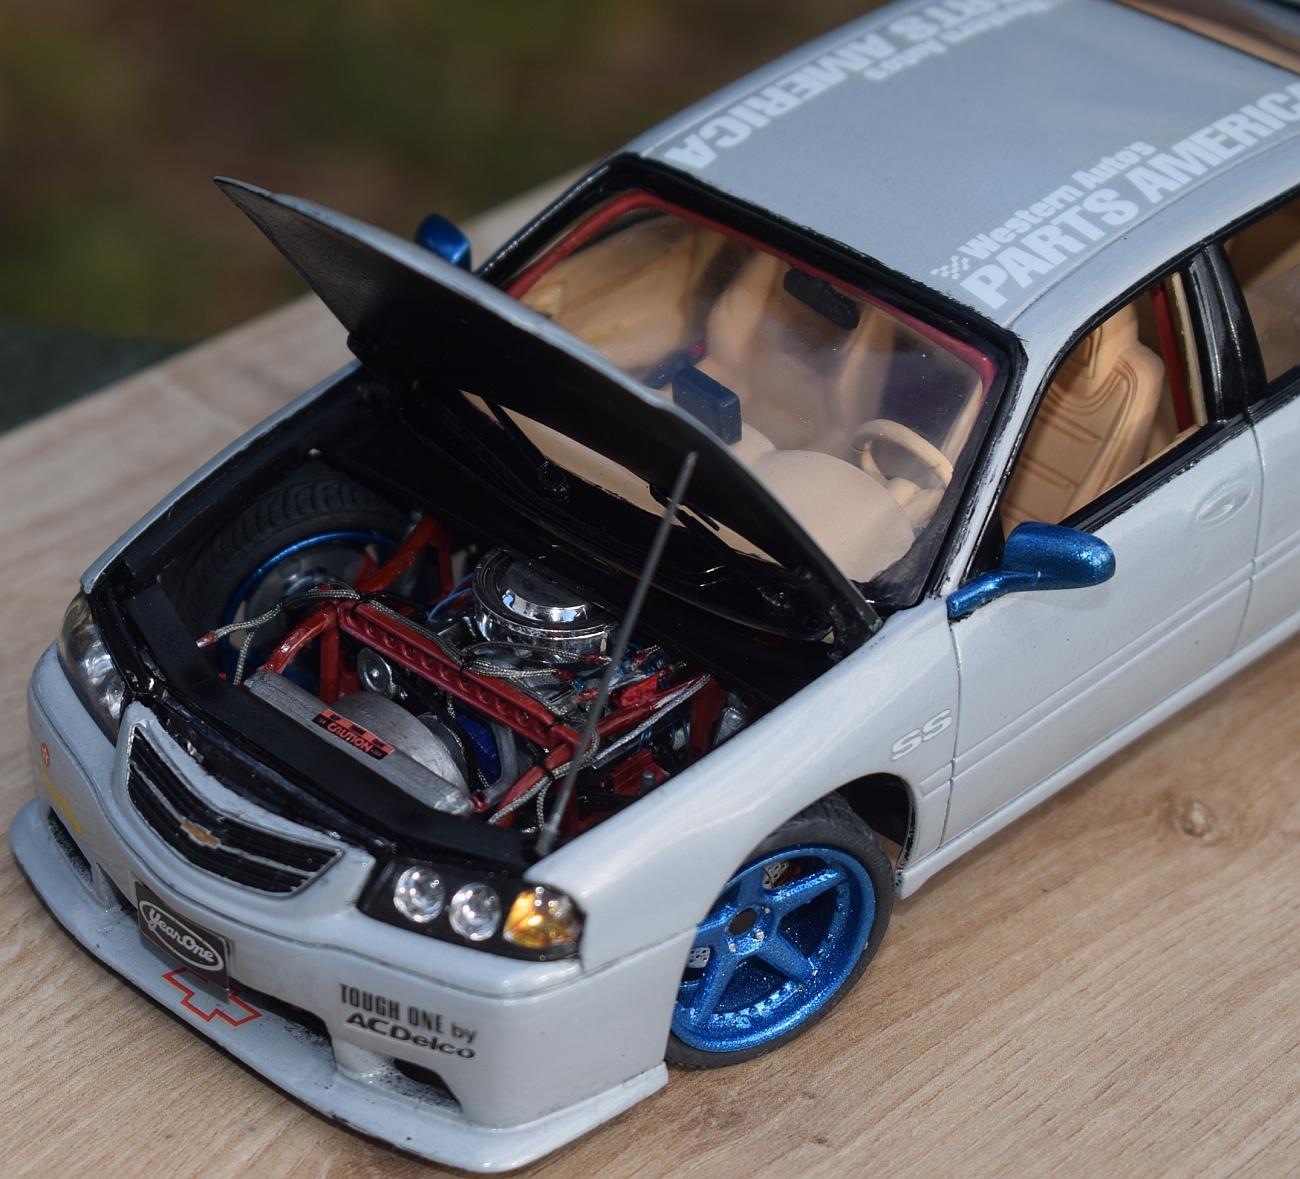
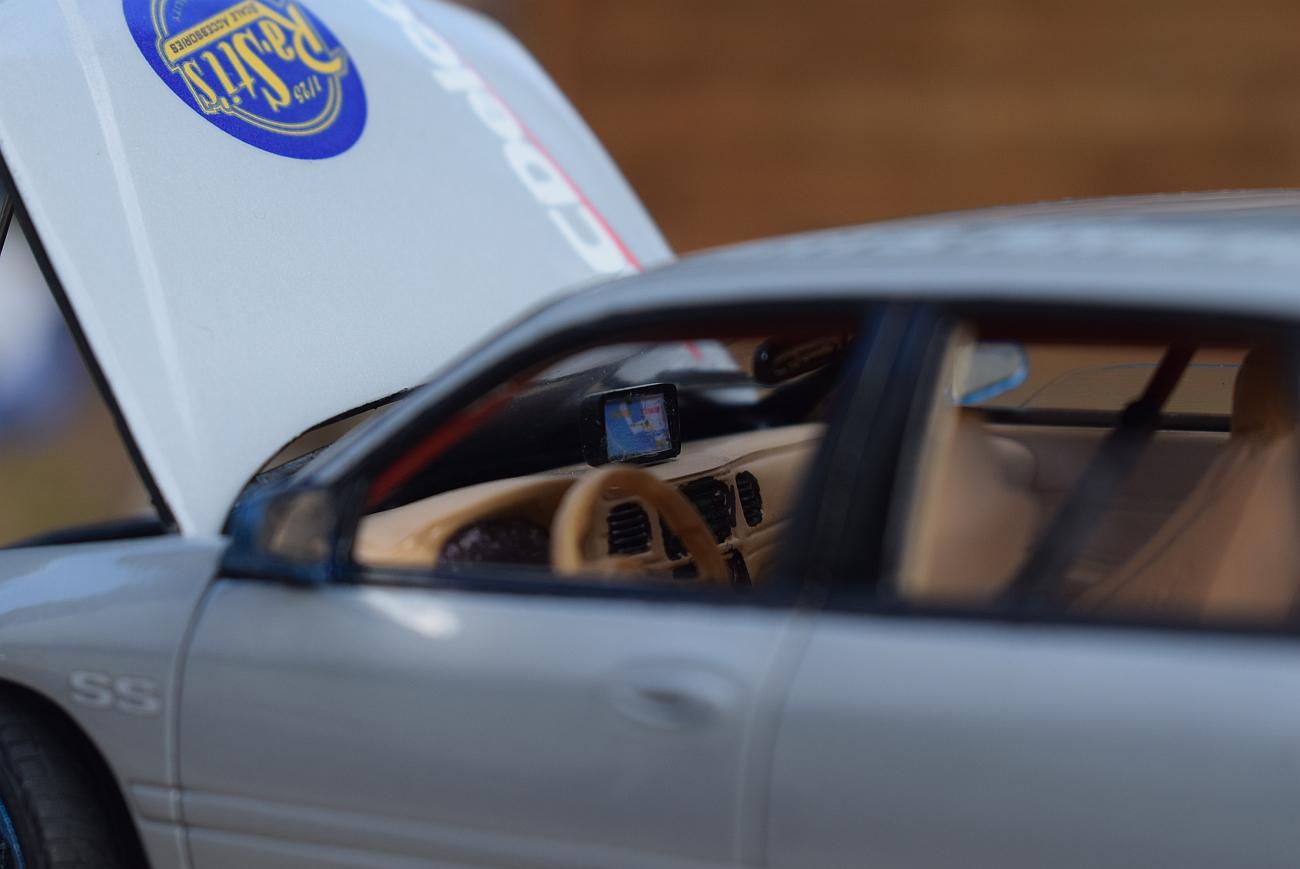
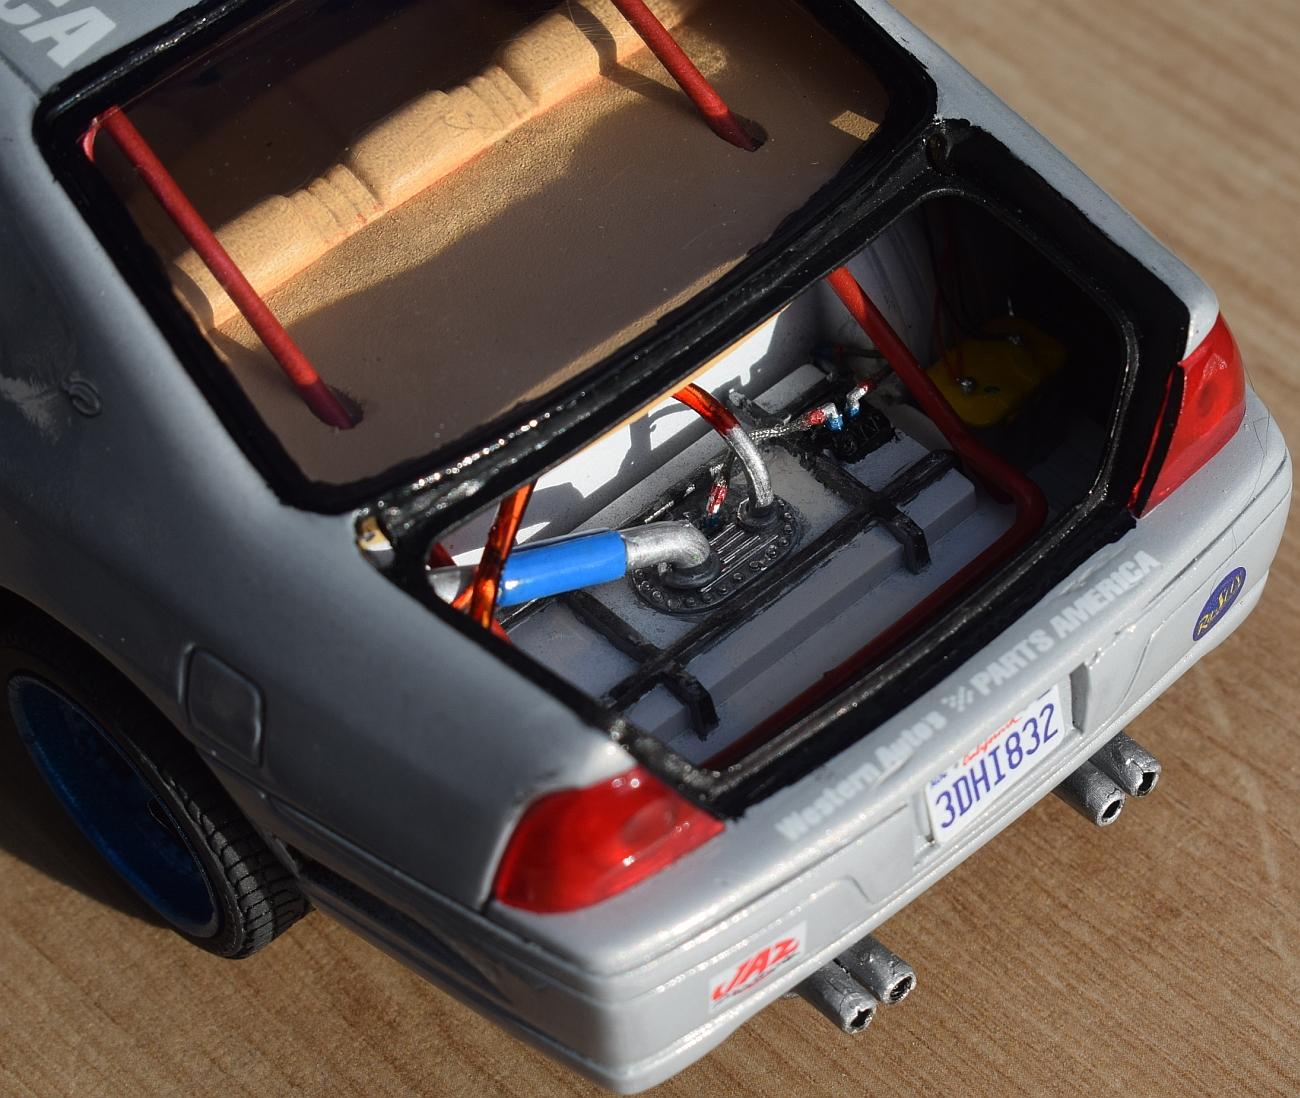
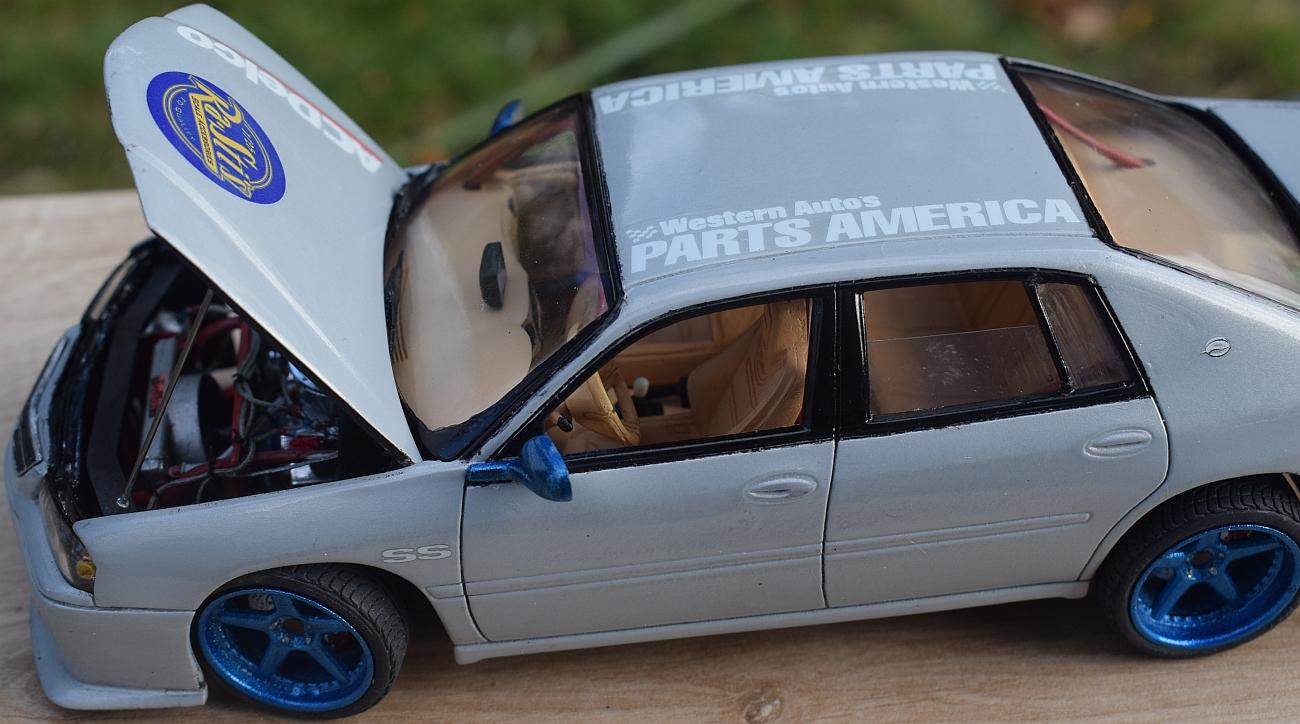
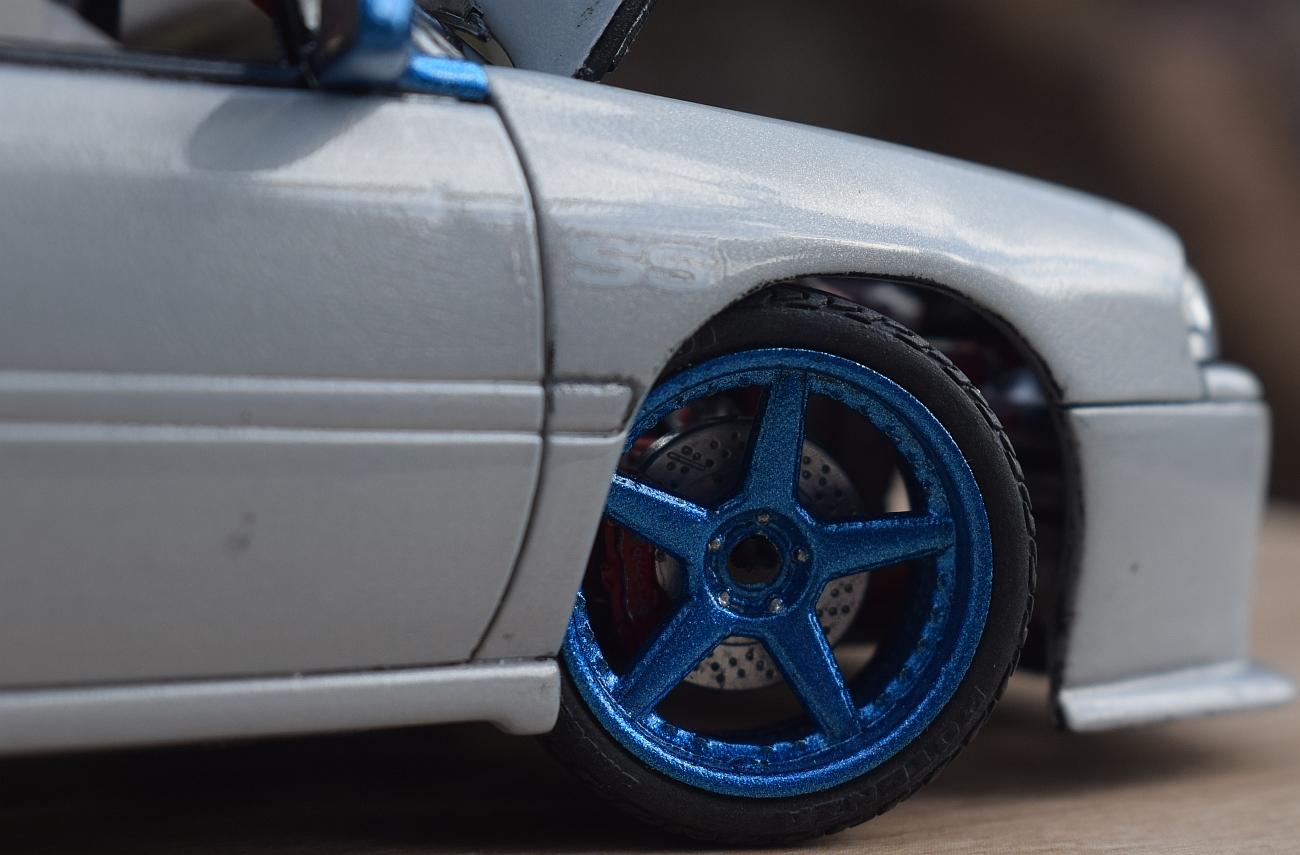
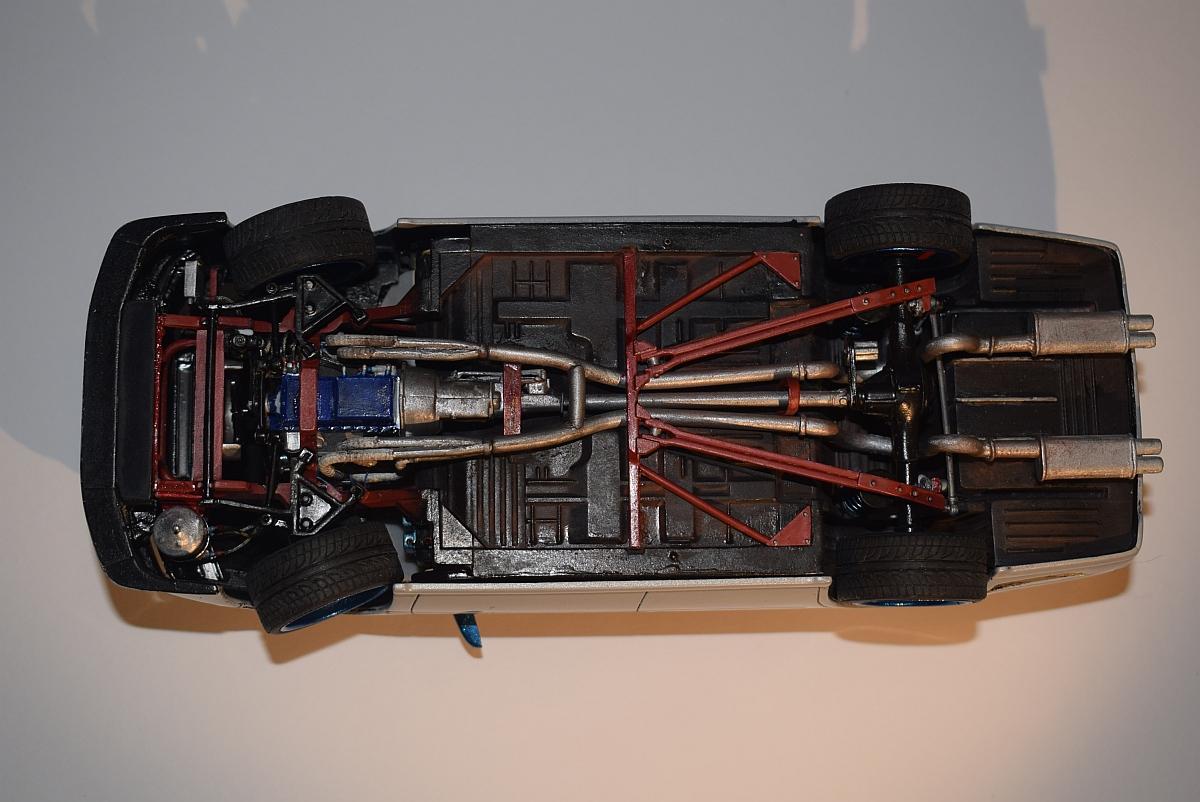
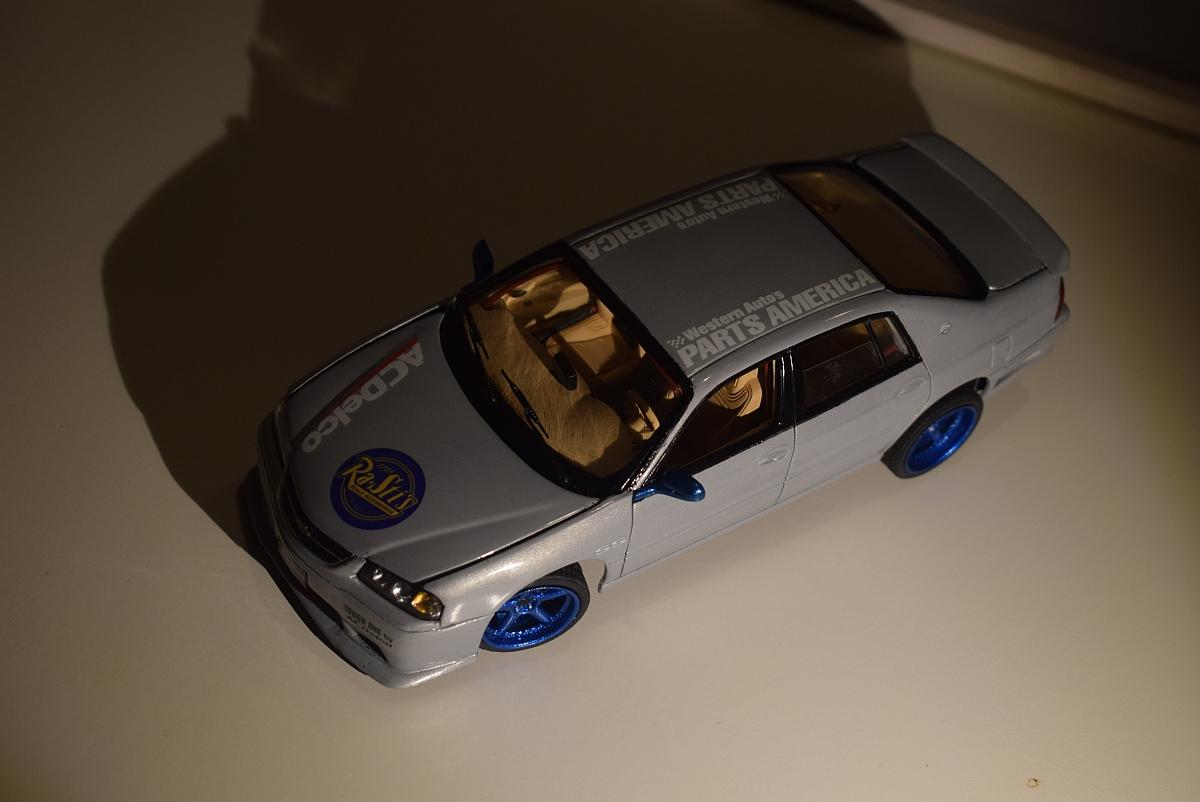
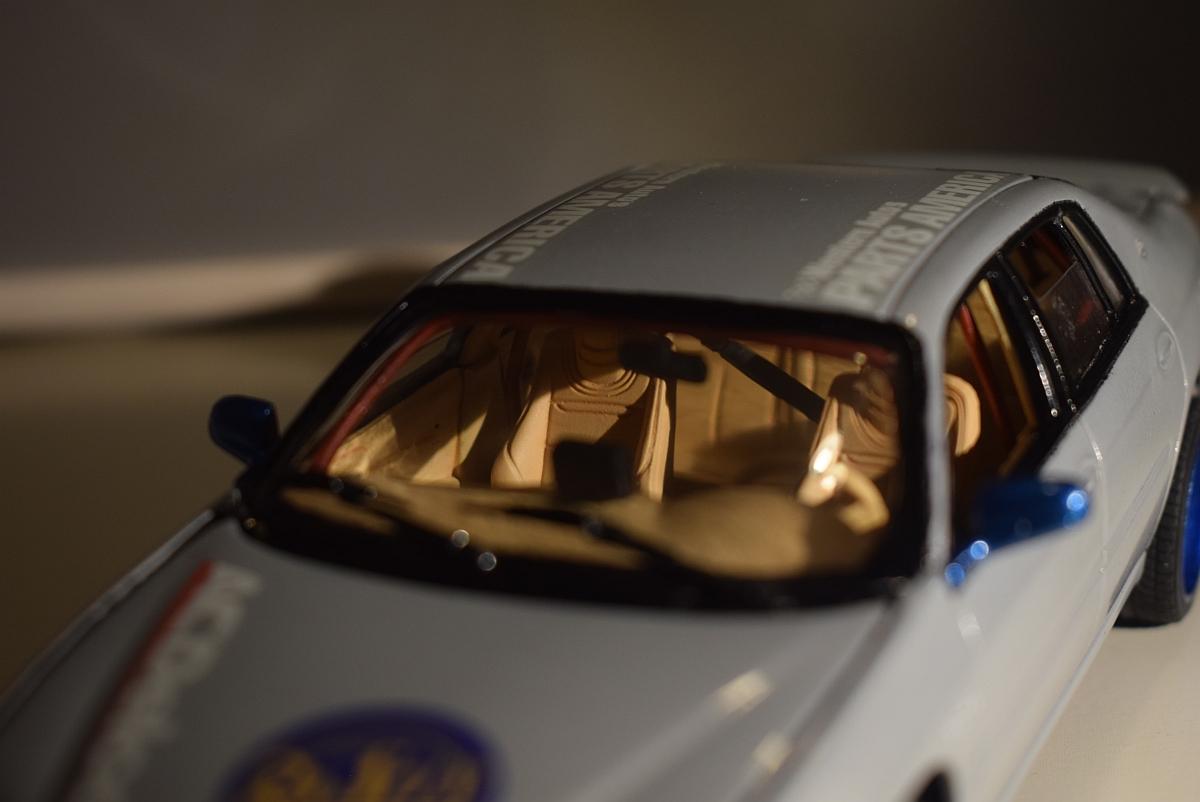
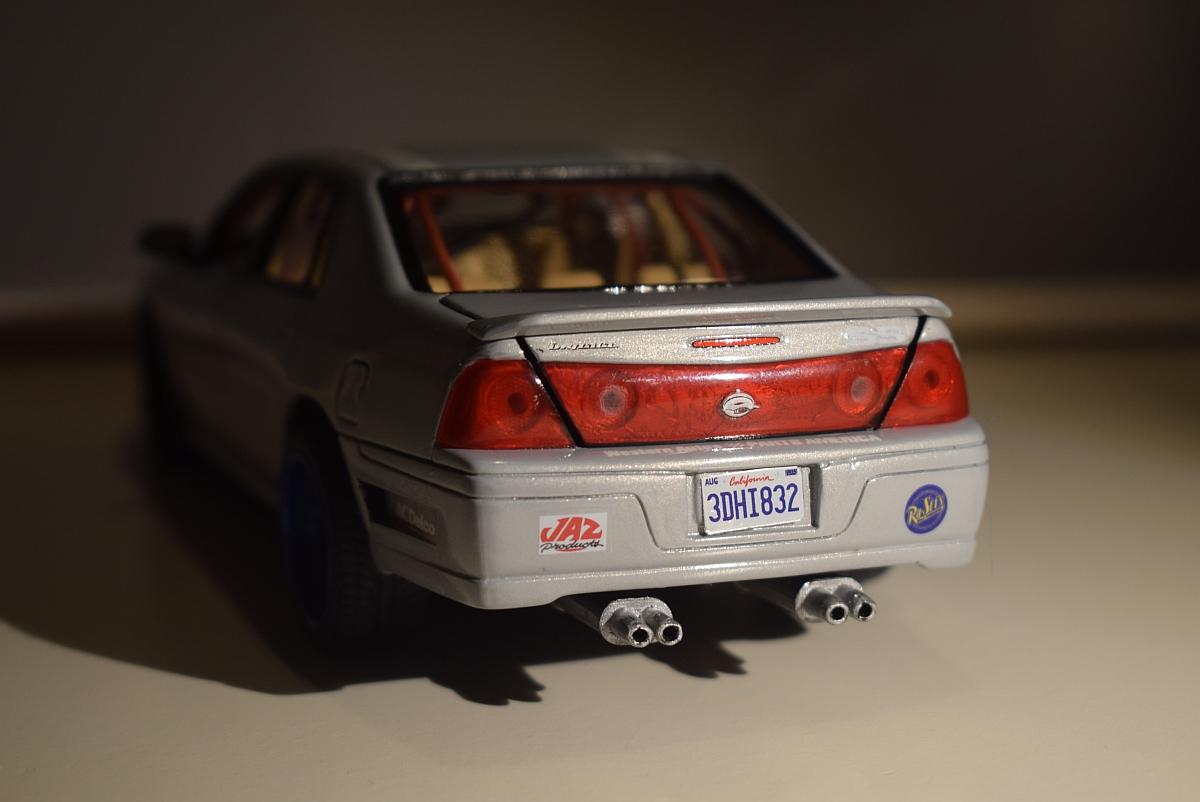
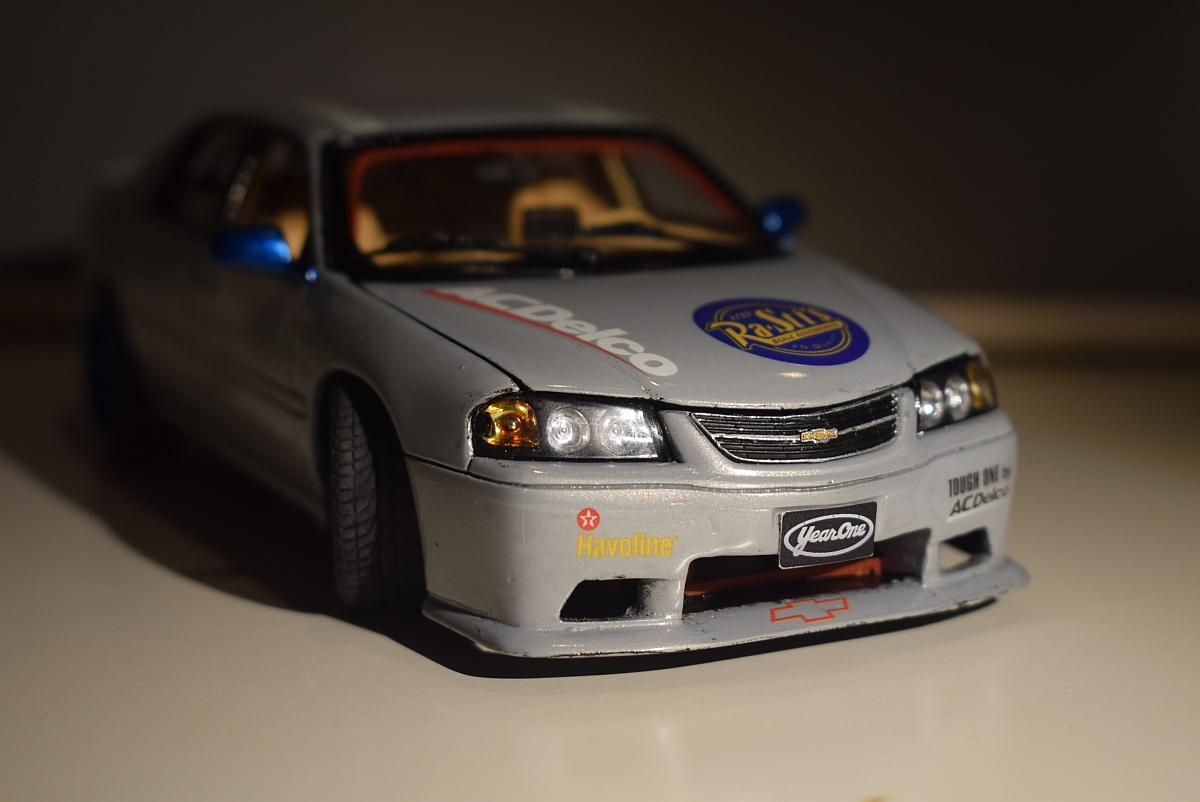
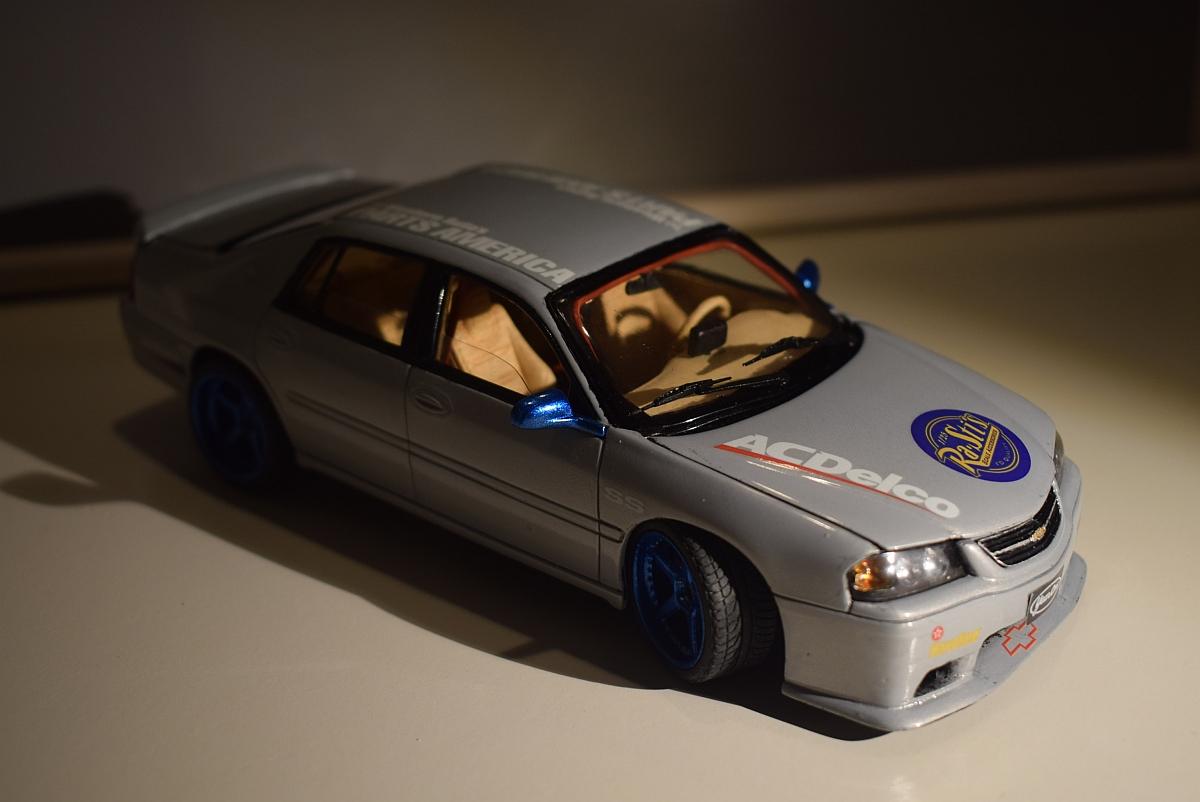
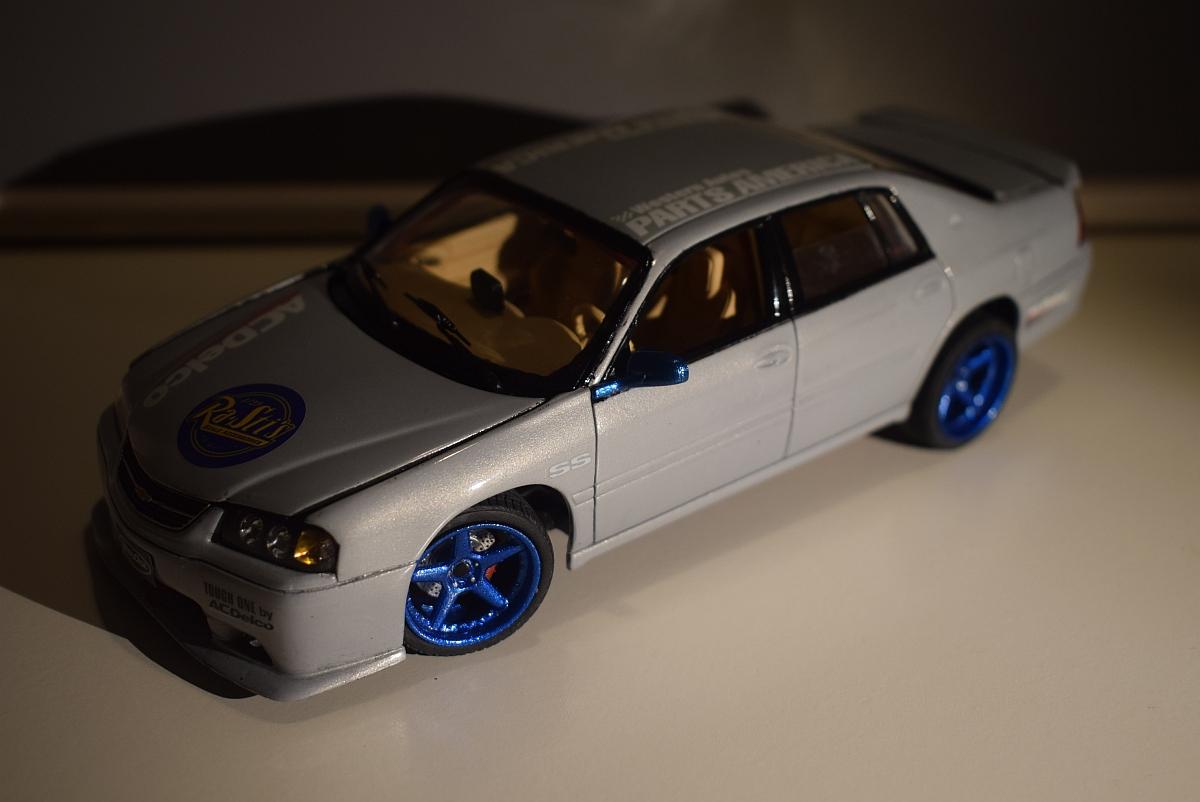
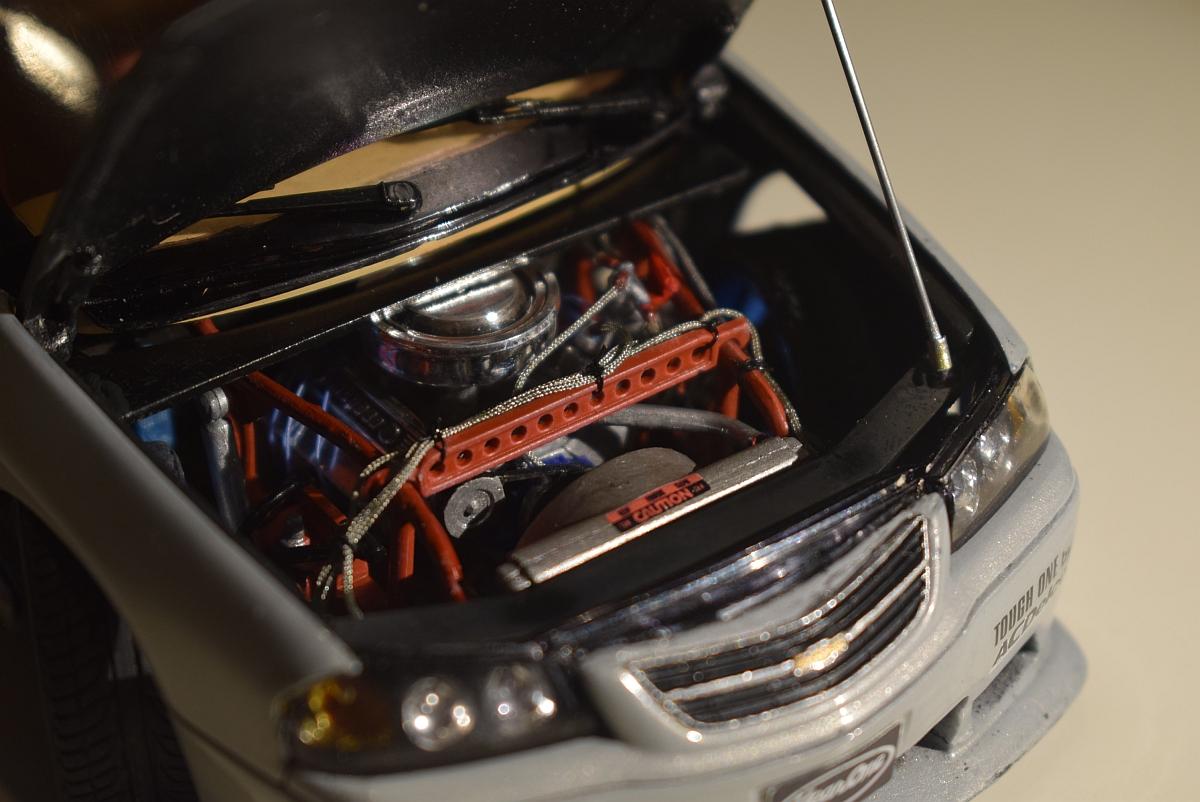
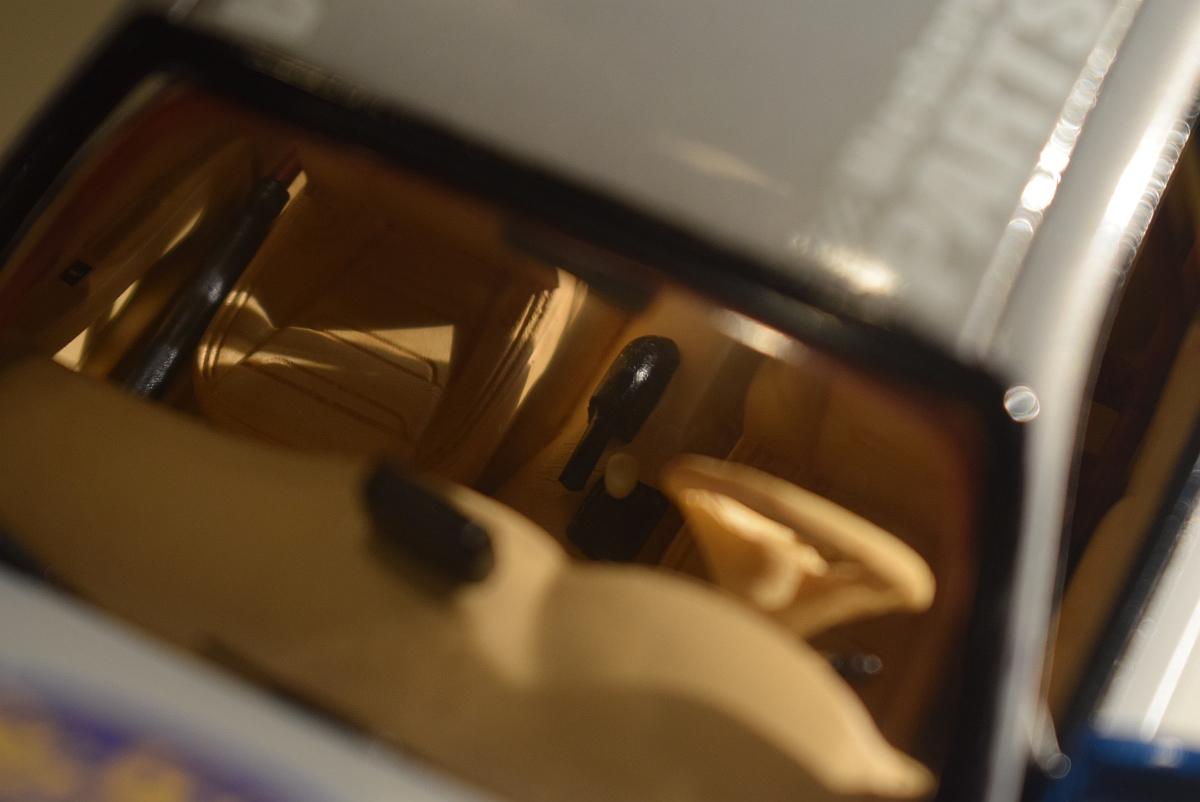
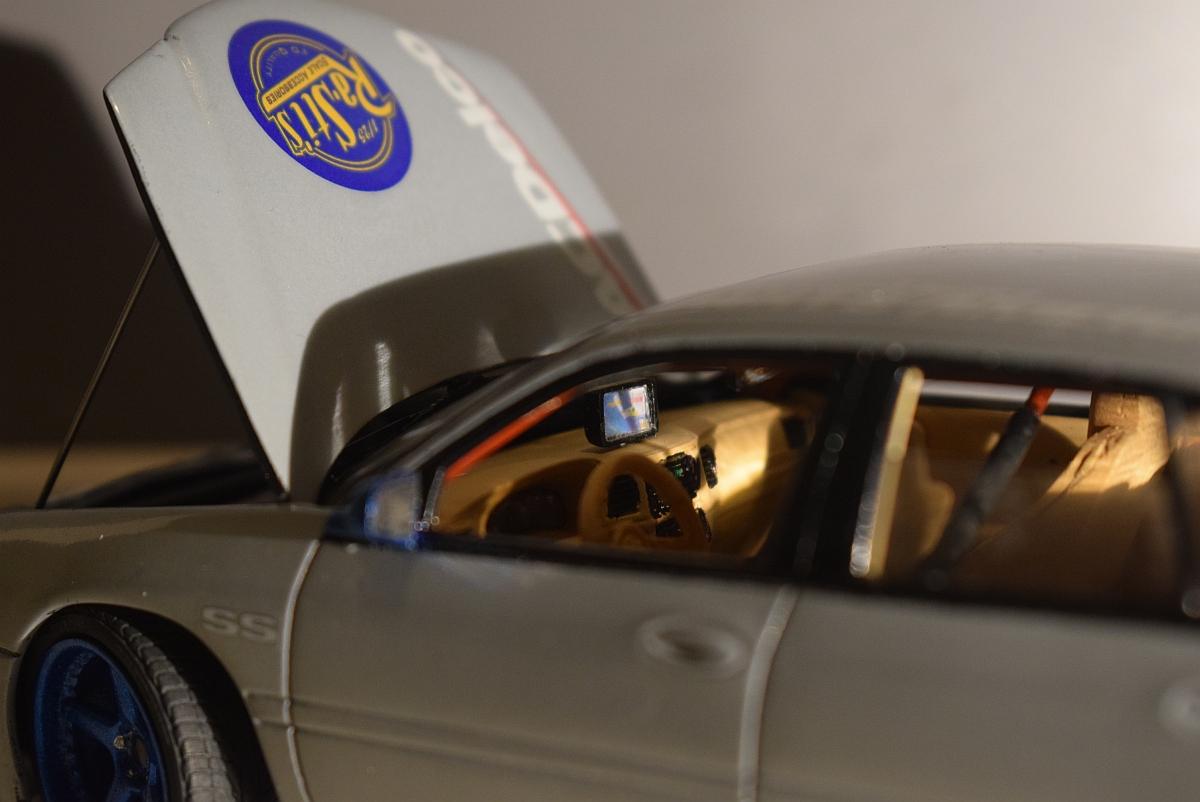
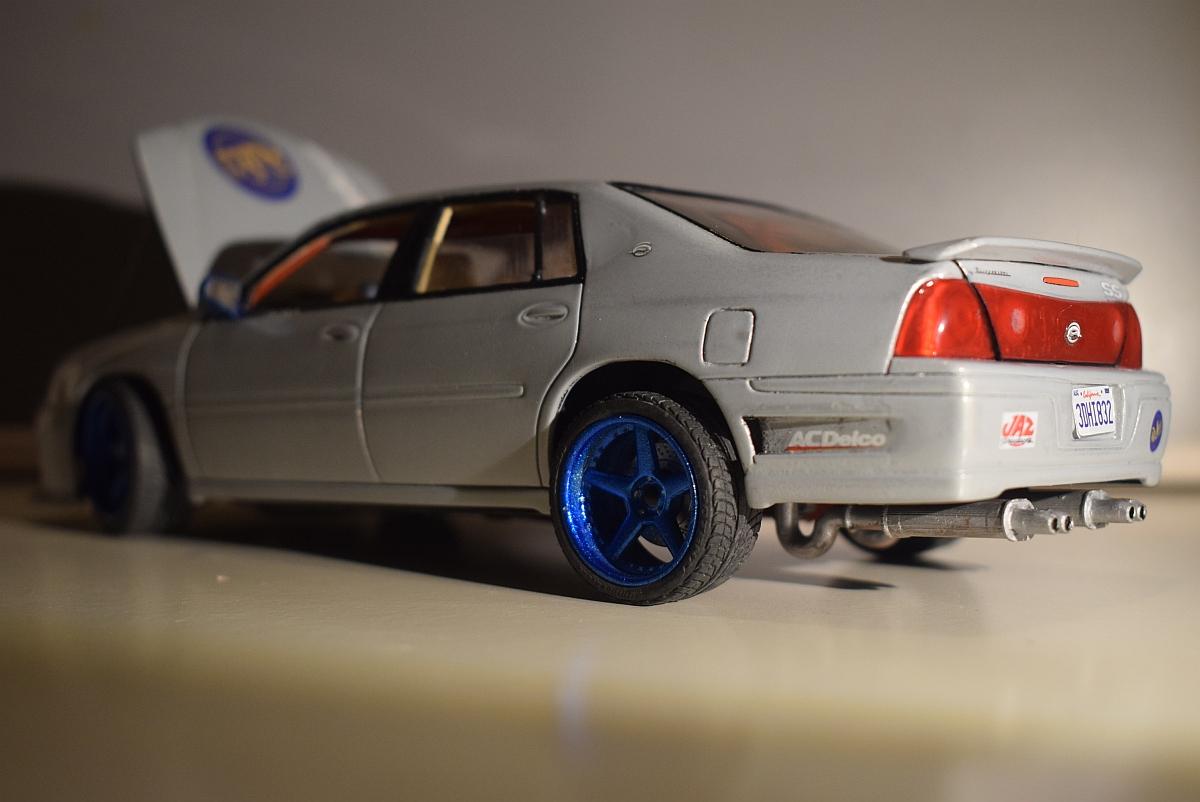
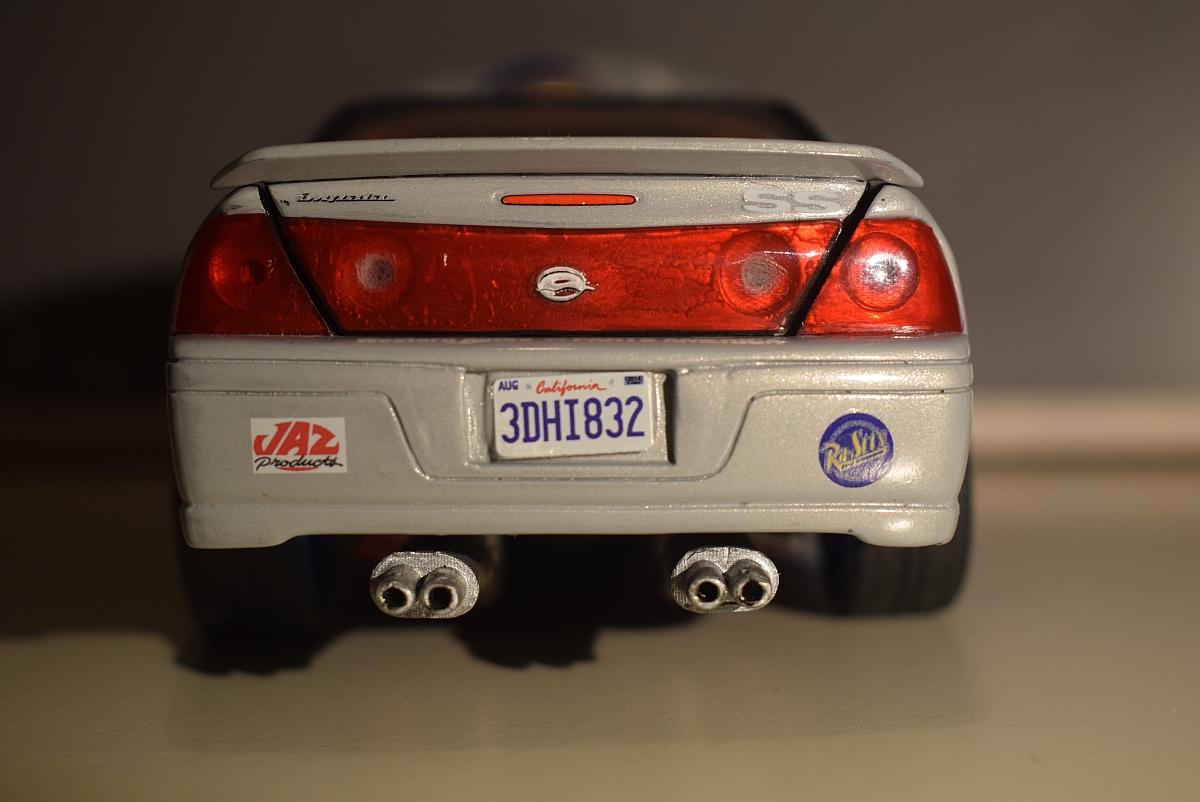
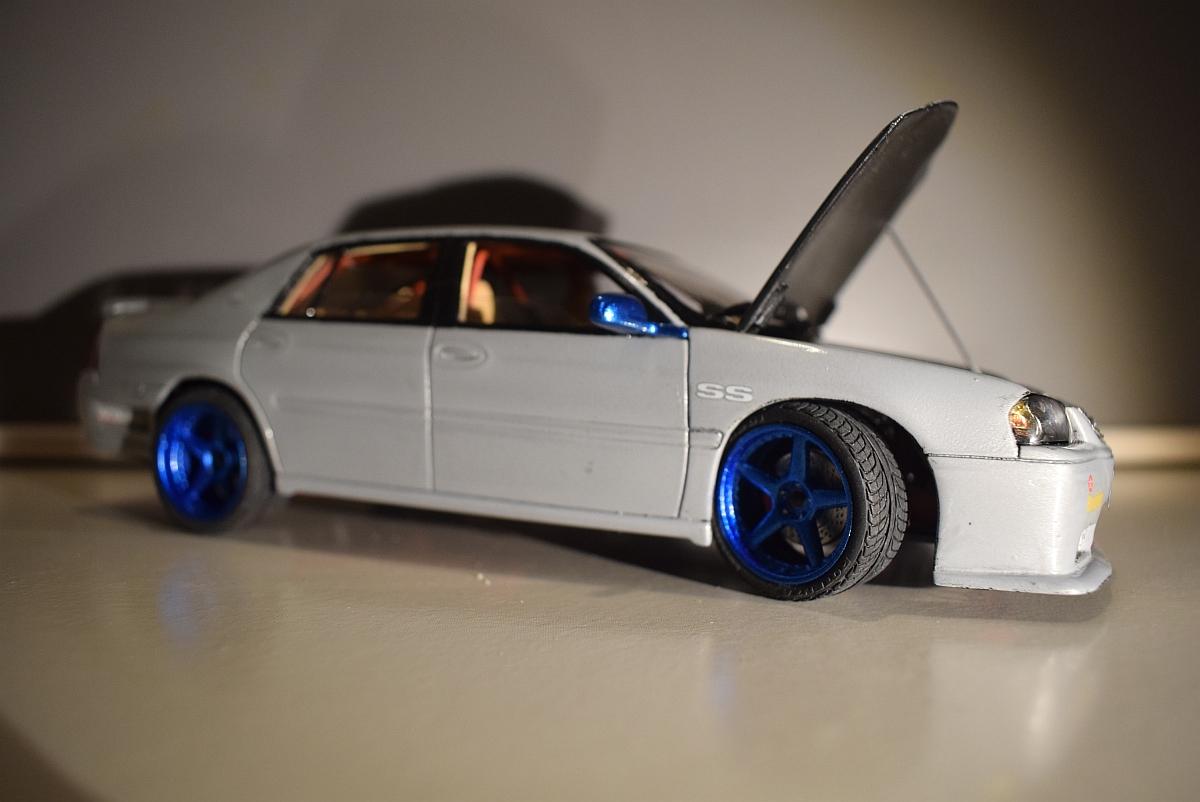
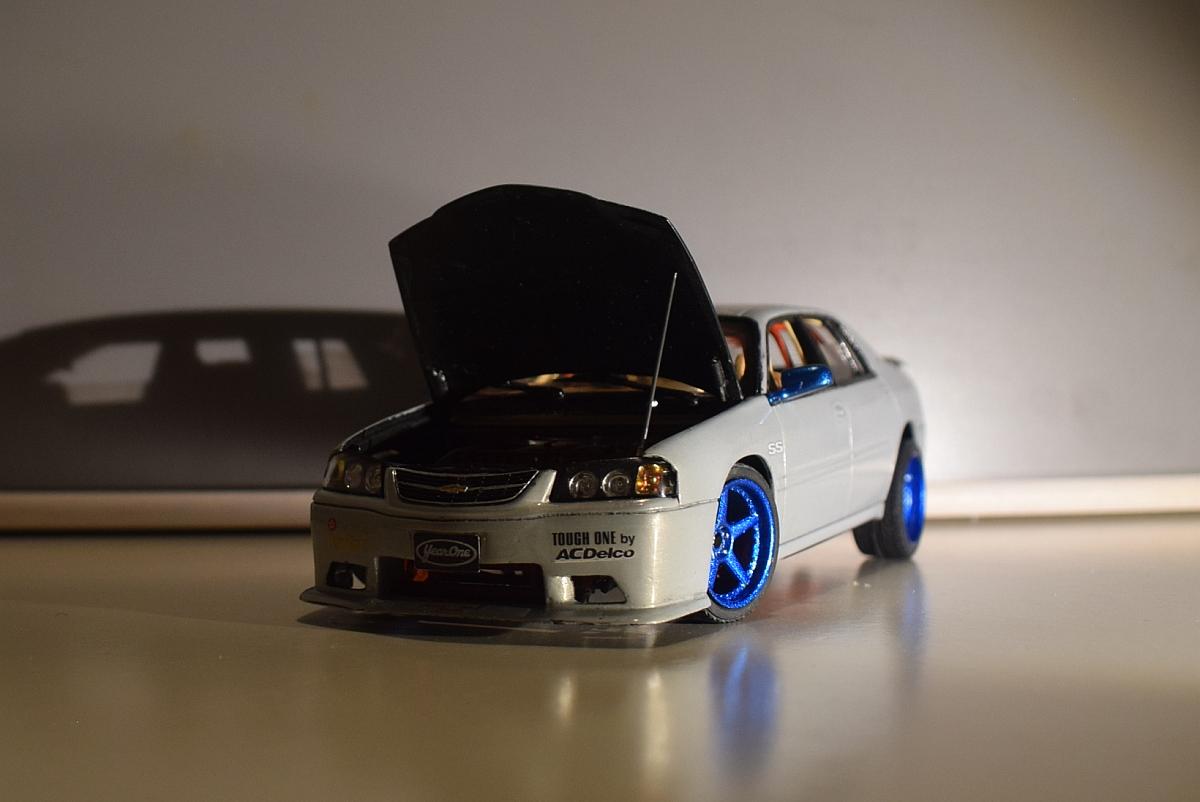
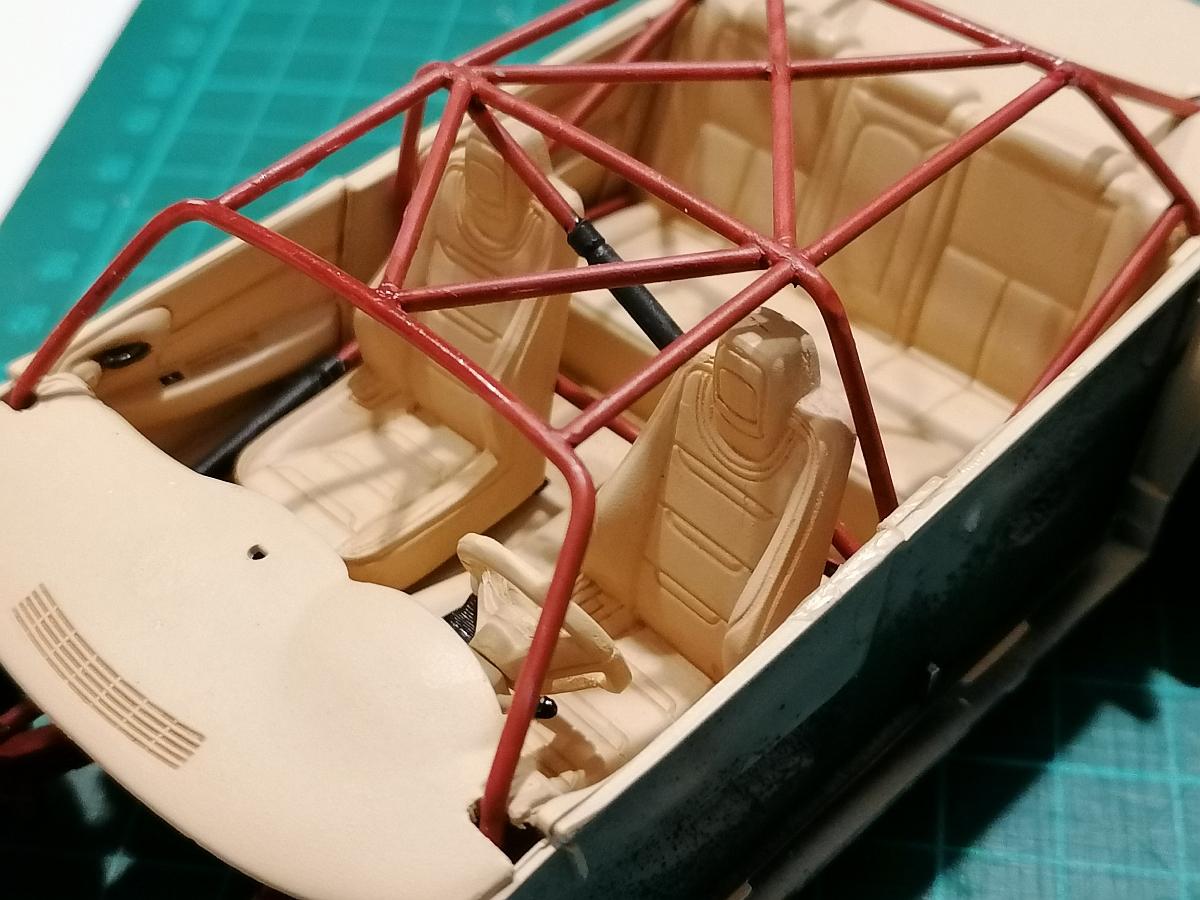
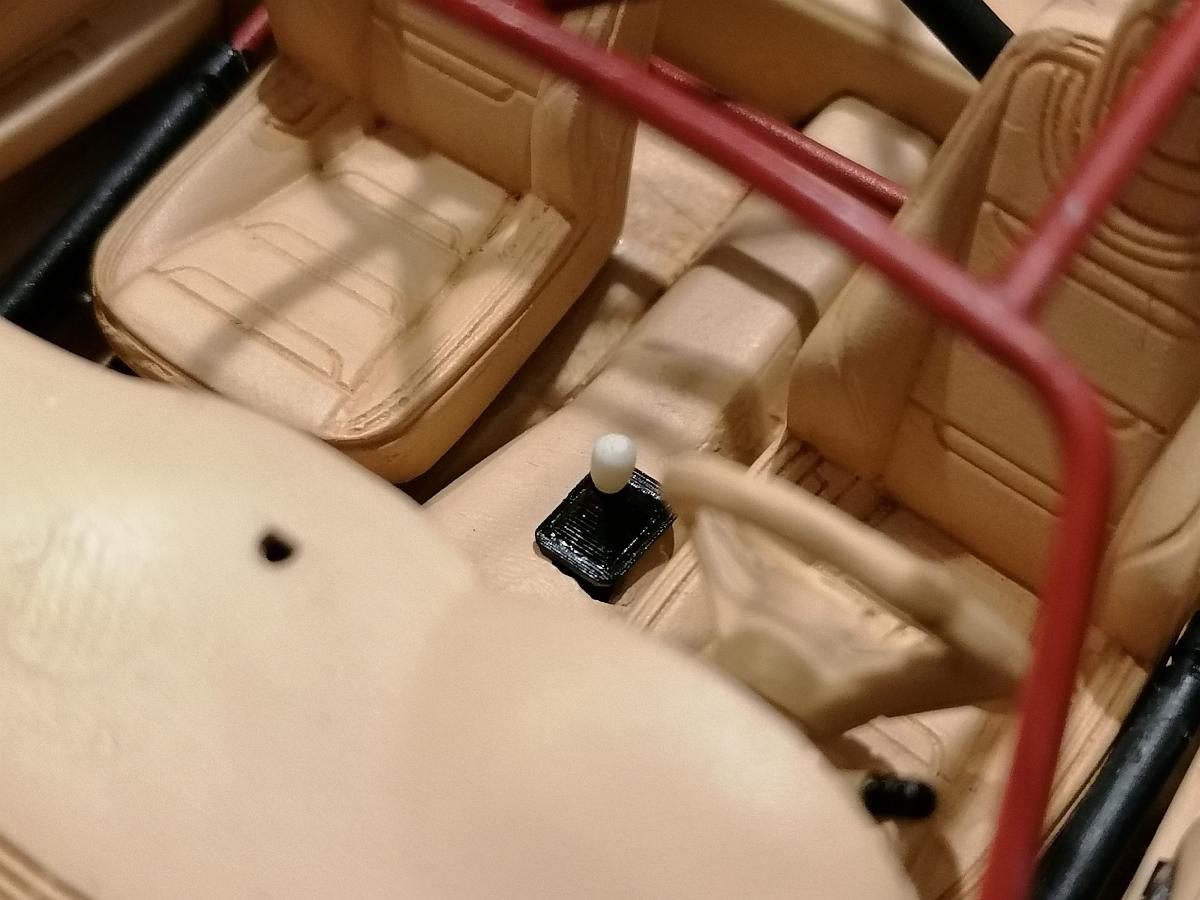
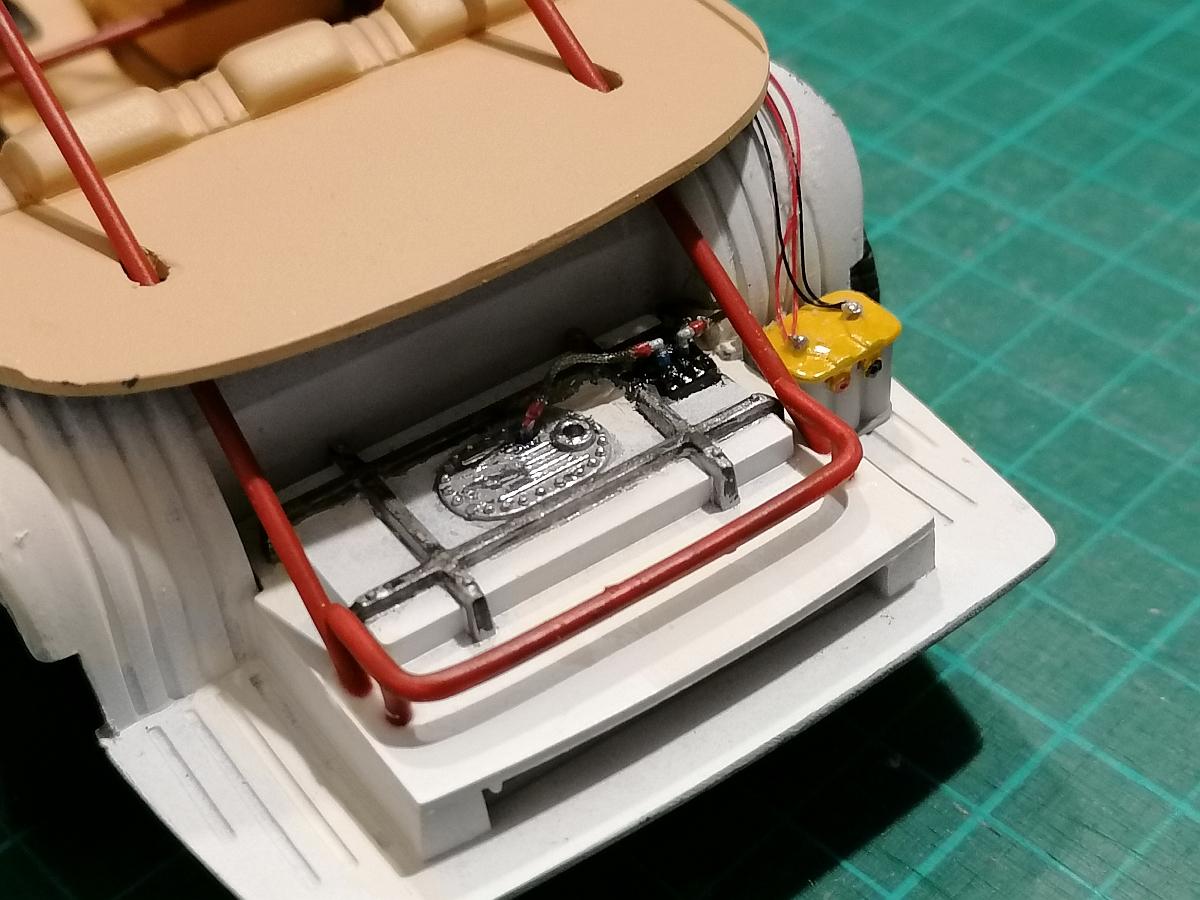
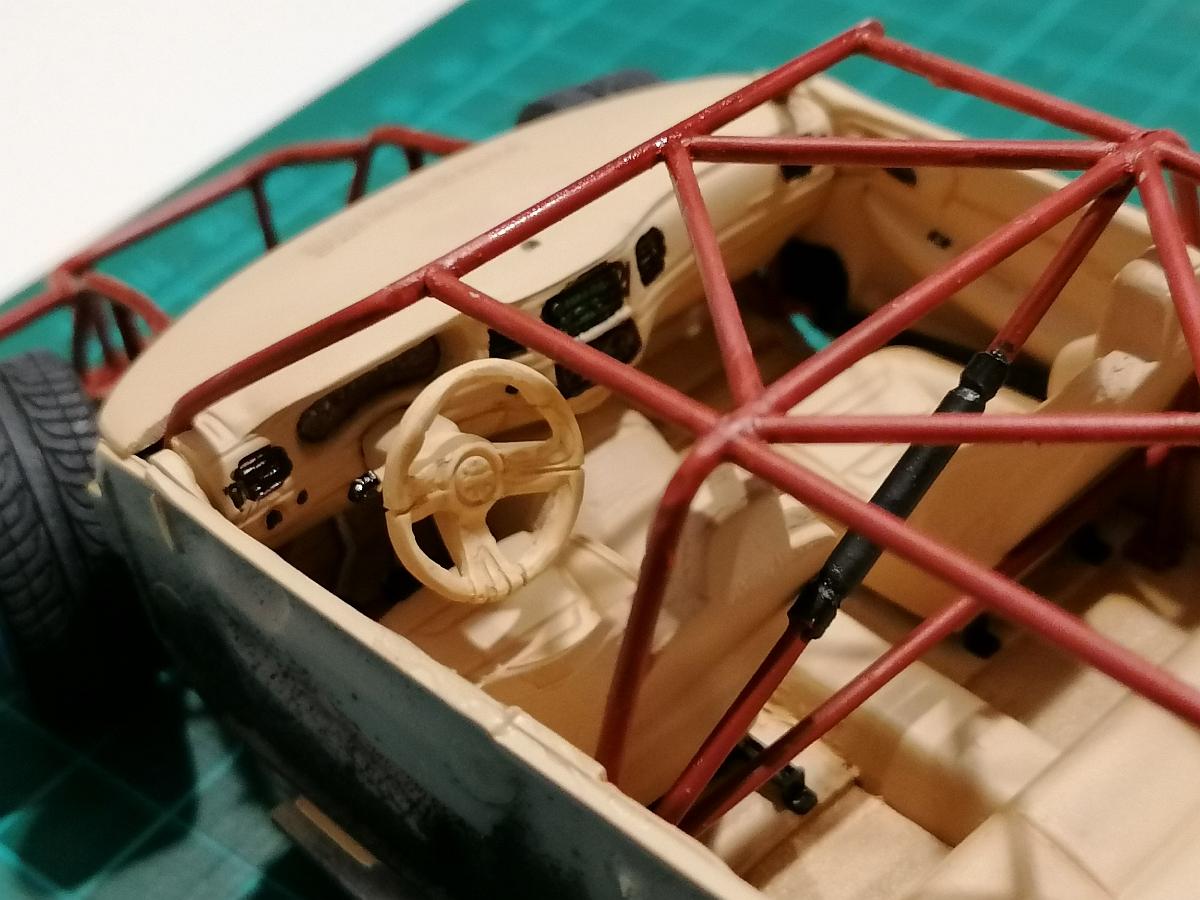
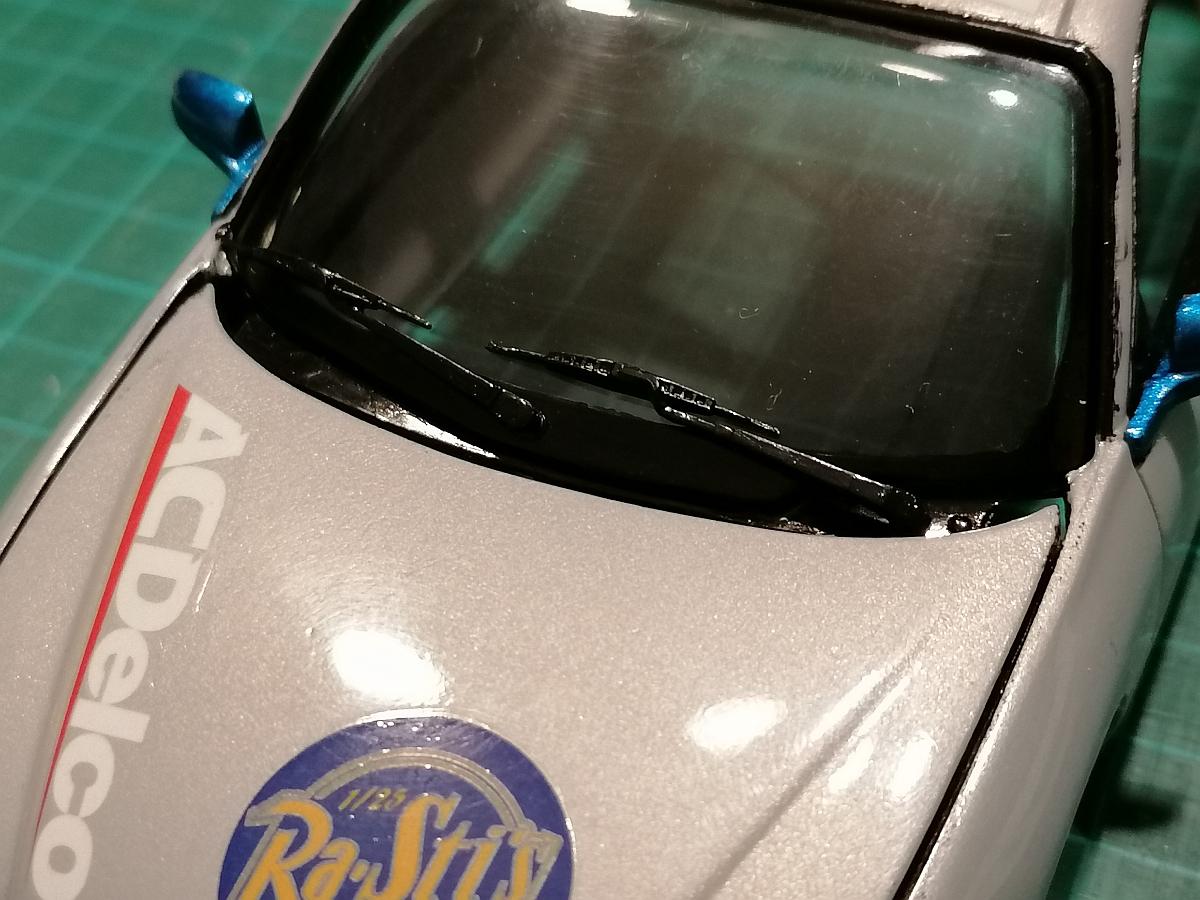
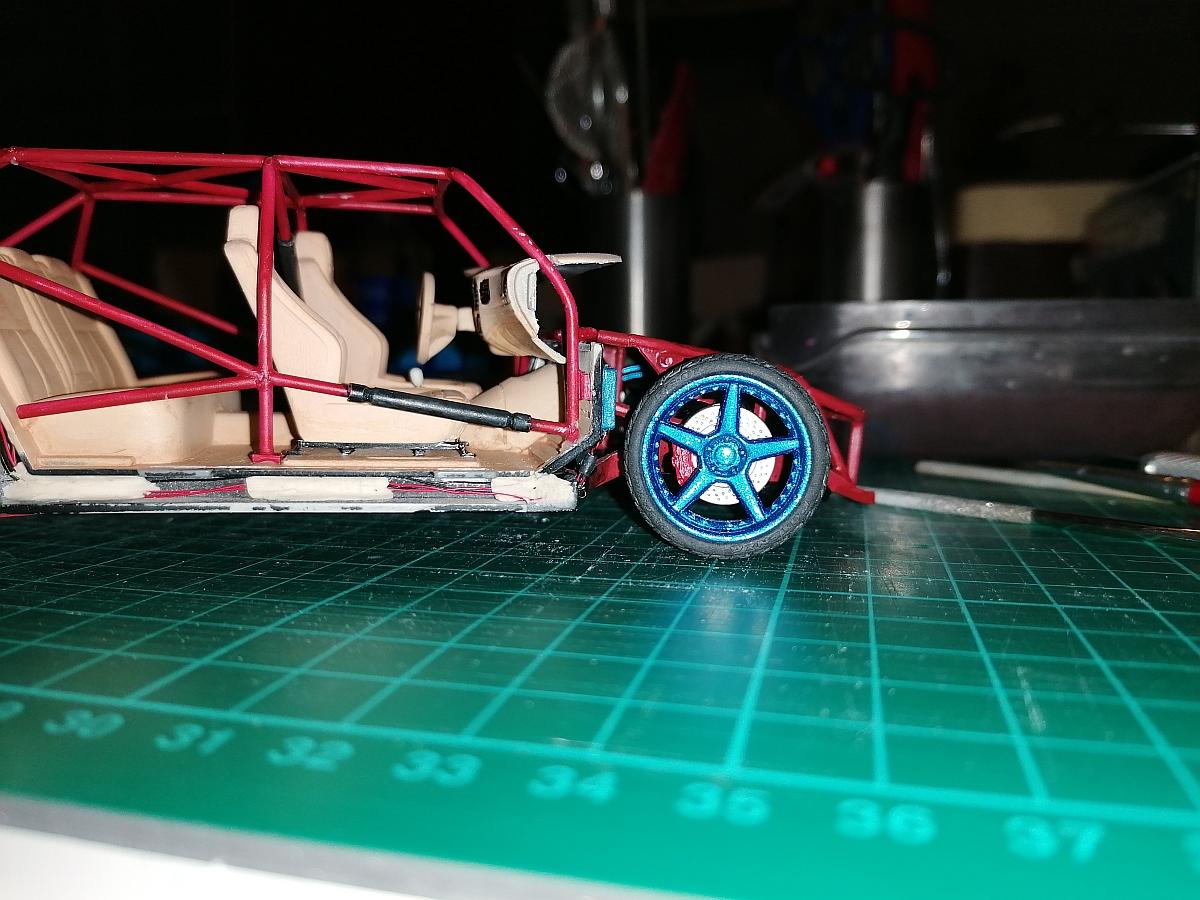
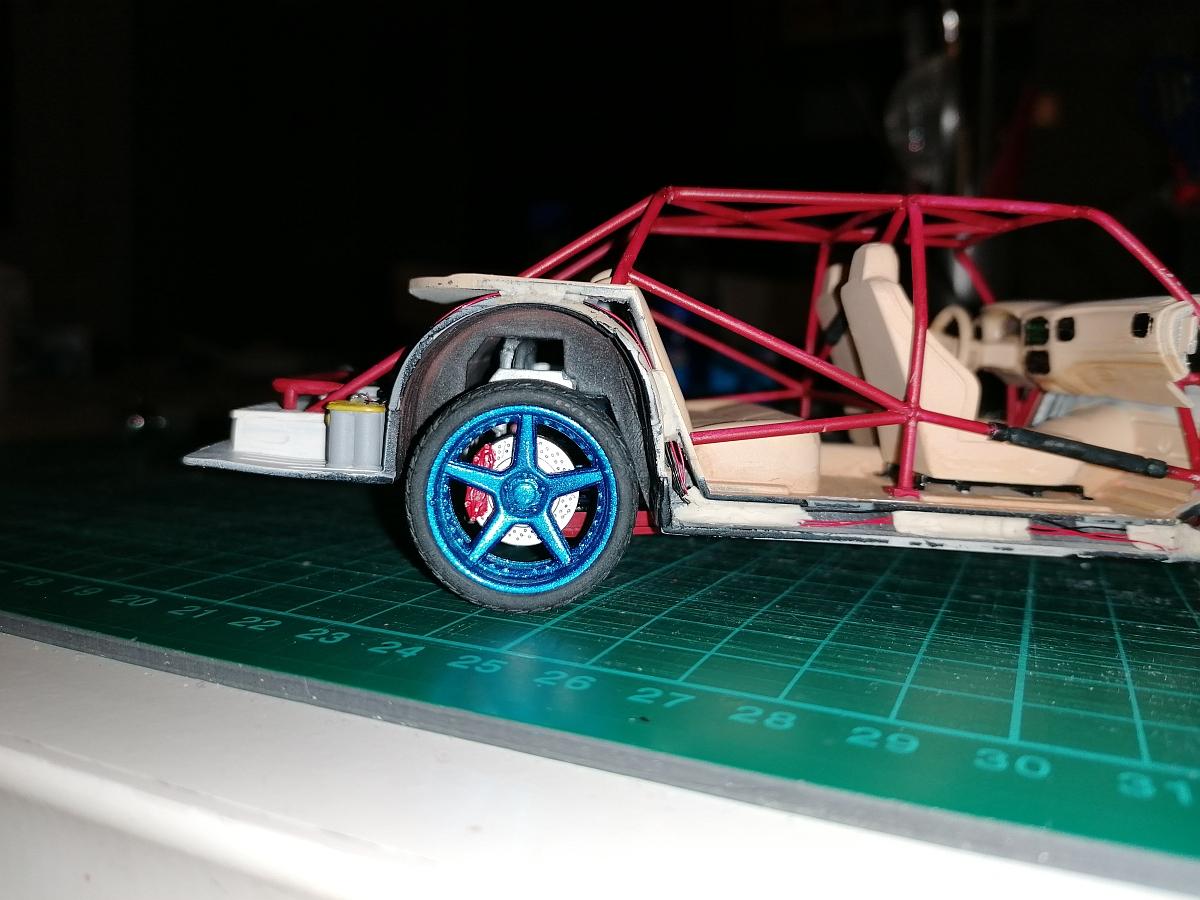
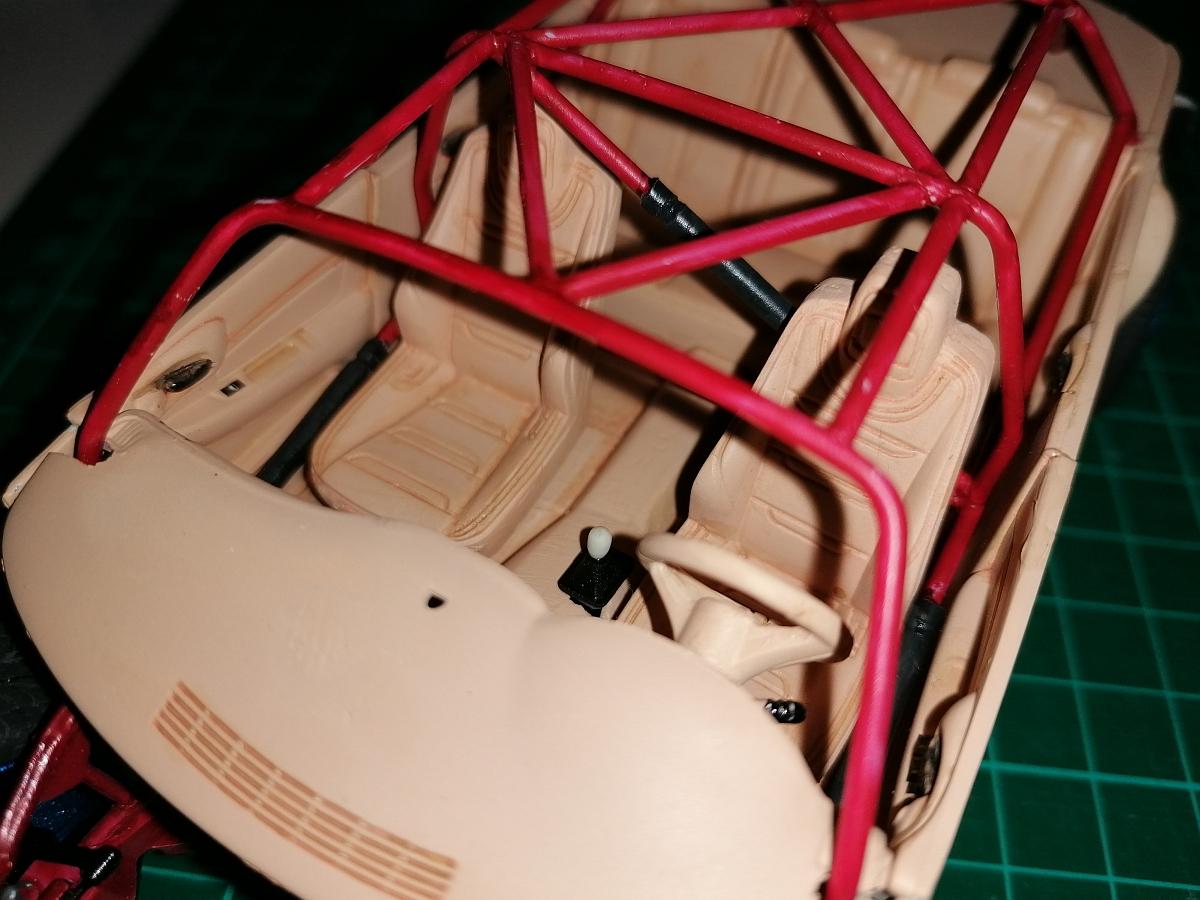
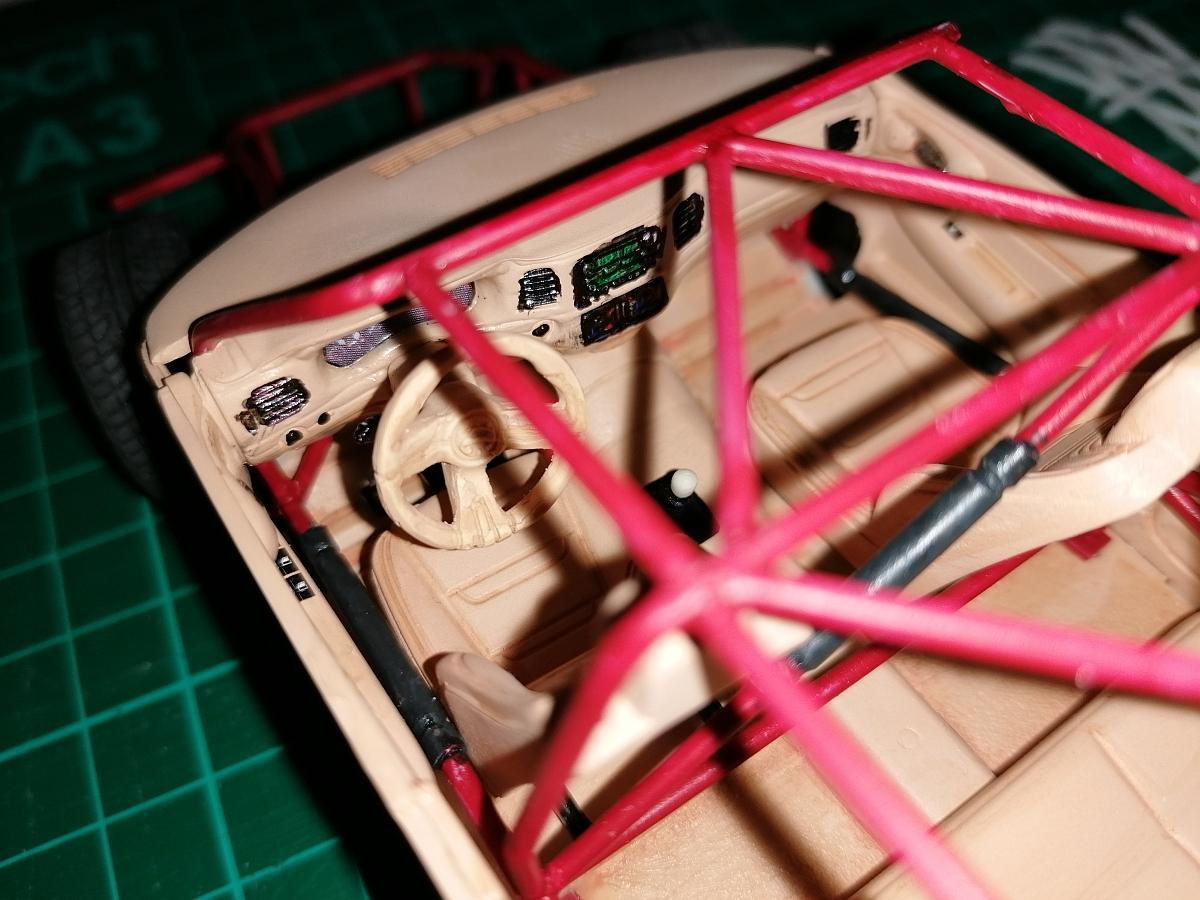
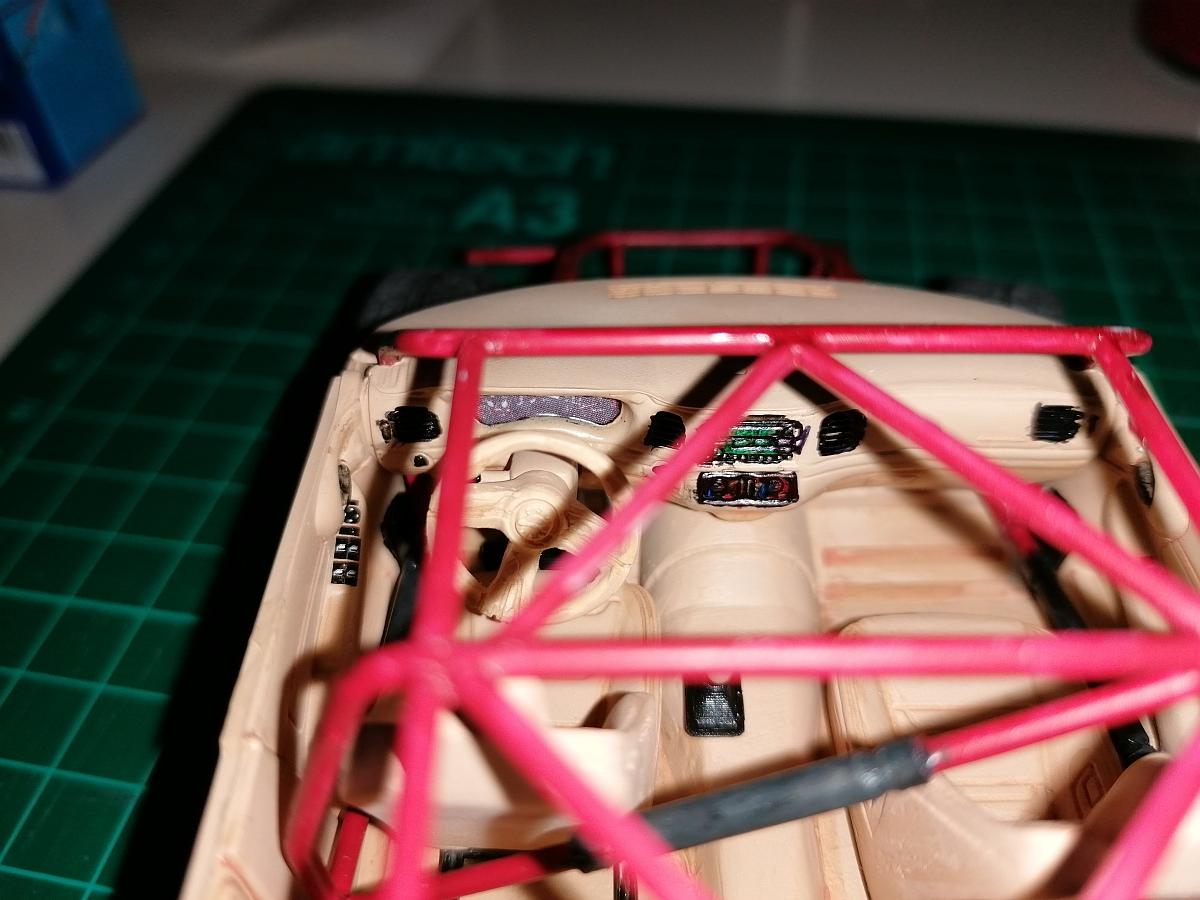
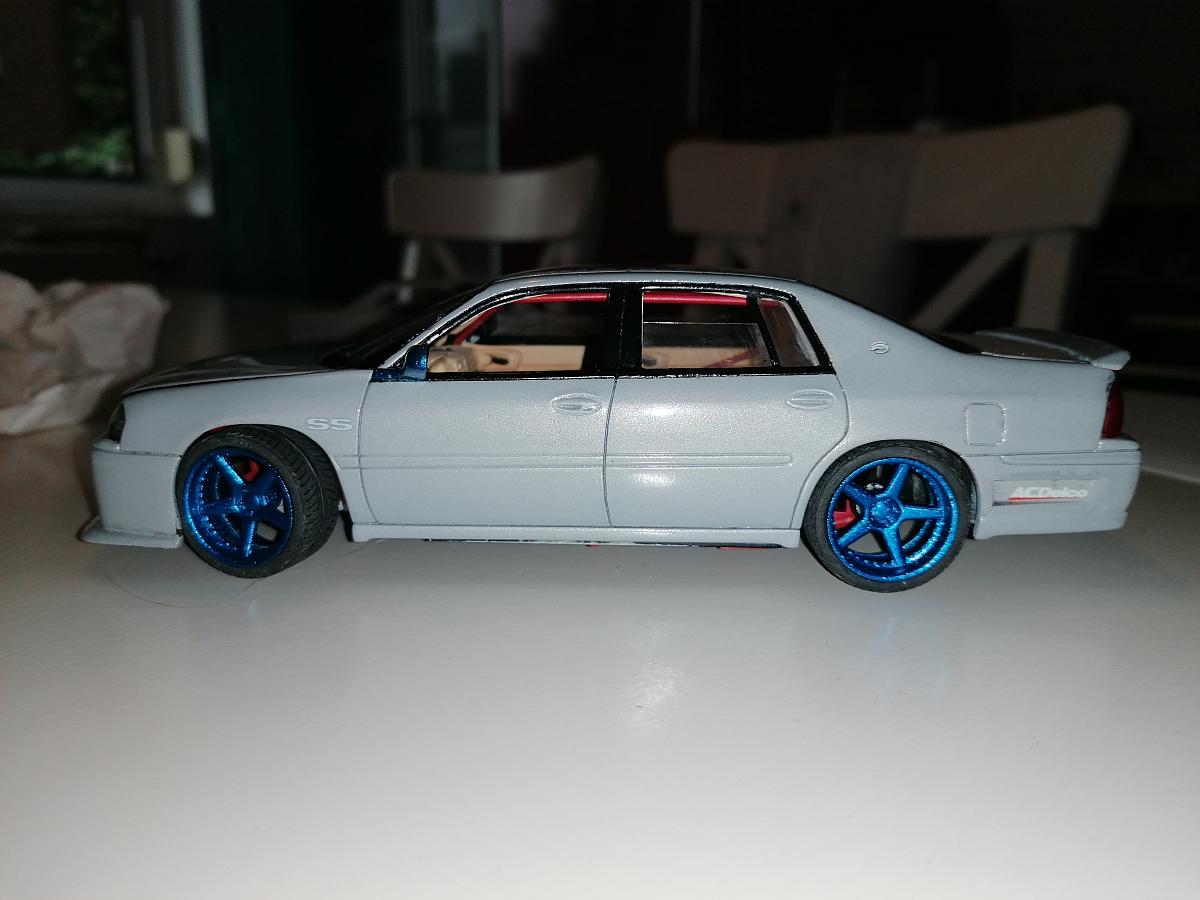
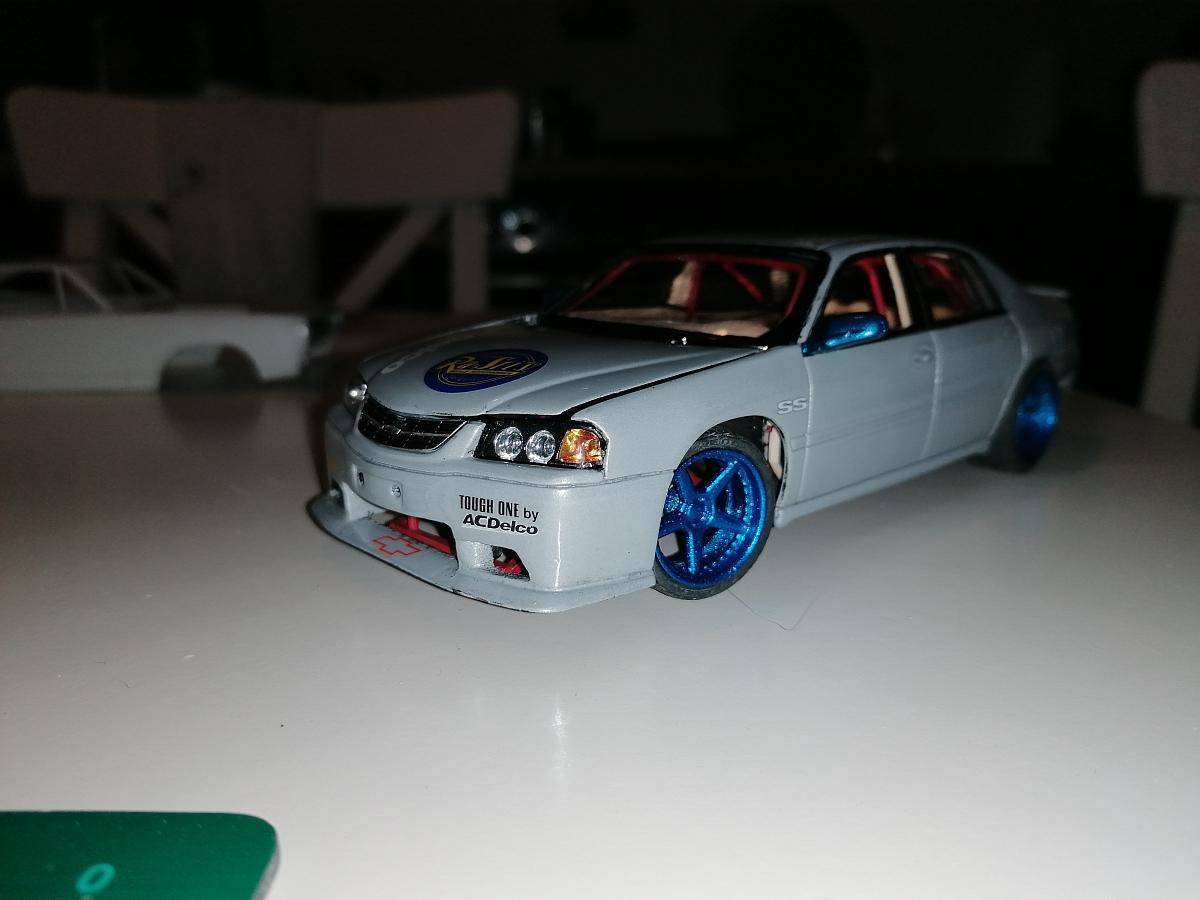
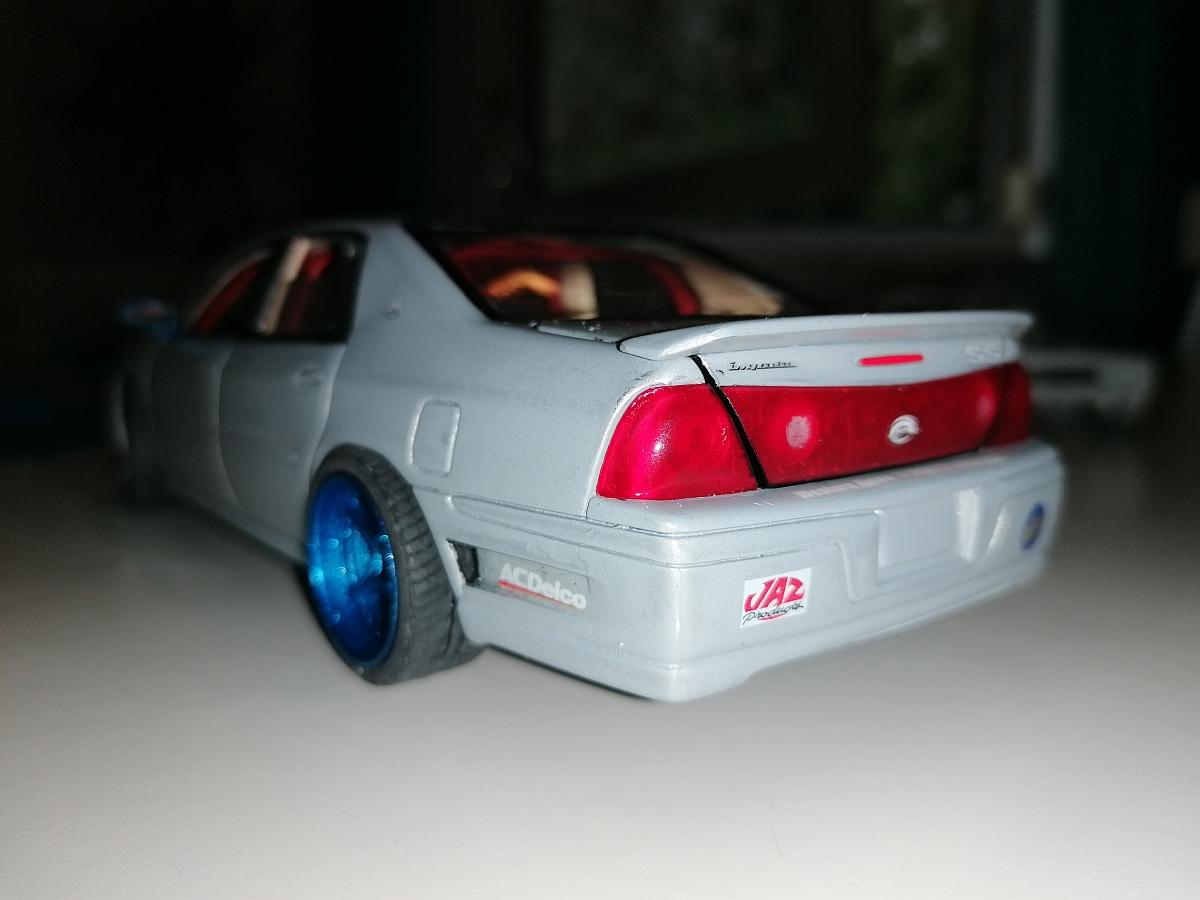
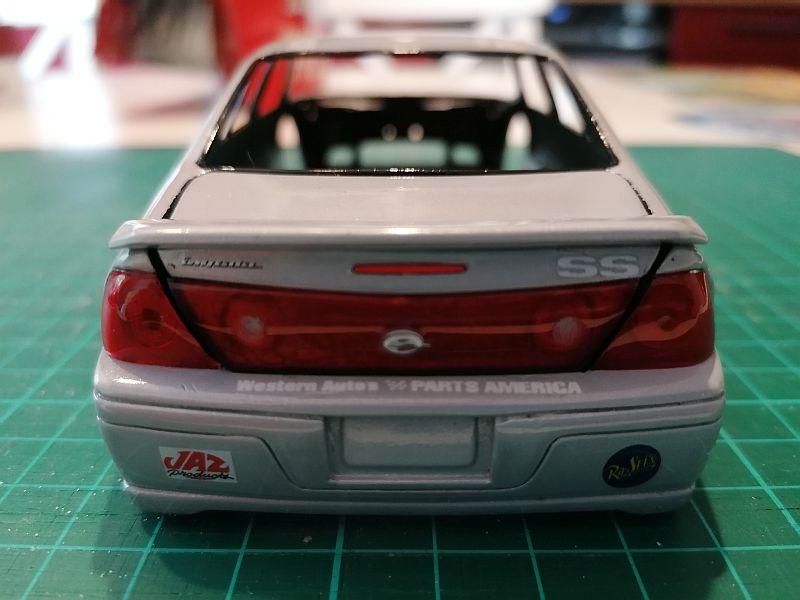
#25. camaro69 - Monte Carlo Nascar disguised as a 2003 Chevrolet Impala. Here´s my entry. It was the second time I started to participate the CBR and the 1st time I finished. The title doesn´t say everything. I used the Revell Chevrolet Impala Police Car body on top of the AMT Western Auto Monte Carlo Nascar chassis. Paint is BMW Hockenheim silver. What I´ve done... Bodywork / exterior: closed the holes for the light bar, changed the front bumper using a lot of different evergreen stripes and acrylic modeling paste followed by a lot of sanding, cutted out the hood and trunk lid (did the water rails in the trunk out of evergreen), closed the triangle windows behind the back doors and splitted the back door windows using different evergreen and modeling paste again, added air takeouts to the rear bumper, cutted out the back door windows, reworked the b-pillar on the kits glass part, added a rear wing from Revell´s 2005 Ford Mustang GT500 and windshield wipers from the 1999 Mustang Cobra, used self designed 3d-printed wheels with Aoshima tires and Fujimi disc brakes, added side windows in different positions out of blister plastic, added decals from the Nascar and some selfmade too (f.e. the license plates and my avatar logo), weathered the chassis. Engine / fuelsystem / suspension: wired the distributor and the MSD-Ignition boxes, added a selfmade ignition coil, plumbed the oil system in the engine bay and the fuel system in the trunk using Top Studio fittings and braided line (secured the oil plumbing to the roll cage parts using 0,28mm wire) added a selfdesigned and selfprinted oil tank, made the rear supension work with real springs and selfmade shock absorbers, made new front wheel carriers, selfmade a stock exhaust system, added an Optima battery selfmade out of evergreen and wired it too. Interior: changed the roll cage to make it mostly unseen from the side (added some evergreen rounds to complete it and evergreen pipes as pads), casted front seats and steering wheel from the Jada Toys Camaro concept and mounted the seats on to selfmade railings, selfmade shifter and parking brake lever, selfmade navigation with the "Finish Line (Portofino Inn)" on the screen ?, fitted the interior tub to the Nascar chassis. I think that´s it. There are some minor issues or maybe things I can do better next time but for the first finished model after many many years I´m pleased with how it turned out. Still a little bit dirty but I like it. Hope you´ll like it too. Rico

-

Custom Terlingua Race Team Decals wanted?
camaro69 replied to Ralph Henderson's topic in Car Aftermarket / Resin / 3D Printed
Hi Michael, I let them print by order so if you want some of them please let me know the dimensions you need and I will prepare them. Rico -
Anton and Anthony: Thanks for the kind words. I´m really happy how the Impala turned out after the lot of difficulties. The hardest part was to assemble the chassis to the body. @Mattilacken: Nice progress on the Supra. Model on. I like to see this finished.
-
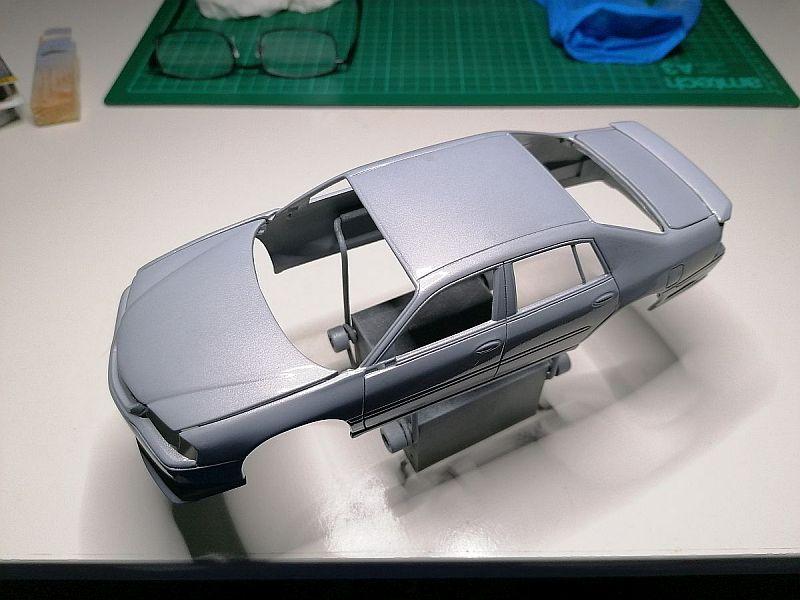
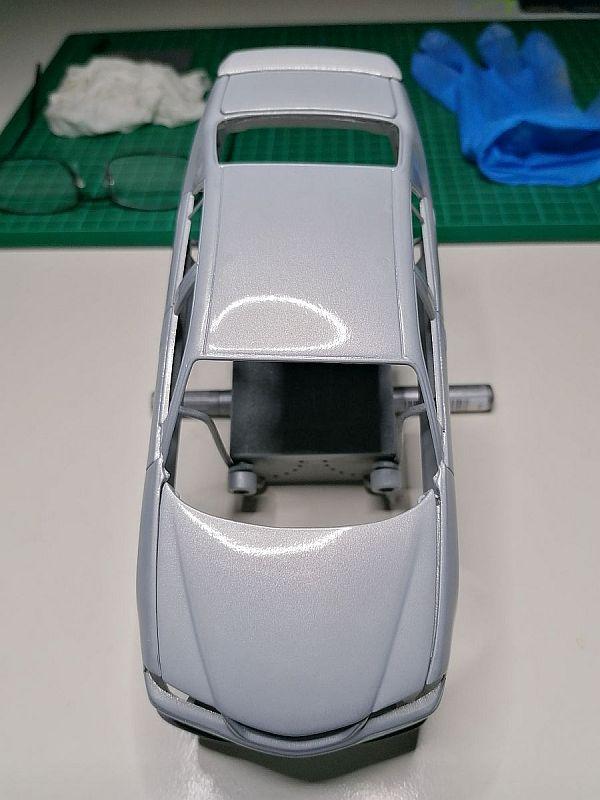
Hey Anton, nice color on the Supra!!! And here´s my Impala - I call it finished now. First of all some pics of the things that were left to do... Parking brake... Navigation... (used the kits mounting hole for the laptop in the dash) Rear view mirror... street legal exhaust system (front parts out of styrene, the rest is 3d printed on my Anycubic)... Oil piping... Fuel lines and license plate... And now a little overview... Hope you´ll like it, Rico
-
Yes Sir, the RR tailpanel is on the list.
-
Hey guys, first of all nice progress here. @disconovaman Your Ford looks killer. Like a real sleeper... ? @Mattilacken Wish you get your Supra done till deadline... Here´s my next update from the work of the last two days. Worked on finishing the interior with the self casted seats and steering wheel 3d printed shift lever housing, the knob is made out of a needle with a white plastic head. The Impala also became a working rear suspension... VID_20211025_105914.mp4 brakes... and windshield wipers. The inner panels were disassembled and the dashboard rised again to get the engine in place. Once the engine sits in place all can be reassembled again. That´s it for today. Still a lot more to do. Model on, Rico
-
Hey Mike, I know that I have the ´69 GTX body. It was just for taking the dimensions. If I really consider to do it as a ´68 I would change the marker lights. I asked at the Model Building Questions section and received the feedback that the model body dimensions are the same so the rearpanel I modeled should fit the ´68 kits too. I already had a request for these so it´s on the list.
-
AMT ´68 Roadrunner & ´69 GTX
camaro69 replied to camaro69's topic in Model Building Questions and Answers
No, I did a new trunklid with taillght housings, lower valance, taillight parts and rear bumper. http://www.modelcarsmag.com/forums/topic/128888-68-gtx-grille/?do=findComment&comment=2472642 -
AMT ´68 Roadrunner & ´69 GTX
camaro69 replied to camaro69's topic in Model Building Questions and Answers
Thanks Snake for the info. I asked because I have finished the ´68 GTX rearend after more than three years and wanted to know if it would fit both the kit bodies. -
AMT ´68 Roadrunner & ´69 GTX
camaro69 replied to camaro69's topic in Model Building Questions and Answers
Thank you all but I think my question was wrong. I meant if the model kit bodies had the same dimensions...? -
Update... The rear end is iploaded to my shop.
-
Hi folks, have one question about these... Do they have the same body dimensions? Thanks for any help. Rico
-
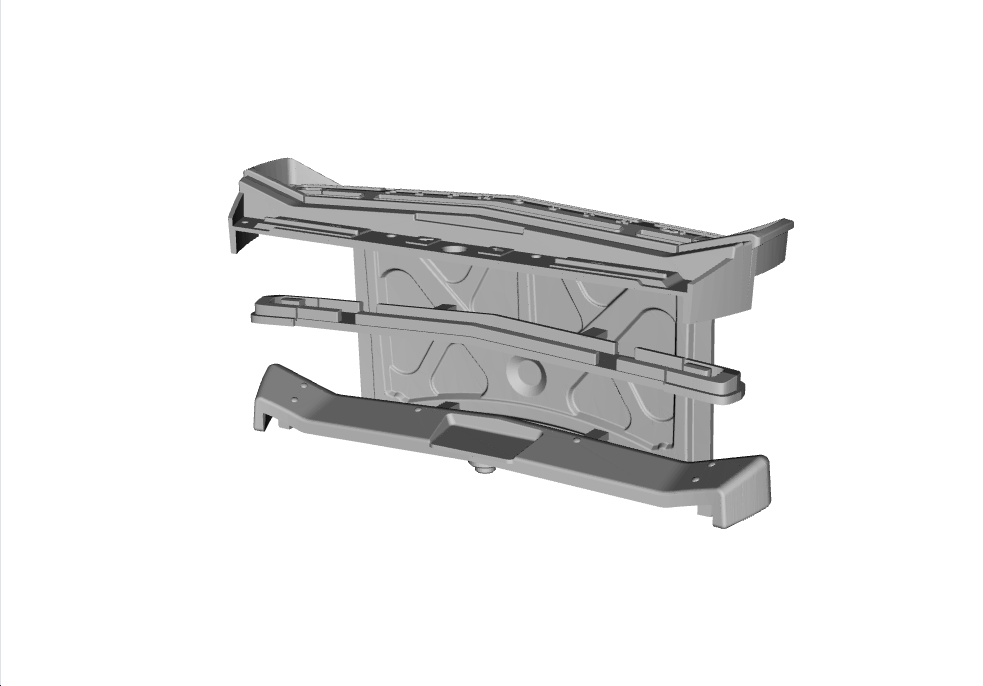
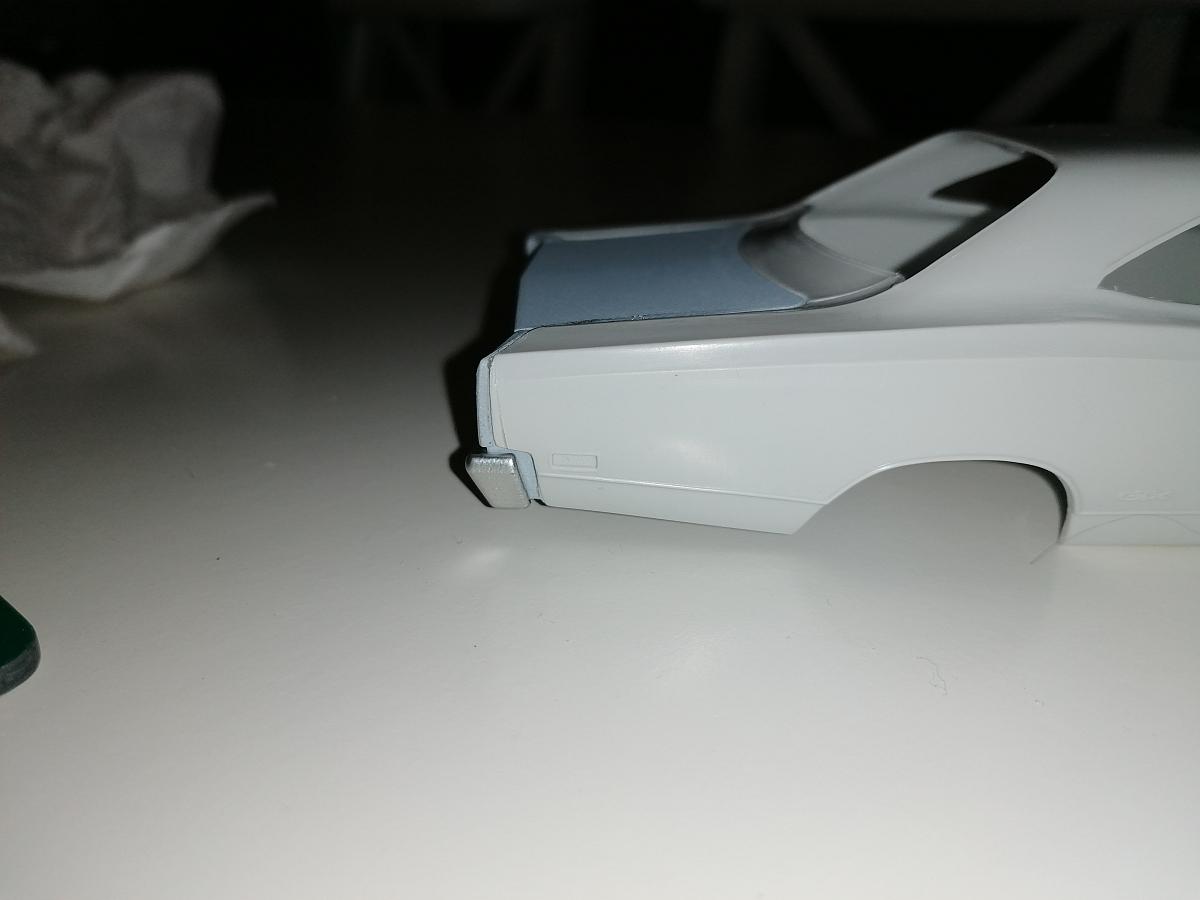
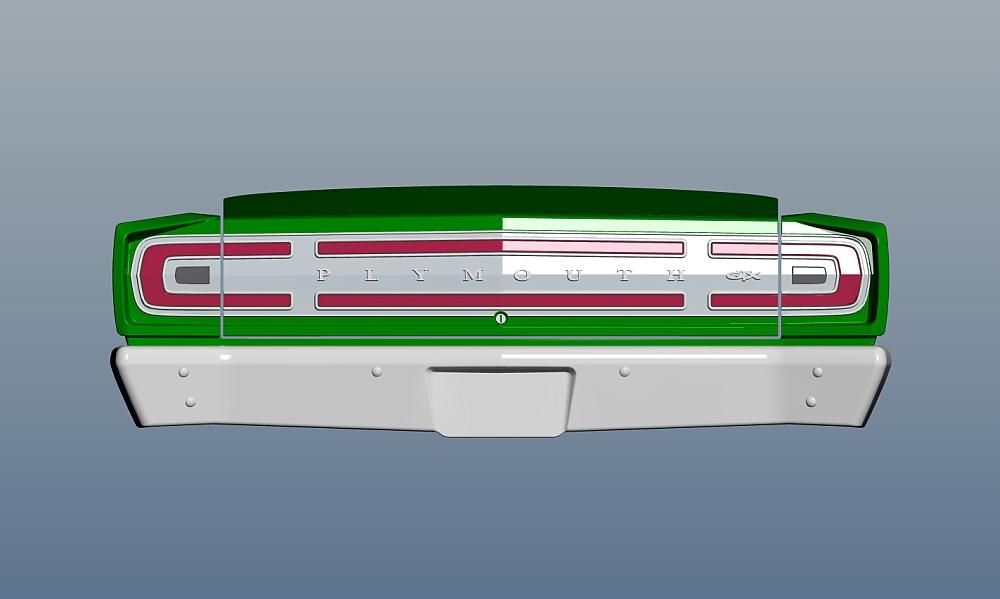
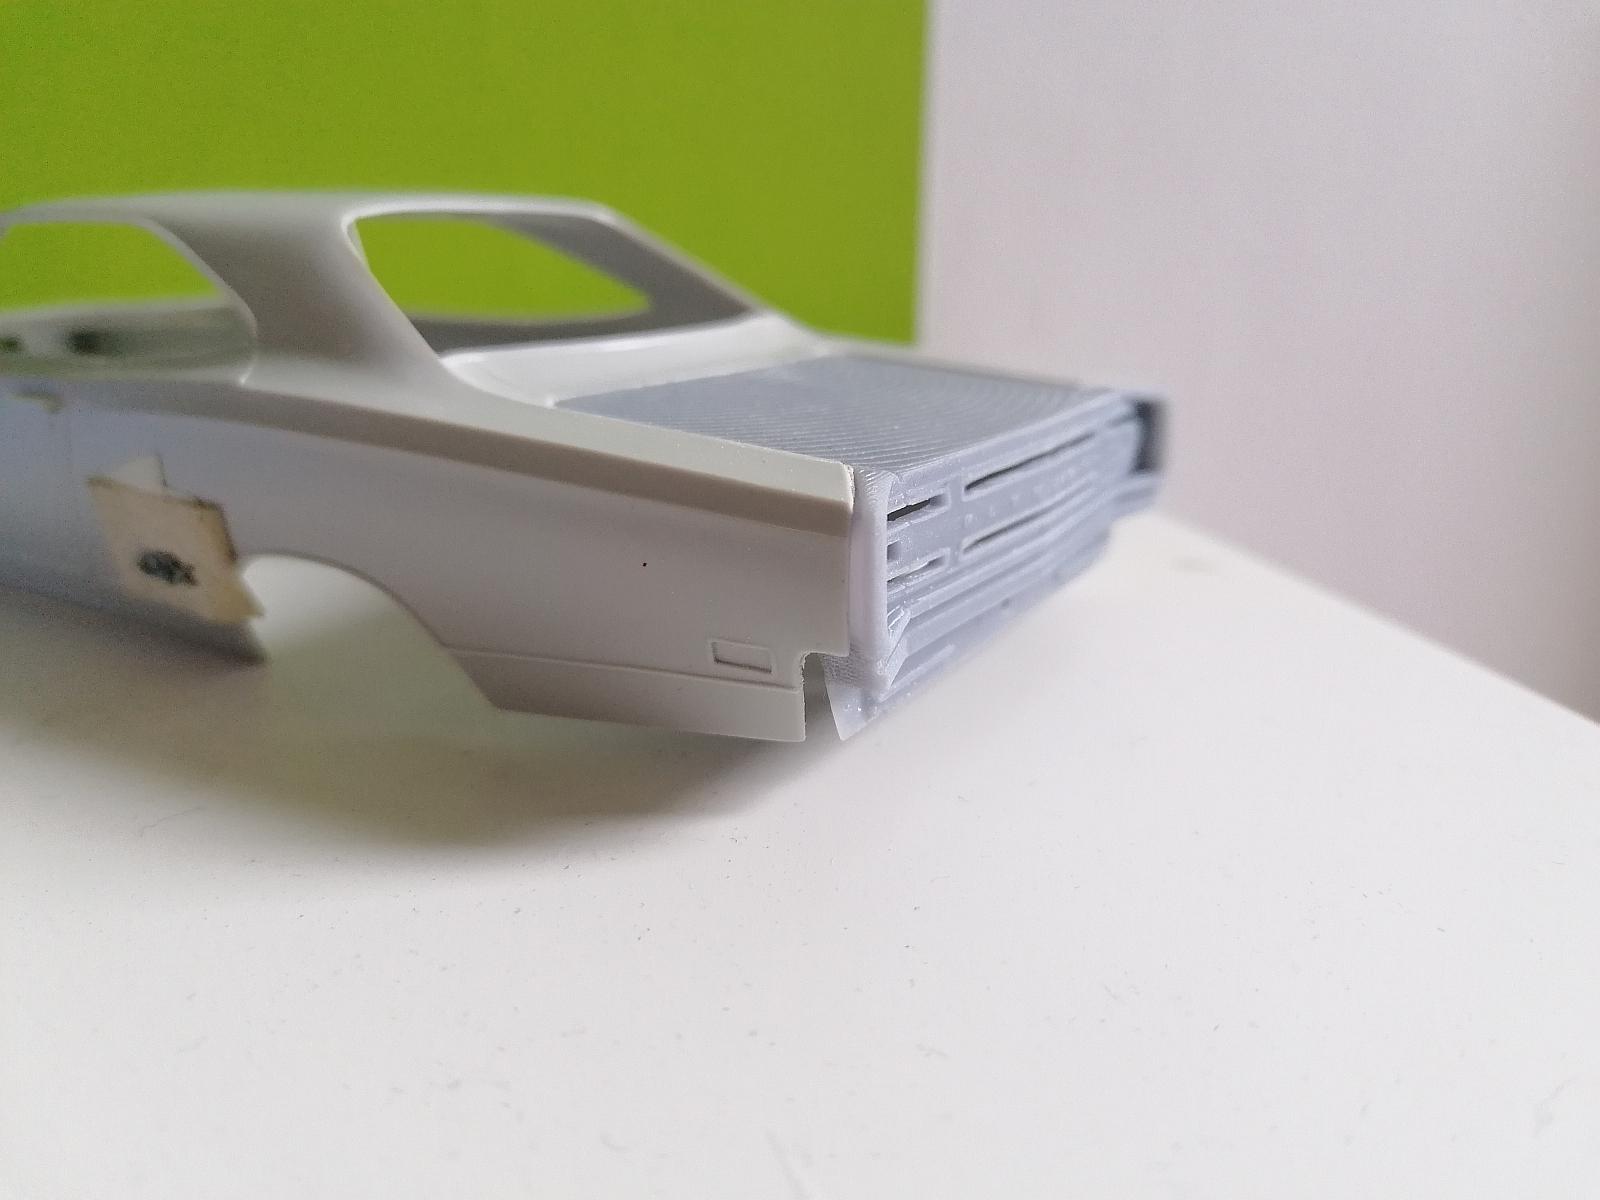
Thanks for the feedback. This is how the actual assembly looks like. There are three parts included (trunklid with taillight housings and lower valance, lightning part and bumper). The lower valance with taillight housings can be separated from the trunk lid. Then these would be FOUR separate parts because of the then separate inner taillght frames. The taillights can be separated from the center part too. Then you count THREE lightning parts. With the included bumper this assembly would contain EIGHT parts in summary if you separate everything what´s possible. Hope this helps for your info. I will put the assembly into my shop this weekend. Rico
-
Thanks Anthony !!! I still hope to get over the finish line this year. If yes I definitely will join again next year although less spare time is still the biggest issue... There are so many 3d printing projects on my to do list. ??
-
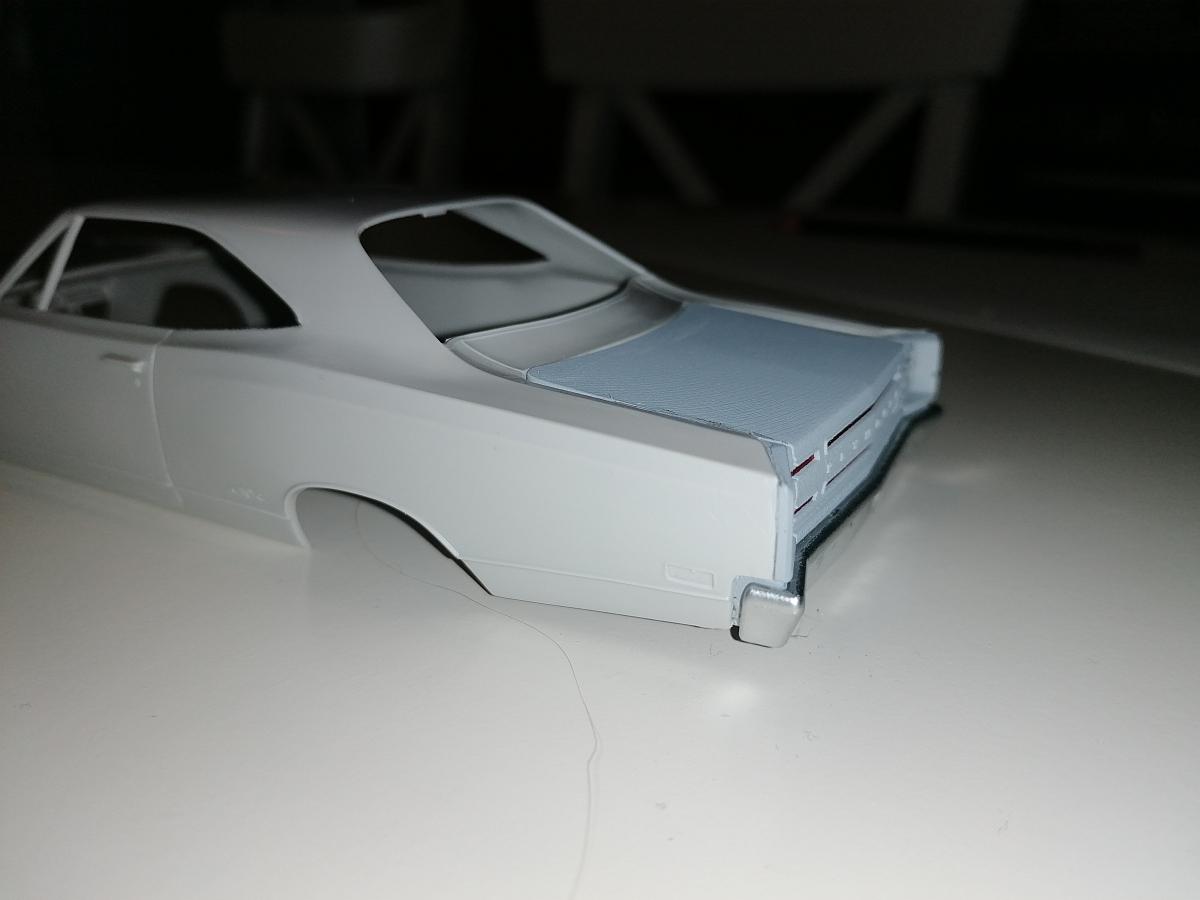
I would call it done. Please let me know what you all think about it. There are still some bodyworks to do from the modeler itself, for example make the fenders top fit to the trunk lid and there´s also much sanding necessary on the inside of the fenders. But these are issues because of the contours of the taillight housings even on the 1:1 scale. If I would change these things it wouldn´t look like the original part. Here are some pics... If you say it´s good like it is I would put it into my shapeways shop. But please be aware... Only the printing costs without any markup for my work are at about US$26 already for the "Smooth fine detail". The "smoothest" it would even be about US$40. I hope you´ll like it anyway. Best regards, Rico
-
Hey guys, glad to you´re still moving on. Anton, I hope you´ll find the time to finish the Supra. Here some progress on my Impala. Side windows were made out of blister. Wheels and mirrors got color and I couldn´t resist to mockup...? Only thing that I don´t like is that the drivers side mirror stand up to the sky???
-
Yes, the testprint showed me that there are still some fine adjustments left to do. Hope to get this done till end of the month.
-
2022 Cannonball Group Build theme suggestion thread
camaro69 replied to Fat Brian's topic in Community Builds
Love the song theme... Already found a song and a suitable kit for it. -
2022 Cannonball Group Build theme suggestion thread
camaro69 replied to Fat Brian's topic in Community Builds
This theme I like the most...? These two would be coll too, especially because there are not many kits molded as 4door or even as Station wagon... I have some suggestions too. #1 - Pickups (you can choose any Pickup or El Camino/Ranchero kit or even scratchbuild your own using another kit?) #2 - Government vehicles (you can choose any kit that would represent a government vehicle type that exists in real life no matter of Police, Emergency, FBI, etc... ??) -
Hey Brian, nice looking Stang. It´s very clean... Pat, your patina looks amazing again... And Hakån, your work on the headers is looking good.
-
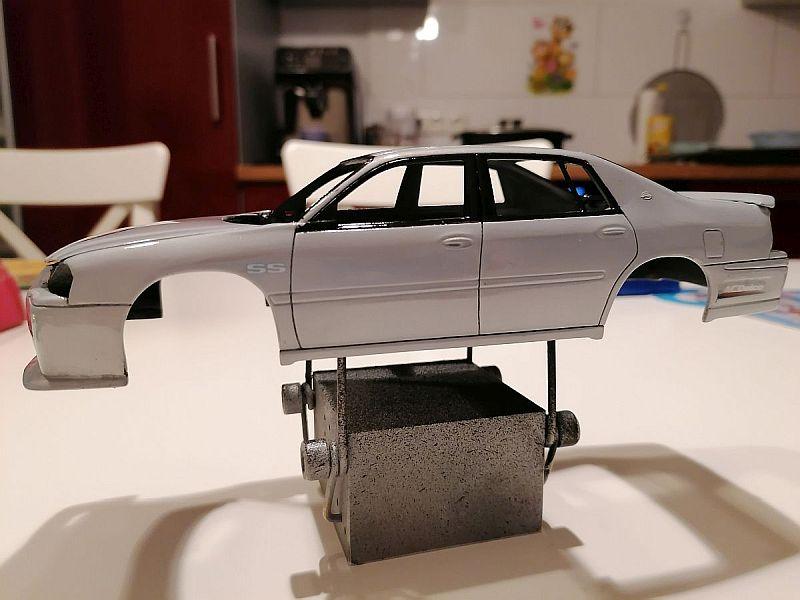
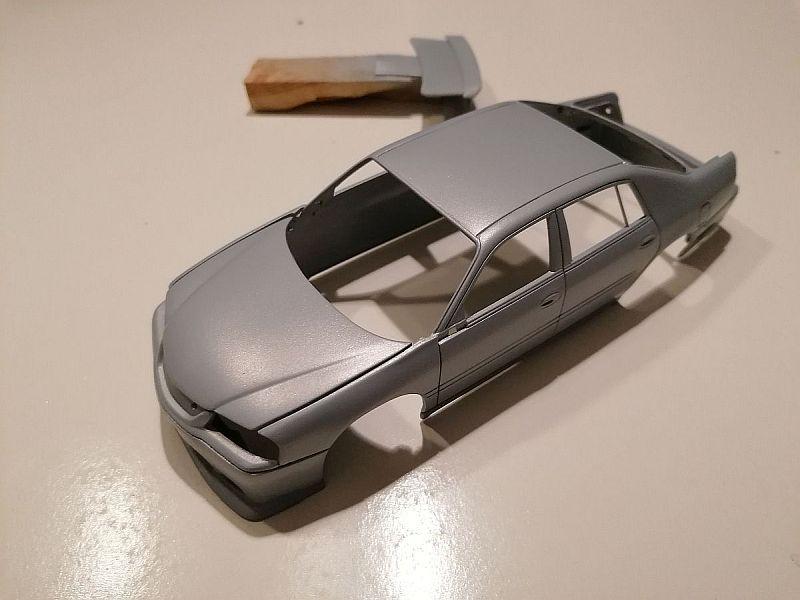
Hey guys, after a long time without getting the hands on mine here´s a little update. Primed and painted the body with rattle can paint. Color is BMW Hockenheim-Silber. After first polishing I masked the window frames and painted them black again out of a can. After that I attached some decals and clearcoated the body with the topcoat from the BMW paint. Then another little bit of polishing. Finally installed the head- and taillights and 3d printed an oiltank which was painted with chrome rattle can paint. Here are the pics... That´s it for this weekend. I hope to get it finished this time... Rico
-
Got a first testprint from shapeways these days. Will try to mount it this weekend to know how it fits. If then all is like I wanted it I will offer it for sale.
-
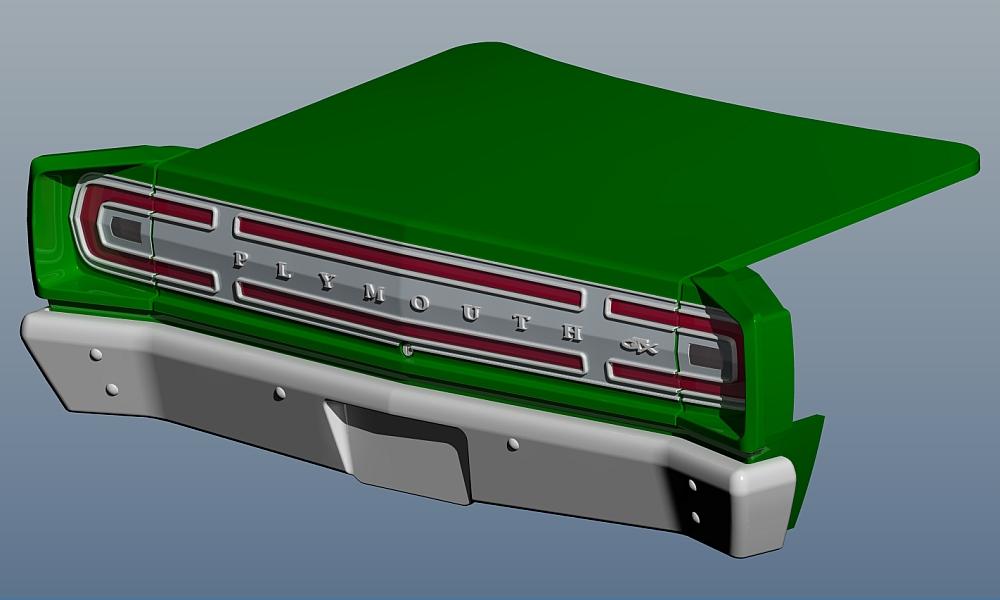
New update... Have designed a rear bumper and will testprint it this weekend to make sure it will fit the body and looking correctly. Here are some renderings for a first look. Hope you´ll like it. Cheers, Rico
-
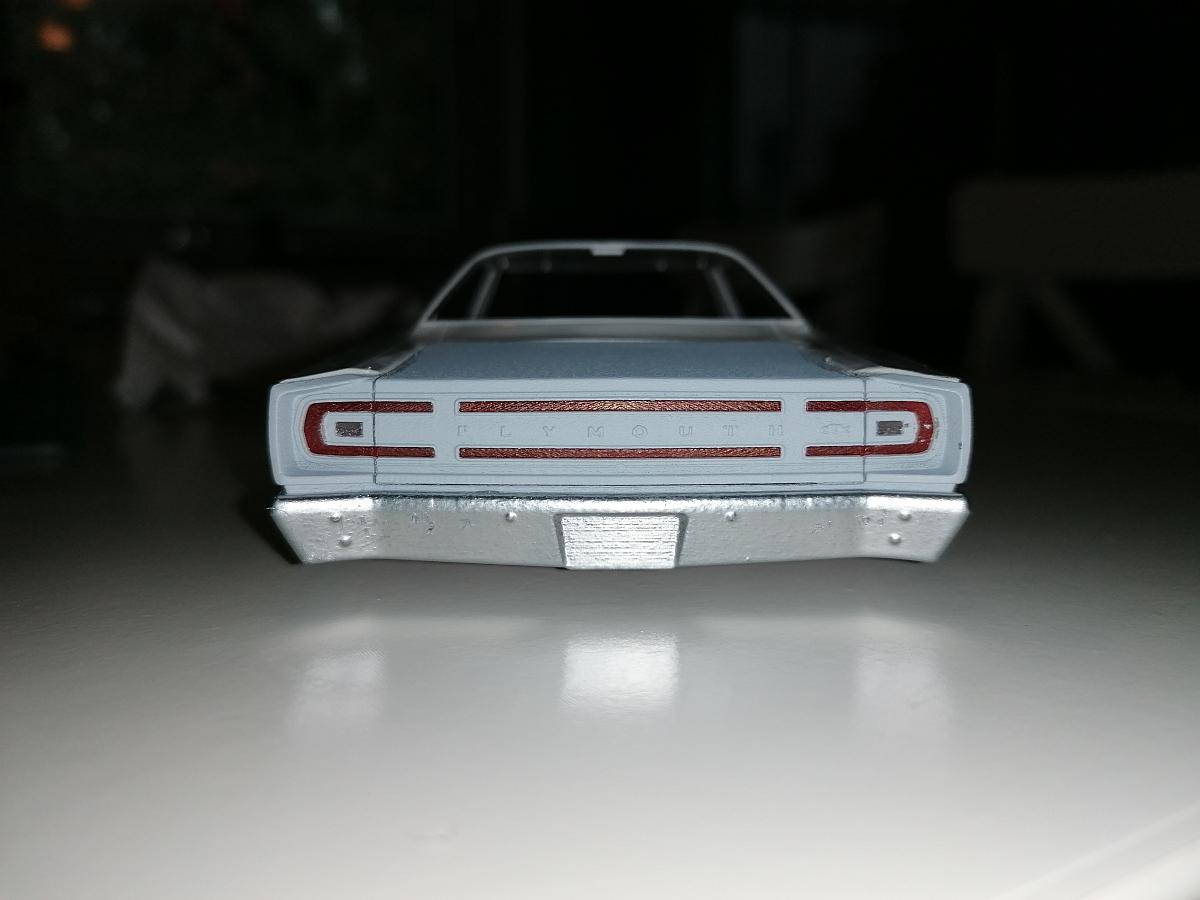
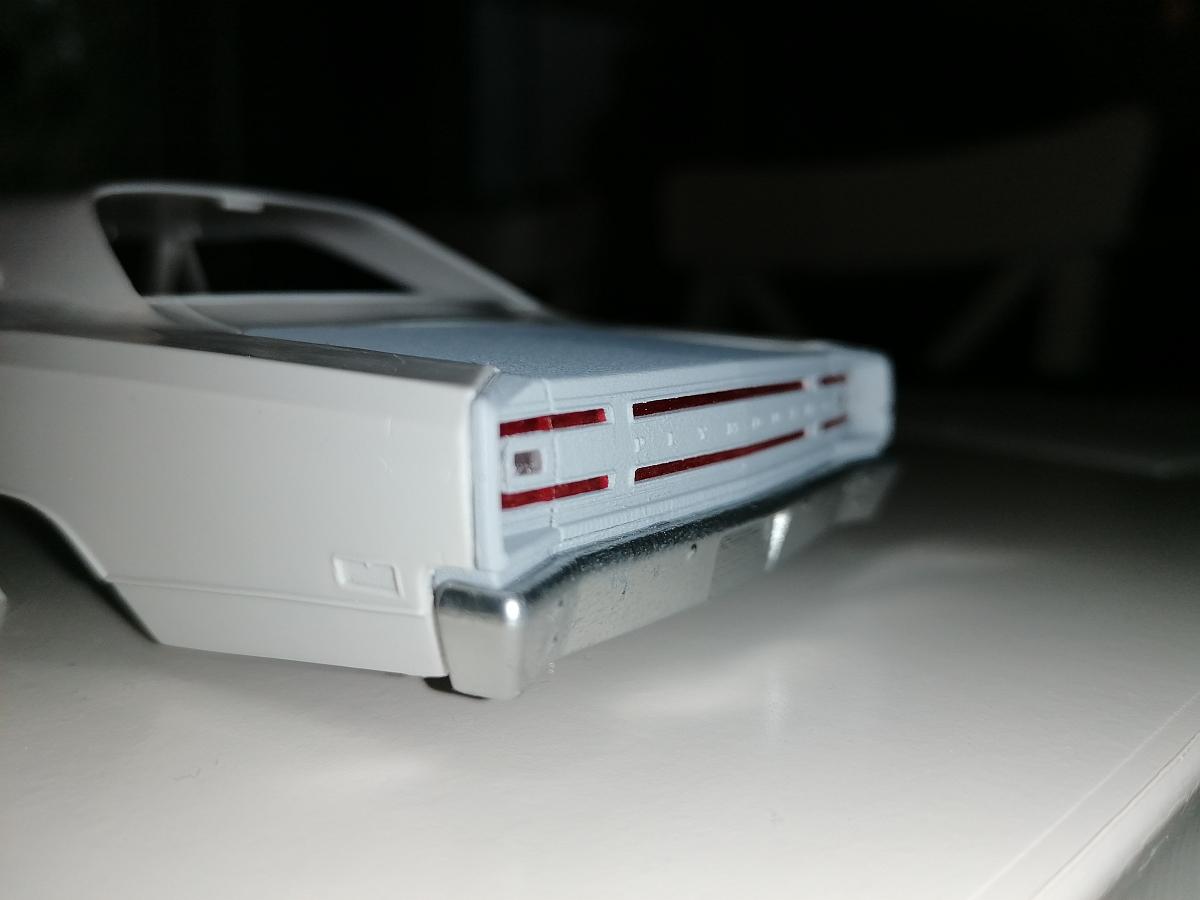
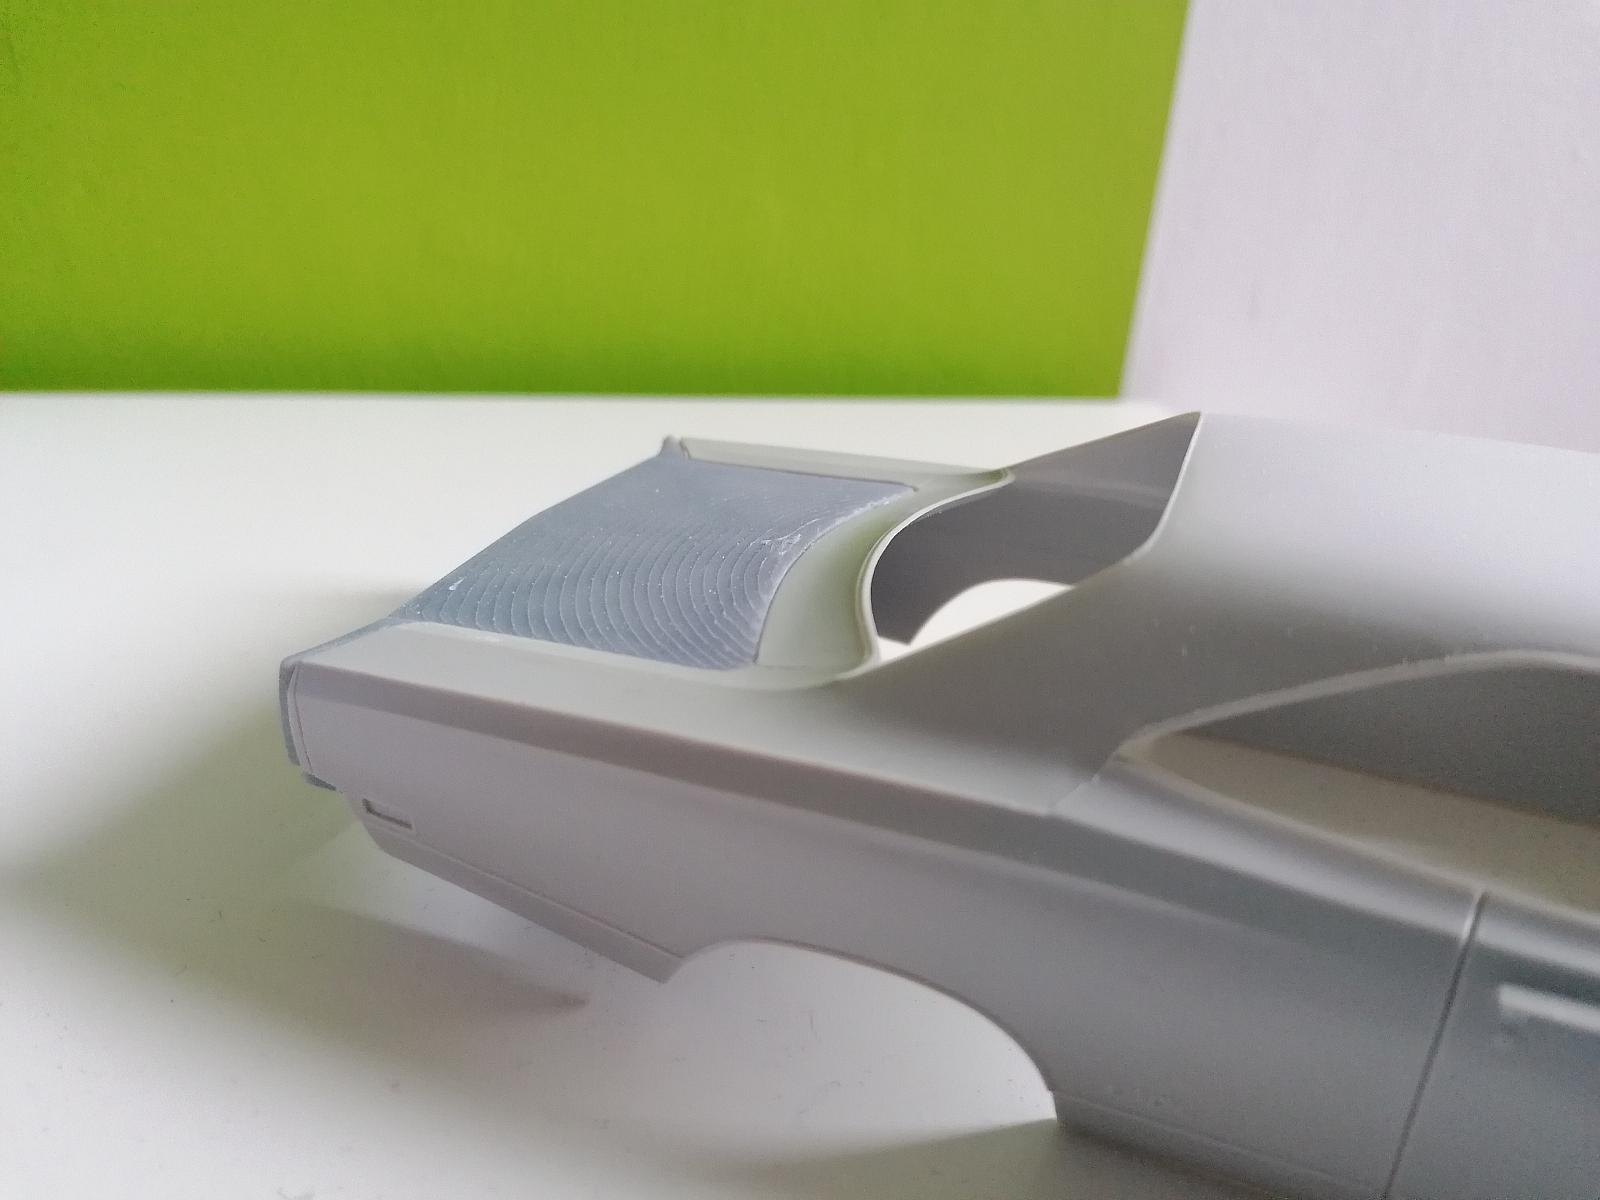
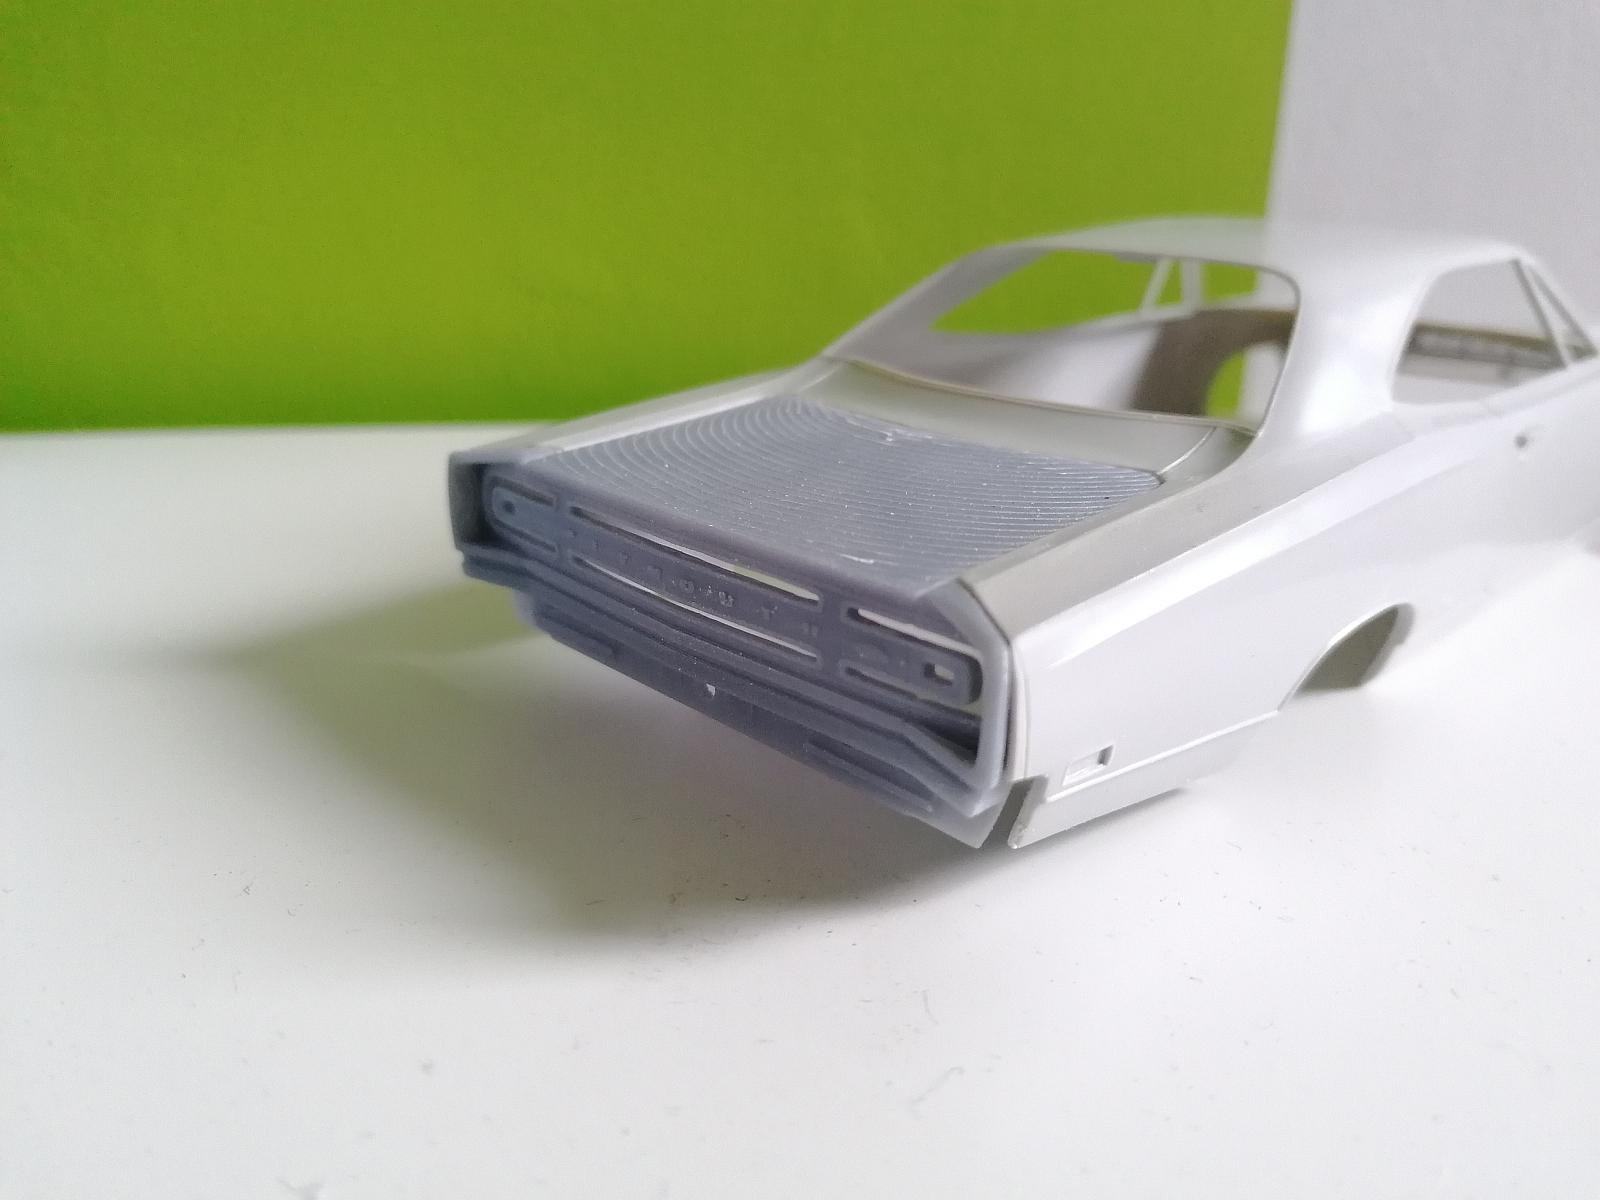
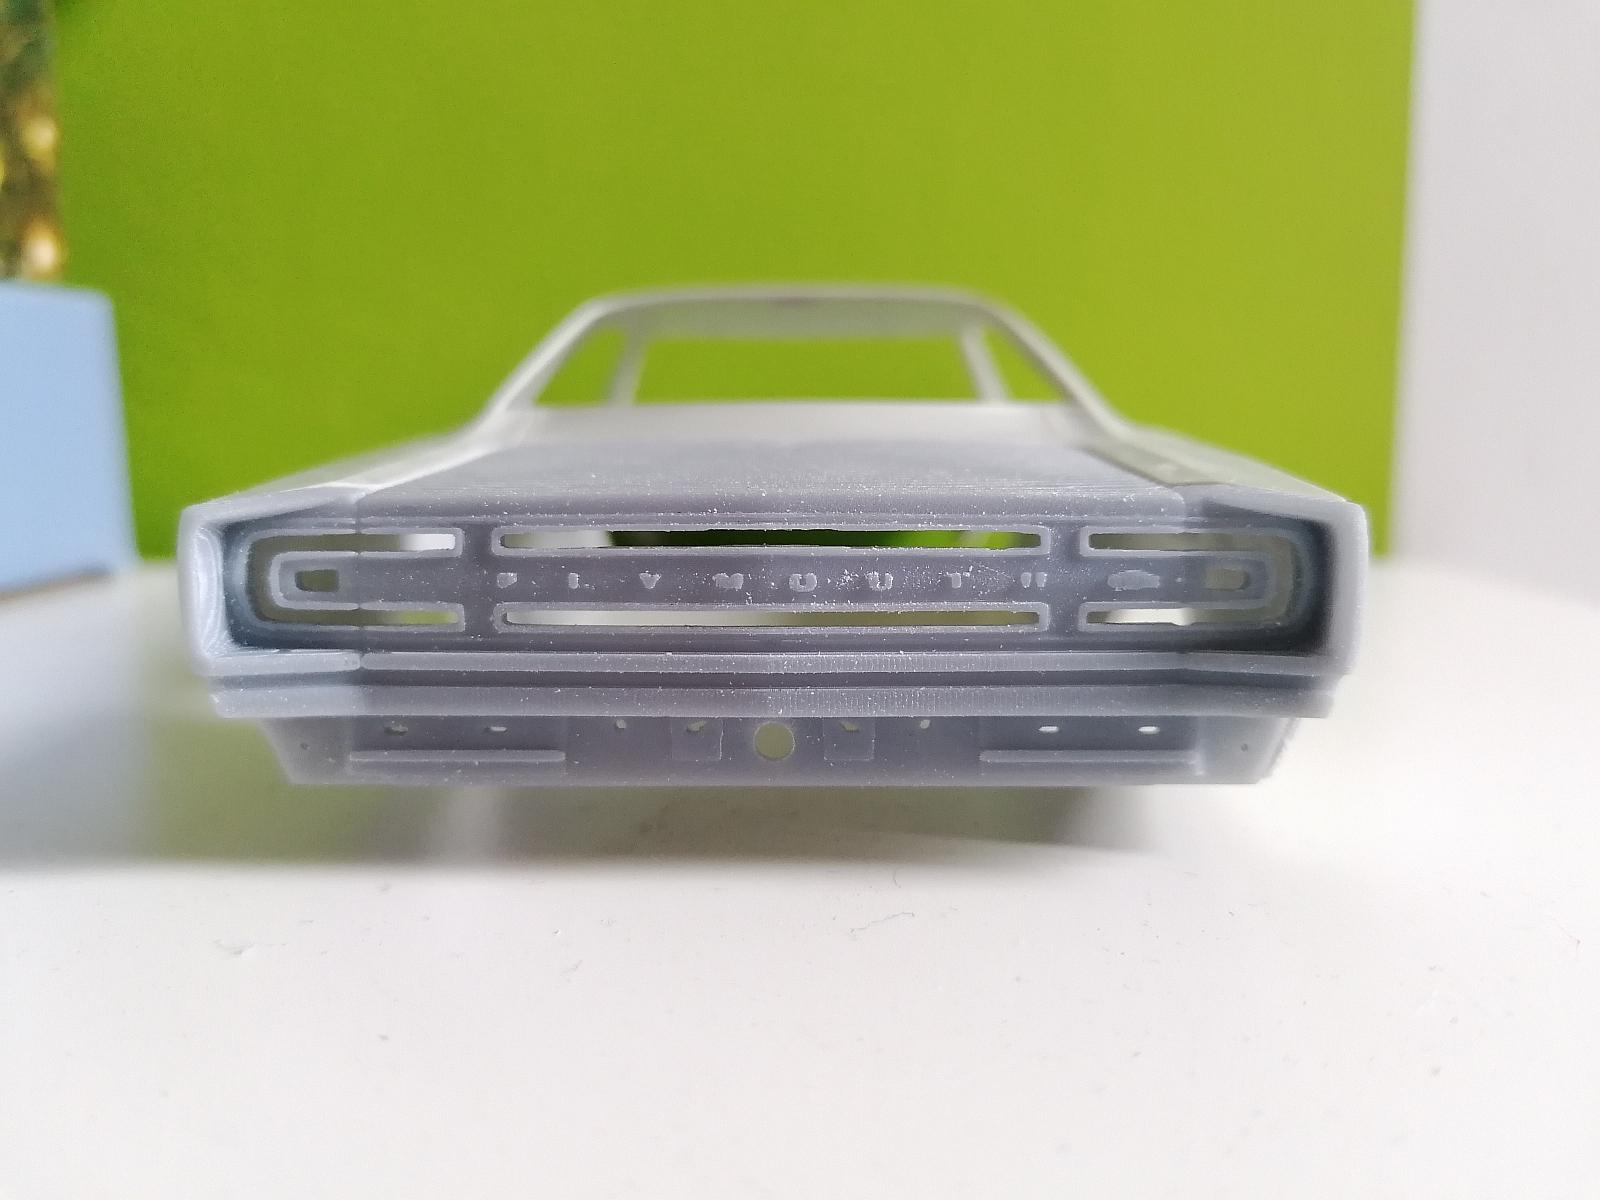
Hey guys, here are some pics of my latest testprint of the rear panel. Sorry for the rough print but my Anycubic Photon Mono has a resolution of only 0.1mm in X- and Y-direction. I did some changes already on the cross rail and started designing the bumper so I think I can finish this long time project soon. The only thing that bothers me is that there is so much plastic to remove on the inner edges of the fenders to make the taillight housings fit right but that is because of the design of the housings itself even on the 1:1. So here it is... Stay well, Rico
-
72 Buick Riviera Boattail (Update 18/12/26)
camaro69 replied to camaro69's topic in Car Aftermarket / Resin / 3D Printed
@peteski: Yes, TWO years with no updates but they were very busy for me. This project is still one of my all time favourites so it will definitely find it´s way back on my bench.