camaro69
-
Posts
272 -
Joined
-
Last visited
Content Type
Profiles
Forums
Events
Gallery
Everything posted by camaro69
-
If you´re happy, I´m happy too...
-
Hey Bill, really like your progressand I hope yours will become a success for you too.
-

72 Buick Riviera Boattail (Update 18/12/26)
camaro69 replied to camaro69's topic in Car Aftermarket / Resin / 3D Printed
THX Bill, already had an offer for the rest of this and couldn´t resist. @ Steve: Yes, I lowered the window sill and reshaped the whole quarter panel. -
72 Buick Riviera Boattail (Update 18/12/26)
camaro69 replied to camaro69's topic in Car Aftermarket / Resin / 3D Printed
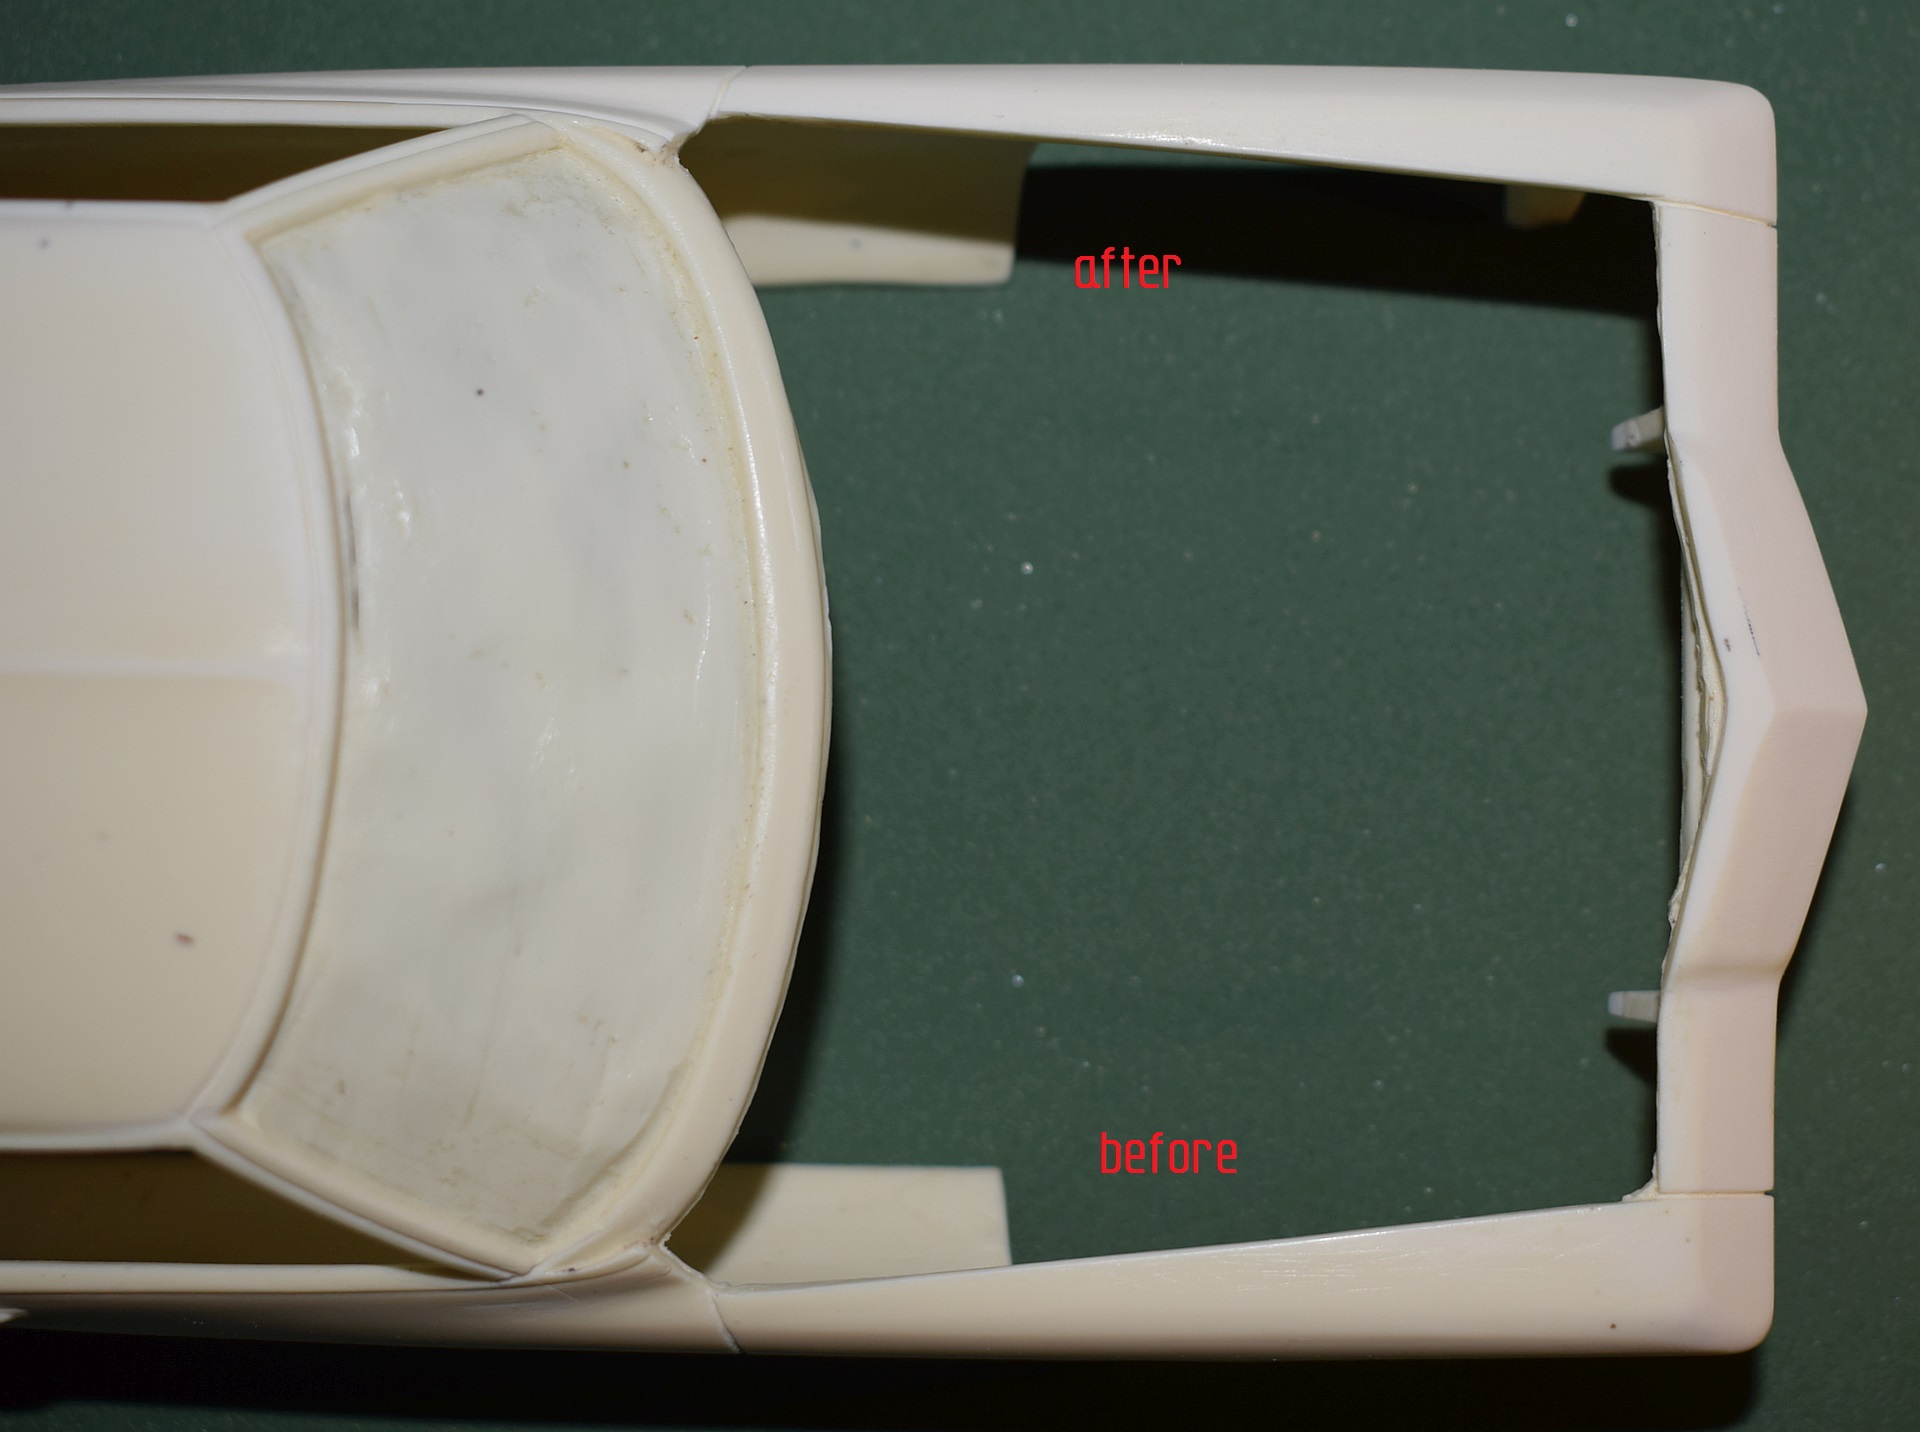
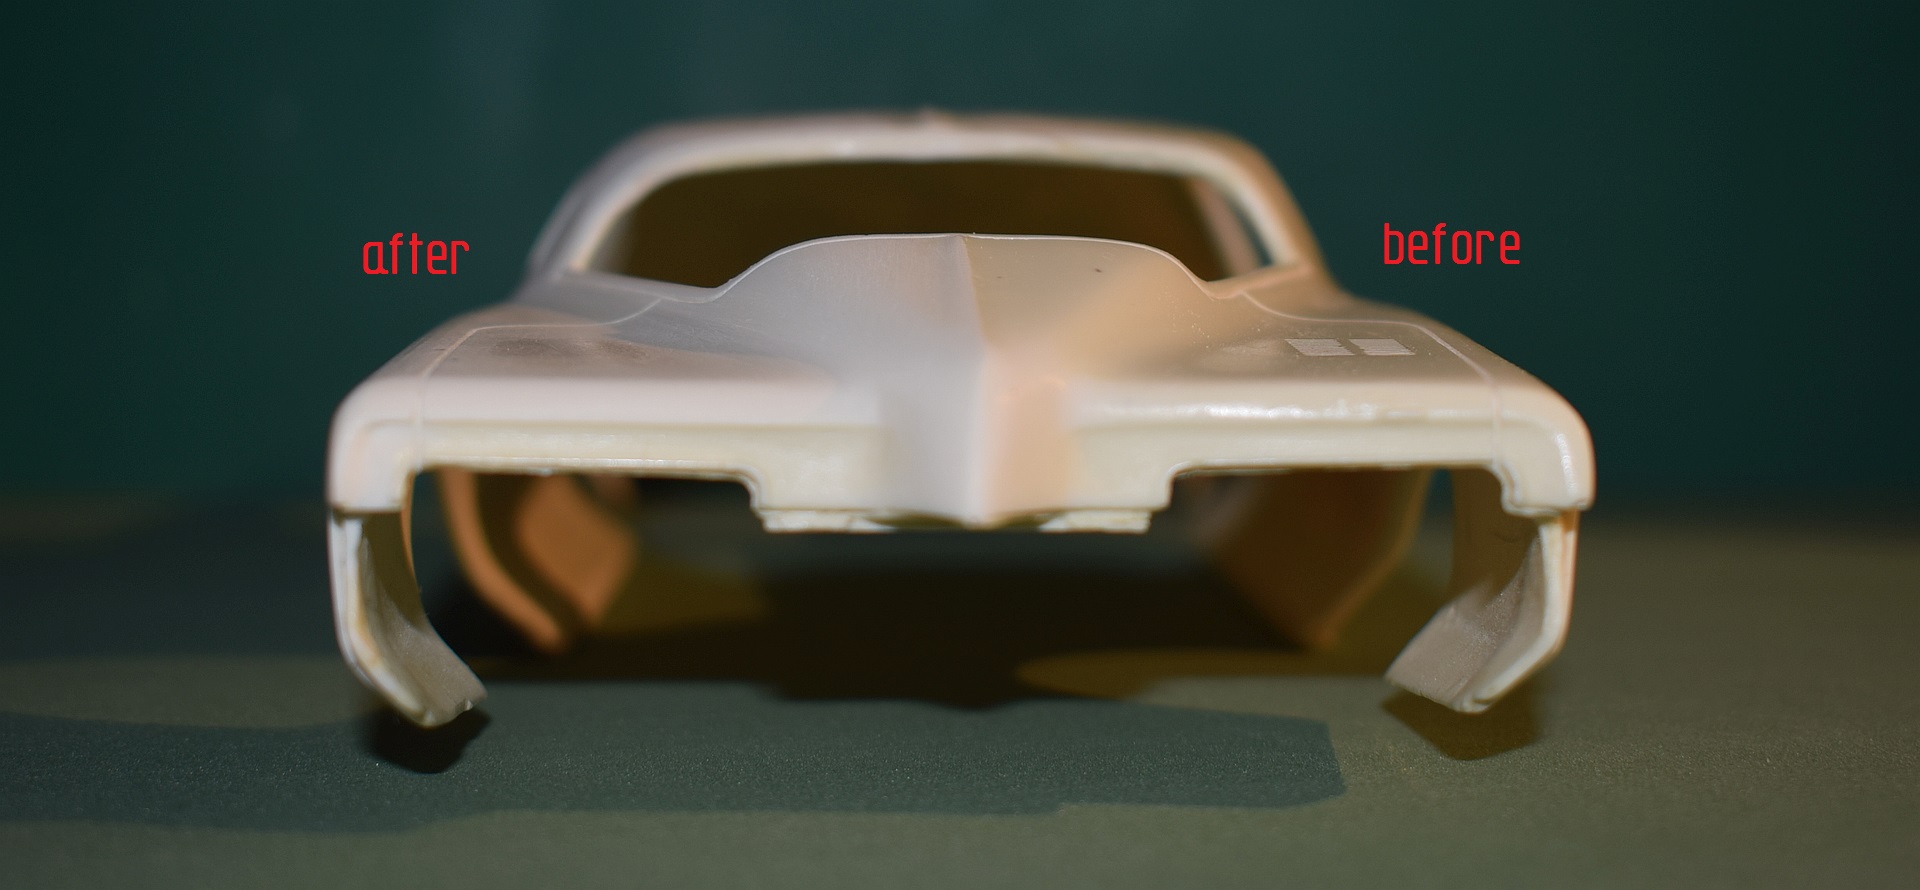
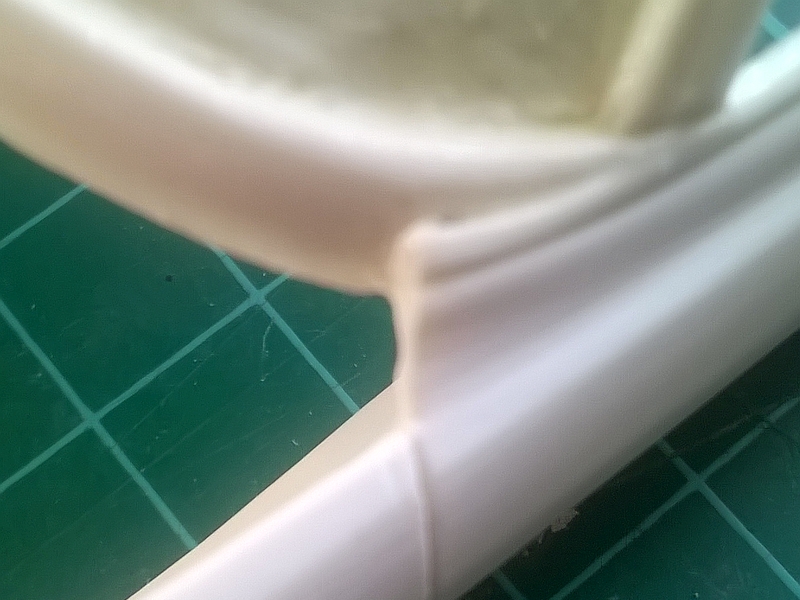
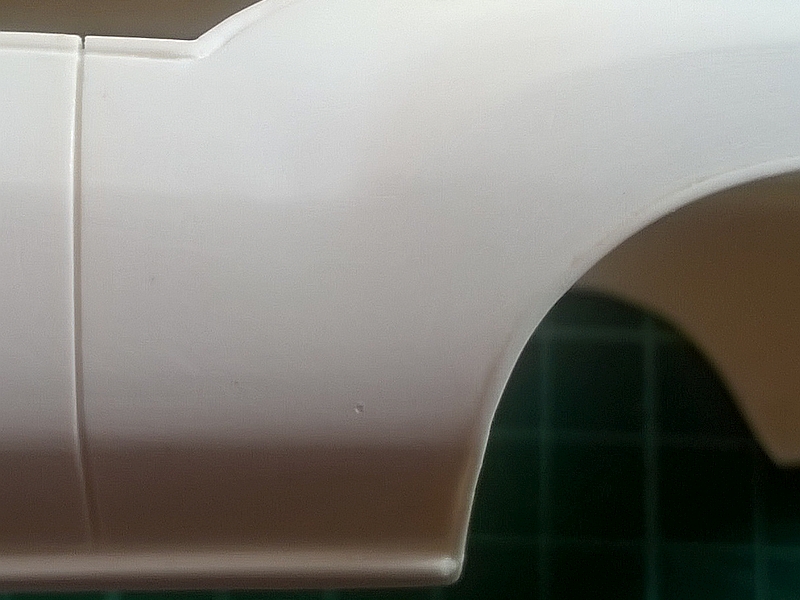
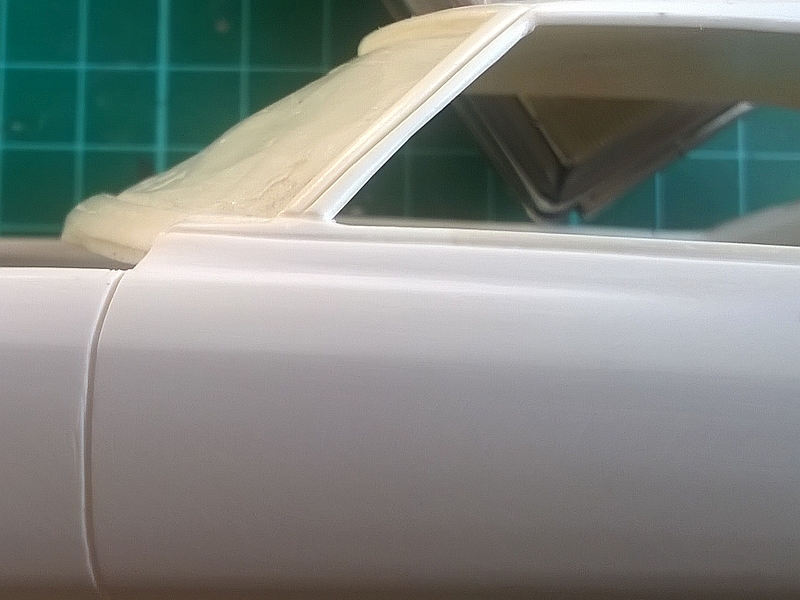
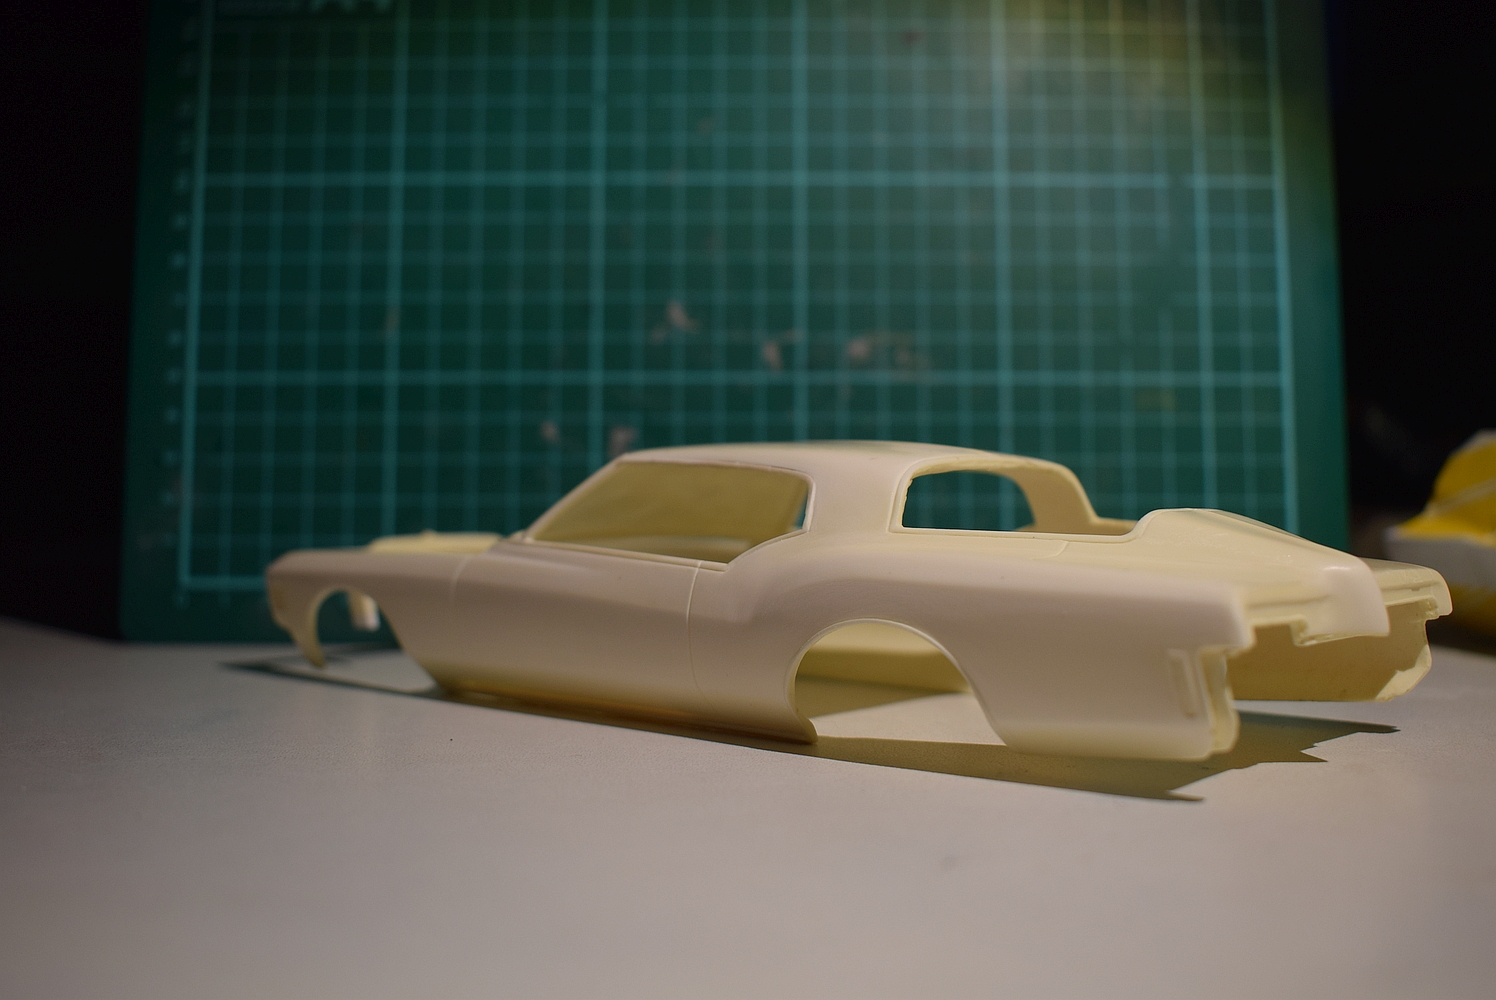
Thank you Steve... What was done? 1. Sharpened the beltline especially at the front fender and door. 2. Reworked the whole side window frame excepting the A-pillar. 3. Rounded the roof line at the rear and the center of te trunk lid too. Don´t know if I have listed everything but hope these infos may help. -
72 Buick Riviera Boattail (Update 18/12/26)
camaro69 replied to camaro69's topic in Car Aftermarket / Resin / 3D Printed
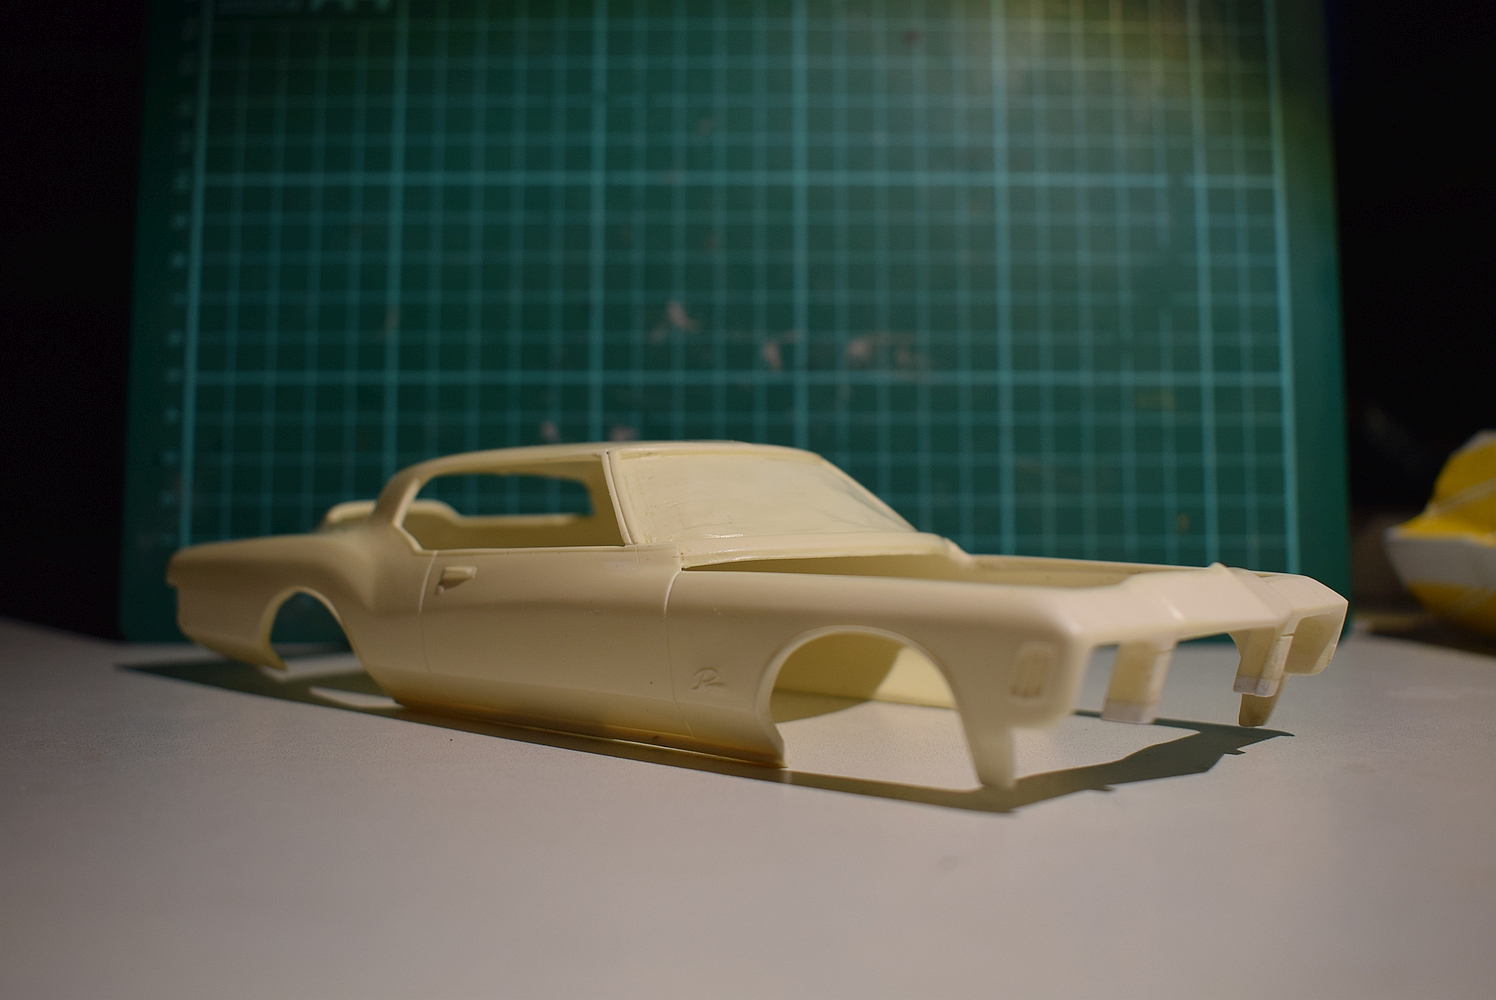
Hey Paul, thanks again. Meanwhile I have found some time for slicing and dicing again... Also closed the parking lights and the louvers on the trunk lid. Thinking of doing the parking lights as the scripts as PE parts. Mirrored the passengers sides pics to make it easier to compare with the changes I´ve done on drivers side. Once again any comment and suggestion will be much apprecciated. Hope you´ll like it. Rico
-
Hey Bill, nice to see that I´m not the only one who wants to correct this. I have modeled the 69 grill too but wanted to make it available at shapeways. Mine is still without the Ranger emblem but it can still be added and so anybody could choose which one he wants to have. Done the turn signals as seperate parts and at mine the kit headlight lenses fit too. Greets, Rico P.S.: It was already printed successfully at shapeways but I haven´t got a pic. Have to ask my friend because he got it...
-
72 Buick Riviera Boattail (Update 18/12/26)
camaro69 replied to camaro69's topic in Car Aftermarket / Resin / 3D Printed
Hi Paul, your car looks really awesome. And I really apprecciate your help. I think some pics would help me alot to get this done right. The following pics are showing some of the key points for me. Maybe you can take such photos for me from your beauty. The closer the better it would be. A complete side view and a close up of a door handle and the rear view mirror would be great too. Again thank you very much in advance, Rico
-
72 Buick Riviera Boattail (Update 18/12/26)
camaro69 replied to camaro69's topic in Car Aftermarket / Resin / 3D Printed
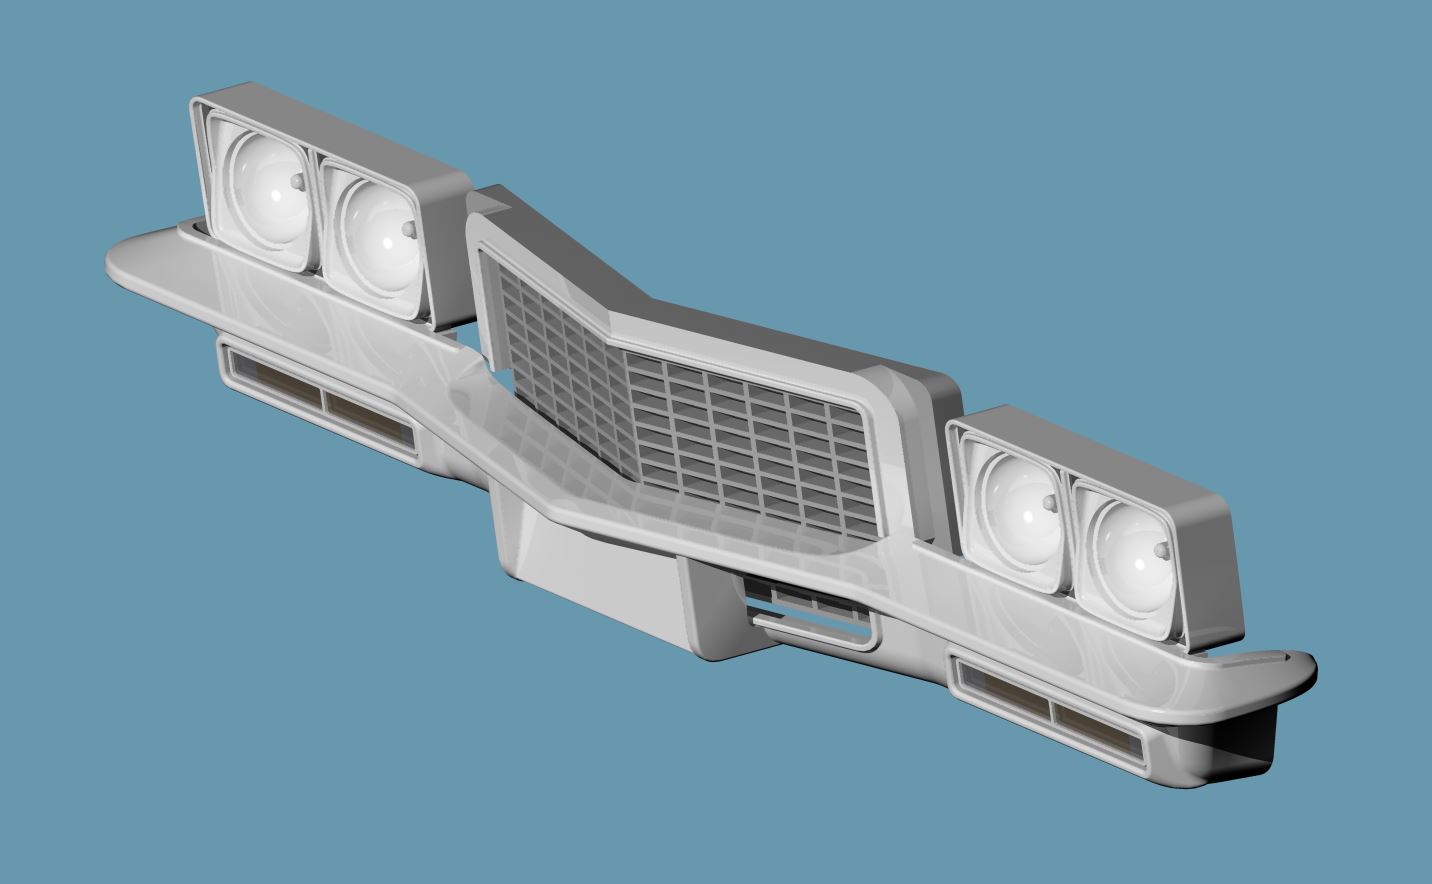
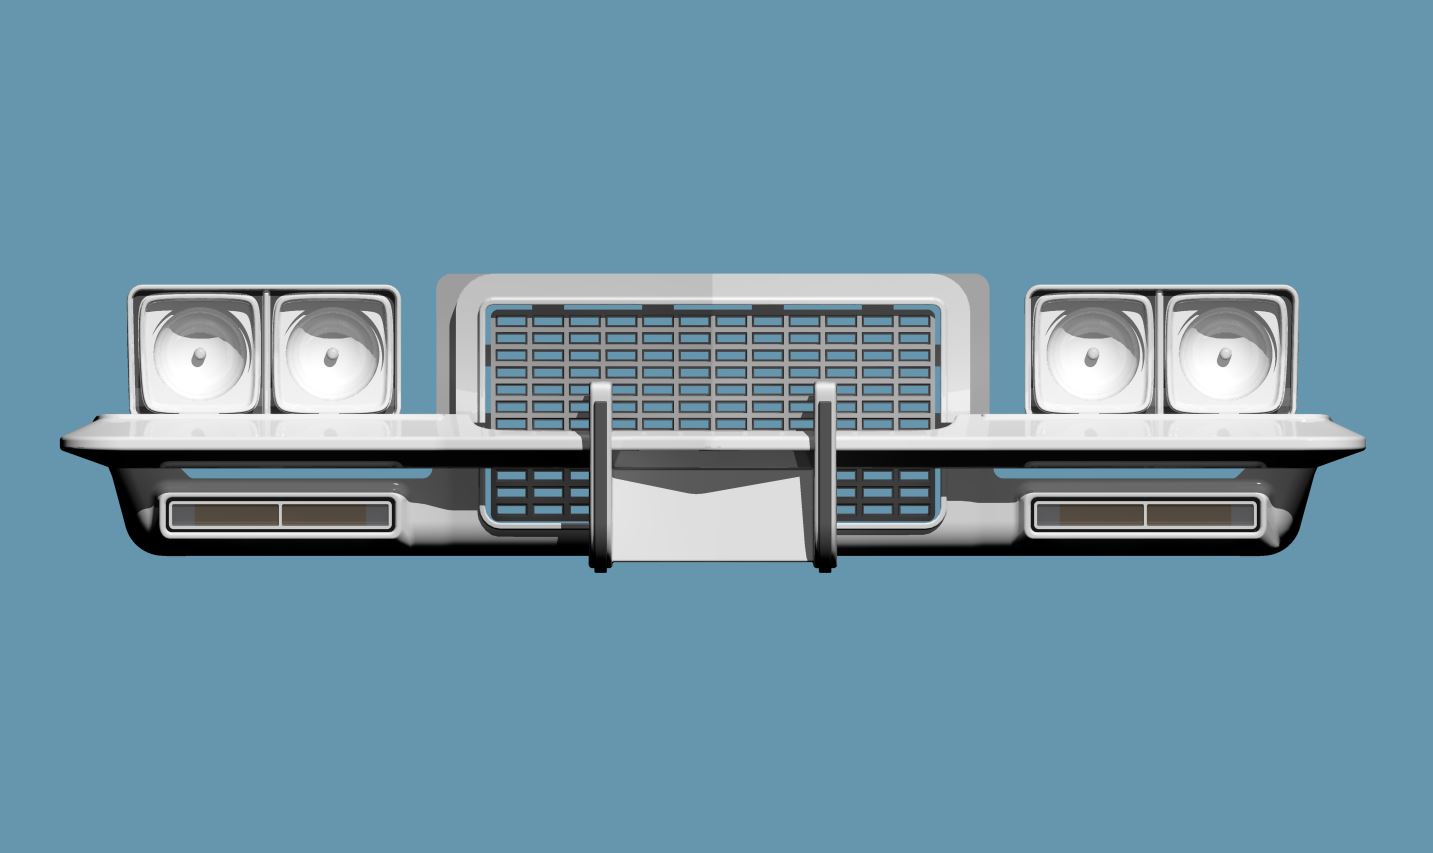
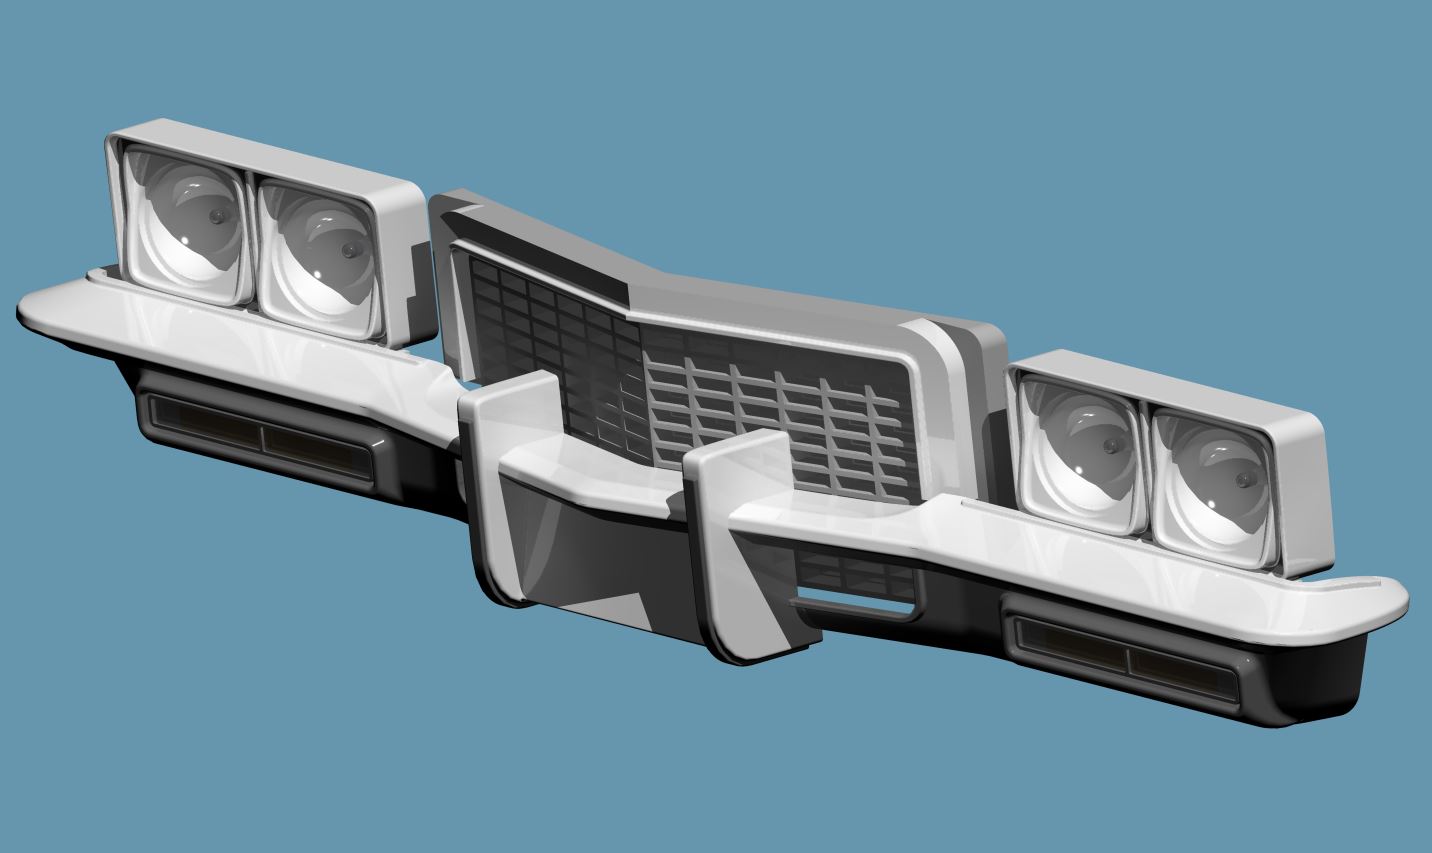
Today I did the bumper without the big bumper guards which can also be used for a ´71... Grille will follow... Hope you´ll like it.
-
All of you have great ideas. Thank you Peter for the link. Maybe I will give it a try...
-
72 Buick Riviera Boattail (Update 18/12/26)
camaro69 replied to camaro69's topic in Car Aftermarket / Resin / 3D Printed
I will do so when I think it´s the right time for it... Thank you too. -
72 Buick Riviera Boattail (Update 18/12/26)
camaro69 replied to camaro69's topic in Car Aftermarket / Resin / 3D Printed
Thanks Paul. Think I know what you mean. As I wrote it´s not ready yet and passengers side isn´t started. Will post update pics soon. -
Thank you all. @ Ron: I can try to model the flat hood too. Scripts would be to small for 3d printing. I have already drawn the Sport Satellite scripts for decals. Maybe if anyone has good connections to a PE parts manufacturer I can offer the drawing for making the scripts as PE.
-
72 Buick Riviera Boattail (Update 18/12/26)
camaro69 replied to camaro69's topic in Car Aftermarket / Resin / 3D Printed
@ Paul: Thank you. I think you mean the rear fenders? -
72 Buick Riviera Boattail (Update 18/12/26)
camaro69 replied to camaro69's topic in Car Aftermarket / Resin / 3D Printed
Yeah Kris, that´s the plan. Took a look at your site. Maybe we can finish this project together... -
72 Buick Riviera Boattail (Update 18/12/26)
camaro69 replied to camaro69's topic in Car Aftermarket / Resin / 3D Printed
Hi Bill, thanks for your reply and for your "small critism"... But the pic you posted shows a 3d surface model someone did sometimes. If you look at the pic below the roof isn´t that much too flat. But you´re right the center should become a little attention especially the beading. I think correcting the upper window line helps already a lot (see my pic 3 at the first posting). source: https://www.streetsideclassics.com/vehicles/1432-tpa/1972-buick-riviera I definitely think of recasting the "new master" if it´s done so updates will come. I have to do the whole interior and chassis too because this wasn´t part of the auction. Best, Rico -
Hello buddies, first of all I want to thank everyone for the praise and patience you brought to me. Because of the less of spare time there are so many requests left to process. Please let me tell you that I will draw every requested part and hope that I get some of these done the next weeks. But now let´s go over to the originally topic, the... 1972 Buick Riviera Boattail About three weeks ago I found a 1971 Riviera on ebay. I think it´s an All American Resin body. I only got the body, front and rear bumper, sepaerate hood, two sets of outer wheels and a custom steering wheel. After receiving the package and checking the parts I decided for a complete restauration. But because the deck lid louvers and the bumpers aren´t really nice and very difficult to restore I decided to make it a 1972... The grille has to be made too because I doesn´t have one. First of all I started to reshape the whole body lines and seems at first on the drivers side which is mostly done. Next will be passengers side. Passengers side before reshaping... Drivers side mostly done... You all know that I draw parts for 3d printing. That´s why the next thing I started was to model an all new front bumper, seperate headlights, seperate turn signal lenses and the grille. Completed this today and ordered the parts at shapeways. I will show them if they arrived. Here are some pics of the 3d model and one mock up pic with the drawing taped to the body. I hope you like my progress. Every suggestions and comments are welcome. Best, Rico P.S.: This project drives beside all the other parts I have left to model for 3d printing. So don´t be afraid. I´m at it to get all the things done but it will take some time yet...
-
Thanks for your fast reply. All questions answered. So I´m in with this one.
-
Have some questions to the rules of the Cannonball CBP. I would like to challenge this CBP too but my entry (Revell 55 Ford Panel Truck) would be already started. It´s a long time project and the CBP would give me the energy to finish it earlier than in five years or so. Did some bodywork already but the rest are still seperate parts. Next question is can I do it as a Custom including engine and wheels swap and other things (cage, fuel cell, suspension, etc.)? Thank you in advance. Rico
-
Hey folks, thank you all for your replies. @Luc Janssens and @espo : I really appreciate your suggestions with the preparation the body for the decals. Will take attention on this when repainting the body. And yes, the Fury should slide around the corner on the diorama. Hope to get some things done during the next weeks. @Dann Tier: I don´t have any figures at my shop thats why I can´t help you with this. At another forum I was following years ago and what meanwhile is offline we had a guy who does figures. Most of them were casted in resin by scaleproductions. But he never did a John Wayne figure. Last year I asked him for doing the figures for my diorama but after his first answer I never heard from him again. He told me that he´s no longer working with figures. Maybe someday we´ll find someone who does figures.
-
Thank you Dann. All the 3d printed parts are available at my shapeways shop... And as a german guy I was at the Bundeswehr but that´s meanwhile 18 years ago.
-
Thank you guys. But please be patient because the rear parts are not available yet. I want to do another testprint of the reshaped fender parts. When they turned out like I want, I will offer the complete rear assembly for sale too. Otherwise here is the link to my shop again: https://www.shapeways.com/shops/ra-sti-acute-s-scale-accessories
-
Hey guys, this is a long time project started about over a year ago. I thought it would be cool to do a car chasing scene from the TV-series "The A-Team". That´s why it leans to the passengers side. The car should came out of a corner in a little diorama I want to build for both cars too. So let´s get started... The only things of the original AMT Joker Goon Car I use are the body parts and the dashboard. Chassis and Interior pan come from the 71 AMT Dodge Charger. Tires are from the 72 Chevy Fleetside. The grill and headlight bezels are 3d printed parts as well as the taillights, the door panels and the wheels. Decals are selfmade and the interior became a little washing already. The engine bay I cutted out of the charger and glued it to the Monacos body. After posting this at another forum a guy told me that I´ve choosen the incorrect color. So next to come is to strip the paint from the body and repaint it. BTW the wheels color is the one the body will become later too. Also the turning of the front wheels isn´t correct so I have to this again too. But I don´t want to cry because it´s learning by doing... The bumpers chrome I stripped off and redone it with a rattle can. The bumper guards are made out of the inner part of a bicycle tire. Now I let speek the pics... Overview Front wheel Rear wheel 3d printed grill Door panels Monaco dashbord with Charger steering wheel Front again Overview from the other side Bumpers
-
Dwayne you´re doing very impressive work again. So much scratchbuilding. Would be glad to have time and skills to do something like this. Maybe I can can ask you for help when time has come...
-
Fully detailed Airfix James Bond Aston Martin DB-5
camaro69 replied to Dann Tier's topic in WIP: Model Cars
Hi Dann, great work you´re doing on this one. Would be glad to have your modeling skills. -
Thank you Keith, but I wasn´t really happy with it. Reshaped the center area in hope the next test will fit better.