Oldmopars
-
Posts
2,058 -
Joined
-
Last visited
Content Type
Profiles
Forums
Events
Gallery
Everything posted by Oldmopars
-
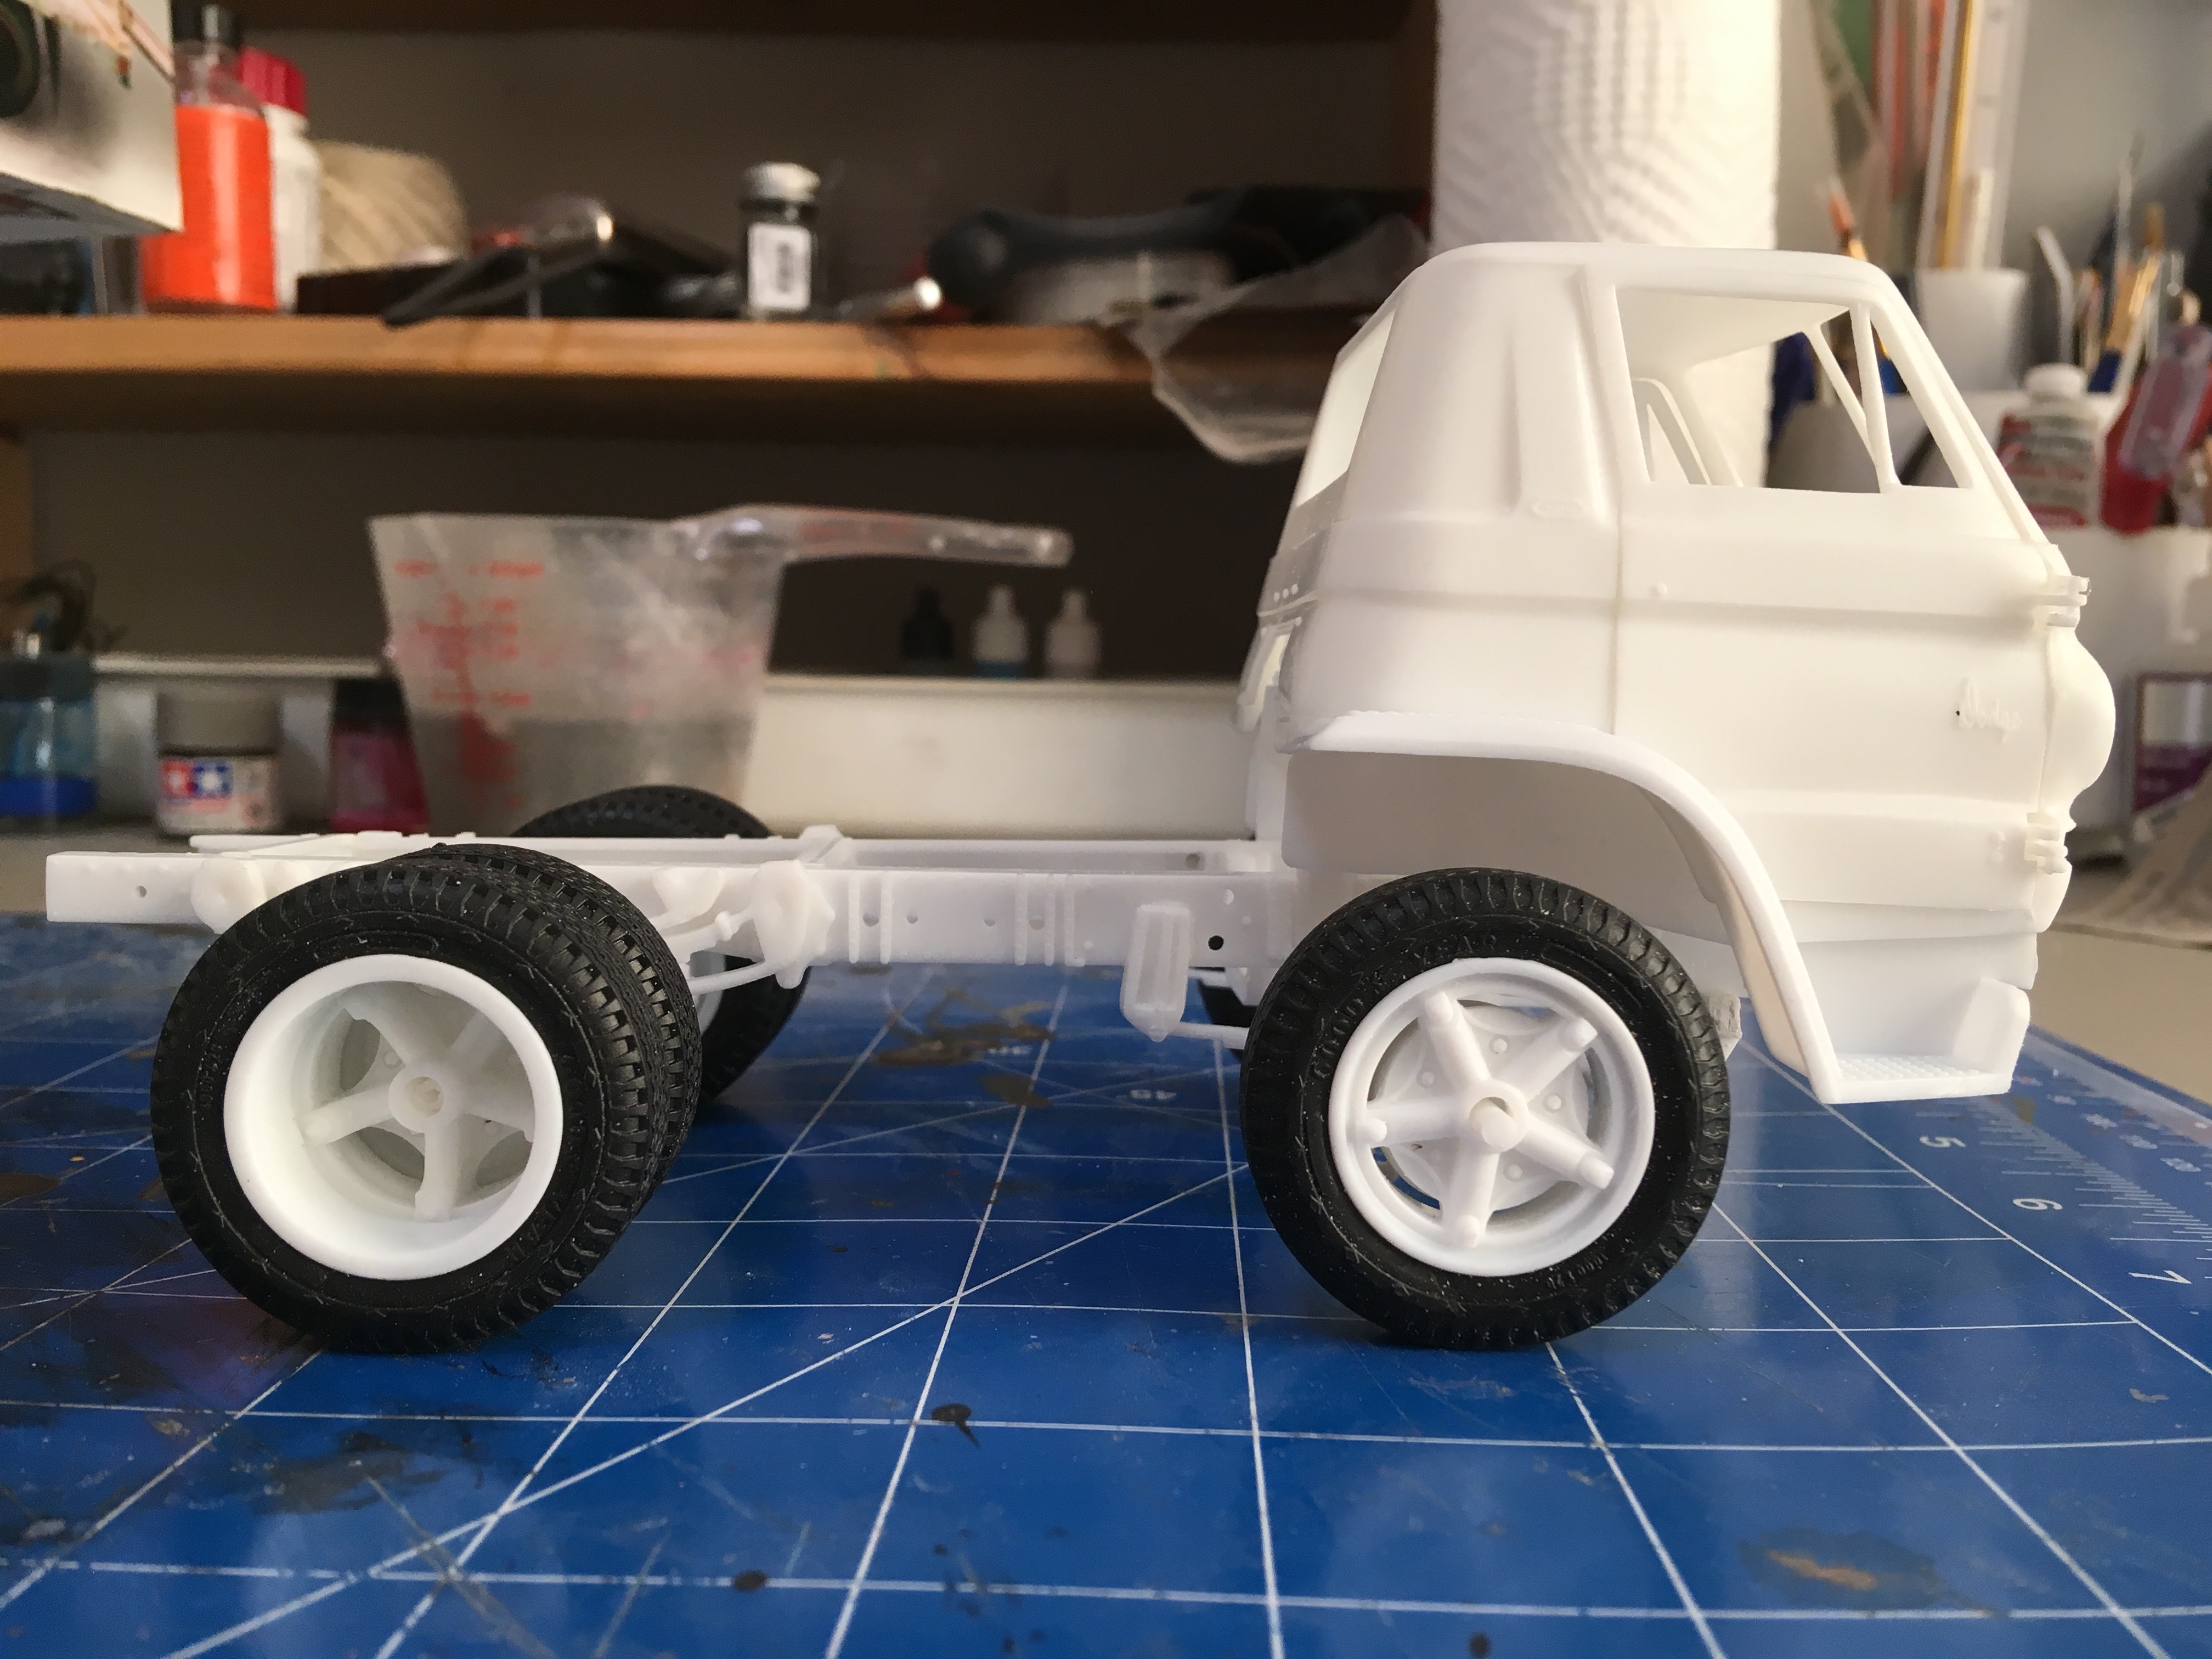
So, I am working on a new project. My plan is to build a L700 and put the 40 Ford that came with it on the trailer. However the Ford is really bad and so I decided to make it a period Gasser from 1962. I have the build for that here: As for the L700, I have started it. I have spent a bunch of time first getting the stance correct so it does not look like a stink bug. I also got the doors fitted before the paint so I could make sure they fit right.

-
In an attempt to keep this correct to the era, I pulled the manifold off and put the 3 duces from the 58 Chevy kit on it with the air cleaner from the 40 Ford. I now have added a hood scoop made from an old roof top Air Conditioner from a Peterbilt. I added some wires and painted the engine. The header do not show in the picture, but they are fender exit style that became legal in 1962. Max 2 exits, ending in a collector. I went with the stock style distributor as I did not know what custom ignitions would have been right, and stock I know would be. As you can see, the engine is a really tight fit. The wires are too close together and all come out of the center of the cap and can't be seen, so they are not necessarily in the right order, but look good anyway. I am having a slight delay, I need to get into town to buy some primer. I work from home and only go to town once every week or so. I live kind of out in the sticks in the foot hills. I should be able to grab some Thursday.
-
Comparing the AMT and Revell 1940 Ford Coupes.
Oldmopars replied to Lovefordgalaxie's topic in Model Cars
That is why my build of a Lindberg 40 Ford is being made into a 60's era Gasser. I have cut off or replaced most of the problems and fixed what I did not remove or replaced. To make anything like seen above would take more time and skill than I possess. -
While I did not follow the last 7 years, I have cured through the build over the last few months. I am blown away buy the detail you put into this thing. It is truly outstanding. Many of the pictures
-
Comparing the AMT and Revell 1940 Ford Coupes.
Oldmopars replied to Lovefordgalaxie's topic in Model Cars
Does anyone know the history on the Lindberg '40 ford? I am building one right now, and let me tell you it would take a lot of work to get on to turn out as nice as the 2 kits here. However, the kit looks to be the same as the AMT kit. Everything is identical, just that the Lindberg kit seems to be made out of old worn out AMT tooling. Body lines are more of a hint that a grove, the flash is bad and details weak. I am spending hours just fixing poor body lines and fixing fit issues. Is it possible that the AMT and the Lindberg kit were at one time the same kit? -
I love this, it turned out great!
-
I would love a set. I tried to PM you but it says that you can not receive messages. I have a P.O. box, so I can just give you that. P.O. Box 591 Naches Wa 98937 Thank you so very much, it will help me finish it in the right era.
-
If you really want to master the whole weathering thing, spend some time on the Armor/Military forums, videos, Pintrest, etc. Lots of info and these guys know what they are doing. Good thing is, it applies to cars and trucks because rust is rust and the weather effects all steel machines the same. Only difference is that everything they do is some shade or variation of camo. There are also some good car related videos out there too. I have a buddy that is into tanks, he was a tank commander in the Army, while I was in the Air Force. He is always sending me great pictures of the stuff he does, I need to pick his brain or even go watch him do his craft, he is really good.
-
Well, thank you for your input, I appreciate it. These are the things I did not know. I guess I should have looked at the stock manifold before I tabbed up the other one. I do have the option of fixing the hood, and putting on a 409 manifold with 2 4 barrels. This may be the way I go. I will look for the other slick in my parts box, I may have a set, if nothing else I will run a set that is just black wall and ask for a pass on the pie crust side walls. Yes, I also know that it is just a model, and the I am never going to enter it into any contest. I am building it for me and the fun is making it era correct, even if I have to change things a little. I was not able to modify the rear axle to my liking so I ended up ordering a Ford 9in. I had to check, and they came out in 1957, so I am good. It will have leaf springs, and they have been around since before the Model T. I have no idea who makes the traction bars I will use, but they are somewhat nondescript so it won't matter.
-
I can't take credit. its hardly my original idea. But, I will tell you what I did do. I started by painting the body with a red oxide primer, it looks like rust. You can also fog in, or air brush some other rust colors too to give it a multi color of rust. Then I used a paint brush to wet the ares I wanted rusty, sprinkled on the salt. Let dry. Painted the top coat color, this happened to be a Duplicolor Ford Red, but I have used other paints. Once the top coat is dry, you use a tooth brush or other stiff bristle brush and scrub, with water till the salt is gone. Careful not to scrub too hard as to scratch the paint or leave harsh brush strokes. I then mixed some dish soap, water and flat black paint to make a wash. You can use browns, blacks, greys, etc. This will highlight the edges. I brushed it on, let dry and then rubbed it off. Because the paint contains soap, it is easy to rub off. I used cotton balls, rags, and swabs. I then covered it with a matte clear to seal it all up. You can do this with rattle cans or an air brush. I have also found that smaller grains of salt tend to work better, but some larger grains mixed in help give it variety. BTW, the soap, water and dark paint works great for adding depth to panel lines, engines, etc. It is really nice because you put it on, let dry and you control what is left by how much you rub off. It it look bad, simply wash off with water and try again. You can't really screw it up, because until you clear over it, you can wash it off. Again, I am no expert and I stole all my ideas from others, mostly YouTube videos of Armor guys doing weathering.
-
´33 Ford 3W Coupe - Billy F. Gibbons´ Eliminator
Oldmopars replied to Koellefornia Kid's topic in Model Cars
That is strange, I thought I remember that the car had been stolen and never found and that there was some weird story with it. I am getting older and maybe my memory is fading. -
´33 Ford 3W Coupe - Billy F. Gibbons´ Eliminator
Oldmopars replied to Koellefornia Kid's topic in Model Cars
Nice job, looks great. I built this one back in the 80's. Unfortunately my model of it vanished just like the real car, never to be seen again. -
Help me understand the NHRA classes for an old Gasser
Oldmopars replied to Oldmopars's topic in WIP: Drag Racing Models
Sorry, I could not remember when Pontiac started, I only meant to say I want to do a non-traditional Gasser, not a 41 Willys or 55 Chevy. I can imagine that having the nose high on a light car with a short wheelbase at 140+MPH would be terrifying. As a side note, I love the picture of the Empi Inch Pincher. I am a huge VW fan from way back and the Empi cars were the Stone Woods and Cook of the VW world. They had a look that was copied on the street for a couple of decades. -
Just a suggestion on the salt. You may want to try finer salt. Or, a mix of fine salt and slightly larger salt. This gives a more natural rust effect. I used Himalayan Pink salt on this. Because it is not refined, the texture is more varied. After you have salted it, go over the paint with a wash, this will highlight the ares that the salt covered by getting stuck in the imperfections. BTW, I am no expert. I have learned a lot about this by looking at how the Armor guys detail their tanks and planes. Lots of info on the web. Every model is a learning opportunity for me. I hope I am getting better.
-
Help me understand the NHRA classes for an old Gasser
Oldmopars replied to Oldmopars's topic in WIP: Drag Racing Models
Thanks for the link. It is great to see real Gassers, at the time they were run, not tribute cars or modern copies. Some things I saw, very few ran the 3.5 Gallon fuel tank out front even though it is encouraged in the rule book. Very few ran tinted plexiglass windows. Quite a few were running 3/4 ton pick up truck rear axles. I assume once over a HP range the stock axles self destruct and this was the budget replacement. As far as stance, they were all over the map, some really nose down, some level, and some everything from a little nose high to stupid crazy nose high. But nose high seemed to be abnormal, not normal. You can also see the budgets of the different cars and how they went up over the years and the backyard builders got pushed out. Early pictures show Plymouths, Studes, Willy's, Chevy's, Fords, and anything else. As time went on it seems they all gravitated to the same cars, 33, 41 Willy's, Anglias, Opals, shoe box Chevy's and a few others. The tires and paint seem to be a good indication of the time as well as the years of the cars in the background. It was very educational to see REAL Gassers. It has inspired me to build another. Maybe something a little odd and from the early years. Like a 30's Pontiac with a 3/4ton truck rear and a straight 6 or 8 or some other oddball V8. -
Help me understand the NHRA classes for an old Gasser
Oldmopars replied to Oldmopars's topic in WIP: Drag Racing Models
Nobody ever broke this rule. (Page 7 NHRA rulebook 1962)
-
Help me understand the NHRA classes for an old Gasser
Oldmopars replied to Oldmopars's topic in WIP: Drag Racing Models
I thank all of you for your input on this subject. It seems that there is no one right answer and that there were probably a lot of rule bending and experimenting going on during those days. I am doing this for fun, the rules have been fun for me to read, and then search for cars of the era. I wish I could have been around then and raced myself, it seems like a fun time in a rapidly growing motorsport. Too much money have ruined drag racing (and NASCAR) for me. If you don't have deep pockets of loads of sponsor money, don't bother. I liked the grassroots feel of the early 60's. -
I have also done some math. The car stock is 2970lbs stock curb weight. The flathead stock was 535, but the 348/409 was 625. So I have added 90lbs to the curb weight. Assuming I have done nothing to add or subtract weight other than the engine swap I am sitting at 8.79lbs per cube with the 348 and 7.49 with the 409. So, I would be solid in the A/G class. To get it into the B/G class I would have to add quite a bit of ballast. A big truck battery, etc. Seeing as I have removed the bumpers, running boards and swapped to lighter seats, it would be a lot of weight to drop into the B/G class if I call it a 409, but less if I say its a 348.
-
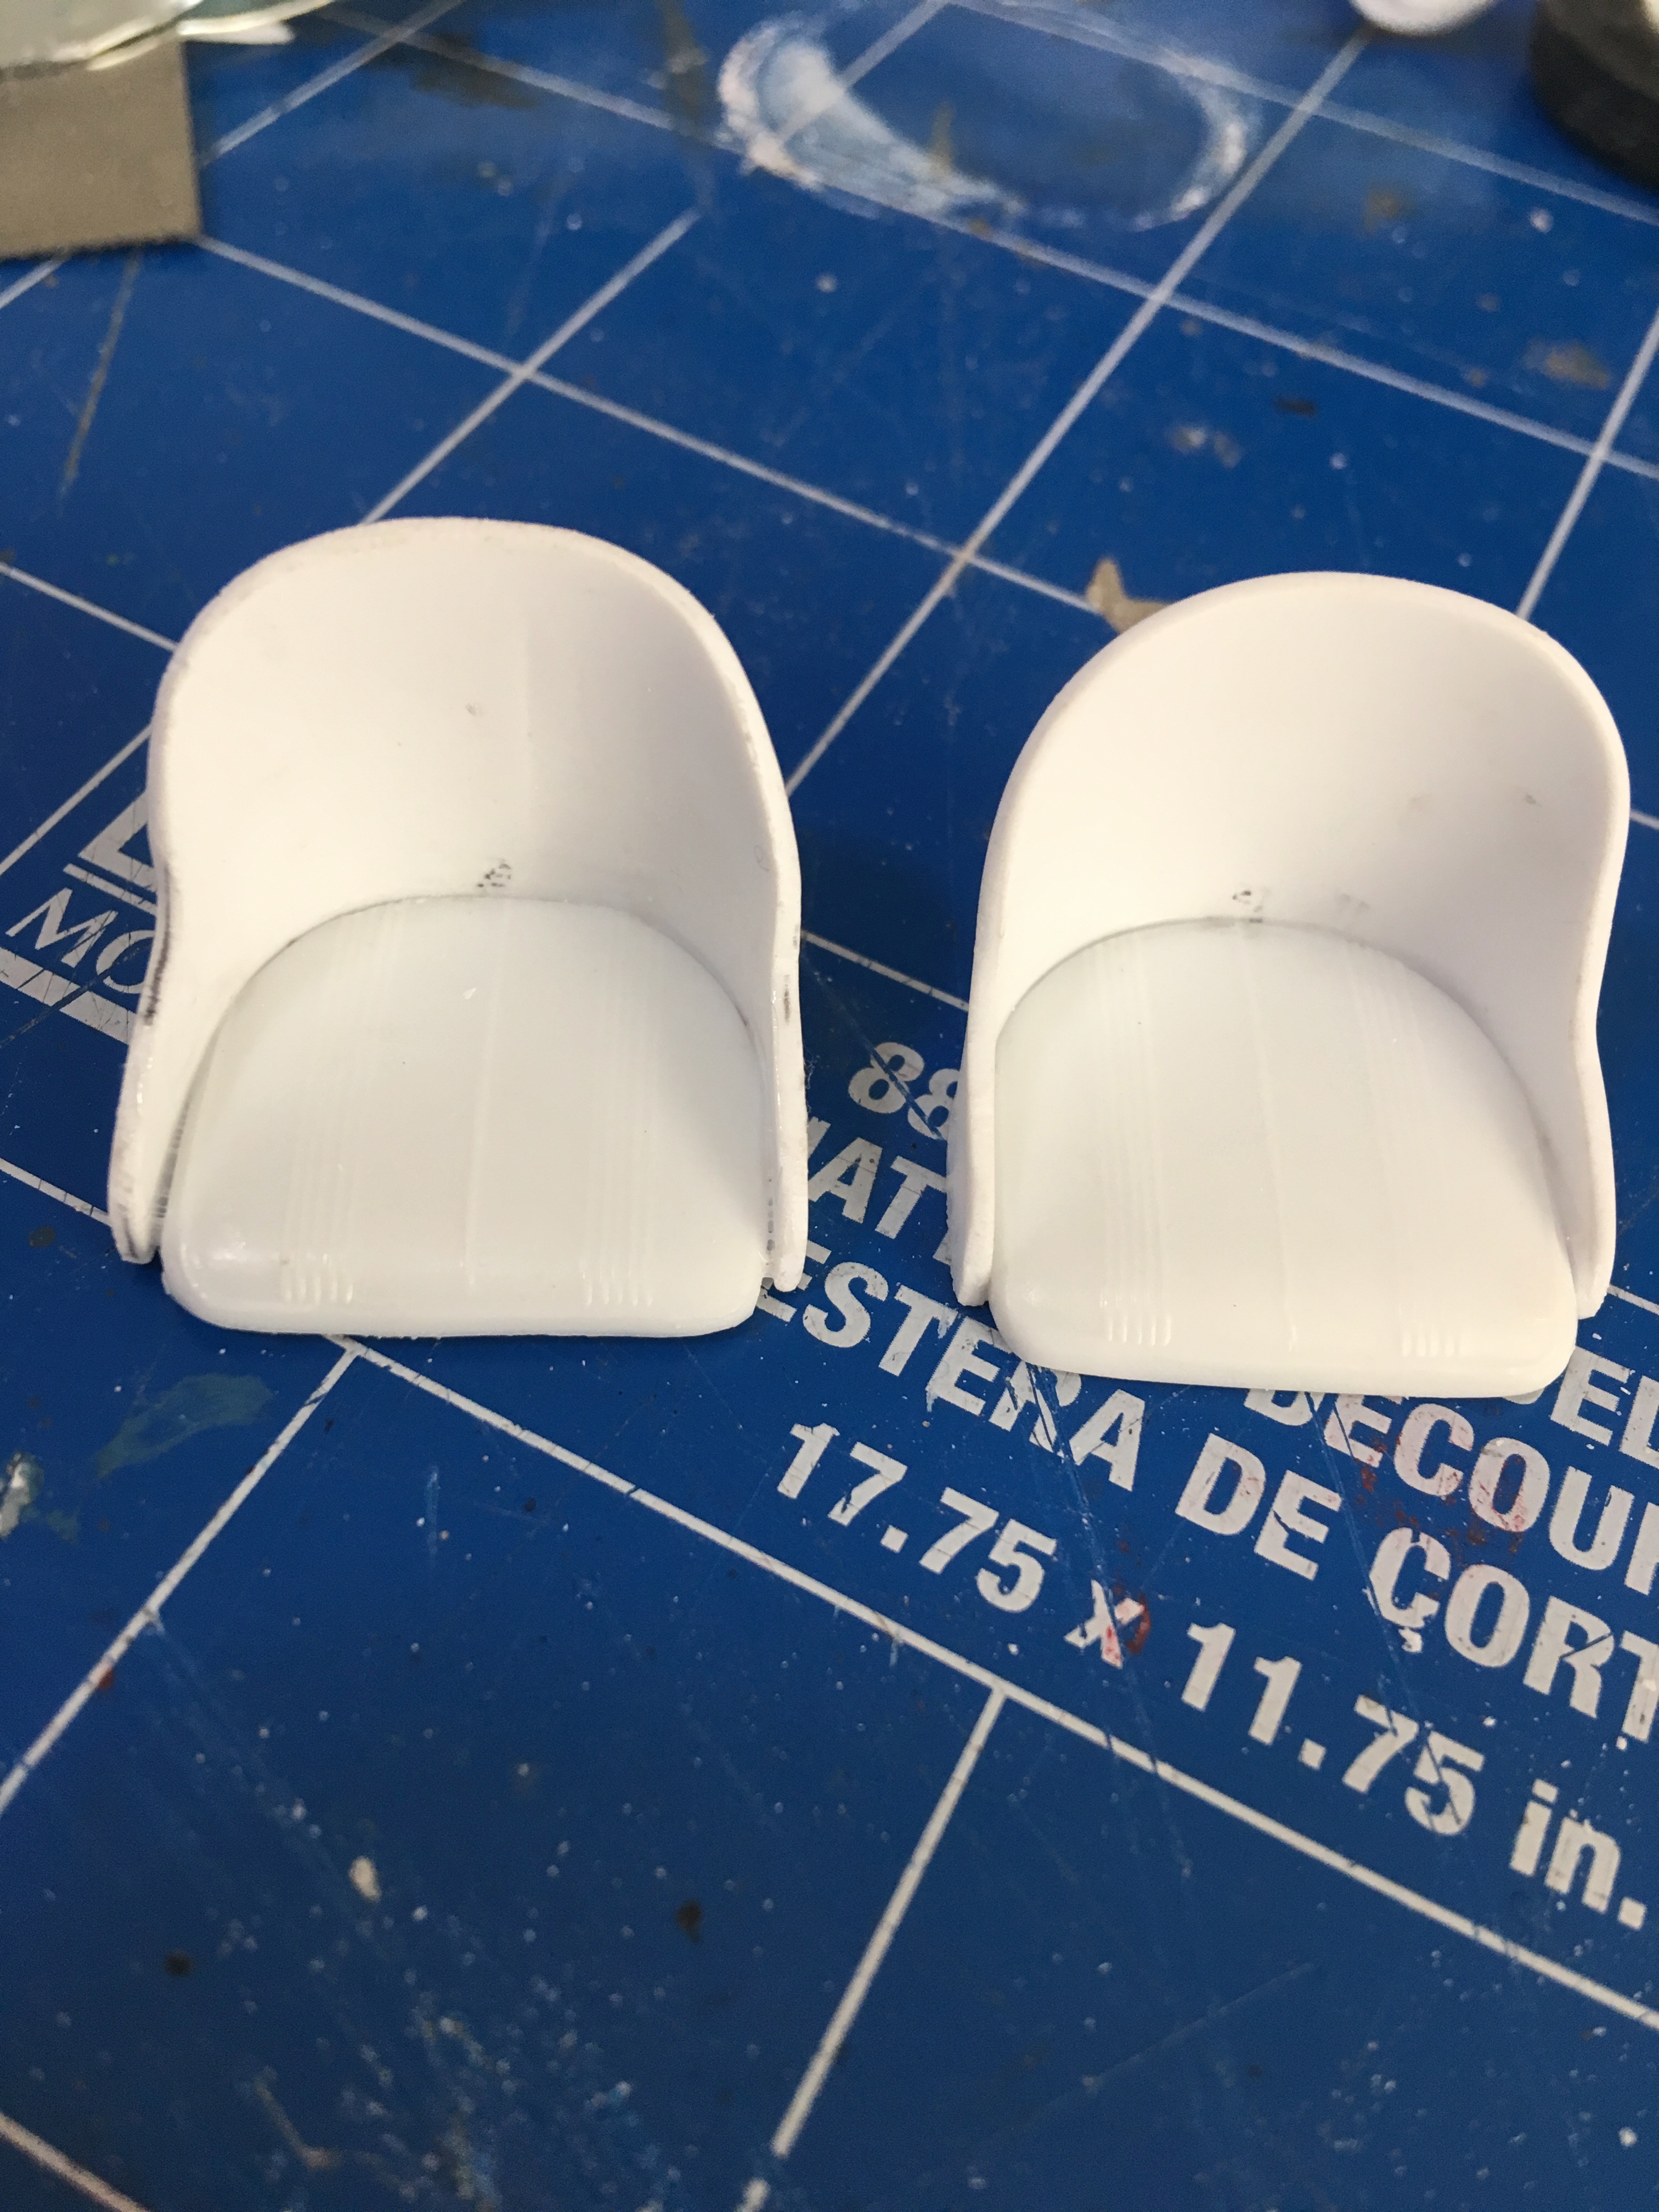
So, thanks everyone for the inspiration. I did some looking and found that the MG's from the 50's and a few other sports cars from the 50's had some nice simple buckets. So, I cut the back off the factory bench seat, cut it in half and shaped it like a seat bottom. This way I still have some of the upholstery pattern in the bottom of the seat. I then cut some .040 and heated it with my heat gun and bent it around the back of the seat giving it the shape and look of the old sports car seats. I have fixed the left seat where it is pulling away, just needed a little more heat. I think these will fit the look and be right for the intended era.
-
That is some good info. I bet I could make a set of MG/Triumph/Austin Healey style seat fairly easy. They would look a little better than the custom seats I currently have.
-
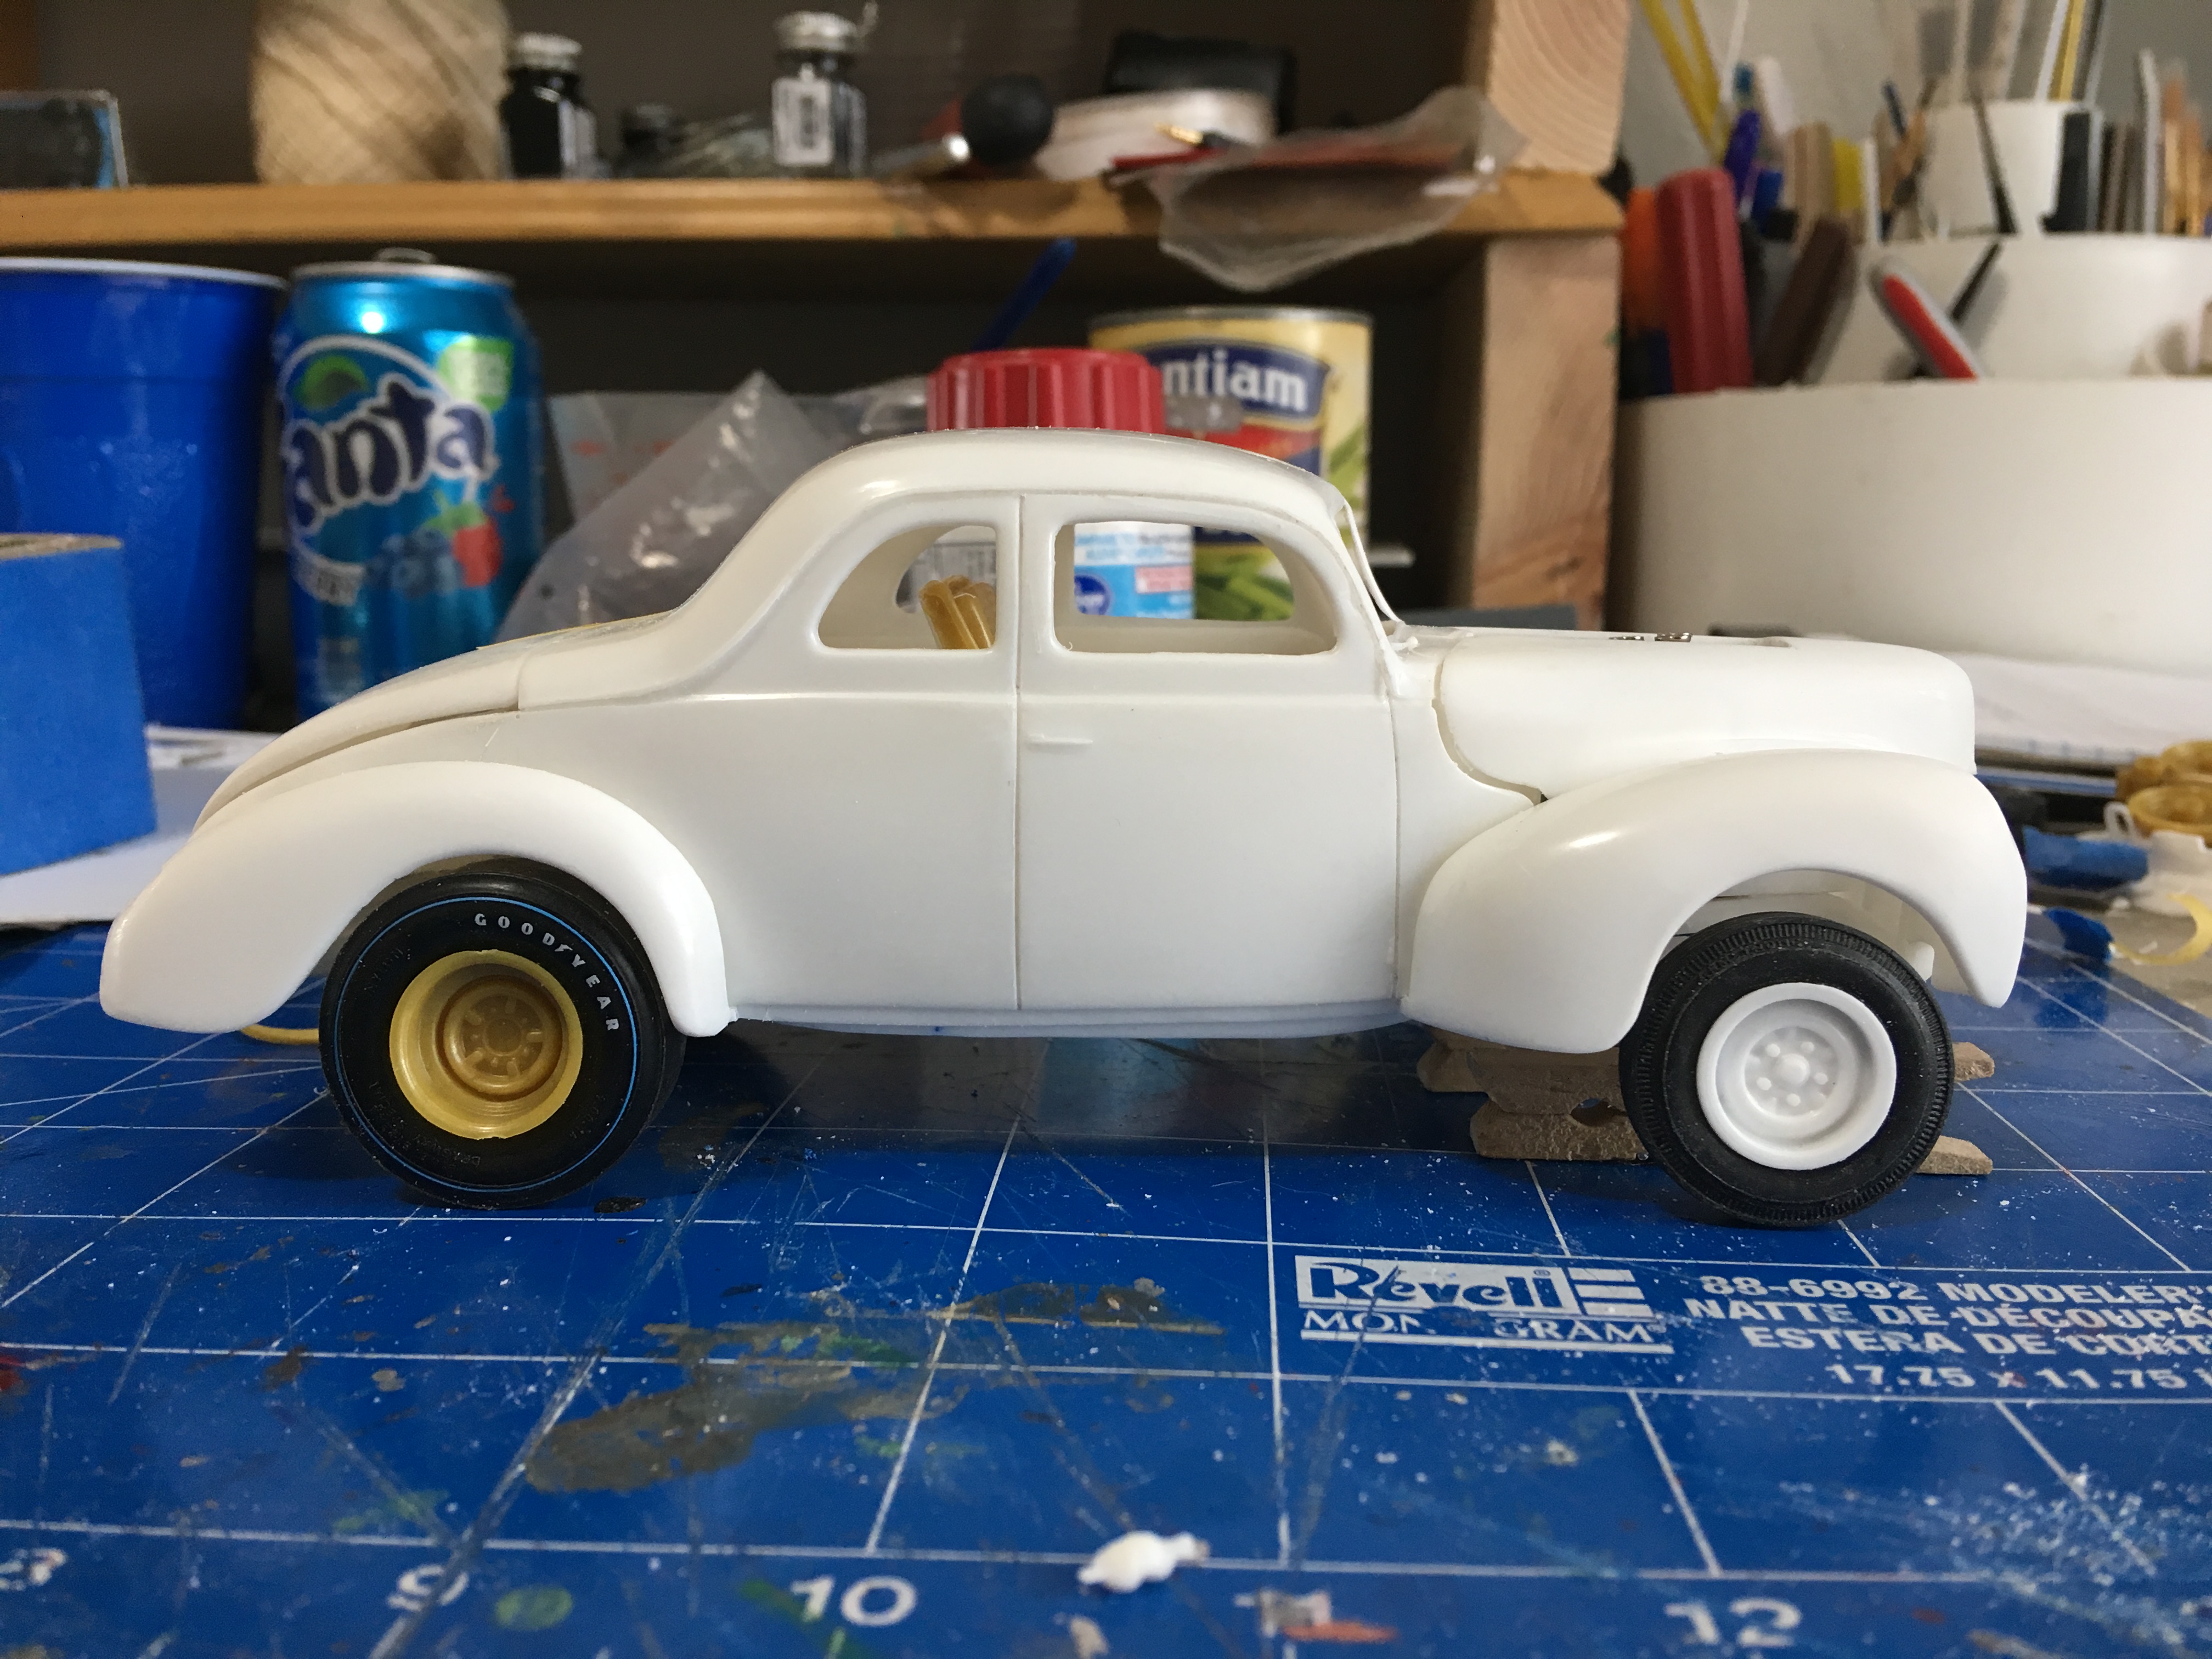
So, I have a lot done. To start with, the body is one step above garbage, or a bad resin. There were no body panel lines. Any amount of paint would have made it impossible to see the trunk. I started to scribe the lines and well, I just kept going till the truck came off. I was then able to build up the area around the truck so I could put the truck back on with a hinge. This led me to look at the truck inside. The wheel tubs were way too large and stuck into the trunk too far. Good if I was tubbing it, but I am not. So, I cut off the tubs, then cut out about 3/16in and put them back to look more like the 1:1 car. I then had to make a floor. Seeing as this is a Gasser, the body trim was removed. It was junk anyway and so weak that to try to foil or paint it would have been all but impossible. It a race car, no need for chrome trim anyway. It was a little too nose high, so I have adjusted things to get the stance with just a little nose down from level. Its hard to tell, but the nose is lower. The engine I am using comes from a 58 Chevy kit. I know the stock engine was a 348ci, but the box calls it a 409ci with the custom parts on it. So, its a 409ci. I pulled a Hilborn manifold and injector tubes from a corvette kit. I had to narrow the manifold to fit, but it looks good. The injector tubes are metal. According to the 1962 rules, you can have a hole in the hood to allow for a blower(A/GS) or for injection tubes, so I did not have to run a hood scoop. It allows me to show off the nice tubes. I had to cut out the firewall a but and add a larger tunnel for the engine. The lower firewall is now smoothed. All in all it is coming together. I am having a lot of fun reading the rule book and adding or deleting things to fit. As far as A/G or B/G, it will depend on what decals I have or find that I like. I built a dash, I can't find anything in the rules against a non-stock dash. So it is flat metal/Aluminum and has a box with gauges in it. The seats are a bit of a challenge. The rules say you can swap in buckets for the stock bench, but I am having trouble locating any Pre-1962 bucket seats. I have the "Custom" buckets out of the 58 Chevy, but not sure I like them. Anyway, I have a lot left to do, but moving along.
-
Help me understand the NHRA classes for an old Gasser
Oldmopars replied to Oldmopars's topic in WIP: Drag Racing Models
Funny thing is, it is the research and the digging, reading the NHRA rule book and then making the car fit that has been fun. I am having a lot of fun with this build and it is because I am trying to make it right. I am not going crazy, but learning this stuff has been a lot of fun for me. -
Help me understand the NHRA classes for an old Gasser
Oldmopars replied to Oldmopars's topic in WIP: Drag Racing Models
Thanks, I did some tweaking and I now have the car sitting just slightly nose down. A little heat to the front springs helped adjust things ever so slightly. I also checked, and the crank centerline is right at or slightly less then 24in(scale) I know that other than the pictures I post here, I am likely the only person that will ever see it. But, it is nice for me to know that what I built is a correct representation of the Gassers of the era. -
Help me understand the NHRA classes for an old Gasser
Oldmopars replied to Oldmopars's topic in WIP: Drag Racing Models
The short answer is NO, this will most likely just be a shelf model, just for me. But, if I am going to build something I know very little about, I research it and find out what I can. I do not like current drag racing, but after doing this research I have become very fond of the early 60's Gasser class. I learned that some big changes came in 1962, and this is cool to me. So, I want to build a car that is a good representation of a car from that era. I may never build another drag car, but I might. I know that having the nose way high in the air is wrong, but I have seen a lot of pictures of gassers at rest and the nose always seems to be higher than the rear. More like a 2-3 degree angle as apposed to the 10 degree angle I see a lot of. I am limited on how low I can get the front due to the axle hitting the oil pan. I do know that the centerline of the crank needs to be at 24in or less from the ground according to the 1962 rules. I know racers pushed this to get the weight transfer to the rear due to the hard rubber of the slicks of the day. I willraise the back just a little to keep the stance as close to the era as possible. -
Help me understand the NHRA classes for an old Gasser
Oldmopars replied to Oldmopars's topic in WIP: Drag Racing Models
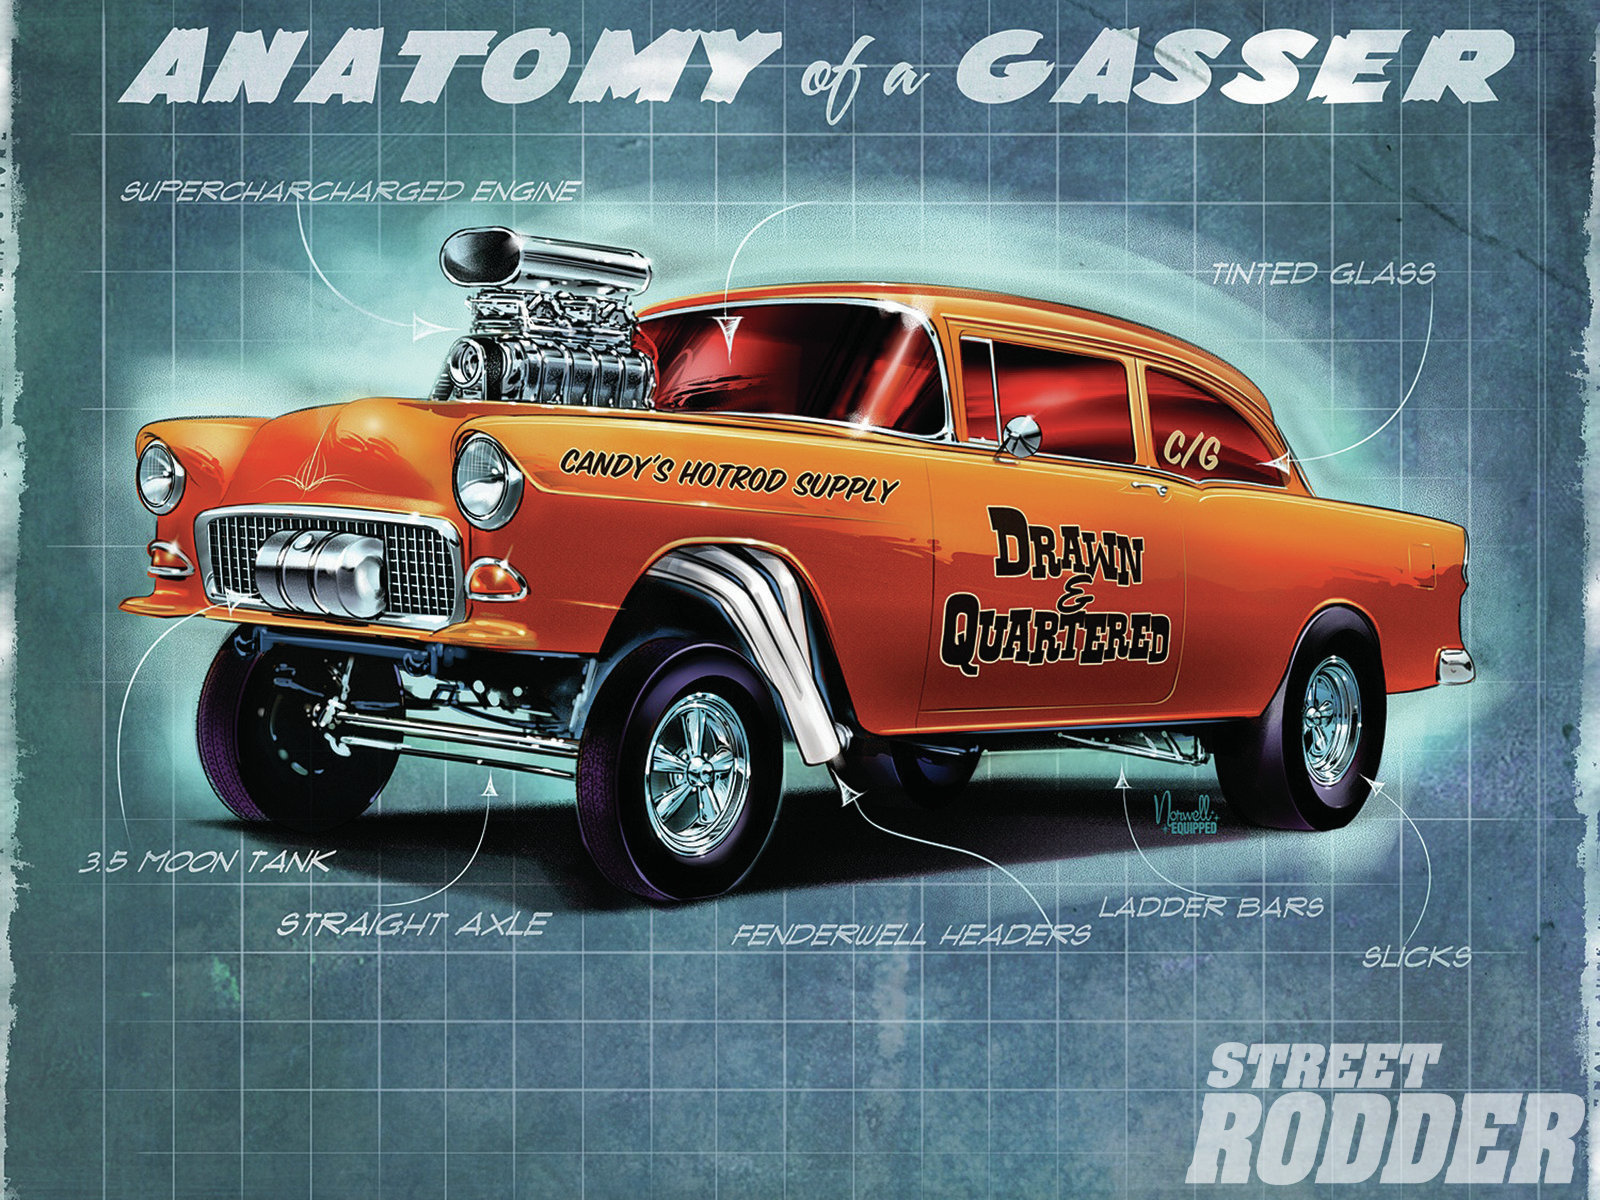
So, now that I have been doing all this looking at the rule books to build this car, I know what the letters mean. However as I have been looking at models and other pictures on line, I am seeing models built with the wrong class markings and it is now bugging me, never did before. I found a 58 Chevy with 409 and Hilborn Injection lettered as an A/GS-wrong. Found this picture from Street Rodder Magazine called Anatomy of a Gasser, showing a blown engine and a C/G class, should be CC/G, C/GS, or even CC/GS depending on year. I liked it better when I didn't know. These are only a small sample of the errors I have found.