Steamboat
-
Posts
826 -
Joined
-
Last visited
Content Type
Profiles
Forums
Events
Gallery
Everything posted by Steamboat
-
Nice build of a very unusual subject. It looks way better than the 1:1 cars did!
-
It was the Testors kit. It built up well though. I had some fit issues with hoses around the turbo, but they can't be seen with the engine in the body. The engine is made up of 49 pieces!
-
Does anyone have a trick for making realistic rear view mirrors? I have tried BMF and polished aluminum, but am still not satisfied with the results.
-
Sweet! Nice clean build.
-
Thanks guys for the kind comments! The outside mirrors are actually aluminum cut from a soda can and polished. I originally tried BMF and didn't like it, so this was my attempt to find something shiny. I'll post a question in the Q&A about whether anyone has a trick for these.
-
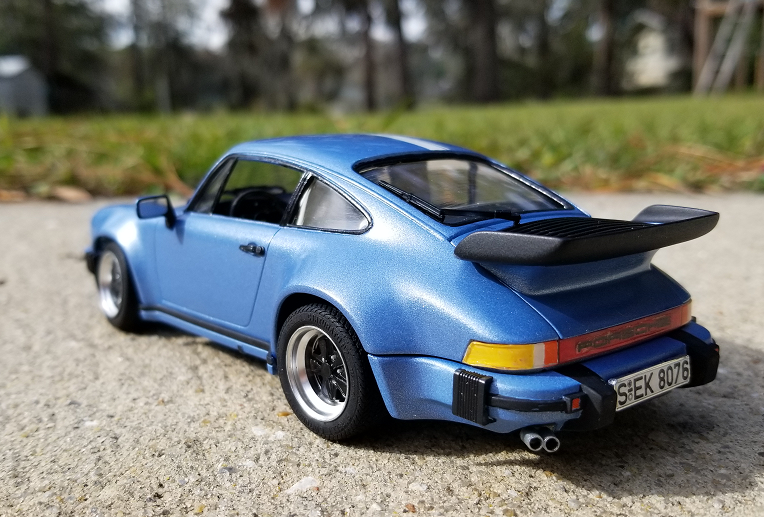
Just finished my 4th build of the year. When I got the kit, the roof was crushed and the a-pillars and vent window frames were all broken. I felt bad for the little car and had to restore it. Paint is Duplicolor GM blue with clearcoat by Future. I could only salvage 2 of the decals, even with Micro Mark's help - the front Porsche medallion and the PORSCHE lettering on the tail lights, but that in itself was a lifesaver. Thanks to the members for pointing me towards a set of instructions. Comments are welcome!

-
Very nice! It looks like you could hop in and turn the key. Did you do anything special with the headlights? They are sooo hard to get to look realistic.
-
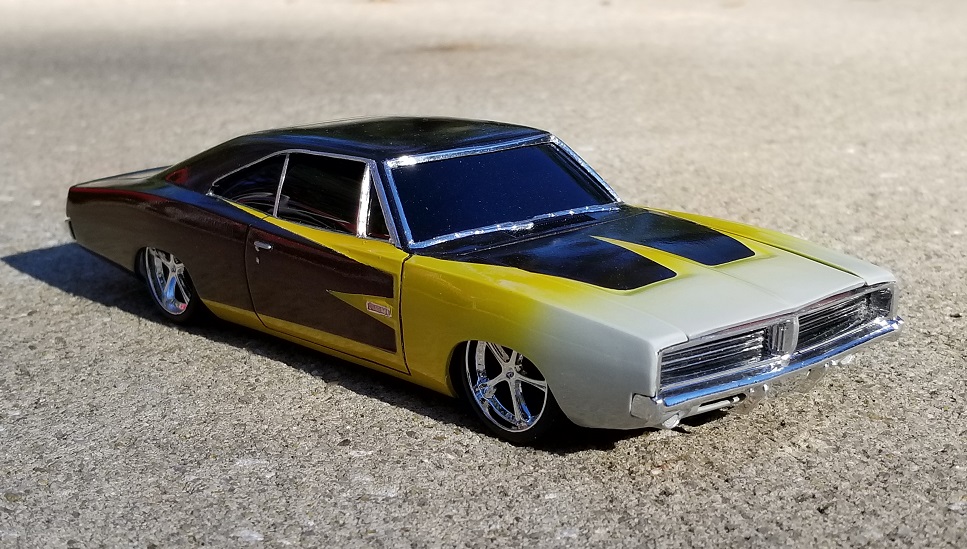
Here's my AMT "Dukes" Charger. Built intentionally as a curbside with no engine or interior. Mirage color-shifting paint and Pegasus wheels. I used exposed 35mm camera film for the side windows.
-
Very nice. That red paint really looks good. I like the paint on the wheels too.
-
I just finished this Lindberg snapper. I needed to complete a build to get my creative juices flowing again, so here it is. There are actually a few 1:1 cars in my area that look like this. The paint is Spaz Stix color-shifting lacquer, over Alclad primer. It's hard to see from the pics, but it shifts from blue to brown to purple. I was in a hurry and sprayed the Alclad on a humid day, and now am getting a little blush through the top coat. It was built for fun anyways, not a contest build. The wheels and brake rotors are from a Charger SRT kit, with homemade axle tubes made from 1/4" aluminum tubes. The wheels actually rotate inside the tubes. The kit glass is horrible. The black areas are oversized and make it look like an armored car. The quarter window clear area was so small that I ended up painting the entire quarter window black. If I had to do it over, I'd make my own windows. Otherwise, the kit went together pretty nicely.
-
4-lug Mustang / Falcon steel wheels
Steamboat replied to Steamboat's topic in Model Building Questions and Answers
Thanks. That's a great lead. I'll look into the Japanese kits. -
Tamiya TS-26 Pure White
Steamboat replied to Steamboat's topic in Model Building Questions and Answers
Thanks for the input. I'll give it a try. I've had great results with the other colors, just a little leery when it comes to white. -
Does anyone have any long-term experience with TS-26 Pure White? I've used Testors white enamel a few times over the years and it always yellows after time. Does the Tamiya paint do this? Thinking about using it on my next build. I could use white nail polish also, but I love the simplicity of the rattle cans!
-
4-lug Mustang / Falcon steel wheels
Steamboat posted a topic in Model Building Questions and Answers
Has anybody ever offered 4-lug steel wheels for Mustang or Falcon 6-cylinder cars like the wheel pictured below? I'm trying to do a 6-cylinder conversion and could either use wheels like this or stock wheel covers. -
Who makes the best DeTomaso Panteta
Steamboat replied to Steamboat's topic in Model Building Questions and Answers
Thanks guys, It has my interest now. Curbside only? I have an assortment of Lamborghini Diablo and Countach kits. Maybe I could use the rear section of the chassis from one of them. I also have plenty of NASCAR 351 engines. Another vision that will become another uncompleted project..... -
Who makes the best DeTomaso Panteta
Steamboat posted a topic in Model Building Questions and Answers
Saw a Panteta at a super car emporium today. What is the best model? -
I have some of those parts in my stash box too. I always wondered where they came from!
-
'71 Cuda Late Model
Steamboat replied to afx's topic in WIP: Other Racing: Road Racing, Land Speed Racers
Your work looks great, but you can tell it's a big block by the external oil pump forward of the drivers side motor mount. Small blocks have an internal oil pump. -
'71 Cuda Late Model
Steamboat replied to afx's topic in WIP: Other Racing: Road Racing, Land Speed Racers
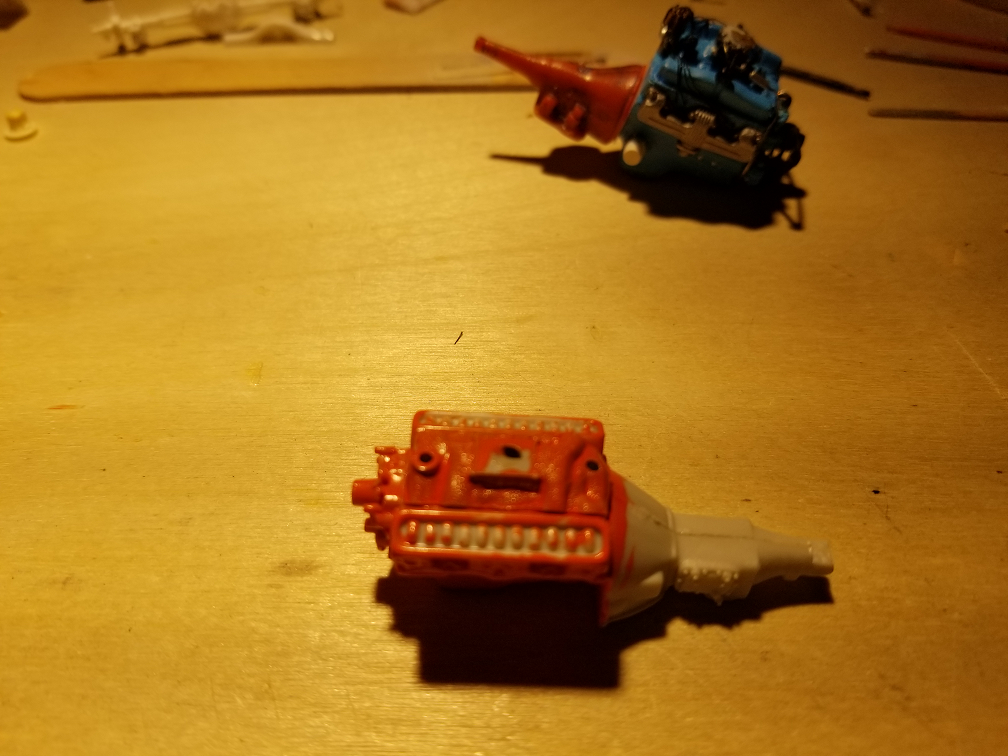
You'll get some extra horsepower if you use the AMT Duster Street Machine small block pictured. It has 5-1/2 cylinders per bank, as evidenced by the 11 rocker arms. Either that or 3 cylinders with 3 valves and one cylinder with 2. You have to wonder what they were thinking in China. The engine in the background is the 340 from the Monogram T/A Challenger, but it's 1:24 scale.
-
'71 Cuda Late Model
Steamboat replied to afx's topic in WIP: Other Racing: Road Racing, Land Speed Racers
It's good to see the old 'Cuda start a new life. Will you be going with small-block power? -
Hi, I've been playing around with spraying Future as a clear coat. When I sprayed it over decals yesterday, it caused the decals to wrinkle, and they did not flatten again after it dried. I cut the Future 10% with rubbing alcohol. Could that have caused the decals to wrinkle?
-
Fujimi Porsche 911 instructions needed
Steamboat replied to Steamboat's topic in Model Building Questions and Answers
Yes! The 73 Carrera looks like it will work fine. Thanks! -
Fujimi Porsche 911 instructions needed
Steamboat replied to Steamboat's topic in Model Building Questions and Answers
Brian, I tried Hobby Search, but they don't have instructions for that model. They do have some other Porsches, but not the 911 Turbo. It's my first time building a Porsche, so I'm at a loss here. I do have some instructions for an AMT Porsche 935, but it has about 1/3 as many parts! -
Does anyone have instructions for a Testors (Fujimi) Porsche 911? I picked up a buildable kit on eBay, but the instructions are missing. Thanks! Steamboat
-
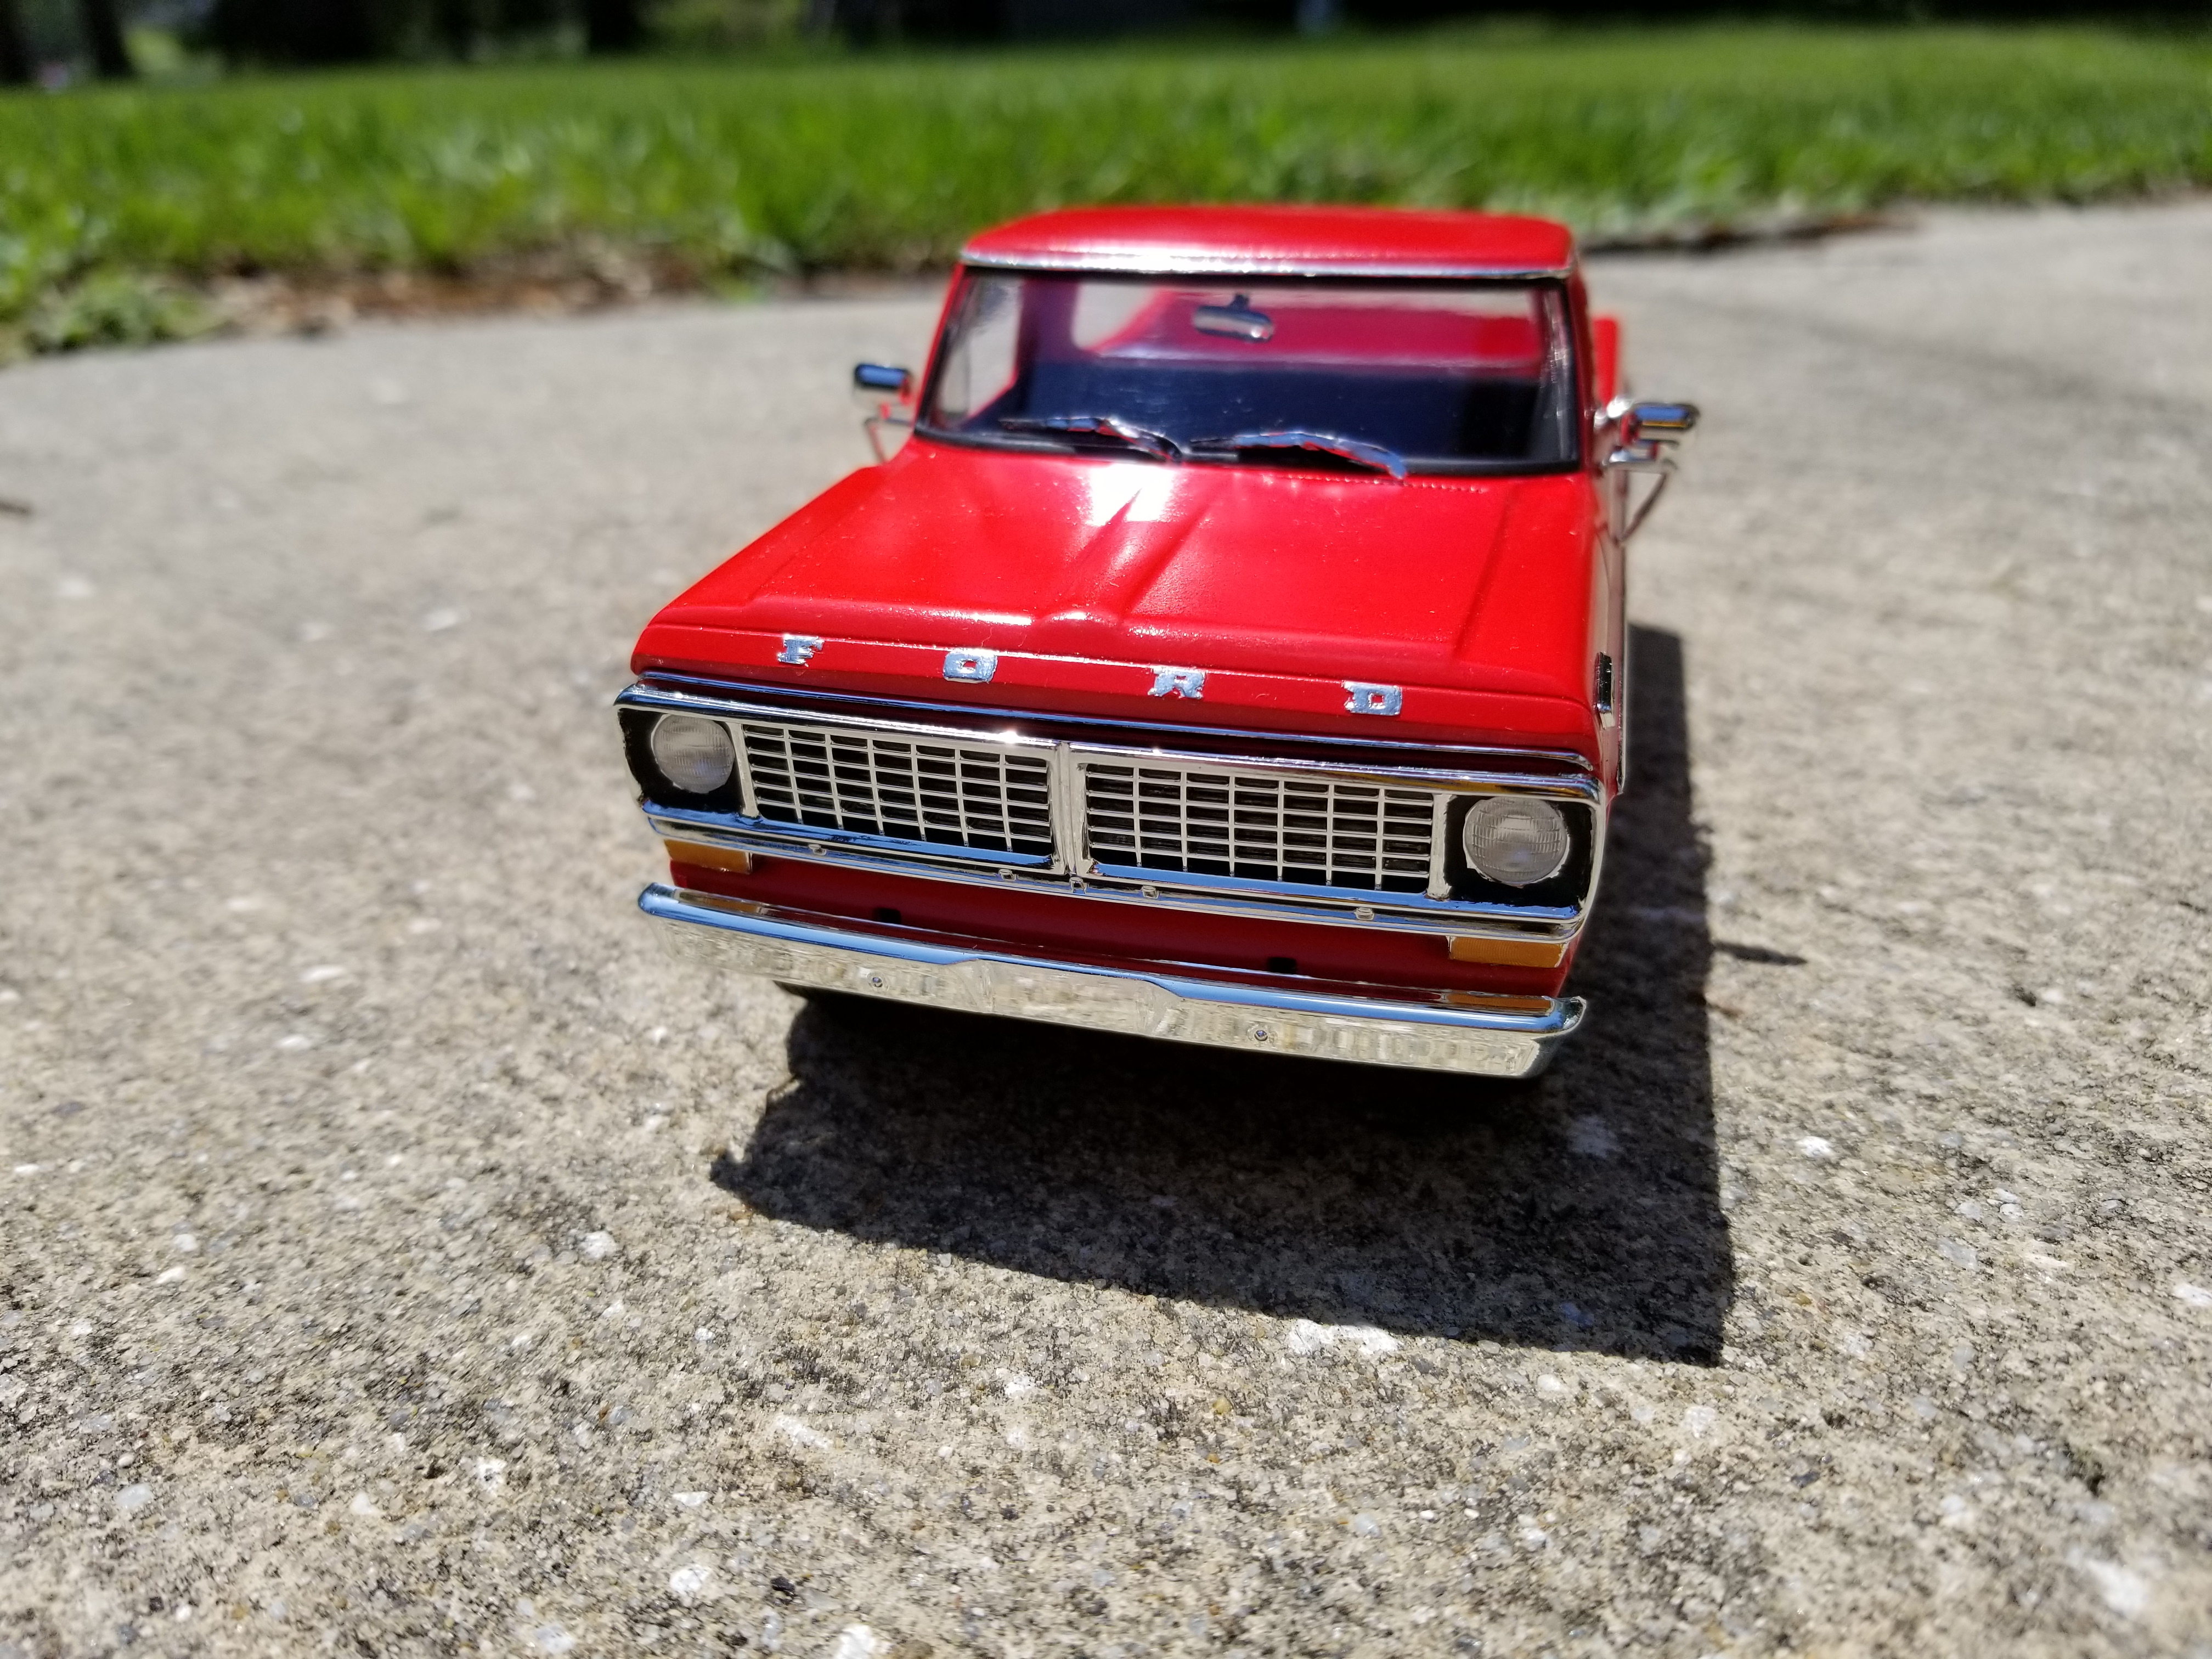
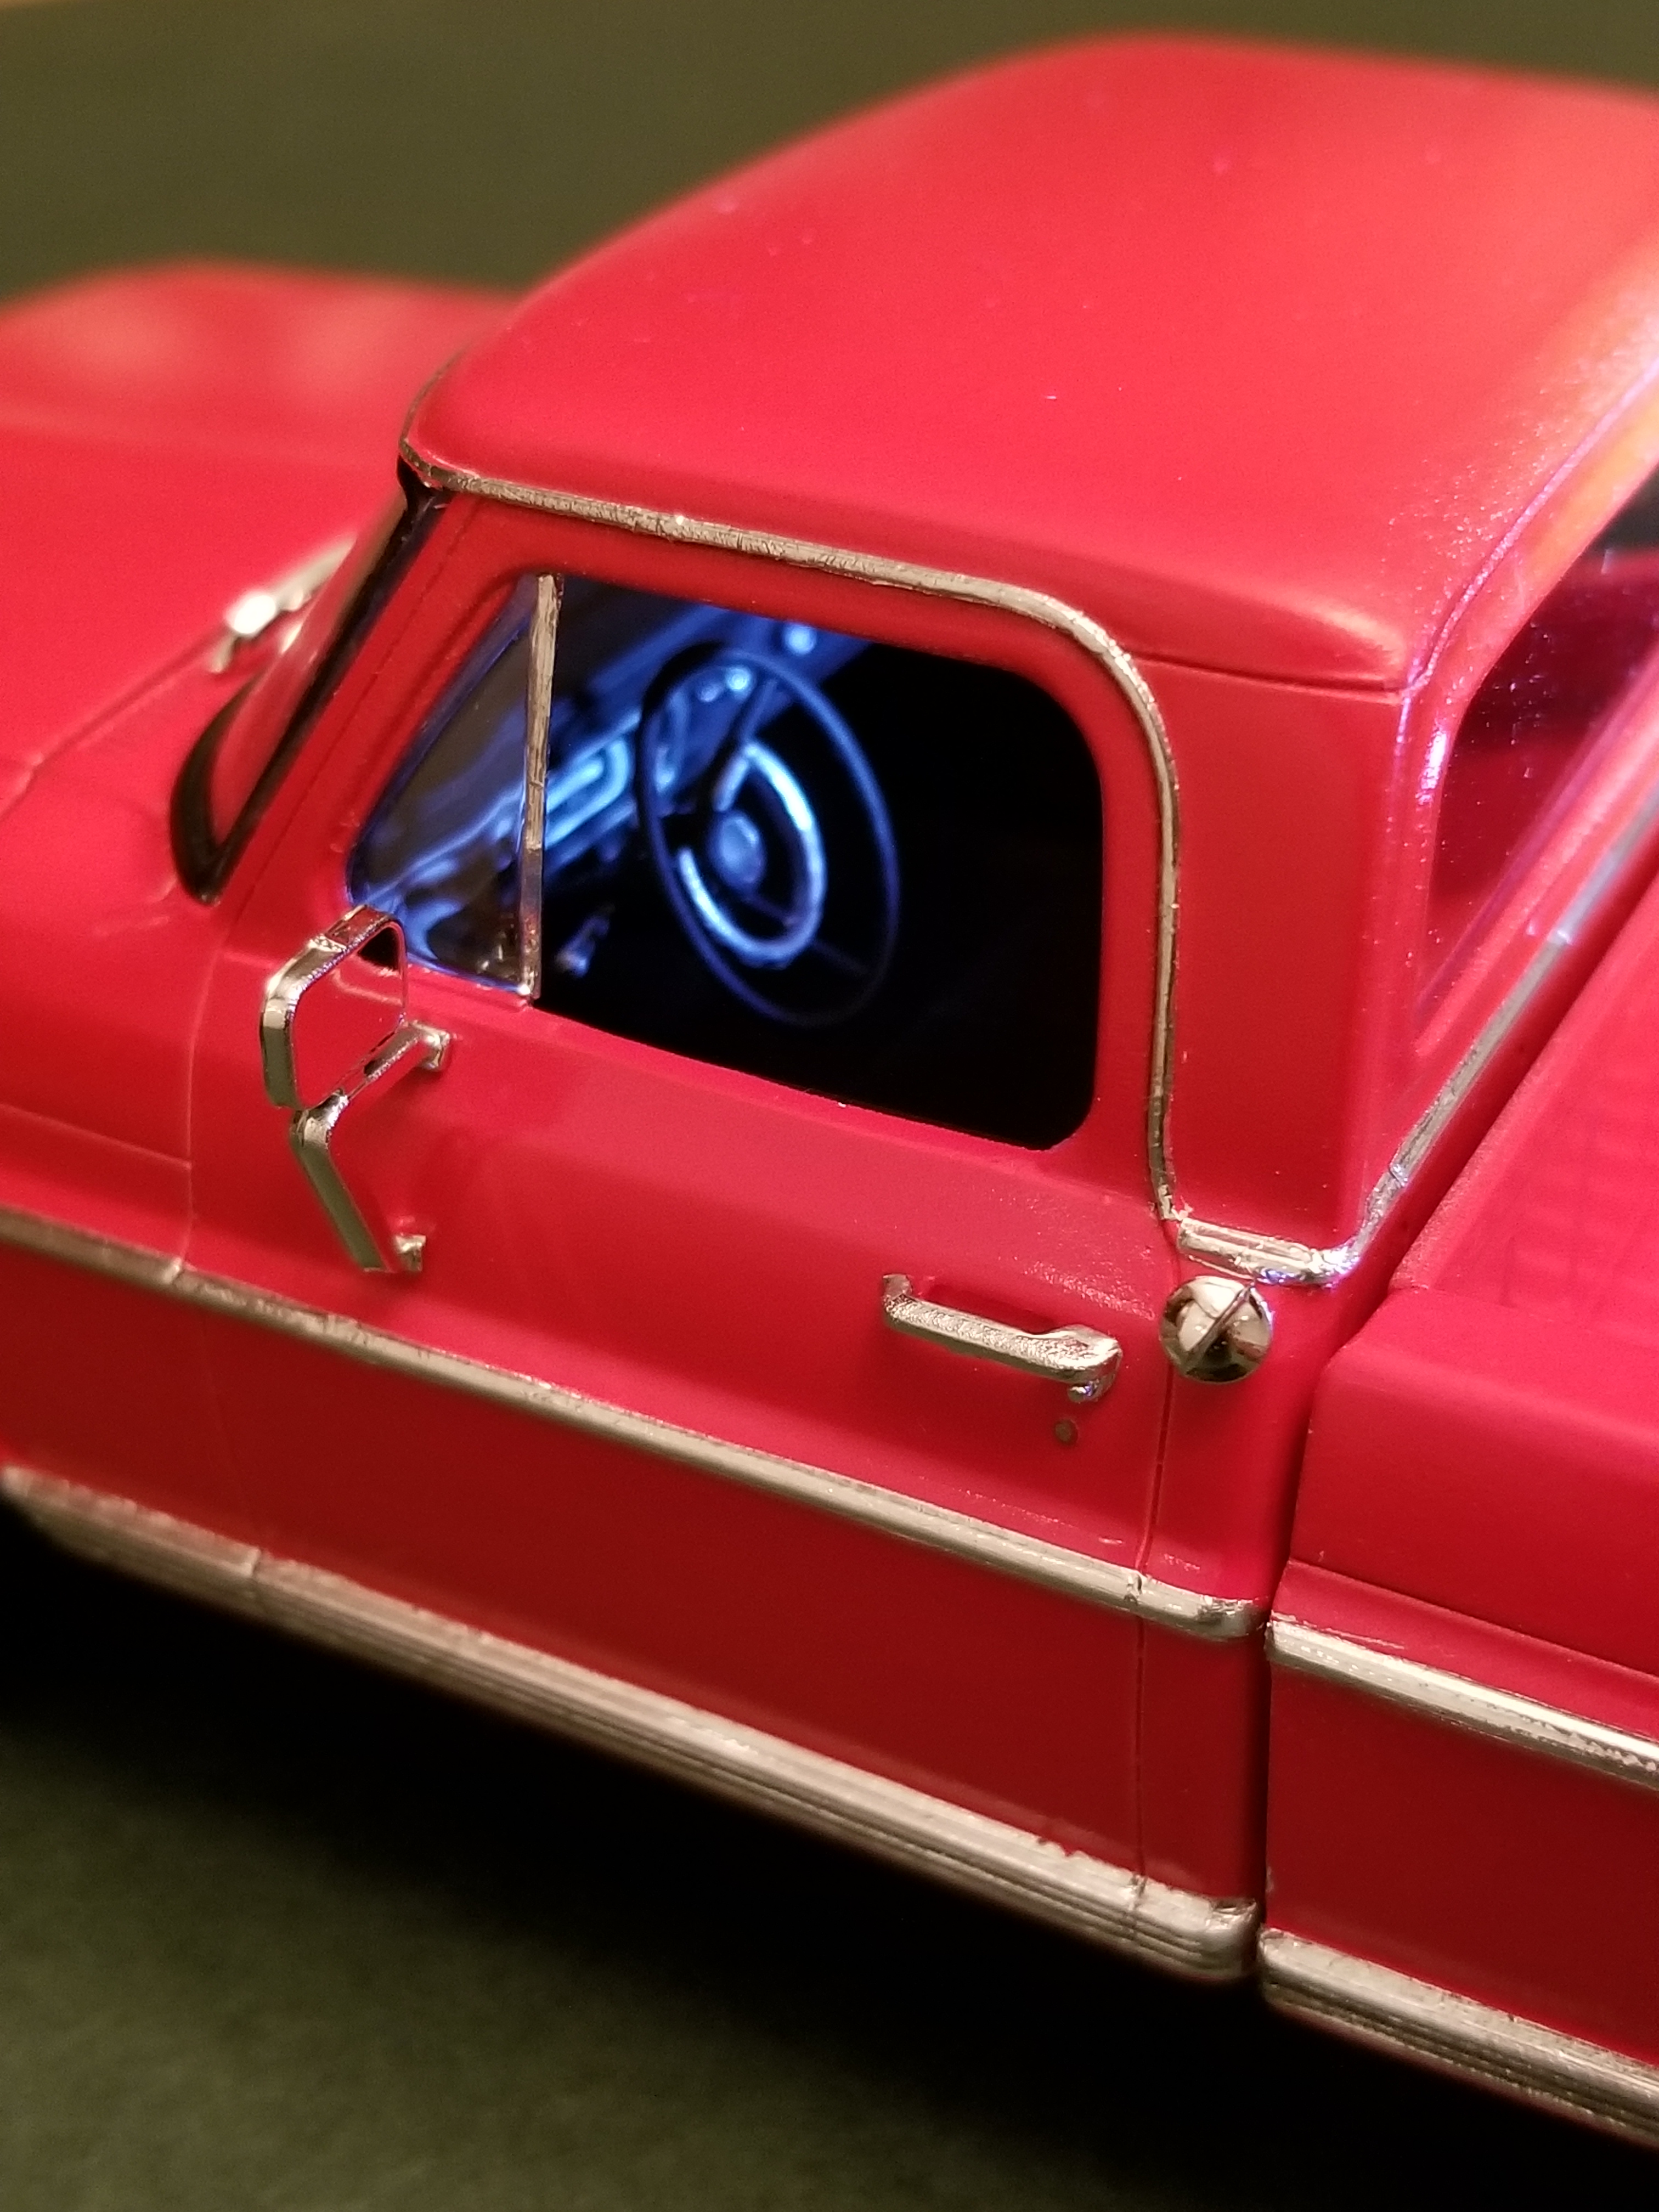
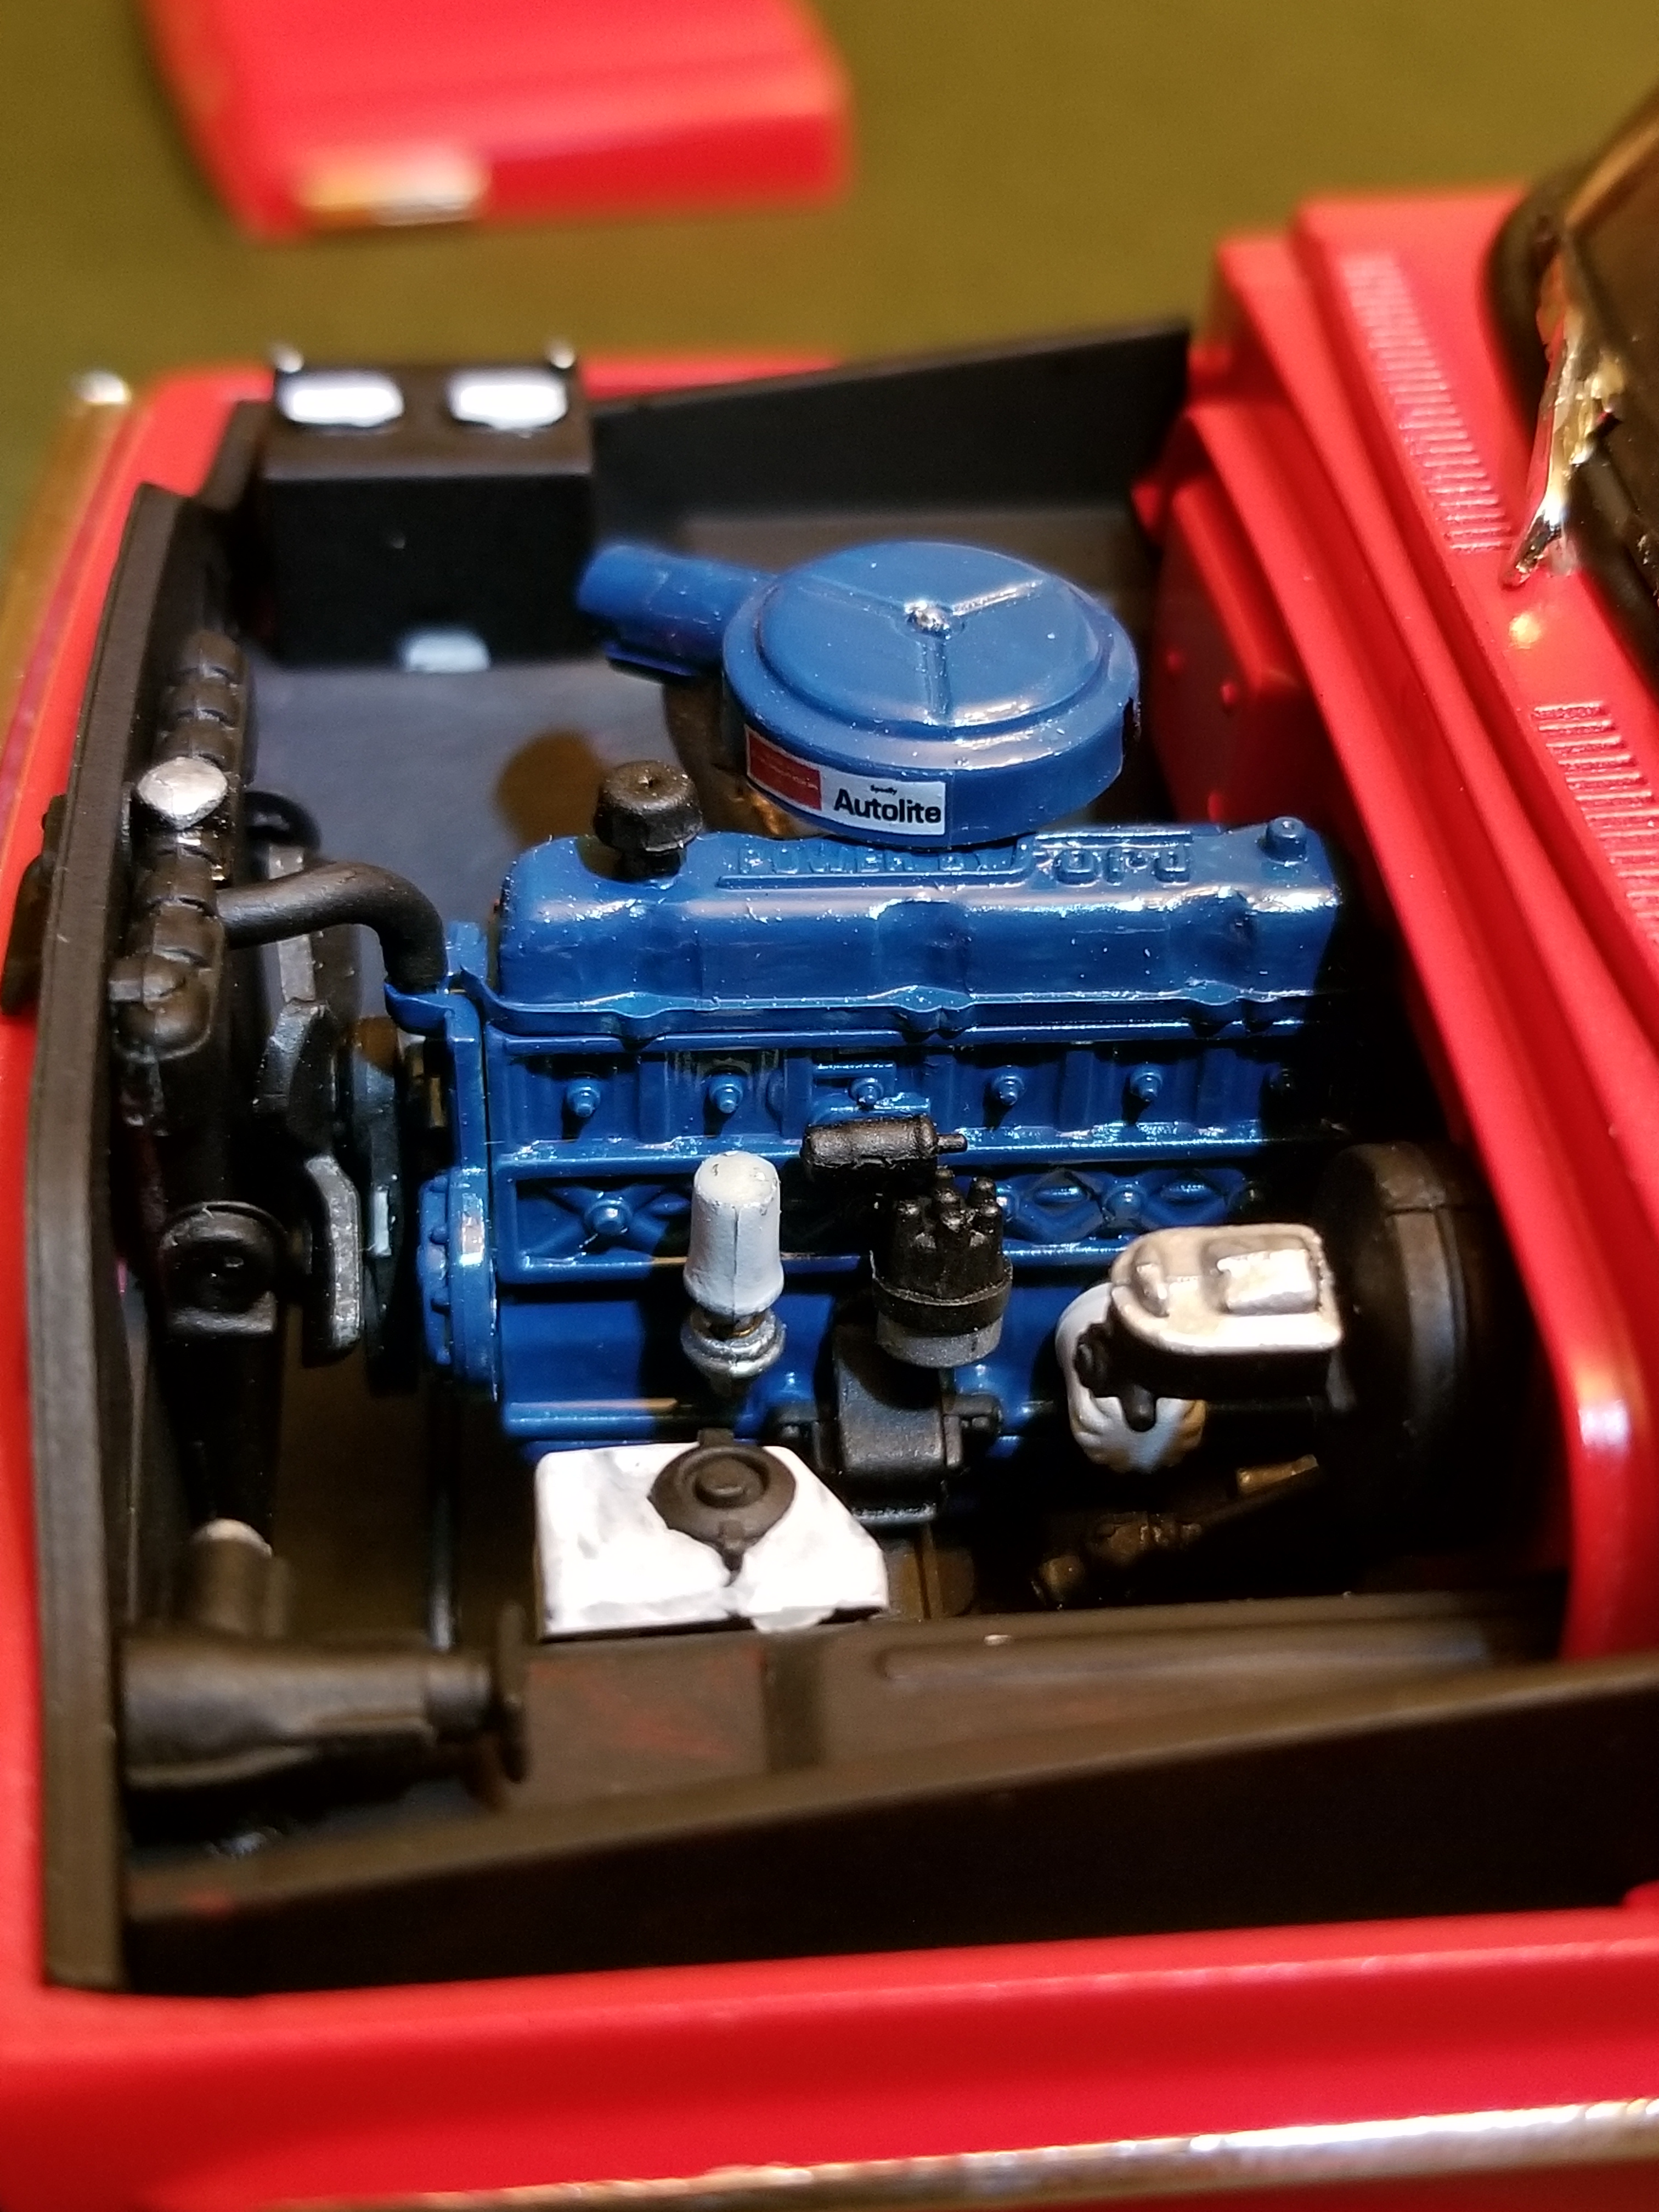
My first completed build since February. My uncle had a 1:1 truck, and I plan to give him this one for his birthday. I just wanted to do a box stock build to keep my hands busy while waiting for filler to dry on other projects. The paint is Tamiya red, and came out about a 6 out of 10. The Moebius F-100 is a really nice kit. All parts fit with very little finessing. The grille is a work of art. The body was nearly perfect, with the exception of a could small sinkholes on the front fenders right behind the headlights, and the cab roof needed to be straightened a little. If I wanted to spend a little more time on it, I would have tried to make the side mirrors and the wiper blades more true to scale. Otherwise, I would definitely recommend this kit.