
Jeff Johnston
-
Posts
1,095 -
Joined
-
Last visited
Content Type
Profiles
Forums
Events
Gallery
Everything posted by Jeff Johnston
-
Thanks Lambros. My builds are usually just off the line builds too, but this one is in the spirit of the 69 I owned for 13 years. Purrty on the outside and a little rough underneath
-
Some more work last night. i tried to fabricate exhaust like I had on mine which were just pipes and a muffler (dual) but after several tries it wasn't coming out like I wanted. It just looked like styrene tubing with a couple mufflers on it. So I used the 67 Mustang exhaust and called it good enough. I say 67 because I used the 289 out of the 67 kit as the engine. Its a lot closer to the 302 that I had in mine than is the 428 that comes in the kit.
-
First build - any suggestions?
Jeff Johnston replied to Ezuna's topic in General Automotive Talk (Trucks and Cars)
If you like muscle cars I'd say the Revell-Monogram 70 Mustang. It goes together nicely and sits straight on all 4 wheels every time. That 458 Kit is a nice kit too. Good place to start if that is where your interests are. -
How can one bend time?
Jeff Johnston replied to The Creative Explorer's topic in General Automotive Talk (Trucks and Cars)
Things will get a little easier once your kids are a little older. At least when it comes to time for building models. Find an hour on a Saturday night. That's what I did for years. Once everyone went top bed I'd spend a couple hours on a Saturday night. -
My car was a real looker on the outside and in the interior, but was well driven on the underside. This is my start to the chassis and engine.
-
I print out a photo on line of the trunk and I shrink it so that its pretty much the size of the trunk in scale. Then I basically use that to draw half the shape onto a piece of white paper, and I use a #11 blade to cut the shapes out. Then I fold this in half so I can exactly replicate the shape on the other side. Hard to explain but maybe I'll do a tutorial on it. Once I have that paper with the skeleton cut out. I trace that onto sheet styrene, then I carefully cut it out with a blade.
-
Yes they will. One thing you can do is fill that in with a light glaze of super glue, then put a drop of ca glue accelerator on it. Then sand it smooth. I find this method works best for me. I only use bondo to fill sink marks in bodies. It'll work on that but you might still get ghosting.
-
Thanks for posting this. I hope folks see it. I posted a similar thing regarding paint a while back and it got deleted for "selling"...yeah I know, thats silly. That is certainly the best price I've seen. Thanks for posting. I think I'll grab one.
-
The hood scoop is from the Revell 1970 Mach 1 kit.
-
This is where I am at this point. From here I will start to prime and paint the body, and also start working on the chassis and engine.
-
The Mach 1 kit has the shaker hood. My car had the standard Mustang non functional hood scoop. I'm not sure if this was factory with the car or if someone added it along the way. It had it on the car when I got it. I sanded the opening and filled it in with styrene. My 1:1 car actually had a plate covering the opening so I am pretty sure it came on the car. and the real car
-
My car did not have the fold down searts to I put a package tray like was in my car. Also have the detail for the trunk.
-
Here are my door panels. Those gaps that you see will be filled in with super glue and some super glue and accelerator. I'll sand it smooth and there will be no more gaps (I guess thatch why they call it gap filling glue haha). Here is the other side done.
-
Filled in where the roll bar goes. That is left over from the Shelby kit. Actually the whole interior is from the Shelby and many parts not correct for a Mach 1 or standard fastback. See on the drivers side rear where I cut it out and filled that in. I've done the other side now too. Also the middle arm rest in a standard mustanf is flat. no pleats kike that. I filled those gaps in with some spot bondo and sanded it smooth.
-
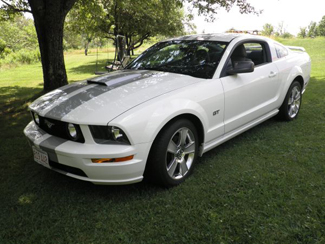
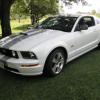
Well its been 2 and a half years since I sold my 69 Mustang so I think its time to build a scale version. Next maybe I will build a scale version of my current 2006. My car was like that really cute girl you knew in high school. Looked great on the outside. Very sexy and clean. Underneath, well she was not quite as put together... Mine had a 302 so I am going to be using the 289 out of the AMT 67 kit as it looks way more like a 302 than the 428 that comes in the 69 kit. I am going to take my time because there are many bits and pieces needed to make this like mine. Sometimes I tend to rush through some details and I'm trying not to do that on this build. Here is where I am. Pretty far but I keep forget in to take pics alone the way. Snapped most of these today. This is the trunk. When I do trunks I usually carve the detail out of sheet styrene, and glue it tothe trunk underside. It's painstaking, and sometimes the shapes are not exactly symmetrical. I decided to try something different by creating the shapes. Its a reverse of what I usually do. Well...It will look ok but I have cince decided I like the other way better. Here is the Mustang. This is the "other way". I think I like this better. This is from a 66 Mustang I did a couple years back. Too late now haha. I don't think one will be that much more noticeable on the built model, but no more experiments HAHA Sure would like some opinions on this one. Let me know what you think is more authentic looking.
-
Dang. that is just plain awesome ! Easily the most authentically weathered model I've seen...well maybe ever. This is just great. Every detail, right down the the carpet in the interior, the fuzz coming out of the seats, to the rust patterns on the bumpers and hubcaps, to the welded body panel are soooo well done.
-
Very nice build !. Once you see the Revell kit net to the resin body you can really appreciate how goofed up that Revell roof is.
-
Very nice and authentic.
-
Very Nice !
-
Want To Work For Revell?
Jeff Johnston replied to martinfan5's topic in General Automotive Talk (Trucks and Cars)
I'd love to have the technical manager job, as I have all of the requirements other than the familiarity with the injection molding process. Have a good job now doing a similar thing with a household name company, and I would never move. Plus I love where I live. I wonder how being "in the business" would affect someone's enjoyment of the hobby in the same way. Would a person be more excited or less excited to get home and break out the plastic glue ? JJ -
Greenfield News & Hobbies
Jeff Johnston replied to lordairgtar's topic in General Automotive Talk (Trucks and Cars)
Happening way too often over the past 10 years or so. The (2) good LHS near me are all gone. Though I do have a nice well stocked real Hobby SHop about 40 minutes from here in Nasuw NH, and about 50 minutes in Marlboro MA. -
Thanks guys ! Here is one more I forgot.
-
I like Mustangs a little LOL Onto 2015
-
New kits with flaws.
Jeff Johnston replied to Dave Metzner's topic in General Automotive Talk (Trucks and Cars)
I thought Dave stated in this thread that the main reason (clearly not the only) for the Chinese manufacturing was he talks to one person, and they are a one stop shop. Everything is done in one place, through one guy. Here he would have to farm each piece out separately. At least that's how I read it. The Chinese get a buck twenty six an hour doesn't mean they are charging US companies the same Rate. I can guarantee you they aren't. I'm sure its a lot less than 23/hr but definitely not $1.23. The good new behind this thread, as I see it, is that the top guy explains to us how inaccuracies happen and why. This is from an organization that has developed some very accurate kits in recent years.. Not once do I recall a thread about any inaccuracies the Hudson's or Chryslers or Lonestar kits. This shows me the level of scrutiny they put into this because as to my eye, these kits are the top of the heap with respect to Accuracy. I sure can't wait to get my hands on one or two of the 65 Comets when they come out ! JJ -
New kits with flaws.
Jeff Johnston replied to Dave Metzner's topic in General Automotive Talk (Trucks and Cars)
Man I read this and just shake my head. Some of you have some real class... Seriously, its shameful.