Rich Chernosky
-
Posts
2,104 -
Joined
-
Last visited
Content Type
Profiles
Forums
Events
Gallery
Everything posted by Rich Chernosky
-
1968 Lotus Turbine #70 Indy Car
Rich Chernosky replied to tuffone20's topic in Other Racing: Road Racing, Salt Flat Racers
Nice job on this...I too lwould like to know what paint you used...especially the clear if you used it -
My attempt on a Cobra
Rich Chernosky replied to kjohan's topic in Other Racing: Road Racing, Salt Flat Racers
Aaahh..much better. Nice job on this one. Oscar Koveleski and Hal Keck ( I think) drove this car to victory at Watkins Glen. -
1939 Mercedes W154
Rich Chernosky replied to Rich Chernosky's topic in Other Racing: Road Racing, Salt Flat Racers
-
1939 Mercedes W154
Rich Chernosky replied to Rich Chernosky's topic in Other Racing: Road Racing, Salt Flat Racers
-
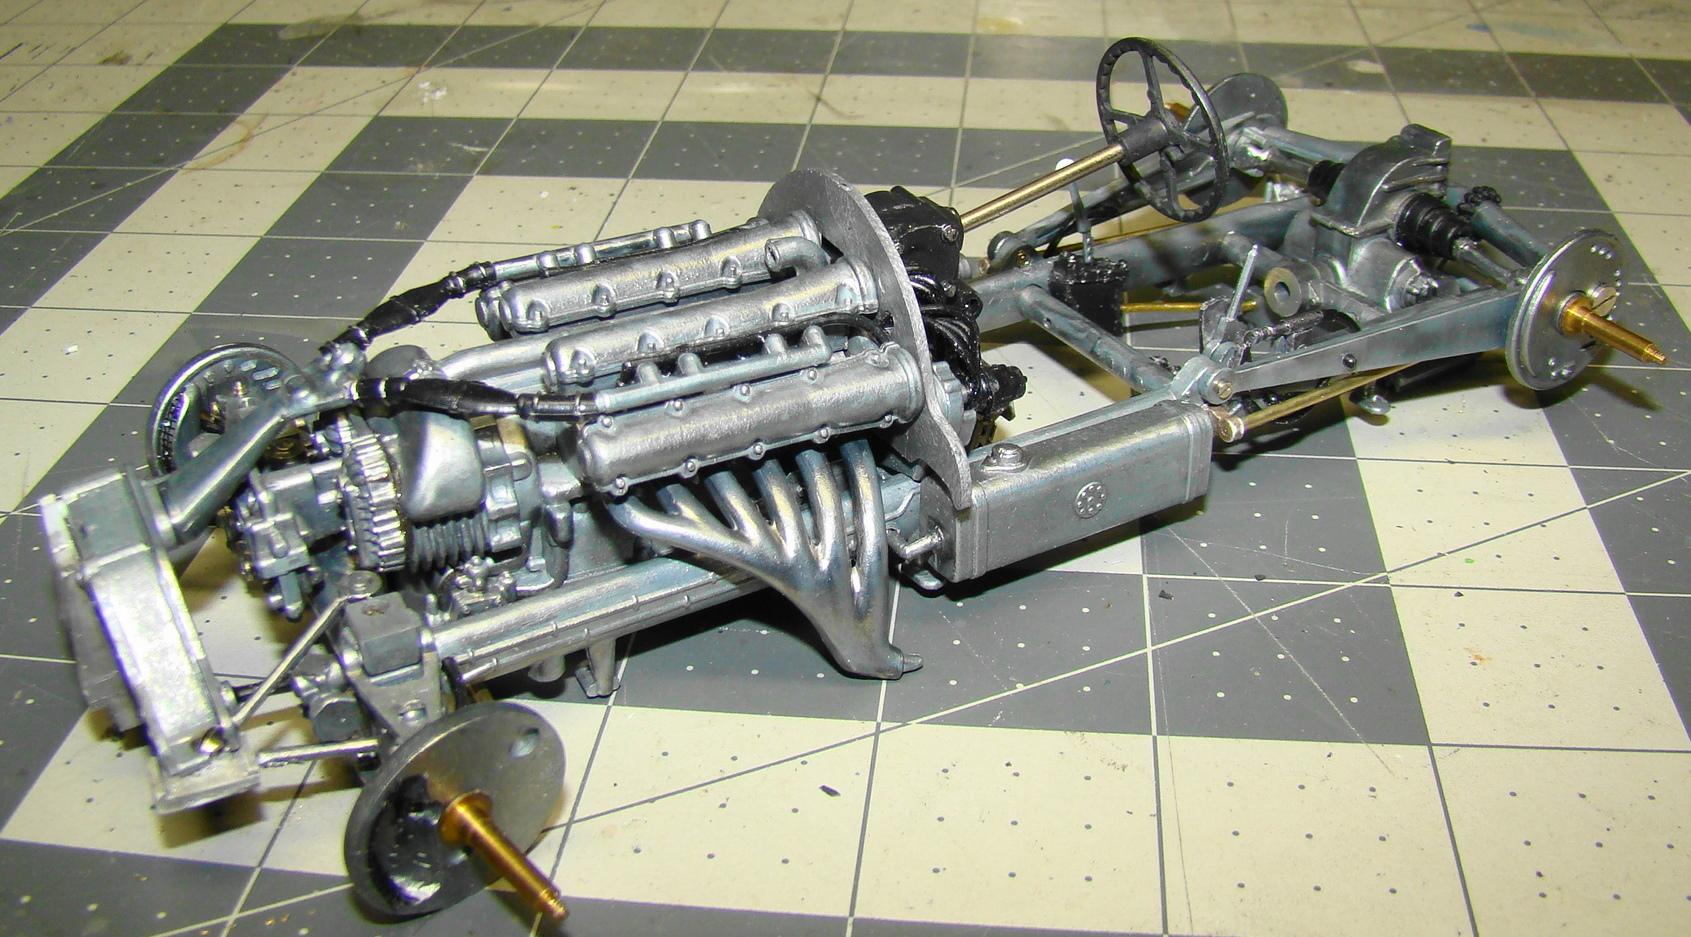
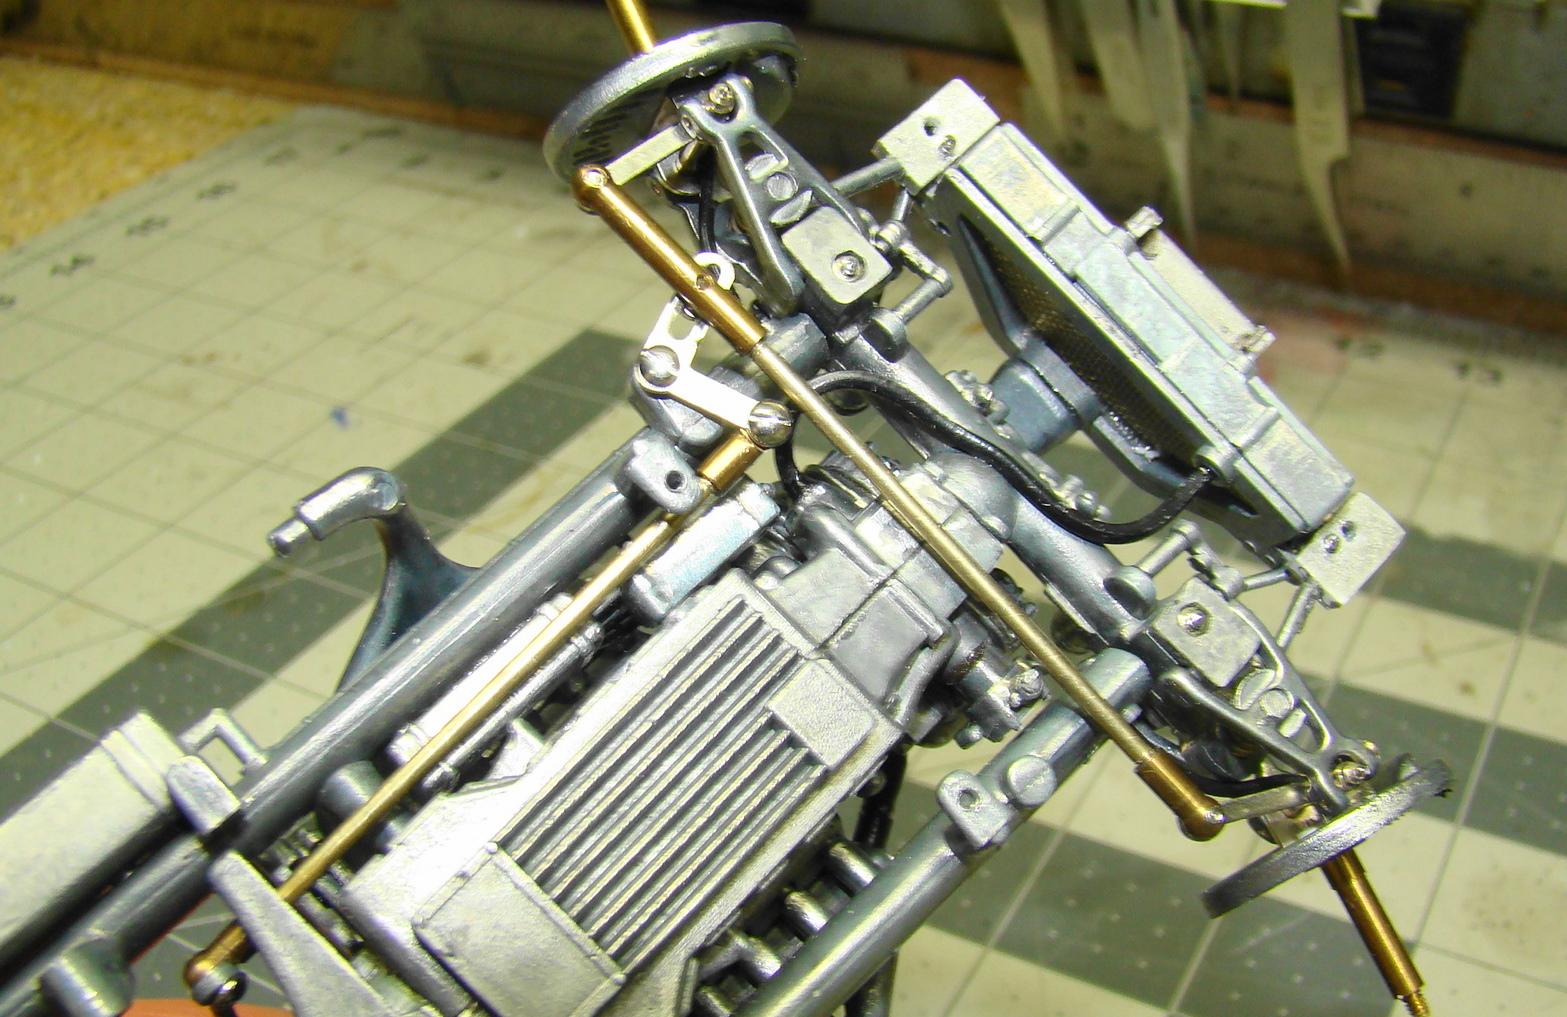
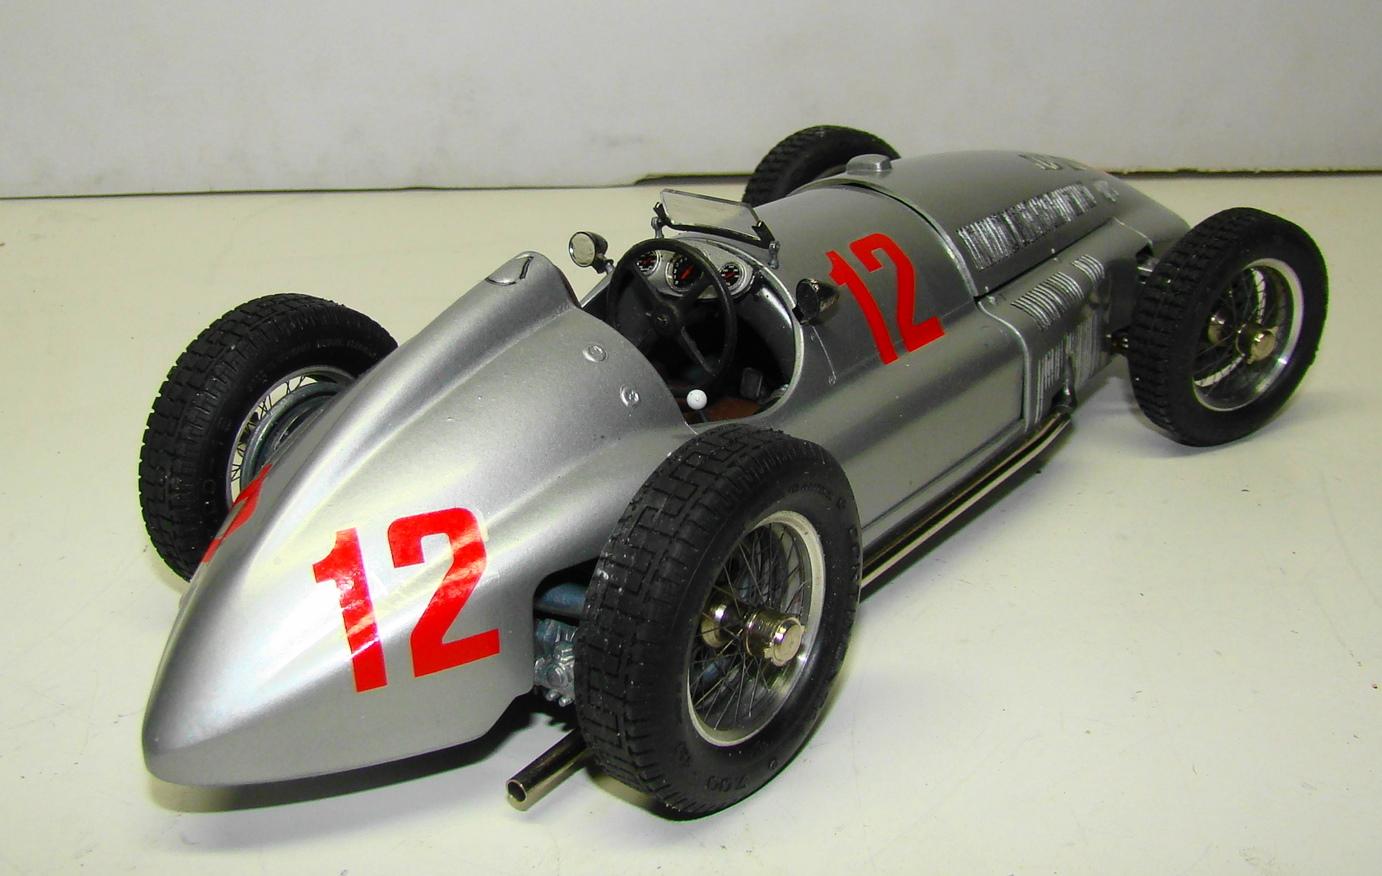
Can't count the times I have looked at this kit, ordered parts for it (which took forever) fiddled with and now finally finished it. This one has to be the hardest challenge I have ever faced. Kit fought me every step of the way. I think I used every tool in my extensive inventory. This is the tenth Revival model I have finished and was well aware of the problems associated with these kits. It still surprised me. But on the bright side, I have the satisfaction of completing one of the toughest kits out there. Below the pictures are some of the highlights of this model and just a few of the problems. But its done...enjoy. Completed chassis minus body and wheels. It took a lot of work to get to this point. Rear veiw of completed chassis. Despite the fact that I ordered missing pieces I failed to give Revival a complete inventory. As a result there were still 17 more missing pieces that had to be scratchbuilt. Those pedals and some of the suspension mounts were among them. The intricate steering was all screw construction and went together with jewel like precision. The only thing that did. Wheels steer through the steering wheel using as gearbox and various rods and linkages. Front suspension works with upper and lower control arms and springs. Rear suspension works too with a single coil spring and DeDion axle. Finished car on its nicely done wire wheels. A Revival trademark. The engine cover actually fits better that this picture. Getting it to fit required taking the entire body off (several times) Removing the engine heads and grinding them down. This is a mostly all metal kit BTW so the modifications were never easy. Rear veiw of the car sits rather low but is period correct. The plated brass pipes were a nice touch but getting them to sit right was a challenge. Cockpit turned out rather well. The kit gauge decals disintegrated and had to be replaced. Seat was a vinyl affair and was sprayed flat brown, and darker wash applied then a flat varnish and some wax for the highlights. The gearshift knob was my idea and probably not correct. But it looks good anyway.

-
2 x Ferrari 250 LM
Rich Chernosky replied to 1959scudetto's topic in Other Racing: Road Racing, Salt Flat Racers
Very nice considering their age. Look forward to the updates. -
Nothing quite like a black with gold trim livery. Perfect for a Lotus and yours is. Very cool.
-
Welcome Richard, always a pleasure to have another 1/12 and 1/24 race fan on board here. My work horse airbrush is your Paashe H that I have used for many and many years.
-
Helmut., those look great and that is a good idea. I built both of those for that very same reason.
-
Tim...this my solution (one of many) on a Fisher resin Mclaren M6A. This build was recent and is featured in Under Glass. Look forward to seeing some of yours...Rich
-
Welcome back Tim....I see we have the same pet peeve...non steering wheels on model cars. I will be interested to see some of the innovative ways you solve this problem.
-
1963 King Cobra
Rich Chernosky replied to Gramps46's topic in Other Racing: Road Racing, Salt Flat Racers
Very cool, Gary...like it. -
Ferrari F2001 Monza Blacknose
Rich Chernosky replied to Phildaupho's topic in Other Racing: Road Racing, Salt Flat Racers
Excellent job Phil. Really liked the background information. Makes one appreciate the model even more. -
1/20 Lancia Stratos Rally
Rich Chernosky replied to Rich Chernosky's topic in Other Racing: Road Racing, Salt Flat Racers
Thanks for the info Steve. I have been building continuously since 1964. That might account for my total. That and I always have had a dedicated work area. Interesting story. About 20+yrs ago I was talking to a fellow modeler in a hobby shop. I asked him how many kits he had completed. He said somewhere between 4-500. I figured I had about 300 done at that time. Since all of mine are on display I went back and counted them. To my dismay I only had 298 done. That weekend I finished two Mercedes 300SL kits. I keep all the box tops. I dated them, added all the pertinent information and started numbering them. I have done so ever since. The Stratos was 827. I have friends who have done more than 1000. So I have some catching up to do as well. 200 is a good number. I know of others who will never do that many in a lifetime. So keep it up. I will be interested to see you start that 1/12 Stratos. Mine is painted and the body somewhat fitted. Thanks again...Rich -
1/20 Lancia Stratos Rally
Rich Chernosky replied to Rich Chernosky's topic in Other Racing: Road Racing, Salt Flat Racers
1/12 (unbuilt), 1/16 (built) 1/20 (built) 1/24 (built) 1/25 (Unbuilt) plus I have a couple of 1/64 diecast didn't know there was a 1/10 one who makes it. The 1/12 is Nitto but I believe Otaki also has the molds. -
1/20 Lancia Stratos Rally
Rich Chernosky replied to Rich Chernosky's topic in Other Racing: Road Racing, Salt Flat Racers
Thank you Hans, retirement just gives me stress free building time. I have actually been building models continously since 1964. The Stratos was my 827th completion. -
1/20 Lancia Stratos Rally
Rich Chernosky replied to Rich Chernosky's topic in Other Racing: Road Racing, Salt Flat Racers
-
1/20 Lancia Stratos Rally
Rich Chernosky replied to Rich Chernosky's topic in Other Racing: Road Racing, Salt Flat Racers
Sorry Steve but no. I build a lot of different scales, but stay away from 1/10, 1/8 and 1/43. A man has his limits...ya know. -
1/20 Lancia Stratos Rally
Rich Chernosky replied to Rich Chernosky's topic in Other Racing: Road Racing, Salt Flat Racers
You sure will Helmut....you may even get tired of seeing my posts. Sports racing, F-1, exotic cars is all I do so you should be delighted. -
1985 Warpzone Toyota 85C
Rich Chernosky replied to dougwintz's topic in Other Racing: Road Racing, Salt Flat Racers
Unusual livery that you don't usually see. Well executed model. Like the detail work. -
1/20 Lancia Stratos Rally
Rich Chernosky replied to Rich Chernosky's topic in Other Racing: Road Racing, Salt Flat Racers
It was my pleasure Gary. I fully plan on enjoying my retirement. I am sure you will see a lot more here. -
1/20 Lancia Stratos Rally
Rich Chernosky replied to Rich Chernosky's topic in Other Racing: Road Racing, Salt Flat Racers
Thank you Larry -
JPS Mustang old build
Rich Chernosky replied to 4mula1fan's topic in Other Racing: Road Racing, Salt Flat Racers
I built this one too. Decals in my kit were beyond using and had to get an extra set from Patto's...the only one who made them. Its done but didn't turn out nearly as nice as yours. good job. Did you do any of the others in this series. I did em all and enjoyed it very much. -
1/20 Lancia Stratos Rally
Rich Chernosky replied to Rich Chernosky's topic in Other Racing: Road Racing, Salt Flat Racers
Josh I have actually worked physically harder since I retired. I asked the people who bought my business if they had a job opening so I could come back and rest. But seriously, it took 8yrs of trying to sell that and it was a dream come true. Now if I can only extricate myself from it completely. But keep dreaming like I did. And one day you, when you do retire, you will wake up and ask yourself what will I do today. Build models....of course...what else is there. -
1/20 Lancia Stratos Rally
Rich Chernosky replied to Rich Chernosky's topic in Other Racing: Road Racing, Salt Flat Racers
Thanks for the incentive Andy but I already have plans for the 1/12 as it will be the same as this one. When completed I will have 5 cars in the same livery but all in different scales.