RCprofile.JPG.6b95b19b856bf00a3becd6aeaaa48f3b.JPG)
Ian McLaren
-
Posts
1,360 -
Joined
-
Last visited
Content Type
Profiles
Forums
Events
Gallery
Everything posted by Ian McLaren
-
RCprofile.thumb.JPG.1691ea753d0f0897fdc1b2510cf06775.JPG)
Tom Hanna inspired front engine AA/FD build
Ian McLaren replied to GlueSniffer's topic in WIP: Drag Racing Models
Very impressive project, I have an affinity for the longer wheelbase FEDs around 200 to 215" I really like how this is going, well done! -
Project 1/16th AA/FA AND HERE IT IS!
Ian McLaren replied to Ian McLaren's topic in WIP: Drag Racing Models
Progress today, All of the aluminum panels car cut and fitted. Just need the fastener holes drilled in the panels and the plates mounted on the chassis. Then the panels will be test fitted and if that goes well, I will apply the self etching primer to make sure the paint really sticks to the aluminum as there is going to be a lot of masking required on this one. Front rotors and calipers are painted and lines fitted, just have to build a dual reservoir master cylinder. Scratch built dash is ready for paint and gauges. Most of the switches are mounted and the wiring can be completed.
-
Project 1/16th AA/FA AND HERE IT IS!
Ian McLaren replied to Ian McLaren's topic in WIP: Drag Racing Models
Small update, MSD 8142 44 Amp coil scratch built, plus built and mounted the twin parachute packs.
-
Project 1/16th AA/FA AND HERE IT IS!
Ian McLaren replied to Ian McLaren's topic in WIP: Drag Racing Models
Headers have the thermocouple holes drilled and the outer braces installed, Headers painted, engine position finalized so that the engine clears the body when it is lowered and the headers clear the body when opening. test fit of the thermocouples.
- 149 replies
-
- 1
-

-
- 1/16 scale
- supercharged
- (and 2 more)
-
Project 1/16th AA/FA AND HERE IT IS!
Ian McLaren replied to Ian McLaren's topic in WIP: Drag Racing Models
Lots of hours but not much to show for it, but progress is progress. Hours spent just getting the electronics to fit with the body fully down. Next wire the dash and get all the wires through the engine plate and to the engine, sensors and race pack up front
- 149 replies
-
- 1
-
-
- 1/16 scale
- supercharged
- (and 2 more)
-
Project 1/16th AA/FA AND HERE IT IS!
Ian McLaren replied to Ian McLaren's topic in WIP: Drag Racing Models
Well the zoomies are official. Photos show the jig I made up to build them. tube sitting in the jig with the solder sitting between the tubes. Heat the whole thing with a Butane torch and you have these.
- 149 replies
-
- 1
-
-
- 1/16 scale
- supercharged
- (and 2 more)
-
Project 1/16th AA/FA AND HERE IT IS!
Ian McLaren replied to Ian McLaren's topic in WIP: Drag Racing Models
Perhaps not that far, although not completely locked down the basic color will be pearl white, the graphics will be all pearls - Red - Orange - Yellow - Black/Gunmetal -
Project 1/16th AA/FA AND HERE IT IS!
Ian McLaren replied to Ian McLaren's topic in WIP: Drag Racing Models
Checking clearances around the engine
-
Super Gas '77 Vega--Completed! (11/12)
Ian McLaren replied to Straightliner59's topic in WIP: Drag Racing Models
The interior is coming along nicely and the cage style is very appropriate for the era, I also see the start of some wheelie bars sticking out. I've used the Eduard belt sets in a couple of aircraft, I was very impressed with them -
Looking good Art, I'll be watching your progress as I just bought a 1/16th 57 Vette kit and I'm looking for ideas as to how I'm going to proceed with it.
-
Project 1/16th AA/FA AND HERE IT IS!
Ian McLaren replied to Ian McLaren's topic in WIP: Drag Racing Models
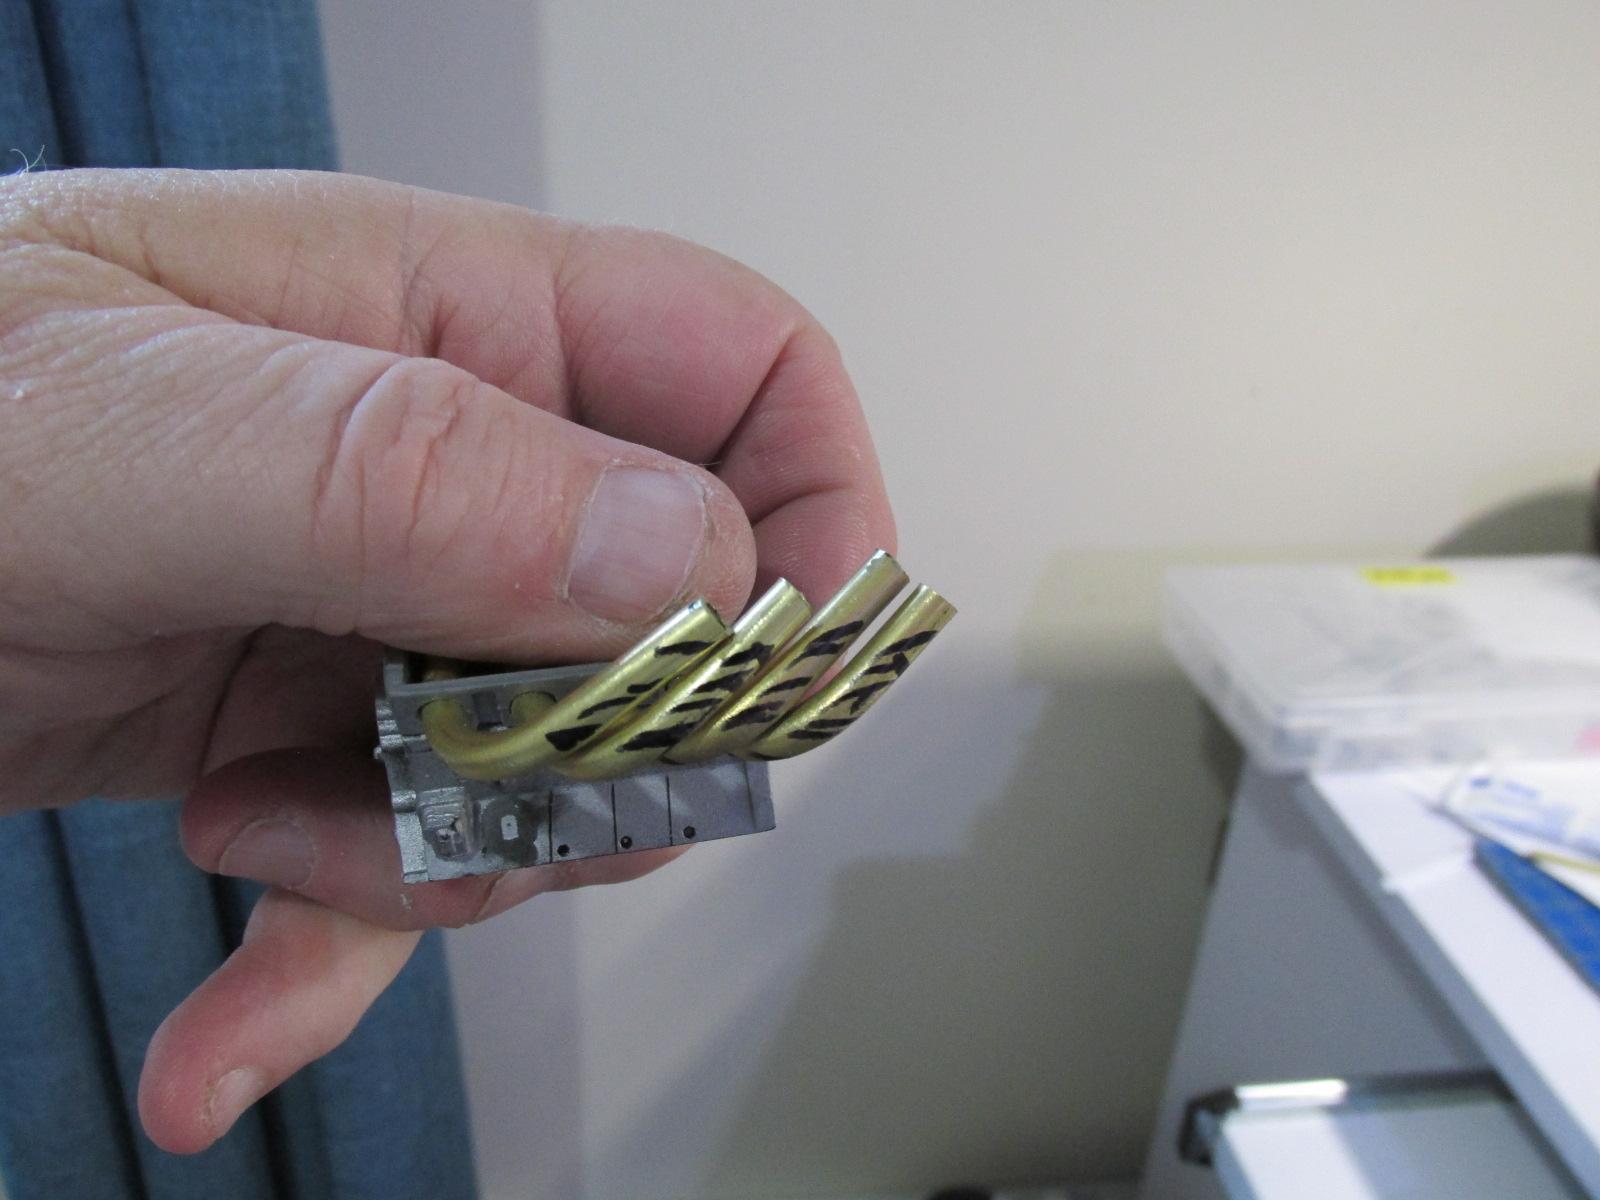
After the last set of zoomies I built I swore that I would not build another set! This thing just won't leave me alone. Every day when I think I can begin assembling parts I notice an area that just doesn't measure up to some of the things that are already started and or being finished off. Headers case in point, brass 2 1/2 inch with thermocouples than go with the electronics suite. Just nailing the lengths and radius required to clear the body side skirts
- 149 replies
-
- 1
-
-
- 1/16 scale
- supercharged
- (and 2 more)
-
Project 1/16th AA/FA AND HERE IT IS!
Ian McLaren replied to Ian McLaren's topic in WIP: Drag Racing Models
You Win!- 149 replies
-
- 1
-

-
- 1/16 scale
- supercharged
- (and 2 more)
-
Project 1/16th AA/FA AND HERE IT IS!
Ian McLaren replied to Ian McLaren's topic in WIP: Drag Racing Models
A little more progress, wheelie bar has chute net and spring completed and the front chassis tin is roughed out but can't got any further with it until the body side tins are fabricated and positively located.
-
Project 1/16th AA/FA AND HERE IT IS!
Ian McLaren replied to Ian McLaren's topic in WIP: Drag Racing Models
Small update MSD system will now fit between the chassis and the body when down. Had to thin the body and remount and rebuild the steering box, now underslung and the output shaft is on the other side. The only differentials I had were out of the Revell kits and neither the 8 3/4 or the quick change would be up to the task. Fellow modeler Dave Tolson came to the rescue with a killer 9 inch that is a direct replacement. Great work Dave!
-
1/12th Porsche 934 Vaillant
Ian McLaren replied to majel's topic in WIP: Other Racing: Road Racing, Land Speed Racers
Jim this is simply a exceptional project, great detail, use of color to accent molded detail, and a very clean building style. Very well done! -
Magnifier 1/12 Ford GT 40
Ian McLaren replied to cobraman's topic in WIP: Other Racing: Road Racing, Land Speed Racers
Everything looks very believable and has a correct look. I like what you are doing and if a couple of hoses are not routed correct it does not take away from the model from an esthetics point of view. -
1/8 Scale Lotus 72c -3d Printed
Ian McLaren replied to kenlwest's topic in WIP: Other Racing: Road Racing, Land Speed Racers
Very impressive project, everything looks very good. Well done. -
Great update, your really bringing back memories with leaf springs and Lakewood bars deal. Did I miss something, l don't see reference to the rear leaf springs.
-
Project 1/16th AA/FA AND HERE IT IS!
Ian McLaren replied to Ian McLaren's topic in WIP: Drag Racing Models
Very preliminary mock up of the MSD Power Grid Module controller circuit. All of the major components of a basic system are represented. Now detail each box and add wiring plus upgrade or replace mounting plate and add the master on off switch in the right rear corner of the plate. Added some color to give a better representation of its final look none of this pieces will end up in the final assembly this piece was to simply check clearances and it did require a lot of reworking not only to this assembly but also the body, driveline and also the steering gear. Getting a low ride height does require careful packaging of the mechanicals
-
Super Gas '77 Vega--Completed! (11/12)
Ian McLaren replied to Straightliner59's topic in WIP: Drag Racing Models
That's a trick I just learned while doing the cowl on the FED, a while being in the acetone loosens the part, two hours and the glue is completely gone, no residue. Doesn't work nearly as good on plastic though. -
Super Gas '77 Vega--Completed! (11/12)
Ian McLaren replied to Straightliner59's topic in WIP: Drag Racing Models
I'm liking the shifter, and the slicks. Looking forward to the next update. -
Project 1/16th AA/FA AND HERE IT IS!
Ian McLaren replied to Ian McLaren's topic in WIP: Drag Racing Models
Thank you David, I'm glad you liked the slightly different format this project has been presented in. But wait there's more. -
Project 1/16th AA/FA AND HERE IT IS!
Ian McLaren replied to Ian McLaren's topic in WIP: Drag Racing Models
It's good to hear from you Francis! Yes this project has had its share of changes a lot of which I would not normally show but I thought it might be of some interest to show how these things evolve. It started as a quick basic shelf filler but it has now taken on a life of its own and kind of captured my imagination. I'm still not completely sure where it is going but I am enjoying the ride. Thanks for the kind words and I am looking forward to seeing you back on the bench. -
Project 1/16th AA/FA AND HERE IT IS!
Ian McLaren replied to Ian McLaren's topic in WIP: Drag Racing Models
Next part of the evolution, just showing the basic framework of the wheelie bar, scratch built and back to brass as it has properties plastic just can't duplicate, details to be added late on.
-
Project 1/16th AA/FA AND HERE IT IS!
Ian McLaren replied to Ian McLaren's topic in WIP: Drag Racing Models
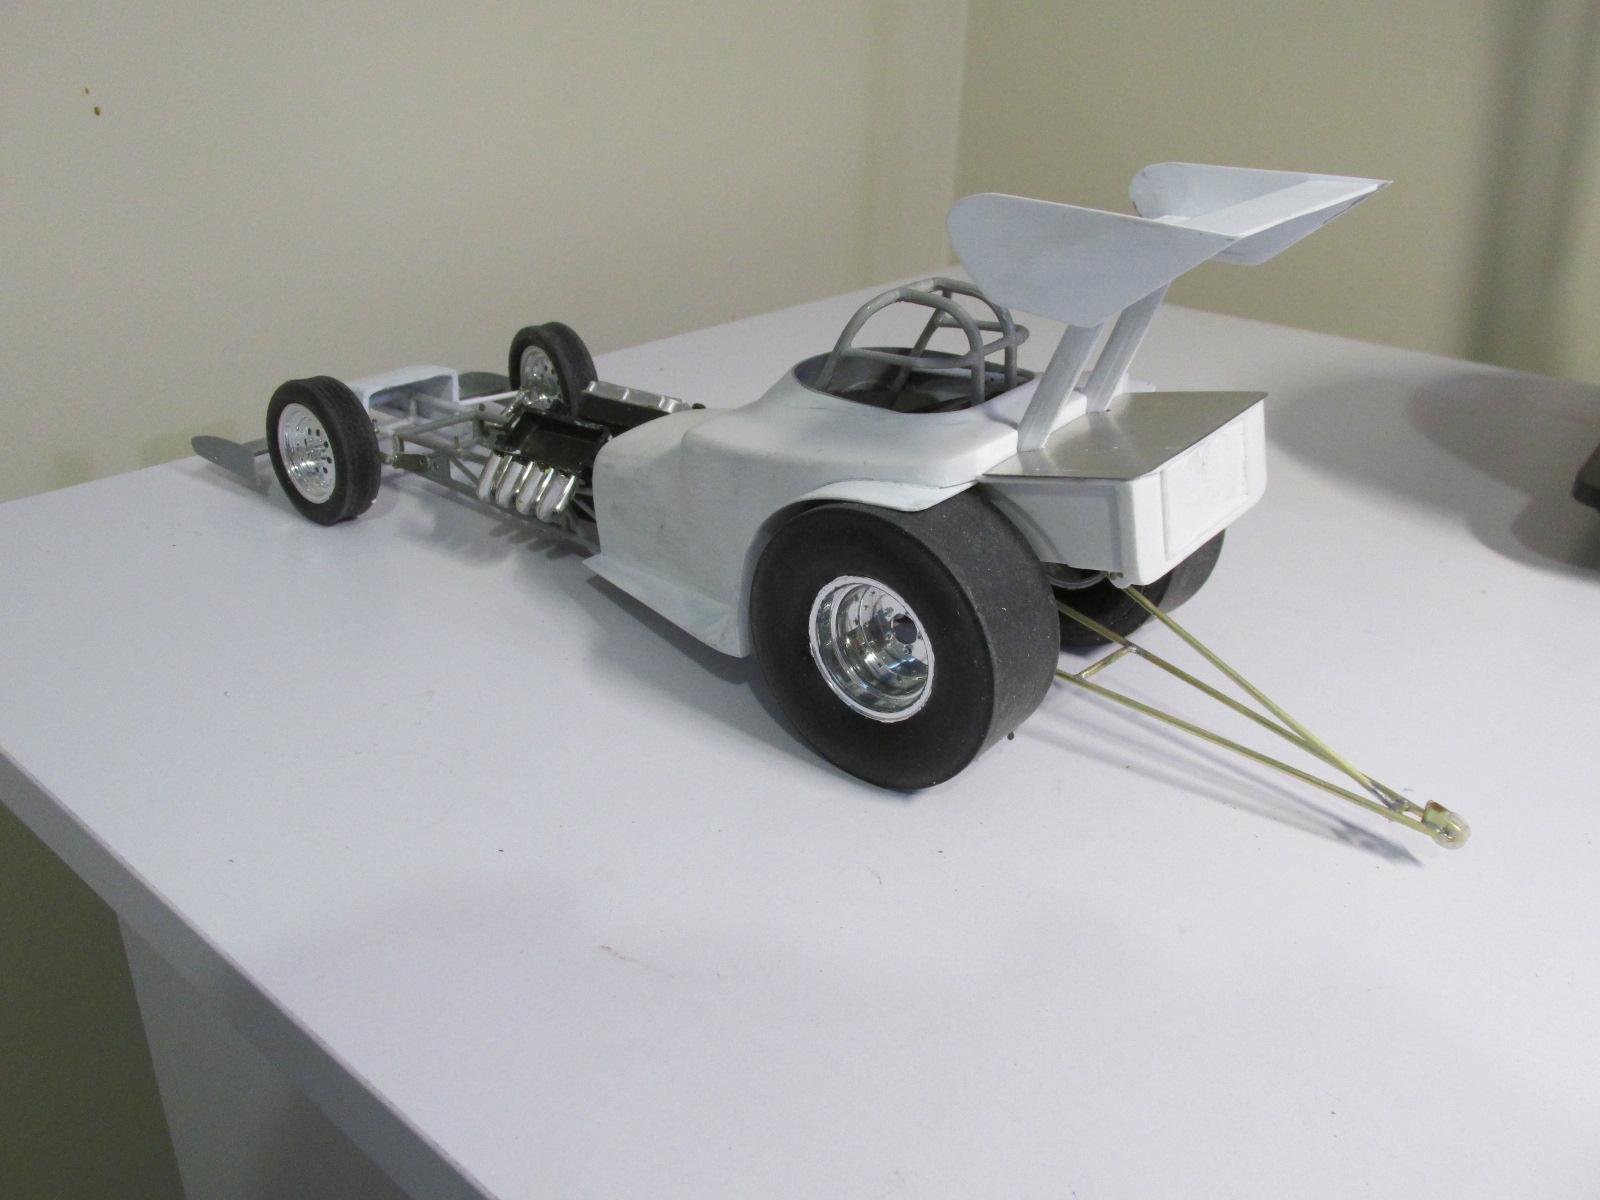
Thank you Kelly glad you like it, there lots more to come. The 14-71 came from Ted's Modeling Marketplace, the hat came from Competition Resins, and the injector lines are out of the Atlantis Green Elephant kit, but may very well be replaced with stainless lines and brass fittings further down the road.
.JPG.384cde42844b709b71e40fbd48e9d73e.JPG)
.JPG.6264701a50c2fdda34799f8720766b3a.JPG)
.JPG.54efe0bf179a8115d4d3e14bcade7f2b.JPG)
.JPG.1b0cd87e0dd1dd91be111238d85dddb2.JPG)
.JPG.c19deeb53821c711b8bc0c20634f6034.JPG)
.JPG.3d84656bc7fce62f339548d2ae70cf81.JPG)

.JPG.79ace040b184995f0bd6e9a170534abb.JPG)
.JPG.546e3af039b7ae1c5ef144eb95cc7fe4.JPG)
.JPG.90d72847eb91c775c53be4d1ddc71cb2.JPG)
.JPG.5a88cfa5fcd9a9145c9cfe5cbe2efa9f.JPG)
.JPG.4900122674ac92e0bd157e39684697b0.JPG)
.JPG.56376f53d7ffdfacece12871e390ed49.JPG)
.JPG.a2c6d00d67389488caa8714db1d5e0dc.JPG)
.JPG.d9a579f1643175b646080434b6fcd4ec.JPG)
.JPG.9649c8f7f5cf3f244ea8598086389b9f.JPG)
.JPG.5fed54c4a7489a845ba1c64bc926d31d.JPG)
.JPG.2eee9ac5a669dca5a9773ed54b0f4bca.JPG)
.JPG.ba4a2557d9d1507b3219beac91e1718c.JPG)
.JPG.764ea4b5e8b379ed75da7bd53e7fac0e.JPG)
.JPG.f6f4cb3d9fc3fdcfbef008638efdcdbe.JPG)
.JPG.373e6d30e406490fcb0eee035641fe2d.JPG)
.JPG.56daa6faebe85e528ccb0c382270d1c5.JPG)
.JPG.7e23d5d5f88cd1f020cbb1cc1727e915.JPG)


.JPG.7ea9c217cd364a1dc53bae2ef615ea02.JPG)
.JPG.24ae23c85901bebbf4d6fbce9213e106.JPG)
.JPG.145feaf9ad72b4df891ac3225f09b65f.JPG)