Pete75
-
Posts
538 -
Joined
-
Last visited
Content Type
Profiles
Forums
Events
Gallery
Everything posted by Pete75
-
Thanks! Indeed, after years of messing around with card that wobbles when breathed on, it's nice to feel rigidity! The brick is printed on adhesive-backed vinyl and was bought from walker-model-supplies@ebay, uk.
-
Got the door painted & fixed in place, plus I secured the tyre rack and its contents in position. (I went with double-sided tape). I got some self-adhesive floor markings (allscale.diorama@ebay, uk) for added colour/depth. I checked UK regulations and, allowing for furniture, made sure the perimeter walkway complies (to scale) with the 800mm minimum! You can see that I also added some scratch built electrical sockets and a light switch. They were made from plasticard, with electrical wire for the conduits: More small stuff is being accrued. I painted some 3DP Jerrycans and a fire bucket. For the latter, I added sand by gluing embossing powder to a styrene disc, then spraying them with my newly-purposed tan interior paints! I made the fire extinguisher by cutting a section of a plastic pipette and filling it with Green Stuff; this also allowed me to shape the tapered top section. The handle and nozzle were fashioned from styrene, while the hose is electrical wire. Lastly, I added some random safety-looking decals from the parts bin. The sign (leftover from my collapsible dio setup) is printed on matt vinyl, so I mounted it on thin plasticard and laminated it to make it look more glossy and "official": And that's us up to date, for now. Thanks for looking.

-
Whilst working on the main structure, I simultaneously started on the small bits. The garage will be populated by a 50/50 mix of scratch built items and 3D printed stuff from eBay. The first thing I built was a tyre rack, because it's relatively simple and it will make use of some parts bin wheels! After researching some designs online and noting their 1:1 dimensions, I just divided everything by 24 and got busy with the Evergreen styrene. My first furniture effort, like the dio structure itself, is substantial and not likely to blow away in a breeze! Additionally, as with my car builds, I got a little carried away with panel wash & weathering powder, so the end result is quite... industrial! Next I decided to buy a 3DP single roller door and some oil drums (from scalemodllersg & 3dprinting corner, respectively, @ ebay, uk). My rationale for deciding to purchase items is, if would take too long, and take too much effort to make, then why not just get it cheaply-ready-made and paint it? Anyhow, before overloading my shopping basket, I thought I'd better find something else that I could build without too much stress. I selected a workbench. For this one, I found one for sale and literally copied the design & dimensions: With the Evergreen angle strips & some plasticard I had a go at making my own kit: It took some thought as to how to get it painted and assembled. I decided to pre-paint, then carefully glue. The finish on the "chipboard" gave me particular pleasure because I blended two cans of unused paint I bought ages ago when trying to find the right colour for a leather interior. They were good for something after all! The finished result ended up being somewhat more "used" than the reference photo, but perhaps less-so than the 3DP sack truck, which I subsequently acquired & painted. The bucket was also bought, but I did make the cloth out of Green Stuff. I finally got the floor paint to play ball using Polyfilla, rather than wood filler, but probably it had more to do with letting everything completely dry overnight between stages. Anyhow, with the furniture starting to take shape, it was time to start moving pieces around and looking through a camera lens to see if my mental design was going to work. After a couple of tweaks, I settled on the basic layout below. (Note, I also purchased a 3DP rolling tool chest): Time for a rest now. One more post should bring us up to date. Thanks for looking. More shortly...
-
Thanks Scot. Good to have you along. Any pics of your own project very welcome here!
-
I thought I'd document my first diorama build for anyone else thinking of doing something similar, plus I'll be pleased to get feedback/tips from those with more experience. I'm currently past the midway point in the project, so I'll do a couple of quick posts to catch up. The aim is to build a small garage backdrop for photographing my 1/24 scale kit builds and die-casts. Space restrictions mean that any photo setups have to be temporary/mobile. Until now I've used white paper/vinyl, and also made an A4 size collapsible cardboard dio, neither of which have proved much fun to set up and work with. I need something solid/fixed to drop my models in, illuminate, photograph, then it needs to be portable, durable, and easy to store. Experience from using my temporary dio showed me that I only need a floor and two walls/one corner - turns out three walls are a hindrance to photo angles and light. I then took some time with my phone camera, cardboard walls & a model car to establish the minimum dimensions that would enable one car to be photographed comfortably: i.e., not having to worry about wall edges yet not using any excess real estate. I calculated the optimal interior dimensions as: 295mm long, 255mm wide, and 155mm high. I got some construction ideas from LIFE_in_118_SCALE@YouTube, a channel which has inspired me to start designing a diorama for my 1/18 die-casts, but the project has given way to this smaller one to begin with. I'm already glad! Starting with a solid foundation: the floor is 12mm plywood stuck with wood glue to a mitred baton frame that will help bolster the walls. (After years of my flimsy cardboard walls falling over, I'm making sure this structure isn't going anywhere!) The floor is then painted with primer/undercoat, then some grey floor paint from the shed. (Painting actually caused the cheap, old plywood I'm using to blister, so for future projects I'll be investing in something better - maybe birch ply?) Whilst trying to repair the blistering plywood, I glued the walls to the base and braced all the joints with stripwood. It is essentially bombproof! The floor was proving to be a pain, and the blisters kept coming back after being repaired twice. I kind of gave up on the floor paint idea and ordered some printed self-adhesive vinyl from the same source as the brick wall covering I had chosen (walker-model-supplies@ebay.co.uk). However, once I looked at the pictures from my mock-up I found that I preferred the look of the paint, even when all scuffed up from sanding! I returned to the repairs knowing that the finish wouldn't have to perfect; after all, my intention is to build a slightly grimey workshop rather than a showroom. Thanks for looking. Comments & questions welcome. To be continued, shortly...
-
Lovely Porsche. Great work!
-
Stunning work. A real beauty!
-
Nissan R91CP (Hasegawa, 1/24 scale)
Pete75 replied to Tommy124's topic in Other Racing: Road Racing, Salt Flat Racers
Highly realistic. Great job! -
Nice one. Will enjoy following. Personally, I love the pepper pot wheels - they sort of feel like a signature element - but I look forward to seeing your vision realised. I'm hoping the red pinstripe will be staying?
-
Kermit My AMT Chevy Truck
Pete75 replied to oldcarfan's topic in Model Trucks: Pickups, Vans, SUVs, Light Commercial
Beautiful build - looks awesome. Love the diorama too! -
Love it. That's a heck of a lot of work there, and going the extra mile (or two!) really paid off. Well done!
-
Nice. Will keep an eye on this, as it's in the stash!
-
Tamiya Renault Alpine 110 Monte Carlo 1971
Pete75 replied to PatW's topic in Other Racing: Road Racing, Salt Flat Racers
Very nice indeed! -
Beautiful subject. Looking great!
-
Amazing detailed work. Will enjoy watching!
-
Excellent tip. Thanks!
-
Nice work. I really love that interior detailing. Is that painted-over embossing powder painted for the carpet? Great effect!
-
Excellent work. First rate. Must confess, the subject is new one on me - good to broaden one's horizons! The front end reminds me of a Fiat X19 and a Toyota MR2. Don't know what "influenced" what?!
-
Single drive crackerbox
Pete75 replied to 53gmc's topic in Model Trucks: Big Rigs and Heavy Equipment
Looks great! -
Beautiful work. Love it!
-
Nice looking kit this. My favourite era of Range Rover too. Interior detailing looking sweet. I think you chose the right colour in the end. I'm no expert, but I do have a fair amount of experience with Tamiya TS-13 clear coat... and fixing problems with it! My vote - if you have the time and/or energy - would be to sand the bulk of the orange peel out with, say 800/1500 grit. You'd probably touch the colour coat here and there, but be slow & careful. Finish off with, say, 2000 and clean-up well. Then do the clear again - 3 light coats (TS-13 loves to run if applied to heavily). I normally wait a week, then sand & polish starting at 1500 grit. Of course, you may just be sick of the sight of it and just wanna have done with it!
-
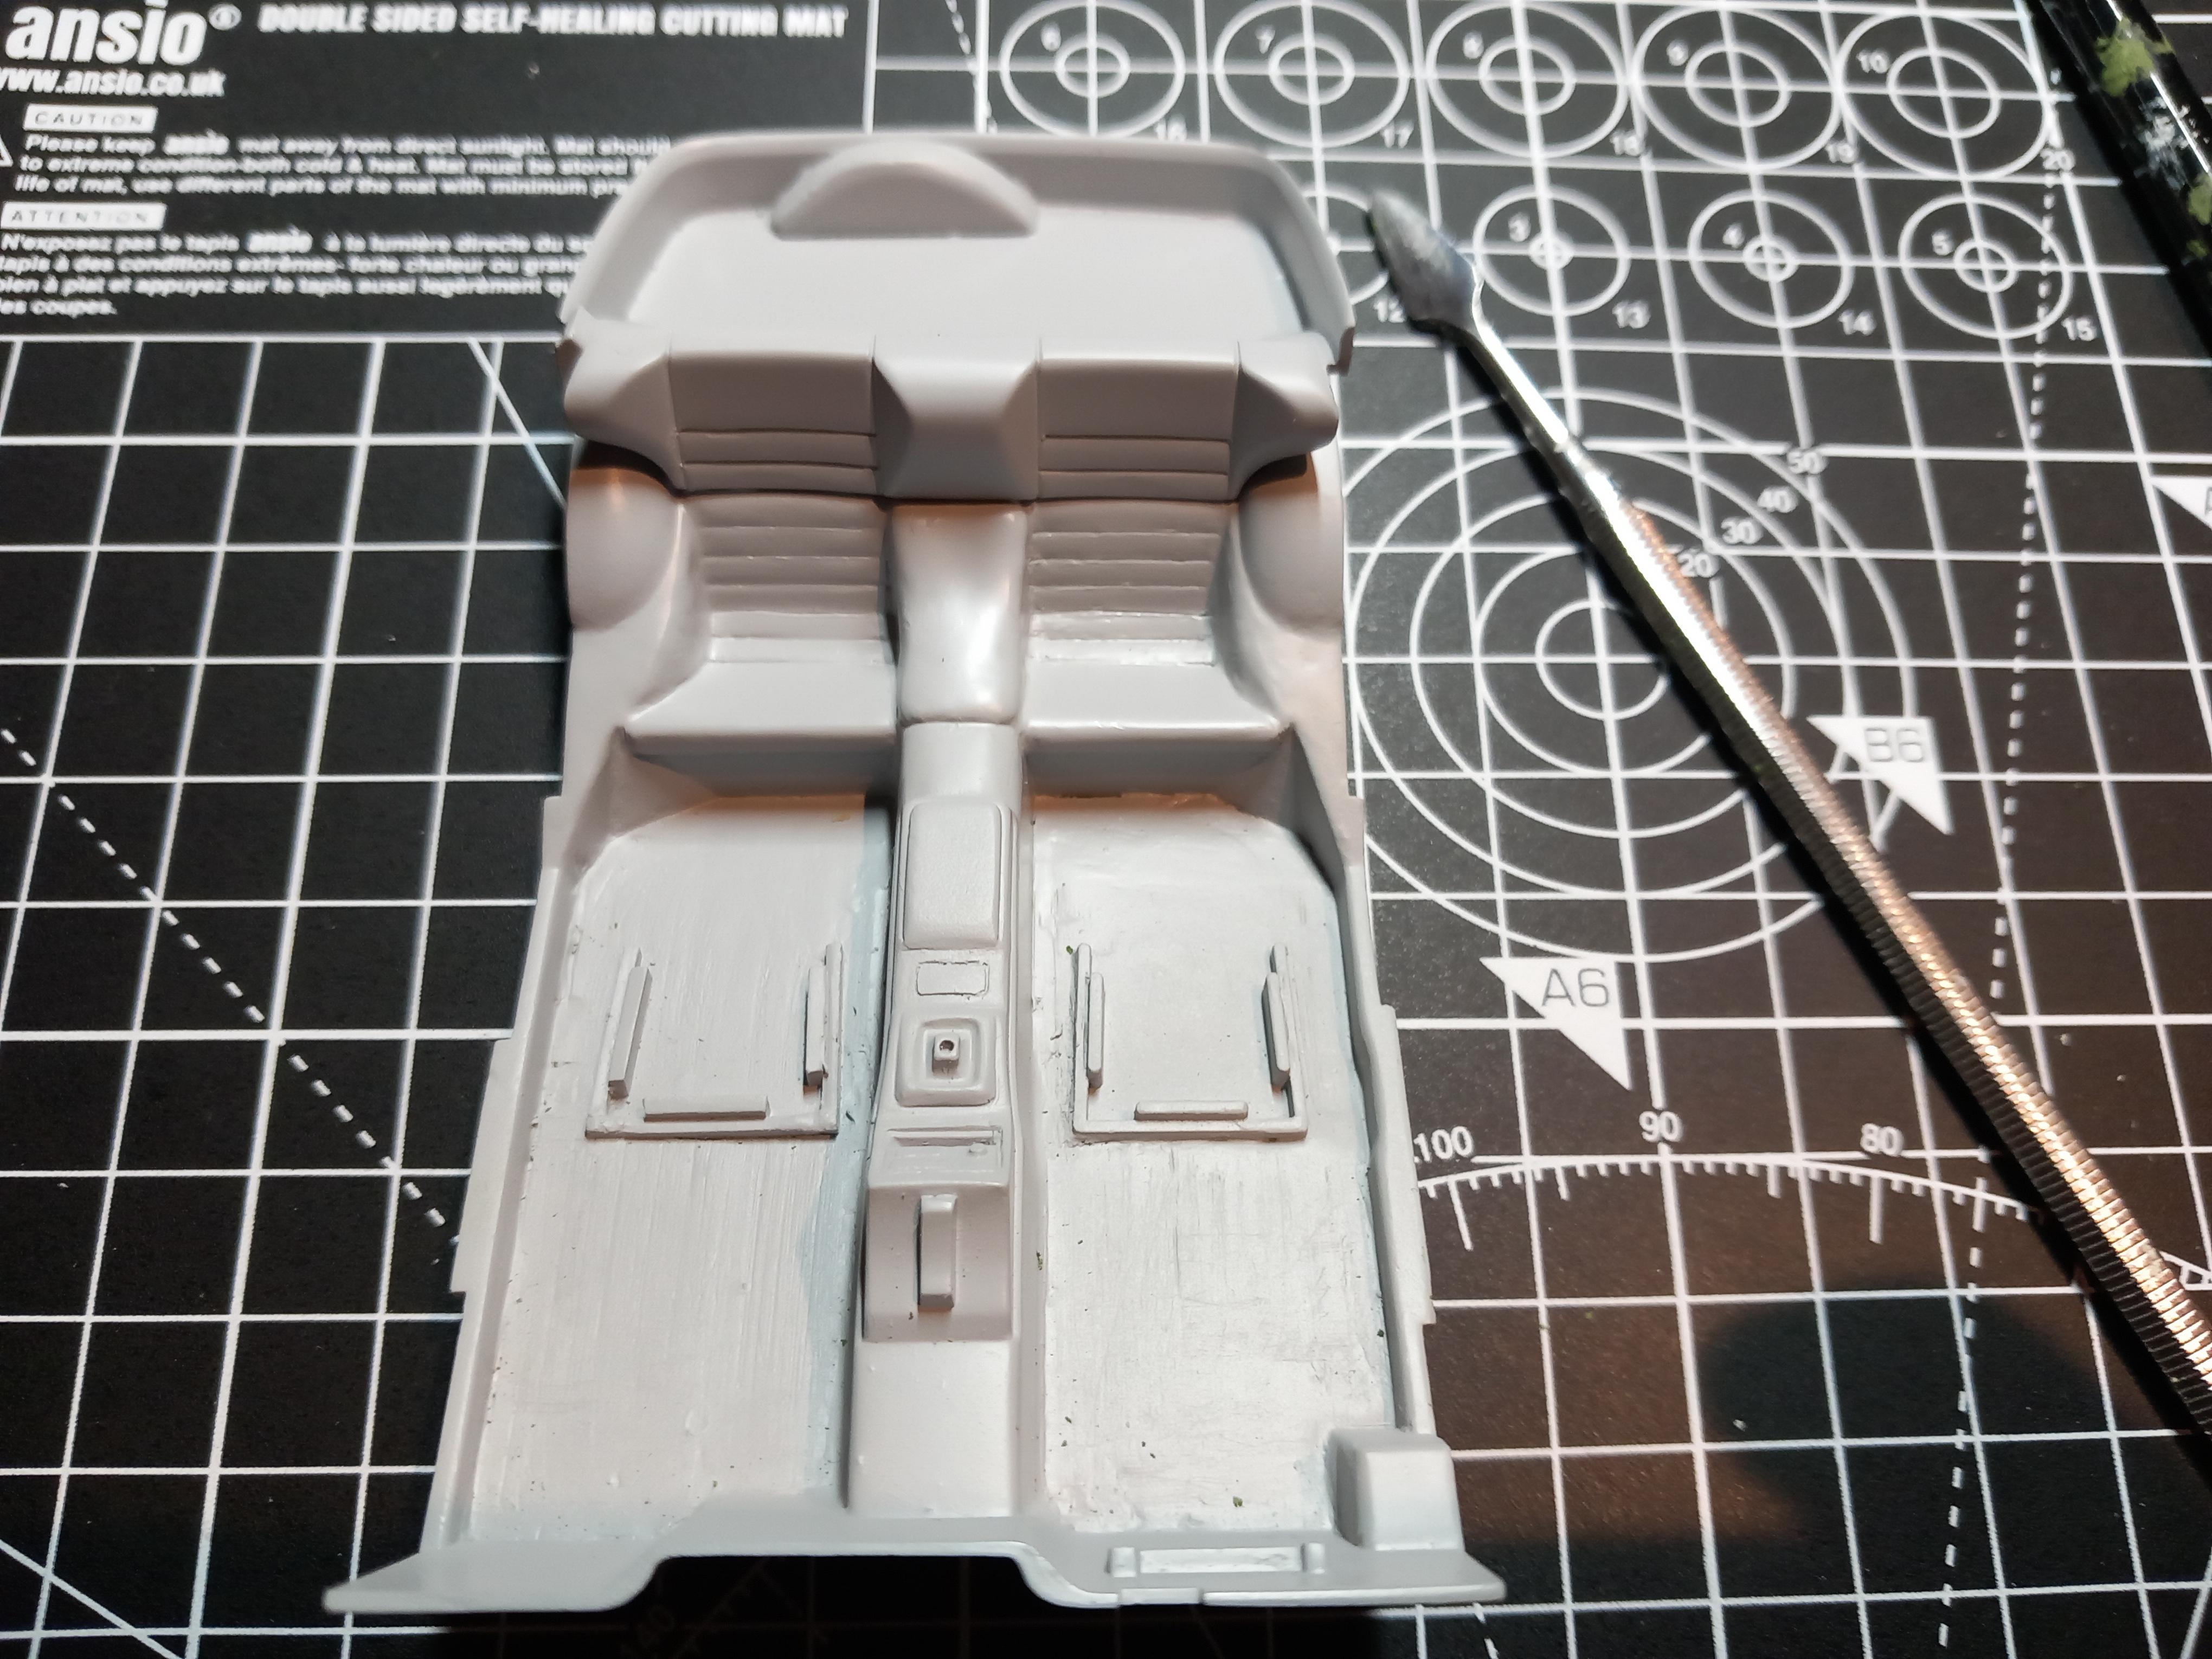
OK. Got the primer on, and was very pleased with the contours until I noticed the bolster cushion was several scale inches short! It should come to the line of the seat, so it was back to the putty... I am now a devotee of Green Stuff. As long as your not in a hurry it is almost idiot proof... luckily! Considering this is the back seat of a closed door coupe with an all black interior, I'm saying good enough! Scale modelling, when I do it, often feels like firefighting a string of mishaps. While the styrene gods can often seem angry, I just wanted to share a moment of serendipity. It goes like this... First, in the year since I painted the tele-dial wheels, I've been bugged by the fact that the ancient, tiny, centre cap decals fell to pieces. Additionally, the dashboard decal looked like it had faded beyond all recognition, and the options for finding replacements weren't only marginally more appealing than omitting the decals altogether. Finally, the kit-supplied, slick, track tyres were not only not road legal, but looked lame on account of being too narrow... Then, in a matter of minutes the other night, I discovered (in my pretty modest parts bin) I have a set of tyres from a BMW that fit nicely, plus a four mint condition hubcap decals leftover. Furthermore, it turns out that the dashboard instrument decal looked faded because it was the reverse side showing, and that the kit requires sticking it to the back of a supplied binnacle lens. This part was is not wholly clear in the instructions, so it was a pleasant surprise, but the miraculous part is that, despite it falling to pieces and having the texture of wet sand, I just about manged to piece it together for a save! Sometimes it's the small things that make us happiest!!
-
Nice! A Milliput seat, cool. How did you do the piping & strap?
-
Fujimi Fina McLaren F1 GTR Long Tail
Pete75 replied to Nacho Z's topic in WIP: Other Racing: Road Racing, Land Speed Racers
Looking great. Nice to know I'm not alone in touching up decals with paint! -
Great setup there, Anton. It's given me an idea for my own project. I must say, your figure painting is brilliant!

.jpg.c8b89b42767962c6c1de05b60f48f586.jpg)
.jpg.15b94757a5ced835a94ad58a15794a9e.jpg)
.jpg.9094765b7bb9aaa73b732607c88ed78c.jpg)
.jpg.3b8c2eab72610fb8726fca5adf4d6833.jpg)
.jpg.6be19fa38f40ec13d8861aceedc53e5c.jpg)
-side-down.jpg.07ebc82d31a7c0a4d2a6c25f100e0f42.jpg)
.jpg.f7a8ddc2bd6f29be0d439fc59e75c774.jpg)
.jpg.3f744d9504b176533abb094aba912f4c.jpg)
.jpg.6766e01fc6ceb89fa91c5cce3d8c7ba8.jpg)
.jpg.a0b16a60c46aba4de40399e7e9899016.jpg)
-tile.jpg.4677a4c5c6cfa150f6c30bd71ba68928.jpg)