Pete75
-
Posts
538 -
Joined
-
Last visited
Content Type
Profiles
Forums
Events
Gallery
Everything posted by Pete75
-
Love it. Great detailing. And room to put your luggage in the engine bay!?
-
Super job! Looks great in that colour. Look forward to building mine & will be using your build thread for tips!
-
Thanks very much, Chang! ?
-
'Blue Bird' 1935 1:18 scale
Pete75 replied to FURBALL's topic in WIP: Other Racing: Road Racing, Land Speed Racers
Wow - the future of modelling has arrived! Great work & an interesting niche. For me the Bluebird CN7 is the image that springs to mind when I think LSR, but perhaps only because being taken to see it at Beaulieu is among my earliest memories. Thrust 2 was the first active contender I was aware of. I suspect it wins the closest resemblance to a Star Wars prop award! I like how looks exactly like what it is: a jet engine strapped to a trolley!?
-
Thanks very much, Atin! How's the Testarossa progressing? (I've become a bit of a devotee of this particular prancing horse recently) ? Thanks, Dann - you're too kind!
-
The ultimate scale modelling compliment - thanks!?
-
Thanks Terry! I think I know how he felt! ? After some caveman-esque wrestling with my DSLR the other night I thought I'd add this. More experimentation needed, but ok as a first effort:
-
Wow, those are some real American beauties there! Just went through your WIP thread to find out how you did all your excellent bright work. Love the trick of flat clear coating the kit chrome - definitely going to use that one; as for the BMF, I'm going to have to take classes as I can't even peel it off the backing right!! 100% agree with the horizontal-only-lines on the grill. ?
-
Thanks Gareth! Wow, you guys were lucky - and white was definitiely a great colour choice. I think I read they only ever made 11,000, so I guess it's unsurprising you don't see many today. ?
-
Cheers Carl! ?
-
"Looks like a case of drugs AND girls!" ?? Seriously, though, looking cool, Pat! ?
-
Thanks Bruce! Cool truck - think it might be riding a tad high, though? ? Thanks Anthony, you're very kind! ?. I got a lot of satisfaction & new tricks out of this year's build ?
-
Thanks for checking out the detail! ? Cheers Anders, you're very kind ? Appreciate it - thanks! ?
-
Thank you all guys - appreciate it! ? Cheers Nigel! I found the photo of your Tamiya build really useful for reference ?
-
Thanks Bill & Kurt - appreciate it! ?
-
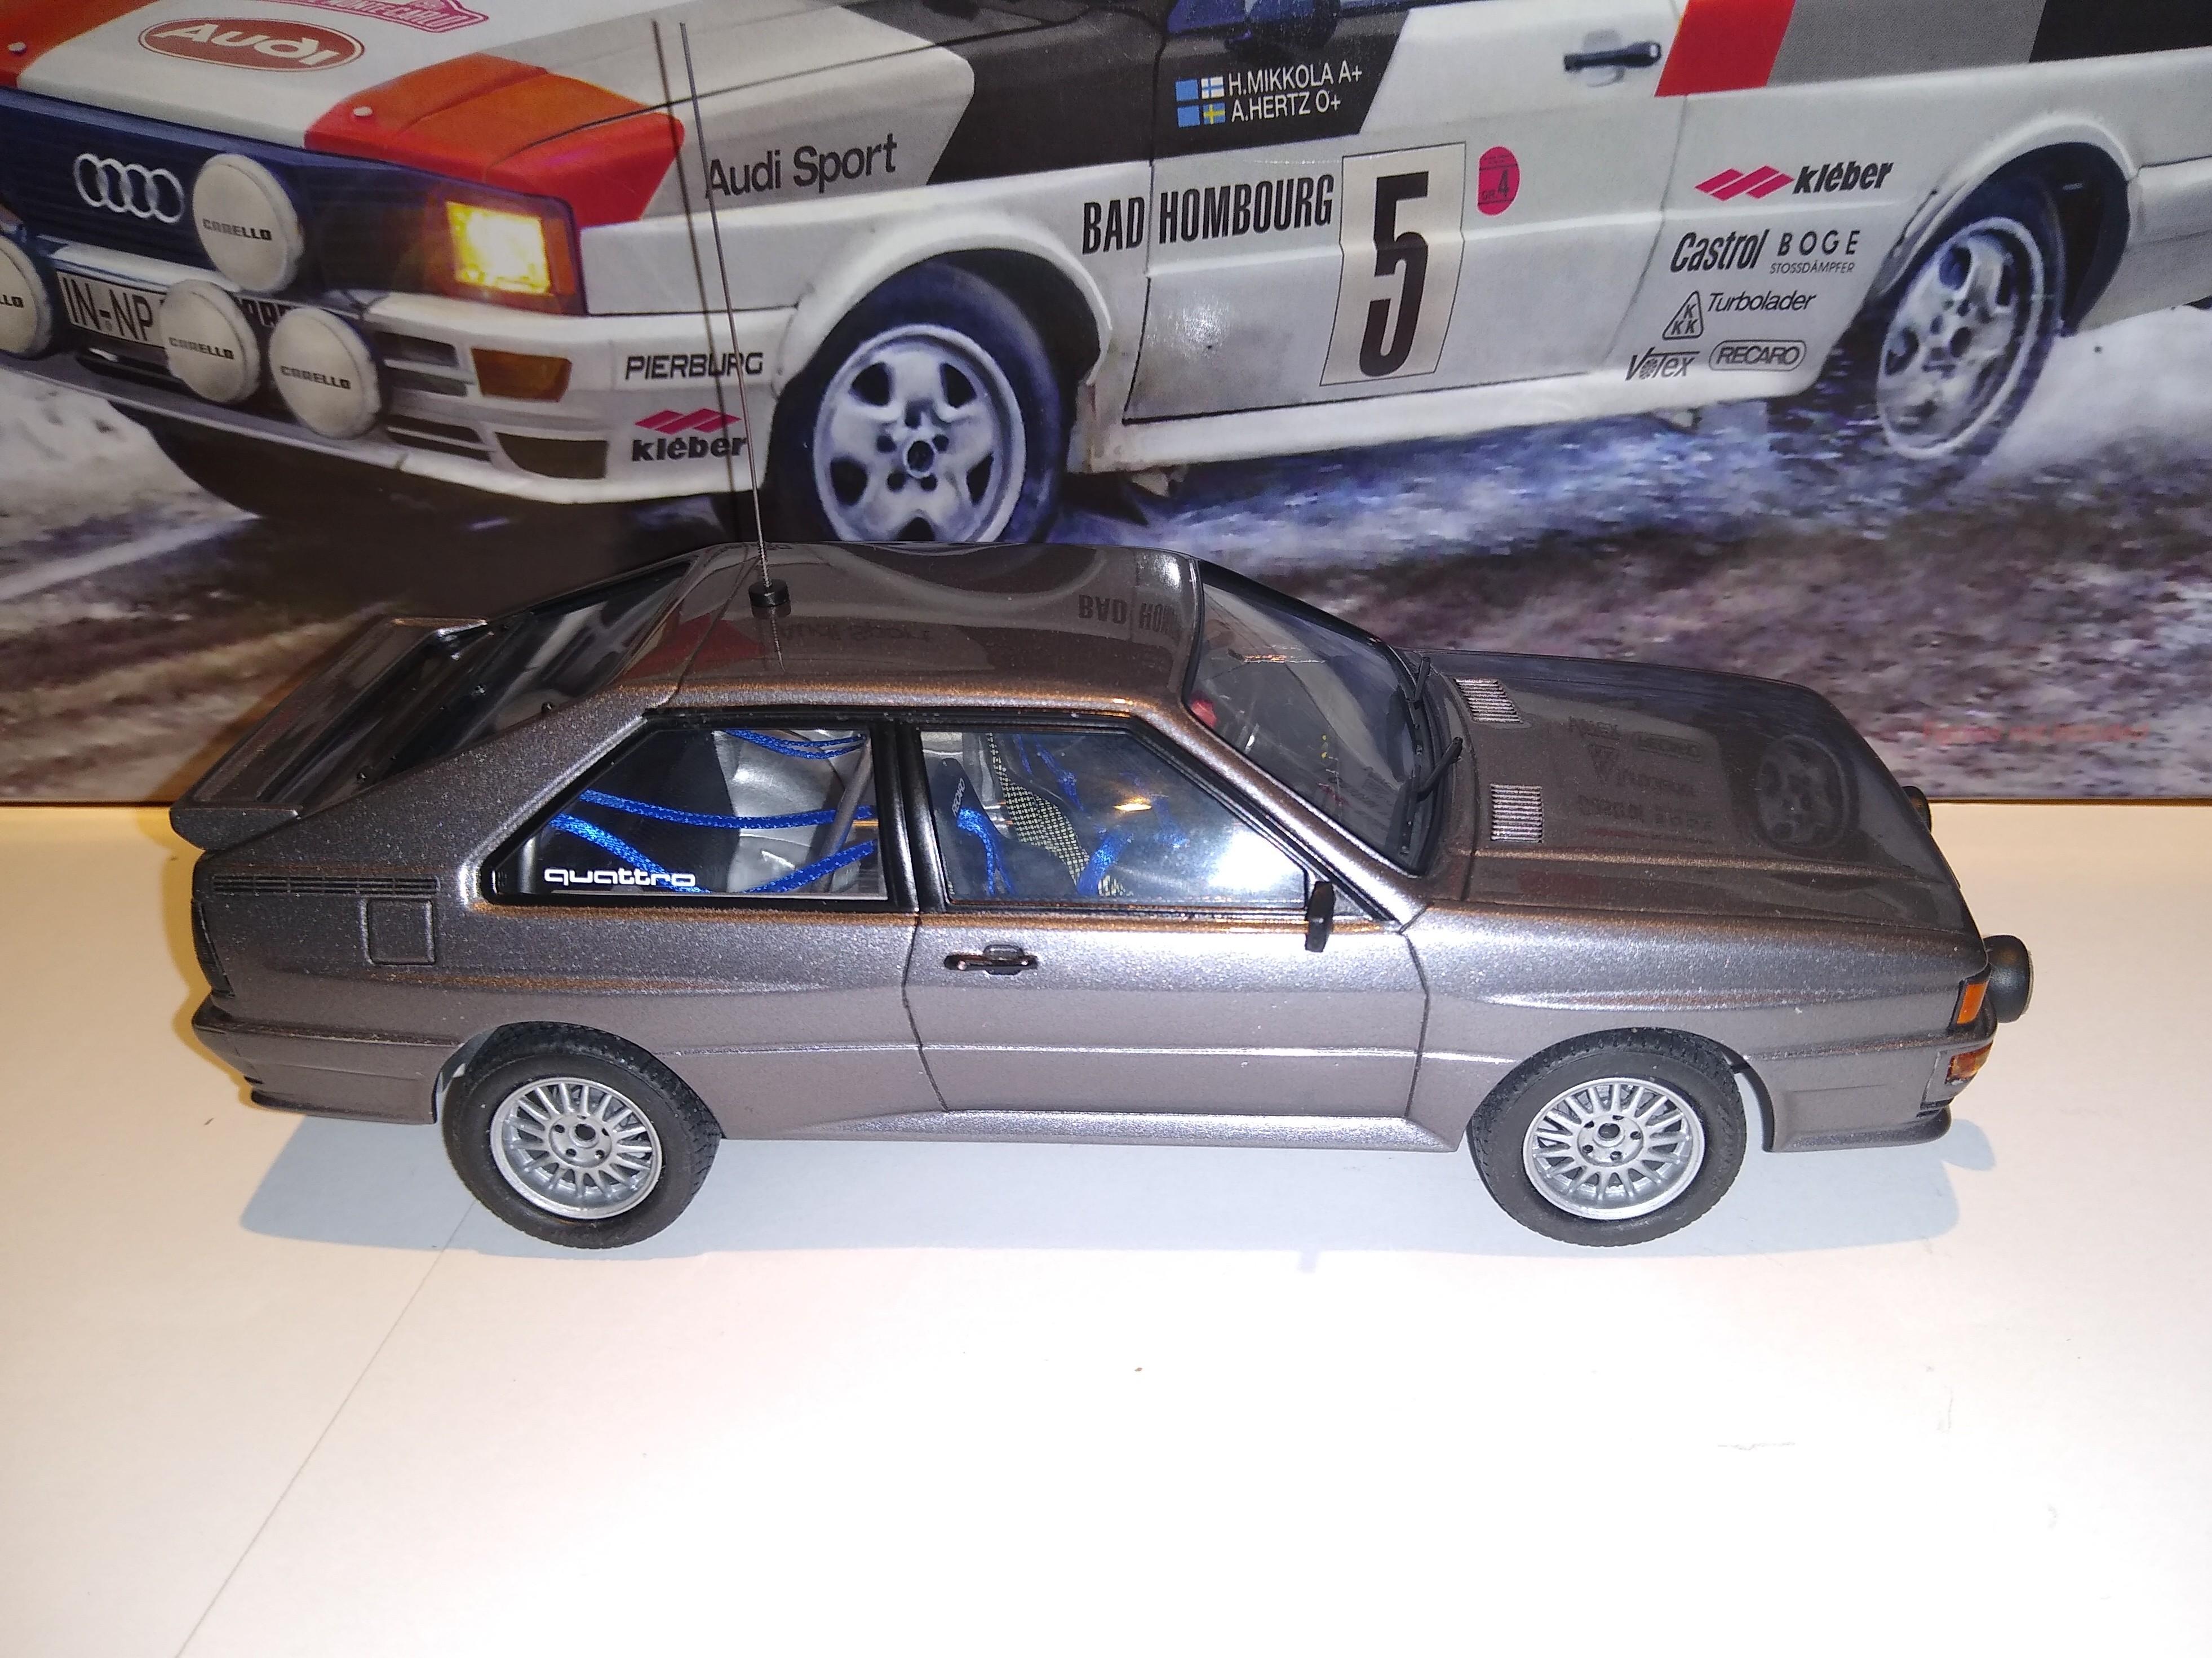
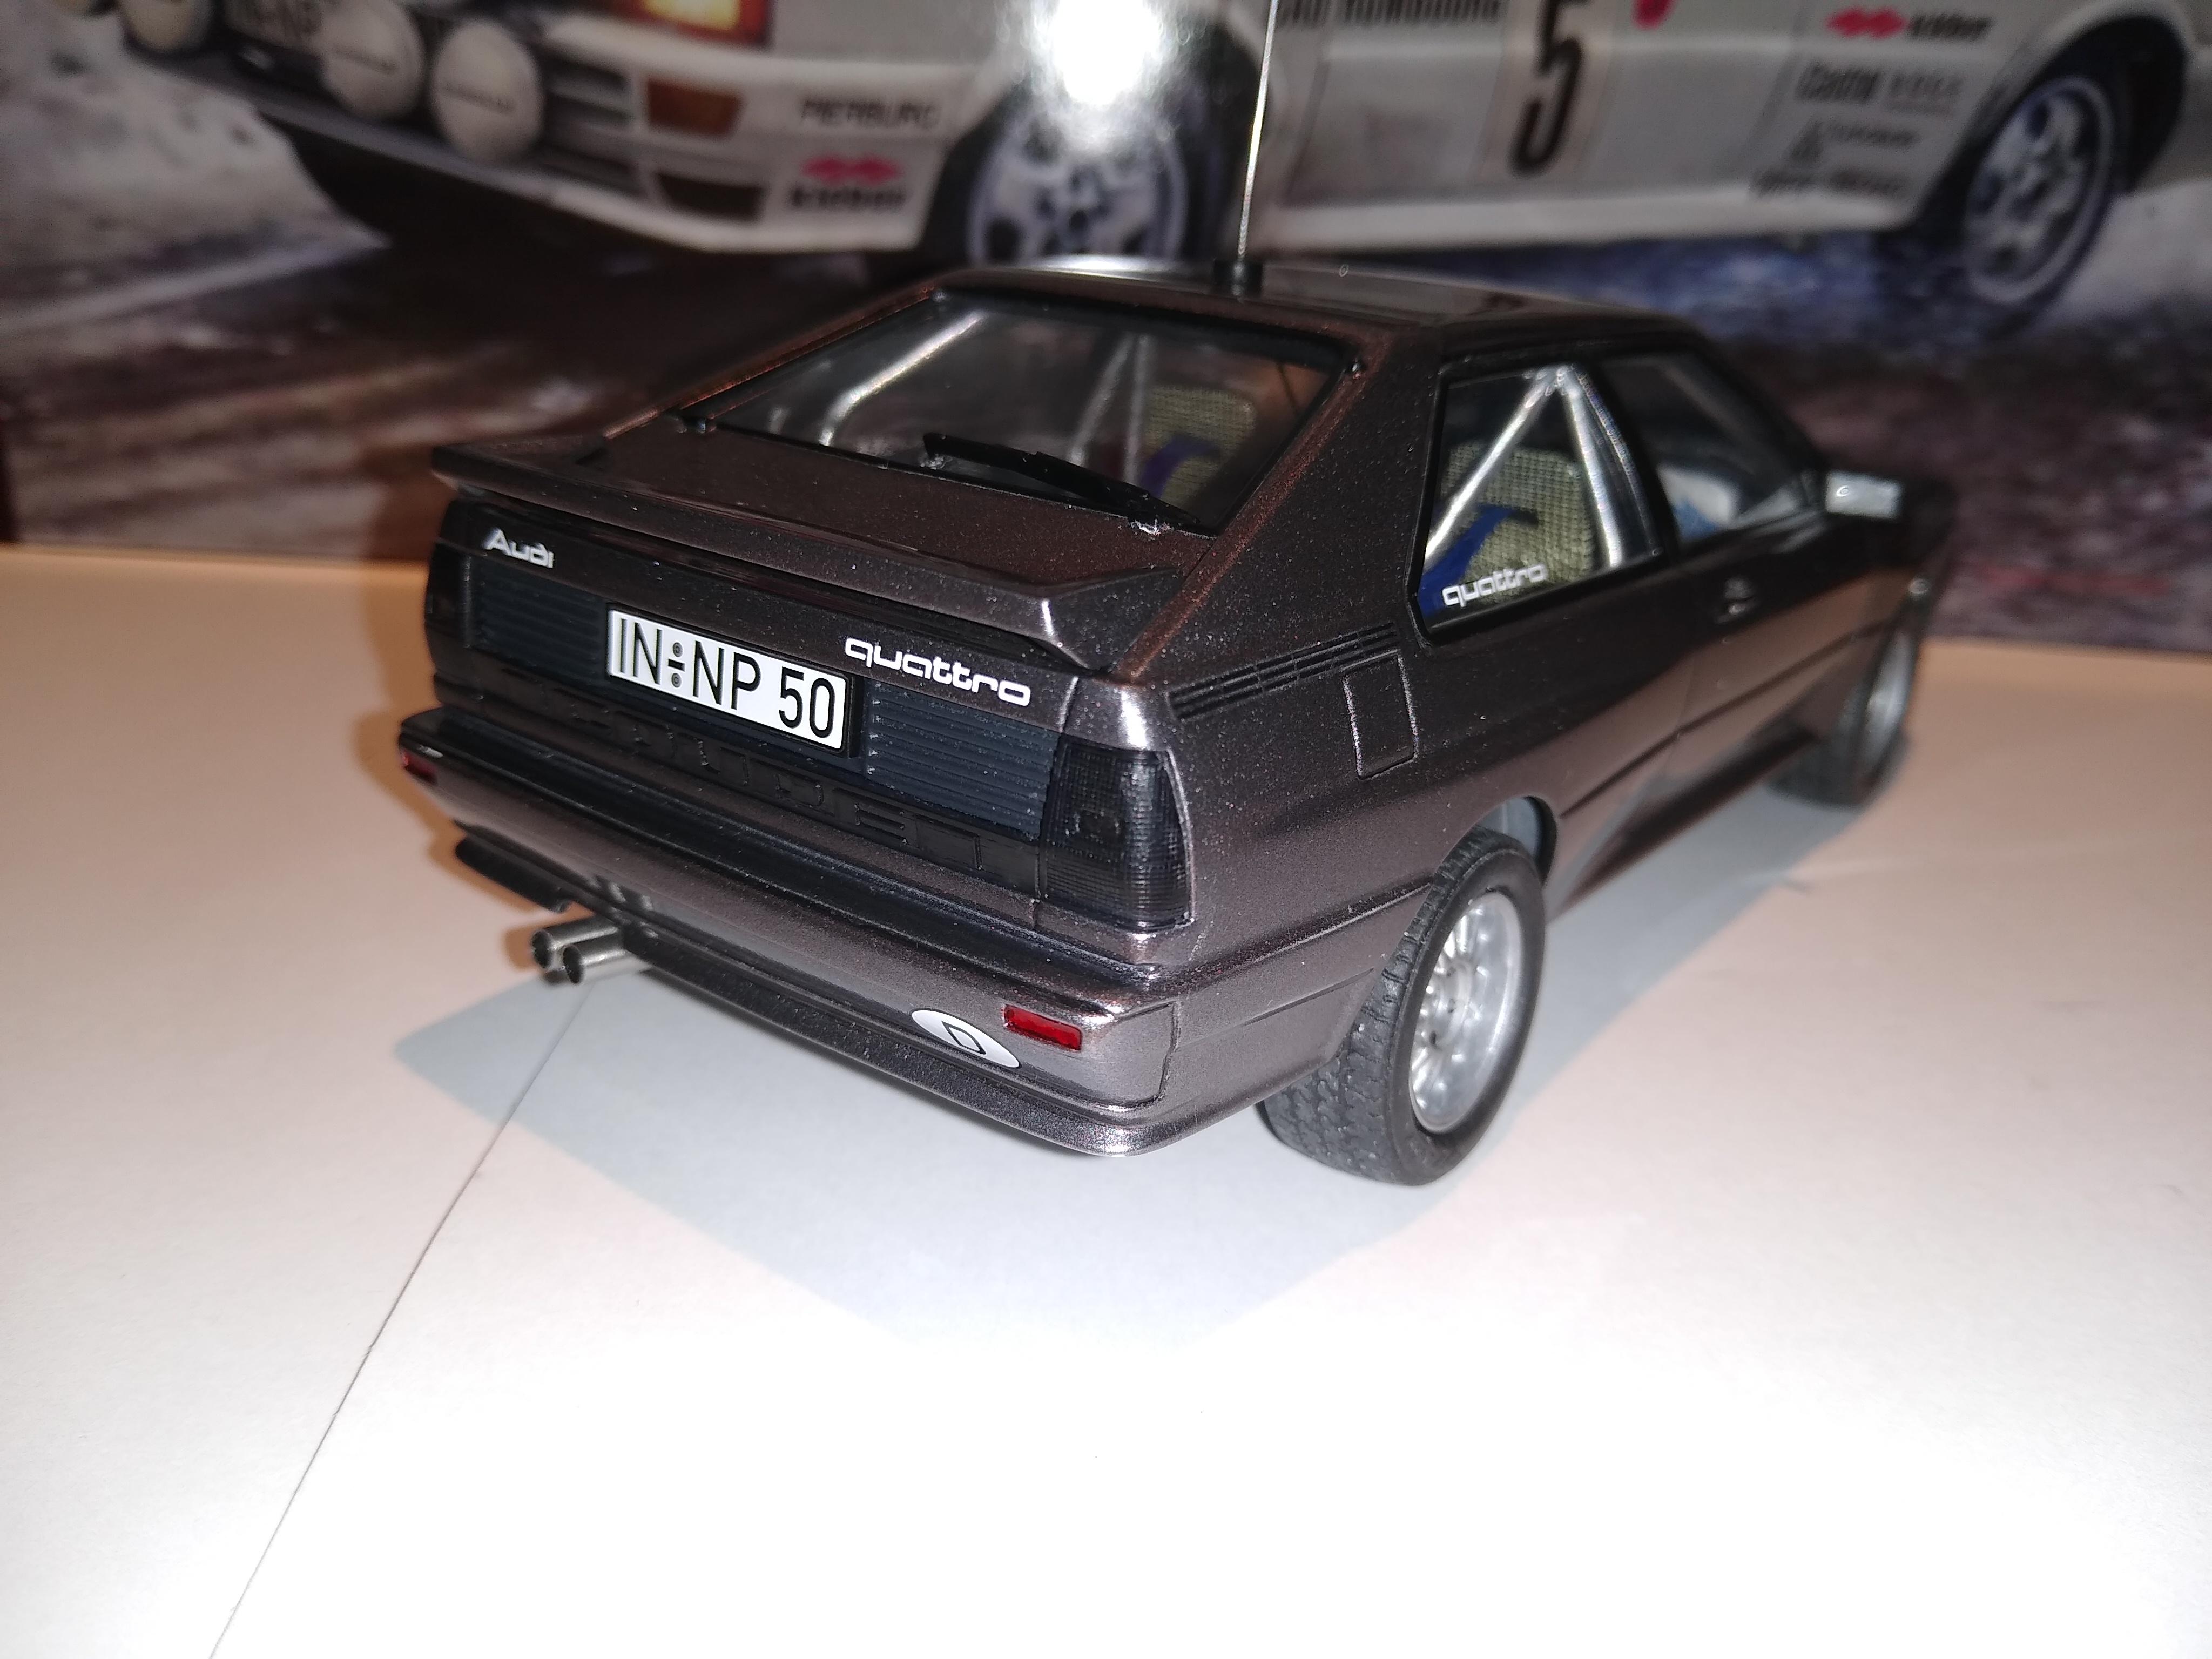
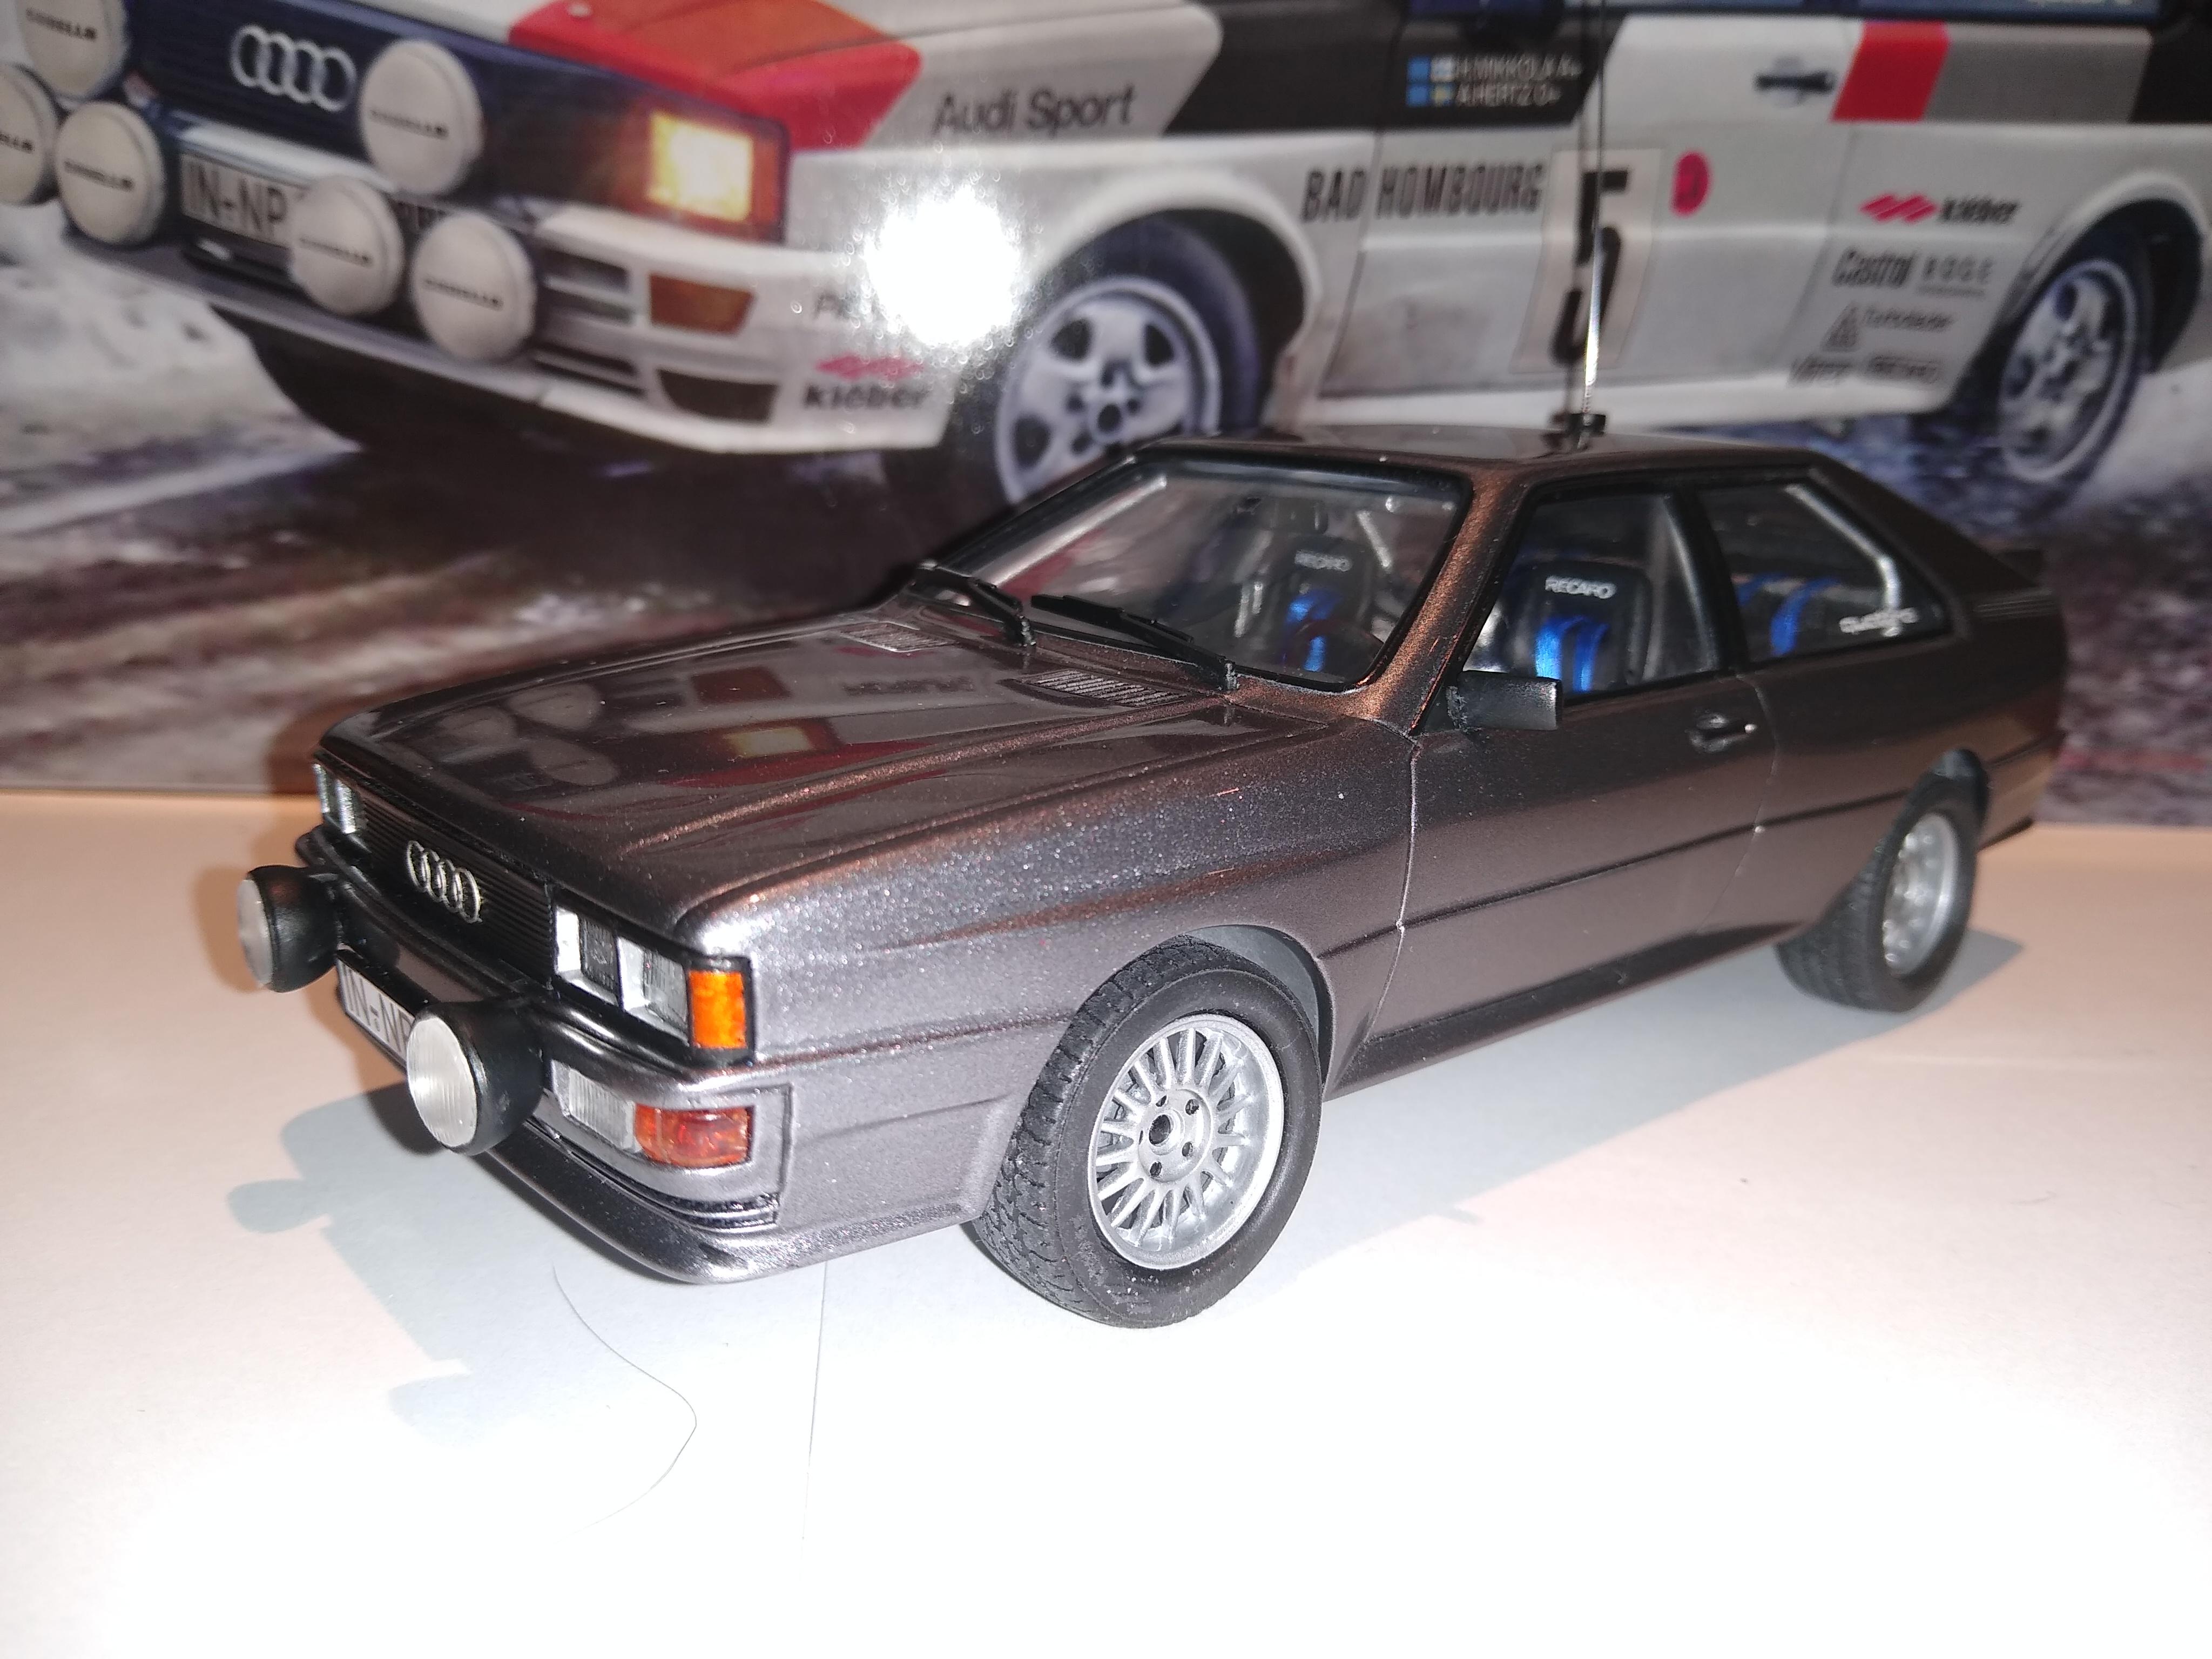
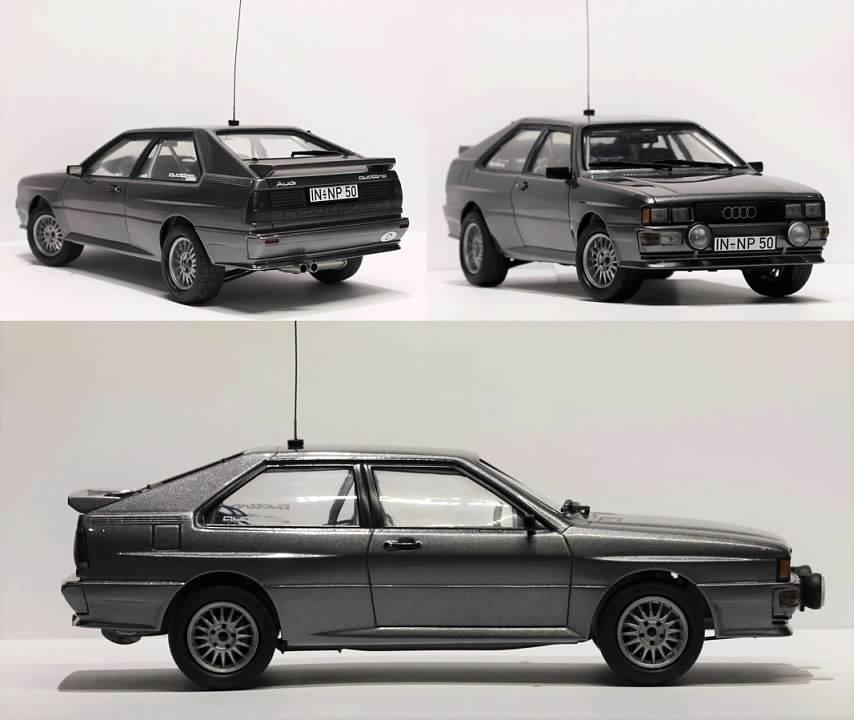
This is my entry for the MCM forum Cannonball Run group build thread. The theme this year is “race cars in disguise”, so here is the Italeri 1/24 Audi Quattro Rally turned into a street racer designed to fly under the police radar(s!). I used the brief as an opportunity to experiment with customising a kit for the first time and to learn a little about scratch building. It's been fun to let imagination rule over the usual constraints of replica building and the result is less about being “faithful” to anything & more about fun. Details are on my WIP thread, but here’s a list of alterations/additions to the box stock kit: Front indicators reduced in size & bodywork/bumper filled to make the front end more accurate; side repeaters removed out of preference. Scratch built: replacement exhaust system; CB antenna; roll cage rear section; gear shifter & linkage; pedal arms; centre console, including CB radio & police scanner; GPS & tablet screens; wiring loom & junction box; door card levers, winders & pulls. Photo-etched parts: grill badge; door locks; pedals; co-driver footplate; belt buckles; dash toggle switches. Other add-ons: Ronal 15” tarmac alloys (Reji resin); steering wheel (spares box); 2mm ribbon belts; all carbon fibre/Kevlar decals. Colour is Tamiya light gunmetal. Questions/comments welcome. Thanks for looking!
-
Beautiful job. Amazing paint finish, as usual!
-
Amazing quality of work - well done!
-
Thanks very much, Snake! Appreciate the compliment ?
-
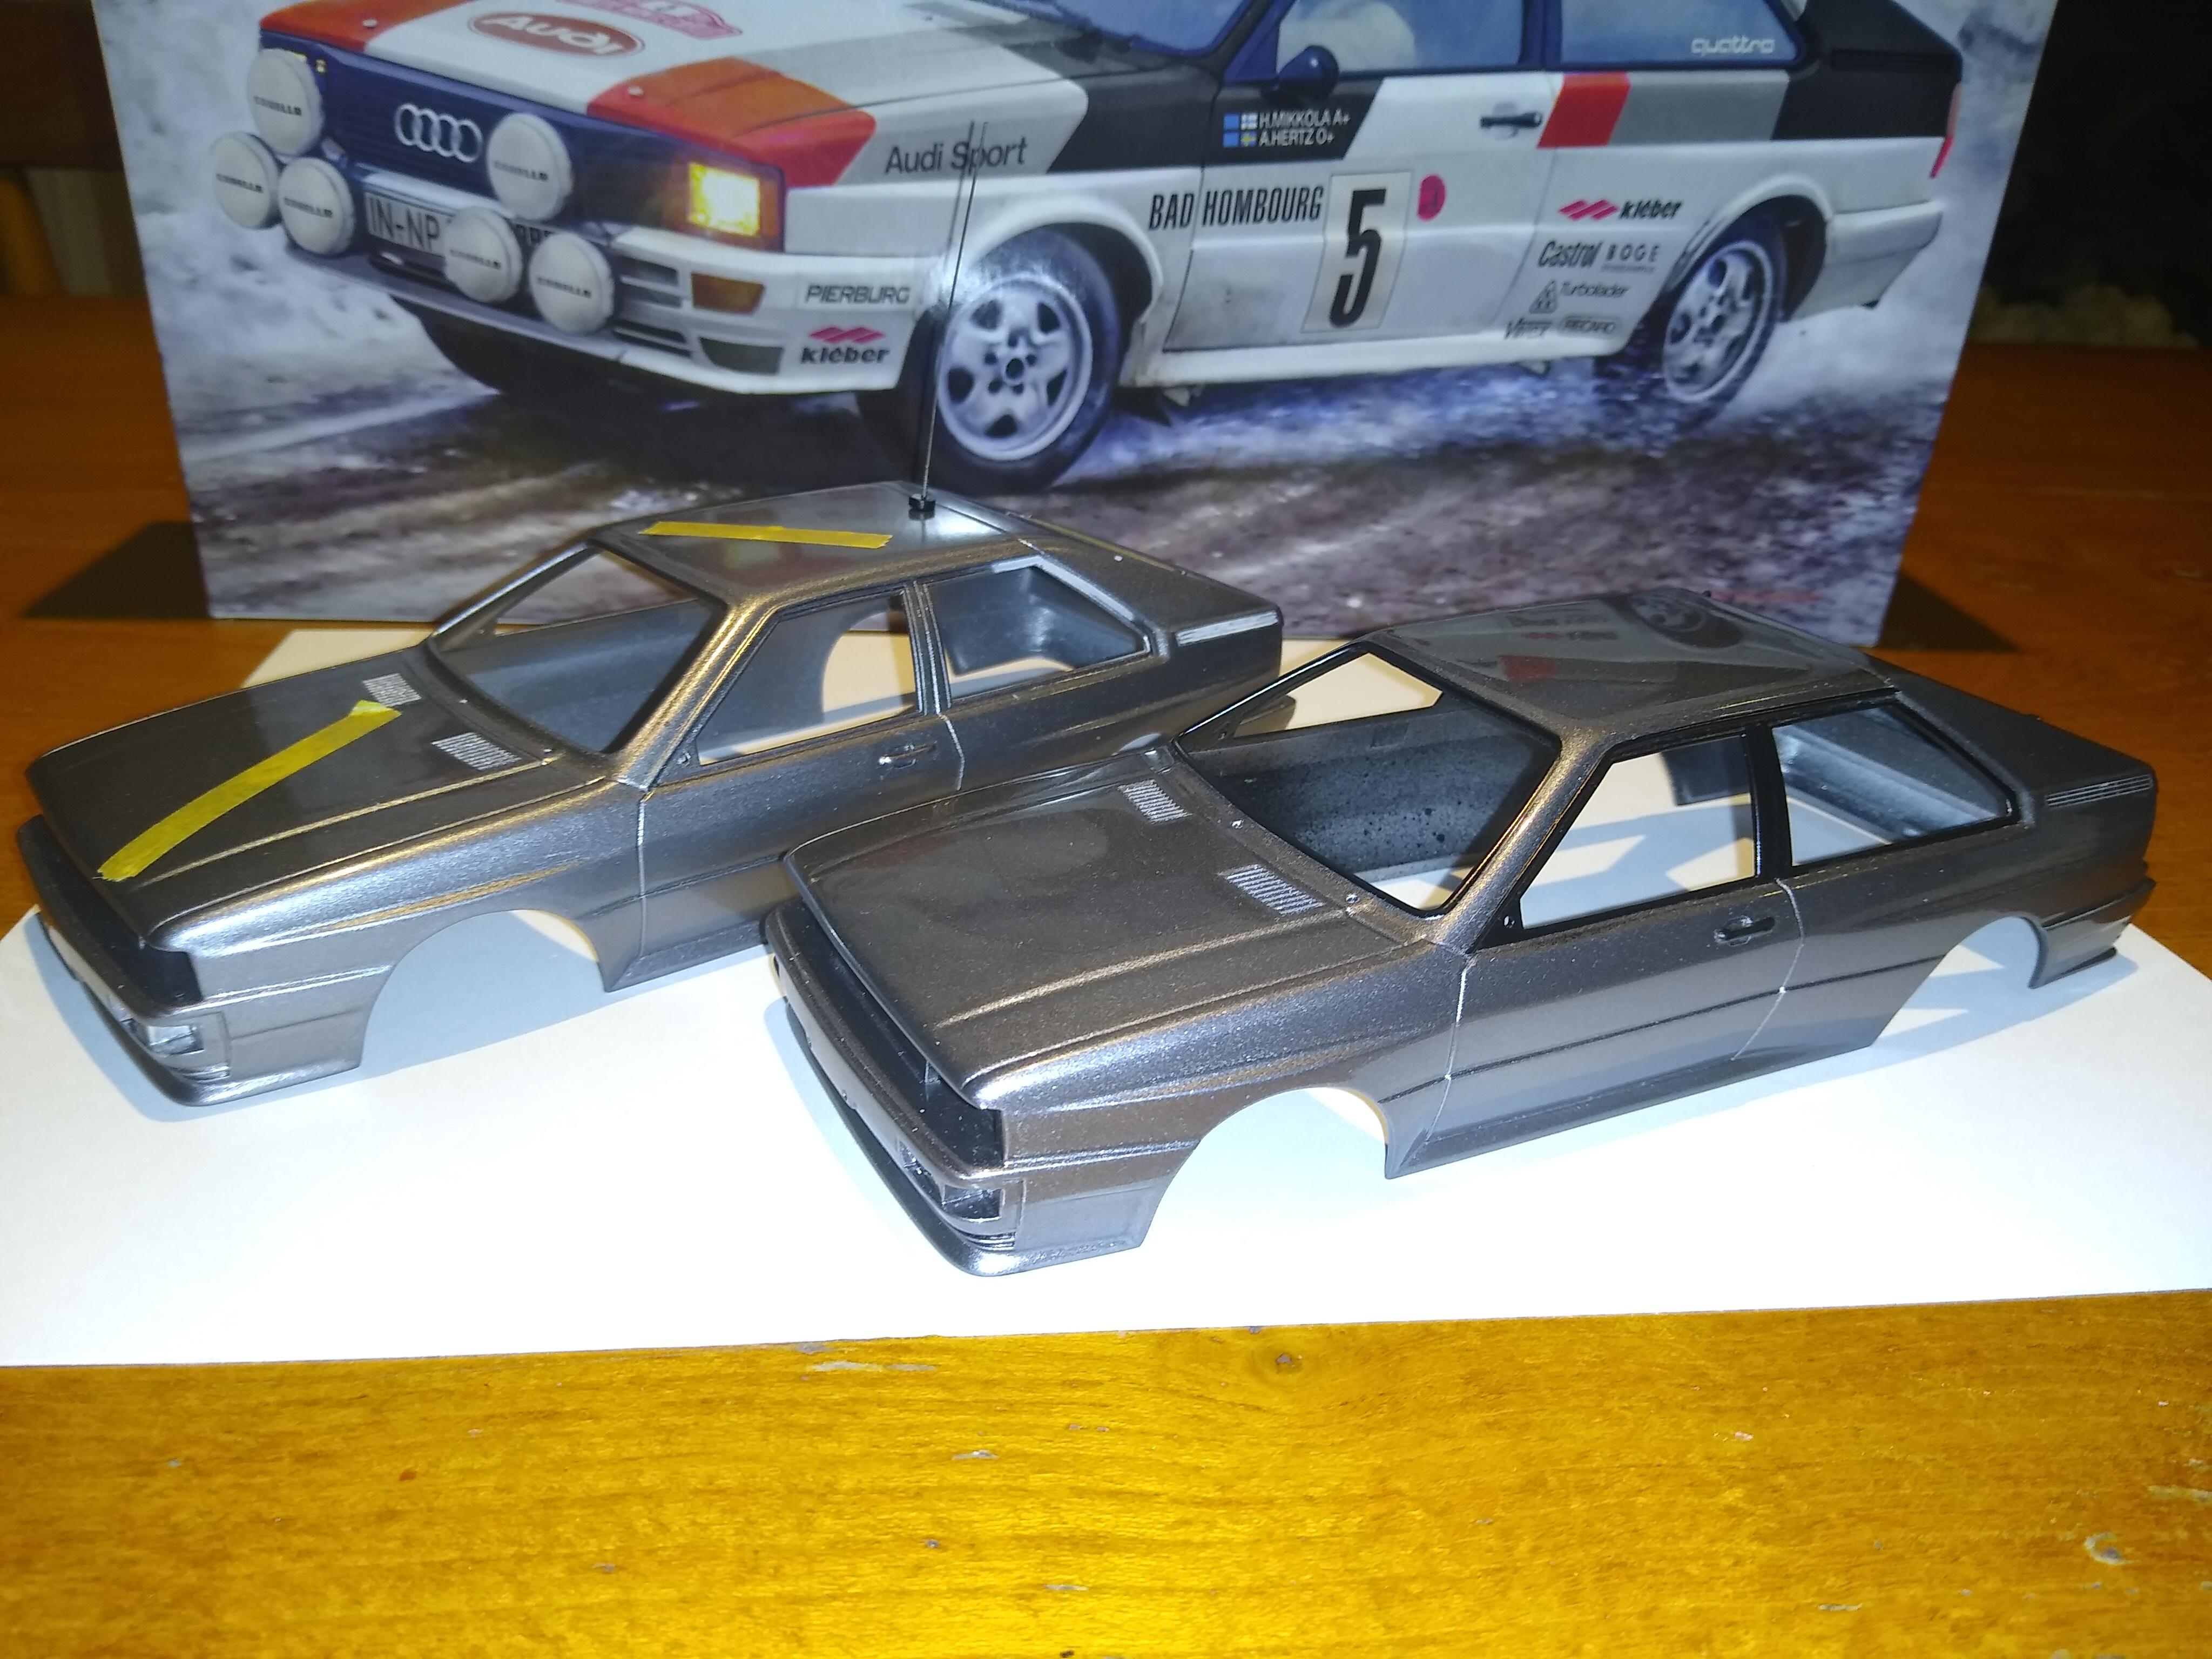
Everything seemed to get slower & slower, but she’s finally done! ? Like before, I ended up having to insert a shim in a front corner of the body in order to lower it, but it was quick & easy. Had a bit of drama with the glasswork, though, which forced me to adapt my approach. Plans to remove the front windows and tint the rear got abandoned midway, but I’m just relieved to have any glass at all - and grateful to have had a second kit! A big issue with this kit is that the one-piece glass insert is barely tall enough to cover the height of the windows: we are talking 1mm-or-less overlap on all sides. Additionally, it is attached to the sprue tree at single point (along the bottom of one side) by an inch-long joint built to withstand an earthquake! It’s almost impossible to separate the thing without damaging the windows, and even at the second attempt there was a bit of a crack left.? Anyway, the short story is that I was able to make one ok piece out of two by cutting them and hiding the join behind the B pillar. The CB antenna was made from a 0.018” guitar string, a micro compression spring (0.8 x 4.6mm found on eBay) and a bit of sprue. I drilled through the roof & glass insert in order to locate & glue it safely. The front end took a lot of effort get right, but I’m pleased with the result. The resizing of the light units & filling of the body were obviously the biggest things, but there was still a bit of intricate masking & brushwork to be done, plus the lenses had to be glued at the correct angles - none of which was aided by the “instructions”, so a bit of research was required. The indicators were painted clear orange over silver & actually came out ok in the end. The PE badge went on fine with a tiny bit of Gorilla glue and the double-sided tape really came into its own in attaching the spot lamps. Interesting fact: I’ve long used Vallejo acrylic gloss varnish to hold light lenses in because it dries 100% clear, gives ages of working time and any surplus just wipes away with water. I wasn’t sure of the strength of the bond though, so the other day I did a side-by-side comparison with Elmers white glue using an old CD and bits of sprue, then left them to set overnight. Result: the Elmers sprue fell away instantly & the varnish one is still in place because I couldn’t budge it! Many surviving Quattros have smoked rear lights. I was quickly sold on the idea as it looks cool, plus it’s more straightforward: just three or four coats of Tamiya smoke and done. The rear fogs are supposed to be red and not orange as the instructions would have it; here I used clear red over silver. So, there we go. I’m happy with the result, but it was a lot of work! I’ll put an Under Glass link below when I take a few pics. Questions & comments welcome - thanks for looking. Finished photos here
-
#5 Audi Quattro Calling her done! Not the most stealthy appearance, perhaps - with spot lamps & smoked rear lights - but I'm not having something that took so long looking uncool! ? Also, I wouldn't want to drive through the night at 150mph without the best available lighting. The plans for tinted windows were abandoned for various reasons, but at least the hard work on the interior isn't hidden now. Best of luck with all your ongoing builds guys. I'll be here watching ?
-
Nice one! Got that one in the stash, too. Like the colour choice - it really suits it ?
-
Awesome build. The TR7 was one of the first cars to catch my eye when I was small. Didn't know the TR8 existed until just now. I see it was a North American thing - more cylinders is better!?
-
Nice job! Love the wheels & exhaust ?
-
#5 Audi Quattro: Not that far away now. Body #2 (nearer) has been clear coated, sanded & (mostly) polished. The rubber seals & door handles have been painted. Weirdly, after sanding and polishing, it now looks darker than #1, but if anything I prefer it so all good. The first shell has proved a useful testing ground, and the latest trial is with my scratch built CB whip antenna - made from a guitar string & micro spring (look closely). However, despite having bought the pack of springs especially, I'm not sure I can bring myself to put it on the final car, having now looked at it side by side. The roof is really the only feasible place to mount it, but I think it detracts from the body lines, so the CB may just have to have a retractable (and completely invisible) antenna!! Edit: Ok, after sleeping on it, I've edged back towards the antenna. Not drilling anything yet though, just in case... Tune in later for more intense modelling drama!! ?


.jpg.5c643a19b649ea35ce7c46082fd7e59a.jpg)
.jpg.f6d506dead8d904c5d13f75dbe2e9d55.jpg)
.jpg.5fa28e9212d3f633a2c253d28a98983b.jpg)
.jpg.ddeda556da45c3179fc7972db7523ab4.jpg)
.jpg.3a2885bdb774f132df8283b33621e480.jpg)
.jpg.0101b9fdf552c5bfe345843d85295259.jpg)
.jpg.042fe6e31faa48f019654959dd650995.jpg)
.jpg.38f7ebdcc40365aadb60fa7fe5672e4f.jpg)
.jpg.3ebfa8d0d6e3bd7b8ffff7a2c0167a8c.jpg)
.jpg.647bfb2946c73e116a2d564e2e4ac288.jpg)
.jpg.2d148d4403028b67b09347bdde4c2bde.jpg)
.jpg.85cc81a963850543b5b90a02d3cfa878.jpg)
.jpg.521e47657281c322b526babec55a7e8d.jpg)
.jpg.443e15d56a4e9eba9e3ec307cf5c4874.jpg)
.jpg.4e43d188cc4ba1e26bc61228dd2ac985.jpg)