Pete75
-
Posts
538 -
Joined
-
Last visited
Content Type
Profiles
Forums
Events
Gallery
Everything posted by Pete75
-
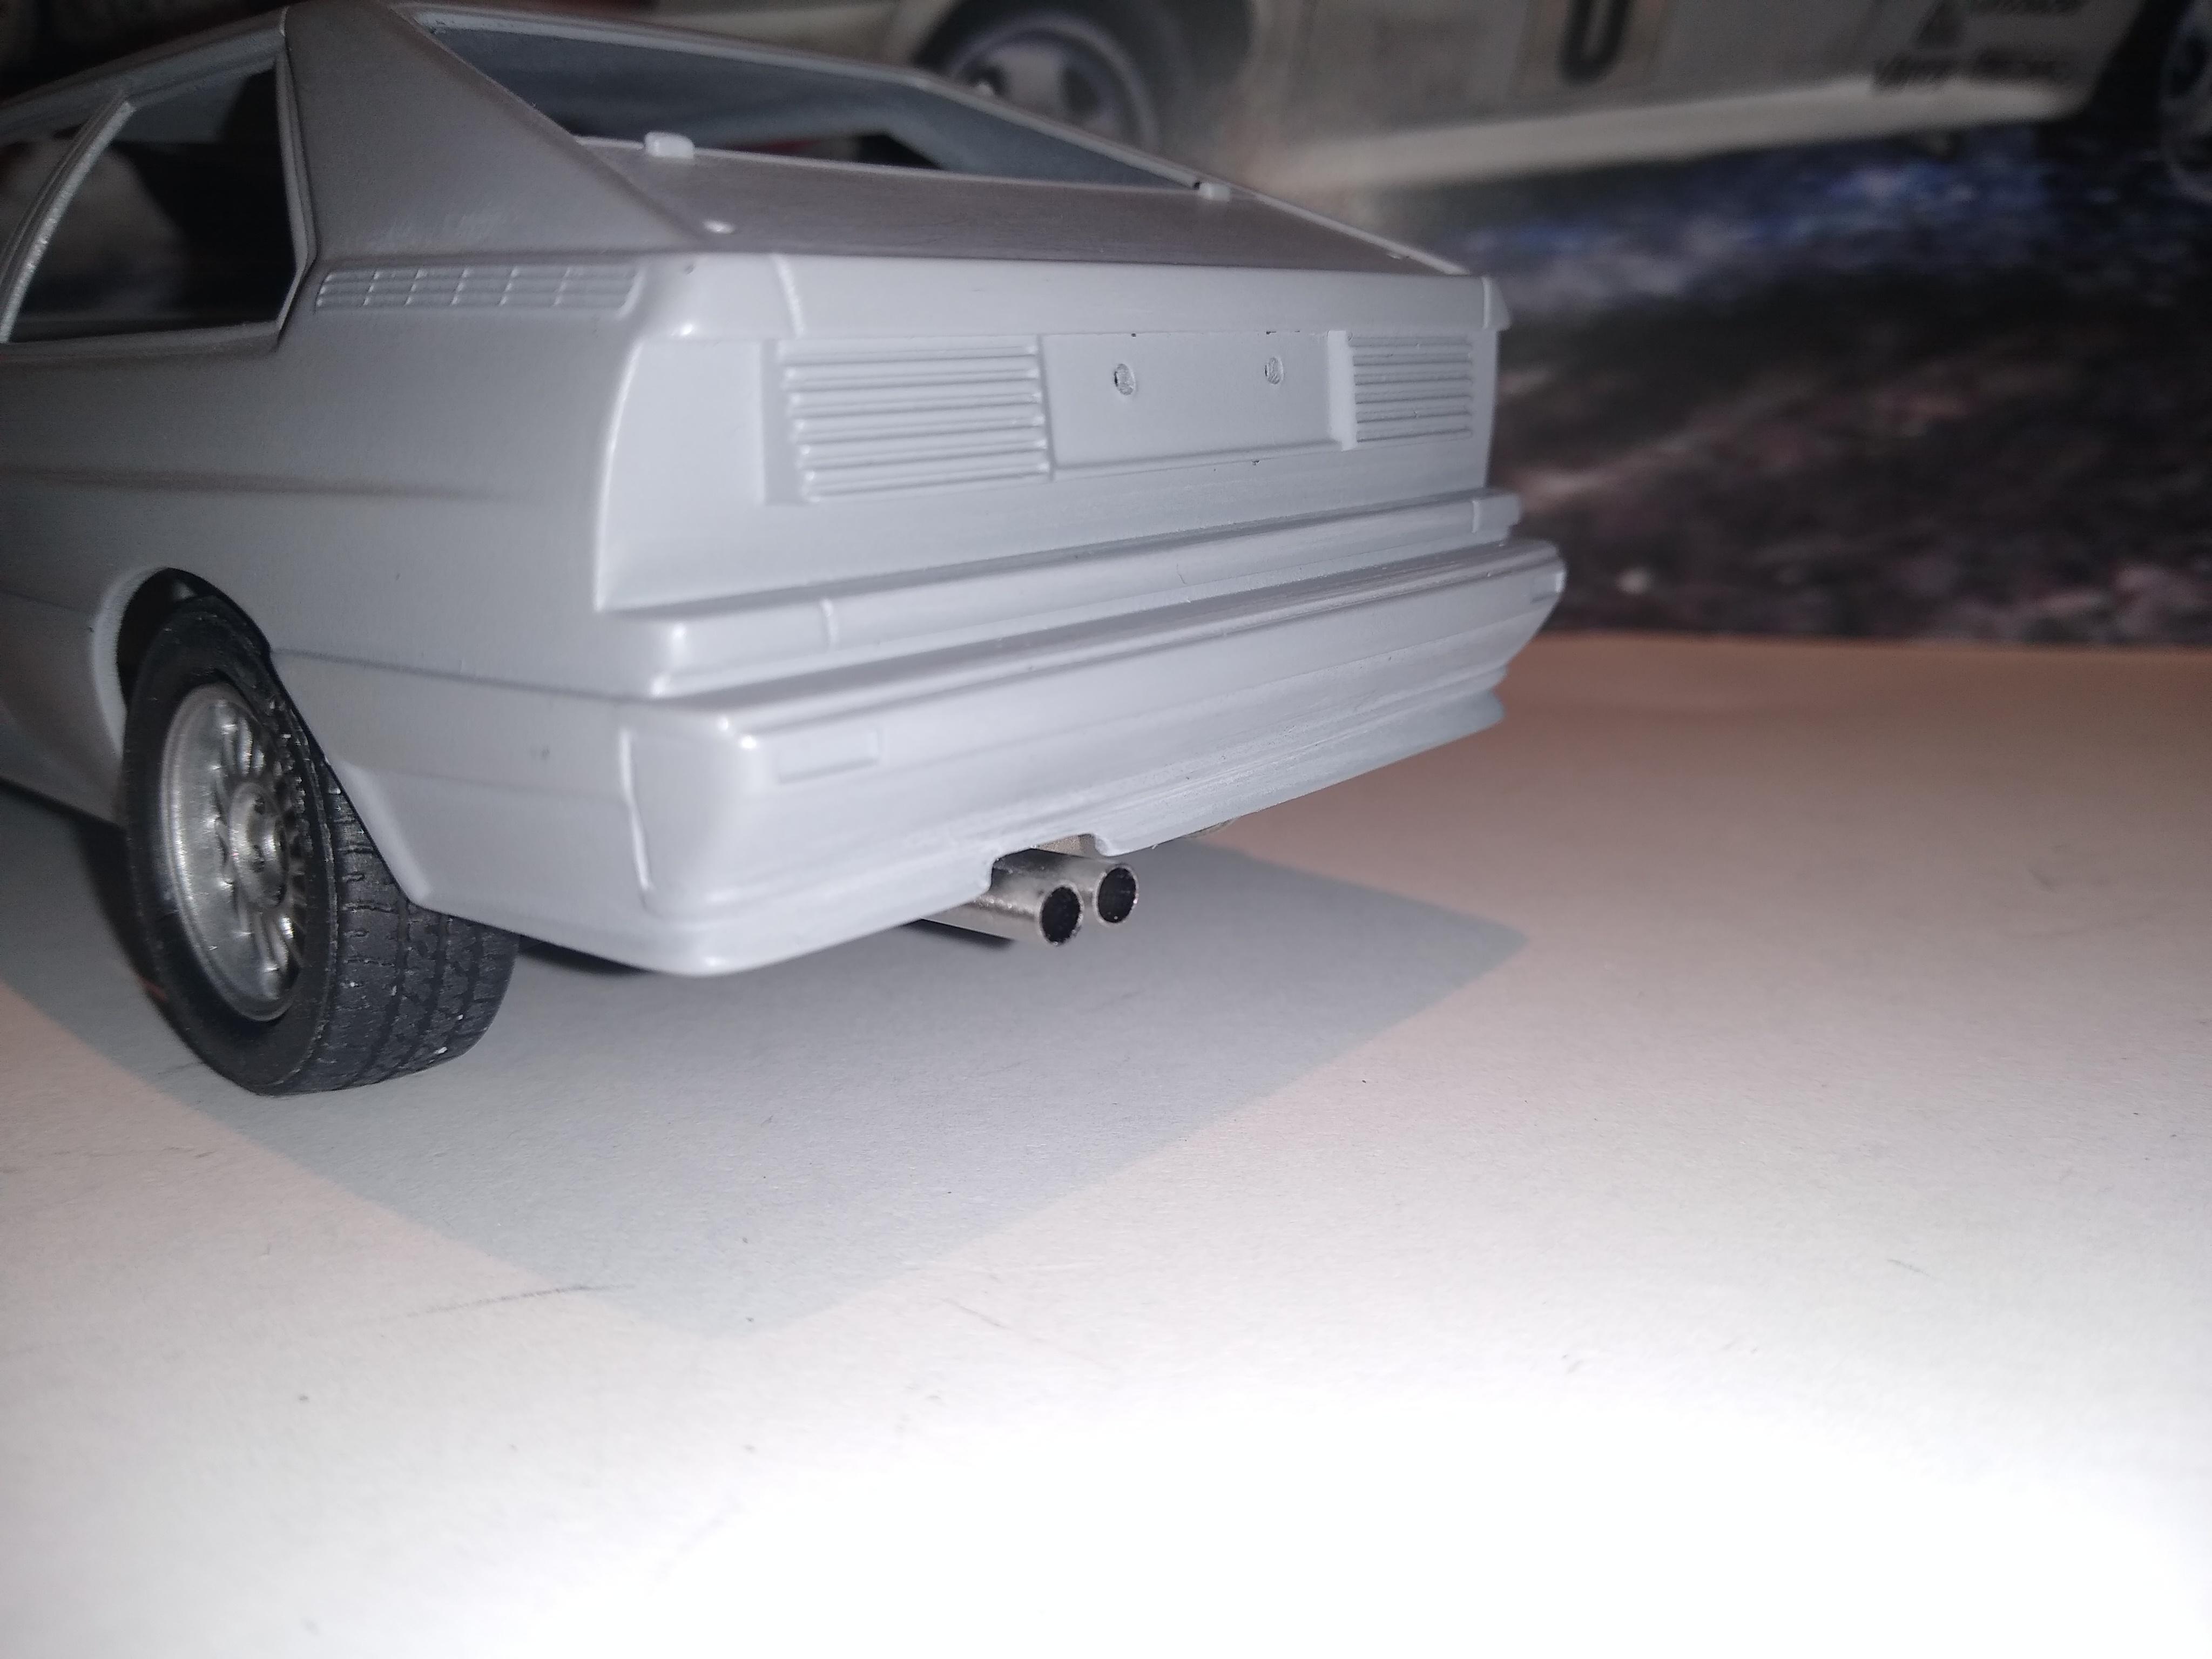
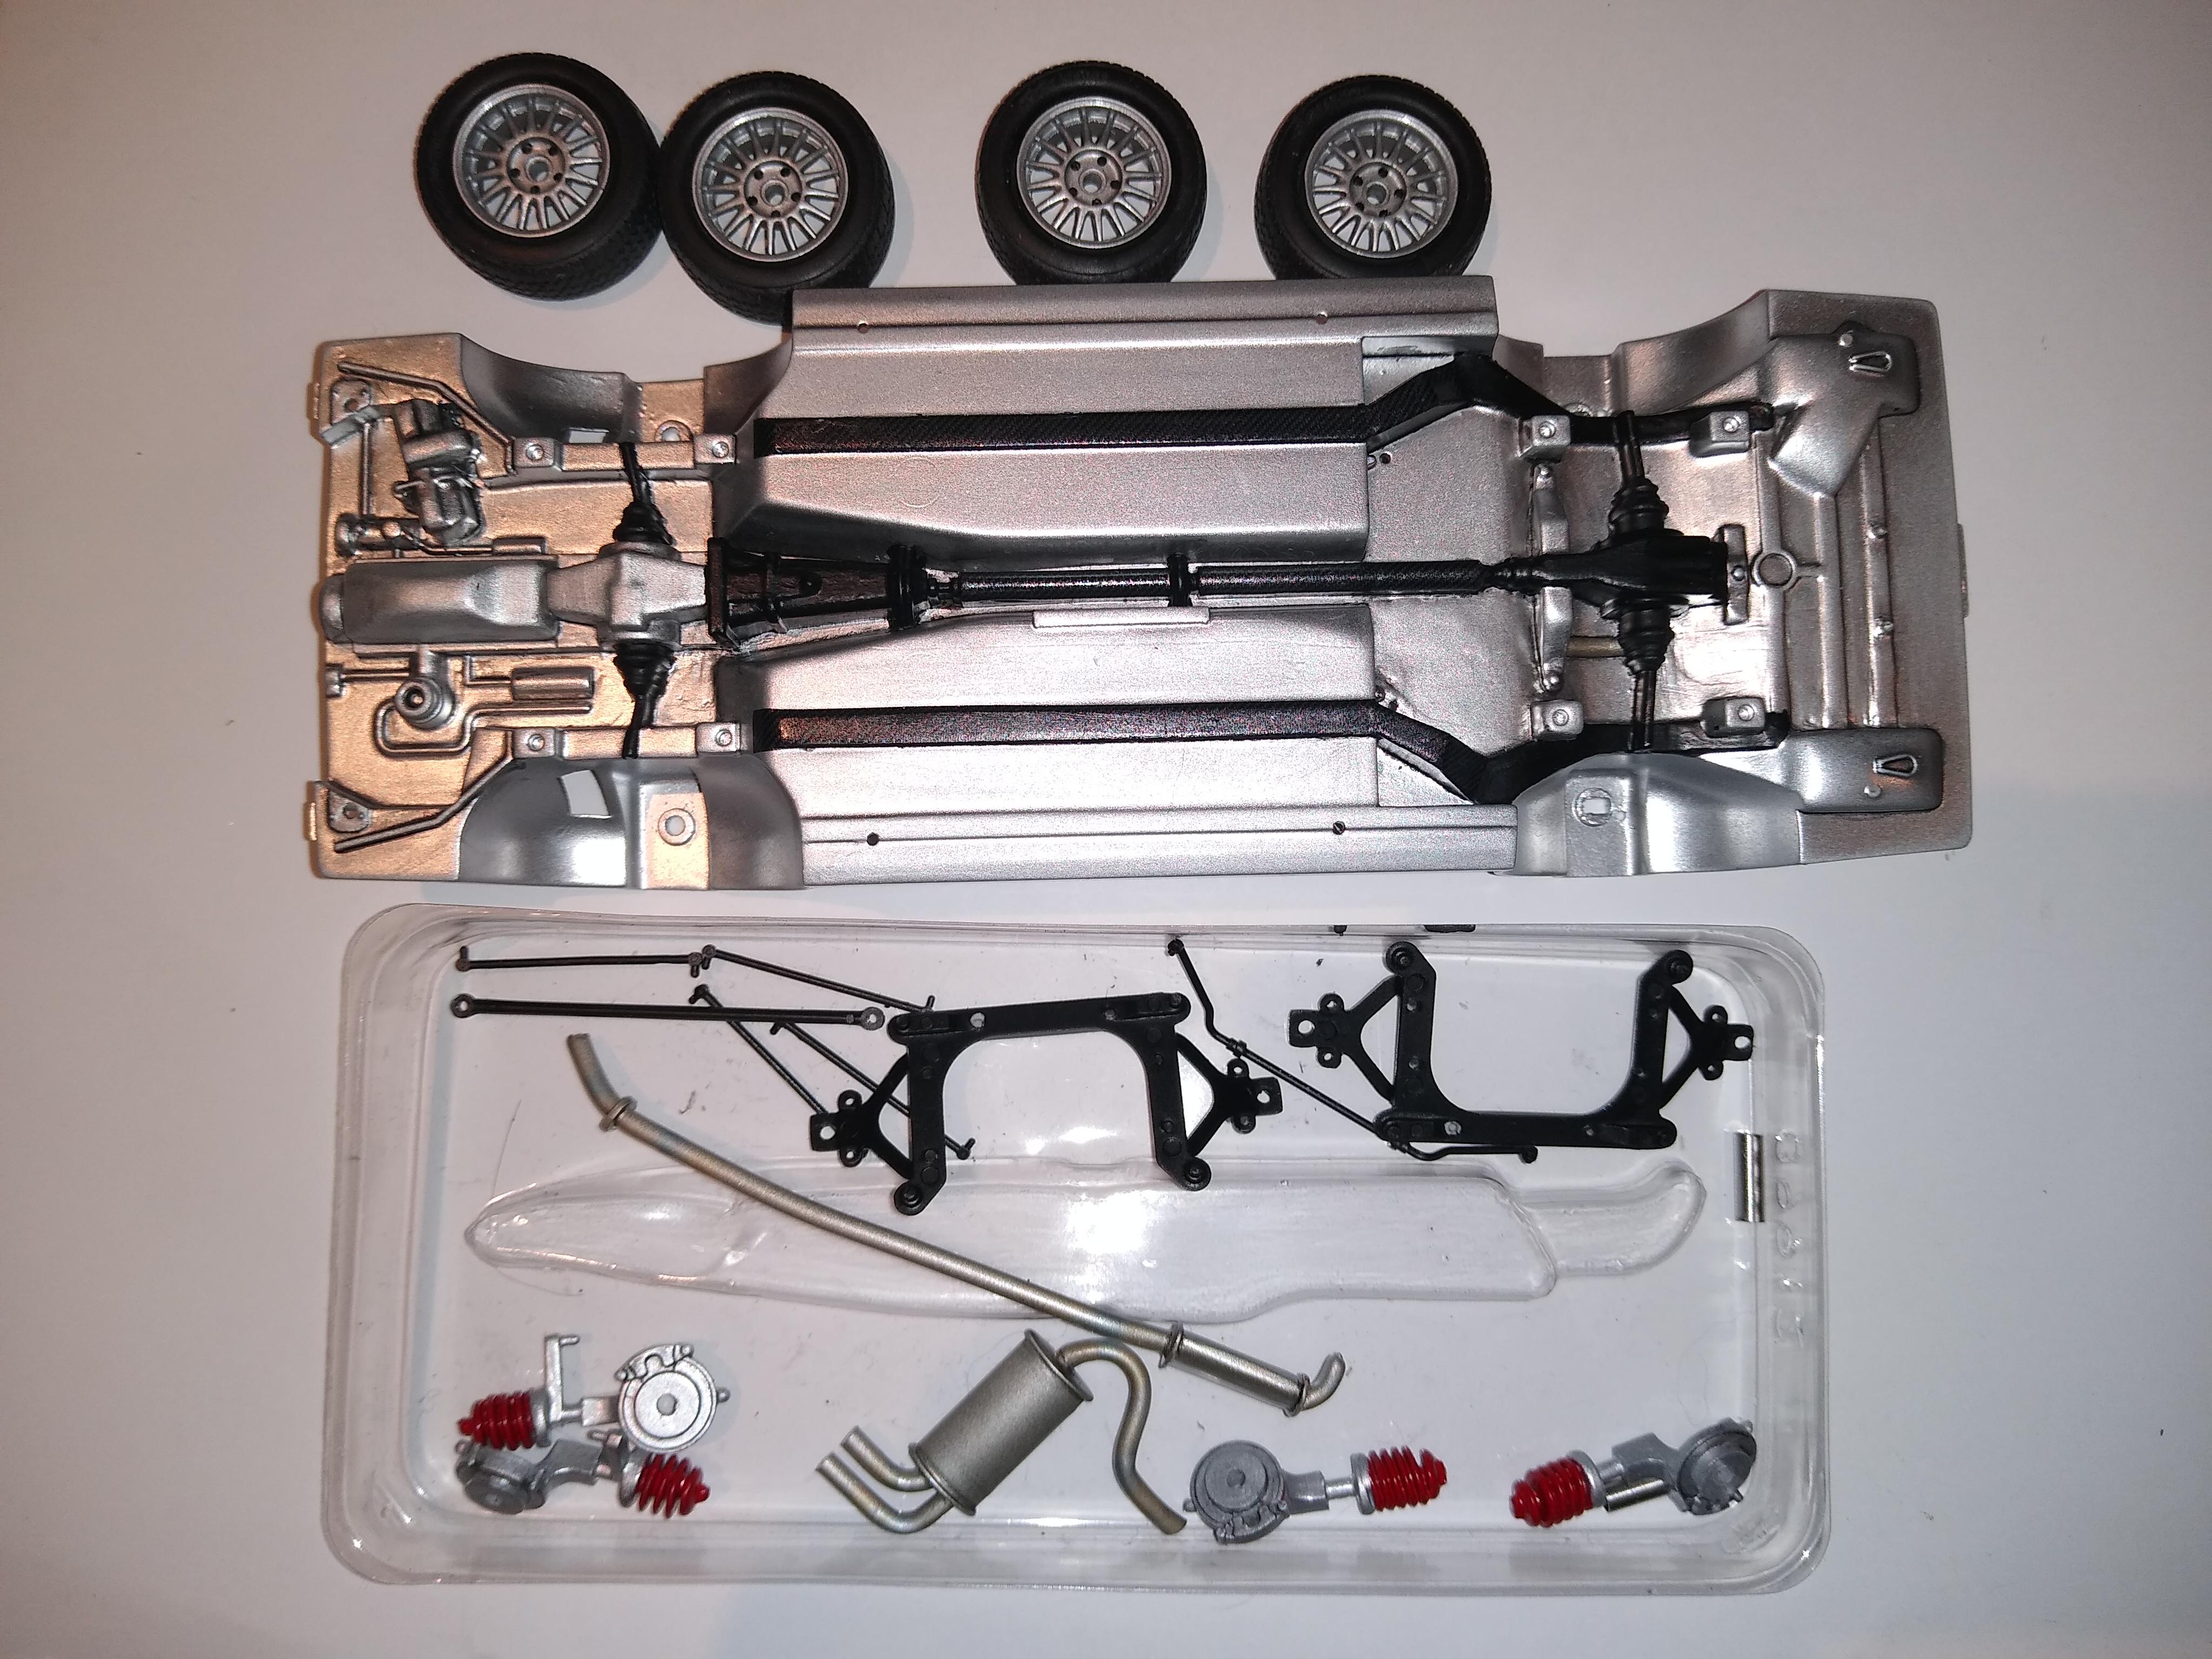
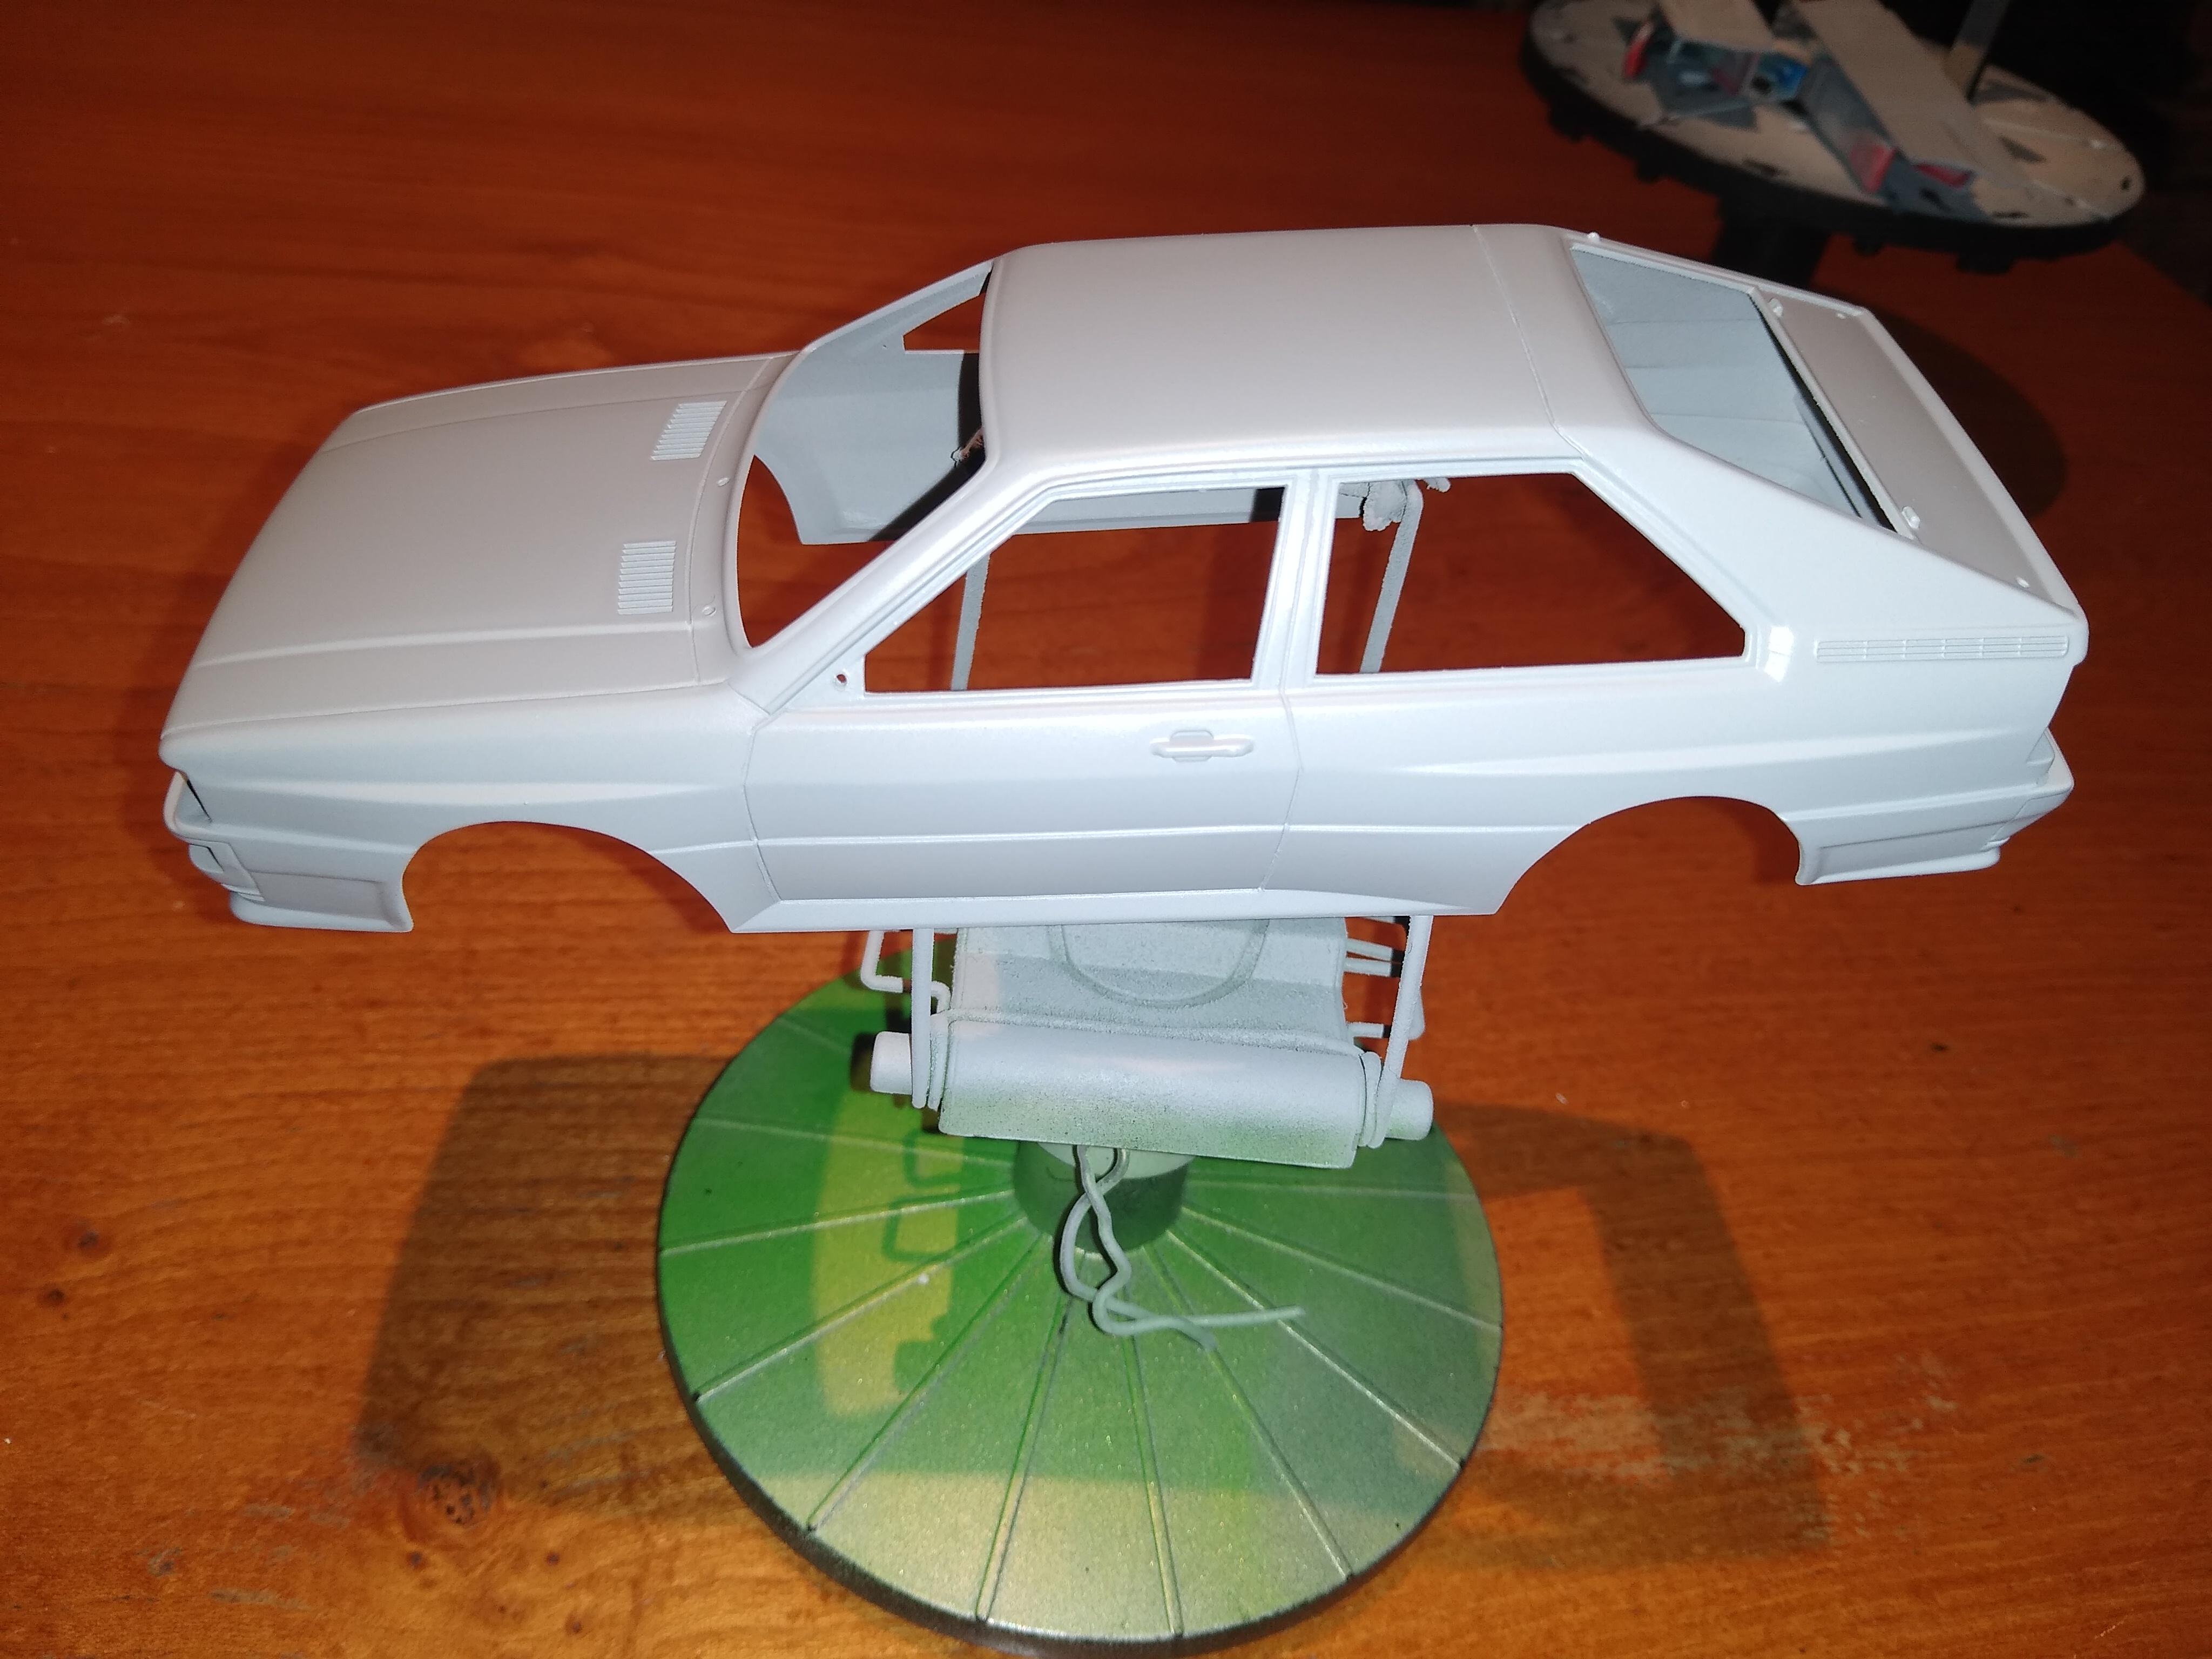
 Got the chassis underside & wheels finished ?. Added a some carbon fibre decal to (what I assume is) the trunking, plus the prop shaft. The exhaust tips were nice & easy to cut with the multitool then tidy with a file. Started experimenting with the Tamiya weathering kit on the exhaust system & will finish later: After gluing the suspension I discovered something wasn't right when I came to fit the body ?. A front corner was sitting too high, and it took me a while to solve. After studying the problem, I discounted the actual suspension & alighted upon the body itself: more specifically, the locator tabs and their slots. I found the body slot on the problem corner was misaligned and needed to allow the chassis tab to sit higher up. I solved it by shaving the top side of the slot with a #11 blade (not really visble in the photo, but I did remove a fair bit of material) and gluing in a 0.25mm styrene shim. I also found that the corresponding tab on the chassis was too tall, so I pared it down: This did the trick, although I now noticed that the rear end was sitting fractionally lower than the dry fitting ?. Thankfully this was quickly sorted by adding another shim in the rear slot (on the top edge this time) and now shes finally on her feet ?: I wanted to show how much better the tail pipes looked against the stock ones but I must've chucked them so you'll have to take my word for it!
-
She's gonna be cool! Fascinated by this vacuum forming business - detailed photos much appreciated ?
-
? There speaks a man with an abundance of parts! All coming together sweetly - just looks like one kit ?
-
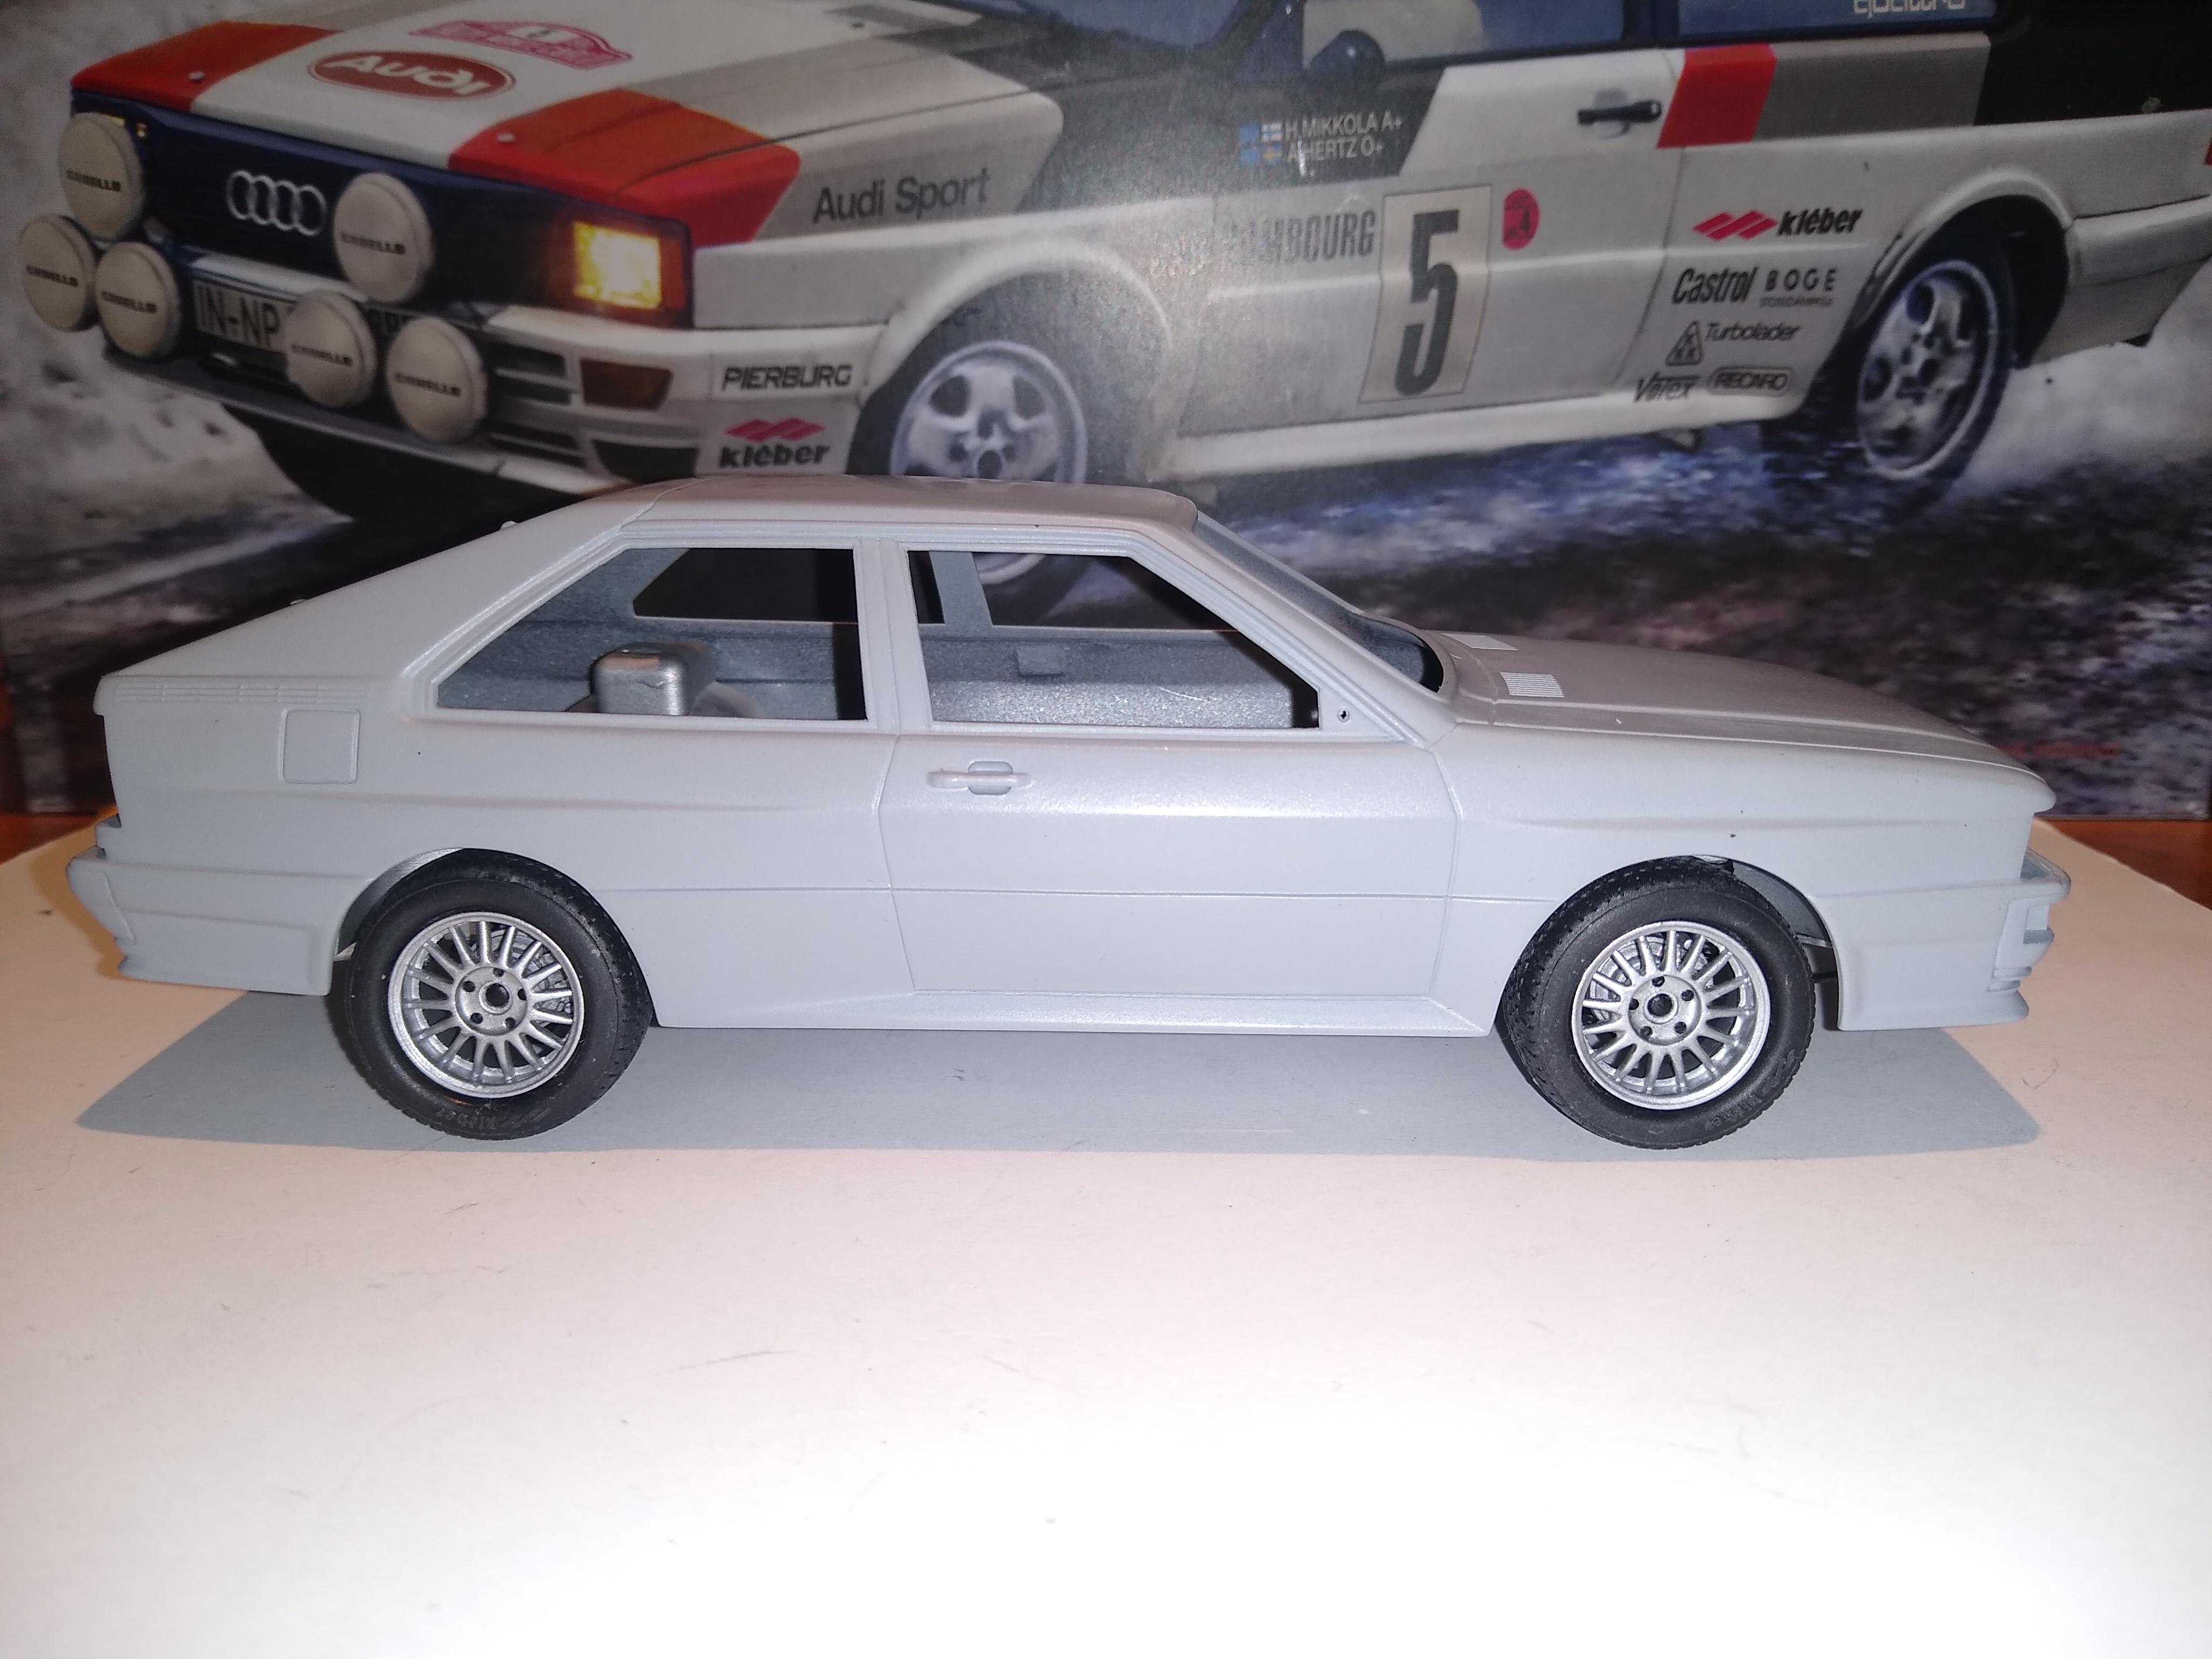
#5 Audi Quattro Paint is finally going on things! ? The body mods are completed, everything sanded & scribed and the primer has erased all traces of tinkering: The resin alloys are finally done: I've never spent so long tidying wheels, but I'm happy enough with the result. The rest of the running gear is all painted, washed & weathered ready for assembly...
-
Salut et bienvenue Arnaud!?
-
Great work, as ever. Really interesting to see your carbon decal technique & all the planning that goes into it. Awesome wheels - where did the chalk pen decals for the tyres come from?
-
Easy to lose your car in Sweden!? It has the blacked rear lights which I'm planning to do - I can't resist it because it looks too cool! Thanks for sharing ?
-
Hi Rick & welcome!?
-
Thanks for looking JC ? Thanks Anton. Don't remember when I last saw one - they're getting old! ?
-
Thank you both, Bruce & Steve - I did take a disproportionate amount of pride in the dash!!?
-
Hi Josh. I avoided the Tamiya line scriber until recently because I didn't like the look of it, but my preconceptions were wrong: it's brilliant! Depending on which point you use, you get a different depth or width of groove. And yes, it's also designed to score/snap styrene, which it does equally well! I have two other scribers, a needle scriber and a fatter tipped one (looks like a short pencil nib) and find them all useful for different sitiations, but the Tamiya one is the best for panel lines. Cheers ?
-
Hi Chaz & welcome! There's a "How To" section here & plenty of members happy to help, but you might want to check out the following link to a three-part tutorial on YouTube. I don't have an airbrush because my workspace is limited, so when I got into modelling a couple of years ago & wanted to learn how to get the best out of spray cans I found these videos invaluable: How to: Paint a Scale Model with Spray cans Cheers ?
-
I'll say it again, the silver OZ wheels against black look badass! Not sure you crammed enough detail into the build though...?
-
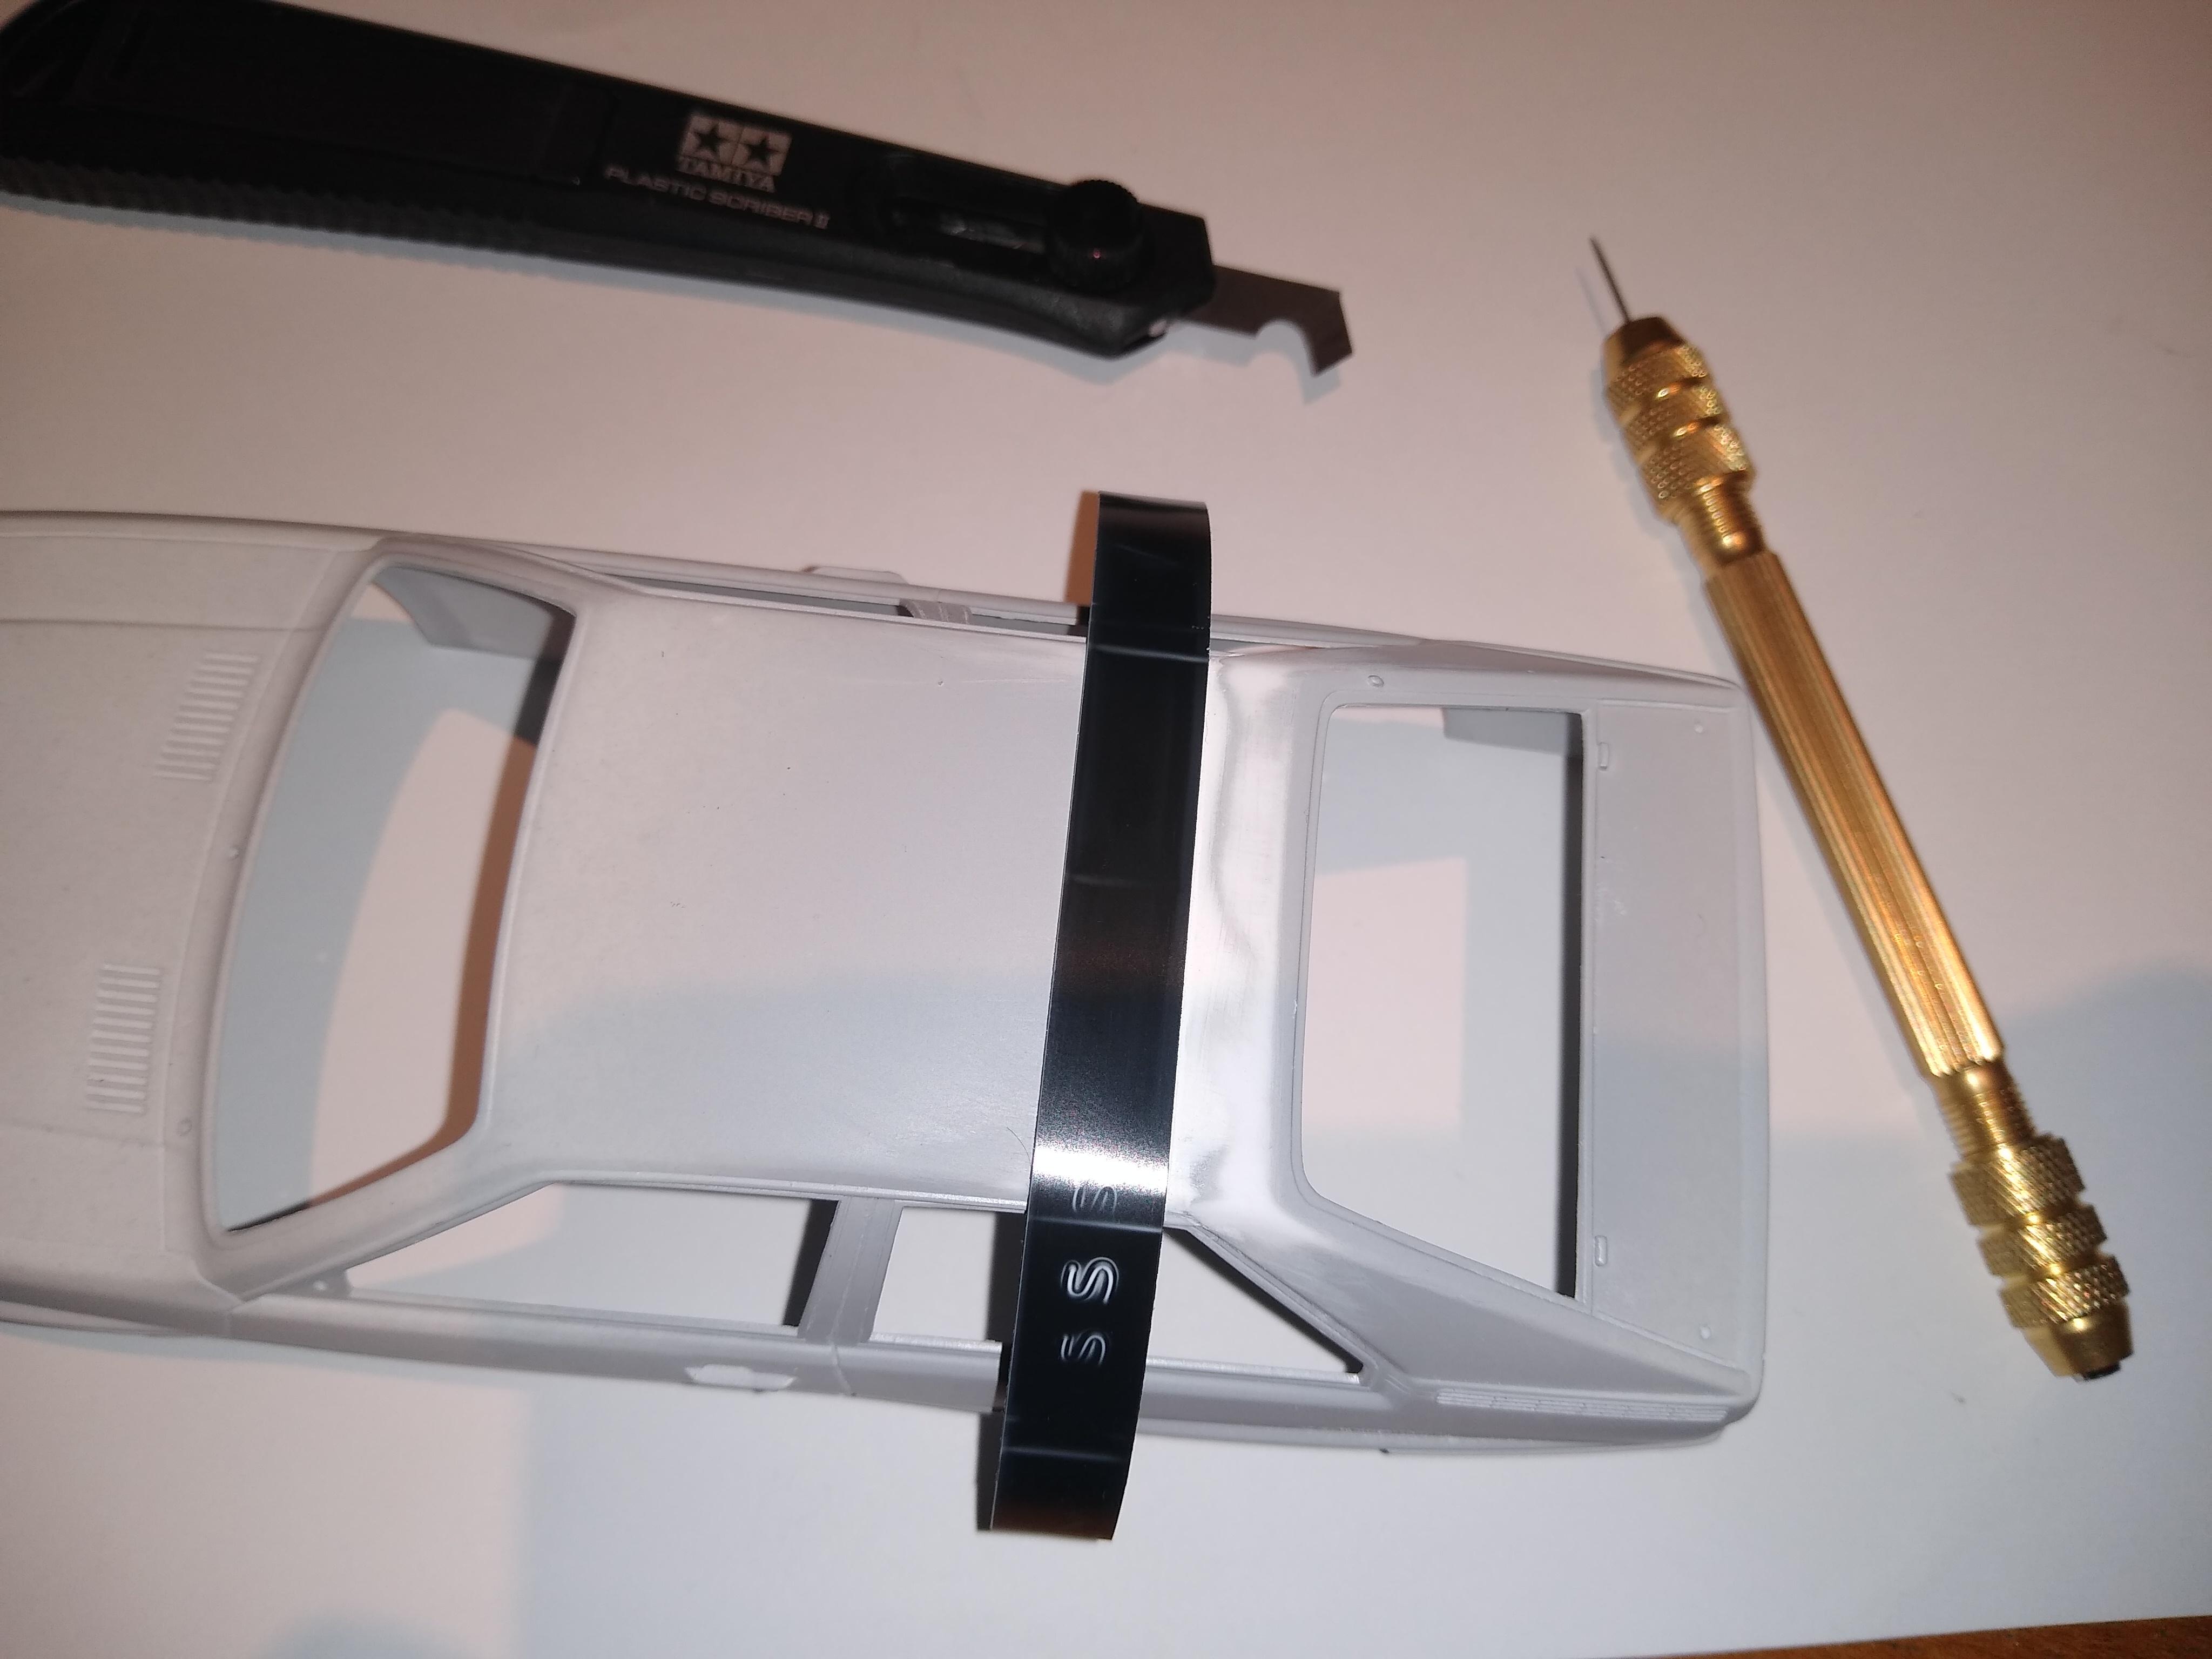
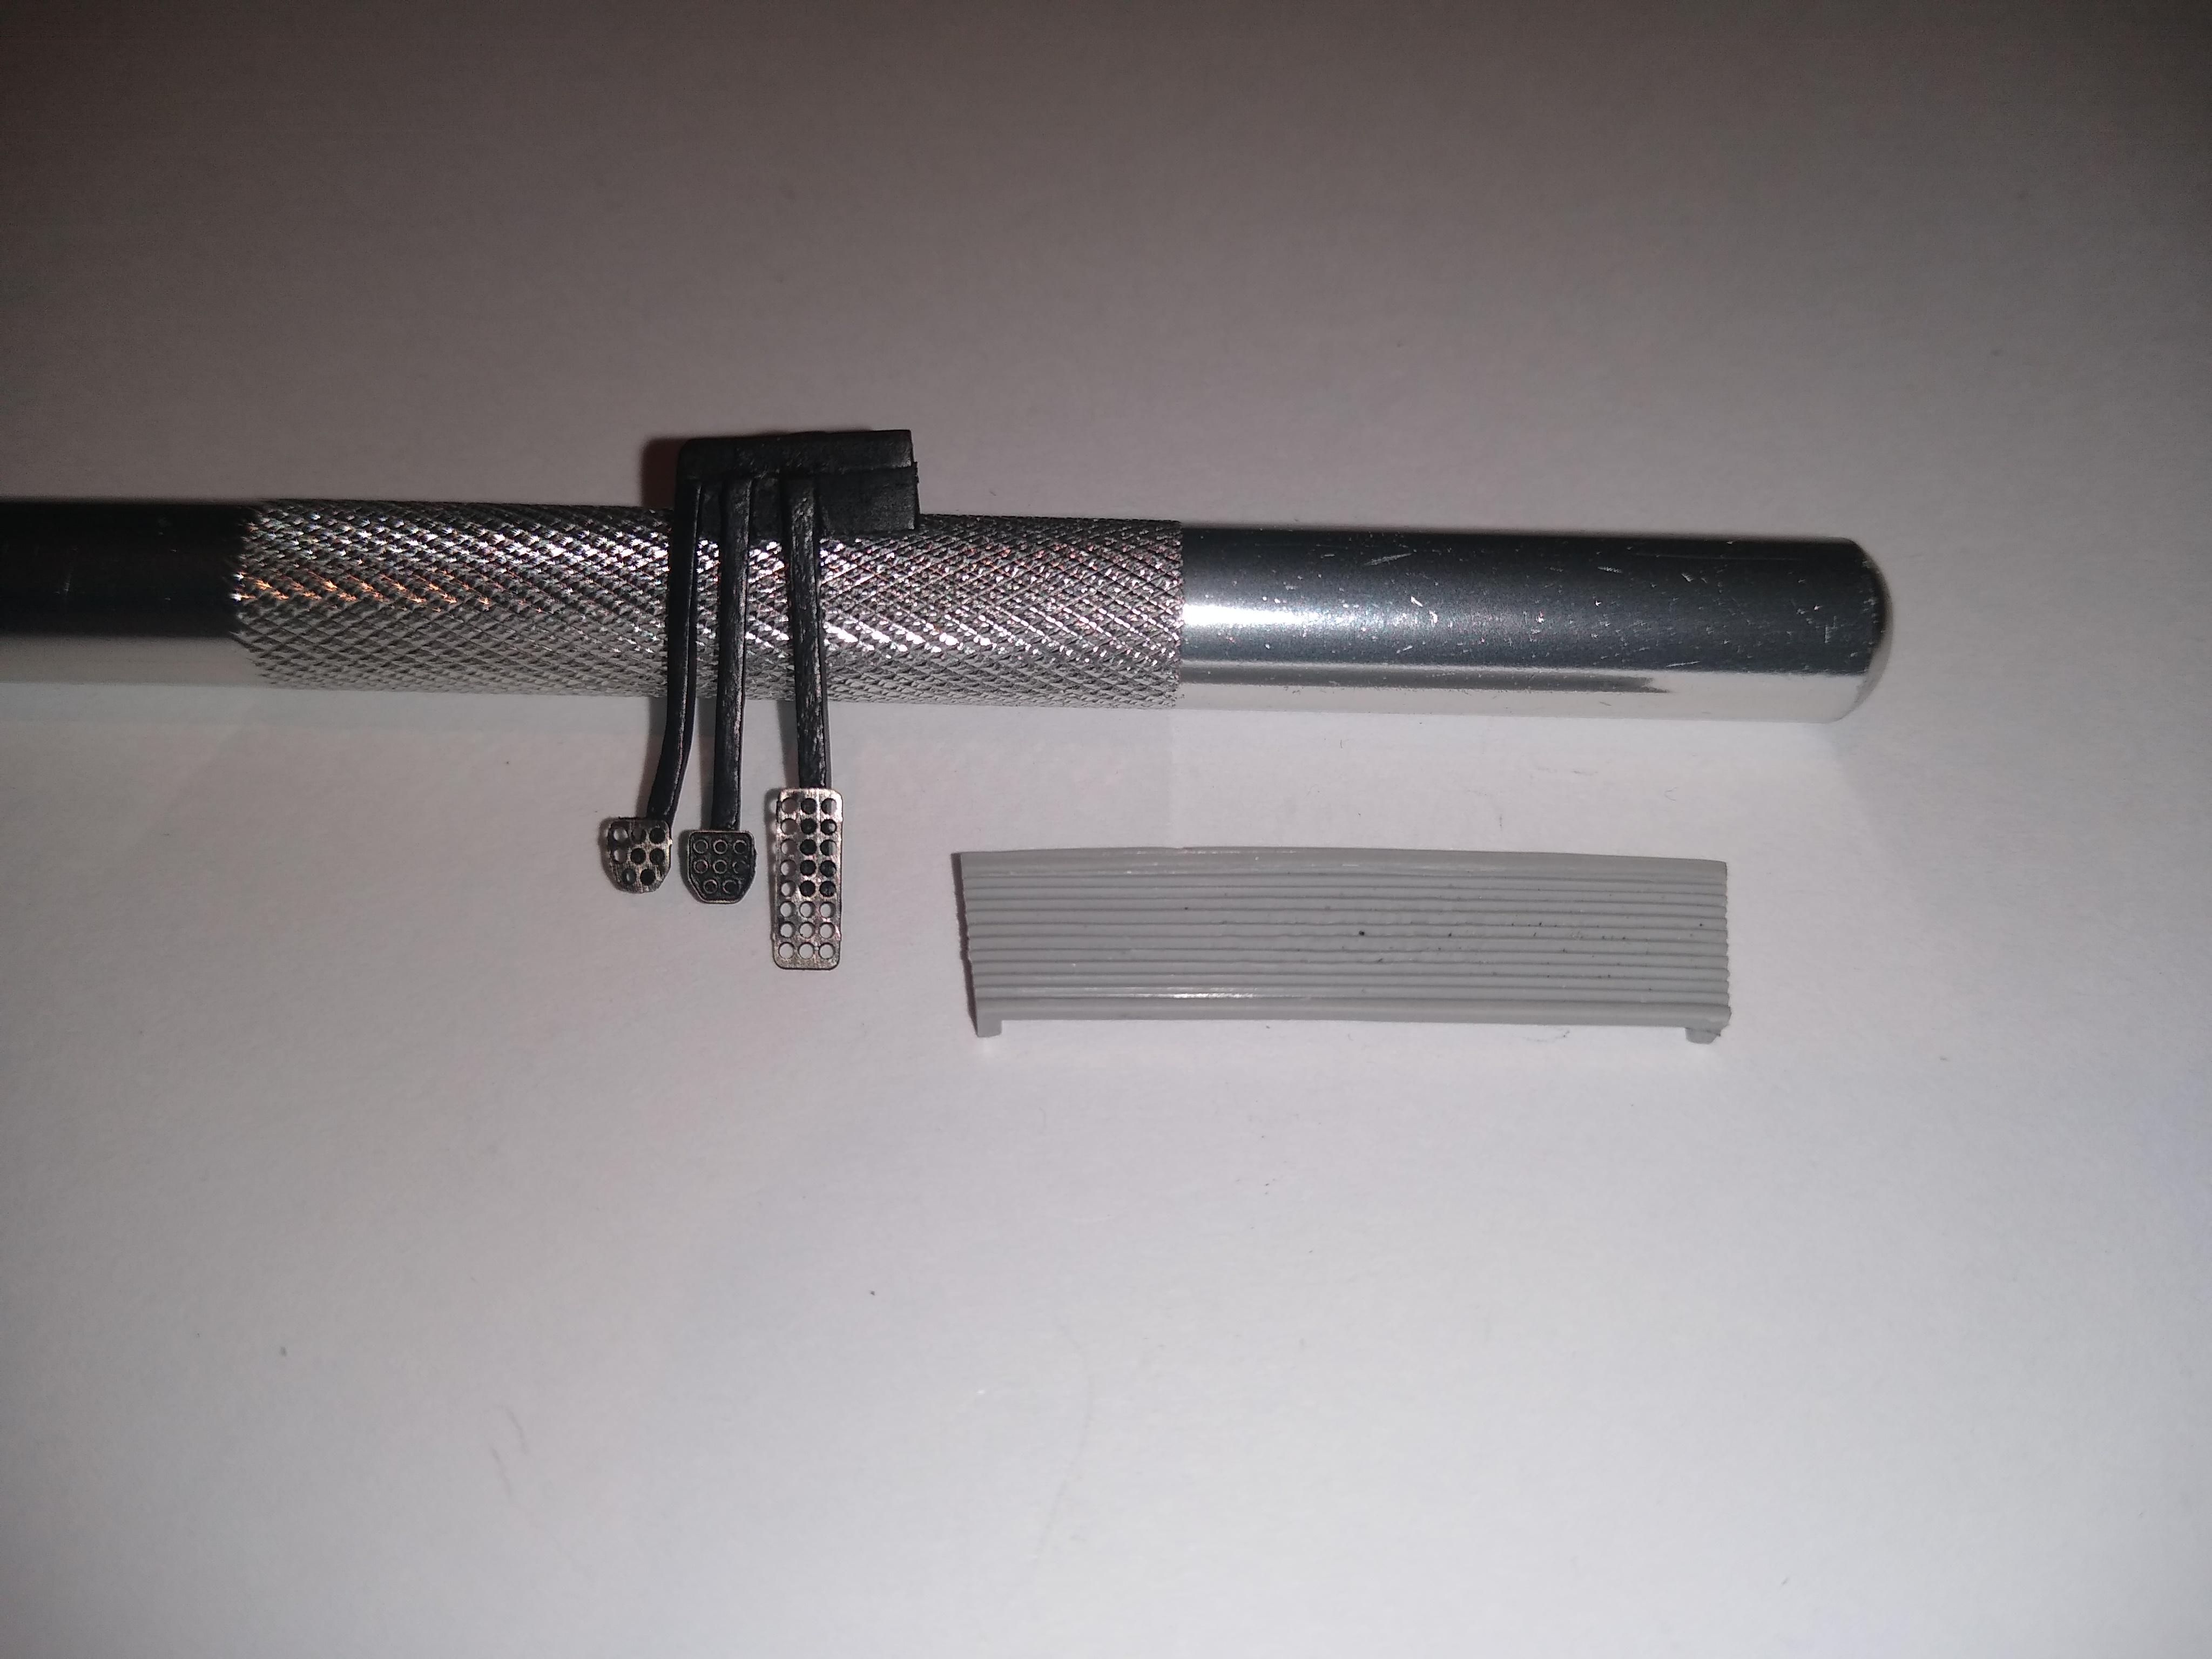
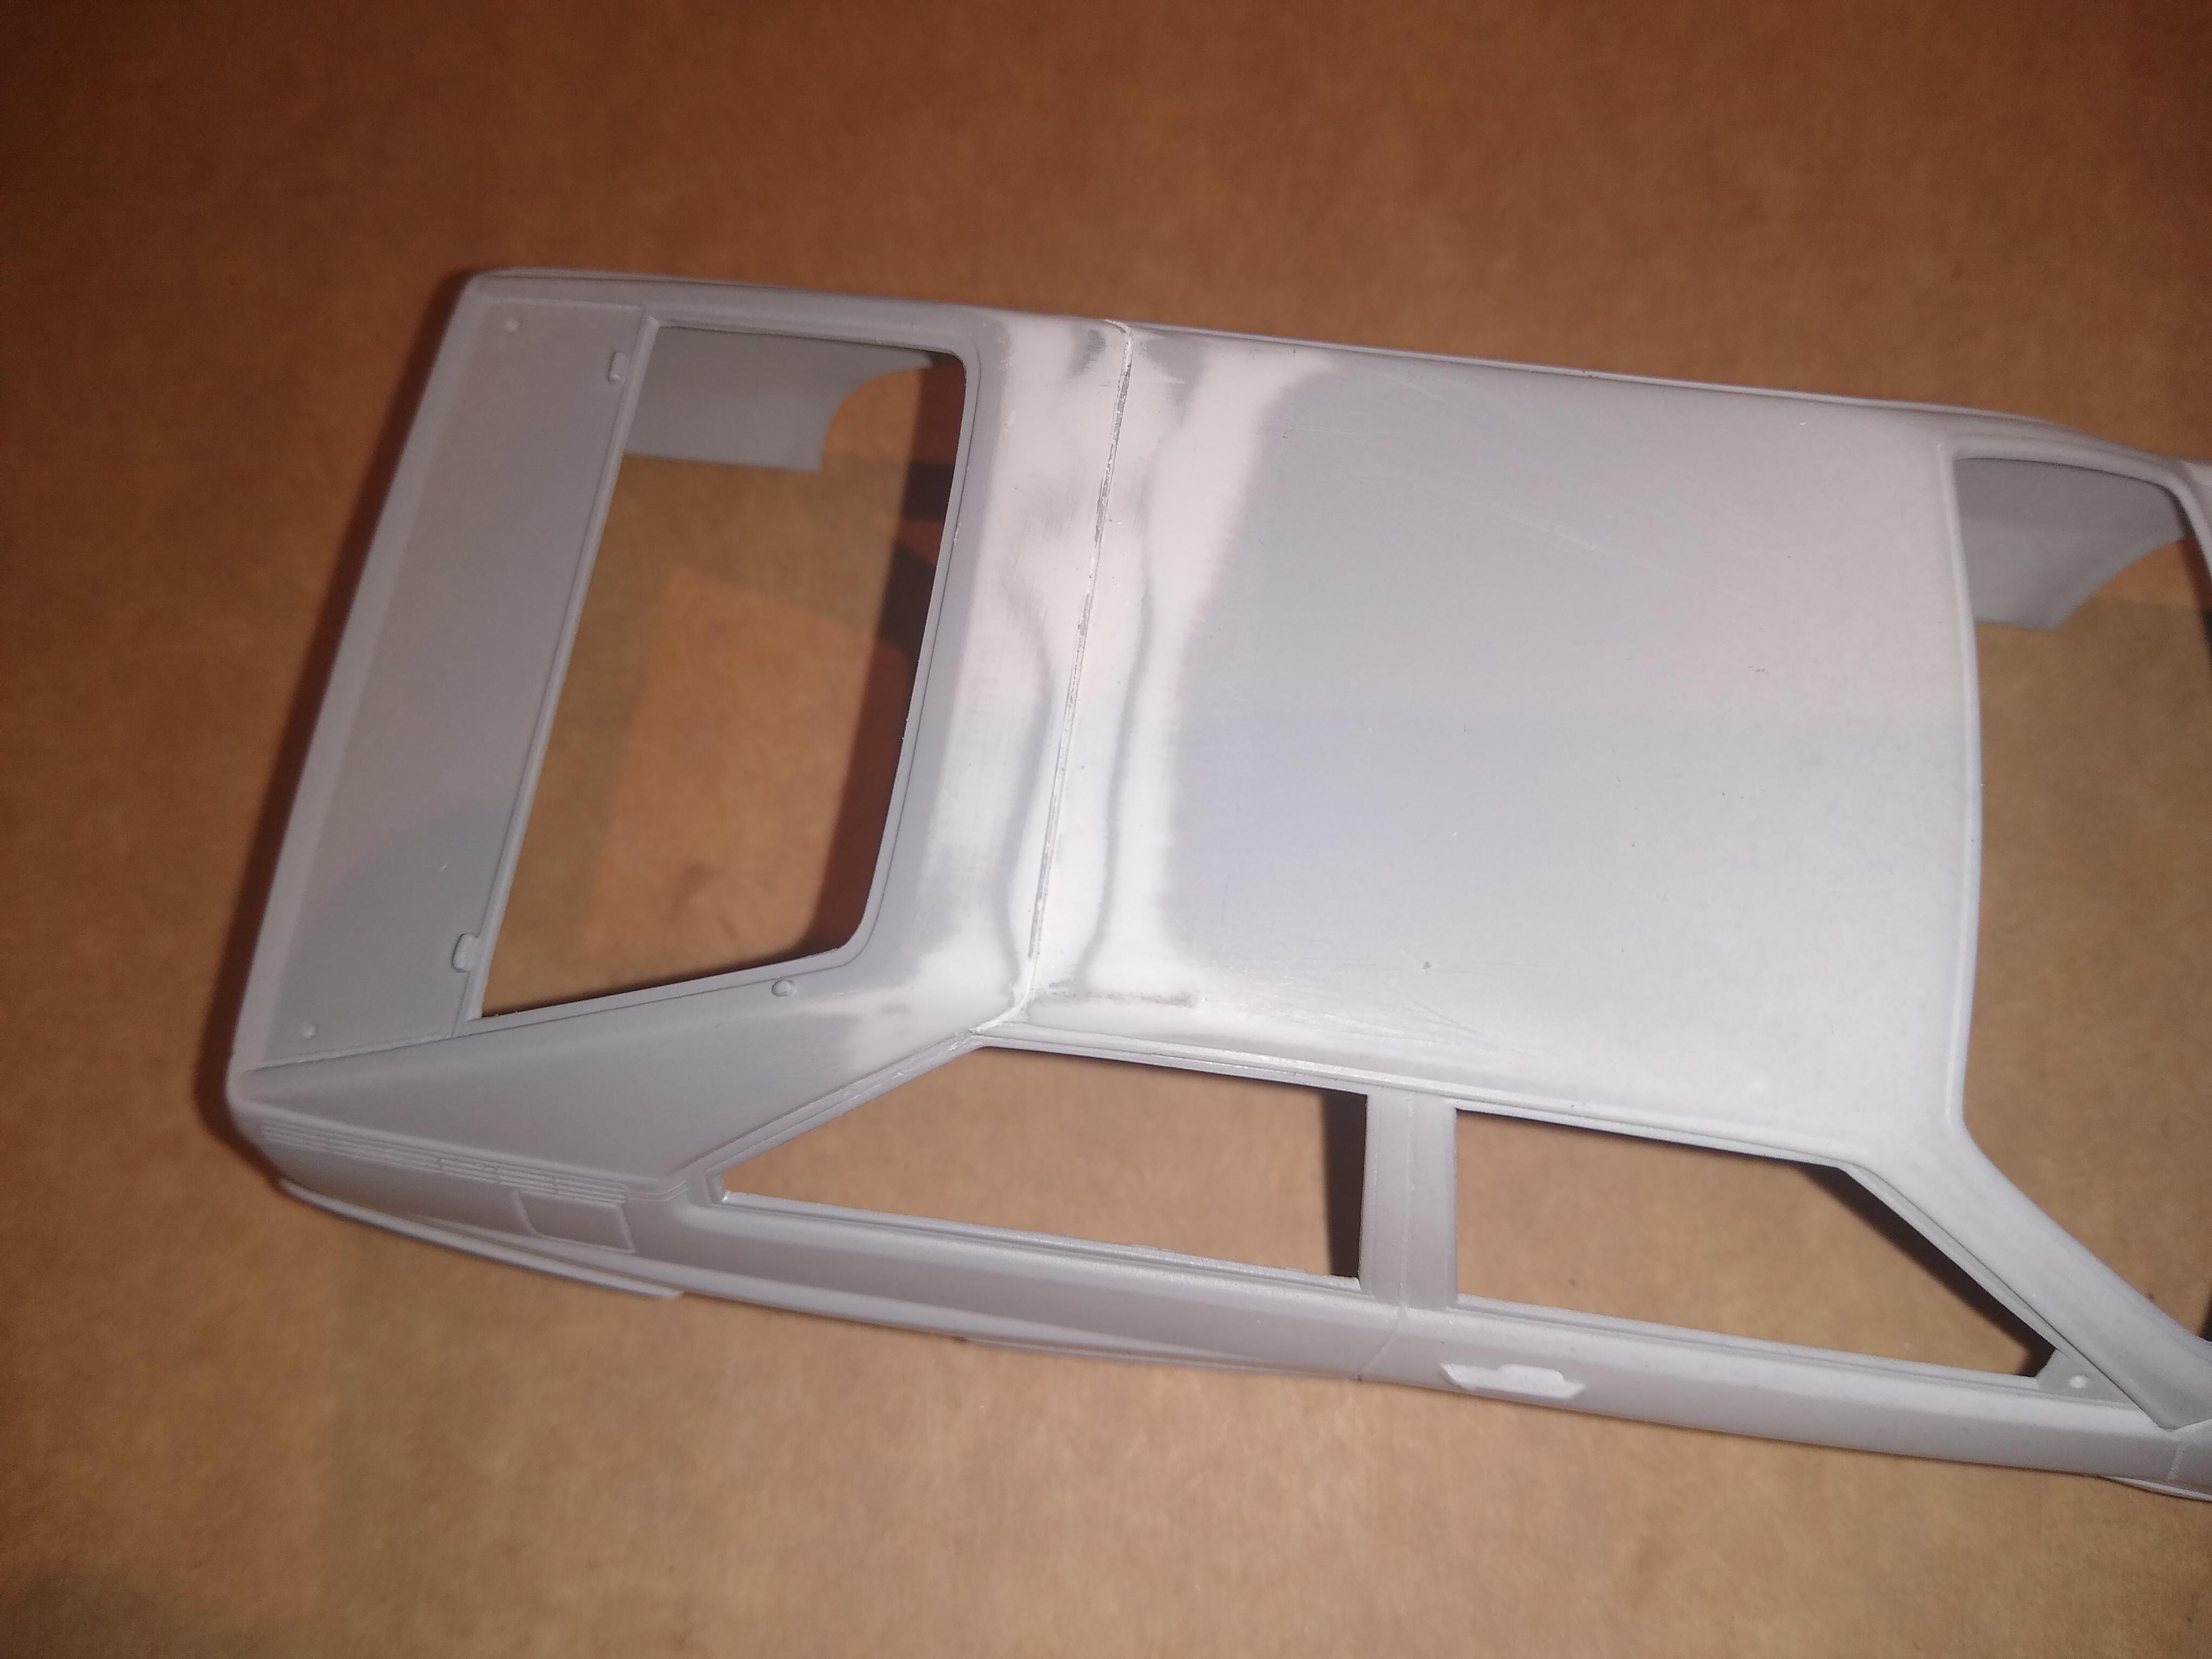
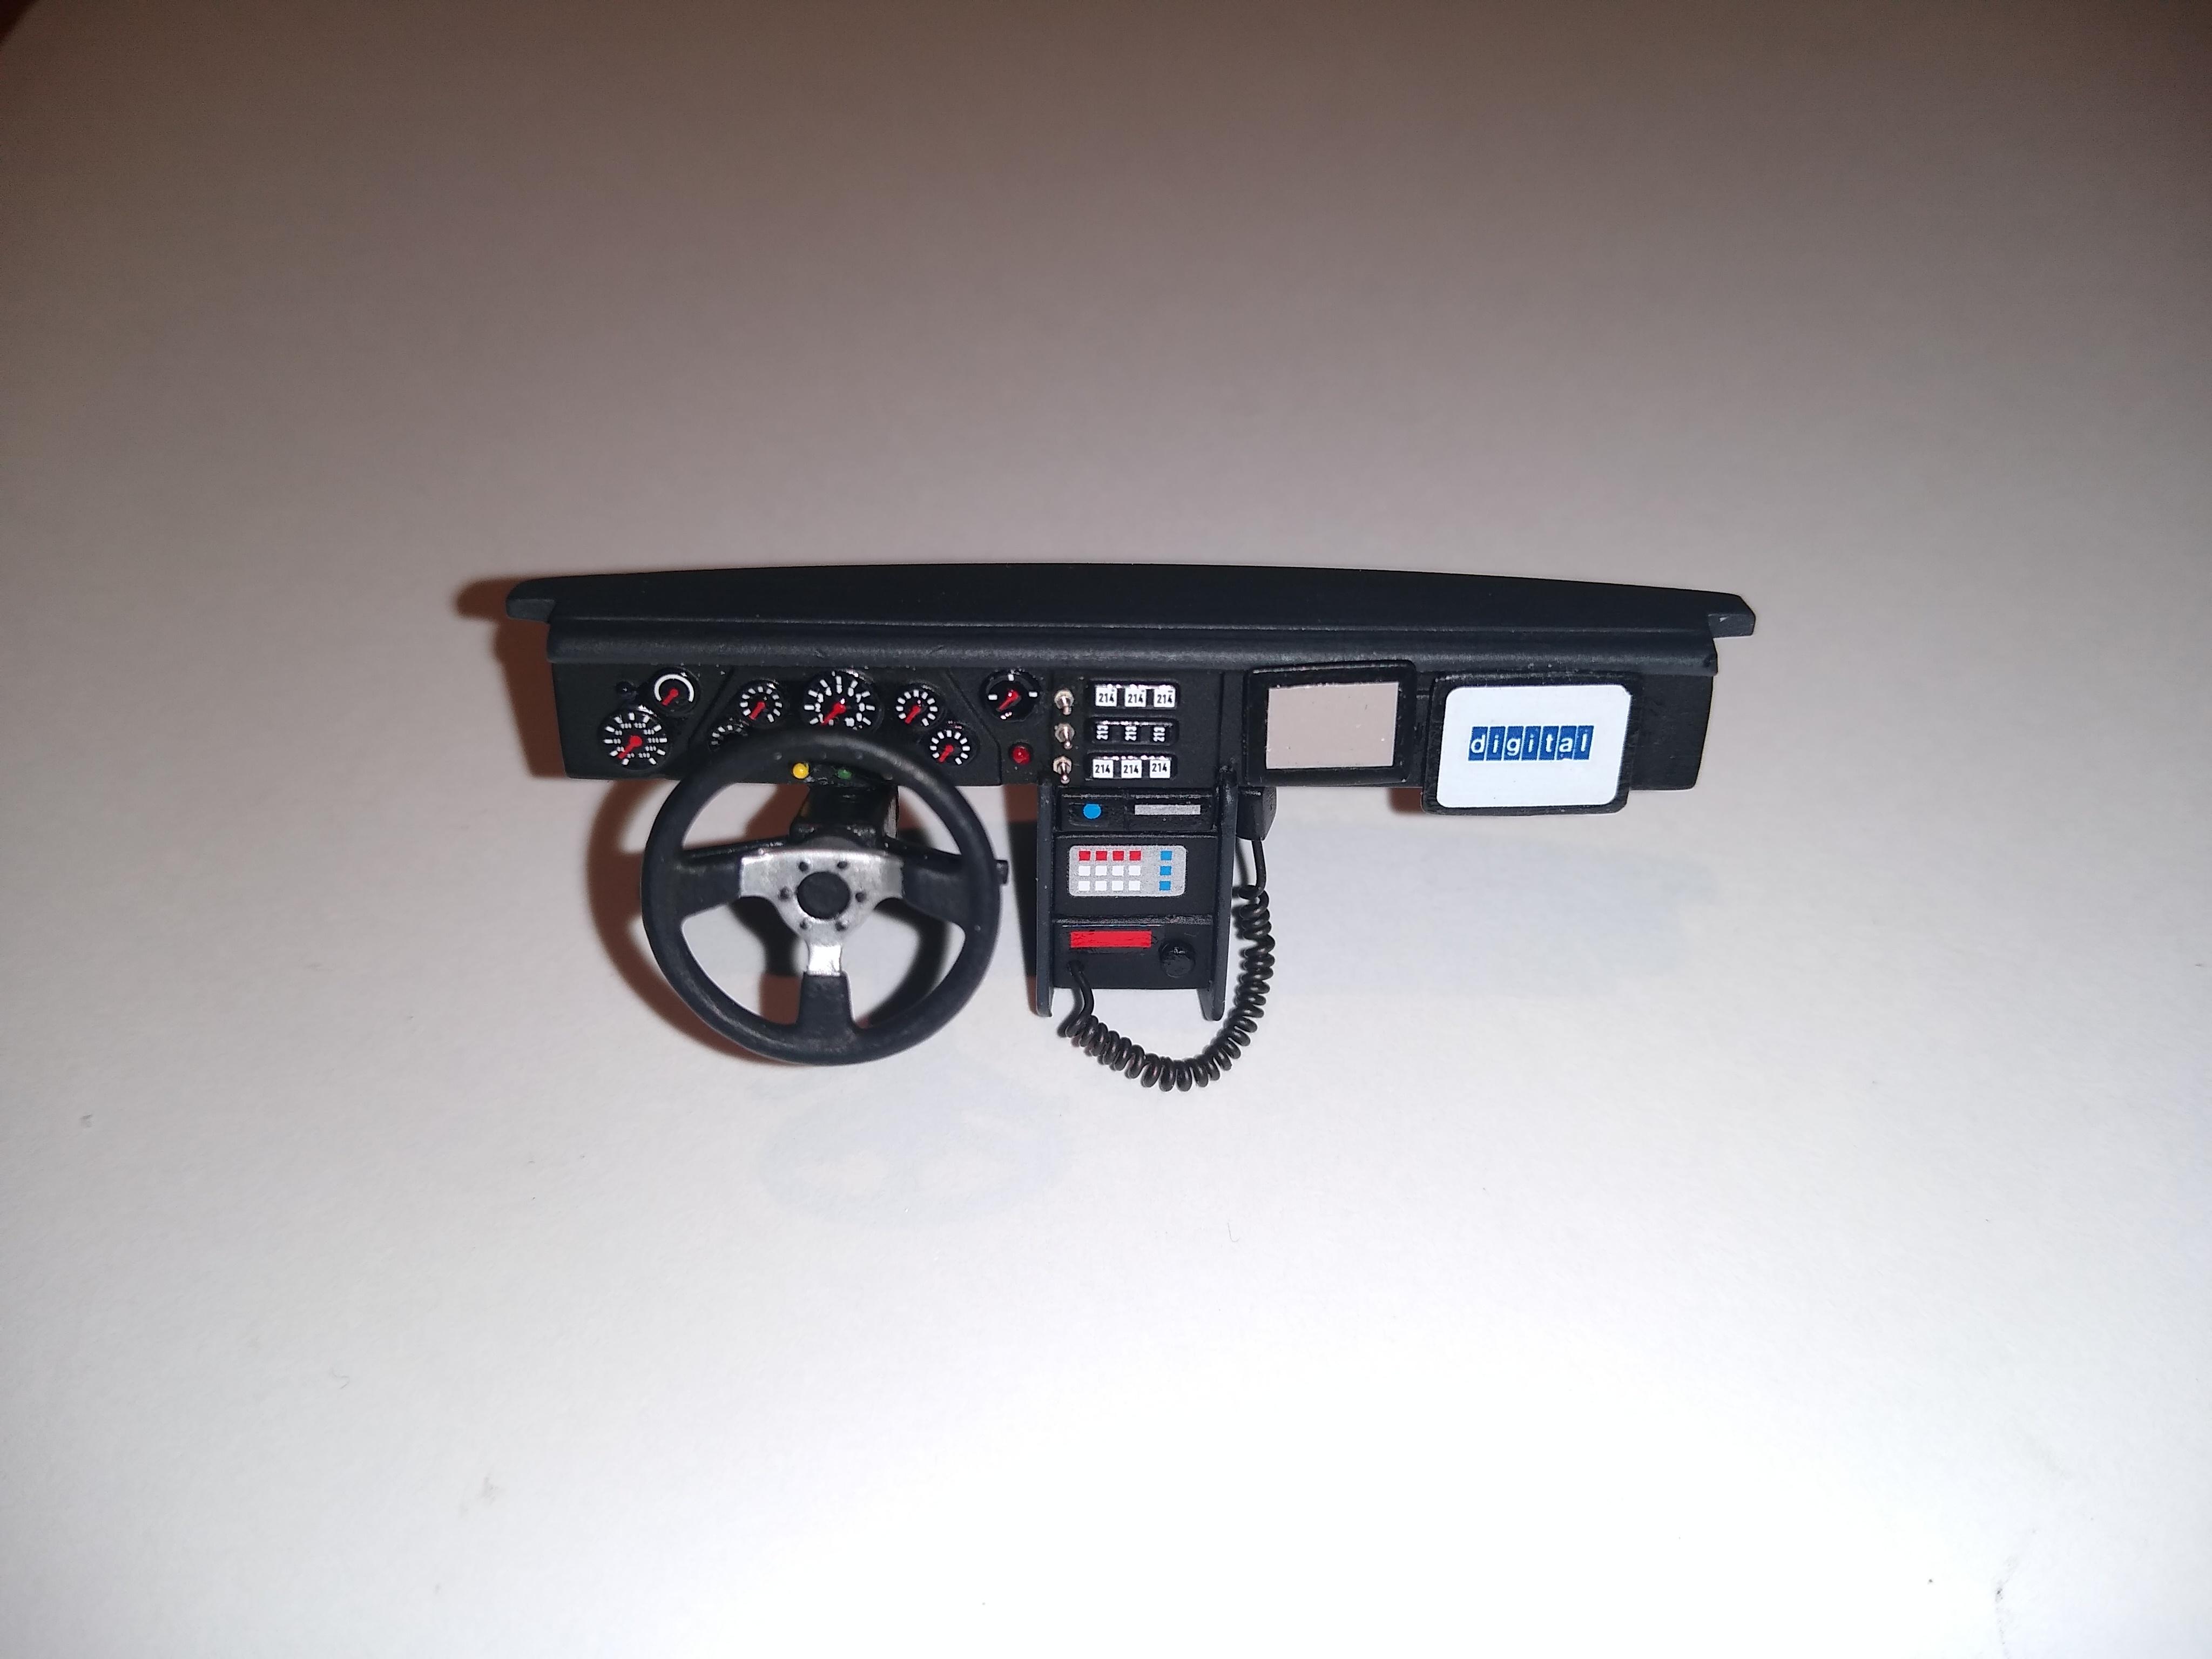
A bit of progress. The bodywork prep has been a long journey that I didn't forsee, not just because of the front end modification but also because of all the cleaning up & scribing needed. First up, I finally got the Tamiya Basic Putty delivered so I could finish the front wings: First impressions of the putty are favourable: it's quick to apply (and set!) & it sands down nicely. I had to fill, sand, then prime 2 or 3 times to get things right, but it's all good training? In altering the indicators/wings, I ended up studying the shell pretty closely and unearthed other significant deviations from the 1:1 car. (I'm not a Quattro afficionado, so I'm learning on the job). The most significant of these is the shape & size of the front bumper, but it's beyond my skills to do anything about & I'm content to just make the best of what I've got. Although not visually obvious, when you pick up the shell you're in danger of cutting your fingers on every single edge because of all the flash! Had to get pretty busy with a de-burring blade before any sanding could take place. I also felt the need to deepen & widen every panel line with my new Tamiya line scriber (which I found to be great) although I got a bit carried away and messed up the boot line on the roof: I tried a quick repair with the Tamiya putty, but found that the edge crumbled when I came to re-scribe. Ended up having to fill the whole thing with Milliput & start over. When I came to scribe this time I employed a trick I recently read & used Dymo tape to act as a guide: Starting with a needle scriber I made a number of passes very gently before going to the line scriber: Still went a bit overboard second time around (I'll have to watch this!) but it's tidy & I'm happy enough. It meant I could finally get the undercoat on!! ? Back to the small bits... Weight saving is my weapon, so I did some carbon Kevlar decals on the seats & sump guard. I don't think the 1981 cars had Kevlar components (I'm happy to be corrected) but this is 2021 and it's MY car! Finished up the pedals. I painted them black then sanded them a bit & decided on the used look. Also above is the front grill which I'm pleased with because I've now all-but-disappeared the embossed Audi badge with a chisel blade & scriber. Lastly, I've been working pretty hard on the custom dash and am now finished: The PE toggle switches were a nightmare! I lost so many of them that I abandoned ship halfway & just used 3. I made a GPS (grey screen) & a tablet (white) and had fun repurposing old decals for the screens and the CB/scanner. Thanks for looking ?
-
How cold is too cold to paint outside?
Pete75 replied to vamach1's topic in Model Building Questions and Answers
No modellers will likely give the same answer ?. FWIW, I generally use Tamiya acrylic cans & have formed the view that spraying below 10C/50F increases the risk of runs developing. However, I often sidestep the issue with the "spraying out the back door" method ? -
#5 Audi Quattro Fine progress guys. Congrats to @89AKurt on crossing the finish line. I've been plugging away slowly & am just starting to get primer on things. I particularly enjoy doing interiors so I've checked off a fair bit here, including finishing the dashboard: The centre console is scratch built, as is the CB radio, tablet screen (right) & GPS. I repurposed some decals to make a scanner (above CB) & spent forever trying to fit the miniscule PE toggle switches ?. The steering wheel is an upgrade from the spares bin modified to fit. Also got some carbon Kevlar decals done for the seats & sump guard to lose some weight:
-
Congrats Kurt ? Don't think anyone will nail the brief with the same kind of creativity - all those add-ons must make her a prime contender!
-
"Who are they going to believe... You're a maniac, Harry." Magnum Force (1973) Great character actor who added class to whatever he was in. RIP. ?
-
A special guy who brought smiles & inspiration to many. RIP. ?
-
Awesome work! Great colour choices & the chrome is really something! ?
-
Alfa Romeo 155 V6 Ti Martini
Pete75 replied to Rich Chernosky's topic in Other Racing: Road Racing, Salt Flat Racers
Wow! Great work. Amazing carbon detailing? -
Gonna be great! Thanks for sharing your engine fit adjustments - will be useful when I come to build mine ?
-
LOL! Love the bottles & cans - ingenuious. And the 1/24 1/24 kit boxes! Safe to say you've travelled the extra mile?. Is it a particular kind of paper you print onto, or just regular?
-
Wow! That's looking really sweet Atin. Glad you're back on it ?
-
Killer build! ?