Pete75
-
Posts
538 -
Joined
-
Last visited
Content Type
Profiles
Forums
Events
Gallery
Everything posted by Pete75
-
 I must confess I hadn't thought of assigning the functions! I'll be adding a couple more to the centre console I'm planning to build but I imagine they'll all remain Top Secret. If the ultra-detailed tool kit in the trunk of your Ferrari 275 is anything to go by, your switches will probably be individually labelled!!?
 -
Thanks Walt, appreciate the input, and that would definitely be "extra rally!" I recall seeing that on in-car footage when I was young & not knowing why they did it ?. The likelihood is that I won't be employing it here, though, as the dash has embossed dials/needles to match the decals (see below). I'm not a fan of this, to the point where I've even considered drilling them out, but the effort/risk is pointing me in the direction of just playing safe. I am taking a lesser leap into unknown with the dash, however, in prepping for unbelievably small PE toggle switches: I've cut/sanded off three raised buttons in the centre & drilled holes with my very smallest bit ?. So far ok, I think... That's a real beauty there, Nigel! Definitely useful for reference too, as the Tamiya kit seems to have a more accurate front end than the Italeri one - which I'm currently doing some minor surgery on...

-
That's inspired; and the kind of thing that could only come from (what sounds like) an ENORMOUS stash! Looks a strong contender ? ?
-
Very interesting stuff. Don't get how the bonnet/hood shut lines look tighter than the moulded lines on the kit before you cut it?! (Knife > scribe > razor saw, if I read correctly?) I've got a really fine saw but it looks wider than that... ?
-
Just beautiful! ??
-
I have to say, a Thule box with a hidden spot lamp is brilliant... Give the man the trophy now! ?
-
Beemax Starion Grp A
Pete75 replied to ShawnS's topic in WIP: Other Racing: Road Racing, Land Speed Racers
Love that grill construction - fascinating ?? -
Great work. You've owned some pretty cool cars between you both! ?
-
Hi Steve - welcome! ?
-
Nice factory you've got going there! I knew that was from Grease!! ?
-
Now THAT'S a custom project! Awesome thread - so much info I can come back and refer to, it's like a scratch builders handbook! ??
-
Thank you sir - appreciate it ?? Thanks Kurt, that's exactly the kind of input I'm looking for, and the earlier the better! I had a great time reading through your "Celexus" build, although it made me regret including the word "custom" in my thread title... so I changed it!! ? The kit does have correct gauge decals: they're clustered and supposed to be laid over the multiple raised dials in one go, but I'll (probably) try to cut them out and lay each one individually. It may take a while... ?
-
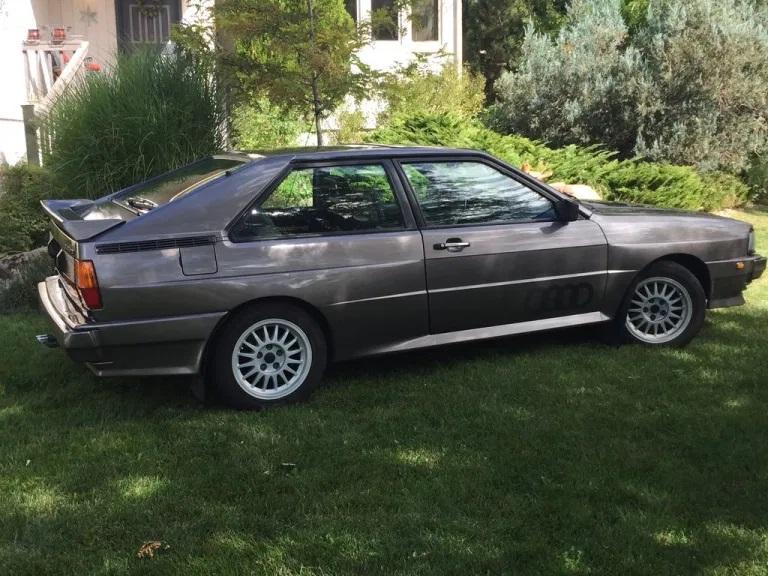
#5 is now a WIP, too: Audi Ur-Quattro "canno-flage" street-rally. Amazed at how far some of you got in such a short time!! Some awesome scratch building going on - really interesting to watch. My progress is going to be more sedate & rather less ambitious, but I'm getting into it nonetheless. Because the Quattro WRC exterior easily converts to that of a road car, much of my efforts will revolve around making the interior "extra rally". Discovered that the Italeri kit doesn't have anywhere to anchor racing belts so I've tried scratch building a copy of the 1:1 roll cage rear section: Another first for me is making my own styrene arms for PE pedals (I also filled in the foot wells, which were too deep):
-
This project is part of the 2021 Cannonball Run group build. The theme this year is "race cars in disguise": competition vehicles modified to travel the highways under the radar of law enforcement - in every sense! The '81 Audi Quattro WRC 1:24 by Italeri is my chosen kit: My aim is to turn it into something similar to this (a later model, but you get the picture): It must be said, from the outside, there aren't huge differences between rally & road cars once they've been to the spray booth. This led me to consider whether I should actively "dorkify" the thing (like some non-Quattro Audi Coupes of the era) but I concluded that I'm not prepared to spend time building something I don't think looks cool: it won't look like a race car, but I'm not going to turn it into a shopping trolley either! I plan to lower the high gravel suspension and switch the wheels, plus tint the rear glass (to disguise the rally interior) and remove the front windows (for display purposes). And, apart from upgrading the exhaust system, that's pretty much it for the exterior - the rest of my effort will be channelled into the interior. I don't have the skills (or mechanical knowledge, frankly!) to be dropping an engine in, but I plan to extend my scratch building knowledge with some creative cockpit upgrades. While the exterior may easily switch to looking like a road car, I plan to make the interior "extra rally". Many of the techniques I intend to use will be a first for me, so any suggestions/tips from experienced builders are welcome. First thing was to mock up the cockpit to see what's what. (The only thing I glued was the roll cage, but not before spending a LONG time sanding off all the flashing). After comparing it with my reference photos, I would say it's pretty accurate: it's not Tamiya, but it's not bad. I was keen to see how to go about fitting aftermarket seat belts. The 1:1 WRC car had its belts tethered to a bar running between the rear struts, but the kit doesn’t have this rear cage section. I had hoped to be able to simply “weld” in a simple alternative, but no dice. The kit (accurately) has angled bars close to the headrests and in a position where the belts coming through the seats can only pass either side of them and anchor somewhere behind (like the 1:1 car), or the belts would have to be very short and tether immediately behind the seat. I didn’t like the second option so I gathered up reference pics and decided to try my hand at roll cage fabrication… After taking measurements with the body shell on, I drilled fixed anchor points above the wheels then worked upwards from here, gluing several sections of 1.6mm rod together before then sanding off sharp corners & adding putty to neaten up. A candle was used to bend the small vertical sections, but I should’ve done it before I started assembly because I burned the horizontal bar! I noticed from the mock up was that the kit seats are positioned too far forward on their runners compared to the typical position seen in my reference pics. A nice straightforward fix here using a razor saw/file to increase the length of the front notched section. (Also, I had to shave off injection nodes from the base of the seats to get them to sit right). I decided that the designated position of the handbrake & gear shifter is too far back, even with the seats retracted. I’m planning on doing something non-stock here anyway, so best to just sand off the mouldings - together with the pitiful “pedals”. Whilst doing this, I noticed the foot wells seemed too narrow to put proper pedals in: it took me a while to figure it out, but I think it’s because they’re too deep, so I made some paper templates and laid some plasticard panels in: Finally, I had a go at making styrene arms for some PE pedals. VERY fiddly, but I found it really satisfying! I’m thinking I’ll spray the assembly with black primer then sand the paint off the pedal faces? (If that doesn’t work, they’ll have to be all black – the chassis is silver so it’ll look cool either way.)
-
Fascinating stuff - a really useful insight into advanced surgery! Will be following closely ?
-
The guy who currently holds the record (in the video posted in last year's build thread) used 260 gallons of fuel. It wasn't a Honda, though.
-
Testors (Gunze Sangyo) Lamborghini Spelling Bee Special (Silhouette)
Pete75 replied to 89AKurt's topic in WIP: Model Cars
Shame about the first paint but the new shade is pretty darn cool! I'll say this: stripping airbrushed paint appears WAY quicker than my experiences getting spray can paint off. Looks to be no big deal! -
What Are You Planning/Hoping to Build in 2021?
Pete75 replied to Snake45's topic in General Automotive Talk (Trucks and Cars)
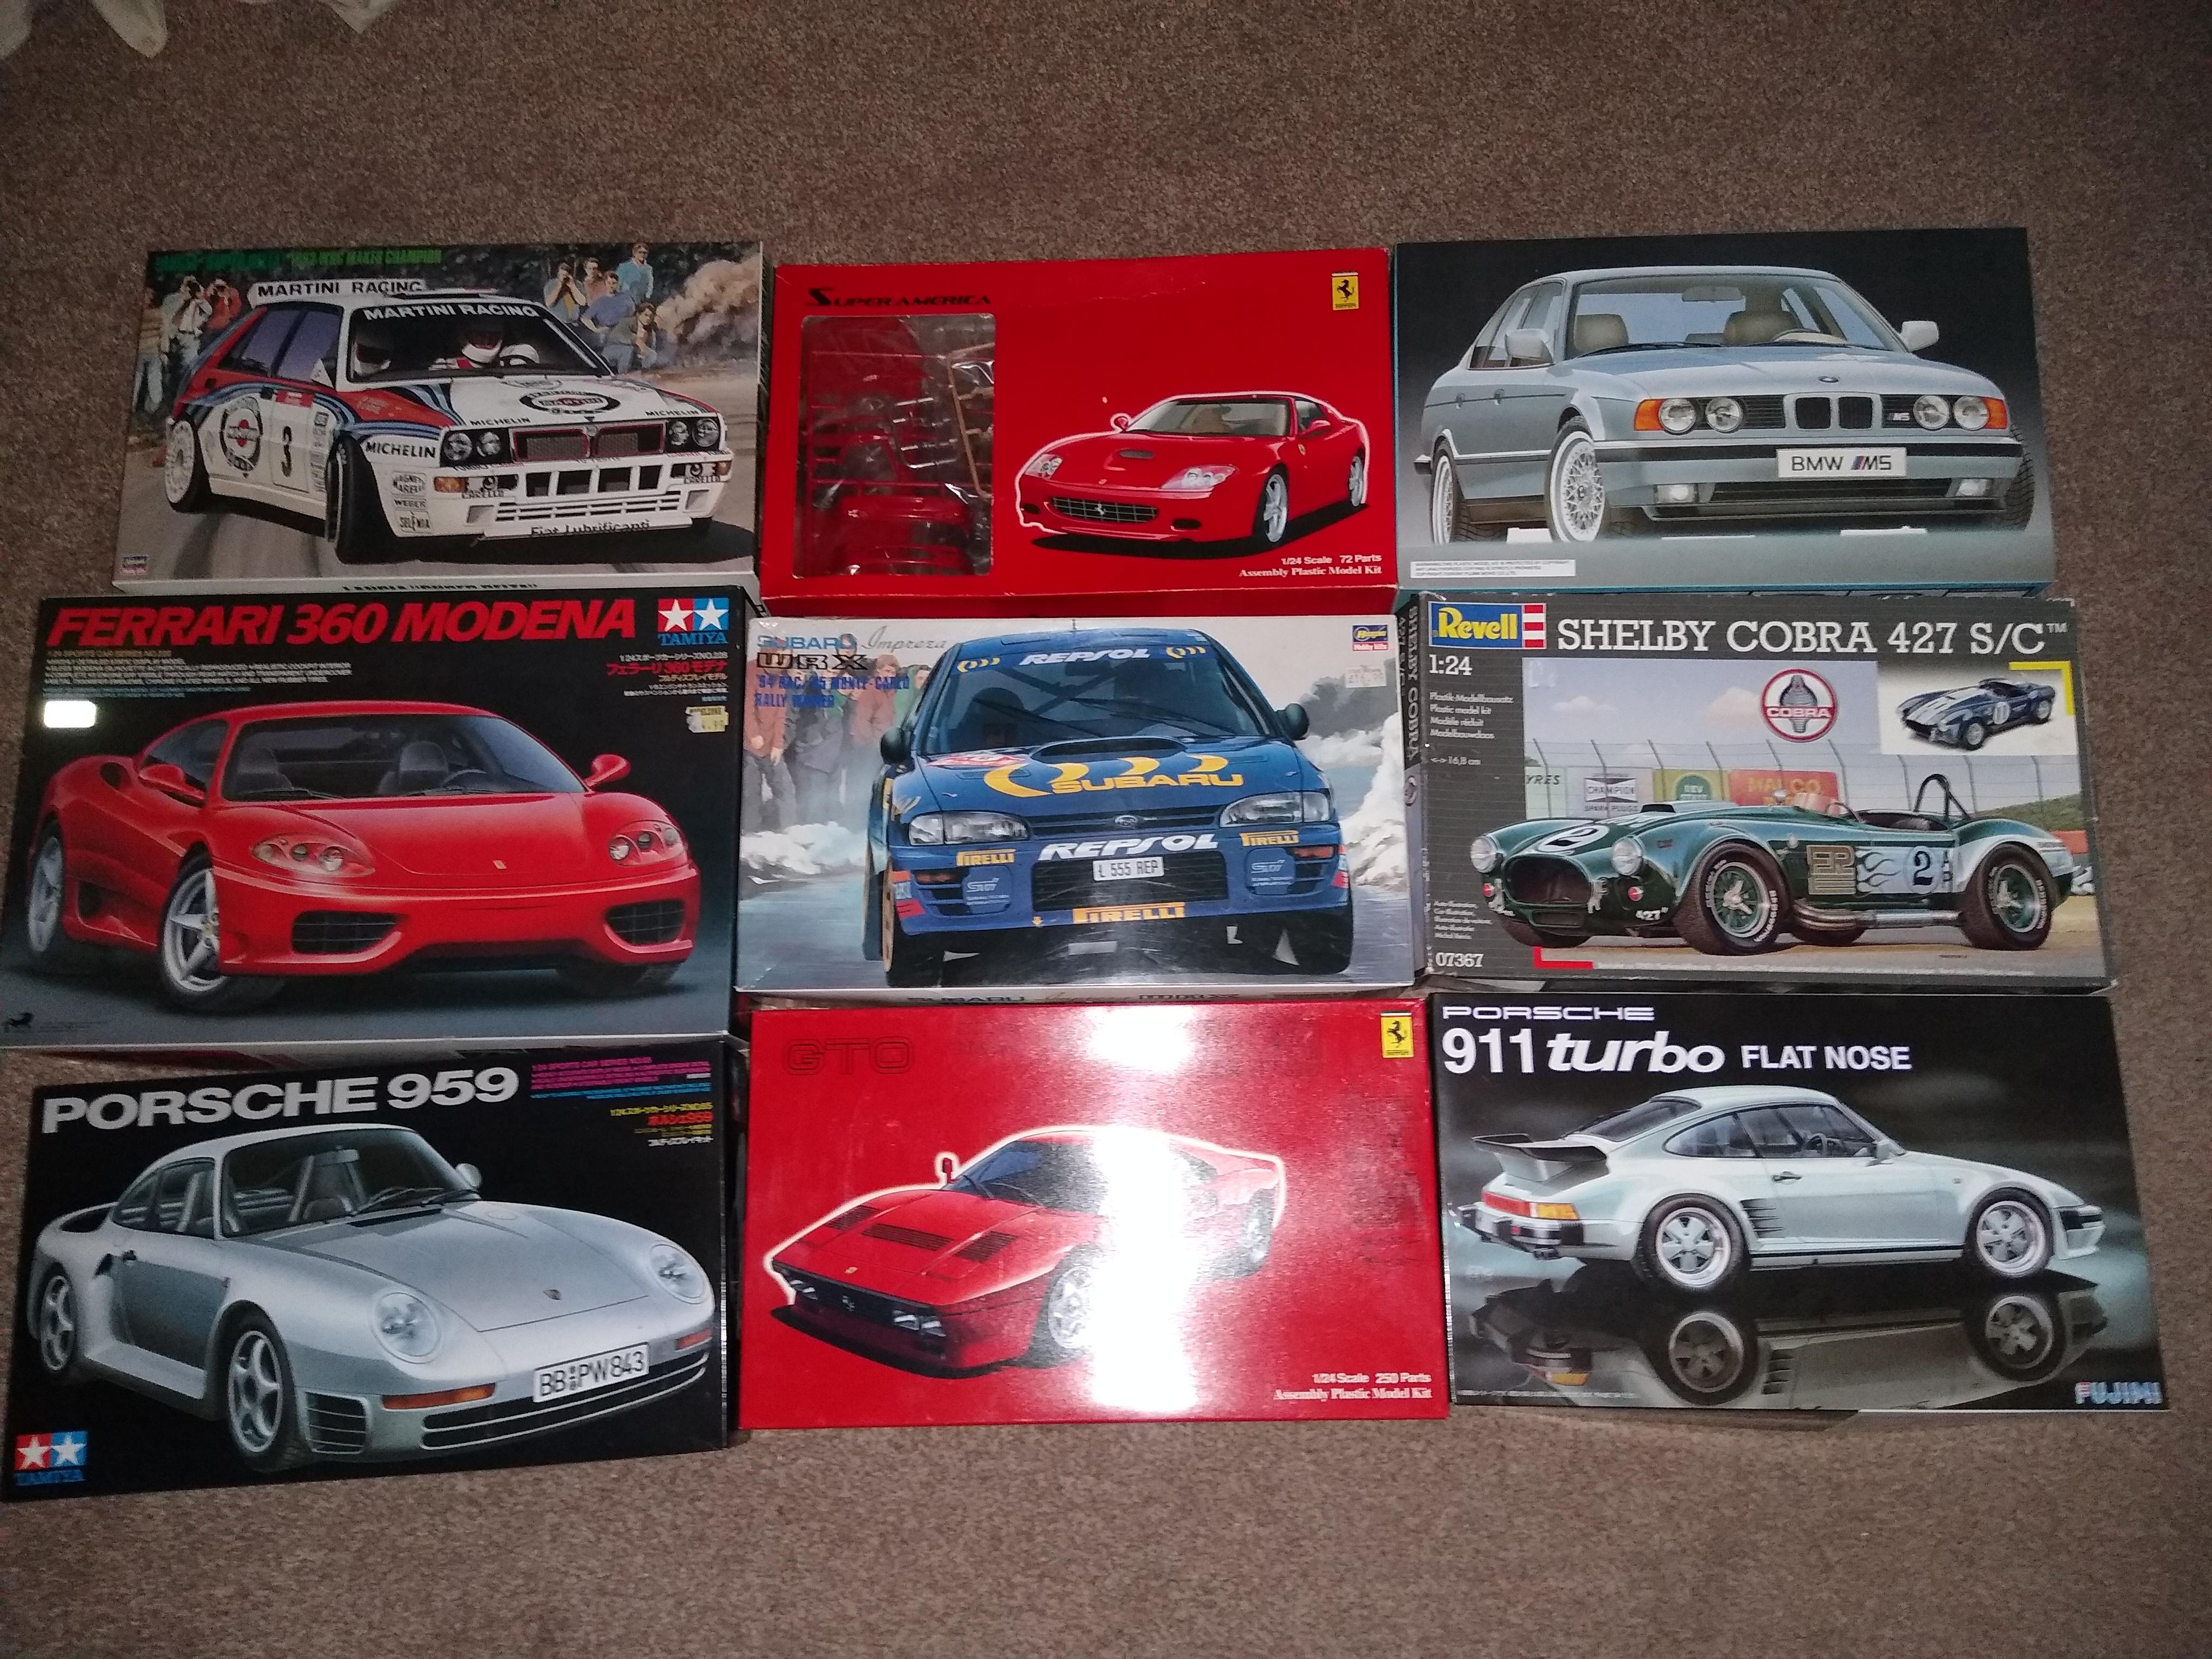
My stash is unremarkable apart from it is supposed to compromise of no more than one kit... Thing is, how do you know you'll ever get the same opportunity to buy it for the right price in future? ? Hope to get some of these done unless urgent newcomers leapfrog them!
-
Porsche 911 Twin turbo
Pete75 replied to Tortuga Kustomz's topic in WIP: Other Racing: Road Racing, Land Speed Racers
That's going to be a seriously mean Porsche!! Really like the front spoiler & BIG wheels! ? -
Terrific group of builds - and such a fast worker! Looking forward to see what you do in '21 ?
-
Amazing work!?
-
Wow, great job - it was all worth it in the end! Love the backdrop ?
-
?Forgot about Cobra Kai! Not long to wait now. Glad your package has been shipped, which is more than happened when I tried to buy a spare kit for last years run - somewhere in Hong Kong a low-level crook is still laughing at my request for a confirmation email!! Happy New Year Cannonballers! ?
-
Awesome stuff. My vote goes to the 275: I've never seen interior detailing done that well before! ??
-
Lotus 98T A.Senna 1/12
Pete75 replied to wartje's topic in WIP: Other Racing: Road Racing, Land Speed Racers
Wow! Brilliant. What technique do you use to get the silver raised writing on the valve covers so sharp?
.jpg.e249a4706cf1404c9178b906d91b57e0.jpg)
.jpg.9442caf3bcc2f1010e0920833a76928d.jpg)
.jpg.156c3e9ba3ef9500eced1d97b10bfdfd.jpg)
.jpg.d4a836bce79db8f4153f5251c7d97dc9.jpg)
.jpg.932fa7b308aaa43efe9fcf29ac589013.jpg)
.jpg.3da477ae6037cc68364035187684736f.jpg)
.jpg.ead0c9a81be84b46dd99d015a77b5f52.jpg)
.jpg.033837794945128571bccbec9c98c43e.jpg)
.jpg.af00061ca802decd59528822d2e28505.jpg)
.jpg.e4b774506f5bea6f6192a4b3af59fe49.jpg)
.jpg.f73600698dffe76151c557dbffb472f8.jpg)
.jpg.d610001dc9256c00756a126bb03dd9d1.jpg)
.jpg.bdee5411b9a5a663215c5f757f991058.jpg)