AmericanMuscleFan
-
Posts
3,058 -
Joined
-
Last visited
Content Type
Profiles
Forums
Events
Gallery
Everything posted by AmericanMuscleFan
-

’72 Dodge Demon Drag Racer 1/25 scale
AmericanMuscleFan replied to AmericanMuscleFan's topic in WIP: Drag Racing Models
Thanks Pierre, your funny my friend. However, what you are describing is supposed to happen only after the second bottle but you seem to have big bottles, maybe after the first one it would be normal... 🤣 Too bad I'm leaving for work, I would have loved to have a drink with you! 🍷 Francis -
’72 Dodge Demon Drag Racer 1/25 scale
AmericanMuscleFan replied to AmericanMuscleFan's topic in WIP: Drag Racing Models
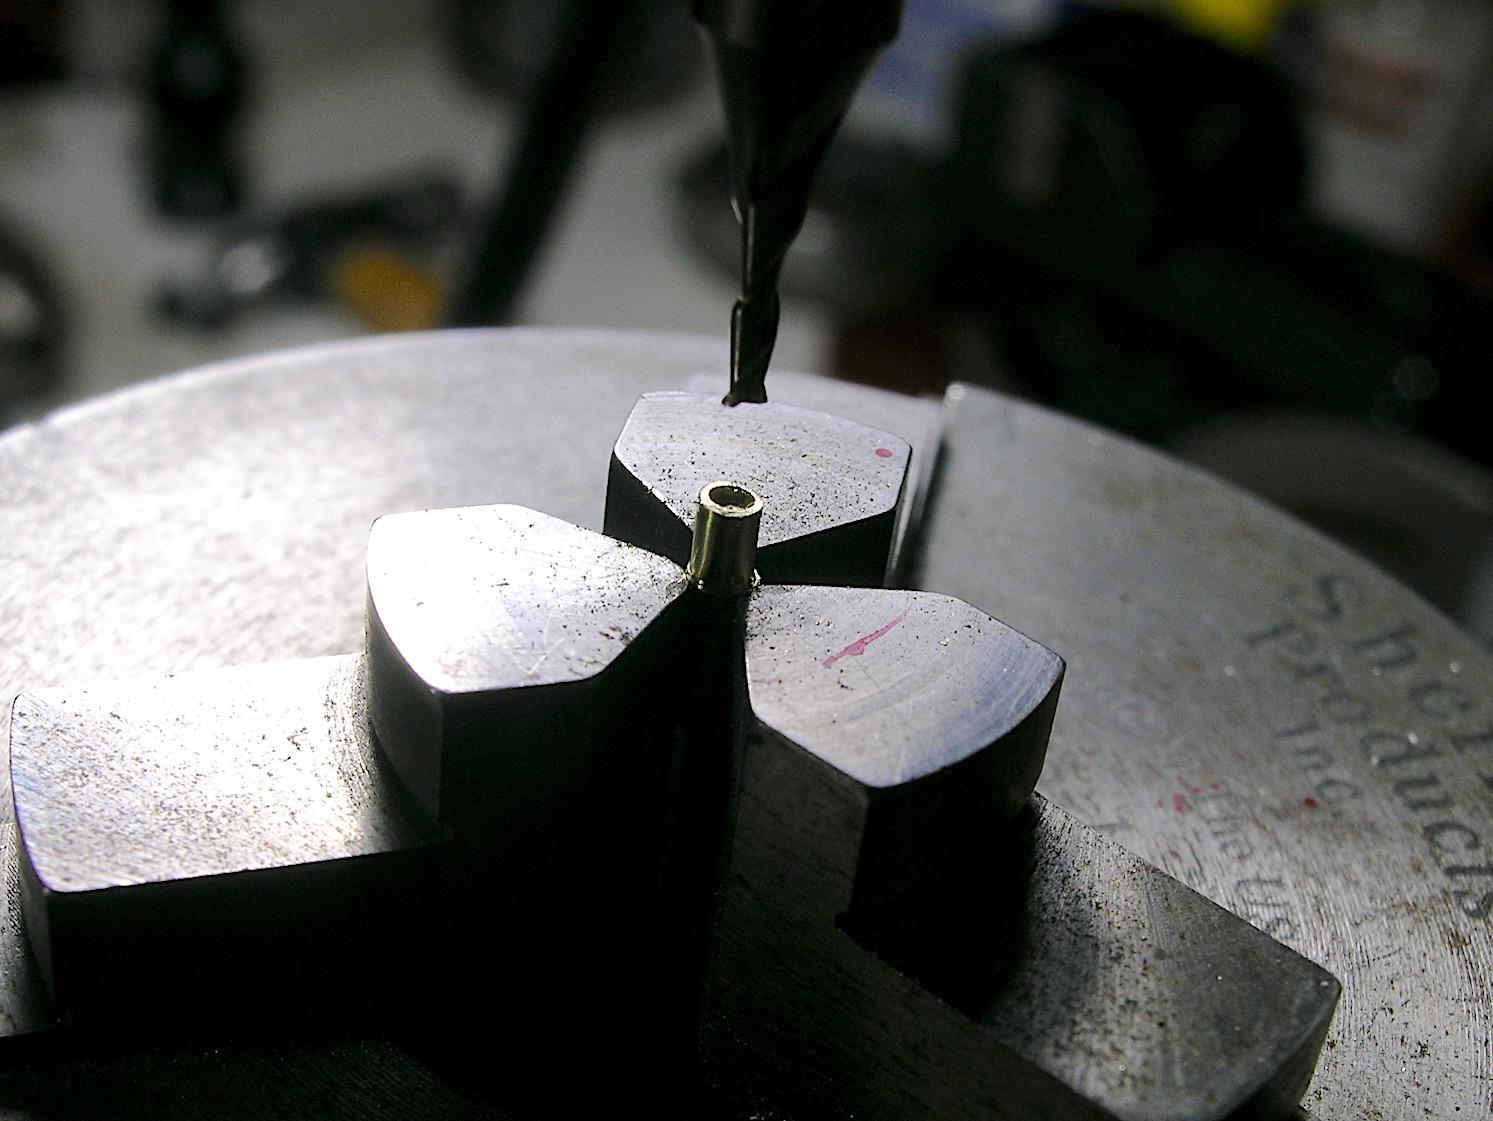
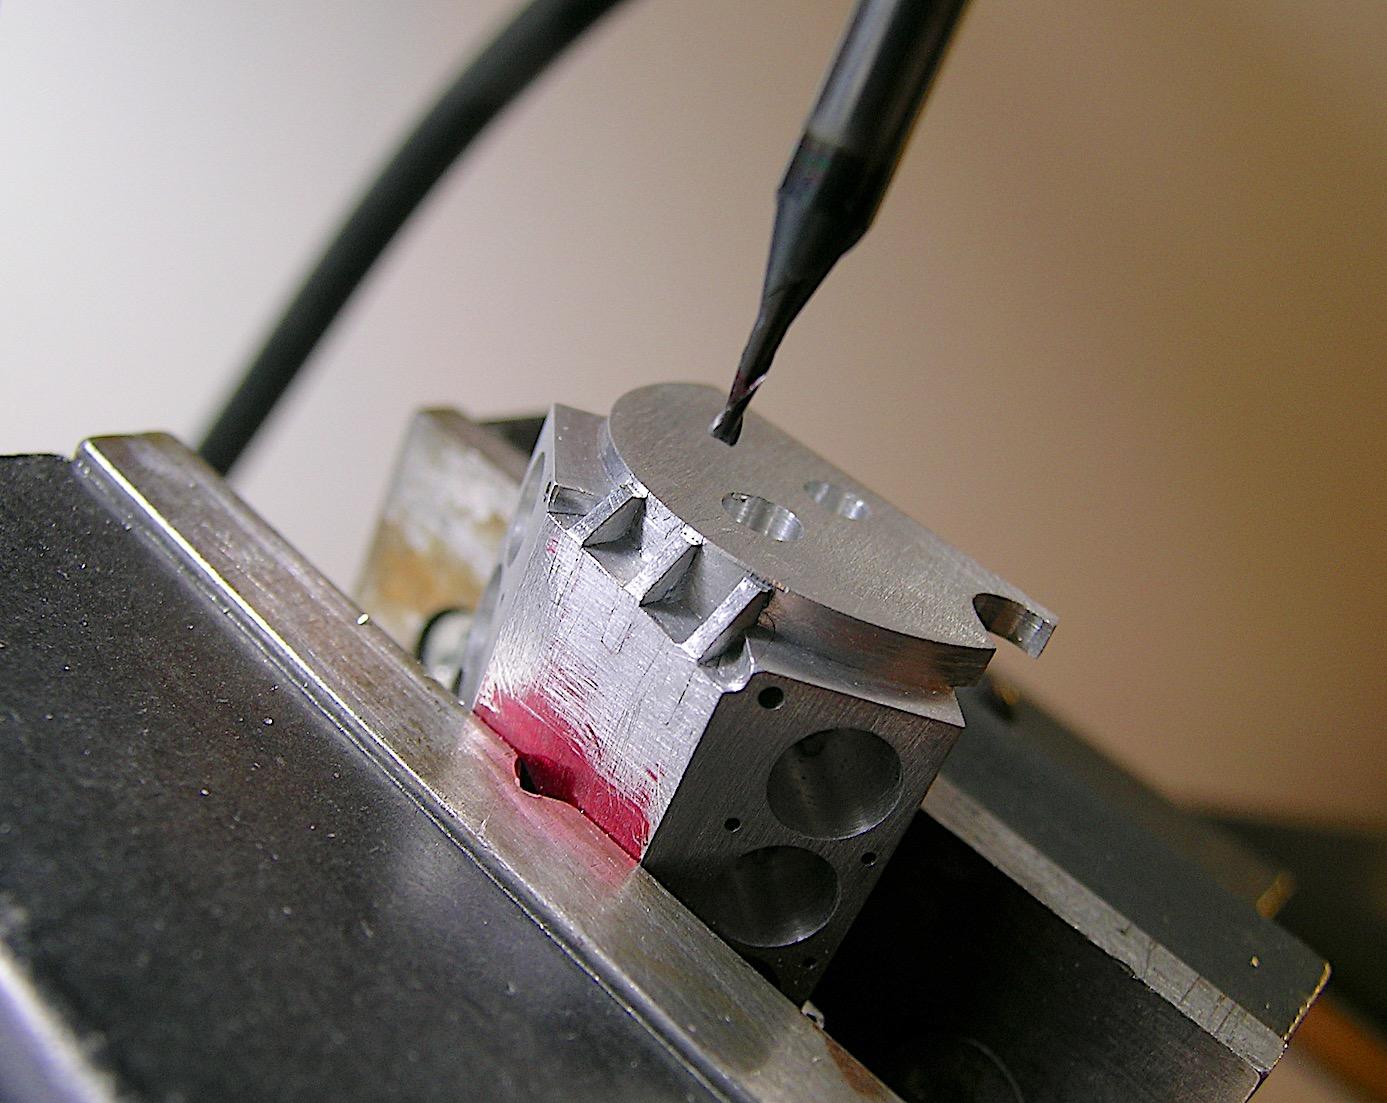
Thanks Mike, I really appreciate your comments! What would be crazy would be to have invested in a CNC to make model parts just to satisfy your precision madness. 😁There's really no limit to what you can do when you're motivated, it's just a longer road when you do it the traditional way with good old cranks! As a bonus, it's good for the neurons to figure out how to get there! To answer your question, I have a photo, it's very easy to do and it amuses me a little to see that what is probably the most simplistic detail is what produces the most reaction. I calculated 1 5/8 inch for the plugs, so I reduced a 0.080" brass rod to 0.065" and used a 0.050" end mill to make the depression. They are pressed all the way into the side of the engine block, no glue or epoxy was used. I hope that answers your question. Francis
-
There won't be much of the original kit left when you cross the finish line Andrew, can we call that improvements or is it attention to detail? Maybe it's love, it makes you do crazy things! 😁
-
’72 Dodge Demon Drag Racer 1/25 scale
AmericanMuscleFan replied to AmericanMuscleFan's topic in WIP: Drag Racing Models
Thanks Bob, I didn't write down the exact time I spent on it (I never do that for any piece) but it's in that range. My approach is to work slowly and plan the next operations so as not to remove material that will form subsequent details, I don't have a technical plan, it's all in my head so to speak.. Measure twice, cut once as they say! 😉 I'll be working on engine heads and valve covers next, hopefully I'll have a bit more time before I close up shop for the summer, I'm into what I love most at the moment! Francis -
formula 55 chevy
AmericanMuscleFan replied to charlie libby's topic in WIP: Other Racing: Road Racing, Land Speed Racers
You're keeping busy Charlie, this is another project that's off to a great start, I have a feeling we're going to have a lot more fun following your updates. 👍 -
Amazing that this all started with aluminum/brass rods and flat brass sheets. You are a magician my friend, the paint is superb as is the color choice! 👍
-
1/25 Chevy Nova Salt Rat
AmericanMuscleFan replied to Pierre Rivard's topic in Other Racing: Road Racing, Salt Flat Racers
I knew you would be a hit Pierre, you prove how versatile and talented you are, it's a fantastic final product that you achieved in record time, like the record time that your Nova could beat in its category, at Bonneville or on the table of a model car show. 🏆 -
’72 Dodge Demon Drag Racer 1/25 scale
AmericanMuscleFan replied to AmericanMuscleFan's topic in WIP: Drag Racing Models
Thanks Bruce, Sometimes it's the less obvious or simple details that make you react, the antifreeze plugs are miniature and not very visible but sometimes it's just to tell yourself that you've covered as much detail as possible. It was just for the sake, at the point I was at, it wasn't one or two hours more that made that much difference. Francis Thanks Robert, you're right, this is definitely my best effort so far and 100 hours seems like a lot for a single piece but there are thousands to put into this kind of project. This should not be seen as hours spent but as quality hours invested in oneself; exercising one's brain can only be beneficial in pushing back the cognitive problems that age sometimes brings when one begins to have less motivation. I am well placed to speak about it, my father has reached the venerable age of 94 and I am witnessing his decline because the motivation is no longer there, he who was a very talented carpenter and who was still tinkering in his workshop not so long ago. Be proud of what you do, it's remarkable and few have the drive to do it, you must not give up! Francis -
’72 Dodge Demon Drag Racer 1/25 scale
AmericanMuscleFan replied to AmericanMuscleFan's topic in WIP: Drag Racing Models
Thank you Tim, your comments are much appreciated, especially coming from an accomplished and skillful fabricator like you. Let's just say I've improved the recipe over my previous efforts and I see this as a logical progression when you're passionate and motivated from all over the forum, with your own project setting the bar ever higher. The media blasted finish is one of the little details that I never thought would have contributed so much to the look of the finished product, thanks again for pushing me in this direction, you were right again as my mother would say! 😁 Francis -
’72 Dodge Demon Drag Racer 1/25 scale
AmericanMuscleFan replied to AmericanMuscleFan's topic in WIP: Drag Racing Models
Thanks Brian, I had a lot of fun and a few cold sweats, but in the end I think it's the best machined part I've ever made. I have many sources of motivation on the forum and your amazing truck build is definitely one of them! Francis Thanks Rich, There are a lot of steps in this thing, I took 36 photos during the machining and that only covers a few steps. It didn't make sense to publish them all but it will give me a kind of user manual for the future. I have to pinch myself to convince myself that I did this, I'm rather proud I must admit! Francis Thanks Daniel, It's definitely not the easiest piece to make and I've always agreed with the saying: You must walk before you can run! I made a lot of aluminum shavings fly before I got to this point, but I realize that you can do great things when you really want to. Your determination proves it my friend, you are a great modeler and I take great pleasure in following your exploits. Francis -
Nova Salt Flat Racer
AmericanMuscleFan replied to Pierre Rivard's topic in WIP: Other Racing: Road Racing, Land Speed Racers
You work too fast for me, Pierre, I don't have time to keep up with you. It's unbelievable how talented you are, it's art, it's astonishingly realistic! I'm going to go and have a look at your Under Glass thread. 😊 -
’72 Dodge Demon Drag Racer 1/25 scale
AmericanMuscleFan replied to AmericanMuscleFan's topic in WIP: Drag Racing Models
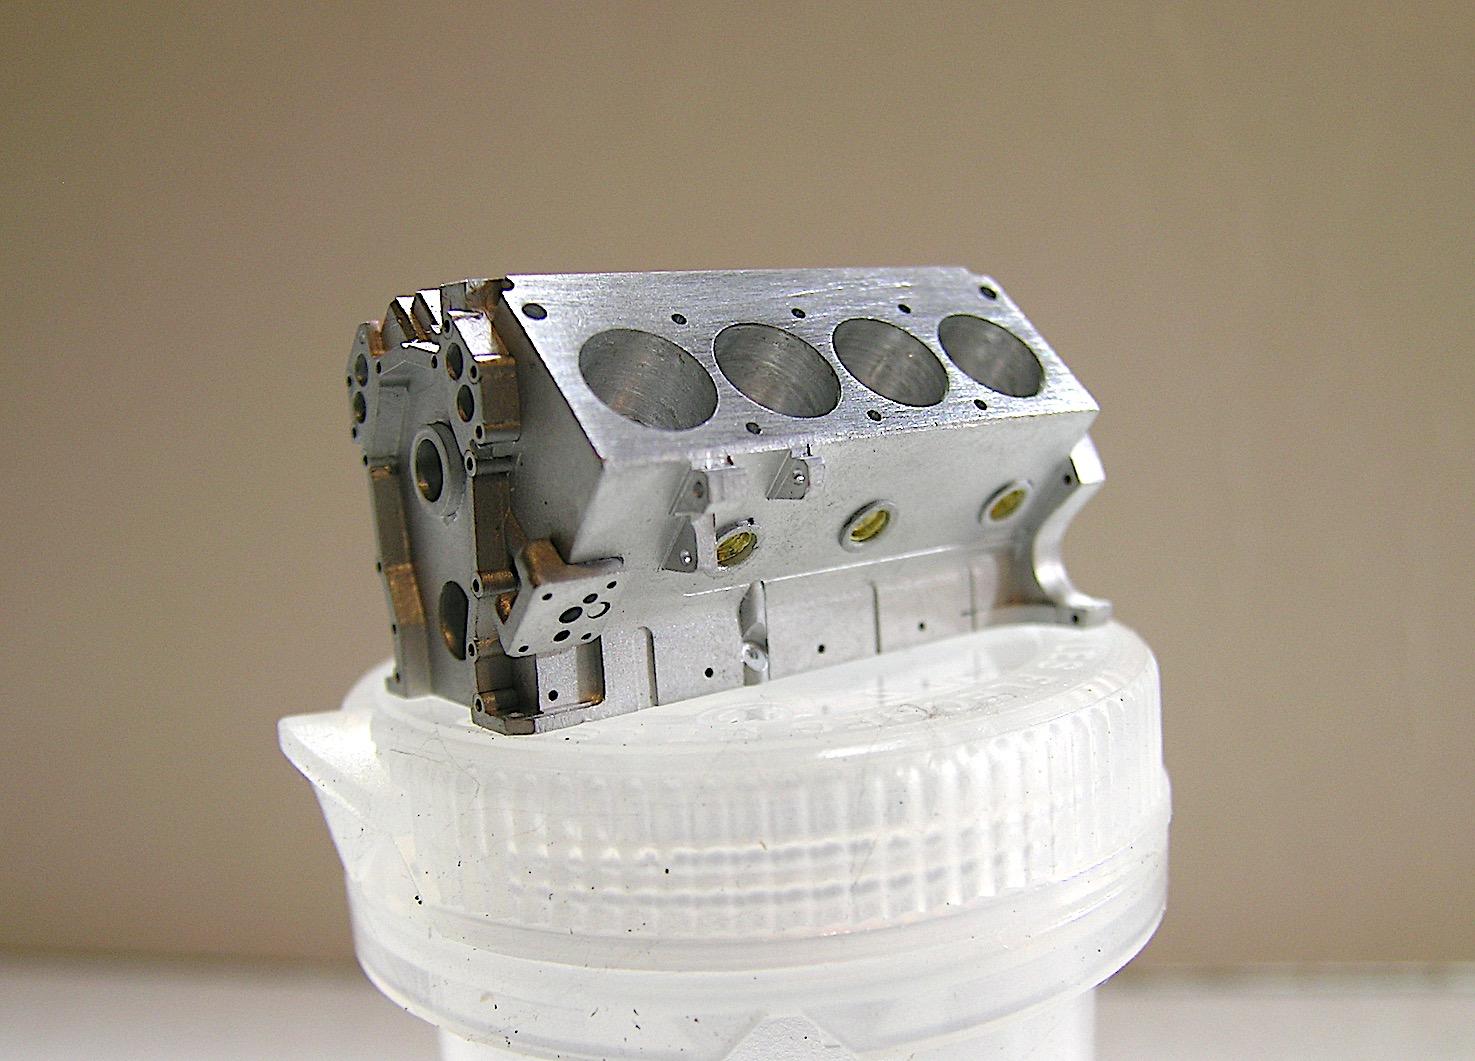
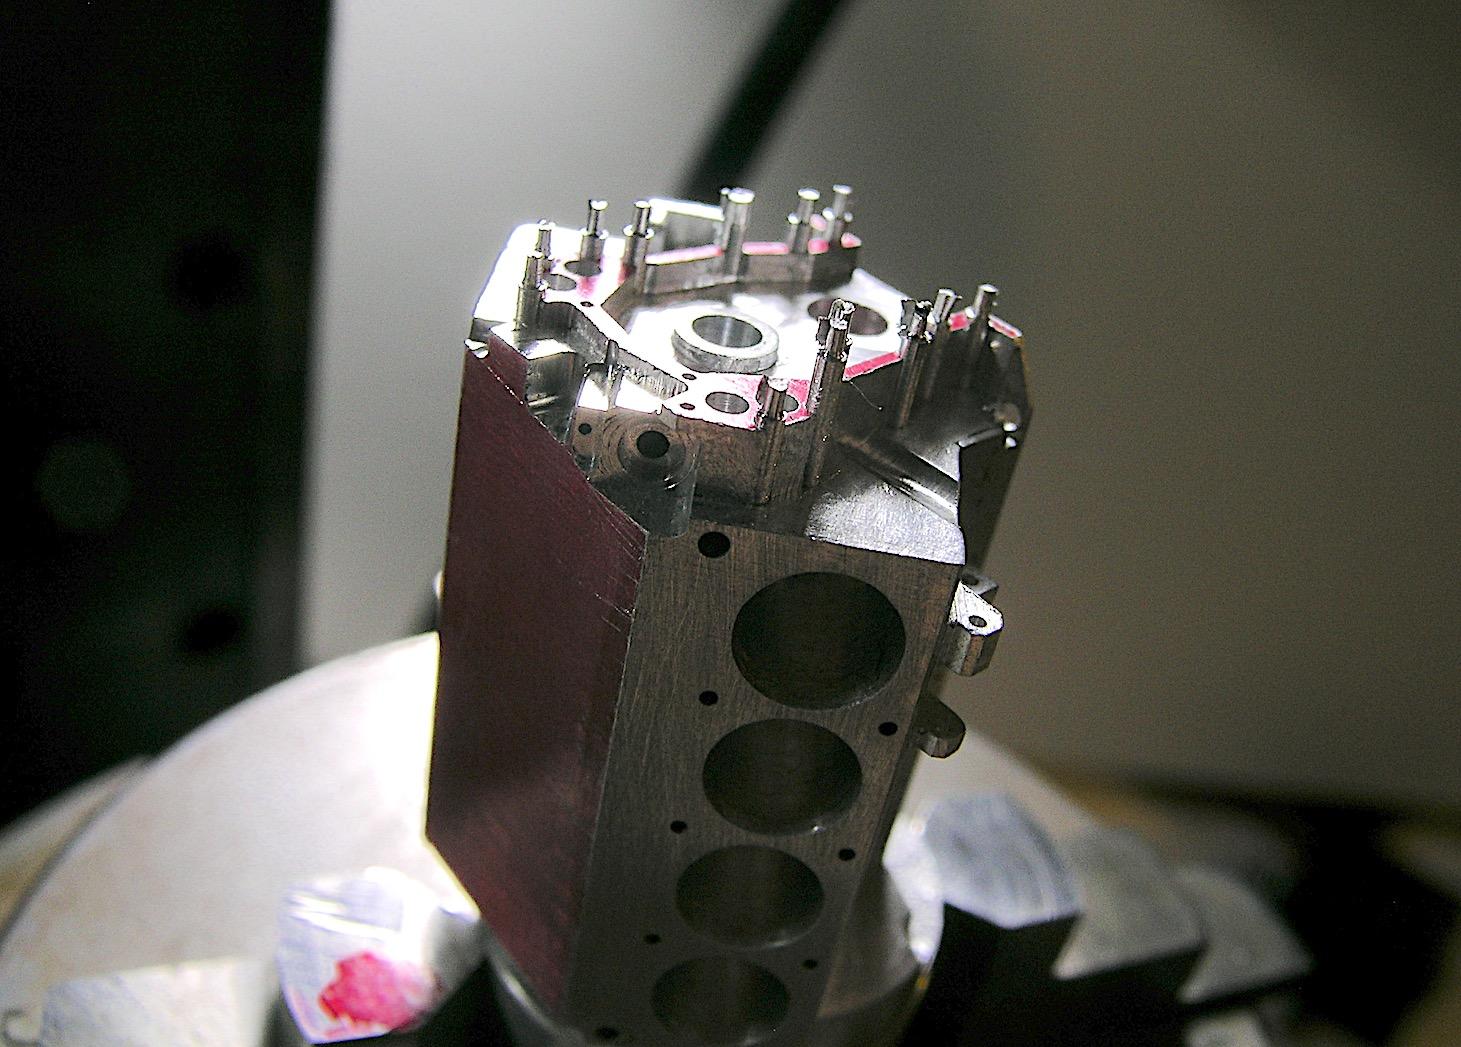
Now the engine block in the final stage.
-
’72 Dodge Demon Drag Racer 1/25 scale
AmericanMuscleFan replied to AmericanMuscleFan's topic in WIP: Drag Racing Models
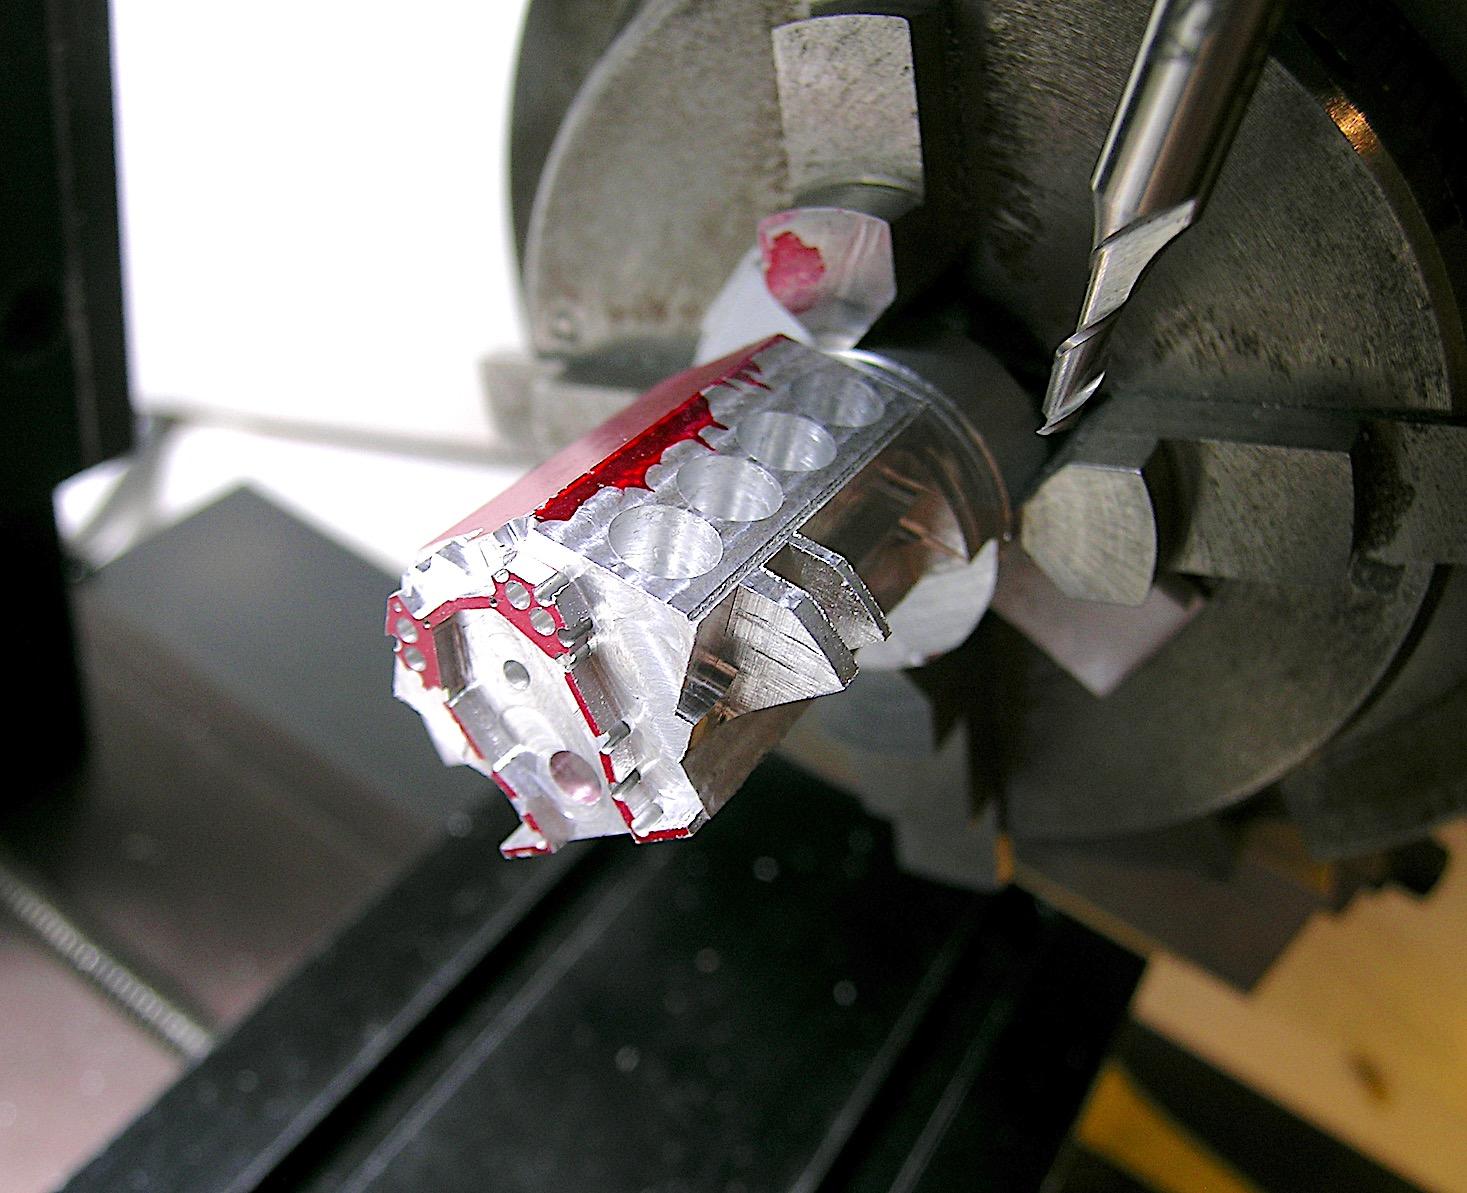
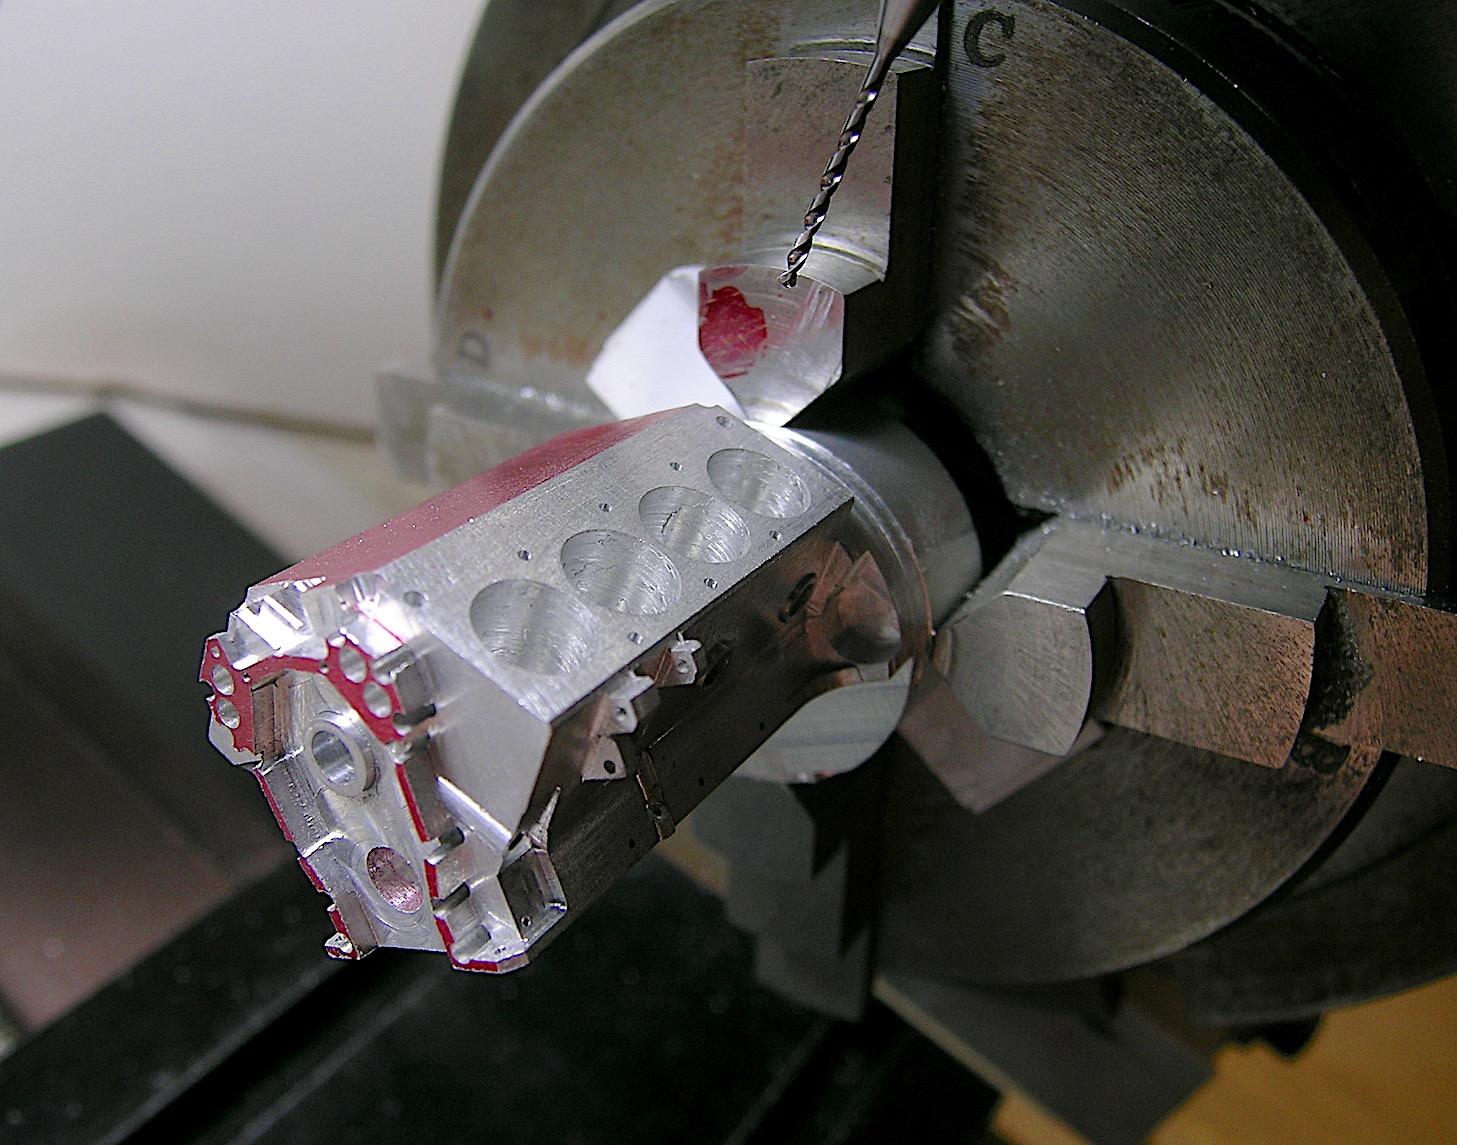
Hello everyone, Tonight, a long-awaited update from several friends who follow my project and who have a preference for the mechanical part, more specifically the engine. What may seem like an easy piece to make is, in my opinion, one of the most difficult with all the intricate details that characterize it. This is not my first engine block and I don't want to deny what I made before, but I sincerely think that this engine block is a big step forward in terms of dimensional accuracy versus a real one. I have done a lot of research on the web and found a large number of documents and technical drawings to guide me and I have followed them as precisely as possible to produce what I have to offer you this evening. There are about 100 hours of work in this piece alone and I couldn't count the number of cuts, rotations, repositioning and tool changes to get to this. I took a ton of pictures but it doesn't make sense to post them all, I'll limit myself to a few but I'll be happy to post the ones that might answer specific questions you might have, if they exist in the ones I took. I wanted to take the time to thank Tim (Codi) for the inspiration and for recommending me to buy a media blasting kit, you were right my friend, it does the job! Technically, the block represents a 528 cu. in. Indy-type racing block, but with some freedom of detail because I found lots of photos with visual differences in most cases. However, the front part which forms the timing gear housing and the water pump inlet/outlet is precise to the thousandth, it was a long job to do. In all modesty, the pictures are not bad but they do not do it justice, it is even more beautiful in real life, I think I have a good basis to continue! Questions or comments are welcome. Francis First, some photos of the machining at different stages of progress.
-
1/16th Vega Funnycar With a difference
AmericanMuscleFan replied to Ian McLaren's topic in WIP: Drag Racing Models
Cool project Ian, is this 1/16 scale like most of your other projects? Is that engine 3D printed? it looks well detailed by the way. -
’72 Dodge Demon Drag Racer 1/25 scale
AmericanMuscleFan replied to AmericanMuscleFan's topic in WIP: Drag Racing Models
With the kind of detailed project you're working on, I thought you were a patient guy? 😁 I was waiting for a nice day to unbox my new media blasting kit and try it out on a piece of aluminum. It's a bit your fault if it stretches, you're the one who put it in my head and proved to me how worth it it was! By the way, it's very nice here today........ 😉 Francis Spring is slow to arrive here this year, today is one of the first truly beautiful warm days of spring! On the other hand, I see the end of my modeling season fast approaching, I hope to have something other than the engine block to offer you. The engine block photos are for this week, I promise! 😊 Francis -
Good news for your injury, it's reassuring to know that you could avoid surgery. That being said, that doesn't seem to stop you, the work on the fuel pumps is impressive and convincing as usual! The total number of things to make for such a project seems endless, but I see that the machine is well underway again! 😁
-
Good job Robert, one piece at a time and you will get a very nice engine block, you are on the right track. 👍
-
WOW Ian, another fantastic Canadian drag car project in progress, your work on the computer to adapt the STL file to your needs is amazing! I don't know this funny car but I'm sure that your usual passion for representing their history will interest us until the end, I'm along for the ride my friend! 😊
-
’72 Dodge Demon Drag Racer 1/25 scale
AmericanMuscleFan replied to AmericanMuscleFan's topic in WIP: Drag Racing Models
Be patient Robert, it's coming, just a few more hours and I'll be able to show you the result. I'm not sure if all the time and work I put into this sole piece is really reasonable, but you don't realize it until you're done. It's promising, though! 😊 Francis -
Absolutely stunning work Brian, the wonder seems to have no end and I have no objection to that! 👌
-
’72 Dodge Demon Drag Racer 1/25 scale
AmericanMuscleFan replied to AmericanMuscleFan's topic in WIP: Drag Racing Models
You're just being too harsh on yourself Charlie, everything you do is absolutely fantastic. I'm just making it smaller because of the scale, that's all! I have almost finished machining the engine block, I am in the details if I may say so, I hope to be able to publish the results in the next few days if all goes well. Francis -
I understand you Brian, I was lucky enough to buy the socket set for all sizes back in the day before Scalehardware was sold and I don't regret it, they are so useful and effective, especially for the smaller nuts. As for the rubber clips on the cover, have you thought about small O-rings that would be stretched between 2 pins? It certainly wouldn't be the same design as the originals but it would be removable much like the real ones. The result is impressive my friend, no detail is missed ! 👌
-
Great job Dan, it's impressive! 👍 I don't know who designed these car transporters, but they're quite a piece of engineering! You wouldn't want to accidentally drop it on the ground with that beautiful load of Mopars, that would be a disaster I can't imagine! 😱
-
That's promising, Brian! 😁 Just kidding, you know, this is another success story in the making, the diamond plate gives them the "real look", it's like wrapping paper on a gift. I also have a photo-etched bender but from a different brand, it's very useful for bending thin aluminum or brass, it creates super straight and precise bends, plus nimble hands, you can never have too many tools, right? 😉
-
That's a good start Robert! I personally use a lot of internet images mainly to confirm the appearance of certain specific details of the engine block. The kit engine is often a good starting point for validating basic measurements, but I found several technical measurements on various websites, including discussion forums, to guide me. Very few modelers take on a project as ambitious as machining an engine block; it's a much more complicated process than it appears. Your determination is admirable my friend, you need to have fun and set yourself goals that will increase your motivation and your desire to go further in creating your own custom pieces. You seem to be on the right track! 👍