AmericanMuscleFan
-
Posts
3,058 -
Joined
-
Last visited
Content Type
Profiles
Forums
Events
Gallery
Everything posted by AmericanMuscleFan
-

’72 Dodge Demon Drag Racer 1/25 scale
AmericanMuscleFan replied to AmericanMuscleFan's topic in WIP: Drag Racing Models
Thanks Roger, I always appreciate your kind words and support, I hope to dive into the heart of the subject (engine and transmission) in the coming weeks, I know that for many it is their favorite part. It is also the case for me but I would like to have more free time to progress in a more coherent and regular way. Thank you for continuing to follow me my friend! 😊 Francis -
Pony Express 70s BB/FC ex M/T Pinto
AmericanMuscleFan replied to Ian McLaren's topic in WIP: Drag Racing Models
FANTASTIC model Ian, this is one of my favorites of all your great builds, the pictures of the final result say it all, a beautiful tribute to a warrior from the finest era (in my opinion) of NHRA history. 👌 -
Badman C/A (ca. 1975)
AmericanMuscleFan replied to Straightliner59's topic in WIP: Drag Racing Models
Good job with the Bare-Metal Daniel (I assume that's what you used), it adds a lot of definition and realism to your excellent work, it's laborious work but essential to bring the final product to another level. 👍 -
Nice collection of warriors Ian, your long wait to receive the decals for the Trans Am seems to have been worth it! 👌
-
Superb job again Claude! I think I will be tempted or forced to use the word again in the future, near or far because you have the gift of surprising us in a beautiful way each time and I'm sure it's not over! On the other hand, I was wondering if you were starting to calm down, by transplanting elements of the same brand you avoid the risk of rejection, well done Doctor Claude! I don't see the day when a piece of Styrene will be unused in your hobby space my friend, nothing is lost, everything is created under your skillful hands and your bubbling brain! 👍 It's true that there is nothing bad that can happen when the basic ingredients are from the late '60 early '70s. 😉
-
’72 Dodge Demon Drag Racer 1/25 scale
AmericanMuscleFan replied to AmericanMuscleFan's topic in WIP: Drag Racing Models
Thanks Brian, coming from you, I take your compliment on my work in Styrene with great pride knowing how much you excel on this point, your creations are a source of wonder! Thanks Robert, I think the wing aprons also give a more realistic look and will allow me to mount some accessories on them without overloading the engine mounting plate. I can't wait to work on the train drive, Tim (Codi) makes me salivate with his prowess and despite the enormous amount of time it takes, it's one of my favorite parts of the project. Thanks Pierre, you are right, I still have to try to create the "illusion" that the part in the engine compartment connects to that of the passenger compartment because the way in which the assembly will be done, the roll cage must be in 3 parts and assembled in a pre-established order. Thanks Andrew! Thanks Tim, I can't believe I can give you tricks with all the talent you have my friend, everything you make is so thoughtful and inspiring. Don't worry, we are spoiled for winter this year, I have almost worn my shovel down to the handle, I must have a few more weeks before the mild temperatures bring the bear out of its den. 😁 Thanks Will, I had a great time making it and I'm pretty proud of the end result. I think it will be effective in cooling the big block that will be under the hood! 😉 Thanks again guys for you comments, more stuff to come soon! Francis -
Badman C/A (ca. 1975)
AmericanMuscleFan replied to Straightliner59's topic in WIP: Drag Racing Models
Very nice polishing Daniel, it's always very long and often stressful when there are many corners and details to avoid getting close to but it's always satisfying to see all the difference it makes in the end. You seem to have things well in hand my friend! 👌 -
’72 Dodge Demon Drag Racer 1/25 scale
AmericanMuscleFan replied to AmericanMuscleFan's topic in WIP: Drag Racing Models
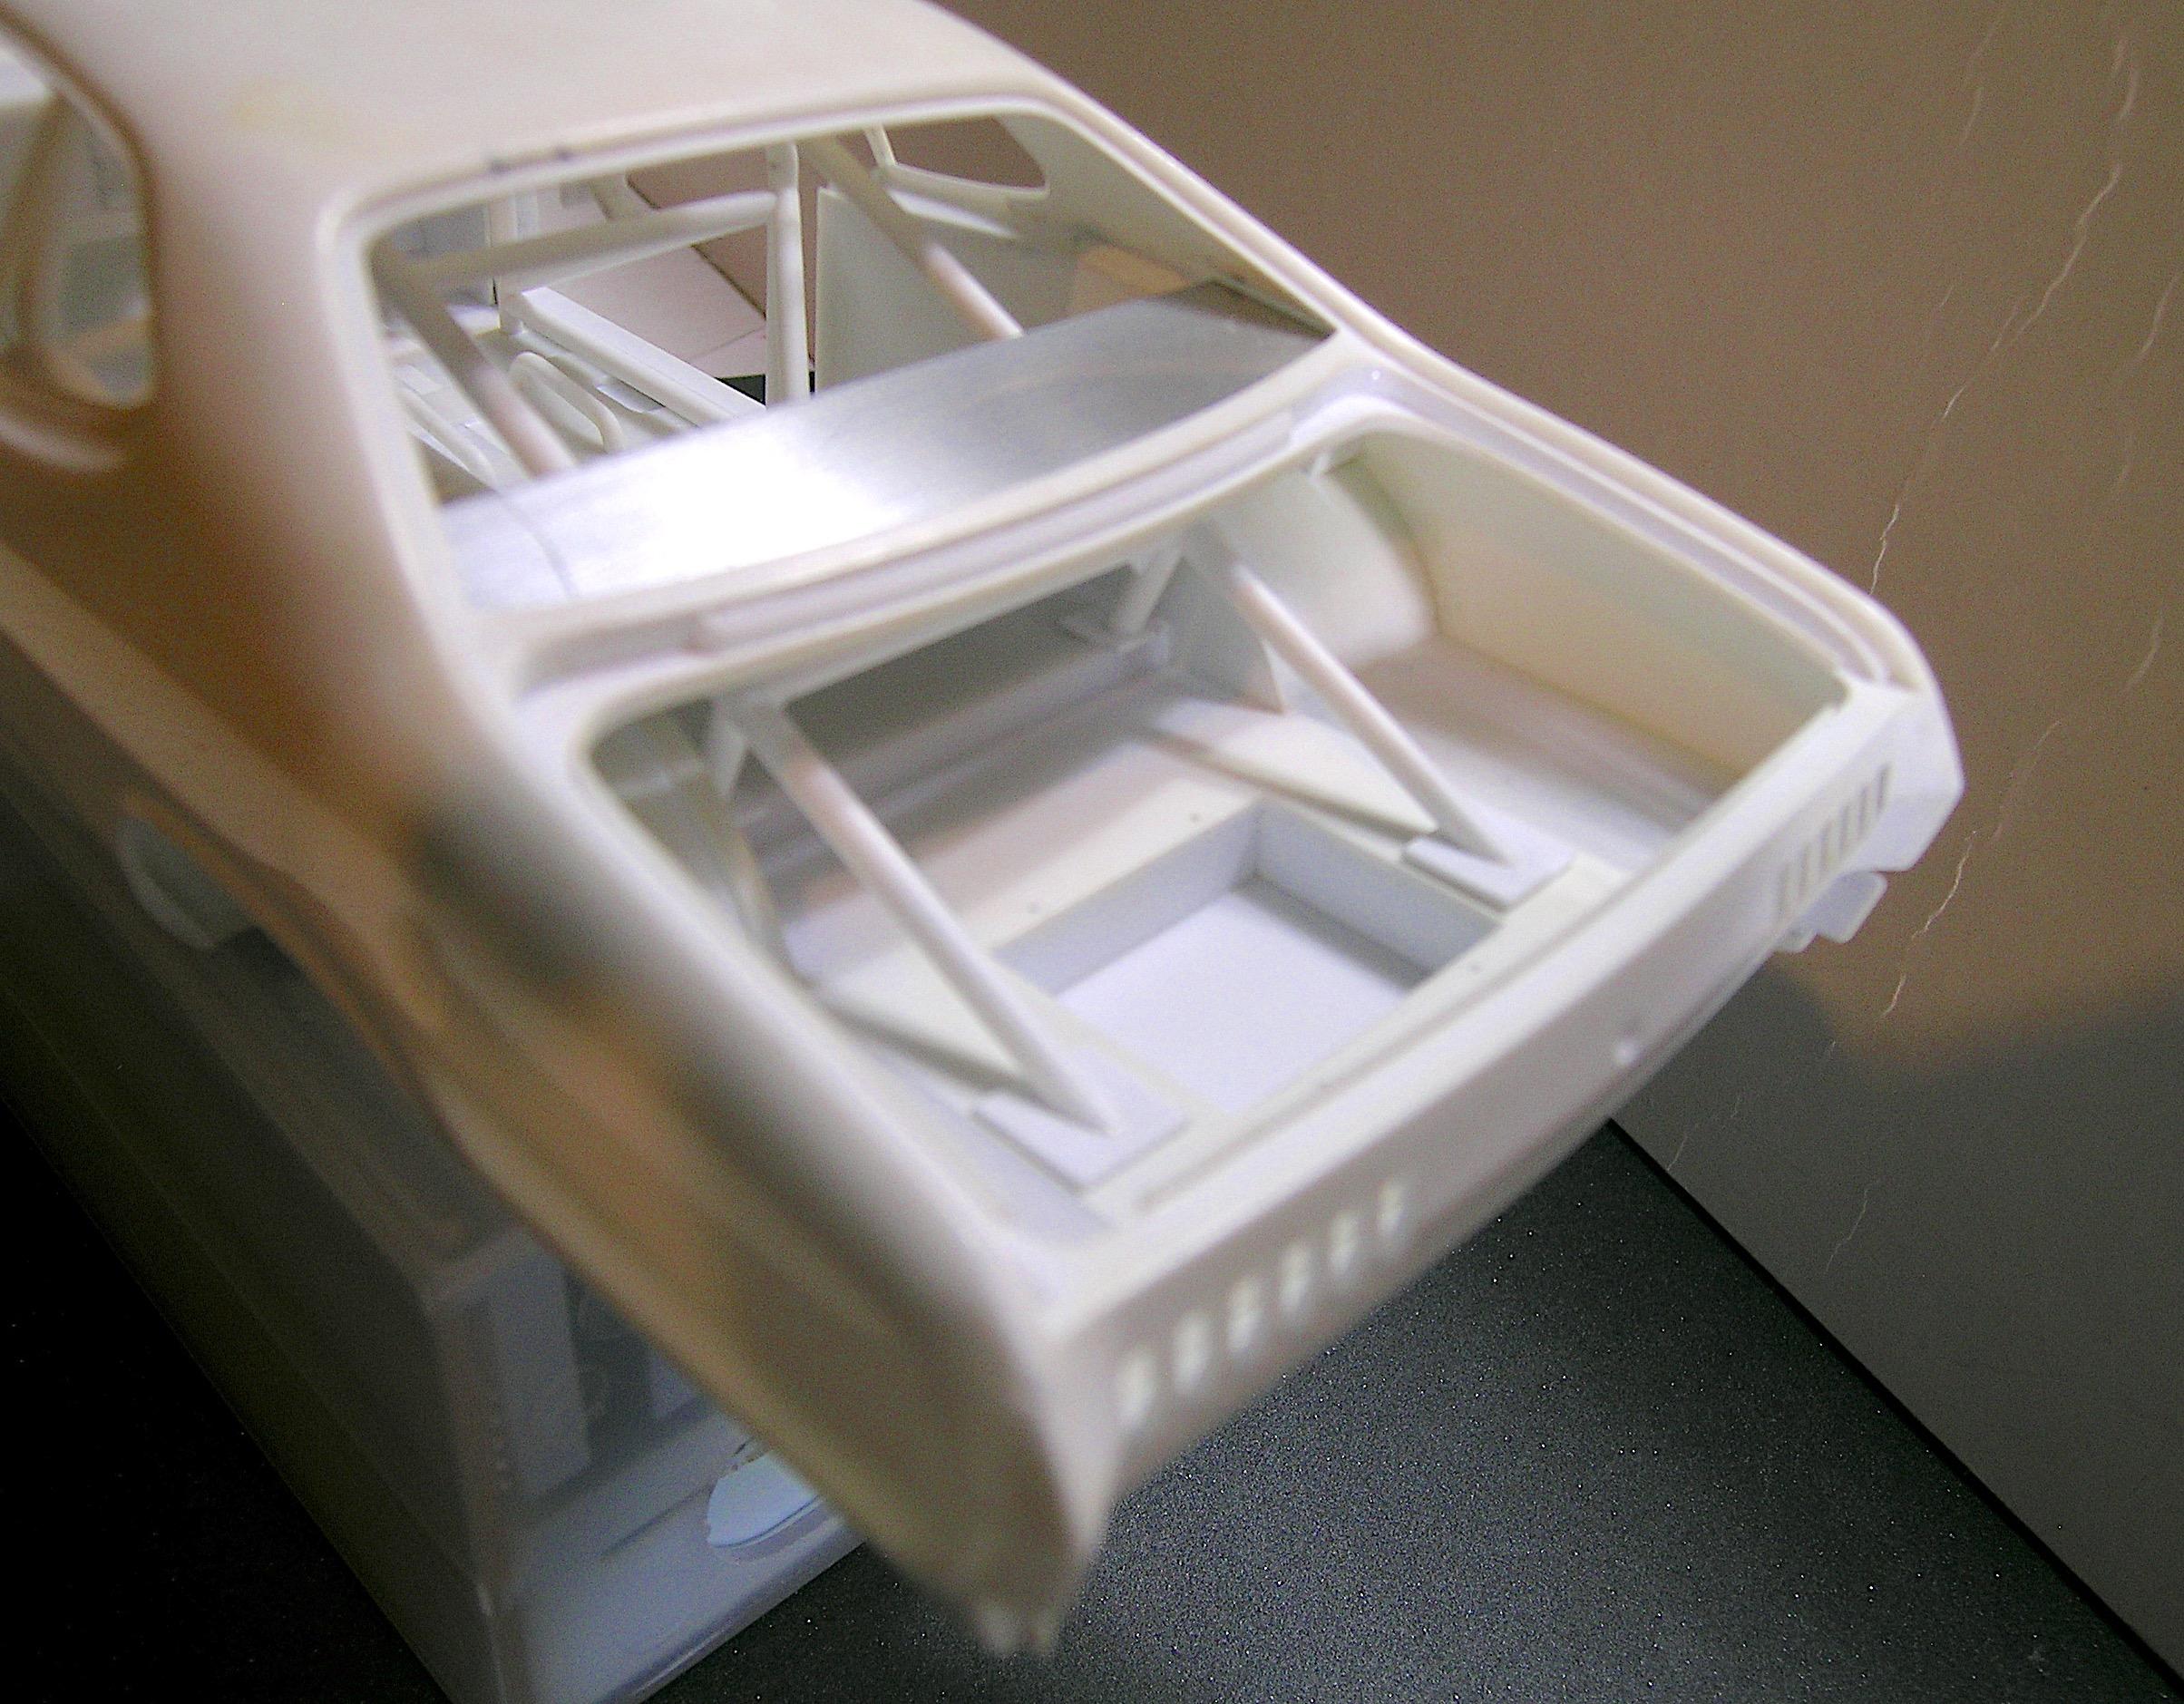
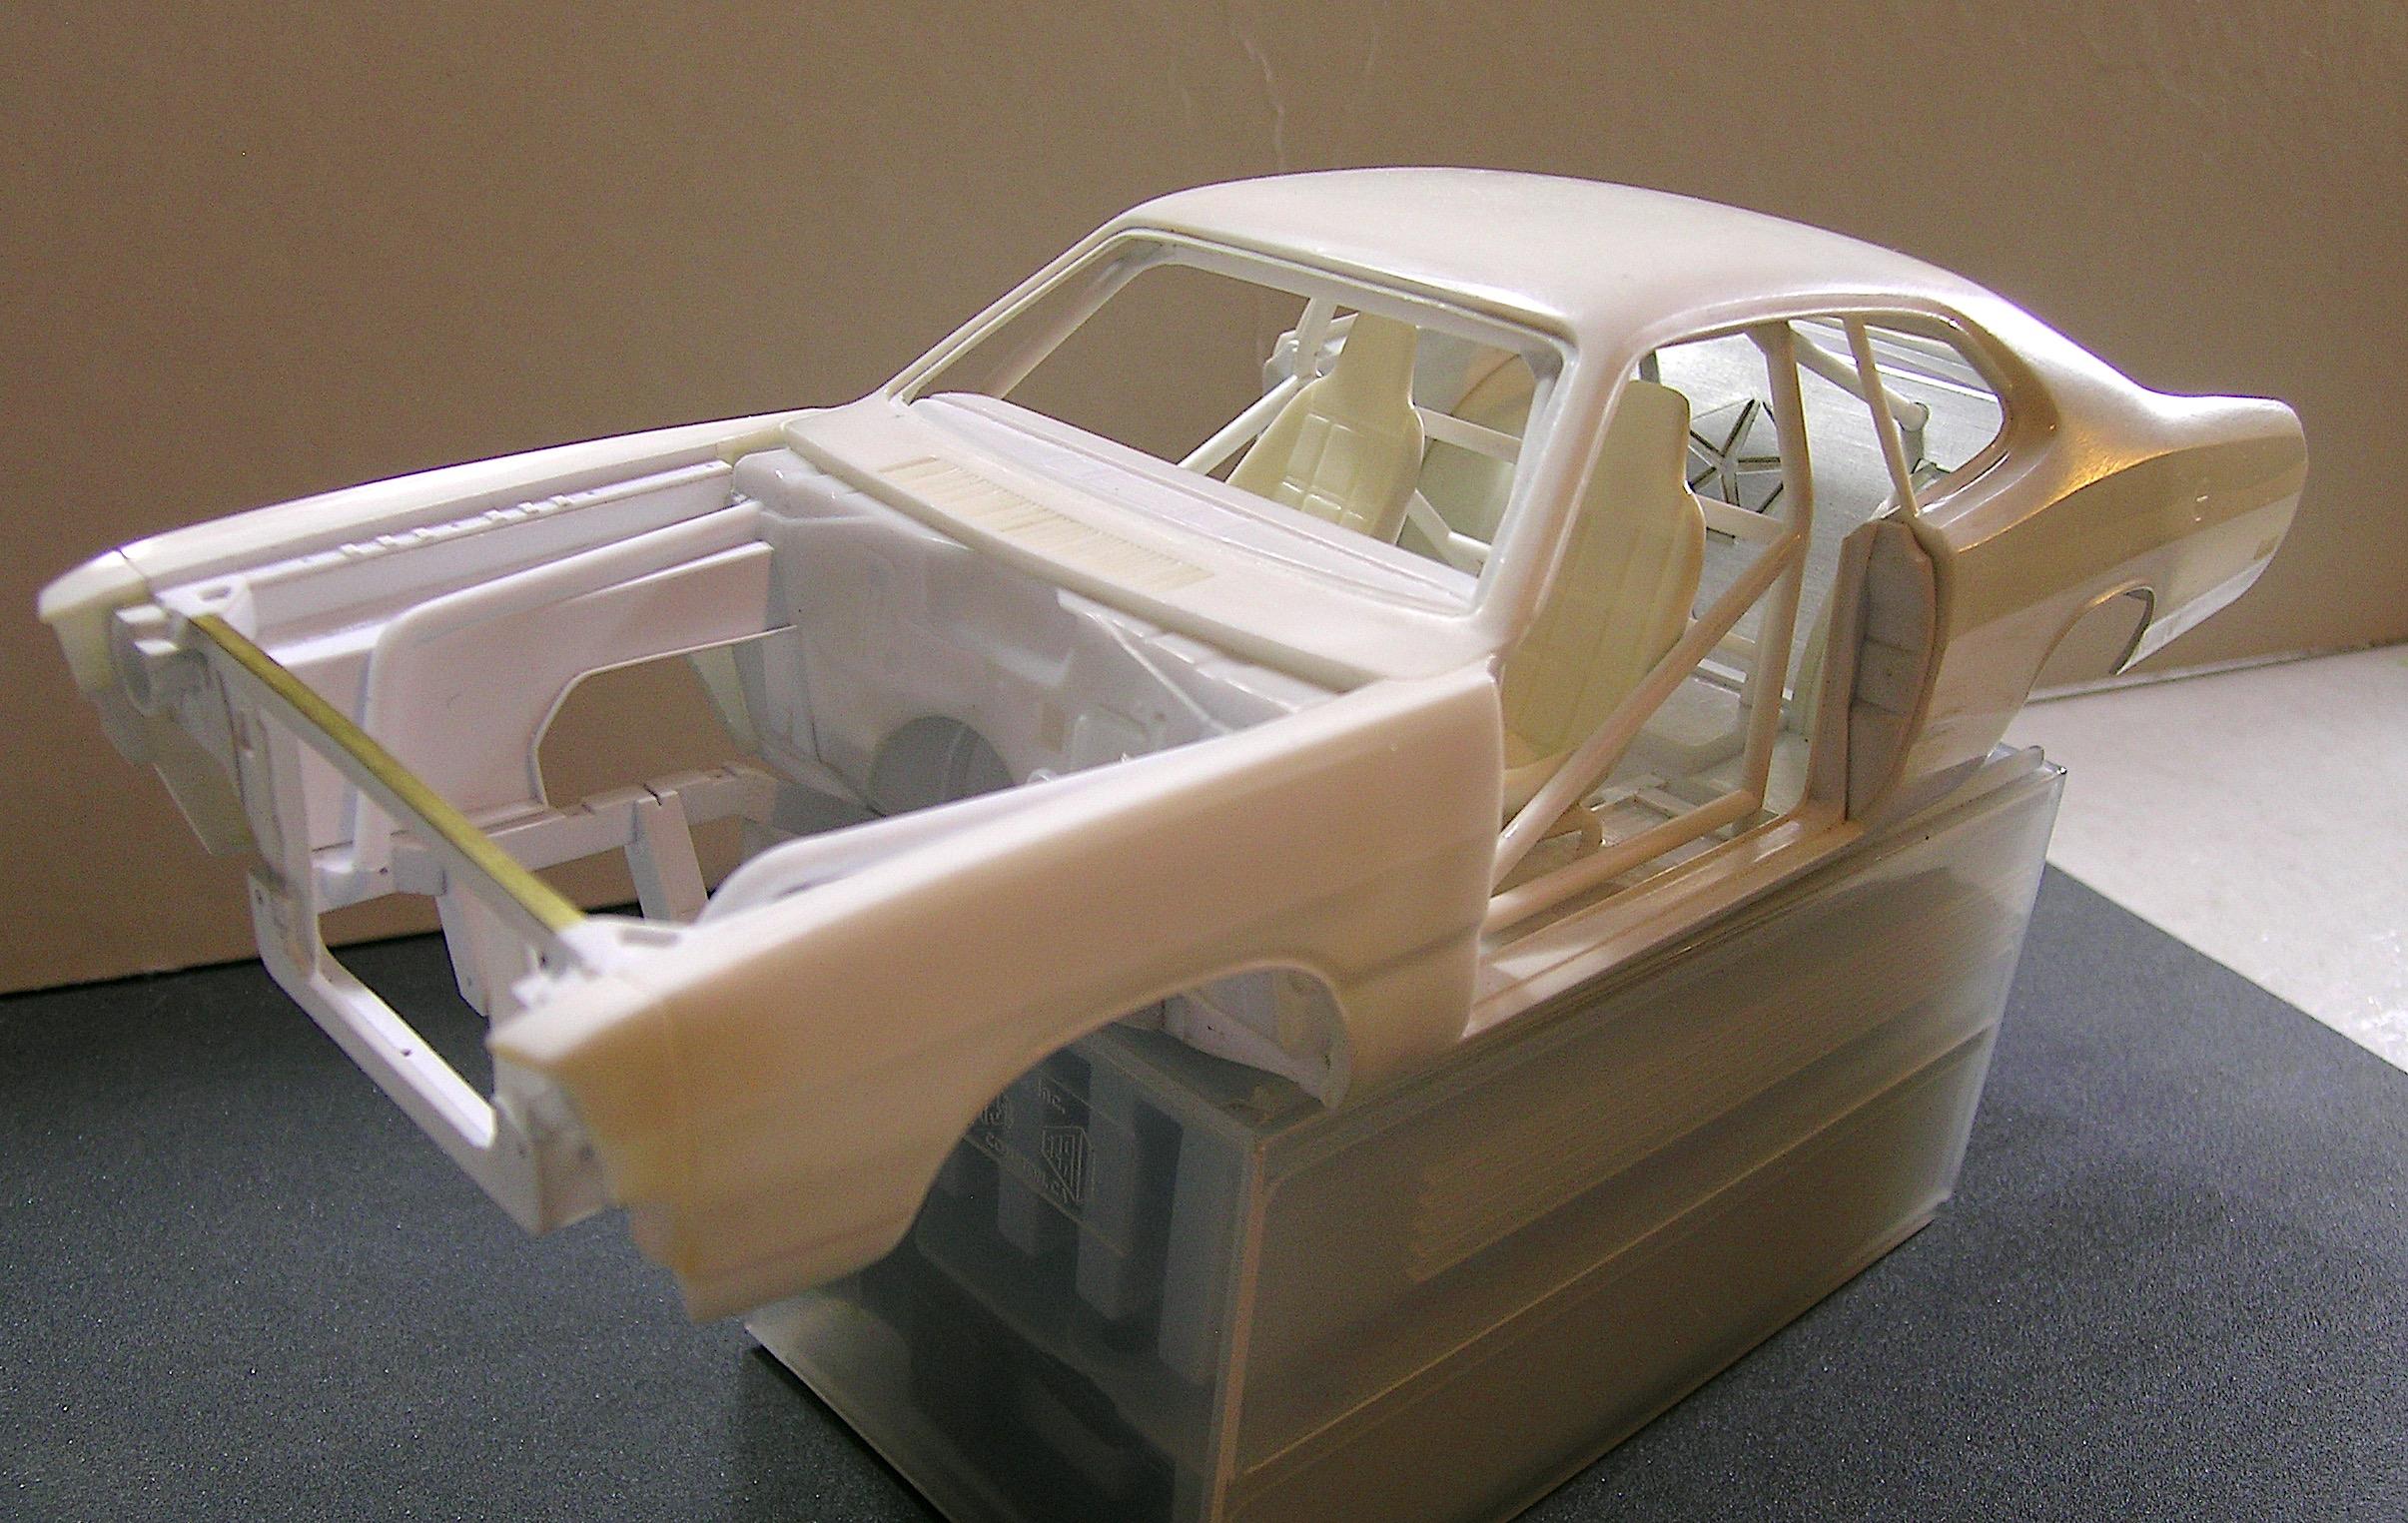
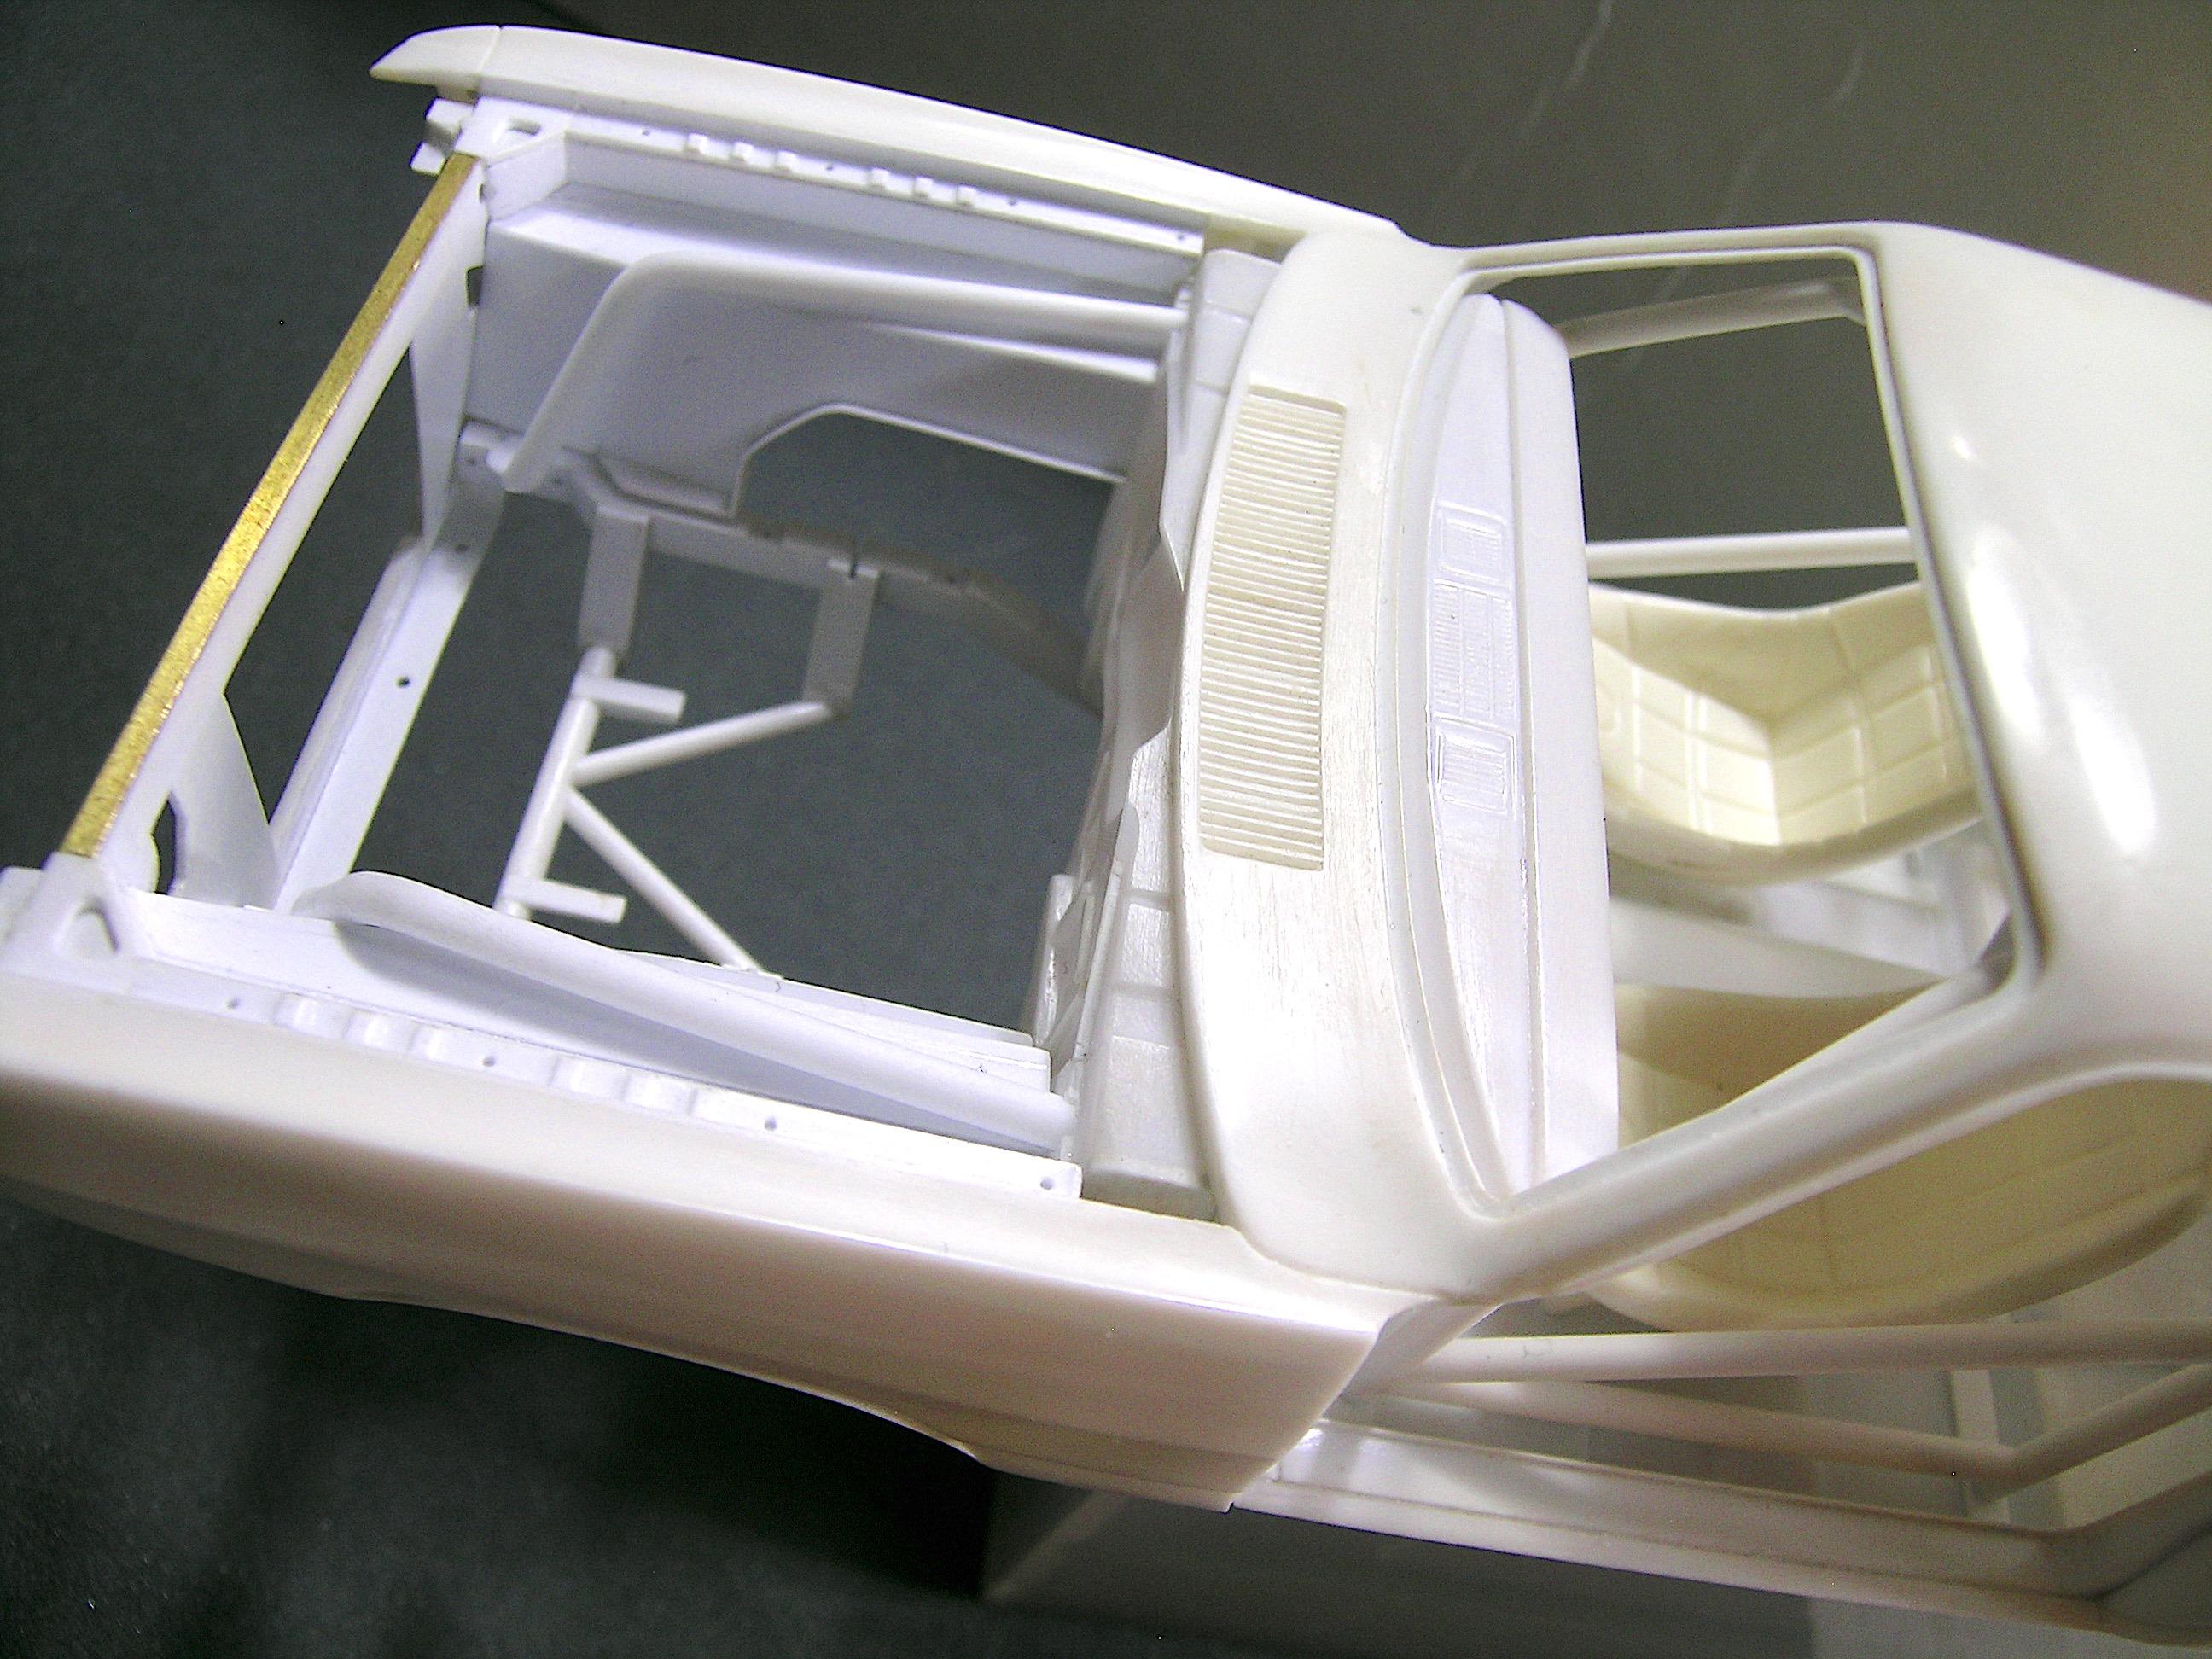
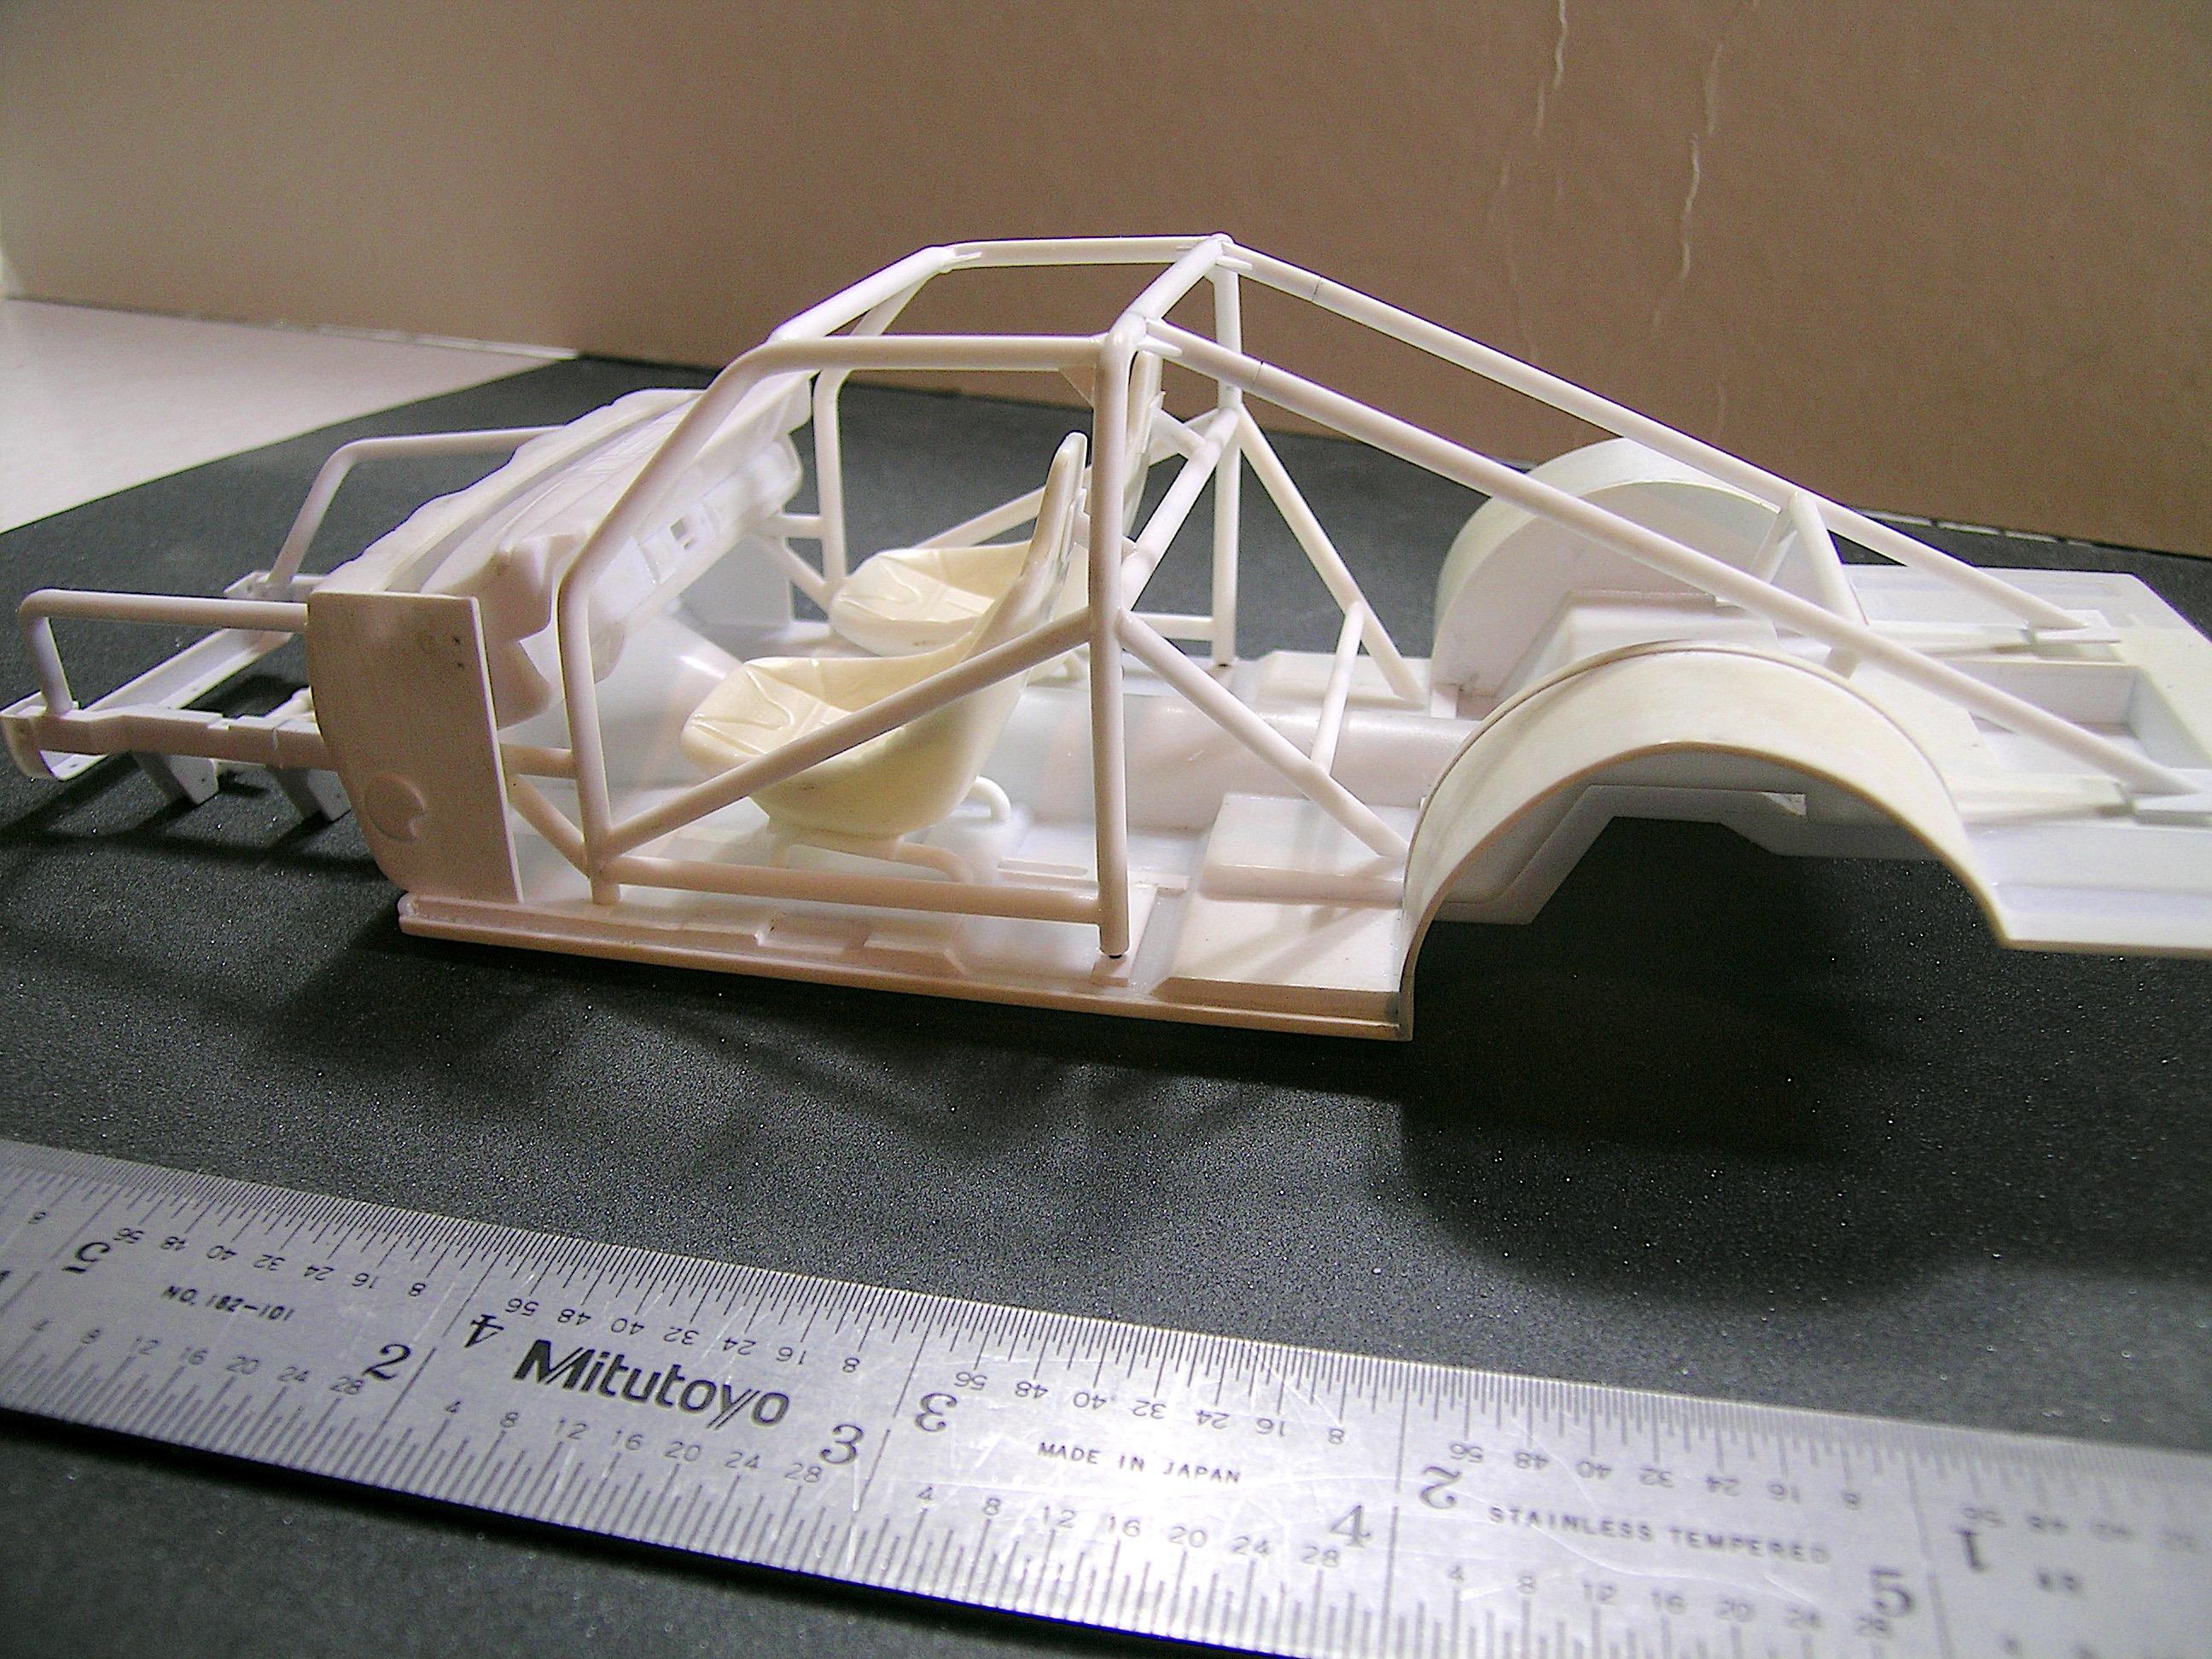
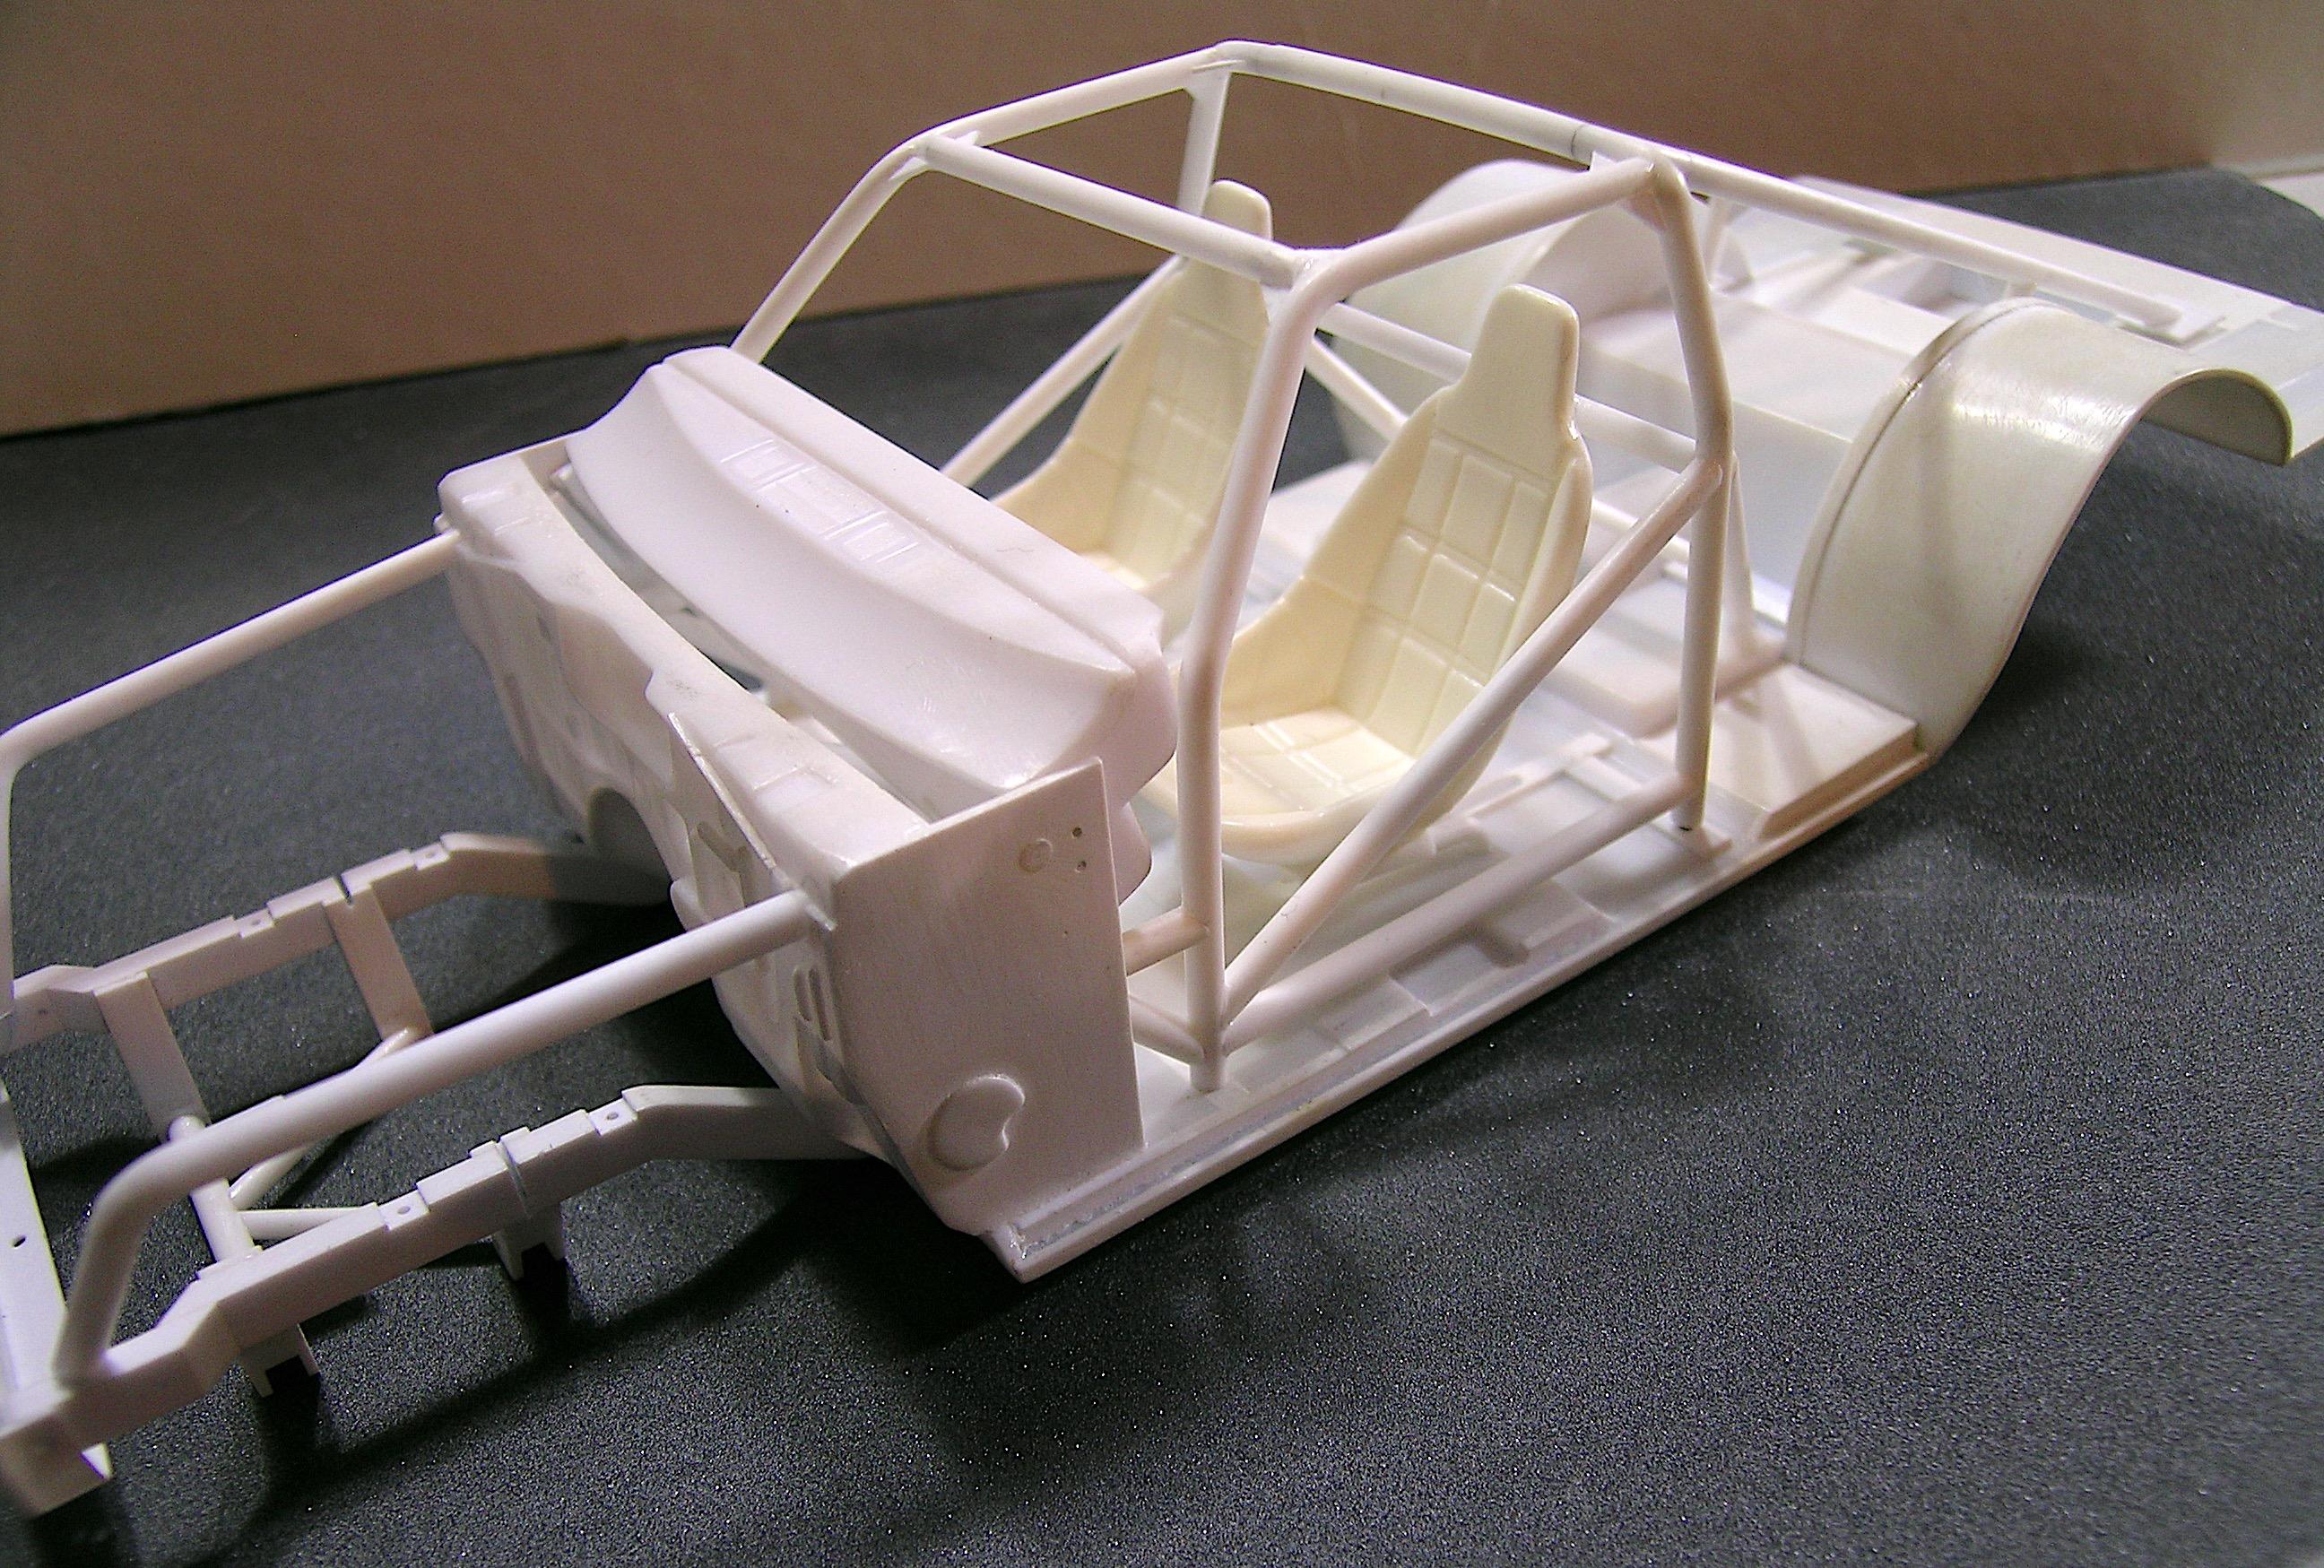
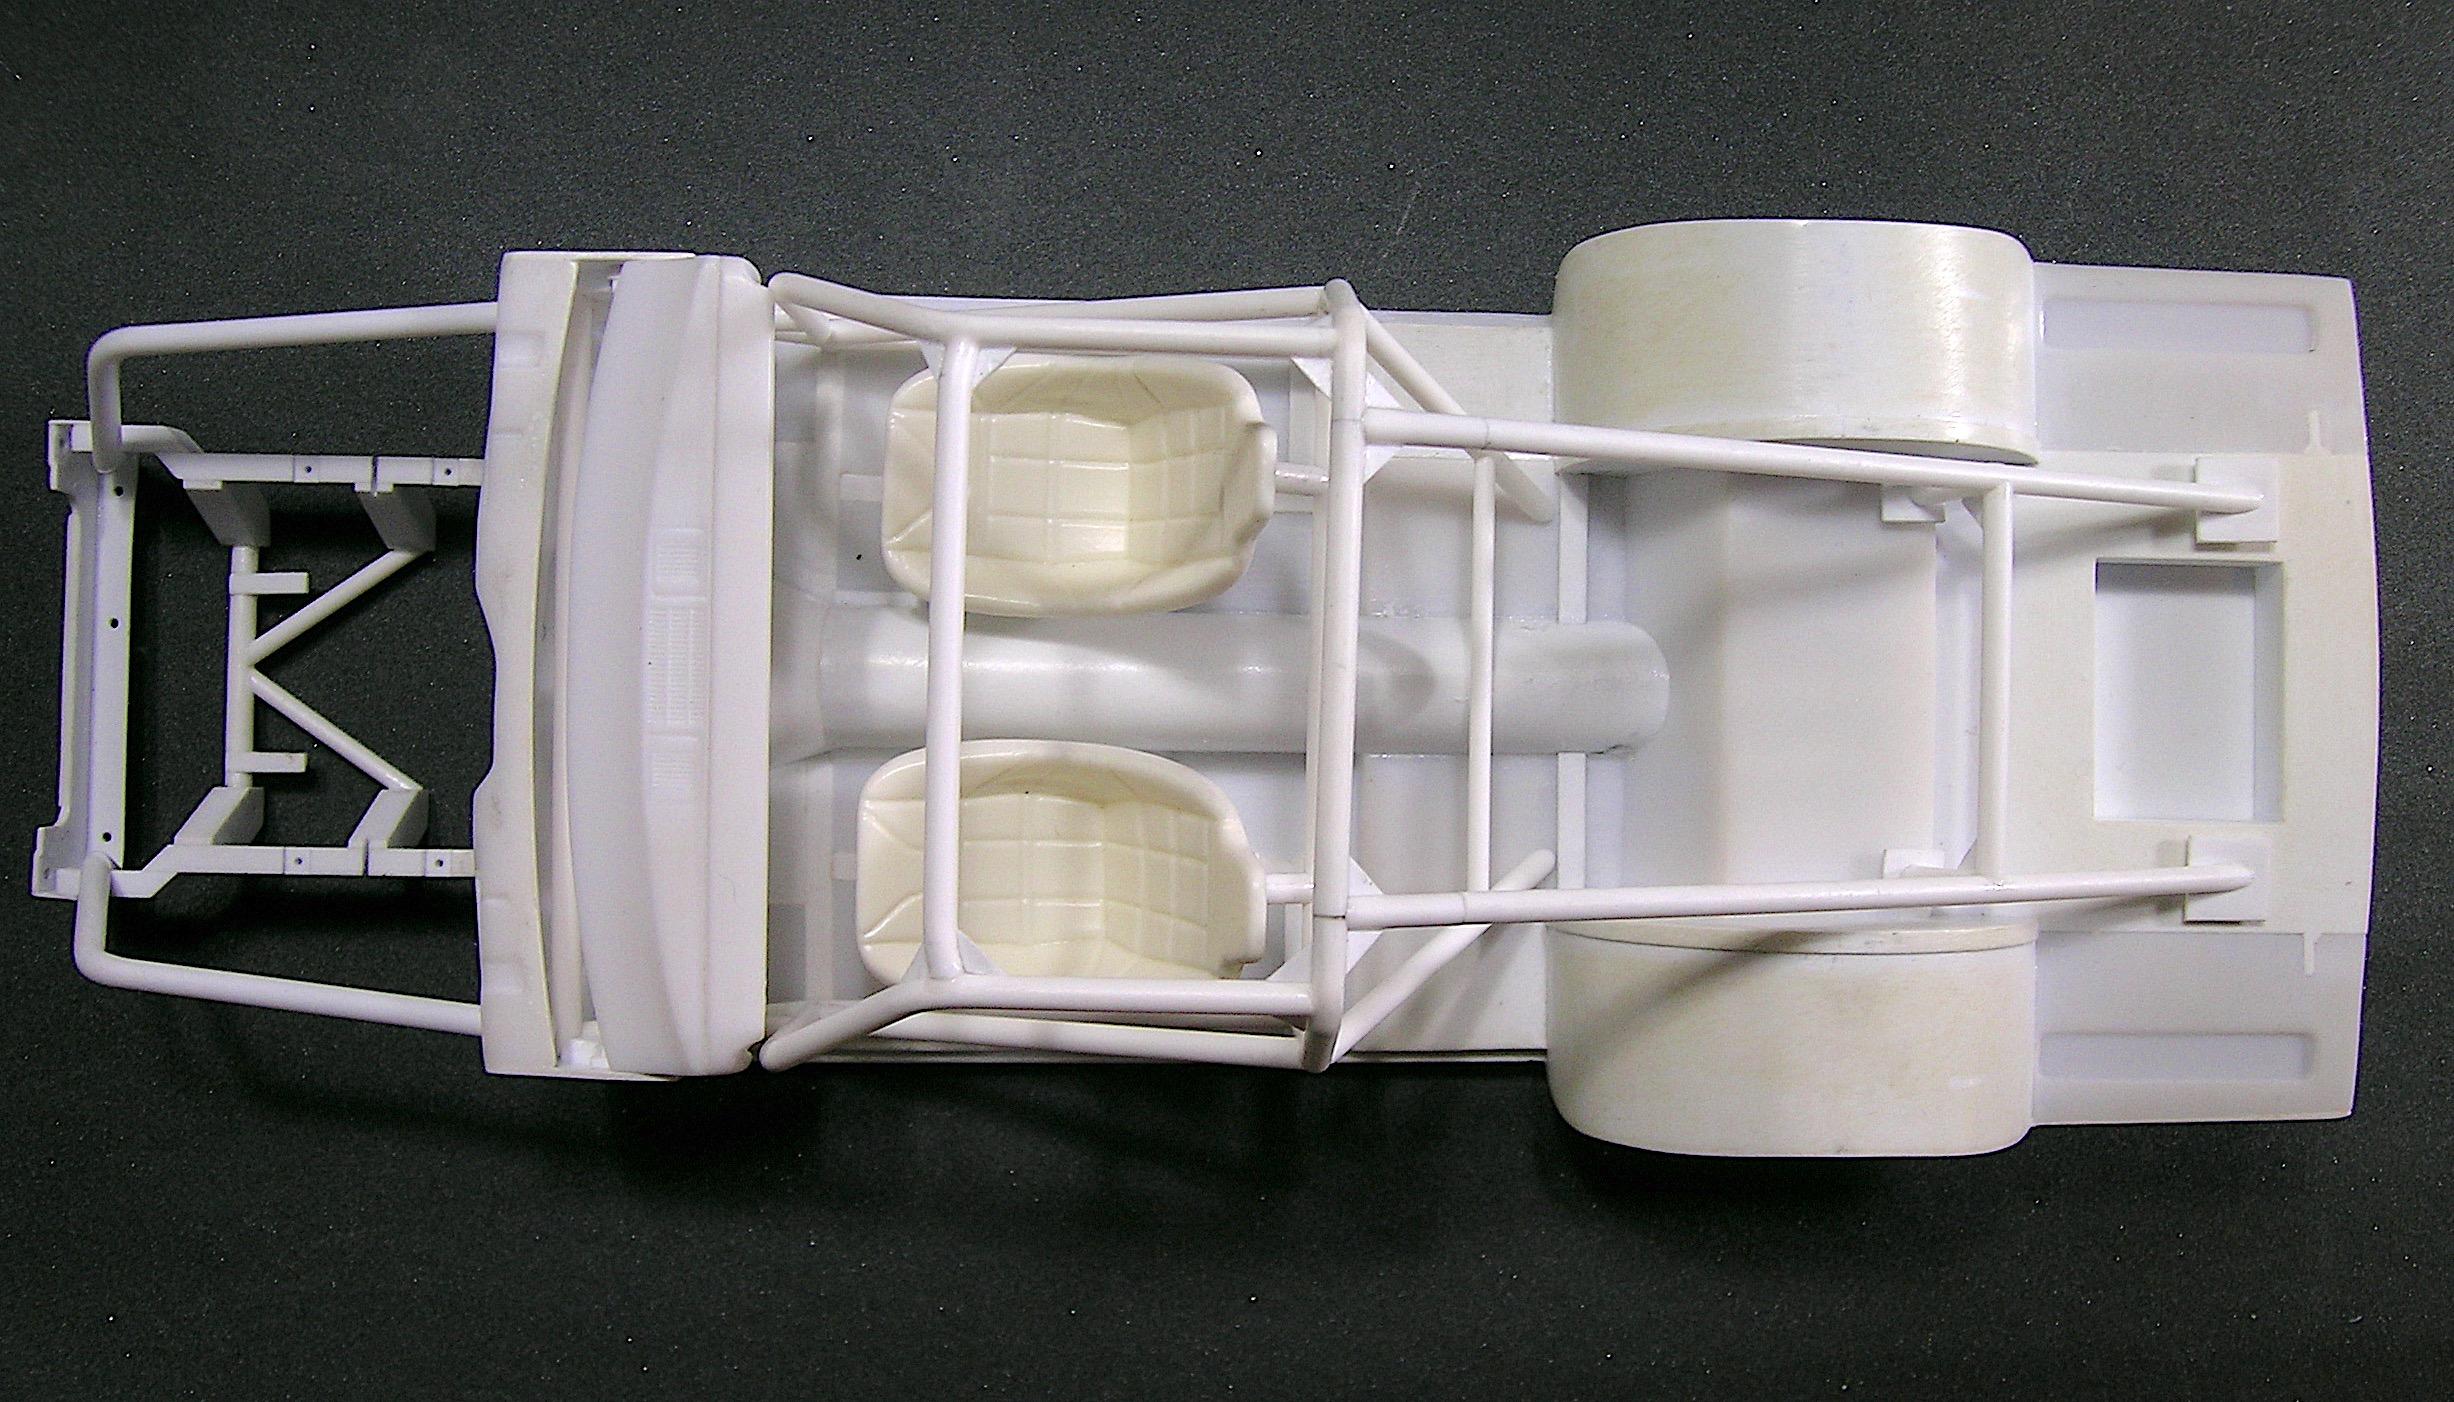
Hello everyone, Tonight a quick update to show you my latest progress, I made some front fenders inner aprons and the roll cage. I found that the engine compartment was too open even though my primary goal was to be able to see the suspension components more easily. I came up with this solution by creating something that looks OEM but partly respecting my original goals. I kept an opening for the headers but I might have to enlarge or modify the opening slightly when I get to this stage, we'll see. For the roll bar, it is entirely tailor-made to fit the driver's cabin and passes through the aluminum plate to rest on the trunk floor and aligned with the frame rails. II designed it in two parts to be able to separate the driver compartment and trunk part in order to be able to pass through the 2 holes in the aluminum plate between the wheel tubs. I also put pieces of pipe as a base for the seats, I had seen this on a (real) drag Dodge Dart being built and I really liked the idea. Everything is white Styrene so it's not very contrasty and rather difficult to show in photos but I think you will still be able to see the details. A few more components to make before I venture into the powertrain. Francis
-
’72 Dodge Demon Drag Racer 1/25 scale
AmericanMuscleFan replied to AmericanMuscleFan's topic in WIP: Drag Racing Models
Hi Randy, thanks for the comment, I still have a lot of crust to eat to reach your level but I find a lot of motivation by going to fill my eyes with your prowess my friend! Thank you for your visit, it is much appreciated. Francis -
Fantastic work on the Lenco so far Tim, who would be surprised? Certainly not me! 😁👍
-
Another step in the right direction, the photos show a perfect fit as you described, who would be surprised, everything is so well organized and thought out! Probably a good sealant and/or a quality primer will be able to effectively hide the blue Styrene. I had already read an article on the subject in a modeling magazine, is it certain that it would be more problematic if the final color was white?
-
The self-criticism of your work and your comparison to the real truck is just another proof of your passion and your commitment to this disproportionate project. Only a handful of modelers could carry out such monastic work and we are lucky enough to be able to appreciate it through the photos you offer us. Styrene is a fantastic material but the thinnest we can use in certain cases (body panels for example) is 10 times thicker than the part we want to reproduce and this inevitably affects the precision of what we want to imitate. You can be proud, even this physical constraint did not prevent you from delivering the goods, the illusion is as perfect as perfection is achievable! 👌
-
It's more than promising Steve! It already keeps its promises, the stance is perfect (the Steve way!) and this beautiful big mill has taken over the engine compartment! 👍
-
’72 Dodge Demon Drag Racer 1/25 scale
AmericanMuscleFan replied to AmericanMuscleFan's topic in WIP: Drag Racing Models
No problem Robert, they might be temporarily out of stock but several hobby stores carry the Detail Master product line, you should be able to get some. Thanks Antony, there is more to come, still much to do! Thanks Tim, I will still have to hide the brass color around the radiator and that will do the trick, I can't wait to start working on the engine, apart from the bodywork, it's one of my favorite parts! 😁 Francis -
Badman C/A (ca. 1975)
AmericanMuscleFan replied to Straightliner59's topic in WIP: Drag Racing Models
There's not much to stop you Daniel, always a trick up your sleeve, the taillights are super my friend! 👍 -
1928-31 Mercedes Benz SSK
AmericanMuscleFan replied to Pierre Rivard's topic in Other Racing: Road Racing, Salt Flat Racers
Absolutely fantastic build Pierre! You are a master builder, the photos and the WIP thread are proof of that. I'm not an expert on cars from this era but with the brick wall behind it, it's hard to tell that it's a model car and that's proof of total success, the illusion is perfect, hats off sir! 🎩 -
Rest assured that you deserve all the compliments you receive Brian, your precision and your knowledge on your subject are impressive. If one day I embark on a heavy truck project, I will need your help and advice, the solidarity of the members of this category is obvious, you are a bunch of enthusiasts, it's great to see! 👍 There are certainly several other beautiful projects around here, I just don't have enough time to visit them all. 😢
-
OUTCH!!! Very sad news Charlie, I hope you come back in great shape very soon without any after-effects of this mishap. For everyday life and the benefit of the hobby, I hope the best for you my friend! It's hard to believe that you made the bodywork in brass, the paint hides your incredible artistic work but the photos of your work beforehand remain for posterity! 🎩
-
’72 Dodge Demon Drag Racer 1/25 scale
AmericanMuscleFan replied to AmericanMuscleFan's topic in WIP: Drag Racing Models
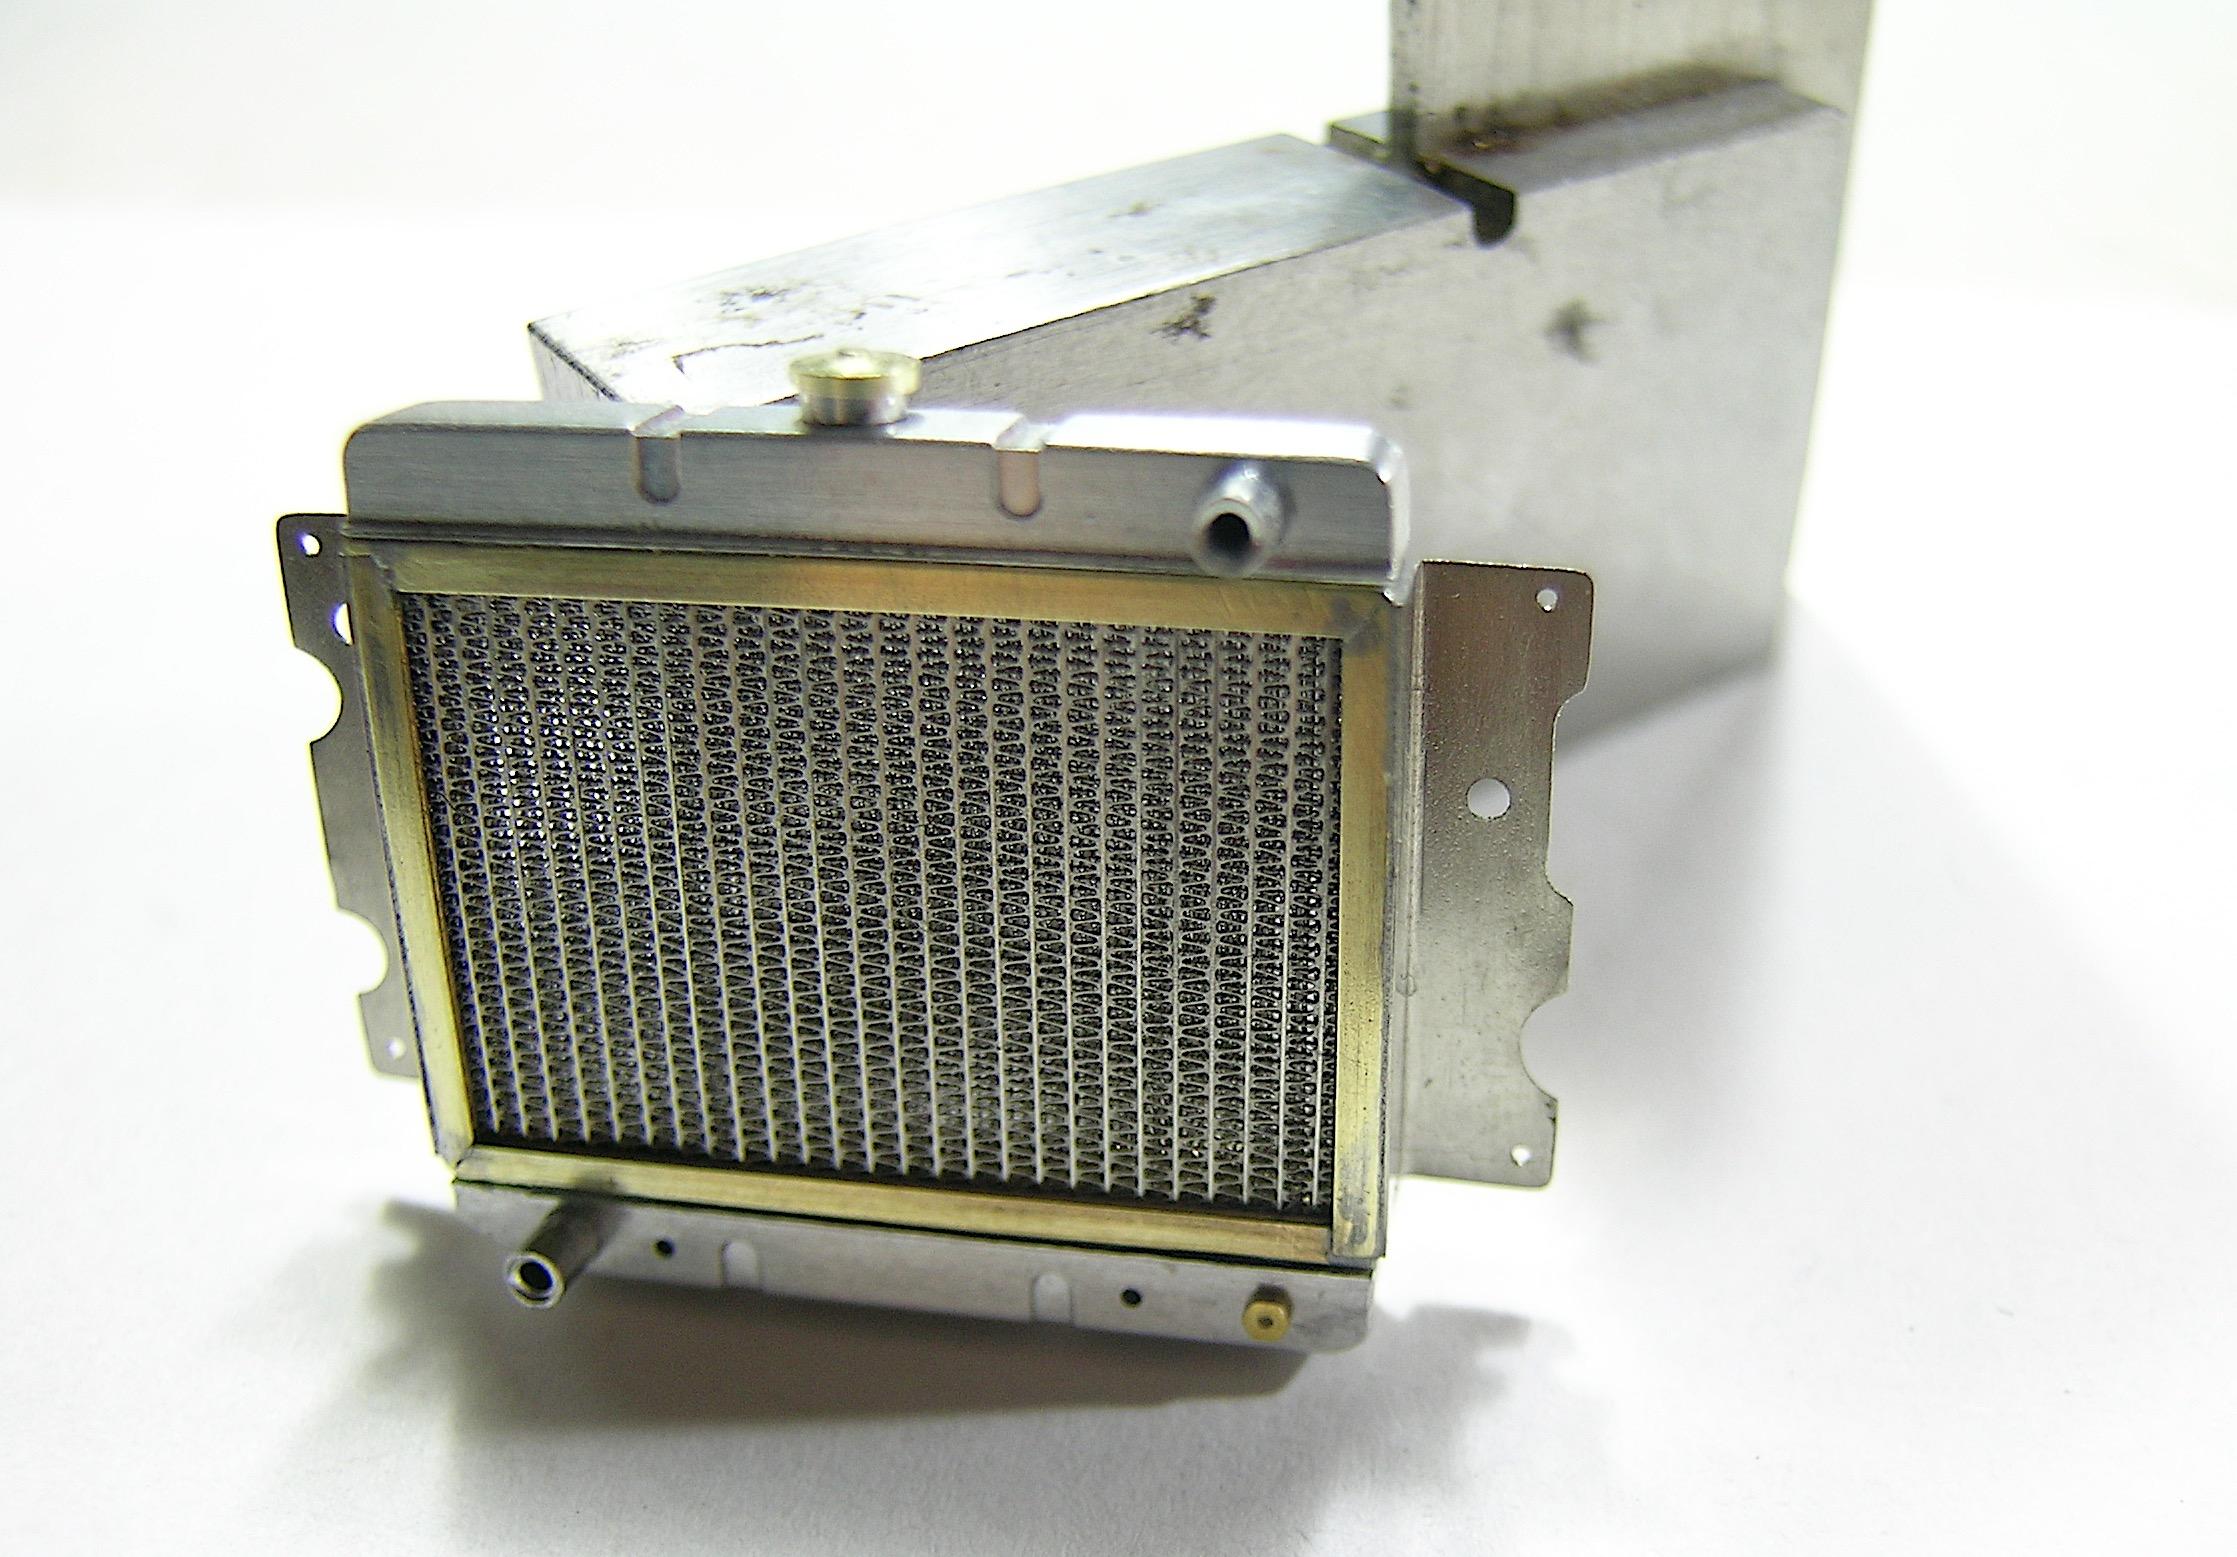
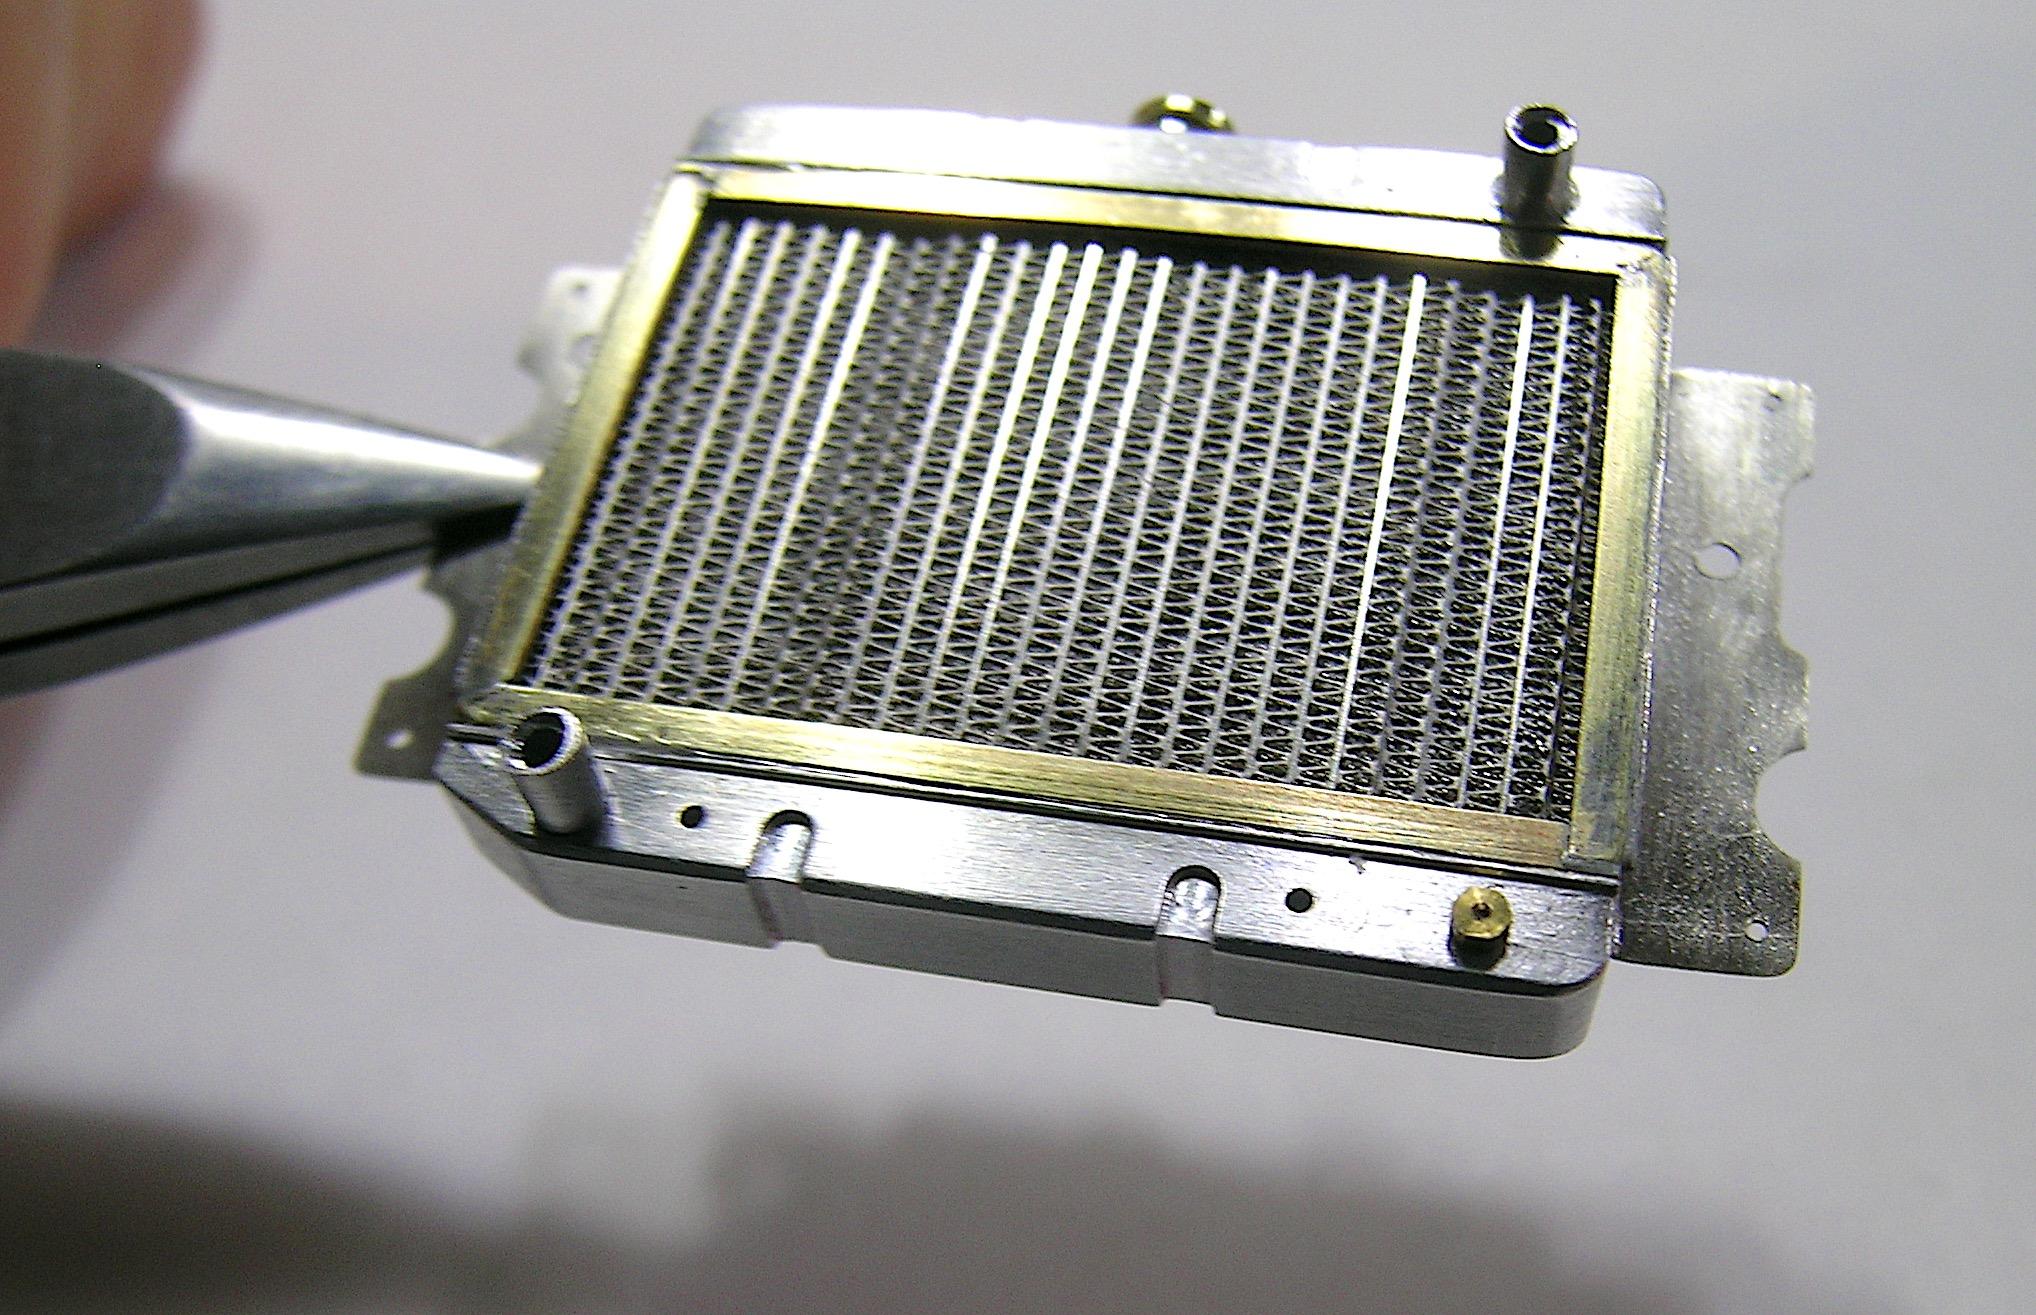
Thanks Steve, nothing really new here, I've made several this way so I thought this cap improvement would be a nice addition, I'm glad to know you liked it! Thanks Brian, in fact, the first radiator I made with this kind of detail was all Styrene, I then moved to aluminum and brass for my pickup and this one. I really like working with Styrene, the advantage of brass is that you can weld it and you can make thinner parts that would be very fragile in Styrene. Thanks Daniel, I didn't want to make a replica of a vintage OEM but rather a more efficient model for a competition engine. The one I took as a model is from the Cold-Case brand, it seems like a good product for this type of application. Thanks Pierre and Robert for the kind comments! The PE radiator mesh comes from Detail Master (DM-2490), it is one of the most beautiful and realistic but it is also very fragile to handle. Francis -
I'm telling you that you shouldn't be away for too long... You work so well, it's surgically precise. 👌 You're going to make me want to change categories Brian! 🤔
-
Keep it up and the Martians will come get you Randy!🛸 We never tire of your feats of strength, you have talent to spare as they say! I have to stop scratching my head, I won't have any more hair... 😁
-
Superb job Steve, I love your work on the dash, it will be a great improvement. The aluminum bezels for the tail lights is a nice touch too! 👍
-
Mercedes Benz SSK
AmericanMuscleFan replied to Pierre Rivard's topic in WIP: Other Racing: Road Racing, Land Speed Racers
It's great art Pierre, the dashboard is spectacular like all the rest of the details you added. I'm going to go salivate on you Under Glass thread! 😊 -
’72 Dodge Demon Drag Racer 1/25 scale
AmericanMuscleFan replied to AmericanMuscleFan's topic in WIP: Drag Racing Models
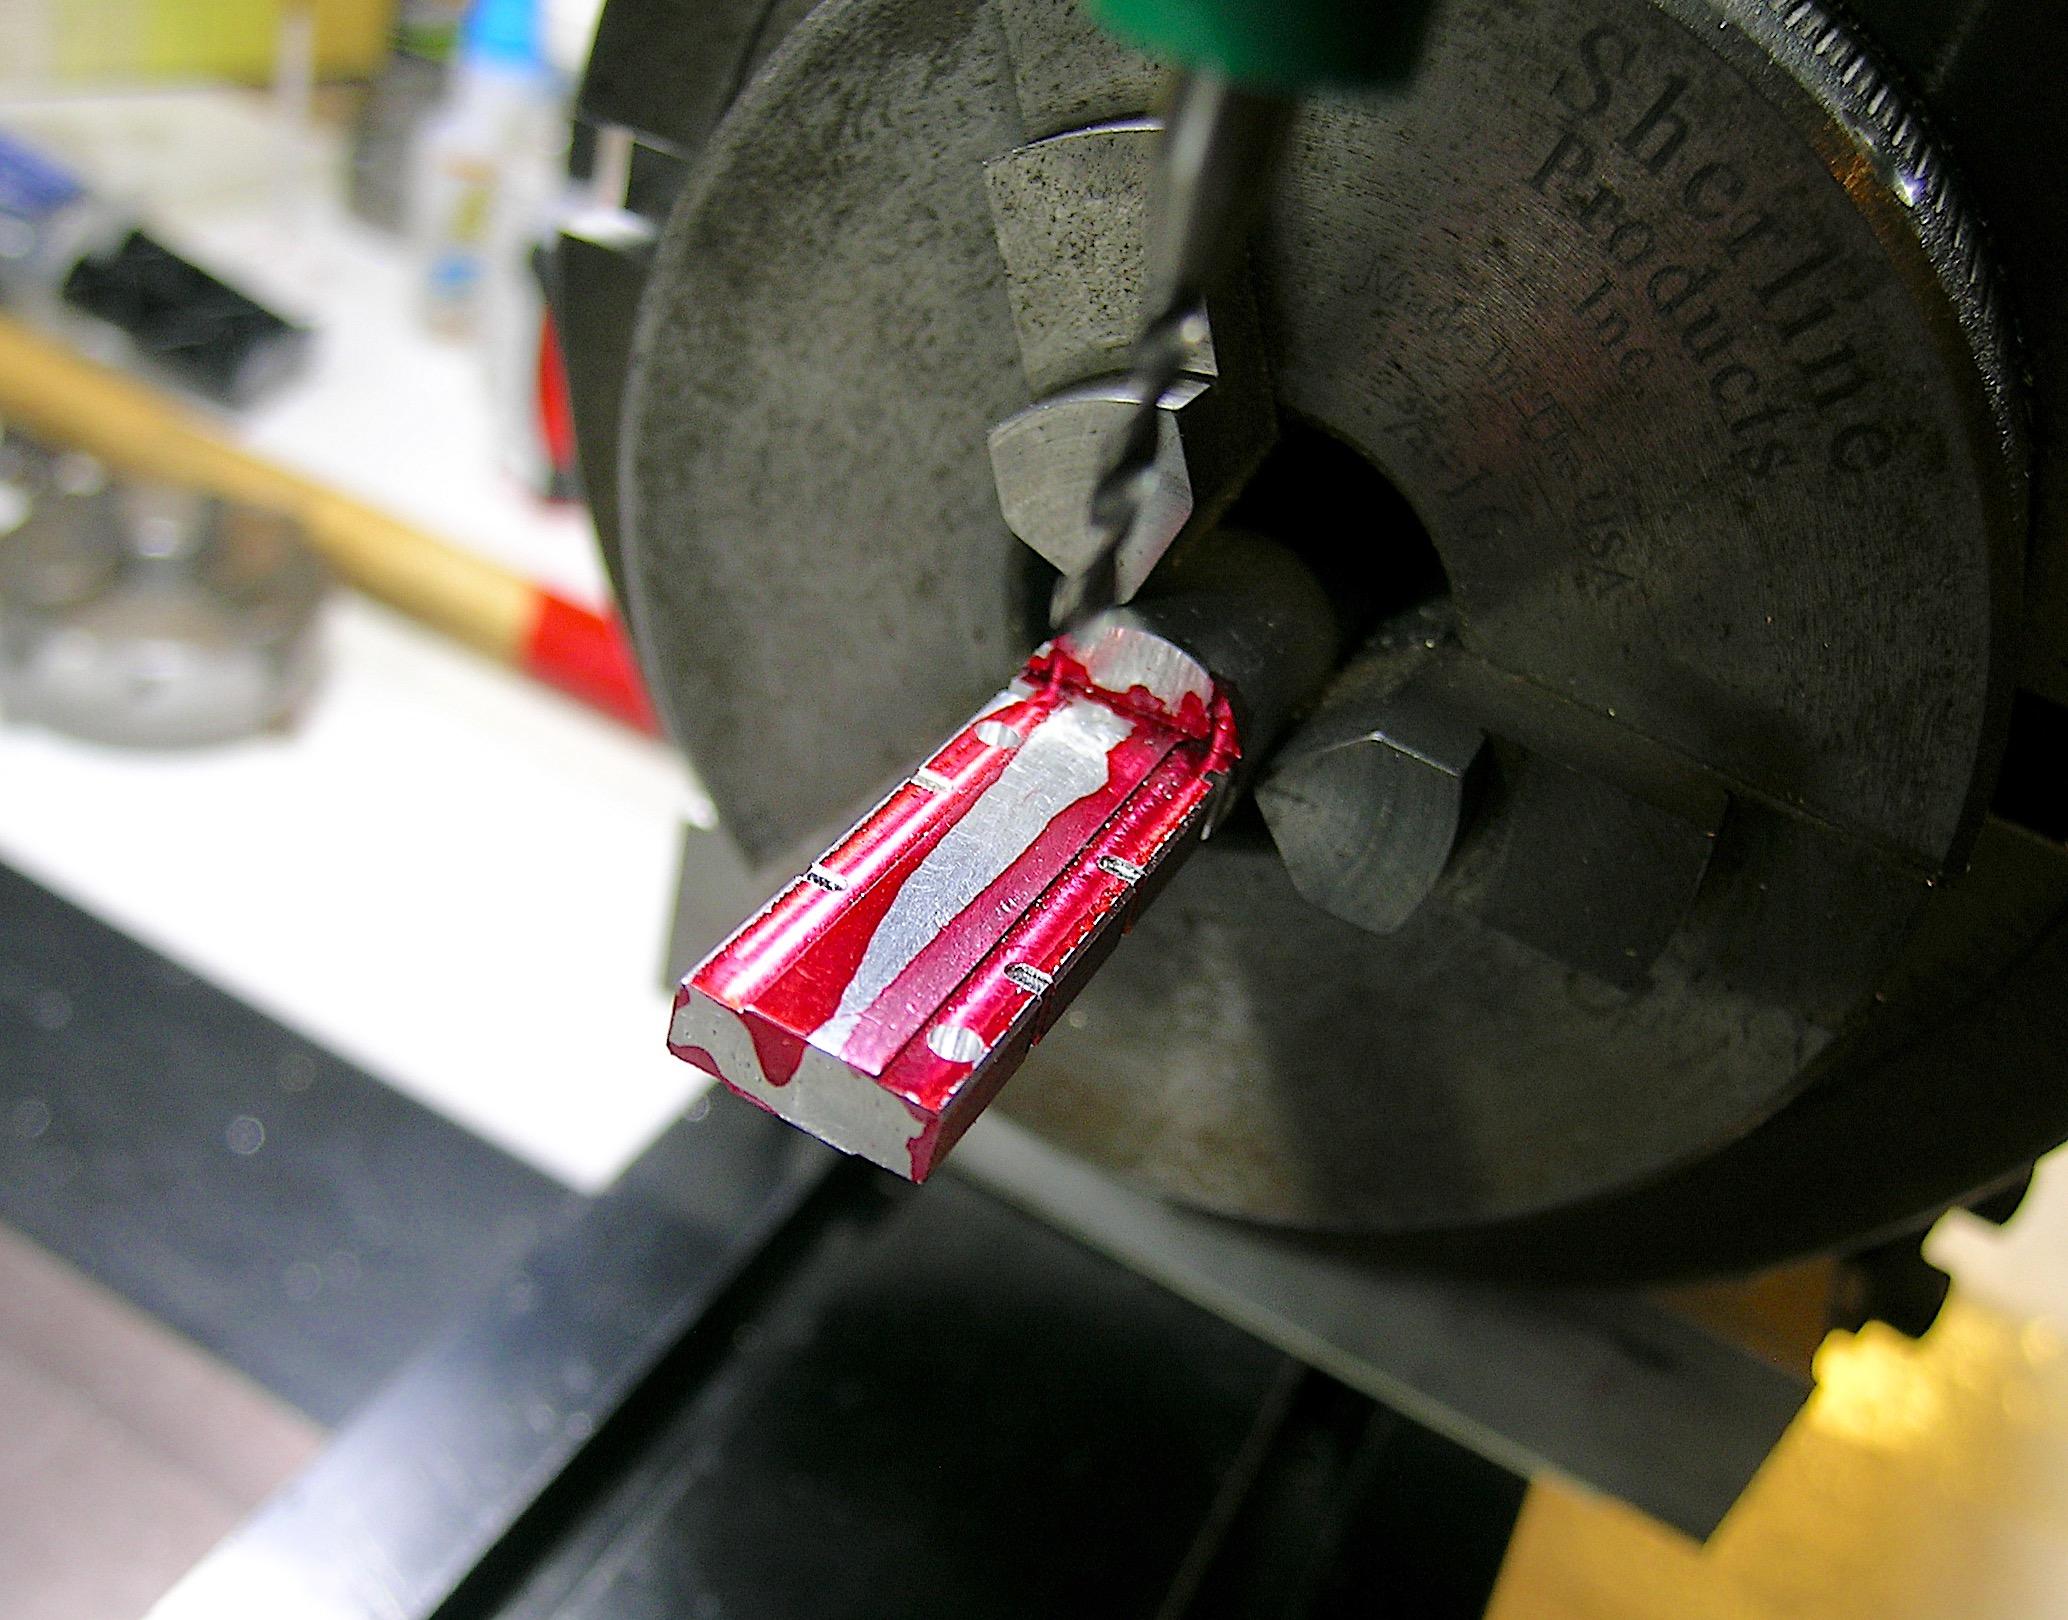
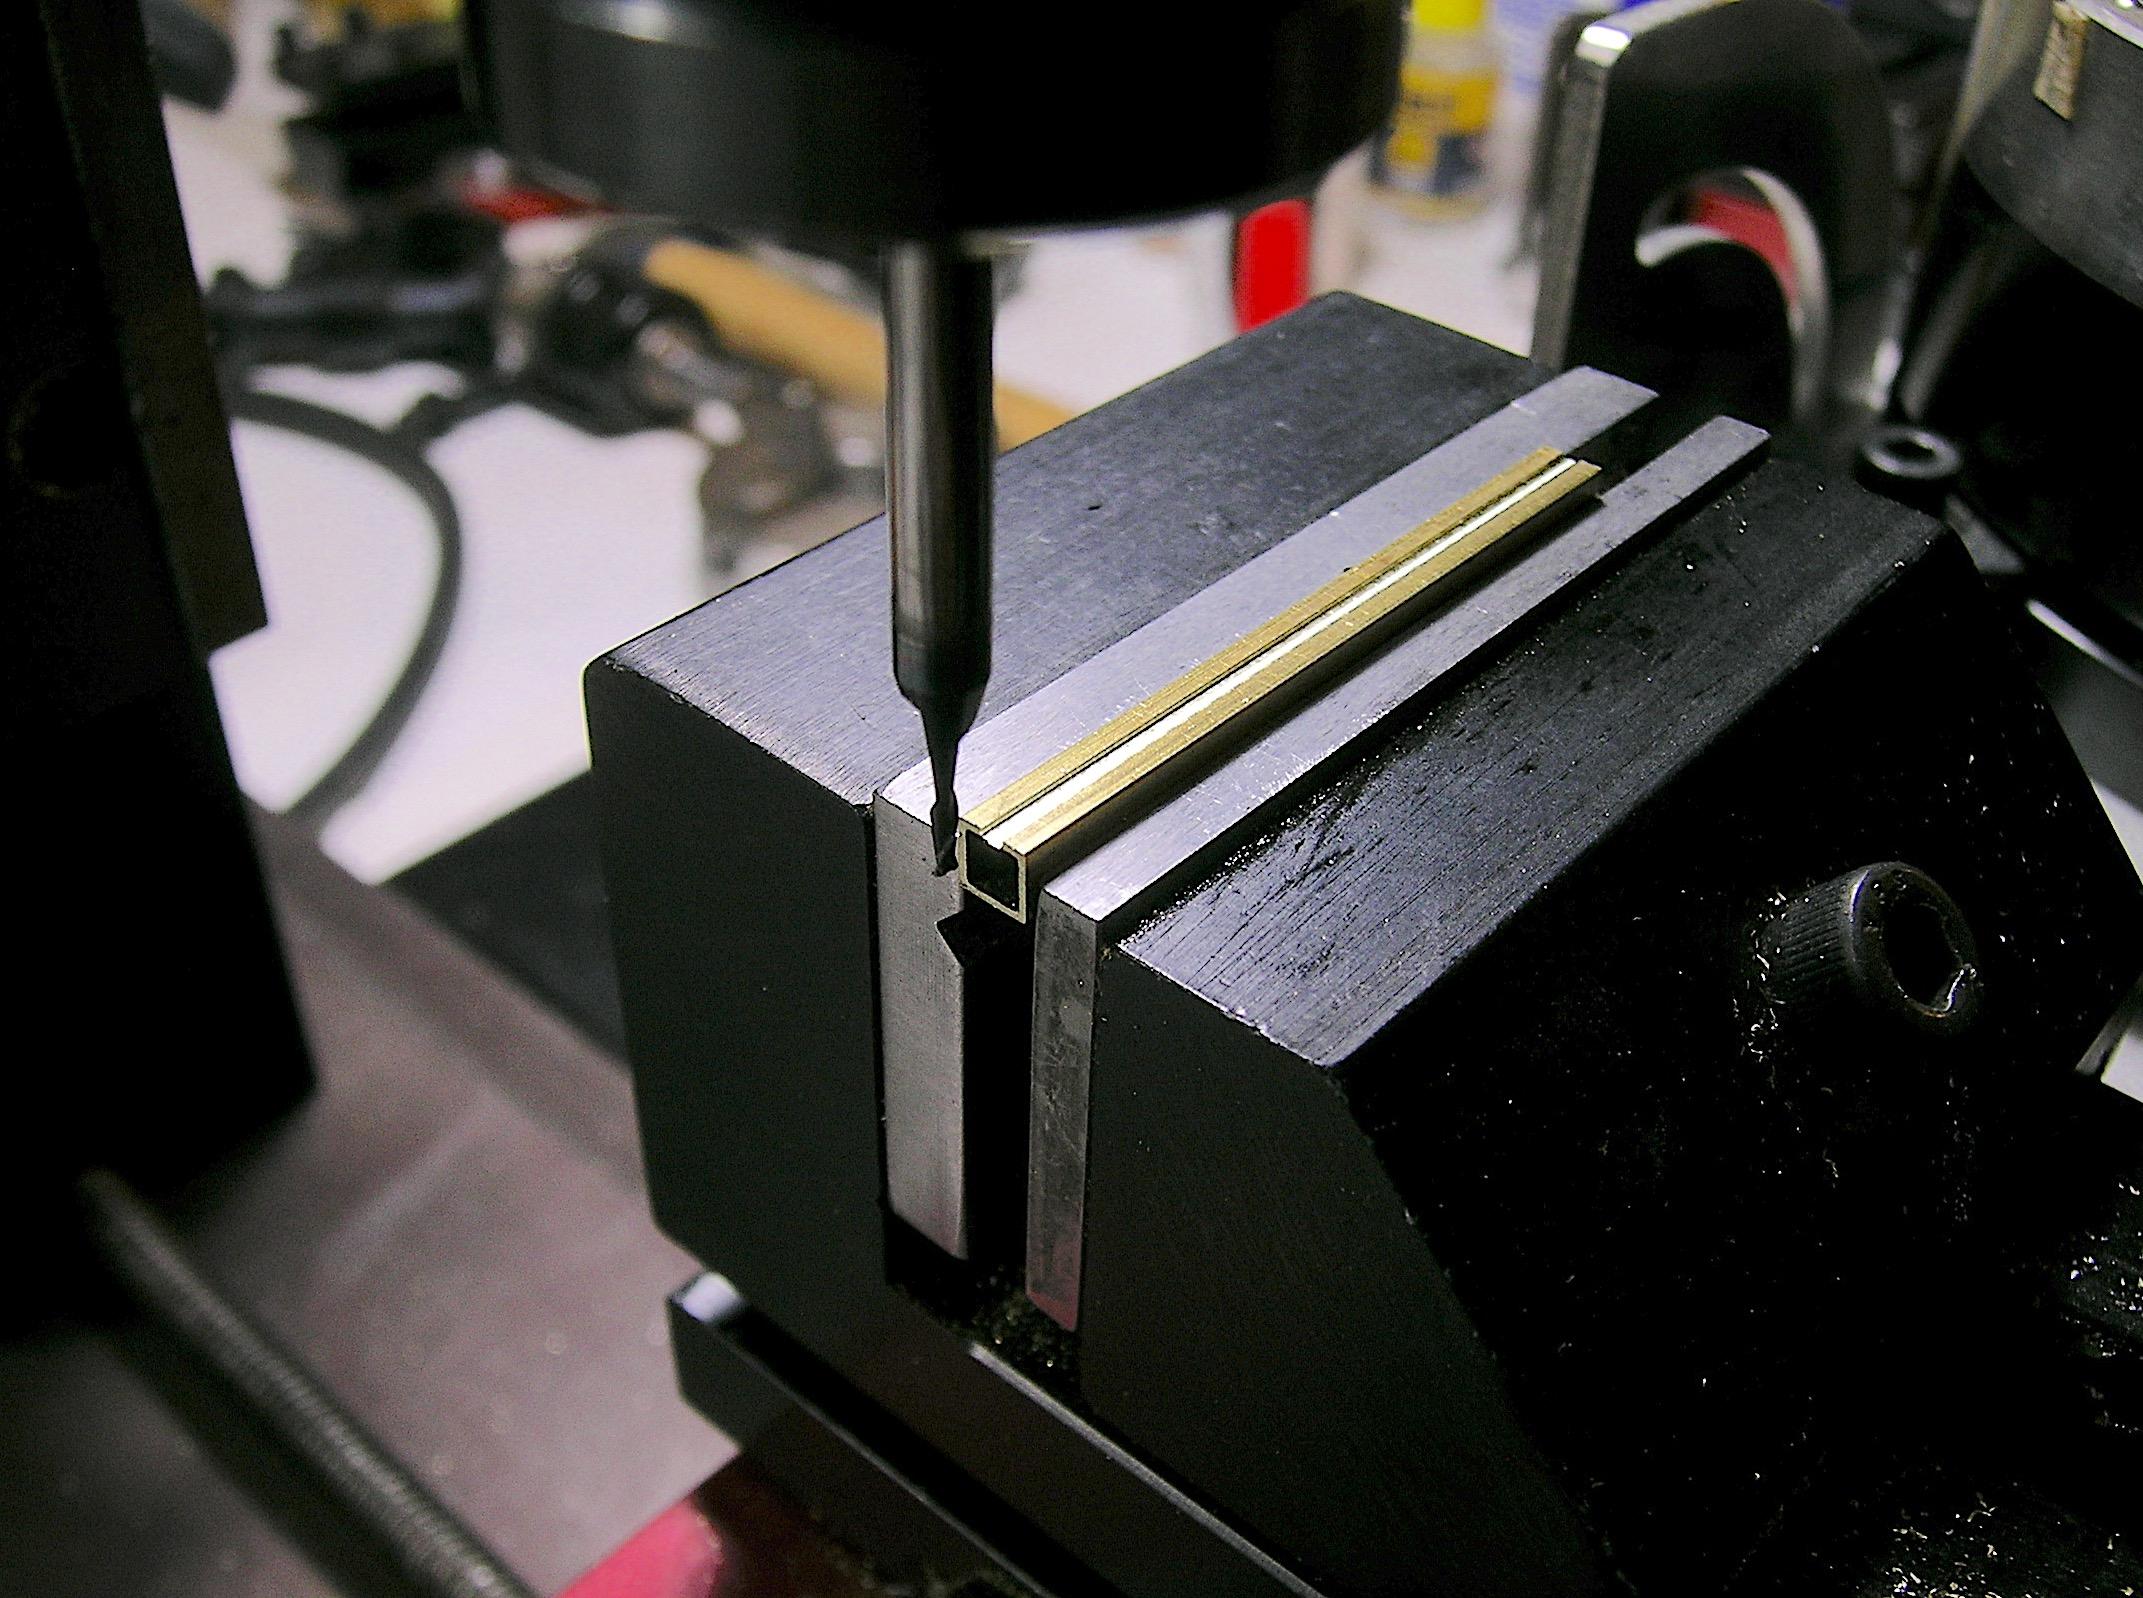
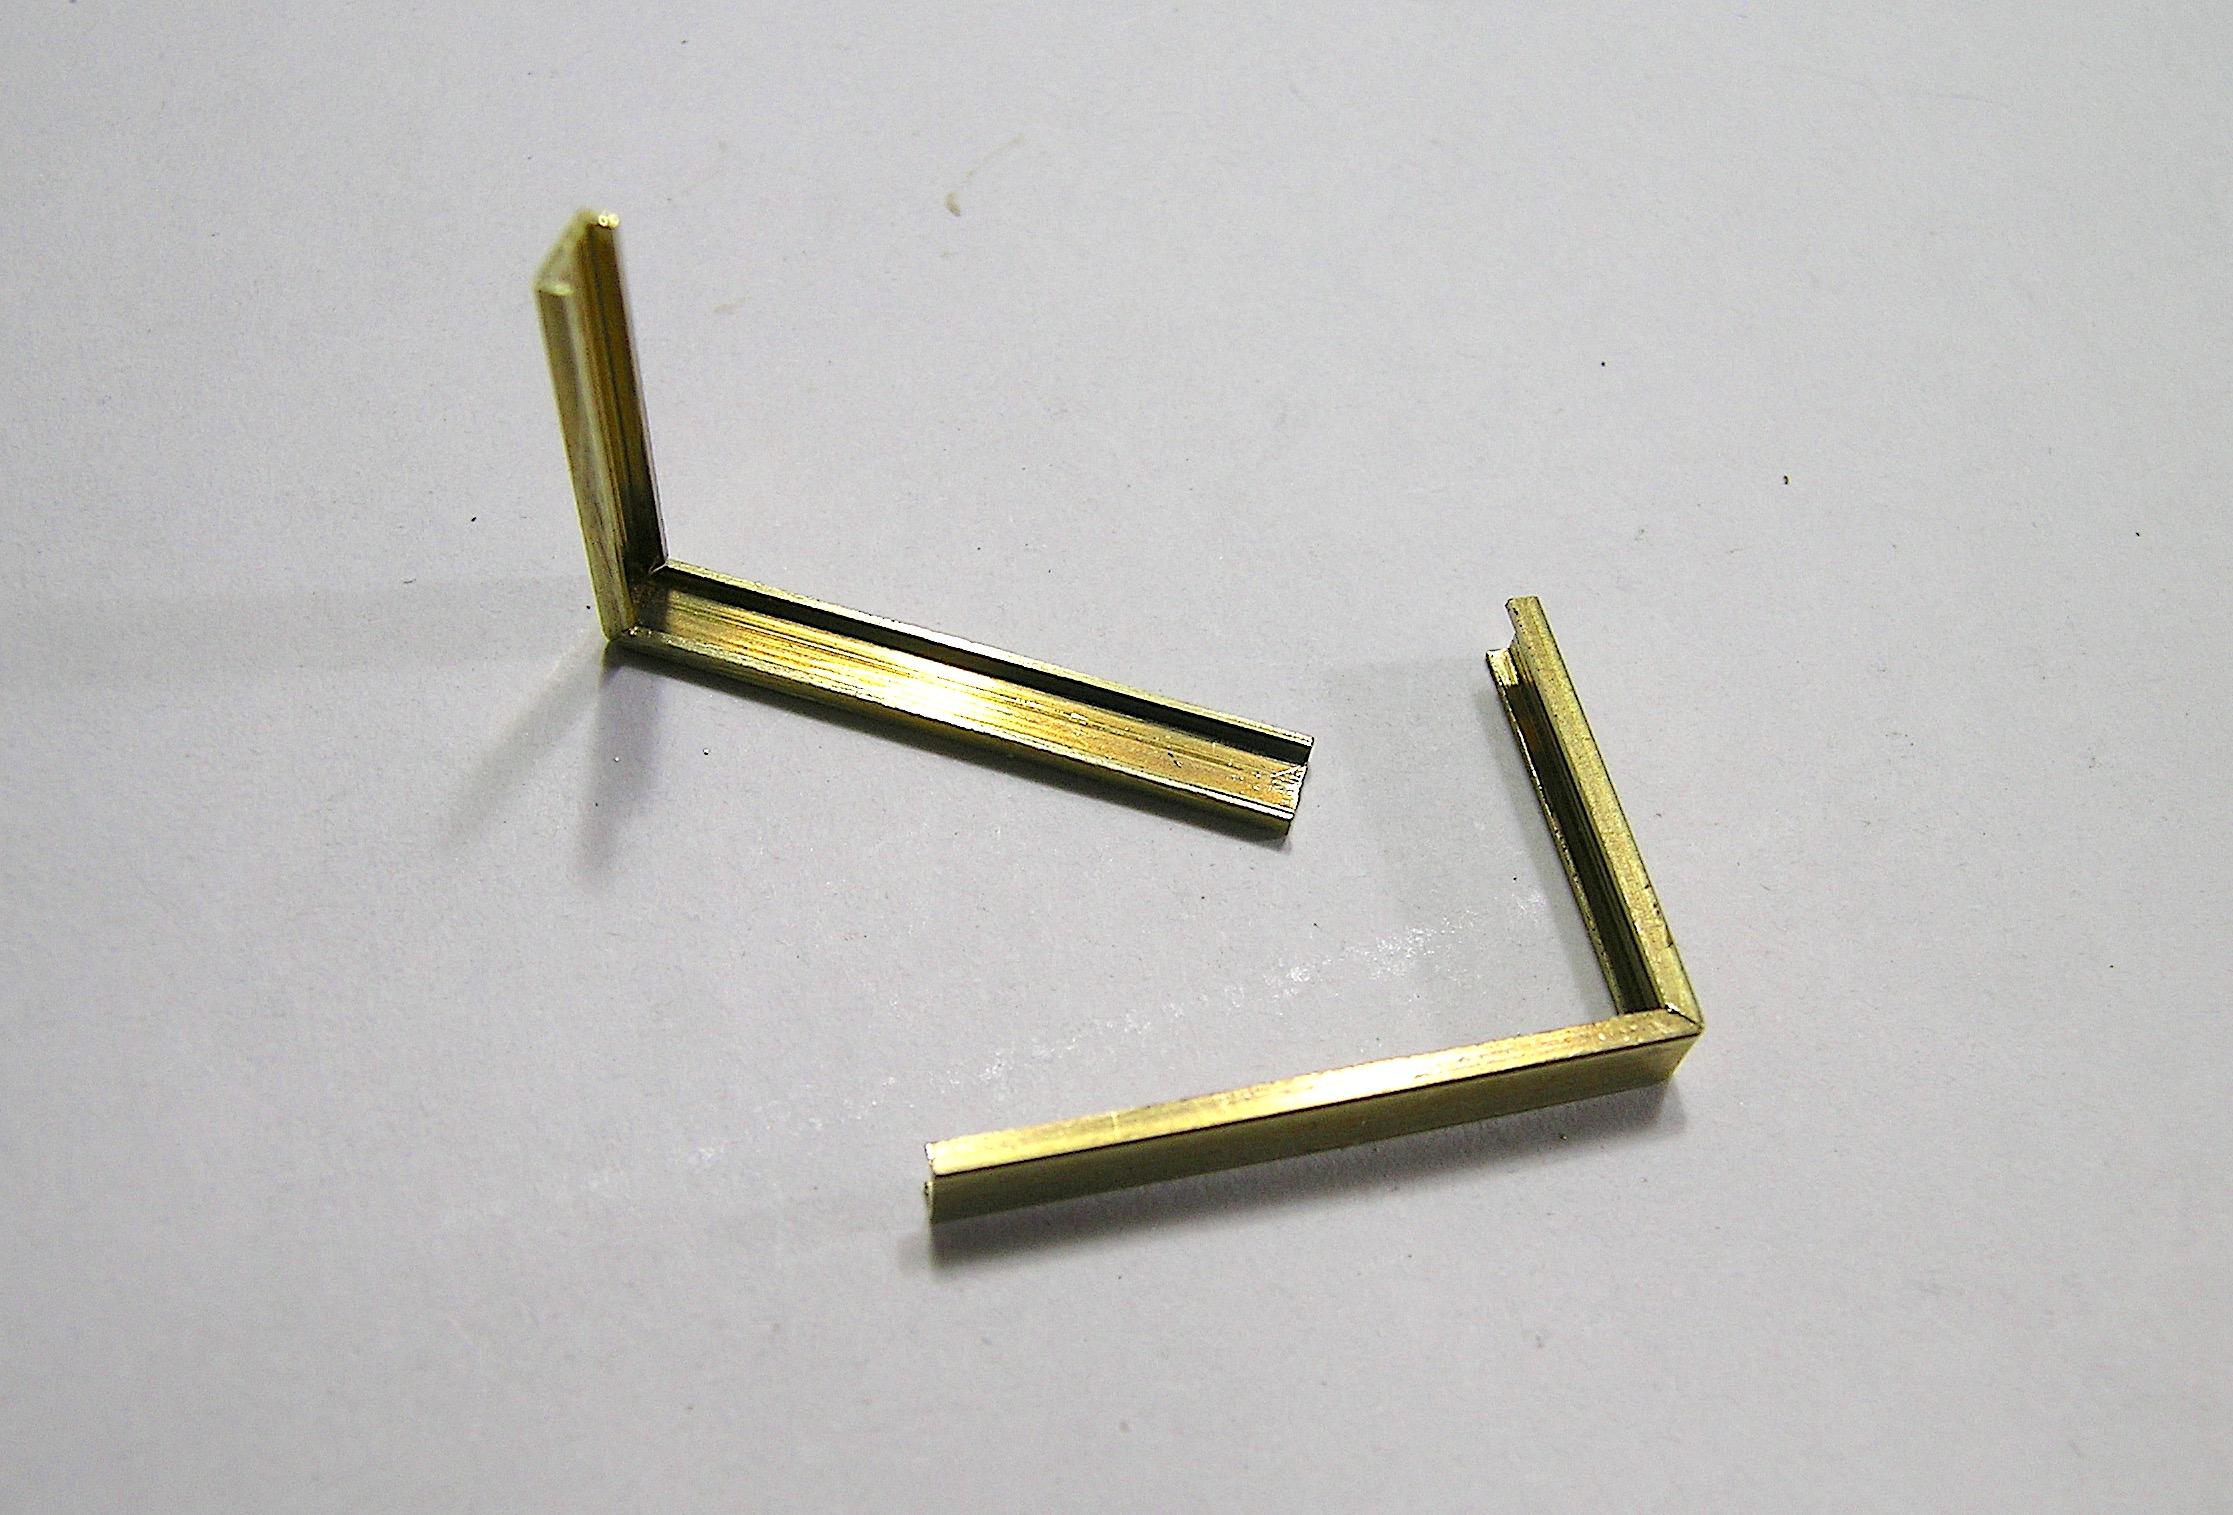
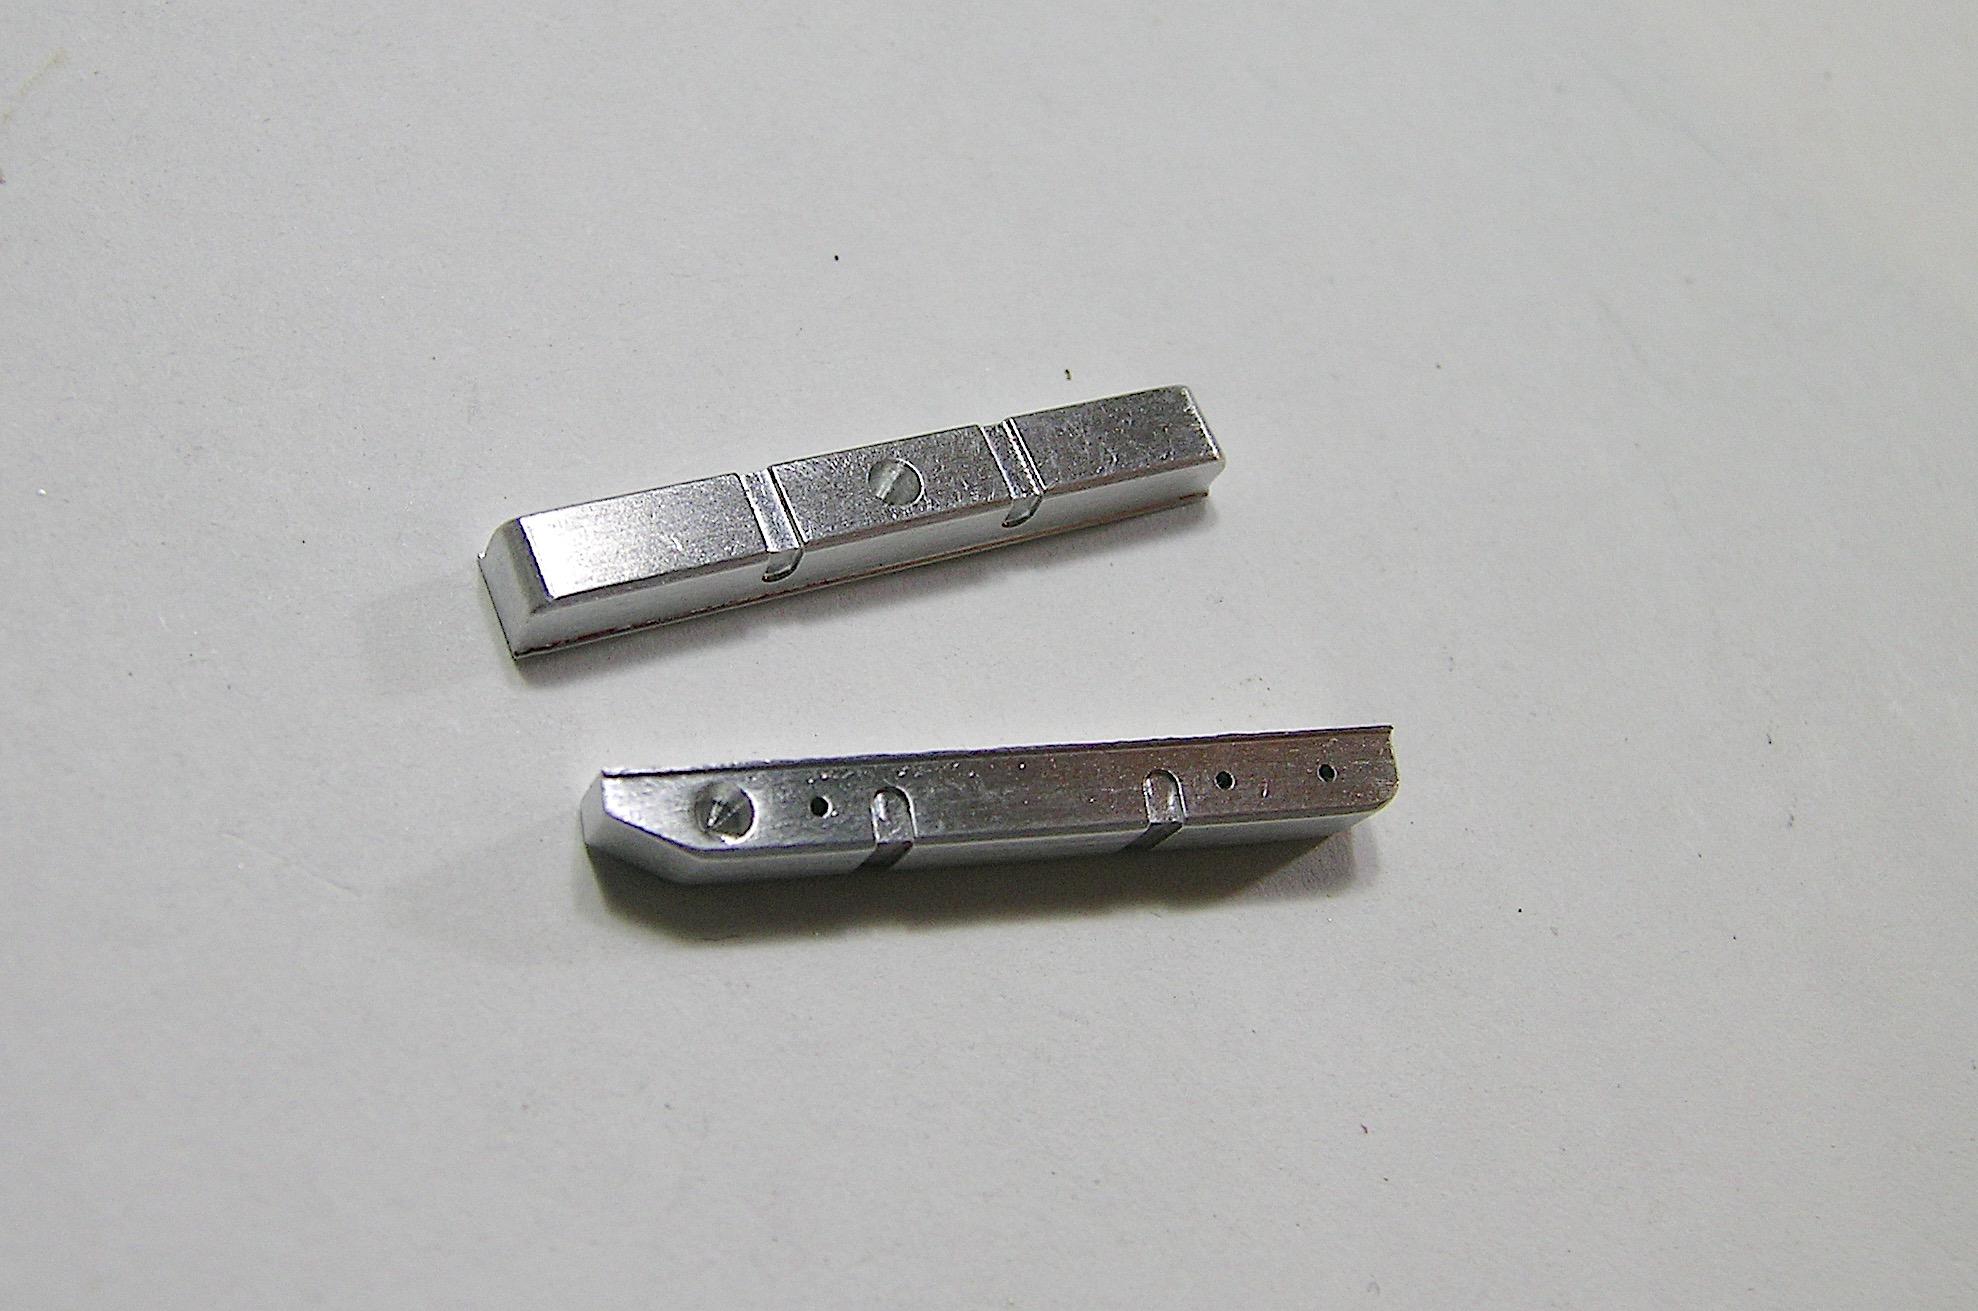
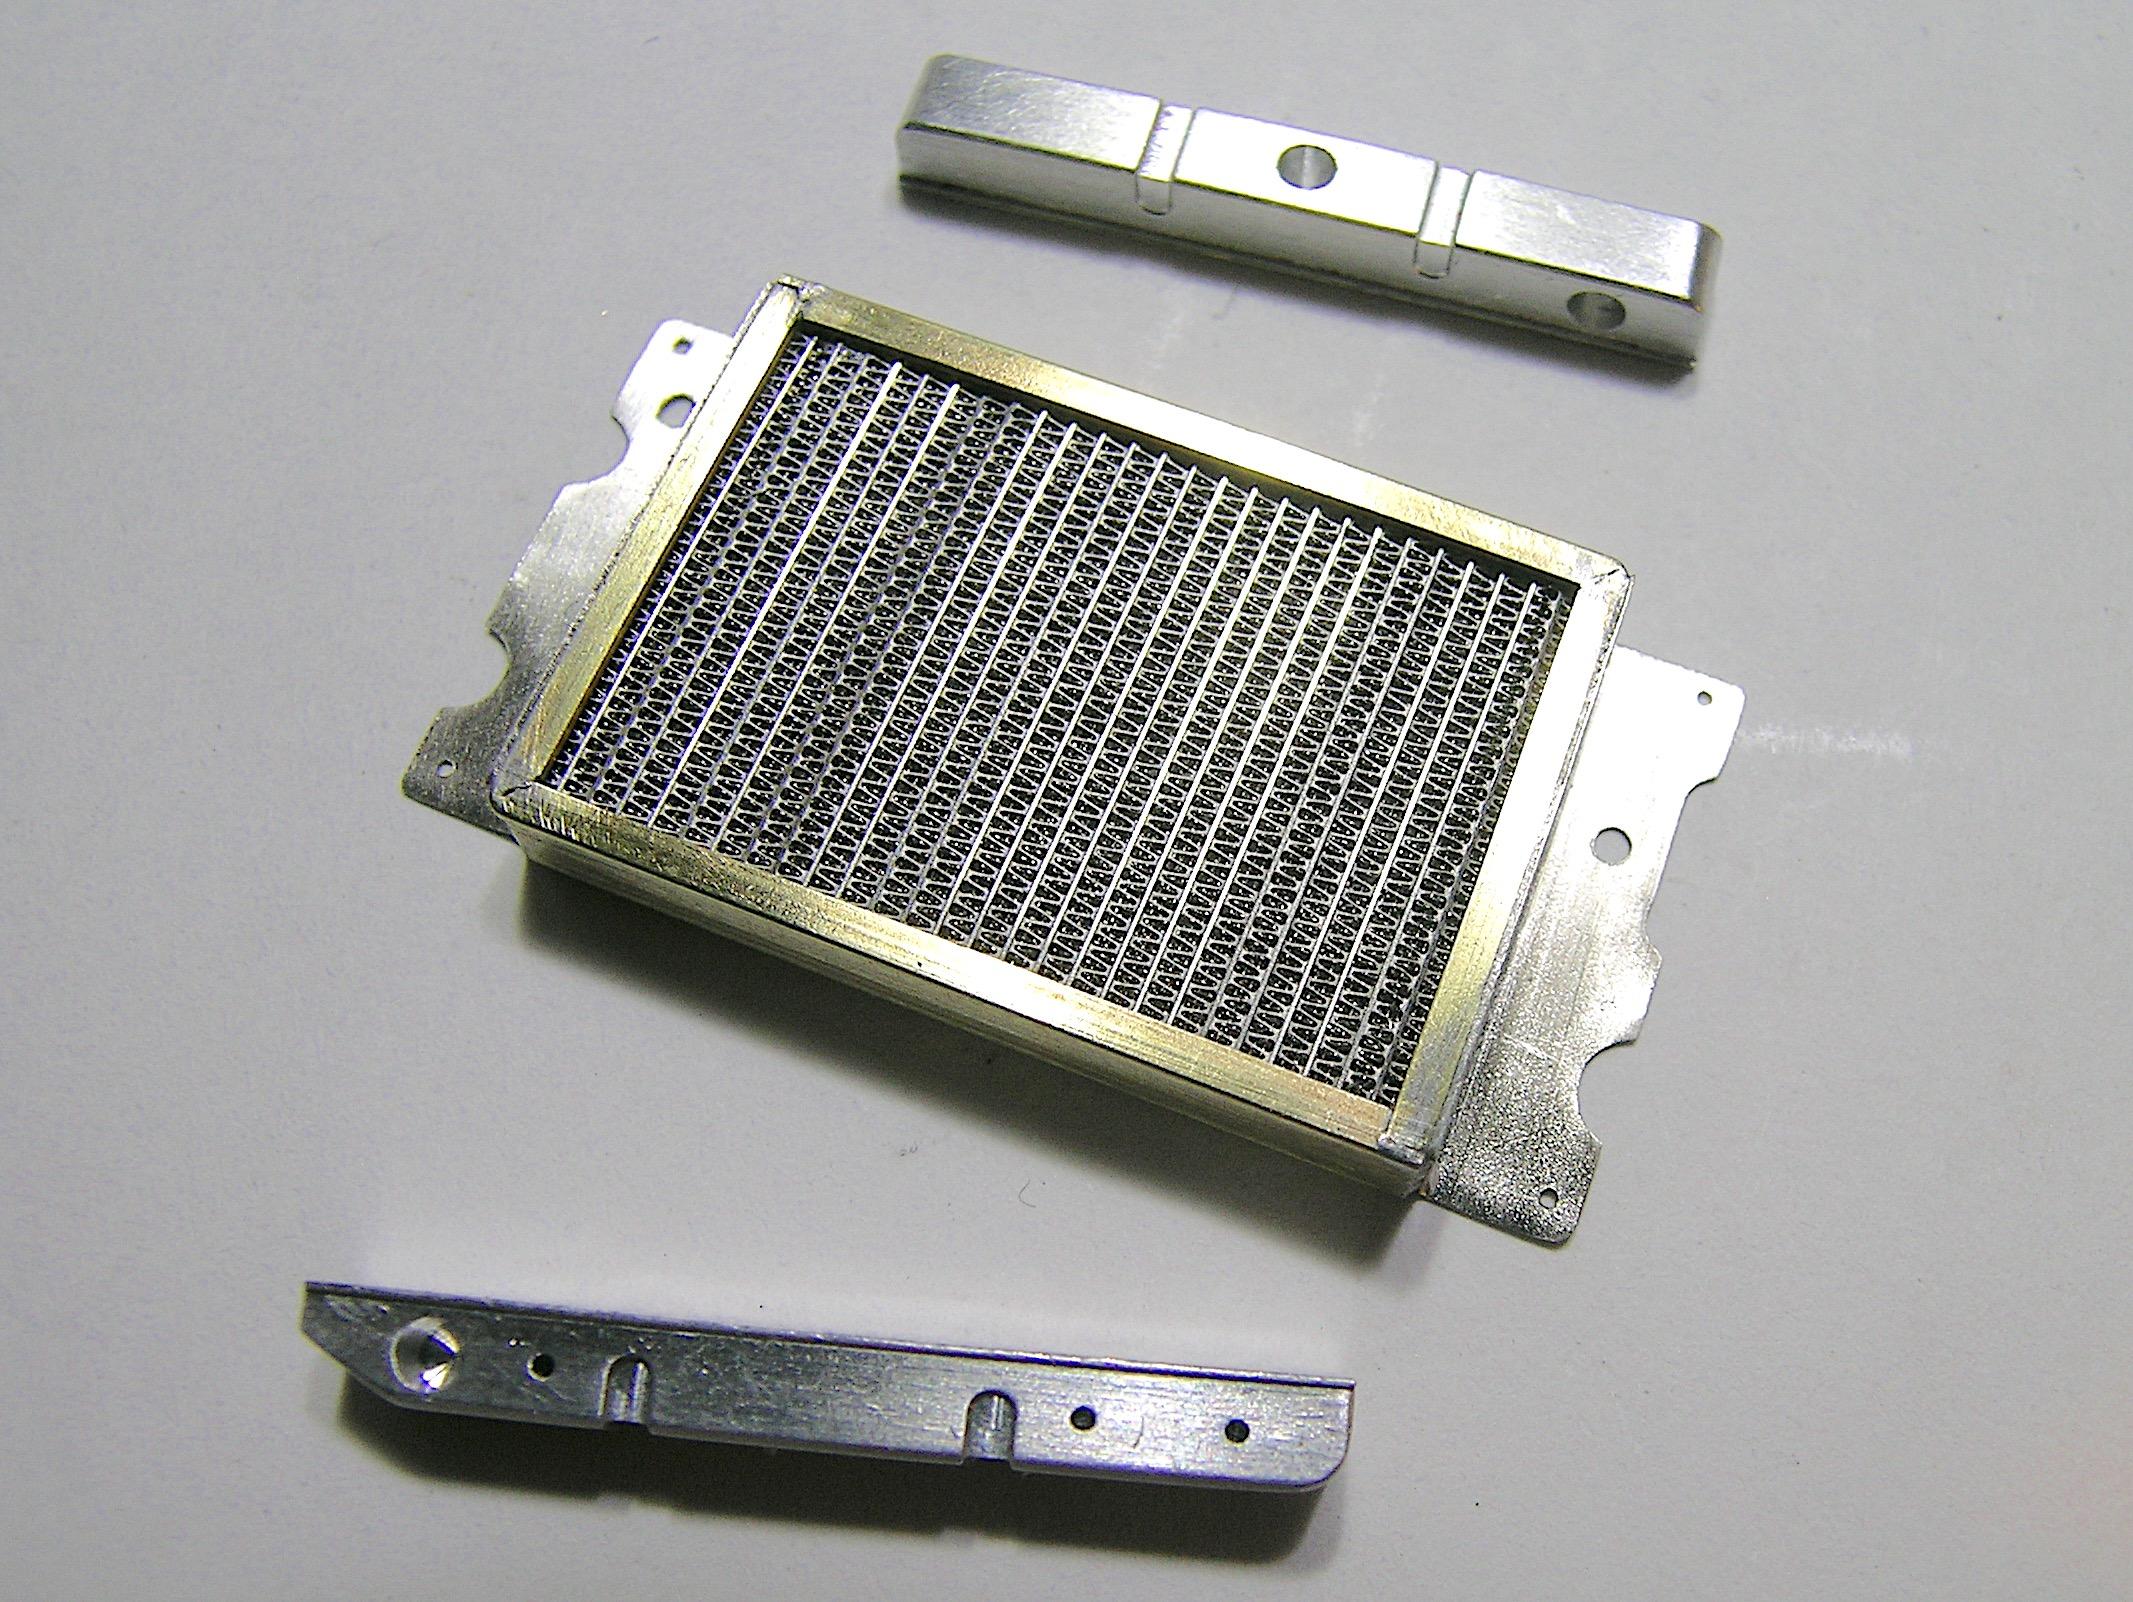
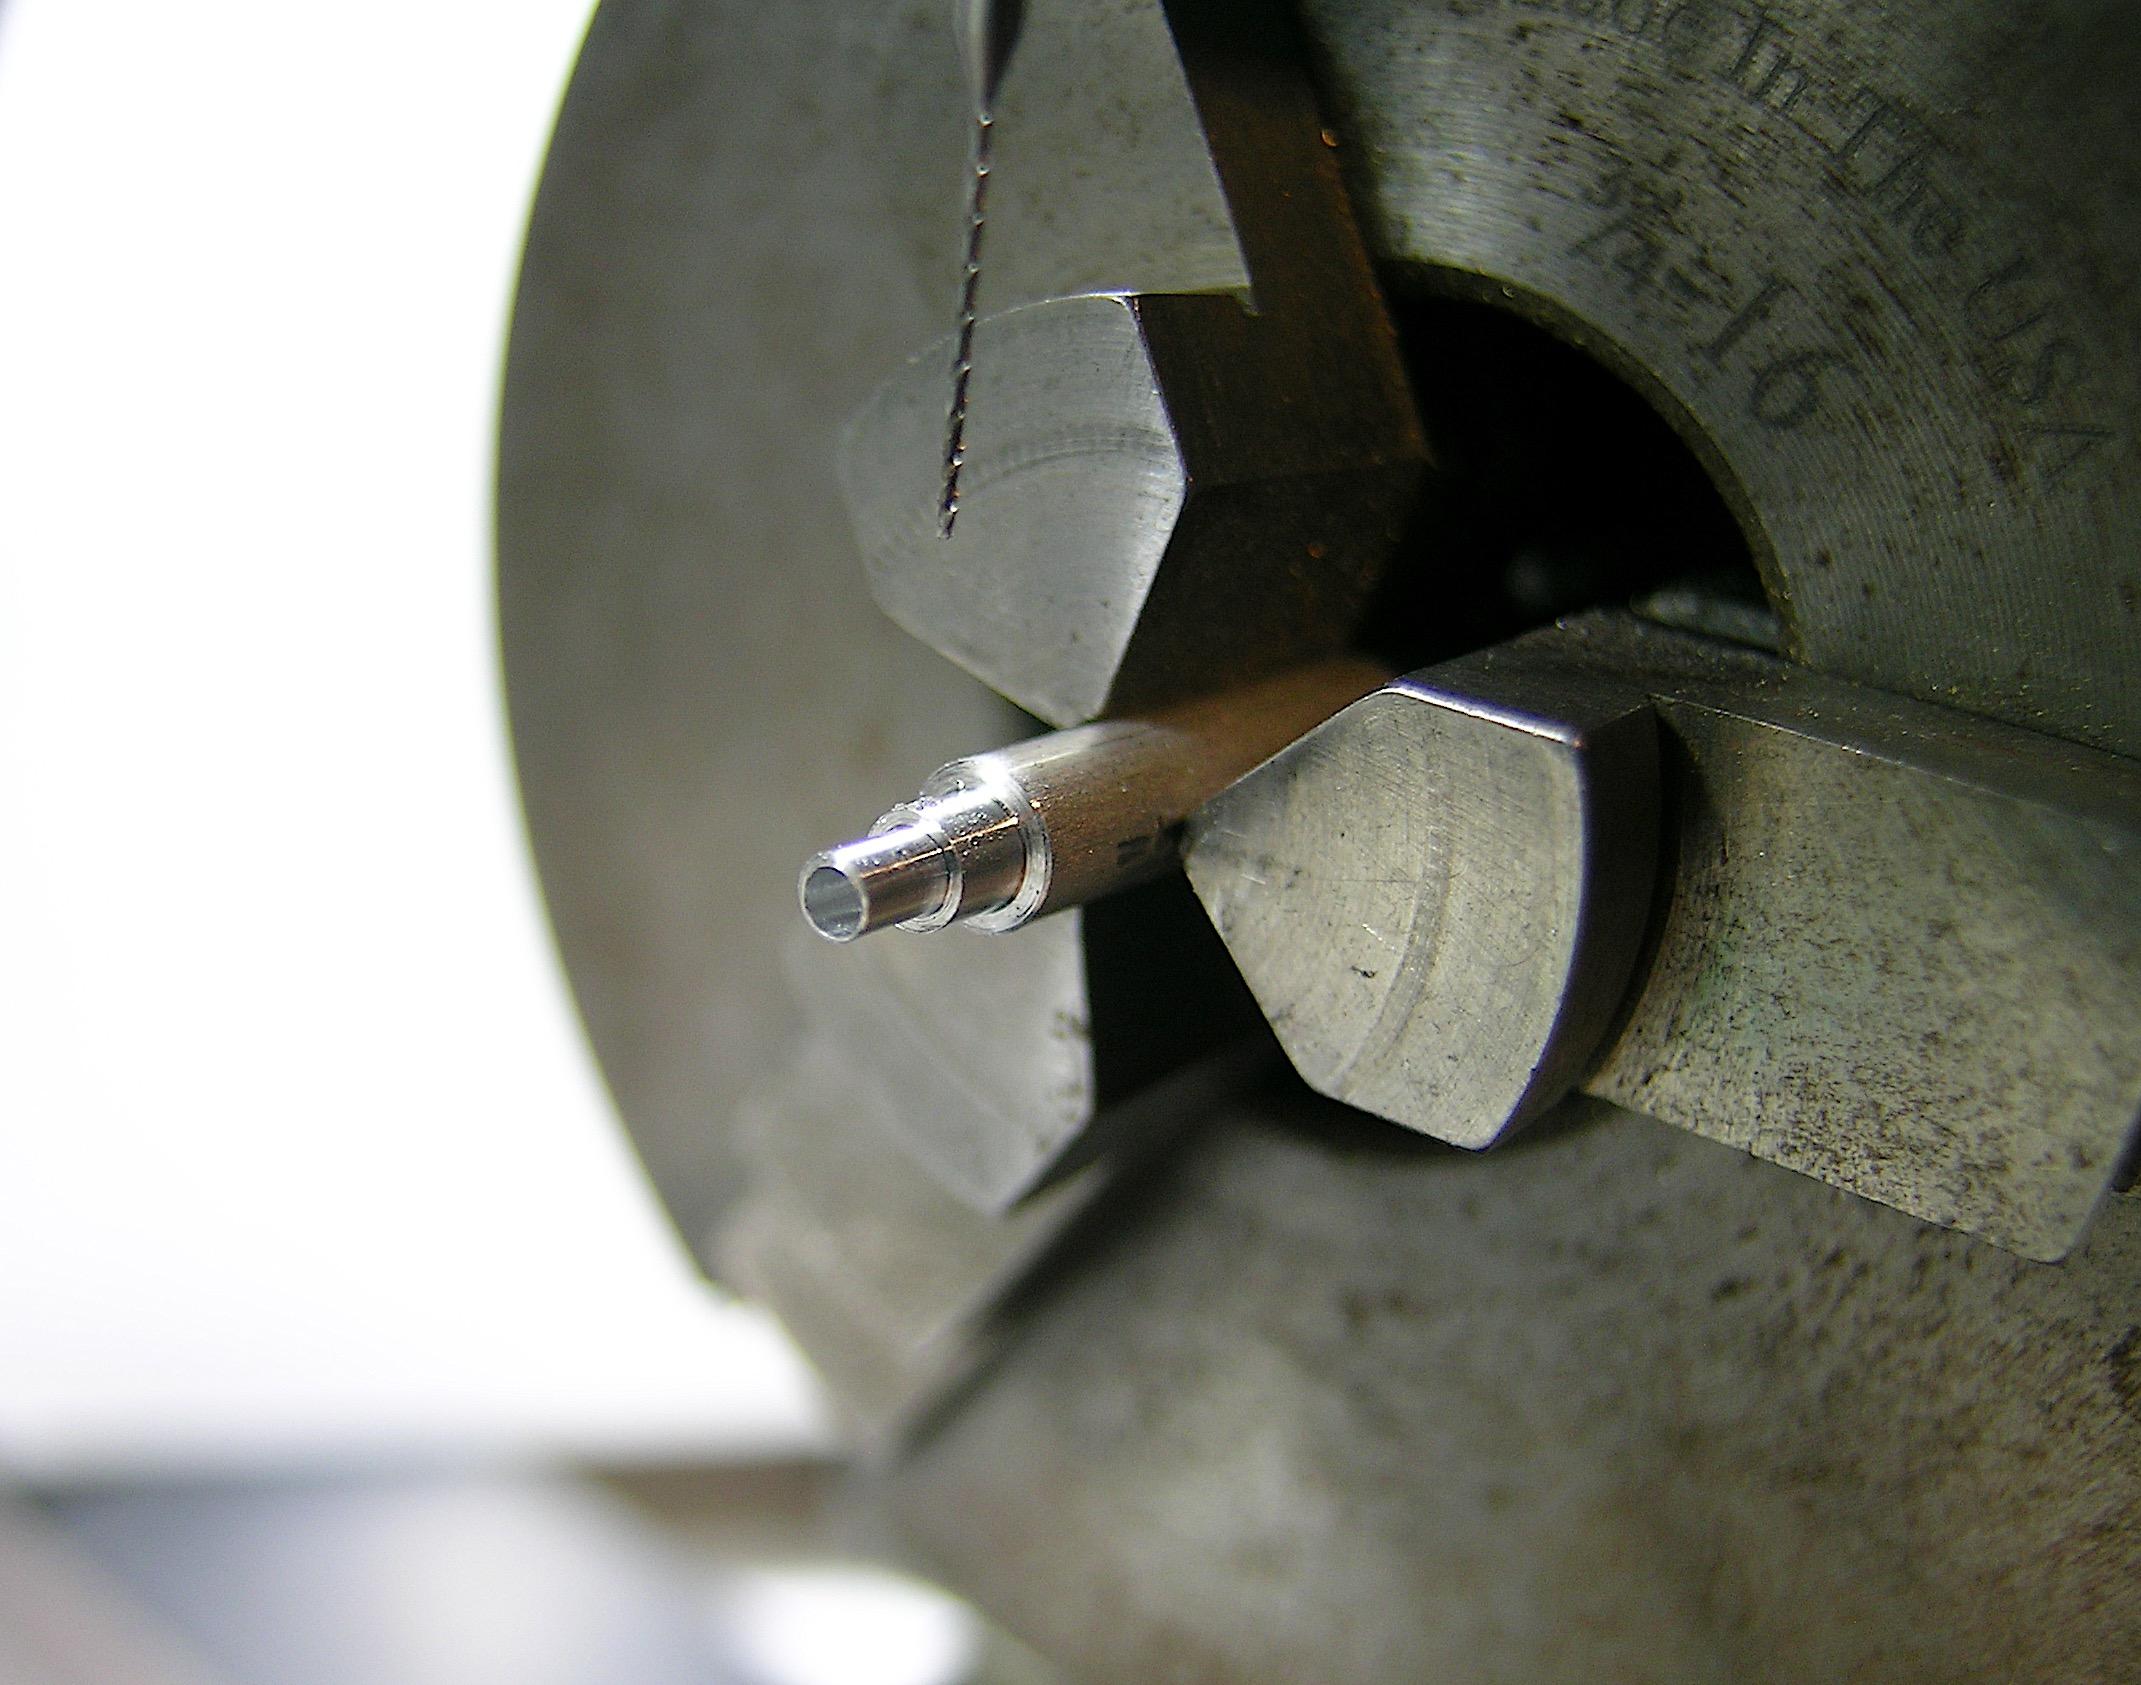
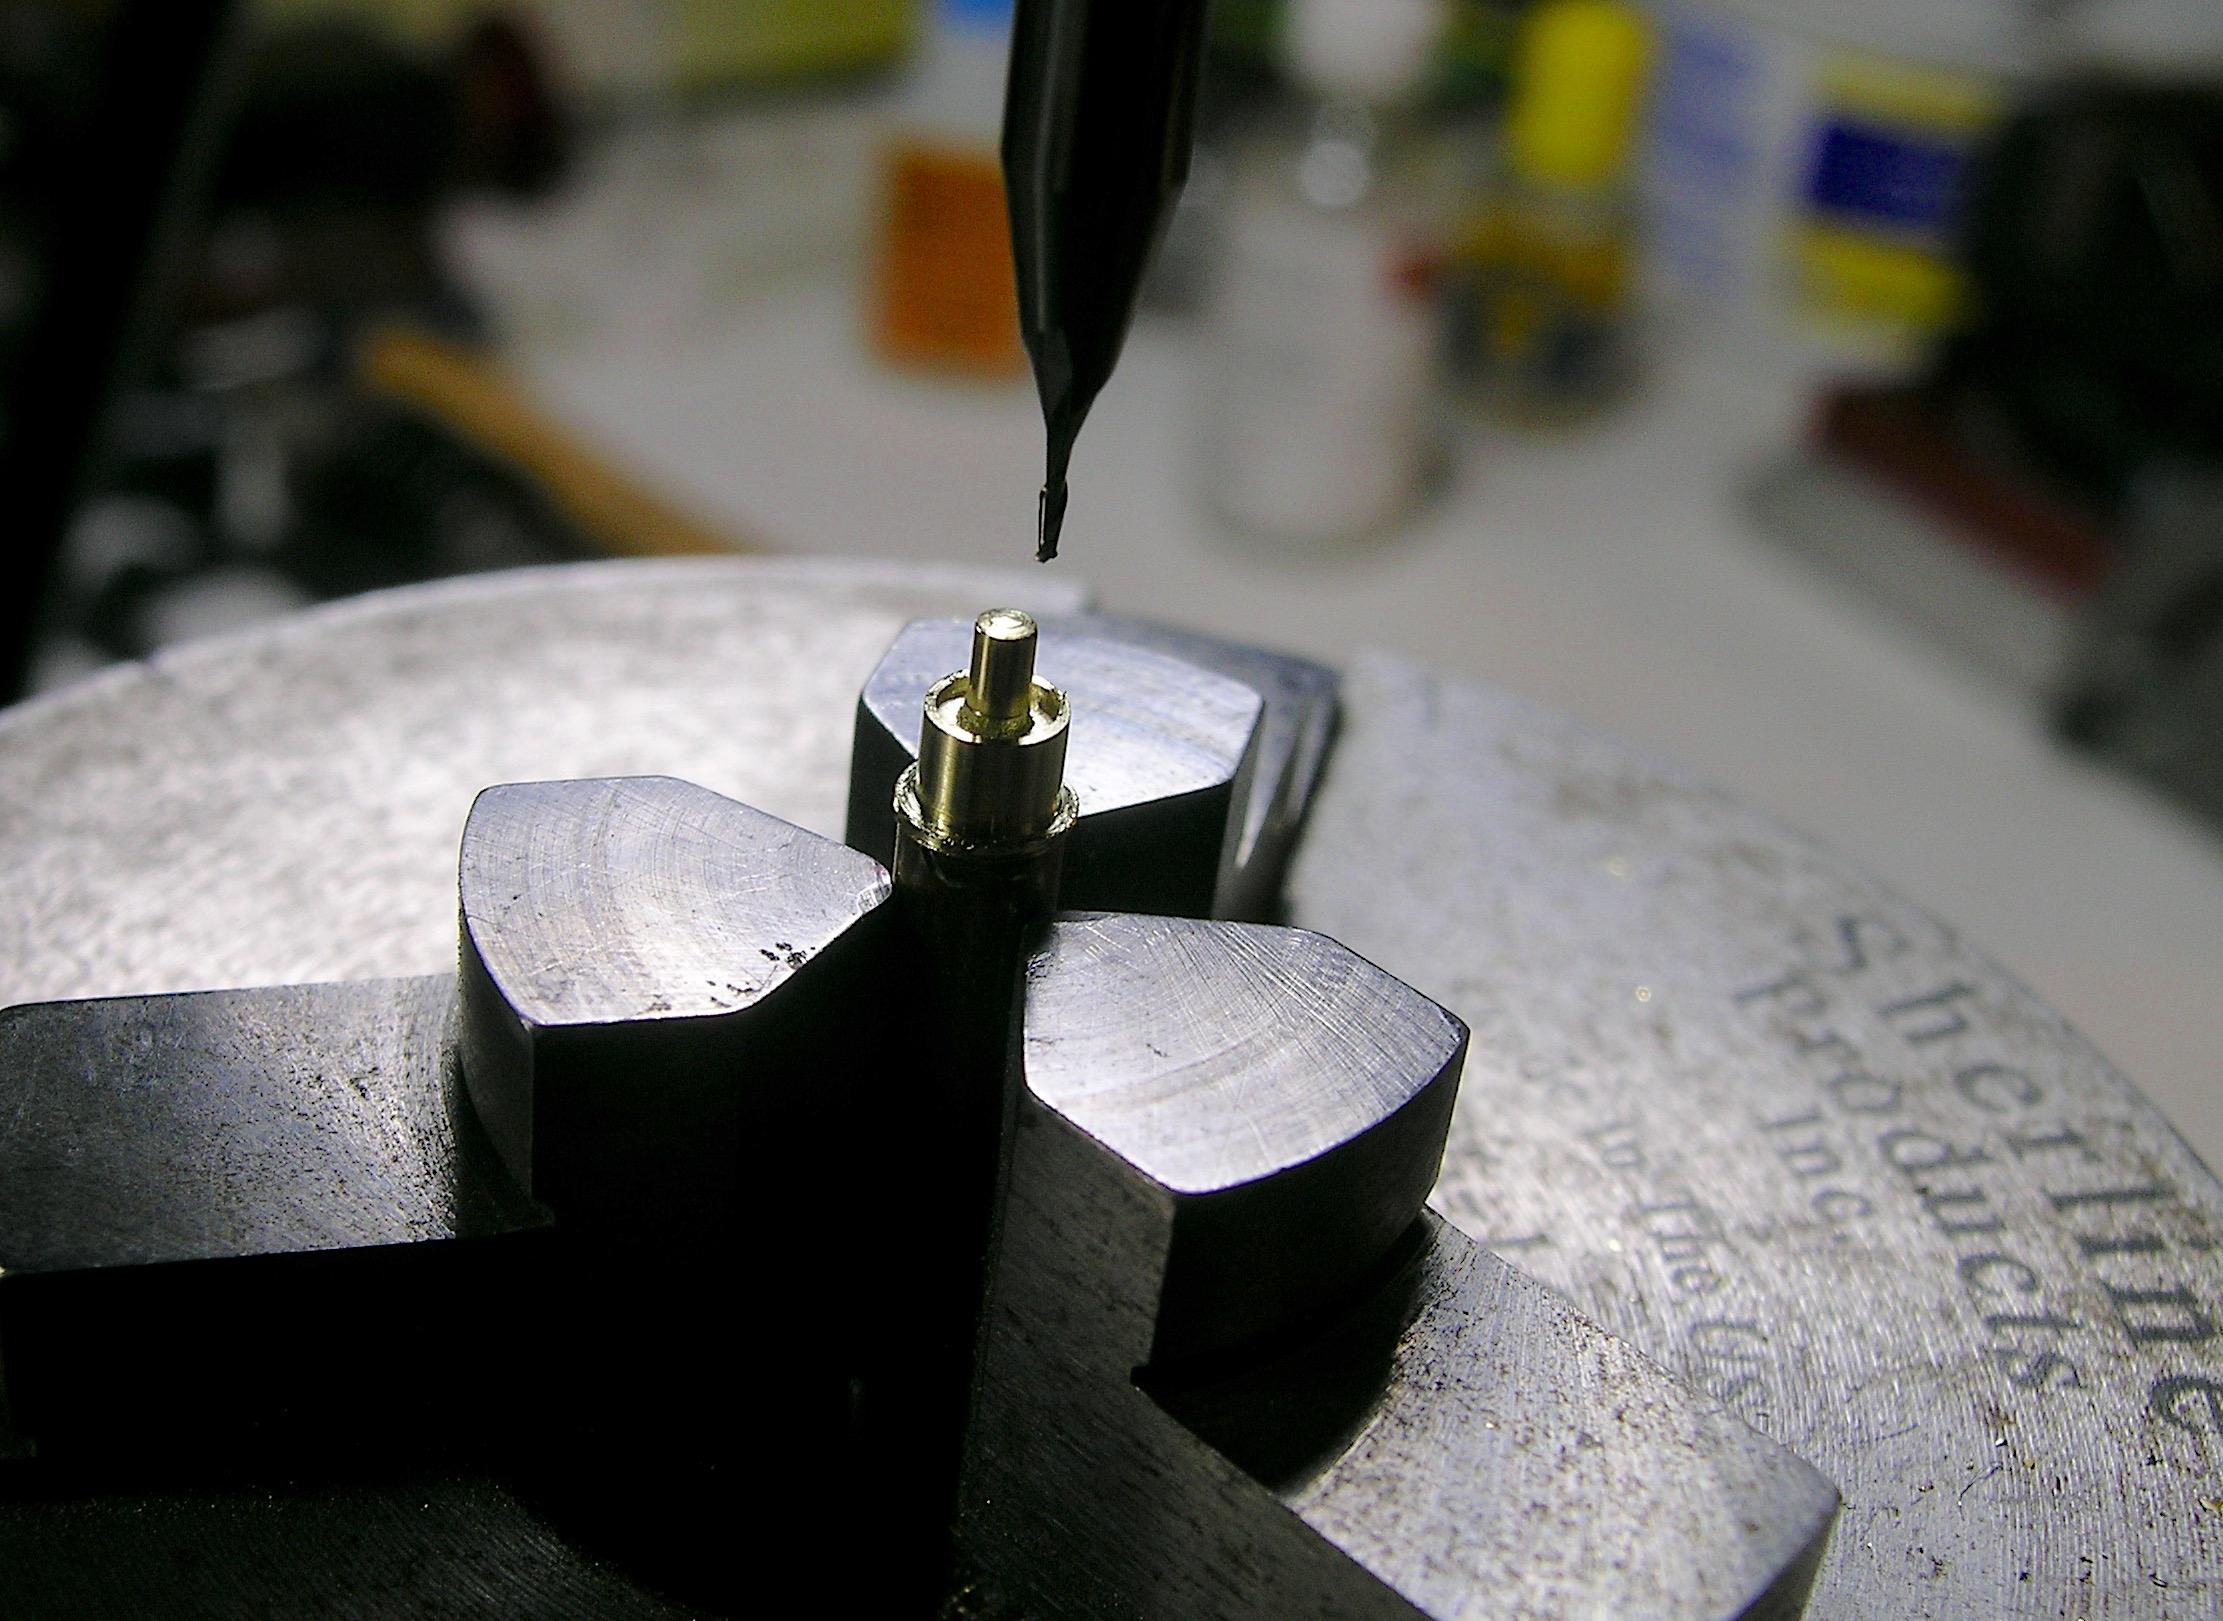
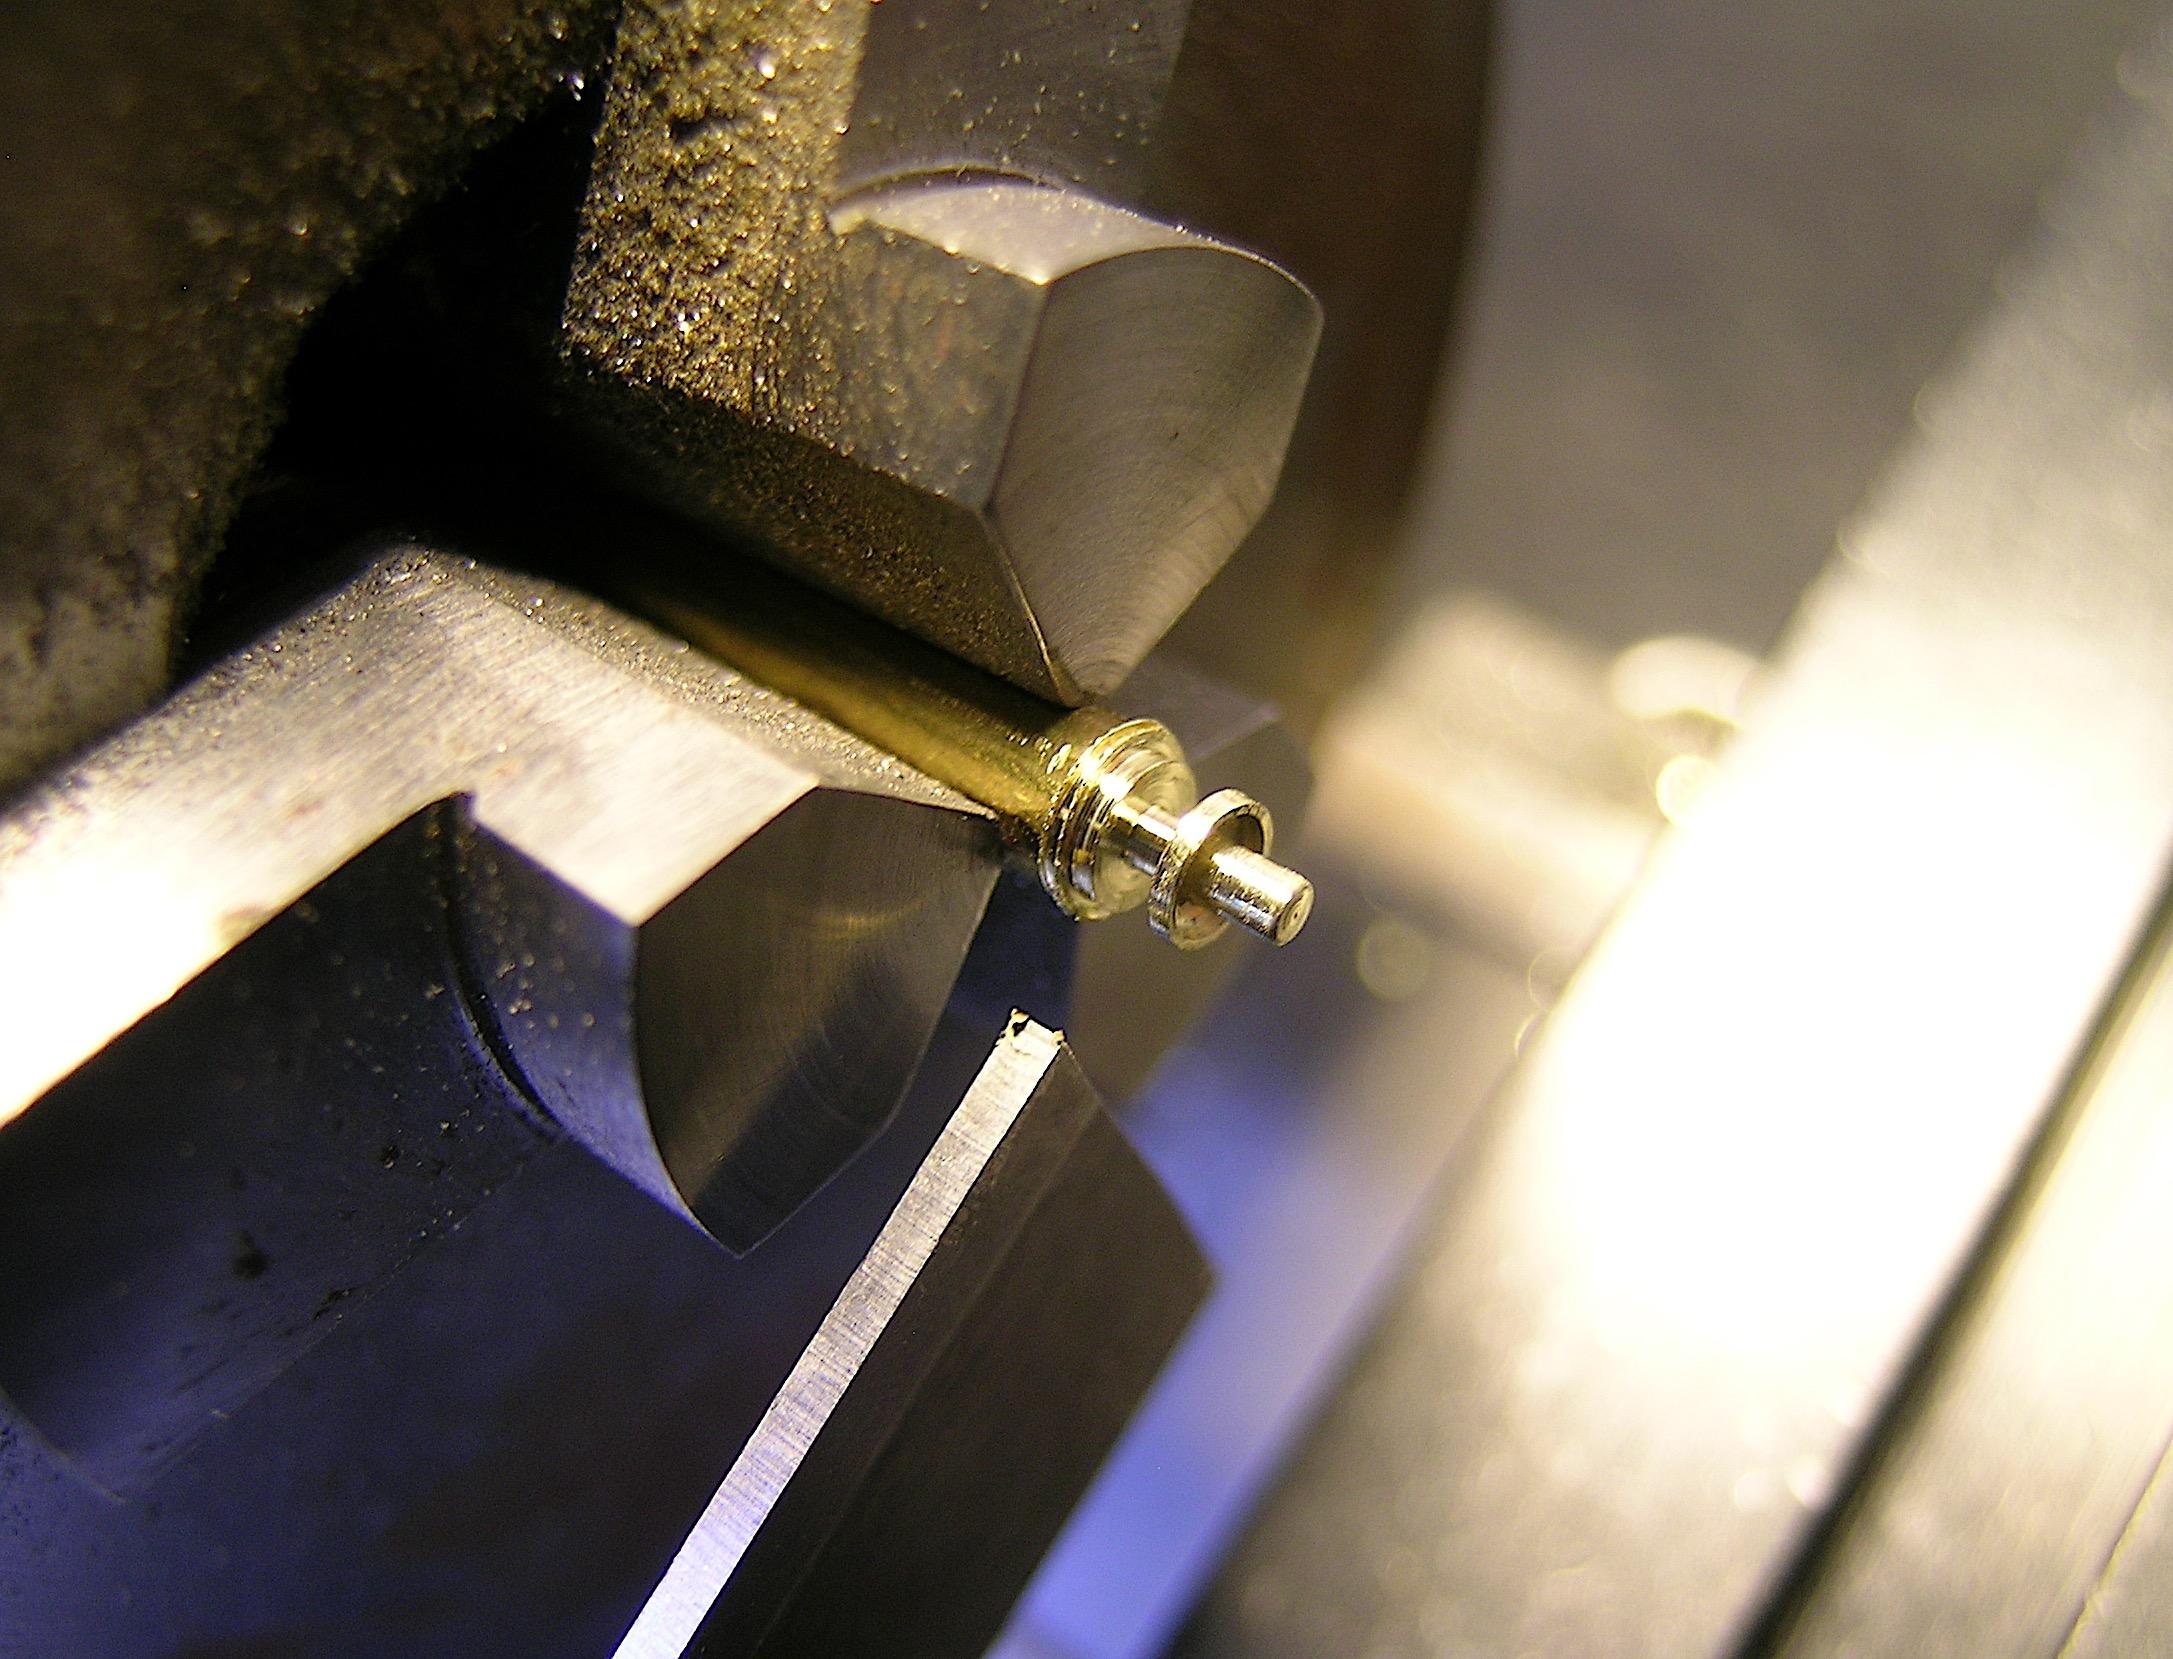
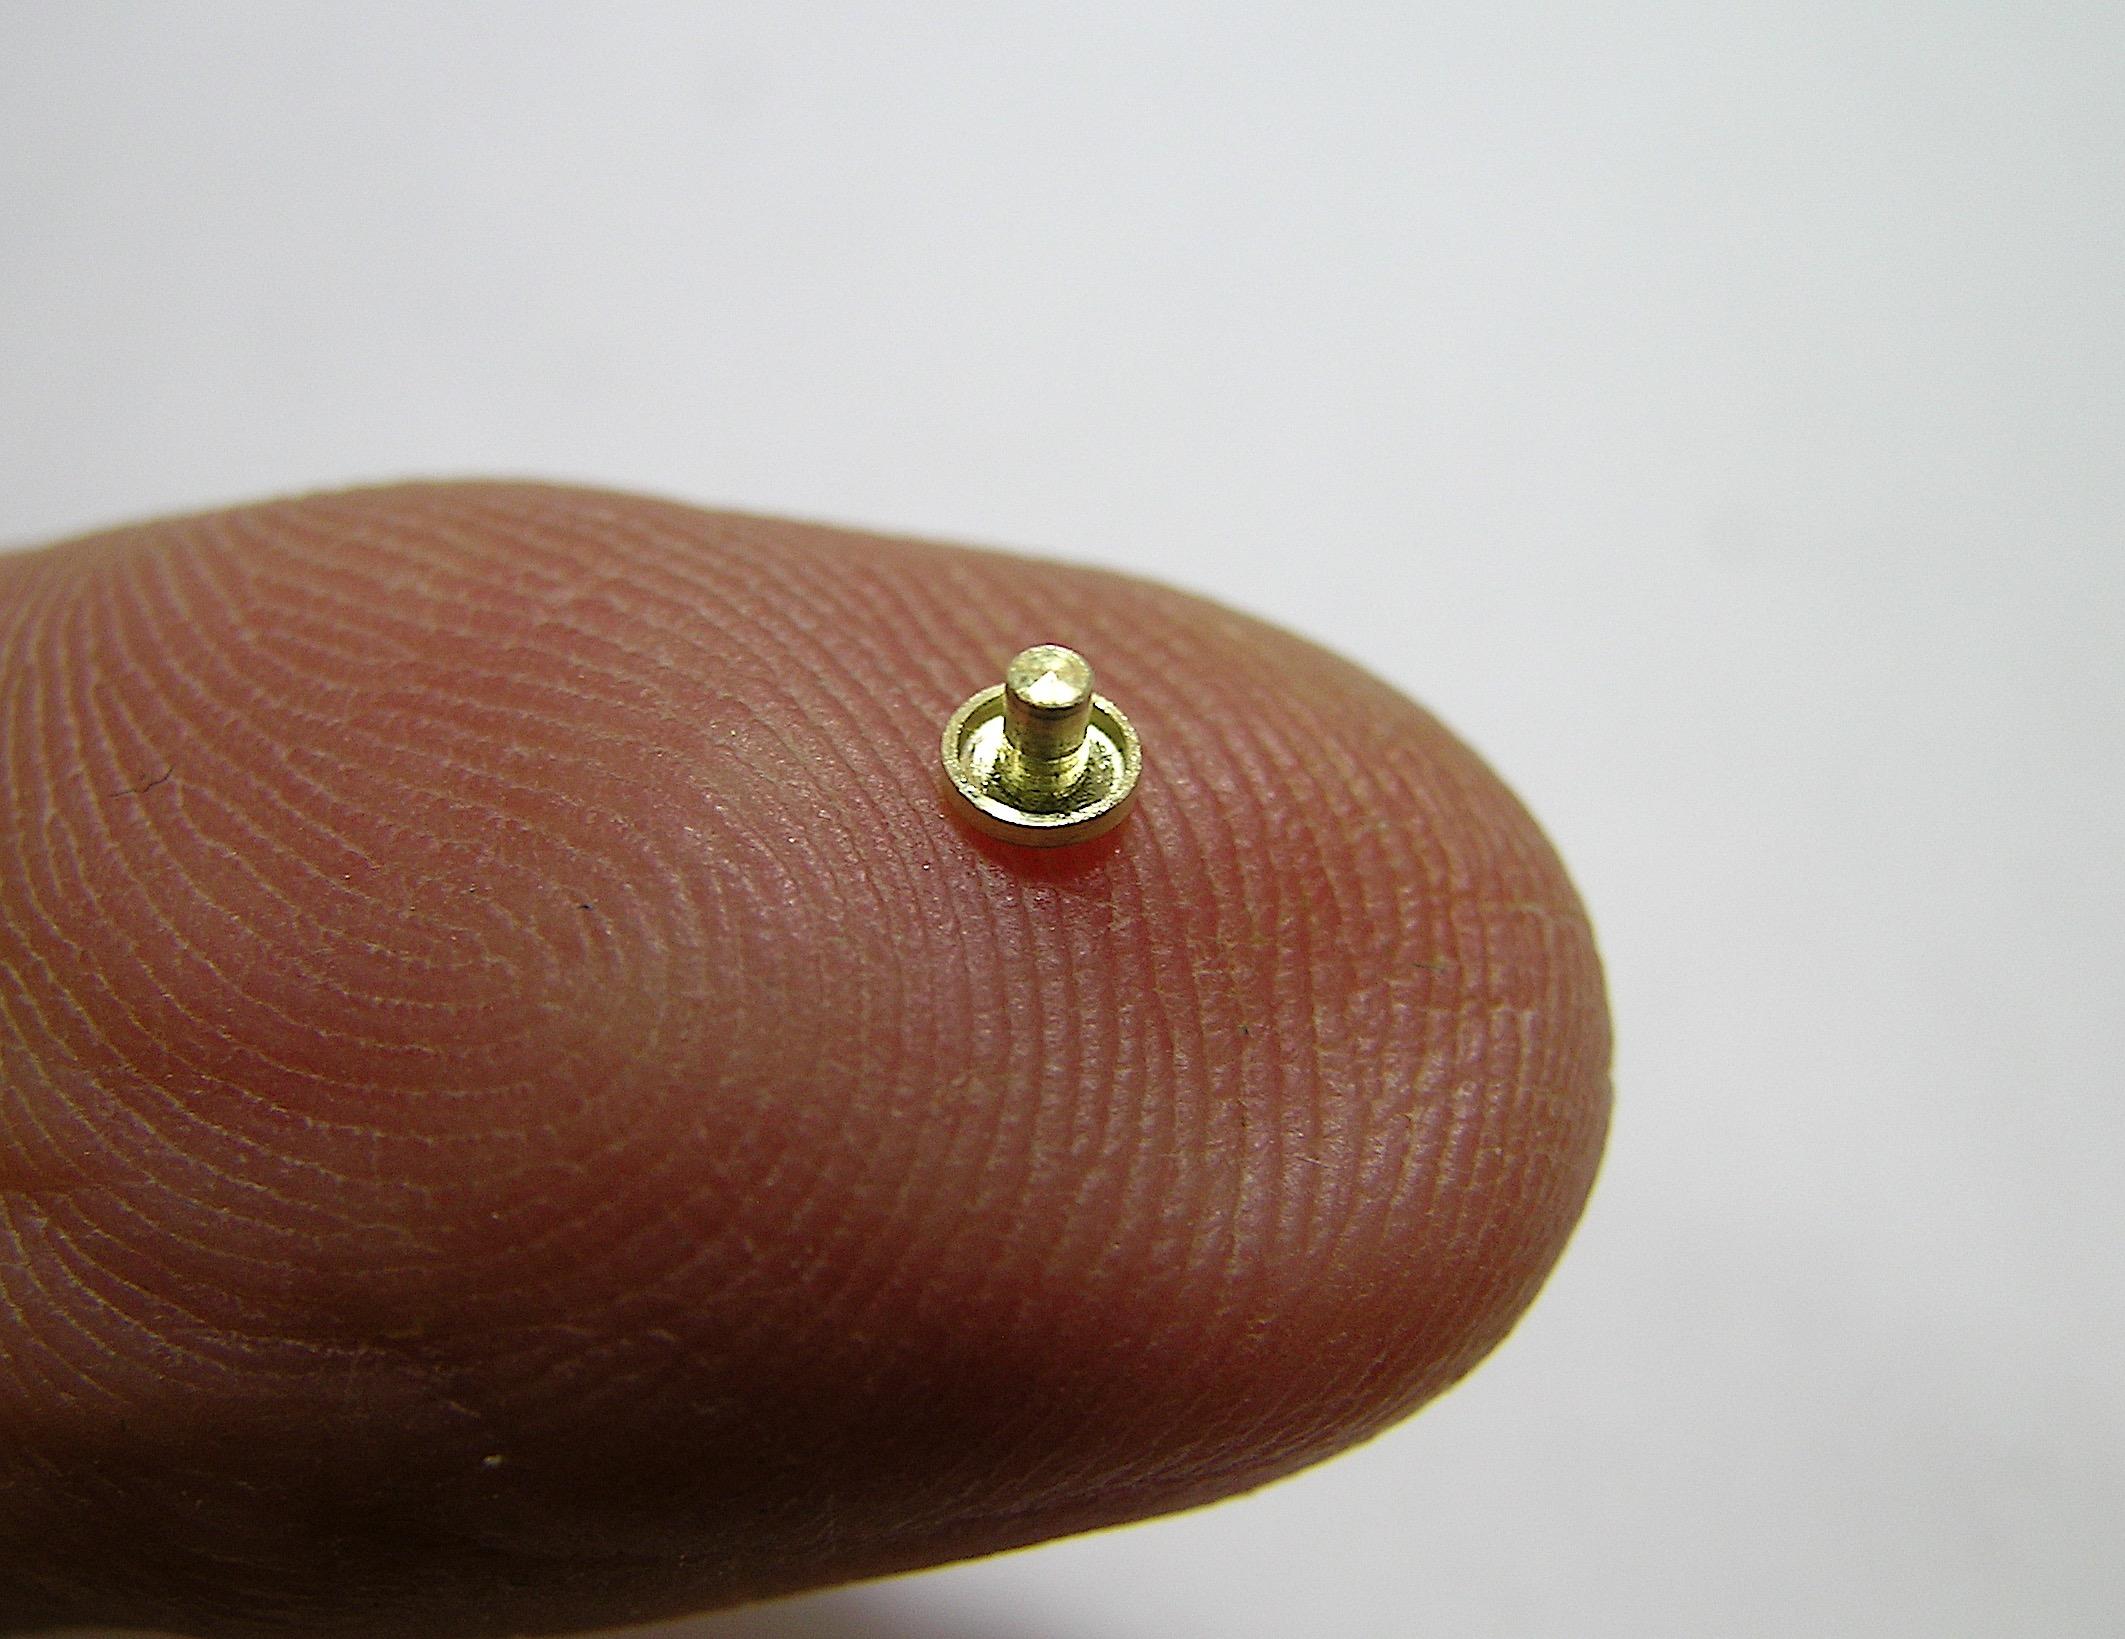
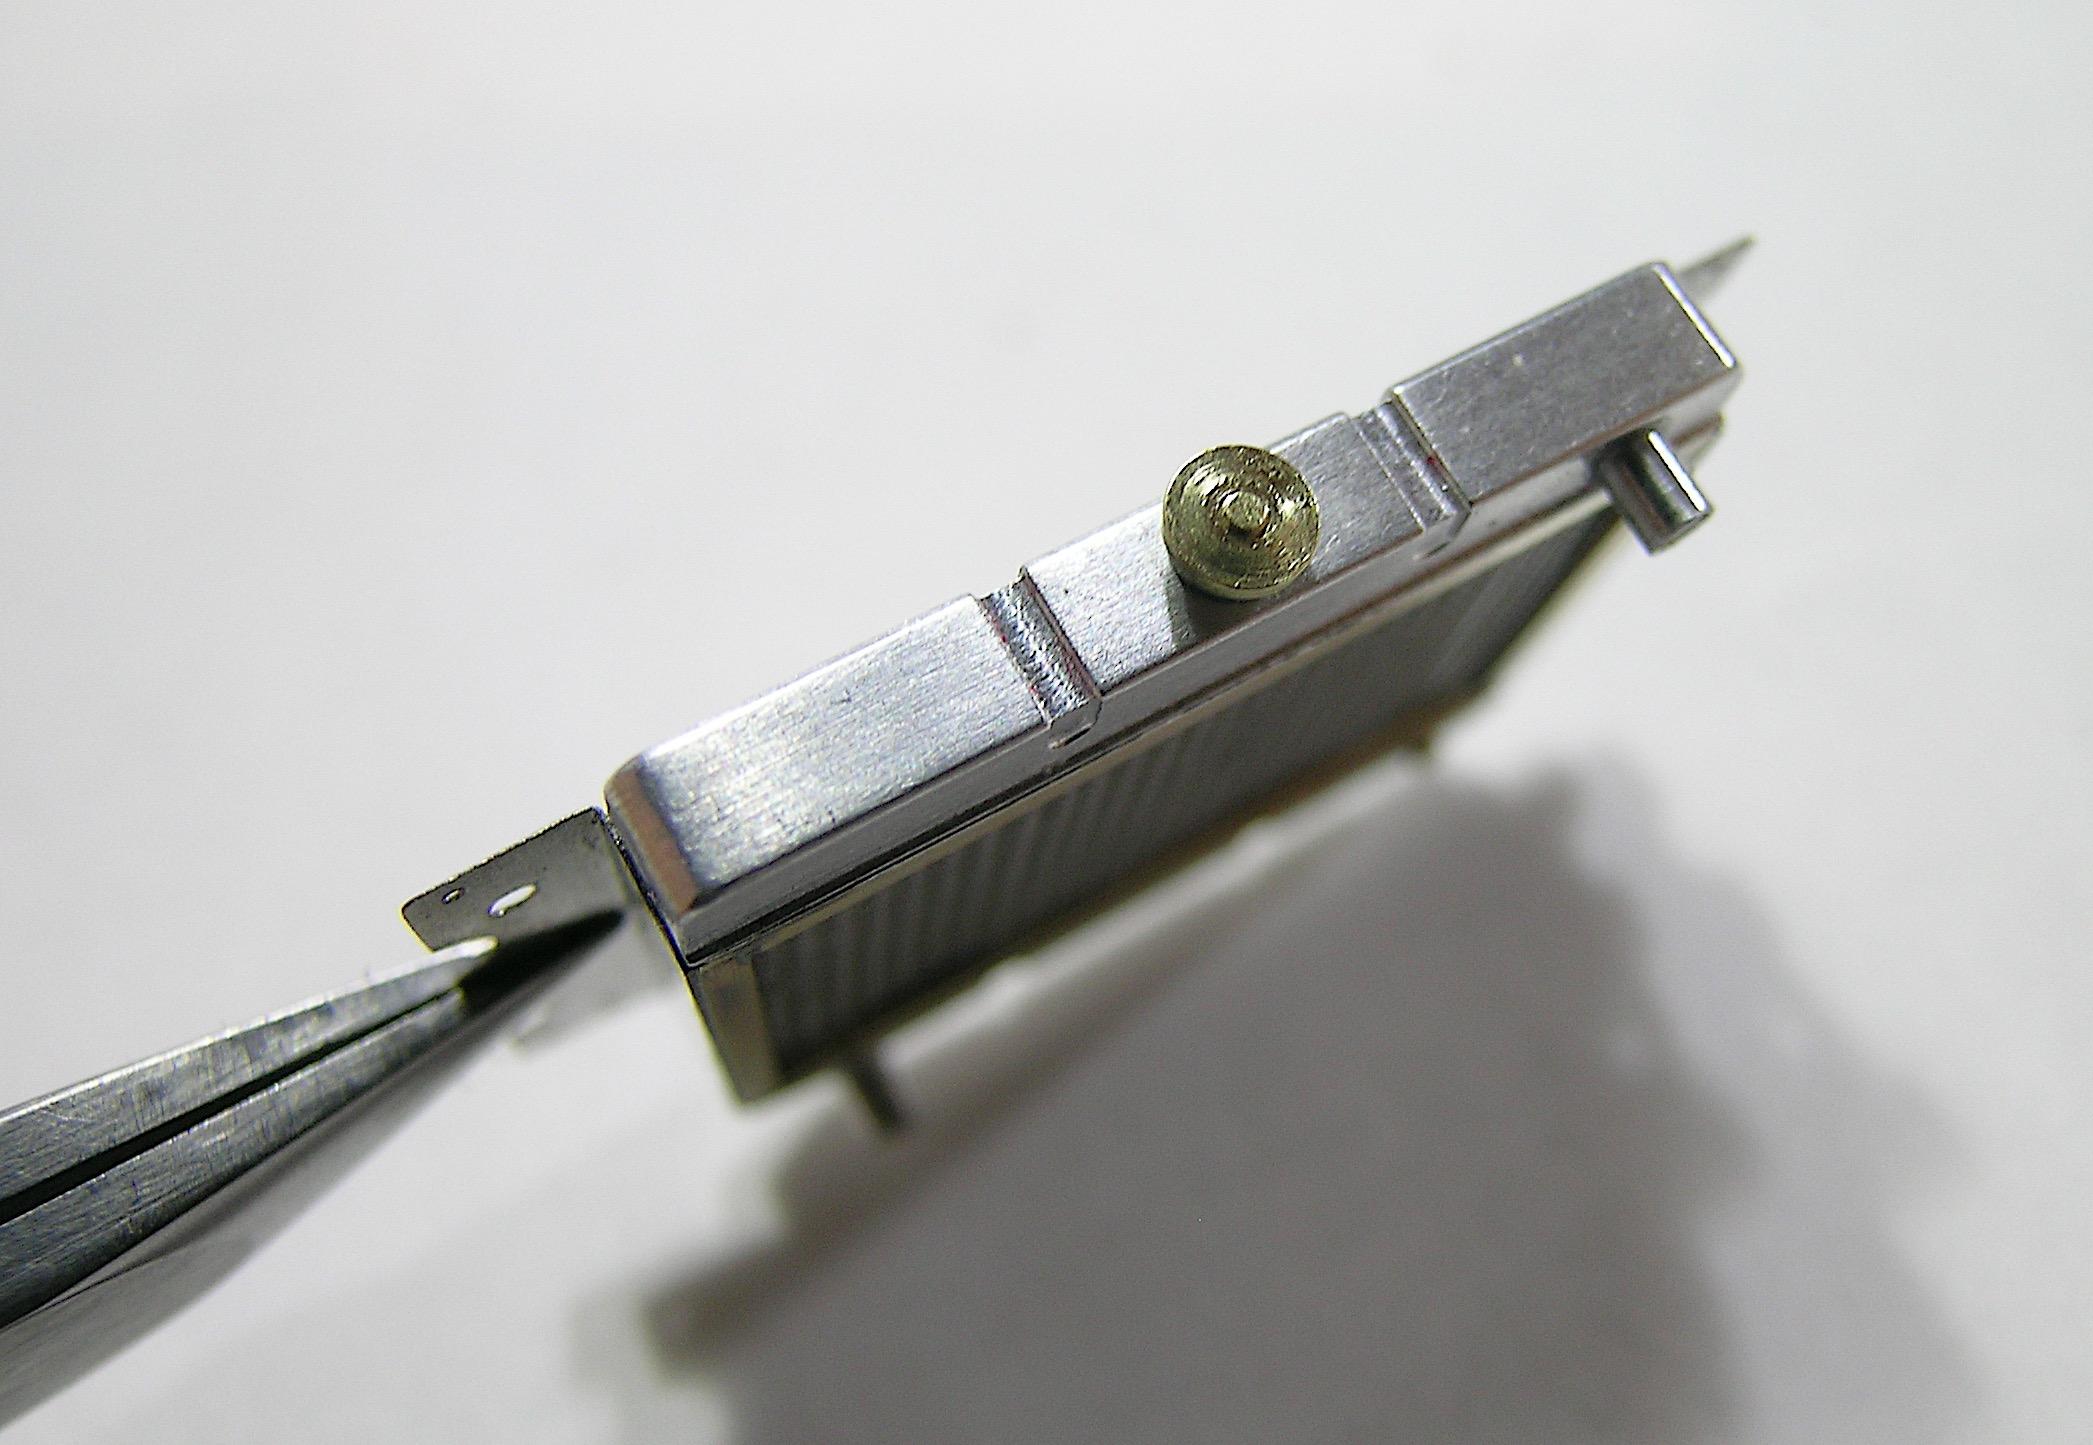
Hello everyone, Hopefully I'll have less trouble today than last time with my update...it took me probably 10 attempts to finally be able to post it. My last part made is the radiator, I used almost the same technique as for the D100 but I made the frame in 2 parts instead of 4 for the truck, it made my life easier so that it was straight and square, it is probably more rigid too. Let's take action, there are several photos but don't hesitate to ask if you have any specific questions, I didn't take photos of all the fabrication steps, I wouldn't have finished it yet! I hope you will like it, Francis After determining the measurements based on an Internet reference, I reduced a rod to the desired size to create the 2 tanks. I added some details and drilled holes for the inlet and outlet for the cooling water. I started with a square brass tube that I cut for the radiator core. I made a cut to bend the corners 90 degrees. Both tanks after a bit of sanding and polishing. I inserted the photo-etched radiator mesh inside the brass frame I made earlier. This is the inlet where the radiator cap is screwed on, this part will be inserted into the top tank. I am drilling a small hole for the overflow pipe. I made the radiator cap from brass, I made a cut so that the cap fits in rather than remaining on the surface. Now onto the lathe to separate it from the raw rod. A close view. Once completed. I used 0.005" nickel alloy sheet to make the 2 installation brackets, It welds wonderfully with brass. I tried to reproduce the pressure test in the center of the cap. I also drilled holes for the transmission cooling plumbing, I will plug them with brass bolts depending on what type of transmission I will be using on the car.
-
’72 Dodge Demon Drag Racer 1/25 scale
AmericanMuscleFan replied to AmericanMuscleFan's topic in WIP: Drag Racing Models
Thanks Claude! We do what we can with what we have, as they say! 😁 Francis