AmericanMuscleFan
-
Posts
3,058 -
Joined
-
Last visited
Content Type
Profiles
Forums
Events
Gallery
Everything posted by AmericanMuscleFan
-

64 Dodge D100 Pickup Pro Street
AmericanMuscleFan replied to AmericanMuscleFan's topic in WIP: Drag Racing Models
Thanks Scott! Nothing is more frustrating than ruining a beautiful, well-crafted piece with too much glue in the final assembly. That's why most of the parts I make are assembled with aluminum or brass pins, you can never be too careful ! I am not teaching you anything because I know you know the technique my friend!!! Francis -
64 Dodge D100 Pickup Pro Street
AmericanMuscleFan replied to AmericanMuscleFan's topic in WIP: Drag Racing Models
Thank you for your vote of confidence Greg! I'm used to being cautious and not claiming victory until I've crossed the finish line. Without being superstitious, it's not over until it's over... ? Francis -
Sad to hear that you had problems with the top of the manifold (if I can call it that way). You always come back strong no matter what the problem is, so I'm sure your next attempt will be the right one. It just keeps the fun going... for us!!!
-
Such a beautiful build Dave, it would have been sad not to finish it (at least move the project forward), quality takes time, the results so far are spectacular !!!
-
64 Dodge D100 Pickup Pro Street
AmericanMuscleFan replied to AmericanMuscleFan's topic in WIP: Drag Racing Models
Thanks Ray, It's going to feel strange to not have to update this thread anymore but all good things come to an end (I hope this qualifier applies...)! As for the next project, you saw with the pickup, I don't tend to take it easy and I intend to go back to my roots. I have an original '71 Dodge Demon body that is damaged by glue, the rear is unusable among other so I would like to save it and improve it at the same time, it is a rather rare model (I also have a brand new sealed MPC kit but it is too valuable). I'd be tempted to convert it for a '72 and make it a Pro Stock or other kind of drag car, it's just a project in my head right now. I hope you'll be along for the ride if I take action, it's not a Cobra but I guess you'll forgive me! ? Francis -
Great job JC, I really like this kind of build, your fabrication is very inspiring, your skill is obvious! ? I don't understand how I missed this build, maybe I spend too much of my free time in one place... ?
-
Third gen Chevelles and a Cutlass
AmericanMuscleFan replied to Mattilacken's topic in WIP: Model Cars
Great job on the Cutlass Anton, the small spoiler is a very nice addition and the raised back gives it attitude! I really like the '75 Chevelle Laguna, especially the front end. You don't see it often and it could make a very nice restomod or any kind of drag racing car... ? -
64 Dodge D100 Pickup Pro Street
AmericanMuscleFan replied to AmericanMuscleFan's topic in WIP: Drag Racing Models
Thank you very much Trevor! I'm having a little trouble finding time to complete it but considering the work done so far, I consider the project to be nearing completion. I still have some small details that I hope you will like! ? Francis -
More than just an excellent modeler, your perseverance and attention to detail have once again created a high quality product. Combined with an obvious pleasure and a great ingenuity, the proof is in the pudding as we say around here! A first place winner for sure!!! ??
-
64 Dodge D100 Pickup Pro Street
AmericanMuscleFan replied to AmericanMuscleFan's topic in WIP: Drag Racing Models
Thanks Daniel, my part box is almost empty... I should be able to finish assembling this thing soon, I hope it will be done without major problems... ? Francis -
64 Dodge D100 Pickup Pro Street
AmericanMuscleFan replied to AmericanMuscleFan's topic in WIP: Drag Racing Models
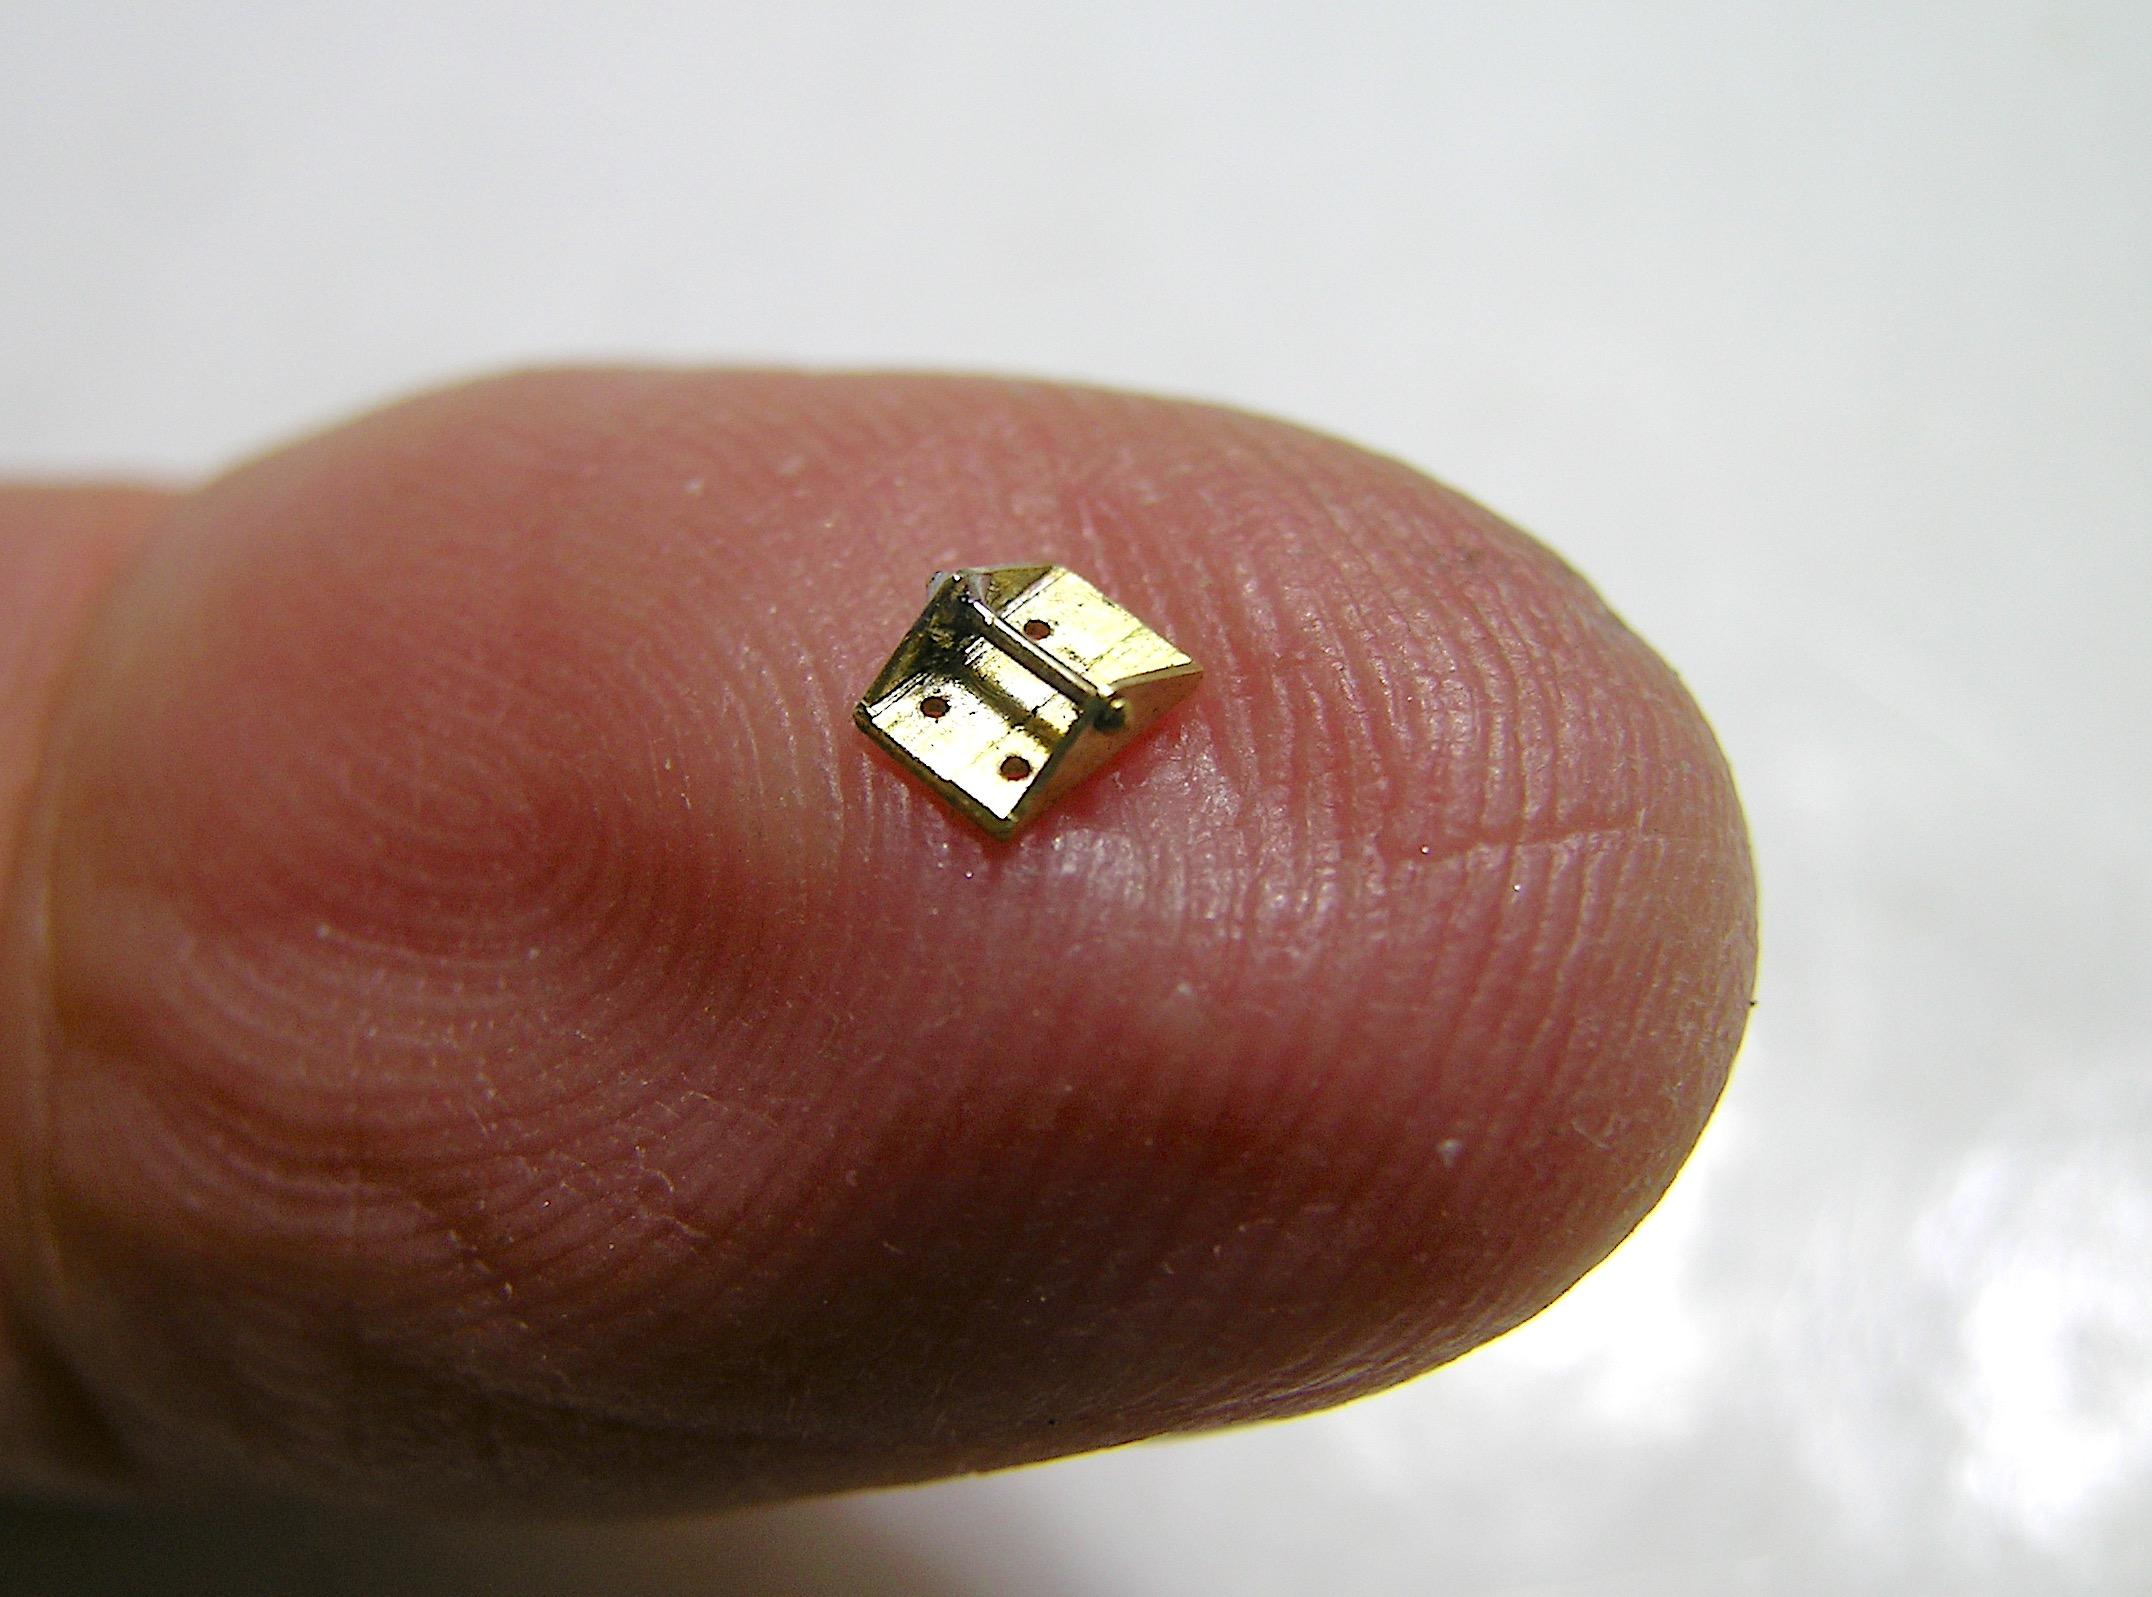
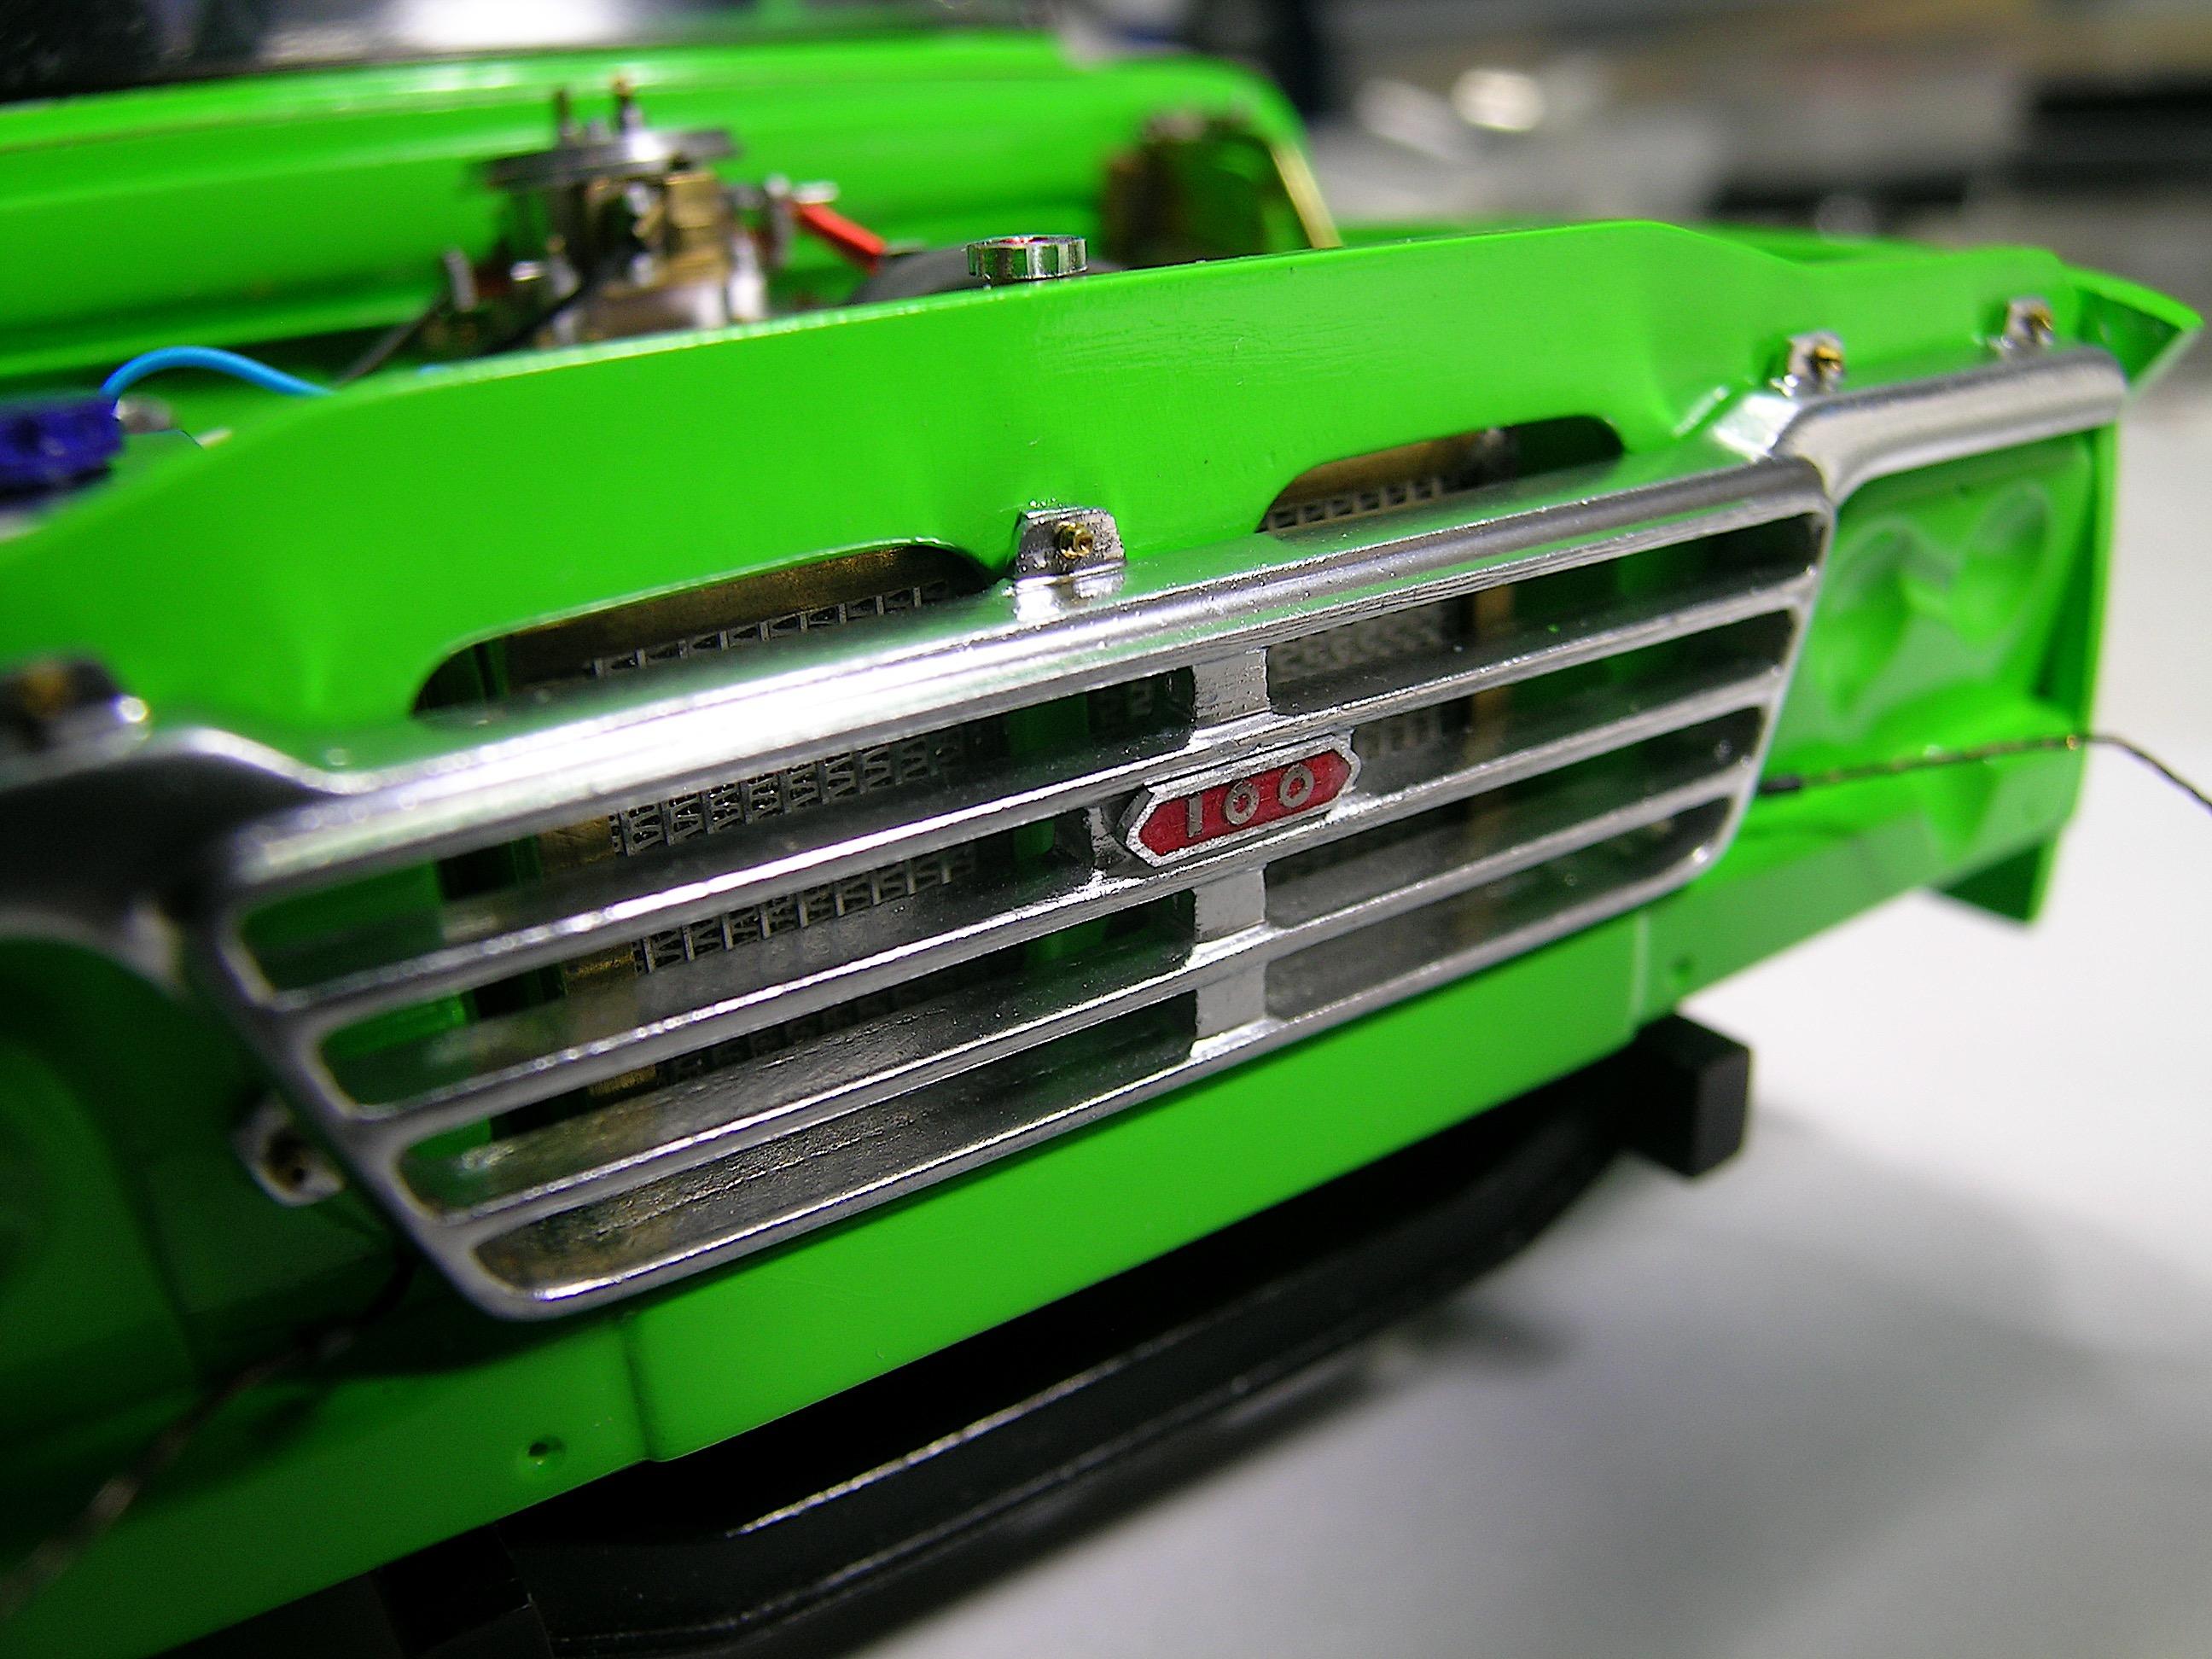
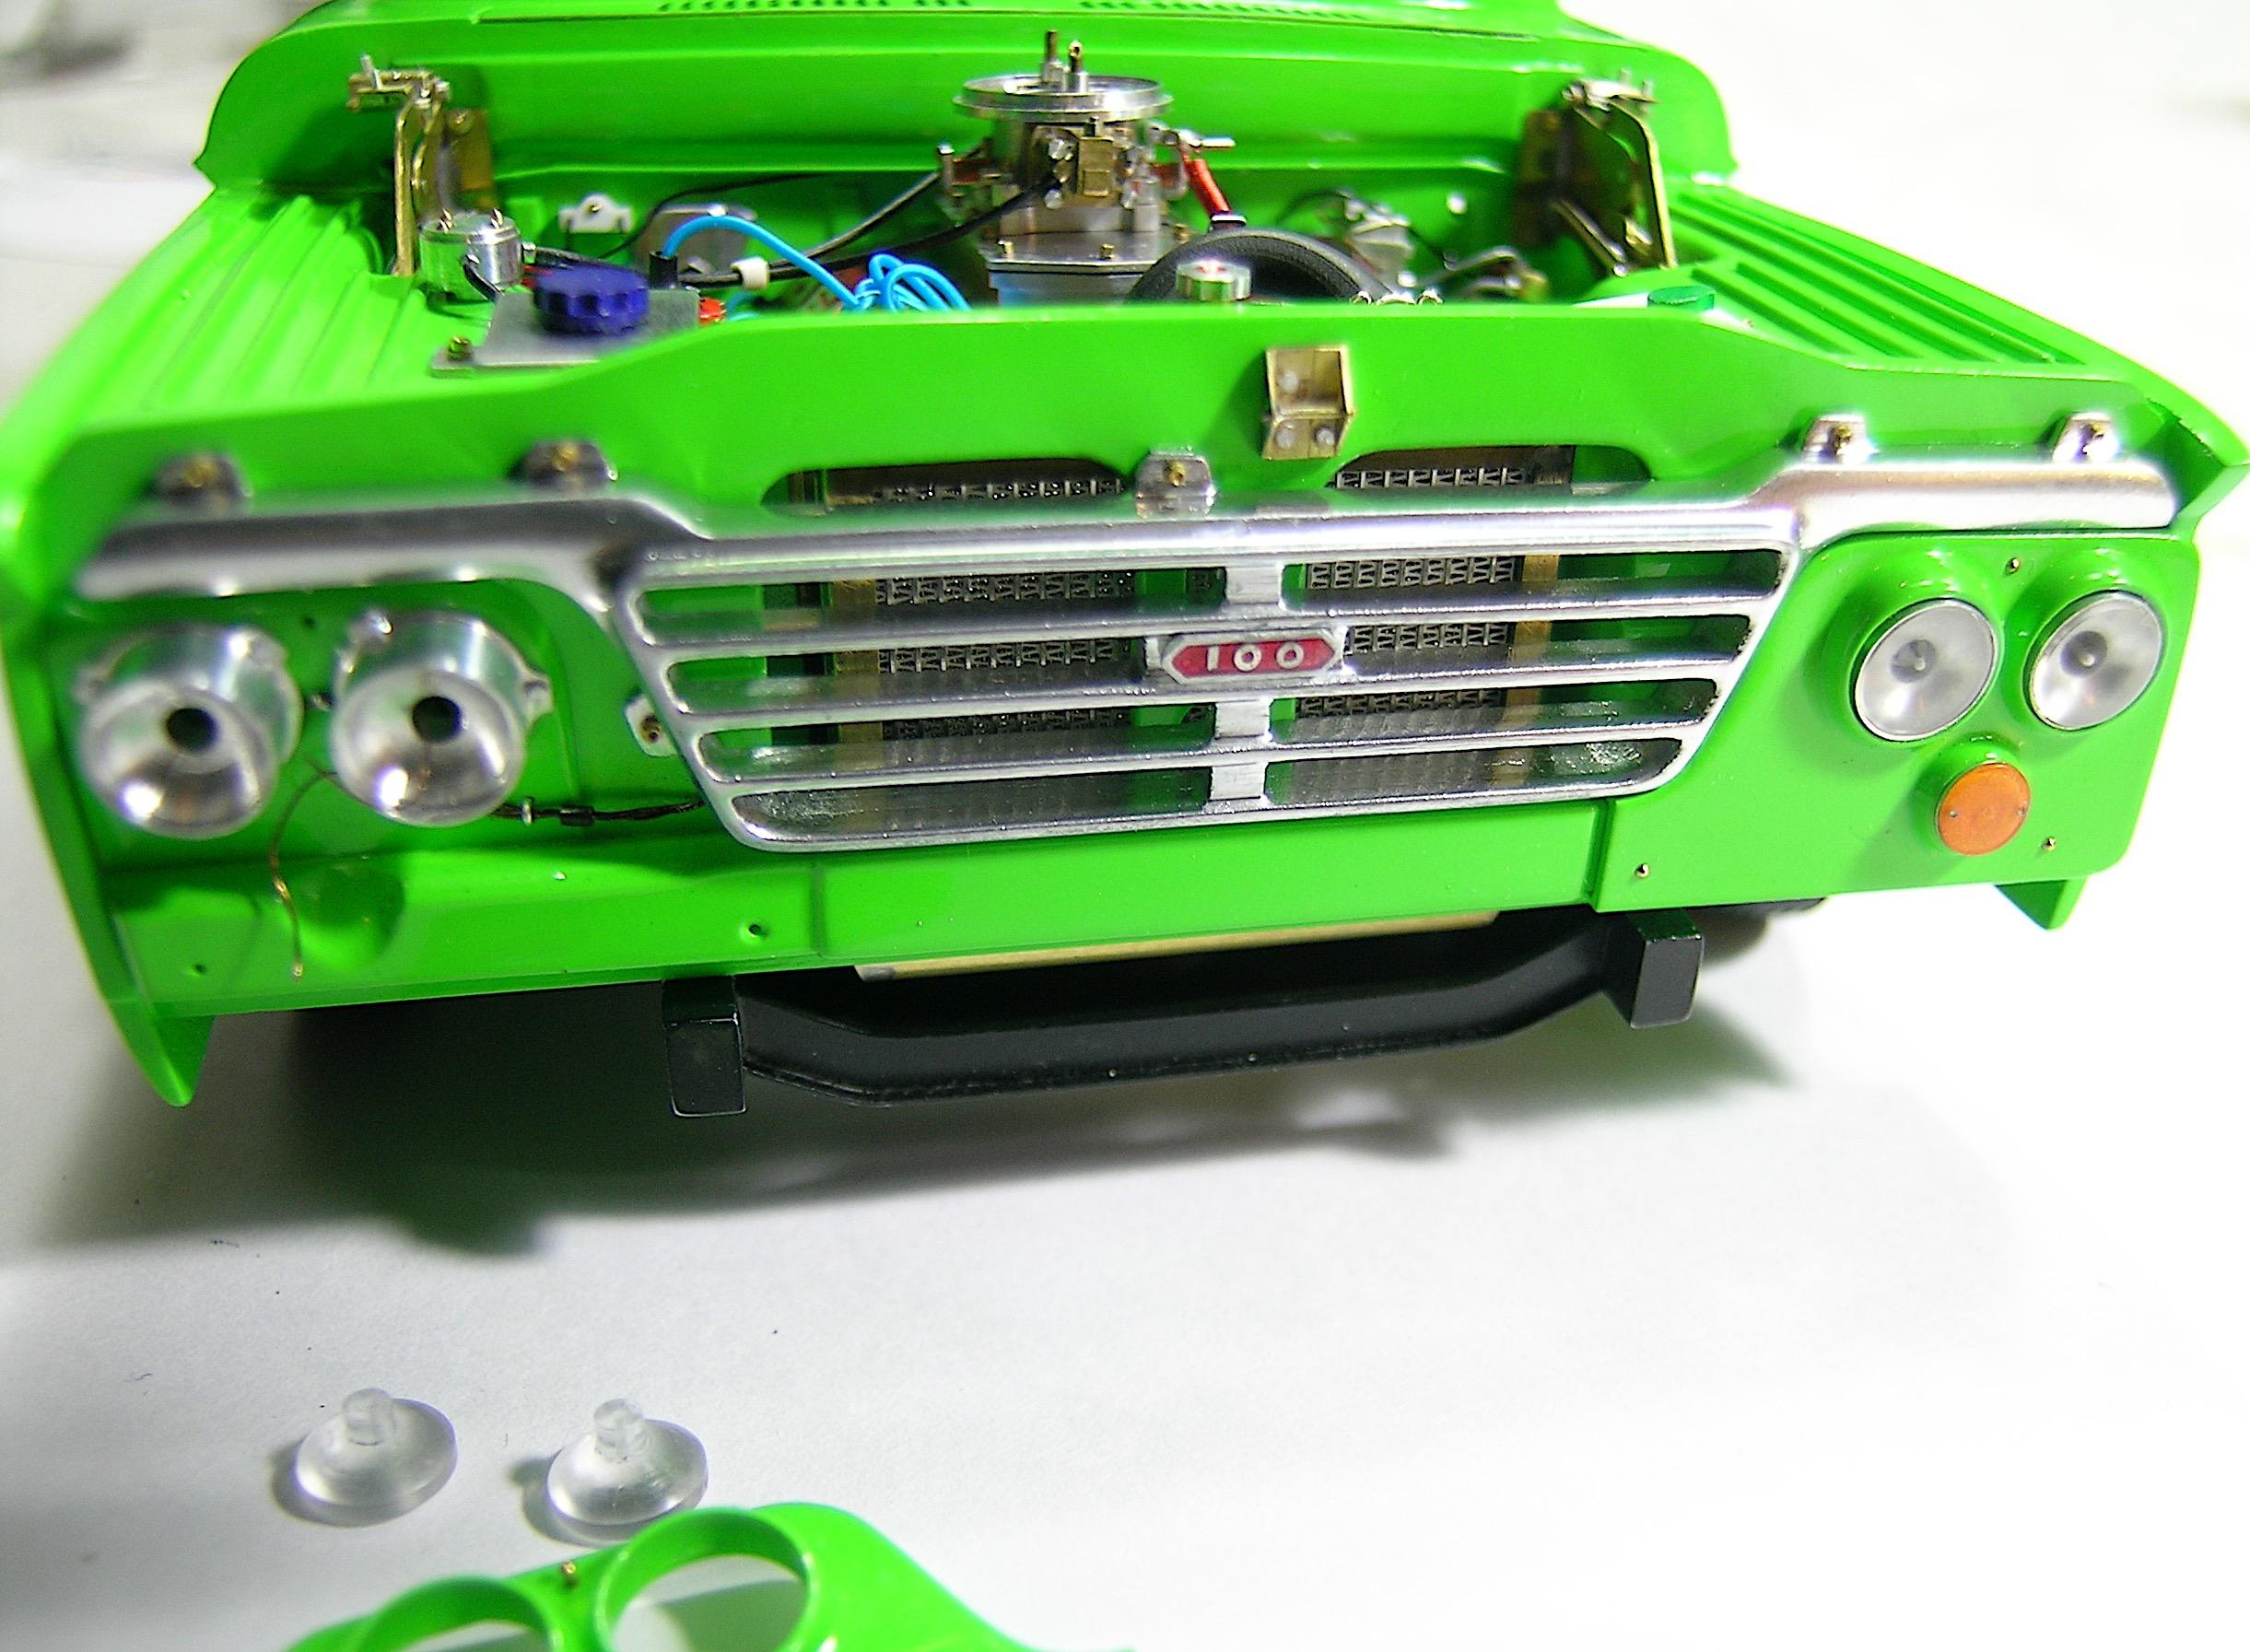
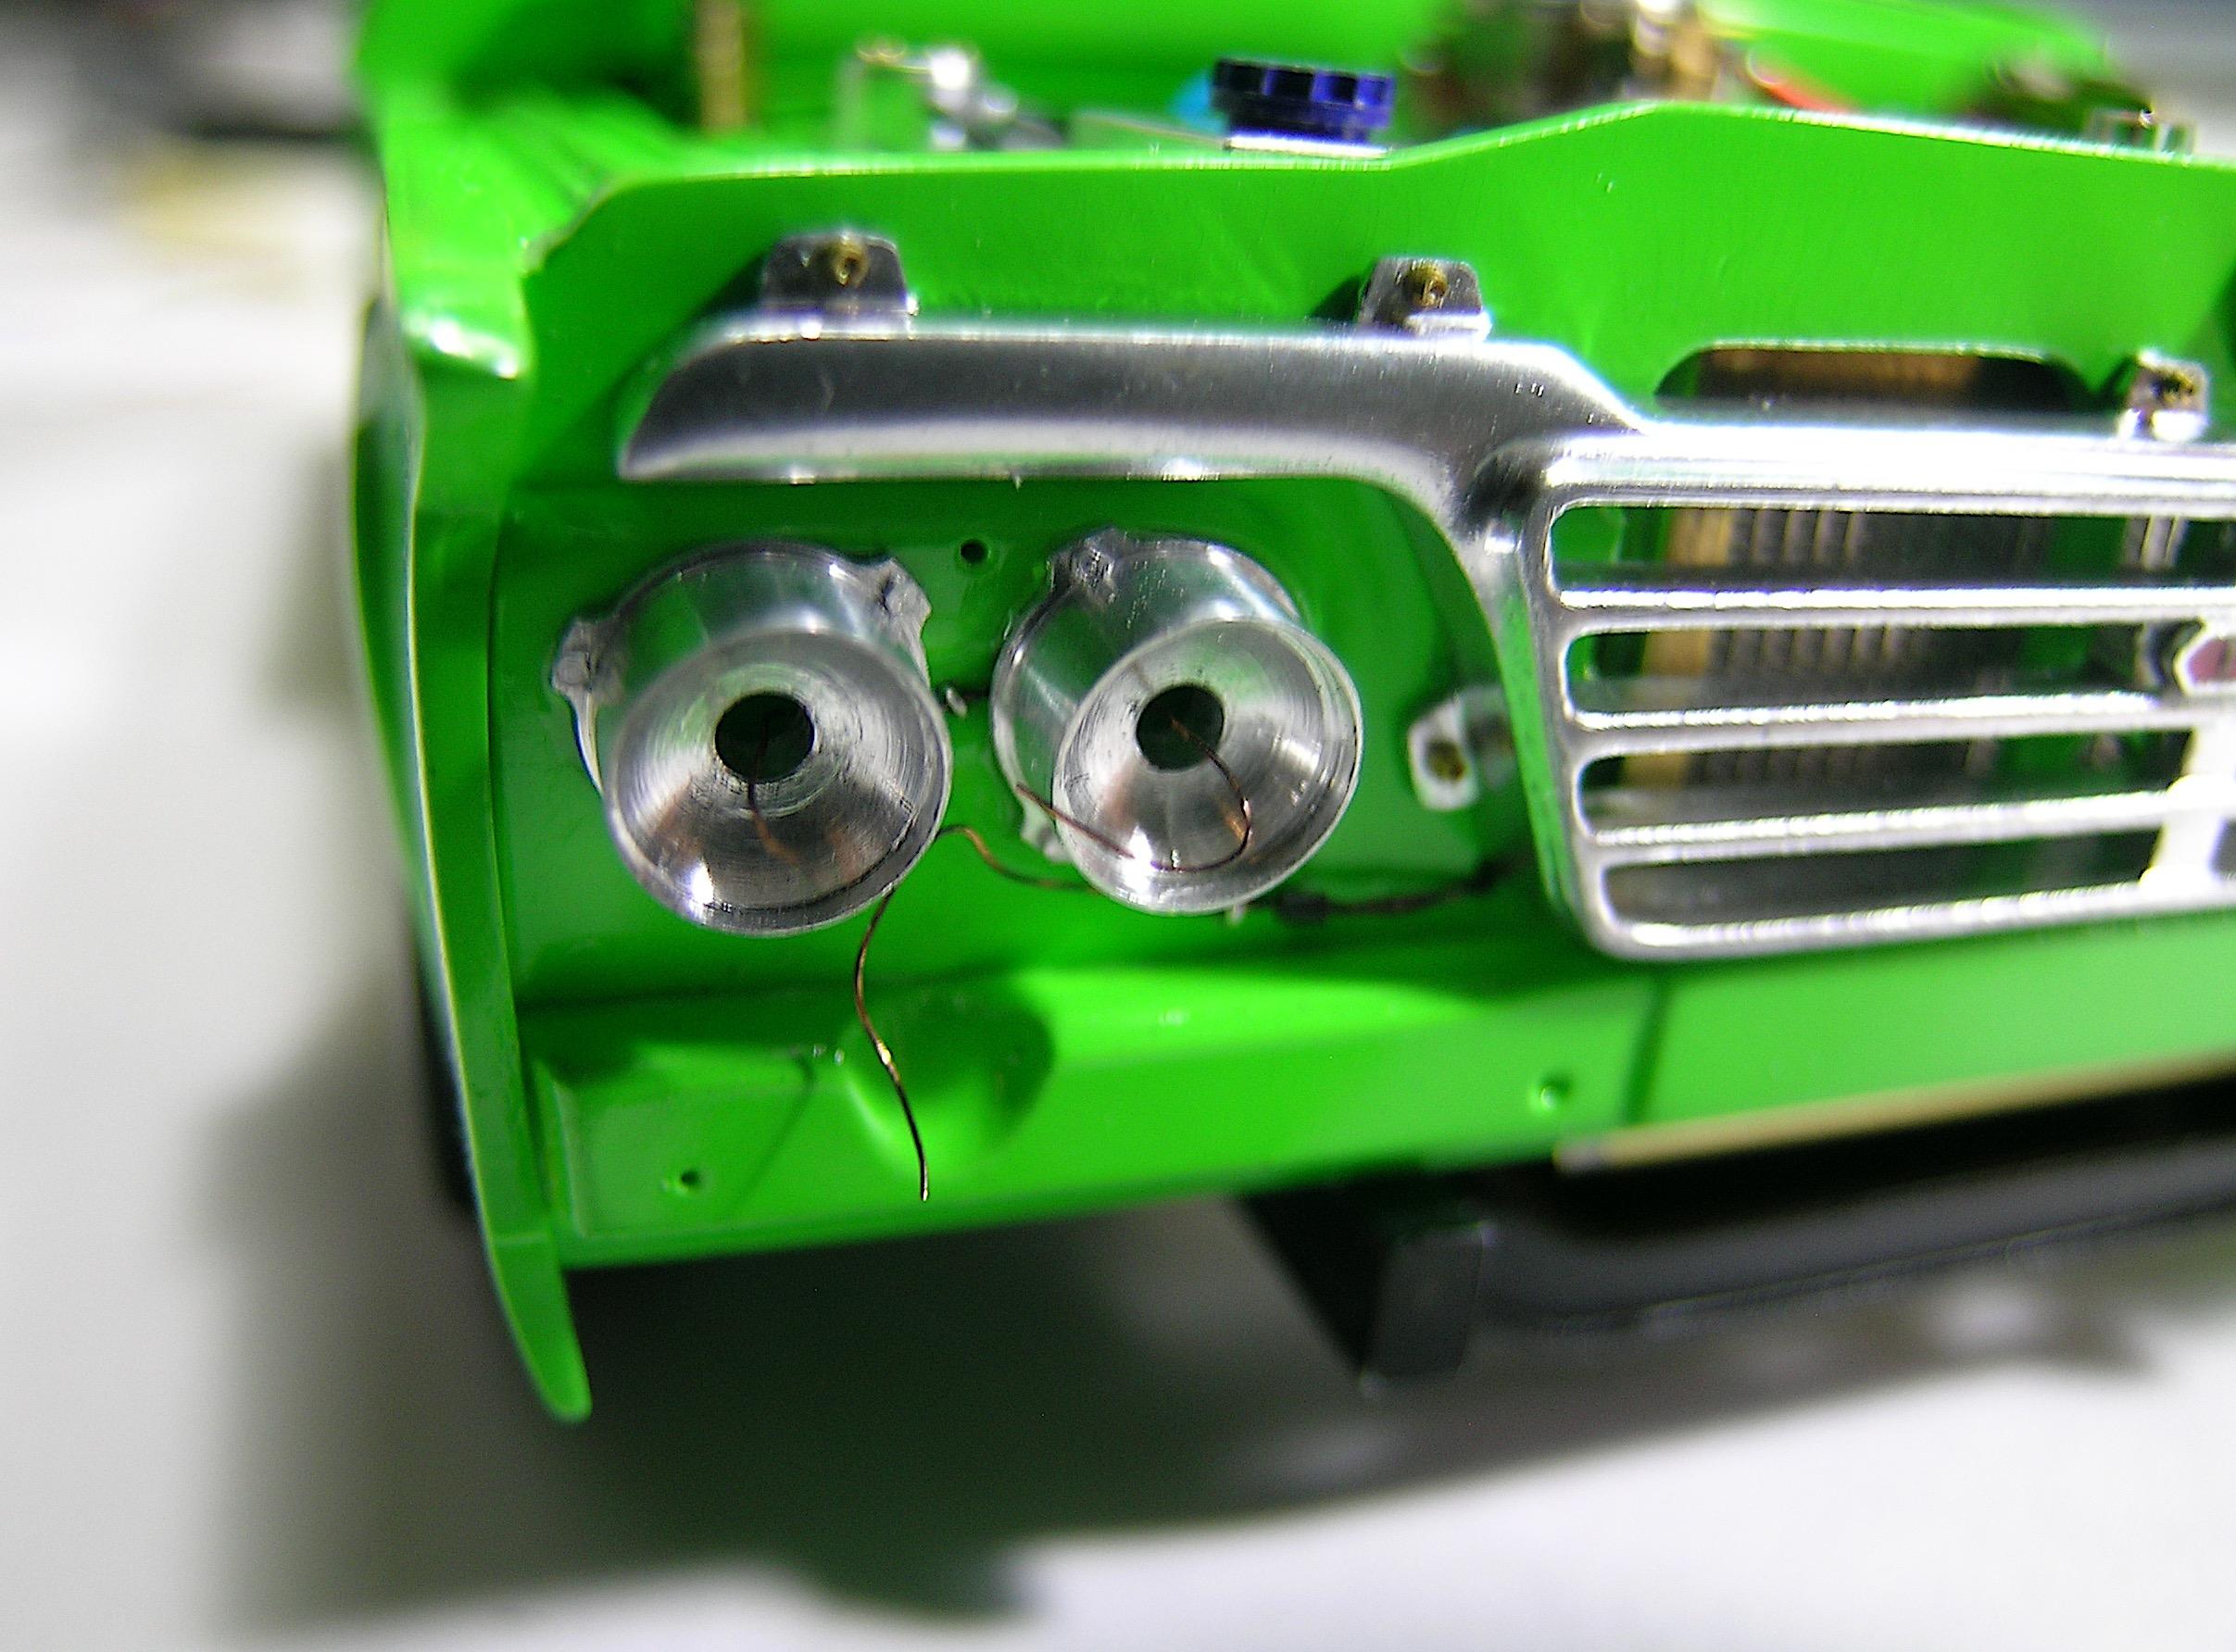
Hello everyone! Sorry for the long delay in updating, but I haven't had much bench time lately, a little health problem and a couple of otherworldly departures in my immediate family have kept me away from the build. The nice weather is slowly setting in, so it's time to finish this project before moving on to the next project. The last details are the ones that require the most time and care, because they are the most visible and in some ways the most important when you have spent so much time to get to this point in a project. The grille and front panels are now in place, they are held in place by small brass rivets (to simulate screws) and not glued so they can be removed like on the real truck. I ran wires to the headlights and turn signals trying to route them as closely as possible to what I could find on the internet. I also made the brass hood striker plate, this element being very visible when the hood is open, I thought it was worth making a replica even if it doesn't have all the details including the release lever. I still have to install the front bumper and I'll take some pictures of the front of the truck when it's done. As usual, your comments are welcome, There are probably not many on the forum so don't forget to wish your wives and mothers a happy Mother's Day! Francis Hood striker plate made with brass, the small rod is soldered in place at one end. The iconic front grille was finally installed with small brass bolts. The "100" nameplate has found it's place in the center of the grille. You can see that the electrical wires come out of the headlight brackets that are bolted to the radiator support with aluminum bolts. A glimpse of the front assembly, it looks promising so far! ?
-
De Foosing the FD-100
AmericanMuscleFan replied to butter's topic in WIP: Model Trucks: Pickups, Vans, SUVs, Light Commercial
Good job Ron ! You have the real deal close to you and it shows, the results so far are proof of your dedication to this project! I really like that you took the time to replace the molded springs with real springs on the 4 link, a small detail that makes a big difference! ? -
1969 camaro street machine
AmericanMuscleFan replied to charlie libby's topic in WIP: Drag Racing Models
Great job on the wheels Charlie! This is not an easy wheel model to make but it seems to me that you have found the right technique, I take my hat off to you ! They will be very beautiful once the background is painted black, it will bring out the spokes. ? -
Great start and cool project Daniel! You did a great job on the slicks, I did the same kind of treatment for the same tires on one of my old builds and the visual effect is much more realistic, the finish looks much more like real tires. Another good subject where your skills will be highlighted, I'll be back to see your progress my friend!
-
64 Dodge D100 Pickup Pro Street
AmericanMuscleFan replied to AmericanMuscleFan's topic in WIP: Drag Racing Models
No problem Dave, I've made the same kind of little typo several times myself, what matters is the message and coming from a machinist of your caliber it's an honor I accept with great humility! ? Francis -
64 Dodge D100 Pickup Pro Street
AmericanMuscleFan replied to AmericanMuscleFan's topic in WIP: Drag Racing Models
Thanks Dave, I don't know if your message was meant for me, Claude Thibodeau is a very talented and prolific modeler! Tim (Codi) is one of the reasons I'm on this forum, his work is a constant source of inspiration. Your work is a new source of motivation and I don't think it's possible to have too much... ? Francis -
64 Dodge D100 Pickup Pro Street
AmericanMuscleFan replied to AmericanMuscleFan's topic in WIP: Drag Racing Models
Thanks Daniel, I had a little setback due to a small health problem (nothing too serious according to my doctor) and I didn't progress as planned but I hope to put some hours on the truck in the next few days. I can't wait to see the front completed, it's one of the most important parts in my opinion. Francis -
WOW Dave, your real toy is a piece of art, It helps to understand your obsession for the creation of all these details on your model, a logical continuation I would say! Even if the body walls are thicker than desired, I don't think they are going to be the focal point considering the amount of detail that enthusiasts will have to deal with... ?
-
It's hard to believe that you could make such a complex piece from this blurry photo. It must be said that this kind of intake manifold is not the kind you can find under the hood of the first car you see... Another fantastic part in the making! ?
-
64 Dodge D100 Pickup Pro Street
AmericanMuscleFan replied to AmericanMuscleFan's topic in WIP: Drag Racing Models
Thanks Claude! The mileage of the odometer does not mean much, in fact, it is the choice of vehicle that should surprise more considering the offer of models of this car manufacturer. 36,000 miles is not much for a vehicle of this age, but that's a lot of round trips on the quarter mile... ? When it comes to drag racing, dealerships are usually tough, so it's better to have deep pockets and enjoy yourself without restraint! ? Francis -
64 Dodge D100 Pickup Pro Street
AmericanMuscleFan replied to AmericanMuscleFan's topic in WIP: Drag Racing Models
Thanks Jerry! The book is in its last chapters, only a few pages left, I still have a few plots to complete and hope for a happy ending! ? Francis -
64 Dodge D100 Pickup Pro Street
AmericanMuscleFan replied to AmericanMuscleFan's topic in WIP: Drag Racing Models
Thanks Mike! Your smile means a lot to me, we can't say we've had much to be happy about lately but it's often the most unexpected details that can make a small difference... ? Francis -
64 Dodge D100 Pickup Pro Street
AmericanMuscleFan replied to AmericanMuscleFan's topic in WIP: Drag Racing Models
Thanks Ron, more updates to come later but expect them to end one of these days... ? Francis Thanks Bob, this is one of the aspects of the build that I was most looking forward to completing! Francis Thanks a lot Dave, I've lost count of the hours I've spent on this thing but I really appreciate your comments. Francis -
Thanks for showing us all these fantastic parts Dave, your attention to recreating the true details is unquestionable. ? I love the engine block machined in Renshape, one day I'll have to try this material if I can end up getting a small piece of it at a decent price...
-
De Foosing the FD-100
AmericanMuscleFan replied to butter's topic in WIP: Model Trucks: Pickups, Vans, SUVs, Light Commercial
Great job Ron! It's a perfect match for your real truck, you can be proud, your attention to reproduce the details of your truck is an undeniable success! ?